

Page 1

KH 2257
KH 2258
KH 2259
KH 2260
Operating Instructions
Page 2

Page 3

Operating Instructions
eBench KH 2257/2258/2259/2260
Portable MP3-CD Player
with electronic digital anti-shock system
Operating Instructions |
Page 4

| Operating Instructions
Contents
1. Technical data............................................................................................................................ 4
2. Included ...................................................................................................................................... 4
3. Use................................................................................................................................................. 4
4. Functions .................................................................................................................................... 5
5. Controls, displays and connections................................................................................... 6
5.1. Controls on the CD player ................................................................................................. 6
5.2. Displays on the CD player.................................................................................................. 7
5.3. Connections on the CD player......................................................................................... 7
KH 2257............................................................................................................................................ 8
KH 2259............................................................................................................................................ 8
KH 2258............................................................................................................................................ 9
KH 2260............................................................................................................................................ 9
5.4. Controls on the remote control..................................................................................... 10
5.5. Displays on the remote control .....................................................................................10
5.6. Connections on the remote control............................................................................ 10
6. Point of installation, operating conditions and safety instructions..................... 11
7. Getting started........................................................................................................................13
7.1. Connecting to the power supply..................................................................................13
7.1.1. Mains operation ..............................................................................................................13
7.1.2. Battery operation............................................................................................................ 14
7.1.2.1. Exchanging batteries .................................................................................................15
7.1.2.2. Charging rechargeable batteries........................................................................... 16
8. Conventional audio CDs......................................................................................................18
8.1. Playback................................................................................................................................. 18
8.2. Setting the playback volume.........................................................................................20
8.3. Switching on Bass Boost.................................................................................................. 21
8.4. Stopping playback (PAUSE mode)................................................................................21
8.5. Ending playback .................................................................................................................22
8.6. Selecting a track..................................................................................................................22
8.6.1. Skip forward/back to the beginning of a track.....................................................22
8.6.2. Skip 10 tracks forward................................................................................................... 23
8.7. Fast search forward/back................................................................................................. 24
8.8. Programming a compilation of tracks (PROGRAM function).............................. 24
8.9. Intro play function .............................................................................................................26
8.10. Random playback (SHUFFLE) ......................................................................................27
8.11. Repeat functions..............................................................................................................28
8.11.1. Repeat playback of a single track...........................................................................28
8.11.2. Repeat playback of all CD tracks............................................................................. 28
9. MP3-CDs.................................................................................................................................... 29
Page 5

9.1. Playback................................................................................................................................. 29
9.2. Title selection....................................................................................................................... 30
9.3. Skip forward by 10 titles ..................................................................................................31
9.4. Intro play function .............................................................................................................32
9.5. Random playback (SHUFFLE)......................................................................................... 32
9.6. Repeat functions.................................................................................................................33
9.6.1. Repeated playback of a single title...........................................................................33
9.6.2. Repeated playback of a title of a directory ............................................................34
9.6.3. Repeated playback of all MP3-CD titles.................................................................. 34
9.7. Programming a compilation of titles (PROGRAM function)................................ 35
9.8. Selecting tracks by their name......................................................................................37
10. Equalizer function ...............................................................................................................38
11. Button lock (HOLD)............................................................................................................. 39
12. Switching o the MP3-CD player...................................................................................40
13. Connecting and using the accessories........................................................................ 40
13.1. Remote control................................................................................................................. 40
13.2. Line-OUT cable .................................................................................................................41
13.3. Car adapter set.................................................................................................................. 42
13.3.1. Function........................................................................................................................... 42
13.3.2. Use .....................................................................................................................................43
13.3.3. Setting up........................................................................................................................ 43
13.3.4. After use...........................................................................................................................44
14. Cleaning.................................................................................................................................. 45
15. Functional faults..................................................................................................................45
Operating Instructions |
Page 6

| Operating Instructions
1. Technical data
Mains: AC adapter/alternating current: 230 V ~ 50 Hz
or DC/direct current: 1.2 V – 2 x AA-type
Laser 3-beam laser
Frequency
response 100 Hz to 16 kHz
2. Included
1. MP3-CD player
2. Mains adapter
3. Headphones
4. Remote cable control
5. Line-OUT cable (chinch to 3.5 mm jack plug)
6. Two rechargeable NiCd batteries (AA-type, 1.2 V)
7. Protective bag
8. Auto-adapter set:
a) CD cassette adapter
b) Mains adapter for in-car cigarette lighter socket
3. Use
The eBench KH 2257/2258/2259/2260 Portable MP3-CD
Player is intended exclusively for ...
• An entertainment electronics system
• To playback audio CDs, CR-Rs and CR-RW with data in
audio CD format (.cda) and MP3 format (.mp3)
Page 7

• For stationary and mobile use (e.g. in a car)
• For private, non-commercial use
The following can be used for the output of speech or music …
• The supplied headphones or headphones with a 3.5 mm
jack plug connection
• Loudspeakers with a 3.5 mm jack plug connection
• Other external HiFi units (connection by way of the supplied line-OUT cable)
4. Functions
• Playback of audio CDs, CD-Rs and CD-RWs with data in
audio-CD format (.cda) and MP3 format (.mp3) up to 256
kbps.
• “ESP” Electronic digital anti-shock system with 45 seconds
(conventional audio CDs) and 120 seconds (MP3 CDs) interim
storage.
• Track name display with up to 11 characters (ISO Level 1)
or 31 characters (ISO Level II).
• Automatic display of title information (“ID 3 days”).
• Skip and fast search function forward/back
• Program function for individually programmed track com-
pilations
• Repeat functions for repeated playback of individual tracks,
programmed track compilations, directories and all CD tracks.
• Shue function for random playback.
• Intro Play to playback the beginning of all CD tracks
• Bass Boost System.
• Automatic switch-o (30 seconds).
Operating Instructions |
Page 8

| Operating Instructions
• Battery change indication on the LCD display.
•
Charging suitable batteries in the unit, incl. charge indication.
• Key lock.
Warning!
We do not accept any liability/warranty for damage incurred
as a result of incorrect use!
5. Controls, displays and connections
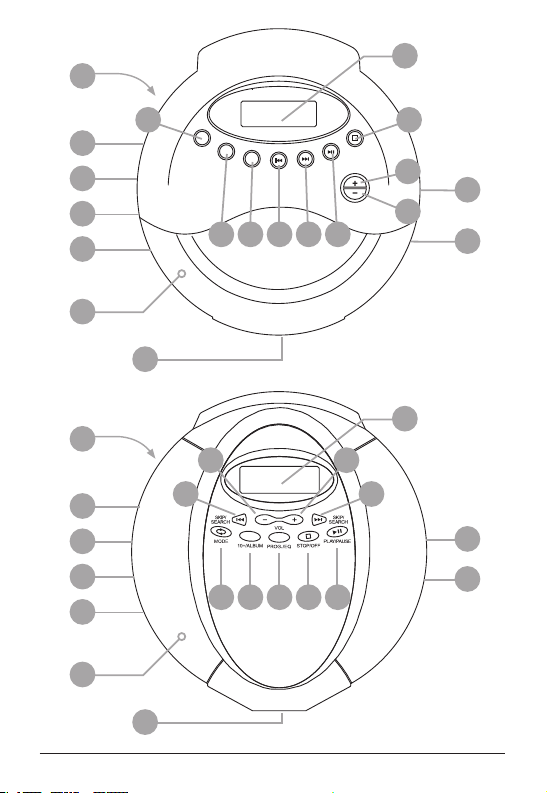
5.1. Controls on the CD player
1. CD compartment
2. “OPEN” slide
3. “MODE” button
4. “10+/ALBUM” button
5. “PROG./EQ” button
6. “SKIP/SEARCH 8” button
7. “SKIP/SEARCH 7” button
8. “PLAY/PAUSE 4;” button
9. “STOP <” button
10. “VOLUME +” button
11. “VOLUME –“ button
12. “HOLD” slide
13. “Bass Boost OFF/ON” slide
14. “CHARGE” slide
Page 9

5.2. Displays on the CD player
15. LCD display
16. “CHARGE” display
5.3. Connections on the CD player
17. “DC 4.5V” connection for mains adapter
18. “PHONES” socket for headphones or remote cable control
19. “Line OUT” socket for chinch cable
Operating Instructions |
Page 10
| Operating Instructions
VOL
PROG./
EQ
SKIP/
SEARCH
PLAY/
PAUSE
MODE
STOP
/
OFF
10+/
ALBUM
KH 2257
14
15
17
12
13
16
1
KH 2259
14
17
12
13
16
1
3
9
10
19
11
4
18
8
6
7
5
2
15
11
7
10
6
19
18
8
9
5
4
3
2
Page 11
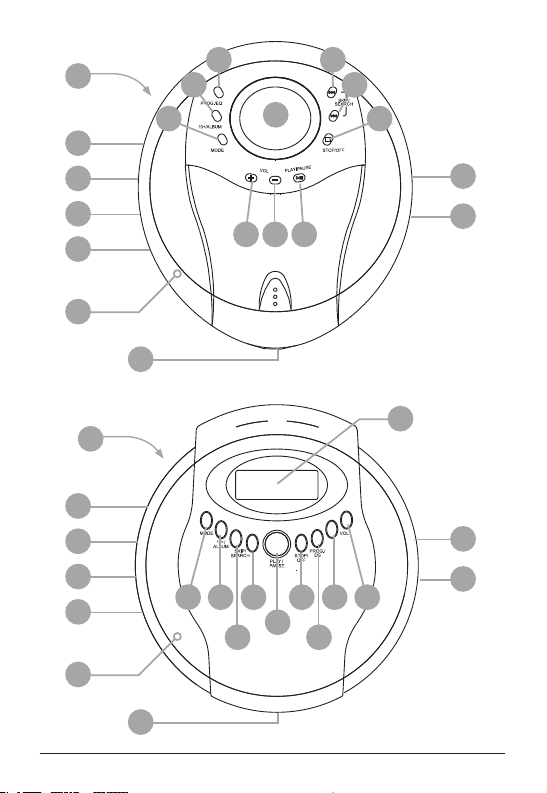
KH 2258
14
17
12
5
4
3
15
7
6
9
19
13
16
1
KH 2260
14
17
12
13
16
1
8
11
10
2
15
19
18
18
3
4
7
9
6
8
10
11
5
2
Operating Instructions |
Page 12
| Operating Instructions
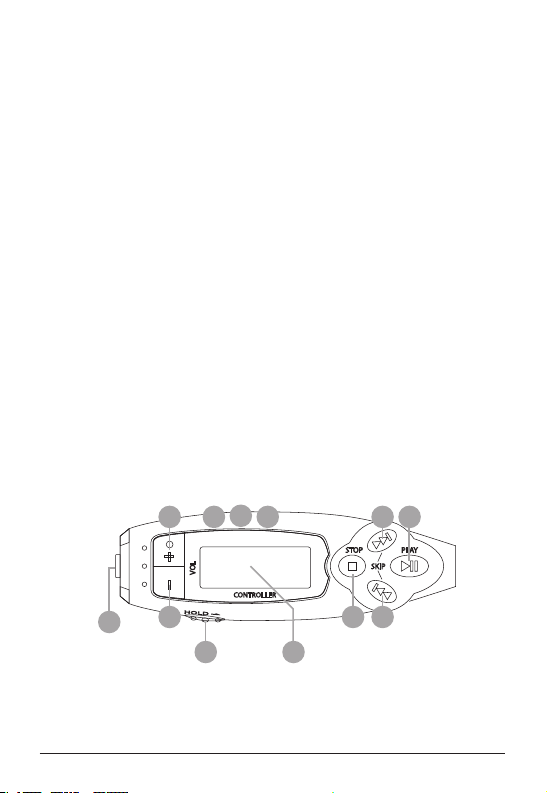
5.4. Controls on the remote control
20. “+” button
21. “–” button
22. “<” button
23. “:” button
24. “9” button
25. “4;” button
26. “MODE” button
27. “10+/ALBUM” button
28. “PROG./EQ” button
29. “HOLD” slide
5.5. Displays on the remote control
30. LCD display
5.6. Connections on the remote control
31. Headphones socket
27
28
26
20
31
21
29
30
25
23
22
24
Page 13

6. Point of installation, operating conditions
and safety instructions
Place the MP3-CD player, be it for stationary use, - e.g. at home –
or when en route, on a level, smooth non-slip base so that the
CD player cannot slip. This applies particularly when the CD
player is operated in a car.
To prevent damage, functional interference and the danger
of an electric shock do not use the set …
• … In the immediate vicinity of heat sources such as stoves,
fan heaters and similar appliances! Exposure to heat can
cause the set to overheat and the risk of melting plastic
parts, thereby causing irreparable damage!
Do not leave the MP3-CD player at high temperatures in the
car, particularly on sunny days when the interior of the car can
become very hot!
Ensure that the MP3-CD player is not exposed to direct sunlight
in a car (e.g. directly behind the windscreen).
Warning!
Set overheating gives rise to the danger of a re!
Operating Instructions |
Page 14

| Operating Instructions
• … In damp surroundings, for instance in basements or in
a sauna! Moisture entering the CD player can cause func-
tional problems and irreparable damage!
• … Not in the immediate vicinity of water, for instance in
a bathroom or near a swimming pool. Never place any
water-lled containers, for instance a ower vase, on the
CD player.
Warning!
Moisture entering the CD player can result in the danger of
electric shock!
Please note!
No liability/warranty is accepted for damage to the player
as a result of the following:
• Exposure to moisture
• Water entering the set
• Overheating
Page 15

7. Getting started
7.1. Connecting to the power supply
The Portable MP3-CD player can be operated with …
• the supplied mains adapter plugged into a mains socket
• or with batteries
7.1.1. Mains operation
To operate the Portable MP3-CD player from the mains …
1 Insert the plug on the cable of the mains adapter in the
“DC 4.5V” socket on the left-hand side of the portable MP3-
CD player.
2 Plug the mains adapter into a mains socket. The Portable
MP3-CD player is automatically switched over to mains operation. This means that any batteries which may be in the battery
compartment do not have to be removed.
The portable CD player is now operational.
Warning!
The use of unsuitable mains cables from other appliances
can give rise to the danger of an electric shock!
Operating Instructions |
Page 16

| Operating Instructions
Please note!
Only use the supplied mains adapter to connect the Portable
MP3-CD player to the mains! The use of mains adapters that
were not intended for the Portable MP3-CD player can result
in irreparable damage to the player!
7.1.2. Battery operation
Proceed as follows to operate the Portable MP3-CD player
with batteries …
1 Set “OFF” with the “CHARGE” slide on the underside of the
MP3-CD player.
2 Open the CD compartment by pushing the “OPEN” slide
to the right.
3 Open the battery compartment cover inside the CD com-
partment and remove.
4 Place the supplied rechargeable NiCd batteries (AA-type,
1.2 V), or conventional NiMh batteries (AA-type, 1.5 V, non-re-
chargeable) in the battery compartment. Ensure that the bat-
teries are inserted into the battery compartment according to
their polarity – as indicated inside the battery compartment
Warning!
Never try to recharge conventional, non-rechargeable NiMh
batteries! Ensure that the “CHARGE” slide on the underside
Page 17

of the MP3-CD player is denitely set at “OFF” beforehand
otherwise the player and the batteries will suer irreparable
damage!
5
Return the battery compartment cover and press down until
it becomes audibly locked in place. Close the CD compartment
by pressing down the cover until it is audibly locked in place.
The portable CD player is now operational.
7.1.2.1. Exchanging batteries
The batteries must be exchanged when the battery symbol
on the LCD display ashes.
Always exchange both batteries to operate the Portable MP3CD player with full power or connect the player with the mains
adapter to the mains socket.
Please note:
Spent batteries must not be disposed of in the domestic
waste. Hand in spent batteries at collecting or waste-disposal points or return them to the place where they were
purchased. If you eventually dispose of the Portable MP3-CD
player yourself, then ensure that the batteries are removed
beforehand!
Operating Instructions |
Page 18

| Operating Instructions
7.1.2.2. Charging rechargeable batteries
Rechargeable NiCd batteries, AA-type 1.5 V, can be recharged
in the battery compartment of the MP3-CD player within ap-
prox. 15 hours.
Rechargeable batteries must rst be recharged prior to their
use if they are …
• New (as the included batteries) or
•
Have not been used for an extended period (more than
60 days).
Proceed as follows to charge the rechargeable batteries in
the MP3-CD player ...
1 Open the CD compartment by pushing to the right the
“OPEN” slide on the front of the CD player.
2 Open the battery compartment inside the CD compart-
ment and insert two rechargeable NiCd batteries, AA-type
1.2 V, in the battery compartment. Ensure that the batteries
are inserted into the battery compartment according to their
polarity – as indicated inside the battery compartment.
3 Return the battery compartment cover and press down
until it is audibly locked in place. Close the CD compartment
by pressing down the cover until it is audibly locked in place.
4 Insert the plug on the mains adapter cable into the “DC
Page 19

4.5V” socket on the left-hand side of the Portable MP3-CD
player.
5 Plug the mains adapter into a mains socket.
6 To start charging the batteries set “ON” with the “CHARGE”
slide on the underside of the MP3-CD player. The “CHARGE” dis-
play on the left-hand side will now light up in red.
Warning!
Only use the supplied mains adapter to charge the rechargeable batteries in the MP3-CD player!
Battery charging continues …
• During CD playback or
• after the MP3-CD player has been switched o.
7 After 15 hours charging set “OFF” with the “CHARGE” slide
and disconnect the mains adapter from the mains socket.
Info:
Rechargeable batteries should always be fully discharged
before they are recharged, otherwise they can suer a serious
decline of their storage capacity (Memory Eect)!
If the performance of the MP3-CD player declines drastically
during battery operation, even through the rechargeable
Operating Instructions |
Page 20

| Operating Instructions
batteries have been correctly recharged, then all batteries
should be exchanged for new rechargeable NiCd batteries
or non-rechargeable NiMh batteries.
Following rst-time charging, or if the CD player has not
been used for an extended period, the playback time may
be shorter. In this case the batteries should be fully discharged and fully recharged several times.
8. Conventional audio CDs
8.1. Playback
1 Open the CD compartment by pushing to the right the
“OPEN” slide on the front of the player.
Prior to rst-time use:
Remove the cardboard transport protection from the CD
compartment.
2 Insert the jack plug of the supplied headphones into the
“PHONES” socket on the right-hand side of the MP3-CD player.
3 Place a CD – label side up – on the axle in the middle of the
CD compartment. Press the CD down lightly until it is percept-
ibly engaged.
4 Close the CD compartment by pressing down the cover
until it is perceptibly engaged.
Page 21

5 Press the “PLAY/PAUSE” button. “READING” now appears
on the display and the MP3-CD player now reads in the informa-
tion from the loaded CD.
The rst track of the loaded audio CD is then automatically
played.
The following is indicated on the display:
Info
ESP is the abbreviation for “Electronic Shock Protection”
system of the eBench KH 2257/2258/2259/2260 Portable
MP3-CD Player. The ESP system is automatically switched
on when playing audio and MP3 CDs. The system ensures that
playback of CDs, MP3-CDs, CD-Rs and CD-RWs is not impaired
when the player is exposed to shocks and vibrations.
The digital data of the loaded CD, equalling a playback period of 40 seconds, is temporarily stored in a read-ahead memory buer. As soon as this memory is full – recognisable
by the bar in the memory display of the LCD display – the
Operating Instructions |
Page 22

| Operating Instructions
next data from the loaded CD is overwritten (once again 40
seconds of playback).
If the player is exposed to a shock during playback, then the
data stored in the read-ahead memory buer is read out
for interference-free playback. This gives the laser scanner
time to re-stabilise and read in new data from the CD. After
the data from the read-ahead memory buer have been collected, new data are transferred to the memory.
Please note!
The ESP system cannot prevent damage to the MP3-CD player
as a result of jolts or vibrations or if the player is dropped!
Ensure that the MP3-CD player is transported or stands as
vibration-free as possible and that it cannot fall down from
its location point.
The MP3 DC player can be irreparably damaged by shocks
and vibrations or if it falls down!
6 The rst track on the audio CD is then played.
The following is then possible …
8.2. Setting the playback volume
Set the required playback volume with “VOLUME +” (for loud-
er) and “VOLUME -” (for softer). The currently set volume is
indicated between “Volume 01” (sound OFF) and “Volume 32”
(maximum volume).
Page 23

8.3. Switching on Bass Boost
Switching on the Bass Boost system ensures more faithful rendition of the low frequencies (bass) to produce a more “saturated”
sound of greater volume.
Set “ON” with the “Bass Boost” slide on the left-hand side of
the MP3-CD player to switch on the Bass Boost system.
Set “OFF” with the “Bass Boost” slide to switch o the Bass
Boost system.
8.4. Stopping playback (PAUSE mode)
To stop audio CD playback press the “PLAY/PAUSE” button
once. The MP3-CD player is then in PAUSE mode. “PAUSE” is
indicated on the LCD display and the number of the currently
stopped track ashes.
Press the “PLAY/PAUSE” button once to continue playback.
The current track is continued from the point it was stopped.
Operating Instructions |
Page 24

| Operating Instructions
8.5. Ending playback
Press the “STOP/OFF” button once to end playback. The MP3CD player is then in STOP mode and the following is indicated
on the display …
• The total number of tracks on the loaded CD
• The total playing time of all tracks on the loaded CD
8.6. Selecting a track
8.6.1. Skip forward/back to the beginning of a track
Proceed in the following manner to skip within a track on an
audio CD forward/back to the beginning of a track …
a) … during CD playback:
1 Continue pressing the “SKIP/SEARCH 8” button (skip for-
ward to the beginning of the next track) or “SKIP/SEARCH 7”
button (skip back to the beginning of the last track), until the
number of the desired track is indicated on the display.
2 Track playback commences immediately without having
to press the “PLAY/PAUSE” button.
Page 25

b) … during stopped CD playback (PAUSE mode):
1 Continue pressing the “SKIP/SEARCH 8” button (skip for-
ward to the beginning of the next track) or “SKIP/SEARCH 7”
button (skip back to the beginning of the last track), until the
number of the desired track is indicated on the display.
2 Track playback commences immediately without having
to press the “PLAY/PAUSE” button.
c) … during stopped CD playback (STOP mode):
1 Continue pressing the “SKIP/SEARCH 8” button (skip for-
ward to the beginning of the next track) or “SKIP/SEARCH 7”
button (skip back to the beginning of the last track), until the
number of the desired track is indicated on the display.
2 Press the “PLAY/PAUSE” button once to start playback.
8.6.2. Skip 10 tracks forward
Press the “10+/Album” button to skip 10 tracks forward on
the loaded CD during playback.
If the “10+/Album” button is pressed during playback or PAUSE
mode, then playback of the selected track is instant without
having to press the “PLAY/PAUSE” button.
If the “10+/Album” button is pressed in STOP mode, then the
“PLAY/PAUSE” button has to be depressed to playback the selected track.
Operating Instructions |
Page 26

| Operating Instructions
8.7. Fast search forward/back
Proceed in the following manner to select a certain section with-
in a track that is being played in fast search forward/back …
1 Keep the “SKIP/SEARCH 8” button depressed during
playback of the desired track for rapid forward search.
Keep the “SKIP/SEARCH 7” button depressed during playback
of the desired track for rapid back search.
2 Release the “SKIP/SEARCH 8” or “SKIP/SEARCH 7” button
as soon as the desired section within the track is reached.
Playback of the track at the selected point starts automatically.
8.8. Programming a compilation of tracks
(PROGRAM function)
You can compile your own music programme with the program function merely by selecting certain tracks on the loaded
audio CD for repeat. Moreover, you can decide the sequence
in which the titles are to be played.
Proceed in the following manner to program your own track
compilation for playback …
1 In the event that a CD is loaded in the CD compartment of
the MP3-CD player and is already being played, then press the
“STOP/OFF” button to terminate playback.
Page 27

2 Press the “PROG./EQ” button once. The display indicates
the following:
3
Continue pressing the “SKIP/SEARCH8” or “SKIP/SEARCH7”
button until the number of the rst program storage place for
the desired track is indicated on the LCD display.
4 Then press the “PROG./EQ” button once to program the
selected track. “P-O2” is indicated on the display for the sec-
ond program storage place that is to be programmed.
5 Repeat steps 3. and 4. until all tracks for your compilation
of tracks have been programmed in the desired sequence. Up
to 99 tracks can be programmed in this manner.
6 Press the “PLAY/PAUSE” button once to start playback of
the programmed compilation of tracks.
To end playback of the compiled tracks press the “STOP/OFF”
button once. The programmed compilation of tracks continues
to be stored and the display continues to indicate “PROG”.
To renew playback of the programmed compilation of tracks
press the “PLAY/PAUSE” button once again.
To switch o the program function press the “STOP/OFF”
Operating Instructions |
Page 28

| Operating Instructions
button twice during playback. This ends the program function, “PROG” is faded out on the display and the programmed
compilation of titles is deleted.
The player is automatically transferred to STOP mode after
all programmed tracks have been played. The programmed
tracks continue to be stored until …
• You open the CD compartment
•
You switch o the player by depressing the “STOP” button.
• The MP3-CD player is automatically switched o after 30
seconds.
8.9. Intro play function
The rst 10 seconds of all tracks of the loaded CD are played one
after the other in the Intro play function.
Proceed in the following manner to switch on the Intro play
function …
1 If a CD is being played, then end playback by pressing the
“STOP” button once.
1 Press the “MODE” button three times. “INTRO” appears
on the display. Then press the “PLAY/PAUSE” button once to
start the Intro play function.
Page 29

To end the Intro play function press the “STOP” button once;
“INTRO” is faded out on the display.
8.10. Random playback (SHUFFLE)
With the “SHUFF” function it is possible to play all tracks of a
loaded CD in a random sequence.
Proceed in the following manner to switch on random play-
back …
1 In the event that a CD is being played, then rst end play-
back by pressing the “STOP” button once.
2 Press the “MODE” button four times; “SHUFF” appears
on the display.
3 Press the “PLAY/PAUSE” button to start random play-
back.
Proceed in the following manner to end “SHUFF” random
playback …
• Press the “MODE” button once. “SHUFF” is faded out on the
display and playback of the current track is continued.
or
• Press the “STOP” button once. “SHUFF” is faded out on the
Operating Instructions |
Page 30

| Operating Instructions
display and playback of the current track is terminated. The
MP3-CD player is now in STOP mode.
8.11. Repeat functions
The following can be set with the repeat functions ...
• Repeat a single track of an audio CD and
• repeat the entire audio CD
8.11.1. Repeat playback of a single track
To repeat playback of a single track on the loaded CD press
the “MODE” button once during playback of the desired title.
“REPT 1” appears on the LCD display.
The selected track continues to be repeated until …
• Press the “STOP” button once to end repeat playback.
• Press the “MODE” button four times to return to normal
playback mode.
8.11.2. Repeat playback of all CD tracks
To repeat all tracks on the loaded CD press the “MODE” but-
ton twice during playback of a track. “REPT ALL” appears on
the LCD display.
Page 31

The entire loaded CD continues to be repeated until …
• The “STOP” button is pressed once to end playback.
or
• The “MODE” button is pressed three time to return to
normal playback mode.
9. MP3-CDs
9.1. Playback
1 Open the CD compartment, load an MP3-CD and close
the CD compartment.
2 Then press the PLAY/PAUSE” button.
“READING” appears on the display and the MP3-CD player now
reads the information on the loaded MP3-CD.
Please note:
Due to the enormous recording capacity of MP3 discs the
read-in/scanning times are somewhat longer than with
conventional audio CDs.
3 The rst title in the rst directory of the loaded MP3-CD is
Operating Instructions |
Page 32

| Operating Instructions
now automatically played and the following is indicated on
the display:
If the title designation under which a currently playing PM3-le
was stored on the loaded CD (e.g. song title and artist) is too long
to be shown in its entirety on the display, then the title designation is continuously scrolled to the left during playback.
9.2. Title selection
Titles in MP3 mode can be selected with the “SKIP/SEARCH 8”
or “SKIP/SEARCH 7” button in a similar manner as with audio
CD playback.
To select a title rst select in MP3 mode the le in which the
desired title is located, and then select the desired title.
1 Hold down the “10+/Album” button during playback in
PAUSE or STOP mode until the number of the current le starts
to ash on the LCD display.
2
Continue pressing the “SKIP/SEARCH8” or “SKIP/SEARCH 7”
Page 33

button until the number and designation of the desired le
is indicated on the display.
3 Then press the “PLAY/PAUSE” button to playback the rst
title of the selected le.
4 Continue pressing the “SKIP/SEARCH 8” or “SKIP/SEARCH
7” button until the number and designation of the desired
le is indicated on the display.
Track playback starts immediately without having to press
the “PLAY/PAUSE” button.
If the title currently indicated on the display is the last title in
the current le, then the MP3 player will change over to the
rst title of the next le when if the “SKIP/SEARCH 8” button
is depressed.
9.3. Skip forward by 10 titles
Press the “10+/Album” button to skip 10 titles forward during playback in STOP and PAUSE mode within the music titles
of a directory on the loaded MP3-CD.
If the “10+/Album” button is pressed during playback or when
in PAUSE mode, then playback of the selected titles starts in-
stantly without having to press the “PLAY/PAUSE” button.
If the “10+/Album” button is pressed in STOP mode, then the
“PLAY/PAUSE” button must be pressed to start playback of
the selected title.
Operating Instructions |
Page 34

| Operating Instructions
9.4. Intro play function
The rst 10 seconds of all tracks of the loaded CD are played one
after the other in the Intro play function.
Proceed in the following manner to switch on the Intro play
function … …
1 If a CD is being played, then end playback by pressing the
“STOP” button once.
2 Press the “MODE” button four times. “INTRO” appears
on the display.
3 Then press the “PLAY/PAUSE” button once to start the
Intro play function.
To end the Intro play function …
• Press the “MODE” button twice; “INTRO” is faded out on
the display or
• press the “STOP” button once; “INTRO” is faded out on the
display.
The MP3-CD player is now in STOP mode.
9.5. Random playback (SHUFFLE)
With the “SHUFF” random playback function it is possible to play
all tracks of a loaded CD in a random sequence.
Page 35

Proceed in the following manner to switch on random play-
back …
1 In the event that a CD is being played, then rst end play-
back by pressing the “STOP” button once.
2 Press the “MODE” button ve times; “SHUFF” appears on
the display.
3 Press the “MODE” button to start random playback.
Proceed in the following manner to end “SHUFF” random
playback …
• Press the “MODE” button once. “SHUFF” is faded out on the
display and playback of the current title continues or
• press the “STOP” button once. “SHUFF” is faded out on the
display and playback of the current title is terminated. The
MP3-CD player is now in STOP mode.
9.6. Repeat functions
The following can be set with the repeat functions …
• Repeat a single title of an MP3-CD
• Repeat all titles of an MP3-CD directory
• Repeat the entire MP3-CD
9.6.1. Repeated playback of a single title
Operating Instructions |
Page 36

| Operating Instructions
To repeat a single music title of a loaded MP3-CD press the
“MODE” button during playback of the desired title. “REPT
1” appears on the LCD display.
The selected title will then be continuously repeated until …
• The “STOP” mode is pressed to end playback or
• Press the “MODE” button ve times to return to normal
playback mode.
9.6.2. Repeated playback of a title of a directory
To repeat playback of all titles of a directory on a loaded
MP3-CD, press the “MODE” button twice during playback of
a title from the desired directory; “REPT DIR” is indicated on
the LCD display.
The titles of the selected directory will be played one after the
other until …
• The “STOP” button is pressed to end playback or
• The “MODE” button is pressed four times to return to
normal playback mode
9.6.3. Repeated playback of all MP3-CD titles
Page 37

To repeat playback of all titles of a loaded MP3-CD, press the
“MODE” button three times during playback of a title; “REPT
ALL” is indicated on the LCD display.
The entire loaded CD will continue to be played until …
• The “STOP” button is pressed to end playback or
• the “MODE” button is pressed three times to return to
normal playback mode
9.7. Programming a compilation of titles
(PROGRAM function)
Proceed as follows to program your own compilation of titles
for playback …
1 In the event that an MP3-CD is being played, then press the
“STOP” button once to terminate playback.
2 Press the “PROG./EQ” button once. “01” will ash on the
display.
3 Select with the “SKIP/SEARCH 8” or “SKIP/SEARCH 7”
button the directory holding the rst title that you wish to pro-
gram.
4 Press the “PROG./EQ” button once again. The title number
Operating Instructions |
Page 38

| Operating Instructions
“000” will ash on the display.
5 Select with the “SKIP/SEARCH 8” or “SKIP/SEARCH 7”
button the desired title within the selected directory.
6 Press the “PROG./EQ” button once again to program the
selected title.
7 Repeat steps 3. to 6. until all music titles for your compila-
tion have been programmed in the desired sequence. Up to 99
tracks can be programmed in this manner.
8 Press the “PLAY/PAUSE” button once to start playback of
the programmed compilation of titles.
To end playback of the compilation press the “STOP/OFF”
button once. The programmed compilation continues to be
stored and the display continues to indicate “PROG”.
To renew playback of the programmed compilation press
the “PLAY/PAUSE” button once again.
To switch o the program function press the “STOP/OFF”
button twice during playback. This ends the program function, “PROG” is faded out on the display and the programmed
compilation of titles is deleted.
The player is automatically transferred to STOP mode after
all programmed titles have been played. The programmed
tracks continue to be stored until …
• You open the CD compartment
Page 39

• You switch o the player by depressing the “STOP” button.
• The MP3-CD player is automatically switched o after 30
seconds in STOP mode.
9.8. Selecting tracks by their name
With MP3-CDs it is possible to search for tracks on the loaded
MP3-CD by entering the beginning of the track name.
The entry is then compared with the rst 8 places of the track
names on the MP3-CD. Consequently it is necessary to ensure
that you are aware of the title designation system of the loaded
MP3-CD (e.g. whether the name of the artist or the name of the
title has been stored).
Conducting a search by track names …
1 If an MP3-CD is being played, then end playback by press-
ing the “STOP” button once.
2 Then hold down the “MODE” button; “SEARCH NAME”
briey appears on the display after which the letter “A” will
start to ash at the rst place of the track name.
3
Continue pressing the “SKIP/SEARCH8” or “SKIP/SEARCH7”
button until the rst letter, the rst numeral or the rst char-
Operating Instructions |
Page 40

| Operating Instructions
acter of the desired title is indicated on the display.
4 Press the “MODE” button to select the displayed letters,
numerals or characters.
5 A second “A” will then ash on the display at the second
place of the track name. Repeat the steps 3. and 4. to enter
further letters, numerals or characters of the desired track
name.
Between one and eight letters, numerals or characters can be
entered. The more letters, numerals and/or characters that are
entered, the greater the accuracy of the search.
6 When entry has been completed press the “PLAY/PAUSE”
button to start the search.
7 When a title is found that corresponds with the given en-
try, then it will appear on the display, followed by automatic
playback.
If several titles are found that correspond with the given entry,
then all located titles are played one after the other.
If no title is found that corresponds with the given entry, then
“NOT FOUND” appears on the display.
10. Equalizer function
The music can be played with diering equalizer curves. It
is possible to choose between DBB, Pop, Classic, Jazz, Rock
and Normal. Each equalizer curve has its own characteristic
Page 41

enhancement of the treble tone, middle tone and bass so that
the dierent styles of music can be played according to personal preference.
Proceed in the following manner to set dierent equalizer
curves …
1 Press during playback the “PROG./EQ” button. “DBB” will
appear for three seconds on the display instead of “PLAY”.
This indicates that the “DBB” equalizer curve has been
switched on.
2 With each further depression of the “PROG./EQ” button
another equalizer curve is set in the following sequence:
DBB ➠ Pop ➠ Classic ➠ Jazz ➠ Rock ➠ Normal
The designation of the selected equalizer curve is shown for
approx. three seconds on the display instead of “PLAY”.
The equalizer function is turned o in the “Normal” setting.
11. Button lock (HOLD)
All buttons on the MP3-CD player are blocked when the button
lock is activated, thereby excluding the possibility of accidental
operation, e.g. when the MP3-CD player is placed in a pocket.
To activate button lock set “HOLD” by pushing the slide on
the left-hand side of the MP3-CD player to the right; “HOLD”
Operating Instructions |
Page 42

| Operating Instructions
appears on the display.
To switch o button lock push the “HOLD” slide back towards
the left. The “HOLD” symbol disappears from the display.
12. Switching o the MP3-CD player
To switch o the MP3-CD player press the “STOP” button
once during title playback. The MP3-CD player is then in
“STOP” mode.
Press the “STOP/OFF” button once again in STOP mode.
The display indicates “POWER OFF” and the MP3-CD player
switches itself o.
The MP3-CD player automatically switches itself o …
• 30 seconds after all tracks of the loaded audio or MP3-CD
have been played.
• 30 seconds after all titles of a programmed compilation
have been played.
• 30 seconds after the STOP mode was switched on.
13. Connecting and using the accessories
13.1. Remote control
When the remote control is connected to the MP3-CD player all
functions of the player can be operated by the remote control.
Functions of the remote control buttons equivalent to…
Page 43

Button on the remote control Button on the player
+ Vol +
- Vol -
4; Play/Pause 4;
< Stop/O <
8 Skip/Search 8
7 Skip/Search 7
To connect the supplied remote control with the MP3-CD
player insert the plug on the remote control cable in the
“PHONES” headphones socket on the right-hand side of the
MP3-CD player.
When the remote control is connected to the MP3-CD player,
then…
• The headphones
• The speaker with the 3.5 mm jack plug
must be connected with the headphones socket of the remote
control instead of the “PHONES” headphones socket on the
MP3-CD player.
13.2. Line-OUT cable
The supplied Line-OUT cable (chinch to 3.5 mm jack plug) can
be used to connect external HiFi units to the MP3-CD player.
For this purpose proceed as follows …
Operating Instructions |
Page 44

| Operating Instructions
1
Insert the 3.5 mm jack plug of the line-OUT cable into the
Line-OUT socket on the right-hand side of the MP3-CD player.
2 Insert the chinch plug in the chinch sockets of the HiFi
system that is to be connected to the MP3-CD player.
13.3. Car adapter set
13.3.1. Function
The car adapter set consists of …
• CD cassette adapter
• Cigarette lighter power adapter
The car adapter set is used to operate the MP3-CD player inside
a car. Use the …
• CD cassette adapter to connect the MP3-CD player to a car
radio with cassette deck so that the in-car speakers can be
used to reproduce speech and music.
• Cigarette lighter adapter to operate the MP3-CD player connected to the car’s radio from the car’s power system instead
of with batteries.
Warning!
The eBench KH 2257/2258/2259/2260 portable MP3-CD
player must only be used with the supplied cigarette lighter power adapter. The use of any other cigarette lighter po-
Page 45

wer adapter could cause irreparable damage to the portable
MP3-CD player.
13.3.2. Use
The CD cassette adapter is exclusively intended for the operation
of the portable MP3-CD player in connection with an existing
in-car cassette radio and its speakers.
The cigarette lighter power adapter is exclusively intended for
supplying power to the eBench KH 2257/2258/2259/2260 portable MP3-CD player from the car’s cigarette lighter socket.
13.3.3. Setting up
1 Remove the car’s cigarette light from its socket.
2 Insert the large plug of the cigarette lighter adapter cable
rmly into the cigarette lighter socket.
Please note!
If the inside of the cigarette lighter socket is found to be dirty – e.g. cigarette ashes – then ensure that it is thoroughly
cleaned before the adapter cable is inserted! Otherwise, overheating may arise and this could cause irreparable damage
to the MP3-CD player and the cigarette lighter adapter!
3 Insert the plug at the other end of the adapter cable into
the “DC 4.5V” socket on the left-hand side of the portable MP3-
CD player.
Operating Instructions |
Page 46

| Operating Instructions
The MP3-CD player will then be supplied with power from the
car’s electrical system.
4 Insert the car cassette adapter into the cassette deck of
the car’s radio in such a manner that the side with the connect-
ing cable is pointing towards you.
5 Insert the plug of the connecting cable into the “PHONES”
headphones socket of the MP3-CD player.
6 Set “OFF” with the “CHARGE” slide underneath the MP3-CD
player.
7 Open the CD compartment, insert an audio CD or MP3-CD,
and then close the CD compartment.
8 Switch on the car radio and set the volume to a minimum
level.
9 Switch on the MP3-CD player and set the volume at a
middle level.
10 Start playback of the loaded CD/MP3-CD.
11 Set the required playback volume on the car radio and
PM3-CD player.
13.3.4. After use
After use remove the car cassette adapter from the cassette
deck of the car radio and disconnect the connecting cable from
the “PHONES” headphones socket of the MP3-CD player.
Page 47

After use disconnect the cigarette lighter power adapter from
the cigarette lighter socket and from the “DC 4.5V” socket of
the MP3-CD player.
14. Cleaning
Only use a slightly moist cloth and a mild washing-up liquid
to clean the case surface of the MP3-CD player. Ensure when
cleaning that no moisture enters the player.
Warning!
Moisture penetrating the set can give rise to the danger of
an electric shock!
The inside of the CD compartment and the laser scanning lens
must only be cleaned (if necessary) with a clean, dry brush (e.g.
lens brush available from photographic dealers). NEVER moist
clean the inside of the CD compartment! NEVER touch the
laser scanning lens with bare hands!
Please note!
Fingerprints and moisture on the laser scanning lens will
cause faulty CD playback!
15. Functional faults
In the event that functional faults arise during operation of the
MP3-CD player, then rst disconnect the mains adapter from
the player or, alternatively, remove the batteries.
Operating Instructions |
Page 48

| Operating Instructions
Proceed in the following manner if the display remains
blank when the “PLAY/PAUSE” button is pressed …
With mains operation
First check that the mains adapter is correctly inserted in the
mains socket and the plug on the cable of the mains adapter
has been correctly inserted in the “DC 4.5V” socket on the
left-hand side of the MP3-CD player.
If both have been correctly inserted, then check whether the
mains socket is conducting power by connecting another
electrical appliance to the same mains socket.
With battery operation
Check whether the batteries have been correctly loaded into
the player. If this is the case then check whether the batteries
are discharged or defective.
Rechargeable batteries must be recharged in the battery
compartment of the MP3-CD player. Non-rechargeable batteries must be exchanged or, alternatively, change the MP3-CD
player over to mains operation.
If playback of audio/MP3-CDs does not function or is
faulty, then check whether a lm of condensation has formed
on the laser scanning lens of the MP3-CD player.
Page 49

This can happen if the MP3-CD player has been exposed to
wide temperature uctuations.
Proceed in the following manner if this is the case …
1 Place the MP3-CD player in a dry environment with a nor-
mal room temperature.
2 Remove a loaded audio CD/MP3-CD from the CD com-
partment.
3 Leave the MP3-CD player switched on for at least one hour
without using it to allow the condensation lm to evaporate.
In the event that the MP3-CD player does not react when
buttons on the player or the remote control are pressed, then
check whether the “HOLD” slide on the left-hand side of the
MP3-CD player, or on the remote control, has been pushed to
its left-hand setting. If the slide is in its right-hand setting,
then this means that button lock has been activated!
Consult our nearest service partner in the event of the following …
• If the functional faults cannot be remedied in the described manner.
• If functional faults occur which have not been described.
Warning!
NEVER open the case of the MP3-CD player! It does not con-
Operating Instructions |
Page 50

tain any parts that can be repaired by the user. The warranty
becomes null and void if the set’s case has been opened.
We do not accept any liability/warranty for damage resulting from opening the case or repair attempts that were not
carried out by qualied personnel!
| Operating Instructions
Page 51

Page 52

Kompernaß Handelsgesellschaft mbH
Burgstraße 21 • D-44867 Bochum • Germany
www.kompernass.com
 Loading...