

Page 1
3 A
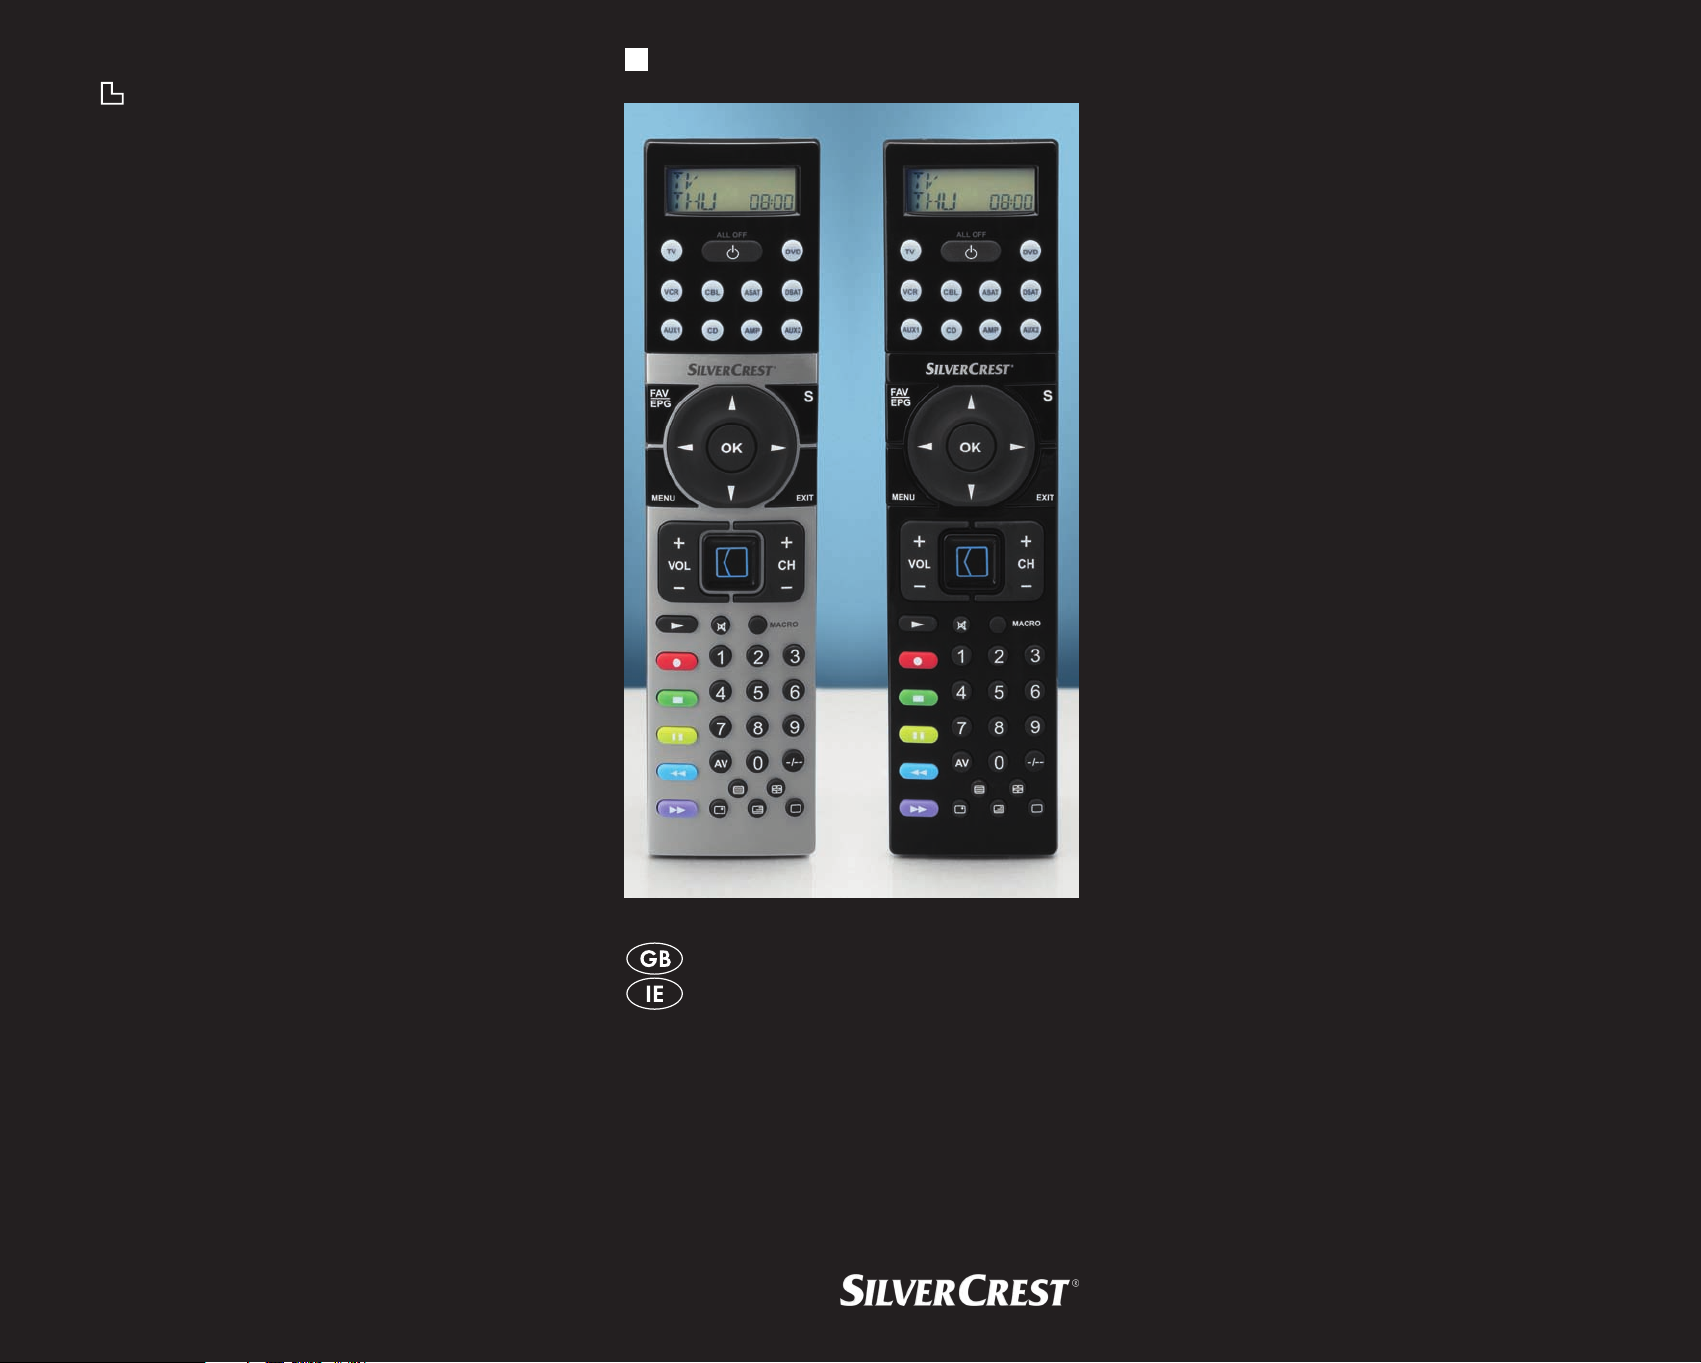
UNIVERSAL REMOTE CONTROL
KOMPERNASS GMBH
BURGSTRASSE 21 ⋅ D-44867 BOCHUM
www.kompernass.com
ID-Nr.: KH2156-08/09-V3
KH 2156
UNIVERSAL REMOTE CONTROL
Operating manual
08/2009
Page 2
KH 2156
Page 3
INDEX PAGE
Important safety instructions 2
Device summary 3
Initial use 4
Unpacking the device / checking the
package contents 4
Inserting the batteries 4
Operating components 5
LCD display 5
Buttons 6
SETUP - System settings 8
Code Setup
Programming by brand code search 10
Programming by manual code input 11
Programming by automatic code search 11
System-Setup 13
Setting the time 13
Setting the date 13
Adjust contrast 14
Background Illumination 14
System reset 14
Timer Setup 15
Sleep timer 15
Event timer 15
Learn Setup 16
Code learn function 16
Macro Setup 17
Favourites channel 19
Volume control 20
Vol +/—,
For operation 21
All OFF 21
Faults / Remedies 21
Disposal 22
CE- Conformity 23
Importer 23
Technical data 23
Important Warranty Notices 23
(Programming the remote control) 10
(Mute switching) 20
- 1 -
Page 4
Universal remote control KH2156
Read the operating instructions carefully before using the device for the rst time and preserve this booklet for later reference. Pass this manual on to whoever might acquire
the device at a future date.
Important safety instructions
Proper use
Children may only operate the remote control under adult
supervision.
The universal remote control can replace a maximum of ten
remote controls. It can only be used for entertainment electronics with infrared receivers. The functions of the Universal
remote control essentially correspond to those of the original
remote control. The universal remote control is intended for
private use. It is not suitable for commercial use.
Any other use is considered improper use. The manufacturer
declines to accept responsibility for damage(s) arising from
improper use.
There is a danger of injury in the event of
improper handling of batteries!
Batteries must be handled with special care. Take note of the
following safety instructions:
•
Take the batteries out of the battery compartment as soon
as they are depleted.
Do not throw batteries into a re. Never subject batteries
•
to high temperatures.
If you will not be using the device for a long period of time,
•
remove the batteries to prevent them from discharging.
Explosion hazard! Non-rechargeable batteries must never
•
be recharged.
Do not open the batteries or short-circuit them.
•
Battery acid leaking from a battery can cause inamma-•
tion of the skin. In event of contact with the skin, rinse with
large amounts of water. If the liquid comes into contact
with your eyes, rinse thoroughly with water, do not rub
and immediately consult a doctor.
Always change all batteries at the same time and always
•
use batteries of the same type.
Keep batteries well away from children. Children can
•
put batteries into their mouths and swallow them. If a battery is swallowed medical assistance must be sought IMMEDIATELY.
Laser
The Universal remote control contains an infrared diode
of laser class 1. A safety system prevents the emmision of
dangerous laser radiation during use. To prevent eye injuries,
do not modify or damage the safety system of the device.
- 2 -
Page 5

- 3 -
Damage to the device
If the device is defective, do not attempt to repair it your-•
self. In case of damage, contact the manufacturer or the
manufacturer's service hotline (see Warranty information).
If liquid escapes from the device or if the device has been
•
otherwise damaged, it must be inspected by the manufacturer or the manufacturer's service hotline.
Contact the manufacturer or the manufacturer's service
hotline (see Warranty information).
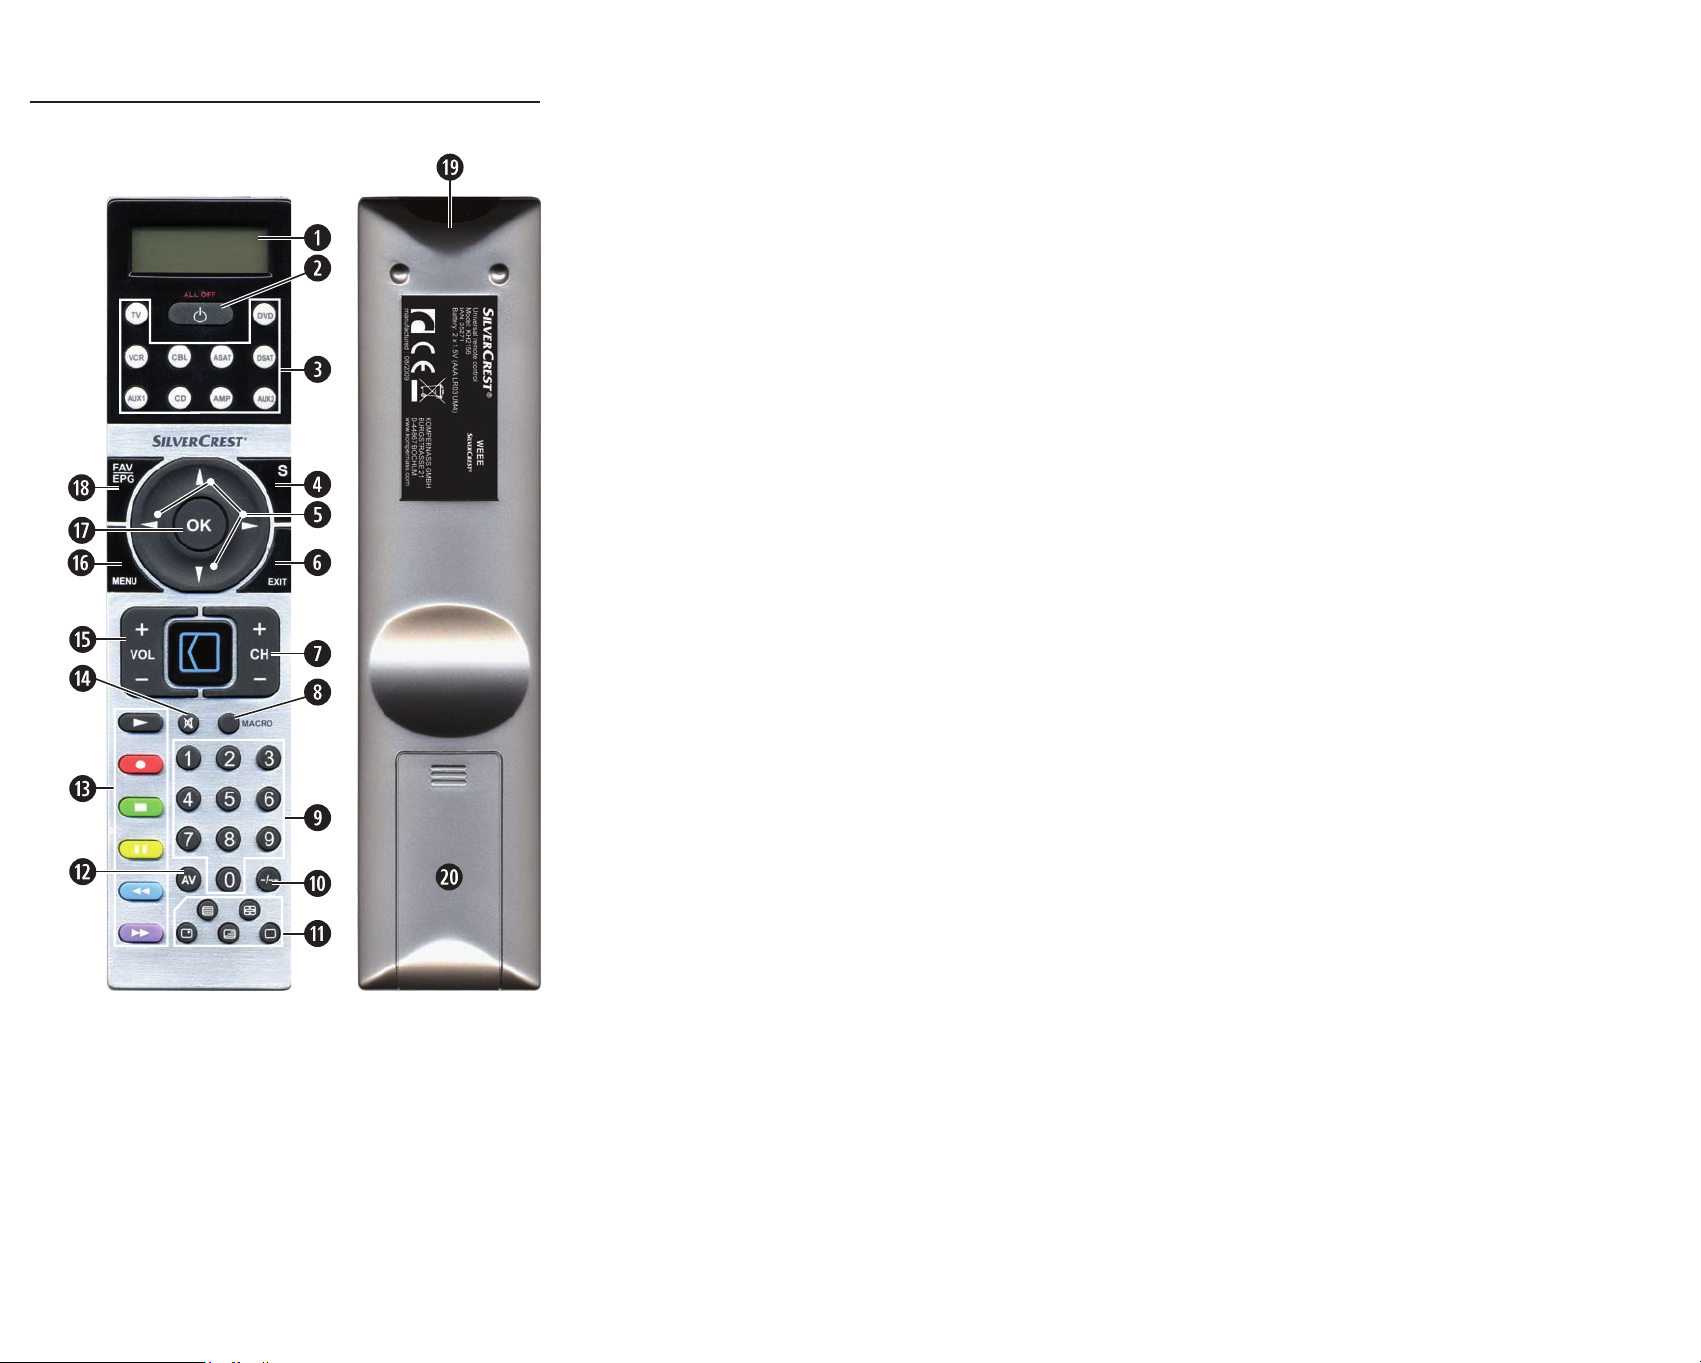
Device summary
q LCD display
w /ALL OFF button
e Device buttons
r S button
t Arrow buttons
y EXIT button
u CH +/— buttons
i MACRO button
o Number buttons
a Button for one or two digit programme numbers
s Teletext function buttons
d AV button
f Record/Playback buttons
g Mute switching
h VOL +/— buttons
j MENU button
k OK button
l FAV / EPG button
1( Infrared sender/receiver
2) Battery compartment cover
Tips:
The functions described here pertain to the theoretically •
ideal circumstance that the button structure of the respective original remote control is identical to this universal
remote control. This only occurs, however, in rare cases. If,
therefore, not all of the original remote control's functions
can be reproduced it is not due to a diciency in the Universal remote control.
All the brand names used in these instructions or in the
•
accompanying code list are trademarks of the corresponding companies.
Page 6
Initial use
Unpacking the device / checking the package
contents
Important!
Keep the plastic packaging well away from small children.
There is a risk of suocation!
•
Unpack the device and accessories.
Check the package contents •
- Universal remote control (URC),
- Operating instructions,
- Manufacturers directory with device code list:
- 2 x 1,5 V Batteries, type AAA/LR03 (Micro)
• q.
Remove the protective foil from the LCD display
Note: Transport damage
If you notice any transport damage contact the manufacturer or
the manufacturer's Service-Hotline (see warranty information).
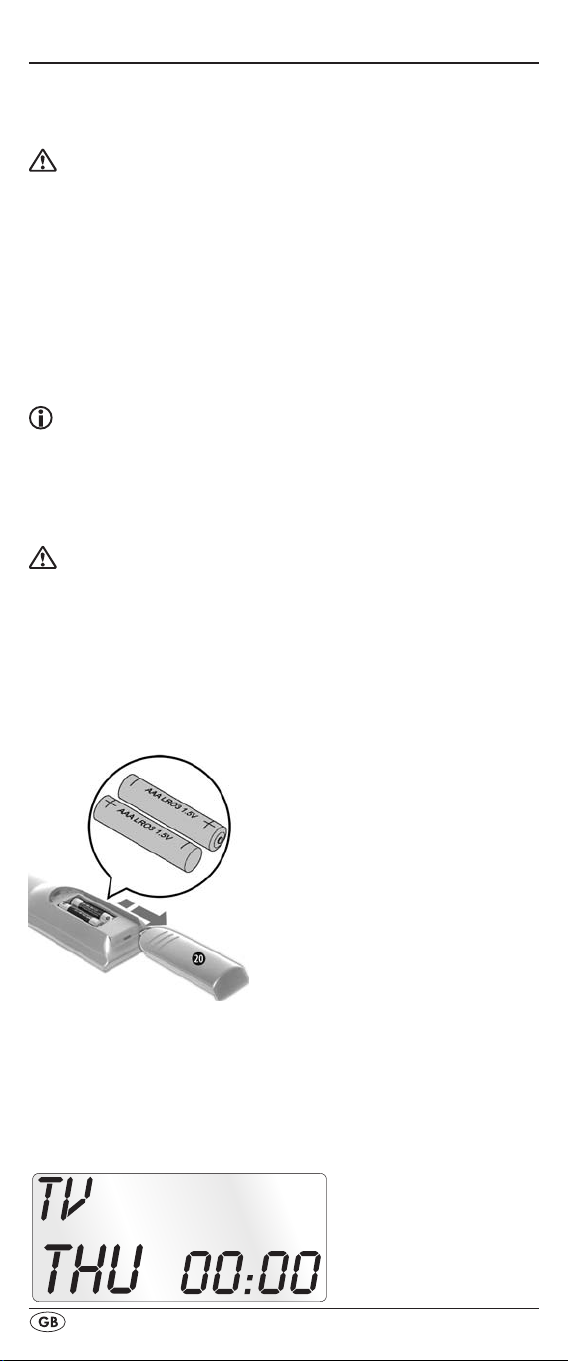
Inserting the batteries
Attention!
The Universal remote control must only be operated with
1.5 Volt batteries (Type AAA, LR03).
Carry out the battery change as quickly as possible. Preset
settings will remain saved for approx. 1 minute. If new batteries have not been installed within this time all of the settings
will have to be carried out again. The time of day will, however, in any case be deleted.
1. Open the battery compartment cover 2) in the direction
of the arrow.
2. Insert the batteries as shown in the diagram and close the
battery compartment.
The LCD display q is activated as long as batteries are
installed. The following diagram shows the LCD display q
after the batteries have been installed or changed.
- 4 -
Page 7
- 5 -
Note:
If no LCD display q is visible check the polarity of the
batteries or install new ones.
Operating components
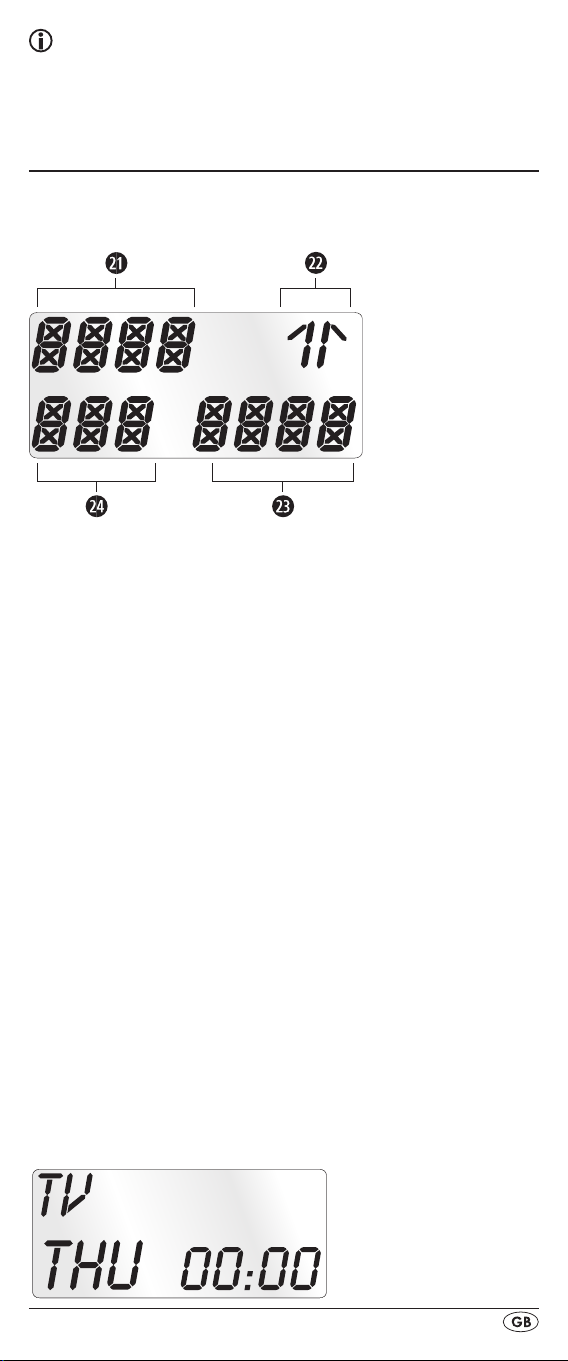
LCD display
The LCD display q is divided into elds.
Text field 2!
Here is shown the currently selected device, for example
DVD, TV VCR etc.
Infrared symbol 2@
Every time a button is pressed, with which an infrared signal
is to be sent the Infrared symbol illuminates.
Code/Time field 2#
Here is shown the device code of the relevent selected device or the time of day. With the time of day indicator "
numbers blink in the middle.
Day of the week field 2$
Here you can read the English shortened form of the current
day of the week after you have entered the date.
= Monday
MON
Tue
= Tuesday
WED
= Wednesday
THU
= Thursday
FRI = Friday
= Saturday
SAT
= Sunday
SUN
Standard display:
:" the
Page 8
The standard readout of the LCD display q consists of the
details for the relevent device, for example, "TV", the initial
for the day of the week and the time of day indicator.
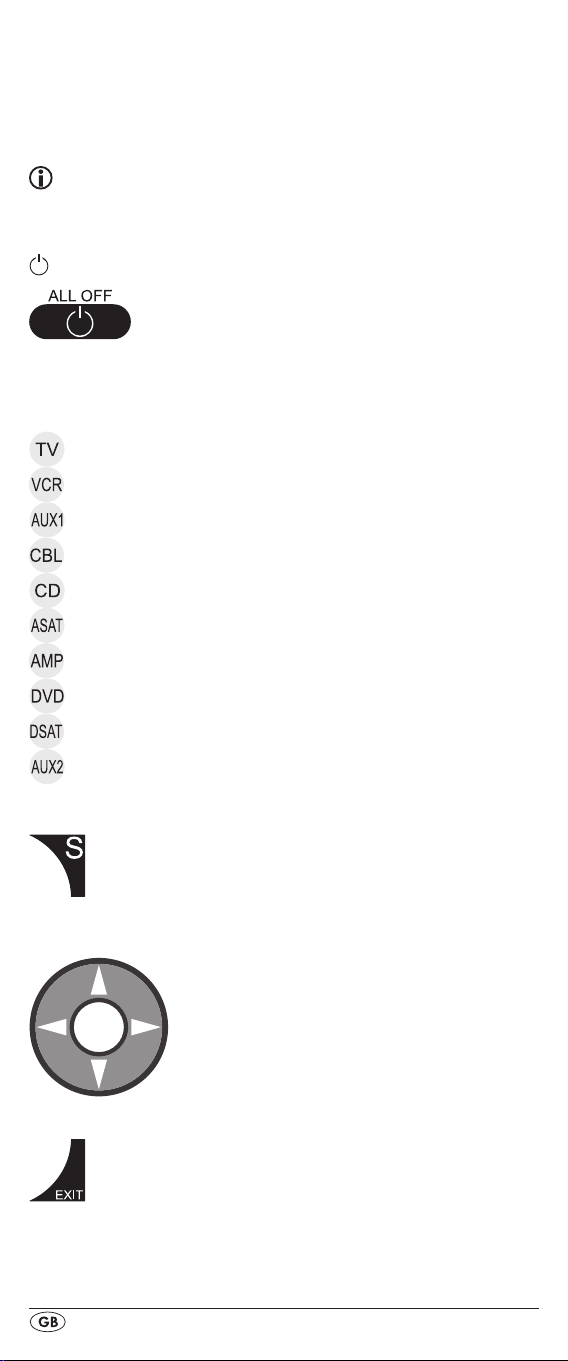
Buttons
Note:
All the functions described here can, of course, only be used
if they are supported by the device being controlled.
/ALL OFF button. w
Switch device on/o. hold down for approx.
5 seconds to switch all devices on/o.
Device buttons e
The device buttons are used to select the device that should
be operated.
Television
Video recorder
Accessory unit 1
Cable receiver
CD player
Analogue satellite receiver
Audio amplier
DVD player
Digital satellite receiver
Accessory unit 2
"S" button r
Hold down for 3 seconds to access the
SETUP menu.
Arrow buttons t
Move up, right, left and down in menus.
EXIT button y
Move a level backward in the menu.
- 6 -
Page 9

- 7 -
CH +/— buttons u
Change the reception channel.
MACRO button i
MACRO button i followed by a number
button o 1-4 activates a previously saved
chain of commands.
Number buttons o
Enter programme and device code numbers.
Button for one/two digit programme numbers a
For two digit programme numbers (depend-
ing on the device type) rst press
the a button then via the number buttons o
enter the programme number.
When pressed again the display becomes
single digit once more.
Teletext function buttons s
In teletext operation the buttons have the following
functions:
Access the teletext function
Stop automatic paging forward for
multi-page teletexts.
Enlarge page presentation
Screen text and TV image one upon
the other
To end the teletext function.
Note:
The function is only available in the European TV mode
and your TV device must have a teletext module.
In addition the CH+/- buttons u control the following
teletext functions:
CH +
Leaf one page forward
CH — Leaf one page backwards
AV button d
Switch to the AV input.
Page 10

Record/playback buttons f
The playback buttons f control devices such as DVD/CD
players and video recorders:
Record
Start playback
Stop Playback/Record/Wind
Pause playback
Wind forward
Rewind
Mute switching g
Switch sound on/o.
VOL+/— buttons h
Set volume (Volume).
MENU button j
Access the menu of the controlled device.
OK button k
You can conrm a menu selection with the OK
button.
FAV/EPG button l
The FAV/EPG button accesses the electronic pro-
gramme guide of the device and/or your previously
programmed favourite
stations.
SETUP - System settings
In the system settings you undertake the following:
•
Programming the remote control to the devices to be controlled
Settings for time of day, date, display contrast and
•
background illumination
Timer settings
•
The "learning" of designated button commands•
Setting up Macros•
Assigning favourites•
etc.•
On the following page you can see a summary of the menu
structure.
- 8 -
Page 11

- 9 -
Page 12

Code Setup (Programming the remote control)
3 Programming methods are available for the remote control:
Programming by brand code search, by automatic code
search and by direct code input (manual).
First you should use the brand code search since this method is
the fastest way of programming if the manufacturer of your device is itemized in the code list. As second is recommended the
direct code input followed by the automatic code search.
Programming by brand code search
With this method you select the brand and code direct via
the LCD display q.
Observe the following operational references to programme
the remote control
1. Press the device button e for the device that you want to
programme the remote control.
2. Hold down the S button r for a little longer than 3 sec-
onds. Carry out entries in the menu quickly because after
approx. 15 seconds without an entry the menu will be
ended.
3. In the LCD display q "CODE SETUP" appears. Press the
OK button k. "ENTER CODE" now appears in the LCD
display q. With the buttons t select "BRAND
CODE" and conrm with the OK button k.
4. Now appears the alphabetical rst brand name from the
list of pre-programmed devices.
5.With the 34 buttons t select the various brand names.
6. To make access easier you can skip directly to specic let-
ters of the alphabet with the number buttons o:
2 => A 3 => D 4 => G 5 => J
6 => M 7 => P 8 => T 9 => W
Example With button number 5 the display skips to the
letter "J". The rst brand is "JVC"*. If, for example, you
own a "Kenwood"* brand device, continue leang with
the 4 button t until this brand name appears. (* All
brand names used here are trademarks of the corre-
sponding manufacturer.)
7. The majority of manufacturers use several dierent codes
for the remote control. You must now ascertain which of
the available codes is best suited to your device. On the
right underneath the brand name the relevent code will
be shown in the LCD display q.
8.Point the remote control to the relevent device and press
the function buttons to test the code (except
OK k, or the number buttons o).
34t,
- 10 -
Page 13

- 11 -
9. If most of the buttons function press the OK button k to
save the setting. In the LCD display q "OK" appears.
Now the mode "BRAND CODE" appears again.
10. If, however, none or only a few of the buttons function
select with the
again as described in step 8.
11.With the EXIT button y you will move one level upwards
in the menu.
Repeat these operational steps for all devices that you would
like to control with the remote control.
or button t the next code and test
Programming by manual code input
In this mode the remote control can be programmed by direct
input of a code number. You can obtain the necessary code
number from the enclosed manufacturers directory with device
code list. In the event that the new code is invalid the last valid
programmed code will be restored.
1. Press the device button e for the device that you want to
programme the remote control.
2. Hold down the S button r for a little longer than 3 sec-
onds.
3. In the LCD display q "CODE SETUP" appears. Press the
OK button k.
display q.
4. In the LCD display q appears the presently used code for
the selected device. Now the rst digit of the code blinks
and waits for your code input. Enter the new four digit
code via the number buttons o.
5. If the entered code is valid for the selected device type
then the code will be saved. In the LCD display q "OK"
appears briey and then again "ENTER CODE". In the
event of failure the LCD display q shows briey "ERROR"
and waits for a new code entry. Then you repeat step 4.
6. With the EXIT button y you will move one level upwards
in the menu.
"ENTER CODE" now appears in the LCD
To access this function press the OK button k.
Programming by automatic code search
This process can take several minutes per device since all
codes for the selected device have to be gone through.
Therefore this method should only be used when the device
cannot be programmed via brand code search or direct
code input or if your device is not listed at all in the manufacturers directory with device code list.
Follow the steps listed below to carry out programming by
means of the automatic code search.
Page 14

1. Press the device button e for the device that is to be con-
trolled (i.e. VCR).
2. Switch the device that is to be controlled with the remote
control on. With VCR/DVD/CD devices please insert a
tape and/or disc.
3. Hold down the S button r for a little longer than 3 sec-
onds.
4. In the LCD display q "CODE SETUP" appears. Press the
OK button k. "ENTER CODE" now appears in the LCD
display q. Press the or button t until "SEARCH
CODE" is shown in the LCD display q. Point the remote
control to the device and then press the OK button k to
access the mode "automatic code search".
5. The search begins. Thereby the device sends, one after
the other, the code numbers in ascending order. This is
shown by a blinking infrared symbol 2@.
6. When the device reacts by switching o press immedi-
ately the OK button k to save the relevent code. The LCD
display q shows briey "OK".
Check to see if the majority of your device's functions can
7.
now be controlled with the remote contol. If yes you have
most probably found the correct code. In the event that a
few functions are not working you can start the automatic
code search again beginning with step 1.
8.
However if the device does not react any more you prob-
ably did not press the OK button k quick enough in step
6. Then press repeatedly the EXIT button y to exit the
menu and return to the standard display.
9. Now hold down the device button e of the device for
which you have just sought the relevent code. Below on
the right in the LCD display q will thereby be shown the
relevent code. Make a note of this number.
10. Then proceed as described in the preceding chapter
"Programming by manual code entry" and check to see
if the code with the next lowest number combination will
function.
Tips:
1. When code search is activated all buttons except OK k
and EXIT y are ignored.
2.Should the correct code be found, however the device's
original remote control did not have a POWER button
then it is possible that the device cannot be switched on
or o remotely. Then try the buttons 4 t, CH + u or
MUTE SWITCHING
1$.
3. If the automatic search has reached the end of the code
list it stops there. The display then returns to "SEARCH
CODE".
- 12 -
Page 15

- 13 -
System-Setup
Setting the time
The LCD display q shows you the time of day. You set this as
follows:
1. Hold down the S button r for a little longer than 3
seconds. The notice "CODE SETUP" appears. If appox.
15 seconds passes without an entry the device exits the
menu and returns to the standard display.
2. With the or button t select "SYSTEM SETUP" and
conrm with the OK button k.
3. In the LCD display q "TIME SETUP" appears. Conrm
with the OK button k.
"TIME" and the time format (24 HR) blinks.
4.With the or button t you can switch to the other
time format (12 HR AM/PM). Thereby "AM" stands for "ante
meridium" (= morning, 0:00 to 12:00 o'clock) and "PM"
stands for "post meridium" (= afternoon, 12:00 to 0:00
o'clock). Press the OK button k to conrm.
5.Now the hour indicator blinks. With the or button t
select the hour number for the present time of day and
press the OK button k.
6.Now the minute indicator blinks. With the or button
t select the minute number for the present time of day
and press the OK button k to save. The "TIME SETUP"
notice appears again.
7. To exit this or the following menus press repeatedly the
EXIT button y until the standard display appears in the
LCD display q.
The LCD display q now shows
Setting the date
The LCD display q shows you the date when you press the S
button r. You set the date in this way:
1. Hold down the S button r for a little longer than 3 sec-
onds. The notice "CODE SETUP" appears.
2.With the or button t select "SYSTEM SETUP" and
conrm with the OK button k.
3. In the LCD display q "TIME SETUP" appears. Press the
button t to change to "DATE SETUP". Conrm with the
OK button k.
4.In the display the year "2009" blinks. With the or
button t you can change the year and conrm with
the OK button k. With the or button t you can
change the now blinking month and conrm with the OK
button k. Now the day indicator blinks which you can
also change with the or button t.
5. To save press the OK button k. The "DATE SETUP"
notice appears again.
Page 16

Adjust contrast
You can set the display's contrast as follows:
1. Hold down the S button r for a little longer than 3 sec-
onds. The notice "CODE SETUP" appears.
2.With the or button t select "SYSTEM SETUP" and
conrm with the OK button k.
3.With the or button t select "CONTRAST SETUP"
and conrm with the OK button k.
4. In the LCD display q the contrast value now blinks which
you can set with the or button t.
Display readout:
0 = highest contrast:
15 = lowest contrast
5. With the OK button k you can save the desired setting.
The notice "CONTRAST SETUP" appears again.
Background Illumination
You can set the length of time that the background of the
LCD display q stays illuminated after the end of operation.
Thereby taking into account that the longer the illumination
remains lit the shorter the battery life will be.
1. Hold down the S button r for a little longer than 3 sec-
onds. The notice "CODE SETUP" appears.
2.With the or button t select "SYSTEM SETUP" and
conrm with the OK button k.
3.With the or button t select "BACKLIT SETUP" and
conrm with the OK button k.
4. In the LCD display q now blinks the second count for the
length of time that the light is to be left on which you can
set with the buttons t from 0 to 60. If you select
"0" the background illumination will shut o completely.
5. With the OK button k you can save the desired setting.
The notice "BACKLIT SETUP" appears again.
System reset
Via this function you can reset the URC to its factory default
settings. Thereby all settings made by you will be deleted.
1. Hold down the S button r for a little longer than 3 sec-
onds. The notice "CODE SETUP" appears.
2.With the or button t select "SYSTEM SETUP" and
conrm with the OK button
3.With the or button t select "SYSTEM RESET" and
conrm with the OK button k.
4. In the LCD display q now appears "CONFIRM RESET"
conrm the reset with the OK button k. All settings are
now deleted and the menu will end.
k.
- 14 -
Page 17

- 15 -
Timer Setup
The URC oers 2 timer modes, sleep timer and event timer.
Sleep timer
1. Press the device button e for the device that is to be con-
trolled (i.e. VCR).
2. Hold down the S button r for a little longer than 3 sec-
onds. The notice "CODE SETUP" appears.
3.Press the or button t until "TIMER SETUP" is
shown. Press the OK button k "TIMER SLEEP" appears in
the LCD display q.
with the OK button k.
4. Now, below to the right in the LCD display q blinks the
minutes for the remaining time of the selected device.
Set with the or button t the desired value from 1
to 99 minutes. Press the OK button k to conrm.
5. Position the remote control in such a way that your infra-
red signal can reach the device to be switched o. After
expiration of the set time the remote control will switch the
device o.
6. To check if the SLEEP timer is activated press the S button
r. Then below to the left in the LCD display q "SL" will
be shown.
Event timer
The remote control has 4 event timers available via which
you are allowed to send out specic series of button combinations at designated times.
1. Hold down the S button r for a little longer than 3 sec-
onds. The notice "CODE SETUP" appears.
2.With the or button t select "TIMER SETUP" and
conrm with the OK button k. "TIMER SLEEP" appears
in the LCD display q.
the desired memory slot "TIMER SETUP 1" to "TIMER
SETUP 4" and conrm with the OK button k.
3. Now the hour of the time of day, to which the desired
button combinations are to be carried out, blinks. Set with
the or button t the desired hour and press for conrmation the OK button k.
4. Now the minutes of the time of day, to which the desired
button combinations are to be carried out, blinks. Set with
the or button t the desired minutes and press for
conrmation the OK button k.
5. In the LCD display q you will see "TIMER X KEY" (X
stands for the desired timer). Now press the desired
device button e followed by the desired sequence of the
button commands.
6. Press the S button r to save your entry and to return to
the timer menu.
7. Procede in a similar manner in order to, if required,
programme the other timer memory slots also.
Conrm the selection of this function
With the or button t select
Page 18

Tips:
1. Per timer memory slot a maximum of 14 buttons can be
programmed. After entry of the 14th button the sequence
will be automatically saved and "FULL" is shown in the
LCD display q.
2. In this menu also the device will return to the standard dis-
play after approx. 15 seconds without an entry.
Learn Setup
The Universal remote control (URC) can learn and save button signals of an original remote control. If the URC does not
work after applying the programming methods already described or cannot carry out all commands please attempt to
teach the URC with the help of the original remote control.
•
Use new batteries for the URC and the original remote
control.
Maintain a distance of at least one metre from other light
•
sources. The light sources could disrupt the infrared transmission.
Place the URC and the original remote control at a dis-
•
tance of 20 to 50 mm from each other on an even surface
so that the infrared diodes 1( are facing each other.
Tips:
1. Do not use the following buttons for the learn function: all
device buttons e, MACRO i, S button r, EXIT y.
2. When teaching please do not release the button of the
original remote control until "SUCCESS" or "LEARN
ERROR" appears in the LCD display q.
3. If when teaching, during the notice "LEARNING", no
button is pressed on the original RC after 25 seconds the
learn menu will end. This mode can not be ended
by pressing a button on the URC.
4. If the memory is full the LCD display q shows "LEARN
FULL" and the learn mode will end.
5. With the EXIT button y you return to the previous status
(except with a notice of "LEARN KEY" and/or "LEARNING").
Code learn function
1. Press the device button e for the device that the URC
should learn a button code.
2. Hold down the S button r for a little longer than 3 sec-
onds. The notice "CODE SETUP" appears.
3. With the or button t select the menu "LEARN
SETUP" and then press the OK button k.
4. In the LCD display q "LEARN SET" appears. Then press
the OK button k.
pears.
In the LCD display q "LEARN KEY" ap-
- 16 -
Page 19

- 17 -
5. First press the button on the URC that is to be taught. In the
LCD display q "LEARNING" appears. The URC now waits
for the infrared signal from the original remote control.
Note:
Should the notice not change to "LEARNING" you have
selected a button for which no button code can be
taught.
6. Point the infrared sensors 1( of both remote controls
towards each other.
7. Now hold down the desired button of the original
remote control until "SUCCESS" or "LEARN ERROR"
appears in the display q of the URC.
8. If in the LCD display q "SUCCESS" appears (process
successful), you can teach further buttons begining with
step 5. If "LEARN ERROR" appears (process unsuccessful)
repeat the process in any case from step 5.
9. To stop the learn process press, during the notice "LEARN
SET", the S button then press repeatedly the EXIT button y
until the standard display appears in the LCD display q.
During the notice "LEARN KEY" and/or "LEARNING" simply allow 25 seconds to pass without any operation then
the device will end the menu.
Delete all of a device's programmed buttons
1. Press the device button e for the device that you want
to delete all taught button codes.
2. Hold down the S button r for a little longer than 3 sec-
onds. The notice "CODE SETUP" appears.
3.With the or button t select the menu "LEARN
SETUP" and then press the OK button k. In the LCD
display q "LEARN SET" appears.
4.With the or button t select "LEARN CLEAR"
(taught delete) and conrm with the OK button k. In
the LCD display q "CONFIRM CLEAR" (conrm delete)
appears.
5. Conrm with the OK button k.
"SUCCESS" appears. All programmed buttons for the selected device are deleted. Finally the menu will automatically end.
In the LCD display q
Macro Setup
With the MACRO function up to 16 button commands can
be carried out with the press of a single button, that is to say,
several previously saved control commands can be deleted
with one MACRO button. There are 4 Macro memory slots
available for you.
Page 20

To programme a Macro
For Macro programming proceed as follows:
1. Hold down the S button r for a little longer than 3 sec-
onds. The notice "CODE SETUP" appears.
2.With the or button t select "MACRO SETUP" and
conrm with the OK button k. In the display "MACRO
SETUP 1" appears.
3.With the or button t select the memory slot to be
programmed (MACRO SETUP 1 - 4) and conrm with the
OK button k.
4. In the LCD display q "MACRO STEP" appears. Now
press, one after the other, the desired buttons (max. 16).
The sequence should begin with a device button e.
5. When the maximum number of button commands is
reached the LCD display q shows "FULL".
6. Save the entry with the S button r. In the LCD display q
"MACRO SETUP" appears.
7. If, with the selection of the Macros to be programmed
(step 3), you select a memory slot that is already occupied
the existing Macro will be overwritten.
8. Repeat the process from step 3 to create further Macros.
9. With the EXIT button y you move a level upwards in the
menu except during the entry of the button commands.
Tips:
1. A maximum of 16 button commands can be saved in a
Macro. After entering the 16 button commands the Macro is automatically saved and in the LCD display q "FULL"
appears.
2. To exit the mode without saving allow approx. 15 sec-
onds to pass without an entry.
3. In the mode "MACRO STEP" you can only return to the
previous status with the S button r.
Example: You want to save a command chain in a Macro.
We begin in the mode "MACRO STEP".
Desired command chain: Switch on TV => switch to the AV
input => switch on DVD and playback.
In the mode "MACRO STEP", for this you enter the following
button commands:
=> => => => =>
Execute a Macro
To execute a pre-programmed Macro proceed as follows:
1. Press the MACRO button i.
2. With the corresponding number button o you access the
desired Macro (1-4). Example: If Macro 3 is to be implemented press rst the Macro button i and then, within 5
seconds, the number button "
".
- 18 -
Page 21

- 19 -
To delete all Macros
To delete all pre-programmed Macros proceed as follows:
1. Hold down the S button r for a little longer than 3 sec-
onds. The notice "CODE SETUP" appears.
2.With the or button t select "MACRO SETUP" and
conrm with the OK button k. In the display "MACRO
SETUP 1" appears.
3.With the or button t select "MACRO CLEAR" and
conrm with the OK button k.
4. In the LCD display q "CONFIRM CLEAR" (conrm
delete) appears. Conrm the delete process with the
OK button k.
All Macros are now deleted and the menu will end.
Tips:
1. When the LCD display q shows "CONFIRM CLEAR" you
can stop the delete process with the EXIT button y.
2. Individual Macros can not be deleted they can only be
overwritten.
The LCD display q shows "SUCCESS".
Favourites channel
Note:
With this function you can save your preferred stations as
favourites.
To programme favourites
Your favourite stations are saved as follows:
1. Press the device button e for the device that you want to
save a favourite.
2. Hold down the S button r for a little longer than 3 sec-
onds. The notice "CODE SETUP" appears.
3.With the or button t select "FAV CH SETUP" and
conrm with the OK button k. In the display "FAV CH
SETUP 1" appears.
4.With the or button t select the memory slot to be
programmed (FAV CH SETUP 1 - 4) and conrm with the
OK button k.
5. In the LCD display q "FAV CH STEP" appears. Now
press, one after the other, the buttons (max. 4) for access
to your desired favourite stations.
6. When the maximum number of button commands is
reached the LCD display q shows "FULL".
7. Save the entry with the S button r.
"FAV CH SETUP" appears.
8. If, with the selection of the favourites to be programmed
(step 4), you select a memory slot that is already occupied the existing favourite will be overwritten.
9. Repeat the steps to apply further favourites.
10.With the EXIT button y you move a level backwards in the
menu except during the entry of the button commands.
In the LCD display q
Page 22

Note:
The input of the channel numbers can vary according to
the model and brand of the selected devices. If necessary,
with multi-digit channel numbers you must rst press the
button a.
To access favourites
To access a pre-programmed favourite press the FAV/EPG
button l followed by the corresponding number button for
the desired memory slot (1 - 4).
Delete All FAV channels
To delete all pre-programmed favourites proceed as follows:
1. Hold down the S button r for a little longer than 3 sec-
onds.
2.With the or button t select "FAV CH SETUP" and
conrm with the OK button k. In the display "FAV CH
SETUP 1" appears.
3.With the or button t select "FAV CH CLEAR" and
conrm with the OK button k.
4. In the LCD display q "CONFIRM CLEAR" (conrm delete)
appears. Conrm the delete process with the OK button k.
The LCD display q shows "SUCCESS". All favourites are
now deleted and the menu will end.
Tips:
1. When the LCD display q shows "CONFIRM CLEAR" you
can stop the delete process with the EXIT button y.
2. Individual favourites can not be deleted they can only be
overwritten.
Volume control
Vol +/—, (Mute switching)
Press the "VOL+" button to increase the volume. With the
"VOL —" button you reduce the volume. To mute the sound
press the
sound back on.
When you activate the VOL +/— buttons h on the URC basically the volume adjustment on the TV device is addressed,
regardless thereof, which device button e was pressed previously. This admittedly does not apply to the devices "AMP"
and "DSAT" since you can assume that
these devices have their own volume adjustment.
-button g. A further press of this button turns the
- 20 -
Page 23

- 21 -
For operation
To operate one of the programmed devices with the URC >
rst press the corresponding device button e.
Then point the URC to this device and press the desired
button.
> o exactly as you do with the
Put the number buttons
original remote control. Before you make a two digit
entry press, if necessary, the
> l to start the electronic pro-
Press the FAV/EPG button
gramme guide of a device equipped with this function.
> rthe date will be su-
Whilst you hold down the S button
perimposed below to the right in the LCD display q.
> e the
Whilst you hold down one of the device buttons
active code for this device will be superimposed below to
the right in the LCD display q.
> j you access the dialogue for the
Via the MENU button
setting of the respective target device.
All OFF
Tips:
With the button ALL OFF (all o) w all devices that
are switched on can be automatically switched o. This func-
tion can switch on again devices that have already been
switched o (depending on the device). For this hold down
the ALL OFF button w for approx. 5 seconds. This will only
function under the following circumstances:
button a.
1. A visible connection exists between all the devices and
the URC.
2. Automatic code search, brand code search and MACRO
function are not active.
3. All target devices must be suitable for remote control
switch o.
To again switch on all devices automatically hold down once
more the button
w until all devices are switched on.
Faults / Remedies
Your device does not react to the URC.
>
Check the batteries. They must have enough voltage and
be properly installed.
> e for
Firstly have you pressed the correct device button
the desired target device?
>
Check to see that the correct code is programmed in for
the target device (see section "Code Setup").
The URC is transmitting the commands incorrectly.
> e to set the URC
Press the corresponding device button
to the correct mode.
>
The batteries must have enough voltage and be properly
installed.
Page 24

It is possible that you are using the wrong code. Start the >
brand code search, the automatic code search or the direct code input (manual).
The URC does not change the station on the device.
> e to set the URC
Press the corresponding device button
to the correct mode.
>
In the event that the original RC does not have a "-/- -"
button, change the programme with the CH+/— buttons u
or the number buttons o.
>
If this also does not work the child protection for the
target device could be activated.
Some buttons on the URC do not function properly.
>
It is possible that your URC does not have all of the functions that are on the device's original remote control.
>
It is possible that you have not programmed in the optimal
code. Search for a code that supports more of the target
device's functions.
The URC stops reacting after a button is pressed.
>
The batteries must have enough voltage and be properly
installed.
>
Point the URC towards your device.
The LCD display q shows nothing.
>
The batteries must have enough voltage and be properly
installed.
>
The contrast could be set too low. Increase the contrast
setting.
Disposal
Do not dispose of the device in your normal
domestic waste. This product is subject to the
European directive 2002/96/EC.
Universal remote control
Have the universal remote control or parts of it disposed
•
of by a professional disposal company or by your communal disposal facility.
Observe the currently applicable regulations. In case of
•
doubt contact your disposal facility.
Batteries/rechargeable batteries
Used batteries/rechargeable batteries may not be dis-
•
posed of in household waste.
Batteries can contain poisons which are damaging to the
•
environment. Therefore, dispose of the batteries/rechargeable batteries in accordance with statutory regulations.
- 22 -
Page 25

- 23 -
Every consumer is legally obliged to surrender batteries/•
rechargeable batteries to a community collection centre
in their district or to a dealer. The purpose of this obligation is to ensure that batteries are disposed of in a nonpolluting manner.
Only dispose of batteries when they are fully discharged.
•
Dispose of packaging materials in an environmentally
responsible manner.
CE- Conformity
This device satises the fundamental requirements
and other relevant regulations of the EMC Directive
2004/108/EC.
Importer
KOMPERNASS GMBH
BURGSTRASSE 21
44867 BOCHUM, GERMANY
www.kompernass.com
Technical data
Controllable devices: 10
Dimensions
L x W x H: 212 x 50 x 23 mm
Weight : 116 g (without batteries)
Infrared LED: Laser class 1
Power supply
Batteries: 2 x 1.5 V, type AAA/LR03 (micro)
(supplied)
Important Warranty Notices
The warranty for this device is for 3 years from the date of
purchase. Should you have grounds for complaint, despite
our high quality standards, please contact our Service Hotline. In the event that your complaint cannot be resolved over
the telephone, you will receive from them
•
a processing number (RMA number) as well as
an address to which you can send your device for repair •
under warranty.
In the case of a mail-in shipment please enclose a copy of
the purchase receipt (sales slip). The device must be securely
packed and the RMA number clearly visible. Shipments without an RMA number can not be processed.
Page 26

Note: The warranty provisions cover only material or
factory defects.
The warranty provisions do not cover
•
parts subject to wear and tear
for damage to breakable parts, such as switches or •
rechargeable batteries.
This product is for private use only and is not intended for
commercial use. The warranty is void in the case of abusive
and improper handling, use of force and internal tampering
not carried out by our authorized service branch. Your statutory warranty claims are not restricted by this warranty.
DES Ltd
Tel.: 0870/787-6177
Fax: 0870/787-6168
e-mail: support.uk@kompernass.com
Kompernass Service Ireland
Tel: 1850 930 412
Standard call rates apply. Mobile operators may vary.
e-mail: support.ie@kompernass.com
(0,082 EUR/Min.)
- 24 -
 Loading...