

Page 1

IAN 275078
DashboarD Camera Cr 5 a2
DashCam
Bedienungsanleitung und Sicherheitshinweise
Видеорегистратор
Ръководство за потребителя и указания за безопасност
Cameră viDeo pentru maşină
Instrucţiuni de utilizare și indicaţii de siguranţă
DashboarD Camera
Operating instructions and safety instructions
Page 2

GB Operating instructions and safety instructions Page 1
RO Instrucţiuni de utilizare și indicaţii de siguranţă Pagina 27
BG Ръководство за потребителя и указания за безопасност Cтраница 53
DE / AT / CH Bedienungsanleitung und Sicherheitshinweise Seite 79
Before reading, unfold the page containing the illustrations and familiarise yourself with all functions of the device.
Înainte de a citi instrucţiunile, priviţi imaginile şi familiarizaţi-vă cu toate funcţiile aparatului.
Преди да прочетете отворете страницата с фигурите и след това се запознайте с всички
функции на уреда.
Klappen Sie vor dem Lesen die Seite mit den Abbildungen aus und machen Sie sich anschließend
mit allen Funktionen des Gerätes vertraut.
Page 3

a
e
b
C
d
Page 4

IAN 275078
Kompernass Handels GmbH
BURGSTRASSE 21
44867 BOCHUM
DEUTSCHLAND / GERMANY
www.kompernass.com
Last Information Update · Versiunea informaţiilor
Актуалност на информацията · Stand der Informationen:
03 / 2016 · Ident.-No.: CR5A2-022016-3
Page 5

CR 5 A2
GB│CY
│
1 ■
Contents
Introduction ...................................................2
Information concerning these operating instructions ...............................2
Copyright ................................................................2
Notes on trademarks .......................................................2
Intended use .............................................................2
Warnings used ............................................................3
Safety . . . . . . . . . . . . . . . . . . . . . . . . . . . . . . . . . . . . . . . . . . . . . . . . . . . . . . . . 4
Basic safety guidelines ......................................................4
Possible infringements of the rights of third parties ................................6
Controls.......................................................7
Contents of package and transport inspection ...................................8
Disposal of packaging materials ..............................................8
Initial operation ................................................9
Inserting/removing the microSD card ..........................................9
Mounting the camera on the windscreen ......................................10
Providing electric power ...................................................10
Handling and operation ........................................11
Switching on and off, making settings .........................................11
Basic settings ............................................................11
Setup menu ...........................................................11
Video standby mode ...................................................14
Start / end recording ....................................................14
Photo standby .........................................................17
Taking photos .........................................................17
Playback mode ........................................................18
Showing recordings on an external monitor ....................................21
Transferring recordings to a computer .........................................22
Resetting the device .......................................................22
Changing the fuse ........................................................22
Cleaning .....................................................23
Troubleshooting...............................................23
Fault causes and rectification ................................................23
Storage / Disposal .............................................24
Storage when not in use ...................................................24
Disposal of the device .....................................................24
Appendix ....................................................24
Notes on the EU-Declaration of Conformity ....................................24
Technical data ...........................................................25
Warranty ...............................................................26
Service .................................................................26
Importer ................................................................26
Page 6

CR 5 A2
■ 2│GB
│
CY
Introduction
Information concerning these operating instructions
Congratulations on the purchase of your new device.
You have selected a high-quality product. The operating instructions are part of this
product. They contain important information on safety, usage and disposal.
Before using the product, familiarise yourself with all handling and safety guidelines.
Use the product only as described and for the range of applications specified. Keep
these operating instructions as a reference and store them near the product. Please
pass on all documentation incl. these operating instructions on to any future owner(s)
if you sell this product or give it away.
Copyright
This documentation is subject to copyright protection.
Any copying or reproduction, including extracts thereof, and the reproduction of
images (even in a modified state), is permitted only with the written authorisation of
the manufacturer.
Notes on trademarks
USB® is a registered trademark of USB Implementers Forum, Inc.
All other names and products may be trademarks or registered trademarks of their
respective owners.
Intended use
This cockpit recorder is an information electronics device designed to record digital
photos and videos in motor vehicles, particularly while on the road. It is not intended
for any other use. This device is not intended for use in commercial or industrial
environments. The manufacturer accepts no responsibility for damage caused by
failure to observe these instructions, improper use, incompetent repairs, making
unauthorised modifications or for using unapproved replacement parts. The risk shall
be borne solely by the user.
Page 7
CR 5 A2
GB│CY
│
3 ■
Warnings used
The following warnings are used in these operating instructions:
DANGER
A warning at this hazard level indicates an imminently hazardous
situation.
If the dangerous situation is not avoided, serious injuries or death may follow.
► Follow the instructions in this warning to avoid the risk of serious injury or death.
WARNING
A warning at this hazard level indicates a potentially hazardous
situation.
Failure to avoid this hazardous situation could result in physical injury.
► Follow the instructions in this warning to prevent physical injury.
CAUTION
A warning at this hazard level indicates potential material damage.
Failure to avoid this situation could result in material damage.
► Follow the instructions in this warning to prevent material damage.
NOTE
► A note indicates additional information that eases device handling.
Page 8

CR 5 A2
■ 4│GB
│
CY
Safety
In this section, you will receive important safety advice relating to device handling.
The device complies with the statutory safety regulations. Improper use may result in
personal injury and material damage.
Basic safety guidelines
To ensure safe handling of the device, follow the safety guidelines set out below:
■ Prior to use, check the device for visible, external damage. Do not operate an
device that has been damaged or dropped.
■ If the cables or connections are damaged, have them replaced by an authorised
specialist or customer service.
■ All repairs must be carried out by authorised specialist companies or by the
Customer Service department. Failure to make proper repairs can put the user at
risk. Warranty entitlement will also lapse.
■ Defective components must always be replaced with original replacement parts.
Compliance with the safety requirements can only be guaranteed by using these
replacement parts.
■ Never open the device, and never carry out any repairs yourself.
■ Protect the device from moisture, spray and dripping water and penetration by
liquids.
■ Never subject the device to extreme heat or humidity. This applies especially to
storage in a car. If the car is stationary for long periods and the weather is
warm and sunny, temperatures of more than 40°C can arise in the car interior
and the glove compartment. Remove electrical and electronic devices from the
vehicle.
■ When fitting the camera and accessories, ensure that it does not interfere with
the steering, braking or the operation of other vehicle systems (such as airbags)
and does not restrict your field of view when driving.
DANGER
► Do not place the car cradle in or near the expansion area of the airbag, since
the cradle could be flung through the vehicle interior in the event of airbag
deployment and cause serious injuries.
WARNING
► The camera should not be mounted in such a way that you or other passengers
could be hit by the camera in the event of an accident. This could cause serious
injury.
Page 9

CR 5 A2
GB│CY
│
5 ■
■ Children and people who, due to their physical, intellectual, motor or sensory ca-
pabilities, are incapable of operating the device safely may only use the device
under the supervision or direction of a responsible person.
DANGER
► Packaging materials must be kept out of the reach of children and should not
be used as playthings. Risk of suffocation.
■ Do not allow children to use the device unless they are being supervised. Child-
ren are not always able to correctly recognise potential dangers. Children must
not play with the appliance.
■ Do not place any objects on the device.
■ Do not operate the device close to open flames (e.g. candles).
■ If you notice a burning smell or smoke coming from your device, disconnect
it from the power supply immediately.
WARNING
► Under no circumstances should the smoke be inhaled as this could be harmful
to your health.
■ Check regularly to ensure that the suction cup is securely attached to the wind-
screen. This is especially important in areas where extreme outside temperature
fluctuations occur.
■ All of the applicable laws in your location must be observed. The use of a cock-
pit camera is banned in some countries and may constitute a criminal offence.
The camera should not be operated while driving. Traffic safety must ALWAYS
take priority whilst driving. Use this device only if it is not like to lead to any
hazard during driving situations.
DANGER
► The device contains a lithium-ion battery. Therefore, the device must not be
thrown into the fire. There is a risk of explosion!
■ Do not exert any pressure on the display. If it should break, touching the sharp
edges could cause injury.
Page 10

CR 5 A2
■ 6│GB
│
CY
Possible infringements of the rights of third parties
Please note the following when using the cockpit camera:
Copyright protection
In principle, everyone has the right to pictures of themselves. According to copyright
law, pictures of people may only be published without their permission if the affected
person appears merely as an incidental feature in a landscape or other location. The
question as to whether a person is merely an incidental feature must be ascertained
on a case by case basis.
Protection of privacy
The privacy of others may not be infringed by any recorded images. Do not set up the
camera pointing at the garden or an entrance of a neighbouring residence, even if
these locations are easily visible from your own vehicle or from public places. This
does not a constitute a right to publish these views.
Personal determinability
Personal determinability exists when it can be established that a certain person was
at a certain location at a certain time. This identification can be made by means of
an identifier related to a specific person, e.g. a car number plate. Personal determinability of persons is to be avoided.
Surveillance cameras at the workplace
Surveillance at the workplace is subject to particularly strict legislation in Germany.
Employers should not use surveillance cameras in the workplace in any cases where
this could lead to a possible infringement of legal rights.
The respective legal requirements of the country in which the camera is being used
should always be observed to avoid possible infringements of the rights of third
parties. Due to the possible violation of third party rights, it is illegal to publish
recordings featuring strangers or vehicle license plates without authorisation,
e.g. on the Internet. The recordings may only be used for providing evidence in the
event of an accident.
Page 11
CR 5 A2
GB│CY
│
7 ■
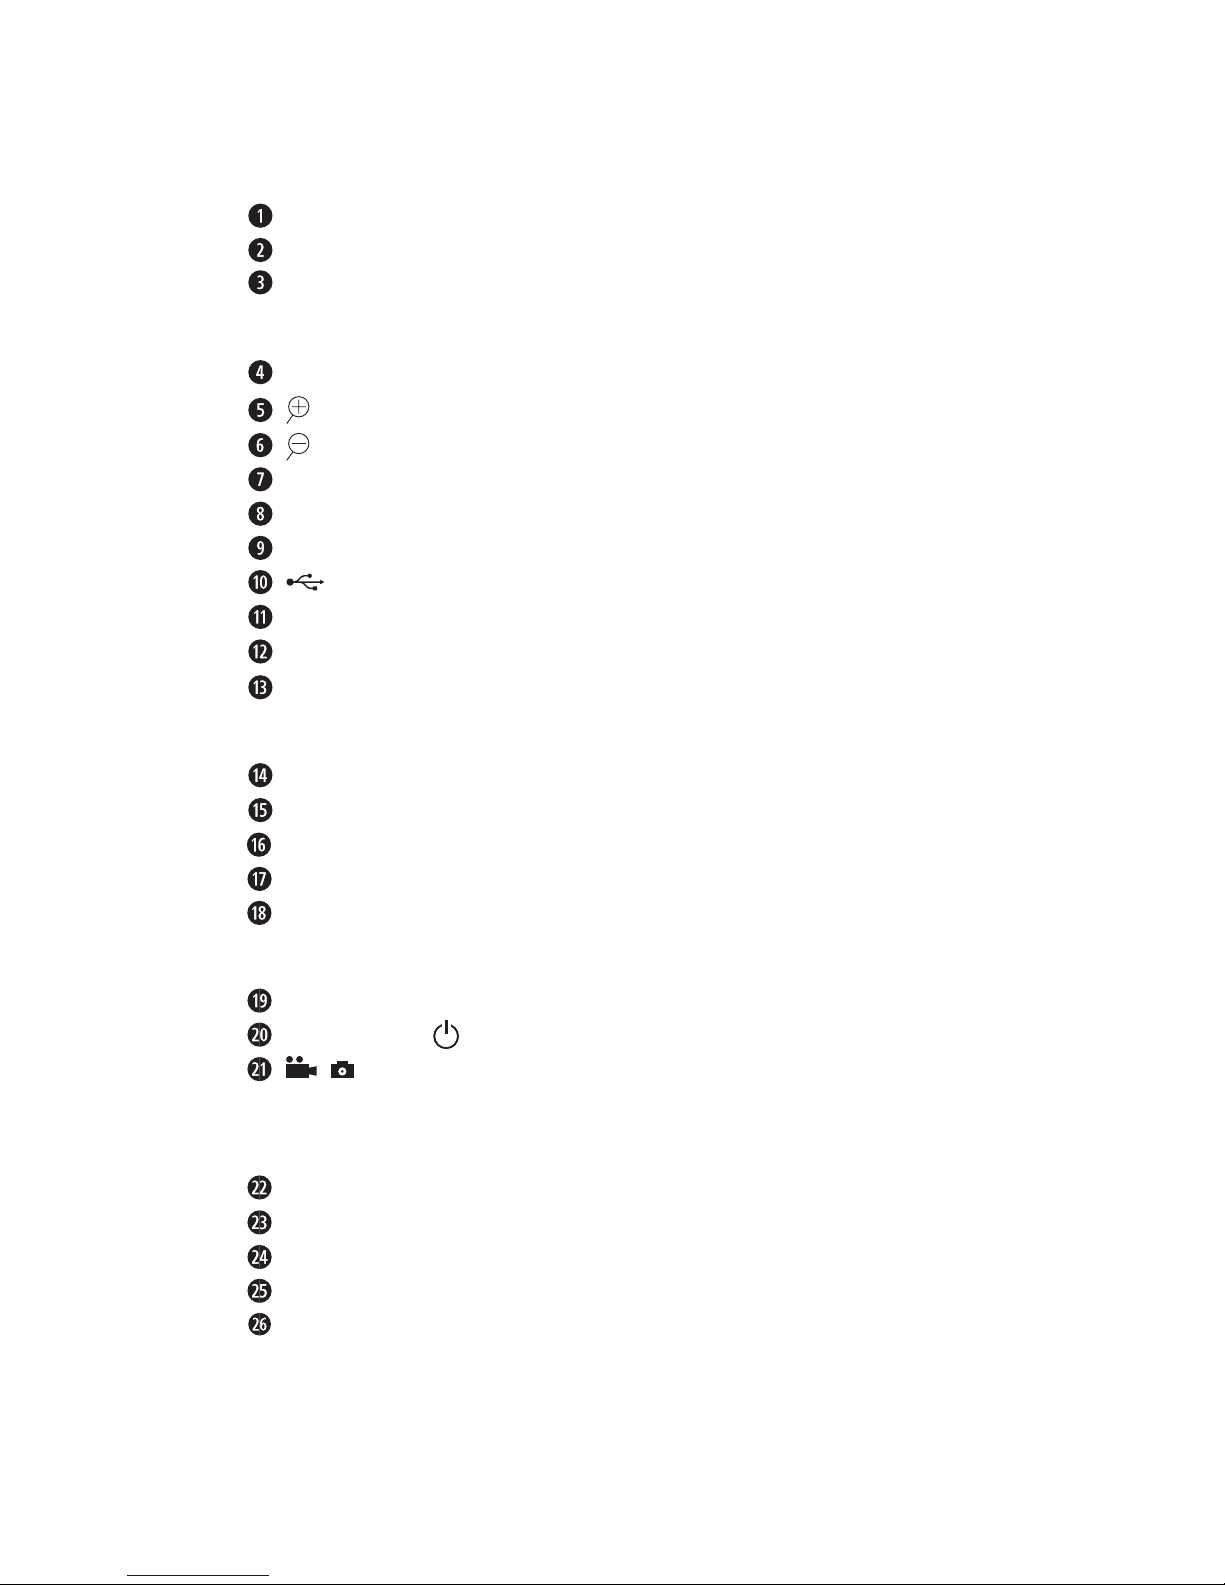
Controls
(For illustrations see the fold-out page)
Figure A:
Cradle with suction cups
Locking lever
Knurled screws for three-dimensional locking
Figure B:
Camera lens
/ ▲ button
/ ▼ button
MENU button
MODE button
Microphone
Mini-USB port
Reset opening
Loudspeaker
Infrared LEDs
Figure C:
Operating display
Cover
Mini-HDMI connection
microSD card slot
Screen
Figure D:
Thread for the tripod mount
On/Off button
/ button to start/stop the video recording, to trigger a photo or
call up menu items
Illustration E:
USB socket for power supply via the in-car adaptor
Operating light
12/24 V car adapter
USB to mini-USB cable
Operating instructions
Page 12

CR 5 A2
■ 8│GB
│
CY
Contents of package and transport inspection
Please check the contents of the package (see fold-out page).
The following components are included in delivery:
● Cockpit recorder CR 5 A2
● Cradle with suction cups
● 12/24 V car adapter
● USB to mini-USB cable
● These operating instructions
♦ Remove all the parts of the device and the operating instructions from the
packaging and then check the contents for completeness and visible damage
(see fold out page).
♦ Remove all packing material and the protective film from the screen
and
camera lens .
NOTE
► If the consignment is incomplete or damaged due to defective packaging or
carriage, contact the Service hotline (see the Service section).
Disposal of packaging materials
The packaging protects the device from damage during carriage. The packaging
materials have been selected in accordance with environmentally congruent and
disposal-specific parameters and are, therefore, recyclable.
Returning the packaging to the materials cycle conserves raw materials and reduces
the amount of waste that is generated. Dispose of packaging materials that are no
longer needed in accordance with applicable local regulations.
NOTE
► If possible, keep the original packaging of the device during the warranty
period, so that the device can be packed properly for returning in the event of
a warranty claim.
Page 13
CR 5 A2
GB│CY
│
9 ■
Initial operation
Inserting/removing the microSD card
CAUTION
► Do not install or remove the microSD card (not supplied) while the device is
switched on. This can cause loss of data on the microSD card.
♦ Insert a microSD card into the microSD card slot
so that the golden contacts
are facing toward the display. Press the microSD card in until it locks into place.
♦ To remove the microSD card, gently press the edge of the microSD card. The
microSD card is ejected slightly and can be removed from the device.
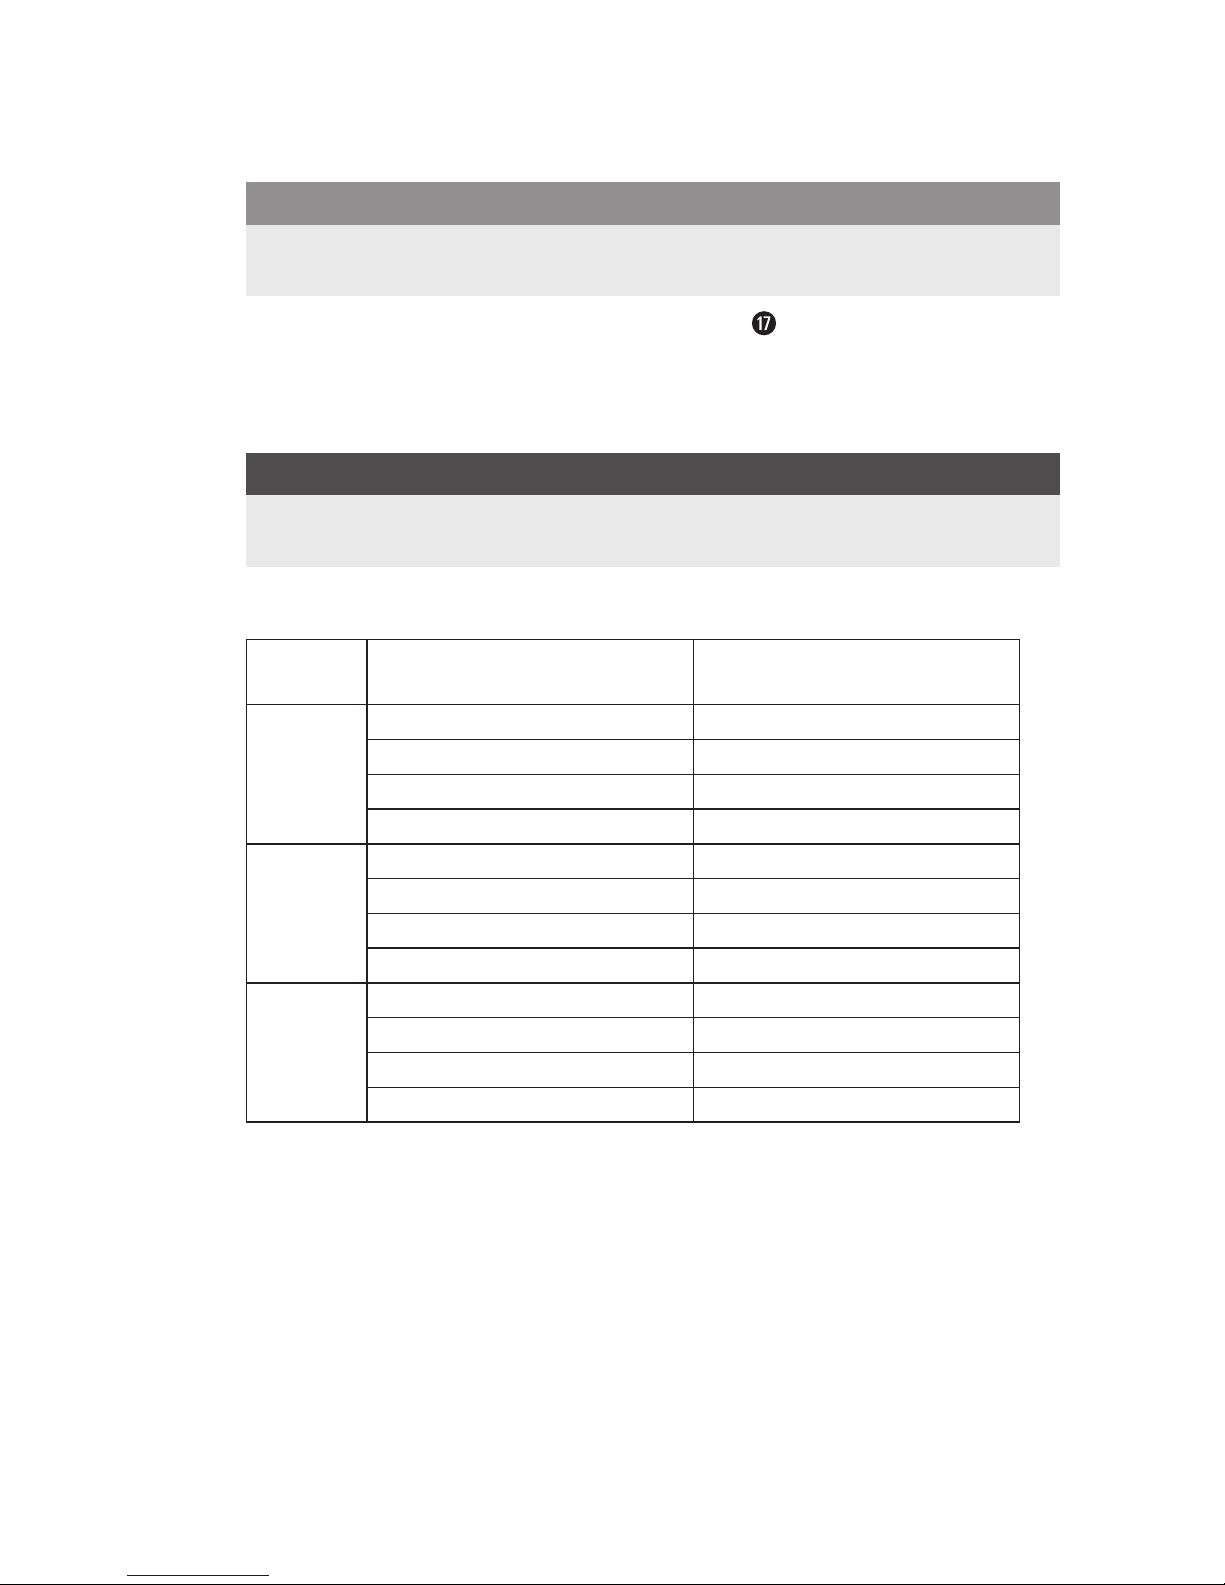
NOTE
► The camera does not have any internal memory. Therefore, recordings can only
be made with a memory card inserted.
You can find the maximum recording time depending on the storage capacity
of the microSD card and the selected resolution in the following table.
Resolution
Storage capacity of the
microSD card
Approximate recording time
1080p
4 GB approx. 0 hrs. 19 min.
8 GB approx. 0 hrs. 41 min.
16 GB approx. 1 hr. 21 min.
32 GB approx. 2 hrs. 41 min.
720p
4 GB approx. 0 hrs. 32 min.
8 GB approx. 1 hr. 06 min.
16 GB approx. 2 hr. 12 min.
32 GB approx. 4 hrs. 22 min.
480P
4 GB approx. 0 hrs. 47 min.
8 GB approx. 1 hr. 37 min.
16 GB approx. 3 hrs. 12 min.
32 GB approx. 6 hrs. 23 min.
Page 14
CR 5 A2
■ 10│GB
│
CY
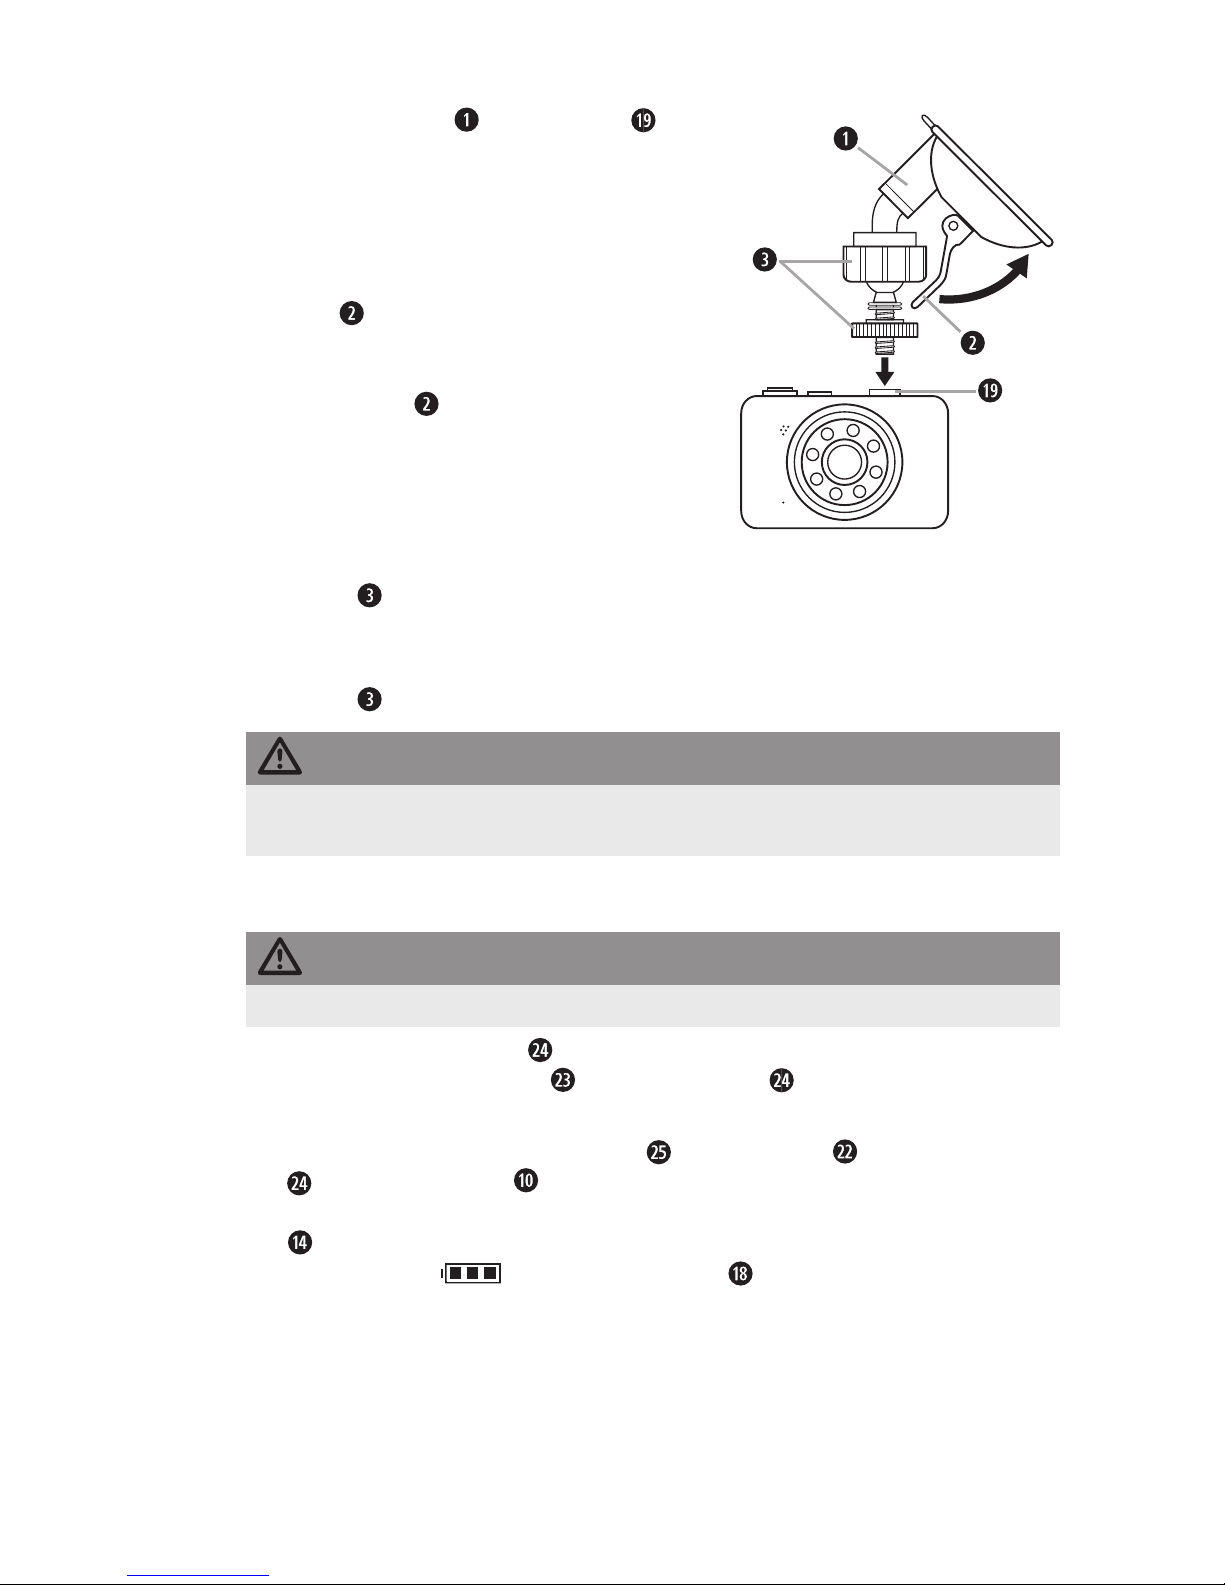
Mounting the camera on the windscreen
1) Screw the cradle into the thread of
the camera Position the suction cup on the
windscreen. Ensure that the suction cup is
pressed on flat.
2) Place the suction cup firmly against the windscreen and press the suction cup locking
lever
downwards towards the windscreen.
This creates suction, and the suction cup is
pulled tightly against the windscreen. Pull the
locking lever in the opposite direction to
release the suction cup from the windscreen.
The suction cup has a tab at the side, which
makes it easier to remove.
3) After attaching the camera with the suction
cup on the windscreen, loosen the knurled
screws
and adjust the camera as per your
wishes.
4) Once you have found the desired position and orientation, retighten the knurled
screws
.
CAUTION
► The camera must be positioned so that the driver's field of vision is not
obscured.
Providing electric power
CAUTION
► Use only the supplied car adapter to power your device.
1) Connect the car adapter
to your vehicle's on-board power supply (cigarette
lighter). The operating light
on the car adapter indicates operational
readiness when the socket is live.
2) Connect the supplied mini-USB cable
to the USB port on the car adapter
and the USB socket of the camera. As soon as the camera is powered by
the on-board power supply, the video recording starts and the operating display
lights up red. Once the internal backup battery is charging, the battery
charger symbol appears on the screen .
Page 15
CR 5 A2
GB│CY
│
11 ■
CAUTION
► In vehicles in which the cigarette lighter also works with the ignition switched off,
the device must be disconnected from the cigarette lighter socket after use.
Otherwise, the vehicle battery may be discharged over a long period of time,
since the device also uses power when it is idle. The vehicle's engine will no
longer start.
► In vehicles in which the cigarette lighter is not switched off, the recording is not
interrupted. In this case, you will need to switch off the camera manually.
Handling and operation
In this chapter you will receive important information for the handling and operation of
the device.
Switching on and off, making settings
Press the on/off button to switch on the device. The camera image is displayed on
the screen
. The device is now in video standby mode.
To switch off the device, press and hold the on/off button
for 3 seconds.
Basic settings
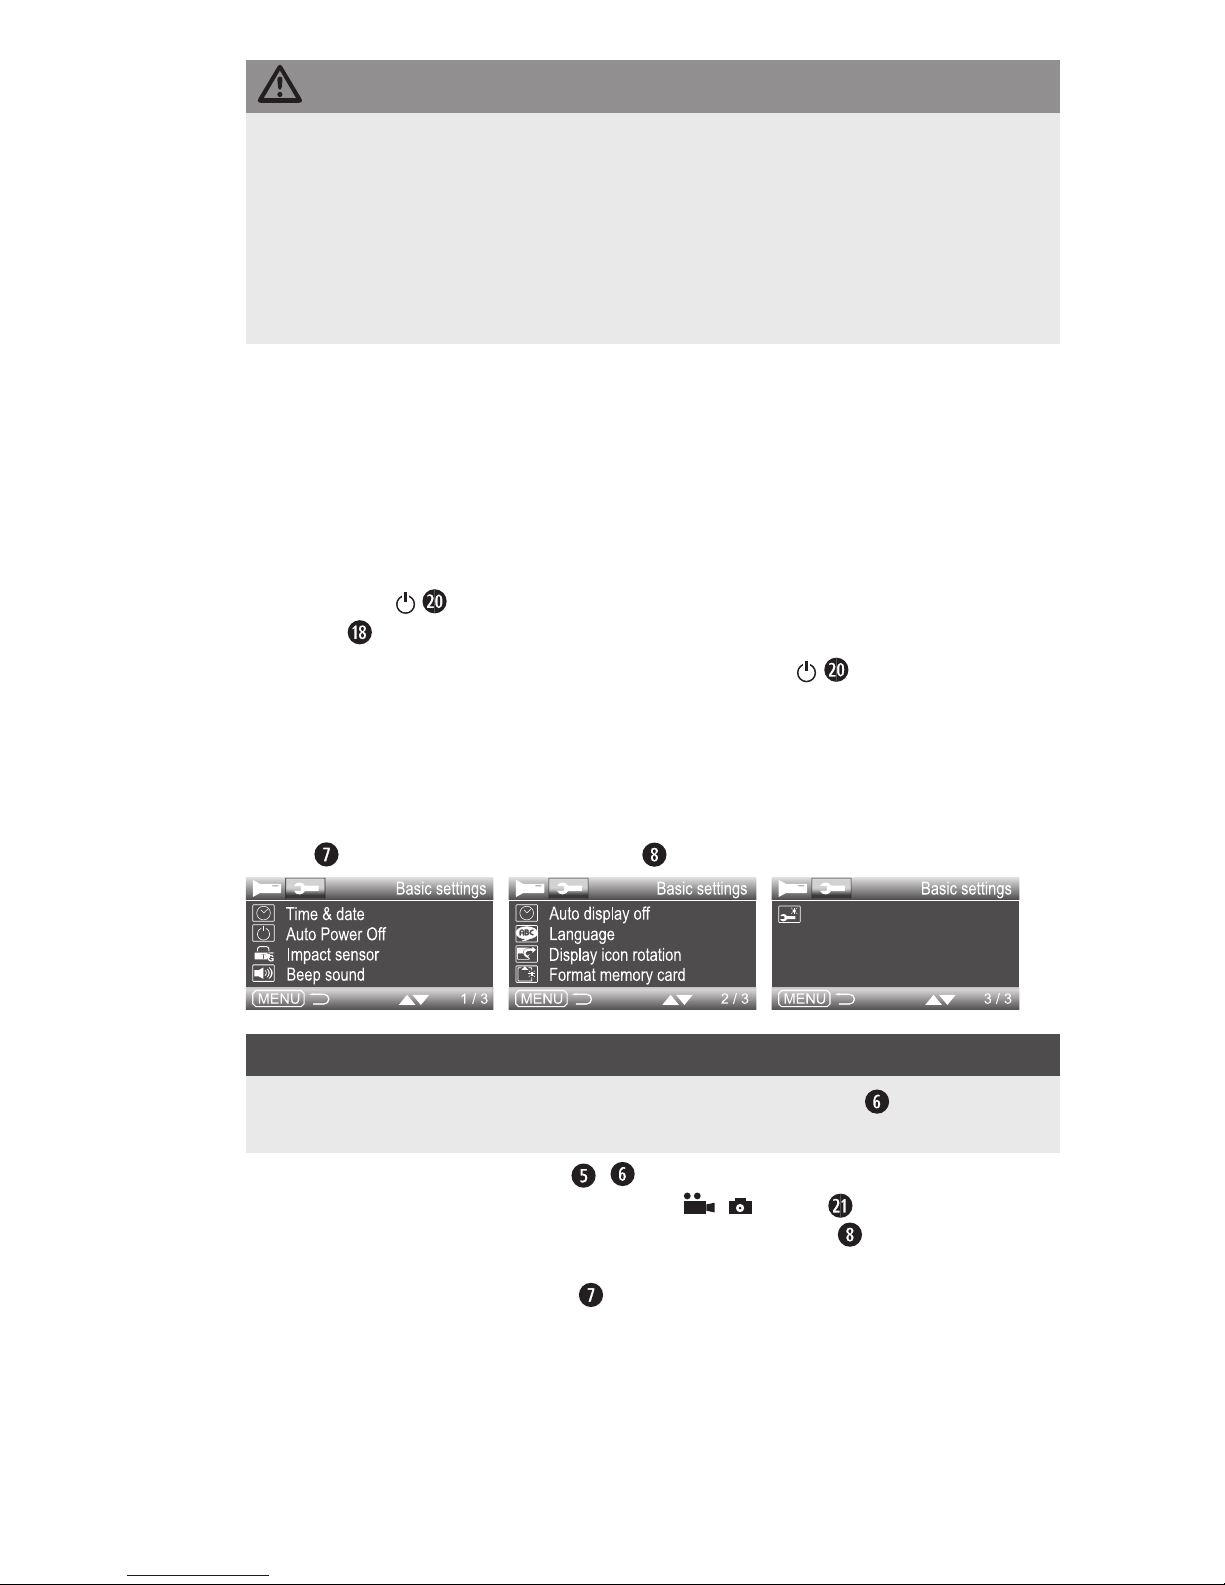
Setup menu
To make the basic settings for the device in the setup menu, press the MENU
button followed by the MODE button . The setup menu opens:
Default settings
NOTE
► When calling up the menu, you must first press the ▼ button
to place the
selection bar on the first entry.
Then you can use the ▲▼ buttons
/ to move the selection bar to the desired
entry and then call up this menu item with the
/ button . To exit the activated
menu item without making a change, press the MODE button . Below right, the
current menu board as well as the total number of menu boards is shown. To close
the menu, press the MENU button .
Page 16
CR 5 A2
■ 12│GB
│
CY
Time & date
If you access this menu option, you can then use the ▲▼ buttons
/ to select
whether the recordings are to be made with or without a date stamp. Select "Time &
date stamp on" to activate ths function or "Time & date stamp off" to deactivate it.
To set the current date, call up "Set time & date". Then use the ▲▼ buttons
/ to set
the current year. Press the MODE button to use the ▲▼ buttons / to set the
hours of the current time. Press the MODE button to use the ▲▼ buttons /
to set the minutes. Press the MODE button to use the ▲▼ buttons / to set the
seconds. Press the MODE button to use the ▲▼ buttons / to set the required
date format. The options are „YY/MM/DD“ for the two-digit date in the order „year/
month/day“, „MM/DD/YY“ for the two-digit date in the order „month/day/year“
and „DD/MM/YY“ for the two-digit date in the order „day/month/year“. Press
the MODE button to use the ▲▼ buttons / to set the day. Press the MODE
button to use the ▲▼ buttons / to set the month.
Confirm your selection by pressing the / button . Afterwards, the display will
return to the list of menu items.
Auto Power Off
If you access this menu option, you can the use the ▲▼ buttons
/ to choose
whether the device switches off automatically after "1 Min", "3 Min" or "5 Min" of
inactivity. If you select "Off", the device will not switch off automatically.
Confirm your selection by pressing the / button . Afterwards, the display will
return to the list of menu items.
Impact sensor
If you access this menu option, then you can use the ▲▼ buttons
/ to select the
sensitivity of the built-in impact sensor: "Very low", "Low", "Middle", "High" and "Very
high" are the available options. This feature automatically protects the current video recording when it recognises an impact, which indicates an accident event, from being
overwritten during a loop recording. The symbol appears on the screen and
the current recording is protected from deletion. Confirm your selection by pressing the
/ button . Afterwards, the display will return to the list of menu items.
Beep sound
If you access this menu option, you can then use ▲▼ buttons
/ to select whether
the device emits an acoustic signal when pressing the device's buttons as well as the
on/off function ("On"), or not ("Off"). Confirm your selection by pressing the /
button . Afterwards, the display will return to the list of menu items.
NOTE
► The countdown and the shutter sound are played for a self-timer capture even if
the sounds are deactivated.
Page 17

CR 5 A2
GB│CY
│
13 ■
Auto display off
If you access this menu option, you can then use the ▲▼ buttons
/ to select the
period after which the display automatically switches off: "1 Min", "3 Min" and "5
Min" are the available options. Select "Display always on" if the display is to remain
on permanently. To reactivate the display after it has been automatically switched off,
press one of the ▲▼ buttons / , the MODE button or the / button .
Language
If you access this menu option, you can then use the ▲▼ buttons
/ to select
"English" or "Deutsch" as the language for the on-screen menus. Confirm your selection by pressing the / button . Afterwards, the display will return to the list of
menu items.
Display icon rotation
If you access this menu option, you can then use the ▲▼ buttons
/ to select
whether the display icons and the menus are to be displayed in the normal mode
("Off") or rotated by 180° ("On"). The best selection depends on how you have
mounted the camera.
Format memory card
If you access this menu option, then you can use the ▲▼ buttons
/ to format the
inserted microSD card. This process will irretrievably delete all the data on the microSD
card, even data which is write protected. To format the card, use the ▲▼ buttons /
to select "OK" and then press the / button .
The formatting process will begin.
Default settings
If you access this menu option, you can then reset all the settings of the device to the
factory defaults. Use the ▲▼ buttons
/ to select "OK" and confirm your selection with the / button . Afterwards, the display will return to the list
of menu items. All of the previously made settings will be reset to the factory settings.
To close the setup menu, press the MENU button
.
Page 18

CR 5 A2
■ 14│GB
│
CY
Video standby mode
In video standby mode, the screen shows the following overview:
A – displays the remaining recording time depending on resolution and
available storage space
B – current video resolution
C – symbol to indicate an inserted microSD card
D – battery charge level of the internal battery
E – date display (only when the "Time & date stamp" is activated)
F – time display (only when the "Time & date stamp" is activated)
G – symbol for motion detection (only visible if the function is activated)
H – symbol for a loop recording as well as its length in minutes (here 3 minutes)
I – display for exposure correction
J – symbol for video standby
K – red dot flashes during recording
L – symbol for a write-protected file
Start / end recording
Press the / ▲ button repeatedly as required to zoom into the subject. Hold
down the button for fast zoom. You can use the
/ ▼ button in the same way to
zoom out. Press the / button to start the video recording. During the video
recording the operating display blinks green (battery operation only). Press the
button again to stop the recording.
If you press the MODE button
during recording, the symbol is displayed and
the current recording will be write-protected.
NOTE
► As soon as the camera is connected to the vehicle's power supply, the recording
starts. To stop the recording, press the
/ button .
Page 19

CR 5 A2
GB│CY
│
15 ■
If you now press the MENU button in video standby, the following menu opens:
Motion detection
Using the ▲▼ buttons / you can move the selection bar to the desired entry
and then call up this menu item with the / button . To exit the activated menu
item without making a change, press the MODE button . Below right, the
current menu board as well as the total number of menu boards is shown. If the
lowest menu item on a menu board is selected which leads to a further menu board,
press the ▼ button to jump to the first entry on the following menu board. To close
the menu, press the MENU button .
Resolution
If you access this menu option, you can then set the the video resolution:
"1920x1080P (HD)", "1280 x 720P" and "640 x 480P" are the options available.
Use the ▲▼ buttons
/ to select the desired resolution and confirm your selection
with the / button to return to the list of menu items.
Exposure
If you access this menu option, you can then adjust the video exposure in three steps
upwards (from +1 to +3, brighter), or downwards (from –1 to –3, darker). When the
setting is set to "0" there is no exposure compensation. Use the ▲▼ buttons
/ to
select the desired video exposure compensation and confirm your selection with the
/ button to return to the list of menu items.
Video length
If you access this menu option, you can then set the length of the loop for the video
recording: "3 Min", "5 Min", "10 Min" or "Loop recording off" are the available
options. Use the ▲▼ buttons
/ to select the desired value for the loop recording
and confirm your selection with the / button to return to the list of menu
items.
Remember that the microSD card used must have a sufficient capacity to record the
desired length of loop in the video resolution set. If you select "Loop recording off"
the recording ends when you reach the capacity of the microSD card. When the end
of the recording is reached, the device will start a new recording with the length set.
If the capacity of the memory card is not sufficient for the set duration, the recording
will be aborted. Reduce the length of the loop recording or use a memory card with
a greater capacity.
Page 20

CR 5 A2
■ 16│GB
│
CY
Motion detection
If you access this menu option, you can then use the ▲▼ buttons
/ to activate or
deactivate this function. Confirm your selection with the / button to return to
the list of menu items.
When this function is activated, the device will automatically stop the video
recording when no moving images are detected. If the device again detects movements, the device will automatically begin recording again. If the function
is deactivated, the device does not stop recording if no motion is detected.
NOTE
► You should only activate this function while the vehicle is parked if you want
to automatically film a break-in attempt or to record the other vehicle after a
collision.
► The initial recording with this function must be started manually.
Audio recording
If you access this menu option, you can then use the ▲▼ buttons
/ to activate or
deactivate audio recording via the built-in microphone. Confirm your selection with
the / button to return to the list of menu items.
Page 21
CR 5 A2
GB│CY
│
17 ■
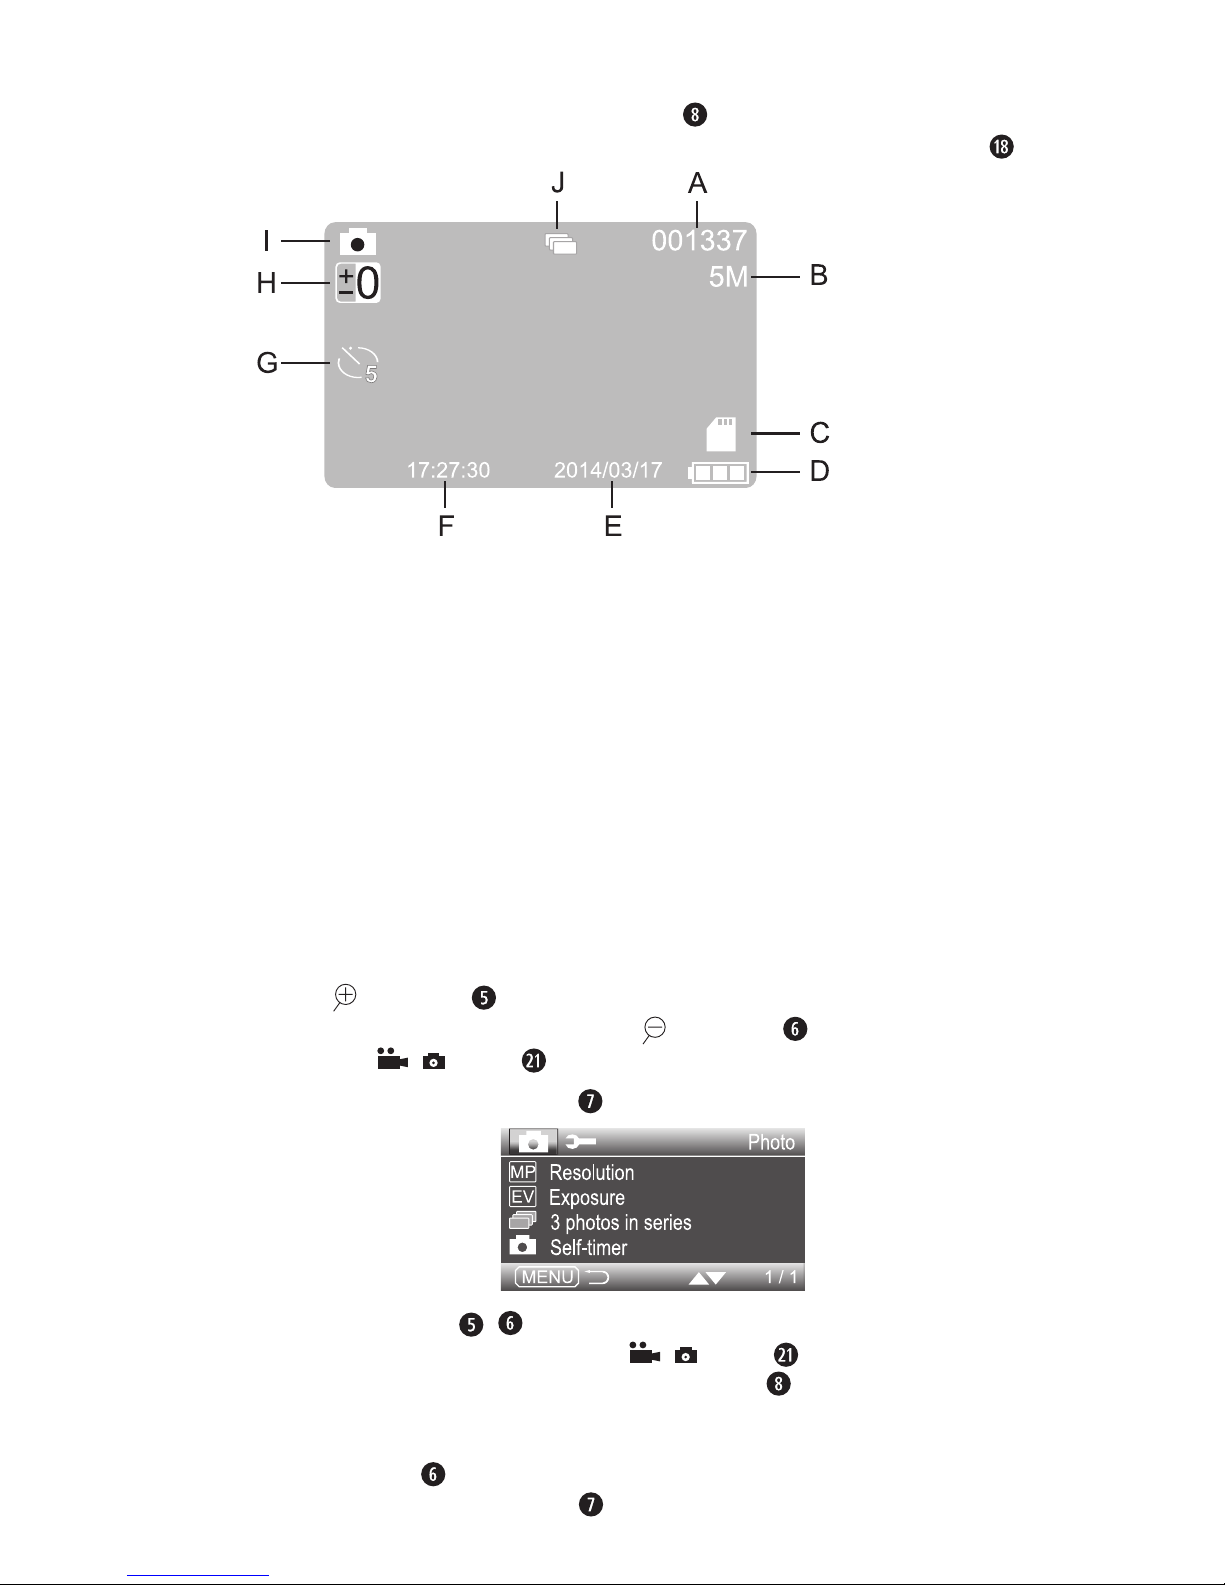
Photo standby
With the menu closed, press the MODE button during video standby to switch to
photo standby. The device then displays the following overview on the screen
:
A – displays the remaining number of photos that can still be taken depending on
resolution and available storage space
B – current photo resolution
C – symbol to indicate an inserted microSD card
D – battery charge level of the internal battery
E – date display (only when the "Time & date stamp" is activated)
F – time display (only when the "Time & date stamp" is activated)
G – symbol for self-timer (here 5 seconds: only visible if the function is activated)
H – symbol for exposure correction
I – display for photo standby
J – display for continuous advance function (only visible if feature is enabled)
Taking photos
Press the / ▲ button repeatedly as required to zoom into the subject. Hold down
the button for fast zoom. You can use the
/ ▼ button in the same way to zoom
out. Press the / button to take a photo.
If you now press the MENU button
in photo standby, the following menu opens:
Using the ▲▼ buttons / you can move the selection bar to the desired entry
and then call up this menu item with the / button . To exit the activated menu
item without making a change, press the MODE button . Below right, the current
menu board as well as the total number of menu boards is shown. If the
lowest menu item on a menu board is selected which leads to a further menu board,
press the ▼ button to jump to the first entry on the following menu board. To close
the menu, press the MENU button .
Page 22

CR 5 A2
■ 18│GB
│
CY
Resolution
If you access this menu option, then you can use the ▲▼ buttons
/ to select the
desired resolution for your photos: "12MP (interp.*)", "7MP (interp.*)", "5MP", "3MP",
"2MP", "1.3MP" oder "0.3MP" are the available options. "MP" stands for megapixel,
e.g. the "5MP" setting creates a photo of 2592 × 1944 pixels, which is about 5 million pixels. The larger the photos, the greater the detail. However, the microSD card
will fill up faster with higher resolution photos. Confirm your selection with the /
button to return to the list of menu items.
*Interpolation = calculation method used to increase the number of pixels
Exposure
If you access this menu option, you can then adjust the photo exposure in three steps
upwards (from +1 to +3, brighter), or downwards (from –1 to –3, darker). Use the
▲▼ buttons
/ to select the desired photo exposure compensation and confirm
your selection with the
/ button to return to the list of menu items.
3 photos in series
If you access this menu option, you can then use the ▲▼ buttons
/ to activate
or deactivate the function take a series of 3 photos in quick succession. Confirm your
selection with the / button to return to the list of menu items.
Self-timer
If you access this menu option, then you can use the ▲▼ buttons
/ to set the
self-timer function to 2, 5 or 10 seconds. The photo will then be taken after the set
delay when you press the / button . Select "direct capture" to deactivate
the self-timer. Confirm your selection with the / button to return to the list of
menu items.
Playback mode
With the menu closed, press the MODE button during photo standby to switch to
playback mode. Using the ▲▼ buttons / you can scroll through the stored
images. If you select a photo and press the / button , all stored photos will
be displayed in an endless slide show. Press the / button again to
stop the playback. If you select a video and press the / button , the video is
played back.
Page 23
CR 5 A2
GB│CY
│
19 ■
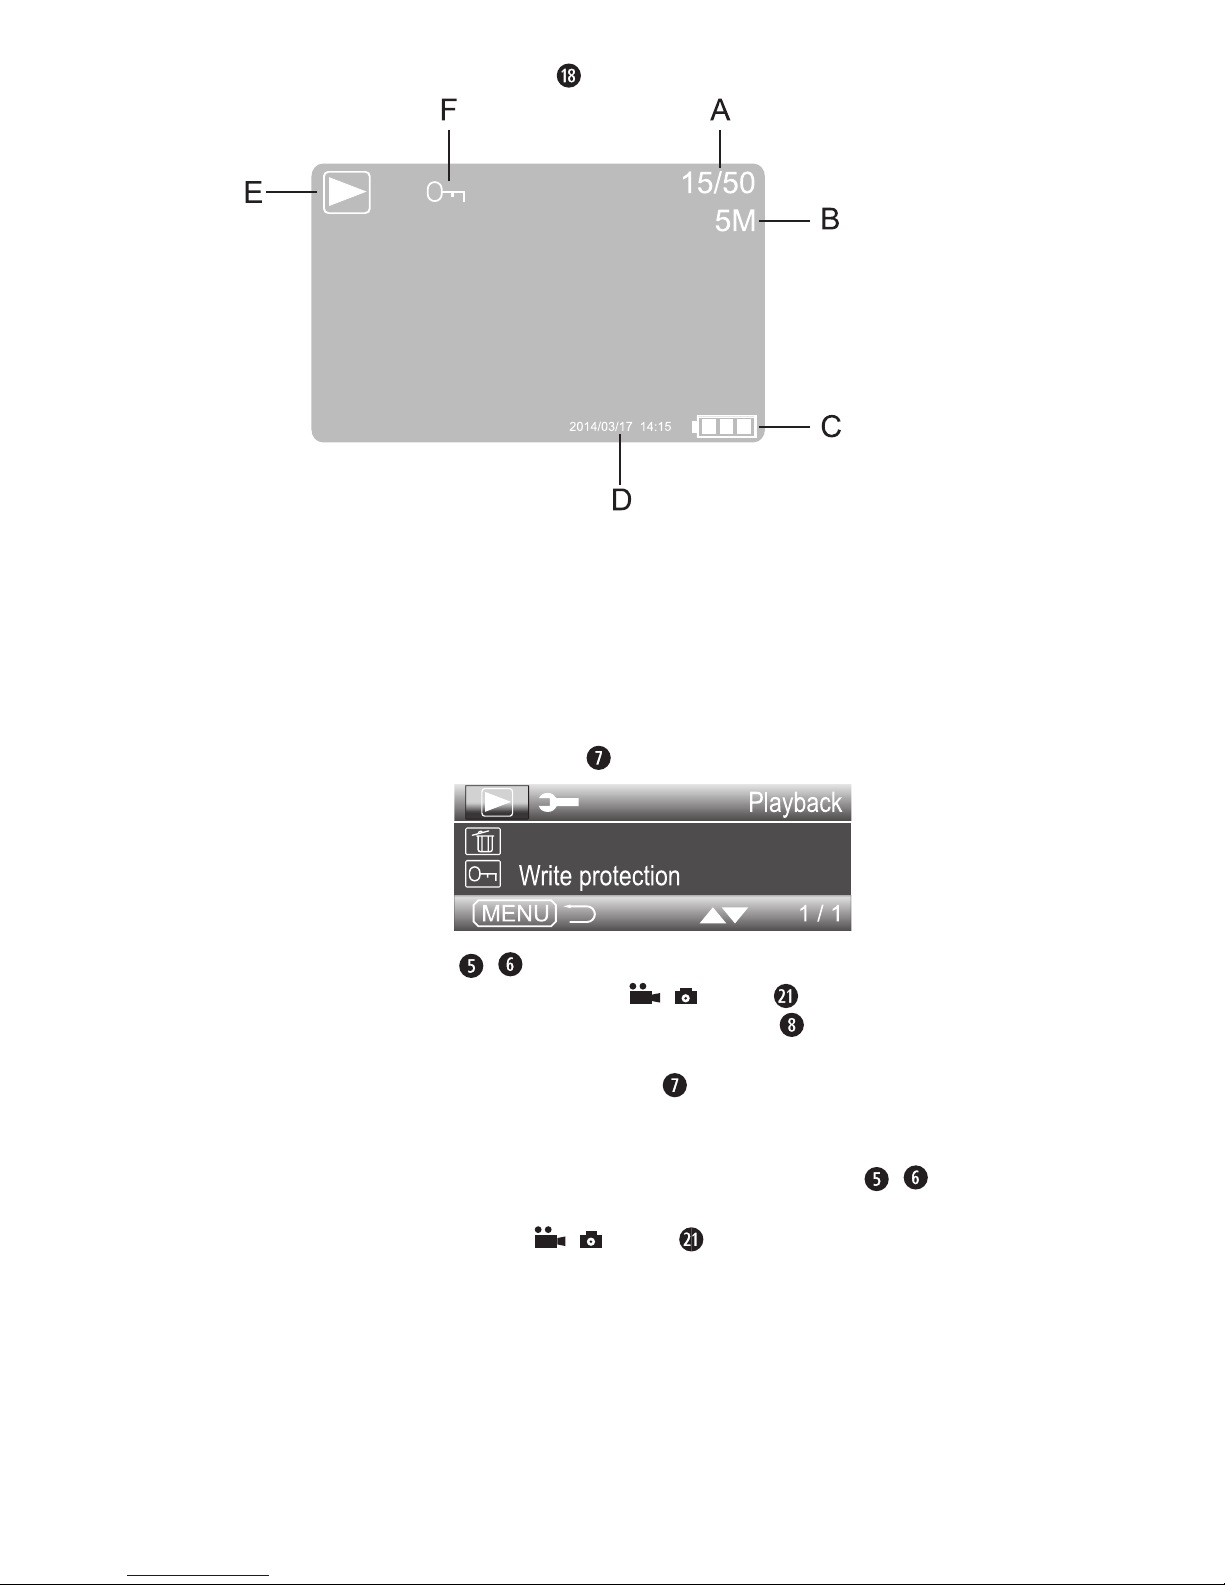
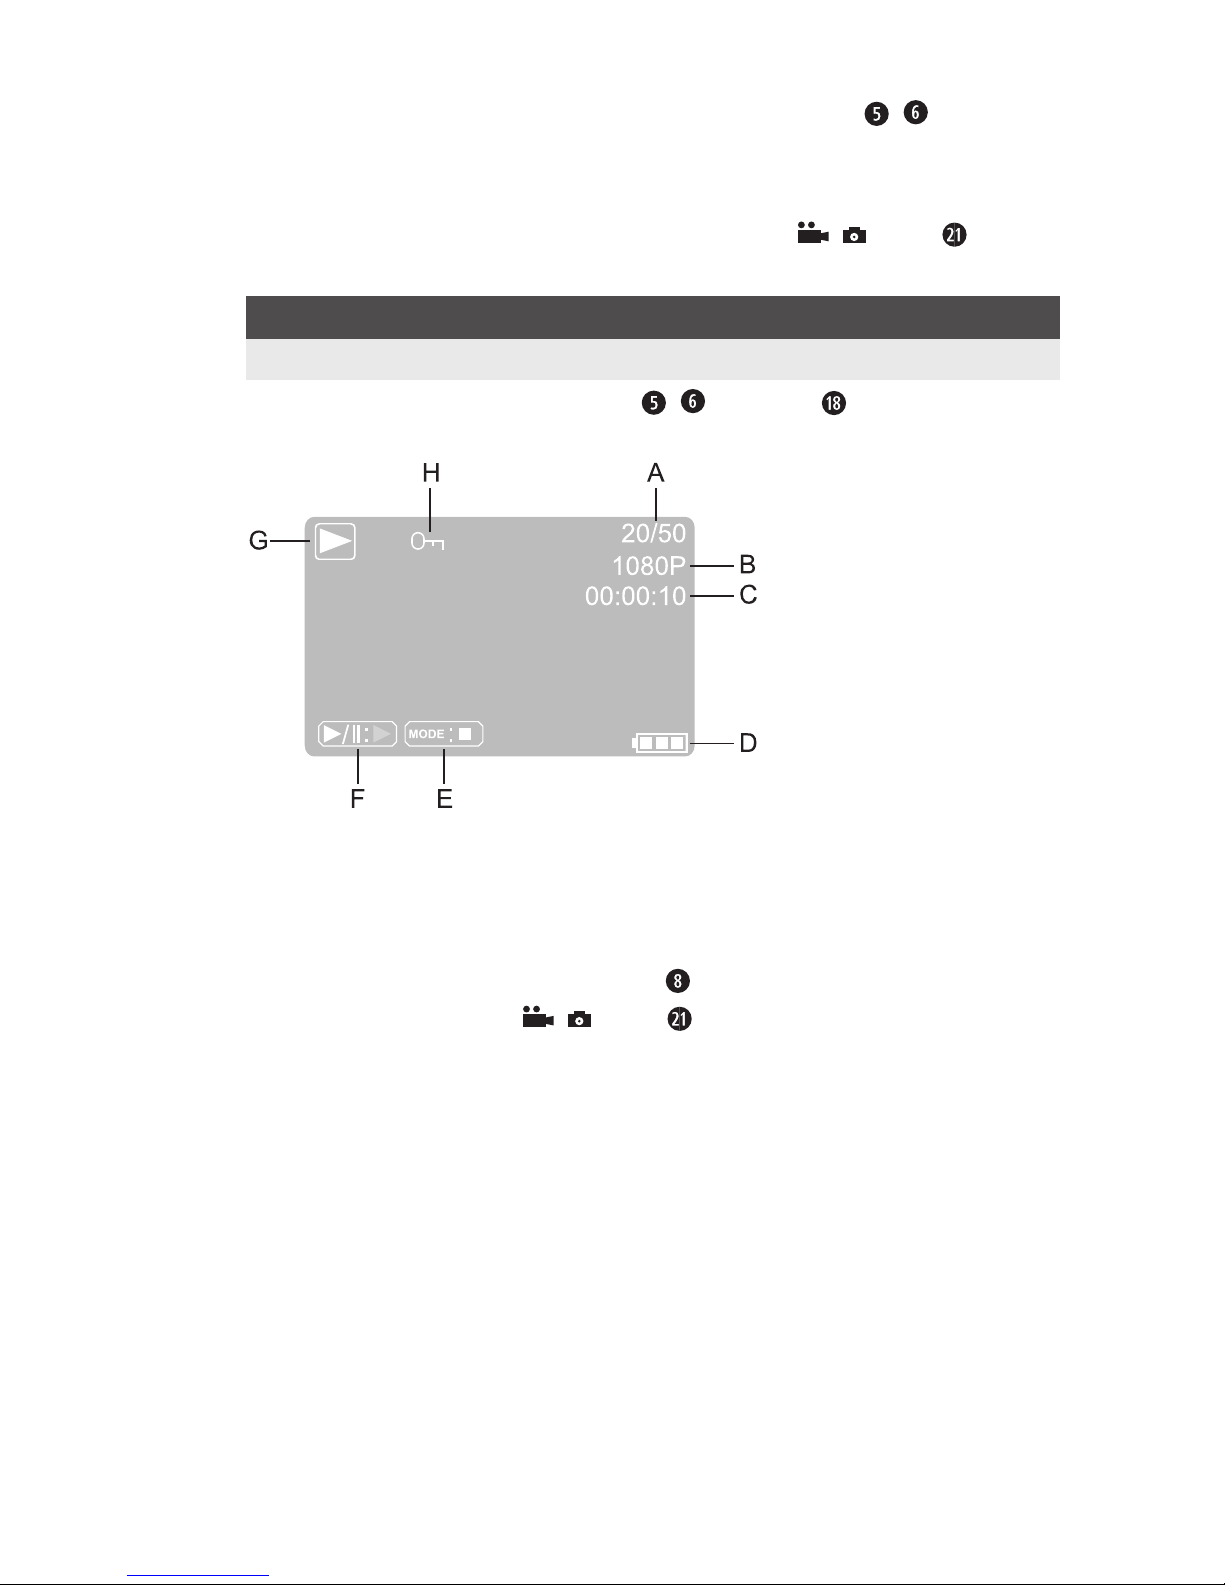
If you select a photo, the screen will display the following overview:
A – display of the current recording number/total number of recordings
B – resolution of the currently selected photo
C – battery charge level of the internal battery
D – date/time stamp of the captured photo
E – symbol for playback mode
F – symbol for a write-protected file
If you now press the MENU button
, the following menu opens:
Delete
Using the ▲▼ buttons / you can move the selection bar to the desired entry
and then call up this menu item with the / button . To exit the activated menu
item without making a change, press the MODE button . Below right, the current
menu board as well as the total number of menu boards is shown.
To close the menu, press the MENU button .
Delete
If you access this menu option, you can then use the ▲▼ buttons
/ to delete
the currently selected image ("Delete this file"), "Delete all files" or "Cancel". Confirm
your selection by pressing the / button . When you confirm the following
query with "OK", the selected delete function will be executed and the menu closes.
If, however, the screen shows "This file is write-protected", you must first deactivate the
write protection as described in the section "Write protection".
Page 24
CR 5 A2
■ 20│GB
│
CY
Write protection
If you access this menu option, you can then use the ▲▼ buttons
/ to select
whether to protect the currently selected file from deletion ("Write-protect this file"), to
remove the write protection for the selected file ("Unlock this file"), protect all files
from deletion ("Write-protect all files") or remove the write protection from all files
("Unlock all files"). Confirm your selection by pressing the / button . Afterwards, the display will return to the list of menu items.
NOTE
► Using this function on a large number of files can take several seconds.
If you select a video with the ▲▼ buttons
/ , the screen will display the
following overview:
A – display of the current recording number/total number of recordings
B – resolution of the currently selected video
C – length of the video
D – battery charge level of the internal battery
E – function symbol for the MODE button
: stop video/photo playback
F – function symbol for the
/ button : start/stop video/photo playback
G – symbol for playback mode
H – symbol for a write-protected file
Page 25

CR 5 A2
GB│CY
│
21 ■
If you now press the MENU button , the following menu opens:
Delete
Using the ▲▼ buttons / you can move the selection bar to the desired entry
and then call up this menu item with the / button . To exit the activated menu
item without making a change, press the MODE button . To close the menu, press
the MENU button .
Delete
If you access this menu option, you can then use the ▲▼ buttons
/ to delete the
currently selected video ("Delete this file"), "Delete all files" or "Cancel".
Confirm your selection by pressing the / button . When you confirm the
following query with "OK", the selected delete function will be executed and the
menu closes. If, however, the screen shows "This file is write-protected", you must first
deactivate the write protection as described in the section "Write protection".
Write protection
If you access this menu option, you can then use the ▲▼ buttons
/ to select
whether to protect the currently selected file from deletion ("Write-protect this file"), to
remove the write protection for the selected file ("Unlock this file"), protect all files
from deletion ("Write-protect all files") or remove the write protection from all files
("Unlock all files"). Confirm your selection by pressing the / button .
Afterwards, the display will return to the list of menu items.
NOTE
► Using this function on a large number of files can take several seconds.
Showing recordings on an external monitor
NOTE
► The camera can transfer the video signal to an external monitor or the video
input of a television set. Please also follow the instructions of the respective
playback device.
♦ Flip the cover
to one side and connect the mini-HDMI connection on the
camera to a suitable monitor using a suitable mini-HDMI cable (not supplied).
This type of connection can only be used to play back saved videos.
The screen is then switched off.
♦ Start playback with the
/ button .
Page 26

CR 5 A2
■ 22│GB
│
CY
Transferring recordings to a computer
Connect the mini-USB plug of the supplied USB cable to the port on
the camera and the USB plug to a free USB port of a switched-on computer. The
computer now recognises the device as "mass storage", the camera connects to the
computer and then the content of the SD/SDHC memory card appears as a new
drive on the computer. Now carry out the required file operations.
Resetting the device
If the device does not work as described in this manual or it does not respond to
your operation, use a pointed object, e.g. a paper clip, to carefully press the switch
behind the RESET opening
in the housing to restart the device.
Changing the fuse
The car adapter contains a fuse. If the device does not function, it may be because the fuse is defective. Exchange the defective fuse for a replacement fuse of the
same type (see also chapter Technical data).
♦ To do this, pull the car adapter
out of the cigarette lighter socket.
♦ Open the car adapter
by carefully unscrewing the ribbed screw insert (C)
anticlockwise (using pliers if necessary) and removing it.
♦ Now, take the plug tip (B) from the fuse (A), remove the fuse (A) and place it to
one side.
♦ Now place the new fuse into the car adapter , place the plug tip (B) onto the
slightly protruding end of the fuse and screw the previously removed screw insert
(C) back in.
NOTE
► If the device still does not work or the fuse blows again immediately, the device
is defective. Please then contact the Service Hotline (see chapter Service).
Page 27
CR 5 A2
GB│CY
│
23 ■
Cleaning
CAUTION
Damage to the device!
► To avoid irreparable damage, ensure that no moisture penetrates the device
during cleaning.
► Do not use any abrasive or solvent-based cleaners as these can damage the
device housing or the device itself.
■ Clean the surfaces of the device with a soft, dry cloth. Use a normal commercial
detergent and water to remove stubborn residue. Ensure that no water gets into
the device.
Troubleshooting
This section contains important information on fault identification and rectification.
Observe the instructions in order to avoid risks and damage.
WARNING
► Repairs to electrical devices may only be carried out by specialists trained by
the manufacturer. Improper repairs can cause considerable risks to users and
damage to the device.
Fault causes and rectification
The following table will help to identify and rectify minor faults:
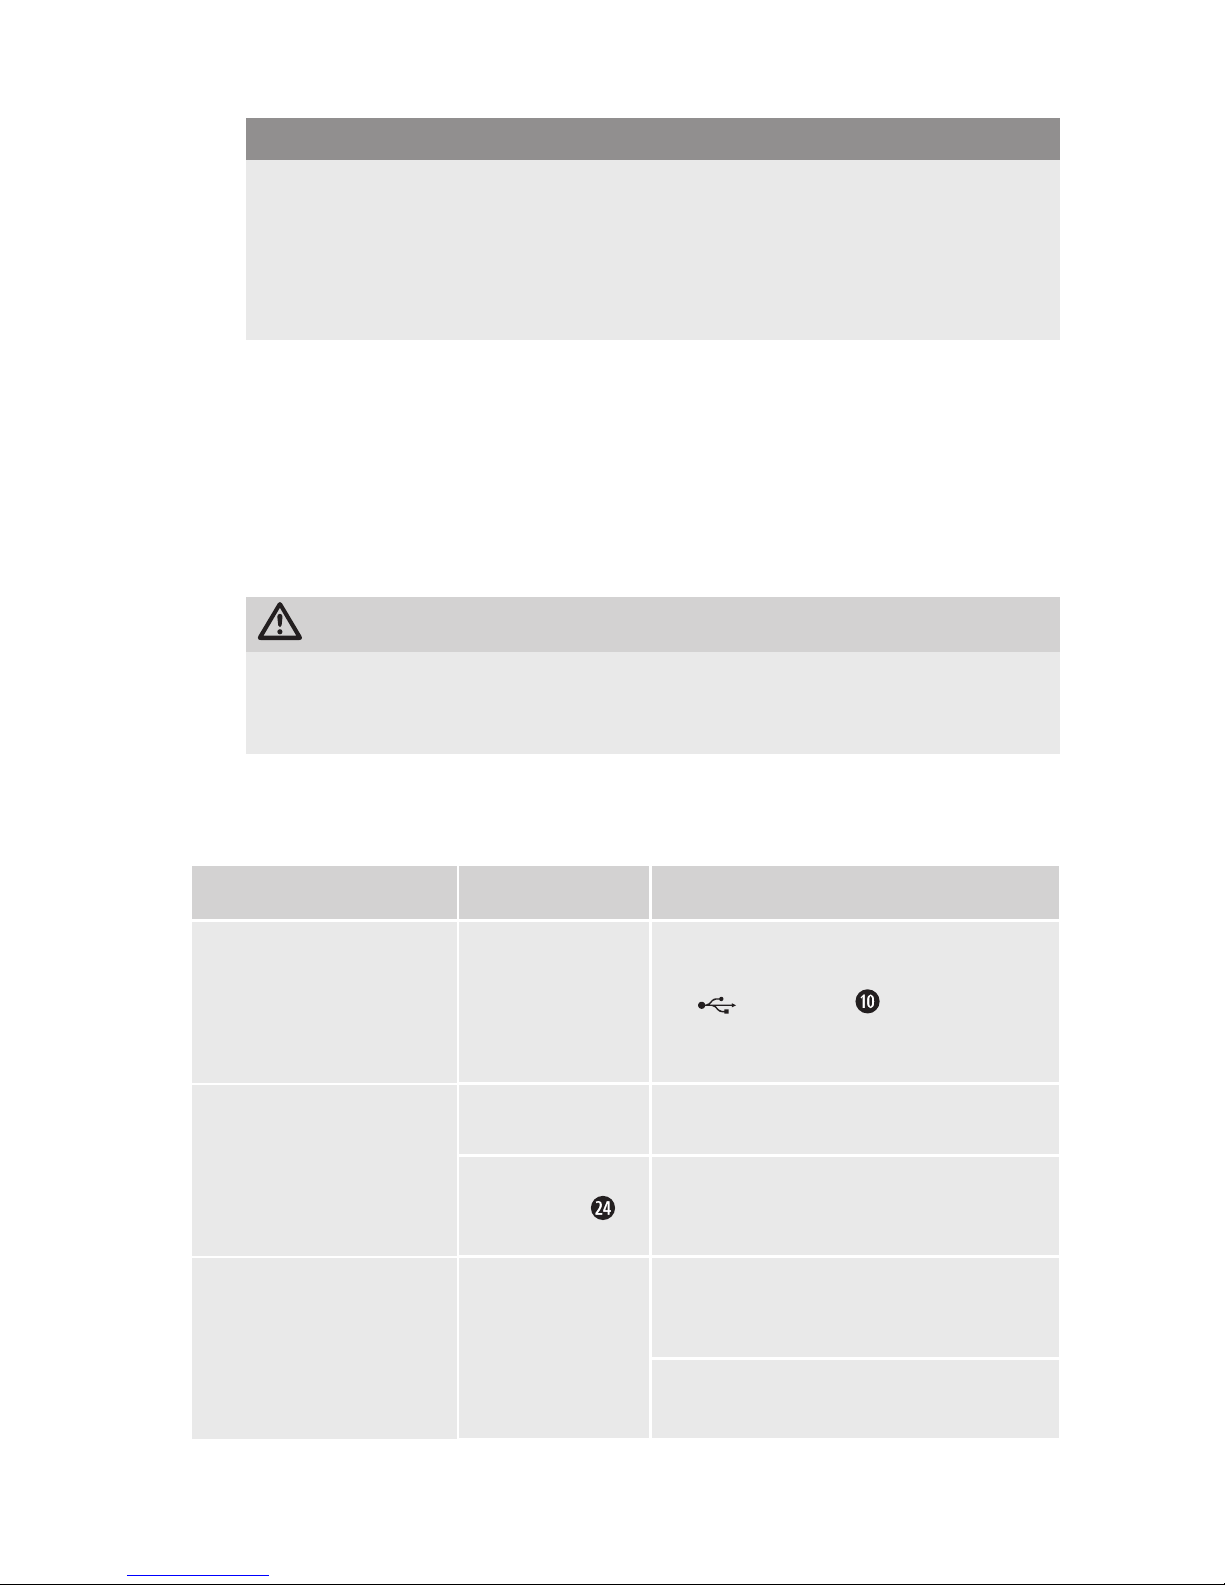
Fault Possible cause Rectification
The camera is not
working with the
built-in battery.
The battery is flat. Charge the built-in battery from a
switched-on computer connected to
the
connection on the device,
or the on-board electrical system of
your vehicle.
The camera does not
work in the vehicle.
The vehicle's
battery is flat.
Charge the vehicle's battery.
The fuse in the
car adapter
is defective.
Replace the fuse (see section
Changing the fuse).
The camera does not
record properly during
the journey.
There is a
problem with the
built-in motion
sensor.
Activate the built-in motion sensor
(function "Motion detection" in the setup
menu) only while the vehicle is parked.
Increase the sensitivity of the motion
sensor.
Page 28

CR 5 A2
■ 24│GB
│
CY
Fault Possible cause Rectification
The device does not
respond as expected to
your operation.
There is a defect. Use a pointed object, e.g. a paper clip,
to carefully press the switch behind the
RESET opening
in the housing to
restart the device.
The suction cup does not
hold firmly.
The surface
being used is not
clean.
Clean the surface. You can also increase
the suction power by moistening the
suction cup.
NOTE
► If you are unable to resolve the problem applying any of the aforementioned
methods, please contact the Customer Service department.
Storage / Disposal
Storage when not in use
If you plan not to use the device for a long period, store it in a clean, dry place away
from direct sunlight. In this case you should charge the built-in battery from time to
time.
Disposal of the device
The adjacent symbol of a crossed-out wheelie bin means that this device is subject to
Directive 2012/19/EU. This directive states that this device may not be disposed of
in normal household waste at the end of its usable life, but must be handed over to
specially set-up collection locations, recycling depots or disposal companies.
The integrated battery cannot be removed.
This disposal is free of charge for the user. Protect the environment
and dispose of this device properly.
You can obtain further information from your local disposal company or the city or
local authority.
Appendix
Notes on the EU-Declaration of Conformity
This device complies with the basic requirements and other relevant provisions
of the Electromagnetic Compatibility Directive 2014/30/EU and the RoHS
Directive 2011/65/EU.
The complete EU-Declaration of Conformity, is available with the importer.
Page 29
CR 5 A2
GB│CY
│
25 ■
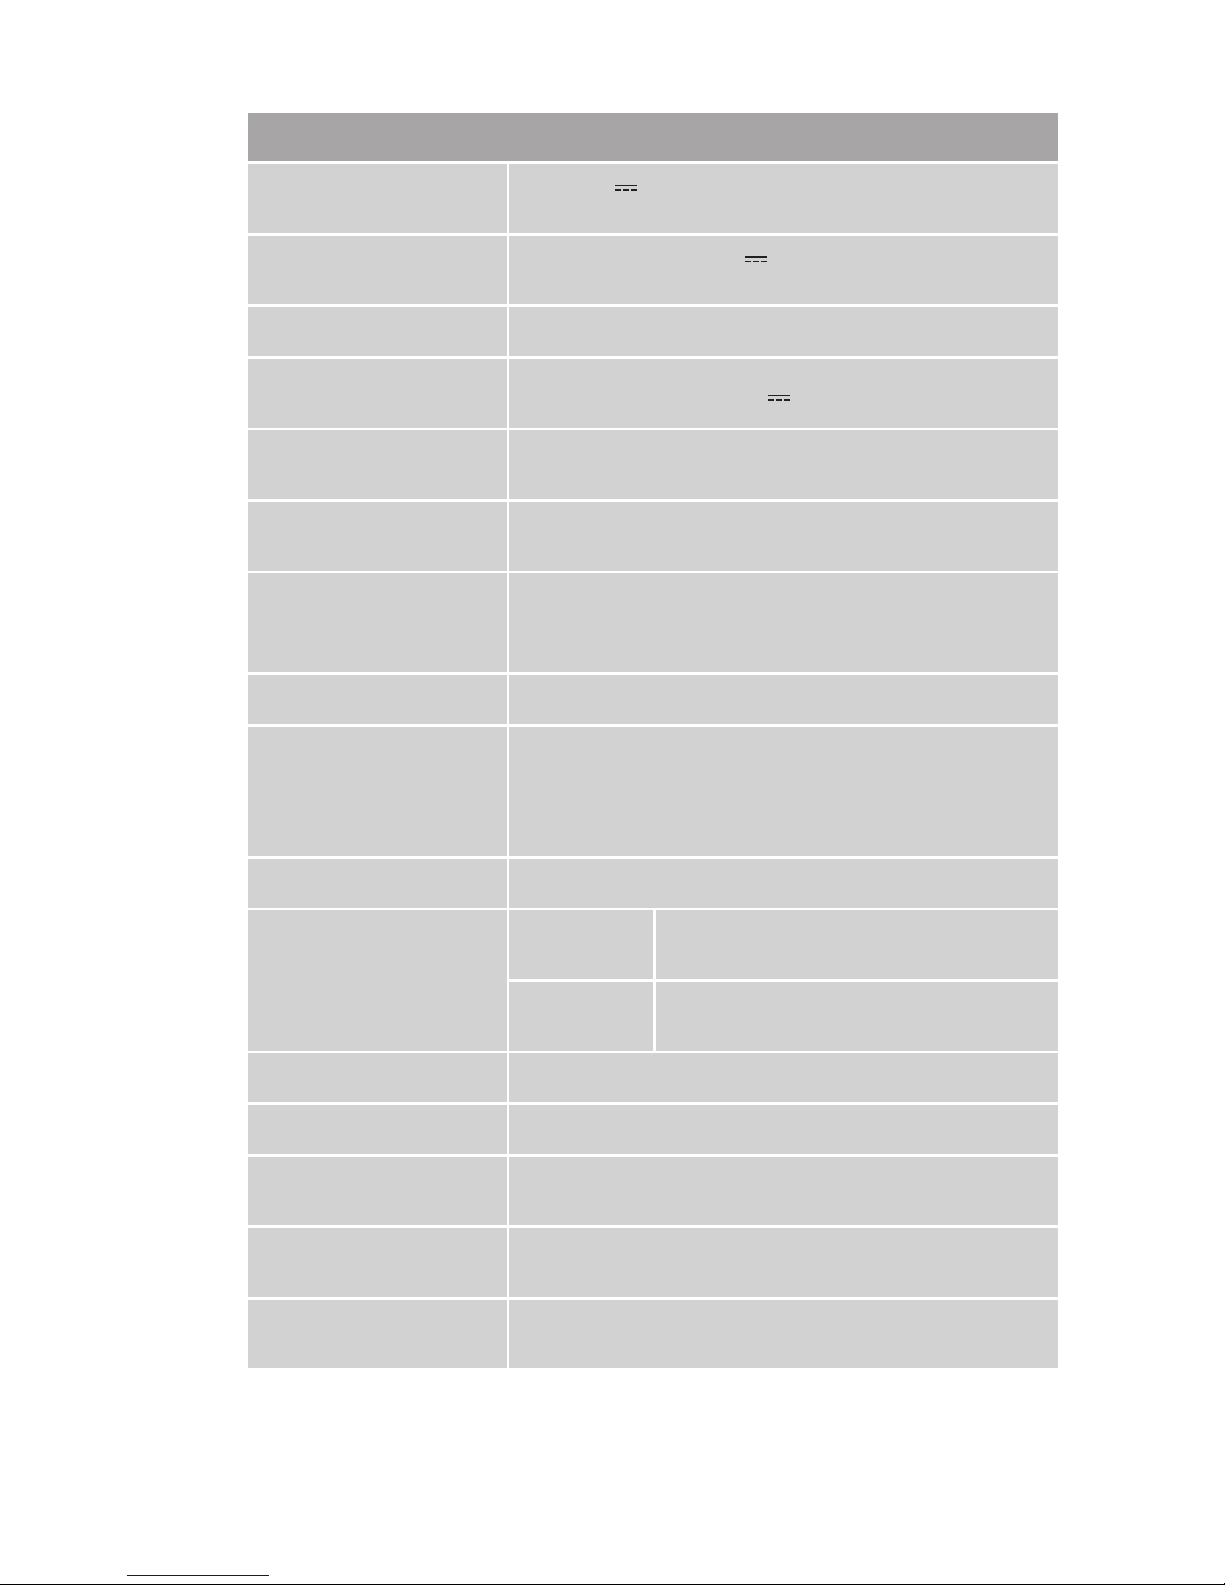
Technical data
Cockpit recorder
Operating voltage
5V
, via the integrated lithium-ion battery
(3.7V/350mAh) or USB connection
Input voltage of the car
adapter
12V/24V
, max. 700mA via
the car's electrical system
Car adapter fuse T2AL / 250V
Output voltage of the
car adapter
5V
,1A
Data storage medium
microSD card, FAT file system, supports cards
up to a maximum capacity of 32GB
Screen
2.7" TFT colour LC display
(approx. 6.8 cm screen diagonal)
Photo resolutions
5 megapixels, 3 megapixels, 2 megapixels,
1.3 megapixels, 0.3 megapixels (7 megapixels and
12 megapixels interpolated))
Photo format JPEG
Video resolution
Res. 1: 1920 x 1080 pixels/frame rate 25 fps
(data: 1 GB/5 min)
Res. 2: 1280 x 720 pixels/frame rate 30 fps
Res. 3: 640 x 480 pixels/frame rate 30 fps
Video recording format AVI
Recording angle
horizontal
58° video 1920 x 1080
80° photo 2592 x 1944
vertical
30° video 1920 x 1080
56° photo 2592 x 1944
Operating temperature 15°C to 40°C
Storage temperature 5°C to 40°C
Humidity
(no condensation)
5 to 75 %
Dimensions
(W x H x D)
approx. 7.5 x 4.8 x 3.2 cm
Weight
Camera approx. 63 g,
complete set approx. 160 g
Page 30

CR 5 A2
■ 26│GB
│
CY
Warranty
The warranty for this appliance is for 3 years from the date of purchase.
The appliance has been manufactured with care and meticulously examined before
delivery.
Please retain your receipt as proof of purchase. In the case of a warranty claim,
please make contact by telephone with our Customer Service Department.
Only in this way can a post-free despatch for your goods be assured.
NOTICE
► The warranty covers only claims for material and manufacturing defects, but
not for transport damage, wearing parts or for damage to fragile components, e.g. buttons or batteries.
This product is for domestic use only and is not intended for commercial use.
The warranty is void in the case of abusive and improper handling, use of force and
internal tampering not carried out by our authorised service branch.
Your statutory rights are not restricted in any way by this warranty. The warranty period is not extended by repairs made under the warranty. This applies also to replaced
and repaired parts.
Damages and defects extant at the time of purchase must be reported immediately
after unpacking, resp. no later than two days after the date of purchase.
Repairs made after the lapse of the warranty period are subject to charge.
Service
Service Great Britain
Tel.: 0871 5000 720 (£ 0.10/Min.)
E-Mail: kompernass@lidl.co.uk
IAN 275078
CY
Service Cyprus
Tel.: 8009 4409
E-Mail: kompernass@lidl.com.cy
IAN 275078
Importer
KOMPERNASS HANDELS GMBH
BURGSTRASSE 21
44867 BOCHUM
GERMANY
www.kompernass.com
Page 31

CR 5 A2
RO
│
27 ■
Cuprins
Introducere...................................................28
Informaţii privind aceste instrucţiuni de utilizare. . . . . . . . . . . . . . . . . . . . . . . . . . . . . . . . . .28
Drepturi de autor .........................................................28
Indicaţii privind marca .....................................................28
Utilizarea conform destinaţiei ...............................................28
Avertizări utilizate ........................................................29
Siguranţa ....................................................30
Indicaţii de bază privind siguranţa ...........................................30
Potenţiala încălcare a drepturilor terţilor .......................................32
Elemente de operare ...........................................33
Furnitura şi verificarea transportului ...........................................34
Eliminarea ambalajului ....................................................34
Punerea în funcţiune ...........................................35
Introducerea / scoaterea cardului micro SD ....................................35
Montarea camerei pe parbriz ...............................................36
Realizarea alimentării cu curent ..............................................36
Operarea şi funcţionarea .......................................37
Pornirea şi oprirea, realizarea setărilor ........................................37
Setări de bază ...........................................................37
Meniul Setup .........................................................37
Pregătirea pentru înregistrarea video .......................................40
Începerea / terminarea înregistrării .........................................40
Starea pregătită de realizare a fotografiilor .................................43
Realizarea fotografiilor ..................................................43
Modul de redare ......................................................44
Afişarea înregistrărilor pe un monitor extern ....................................47
Redarea înregistrărilor pe un computer ........................................48
Resetare aparat ..........................................................48
Schimbarea siguranţei .....................................................48
Curăţarea ....................................................49
Remedierea defecţiunilor .......................................49
Cauzele defecţiunilor şi remedierea acestora ...................................49
Depozitarea / Eliminarea........................................50
Depozitarea în cazul neutilizării .............................................50
Eliminarea aparatului ......................................................50
Anexa . . . . . . . . . . . . . . . . . . . . . . . . . . . . . . . . . . . . . . . . . . . . . . . . . . . . . . .50
Indicaţii privind declaraţia de conformitate UE ..................................50
Date tehnice .............................................................51
Garanţia ...............................................................52
Service-ul ...............................................................52
Importator ..............................................................52
Page 32

CR 5 A2
■ 28│RO
Introducere
Informaţii privind aceste instrucţiuni de utilizare
Felicitări pentru cumpărarea noului dvs. aparat.
Prin aceasta v-aţi decis pentru un produs de calitate superioară. Instrucţiunile de
utilizare fac parte integrantă din acest produs. Acestea cuprind informaţii importante
pentru siguranţă, utilizare şi eliminare. Înainte de utilizarea produsului, familiarizaţivă cu toate indicaţiile privind operarea şi siguranţa. Utilizaţi acest produs numai în
modul descris şi numai în scopurile menţionate. Păstraţi întotdeauna instrucţiunile
de utilizare ca sursă de referinţă în apropierea produsului. În cazul înstrăinării sau
vânzării produsului către terţi, predaţi-le acestora toate documentele, inclusiv prezentele instrucţiuni de utilizare.
Drepturi de autor
Prezenta documentaţie este protejată prin drepturi de autor.
Reproducerea, respectiv retipărirea, chiar şi numai parţială, precum şi redarea imagini-
lor, chiar şi modificate, este permisă numai cu acordul scris al producătorului.
Indicaţii privind marca
USB® este o marcă înregistrată a USB Implementers Forum, Inc.
Toate celelalte denumiri şi produse pot fi marca sau marca înregistrată a proprietari-
lor respectivi.
Utilizarea conform destinaţiei
Acest recorder pentru cabină este un dispozitiv ce ţine de electronica informaţiilor
şi serveşte la înregistrarea digitală de fotografii şi videoclipuri, în special în timpul
deplasării în autovehicule. Orice altă utilizare este considerată a fi neconformă. Este
interzisă utilizarea aparatului în scopuri comerciale sau industriale. Sunt excluse orice
fel de drepturi pentru pagubele rezultate în urma utilizării neconforme, a reparaţiilor
necorespunzătoare, a modificărilor realizate în mod nepermis sau a utilizării de
piese de schimb neaprobate. Riscul este asumat în totalitate de către utilizator.
Page 33

CR 5 A2
RO
│
29 ■
Avertizări utilizate
În cadrul acestor instrucţiuni de utilizare sunt folosite următoarele avertizări:
PERICOL
Avertizările pentru acest grad de pericol marchează o situaţie
periculoasă iminentă.
Dacă situaţia periculoasă nu este evitată, aceasta poate provoca răniri sau
moartea.
► Respectaţi instrucţiunile prezentate în această avertizare pentru a evita pericolul
de rănire gravă sau de moarte.
AVERTIZARE
Avertizările pentru acest grad de pericol marchează o situaţie
potenţial periculoasă.
Dacă situaţia periculoasă nu este evitată, aceasta poate provoca răniri.
► Respectaţi indicaţiile din această avertizare pentru a evita rănirea persoanelor.
ATENŢIE
Avertizările pentru acest grad de pericol marchează posibile
pagube materiale.
În cazul în care această situaţie nu este evitată, aceasta poate duce la pagube
materiale.
► Respectaţi instrucţiunile prezentate în această avertizare, pentru a evita pagu-
bele materiale.
INDICAŢIE
► O indicaţie constituie o informaţie suplimentară care facilitează manipularea
aparatului.
Page 34

CR 5 A2
■ 30│RO
Siguranţa
În acest capitol sunt cuprinse indicaţii importante privind siguranţa în manipularea
aparatului. Acest aparat corespunde dispoziţiilor prezentate cu privire la siguranţă.
Utilizarea necorespunzătoare a aparatului poate provoca rănirea persoanelor
şi pagube materiale.
Indicaţii de bază privind siguranţa
Respectaţi următoarele indicaţii de siguranţă, pentru o manipulare sigură a acestui
aparat:
■ Înainte de utilizare verificaţi dacă aparatul prezintă defecţiuni exterioare vizibile.
Nu puneţi aparatul în funcţiune dacă este deteriorat sau dacă a căzut.
■ Cablurile sau conexiunile defecte trebuie înlocuite de către un specialist autorizat
sau de către serviciul pentru clienţi.
■ Reparaţia aparatului trebuie realizată numai într-un atelier de specialitate auto-
rizat sau de către serviciul clienţi. În urma reparaţiilor necorespunzătoare pot
apărea pericole pentru beneficiarul aparatului. În plus, se pierde garanţia.
■ Componentele defecte trebuie înlocuite numai cu piese de schimb originale.
Numai prin utilizarea acestor componente se asigură respectarea cerinţelor de
siguranţă.
■ Nu deschideţi niciodată aparatul şi nu efectuaţi reparaţii la acesta.
■ Protejaţi aparatul împotriva apei pulverizate sau a apei care picură şi împotriva
infiltrării lichidelor.
■ Nu expuneţi niciodată aparatul căldurii extreme sau unei umidităţi ridicate a ae-
rului. Acest lucru se aplică în special pentru cazurile în care aparatul este păstrat
în maşină. În cazul perioadelor de repaus îndelungate şi în condiţii de vreme
caldă cu radiaţie solară, se produc temperaturi de peste 40°C în habitaclu şi în
torpedou. Scoateţi aparatele electrice şi electronice din autovehicul.
■ La montarea camerei şi a accesoriilor, asiguraţi-vă că acestea nu constituie un
obstacol la conducere, frânare sau pentru funcţionarea altor sisteme operaţionale
ale autovehiculului (de exemplu airbaguri) sau nu limitează vizibilitatea în timpul
deplasării.
PERICOL
Nu amplasaţi suportul auto în zona de declanşare a airbaguri sau în apropiere,
deoarece, în cazul declanşării, acesta ar putea arunca suportul în interiorul autovehiculului provocând accidentări grave.
AVERTIZARE
Camera nu poate fi montată sub nicio formă într-o poziţie din care, în caz de accident, aceasta v-ar putea lovi pe dvs. sau pe ceilalţi pasageri. Acest lucru poate
cauza vătămări corporale grave.
Page 35

CR 5 A2
RO
│
31 ■
■ Persoanelor şi copiilor care din cauza abilităţilor fizice, mentale, motorii sau
senzoriale nu pot opera aparatul în condiţii de siguranţă, le este permisă utilizarea
acestuia numai sub supravegherea sau îndrumarea unei persoane responsabile.
PERICOL
Materialele de ambalare nu trebuie ţinute la îndemâna copiilor şi nu trebuie
utilizate ca jucării. Pericol de asfixiere.
■ Copiii pot utiliza aparatul numai dacă sunt supravegheaţi. Copiii nu recunosc întot-
deauna corect pericolele posibile. Copiilor le este interzis să se joace cu aparatul.
■ Nu aşezaţi niciun fel de obiecte pe aparat.
■ Nu operaţi aparatul în apropierea flăcărilor deschise (de exemplu, a
lumânărilor).
■ Dacă se constată miros de fum sau existenţa fumului la aparat, acesta se va
deconecta imediat de la sursa de alimentare electrică.
AVERTIZARE
► Nu inspiraţi în niciun caz fumul, deoarece acesta este dăunător pentru
sănătate.
■ Verificaţi regulat dacă ventuza este ataşată fix de parbriz. Acest lucru este
important în special în zonele cu temperaturi exterioare oscilante.
■ Respectaţi legislaţia locală în vigoare. Utilizarea unei camere de cabină este
interzisă şi chiar se pedepseşte în unele ţări. În timpul deplasării este interzisă deservirea camerei. Siguranţa rutieră trebuie să fie întotdeauna pe primul plan, la
condus. Utilizaţi aparatul numai dacă nu există posibilitatea apariţiei pericolelor
în nicio situaţie de rulare.
■ În aparat este integrat un acumulator litiu-ion, motiv pentru care aparatul nu
poate fi aruncat în foc. Pericol de explozie!
■ Nu exercitaţi presiune asupra ecranului. În cazul spargerii acestuia, contactul cu
muchiile tăioase poate provoca vătămări corporale.
Page 36

CR 5 A2
■ 32│RO
Potenţiala încălcare a drepturilor terţilor
La utilizarea camerei de cabină se impune respectarea următoarelor indicaţii:
Protecţia dreptului de autor
În principiu, fiecare persoană deţine drepturi asupra propriei imagini. În conformitate
cu legea privind drepturile de autor, fotografiile fără acordul persoanelor ilustrate pot
fi făcute publice numai atunci când acestea sunt subiecte secundare în imagine, alături
de un peisaj sau diferite locaţii. Când este considerată o persoană subiect secundar
într-o imagine depinde de circumstanţele cazului singular.
Protecţia vieţii private
Viaţa privată a celorlalţi nu trebuie lezată de fotografiile realizate. Nu orientaţi
camera pe grădina sau uşa de intrare a locuinţei vecinilor, chiar dacă aceste locaţii
sunt vizibile doar din autovehicul sau din locuri publice. Acest lucru nu vă dă dreptul
să publicaţi astfel de cadre.
Identificarea personală
Vorbim despre o identificare personală în momentul în care se poate determina că o
anumită persoană s-a aflat la un anumit moment într-un anumit loc. Identificarea se
poate face şi cu ajutorul unui marcaj individual, cum ar fi numărul de înmatriculare.
O astfel de identificare a persoanelor trebuie evitată cu orice preţ.
Camerele de monitorizare la locul de muncă
În Germania, monitorizarea la locul de muncă este supusă unor prescripţii deosebit
de stricte. Angajatorul trebuie să renunţe absolut la utilizarea de camere de monitorizare la locul de muncă dacă nu poate fi exclusă complet o posibilitate de lezare a
drepturilor persoanelor.
În ceea ce priveşte lezarea drepturilor terţilor, respectaţi întotdeauna reglementările
legale din ţara de utilizare. Din cauza potenţialei lezări a drepturilor personale ale
terţilor este ilegală publicarea neautorizată, de ex. pe internet, a înregistrărilor cu
persoane străine sau numere de înmatriculare. Utilizarea înregistrărilor este permisă
exclusiv cu titlu de dovadă în urma unui accident rutier.
Page 37

CR 5 A2
RO
│
33 ■
Elemente de operare
(a se vedea figurile de pe pagina pliată)
Figura A:
Suport cu ventuză
Pârghie de blocare
Şuruburi randalinate pentru fixare tridimensională
Figura B:
Obiectiv cameră
Tasta
/▲
Tasta / ▼
Tasta MENU
Tasta MODE
Microfon
Conector Mini-USB
Orificiu RESET
Difuzor
LED-uri infraroşii
Figura C:
Indicator de operare
Capac
Conector mini HDMI
Slot de card micro SD
Ecran
Figura D:
Filet pentru prinderea suportului stativ
Tasta Pornit/Oprit
Tasta / pentru pornirea/oprirea înregistrării video, pentru
declanşarea unei capturi foto sau apelarea punctelor de meniu
Figura E:
Mufă USB pentru alimentarea electrică prin intermediul adaptorului auto
Lumină de operare
Adaptor auto12/24 V
USB pe cablu Mini-USB
Instrucţiuni de utilizare
Page 38

CR 5 A2
■ 34│RO
Furnitura şi verificarea transportului
Verificaţi furnitura (a se vedea pagina pliată). Furnitura conţine următoarele componente:
● Recorder pentru cabină CR 5 A2
● Suport cu ventuză
● Adaptor auto 12/24 V
● USB pe cablu Mini-USB
● Aceste instrucţiuni de utilizare
♦ Scoateţi toate componentele aparatului şi instrucţiunile de utilizare din amba-
laj şi verificaţi furnitura cu privire la integritate şi deteriorări vizibile
(a se vedea pagina pliată).
♦ Îndepărtaţi întregul material de ambalare, precum şi foliile de protecţie pentru
ecran
şi obiectivul camerei .
INDICAŢIE
► În cazul în care furnitura este incompletă sau dacă componentele sunt deteri-
orate din cauza ambalajului precar sau a transportului, apelaţi linia telefonică
directă de service (a se vedea capitolul Service).
Eliminarea ambalajului
Ambalajul protejează aparatul împotriva deteriorărilor în timpul transportului.
Materialele de ambalat sunt alese conform compatibilităţii acestora cu mediul
şi aspectelor tehnice privind eliminarea, fiind astfel reciclabile.
Reintroducerea ambalajelor în circuitul de materiale contribuie la economia de
materie primă şi reduce cantitatea de deşeuri. Eliminaţi ambalajul de care nu
mai aveţi nevoie conform prevederilor locale în vigoare.
INDICAŢIE
► Dacă este posibil, păstraţi ambalajul original al aparatului pe perioada
garanţiei pentru a putea ambala aparatul corespunzător în caz de utilizare a
garanţiei.
Page 39

CR 5 A2
RO
│
35 ■
Punerea în funcţiune
Introducerea / scoaterea cardului micro SD
ATENŢIE
► Nu introduceţi şi nu scoateţi cardul micro SD (nu este inclus în furnitură) în timp
ce aparatul este pornit. Acest lucru poate duce la pierderea datelor de pe
cardul micro SD
♦ Introduceţi un card micro SD în slotul de card dedicat
, în aşa fel încât
contactele aurii să indice în direcţia afişajului. Împingeţi cardul micro SD înăuntru
până când acesta anclanşează sesizabil.
♦ Pentru a scoate cardul micro SD, apăsaţi uşor pe muchia cardului.
Cardul micro SD va ieşi uşor din slot şi poate fi acum scos din aparat.
INDICAŢIE
► Camera nu dispune de memorie internă. De aceea, înregistrările pot fi realizate
numai dacă aţi introdus un card de memorie în aparat.
În tabelul următor puteţi găsi durata maximă a înregistrării, în funcţie de capacitatea
de stocare a cardului micro SD şi de rezoluţia setată:
Rezoluţie
Capacitate de stocare
a cardului micro SD
Durată aproximativă
a înregistrării
1080P
4 GB cca 0 h 19 min.
8 GB cca 0 h 41 min.
16 GB cca 1 h 21 min.
32 GB cca 2 h 41 min.
720P
4 GB cca 0 h 32 min.
8 GB cca 1 h 06 min.
16 GB cca 2 h 12 min.
32 GB cca 4 h 22 min.
480P
4 GB cca 0 h 47 min.
8 GB cca 1 h 37 min.
16 GB cca 3 h 12 min.
32 GB cca 6 h 23 min.
Page 40

CR 5 A2
■ 36│RO
Montarea camerei pe parbriz
1) Montaţi suportul cu ventuză în filetul camerei . Poziţionaţi ventuza pe parbriz. Aveţi
grija ca aceasta să se aşeze plat pe parbriz.
2) Fixaţi ventuza pe parbriz şi apăsaţi în jos
pârghia de blocare
în direcţia parbrizului.
În acest mod este generat vid, iar ventuza se
fixează pe parbriz. Mişcaţi pârghia de blocare
în direcţia opusă pentru a desprinde din
nou ventuza de pe parbriz. Pentru a uşura
desprinderea, ventuza este prevăzută cu o
gaică.
3) După ce aţi fixat camera cu ajutorul ventuzei
pe parbriz, desfaceţi succesiv şuruburile
şi
reglaţi camera conform preferinţelor.
4) După ce aţi găsit poziţia şi orientarea dorite,
strângeţi din nou manual şuruburile randalinate
.
ATENŢIE
► Camera trebuie poziţionată astfel încât câmpul vizual al şoferului să fie în
permanenţă liber.
Realizarea alimentării cu curent
ATENŢIE
► Pentru alimentarea cu curent a aparatului folosiţi exclusiv adaptorul
auto livrat.
1) Conectaţi adaptorul auto
la reţeaua de bord (bricheta) a autovehiculului.
Lumina de operare de pe adaptorul auto indică starea pregătită de funcţionare, dacă la nivelul brichetei există tensiune de bord.
2) Conectaţi cablul mini-USB livrat
cu mufa USB de pe adaptorul auto şi
conectorul USB
al camerei. Imediat ce camera este alimentată cu tensiune de
la bord, înregistrarea video începe, iar afişajul de operare luminează roşu.
Dacă acumulatorul intern al aparatului se încarcă, apare simbolul de încărcare a
bateriei pe ecran .
Page 41

CR 5 A2
RO
│
37 ■
ATENŢIE
► La autovehiculele la care bricheta funcţionează şi atunci când contactul este
oprit, după utilizare, aparatul trebuie deconectat de la brichetă. Bateria
autovehiculului s-ar putea descărca dacă aparatul este lăsat conectat mai mult
timp, deoarece acesta consumă curent şi în stare de repaus. Motorul vehiculului
nu va mai putea fi pornit în acest caz.
► La vehiculele la care bricheta nu este oprită, nici înregistrarea nu este
întreruptă automat. În acest caz va trebui să opriţi camera manual.
Operarea şi funcţionarea
Acest capitol cuprinde indicaţii importante cu privire la operarea şi funcţionarea
aparatului.
Pornirea şi oprirea, realizarea setărilor
Apăsaţi tasta Pornit/Oprit pentru a porni aparatul. Imaginea de la cameră
apare pe ecran
. Aparatul este acum pregătit de operare în modul video.
Pentru a opri aparatul, menţineţi tasta Pornit/Oprit
apăsată timp de 3 secunde.
Setări de bază
Meniul Setup
Pentru a putea realiza setări de bază pentru aparat în meniul Setup, apăsaţi tasta
MENU urmată de tasta MODE . Se deschide meniul Setup:
Default settings
INDICAŢIE
► Atunci când apelaţi meniul, trebuie să apăsaţi mai întâi tasta ▼
pentru a
plasa bara de selecţie pe primul punct.
Ulterior, cu ajutorul tastelor ▲▼
/ puteţi deplasa bara de selecţie pe punctul
dorit şi puteţi apela apoi respectiva funcţie de meniu cu tasta / . Pentru a
părăsi un punct de meniu fără a face modificări, apăsaţi tasta MODE . În dreapta
jos este afişată masca de meniu curentă, precum şi numărul total al măştilor de
meniu. Pentru a închide meniul, apăsaţi tasta MENU .
Page 42

CR 5 A2
■ 38│RO
Time & date (Ora şi data)
Dacă apelaţi această funcţie de meniu puteţi selecta apoi, cu tastele ▲▼
/ ,
dacă înregistrările vor fi salvate sau nu cu o dată inserată în imagine. Selectaţi „Time& date-stamp on”, pentru a activa această funcţie sau „Time- & date-stamp off”
pentru a o dezactiva. Pentru setarea datei curente, apelaţi „Set time & date”. Setaţi
apoi cu tastele ▲▼ / anul pentru data curentă.
Apăsaţi tasta MODE pentru a seta poziţia orelor pentru ora curentă, cu tastele
▲▼ / . Apăsaţi tasta MODE pentru a seta minutele cu tastele ▲▼ / .
Apăsaţi tasta MODE pentru a seta secundele cu tastele ▲▼ / . Apăsaţi tasta
MODE pentru a seta formatul dorit pentru dată cu tastele ▲▼ / : Astfel, succesiunea „YY/MM/DD” este disponibilă pentru formatul de afişare a datei cu două cifre
în ordinea „an / lună / zi”, „MM/DD/YY” este disponibilă pentru formatul de afişare
a datei cu două cifre în ordinea „lună / zi / an”, iar „DD/MM/YY” este disponibilă
pentru formatul de afişare a datei cu două cifre în ordinea „zi / lună / an”. Apăsaţi
tasta MODE pentru a seta ziua cu tastele ▲▼ / . Apăsaţi tasta MODE
pentru a seta luna cu tastele ▲▼ / .
Confirmaţi selecţia cu tasta / . Apoi, afişajul revine la lista punctelor de
meniu.
Auto Power Off (Oprirea automată)
Dacă apelaţi această funcţie de meniu, puteţi selecta apoi cu tastele ▲▼
/
dacă aparatul se va opri automat după „1 min.”, „3 min.” sau „5 min.” de inactivitate. În cazul selecţiei „Off”, aparatul nu se va opri automat. Confirmaţi selecţia cu
tasta
/ . Apoi, afişajul revine la lista punctelor de meniu.
Impact sensor (Senzor de impact)
Dacă apelaţi această funcţie de meniu, puteţi selecta apoi cu tastele ▲▼
/
sensibilitatea senzorului de impact integrat: Puteţi opta între „Very low”, „Low”,
„Middle”, „High” şi „Very high”. În cazul detectării unei vibraţii care poate avea
drept cauză un accident, această funcţie protejează automat înregistrarea video în
curs împotriva suprascrierii în bucla infinită. Pe ecran apare simbolul , iar
înregistrarea curentă este protejată împotriva ştergerii. Confirmaţi selecţia cu tasta
/ . Apoi, afişajul revine la lista punctelor de meniu.
Beep sound (Sunet bip)
Dacă apelaţi această funcţie de mediu, puteţi selecta apoi cu tastele ▲▼
/
dacă aparatul confirmă prin semnale acustice apăsarea tastelor, precum şi pornirea
şi oprirea („On”) sau nu („Off”). Confirmaţi selecţia cu tasta / .
Apoi, afişajul revine la lista punctelor de meniu.
INDICAŢIE
► Numărătoarea inversă şi sunetul de declanşare la o înregistrare cu
autodeclanşator sunt redate chiar şi în cazul semnalului acustic dezactivat.
Page 43

CR 5 A2
RO
│
39 ■
Auto display off (Oprirea automată a afişajului)
Dacă apelaţi această funcţie de meniu, puteţi selecta apoi cu tastele ▲▼
/
intervalele de timp după expirarea cărora afişajul să se oprească automat:
Puteţi opta între „1 min.”, „3 min.” şi „5 min.”. Selectaţi „Display always on”,
dacă afişajul nu trebuie să se oprească. Pentru a reporni afişajul după o oprire
automată a acestuia, apăsaţi una dintre tastele ▲▼ / , tasta MODE sau
tasta / .
Language (Limbă)
Dacă apelaţi această funcţie de meniu, puteţi selecta apoi cu tastele ▲▼
/
„English” sau„Deutsch” ca limbă pentru afişarea meniurilor pe ecran. Confirmaţi
selecţia cu tasta / . Apoi, afişajul revine la lista punctelor de meniu.
Display icon rotation (Rotire pictograme afişaj)
Dacă apelaţi această funcţie de meniu, puteţi seta apoi cu tastele ▲▼
/
dacă reprezentarea simbolurilor de pe afişaj şi a meniurilor se face normal („Off”) sau
rotită la 180° („On”). În acest caz, cea mai potrivită setare depinde de modul în
care aţi poziţionat camera.
Format memory card (Formatare card de memorie)
Dacă apelaţi această funcţie de meniu, puteţi formata apoi cu tastele ▲▼
/
cardul micro SD introdus. În timpul acestui proces, toate datele de pe cardul micro
SD se pierd irecuperabil, acest lucru fiind valabil chiar şi pentru fişierele protejate la
ştergere. Pentru a realiza formatarea, cu tastele ▲▼
/ selectaţi „OK” şi apăsaţi
tasta
/ . Se realizează acum procesul de formatare.
Default settings (Setări implicite)
Dacă apelaţi această funcţie de meniu, puteţi reseta apoi toate setările aparatului la valorile implicite din fabricaţie. Cu tastele ▲▼
/ selectaţi „OK” şi confirmaţi selecţia
cu tasta / .
Apoi, afişajul revine la lista punctelor de meniu. Toate setările pe care le-aţi făcut
anterior sunt resetate acum la valorile implicite din fabricaţie.
Pentru a închide meniul Setup, apăsaţi tasta MENU
.
Page 44

CR 5 A2
■ 40│RO
Pregătirea pentru înregistrarea video
În starea pregătită pentru înregistrarea video, ecranul afişează următoarele:
A – Afişaj al duratei de înregistrare rămasă în funcţie de rezoluţie şi de spaţiul
de stocare disponibil
B – Rezoluţia video curentă
C – Simbolul pentru cardul micro SD introdus
D – Indicatorul stării de încărcare a acumulatorului intern al aparatului
E – Indicarea datei (numai dacă este activată funcţia „Marcaj de oră şi dată”)
F – Indicarea orei (numai dacă este activată funcţia „Marcaj de oră şi dată”)
G – Simbolul pentru detectarea mişcării (vizibil numai dacă funcţia este activată)
H – Simbolul pentru înregistrarea în buclă infinită, precum şi durata în minute (aici 3
minute)
I – Indicaţie pentru corecţia expunerii
J – Simbol pentru starea pregătită de înregistrare video
K – Punctul roşu clipeşte în timpul înregistrării
L – Simbolul pentru un fişier protejat împotriva ştergerii
Începerea / terminarea înregistrării
Apăsaţi, dacă este cazul, repetat tasta /▲ , pentru a apropia subiectul. Menţineţi
apăsată această tastă pentru o mărire rapidă. Cu tasta
/▼ puteţi îndepărta
subiectul, în mod similar. Apăsaţi tasta / , pentru a porni înregistrarea video.
În timpul înregistrării video, indicatorul de operare clipeşte în verde (numai la
funcţionare cu acumulator). Apăsaţi din nou această tastă pentru a termina înregistrarea. Dacă, în timpul înregistrării, apăsaţi tasta MODE , apare simbolul , iar
înregistrarea curentă este protejată împotriva ştergerii.
INDICAŢIE
► Imediat ce camera este alimentată de la reţeaua de bord, înregistrarea începe.
Pentru a opri apoi înregistrarea apăsaţi tasta
/ .
Page 45

CR 5 A2
RO
│
41 ■
Dacă în modul pregătit pentru înregistrarea video apăsaţi tasta MENU , se deschide meniul următor:
Motion detection
Cu tastele ▲▼ / puteţi muta bara de selecţie pe punctul dorit şi puteţi apela
apoi respectiva funcţie de meniu cu tasta / . Pentru a părăsi un punct de meniu fără a face modificări, apăsaţi tasta MODE . În dreapta jos este afişată masca
de meniu curentă, precum şi numărul total al măştilor de meniu. Dacă este selectat
ultimul punct de meniu dintr-o mască, după care mai urmează încă o mască, apăsaţi
tasta ▼ , pentru a sări la primul punct de meniu din următoarea mască. Pentru a
închide meniul, apăsaţi tasta MENU .
Resolution (Rezoluţia)
Dacă apelaţi această funcţie de meniu, puteţi stabili dimensiunea imaginii video:
Puteţi opta între „1920x1080P (HD)”, „1280 x 720P” şi „640 x 480P”.
Cu tastele ▲▼
/ selectaţi rezoluţia dorită şi confirmaţi selecţia cu tasta /
, pentru a reveni apoi la lista punctelor de meniu.
Exposure (Expunerea)
Dacă apelaţi această funcţie de meniu, puteţi corecta apoi expunerea video în trei
trepte în sus (de la +1 până la +3, mai luminos), respectiv în jos (de la -1 până la -3,
mai întunecat). În setarea „0” nu are loc o corecţie a expunerii. Cu tastele ▲▼
/
selectaţi corecţia dorită pentru expunerea video şi confirmaţi selecţia cu tasta
/ , pentru a reveni apoi la lista punctelor de meniu.
Video length (Lungime videoclip)
Dacă apelaţi această funcţie de meniu, puteţi stabili durata buclei infinite pentru
înregistrarea video: Puteţi opta între „3 min.”, „5 min.”, „10 min.” sau „Loop recording off”. Cu tastele ▲▼
/ selectaţi valoarea dorită pentru înregistrarea în buclă
şi confirmaţi selecţia cu tasta
/ , pentru a reveni apoi la lista punctelor de
meniu.
Reţineţi în acest context faptul că, în funcţie de rezoluţia video setată, cardul de me-
morie micro SD trebuie să aibă o capacitate suficientă pentru a putea atinge durata
dorită a buclei infinite. Dacă selectaţi „Loop recording off”, înregistrarea se încheie la
atingerea limitei de capacitate a cardului micro SD. La sfârşitul înregistrării, aparatul
începe o nouă înregistrare cu durata setată.
Page 46

CR 5 A2
■ 42│RO
În cazul în care capacitatea cardului de memorie utilizat nu este suficientă pentru durata setată a buclei infinite, înregistrarea este întreruptă. Reduceţi în acest caz durata
buclei infinite sau utilizaţi un card de memorie cu o capacitate mai mare.
Motion detection (Detectarea mişcării)
Dacă apelaţi această funcţie de meniu, puteţi activa sau dezactiva această funcţie cu
tastele ▲▼
/ . Confirmaţi selecţia cu tasta / pentru a reveni apoi la
lista punctelor de meniu.
Dacă funcţia este activată, aparatul încheie automat înregistrarea în momentul în
care nu mai sunt detectate imagini în mişcare. Dacă aparatul înregistrează din nou
mişcări, acesta reîncepe automat o nouă înregistrare. Dacă funcţia este dezactivată,
aparatul nu întrerupe înregistrarea în cazul absenţei mişcărilor.
INDICAŢIE
► Puteţi activa această funcţie numai atunci când autovehiculul este staţionar, de
ex. pentru a filma o încercare de spargere sau un autovehicul opus după o
coliziune.
► Această primă înregistrare trebuie pornită manual chiar şi atunci când funcţia
este activă.
Audio recording (Înregistrarea audio)
Dacă apelaţi această funcţie de meniu, puteţi activa sau dezactiva înregistrarea
audio prin intermediul microfonului integrat, cu tastele ▲▼
/ . Confirmaţi selecţia
cu tasta / pentru a reveni apoi la lista punctelor de meniu.
Page 47

CR 5 A2
RO
│
43 ■
Starea pregătită de realizare a fotografiilor
Cu meniul închis, apăsaţi în starea pregătită pentru înregistrare video tasta MODE
, pentru a comuta în starea pregătită pentru realizarea fotografiilor. Apoi, aparatul
afişează următoarele elemente pe ecran :
A – Afişaj al numărului de fotografii care mai pot fi realizate în funcţie de rezoluţie şi
de spaţiul de stocare disponibil
B – Rezoluţia foto curentă
C – Simbolul pentru cardul micro SD introdus
D – Indicatorul stării de încărcare a acumulatorului intern al aparatului
E – Indicarea datei (numai dacă este activată funcţia „Marcaj de oră şi dată”)
F – Indicarea orei (numai dacă este activată funcţia „Marcaj de oră şi dată”)
G – Simbolul pentru autodeclanşator (aici 5 secunde; vizibil numai dacă funcţia
este activată)
H – Simbol pentru corecţia expunerii
I – Indicaţie pentru starea pregătită de realizare a fotografiilor
J – Indicaţie pentru funcţia de fotografiere în serie (vizibilă numai dacă funcţia este
activată)
Realizarea fotografiilor
Apăsaţi, dacă este cazul, repetat tasta /▲ , pentru a apropia subiectul. Menţineţi
apăsată această tastă pentru o mărire rapidă. Cu tasta
/▼ puteţi îndepărta
subiectul, în mod similar. Apăsaţi tasta / pentru a face o fotografie.
Dacă în modul pregătit pentru realizarea fotografiilor apăsaţi tasta MENU
, se
deschide meniul următor:
Cu tastele ▲▼ / puteţi muta bara de selecţie pe punctul dorit şi puteţi apela
apoi respectiva funcţie de meniu cu tasta / .
Page 48

CR 5 A2
■ 44│RO
Pentru a părăsi un punct de meniu fără a face modificări, apăsaţi tasta MODE
.
În dreapta jos este afişată masca de meniu curentă, precum şi numărul total al
măştilor de meniu. Dacă este selectat ultimul punct de meniu dintr-o mască, după
care mai urmează încă o mască, apăsaţi tasta ▼ pentru a sări la primul
punct de meniu din următoarea mască. Pentru a închide meniul, apăsaţi tasta MENU
.
Resolution (Rezoluţia)
Dacă apelaţi această funcţie de meniu, puteţi selecta apoi cu tastele ▲▼
/
dimensiunea dorită pentru fotografii: Puteţi opta între „12MP (interp.*)”, „7MP (interp.*)”, „5MP”, „3MP”, „2MP”, „1,3MP” sau „0,3MP”. „MP” este aici acronimul
pentru megapixel, de ex. setarea „5MP” are ca rezultat o imagine de 2.592 ×
1.944 pixeli, echivalentul a aproximativ 5 milioane pixeli. Cu cât imaginile sunt mai
mari, cu atât mai mare este acurateţea detaliilor. Totuşi, cardul micro SD îşi atinge
rapid limitele de capacitate în cazul rezoluţiilor foto mari. Confirmaţi selecţia cu tasta
/ pentru a reveni apoi la lista punctelor de meniu.
* Interpolare = mărire aritmetică a cantităţii de puncte de imagine
Exposure (Expunerea)
Dacă apelaţi această funcţie de meniu, puteţi corecta apoi expunerea foto în trei
trepte în sus (de la +1 până la +3, mai luminos), respectiv în jos (de la –1 până la
–3, mai întunecat). Cu tastele ▲▼
/ selectaţi corecţia dorită pentru expunerea
foto şi confirmaţi selecţia cu tasta / , pentru a reveni apoi la lista punctelor
de meniu.
3 photos in series (3 fotografii în rafală)
Dacă apelaţi această funcţie de meniu, puteţi activa sau dezactiva apoi cu tastele
▲▼
/ această funcţie pentru realizarea a 3 fotografii în succesiune rapidă.
Confirmaţi selecţia cu tasta / pentru a reveni apoi la lista punctelor de
meniu.
Self-timer (Autodeclanşatorul)
Dacă apelaţi această funcţie de meniu, puteţi selecta apoi cu tastele ▲▼
/ o
temporizare de 2, 5 sau 10 secunde a declanşării. Imaginea este capturată apoi
după expirarea timpului setat de la apăsarea tastei / . Selectaţi „direct
capture”, pentru a dezactiva funcţia temporizării declanşării. Confirmaţi selecţia cu
tasta / pentru a reveni apoi la lista punctelor de meniu.
Modul de redare
Cu meniul închis, apăsaţi în starea pregătită pentru realizarea fotografiilor tasta
MODE , pentru a comuta în modul de redare. Cu tastele ▲▼ / puteţi comuta
printre capturile realizate. Dacă selectaţi o fotografie şi apăsaţi tasta
/ , toate fotografiile salvate sunt afişate sub forma unei prezentări de diapozitive. Apăsaţi
din nou tasta / pentru a termina prezentarea de diapozitive. Dacă selectaţi
un videoclip şi apăsaţi tasta
/ , acesta este redat.
Page 49

CR 5 A2
RO
│
45 ■
Dacă selectaţi o fotografie, ecranul afişează următoarele:
A – Indicarea numărului actual/total de înregistrări
B – Rezoluţia fotografiei selectate curent
C – Indicatorul stării de încărcare a acumulatorului intern al aparatului
D – Marcaj dată/oră al imaginii înregistrate
E – Simbolul pentru modul de redare
F – Simbolul pentru un fişier protejat împotriva ştergerii
Dacă apăsaţi acum tasta MENU
, se deschide meniul următor:
Delete
Cu tastele ▲▼ / puteţi muta bara de selecţie pe punctul dorit şi puteţi apela
apoi respectiva funcţie de meniu cu tasta / . Pentru a părăsi un punct de meniu fără a face modificări, apăsaţi tasta MODE . În dreapta jos este afişată masca
de meniu curentă, precum şi numărul total al măştilor de meniu. Pentru a închide
meniul, apăsaţi tasta MENU .
Delete (Ştergere)
Dacă apelaţi această funcţie de meniu, cu tastele ▲▼
/ puteţi şterge apoi imaginea selectată curent („Delete this file”), „Delete all files” sau „Cancel”. Confirmaţi
selecţia cu tasta
/ . În cazul în care confirmaţi următoarea întrebare de
siguranţă cu „OK”, funcţia de ştergere selectată este executată, iar meniul este închis.
Dacă se afişează în schimb „The file is write-protected”, trebuie să ridicaţi mai întâi
protecţia cu ajutorul funcţiei descrise în secţiunea „Write protection”.
Page 50

CR 5 A2
■ 46│RO
Write protection (Protecţie la scriere)
Dacă apelaţi această funcţie de meniu, cu tastele ▲▼
/ puteţi selecta apoi
dacă fişierul selectat curent trebuie protejat împotriva ştergerii („Write-protect this file”),
dacă protecţia fişierului selectat curent trebuie ridicată („Unlock this file”), dacă
toate fişierele trebuie protejate împotriva ştergerii („Write-protect all files”) sau dacă
trebuie ridicată protecţia împotriva ştergerii pentru toate fişierele („Unlock all files”).
Confirmaţi selecţia cu tasta / . Apoi, afişajul revine la lista punctelor de
meniu.
INDICAŢIE
► Aplicarea acestor funcţii pe un număr mare de fişiere poate dura câteva
secunde.
Dacă selectaţi un videoclip cu tastele ▲▼
/ , ecranul afişează
următoarele:
A – Indicarea numărului actual/total de înregistrări
B – Rezoluţia videoclipului selectat curent
C – Durata videoclipurilor
D – Indicatorul stării de încărcare a acumulatorului intern al aparatului
E – Simbolul funcţiei pentru tasta MODE
: oprirea redării video, respectiv foto
F – Simbolul funcţiei pentru tasta
/ : pornirea/întreruperea redării video,
respectiv foto
G – Simbolul pentru modul de redare
H – Simbolul pentru un fişier protejat împotriva ştergerii
Page 51

CR 5 A2
RO
│
47 ■
Dacă apăsaţi acum tasta MENU , se deschide meniul următor:
Delete
Cu tastele ▲▼ / puteţi muta bara de selecţie pe punctul dorit şi puteţi apela
apoi respectiva funcţie de meniu cu tasta / . Pentru a părăsi un punct de meniu fără a face modificări, apăsaţi tasta MODE . Pentru a închide meniul, apăsaţi
tasta MENU .
Delete (Ştergere)
Dacă apelaţi această funcţie de meniu, cu tastele ▲▼
/ puteţi şterge apoi
videoclipul selectat curent („Delete this file”), „Delete all files” sau „Cancel”.
Confirmaţi selecţia cu tasta / . În cazul în care confirmaţi următoarea întrebare de siguranţă cu „OK”, funcţia de ştergere selectată este executată, iar meniul
este închis. Dacă se afişează în schimb „This file is write-protected”, trebuie să ridicaţi
mai întâi protecţia cu ajutorul funcţiei descrise în secţiunea „Write protection”.
Write protection (Protecţie la scriere)
Dacă apelaţi această funcţie de meniu, cu tastele ▲▼
/ puteţi selecta apoi
dacă fişierul selectat curent trebuie protejat împotriva ştergerii („Write-protect this file”),
dacă protecţia fişierului selectat curent trebuie ridicată („Unlock this file”), dacă
toate fişierele trebuie protejate împotriva ştergerii („Write-protect all files”) sau dacă
trebuie ridicată protecţia împotriva ştergerii pentru toate fişierele („Unlock all files”).
Confirmaţi selecţia cu tasta / . Apoi, afişajul revine la lista punctelor de
meniu.
INDICAŢIE
► Aplicarea acestor funcţii pe un număr mare de fişiere poate dura câteva secunde.
Afişarea înregistrărilor pe un monitor extern
INDICAŢIE
► Camera poate transmite imaginea video pe un monitor extern, respectiv la
intrarea video a unui televizor. Respectaţi în acest sens instrucţiunile pentru
dispozitivul de redare respectiv.
♦ Rabataţi capacul
într-o parte şi realizaţi conexiunea între portul mini HDMI
al camerei, printr-un cablu mini HDMI (nu este inclus în furnitură) şi un monitor
adecvat. În cazul acestui tip de conexiune sunt transmise numai videoclipurile
salvate. Afişajul integrat este apoi dezactivat.
♦ Porniţi redarea cu tasta
/ .
Page 52

CR 5 A2
■ 48│RO
Redarea înregistrărilor pe un computer
Introduceţi fişa mini USB a cablului USB livrat în conectorul camerei
şi fişa USB într-un port USB liber al unui computer pornit. Acesta recunoaşte acum
aparatul ca „dispozitiv de stocare în masă”, apoi camera se conectează la computer
şi apoi conţinutul cardului micro SD din cameră este afişat pe computer ca o nouă
unitate de disc. Executaţi operaţiile dorite la nivelul fişierelor.
Resetare aparat
Dacă aparatul nu funcţionează conform instrucţiunilor descrise sau nu reacţionează la
comenzile dvs., apăsaţi cu ajutorul unui obiect ascuţit, de ex. cu o agrafă de birou,
cu atenţie pe comutatorul din spatele orificiului RESET
din carcasă, pentru a-l
reporni.
Schimbarea siguranţei
În adaptorul auto se găseşte o siguranţă. Dacă aparatul nu funcţionează, este
posibil ca siguranţa să fie defectă. Înlocuiţi în acest caz siguranţa cu alta nouă, de
acelaşi tip (consultaţi şi capitolul Date tehnice).
♦ Scoateţi pentru aceasta adaptorul auto
din brichetă.
♦ Deschideţi adaptorul auto
prin rotirea cu atenţie în sens antiorar a capătului
filetat cu striaţii (C), respectiv cu ajutorul unui cleşte, şi scoateţi capătul filetat.
♦ Scoateţi acum vârful fişei (B) din siguranţă (A), extrageţi siguranţa (A) şi puneţi-o
deoparte.
♦ Acum introduceţi siguranţa nouă în adaptorul auto , poziţionaţi vârful fişei (B)
pe capătul uşor proeminent al siguranţei şi înşurubaţi la loc capătul filetat (C)
îndepărtat anterior.
INDICAŢIE
► Dacă în continuare aparatul nu funcţionează sau se arde şi siguranţa nouă,
aparatul prezintă o defecţiune. În acest caz apelaţi linia telefonică directă de
service (a se vedea capitolul Service).
Page 53

CR 5 A2
RO
│
49 ■
Curăţarea
ATENŢIE
Defectarea aparatului!
► În timpul curăţării asiguraţi-vă că în aparat nu pătrunde umezeală, pentru a evita
defectarea iremediabilă a aparatului.
► Nu folosiţi substanţe de curăţare abrazive sau care conţin solvenţi, deoarece
acestea pot deteriora carcasa, respectiv produsul.
■ Curăţaţi suprafeţele aparatului cu un prosop moale şi uscat. În cazul murdăriei
persistente folosiţi detergent universal şi apă. Asiguraţi-vă că nu pătrunde apă în
aparat.
Remedierea defecţiunilor
Acest capitol cuprinde indicaţii importante cu privire la localizarea şi remedierea
defecţiunilor. Respectaţi indicaţiile pentru a evita pericolele şi deteriorările.
AVERTIZARE
► Repararea aparatelor electrice este permisă numai specialiştilor autorizaţi de
producător. Reparaţiile incompetente reprezintă un pericol pentru utilizatorul
aparatului şi defectarea acestuia din urmă.
Cauzele defecţiunilor şi remedierea acestora
Tabelul următor este util pentru localizarea şi remedierea defecţiunilor minore:
Defecţiunea
Cauza
posibilă
Remedierea
Camera nu funcţionează
prin intermediul acumulatorului integrat.
Acumulatorul este
consumat.
Încărcaţi acumulatorul integrat cu
ajutorul unui computer conectat prin
intermediul conectorului
aparatului şi pornit sau prin intermediul reţelei
de bord a autovehiculului.
Camera nu funcţionează
în autovehicul.
Bateria autovehiculului este
consumată.
Încărcaţi bateria autovehiculului.
Siguranţa din
adaptorul auto
este defectă.
Înlocuiţi siguranţa (consultaţi capitolul
Schimbarea siguranţei).
Camera nu înregistrează
corect în timpul deplasării.
Există defecţiuni
la nivelul senzorului de mişcare
integrat.
Activaţi senzorul de mişcare integrat
(funcţia „Motion detection” din meniul
de configurare) numai cu autovehiculul
parcat.
Măriţi sensibilitatea senzorului de
mişcare.
Page 54

CR 5 A2
■ 50│RO
Defecţiunea
Cauza
posibilă
Remedierea
Aparatul nu reacţionează
sau nu reacţionează
conform aşteptărilor la
comenzile dvs.
Există o
defecţiune.
Apăsaţi atent cu un obiect ascuţit pe
comutatorul din spatele orificiului
RESET
din carcasă pentru a-l
reporni.
Ventuza nu ţine. Suprafaţa folosită
nu este curată.
Curăţaţi suprafaţa. Puteţi mări capacitatea de susţinere dacă umeziţi uşor
ventuza înainte de aplicare.
INDICAŢIE
► Dacă nu reuşiţi să rezolvaţi problema cu niciunul dintre paşii indicaţi anterior,
adresaţi-vă serviciului pentru clienţi.
Depozitarea / Eliminarea
Depozitarea în cazul neutilizării
Dacă nu utilizaţi aparatul un timp mai îndelungat, depozitaţi-l într-un loc curat şi
uscat, departe de radiaţia solară directă. În acest caz se recomandă să încărcaţi
acumulatorul integrat din când în când.
Eliminarea aparatului
Simbolul alăturat al pubelei tăiate cu roţi indică faptul că acest aparat face obiectul
directivei 2012/19/EU. Această directivă indică faptul că la sfârşitul perioadei de
utilizare a aparatului, acesta nu trebuie eliminat în gunoiul menajer obişnuit, ci
trebuie predat punctelor de colectare speciale sau centrelor de eliminare a
deşeurilor.
Acumulatorul integrat nu poate fi scos din aparat.
Eliminarea nu implică niciun cost pentru dvs. Contribuiţi la protejarea
mediului înconjurător prin eliminarea corespunzătoare a deşeurilor.
Informaţii suplimentare pot fi solicitate de la centrul local de eliminare sau
administraţia locală.
Anexa
Indicaţii privind declaraţia de conformitate UE
Acest aparat corespunde cerinţelor fundamentale şi altor prescripţii relevante ale
Directivei 2014/30/EU privind compatibilitatea electromagnetică, precum şi celor
ale Directivei RoHS 2011/65/EU.
Declaraţia de conformitate UE completă este disponibilă la sediul importatorului.
Page 55

CR 5 A2
RO
│
51 ■
Date tehnice
Recorder de cabină
Tensiune de operare
5V
, prin intermediul acumulatorului litiu-ion integrat
(3,7V/350mAh) sau al conectorului USB
Tensiune de intrare a
adaptorului auto
12V/24V
, max. 700mA prin intermediul reţelei
de bord a autovehiculului
Siguranţa adaptorului
auto
T2AL / 250V
Tensiune de ieşire a
adaptorului auto
5V
,1A
Mediu de stocare
Card micro SD, sistem de fişiere FAT, sunt acceptate carduri cu o capacitate de stocare de până la 32 GB
Ecran
Ecran LCD color 2,7“ TFT
(diagonala cca 6,8 cm)
Rezoluţii foto
5 megapixeli, 3 megapixeli, 2 megapixeli,
1,3 megapixeli, 0,3 megapixeli (7 megapixeli
şi 12 megapixeli interpolat)
Format de înregistrare
foto
JPEG
Rezoluţii video
Rez. 1: 1.920 x 1.080 pixeli / rată de redare
25 fps (cadre pe secundă) (Date: 1 GB / 5 min.)
Rez. 2: 1.280 x 720 pixeli, rată de redare
30 fps (cadre pe secundă)
Rez. 3: 640 x 480 pixeli, rată de redare
30 fps (cadre pe secundă)
Format înregistrare video AVI
Unghi de înregistrare
orizontal
58° video 1.920 x 1.080
80° foto 2.592 x 1.944
vertical
30° video 1.920 x 1.080
56° foto 2.592 x 1.944
Temperatura de operare 15°C până la 40°C
Temperatura de
depozitare
5°C până la 40°C
Umiditate (fără condens) 5 până la 75 %
Dimensiuni (l x A x Î) cca 7,5 × 4,8 x 3,2 cm
Greutate Camera cca 63 g, setul complet cca 160 g
Page 56

CR 5 A2
■ 52│RO
Garanţia
Pentru acest aparat se acordă o garanţie de 3 ani începând cu data cumpărării.
Aparatul a fost produs cu grijă şi verificat cu scrupulozitate înaintea livrării. Păstraţi
bonul de casă pentru a dovedi cumpărarea. Dacă aveţi solicitări privind garanţia,
contactaţi telefonic centrul dumneavoastră de service. Numai astfel poate fi
asigurată o expediere gratuită a produsului dumneavoastră.
INDICAŢIE
► Garanţia se acordă numai pentru defectele de material sau de fabricaţie, nu şi
pentru daune de transport, piese de uzură sau deteriorări ale componentelor
fragile, de exemplu, întrerupător.
Aparatul este destinat numai pentru uz privat şi nu pentru o utilizare profesională. În
cazul manevrării abuzive sau necorespunzătoare, uzului de forţă şi intervenţiilor care
nu au fost realizate de către filiala noastră autorizată de service, garanţia îşi pierde
valabilitatea. Drepturile dumneavoastră legale nu sunt limitate prin această garanţie.
Perioada de garanţie nu este prelungită după realizarea reparaţiilor realizate în
perioada garanţie. Acest lucru este valabil şi pentru piesele înlocuite şi reparate.
Deteriorările şi deficienţele prezente deja la cumpărare trebuie semnalate imediat după
dezambalare sau cel târziu în două zile de la data cumpărării. Reparaţiile necesare
după expirarea perioadei de garanţie se efectuează contra cost.
Service-ul
R
Service România
Tel.: 0800896637
E-Mail: kompernass@lidl.ro
IAN 275078
Importator
KOMPERNASS HANDELS GMBH
BURGSTRASSE 21
44867 BOCHUM
GERMANY
www.kompernass.com
Page 57

CR 5 A2
BG
│
53 ■
Съдържание
Въведение ...................................................54
Информация относно това ръководство за потребителя ........................54
Авторско право .........................................................54
Указания относно търговски марки .........................................54
Употреба по предназначение .............................................54
Използвани предупредителни указания .....................................55
Безопасност ..................................................56
Основни указания за безопасност. . . . . . . . . . . . . . . . . . . . . . . . . . . . . . . . . . . . . . . . . .56
Възможно нарушаване на права на трети лица ..............................58
Експлоатационни елементи ....................................59
Окомплектовка на доставката и инспекция след транспортиране ...............60
Предаване на опаковката за отпадъци ......................................60
Пускане в експлоатация .......................................61
Поставяне/Изваждане на Micro SD карта ...................................61
Монтиране на камерата на предното стъкло .................................62
Свързване към електрозахранването .......................................62
Обслужване и работа . . . . . . . . . . . . . . . . . . . . . . . . . . . . . . . . . . . . . . . . .63
Включване и изключване, извършване на настройки ..........................63
Основни настройки ......................................................63
Меню Setup ..........................................................63
Готовност за видеозапис ...............................................66
Стартиране/Завършване на запис .......................................66
Готовност за фотозаснемане ............................................69
Фотозаснемане ......................................................69
Режим на възпроизвеждане ............................................70
Показване на записи на външен монитор ...................................73
Възпроизвеждане на записи на компютър ...................................74
Връщане на уреда в изходно състояние .....................................74
Смяна на предпазител ...................................................74
Почистване ..................................................75
Отстраняване на неизправности ................................75
Причини за неизправности и отстраняване на неизправности ...................75
Съхранение /Предаване за отпадъци ...........................76
Съхранение при неизползване ............................................76
Предаване на уреда за отпадъци ..........................................76
Приложение .................................................76
Указания относно ЕС декларацията за съответствие ...........................76
Технически характеристики ...............................................77
Гаранция. . . . . . . . . . . . . . . . . . . . . . . . . . . . . . . . . . . . . . . . . . . . . . . . . . . . . . . . . . . . . . .78
Сервиз ................................................................78
Вносител ...............................................................78
Page 58

CR 5 A2
■ 54│BG
Въведение
Информация относно това ръководство за потребителя
Поздравяваме ви за покупката на вашия нов уред.
Избрали сте висококачествен продукт. Ръководството за потребителя е нераз-
делна част от този продукт. То съдържа важни указания относно безопасността,
употребата и предаването за отпадъци. Преди да използвате продукта, се запознайте с всички указания за обслужване и безопасност. Използвайте продукта
единствено според описанието и за указаните области на приложение. Винаги
съхранявайте ръководството за потребителя за справка в близост до продукта.
При предаване или продажба на продукта на трети лица предайте също и цялата документация, вкл. това ръководство за потребителя.
Авторско право
Тази документация е защитена от Закона за авторското право.
Всяко размножаване респ. препечатване на ръководството или на части от него,
както и възпроизвеждането на изображенията, също и с направени промени в
тях, е разрешено единствено с писменото съгласие на производителя.
Указания относно търговски марки
USB® е регистрирана търговска марка на USB Implementers Forum, Inc.
Всички останали наименования и продукти могат да са търговските марки или
регистрирани търговски марки на съответните им собственици.
Употреба по предназначение
Този видеорегистратор е уред от информационната електроника и служи за
цифрово фото- и видеозаснемане, специално по време на пътуване в моторни
превозни средства. Друга или излизаща извън тези рамки употреба се счита
за нецелесъобразна. Уредът не е предвиден за употреба в производствени или
промишлени условия. Претенции от всякакъв вид за щети, произтичащи от употреба не по предназначение, некомпетентни ремонти, извършени без разрешение изменения или използване на неодобрени резервни части са изключени.
Рискът се поема единствено от потребителя.
Page 59

CR 5 A2
BG
│
55 ■
Използвани предупредителни указания
В настоящото ръководство за потребителя са използвани следните предупреждения:
ОПАСНОСТ
Предупредително указание с тази степен на опасност обозначава
грозяща опасна ситуация.
Ако опасната ситуация не бъде избегната, тя може да доведе до тежки
наранявания или смърт.
► Спазвайте инструкциите в това предупредително указание, за да избегне-
те опасността тежки наранявания или смърт.
ПРЕДУПРЕЖДЕНИЕ
Предупредително указание с тази степен на опасност обозначава
възможна опасна ситуация.
Ако опасната ситуация не бъде избегната, тя може да доведе до наранявания.
► Спазвайте инструкциите в това предупредително указание, за да избегне-
те наранявания на хора.
ВНИМАНИЕ
Предупредително указание с тази степен на опасност обозначава
възможни материални щети.
Ако ситуацията не бъде избегната, тя може да доведе до материални щети.
► Спазвайте инструкциите в това предупредително указание, за да избегне-
те материални щети.
УКАЗАНИЕ
► Указанието дава допълнителна информация, която улеснява работата с уреда.
Page 60

CR 5 A2
■ 56│BG
Безопасност
Тази глава съдържа важни указания за безопасност при работа с уреда. Този
уред отговаря на основните правила по техника на безопасност. Неправилна
употреба може да доведе до телесни увреждания и материални щети.
Основни указания за безопасност
За безопасна работа с уреда спазвайте следните указания за безопасност:
■ Преди употреба проверявайте уреда за видими външни повреди. Не
използвайте уреда, ако е повреден или е падал.
■ Повредените кабели или клеми трябва да бъдат сменени от оторизиран
квалифициран персонал или от сервизната служба.
■ Възлагайте ремонтите на уреда само на оторизирани специализирани
фирми или на сервизната служба. При некомпетентно извършени ремонти
могат да възникнат опасности за потребителя. Освен това отпада правото
за изискване на гаранция.
■ Повредените части трябва да се сменят само с оригинални резервни части.
Само за тези части е гарантирано, че отговарят на изискванията за безопасност.
■ Никога не отваряйте уреда и не предприемайте ремонти по него.
■ Пазете уреда от водни пръски и капки, както и от проникване на течности.
■ Никога не излагайте уреда на екстремно висока температура или висока
влажност на въздуха. Това важи особено при съхранение в автомобил.
При по-продължителни периоди на престой и топло време с директна
слънчева светлина в купето и жабката се получават температури от над
40°C. Не оставяйте електрически и електронни уреди в автомобила.
■ При монтажа на камерата и принадлежностите се уверете, че те не
представляват препятствие при управлението на волана, натискането на
спирачките или за функционирането на други системи на превозното
средство (напр. въздушни възглавници) и не ограничават вашето зрително
поле по време на шофиране.
ОПАСНОСТ
► Не поставяйте стойката в зоната за отваряне на въздушната възглавни-
ца или в близост до нея, тъй като в случай на задействане стойката ще
отхвръкне в купето на превозното средство и може да причини тежки
наранявания.
ПРЕДУПРЕЖДЕНИЕ
► Камерата не трябва в никакъв случай да се монтира така, че вие или
другите пасажери да можете да бъдете ударени от камерата в случай
на инцидент. Това може да причини тежки наранявания.
Page 61

CR 5 A2
BG
│
57 ■
■ Деца или лица, които поради своите физически, умствени, двигателни
или сетивни способности не са в състояние да работят безопасно с уреда,
могат да го използват само под наблюдение или под ръководството на
отговорно за тях лице.
ОПАСНОСТ
► Опаковъчните материали трябва да се държат далеч от деца и не трябва
да се използват за игра. Съществува опасност от задушаване.
■ Позволявайте на деца да използват уреда само под наблюдение. Децата
не винаги могат да преценят правилно възможните опасности. Не допускайте деца да играят с уреда.
■ Не поставяйте предмети върху уреда.
■ Уредът не трябва да се използва в близост до открит огън (напр. свещи).
■ В случай че установите мирис на пушек или образуване на дим от уреда,
незабавно го изключете от електрозахранването.
ПРЕДУПРЕЖДЕНИЕ
► Димът в никакъв случай не трябва да се вдишва, тъй като е вреден за
здравето.
■ Проверявайте редовно дали вендузата е свързана стабилно с предното
стъкло. Това е особено важно в райони, където външната температура
варира често.
■ Спазвайте всички действащи местни закони. Използването на видеоре-
гистратор в някои страни е забранено и евентуално подлежи на санкциониране. Камерата не трябва да се обслужва по време на шофиране.
Пътната безопасност винаги има приоритет по време на шофиране. Използвайте този уред само когато не може да възникне опасност по време
на движение.
ОПАСНОСТ
► В уреда е монтирана литиево-йонна батерия, поради това уредът никога
не трябва да се хвърля в огън. Съществува опасност от експлозия!
■ Не упражнявайте натиск върху дисплея. Ако той се счупи, докосването на
острите ръбове може да доведе до наранявания.
Page 62

CR 5 A2
■ 58│BG
Възможно нарушаване на права на трети лица
При използването на видеорегистратора трябва да спазвате следните указания:
Авторско право
По принцип всяко лице притежава правата върху собствено изображение.
Според закона за авторското право изображенията могат да се публикуват
без съгласието на засегнатите лица единствено ако лицата се появяват само
като допълнение към пейзаж или други местности. Отговорът на въпроса дали
дадено лице е допълнение зависи от обстоятелствата на конкретния случай.
Защита на правото на неприкосновеност на личния живот
Правото на неприкосновеност на личния живот на други лица не трябва да се
нарушава от заснетите изображения. Не насочвайте камерата към градината
или входната врата на съседното ви жилище също и ако тези места могат да
се видят от автомобила или от обществени локации. Това не дава право за
публикуване на тези изгледи.
Възможност за определяне на лица
Възможност за определяне на лица е налице тогава, когато може да се установи, че определено лице е било на определено място в определен момент. При
това идентификацията може да се извърши чрез свързано с лицето обозначение, като напр. регистрационен номер на автомобил. Възможността за лично
определяне на лица задължително трябва да се избягва.
Камери за наблюдение на работното място
Наблюдението на работното място в Германия подлежи на особено строги
изисквания. Работодателите в никакъв случай не трябва да използват камери
за наблюдение на работното място, освен ако правно нарушение не може да
бъде изключено напълно.
Относно възможните нарушения на правата на трети лица винаги взимайте
под внимание законовите изисквания в съответната страна на приложение.
Поради възможното нарушение на личните права на трети лица е незаконно
публикуването без разрешение на записи с чужди лица или регистрационни
номера на автомобили, напр. в Интернет. Използването на записи е разрешено единствено като доказателствен материал след злополука.
Page 63

CR 5 A2
BG
│
59 ■
Експлоатационни елементи
(Вж. фигурите на разгъващата се страница)
Фигура A:
Стойка с вендуза
Блокиращ лост
Винтове с глава с накатка за триизмерно насочване
Фигура Б:
Обектив на камерата
Бутон / ▲
Бутон / ▼
Бутон MENU
Бутон MODE
Микрофон
Mini USB изход
Отвор RESET
Тонколона
Инфрачервени светодиоди
Фигура В:
Индикатор за режим на работа
Капак
Mini HDMI изход
Слот за Micro SD карта
Екран
Фигура Г:
Резба за закрепване на стойката за статив
Бутон за включване/изключване
Бутон / за стартиране/спиране на видеозаписа, за задействане на
фотозаснемане или извикване на точки от менюто
Фигура Д:
USB букса за електрозахранване чрез адаптер за автомобил
Лампа за работен режим
12/24 V адаптер за автомобил
Кабел USB към Mini USB
Ръководство за потребителя
Page 64

CR 5 A2
■ 60│BG
Окомплектовка на доставката и инспекция след
транспортиране
Моля, проверете окомплектовка на доставката (вж. разгъващата се страница).
Окомплектовката на доставката се състои от следните компоненти:
● Видеорегистратор CR5A2
● Стойка с вендуза
● 12/24 V адаптер за автомобил
● Кабел USB към Mini USB
● Настоящото ръководство за потребителя
♦ Извадете всички части на уреда и ръководството за потребителя от
опаковката и проверете окомплектовката на доставката за комплектност и
видими външни повреди (вж. разгъващата се страница).
♦ Отстранете всички опаковъчни материали, както и защитните фолиа от
екрана
и обектива на камерата .
УКАЗАНИЕ
► При непълна доставка или повреди поради лоша опаковка или щети,
получени при транспорта, се обърнете към горещата линия за сервизно
обслужване (вж. глава Сервиз).
Предаване на опаковката за отпадъци
Опаковката предпазва уреда от повреди при транспортирането. Опаковъчните материали са подбрани от гледна точка на екологичната съвместимост и
утилизацията и затова могат да се рециклират.
Връщането на опаковката в системата за циркулация на материалите спестява
суровини и намалява количеството отпадъци. Предавайте ненужните ви вече
опаковъчни материали за отпадъци съгласно действащите местни разпоредби.
УКАЗАНИЕ
► По възможност запазете оригиналната опаковка за времето на гаран-
ционния срок, за да можете да опаковате правилно уреда, ако се наложи да се възползвате от гаранцията.
Page 65

CR 5 A2
BG
│
61 ■
Пускане в експлоатация
Поставяне/Изваждане на Micro SD карта
ВНИМАНИЕ
► Не поставяйте и не отстранявайте Micro SD картата (не се съдържа в
окомплектовката на доставката), докато уредът е включен. Това може да
доведе до загуба на данни на Micro SD картата.
♦ Вкарайте Micro SD карта в слота за Micro SD карта
така, че златните
контакти да сочат в посока към дисплея. Натиснете Micro SD картата
навътре така, че да се фиксира осезаемо.
♦ За да отстраните Micro SD картата, натиснете леко ръба на Micro SD картата.
Micro SD картата се изважда леко навън и може да бъде отстранена от уреда.
УКАЗАНИЕ
► Камерата не разполага с вътрешна памет. Поради това записи могат да
се правят само с поставена карта памет.
В следващата таблица е посочена максималната продължителност на записа
в зависимост от капацитета на паметта на Micro SD картата и настроената
разделителна способност:
Разделителна
способност
Капацитет на паметта на
Micro SD картата
Приблизителна продължителност
на записа
1080P
4 GB около 0 часа и 19 минути
8 GB около 0 часа и 41 минути
16 GB около 1 час и 21 минути
32 GB около 2 часа и 41 минути
720P
4 GB около 0 часа и 32 минути
8 GB около 1 час и 06 минути
16 GB около 2 часа и 12 минути
32 GB около 4 часа и 22 минути
480P
4 GB около 0 часа и 47 минути
8 GB около 1 час и 37 минути
16 GB около 3 часа и 12 минути
32 GB около 6 часа и 23 минути
Page 66

CR 5 A2
■ 62│BG
Монтиране на камерата на предното стъкло
1) Завийте стойката в резбата на
камерата. Позиционирайте вендузата на
предното стъкло. Внимавайте вендузата да
лежи плоско.
2) Поставете вендузата стабилно на предното
стъкло и натиснете блокиращия лост на
вендузата
по посока на предното стъкло.
По този начин се образува вакуум и вендузата прилепва плътно към предното стъкло.
Преместете блокиращия лост в срещуположната посока, за да освободите отново
вендузата от предното стъкло. За по-лесно
сваляне на вендузата е поставено езиче.
3) След като сте закрепили камерата с вендузата към предното стъкло, разхлабете
един след друг винтовете с глава с накатка
и настройте камерата според вашите
желания.
4) Ако сте намерили желаните позиция и
насочване, отново затегнете ръчно винтовете с глава с накатка
.
ВНИМАНИЕ
► Камерата трябва да се позиционира така, че зрителното поле на шофьо-
ра да е винаги свободно.
Свързване към електрозахранването
ВНИМАНИЕ
► За електрозахранване на уреда използвайте единствено доставения
адаптер за автомобил.
1) Включете адаптера за автомобил
към бордовото напрежение (букса за
запалката) на вашия автомобил. Лампата за работен режим на адаптера
за автомобил показва готовността за работа, когато при буксата е налице
бордово напрежение.
2) Свържете доставения Mini USB кабел
с USB буксата на адаптера за
автомобил
и с USB изхода на камерата. Когато камерата бъде захранена с напрежение посредством бордовото напрежение, започва видеозаписът и индикаторът за режим на работа светва червено. Когато вътрешната
батерия на уреда се зарежда, символът за зареждане на батерията се
показва на екрана .
Page 67

CR 5 A2
BG
│
63 ■
ВНИМАНИЕ
► При превозни средства, при които запалката функционира и при изклю-
чено запалване, уредът трябва да се отдели от буксата на запалката след
употреба. В противен случай акумулаторът на автомобила може да се
разреди в рамките на по-продължителен период от време, тъй като уредът
консумира ток и в неработно състояние. Възможно е двигателят на автомобила да не може да се стартира след това.
► При автомобили, при които запалката за цигари не се изключва, записът не
се прекъсва автоматично. В такъв случай изключете камерата ръчно.
Обслужване и работа
В тази глава са посочени важни указания относно обслужването и работата с уреда.
Включване и изключване, извършване на настройки
Натиснете бутона за включване/изключване , за да включите уреда.
Картината на камерата се показва на екрана . Уредът е в готовност за
видеозаснемане.
За изключване на уреда задръжте натиснат бутона за включване/изключване
в продължение на 3 секунди.
Основни настройки
Меню Setup
За да можете да извършите основната настройка на уреда в меню Setup, натиснете бутона MENU и след това бутона MODE . Менюто Setup се отваря:
Default settings
УКАЗАНИЕ
► Когато извикате менюто, първо трябва да натиснете бутона ▼
, за да
разположите кутийката за избор върху първия елемент.
След това с бутоните ▲▼
/ можете да преместите кутийката за избор върху
желания елемент и да извикате тази функция от менюто с бутона / . За
да напуснете отново извикана точка от менюто без промяна, натиснете бутона
MODE . Долу вдясно се показва текущата страница на менюто, както и общият
брой страници на менюто. За да затворите менюто, натиснете бутона MENU .
Page 68

CR 5 A2
■ 64│BG
Time & date (Час и дата)
Когато извикате тази функция от менюто, след това с бутоните ▲▼
/ можете да изберете, дали записите да се запаметяват със или без показана дата.
Изберете „Печат с час и дата включен“, за да активирате тази функция, или
„Печат с час и дата изключен“, за да я деактивирате. За настройка на текущата
дата извикайте „Настройка на час и дата“. След това настройте с бутоните ▲▼
/ цифрата на годината за текущата дата. Натиснете бутона MODE , за
да настроите часовете за текущия час с бутоните ▲▼
/ . Натиснете бутона
MODE
, за да настроите минутите с бутоните ▲▼ / . Натиснете бутона
MODE , за да настроите секундите с бутоните ▲▼ / . Натиснете бутона
MODE
, за да настроите желания формат на датата с бутоните ▲▼ / .
При това „YY/MM/DD“ означава двуцифрено показание на датата в последователността „година/месец/ден“, „MM/DD/YY“ означава двуцифрено показание на датата в последователността „месец/ден/година“ и „DD/MM/YY“
означава двуцифрено показание на датата в последователността „ден/месец/
година“. Натиснете бутона MODE
, за да настроите деня с бутоните ▲▼ /
. Натиснете бутона MODE , за да настроите месеца с бутоните ▲▼ / .
Потвърдете вашия избор с бутона
/ . След това показанието се връща
обратно към списъка с точките от менюто.
Auto Power Off (Автоматично изключване)
Когато извикате тази функция от менюто, с бутоните ▲▼
/ можете да изберете след това, дали уредът да се изключа автоматично след „1 мин“, „3 мин“ или
„5 мин“. Ако изберете „Изкл.“, уредът няма да се изключва автоматично. Потвърдете вашия избор с бутона / . След това показанието се връща обратно
към списъка с точките от менюто.
Impact sensor (Сензор за сблъсък)
Когато извикате тази функция от менюто, с бутоните ▲▼
/ можете да изберете след това чувствителността на монтирания сензор за сблъсък: За избор на разположение са „Много ниска“, „Ниска“, „Средна“, „Висока“ и „Много висока“.
Тази функция предпазва автоматично срещу презаписване в безкрайния цикъл
текущия в момента видеозапис при разпознаване на сътресение, което може да
се дължи на злополука. На екрана се появява символът и текущият запис
е защитен срещу изтриване. Потвърдете вашия избор с бутона / . След
това показанието се връща обратно към списъка с точките от менюто.
Beep sound (Звуков сигнал)
Когато извикате тази функция от менюто, с бутоните ▲▼
/ можете да
изберете след това дали уредът да потвърждава със звуков сигнал („Вкл.“
респ. „Изкл.“) натискането на бутоните, както и включването и изключването.
Потвърдете вашия избор с бутона / . След това показанието се връща
обратно към списъка с точките от менюто.
УКАЗАНИЕ
► Обратното броене и шума от задействане при самостоятелно активиращ
се запис се възпроизвеждат също при деактивиран звуков сигнал.
Page 69

CR 5 A2
BG
│
65 ■
Auto display off (Изключване на дисплея)
Когато извикате тази функция от менюто, с бутоните ▲▼
/ можете да изберете след това времевия интервал, след чието изтичане дисплеят да се изключва
автоматично: При това можете да избирате между „1 мин“, „3 мин“ и „5 мин“.
Изберете „Дисплей винаги включен“, ако дисплеят не трябва да се изключва.
За да включите отново дисплея след автоматично изключване, натиснете един
от бутоните ▲▼ / , бутона MODE или бутона / .
Language (Език)
Когато извикате тази функция от менюто, с бутоните ▲▼
/ можете да изберете след това „Английски“ или „Немски“ като език за менютата на екрана.
Потвърдете вашия избор с бутона / . След това показанието се връща
обратно към списъка с точките от менюто.
Display icon rotation (Завъртане на символите на дисплея)
Когато извикате тази функция от менюто, с бутоните ▲▼
/ можете да
настроите след това дали изображението на символите на дисплея и на менютата да се показва нормално („Изкл.“) или завъртяно на 180° („Вкл.“). Коя
настройка е целесъобразна в случая зависи от позиционирането на камерата.
Format memory card (Форматиране на картата памет)
Когато извикате тази функция от менюто, с бутоните ▲▼
/ можете да
форматирате след това поставената Micro SD карта. При този процес всички
данни на Micro SD картата се изгубват необратимо, като това важи и за защитените срещу изтриване файлове. За да извършите форматирането, изберете
„OK“ с бутоните ▲▼ / и натиснете бутона / . След това се извършва форматирането.
Default settings (Фабрични настройки)
Когато извикате тази функция от менюто, след това можете да възстановите всички фабрични настройки на уреда. Изберете „OK“ с бутоните ▲▼
/ и потвърдете вашия избор с бутона / . След това показанието се връща обратно
към списъка с точките от менюто. Всички извършени преди това от вас настройки
се възстановаваят до фабрични настройки.
За да затворите менюто Setup, натиснете бутона MENU
.
Page 70

CR 5 A2
■ 66│BG
Готовност за видеозапис
В готовност за видеозапис екранът показва следния изглед:
A – Показание на оставащата продължителност на записване в зависимост от
разделителната способност и наличното място за запаметяване
B – Текуща видео разделителна способност
C – Символ за поставена Micro SD карта
D – Показание за състоянието на зареждане на вътрешната батерия на уреда
E – Показание за датата (само при активирана функция „Печат за час и дата“)
F – Показание за часа (само при активирана функция „Печат за час и дата“)
G – Символ за разпознаване на движение (показва се само когато функцията е
активирана)
H – Символ за запис в безкраен цикъл, както и неговата дължина в минути
(в случая 3 минути)
I – Показание за корекция на експозицията
J – Символ за готовност за видеозапис
K – Червена точка мига по време на запис
L – Символ за защитен срещу изтриване файл
Стартиране/Завършване на запис
При необходимост натиснете неколкократно бутна / ▲ , за да увеличите
мотива.Задръжте бутона натиснат за бързо увеличение. С бутона
/ ▼ по
същия начин можете намалите размера.Натиснете бутона / , за да стартирате видеозаписа. По време на видеозаписа индикаторът за режим на работа
мига зелено (само при режим на работа с батерия). Натиснете този бутон
отново, за да спрете записа.
Ако по време на записа натиснете бутона MODE
, се появява символът
и текущият запис се защитава срещу изтриване.
УКАЗАНИЕ
► Веднага щом камерата се захранва посредством бордовата мрежа,
записът започва. За да спрете видеозаписа, натиснете бутона
/ .
Page 71

CR 5 A2
BG
│
67 ■
Ако в готовност за видеозапис натиснете бутона MENU , се отваря следното
меню:
Motion detection
С бутоните ▲▼ / можете да преместите кутийката за избор върху желания елемент и да извикате тази функция от менюто с бутона / . За да
напуснете отново извикана точка от менюто без промяна, натиснете бутона
MODE . Долу вдясно се показва текущата страница на менюто, както и общият брой страници на менюто. Ако е избран най-долният елемент от дадена
страница на меню, след което следва друга страница на менюто, натиснете
бутона ▼ , за да прескочите към първия елемент на следващата страница на
менюто. За да затворите менюто, натиснете бутона MENU .
Resolution (Разделителна способност)
Когато извикате тази функция от менюто, след това можете да определите
размера на видеоизображението. Може да е избира между „1920x1080P
(HD)“, „1280 x 720P“ и „640 x 480P“. С бутоните ▲▼
/ изберете желаната разделителна способност и потвърдете вашия избор с бутона / , за
да се върнете след това към списъка с точките от менюто.
Exposure (Експозиция)
Когато извикате тази функция от менюто, след това можете да коригирате експозицията на видеото в три стъпки нагоре (от +1 до +3, по-светла) респ. надолу
(от -1 до -3, по-тъмна). При настройка „0“ не се извършва корекция на експозицията. С бутоните ▲▼
/ изберете желаната корекция на експозицията на
видеото и потвърдете вашия избор с бутона / , за да се върнете след
това към списъка с точките от менюто.
Video length (Дължина на видеото)
Когато извикате тази функция от менюто, след това можете да определите продължителността на безкрайния цикъл за видеозаписа: На разположение за избор са
„3 мин“, „5 мин“, „10 мин“ или „Цикъл на записване изкл.“. С бутоните ▲▼
/
изберете желаната стойност за цикличния запис и потвърдете вашия избор с
бутона / , за да се върнете след това към списъка с точки от менюто.
При това вземете под внимание, че използваната Micro SD карта трябва да имат
достатъчен капацитет в зависимост от настроения размер на видеоизображението, за да може да се постигне желаната продължителност на безкрайния цикъл.
Когато изберете „Цикъл за записване изкл.“, записът приключва при достигане
на границата на капацитета на Micro SD картата. Когато бъде достигнат краят
на записа, уредът започва нов запис с настроената дължина. Ако капацитетът на
поставената карта памет не стига за настроената продължителност на безкрайния цикъл, записът се прекъсва. В такъв случай намалете продължителността на
безкрайния цикъл или използвайте карта памет с по-голям капацитет.
Page 72

CR 5 A2
■ 68│BG
Motion detection (Разпознаване на движение)
Когато извикате тази функция от менюто, с бутоните ▲▼
/ можете след
това да включите или изключите тази функция. Потвърдете вашия избор с бутона / , за да се върнете след това към списъка с точки от менюто.
При включена функция уредът прекратява автоматично видеозаписа, когато
повече не се записват двищещи се изображения. Ако уредът отново регистрира движения, автоматично започва нов запис. При изключена функция уредът
не прекъсва записа, когато няма движения.
УКАЗАНИЕ
► Тази функция трябва да се активира само когато автомобилът е паркиран
с цел автоматично заснемане напр. на опит за разбиване на автомобила
или движещ се насрещно автомобил след сблъсък.
► Първият запис трябва да се стартира ръчно също при включена функция.
Audio recording (Запис на звук)
Когато извикате тази функция от менюто, с бутоните ▲▼
/ можете след
това да включите или изключите аудио записа посредством вградения микрофон. Потвърдете вашия избор с бутона / , за да се върнете след това
към списъка с точки от менюто.
Page 73

CR 5 A2
BG
│
69 ■
Готовност за фотозаснемане
При затворено меню в готовност за видеозаснемане натиснете бутона MODE ,
за да превключите към готовност за фотозаснемане. Тогава уредът показва следния изглед на екрана
:
A – Показание на оставащия брой снимки, които могат да се заснемат в зави-
симост от разделителната способност и наличното място за запаметяване
B – Текуща разделителна способност на снимките
C – Символ за поставена Micro SD карта
D – Показание за състоянието на зареждане на вътрешната батерия на уреда
E – Показание за датата (само при активирана функция „Печат за час и дата“)
F – Показание за часа (само при активирана функция „Печат за час и дата“)
G – Символ за самостоятелно активиране (в случая 5 секунди; показва се
само когато функцията е активирана)
H – Символ за корекция на експозицията
I – Показание за готовност за фотозаснемане
J – Показание за функция за серийна снимка (показва се само когато функ-
цията е активирана)
Фотозаснемане
При необходимост натиснете неколкократно бутна / ▲ , за да увеличите
мотива. Задръжте бутона натиснат за бързо увеличение. С бутона
/ ▼
по същия начин можете намалите размера. Натиснете бутона / , за да
направите снимка.
Ако в готовност за фотозаснемане натиснете бутона MENU
, се отваря
следното меню:
С бутоните ▲▼ / можете да преместите кутийката за избор върху желания елемент и да извикате тази функция от менюто с бутона / .
Page 74

CR 5 A2
■ 70│BG
За да напуснете отново извикана точка от менюто без промяна, натиснете бутона MODE
. Долу вдясно се показва текущата страница на менюто, както и
общият брой страници на менюто. Ако е избран най-долният елемент от дадена страница на меню, след което следва друга страница на менюто, натиснете
бутона ▼
, за да прескочите към първия елемент на следващата страница на
менюто. За да затворите менюто, натиснете бутона MENU
.
Resolution (Разделителна способност)
Когато извикате тази функция от менюто, с бутоните ▲▼
/ можете да
настроите желания размер за снимките: На разположение за избор са „12MP
(интерп.*)“, „7MP (интерп.*)“, „5MP“, „3MP“, „2MP“, „1,3MP“ или „0,3MP“.
При това „MP“ означава мегапиксел, напр. при настройка „5MP“ се получава
снимка от 2592 × 1944 пиксела, което съответства на приблизително 5 милиона пиксела. Колкото по-големи са снимките, толкова по-голяма е плътността
на детайлите. Но при по-голям размер на снимките Micro SD картата достига
по-бързо границата на своя капацитет. Потвърдете вашия избор с бутона /
, за да се върнете след това към списъка с точки от менюто.
* Интерполация = увеличение чрез пресмятане на броя точки на изображението
Exposure (Експозиция)
Когато извикате тази функция от менюто, след това можете да коригирате експозицията на снимката в три стъпки нагоре (от +1 до +3, по-светла) респ. надолу
(от 1 до 3, по-тъмна). С бутоните ▲▼
/ изберете желаната корекция на
експозицията на снимката и потвърдете вашия избор с бутона
/ , за да
се върнете след това към списъка с точките от менюто.
3 photos in series (Серия от 3 снимки)
Когато извикате тази функция от менюто, с бутоните ▲▼
/ можете след
това да включите или изключите функцията за заснемане на 3 снимки в бърза
последователност. Потвърдете вашия избор с бутона / , за да се върнете след това към списъка с точки от менюто.
Self-timer (Самостоятелно активиране)
Когато извикате тази функция от менюто, с бутоните ▲▼
/ можете да настроите забавяне на активирането с 2, 5 или 10 секунди. След това изображението
се заснема с предварително настроеното забавяне след натискане на бутона
/ . Изберете „Директно заснемане“, за да деактивирате забавянето на
активирането. Потвърдете вашия избор с бутона / , за да се върнете след
това към списъка с точки от менюто.
Режим на възпроизвеждане
При затворено меню в готовност за фотозаснемане натиснете бутона MODE
, за да превключите към режим на възпроизвеждане. С бутоните ▲▼ /
можете да превключвате между запаметените записи. Когато изберете дадена
снимка и натиснете бутона / , всички запаметени снимки се показват
в безкрайно слайдшоу. Натиснете отново бутона / , за да прекратите
слайдшоуто. Когато изберете видеоклип и натиснете бутона / , видеоклипът се възпроизвежда.
Page 75

CR 5 A2
BG
│
71 ■
Когато изберете снимка, екранът показва следния изглед:
A – Показание на текущия номер на запис/ общ брой на записите
B – Разделителна способност на текущо избраните снимки
C – Показание за състоянието на зареждане на вътрешната батерия на уреда
D – Печат с дата/час на заснетото изображение
E – Символ за режима на възпроизвеждане
F – Символ за защитен срещу изтриване файл
Ако сега натиснете бутона MENU
, се отваря следното меню:
Delete
С бутоните ▲▼ / можете да преместите кутийката за избор върху желания
елемент и да извикате тази функция от менюто с бутона / . За да напуснете отново извикана точка от менюто без промяна, натиснете бутона MODE
. Долу вдясно се показва текущата страница на менюто, както и общият брой
страници на менюто. За да затворите менюто, натиснете бутона MENU
.
Delete (Изтриване)
Когато извикате тази функция от менюто, с бутоните ▲▼
/ можете след това
да изберете между изтриване на текущо избраното изображение („Изтрий този
файл“), „Изтрий всички файлове“ или „Прекрати“. Потвърдете вашия избор с
бутона / . Ако потвърдите следващия въпрос за потвърждение с „OK“,
избраната функция за изтриване се изпълнява и менюто се затваря. Но ако се
покаже „Файлът е защитен срещу запис“, първо трябва да отмените защитата с
помощта на описаната в раздела „Защита срещу запис“ функция.
Page 76

CR 5 A2
■ 72│BG
Write protection (Защита срещу запис)
Когато извикате тази функция от менюто, с бутоните ▲▼
/ можете да изберете след това дали текущо избраният файл да бъде защитен срещу изтриване
(„Защити този файл срещу изтриване“), да се отмени защитата на текущо избрания файл („Отключи този файл“), да се защитят всички файлове срещу изтриване
(„Защити всички файлове срещу изтриване“) или да се отмени защитата на
всички файлове срещу изтриване („Отключи всички файлове“). Потвърдете вашия
избор с бутона / . След това показанието се връща обратно към списъка
с точките от менюто.
УКАЗАНИЕ
► Приложението на тези функции за множество файлове може да отнеме
няколко секунди.
Когато с бутоните ▲▼
/ изберете видеоклип, екранът показва следния
преглед:
A – Показание на текущия номер на запис/ общия брой записи
B – Разделителна способност на текущо избрания видеоклип
C – Продължителност на видеоклипа
D – Показание за състоянието на зареждане на вътрешната батерия на уреда
E – Символ за функцията на бутона MODE
: Спиране на видео- респ. фото-
възпроизвеждането
F – Символ за функцията на бутона
/ : Стартиране/Спиране на видео-
респ. фотовъзпроизвеждането
G – Символ за режим на възпроизвеждане
H – Символ за защитен срещу изтриване файл
Page 77

CR 5 A2
BG
│
73 ■
Ако сега натиснете бутона MENU , се отваря следното меню:
Delete
С бутоните ▲▼ / можете да преместите кутийката за избор върху желания елемент и да извикате тази функция от менюто с бутона / . За да
напуснете отново извикана точка от менюто без промяна, натиснете бутона
MODE . За да затворите менюто, натиснете бутона MENU .
Delete (Изтриване)
Когато извикате тази функция от менюто, с бутоните ▲▼
/ можете след
това да изберете между изтриване на текущо избрания видеоклип („Изтрий
този файл“), „Изтрий всички файлове“ или „Прекрати“. Потвърдете вашия
избор с бутона / . Ако потвърдите следващия въпрос за потвърждение
с „OK“, избраната функция за изтриване се изпълнява и менюто се затваря.
Но ако се покаже „Файлът е защитен срещу запис“, първо трябва да отмените
защитата с помощта на описаната в раздела „Защита срещу запис“ функция.
Write protection (Защита срещу запис)
Когато извикате тази функция от менюто, с бутоните ▲▼
/ можете да изберете след това дали текущо избраният файл да бъде защитен срещу изтриване
(„Защити този файл срещу изтриване“), да се отмени защитата на текущо избрания файл („Отключи този файл“), да се защитят всички файлове срещу изтриване
(„Защити всички файлове срещу изтриване“) или да се отмени защитата на
всички файлове срещу изтриване („Отключи всички файлове“). Потвърдете вашия
избор с бутона / . След това показанието се връща обратно към списъка
с точки от менюто.
УКАЗАНИЕ
► Приложението на тези функции за множество файлове може да отнеме
няколко секунди.
Показване на записи на външен монитор
УКАЗАНИЕ
► Камерата може да пренася видеоизображението на външен монитор
респ. на видеовхода на телевизионен апарат. За целта моля спазвайте
също ръководството на съответното възпроизвеждащо устройство.
♦ Отворете капака
настрани и свържете Mini HDMI изхода на камерата посредством Mini HDMI кабел (не е включен в окомплектовката на
доставката) към подходящ монитор. При този вид свързване се прехвърлят
само запаметени видеоклипове. Тогава вграденият дисплей се изключва.
♦ Стартирайте възпроизвеждането чрез бутона
/ .
Page 78

CR 5 A2
■ 74│BG
Възпроизвеждане на записи на компютър
Включете Mini USB щекера на доставения USB кабел в изхода на
камерата и USB щекера в свободен USB изход на включен компютър. Той разпознава уреда като „Устройство за съхранение“, след това свързва камерата с
компютъра и накрая съдържанието на Micro SD картата в камерата се показва
като ново устройство на компютъра. След това извършете желаните операции с
файловете.
Връщане на уреда в изходно състояние
Ако уредът не функционира както е описано в настоящото ръководство или не
реагира на вашето управление, натиснете с остър предмет, напр. с кламер, внимателно превключвателя зад отвора RESET
в корпуса, за да го рестартирате.
Смяна на предпазител
В адаптера за автомобил се намира предпазител. Ако уредът не функционира, е възможна повреда на предпазителя. В такъв случай го сменете с резервен
предпазител от същия тип (вж. също глава Технически характеристики).
♦ За целта изключете адаптера за автомобил
от буксата на запалката за цигари.
♦ Отворете адаптера за автомобил
, като завъртите внимателно резбовия
накрайник (В) при необходимост с клещи обратно на часовниковата
стрелка и го свалите.
♦ След това свалете върха на щекера (Б) от предпазителя (А), извадете пред-
пазителя (А) и го оставете настрана.
♦ Поставете новия предпазител в адаптера за автомобил , поставете върха
на щекера (Б) на издаващия се леко край на предпазителя и отново завинтете сваления преди това резбови накрайник (В).
УКАЗАНИЕ
► Ако уредът все още не функционира или новият предпазител изгаря
отново, е налице дефект на уреда. Обърнете се към горещата линия за
сервизно обслужване (вж. глава Сервиз).
Page 79

CR 5 A2
BG
│
75 ■
Почистване
ВНИМАНИЕ
Възможно е повреждане на уреда!
► Уверете се, че при почистването в уреда не прониква влага, за да избег-
нете необратимо повреждане на уреда.
► Не използвайте абразивни или съдържащи разтворители почистващи
препарати, защото те могат да повредят корпуса респ. уреда.
■ Почиствайте повърхностите на уреда с мека, суха кърпа. При упорити
замърсявания използвайте обикновени миещи препарати и вода. Внимавайте в уреда да не прониква вода.
Отстраняване на неизправности
В тази глава се съдържат важни указания за локализиране и отстраняване на
неизправности. Спазвайте указанията, за да избегнете опасности и повреди.
ПРЕДУПРЕЖДЕНИЕ
► Ремонтите по електроуредите трябва да се извършват само от специалисти,
които са обучени от производителя. Поради непрофесионални ремонти са
възможни сериозни опасности за потребителя и повреди на уреда.
Причини за неизправности и отстраняване на неиз-
правности
Следващата таблица помага при локализирането и отстраняването на малки
неизправности:
Неизправност Възможна причина Отстраняване
Камерата не функционира с вградената батерия.
Батерията е изтощена. Заредете вградената батерия чрез
свързан с изхода
на уреда и включен компютър или чрез
бордовата мрежа на автомобил.
Камерата не функционира в автомобила.
Акумулаторът на автомобила е изтощен.
Заредете акумулатора на автомобила.
Предпазителят в адаптера за автомобил
е повреден.
Сменете предпазителя (вж. глава
Смяна на предпазител).
По време на движение камерата не
записва правилно.
Възникват неизправности с вградения сензор
за движение.
Активирайте вградения сензор за
движение (функция „Разпознаване
на движение“ в меню Setup) само
при паркиран автомобил.
Увеличете чувствителността на
сензора за движение.
Page 80

CR 5 A2
■ 76│BG
Неизправност Възможна причина Отстраняване
Уредът не реагира
или не реагира
както се очаква на
вашето управление.
Налице е неизправност. Натиснете с тънък предмет
внимателно превключвателя зад
отвора RESET
в корпуса, за да
го рестартирате.
Вендузата не държи. Използваната повърх-
ност не е чиста.
Почистете повърхността. Вие
можете също да увеличите ефективността на засмукване, като
навлажните вендузата.
УКАЗАНИЕ
► Ако не можете да решите проблема с горепосочените стъпки, се обърне-
те към сервизната служба.
Съхранение /Предаване за отпадъци
Съхранение при неизползване
Съхранявайте уреда на чисто, сухо място без пряка слънчева светлина, ако
няма да го използвате по-продължително време. В такъв случай трябва да
зареждате вградената батерия от време на време.
Предаване на уреда за отпадъци
Показаният встрани символ на зачеркнат контейнер за отпадъци на колела
показва, че този уред подлежи на Директивата 2012/19/ЕU. Съгласно тази
Директива уредът не трябва да се изхвърля с обикновените битови отпадъци, а да
се предаде в специален събирателен пункт, депо за обработка и рециклиране на
отпадъци или във фирма за управление на отпадъци.
Вградената батерия не може да се изважда.
Това предаване за отпадъци е безплатно. Пазете околната среда
и предавайте отпадъците според правилата.
Допълнителна информация ще получите от местното предприятие за изхвърляне на отпадъци или градската респ. общинската администрация.
Приложение
Указания относно ЕС декларацията за съответствие
По отношение на съответствието с основните изисквания и другите съществени
разпоредби този уред отговаря на европейската Директива за електромагнитна съвместимост 2014/30/EU и на Директивата относно ограничението за
употребата на определени опасни вещества в електрическото и електронното
оборудване 2011/65/EU. Пълната ЕС декларация за съответствие може да се
получи от вносителя.
Page 81

CR 5 A2
BG
│
77 ■
Технически характеристики
Видеорегистратор
Работно напрежение
5V
, чрез интегрирана литиево-йонна батерия
(3,7V/350mAh) или USB изход
Входно напрежение на
адаптера за автомобил
12V/24V
, макс. 700mA чрез бордовата
мрежа на автомобил
Предпазител на адаптера
за автомобил
T2AL / 250V
Изходно напрежение на
адаптера за автомобил
5V
,1A
Носител за съхранение
на данни
Micro SD карта, FAT файлова система, поддържат
се карти с размер до 32 GB
Екран
2,7“ TFT цветен LC дисплей
(около 6,8 cm диагонал на изображението)
Разделителни способности за снимки
5 мегапиксела, 3 мегапиксела, 2 мегапиксела,
1,3 мегапиксела, 0,3 мегапиксела (7 мегапиксела
и 12 мегапиксела интерполирани)
Формат за фотозаснемане
JPEG
Разделителни способности за видеоклипове
Разд. сп. 1: 1920 х 1080 пиксела/скорост на
кадрите 25 fps (данни: 1 GB/5 мин)
Разд. сп. 2: 1280 х 720 пиксела/скорост на
кадрите 30 fps
Разд. сп. 3: 640 х 480 пиксела/скорост на
кадрите 30 fps
Формат за видеозаснемане
AVI
Ъгъл на заснемане
хоризон-
тално
58° видео 1920 x 1080
80° снимка 2592 x 1944
вертикално
30° видео 1920 x 1080
56° снимка 2592 x 1944
Работна температура 15 до 40 °C
Температура на съхранение
5 до 40 °C
Влажност на въздуха
(без кондензация)
5 до 75 %
Размери
(Ш х Д х В)
около 7,5 × 4,8 x 3,2 cm
Тегло Камера около 63 g, пълен комплект около 160 g
Page 82

CR 5 A2
■ 78│BG
Гаранция
За този уред вие получавате гаранция от 3 години от датата на закупуване.
Уредът е произведен старателно и е изпитан щателно преди доставката.
Запазете касовата бележка като доказателство за покупката. Ако се наложи
да се възползвате от гаранцията, първо се свържете по телефона със сервиза.
Само по този начин може да се осигури безплатно връщане на вашата стока.
УКАЗАНИЕ
► Даването на гаранция важи само за материални или фабрични дефекти,
но не и за транспортни щети, износващи се части или при повреди на
лесно чупливи части, напр. превключватели или акумулаторни батерии.
Продуктът е предназначен само за лична, а не за професионална употреба.
При неправилна и нецелесъобразна употреба, упражняване на сила или
ремонтни дейности, които не са извършени от нашия оторизиран сервизен
филиал, гаранцията отпада.
Законовите ви права не се ограничават от тази гаранция. Гаранционният срок
не се удължава от гаранцията. Това важи и за сменени и ремонтирани части.
Евентуално наличните още при закупуването повреди и дефекти, както и липсващи части трябва да се съобщят незабавно след разопаковането.
След като изтече гаранционният срок, ремонтите се заплащат.
Сервиз
Сервизно обслужване България
Тел.: 00800 111 4920
Е-мейл: kompernass@lidl.bg
IAN 275078
Вносител
KOMPERNASS HANDELS GMBH
BURGSTRASSE 21
44867 BOCHUM
GERMANY
www.kompernass.com
Page 83

CR 5 A2
DE│AT│CH
│
79 ■
Inhaltsverzeichnis
Einführung ...................................................80
Informationen zu dieser Bedienungsanleitung ...................................80
Urheberrecht ............................................................80
Hinweise zu Warenzeichen .................................................80
Bestimmungsgemäße Verwendung ...........................................80
Verwendete Warnhinweise .................................................81
Sicherheit ....................................................82
Grundlegende Sicherheitshinweise ...........................................82
Mögliche Verletzung von Rechten Dritter .......................................84
Bedienelemente ...............................................85
Lieferumfang und Transportinspektion .........................................86
Entsorgung der Verpackung ................................................86
Inbetriebnahme ...............................................87
Micro-SD-Karte einstecken / entfernen .........................................87
Kamera an der Windschutzscheibe montieren ..................................88
Stromversorgung herstellen .................................................88
Bedienung und Betrieb .........................................89
Ein- und Ausschalten, Einstellungen vornehmen ..................................89
Grundeinstellungen .......................................................89
Setup Menü ..........................................................89
Video-Aufnahmebereitschaft .............................................92
Aufnahme starten / beenden .............................................92
Foto-Aufnahmebereitschaft ...............................................95
Foto aufnehmen .......................................................95
Wiedergabemodus ....................................................96
Aufnahmen auf externem Monitor anzeigen ....................................99
Aufnahmen auf einen Computer überspielen ................................. 100
Gerät zurücksetzen ..................................................... 100
Sicherungswechsel ...................................................... 100
Reinigung ...................................................101
Fehlerbehebung..............................................101
Fehlerursachen und -behebung ............................................ 101
Lagerung / Entsorgung ........................................102
Lagerung bei Nichtbenutzung ............................................. 102
Gerät entsorgen ........................................................ 102
Anhang .....................................................102
Hinweise zur EU-Konformitätserklärung ...................................... 102
Technische Daten ....................................................... 103
Garantie ............................................................. 104
Service ............................................................... 104
Importeur ............................................................. 104
Page 84

CR 5 A2
■ 80│DE
│AT│
CH
Einführung
Informationen zu dieser Bedienungsanleitung
Herzlichen Glückwunsch zum Kauf Ihres neuen Gerätes.
Sie haben sich damit für ein hochwertiges Produkt entschieden. Die Bedienungsan-
leitung ist Bestandteil dieses Produkts. Sie enthält wichtige Hinweise für Sicherheit,
Gebrauch und Entsorgung. Machen Sie sich vor der Benutzung des Produkts mit
allen Bedien- und Sicherheitshinweisen vertraut. Benutzen Sie das Produkt nur wie beschrieben und für die angegebenen Einsatzbereiche. Bewahren Sie die Bedienungsanleitung immer als Nachschlagewerk in der Nähe des Produkts auf. Händigen Sie
bei Weitergabe oder Verkauf des Produktes an Dritte alle Unterlagen inkl. dieser
Bedienungsanleitung mit aus.
Urheberrecht
Diese Dokumentation ist urheberrechtlich geschützt.
Jede Vervielfältigung, bzw. jeder Nachdruck, auch auszugsweise, sowie die Wieder-
gabe der Abbildungen, auch im veränderten Zustand ist nur mit schriftlicher Zustimmung des Herstellers gestattet.
Hinweise zu Warenzeichen
USB® ist eingetragenes Warenzeichen von USB Implementers Forum, Inc.
Alle weiteren Namen und Produkte können die Warenzeichen oder eingetragene
Warenzeichen ihrer jeweiligen Eigentümer sein.
Bestimmungsgemäße Verwendung
Dieser Cockpit-Rekorder ist ein Gerät der Informationselektronik und dient zum
digitalen Aufzeichnen von Fotos und Videos, speziell während der Fahrt in Kraftfahrzeugen. Eine andere oder darüber hinausgehende Benutzung gilt als nicht
bestimmungsgemäß. Das Gerät ist nicht zur Verwendung in gewerblichen oder
industriellen Bereichen vorgesehen. Ansprüche jeglicher Art wegen Schäden aus
nicht bestimmungsgemäßer Verwendung, unsachgemäßen Reparaturen, unerlaubt
vorgenommener Veränderungen oder Verwendung nicht zugelassener Ersatzteile
sind ausgeschlossen. Das Risiko trägt allein der Benutzer.
Page 85

CR 5 A2
DE│AT│CH
│
81 ■
Verwendete Warnhinweise
In der vorliegenden Bedienungsanleitung werden folgende Warnhinweise verwendet:
GEFAHR
Ein Warnhinweis dieser Gefahrenstufe kennzeichnet eine drohende
gefährliche Situation.
Falls die gefährliche Situation nicht vermieden wird, kann dies zu schweren Verletzungen oder zum Tode führen.
► Die Anweisungen in diesem Warnhinweis befolgen, um die Gefahr von
schweren Verletzungen oder des Todes zu vermeiden.
WARNUNG
Ein Warnhinweis dieser Gefahrenstufe kennzeichnet eine mögliche
gefährliche Situation.
Falls die gefährliche Situation nicht vermieden wird, kann dies zu Verletzungen
führen.
► Die Anweisungen in diesem Warnhinweis befolgen, um Verletzungen von Personen
zu vermeiden.
ACHTUNG
Ein Warnhinweis dieser Gefahrenstufe kennzeichnet einen möglichen Sachschaden.
Falls die Situation nicht vermieden wird, kann dies zu Sachschäden führen.
► Die Anweisungen in diesem Warnhinweis befolgen, um Sachschäden zu
vermeiden.
HINWEIS
► Ein Hinweis kennzeichnet zusätzliche Informationen, die den Umgang mit dem
Gerät erleichtern.
Page 86

CR 5 A2
■ 82│DE
│AT│
CH
Sicherheit
In diesem Kapitel erhalten Sie wichtige Sicherheitshinweise im Umgang mit dem
Gerät. Dieses Gerät entspricht den vorgeschriebenen Sicherheitsbestimmungen.
Ein unsachgemäßer Gebrauch kann zu Personen- und Sachschäden führen.
Grundlegende Sicherheitshinweise
Beachten Sie für einen sicheren Umgang mit dem Gerät die folgenden Sicherheitshinweise:
■ Kontrollieren Sie das Gerät vor der Verwendung auf äußere sichtbare Schäden.
Nehmen Sie ein beschädigtes oder heruntergefallenes Gerät nicht in Betrieb.
■ Bei Beschädigung der Kabel oder Anschlüsse lassen Sie diese von autorisiertem
Fachpersonal oder dem Kundenservice austauschen.
■ Lassen Sie Reparaturen am Gerät nur von autorisierten Fachbetrieben oder dem
Kundenservice durchführen. Durch unsachgemäße Reparaturen können Gefahren für den Benutzer entstehen. Zudem erlischt der Garantieanspruch.
■ Defekte Bauteile dürfen nur gegen Original-Ersatzteile ausgetauscht werden. Nur
bei diesen Teilen ist gewährleistet, dass sie die Sicherheitsanforderungen erfüllen.
■ Öffnen Sie niemals das Gerät und nehmen Sie keine Reparaturen daran vor.
■ Schützen Sie das Gerät vor Spritz- und Tropfwasser und dem Eindringen von
Flüssigkeiten.
■ Setzen Sie das Gerät nie extremer Hitze oder hoher Luftfeuchtigkeit aus. Dies gilt
insbesondere für eine Lagerung im Auto. Bei längeren Standzeiten und warmer
Witterung mit Sonneneinstrahlung entstehen Temperaturen von mehr als 40°C
in Innenraum und Handschuhfach. Entfernen Sie elektrische und elektronische
Geräte aus dem Fahrzeug.
■ Stellen Sie bei der Montage der Kamera und des Zubehörs sicher, dass diese
keine Behinderung beim Steuern, Bremsen oder für die Einsatzfähigkeit anderer
Betriebssysteme des Fahrzeugs (z.B. Airbags) darstellen, oder Ihr Sichtfeld beim
Fahren einschränken.
GEFAHR
► Platzieren Sie die Halterung nicht im Entfaltungsbereich des Airbags oder in
dessen Nähe, da dieser die Halterung im Falle einer Auslösung durch den
Innenraum des Fahrzeuges schleudern würde und schwere Verletzungen
verursachen kann.
WARNUNG
► Die Kamera darf keinesfalls so montiert werden, dass Sie oder andere Insassen
im Falle eines Unfalls von der Kamera getroffen werden können. Dies kann
schwerwiegende Verletzungen verursachen.
Page 87

CR 5 A2
DE│AT│CH
│
83 ■
■ Kinder und Personen, die aufgrund ihrer körperlichen, geistigen, motorischen
oder sensorischen Fähigkeiten nicht in der Lage sind das Gerät sicher zu bedienen, dürfen das Gerät nur unter Aufsicht oder Anweisung durch eine verantwortliche Person benutzen.
GEFAHR
► Verpackungsmaterialien sind von Kindern fernzuhalten und dürfen nicht zum
Spielen verwendet werden. Es besteht Erstickungsgefahr.
■ Gestatten Sie Kindern die Benutzung des Gerätes nur unter Aufsicht. Kinder
können mögliche Gefahren nicht immer richtig erkennen. Kinder dürfen nicht mit
dem Gerät spielen.
■ Stellen Sie keine Gegenstände auf das Gerät.
■ Das Gerät nicht in der Nähe von offenen Flammen (z.B. Kerzen) betreiben.
■ Wenn Sie am Gerät Brandgeruch oder Rauchentwicklung feststellen, trennen Sie
es sofort von der Stromversorgung.
WARNUNG
► Der Rauch darf keinesfalls eingeatmet werden, da dieser gesundheitsschädlich
ist.
■ Überprüfen Sie regelmäßig, ob der Saugnapf fest mit der Windschutzscheibe
verbunden ist. Dies ist insbesondere in Gegenden wichtig, in denen die Außentemperatur häufig hohen Schwankungen unterliegt.
■ Beachten Sie alle vor Ort geltenden Gesetze. Die Verwendung einer Cockpit-
kamera ist in einigen Ländern verboten und ggf. strafbar. Während der Fahrt
darf die Kamera nicht bedient werden. Die Verkehrssicherheit muss beim Fahren
immer Vorrang haben. Verwenden Sie das Gerät nur, wenn keine Gefahr in
irgendeiner Fahrsituation entstehen kann.
GEFAHR
► Im Gerät ist ein Lithium-Ionen Akku verbaut, deshalb darf das Gerät nicht ins
Feuer geworfen werden. Es besteht Explosionsgefahr!
■ Üben Sie keinen Druck auf das Display aus. Sollte es zerbrechen, kann die
Berührung scharfer Kanten zu Verletzungen führen.
Page 88

CR 5 A2
■ 84│DE
│AT│
CH
Mögliche Verletzung von Rechten Dritter
Bei der Benutzung der Cockpitkamera müssen Sie folgende Hinweise beachten:
Urheberschutz
Grundsätzlich hat jede Person das Recht am eigenen Bild. Nach dem Urheberrechtsgesetz dürfen Bilder ohne Einwilligung der Betroffenen nur dann veröffentlicht werden, wenn die Personen lediglich als Beiwerk neben einer Landschaft oder sonstigen
Örtlichkeiten erscheinen. Die Beantwortung der Frage, ob eine Person nur Beiwerk
ist, hängt von den Umständen des Einzelfalls ab.
Schutz der Privatsphäre
Die Privatsphäre Anderer darf durch die aufgenommenen Bilder nicht verletzt
werden. Richten Sie Ihre Kamera nicht in den Garten oder auf die Eingangstür Ihrer
Nachbarwohnung, auch wenn diese Orte aus dem Fahrzeug oder von öffentlichen
Standorten aus einsehbar sind. Dies berechtigt nicht zur Veröffentlichung dieser
Ansichten.
Personelle Bestimmbarkeit
Eine personelle Bestimmbarkeit liegt vor, wenn festgestellt werden kann, dass eine
bestimmte Person zu einer bestimmten Zeit an einem bestimmten Ort war. Die
Identifikation kann dabei auch über ein personenbezogenes Kennzeichen, wie z.B.
das Fahrzeugkennzeichen, erfolgen. Eine personelle Bestimmbarkeit von Personen ist
unbedingt zu vermeiden.
Überwachungskameras am Arbeitsplatz
Die Überwachung am Arbeitsplatz untersteht in Deutschland besonders strengen
Auflagen. Arbeitgeber sollten auf Überwachungskameras am Arbeitsplatz vollständig
verzichten, solange eine mögliche Rechtsverletzung nicht vollständig ausgeschlossen
werden kann.
Beachten Sie zu möglichen Verletzungen von Rechten Dritter immer die gesetzlichen
Bestimmungen des jeweiligen Einsatzlandes. Wegen der möglichen Verletzung von
Persönlichkeitsrechten Dritter ist es illegal, Aufnahmen mit Fremden oder Autokennzeichen unautorisiert zu veröffentlichen, z.B. im Internet. Erlaubt ist die Verwendung der
Aufnahmen ausschließlich zur Beweisführung nach einem Unfall.
Page 89

CR 5 A2
DE│AT│CH
│
85 ■
Bedienelemente
(Abbildungen siehe Ausklappseite)
Abbildung A:
Halterung mit Saugnapf
Verriegelungshebel
Rändelschrauben zur dreidimensionalen Ausrichtung
Abbildung B:
Kameraobjektiv
/ ▲-Taste
/ ▼-Taste
MENU-Taste
MODE-Taste
Mikrofon
Mini-USB-Anschluss
RESET-Öffnung
Lautsprecher
Infrarot-LEDs
Abbildung C:
Betriebsanzeige
Abdeckung
Mini-HDMI-Anschluss
Micro-SD-Karteneinschub
Bildschirm
Abbildung D:
Gewinde zur Aufnahme der Stativhalterung
Ein-/Aus-Taste
/ -Taste zum Starten /Stoppen der Videoaufnahme, zum Auslösen einer
Fotoaufnahme oder Aufrufen von Menüpunkten
Abbildung E:
USB-Buchse zur Stromversorgung über den Kfz-Adapter
Betriebsleuchte
12/24 V Kfz-Adapter
USB auf Mini-USB Kabel
Bedienungsanleitung
Page 90

CR 5 A2
■ 86│DE
│AT│
CH
Lieferumfang und Transportinspektion
Bitte prüfen Sie den Lieferumfang (siehe Ausklappseite). Der Lieferumfang besteht aus
folgenden Komponenten:
● Cockpit-Rekorder CR5A2
● Halterung mit Saugnapf
● 12/24 V Kfz-Adapter
● USB auf Mini-USB Kabel
● Diese Bedienungsanleitung
♦ Entnehmen Sie alle Teile des Gerätes und die Bedienungsanleitung aus der
Verpackung und prüfen Sie den Lieferumfang auf Vollständigkeit und sichtbare
Schäden (siehe Ausklappseite).
♦ Entfernen Sie sämtliches Verpackungsmaterial sowie die Schutzfolien von Bild-
schirm
und Kameraobjektiv .
HINWEIS
► Bei einer unvollständigen Lieferung oder Schäden infolge mangelhafter
Verpackung oder durch Transport wenden Sie sich an die Service-Hotline (siehe
Kapitel Service).
Entsorgung der Verpackung
Die Verpackung schützt das Gerät vor Transportschäden. Die Verpackungsmaterialien
sind nach umweltverträglichen und entsorgungstechnischen Gesichtspunkten ausgewählt und deshalb recyclebar.
Die Rückführung der Verpackung in den Materialkreislauf spart Rohstoffe und
verringert das Abfallaufkommen. Entsorgen Sie nicht mehr benötigte Verpackungsmaterialien gemäß den örtlich geltenden Vorschriften.
HINWEIS
► Heben Sie wenn möglich die Originalverpackung während der Garantiezeit
des Gerätes auf, um das Gerät im Garantiefall ordnungsgemäß verpacken zu
können.
Page 91

CR 5 A2
DE│AT│CH
│
87 ■
Inbetriebnahme
Micro-SD-Karte einstecken / entfernen
ACHTUNG
► Installieren und entfernen Sie die Micro-SD-Karte (nicht im Lieferumfang enthal-
ten) nicht, während das Gerät eingeschaltet ist. Dies kann zu Datenverlust auf
der Micro-SD-Karte führen.
♦ Stecken Sie eine Micro-SD-Karte so in den Micro-SD-Karteneinschub
, dass die
goldenen Kontakte in Richtung Display zeigen. Drücken Sie die Micro-SD-Karte
soweit hinein, bis sie spürbar einrastet.
♦ Um die Micro-SD-Karte zu entfernen, drücken Sie sanft auf die Kante der Micro-
SD-Karte. Die Micro-SD-Karte wird ein kleines Stück ausgeworfen und kann aus
dem Gerät entnommen werden.
HINWEIS
► Die Kamera verfügt über keinen internen Speicher. Aufnahmen können daher
nur mit eingelegter Speicherkarte angefertigt werden.
Aus der folgenden Tabelle können Sie die maximale Aufzeichnungsdauer in
Abhängigkeit von der Speicherkapazität der Micro-SD-Karte und der eingestellten
Auflösung entnehmen:
Auflösung
Speicherkapazität der
Micro-SD-Karte
Ungefähre Aufzeichnungsdauer
1080P
4 GB ca. 0 Std. 19 Min.
8 GB ca. 0 Std. 41 Min.
16 GB ca. 1 Std. 21 Min.
32 GB ca. 2 Std. 41 Min.
720P
4 GB ca. 0 Std. 32 Min.
8 GB ca. 1 Std. 06 Min.
16 GB ca. 2 Std. 12 Min.
32 GB ca. 4 Std. 22 Min.
480P
4 GB ca. 0 Std. 47 Min.
8 GB ca. 1 Std. 37 Min.
16 GB ca. 3 Std. 12 Min.
32 GB ca. 6 Std. 23 Min.
Page 92

CR 5 A2
■ 88│DE
│AT│
CH
Kamera an der Windschutzscheibe montieren
1) Schrauben Sie die Halterung in das
Gewinde der Kamera ein. Positionieren
Sie den Saugnapf an der Windschutzscheibe.
Achten Sie darauf, dass der Saugnapf flach
aufliegt.
2) Setzen Sie den Saugnapf fest auf die Windschutzscheibe und drücken Sie den Verriegelungshebel
in Richtung der Windschutzscheibe. Dadurch wird ein Unterdruck erzeugt
und der Saugnapf fest an die Windschutzscheibe gezogen. Bewegen Sie den Verriegelungshebel entgegengesetzt, um den
Saugnapf wieder von der Windschutzscheibe
zu lösen. Um das Lösen zu erleichtern, ist am
Saugnapf eine Lasche angebracht.
3) Nachdem Sie die Kamera mit dem Saugnapf
an der Windschutzscheibe befestigt haben,
lösen Sie nacheinander die Rändelschrauben
und justieren die Kamera nach Ihren
Wünschen.
4) Sind gewünschte Position und Ausrichtung gefunden, ziehen Sie die Rändelschrauben
wieder handfest an.
ACHTUNG
► Die Kamera muss so positioniert werden, dass das Sichtfeld des Fahrers immer
frei ist.
Stromversorgung herstellen
ACHTUNG
► Verwenden Sie zur Stromversorgung des Gerätes ausschließlich den
mitgelieferten Kfz-Adapter.
1) Schließen Sie den Kfz-Adapter
an die Bordspannung (Zigarettenanzünder-
Buchse) Ihres Fahrzeugs an. Die Betriebsleuchte
am Kfz-Adapter zeigt die
Betriebsbereitschaft an, wenn die Bordspannung an der Buchse anliegt.
2) Verbinden Sie das mitgelieferte Mini-USB-Kabel
mit der USB-Buchse am
Kfz-Adapter
und dem USB-Anschluss der Kamera. Sobald die Kamera
über die Bordspannung mit Spannung versorgt wird, startet die Videoaufnahme
und die Betriebsanzeige leuchtet rot. Wenn der interne Geräteakku geladen
wird, erscheint das Batterieladesymbol auf dem Bildschirm .
Page 93

CR 5 A2
DE│AT│CH
│
89 ■
ACHTUNG
► Bei Fahrzeugen, bei denen der Zigarettenanzünder auch bei ausgeschalteter
Zündung funktioniert, muss das Gerät nach der Nutzung von der Zigarettenanzünder-Buchse getrennt werden. Anderenfalls kann die Fahrzeugbatterie über
einen längeren Zeitraum entladen werden, da das Gerät auch im Ruhezustand
Strom aufnimmt. Der Fahrzeugmotor könnte dann nicht mehr gestartet werden.
► Bei Fahrzeugen, in denen der Zigarettenanzünder nicht abgeschaltet wird, wird
auch die Aufnahme nicht automatisch unterbrochen. Schalten Sie in diesem Fall
die Kamera manuell ab.
Bedienung und Betrieb
In diesem Kapitel erhalten Sie wichtige Hinweise zu Bedienung und Betrieb des
Gerätes.
Ein- und Ausschalten, Einstellungen vornehmen
Drücken Sie die Ein-/Aus-Taste , um das Gerät einzuschalten. Das Kamerabild
erscheint auf dem Bildschirm . Das Gerät ist nun in Video-Aufnahmebereitschaft.
Um das Gerät auszuschalten, halten Sie die Ein-/Aus-Taste
3 Sekunden lang
gedrückt.
Grundeinstellungen
Setup Menü
Um im Setup-Menü die Grundeinstellung für das Gerät vornehmen zu können, drücken
Sie die MENU-Taste gefolgt von der MODE-Taste . Das Setup-Menü öffnet sich:
HINWEIS
► Wenn Sie das Menü aufrufen, müssen Sie zuerst die ▼-Taste
drücken, um
den Auswahlbalken auf den ersten Eintrag zu platzieren.
Anschließend können Sie mit den ▲▼-Tasten
/ den Auswahlbalken auf den
gewünschten Eintrag verschieben und diese Menüfunktion dann mit der / -Taste
aufrufen. Um einen aufgerufenen Menüpunkt ohne Änderung wieder zu verlassen, drücken Sie die MODE-Taste . Unten rechts wird die aktuelle Menütafel sowie
die Gesamtzahl der Menütafeln angezeigt. Um das Menü zu schließen, drücken Sie
die MENU-Taste .
Page 94

CR 5 A2
■ 90│DE
│AT│
CH
Zeit & Datum
Wenn Sie diese Menüfunktion aufrufen, können Sie anschließend mit den ▲▼-Tasten
/ auswählen, ob die Aufnahmen mit oder ohne eingeblendetes Datum
gespeichert werden. Wählen Sie „Zeit- & Datums-Stempel ein“, um diese Funktion zu
aktivieren, oder „Zeit- & Datums-Stempel aus“ um sie zu deaktivieren.
Rufen Sie zum Einstellen des aktuellen Datums „Zeit & Datum einstellen“ auf. Dann
stellen Sie mit den ▲▼-Tasten
/ die Jahreszahl des aktuellen Datums ein.
Drücken Sie die MODE-Taste
, um mit den ▲▼-Tasten / die Stundenzahl der
aktuellen Uhrzeit einzustellen. Drücken Sie die MODE-Taste
, um mit den
▲▼-Tasten / die Minutenzahl einzustellen. Drücken Sie die MODE-Taste , um
mit den ▲▼-Tasten
/ die Sekundenzahl einzustellen. Drücken Sie die MODE-
Taste
, um mit den ▲▼-Tasten / das gewünschte Datumsformat einzustellen:
Dabei steht „YY/MM/DD“ für die zweistellige Datumsanzeige in der Reihenfolge
„Jahr / Monat / Tag“, „MM/DD/YY“ steht für die zweistellige Datumsanzeige in
der Reihenfolge „Monat / Tag / Jahr“ und „DD/MM/YY“ steht für die zweistellige
Datumsanzeige in der Reihenfolge „Tag / Monat / Jahr“. Drücken Sie die MODETaste , um mit den ▲▼-Tasten / den Tag einzustellen. Drücken Sie die
MODE-Taste
, um mit den ▲▼-Tasten / den Monat einzustellen.
Bestätigen Sie Ihre Auswahl mit der
/ -Taste . Anschließend kehrt die
Anzeige zur Liste der Menüpunkte zurück.
Automatische Abschaltung
Wenn Sie diese Menüfunktion aufrufen, können Sie anschließend mit den ▲▼-Tasten
/ auswählen, ob sich das Gerät nach „1 Min“, „3 Min“ oder „5 Min“
Inaktivität automatisch abschaltet. Wenn Sie „Aus“ auswählen, wird sich das Gerät
nicht automatisch abschalten. Bestätigen Sie Ihre Auswahl mit der / -Taste .
Anschließend kehrt die Anzeige dann zur Liste der Menüpunkte zurück.
Aufprall-Sensor (G-Sensor)
Wenn Sie diese Menüfunktion aufrufen, können Sie anschließend mit den ▲▼-Tasten
/ die Empfindlichkeit des eingebauten Aufprall-Sensors auswählen: „Sehr gering“, „Gering“, „Mittel“, „Hoch“ und „Sehr hoch“ stehen zur Auswahl. Diese Funktion schützt die aktuell laufende Video-Aufnahme bei Erkennung einer Erschütterung,
die auf ein Unfallereignis schließen lässt, automatisch gegen das Überschreiben in
der Endlosschleife. Im Bildschirm erscheint das -Symbol und die aktuelle
Aufnahme ist gegen Löschen geschützt. Bestätigen Sie Ihre Auswahl mit der /
-Taste . Anschließend kehrt die Anzeige dann zur Liste der Menüpunkte zurück.
Akustisches Signal
Wenn Sie diese Menüfunktion aufrufen, können Sie anschließend mit den
▲▼-Tasten
/ auswählen, ob das Gerät das Drücken der Tasten sowie das Einund Ausschalten mit akustischen Signalen quittiert („Ein“), oder nicht („Aus“).
Bestätigen Sie Ihre Auswahl mit der / -Taste . Anschließend kehrt die
Anzeige dann zur Liste der Menüpunkte zurück.
HINWEIS
► Der Countdown und das Auslösegeräusch bei einer Selbstauslöser-Aufnahme
werden auch bei deaktiviertem akustischen Signal wiedergegeben.
Page 95

CR 5 A2
DE│AT│CH
│
91 ■
Display-Abschaltung
Wenn Sie diese Menüfunktion aufrufen, können Sie anschließend mit den ▲▼-Tasten
/ die Zeitspanne auswählen, nach deren Ablauf sich das Display automatisch
abschaltet: „1 Min.“, „3 Min.“ und „5 Min.“ stehen dazu zur Auswahl. Wählen Sie
„Display immer an“, wenn sich das Display nicht abschalten soll. Um das Display
nach der automatischen Abschaltung wieder einzuschalten, drücken Sie eine der
▲▼-Tasten / , die MODE-Taste oder die / -Taste .
Sprache
Wenn Sie diese Menüfunktion aufrufen, können Sie anschließend mit den ▲▼-Tasten
/ „Englisch“ oder „Deutsch“ als Sprache für die Bildschirmmenüs auswählen.
Bestätigen Sie Ihre Auswahl mit der / -Taste . Anschließend kehrt die Anzeige
dann zur Liste der Menüpunkte zurück.
Display Symbol Drehung
Wenn Sie diese Menüfunktion aufrufen, können Sie anschließend mit den ▲▼-Tasten
/ einstellen, ob die Darstellung der Display-Symbole und der Menüs normal
(„Aus“) oder um 180° gedreht („Ein“) angezeigt werden sollen. Welche Einstellung
hier sinnvoll ist, richtet sich danach, wie Sie die Kamera angebracht haben.
Speicherkarte formatieren
Wenn Sie diese Menüfunktion aufrufen, können Sie anschließend mit den ▲▼-Tasten
/ die eingesetzte Micro-SD-Karte formatieren. Bei diesem Prozess gehen
sämtliche Daten auf der Micro-SD-Karte unwiederbringlich verloren, auch die gegen
Löschen geschützten Dateien. Um die Formatierung durchzuführen, wählen Sie mit
den ▲▼-Tasten / „OK“ an und drücken die / -Taste . Daraufhin wird
die Formatierung durchgeführt.
Werkseinstellungen
Wenn Sie diese Menüfunktion aufrufen, können Sie anschließend sämtliche Einstellungen des Gerätes auf die Werkseinstellungen zurücksetzen. Wählen Sie mit den
▲▼-Tasten
/ „OK“ aus und bestätigen Sie Ihre Auswahl mit der / -Taste
. Anschließend kehrt die Anzeige dann zur Liste der Menüpunkte zurück. Alle
zuvor von Ihnen vorgenommenen Einstellungen sind nun auf die Werkseinstellungen
zurücksetzt.
Um das Setup-Menü zu schließen, drücken Sie die MENU-Taste
.
Page 96

CR 5 A2
■ 92│DE
│AT│
CH
Video-Aufnahmebereitschaft
In der Video-Aufnahmebereitschaft zeigt der Bildschirm folgende Übersicht an:
A – Anzeige der Rest-Aufzeichnungsdauer in Abhängigkeit von Auflösung und
verfügbarem Speicherplatz
B – Aktuelle Video-Auflösung
C – Symbol für eingesetzte Micro-SD-Karte
D – Ladezustandsanzeige des internen Geräteakkus
E – Datumsanzeige (nur bei aktivierter Funktion „Zeit- & Datums-Stempel“)
F – Uhrzeitanzeige (nur bei aktivierter Funktion „Zeit- & Datums-Stempel“)
G – Symbol für Bewegungserkennung (nur sichtbar, wenn Funktion aktiviert ist)
H – Symbol für Aufnahme in Endlosschleife sowie deren Länge in Minuten
(hier 3 Minuten)
I – Anzeige für Belichtungskorrektur
J – Symbol für Video-Aufnahmebereitschaft
K – Roter Punkt blinkt während der Aufnahme
L – Symbol für eine gegen Löschen geschützte Datei
Aufnahme starten / beenden
Drücken Sie ggf. wiederholt die / ▲-Taste , um das Motiv heranzuzoomen. Halten Sie diese Taste für schnelles Zoomen gedrückt. Mit der
/ ▼-Taste können
Sie auf gleiche Weise herauszoomen. Drücken Sie die / -Taste , um die
Videoaufnahme zu starten. Während der Videoaufnahme blinkt die Betriebsanzeige
grün (nur bei Akkubetrieb). Drücken Sie diese Taste erneut, um die Aufnahme zu
beenden.
Wenn Sie während der Aufnahme die MODE-Taste
drücken, erscheint das
-Symbol und die aktuelle Aufnahme wird gegen Löschen geschützt.
HINWEIS
► Sobald die Kamera über das Kfz-Bordnetz versorgt wird, startet die Aufnahme.
Um die Aufnahme dann zu beenden, drücken Sie die
/ -Taste .
Page 97

CR 5 A2
DE│AT│CH
│
93 ■
Wenn Sie in der Video-Aufnahmebereitschaft die MENU-Taste drücken, öffnet
sich das folgende Menü:
Mit den ▲▼-Tasten / können Sie den Auswahlbalken auf den gewünschten
Eintrag verschieben und diese Menüfunktion dann mit der / -Taste aufrufen.
Um einen aufgerufenen Menüpunkt ohne Änderung wieder zu verlassen, drücken Sie
die MODE-Taste . Unten rechts wird die aktuelle Menütafel sowie die Gesamtzahl
der Menütafeln angezeigt. Wenn der unterste Menüeintrag auf einer Menütafel angewählt ist, auf die noch eine weitere Tafel folgt, drücken Sie die ▼ Taste , um zum
ersten Eintrag auf der folgenden Menütafel zu springen. Um das Menü zu schließen,
drücken Sie die MENU-Taste .
Auflösung
Wenn Sie diese Menüfunktion aufrufen, können Sie anschließend die Video-Bildgröße festlegen: „1920x1080P (HD)“, „1280 x 720P“ und „640 x 480P“ stehen zu
Auswahl. Wählen Sie mit den ▲▼-Tasten
/ die gewünschte Auflösung aus und
bestätigen Sie Ihre Auswahl mit der / -Taste , um dann zur Liste der Menüpunkte zurückzukehren.
Belichtung
Wenn Sie diese Menüfunktion aufrufen, können Sie anschließend die Video-Belichtung in drei Schritten nach oben (von +1 bis +3, heller), bzw. nach unten (von -1 bis
-3, dunkler) korrigieren. In der Einstellung „0“ findet keine Belichtungskorrektur statt.
Wählen Sie mit den ▲▼-Tasten
/ die gewünschte Video-Belichtungskorrektur
aus und bestätigen Sie Ihre Auswahl mit der / -Taste , um dann zur Liste der
Menüpunkte zurückzukehren.
Video Länge
Wenn Sie diese Menüfunktion aufrufen, können Sie anschließend die Dauer der
Endlosschleife für die Videoaufnahme festlegen: „3 Min“, „5 Min“, „10 Min“ oder
„Aufnahme-Schleife aus“ stehen zur Auswahl. Wählen Sie mit den ▲▼-Tasten
/
den gewünschten Wert für die Loop-Aufnahme aus und bestätigen Sie Ihre Auswahl
mit der / -Taste , um dann zur Liste der Menüpunkte zurückzukehren.
Bedenken Sie dabei, dass die verwendete Micro-SD-Karte in Abhängigkeit von der
eingestellten Video-Bildgröße eine ausreichende Kapazität haben muss, um die
gewünschte Dauer der Endlosschleife erreichen zu können. Wenn Sie „AufnahmeSchleife aus“ wählen, endet die Aufnahme bei Erreichen der Kapazitätsgrenze der
Micro-SD-Karte. Wenn das Ende der Aufnahme erreicht wird, beginnt das Gerät eine
neue Aufnahme mit der eingestellten Länge.
Reicht die Kapazität der eingesetzten Speicherkarte nicht für die eingestellte Dauer der
Endlosschleife, wird die Aufnahme abgebrochen. Verringern Sie dann die Dauer der
Endlosschleife oder verwenden Sie eine Speicherkarte mit größerer Kapazität.
Page 98

CR 5 A2
■ 94│DE
│AT│
CH
Bewegungserkennung (Motion-Detection)
Wenn Sie diese Menüfunktion aufrufen, können Sie anschließend diese Funktion mit
den ▲▼-Tasten
/ ein- oder ausschalten. Bestätigen Sie Ihre Auswahl mit der
/ -Taste , um dann zur Liste der Menüpunkte zurückzukehren.
Bei eingeschalteter Funktion beendet das Gerät die Videoaufnahme automatisch,
wenn keine bewegten Bilder mehr aufgezeichnet werden. Registriert das Gerät wieder
Bewegungen, beginnt das Gerät automatisch mit einer neuen Aufnahme. Bei ausgeschalteter Funktion unterbricht das Gerät die Aufnahme nicht, wenn Bewegungen
ausbleiben.
HINWEIS
► Diese Funktion sollten Sie nur aktivieren, während das Fahrzeug geparkt steht, um
z.B. einen Aufbruchsversuch oder ein gegnerisches Fahrzeug nach einer Kollision
automatisch zu filmen.
► Die erste Aufnahme muss auch bei eingeschalteter Funktion manuell gestartet
werden.
Tonaufnahme
Wenn Sie diese Menüfunktion aufrufen, können Sie anschließend die Audioaufnahme über das eingebaute Mikrofon mit den ▲▼-Tasten
/ ein- oder ausschalten.
Bestätigen Sie Ihre Auswahl mit der / -Taste , um dann zur Liste der Menüpunkte zurückzukehren.
Page 99

CR 5 A2
DE│AT│CH
│
95 ■
Foto-Aufnahmebereitschaft
Bei geschlossenem Menü drücken Sie in der Video-Aufnahmebereitschaft die MODETaste
, um in die Foto-Aufnahmebereitschaft umzuschalten. Das Gerät zeigt dann
folgende Übersicht auf dem Bildschirm :
A – Anzeige der Fotoanzahl, die in Abhängigkeit von Auflösung und verfügbarem
Speicherplatz noch aufgenommen werden können
B – Aktuelle Foto-Auflösung
C – Symbol für eingesetzte Micro-SD-Karte
D – Ladezustandsanzeige des internen Geräteakkus
E – Datumsanzeige (nur bei aktivierter Funktion „Zeit- & Datums-Stempel“)
F – Uhrzeitanzeige (nur bei aktivierter Funktion „Zeit- & Datums-Stempel“)
G – Symbol für Selbstauslöser (hier 5 Sekunden; nur sichtbar, wenn Funktion akti-
viert ist)
H – Symbol für Belichtungskorrektur
I – Anzeige für Foto-Aufnahmebereitschaft
J – Anzeige für Serienbildfunktion (nur sichtbar, wenn Funktion aktiviert ist)
Foto aufnehmen
Drücken Sie ggf. wiederholt die /▲-Taste , um das Motiv heranzuzoomen. Halten Sie diese Taste für schnelles Zoomen gedrückt. Mit der
/ ▼-Taste können
Sie auf gleiche Weise herauszoomen. Drücken Sie die / -Taste , um ein Foto
aufzunehmen.
Wenn Sie in der Foto-Aufnahmebereitschaft die MENU-Taste
drücken, öffnet sich
das folgende Menü:
Mit den ▲▼-Tasten / können Sie den Auswahlbalken auf den gewünschten
Eintrag verschieben und diese Menüfunktion dann mit der / -Taste aufrufen.
Page 100

CR 5 A2
■ 96│DE
│AT│
CH
Um einen aufgerufenen Menüpunkt ohne Änderung wieder zu verlassen, drücken Sie
die MODE-Taste
. Unten rechts wird die aktuelle Menütafel sowie die Gesamtzahl
der Menütafeln angezeigt. Wenn der unterste Menüeintrag auf einer Menütafel angewählt ist, auf die noch eine weitere Tafel folgt, drücken Sie die ▼ Taste , um zum
ersten Eintrag auf der folgenden Menütafel zu springen. Um das Menü zu schließen,
drücken Sie die MENU-Taste .
Auflösung
Wenn Sie diese Menüfunktion aufrufen, können Sie anschließend mit den ▲▼-Tasten
/ die gewünschte Größe für die Fotos einstellen: „12MP (interp.*)“, „7MP
(interp.*)“, „5MP“, „3MP“, „2MP“, „1,3MP“ oder „0,3MP“ stehen zu Auswahl.
„MP“ steht dabei für Mega-Pixel, z.B. erzeugt die Einstellung „5MP“ ein Bild von
2592 × 1944 Pixel, was ungefähr 5 Millionen Pixeln entspricht. Je größer die Bilder
sind, umso höher ist die Detaildichte. Jedoch erreicht die Micro-SD-Karte bei hoher
Fotogröße eher ihre Kapazitätsgrenze. Bestätigen Sie Ihre Auswahl mit der /
-Taste , um dann zur Liste der Menüpunkte zurückzukehren.
* Interpolation = rechnerische Erhöhung der Bildpunktemenge
Belichtung
Wenn Sie diese Menüfunktion aufrufen, können Sie anschließend die Foto-Belichtung
in drei Schritten nach oben (von +1 bis +3, heller), bzw. nach unten (von –1 bis –3,
dunkler) korrigieren. Wählen Sie mit den ▲▼-Tasten
/ die gewünschte FotoBelichtungskorrektur aus und bestätigen Sie Ihre Auswahl mit der / -Taste ,
um dann zur Liste der Menüpunkte zurückzukehren.
3 Fotos in Serie
Wenn Sie diese Menüfunktion aufrufen, können Sie anschließend mit den ▲▼-Tasten
/ diese Funktion zur Aufnahme von 3 Fotos in schneller Folge ein- oder ausschalten. Bestätigen Sie Ihre Auswahl mit der / -Taste , um dann zur Liste der
Menüpunkte zurückzukehren.
Selbstauslöser
Wenn Sie diese Menüfunktion aufrufen, können Sie anschließend mit den ▲▼-Tasten
/ eine Auslöseverzögerung von 2, 5 oder 10 Sekunden einstellen. Das Bild
wird dann erst mit der eingestellen Verzögerung nach Drücken der
/ -Taste
aufgenommen. Wählen Sie „Direktaufnahme“, um die Auslöseverzögerung zu deaktivieren. Bestätigen Sie Ihre Auswahl mit der / -Taste , um dann zur Liste der
Menüpunkte zurückzukehren.
Wiedergabemodus
Bei geschlossenem Menü drücken Sie in der Foto-Aufnahmebereitschaft die MODETaste , um in den Wiedergabemodus umzuschalten. Mit den ▲▼-Tasten /
können Sie durch die gespeicherten Aufnahmen schalten. Wenn Sie ein Foto
anwählen und die / -Taste drücken, werden alle gespeicherten Fotos in
einer endlosen Diashow angezeigt. Drücken Sie die / -Taste erneut, um
die Diashow zu beenden. Wenn Sie ein Video anwählen und die / -Taste
drücken, wird das Video wiedergegeben.
 Loading...