

Page 1

IAN 47583
DASHBOARD CAMERA CR 5 A1
DASHBOARD CAMERA
Operating instructions
DASHCAM
Bedienungsanleitung
CAMERĂ VIDEO PENTRU MAŞINĂ
DASHCAM
Instrucţiuni de utilizare
ΚΑΜΕΡΑ ΠΑΡΑΚΟΛΟΥΘΗΣΗΣ
ΟΔΙΚΗΣ ΚΥΚΛΟΦΟΡΙΑΣ
Οδηүίες χρήσης
Page 2

GB / CY Operating instructions Page 1
RO Instrucţiuni de utilizare Pagina 27
GR / CY Οδηүίες χρήσης Σελίδα 53
DE / AT / CH Bedienungsanleitung Seite 79
Before reading, unfold the page containing the illustrations and familiarise yourself with all functions of the device.
Înainte de a citi instrucţiunile, priviţi imaginile şi familiarizaţi-vă cu toate funcţiile aparatului.
Πριν ξεκινήσετε την ανάγνωση, ανοίξτε τη σελίδα με τις εικόνες και εξοικειωθείτε με όλες τις λειτουργίες της συσκευής.
Klappen Sie vor dem Lesen die Seite mit den Abbildungen aus und machen Sie sich anschließend
mit allen Funktionen des Gerätes vertraut.
Page 3

A
B
C
D
E
IAN 47583
DASHBOARD CAMERA CR 5 A1
DASHBOARD CAMERA
Operating instructions
DASHCAM
Betjeningsvejledning
BILKAMERA
Bruksanvisning
KOJELAUTAKAMERA
Käyttöohje
DASHCAM
Bedienungsanleitung
Page 4

1
CR 5 A1
GB
CY
Contents
Introduction . . . . . . . . . . . . . . . . . . . . . . . . . . . . . . . . . . . . . . . . . . . . . . . . . . .2
Information concerning these operating instructions . . . . . . . . . . . . . . . . . . . . . . . . . . . . . . . 2
Copyright . . . . . . . . . . . . . . . . . . . . . . . . . . . . . . . . . . . . . . . . . . . . . . . . . . . . . . . . . . . . . . . . 2
Intended use . . . . . . . . . . . . . . . . . . . . . . . . . . . . . . . . . . . . . . . . . . . . . . . . . . . . . . . . . . . . . 2
Warnings used . . . . . . . . . . . . . . . . . . . . . . . . . . . . . . . . . . . . . . . . . . . . . . . . . . . . . . . . . . . . 2
Safety . . . . . . . . . . . . . . . . . . . . . . . . . . . . . . . . . . . . . . . . . . . . . . . . . . . . . . . . 3
Basic safety guidelines . . . . . . . . . . . . . . . . . . . . . . . . . . . . . . . . . . . . . . . . . . . . . . . . . . . . . .3
Possible infringements of the rights of third parties . . . . . . . . . . . . . . . . . . . . . . . . . . . . . . . . 5
Controls. . . . . . . . . . . . . . . . . . . . . . . . . . . . . . . . . . . . . . . . . . . . . . . . . . . . . . . 6
Contents of package and transport inspection . . . . . . . . . . . . . . . . . . . . . . . . . . . . . . . . . . .7
Disposal of packaging materials . . . . . . . . . . . . . . . . . . . . . . . . . . . . . . . . . . . . . . . . . . . . . . 7
Initial operation . . . . . . . . . . . . . . . . . . . . . . . . . . . . . . . . . . . . . . . . . . . . . . . .8
Inserting/removing the microSD card . . . . . . . . . . . . . . . . . . . . . . . . . . . . . . . . . . . . . . . . . . 8
Mounting the camera on the windscreen . . . . . . . . . . . . . . . . . . . . . . . . . . . . . . . . . . . . . . .9
Providing electric power . . . . . . . . . . . . . . . . . . . . . . . . . . . . . . . . . . . . . . . . . . . . . . . . . . . .9
Handling and operation . . . . . . . . . . . . . . . . . . . . . . . . . . . . . . . . . . . . . . . . 10
Switching on and off , making settings . . . . . . . . . . . . . . . . . . . . . . . . . . . . . . . . . . . . . . . . .10
Basic settings . . . . . . . . . . . . . . . . . . . . . . . . . . . . . . . . . . . . . . . . . . . . . . . . . . . . . . . . . . . .10
Setup menu . . . . . . . . . . . . . . . . . . . . . . . . . . . . . . . . . . . . . . . . . . . . . . . . . . . . . . . . . . .10
Video standby mode . . . . . . . . . . . . . . . . . . . . . . . . . . . . . . . . . . . . . . . . . . . . . . . . . . .13
Start / end recording . . . . . . . . . . . . . . . . . . . . . . . . . . . . . . . . . . . . . . . . . . . . . . . . . . . .13
Photo standby . . . . . . . . . . . . . . . . . . . . . . . . . . . . . . . . . . . . . . . . . . . . . . . . . . . . . . . . .16
Taking photos . . . . . . . . . . . . . . . . . . . . . . . . . . . . . . . . . . . . . . . . . . . . . . . . . . . . . . . . .16
Playback mode . . . . . . . . . . . . . . . . . . . . . . . . . . . . . . . . . . . . . . . . . . . . . . . . . . . . . . . .17
Showing recordings on an external monitor . . . . . . . . . . . . . . . . . . . . . . . . . . . . . . . . . . . .20
Transferring recordings to a computer . . . . . . . . . . . . . . . . . . . . . . . . . . . . . . . . . . . . . . . . .21
Resetting the device . . . . . . . . . . . . . . . . . . . . . . . . . . . . . . . . . . . . . . . . . . . . . . . . . . . . . . .21
Changing the fuse . . . . . . . . . . . . . . . . . . . . . . . . . . . . . . . . . . . . . . . . . . . . . . . . . . . . . . . .21
Cleaning . . . . . . . . . . . . . . . . . . . . . . . . . . . . . . . . . . . . . . . . . . . . . . . . . . . . .22
Troubleshooting. . . . . . . . . . . . . . . . . . . . . . . . . . . . . . . . . . . . . . . . . . . . . . .22
Fault causes and rectifi cation . . . . . . . . . . . . . . . . . . . . . . . . . . . . . . . . . . . . . . . . . . . . . . . .22
Storage / Disposal . . . . . . . . . . . . . . . . . . . . . . . . . . . . . . . . . . . . . . . . . . . . .24
Storage . . . . . . . . . . . . . . . . . . . . . . . . . . . . . . . . . . . . . . . . . . . . . . . . . . . . . . . . . . . . . . . .24
Disposal of the device . . . . . . . . . . . . . . . . . . . . . . . . . . . . . . . . . . . . . . . . . . . . . . . . . . . . .24
Appendix . . . . . . . . . . . . . . . . . . . . . . . . . . . . . . . . . . . . . . . . . . . . . . . . . . . .24
Notes on the Declaration of Conformity . . . . . . . . . . . . . . . . . . . . . . . . . . . . . . . . . . . . . . .24
Technical data . . . . . . . . . . . . . . . . . . . . . . . . . . . . . . . . . . . . . . . . . . . . . . . . . . . . . . . . . . .25
Warranty . . . . . . . . . . . . . . . . . . . . . . . . . . . . . . . . . . . . . . . . . . . . . . . . . . . . . . . . . . . . . . .26
Service . . . . . . . . . . . . . . . . . . . . . . . . . . . . . . . . . . . . . . . . . . . . . . . . . . . . . . . . . . . . . . . . .26
Importer . . . . . . . . . . . . . . . . . . . . . . . . . . . . . . . . . . . . . . . . . . . . . . . . . . . . . . . . . . . . . . . .26
Page 5

2
CR 5 A1
GB
CY
Introduction
Information concerning these operating instructions
Congratulations on the purchase of your new device.
You have selected a high-quality product. The operating instructions are part of
this product. They contain important information on safety, usage and disposal.
Before using the product, familiarise yourself with all handling and safety guidelines.
Use the product only as described and for the range of applications specifi ed.
Please pass on all documentation incl. these operating instructions on to any
future owner(s) if you sell this product or give it away.
Copyright
This documentation is subject to copyright protection.
Any copying or reproduction, including extracts thereof, and the reproduction of
images (even in a modifi ed state), is permitted only with the written authorisation
of the manufacturer.
Intended use
This cockpit recorder is an information electronics device designed to record
digital photos and videos in motor vehicles, particularly while on the road. It is
not intended for any other use. This device is not intended for use in commercial
or industrial environments. The manufacturer accepts no responsibility for damage caused by failure to observe these instructions, improper use, incompetent
repairs, making unauthorised modifi cations or for using unapproved replacement
parts. The risk shall be borne solely by the user.
Warnings used
The following warnings are used in these operating instructions:
DANGER
A warning at this hazard level indicates an imminently hazardous situation.
If the hazardous situation is not avoided, it could result in death or serious
physical injury.
► Follow the instructions in this warning to prevent a fatality or serious
personal injury.
Page 6

3
CR 5 A1
GB
CY
WARNING
A warning at this hazard level indicates a potentially hazardous situation.
Failure to avoid this hazardous situation could result in physical injury.
► Follow the instructions in this warning to prevent physical injury.
CAUTION
A warning at this hazard level indicates potential material
damage.
Failure to avoid this situation could result in material damage.
► Follow the instructions in this warning to prevent material damage.
NOTE
►
A note indicates additional information that eases device handling.
Safety
In this section, you will receive important safety advice relating to device handling.
The device complies with the statutory safety regulations.
Improper use may result in personal injury and material damage.
Basic safety guidelines
To ensure safe handling of the device, follow the safety guidelines set out below:
■ Prior to use, check the device for visible, external damage. Do not operate an
device that has been damaged or dropped.
■ If the cables or connections are damaged, have them replaced by an author-
ised specialist or customer service.
■ All repairs must be carried out by authorised specialist companies or by the
Customer Service department. Failure to make proper repairs can put the
user at risk. Warranty entitlement will also lapse.
■ Defective components must always be replaced with original replacement
parts. Compliance with the safety requirements can only be guaranteed by
using these replacement parts.
■ Never open the device, and never carry out any repairs yourself.
■ Protect the device from moisture, spray and dripping water and penetration
by liquids.
Page 7

4
CR 5 A1
GB
CY
■ Never subject the device to extreme heat or humidity. This applies especially to
storage in a car. If the car is stationary for long periods and the weather is
warm and sunny, temperatures of more than 40°C can arise in the car interior
and the glove compartment. Remove electrical and electronic devices from
the vehicle.
■ When fi tting the cradle, ensure that it does not interfere with the steering,
braking or the operation of other vehicle systems (such as airbags) and does
not restrict your fi eld of view when driving.
DANGER
Do not place the car cradle in or near the expansion area of the airbag, since
the cradle could be fl ung through the vehicle interior in the event of airbag
deployment and cause serious injuries.
WARNING
The camera should not be mounted in such a way that you or other passengers
could be hit by the camera in the event of an accident. This could cause serious
injury.
■ People who, due to their physical, intellectual, motor or sensory capabilities,
are incapable of operating the device safely may only use the device under
the supervision or direction of a responsible person.
DANGER
Packaging materials must be kept out of the reach of children and should not
be used as playthings. Risk of suff ocation.
■ Do not allow children to use the device unless they are being supervised.
Children are not always able to correctly recognise potential dangers.
■ Do not place any objects on the device.
■ Do not operate the device close to open fl ames (e.g. candles).
■ If you notice a burning smell or smoke coming from your device, disconnect
it from the power supply immediately.
WARNING
Under no circumstances should the smoke be inhaled as this could be harmful
to your health.
■ Check regularly to ensure that the suction cup is securely attached to the
windscreen. This is especially important in areas where extreme outside
temperature fl uctuations occur.
■ All of the applicable laws in your location must be observed. The use of a
cockpit camera is banned in some countries and may constitute a criminal
off ence. The camera should not be operated while driving. Traffi c safety must
ALWAYS take priority whilst driving. Use this device only if it is not like to
lead to any hazard during driving situations.
Page 8

5
CR 5 A1
GB
CY
■ The device contains a lithium-ion battery. Therefore, the device must not be
thrown into the fi re. There is a risk of explosion!
■ Do not exert any pressure on the display. If it should break, touching the
sharp edges could cause injury.
Possible infringements of the rights of third parties
Please note the following when using the cockpit camera:
Copyright protection
In principle, everyone has the right to pictures of themselves. According to copyright law, pictures of people may only be published without their permission if the
aff ected person appears merely as an incidental feature in a landscape or other
location. The question as to whether a person is merely an incidental feature
must be ascertained on a case by case basis.
Protection of privacy
The privacy of others may not be infringed by any recorded images. Do not set up
the camera pointing at the garden or an entrance of a neighbouring residence,
even if these locations are easily visible from your own vehicle or from public
places. This does not a constitute a right to publish these views.
Personal determinability
Personal determinability exists when it can be established that a certain person
was at a certain location at a certain time. This identifi cation can be made by
means of an identifi er related to a specifi c person, e.g. a car number plate.
Personal determinability of persons is to be avoided.
Surveillance cameras at the workplace
Surveillance at the workplace is subject to particularly strict legislation in Germany.
Employers should not use surveillance cameras in the workplace in any cases
where this could lead to a possible infringement of legal rights.
The respective legal requirements of the country in which the camera is being used
should always be observed to avoid possible infringements of the rights of third
parties. Due to the possible violation of third party rights, it is illegal to publish
recordings featuring strangers or vehicle license plates without authorisation,
e.g. on the Internet. The recordings may only be used for providing evidence in
the event of an accident.
Page 9

6
CR 5 A1
GB
CY
Controls
(For illustrations see the fold-out page)
Figure A:
Locking lever
Cradle with suction cups
Knurled screws for three-dimensional locking
Figure B:
Camera lens
▲ button
▼ button
MENU button
MODE button
Microphone
USB* port
Reset opening
AV connection
Loudspeaker
Infrared LEDs
Figure C:
Operating display
Cover
Mini-HDMI connection
microSD card slot
Screen
Figure D:
Thread for the tripod mount
On/Off button
/ button to start/stop the video recording, to trigger a photo or
call up menu items
Illustration E:
USB socket for power supply via the in-car adaptor
Operating light
12/24 V car adapter
USB* to mini-USB cable
AV cable (3.5 mm jack to phono plugs)
Protective housing
Operating instructions
*USB
®
is a registered trademark of USB Implementers Forum, Inc.
Page 10

7
CR 5 A1
GB
CY
Contents of package and transport inspection
Please check the contents of the package (see fold-out page).
The following components are included in delivery:
● Cockpit recorder CR 5 A1
● Protective housing
● Cradle with suction cups
● USB* to mini-USB cable
● 12/24 V car adapter
● AV cable (3.5 mm jack to phono plugs)
● These operating instructions
*USB® is a registered trademark of USB Implementers Forum, Inc.
♦ Remove all the parts of the device and the operating instructions from
the packaging and then check the contents for completeness and visible
damage (see fold out page).
♦ Remove all packing material and the protective fi lm from the screen and
camera lens .
NOTE
►
If the consignment is incomplete or damaged due to defective packaging
or carriage, contact the Service hotline (see the Service section).
Disposal of packaging materials
The packaging protects the device from damage during carriage. The packaging
materials have been selected in accordance with environmentally congruent and
disposal-specifi c parameters and are, therefore, recyclable.
Returning the packaging to the materials cycle conserves raw materials and
reduces the amount of waste that is generated. Dispose of packaging materials
that are no longer needed in accordance with applicable local regulations.
NOTE
►
If possible, keep the original packaging of the device during the warranty
period, so that the device can be packed properly for returning in the event
of a warranty claim.
Page 11

8
CR 5 A1
GB
CY
Initial operation
Inserting/removing the microSD card
CAUTION
►
Do not install or remove the microSD card (not supplied) while the device is
switched on. This can cause loss of data on the microSD card.
♦ Insert a microSD card into the microSD card slot so that the golden
contacts are facing toward the display. Press the microSD card in until it
locks into place.
♦ To remove the microSD card, gently press the edge of the microSD card.
The microSD card is ejected slightly and can be removed from the device.
NOTE
►
The camera does not have any internal memory. Therefore, recordings can
only be made with a memory card inserted.
You can fi nd the maximum recording time depending on the storage capacity
of the microSD card and the selected resolution in the following table.
Resolution
Storage capacity of the
microSD card
Approximate recording time
1080p
4 GB approx. 0 hrs. 19 min.
8 GB approx. 0 hrs. 39 min.
16 GB approx. 1 hr. 18 min.
32 GB approx. 2 hrs. 08 min.
720p
4 GB approx. 0 hrs. 29 min.
8 GB approx. 1 hr. 00 min.
16 GB approx. 1 hr. 58 min.
32 GB approx. 4 hrs. 01 min.
VGA
4 GB approx. 0 hrs. 47 min.
8 GB approx. 1 hr. 37 min.
16 GB approx. 3 hrs. 11 min.
32 GB approx. 6 hrs. 29 min.
Page 12

9
CR 5 A1
GB
CY
Mounting the camera on the windscreen
1) To increase the protection for the camera,
you can place the camera in the protective
housing
and push it gently into place until
the camera clicks into place.
2) Screw the cradle
into the thread of the
camera Position the suction cup on the windscreen. Ensure that the suction cup is pressed
on fl at.
3) Place the suction cup fi rmly against the windscreen and press the suction cup locking
lever
downwards towards the windscreen.
This creates suction, and the suction cup is
pulled tightly against the windscreen. Pull the
locking lever in the opposite direction to
release the suction cup from the windscreen.
4) After attaching the camera with the suction
cup on the windscreen, loosen screws A–C
and adjust the camera as per your wishes.
5) Once you have found the desired position and orientation, retighten the knurled
screws
.
CAUTION
►
The camera must be positioned so that the driver's fi eld of vision is not
obscured.
Providing electric power
CAUTION
►
Use only the supplied car adapter to power your device.
1) Connect the car adapter
to your vehicle's on-board power supply (cigarette
lighter). The operating light on the car adapter indicates operational
readiness when the socket is live.
2) Connect the supplied USB cable
to the USB port on the car adapter
and the USB socket of the camera. As soon as the camera is powered by the
on-board power supply, the video recording starts and the operating display
fl ashes alternately red and green. Once the internal backup battery is charging,
the battery charger symbol appears on the screen .
Page 13

10
CR 5 A1
GB
CY
CAUTION
►
In vehicles in which the cigarette lighter also works with the ignition switched
off , the device must be disconnected from the cigarette lighter socket after
use. Otherwise, the vehicle battery may be discharged over a long period
of time, since the device also uses power when it is idle. The vehicle's
engine will no longer start.
► In vehicles in which the cigarette lighter is not switched off , the recording is
not interrupted. In this case, you will need to switch off the camera manually.
Handling and operation
In this chapter you will receive important information for the handling and operation
of the device.
Switching on and off , making settings
Press the on/off button to switch on the device. The camera image is displayed
on the screen and the operating display lights up green. The device is now
in video standby mode.
To switch off the device, press and hold the on/off button for 3 seconds.
Basic settings
Setup menu
To make the basic settings for the device in the setup menu, press the MENU
button followed by the MODE button . The setup menu opens:
Default settings
Using the ▲▼ buttons / you can move the selection bar to the desired entry
and then call up this menu item with the / button . To exit the activated
menu item without making a change, press the MODE button . Below right,
the current menu board as well as the total number of menu boards is shown.
To close the menu, press the MENU button .
Page 14

11
CR 5 A1
GB
CY
Time & date
If you access this menu option, you can then use the ▲▼ buttons
/ to select
whether the recordings are to be made with or without a date stamp. Select
"Time & date stamp on" to activate ths function or "Time & date stamp off " to
deactivate it.
To set the current date, call up "Set time & date". Then use the ▲▼ buttons
/
to set the current year. Press the MODE button
to use the ▲▼ buttons / to
set the month. Press the MODE button to use the ▲▼ buttons / to set the
day. Press the MODE button to use the ▲▼ buttons / to set the hours of
the current time. Press the MODE button to use the ▲▼ buttons / to set
the minutes. Press the MODE button to use the ▲▼ buttons / to set the
seconds. Press the MODE button to use the ▲▼ buttons / to set the
required date format.
The options are "YY/MM/DD" for the two-digit date in the order "year/month/
day", "MM/DD/YY" for the two-digit date in the order "month/day/year" and
"DD/MM/YY" for the two-digit date in the order "day/month/year".
Confi rm your selection by pressing the
/ button . Afterwards, the display
will return to the list of menu items.
Auto Power Off
If you access this menu option, you can the use the ▲▼ buttons
/ to choose
whether the device switches off automatically after "1 Min", "3 Min" or "5 Min"
of inactivity. If you select "Off ", the device will not switch off automatically.
Confi rm your selection by pressing the / button . Afterwards, the display
will return to the list of menu items.
Impact sensor
If you access this menu option, then you can use the ▲▼ buttons
/ to select
the sensitivity of the built-in impact sensor: "Very low", "Low", "Middle", "High" and
"Very high" are the available options. This feature automatically protects the current
video recording when it recognises an impact, which indicates an accident event,
from being overwritten during a loop recording. Confi rm your selection by pressing
the / button . Afterwards, the display will return to the list of menu items.
Beep sound
If you access this menu option, you can then use ▲▼ buttons
/ to select
whether the device emits an acoustic signal when pressing the device's buttons
as well as the on/off function ("On"), or not ("Off "). Confi rm your selection by
pressing the / button . Afterwards, the display will return to the list of
menu items.
Page 15

12
CR 5 A1
GB
CY
Auto display off
If you access this menu option, you can then use the ▲▼ buttons
/ to select
the period after which the display automatically switches off : "1 Min", "3 Min"
and "5 Min" are the available options. Select "Display always on" if the display
is to remain on permanently. To reactivate the display after it has been automatically switched off , press one of the ▲▼ buttons
/ , the MODE button or
the
/ button .
Language
If you access this menu option, you can then use the ▲▼ buttons
/ to select
"English" or "Deutsch" as the language for the on-screen menus. Confi rm your
selection by pressing the / button . Afterwards, the display will return to
the list of menu items.
Display icon rotation
If you access this menu option, you can then use the ▲▼ buttons
/ to select
whether the display icons and the menus are to be displayed in the normal mode
("Off ") or rotated by 180° ("On"). The best selection depends on how you have
mounted the camera.
Format memory card
If you access this menu option, then you can use the ▲▼ buttons
/ to format
the inserted microSD card. This process will irretrievably delete all the data on the
microSD card, even data which is write protected. To format the card, use the
▲▼ buttons / to select "OK" and then press the / button .
The formatting process will begin.
Default settings
If you access this menu option, you can then reset all the settings of the device to
the factory defaults. Use the ▲▼ buttons
/ to select "OK" and confi rm your
selection with the
/ button . Afterwards, the display will return to the list
of menu items. All of the previously made settings will be reset to the factory
settings.
To close the setup menu, press the MENU button
.
Page 16

13
CR 5 A1
GB
CY
Video standby mode
In video standby mode, the screen shows the following overview:
A – displays the remaining recording time depending on resolution and
available storage space
B – current video resolution
C – symbol to indicate an inserted microSD card
D – battery charge level of the internal battery
E – date display (only when the "Time & date stamp" is activated)
E – time display (only when the "Time & date stamp" is activated)
G – symbol for motion detection (only visible if the function is activated)
H – symbol for a loop recording as well as its length in minutes (here 3 minutes)
I – display for exposure correction
J – symbol for video standby
K – red dot fl ashes during recording
L – symbol for a write-protected fi le
Start / end recording
Press the ▲ button repeatedly as required to zoom into the subject. Hold
down the button for fast zoom. You can use the ▼ button in the same way to
zoom out. Press the / button to start the video recording. During the
video recording the operating display blinks green and red. Press the button
again to stop the recording.
If you press the MODE button
during recording, the symbol is displayed
and the current recording will be write-protected.
NOTE
►
As soon as the camera is connected to the vehicle's power supply, the
recording starts. To stop the recording, press the / button .
Page 17
14
CR 5 A1
GB
CY
If you now press the MENU button in video standby, the following menu opens:
Motion detection
Using the ▲▼ buttons / you can move the selection bar to the desired entry
and then call up this menu item with the / button . To exit the activated
menu item without making a change, press the MODE button . Below right, the
current menu board as well as the total number of menu boards is shown. If the
lowest menu item on a menu board is selected which leads to a further menu
board, press the ▼ button to jump to the fi rst entry on the following menu
board. To close the menu, press the MENU button .
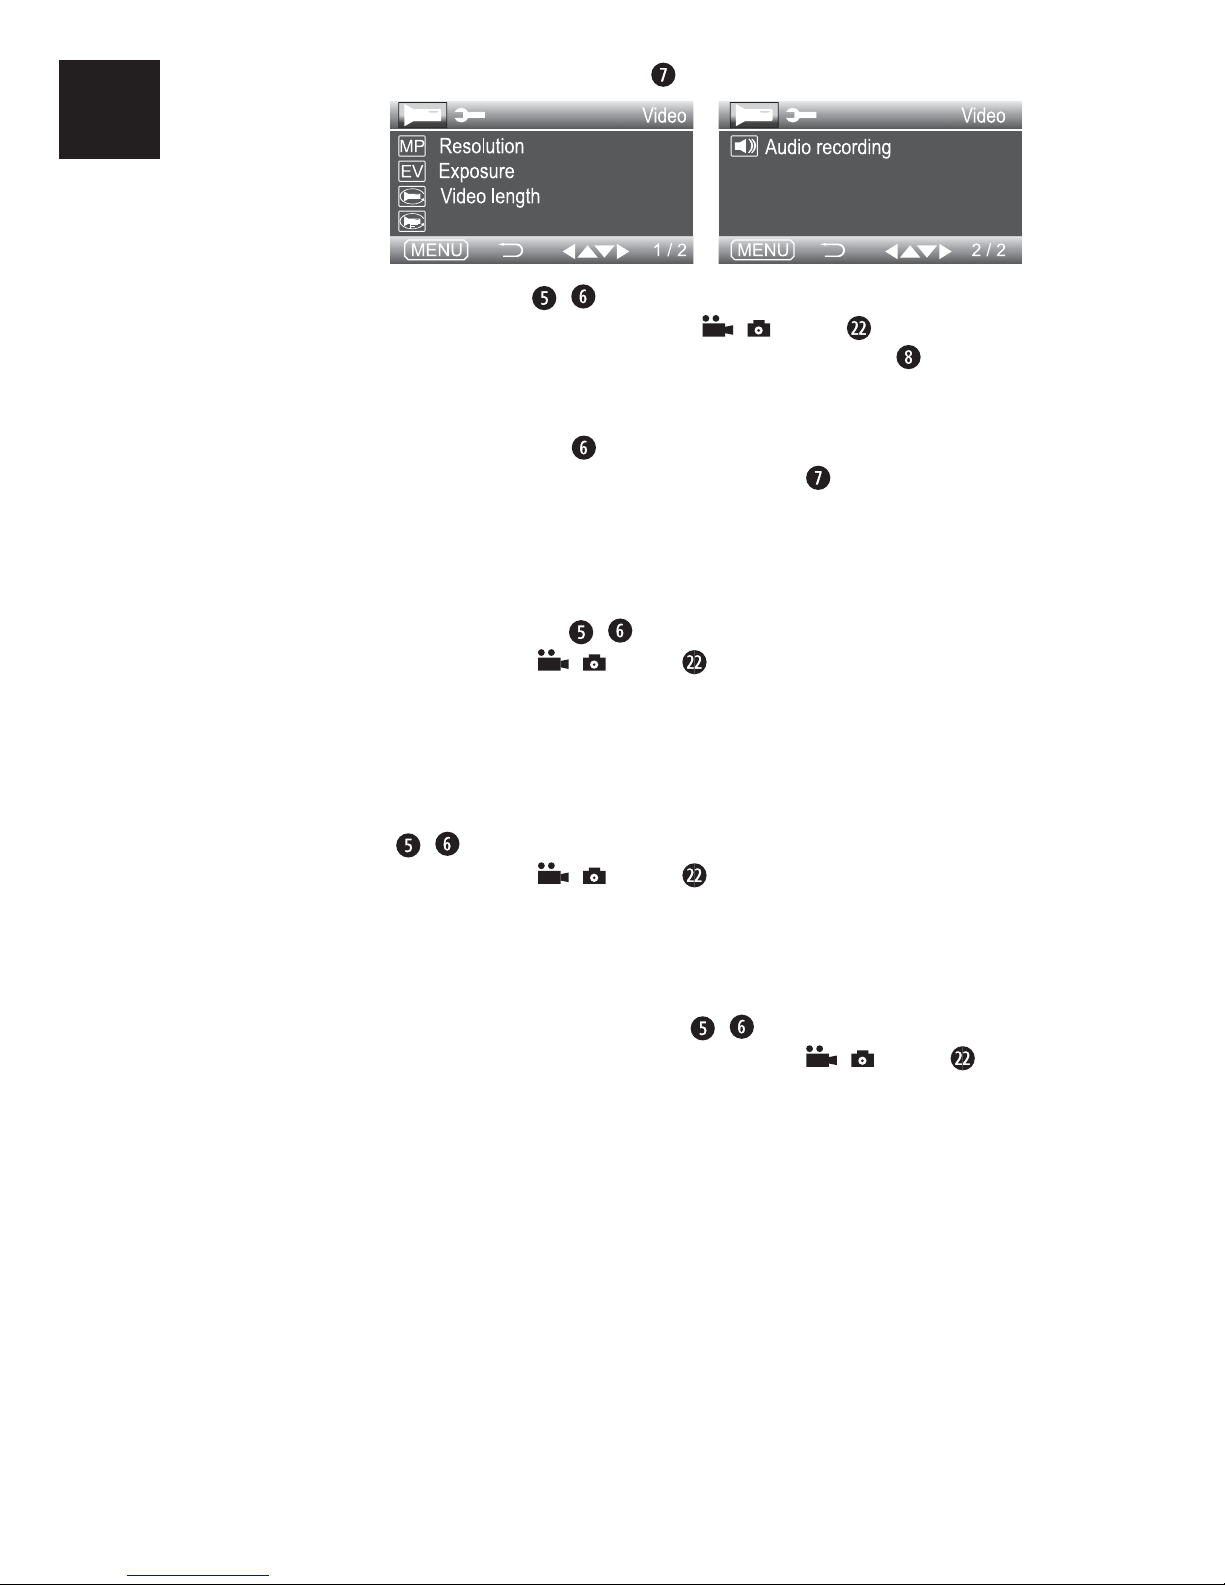
Resolution
If you access this menu option, you can then set the the video resolution:
"1920x1080P (HD)", "1280 x 720P" and "640 x 480P" are the options available. Use the ▲▼ buttons
/ to select the desired resolution and confi rm
your selection with the / button to return to the list of menu items.
Exposure
If you access this menu option, you can then adjust the video exposure in three
steps upwards (from +1 to +3, brighter), or downwards (from –1 to –3, darker).
When the setting is set to "0" there is no exposure compensation. Use the ▲▼
buttons
/ to select the desired video exposure compensation and confi rm
your selection with the / button to return to the list of menu items.
Video length
If you access this menu option, you can then set the length of the loop for the
video recording: "3 Min", "5 Min", "10 Min" or "Loop recording off " are the
available options. Use the ▲▼ buttons
/ to select the desired value for the
loop recording and confi rm your selection with the / button to return to
the list of menu items.
Remember that the microSD card used must have a suffi cient capacity to record
the desired length of loop in the video resolution set. If you select "Loop recording off " the recording ends when you reach the capacity of the microSD card.
When the end of the recording is reached, the device will start a new recording
with the length set.
If the capacity of the memory card is not suffi cient for the set duration, the recording will be aborted. Reduce the length of the loop recording or use a memory
card with a greater capacity.
Page 18

15
CR 5 A1
GB
CY
Motion detection
If you access this menu option, you can then use the ▲▼ buttons
/ to activate
or deactivate this function. Confi rm your selection with the / button to
return to the list of menu items.
When this function is activated, the device will automatically stop the video
recording when no moving images are detected. If the device again detects
movements, the device will automatically begin recording again. If the function
is deactivated, the device does not stop recording if no motion is detected.
NOTE
►
You should only activate this function while the vehicle is parked if you want
to automatically fi lm a break-in attempt or to record the other vehicle after
a collision.
► The initial recording with this function must be started manually.
Audio recording
If you access this menu option, you can then use the ▲▼ buttons
/ to activate
or deactivate audio recording via the built-in microphone. Confi rm your selection
with the / button to return to the list of menu items.
Page 19
16
CR 5 A1
GB
CY
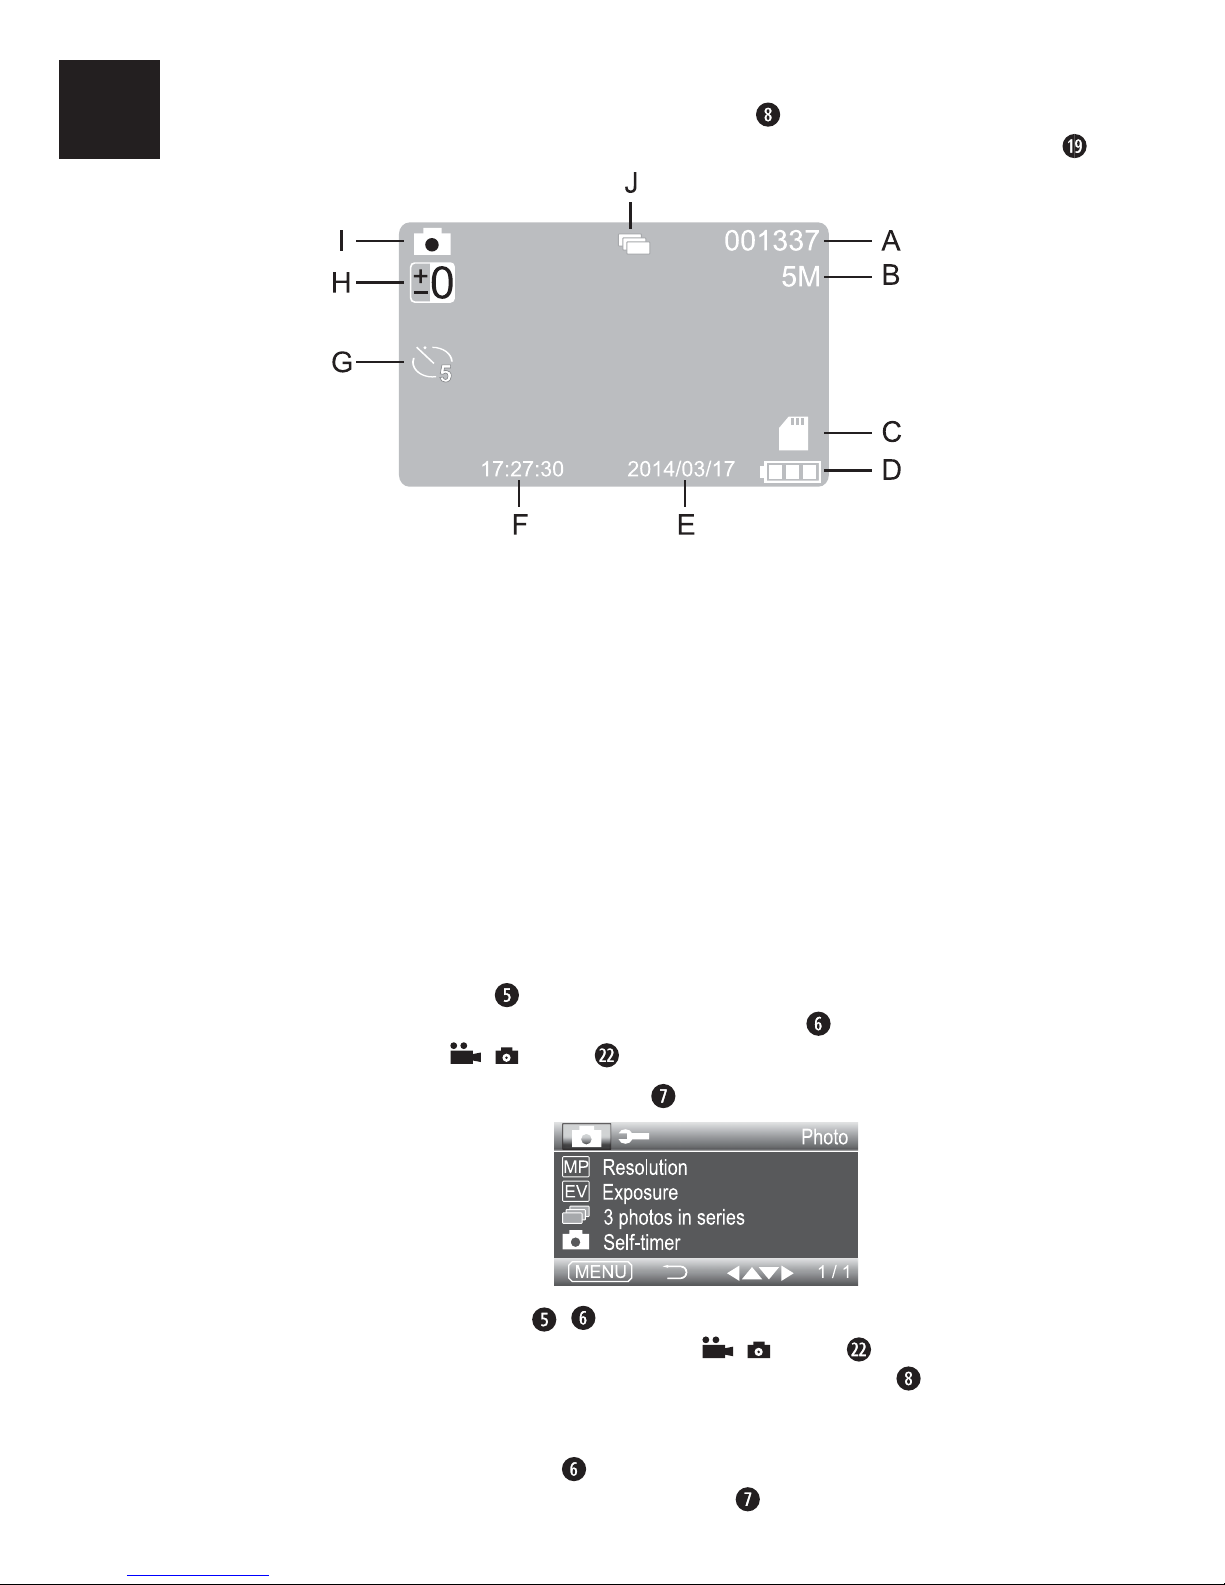
Photo standby
With the menu closed, press the MODE button during video standby to switch to
photo standby. The device then displays the following overview on the screen
:
A – displays the remaining number of photos that can still be taken depending
on resolution and available storage space
B – current photo resolution
C – symbol to indicate an inserted microSD card
D – battery charge level of the internal battery
E – date display (only when the "Time & date stamp" is activated)
E – time display (only when the "Time & date stamp" is activated)
G – symbol for self-timer (here 5 seconds: only visible if the function is activated)
H – symbol for exposure correction
I – display for photo standby
J – display for continuous advance function (only visible if feature is enabled)
Taking photos
Press the ▲ button repeatedly as required to zoom into the subject. Hold down
the button for fast zoom. You can use the ▼ button in the same way to zoom
out. Press the / button to take a photo.
If you now press the MENU button
in photo standby, the following menu opens:
Using the ▲▼ buttons / you can move the selection bar to the desired entry
and then call up this menu item with the / button . To exit the activated
menu item without making a change, press the MODE button . Below right, the
current menu board as well as the total number of menu boards is shown. If the
lowest menu item on a menu board is selected which leads to a further menu
board, press the ▼ button to jump to the fi rst entry on the following menu board.
To close the menu, press the MENU button .
Page 20

17
CR 5 A1
GB
CY
Resolution
If you access this menu option, then you can use the ▲▼ buttons
/ to select
the desired resolution for your photos: "12MP (interp.*)", "7MP (interp.*)", "5MP",
"3MP", "2MP", "1.3MP" oder "0.3MP" are the available options. "MP" stands for
megapixel, e.g. the "5MP" setting creates a photo of 2592 × 1944 pixels, which
is about 5 million pixels. The larger the photos, the greater the detail. However,
the microSD card will fi ll up faster with higher resolution photos. Confi rm your
selection with the
/ button to return to the list of menu items.
*Interpolation = calculation method used to increase the number of pixels
Exposure
If you access this menu option, you can then adjust the photo exposure in three
steps upwards (from +1 to +3, brighter), or downwards (from –1 to –3, darker).
Use the ▲▼ buttons
/ to select the desired photo exposure compensation
and confi rm your selection with the / button to return to the list of menu
items.
3 photos in series
If you access this menu option, you can then use the ▲▼ buttons
/ to
activate or deactivate the function take a series of 3 photos in quick succession.
Confi rm your selection with the / button to return to the list of menu
items.
Self-timer
If you access this menu option, then you can use the ▲▼ buttons
/ to set the
self-timer function to 2, 5 or 10 seconds. The photo will then be taken after the
set delay when you press the / button . Select "direct capture" to deactivate the self-timer. Confi rm your selection with the / button to return to
the list of menu items.
Playback mode
With the menu closed, press the MODE button during photo standby to switch
to playback mode. Using the ▲/▼ buttons / you can scroll through the stored
images. If you select a photo and press the / button , all stored photos
will be displayed in an endless slide show. Press the / button again to
stop the playback. If you select a video and press the / button , the video
is played back.
Page 21

18
CR 5 A1
GB
CY
If you select a photo, the screen will display the following overview:
A – display of the current recording number/total number of recordings
B – resolution of the currently selected photo
C – battery charge level of the internal battery
D – date/time stamp
E – symbol for playback mode
F – symbol for a write-protected fi le
If you now press the MENU button
, the following menu opens:
Delete
Using the ▲▼ buttons / you can move the selection bar to the desired entry
and then call up this menu item with the / button . To exit the activated
menu item without making a change, press the MODE button . Below right,
the current menu board as well as the total number of menu boards is shown.
To close the menu, press the MENU button .
Delete
If you access this menu option, you can then use the ▲▼ buttons
/ to delete
the currently selected image ("Delete this fi le"), "Delete all fi les" or "Cancel".
Confi rm your selection by pressing the / button . When you confi rm the
following query with "OK", the selected delete function will be executed and the
menu closes. If, however, the screen shows "This fi le is write-protected", you must
fi rst deactivate the write protection as described in the section "Write protection".
Page 22

19
CR 5 A1
GB
CY
Write protection
If you access this menu option, you can then use the ▲▼ buttons
/ to select
whether to protect the currently selected fi le from deletion ("Write-protect this fi le"),
to remove the write protection for the selected fi le ("Unlock this fi le"), protect all
fi les from deletion ("Write-protect all fi les") or remove the write protection from all
fi les ("Unlock all fi les"). Confi rm your selection by pressing the
/ button .
Afterwards, the display will return to the list of menu items.
NOTE
►
Using this function on a large number of fi les can take several seconds.
If you select a video with the ▲/▼ buttons
/ , the screen will display the
following overview:
A – display of the current recording number/total number of recordings
B – resolution of the currently selected video
C – length of the video
D – battery charge level of the internal battery
E – function symbol for the MODE button
: stop video/photo playback
E – function symbol for the
/ button : start/stop video/photo playback
G – symbol for playback mode
H – symbol for a write-protected fi le
If you now press the MENU button , the following menu opens:
Delete
Page 23

20
CR 5 A1
GB
CY
Using the ▲▼ buttons / you can move the selection bar to the desired entry
and then call up this menu item with the
/ button . To exit the activated
menu item without making a change, press the MODE button . To close the
menu, press the MENU button .
Delete
If you access this menu option, you can then use the ▲▼ buttons
/ to delete
the currently selected video ("Delete this fi le"), "Delete all fi les" or "Cancel".
Confi rm your selection by pressing the
/ button . When you confi rm the
following query with "OK", the selected delete function will be executed and the
menu closes. If, however, the screen shows "This fi le is write-protected", you must
fi rst deactivate the write protection as described in the section "Write protection".
Write protection
If you access this menu option, you can then use the ▲▼ buttons
/ to select
whether to protect the currently selected fi le from deletion ("Write-protect this fi le"),
to remove the write protection for the selected fi le ("Unlock this fi le"), protect all
fi les from deletion ("Write-protect all fi les") or remove the write protection from all
fi les ("Unlock all fi les"). Confi rm your selection by pressing the / button .
Afterwards, the display will return to the list of menu items.
NOTE
►
Using this function on a large number of fi les can take several seconds.
Showing recordings on an external monitor
NOTE
►
The camera can transfer the video signal to an external monitor or the
video input of a television set. Please also follow the instructions of the
respective playback device.
♦ Connect a suitable monitor to the AV connection using the supplied AV
cable . This allows you to display the live view from the camera.
♦ Alternatively, you can also fl ip the cover to one side and connect the
mini-HDMI connection on the camera to a suitable monitor using a suitable mini-HDMI cable (not supplied). This type of connection can only be
used to play back saved videos. The built-in display is then switched off and
only the green operating display lights up.
♦ Start playback.
Page 24

21
CR 5 A1
GB
CY
Transferring recordings to a computer
Connect the mini-USB plug of the supplied USB cable to the port on
the camera and the USB plug to a free USB port of a switched-on computer. The
computer now recognises the device as "mass storage", the camera connects to
the computer and then the content of the SD/SDHC memory card appears as a
new drive on the computer. Now carry out the required fi le operations.
Resetting the device
If the device does not work as described in this manual or it does not respond
to your operation, use a pointed object, e.g. a paper clip, to carefully press the
switch behind the RESET opening
in the housing to restart the device.
Changing the fuse
The car adapter contains a fuse. If the device does not function, it may be
because the fuse is defective. Exchange the defective fuse for a replacement fuse
of the same type (see also chapter Technical data).
♦ To do this, pull the car adapter out of the cigarette lighter socket.
♦ Open the car adapter by carefully unscrewing the ribbed screw insert (C)
anticlockwise (using pliers if necessary) and removing it.
♦ Now, take the plug tip (B) from the fuse (A), remove the fuse (A) and place
it to one side.
♦ Now place the new fuse into the car adapter , place the plug tip (B) onto
the slightly protruding end of the fuse and screw the previously removed
screw insert (C) back in.
NOTE
►
If the device still does not work or the fuse blows again immediately, the
device is defective. Please then contact the Service Hotline (see chapter
Service).
Page 25

22
CR 5 A1
GB
CY
Cleaning
CAUTION
Damage to the device!
► To avoid irreparable damage, ensure that no moisture penetrates the
device during cleaning.
■ Clean the surfaces of the device with a soft, dry cloth. Use a normal commercial
detergent and water to remove stubborn residue. Ensure that no water gets
into the device.
Troubleshooting
This section contains important information on fault identifi cation and rectifi cation.
Observe the instructions in order to avoid risks and damage.
WARNING
Observe the following safety information to avoid risks and property damage:
► Repairs to electrical devices may only be carried out by specialists trained
by the manufacturer. Improper repairs can cause considerable risks to users
and damage to the device.
Fault causes and rectifi cation
The following table will help to identify and rectify minor faults:
Fault Possible cause Rectifi cation
The camera is not
working with the
built-in battery.
The battery is fl at. Charge the built-in battery from a
switched-on computer connected to
the
connection on the device,
or the on-board electrical system of
your vehicle.
The camera does not
work in the vehicle.
The vehicle's
battery is fl at.
Charge the vehicle's battery.
The fuse in the
car adapter
is defective.
Replace the fuse (see section
Changing the fuse).
The camera does not
record properly during
the journey.
There is a
problem with the
built-in motion
sensor.
Activate the built-in motion sensor
(function "Motion detection" in the setup
menu) only while the vehicle is parked.
Increase the sensitivity of the motion
sensor.
Page 26

23
CR 5 A1
GB
CY
Fault Possible cause Rectifi cation
The device does not
respond as expected to
your operation.
There is a defect. Use a pointed object, e.g. a paper clip,
to carefully press the switch behind the
RESET opening
in the housing to
restart the device.
The suction cup does not
hold fi rmly.
The surface
being used is not
clean.
Clean the surface. You can also increase
the suction power by moistening the
suction cup.
NOTE
►
If you are unable to resolve the problem applying any of the aforementioned methods, please contact the Customer Service department.
Page 27
24
CR 5 A1
GB
CY
Storage / Disposal
Storage
If you plan not to use the device for a long period, store it in a clean, dry place
away from direct sunlight. In this case you should charge the built-in battery from
time to time.
Disposal of the device
The adjacent symbol of a crossed-out wheelie bin means that this device is subject
to Directive 2012/19/EU. This directive states that this device may not be
disposed of in normal household waste at the end of its usable life, but must be
handed over to specially set-up collection locations, recycling depots or disposal
companies.
The integrated battery cannot be removed.
This disposal is free of charge for the user. Protect the environment and dispose of this device properly.
You can obtain further information from your local disposal company or the city
or local authority.
Appendix
Notes on the Declaration of Conformity
This device complies with the basic requirements and other relevant provisions
of the Electromagnetic Compatibility Directive 2004/108/EC and the RoHS
Directive 2011/65/EU.
The complete Declaration of Conformity, in its original form, is available with
the importer.
Page 28

25
CR 5 A1
GB
CY
Technical data
Cockpit recorder
Operating voltage
5V
, via the integrated lithium-ion battery
(3.7V/350mAh) or USB connection
Input voltage of the car
adapter
12V/24V
, max. 700mA via
the car's electrical system
Car adapter fuse T2AL / 250V
Output voltage of the
car adapter
5V
,1A
Data storage medium
microSD card, FAT fi le system, supports cards
up to a maximum capacity of 32GB
Screen
2.7" TFT colour LC display
(approx. 6.8 cm screen diagonal)
Photo resolutions
5 megapixels, 3 megapixels, 2 megapixels,
1.3 megapixels, 0.3 megapixels (7 megapixels
and 12 megapixels interpolated))
Photo format JPEG
Video resolution
Res. 1: 1920 x 1080 pixels/frame rate 25 fps
(data: 1 GB/5 min)
Res. 2: 1280 x 720 pixels/frame rate 30 fps
Res. 3: 640 x 480 pixels/frame rate 30 fps
Video recording format AVI
Recording angle
horizontal
59° video 1920 x 1080
82° photo 2592 x 1944
vertical
30° video 1920 x 1080
56° photo 2592 x 1944
Angle suction cup cradle
frontal: approximately 156° tilt
lateral: approximately 153° swivel
Operating temperature 15°C to 40°C
Storage temperature 5°C to 40°C
Humidity
(no condensation)
5 to 75 %
Dimensions
(W x H x D)
approx. 7.5 x 4.8 x 3.2 cm
Weight
Camera approx. 67 g,
complete set approx. 310 g
Page 29

26
CR 5 A1
GB
CY
Warranty
The warranty for this appliance is for 3 years from the date of purchase.
The appliance has been manufactured with care and meticulously examined
before delivery.
Please retain your receipt as proof of purchase. In the case of a warranty claim,
please make contact by telephone with our Customer Service Department.
Only in this way can a post-free despatch for your goods be assured.
NOTICE
►
The warranty covers only claims for material and manufacturing defects,
but not for transport damage, wearing parts or for damage to fragile
components, e.g. buttons or batteries.
This product is for domestic use only and is not intended for commercial use.
The warranty is void in the case of abusive and improper handling, use of force
and internal tampering not carried out by our authorised service branch.
Your statutory rights are not restricted in any way by this warranty. The warranty
period is not extended by repairs made under the warranty. This applies also to
replaced and repaired parts.
Damages and defects extant at the time of purchase must be reported immediately after unpacking, resp. no later than two days after the date of purchase.
Repairs made after the lapse of the warranty period are subject to charge.
Service
Service Great Britain
Tel.: 0871 5000 720 (£ 0.10/Min.)
E-Mail: kompernass@lidl.co.uk
IAN 47583
CY
Service Cyprus
Tel.: 8009 4409
E-Mail: kompernass@lidl.com.cy
IAN 47583
Hotline availability: Monday to Friday 08:00 - 20:00 (CET)
Importer
KOMPERNASS HANDELS GMBH
BURGSTRASSE 21
44867 BOCHUM
GERMANY
www.kompernass.com
Page 30

27
CR 5 A1
RO
Cuprins
Introducere. . . . . . . . . . . . . . . . . . . . . . . . . . . . . . . . . . . . . . . . . . . . . . . . . . .28
Informaţii privind aceste instrucţiuni de utilizare. . . . . . . . . . . . . . . . . . . . . . . . . . . . . . . . . .28
Drepturi de autor . . . . . . . . . . . . . . . . . . . . . . . . . . . . . . . . . . . . . . . . . . . . . . . . . . . . . . . . .28
Utilizarea conform destinaţiei . . . . . . . . . . . . . . . . . . . . . . . . . . . . . . . . . . . . . . . . . . . . . . .28
Avertizări utilizate . . . . . . . . . . . . . . . . . . . . . . . . . . . . . . . . . . . . . . . . . . . . . . . . . . . . . . . .28
Siguranţa . . . . . . . . . . . . . . . . . . . . . . . . . . . . . . . . . . . . . . . . . . . . . . . . . . . .29
Indicaţii de bază privind siguranţa . . . . . . . . . . . . . . . . . . . . . . . . . . . . . . . . . . . . . . . . . . .29
Potenţiala încălcare a drepturilor terţilor . . . . . . . . . . . . . . . . . . . . . . . . . . . . . . . . . . . . . . .31
Elemente de operare . . . . . . . . . . . . . . . . . . . . . . . . . . . . . . . . . . . . . . . . . . .32
Furnitura şi verifi carea transportului . . . . . . . . . . . . . . . . . . . . . . . . . . . . . . . . . . . . . . . . . . .33
Eliminarea ambalajului . . . . . . . . . . . . . . . . . . . . . . . . . . . . . . . . . . . . . . . . . . . . . . . . . . . .33
Punerea în funcţiune . . . . . . . . . . . . . . . . . . . . . . . . . . . . . . . . . . . . . . . . . . . 34
Introducerea / scoaterea cardului micro SD . . . . . . . . . . . . . . . . . . . . . . . . . . . . . . . . . . . .34
Montarea camerei pe parbriz . . . . . . . . . . . . . . . . . . . . . . . . . . . . . . . . . . . . . . . . . . . . . . .35
Realizarea alimentării cu curent . . . . . . . . . . . . . . . . . . . . . . . . . . . . . . . . . . . . . . . . . . . . . .35
Operarea şi funcţionarea . . . . . . . . . . . . . . . . . . . . . . . . . . . . . . . . . . . . . . .36
Pornirea şi oprirea, realizarea setărilor . . . . . . . . . . . . . . . . . . . . . . . . . . . . . . . . . . . . . . . .36
Setări de bază . . . . . . . . . . . . . . . . . . . . . . . . . . . . . . . . . . . . . . . . . . . . . . . . . . . . . . . . . . .36
Meniul Setup . . . . . . . . . . . . . . . . . . . . . . . . . . . . . . . . . . . . . . . . . . . . . . . . . . . . . . . . .36
Pregătirea pentru înregistrarea video . . . . . . . . . . . . . . . . . . . . . . . . . . . . . . . . . . . . . . .39
Începerea / terminarea înregistrării . . . . . . . . . . . . . . . . . . . . . . . . . . . . . . . . . . . . . . . . .39
Starea pregătită de realizare a fotografi ilor . . . . . . . . . . . . . . . . . . . . . . . . . . . . . . . . .42
Realizarea fotografi ilor . . . . . . . . . . . . . . . . . . . . . . . . . . . . . . . . . . . . . . . . . . . . . . . . . .42
Modul de redare . . . . . . . . . . . . . . . . . . . . . . . . . . . . . . . . . . . . . . . . . . . . . . . . . . . . . .43
Afi şarea înregistrărilor pe un monitor extern . . . . . . . . . . . . . . . . . . . . . . . . . . . . . . . . . . . .46
Redarea înregistrărilor pe un computer . . . . . . . . . . . . . . . . . . . . . . . . . . . . . . . . . . . . . . . .47
Resetare aparat . . . . . . . . . . . . . . . . . . . . . . . . . . . . . . . . . . . . . . . . . . . . . . . . . . . . . . . . . .47
Schimbarea siguranţei . . . . . . . . . . . . . . . . . . . . . . . . . . . . . . . . . . . . . . . . . . . . . . . . . . . . .47
Curăţarea . . . . . . . . . . . . . . . . . . . . . . . . . . . . . . . . . . . . . . . . . . . . . . . . . . . .48
Remedierea defecţiunilor . . . . . . . . . . . . . . . . . . . . . . . . . . . . . . . . . . . . . . .48
Cauzele defecţiunilor şi remedierea acestora . . . . . . . . . . . . . . . . . . . . . . . . . . . . . . . . . . .48
Depozitarea / Eliminarea. . . . . . . . . . . . . . . . . . . . . . . . . . . . . . . . . . . . . . . .50
Depozitarea . . . . . . . . . . . . . . . . . . . . . . . . . . . . . . . . . . . . . . . . . . . . . . . . . . . . . . . . . . . . .50
Eliminarea aparatului . . . . . . . . . . . . . . . . . . . . . . . . . . . . . . . . . . . . . . . . . . . . . . . . . . . . . .50
Anexa . . . . . . . . . . . . . . . . . . . . . . . . . . . . . . . . . . . . . . . . . . . . . . . . . . . . . . .50
Indicaţii privind declaraţia de conformitate . . . . . . . . . . . . . . . . . . . . . . . . . . . . . . . . . . . . .50
Date tehnice . . . . . . . . . . . . . . . . . . . . . . . . . . . . . . . . . . . . . . . . . . . . . . . . . . . . . . . . . . . . .51
Garanţia . . . . . . . . . . . . . . . . . . . . . . . . . . . . . . . . . . . . . . . . . . . . . . . . . . . . . . . . . . . . . . .52
Service-ul . . . . . . . . . . . . . . . . . . . . . . . . . . . . . . . . . . . . . . . . . . . . . . . . . . . . . . . . . . . . . . .52
Importator . . . . . . . . . . . . . . . . . . . . . . . . . . . . . . . . . . . . . . . . . . . . . . . . . . . . . . . . . . . . . .52
Page 31

28
CR 5 A1
RO
Introducere
Informaţii privind aceste instrucţiuni de utilizare
Felicitări pentru cumpărarea noului dvs. aparat.
Prin aceasta v-aţi decis pentru un produs de calitate superioară. Instrucţiunile de
utilizare fac parte integrantă din acest produs. Acestea cuprind informaţii importante pentru siguranţă, utilizare şi eliminare. Înainte de utilizarea produsului, familiarizaţi-vă cu toate indicaţiile privind operarea şi siguranţa. Utilizaţi acest produs
numai în modul descris şi numai în scopurile menţionate. În cazul înstrăinării sau
vânzării produsului către terţi, predaţi-le acestora toate documentele, inclusiv
prezentele instrucţiuni de utilizare.
Drepturi de autor
Prezenta documentaţie este protejată prin drepturi de autor.
Reproducerea, respectiv retipărirea, chiar şi numai parţială, precum şi redarea ima-
ginilor, chiar şi modifi cate, este permisă numai cu acordul scris al producătorului.
Utilizarea conform destinaţiei
Acest recorder pentru cabină este un dispozitiv ce ţine de electronica informaţiilor
şi serveşte la înregistrarea digitală de fotografi i şi videoclipuri, în special în timpul
deplasării în autovehicule. Orice altă utilizare este considerată a fi neconformă.
Este interzisă utilizarea aparatului în scopuri comerciale sau industriale. Sunt
excluse orice fel de drepturi pentru pagubele rezultate în urma utilizării neconforme,
a reparaţiilor necorespunzătoare, a modifi cărilor realizate în mod nepermis sau
a utilizării de piese de schimb neaprobate. Riscul este asumat în totalitate de
către utilizator.
Avertizări utilizate
În cadrul acestor instrucţiuni de utilizare sunt folosite următoarele avertizări:
PERICOL
Avertizările pentru acest grad de pericol marchează o situaţie
periculoasă iminentă.
Dacă nu se va evita situaţia periculoasă, aceasta poate produce moartea sau
rănirea gravă.
► Respectaţi instrucţiunile prezentate în această avertizare, pentru a evita
pericolul de moarte sau rănire gravă a persoanelor.
Page 32

29
CR 5 A1
RO
AVERTIZARE
Avertizările pentru acest grad de pericol marchează o situaţie
potenţial periculoasă.
Dacă situaţia periculoasă nu este evitată, aceasta poate provoca răniri.
► Respectaţi indicaţiile din această avertizare pentru a evita rănirea persoanelor.
ATENŢIE
Avertizările pentru acest grad de pericol marchează posibile
pagube materiale.
În cazul în care această situaţie nu este evitată, aceasta poate duce la pagube
materiale.
► Respectaţi instrucţiunile prezentate în această avertizare, pentru a evita
pagubele materiale.
INDICAŢIE
►
O indicaţie constituie o informaţie suplimentară care facilitează manipularea
aparatului.
Siguranţa
În acest capitol sunt cuprinse indicaţii importante privind siguranţa în manipularea
aparatului.
Acest aparat corespunde dispoziţiilor prezentate cu privire la siguranţă.
Utilizarea necorespunzătoare a aparatului poate provoca rănirea persoanelor
şi pagube materiale.
Indicaţii de bază privind siguranţa
Respectaţi următoarele indicaţii de siguranţă, pentru o manipulare sigură a acestui
aparat:
■ Înainte de utilizare verifi caţi dacă aparatul prezintă defecţiuni exterioare vizi-
bile. Nu puneţi aparatul în funcţiune dacă este deteriorat sau dacă a căzut.
■ Cablurile sau conexiunile defecte trebuie înlocuite de către un specialist
autorizat sau de către serviciul pentru clienţi.
■ Reparaţia aparatului trebuie realizată numai într-un atelier de specialitate
autorizat sau de către serviciul clienţi. În urma reparaţiilor necorespunzătoare pot apărea pericole pentru benefi ciarul aparatului. În plus, se pierde
garanţia.
■ Componentele defecte trebuie înlocuite numai cu piese de schimb originale.
Numai prin utilizarea acestor componente se asigură respectarea cerinţelor
de siguranţă.
Page 33

30
CR 5 A1
RO
■ Nu deschideţi niciodată aparatul şi nu efectuaţi reparaţii la acesta.
■ Protejaţi aparatul împotriva apei pulverizate sau a apei care picură şi împo-
triva infi ltrării lichidelor.
■ Nu expuneţi niciodată aparatul căldurii extreme sau unei umidităţi ridicate a
aerului. Acest lucru se aplică în special pentru cazurile în care aparatul este
păstrat în maşină. În cazul perioadelor de repaus îndelungate şi în condiţii
de vreme caldă cu radiaţie solară, se produc temperaturi de peste 40°C
în habitaclu şi în torpedou. Scoateţi aparatele electrice şi electronice din
autovehicul.
■ La montarea suportului, asiguraţi-vă că acesta nu constituie un obstacol la
manevrare, frânare sau pentru funcţionarea altor sisteme operaţionale ale
autovehiculului (de ex. airbaguri) sau nu limitează vizibilitatea în timpul
deplasării.
PERICOL
Nu amplasaţi suportul auto în zona de declanşare a airbaguri sau în apropiere,
deoarece, în cazul declanşării, acesta ar putea arunca suportul în interiorul
autovehiculului provocând accidentări grave.
AVERTIZARE
Camera nu poate fi montată sub nicio formă într-o poziţie din care, în caz de
accident, aceasta v-ar putea lovi pe dvs. sau pe ceilalţi pasageri. Acest lucru
poate cauza vătămări corporale grave.
■ Persoanelor care din cauza abilităţilor fi zice, mentale, motorii sau senzoriale
nu pot opera aparatul în condiţii de siguranţă, le este permisă utilizarea
acestuia numai sub supravegherea sau îndrumarea unei alte persoane
responsabile.
PERICOL
Materialele de ambalare nu trebuie ţinute la îndemâna copiilor şi nu trebuie
utilizate ca jucării. Pericol de asfi xiere.
■ Copiii pot utiliza aparatul numai dacă sunt supravegheaţi. Copiii nu recunosc
întotdeauna corect pericolele posibile.
■ Nu aşezaţi niciun fel de obiecte pe aparat.
■ Nu operaţi aparatul în apropierea fl ăcărilor deschise (de exemplu, a lumâ-
nărilor).
■ Dacă se constată miros de fum sau existenţa fumului la aparat, acesta se va
deconecta imediat de la sursa de alimentare electrică.
AVERTIZARE
► Nu inspiraţi în niciun caz fumul, deoarece acesta este dăunător pentru
sănătate.
Page 34

31
CR 5 A1
RO
■ Verifi caţi regulat dacă ventuza este ataşată fi x de parbriz. Acest lucru este
important în special în zonele cu temperaturi exterioare oscilante.
■ Respectaţi legislaţia locală în vigoare. Utilizarea unei camere de cabină este
interzisă şi chiar se pedepseşte în unele ţări. În timpul deplasării este interzisă
deservirea camerei. Siguranţa rutieră trebuie să fi e întotdeauna pe primul
plan, la condus. Utilizaţi aparatul numai dacă nu există posibilitatea apariţiei
pericolelor în nicio situaţie de rulare.
■ În aparat este integrat un acumulator litiu-ion, motiv pentru care aparatul nu
poate fi aruncat în foc. Pericol de explozie!
■ Nu exercitaţi presiune asupra ecranului. În cazul spargerii acestuia, contactul
cu muchiile tăioase poate provoca vătămări corporale.
Potenţiala încălcare a drepturilor terţilor
La utilizarea camerei de cabină se impune respectarea următoarelor indicaţii:
Protecţia dreptului de autor
În principiu, fi ecare persoană deţine drepturi asupra propriei imagini. În conformitate cu legea privind drepturile de autor, fotografi ile fără acordul persoanelor
ilustrate pot fi făcute publice numai atunci când acestea sunt subiecte secundare în
imagine, alături de un peisaj sau diferite locaţii. Când este considerată o persoană
subiect secundar într-o imagine depinde de circumstanţele cazului singular.
Protecţia vieţii private
Viaţa privată a celorlalţi nu trebuie lezată de fotografi ile realizate. Nu orientaţi
camera pe grădina sau uşa de intrare a locuinţei vecinilor, chiar dacă aceste
locaţii sunt vizibile doar din autovehicul sau din locuri publice. Acest lucru nu vă
dă dreptul să publicaţi astfel de cadre.
Identifi carea personală
Vorbim despre o identifi care personală în momentul în care se poate determina
că o anumită persoană s-a afl at la un anumit moment într-un anumit loc. Identifi carea se poate face şi cu ajutorul unui marcaj individual, cum ar fi numărul de
înmatriculare. O astfel de identifi care a persoanelor trebuie evitată cu orice preţ.
Camerele de monitorizare la locul de muncă
În Germania, monitorizarea la locul de muncă este supusă unor prescripţii deosebit de stricte. Angajatorul trebuie să renunţe absolut la utilizarea de camere de
monitorizare la locul de muncă dacă nu poate fi exclusă complet o posibilitate
de lezare a drepturilor persoanelor.
În ceea ce priveşte lezarea drepturilor terţilor, respectaţi întotdeauna reglementările legale din ţara de utilizare. Din cauza potenţialei lezări a drepturilor
personale ale terţilor este ilegală publicarea neautorizată, de ex. pe internet, a
înregistrărilor cu persoane străine sau numere de înmatriculare. Utilizarea înregistrărilor este permisă exclusiv cu titlu de dovadă în urma unui accident rutier.
Page 35

32
CR 5 A1
RO
Elemente de operare
(a se vedea fi gurile de pe pagina pliată)
Figura A:
Pârghie de blocare
Suport cu ventuză
Şuruburi randalinate pentru fi xare tridimensională
Figura B:
Obiectiv cameră
Tasta▲
Tasta▼
Tasta MENU
Tasta MODE
Microfon
Conector USB*
Orifi ciu RESET
Conector AV
Difuzor
LED-uri infraroşii
Figura C:
Indicator de operare
Capac
Conector mini HDMI
Slot de card micro SD
Ecran
Figura D:
Filet pentru prinderea suportului stativ
Tasta Pornit/Oprit
Tasta / pentru pornirea/oprirea înregistrării video, pentru
declanşarea unei capturi foto sau apelarea punctelor de meniu
Figura E:
Mufă USB pentru alimentarea electrică prin intermediul adaptorului auto
Lumină de operare
Adaptor auto12/24 V
USB* pe cablu Mini-USB
Cablu AV (jack de 3,5 mm pe mufă cinch)
Carcasă de protecţie
Instrucţiuni de utilizare
*USB
®
este o marcă înregistrată a USB Implementers Forum, Inc.
Page 36

33
CR 5 A1
RO
Furnitura şi verifi carea transportului
Verifi caţi furnitura (a se vedea pagina pliată). Furnitura conţine următoarele
componente:
● Recorder pentru cabină CR 5 A1
● Carcasă de protecţie
● Suport cu ventuză
● USB* pe cablu Mini-USB
● Adaptor auto 12/24 V
● Cablu AV (jack de 3,5 mm pe mufă cinch)
● Aceste instrucţiuni de utilizare
*USB® este o marcă înregistrată a USB Implementers Forum, Inc.
♦ Scoateţi toate componentele aparatului şi instrucţiunile de utilizare din
ambalaj şi verifi caţi furnitura cu privire la integritate şi deteriorări vizibile
(a se vedea pagina pliată).
♦ Îndepărtaţi întregul material de ambalare, precum şi foliile de protecţie
pentru ecran şi obiectivul camerei .
INDICAŢIE
►
În cazul în care furnitura este incompletă sau dacă componentele sunt
deteriorate din cauza ambalajului precar sau a transportului, apelaţi linia
telefonică directă de service (a se vedea capitolul Service).
Eliminarea ambalajului
Ambalajul protejează aparatul împotriva deteriorărilor în timpul transportului.
Materialele de ambalat sunt alese conform compatibilităţii acestora cu mediul
şi aspectelor tehnice privind eliminarea, fi ind astfel reciclabile.
Reintroducerea ambalajelor în circuitul de materiale contribuie la economia de
materie primă şi reduce cantitatea de deşeuri. Eliminaţi ambalajul de care nu
mai aveţi nevoie conform prevederilor locale în vigoare.
INDICAŢIE
►
Dacă este posibil, păstraţi ambalajul original al aparatului pe perioada
garanţiei pentru a putea ambala aparatul corespunzător în caz de utilizare
a garanţiei.
Page 37

34
CR 5 A1
RO
Punerea în funcţiune
Introducerea / scoaterea cardului micro SD
ATENŢIE
►
Nu introduceţi şi nu scoateţi cardul micro SD (nu este inclus în furnitură) în
timp ce aparatul este pornit. Acest lucru poate duce la pierderea datelor
de pe cardul micro SD
♦ Introduceţi un card micro SD în slotul de card dedicat , în aşa fel încât
contactele aurii să indice în direcţia afi şajului. Împingeţi cardul micro SD
înăuntru până când acesta anclanşează sesizabil.
♦ Pentru a scoate cardul micro SD, apăsaţi uşor pe muchia cardului.
Cardul micro SD va ieşi uşor din slot şi poate fi acum scos din aparat.
INDICAŢIE
►
Camera nu dispune de memorie internă. De aceea, înregistrările pot fi
realizate numai dacă aţi introdus un card de memorie în aparat.
În tabelul următor puteţi găsi durata maximă a înregistrării, în funcţie de capacitatea de stocare a cardului micro SD şi de rezoluţia setată:
Rezoluţie
Capacitate de stocare
a cardului micro SD
Durată aproximativă
a înregistrării
1080P
4 GB cca 0 h 19 min.
8 GB cca 0 h 39 min.
16 GB cca 1 h 18 min.
32 GB cca 2 h 08 min.
720P
4 GB cca 0 h 29 min.
8 GB cca 1 h 00 min.
16 GB cca 1 h 58 min.
32 GB cca 4 h 01 min.
VGA
4 GB cca 0 h 47 min.
8 GB cca 1 h 37 min.
16 GB cca 3 h 11 min.
32 GB cca 6 h 29 min.
Page 38

35
CR 5 A1
RO
Montarea camerei pe parbriz
1) Pentru a proteja şi mai bine camera, aceasta
poate fi introdusă în carcasa de protecţie şi
împinsă uşor până când camera anclanşează
sesizabil.
2) Montaţi suportul cu ventuză
în fi letul
camerei. Poziţionaţi ventuza pe parbriz. Aveţi
grija ca aceasta să se aşeze plat pe parbriz.
3) Fixaţi ventuza pe parbriz şi apăsaţi în jos
pârghia de blocare
în direcţia parbrizului.
În acest mod este generat vid, iar ventuza se
fi xează pe parbriz. Mişcaţi pârghia de blocare
în direcţia opusă pentru a desprinde din
nou ventuza de pe parbriz.
4) După ce aţi fi xat camera cu ajutorul ventuzei
pe parbriz, desfaceţi succesiv şuruburile
A - C şi reglaţi camera conform preferinţelor.
5) După ce aţi găsit poziţia şi orientarea dorite,
strângeţi din nou manual şuruburile randalinate
.
ATENŢIE
►
Camera trebuie poziţionată astfel încât câmpul vizual al şoferului să fi e în
permanenţă liber.
Realizarea alimentării cu curent
ATENŢIE
►
Pentru alimentarea cu curent a aparatului folosiţi exclusiv adaptorul
auto livrat.
1) Conectaţi adaptorul auto
la reţeaua de bord (bricheta) a autovehiculului.
Lumina de operare de pe adaptorul auto indică starea pregătită de funcţionare, dacă la nivelul brichetei există tensiune de bord.
2) Conectaţi cablul USB livrat
cu mufa USB de pe adaptorul auto şi conectorul USB al camerei. Imediat ce camera este alimentată cu tensiune de la
bord, înregistrarea video începe, iar indicatorul de operare clipeşte alternativ
roşu-verde. Dacă acumulatorul intern al aparatului se încarcă, apare simbolul de
încărcare a bateriei pe ecran .
Page 39

36
CR 5 A1
RO
ATENŢIE
►
La autovehiculele la care bricheta funcţionează şi atunci când contactul
este oprit, după utilizare, aparatul trebuie deconectat de la brichetă.
Bateria autovehiculului s-ar putea descărca dacă aparatul este lăsat
conectat mai mult timp, deoarece acesta consumă curent şi în stare
de repaus. Motorul vehiculului nu va mai putea fi pornit în acest caz.
► La vehiculele la care bricheta nu este oprită, nici înregistrarea nu este
întreruptă automat. În acest caz va trebui să opriţi camera manual.
Operarea şi funcţionarea
Acest capitol cuprinde indicaţii importante cu privire la operarea şi funcţionarea
aparatului.
Pornirea şi oprirea, realizarea setărilor
Apăsaţi tasta Pornit/Oprit pentru a porni aparatul. Imaginea de la cameră
apare pe ecran , iar indicatorul de operare se aprinde în culoarea verde.
Aparatul este acum pregătit de operare în modul video.
Pentru a opri aparatul, menţineţi tasta Pornit/Oprit apăsată timp de 3 secunde.
Setări de bază
Meniul Setup
Pentru a putea realiza setări de bază pentru aparat în meniul Setup, apăsaţi
tasta MENU urmată de tasta MODE . Se deschide meniul Setup:
Default settings
Cu tastele▲▼ / puteţi muta bara de selecţie pe punctul dorit şi puteţi apela
apoi respectiva funcţie de meniu cu tasta / . Pentru a părăsi un punct de
meniu fără a face modifi cări, apăsaţi tasta MODE . În dreapta jos este afi şată
masca de meniu curentă, precum şi numărul total al măştilor de meniu. Pentru a
închide meniul, apăsaţi tasta MENU .
Page 40

37
CR 5 A1
RO
Time & date (Ora şi data)
Dacă apelaţi această funcţie de meniu puteţi selecta apoi, cu tastele ▲▼
/ ,
dacă înregistrările vor fi salvate sau nu cu o dată inserată în imagine. Selectaţi
„Time- & date-stamp on”, pentru a activa această funcţie sau „Time- & date-stamp
off ” pentru a o dezactiva.
Pentru setarea datei curente, apelaţi „Set time & date”. Setaţi apoi cu tastele ▲▼
/ anul pentru data curentă. Apăsaţi tasta MODE pentru a seta luna cu
tastele ▲▼ / . Apăsaţi tasta MODE pentru a seta ziua cu tastele ▲▼ /
. Apăsaţi tasta MODE pentru a seta poziţia orelor pentru ora curentă, cu
tastele ▲▼ / . Apăsaţi tasta MODE pentru a seta minutele cu tastele
▲▼ / . Apăsaţi tasta MODE pentru a seta secundele cu tastele ▲▼ /
. Apăsaţi tasta MODE pentru a seta formatul dorit pentru dată cu tastele
▲▼ / :
Astfel, succesiunea „YY/MM/DD” este disponibilă pentru formatul de afi şare a
datei cu două cifre în ordinea „an / lună / zi”, „MM/DD/YY” este disponibilă
pentru formatul de afi şare a datei cu două cifre în ordinea „lună / zi / an”, iar
„DD/MM/YY” este disponibilă pentru formatul de afi şare a datei cu două cifre
în ordinea „zi / lună / an”.
Confi rmaţi selecţia cu tasta
/ . Apoi, afi şajul revine la lista punctelor de
meniu.
Auto Power Off (Oprirea automată)
Dacă apelaţi această funcţie de meniu, puteţi selecta apoi cu tastele ▲▼
/
dacă aparatul se va opri automat după „1 min.”, „3 min.” sau „5 min.” de inactivitate. În cazul selecţiei „Off ”, aparatul nu se va opri automat. Confi rmaţi selecţia
cu tasta / . Apoi, afi şajul revine la lista punctelor de meniu.
Impact sensor (Senzor de impact)
Dacă apelaţi această funcţie de meniu, puteţi selecta apoi cu tastele ▲▼
/
sensibilitatea senzorului de impact integrat: Puteţi opta între „Very low”, „Low”,
„Middle”, „High” şi „Very high”. În cazul detectării unei vibraţii care poate avea
drept cauză un accident, această funcţie protejează automat înregistrarea video
în curs împotriva suprascrierii în bucla infi nită. Confi rmaţi selecţia cu tasta /
. Apoi, afi şajul revine la lista punctelor de meniu.
Beep sound (Sunet bip)
Dacă apelaţi această funcţie de mediu, puteţi selecta apoi cu tastele ▲▼
/
dacă aparatul confi rmă prin semnale acustice apăsarea tastelor, precum şi pornirea
şi oprirea („On”) sau nu („Off ”). Confi rmaţi selecţia cu tasta / .
Apoi, afi şajul revine la lista punctelor de meniu.
Page 41

38
CR 5 A1
RO
Auto display off (Oprirea automată a afi şajului)
Dacă apelaţi această funcţie de meniu, puteţi selecta apoi cu tastele ▲▼
/
intervalele de timp după expirarea cărora afi şajul să se oprească automat:
Puteţi opta între „1 min.”, „3 min.” şi „5 min.”. Selectaţi „Display always on”,
dacă afi şajul nu trebuie să se oprească. Pentru a reporni afi şajul după o oprire
automată a acestuia, apăsaţi una dintre tastele ▲▼
/ , tasta MODE sau
tasta
/ .
Language (Limbă)
Dacă apelaţi această funcţie de meniu, puteţi selecta apoi cu tastele ▲▼
/
„English” sau„Deutsch” ca limbă pentru afi şarea meniurilor pe ecran. Confi rmaţi
selecţia cu tasta / . Apoi, afi şajul revine la lista punctelor de meniu.
Display icon rotation (Rotire pictograme afi şaj)
Dacă apelaţi această funcţie de meniu, puteţi seta apoi cu tastele ▲▼
/
dacă reprezentarea simbolurilor de pe afi şaj şi a meniurilor se face normal („Off ”)
sau rotită la 180° („On”). În acest caz, cea mai potrivită setare depinde de
modul în care aţi poziţionat camera.
Format memory card (Formatare card de memorie)
Dacă apelaţi această funcţie de meniu, puteţi formata apoi cu tastele ▲▼
/
cardul micro SD introdus. În timpul acestui proces, toate datele de pe cardul micro
SD se pierd irecuperabil, acest lucru fi ind valabil chiar şi pentru fi şierele protejate
la ştergere. Pentru a realiza formatarea, cu tastele ▲▼ / selectaţi „OK” şi
apăsaţi tasta / . Se realizează acum procesul de formatare.
Default settings (Setări implicite)
Dacă apelaţi această funcţie de meniu, puteţi reseta apoi toate setările aparatului
la valorile implicite din fabricaţie. Cu tastele ▲▼
/ selectaţi „OK” şi confi rmaţi
selecţia cu tasta / .
Apoi, afi şajul revine la lista punctelor de meniu. Toate setările pe care le-aţi făcut
anterior sunt resetate acum la valorile implicite din fabricaţie.
Pentru a închide meniul Setup, apăsaţi tasta MENU
.
Page 42

39
CR 5 A1
RO
Pregătirea pentru înregistrarea video
În starea pregătită pentru înregistrarea video, ecranul afi şează următoarele:
A – Afi şaj al duratei de înregistrare rămasă în funcţie de rezoluţie şi de spaţiul
de stocare disponibil
B – Rezoluţia video curentă
C – Simbolul pentru cardul micro SD introdus
D – Indicatorul stării de încărcare a acumulatorului intern al aparatului
E – Indicarea datei (numai dacă este activată funcţia „Marcaj de oră şi dată”)
F – Indicarea orei (numai dacă este activată funcţia „Marcaj de oră şi dată”)
G – Simbolul pentru detectarea mişcării (vizibil numai dacă funcţia este activată)
H – Simbolul pentru înregistrarea în buclă infi nită, precum şi durata în minute
(aici 3 minute)
I – Indicaţie pentru corecţia expunerii
J – Simbol pentru starea pregătită de înregistrare video
K – Punctul roşu clipeşte în timpul înregistrării
L – Simbolul pentru un fi şier protejat împotriva ştergerii
Începerea / terminarea înregistrării
Apăsaţi, dacă este cazul, repetat tasta ▲ , pentru a apropia subiectul. Menţineţi
apăsată această tastă pentru o mărire rapidă. Cu tasta ▼ puteţi îndepărta
subiectul, în mod similar. Apăsaţi tasta / , pentru a porni înregistrarea
video. În timpul înregistrării video, indicatorul de operare clipeşte în roşu şi
verde. Apăsaţi din nou această tastă pentru a termina înregistrarea.
Dacă, în timpul înregistrării, apăsaţi tasta MODE
, apare simbolul , iar
înregistrarea curentă este protejată împotriva ştergerii.
INDICAŢIE
►
Imediat ce camera este alimentată de la reţeaua de bord, înregistrarea
începe. Pentru a opri apoi înregistrarea apăsaţi tasta / .
Page 43

40
CR 5 A1
RO
Dacă în modul pregătit pentru înregistrarea video apăsaţi tasta MENU , se
deschide meniul următor:
Motion detection
Cu tastele ▲▼ / puteţi muta bara de selecţie pe punctul dorit şi puteţi apela
apoi respectiva funcţie de meniu cu tasta / . Pentru a părăsi un punct de
meniu fără a face modifi cări, apăsaţi tasta MODE . În dreapta jos este afi şată
masca de meniu curentă, precum şi numărul total al măştilor de meniu. Dacă este
selectat ultimul punct de meniu dintr-o mască, după care mai urmează încă o
mască, apăsaţi tasta ▼ , pentru a sări la primul punct de meniu din următoarea
mască. Pentru a închide meniul, apăsaţi tasta MENU .
Resolution (Rezoluţia)
Dacă apelaţi această funcţie de meniu, puteţi stabili dimensiunea imaginii video:
Puteţi opta între „1920x1080P (HD)”, „1280 x 720P” şi „640 x 480P”.
Cu tastele ▲▼
/ selectaţi rezoluţia dorită şi confi rmaţi selecţia cu tasta /
, pentru a reveni apoi la lista punctelor de meniu.
Exposure (Expunerea)
Dacă apelaţi această funcţie de meniu, puteţi corecta apoi expunerea video în trei
trepte în sus (de la +1 până la +3, mai luminos), respectiv în jos (de la -1 până la
-3, mai întunecat). În setarea „0” nu are loc o corecţie a expunerii. Cu tastele
▲▼
/ selectaţi corecţia dorită pentru expunerea video şi confi rmaţi selecţia
cu tasta / , pentru a reveni apoi la lista punctelor de meniu.
Video length (Lungime videoclip)
Dacă apelaţi această funcţie de meniu, puteţi stabili durata buclei infi nite pentru
înregistrarea video: Puteţi opta între „3 min.”, „5 min.”, „10 min.” sau „Loop
recording off ”. Cu tastele ▲▼
/ selectaţi valoarea dorită pentru înregistrarea
în buclă şi confi rmaţi selecţia cu tasta / , pentru a reveni apoi la lista
punctelor de meniu.
Reţineţi în acest context faptul că, în funcţie de rezoluţia video setată, cardul de
memorie micro SD trebuie să aibă o capacitate sufi cientă pentru a putea atinge
durata dorită a buclei infi nite. Dacă selectaţi „Loop recording off ”, înregistrarea
se încheie la atingerea limitei de capacitate a cardului micro SD. La sfârşitul
înregistrării, aparatul începe o nouă înregistrare cu durata setată.
Page 44

41
CR 5 A1
RO
În cazul în care capacitatea cardului de memorie utilizat nu este sufi cientă pentru
durata setată a buclei infi nite, înregistrarea este întreruptă. Reduceţi în acest caz
durata buclei infi nite sau utilizaţi un card de memorie cu o capacitate mai mare.
Motion detection (Detectarea mişcării)
Dacă apelaţi această funcţie de meniu, puteţi activa sau dezactiva această funcţie
cu tastele ▲▼
/ . Confi rmaţi selecţia cu tasta / pentru a reveni
apoi la lista punctelor de meniu.
Dacă funcţia este activată, aparatul încheie automat înregistrarea în momentul
în care nu mai sunt detectate imagini în mişcare. Dacă aparatul înregistrează
din nou mişcări, acesta reîncepe automat o nouă înregistrare. Dacă funcţia este
dezactivată, aparatul nu întrerupe înregistrarea în cazul absenţei mişcărilor.
INDICAŢIE
►
Puteţi activa această funcţie numai atunci când autovehiculul este staţionar,
de ex. pentru a fi lma o încercare de spargere sau un autovehicul opus
după o coliziune.
► Această primă înregistrare trebuie pornită manual chiar şi atunci când
funcţia este activă.
Audio recording (Înregistrarea audio)
Dacă apelaţi această funcţie de meniu, puteţi activa sau dezactiva înregistrarea
audio prin intermediul microfonului integrat, cu tastele ▲▼
/ . Confi rmaţi
selecţia cu tasta / pentru a reveni apoi la lista punctelor de meniu.
Page 45

42
CR 5 A1
RO
Starea pregătită de realizare a fotografi ilor
Cu meniul închis, apăsaţi în starea pregătită pentru înregistrare video tasta
MODE
, pentru a comuta în starea pregătită pentru realizarea fotografi ilor.
Apoi, aparatul afi şează următoarele elemente pe ecran :
A – Afi şaj al numărului de fotografi i care mai pot fi realizate în funcţie de rezoluţie
şi de spaţiul de stocare disponibil
B – Rezoluţia foto curentă
C – Simbolul pentru cardul micro SD introdus
D – Indicatorul stării de încărcare a acumulatorului intern al aparatului
E – Indicarea datei (numai dacă este activată funcţia „Marcaj de oră şi dată”)
F – Indicarea orei (numai dacă este activată funcţia „Marcaj de oră şi dată”)
G – Simbolul pentru autodeclanşator (aici 5 secunde; vizibil numai dacă funcţia
este activată)
H – Simbol pentru corecţia expunerii
I – Indicaţie pentru starea pregătită de realizare a fotografi ilor
J – Indicaţie pentru funcţia de fotografi ere în serie (vizibilă numai dacă funcţia
este activată)
Realizarea fotografi ilor
Apăsaţi, dacă este cazul, repetat tasta ▲ , pentru a apropia subiectul. Menţineţi
apăsată această tastă pentru o mărire rapidă. Cu tasta ▼ puteţi îndepărta
subiectul, în mod similar. Apăsaţi tasta / pentru a face o fotografi e.
Dacă în modul pregătit pentru realizarea fotografi ilor apăsaţi tasta MENU
,
se deschide meniul următor:
Cu tastele ▲▼ / puteţi muta bara de selecţie pe punctul dorit şi puteţi apela
apoi respectiva funcţie de meniu cu tasta / . Pentru a părăsi un punct de
meniu fără a face modifi cări, apăsaţi tasta MODE .
Page 46

43
CR 5 A1
RO
În dreapta jos este afi şată masca de meniu curentă, precum şi numărul total al
măştilor de meniu. Dacă este selectat ultimul punct de meniu dintr-o mască, după
care mai urmează încă o mască, apăsaţi tasta ▼
pentru a sări la primul
punct de meniu din următoarea mască. Pentru a închide meniul, apăsaţi tasta
MENU .
Resolution (Rezoluţia)
Dacă apelaţi această funcţie de meniu, puteţi selecta apoi cu tastele ▲▼
/
dimensiunea dorită pentru fotografi i: Puteţi opta între „12MP (interp.*)”, „7MP
(interp.*)”, „5MP”, „3MP”, „2MP”, „1,3MP” sau „0,3MP”. „MP” este aici
acronimul pentru megapixel, de ex. setarea „5MP” are ca rezultat o imagine
de 2.592 × 1.944 pixeli, echivalentul a aproximativ 5 milioane pixeli. Cu cât
imaginile sunt mai mari, cu atât mai mare este acurateţea detaliilor. Totuşi, cardul
micro SD îşi atinge rapid limitele de capacitate în cazul rezoluţiilor foto mari.
Confi rmaţi selecţia cu tasta
/ pentru a reveni apoi la lista punctelor de
meniu.
* Interpolare = mărire aritmetică a cantităţii de puncte de imagine
Exposure (Expunerea)
Dacă apelaţi această funcţie de meniu, puteţi corecta apoi expunerea foto în
trei trepte în sus (de la +1 până la +3, mai luminos), respectiv în jos (de la –1
până la –3, mai întunecat). Cu tastele ▲▼
/ selectaţi corecţia dorită pentru
expunerea foto şi confi rmaţi selecţia cu tasta / , pentru a reveni apoi la
lista punctelor de meniu.
3 photos in series (3 fotografi i în rafală)
Dacă apelaţi această funcţie de meniu, puteţi activa sau dezactiva apoi cu tastele
▲▼
/ această funcţie pentru realizarea a 3 fotografi i în succesiune rapidă.
Confi rmaţi selecţia cu tasta / pentru a reveni apoi la lista punctelor de
meniu.
Self-timer (Autodeclanşatorul)
Dacă apelaţi această funcţie de meniu, puteţi selecta apoi cu tastele ▲▼
/
o temporizare de 2, 5 sau 10 secunde a declanşării. Imaginea este capturată
apoi după expirarea timpului setat de la apăsarea tastei / . Selectaţi
„direct capture”, pentru a dezactiva funcţia temporizării declanşării. Confi rmaţi
selecţia cu tasta / pentru a reveni apoi la lista punctelor de meniu.
Modul de redare
Cu meniul închis, apăsaţi în starea pregătită pentru realizarea fotografi ilor tasta
MODE , pentru a comuta în modul de redare. Cu tastele ▲/▼ / puteţi
comuta printre capturile realizate. Dacă selectaţi o fotografi e şi apăsaţi tasta
/ , toate fotografi ile salvate sunt afi şate sub forma unei prezentări de
diapozitive. Apăsaţi din nou tasta / pentru a termina prezentarea de
diapozitive. Dacă selectaţi un videoclip şi apăsaţi tasta / , acesta este
redat.
Page 47

44
CR 5 A1
RO
Dacă selectaţi o fotografi e, ecranul afi şează următoarele:
A – Indicarea numărului actual/total de înregistrări
B – Rezoluţia fotografi ei selectate curent
C – Indicatorul stării de încărcare a acumulatorului intern al aparatului
D – Marcaj dată/oră
E – Simbolul pentru modul de redare
F – Simbolul pentru un fi şier protejat împotriva ştergerii
Dacă apăsaţi acum tasta MENU
, se deschide meniul următor:
Delete
Cu tastele ▲▼ / puteţi muta bara de selecţie pe punctul dorit şi puteţi apela
apoi respectiva funcţie de meniu cu tasta / . Pentru a părăsi un punct de
meniu fără a face modifi cări, apăsaţi tasta MODE . În dreapta jos este afi şată
masca de meniu curentă, precum şi numărul total al măştilor de meniu. Pentru a
închide meniul, apăsaţi tasta MENU .
Delete (Ştergere)
Dacă apelaţi această funcţie de meniu, cu tastele ▲▼
/ puteţi şterge apoi
imaginea selectată curent („Delete this fi le”), „Delete all fi les” sau „Cancel”.
Confi rmaţi selecţia cu tasta / . În cazul în care confi rmaţi următoarea
întrebare de siguranţă cu „OK”, funcţia de ştergere selectată este executată,
iar meniul este închis. Dacă se afi şează în schimb „The fi le is write-protected”,
trebuie să ridicaţi mai întâi protecţia cu ajutorul funcţiei descrise în secţiunea
„Write protection”.
Page 48

45
CR 5 A1
RO
Write protection (Protecţie la scriere)
Dacă apelaţi această funcţie de meniu, cu tastele ▲▼
/ puteţi selecta apoi
dacă fi şierul selectat curent trebuie protejat împotriva ştergerii („Write-protect this fi le”),
dacă protecţia fi şierului selectat curent trebuie ridicată („Unlock this fi le”), dacă
toate fi şierele trebuie protejate împotriva ştergerii („Write-protect all fi les”) sau
dacă trebuie ridicată protecţia împotriva ştergerii pentru toate fi şierele („Unlock
all fi les”). Confi rmaţi selecţia cu tasta / . Apoi, afi şajul revine la lista
punctelor de meniu.
INDICAŢIE
►
Aplicarea acestor funcţii pe un număr mare de fi şiere poate dura câteva
secunde.
Dacă selectaţi un videoclip cu tastele ▲/▼
/ , ecranul afi şează
următoarele:
A – Indicarea numărului actual/total de înregistrări
B – Rezoluţia videoclipului selectat curent
C – Durata videoclipurilor
D – Indicatorul stării de încărcare a acumulatorului intern al aparatului
E – Simbolul funcţiei pentru tasta MODE
: oprirea redării video, respectiv foto
F – Simbolul funcţiei pentru tasta / : pornirea/întreruperea redării
video, respectiv foto
G – Simbolul pentru modul de redare
H – Simbolul pentru un fi şier protejat împotriva ştergerii
Dacă apăsaţi acum tasta MENU
, se deschide meniul următor:
Delete
Page 49

46
CR 5 A1
RO
Cu tastele ▲▼ / puteţi muta bara de selecţie pe punctul dorit şi puteţi apela
apoi respectiva funcţie de meniu cu tasta
/ . Pentru a părăsi un punct de
meniu fără a face modifi cări, apăsaţi tasta MODE . Pentru a închide meniul,
apăsaţi tasta MENU .
Delete (Ştergere)
Dacă apelaţi această funcţie de meniu, cu tastele ▲▼
/ puteţi şterge apoi
videoclipul selectat curent („Delete this fi le”), „Delete all fi les” sau „Cancel”.
Confi rmaţi selecţia cu tasta
/ . În cazul în care confi rmaţi următoarea
întrebare de siguranţă cu „OK”, funcţia de ştergere selectată este executată,
iar meniul este închis. Dacă se afi şează în schimb „This fi le is write-protected”,
trebuie să ridicaţi mai întâi protecţia cu ajutorul funcţiei descrise în secţiunea
„Write protection”.
Write protection (Protecţie la scriere)
Dacă apelaţi această funcţie de meniu, cu tastele ▲▼
/ puteţi selecta apoi
dacă fi şierul selectat curent trebuie protejat împotriva ştergerii („Write-protect this fi le”),
dacă protecţia fi şierului selectat curent trebuie ridicată („Unlock this fi le”), dacă
toate fi şierele trebuie protejate împotriva ştergerii („Write-protect all fi les”) sau
dacă trebuie ridicată protecţia împotriva ştergerii pentru toate fi şierele („Unlock
all fi les”). Confi rmaţi selecţia cu tasta / . Apoi, afi şajul revine la lista
punctelor de meniu.
INDICAŢIE
►
Aplicarea acestor funcţii pe un număr mare de fi şiere poate dura câteva
secunde.
Afi şarea înregistrărilor pe un monitor extern
INDICAŢIE
►
Camera poate transmite imaginea video pe un monitor extern, respectiv la
intrarea video a unui televizor. Respectaţi în acest sens instrucţiunile pentru
dispozitivul de redare respectiv.
♦ Conectaţi pentru aceasta un monitor adecvat prin intermediul cablului AV
livrat la conectorul AV . În cazul acestui tip de conexiune se transmite şi
imaginea în timp real (live) de pe cameră.
♦ Alternativ puteţi rabata capacul într-o parte şi realiza legătura între co-
nectorul mini HDMI al camerei, printr-un cablu mini HDMI (nu este inclus
în furnitură), cu un monitor adecvat. În cazul acestui tip de conexiune sunt
transmise numai videoclipurile salvate. Afi şajul integrat este apoi dezactivat
şi luminează doar indicatorul de operare verde.
♦ Porniţi redarea.
Page 50

47
CR 5 A1
RO
Redarea înregistrărilor pe un computer
Introduceţi fi şa mini USB a cablului USB livrat în conectorul camerei
şi fi şa USB într-un port USB liber al unui computer pornit. Acesta recunoaşte acum
aparatul ca „dispozitiv de stocare în masă”, apoi camera se conectează la
computer şi apoi conţinutul cardului micro SD din cameră este afi şat pe computer
ca o nouă unitate de disc. Executaţi operaţiile dorite la nivelul fi şierelor.
Resetare aparat
Dacă aparatul nu funcţionează conform instrucţiunilor descrise sau nu reacţionează
la comenzile dvs., apăsaţi cu ajutorul unui obiect ascuţit, de ex. cu o agrafă de
birou, cu atenţie pe comutatorul din spatele orifi ciului RESET
din carcasă,
pentru a-l reporni.
Schimbarea siguranţei
În adaptorul auto se găseşte o siguranţă. Dacă aparatul nu funcţionează,
este posibil ca siguranţa să fi e defectă. Înlocuiţi în acest caz siguranţa cu alta
nouă, de acelaşi tip (consultaţi şi capitolul Date tehnice).
♦ Scoateţi pentru aceasta adaptorul auto din brichetă.
♦ Deschideţi adaptorul auto prin rotirea cu atenţie în sens antiorar a
capătului fi letat cu striaţii (C), respectiv cu ajutorul unui cleşte, şi scoateţi
capătul fi letat.
♦ Scoateţi acum vârful fi şei (B) din siguranţă (A), extrageţi siguranţa (A) şi
puneţi-o deoparte.
♦ Acum introduceţi siguranţa nouă în adaptorul auto , poziţionaţi vârful
fi şei (B) pe capătul uşor proeminent al siguranţei şi înşurubaţi la loc capătul
fi letat (C) îndepărtat anterior.
INDICAŢIE
►
Dacă în continuare aparatul nu funcţionează sau se arde şi siguranţa nouă,
aparatul prezintă o defecţiune. În acest caz apelaţi linia telefonică directă
de service (a se vedea capitolul Service).
Page 51

48
CR 5 A1
RO
Curăţarea
ATENŢIE
Defectarea aparatului!
► În timpul curăţării asiguraţi-vă că în aparat nu pătrunde umezeală, pentru a
evita defectarea iremediabilă a aparatului.
■ Curăţaţi suprafeţele aparatului cu un prosop moale şi uscat. În cazul murdăriei
persistente folosiţi detergent universal şi apă. Asiguraţi-vă că nu pătrunde
apă în aparat.
Remedierea defecţiunilor
Acest capitol cuprinde indicaţii importante cu privire la localizarea şi remedierea
defecţiunilor. Respectaţi indicaţiile pentru a evita pericolele şi deteriorările.
AVERTIZARE
Respectaţi următoarele indicaţii de siguranţă pentru a evita pericolele şi pagubele
materiale:
► Repararea aparatelor electrice este permisă numai specialiştilor autorizaţi
de producător. Reparaţiile incompetente reprezintă un pericol pentru
utilizatorul aparatului şi defectarea acestuia din urmă.
Cauzele defecţiunilor şi remedierea acestora
Tabelul următor este util pentru localizarea şi remedierea defecţiunilor minore:
Defecţiunea
Cauza
posibilă
Remedierea
Camera nu funcţionează
prin intermediul acumulatorului integrat.
Acumulatorul este
consumat.
Încărcaţi acumulatorul integrat cu
ajutorul unui computer conectat prin
intermediul conectorului
aparatului şi pornit sau prin intermediul reţelei
de bord a autovehiculului.
Camera nu funcţionează
în autovehicul.
Bateria autovehiculului este
consumată.
Încărcaţi bateria autovehiculului.
Siguranţa din
adaptorul auto
este defectă.
Înlocuiţi siguranţa (consultaţi capitolul
Schimbarea siguranţei).
Page 52

49
CR 5 A1
RO
Defecţiunea
Cauza
posibilă
Remedierea
Camera nu înregistrează
corect în timpul deplasării.
Există defecţiuni
la nivelul senzorului de mişcare
integrat.
Activaţi senzorul de mişcare integrat
(funcţia „Motion detection” din meniul
de confi gurare) numai cu autovehiculul
parcat.
Măriţi sensibilitatea senzorului de
mişcare.
Aparatul nu reacţionează
sau nu reacţionează
conform aşteptărilor la
comenzile dvs.
Există o
defecţiune.
Apăsaţi atent cu un obiect ascuţit pe
comutatorul din spatele orifi ciului
RESET
din carcasă pentru a-l
reporni.
Ventuza nu ţine. Suprafaţa folosită
nu este curată.
Curăţaţi suprafaţa. Puteţi mări capacitatea de susţinere dacă umeziţi uşor
ventuza înainte de aplicare.
INDICAŢIE
►
Dacă nu reuşiţi să rezolvaţi problema cu niciunul dintre paşii indicaţi anterior,
adresaţi-vă serviciului pentru clienţi.
Page 53

50
CR 5 A1
RO
Depozitarea / Eliminarea
Depozitarea
Dacă nu utilizaţi aparatul un timp mai îndelungat, depozitaţi-l într-un loc curat şi
uscat, departe de radiaţia solară directă. În acest caz se recomandă să încărcaţi
acumulatorul integrat din când în când.
Eliminarea aparatului
Simbolul alăturat al pubelei tăiate cu roţi indică faptul că acest aparat face
obiectul directivei 2012/19/EU. Această directivă indică faptul că la sfârşitul
perioadei de utilizare a aparatului, acesta nu trebuie eliminat în gunoiul menajer
obişnuit, ci trebuie predat punctelor de colectare speciale sau centrelor de
eliminare a deşeurilor.
Acumulatorul integrat nu poate fi scos din aparat.
Eliminarea nu implică niciun cost pentru dvs. Contribuiţi la protejarea mediului înconjurător prin eliminarea corespunzătoare a
deşeurilor.
Informaţii suplimentare pot fi solicitate de la centrul local de eliminare sau administraţia locală.
Anexa
Indicaţii privind declaraţia de conformitate
Acest aparat corespunde cerinţelor fundamentale şi altor prescripţii relevante ale
Directivei 2004/108/EC privind compatibilitatea electromagnetică, precum şi
celor ale Directivei RoHS 2011/65/EU.
Declaraţia de conformitate completă în original este disponibilă la sediul importatorului.
Page 54

51
CR 5 A1
RO
Date tehnice
Recorder de cabină
Tensiune de operare
5V
, prin intermediul acumulatorului litiu-ion inte-
grat (3,7V/350mAh) sau al conectorului USB
Tensiune de intrare a
adaptorului auto
12V/24V
, max. 700mA prin intermediul
reţelei de bord a autovehiculului
Siguranţa adaptorului
auto
T2AL / 250V
Tensiune de ieşire a
adaptorului auto
5V
,1A
Mediu de stocare
Card micro SD, sistem de fi şiere FAT, sunt acceptate
carduri cu o capacitate de stocare de până la 32 GB
Ecran
Ecran LCD color 2,7“ TFT
(diagonala cca 6,8 cm)
Rezoluţii foto
5 megapixeli, 3 megapixeli, 2 megapixeli,
1,3 megapixeli, 0,3 megapixeli (7 megapixeli
şi 12 megapixeli interpolat)
Format de înregistrare
foto
JPEG
Rezoluţii video
Rez. 1: 1.920 x 1.080 pixeli / rată de redare
25 fps (cadre pe secundă) (Date: 1 GB / 5 min.)
Rez. 2: 1.280 x 720 pixeli, rată de redare
30 fps (cadre pe secundă)
Rez. 3: 640 x 480 pixeli, rată de redare
30 fps (cadre pe secundă)
Format înregistrare video AVI
Unghi de înregistrare
orizontal
59° video 1.920 x 1.080
82° foto 2.592 x 1.944
vertical
30° video 1.920 x 1.080
56° foto 2.592 x 1.944
Unghi suport cu ventuză
înclinabil frontal la cca 156°
rabatabil lateral la cca 153°
Temperatura de operare 15°C până la 40°C
Temperatura de
depozitare
5°C până la 40°C
Umiditate (fără condens) 5 până la 75 %
Dimensiuni (l x A x Î) cca 7,5 × 4,8 x 3,2 cm
Greutate Camera cca 67 g, setul complet cca 310 g
Page 55

52
CR 5 A1
RO
Garanţia
Pentru acest aparat se acordă o garanţie de 3 ani începând cu data cumpărării.
Aparatul a fost produs cu grijă şi verifi cat cu scrupulozitate înaintea livrării.
Păstraţi bonul de casă pentru a dovedi cumpărarea. Dacă aveţi solicitări privind
garanţia, contactaţi telefonic centrul dumneavoastră de service. Numai astfel
poate fi asigurată o expediere gratuită a produsului dumneavoastră.
INDICAŢIE
►
Garanţia se acordă numai pentru defectele de material sau de fabricaţie, nu şi
pentru daune de transport, piese de uzură sau deteriorări ale componentelor
fragile, de exemplu, întrerupător.
Aparatul este destinat numai pentru uz privat şi nu pentru o utilizare profesională.
În cazul manevrării abuzive sau necorespunzătoare, uzului de forţă şi intervenţiilor care nu au fost realizate de către fi liala noastră autorizată de service,
garanţia îşi pierde valabilitatea.
Drepturile dumneavoastră legale nu sunt limitate prin această garanţie. Perioada
de garanţie nu este prelungită după realizarea reparaţiilor realizate în perioada
garanţie. Acest lucru este valabil şi pentru piesele înlocuite şi reparate.
Deteriorările şi defi cienţele prezente deja la cumpărare trebuie semnalate imediat
după dezambalare sau cel târziu în două zile de la data cumpărării.
Reparaţiile necesare după expirarea perioadei de garanţie se efectuează contra cost.
Service-ul
R
Service România
Tel.: 0800896637
E-Mail: kompernass@lidl.ro
IAN 47583
Acces linie telefonică directă: De luni până vineri, între orele 8:00 - 20:00 (CET)
Importator
KOMPERNASS HANDELS GMBH
BURGSTRASSE 21
44867 BOCHUM
GERMANY
www.kompernass.com
Page 56

53
CR 5 A1
GR
CY
Περιεχόμενα
Εισαγωγή . . . . . . . . . . . . . . . . . . . . . . . . . . . . . . . . . . . . . . . . . . . . . . . . . . . .54
Πληροφορίες για αυτές τις οδηγίες χρήσης . . . . . . . . . . . . . . . . . . . . . . . . . . . . . . . . . . . .54
Πνευματικά δικαιώματα . . . . . . . . . . . . . . . . . . . . . . . . . . . . . . . . . . . . . . . . . . . . . . . . . . . .54
Προβλεπόμενη χρήση . . . . . . . . . . . . . . . . . . . . . . . . . . . . . . . . . . . . . . . . . . . . . . . . . . . . .54
Χρησιμοποιούμενες υποδείξεις προειδοποίησης . . . . . . . . . . . . . . . . . . . . . . . . . . . . . . . .54
Ασφάλεια . . . . . . . . . . . . . . . . . . . . . . . . . . . . . . . . . . . . . . . . . . . . . . . . . . . .55
Βασικές υποδείξεις ασφαλείας . . . . . . . . . . . . . . . . . . . . . . . . . . . . . . . . . . . . . . . . . . . . . .55
Πιθανή παραβίαση των δικαιωμάτων τρίτων . . . . . . . . . . . . . . . . . . . . . . . . . . . . . . . . . . . .57
Στοιχεία χειρισμού . . . . . . . . . . . . . . . . . . . . . . . . . . . . . . . . . . . . . . . . . . . . .58
Παραδοτέος εξοπλισμός και έλεγχος μεταφοράς . . . . . . . . . . . . . . . . . . . . . . . . . . . . . . .59
Απόρριψη της συσκευασίας . . . . . . . . . . . . . . . . . . . . . . . . . . . . . . . . . . . . . . . . . . . . . . . .59
Θέση σε λειτουργία . . . . . . . . . . . . . . . . . . . . . . . . . . . . . . . . . . . . . . . . . . . .60
Εισαγωγή / Αφαίρεση κάρτας Micro-SD . . . . . . . . . . . . . . . . . . . . . . . . . . . . . . . . . . . . . . .60
Τοποθέτηση της κάμερας στο παρμπρίζ . . . . . . . . . . . . . . . . . . . . . . . . . . . . . . . . . . . . . . .61
Δημιουργία παροχής ρεύματος . . . . . . . . . . . . . . . . . . . . . . . . . . . . . . . . . . . . . . . . . . . . .61
Χειρισμός και λειτουργία. . . . . . . . . . . . . . . . . . . . . . . . . . . . . . . . . . . . . . . .62
Ενεργοποίηση και απενεργοποίηση, διεξαγωγή ρυθμίσεων . . . . . . . . . . . . . . . . . . . . . . . .62
Βασικές ρυθμίσεις . . . . . . . . . . . . . . . . . . . . . . . . . . . . . . . . . . . . . . . . . . . . . . . . . . . . . . . .62
Μενού εγκατάστασης . . . . . . . . . . . . . . . . . . . . . . . . . . . . . . . . . . . . . . . . . . . . . . . . . . .62
Ετοιμότητα εγγραφής βίντεο . . . . . . . . . . . . . . . . . . . . . . . . . . . . . . . . . . . . . . . . . . . . .65
Έναρξη/Τερματισμός εγγραφής . . . . . . . . . . . . . . . . . . . . . . . . . . . . . . . . . . . . . . . . . .65
Ετοιμότητα λήψης φωτογραφίας . . . . . . . . . . . . . . . . . . . . . . . . . . . . . . . . . . . . . . . . . .68
Λήψη φωτογραφίας . . . . . . . . . . . . . . . . . . . . . . . . . . . . . . . . . . . . . . . . . . . . . . . . . . . .68
Λειτουργία αναπαραγωγής . . . . . . . . . . . . . . . . . . . . . . . . . . . . . . . . . . . . . . . . . . . . . .70
Προβολή εγγραφών σε εξωτερική οθόνη . . . . . . . . . . . . . . . . . . . . . . . . . . . . . . . . . . . . . .72
Μεταφορά εγγραφών σε έναν υπολογιστή . . . . . . . . . . . . . . . . . . . . . . . . . . . . . . . . . . . . .73
Επαναφορά της συσκευής . . . . . . . . . . . . . . . . . . . . . . . . . . . . . . . . . . . . . . . . . . . . . . . . .73
Αλλαγή ασφάλειας . . . . . . . . . . . . . . . . . . . . . . . . . . . . . . . . . . . . . . . . . . . . . . . . . . . . . . .73
Καθαρισμός . . . . . . . . . . . . . . . . . . . . . . . . . . . . . . . . . . . . . . . . . . . . . . . . . .74
Διόρθωση σφαλμάτων. . . . . . . . . . . . . . . . . . . . . . . . . . . . . . . . . . . . . . . . . .74
Αιτίες σφαλμάτων και διόρθωση . . . . . . . . . . . . . . . . . . . . . . . . . . . . . . . . . . . . . . . . . . . . .75
Αποθήκευση / Απόρριψη. . . . . . . . . . . . . . . . . . . . . . . . . . . . . . . . . . . . . . . .76
Αποθήκευση . . . . . . . . . . . . . . . . . . . . . . . . . . . . . . . . . . . . . . . . . . . . . . . . . . . . . . . . . . . .76
Απόρριψη συσκευής . . . . . . . . . . . . . . . . . . . . . . . . . . . . . . . . . . . . . . . . . . . . . . . . . . . . . .76
Παράρτημα. . . . . . . . . . . . . . . . . . . . . . . . . . . . . . . . . . . . . . . . . . . . . . . . . . .76
Υποδείξεις για τη Δήλωση συμμόρφωσης . . . . . . . . . . . . . . . . . . . . . . . . . . . . . . . . . . . . . .76
Τεχνικά χαρακτηριστικά . . . . . . . . . . . . . . . . . . . . . . . . . . . . . . . . . . . . . . . . . . . . . . . . . . . .77
Εγγύηση . . . . . . . . . . . . . . . . . . . . . . . . . . . . . . . . . . . . . . . . . . . . . . . . . . . . . . . . . . . . . . . .78
Σέρβις . . . . . . . . . . . . . . . . . . . . . . . . . . . . . . . . . . . . . . . . . . . . . . . . . . . . . . . . . . . . . . . . .78
Εισαγωγέας . . . . . . . . . . . . . . . . . . . . . . . . . . . . . . . . . . . . . . . . . . . . . . . . . . . . . . . . . . . . .78
Page 57

54
CR 5 A1
GR
CY
Εισαγωγή
Πληροφορίες για αυτές τις οδηγίες χρήσης
Συγχαρητήρια για την αγορά της νέας σας συσκευής.
Αποφασίσατε έτσι για την απόκτηση ενός προϊόντος υψηλής ποιότητας.
Οι οδηγίες χρήσης είναι τμήμα αυτού του προϊόντος. Περιέχουν σημαντικές
υποδείξεις για την ασφάλεια, τη χρήση και την απόρριψη. Πριν από τη χρήση
του προϊόντος, εξοικειωθείτε με όλες τις υποδείξεις χειρισμού και ασφάλειας.
Χρησιμοποιείτε το προϊόν μόνο όπως περιγράφεται και για τους αναφερόμενους
τομείς χρήσης. Σε περίπτωση μεταβίβασης ή πώλησης του προϊόντος σε τρίτους,
παραδώστε όλα τα έγγραφα συμπεριλαμβανομένων αυτών των οδηγιών χρήσης.
Πνευματικά δικαιώματα
Αυτές οι οδηγίες έχουν προστασία πνευματικών δικαιωμάτων.
Κάθε αντιγραφή ή ανατύπωση, ακόμη και αποσπασματική, καθώς και η αναπα-
ραγωγή των εικόνων, ακόμα και σε τροποποιημένη κατάσταση, επιτρέπεται μόνο
με γραπτή έγκριση του κατασκευαστή.
Προβλεπόμενη χρήση
Το παρόν καταγραφικό μηχάνημα αυτοκινήτου είναι μια συσκευή του τομέα ηλεκτρονικής συστημάτων πληροφορικής και εξυπηρετεί την ψηφιακή εγγραφή φωτογραφιών και βίντεο, ειδικά κατά τις διαδρομές με μηχανοκίνητα οχήματα. Μία
άλλη ή διαφορετική χρήση από τα ανωτέρω αναφερόμενα ισχύει ως μη σύμφωνη
με τους κανονισμούς. Η συσκευή δεν προορίζεται για χρήση σε βιομηχανικούς
ή εργοστασιακούς χώρους. Απαιτήσεις οποιουδήποτε είδους λόγω ζημιών από
μη σύμφωνη με τους κανονισμούς χρήση, από ακατάλληλες επισκευές, μη επιτρεπόμενες διεξαχθείσες τροποποιήσεις ή από χρήση μη εγκεκριμένων ανταλλακτικών, αποκλείονται. Την ευθύνη φέρει αποκλειστικά ο χρήστης.
Χρησιμοποιούμενες υποδείξεις προειδοποίησης
Στις παρούσες οδηγίες χρήσης χρησιμοποιούνται οι εξής υποδείξεις προειδοποίησης:
ΚΙΝΔΥΝΟΣ
Μία υπόδειξη προειδοποίησης αυτού του βαθμού κινδύνου
χαρακτηρίζει μία επικείμενη επικίνδυνη κατάσταση.
Στην περίπτωση που δεν μπορεί να αποφευχθεί αυτή η επικίνδυνη κατάσταση,
μπορεί να προκληθεί θάνατος ή βαριοί τραυματισμοί.
► Τηρείτε τις οδηγίες σε αυτή την υπόδειξη προειδοποίησης ώστε να αποφευ-
χθεί ο κίνδυνος θανάτου ή βαριών σωματικών τραυματισμών.
Page 58

55
CR 5 A1
GR
CY
ΠΡΟΕΙΔΟΠΟΙΗΣΗ
Μία υπόδειξη προειδοποίησης αυτού του βαθμού κινδύνου
χαρακτηρίζει μία πιθανή επικίνδυνη κατάσταση.
Στην περίπτωση που δεν μπορεί να αποφευχθεί αυτή η επικίνδυνη κατάσταση,
μπορεί να προκληθούν τραυματισμοί.
► Οι οδηγίες σε αυτή την υπόδειξη προειδοποίησης γίνονται ώστε να απο-
φεύγονται σωματικοί τραυματισμοί.
ΠΡΟΣΟΧΗ
Μία υπόδειξη προειδοποίησης αυτού του βαθμού κινδύνου
χαρακτηρίζει μία πιθανή υλική ζημιά.
Στην περίπτωση που δεν μπορεί να αποφευχθεί αυτή η κατάσταση, μπορεί να
προκληθούν υλικές ζημιές.
► Τηρείτε τις οδηγίες σε αυτή την υπόδειξη προειδοποίησης ώστε να αποφεύ-
γονται υλικές ζημιές.
ΥΠΟΔΕΙΞΗ
►
Μία υπόδειξη χαρακτηρίζει επιπλέον πληροφορίες που διευκολύνουν το
χειρισμό της συσκευής.
Ασφάλεια
Σε αυτό το κεφάλαιο λαμβάνετε σημαντικές υποδείξεις ασφαλείας για το χειρισμό
της συσκευής.
Αυτή η συσκευή ανταποκρίνεται στους προδιαγεγραμμένους κανόνες ασφαλείας.
Μία μη σύμφωνη με τους κανονισμούς χρήση μπορεί να οδηγήσει σε σωματικές
βλάβες και υλικές ζημιές.
Βασικές υποδείξεις ασφαλείας
Τηρείτε τις κάτωθι υποδείξεις ασφαλείας για έναν ασφαλή χειρισμό της συσκευής:
■ Πριν από τη χρήση ελέγχετε τη συσκευή ως προς εξωτερικές εμφανείς φθορές.
Μη θέτετε σε λειτουργία μία συσκευή που έχει υποστεί φθορές ή έχει πέσει κάτω.
■ Σε περίπτωση φθοράς των καλωδίων ή των συνδέσεων αυτά πρέπει να
αντικαθίστανται από εξουσιοδοτημένο ειδικό προσωπικό ή από το τμήμα
εξυπηρέτησης πελατών.
■ Επισκευές στη συσκευή επιτρέπεται να πραγματοποιούνται μόνο από εξου-
σιοδοτημένα και εξειδικευμένα συνεργεία ή από το τμήμα εξυπηρέτησης
πελατών. Λόγω ακατάλληλων επισκευών μπορεί να προκύψουν κίνδυνοι για
το χρήστη. Επίσης ακυρώνεται η αξίωση εγγύησης.
■ Τα ελαττωματικά μέρη κατασκευής επιτρέπεται να αντικαθίστανται μόνο
με γνήσια ανταλλακτικά. Μόνο με αυτά τα ανταλλακτικά εξασφαλίζεται η
εκπλήρωση των απαιτήσεων ασφάλειας.
Page 59

56
CR 5 A1
GR
CY
■ Ποτέ μην ανοίγετε τη συσκευή και μην διεξάγετε σε αυτήν επισκευές.
■ Προστατεύετε τη συσκευή από νερό που ψεκάζεται και στάζει και από τη
διείσδυση υγρών.
■ Ποτέ μην εκθέτετε τη συσκευή σε υπερβολική ζέστη ή σε υψηλή υγρασία αέρα.
Αυτό ισχύει κυρίως για την αποθήκευση στο αυτοκίνητο. Κατά τη διάρκεια
μακρών παύσεων και ζεστού καιρού με ηλιακή ακτινοβολία δημιουργούνται
θερμοκρασίες μεγαλύτερες των 40°C στο εσωτερικό και στο ντουλαπάκι
συνοδηγού. Απομακρύνετε ηλεκτρικές και ηλεκτρονικές συσκευές από το
όχημα.
■ Κατά την εγκατάσταση του στηρίγματος βεβαιωθείτε ότι το στήριγμα δεν
αποτελεί εμπόδιο στην οδήγηση, την πέδηση ή τη δυνατότητα χρήσης άλλων
λειτουργικών συστημάτων του οχήματος (π.χ. αερόσακοι), ούτε και περιορίζει
το οπτικό σας πεδίο κατά την οδήγηση.
ΚΙΝΔΥΝΟΣ
Μην τοποθετείτε το στήριγμα στην περιοχή ανοίγματος του αερόσακου ή εκεί
κοντά, διότι σε περίπτωση ενεργοποίησής του ο αερόσακος θα μπορούσε να
ρίξει το στήριγμα από το εσωτερικό του οχήματος και να προκαλέσει σοβαρούς
τραυματισμούς.
ΠΡΟΕΙΔΟΠΟΙΗΣΗ
Η κάμερα δεν επιτρέπεται σε καμία περίπτωση να τοποθετείται κατά τέτοιο
τρόπο ώστε να υπάρχει πιθανότητα να χτυπήσετε εσείς ή άλλοι επιβάτες σε
περίπτωση ατυχήματος. Αυτό θα μπορούσε να προκαλέσει σοβαρούς τραυματισμούς.
■ Άτομα, τα οποία δεν είναι σε θέση να χειρίζονται τη συσκευή με ασφάλεια
λόγω των σωματικών, διανοητικών, κινητικών ή αισθητηριακών δυνατοτήτων
τους, επιτρέπεται να χρησιμοποιούν τη συσκευή μόνο υπό την επίβλεψη ή
καθοδήγηση από ένα υπεύθυνο άτομο.
ΚΙΝΔΥΝΟΣ
Τα υλικά συσκευασίας πρέπει να παραμένουν μακριά από τα παιδιά και δεν επιτρέπεται να χρησιμοποιούνται για παιχνίδι. Υπάρχει κίνδυνος ασφυξίας.
■ Επιτρέπετε στα παιδιά τη χρήση της συσκευής μόνο υπό επίβλεψη.
Τα παιδιά δεν αναγνωρίζουν πάντα σωστά τους πιθανούς κινδύνους.
■ Μην τοποθετείτε αντικείμενα επάνω στη συσκευή.
■ Μη λειτουργείτε τη συσκευή κοντά σε ακάλυπτες φλόγες (π.χ. κεριά).
■ Εάν διαπιστώσετε οσμή καπνού ή σχηματισμό καπνού στη συσκευή,
αποσυνδέστε την αμέσως από την τροφοδοσία ρεύματος.
ΠΡΟΕΙΔΟΠΟΙΗΣΗ
► Απαγορεύεται η εισπνοή του καπνού, διότι είναι επικίνδυνος για την υγεία.
Page 60

57
CR 5 A1
GR
CY
■ Ελέγχετε τακτικά εάν η βεντούζα είναι καλά συνδεδεμένη με το παρμπρίζ.
Τούτο είναι σημαντικό ειδικά σε περιοχές, όπου η εξωτερική θερμοκρασία
υπόκειται συχνά σε υψηλές διακυμάνσεις.
■ Τηρείτε τους εκάστοτε ισχύοντες νόμους. Η χρήση μιας κάμερας αυτοκινήτου απα-
γορεύεται ή διώκεται ποινικά σε ορισμένες χώρες. Κατά τη διάρκεια της διαδρομής, δεν επιτρέπεται να γίνεται χειρισμός της κάμερας. Η ασφάλεια κυκλοφορίας
πρέπει να έχει πάντα προτεραιότητα κατά την οδήγηση. Χρησιμοποιείτε τη συσκευή
μόνο όταν δεν αποτελεί κανένα κίνδυνο σε οποιαδήποτε οδηγική κατάσταση.
■ Στη συσκευή είναι τοποθετημένος ένας συσσωρευτής λιθίου-ιόντων, γι' αυτό δεν
επιτρέπεται να πετάξετε τη συσκευή στη φωτιά. Υπάρχει κίνδυνος έκρηξης!
■ Μην ασκείτε πίεση επάνω στην οθόνη. Εάν σπάσει, μπορεί να προκύψουν
τραυματισμοί λόγω επαφής με αιχμηρές ακμές.
Πιθανή παραβίαση των δικαιωμάτων τρίτων
Κατά τη χρήση της κάμερας αυτοκινήτου πρέπει να λάβετε υπόψη τις εξής υποδείξεις:
Προστασία πνευματικών δικαιωμάτων
Κατά βάση κάθε άτομο έχει δικαίωμα επί της ιδίας εικόνας. Σύμφωνα με το νόμο
περί δικαιωμάτων πνευματικής ιδιοκτησίας, οι εικόνες επιτρέπεται να δημοσιεύονται χωρίς συγκατάθεση των αντίστοιχων προσώπων μόνο εφόσον τα άτομα
αυτά εμφανίζονται αποκλειστικά ως συμπληρωματικό στοιχείο σε ένα τοπίο ή
σε άλλες τοποθεσίες. Η απάντηση στην ερώτηση εάν ένα άτομο αποτελεί μόνο
συμπληρωματικό στοιχείο, εξαρτάται από τις συνθήκες κάθε περίπτωσης.
Προστασία της ιδιωτικής ζωής
Η ιδιωτική ζωή τρίτων δεν επιτρέπεται να παραβιάζεται μέσω των ληφθέντων εικόνων.
Μην κατευθύνετε την κάμερα στον κήπο ή στην πόρτα εισόδου της γειτονικής σας
κατοικίας, ακόμα και εάν αυτά τα σημεία είναι ορατά από το όχημα ή από δημόσιες
τοποθεσίες. Αυτό δεν παρέχει δικαίωμα δημοσίευσης αυτών των παρατηρήσεων.
Ατομική δυνατότητα προσδιορισμού
Η ατομική δυνατότητα προσδιορισμού υφίσταται όταν μπορεί να διαπιστωθεί ότι
ένα συγκεκριμένο άτομο μια συγκεκριμένη χρονική στιγμή βρισκόταν σε συγκεκριμένη τοποθεσία. Η αναγνώριση μπορεί να γίνει και μέσω ενός αναφερόμενου σε
κάποιο άτομο χαρακτηριστικού, όπως π.χ. οι πινακίδες κυκλοφορίας ενός οχήματος. Η δυνατότητα προσδιορισμού ατόμων πρέπει οπωσδήποτε να αποφεύγεται.
Κάμερες παρακολούθησης στο χώρο εργασίας
Η παρακολούθηση στο χώρο εργασίας υπάγεται στη Γερμανία σε ιδιαίτερα
αυστηρό καθεστώς. Οι εργοδότες πρέπει να μην διαθέτουν κάμερες παρακολούθησης στο χώρο εργασίας, εφόσον δεν μπορεί να αποκλειστεί ολοκληρωτικά μια
πιθανή προσβολή των δικαιωμάτων.
Αναφορικά με τις πιθανές παραβιάσεις δικαιωμάτων τρίτων, λαμβάνετε πάντα
υπόψη τις νομικές διατάξεις στην εκάστοτε χώρα χρήσης. Λόγω πιθανής παραβίασης ατομικών δικαιωμάτων τρίτων, είναι παράνομη μια μη εξουσιοδοτημένη
δημοσίευση καταγραφών με ξένους ή πινακίδες κυκλοφορίας οχημάτων, π.χ.
στο διαδίκτυο. Η χρήση των καταγραφών επιτρέπεται αποκλειστικά ως στοιχείο
απόδειξης σε περίπτωση ατυχήματος.
Page 61

58
CR 5 A1
GR
CY
Στοιχεία χειρισμού
(Για Εικόνες βλ. αναδιπλούμενη σελίδα)
Εικόνα A:
Μοχλός ασφάλισης
Στήριγμα με βεντούζα
Κοχλίες με ροζέτες για τρισδιάστατη ασφάλιση
Εικόνα B:
Φακός κάμερας
Πλήκτρο ▲
Πλήκτρο ▼
Πλήκτρο MENU
Πλήκτρο MODE
Μικρόφωνο
Υποδοχή σύνδεσης USB*
Άνοιγμα RESET
Υποδοχή σύνδεσης AV
Ηχεία
LED υπερύθρων
Εικόνα C:
Ένδειξη λειτουργίας
Κάλυμμα
Υποδοχή σύνδεσης Mini-HDMI
Υποδοχή καρτών Micro-SD
Οθόνη
Εικόνα D:
Σπείρωμα για την υποδοχή του στηρίγματος τρίποδου
Πλήκτρο On/Off
Πλήκτρο / για την εκκίνηση/το σταμάτημα της εγγραφής βίντεο, για τη
θέση σε λειτουργία μιας λήψης φωτογραφίας ή για την εμφάνιση στοιχείων μενού
Εικόνα E:
Υποδοχή USB για την τροφοδοσία ρεύματος μέσω του αντάπτορα οχήματος
Λυχνία λειτουργίας
Αντάπτορας οχήματος 12/24 V
USB* σε καλώδιο Mini-USB
Καλώδιο AV (3,5 mm υποδοχή σε βύσμα Cinch)
Προστατευτικό περίβλημα
Οδηγίες χρήσης
*Το USB
®
είναι σήμα κατατεθέν της USB Implementers Forum, Inc.
Page 62

59
CR 5 A1
GR
CY
Παραδοτέος εξοπλισμός και έλεγχος μεταφοράς
Ελέγξτε τον παραδοτέο εξοπλισμό (βλ. αναδιπλούμενη σελίδα).
Ο παραδοτέος εξοπλισμός αποτελείται από τα ακόλουθα στοιχεία:
● Καταγραφικό μηχάνημα αυτοκινήτου CR5A1
● Προστατευτικό περίβλημα
● Στήριγμα με βεντούζα
● USB* σε καλώδιο Mini-USB
● Αντάπτορας οχήματος 12/24 V
● Καλώδιο AV (3,5 mm υποδοχή σε βύσμα Cinch)
● Οι παρούσες οδηγίες χρήσης
*Το USB® είναι σήμα κατατεθέν της USB Implementers Forum, Inc.
♦ Απομακρύνετε όλα τα εξαρτήματα της συσκευής και τις οδηγίες χρήσης
από τη συσκευασία και ελέγξτε τον παραδοτέο εξοπλισμό για την πληρότητα
του και για ορατές ζημιές (βλ. αναδιπλούμενη σελίδα).
♦ Απομακρύνετε όλα τα υλικά συσκευασίας, καθώς και τις προστατευτικές
μεμβράνες από την οθόνη και το φακό κάμερας .
ΥΠΟΔΕΙΞΗ
►
Σε περίπτωση ελλιπούς παραδοτέου εξοπλισμού ή ζημιών λόγω ελλιπούς
συσκευασίας ή λόγω μεταφοράς, απευθυνθείτε στην ανοικτή τηλεφωνική
γραμμή εξυπηρέτησης (βλ. κεφάλαιο Σέρβις).
Απόρριψη της συσκευασίας
Η συσκευασία προστατεύει τη συσκευή από φθορές κατά τη μεταφορά. Τα υλικά
συσκευασίας έχουν επιλεγεί σύμφωνα με τους οικολογικούς παράγοντες και τους
παράγοντες της τεχνικής απόρριψης και για το λόγο αυτό είναι ανακυκλώσιμα.
Η επιστροφή της συσκευασίας στο κύκλωμα υλικών εξοικονομεί πρώτες ύλες και
μειώνει την ποσότητα των απορριμμάτων. Απορρίπτετε τα υλικά συσκευασίας που
δεν χρησιμοποιούνται πλέον σύμφωνα με τις τοπικές ισχύουσες προδιαγραφές.
ΥΠΟΔΕΙΞΗ
►
Εάν είναι δυνατό φυλάξτε τη γνήσια συσκευασία κατά τη διάρκεια της εγγύησης, για να μπορείτε σε περίπτωση εγγύησης να συσκευάσετε τη συσκευή
σωστά.
Page 63

60
CR 5 A1
GR
CY
Θέση σε λειτουργία
Εισαγωγή / Αφαίρεση κάρτας Micro-SD
ΠΡΟΣΟΧΗ
►
Μην εγκαθιστάτε και μην αφαιρείτε την κάρτα Micro-SD (δεν περιλαμβάνεται
στον παραδοτέο εξοπλισμό) όσο η συσκευή είναι ενεργοποιημένη. Αυτό
μπορεί να οδηγήσει σε απώλεια των δεδομένων στην κάρτα Micro-SD.
♦ Εισαγάγετε μια κάρτα Micro-SD κατά τέτοιο τρόπο στην υποδοχή καρτών
Micro-SD , ώστε οι χρυσές επαφές να δείχνουν προς την οθόνη. Πιέστε
την κάρτα Micro-SD τόσο μέσα, έως ότου κουμπώσει αισθητά.
♦ Για να αφαιρέσετε την κάρτα Micro-SD, πιέστε απαλά στην άκρη της κάρτας
Micro-SD. Η κάρτα Micro-SD εκτινάσσεται λίγο προς τα έξω και μπορεί να
αφαιρεθεί από τη συσκευή.
ΥΠΟΔΕΙΞΗ
►
Η κάμερα δεν διαθέτει εσωτερική μνήμη. Έτσι οι εγγραφές μπορούν να
διεξάγονται μόνο με τοποθετημένη κάρτα μνήμης.
Στον ακόλουθο πίνακα μπορείτε να βρείτε τη μέγιστη διάρκεια εγγραφής αναφορικά
με τη χωρητικότητα μνήμης της κάρτας Micro-SD και τη ρυθμισμένη ευκρίνεια:
Ευκρίνεια
Χωρητικότητα μνήμης
της κάρτας Micro-SD
Κατά προσέγγιση
διάρκεια εγγραφής
1080P
4 GB περ. 0 ώρες 19 λεπτά
8 GB περ. 0 ώρες 39 λεπτά
16 GB περ. 1 ώρα 18 λεπτά
32 GB περ. 2 ώρες 08 λεπτά
720P
4 GB περ. 0 ώρες 29 λεπτά
8 GB περ. 1 ώρα 00 λεπτά
16 GB περ. 1 ώρα 58 λεπτά
32 GB περ. 4 ώρες 01 λεπτά
VGA
4 GB περ. 0 ώρες 47 λεπτά
8 GB περ. 1 ώρα 37 λεπτά
16 GB περ. 3 ώρες 11 λεπτά
32 GB περ. 6 ώρες 29 λεπτά
Page 64

61
CR 5 A1
GR
CY
Τοποθέτηση της κάμερας στο παρμπρίζ
1) Για να αυξήσετε την προστασία της κάμερας,
μπορείτε να την τοποθετήσετε στο προστατευτικό περίβλημα
και να την πιέσετε ελαφρώς
προς τα μέσα, έως ότου κουμπώσει αισθητά.
2) Βιδώστε το στήριγμα
στο σπείρωμα της
κάμερας. Τοποθετήστε τη βεντούζα στο
παρμπρίζ. Προσέξτε ώστε η βεντούζα να
εφάπτεται επίπεδα.
3) Τοποθετήστε σταθερά τη βεντούζα στο παρμπρίζ και πιέστε το μοχλό ασφάλισης
προς
το παρμπρίζ. Έτσι παράγεται μία υποπίεση
και η βεντούζα σφίγγεται στο παρμπρίζ.
Μετακινήστε το μοχλό ασφάλισης αντίθετα,
για να λασκάρετε τη βεντούζα πάλι από το
παρμπρίζ.
4) Αφού στερεώσετε την κάμερα με τη βεντούζα
στο παρμπρίζ, λασκάρετε διαδοχικά τις βίδες
Α - C και ρυθμίστε την κάμερα όπως επιθυμείτε.
5) Όταν βρείτε την επιθυμητή θέση και ρύθμιση, σφίξτε πάλι με το χέρι τους κοχλίες
με ροζέτες
.
ΠΡΟΣΟΧΗ
►
Η κάμερα πρέπει να τοποθετείται κατά τέτοιο τρόπο, ώστε το οπτικό πεδίο
του οδηγού να είναι πάντα ελεύθερο.
Δημιουργία παροχής ρεύματος
ΠΡΟΣΟΧΗ
►
Για την παροχή ρεύματος της συσκευής χρησιμοποιείτε αποκλειστικά τον
απεσταλμένο αντάπτορα οχήματος.
1) Συνδέστε τον αντάπτορα οχήματος
στην τάση (υποδοχή αναπτήρα) του
οχήματός σας. Η λυχνία λειτουργίας στον αντάπτορα οχήματος δείχνει
την ετοιμότητα λειτουργίας, όταν υπάρχει τάση στην υποδοχή.
2) Συνδέστε το απεσταλμένο καλώδιο USB
με την υποδοχή USB στον
αντάπτορα οχήματος και στην υποδοχή σύνδεσης USB της κάμερας.
Μόλις τροφοδοτηθεί η κάμερα μέσω της τάσης οχήματος με τάση, εκκινείται η
εγγραφή βίντεο και η ένδειξη λειτουργίας αναβοσβήνει διαδοχικά κόκκινη
και πράσινη. Όταν φορτιστεί ο εσωτερικός συσσωρευτής συσκευής, εμφανίζεται
το σύμβολο φόρτισης μπαταρίας στην οθόνη .
Page 65

62
CR 5 A1
GR
CY
ΠΡΟΣΟΧΗ
►
Σε οχήματα, στα οποία ο αναπτήρας τους λειτουργεί ακόμη και με απενεργοποιημένη ανάφλεξη, η συσκευή πρέπει να αποσυνδέεται μετά τη χρήση
της υποδοχής αναπτήρα. Σε αντίθετη περίπτωση η μπαταρία του οχήματος
μπορεί να αποφορτιστεί για μεγάλο διάστημα, διότι η συσκευή καταναλώνει
ρεύμα ακόμη και στο ρελαντί. Ο κινητήρας οχήματος δεν θα μπορεί στη
συνέχεια να εκκινηθεί.
► Σε οχήματα, στα οποία δεν απενεργοποιείται ο αναπτήρας, δεν διακόπτεται
αυτόματα και η εγγραφή. Σε αυτήν την περίπτωση απενεργοποιήστε την
κάμερα χειροκίνητα.
Χειρισμός και λειτουργία
Σε αυτό το κεφάλαιο λαμβάνετε σημαντικές υποδείξεις για το χειρισμό και τη
λειτουργία της συσκευής.
Ενεργοποίηση και απενεργοποίηση, διεξαγωγή
ρυθμίσεων
Πιέστε το πλήκτρο On/Off , ώστε να ενεργοποιήσετε τη συσκευή.
Η εικόνα κάμερας προβάλλεται στην οθόνη και η ένδειξη λειτουργίας
ανάβει πράσινη. Η συσκευή είναι τώρα έτοιμη για εγγραφή βίντεο.
Για να απενεργοποιήσετε τη συσκευή, κρατήστε το πλήκτρο On/Off πατημένο
για 3 δευτερόλεπτα.
Βασικές ρυθμίσεις
Μενού εγκατάστασης
Για να μπορείτε να διεξάγετε στο μενού εγκατάστασης τη βασική ρύθμιση για
τη συσκευή, πατήστε το πλήκτρο MENU και στη συνέχεια το πλήκτρο
MODE . Το μενού εγκατάστασης ανοίγει:
Default settings
Με τα πλήκτρα ▲▼ / μπορείτε να μετατοπίσετε τη μπάρα επιλογής στην
επιθυμητή καταχώρηση και στη συνέχεια να καλέσετε αυτή τη λειτουργία μενού
με το πλήκτρο / . Για να αποχωρήσετε από το στοιχείο μενού που έχετε
καλέσει χωρίς αλλαγή, πατήστε το πλήκτρο MODE . Κάτω δεξιά προβάλλεται
ο τρέχων πίνακας μενού, καθώς και ο συνολικός αριθμός των πινάκων μενού.
Για να κλείσετε το μενού, πατήστε το πλήκτρο MENU .
Page 66

63
CR 5 A1
GR
CY
Time & date (Ώρα & Ημερομηνία)
Εάν καλέσετε αυτή τη λειτουργία μενού, μπορείτε να επιλέξετε στη συνέχεια με τα
πλήκτρα ▲▼
/ , εάν οι εγγραφές θα αποθηκευτούν με ή χωρίς εμφανιζόμενη
ημερομηνία. Επιλέξτε το „Time- & date-stamp on“, για να ενεργοποιήσετε αυτή τη
λειτουργία, ή το „Time- & date-stamp off“ για να την απενεργοποιήσετε.
Για τη ρύθμιση της τρέχουσας ημερομηνίας καλέστε το „Set time & date“. Στη
συνέχεια ρυθμίστε με τα πλήκτρα ▲▼
/ το έτος της τρέχουσας ημερομηνίας.
Πατήστε το πλήκτρο MODE , για να ρυθμίσετε με τα πλήκτρα ▲▼ / το
μήνα. Πατήστε το πλήκτρο MODE , για να ρυθμίσετε με τα πλήκτρα ▲▼ /
την ημέρα. Πατήστε το πλήκτρο MODE , για να ρυθμίσετε με τα πλήκτρα ▲▼
/ τα ψηφία για την τρέχουσα ώρα. Πατήστε το πλήκτρο MODE , για να
ρυθμίσετε με τα πλήκτρα ▲▼ / τον αριθμό λεπτών. Πατήστε το πλήκτρο
MODE , για να ρυθμίσετε με τα πλήκτρα ▲▼ / τον αριθμό δευτερολέπτων.
Πατήστε το πλήκτρο MODE , για να ρυθμίσετε με τα πλήκτρα ▲▼ / την
επιθυμητή μορφή ημερομηνίας:
Το στοιχείο „YY/MM/DD“ υποδεικνύει την διψήφια ένδειξη ημερομηνίας με σειρά
„Έτος / Μήνας / Ημέρα“, το στοιχείο „MM/DD/YY“ υποδεικνύει την διψήφια
ένδειξη ημερομηνίας με σειρά „Μήνας / Ημέρα / Έτος“ και το στοιχείο
„DD/MM/YY“ υποδεικνύει την διψήφια ένδειξη ημερομηνίας με σειρά „Ημέρα /
Μήνας / Έτος“.
Επιβεβαιώστε την επιλογή σας με το πλήκτρο
/ . Στη συνέχεια η ένδειξη
επιστρέφει στη λίστα των στοιχείων μενού.
Auto Power Off (Αυτόματη απενεργοποίηση ισχύος)
Όταν καλείτε αυτή τη λειτουργία μενού, μπορείτε στη συνέχεια να επιλέξετε με
τα πλήκτρα ▲▼
/ , εάν η συσκευή θα απενεργοποιείται αυτόματα μετά από
αδράνεια „1 Min“, „3 Min“ ή „5 Min“. Όταν επιλέγετε το „Off“, η συσκευή δεν θα
απενεργοποιείται αυτόματα. Επιβεβαιώστε την επιλογή σας με το πλήκτρο /
. Στη συνέχεια η ένδειξη επιστρέφει στη λίστα των στοιχείων μενού.
Impact sensor (Αισθητήρας πρόσκρουσης)
Όταν καλείτε αυτή τη λειτουργία μενού, μπορείτε στη συνέχεια με τα πλήκτρα ▲▼
/ να επιλέξετε την ευαισθησία του τοποθετημένου αισθητήρα πρόσκρουσης:
Είναι στη διάθεσή σας τα „Very low“, „Low“, „Middle“, „High“ και „Very high“.
Αυτή η λειτουργία προστατεύει την τρέχουσα εν λειτουργία εγγραφή βίντεο σε
αναγνώριση δόνησης, η οποία είναι πιθανή σε περίπτωση ατυχήματος, αυτόματα
έναντι επεγγραφής στον ατέρμονο βρόχο. Επιβεβαιώστε την επιλογή σας με το
πλήκτρο / . Στη συνέχεια η ένδειξη επιστρέφει στη λίστα των στοιχείων
μενού.
Beep sound (Ήχος μπιπ)
Όταν καλείτε αυτή τη λειτουργία μενού, μπορείτε στη συνέχεια να επιλέξετε με τα
πλήκτρα ▲▼
/ , εάν η συσκευή θα επιβεβαιώνει με ακουστικά σήματα την
πίεση των πλήκτρων, καθώς και την ενεργοποίηση και απενεργοποίηση („On“),
ή όχι („Off“). Επιβεβαιώστε την επιλογή σας με το πλήκτρο / . Στη συνέχεια η ένδειξη επιστρέφει στη λίστα των στοιχείων μενού.
Page 67

64
CR 5 A1
GR
CY
Auto display off (Αυτόματη απενεργοποίηση οθόνης)
Όταν καλείτε αυτή τη λειτουργία μενού, μπορείτε στη συνέχεια να επιλέξετε με τα
πλήκτρα ▲▼
/ τη χρονική περίοδο, μετά τη λήξη της οποίας θα απενεργοποιηθεί αυτόματα η οθόνη: Μπορείτε να επιλέξετε μεταξύ των „1 Min.“, „3 Min.“
και „5 Min.“. Επιλέξτε το „Display always on“, εάν δεν πρέπει να απενεργοποιηθεί
η οθόνη. Για να ενεργοποιήσετε πάλι την οθόνη μετά την αυτόματη απενεργοποίηση, πατήστε ένα από τα πλήκτρα ▲▼ / , το πλήκτρο MODE ή το
πλήκτρο
/ .
Language (Γλώσσα)
Όταν καλείτε αυτή τη λειτουργία μενού, μπορείτε στη συνέχεια να επιλέξετε με
τα πλήκτρα ▲▼
/ „English“ ή „Deutsch“ ως γλώσσα για τα μενού οθόνης.
Επιβεβαιώστε την επιλογή σας με το πλήκτρο / . Στη συνέχεια η ένδειξη
επιστρέφει στη λίστα των στοιχείων μενού.
Display icon rotation (Περιστροφή εικονιδίου οθόνης)
Όταν καλείτε αυτή τη λειτουργία μενού, μπορείτε στη συνέχεια να ρυθμίσετε με
τα πλήκτρα ▲▼
/ , εάν η προβολή των συμβόλων οθόνης και των μενού θα
προβάλλεται κανονικά („Off“) ή με περιστροφή κατά 180° („On“). Η λογικότερη
ρύθμιση εδώ εξαρτάται από το πώς έχετε τοποθετήσει την κάμερα.
Format memory card (Διαμόρφωση κάρτας μνήμης)
Όταν καλείτε αυτή τη λειτουργία μενού, μπορείτε στη συνέχεια με τα πλήκτρα ▲▼
/ να μορφοποιήσετε την τοποθετημένη κάρτα Micro-SD. Σε αυτή τη διαδικασία χάνονται ανέκκλητα όλα τα δεδομένα στην κάρτα Micro-SD, ακόμα και
αυτά με προστασία έναντι διαγραφής. Για να διεξάγετε τη μορφοποίηση, επιλέξτε
με τα πλήκτρα ▲▼ / το „OK“ και πατήστε το πλήκτρο / . Αμέσως
διεξάγεται η μορφοποίηση.
Default setting (Προεπιλεγμένες ρυθμίσεις)
Όταν καλείτε αυτή τη λειτουργία μενού, μπορείτε στη συνέχεια να επαναφέρετε
όλες τις ρυθμίσεις της συσκευής στις εργοστασιακές ρυθμίσεις. Επιλέξτε με τα
πλήκτρα ▲▼
/ το „OK“ και επιβεβαιώστε την επιλογή σας με το πλήκτρο
/ . Στη συνέχεια η ένδειξη επιστρέφει στη λίστα των στοιχείων μενού.
Όλες οι ρυθμίσεις που είχατε εκτελέσει πρωτύτερα, τώρα επανέρχονται στις
εργοστασιακές ρυθμίσεις.
Για να κλείσετε το μενού εγκατάστασης, πατήστε το πλήκτρο MENU
.
Page 68

65
CR 5 A1
GR
CY
Ετοιμότητα εγγραφής βίντεο
Στην ετοιμότητα εγγραφής βίντεο, η οθόνη προβάλει την εξής επισκόπηση:
A – Ένδειξη της υπολειπόμενης διάρκειας εγγραφής σύμφωνα με την ανάλυση
και το διαθέσιμο χώρο αποθήκευσης
B – Τρέχουσα ανάλυση βίντεο
C – Σύμβολο για την τοποθετημένη κάρτα Micro-SD
D – Ένδειξη κατάστασης φόρτισης του εσωτερικού συσσωρευτή συσκευής
E – Ένδειξη ημερομηνίας (μόνο σε ενεργοποιημένη λειτουργία „Σφραγίδα
χρόνου & ημερομηνίας“)
E – Ένδειξη ώρας (μόνο σε ενεργοποιημένη λειτουργία „Σφραγίδα χρόνου &
ημερομηνίας“)
G – Σύμβολο για την αναγνώριση κίνησης (ορατό μόνο όταν είναι ενεργοποιημένη
η λειτουργία)
H – Σύμβολο για την εγγραφή σε ατέρμονο βρόχο καθώς και η διάρκεια σε
λεπτά (εδώ 3 λεπτά)
I – Ένδειξη για τη διόρθωση φωτισμού
J – Σύμβολο για την ετοιμότητα εγγραφής βίντεο
K – Αναβοσβήνει μια κόκκινη τελεία κατά τη διάρκεια της εγγραφής
L – Σύμβολο για ένα αρχείο με προστασία έναντι διαγραφής
Έναρξη/Τερματισμός εγγραφής
Πατήστε εφόσον απαιτείται επανειλημμένα το πλήκτρο ▲ για να ζουμάρετε
το μοτίβο. Κρατήστε αυτό το πλήκτρο πατημένο για γρήγορο ζουμάρισμα.
Με το πλήκτρο ▼ μπορείτε με τον ίδιο τρόπο να ξεζουμάρετε. Πατήστε το
πλήκτρο / για να εκκινήσετε την εγγραφή βίντεο. Κατά τη διάρκεια της
εγγραφής βίντεο αναβοσβήνει η ένδειξη λειτουργίας με πράσινο και κόκκινο.
Πιέστε αυτό το πλήκτρο εκ νέου για να τερματίσετε την εγγραφή.
Εάν κατά την εγγραφή πατήσετε το πλήκτρο MODE
, εμφανίζεται το σύμβολο
και η τρέχουσα εγγραφή προστατεύεται έναντι διαγραφής.
Page 69

66
CR 5 A1
GR
CY
ΥΠΟΔΕΙΞΗ
►
Μόλις η κάμερα τροφοδοτηθεί μέσω του δικτύου οχήματος, αρχίζει η
εγγραφή. Για να τερματίσετε την εγγραφή, πατήστε το πλήκτρο / .
Εάν πιέσετε στην ετοιμότητα εγγραφής βίντεο το πλήκτρο MENU
, ανοίγει το
ακόλουθο μενού:
Motion detection
Με τα πλήκτρα ▲▼ / μπορείτε να μετατοπίσετε τη μπάρα επιλογής στην
επιθυμητή καταχώρηση και στη συνέχεια να καλέσετε αυτή τη λειτουργία μενού
με το πλήκτρο / . Για να αποχωρήσετε από το στοιχείο μενού που έχετε
καλέσει χωρίς αλλαγή, πατήστε το πλήκτρο MODE . Κάτω δεξιά προβάλλεται
ο τρέχων πίνακας μενού, καθώς και ο συνολικός αριθμός των πινάκων μενού.
Εάν επιλεγεί η κατώτερη καταχώρηση μενού σε έναν πίνακα μενού, στον οποίο
ακολουθεί και άλλος πίνακας, πατήστε το πλήκτρο ▼ για να μεταπηδήσετε
στην πρώτη καταχώρηση στον ακόλουθο πίνακα μενού. Για να κλείσετε το μενού,
πατήστε το πλήκτρο MENU .
Resolution (Ανάλυση)
Καλώντας αυτή τη λειτουργία μενού, μπορείτε στη συνέχεια να καθορίσετε το
μέγεθος εικόνας βίντεο: Είναι διαθέσιμες οι επιλογές „1920x1080P (HD)“,
„1280 x 720P“ και „640 x 480P“. Επιλέξτε με τα πλήκτρα ▲▼
/ την
επιθυμητή ανάλυση και επιβεβαιώστε την επιλογή σας με το πλήκτρο / ,
ώστε να επιστρέψετε μετά στη λίστα των στοιχείων μενού.
Exposure (Έκθεση)
Όταν καλείτε αυτή τη λειτουργία μενού, μπορείτε στη συνέχεια να διορθώσετε το
φωτισμό βίντεο σε τρία βήματα προς τα επάνω (από +1 έως +3, φωτεινότερη), ή
προς τα κάτω (από -1 έως -3, σκοτεινότερη). Στη ρύθμιση "0" δεν λαμβάνει χώρα
διόρθωση φωτισμού. Επιλέξτε με τα πλήκτρα ▲▼
/ την επιθυμητή διόρθωση
φωτισμού βίντεο και επιβεβαιώστε την επιλογή σας με το πλήκτρο / ,
ώστε να επιστρέψετε μετά στη λίστα των στοιχείων μενού.
Video length (Διάρκεια βίντεο)
Όταν καλείτε αυτή τη λειτουργία μενού, μπορείτε στη συνέχεια να καθορίσετε
τη διάρκεια του ατέρμονου βρόχου για την εγγραφή βίντεο: Είναι διαθέσιμες
οι επιλογές „3 Min“, „5 Min“, „10 Min“ ή „Loop recording off“. Επιλέξτε με τα
πλήκτρα ▲▼
/ την επιθυμητή τιμή για την εγγραφή βρόχου και επιβεβαιώστε
την επιλογή σας με το πλήκτρο / , ώστε να επιστρέψετε μετά στη λίστα
των στοιχείων μενού.
Page 70

67
CR 5 A1
GR
CY
Λάβετε εδώ υπόψη ότι η χρησιμοποιούμενη κάρτα Micro-SD, ανάλογα με το
ρυθμισμένο μέγεθος εικόνας βίντεο, πρέπει να έχει επαρκή χωρητικότητα, ώστε
να επιτευχθεί η επιθυμητή διάρκεια του ατέρμονου βρόχου. Όταν επιλέγετε „Loop
recording off“, τερματίζεται η εγγραφή κατά την επίτευξη του ορίου χωρητικότητας
της κάρτας Micro-SD. Όταν επιτευχθεί το τέλος της εγγραφής, η συσκευή εκκινεί
μια νέα εγγραφή με τη ρυθμισμένη διάρκεια.
Εάν δεν επαρκεί η χωρητικότητα της τοποθετημένης κάρτας μνήμης για τη ρυθμισμένη διάρκεια του ατέρμονου βρόχου, διακόπτεται η εγγραφή. Μειώστε τότε
τη διάρκεια του ατέρμονου βρόχου ή χρησιμοποιήστε μια κάρτα μνήμης με
μεγαλύτερη χωρητικότητα.
Motion detection (Ανίχνευση κίνησης)
Όταν καλείτε αυτή τη λειτουργία μενού, μπορείτε στη συνέχεια να την ενεργοποιήσετε ή απενεργοποιήστε με τα πλήκτρα ▲▼
/ . Επιβεβαιώστε την επιλογή
σας με το πλήκτρο / για να επιστρέψετε στη συνέχεια στα στοιχεία μενού.
Σε ενεργοποιημένη λειτουργία η συσκευή τερματίζει την εγγραφή βίντεο αυτόματα,
όταν δεν γίνεται άλλη εγγραφή κινούμενων εικόνων. Εάν η συσκευή καταγράφει
πάλι κινήσεις, ξεκινά αυτόματα με μια νέα εγγραφή. Σε απενεργοποιημένη λειτουργία, η συσκευή δεν διακόπτει την εγγραφή όταν δεν εμφανίζονται κινήσεις.
ΥΠΟΔΕΙΞΗ
►
Θα πρέπει να ενεργοποιήσετε αυτή τη λειτουργία μόνο όσο το όχημα είναι
σταθμευμένο, ώστε π.χ. να κινηματογραφήσετε αυτόματα μια απόπειρα
κλοπής ή το όχημα ενός αντίδικου μετά από μια σύγκρουση.
► Η πρώτη εγγραφή πρέπει να εκκινηθεί χειροκίνητα σε ενεργοποιημένη
λειτουργία.
Audio recording (Εγγραφή ήχου)
Όταν καλείτε αυτή τη λειτουργία μενού, μπορείτε στη συνέχεια να ενεργοποιήσετε
ή απενεργοποιήστε την εγγραφή ήχου μέσω του ενσωματωμένου μικροφώνου με
τα πλήκτρα ▲▼
/ . Επιβεβαιώστε την επιλογή σας με το πλήκτρο /
για να επιστρέψετε στη συνέχεια στα στοιχεία μενού.
Page 71

68
CR 5 A1
GR
CY
Ετοιμότητα λήψης φωτογραφίας
Σε κλειστό μενού πατήστε στην ετοιμότητα εγγραφής βίντεο το πλήκτρο MODE ,
ώστε να γίνει εναλλαγή στην ετοιμότητα λήψης φωτογραφίας. Η συσκευή προβάλει
στη συνέχεια την εξής επισκόπηση στην οθόνη
:
A – Ένδειξη του αριθμού φωτογραφιών που μπορούν ακόμα να ληφθούν,
σύμφωνα με την ανάλυση και το διαθέσιμο χώρο αποθήκευσης.
B – Τρέχουσα ανάλυση φωτογραφίας
C – Σύμβολο για την τοποθετημένη κάρτα Micro-SD
D – Ένδειξη κατάστασης φόρτισης του εσωτερικού συσσωρευτή συσκευής
E – Ένδειξη ημερομηνίας (μόνο σε ενεργοποιημένη λειτουργία „Σφραγίδα
χρόνου & ημερομηνίας“)
F – Ένδειξη ώρας (μόνο σε ενεργοποιημένη λειτουργία „Σφραγίδα χρόνου &
ημερομηνίας“)
G – Σύμβολο για την αυτόματη ενεργοποίηση (εδώ 5 δευτερόλεπτα, ορατό μόνο
όταν είναι ενεργοποιημένη η λειτουργία)
H – Σύμβολο για τη διόρθωση φωτισμού
I – Ένδειξη για την ετοιμότητα λήψης φωτογραφίας
J – Ένδειξη για τη λειτουργία συνεχούς προώθησης (ορατό μόνο όταν είναι
ενεργοποιημένη η λειτουργία)
Λήψη φωτογραφίας
Πατήστε εφόσον απαιτείται επανειλημμένα το πλήκτρο ▲ για να ζουμάρετε
το μοτίβο. Κρατήστε αυτό το πλήκτρο πατημένο για γρήγορο ζουμάρισμα. Με
το πλήκτρο ▼ μπορείτε με τον ίδιο τρόπο να ξεζουμάρετε. Πατήστε το πλήκτρο / για να βγάλετε μια φωτογραφία.
Εάν πιέσετε στην ετοιμότητα λήψης φωτογραφίας το πλήκτρο MENU
, ανοίγει
το ακόλουθο μενού:
Page 72

69
CR 5 A1
GR
CY
Με τα πλήκτρα ▲▼ / μπορείτε να μετατοπίσετε τη μπάρα επιλογής στην
επιθυμητή καταχώρηση και στη συνέχεια να καλέσετε αυτή τη λειτουργία μενού
με το πλήκτρο
/ . Για να αποχωρήσετε από το στοιχείο μενού που έχετε
καλέσει χωρίς αλλαγή, πατήστε το πλήκτρο MODE . Κάτω δεξιά προβάλλεται
ο τρέχων πίνακας μενού, καθώς και ο συνολικός αριθμός των πινάκων μενού.
Εάν επιλεγεί η κατώτερη καταχώρηση μενού σε έναν πίνακα μενού, στον οποίο
ακολουθεί και άλλος πίνακας, πατήστε το πλήκτρο ▼ για να μεταπηδήσετε
στην πρώτη καταχώρηση στον ακόλουθο πίνακα μενού. Για να κλείσετε το μενού,
πατήστε το πλήκτρο MENU
.
Resolution (Ανάλυση)
Όταν καλείτε αυτή τη λειτουργία μενού, μπορείτε στη συνέχεια με τα πλήκτρα ▲▼
/ να ρυθμίσετε το επιθυμητό μέγεθος των φωτογραφιών: Είναι διαθέσιμες οι
επιλογές „12MP (interp.*)“, „7MP (interp.*)“, „5MP“, „3MP“, „2MP“, „1,3MP“
ή „0,3MP“. Το „MP“ σημαίνει Mega-Pixel, π.χ. η ρύθμιση „5MP“ δημιουργεί μια
εικόνα 2592 × 1944 εικονοστοιχείων, που αντιστοιχούν περίπου σε 5 εκατομμύρια εικονοστοιχεία. Όσο μεγαλύτερες είναι οι εικόνες, τόσο υψηλότερη είναι η λεπτομερής πυκνότητα. Ωστόσο, η κάρτα Micro-SD επιτυγχάνει σε υψηλό μέγεθος
εικόνας νωρίτερα το όριο χωρητικότητας της. Επιβεβαιώστε την επιλογή σας με
το πλήκτρο / για να επιστρέψετε στη συνέχεια στα στοιχεία μενού.
* Παρεμβολή = αριθμητική αύξηση της ποσότητας εικονοστοιχείων
Exposure (Έκθεση)
Όταν καλείτε αυτή τη λειτουργία μενού, μπορείτε στη συνέχεια να διορθώσετε το
φωτισμό φωτογραφίας σε τρία βήματα προς τα επάνω (από +1 έως +3, φωτεινότερη), ή προς τα κάτω (από –1 έως – 3, σκοτεινότερη). Επιλέξτε με τα πλήκτρα
▲▼
/ την επιθυμητή διόρθωση φωτισμού φωτογραφίας και επιβεβαιώστε
την επιλογή σας με το πλήκτρο / , ώστε να επιστρέψετε μετά στη λίστα
των στοιχείων μενού.
3 photos in series (3 φωτογραφίες σε σειρά)
Όταν καλείτε αυτή τη λειτουργία μενού, μπορείτε στη συνέχεια να ενεργοποιήσετε
ή απενεργοποιήστε με τα πλήκτρα ▲▼
/ αυτή τη λειτουργία για τη λήψη
3 φωτογραφιών σε γρήγορη αλληλουχία. Επιβεβαιώστε την επιλογή σας με το
πλήκτρο / για να επιστρέψετε στη συνέχεια στα στοιχεία μενού.
Self-timer (Χρονοδιακόπτης)
Όταν καλείτε αυτή τη λειτουργία μενού, μπορείτε στη συνέχεια με τα πλήκτρα ▲▼
/ να ρυθμίσετε μια επιβράδυνση ενεργοποίησης 2, 5 ή 10 δευτερολέπτων.
Η φωτογραφία λαμβάνεται μόνο με τη ρυθμισμένη επιβράδυνση μετά από το
πάτημα του πλήκτρου / . Επιλέξτε το „direct capture“ για να απενεργοποιήσετε την επιβράδυνση ενεργοποίησης. Επιβεβαιώστε την επιλογή σας με το
πλήκτρο / για να επιστρέψετε στη συνέχεια στα στοιχεία μενού.
Page 73

70
CR 5 A1
GR
CY
Λειτουργία αναπαραγωγής
Σε κλειστό μενού πατήστε στην ετοιμότητα λήψης φωτογραφίας το πλήκτρο
MODE
, ώστε να γίνει εναλλαγή στην λειτουργία αναπαραγωγής. Με τα
πλήκτρα ▲/▼ / μπορείτε να εναλλάσσεστε στις αποθηκευμένες εγγραφές.
Όταν επιλέξετε μια φωτογραφία και πατήσετε το πλήκτρο / , προβάλλονται όλες οι αποθηκευμένες φωτογραφίες σε μια ατέρμονη προβολή διαφανειών.
Πατήστε το πλήκτρο
/ ξανά, για να τερματίσετε την προβολή διαφανειών.
Όταν επιλέξετε ένα βίντεο και πατήσετε το πλήκτρο / , θα αναπαραχθεί
το βίντεο.
Όταν επιλέξετε μια φωτογραφία, η οθόνη
προβάλει αυτή την επισκόπηση:
A – Ένδειξη του τρέχοντος αριθμού λήψης/συνολικού αριθμού λήψεων
B – Ανάλυση των ήδη επιλεγμένων φωτογραφιών
C – Ένδειξη κατάστασης φόρτισης του εσωτερικού συσσωρευτή συσκευής
D – Σφραγίδα ημερομηνίας/ώρας
E – Σύμβολο για τη λειτουργία αναπαραγωγής
F – Σύμβολο για ένα αρχείο με προστασία έναντι διαγραφής
Εάν πιέσετε τώρα το πλήκτρο MENU
, ανοίγει το ακόλουθο μενού:
Delete
Με τα πλήκτρα ▲▼ / μπορείτε να μετατοπίσετε τη μπάρα επιλογής στην
επιθυμητή καταχώρηση και στη συνέχεια να καλέσετε αυτή τη λειτουργία μενού
με το πλήκτρο / . Για να αποχωρήσετε από το στοιχείο μενού που έχετε
καλέσει χωρίς αλλαγή, πατήστε το πλήκτρο MODE . Κάτω δεξιά προβάλλεται
ο τρέχων πίνακας μενού, καθώς και ο συνολικός αριθμός των πινάκων μενού.
Για να κλείσετε το μενού, πατήστε το πλήκτρο MENU .
Page 74

71
CR 5 A1
GR
CY
Delete (Διαγραφή)
Όταν καλείτε αυτή τη λειτουργία μενού, μπορείτε στη συνέχεια με τα πλήκτρα ▲▼
/ να διαγράψετε την μόλις επιλεγμένη εικόνα („Delete this file“), „Delete all
files“ ή „Cancel“. Επιβεβαιώστε την επιλογή σας με το πλήκτρο / .
Εάν επιβεβαιώσετε την επακόλουθη ερώτηση ασφαλείας με το „OK“, διεξάγεται
η επιλεγμένη λειτουργία διαγραφής και κλείνει το μενού. Εάν αντίθετα εμφανιστεί
το „The file is write-protected“, πρέπει πρώτα να ακυρώσετε την προστασία με τη
λειτουργία που περιγράφεται στο απόσπασμα „Write protection“.
Write protection (Προστασία εγγραφής)
Εάν καλέσετε αυτή τη λειτουργία μενού, μπορείτε στη συνέχεια με τα πλήκτρα ▲▼
/ να επιλέξετε εάν το μόλις επιλεγμένο αρχείο θα πρέπει να προστατευθεί
από διαγραφή („Write-protect this file“), εάν η προστασία του μόλις επιλεγμένου
αρχείου πρέπει να ακυρωθεί („Unlock this file“), εάν πρέπει να προστατευθούν
όλα τα αρχεία έναντι διαγραφής („Write-protect all files“) ή εάν πρέπει να ακυρωθεί
η προστασία όλων των αρχείων έναντι διαγραφής („Unlock all files“).
Επιβεβαιώστε την επιλογή σας με το πλήκτρο / . Στη συνέχεια η ένδειξη
επιστρέφει στη λίστα των στοιχείων μενού.
ΥΠΟΔΕΙΞΗ
►
Η χρήση αυτών των λειτουργιών σε πλήθος αρχείων μπορεί να διαρκεί
μερικά δευτερόλεπτα.
Εάν επιλέξετε με τα πλήκτρα ▲/▼
/ ένα βίντεο, η οθόνη προβάλει αυτή
την επισκόπηση:
A – Ένδειξη του τρέχοντος αριθμού εγγραφής/συνολικού αριθμού εγγραφών
B – Ευκρίνεια του μόλις επιλεγμένου βίντεο
C – Διάρκεια του βίντεο
D – Ένδειξη κατάστασης φόρτισης του εσωτερικού συσσωρευτή συσκευής
E – Σύμβολο λειτουργίας για το πλήκτρο MODE
: Σταμάτημα αναπαραγωγής
βίντεο ή φωτογραφιών
F – Σύμβολο λειτουργίας για το πλήκτρο / : Εκκίνηση/Σταμάτημα
αναπαραγωγής βίντεο ή φωτογραφιών
G – Σύμβολο για τη λειτουργία αναπαραγωγής
Η – Σύμβολο για ένα αρχείο με προστασία έναντι διαγραφής
Page 75

72
CR 5 A1
GR
CY
Εάν πιέσετε τώρα το πλήκτρο MENU , ανοίγει το ακόλουθο μενού:
Delete
Με τα πλήκτρα ▲▼ / μπορείτε να μετατοπίσετε τη μπάρα επιλογής στην
επιθυμητή καταχώρηση και στη συνέχεια να καλέσετε αυτή τη λειτουργία μενού
με το πλήκτρο / . Για να αποχωρήσετε από το στοιχείο μενού που έχετε
καλέσει χωρίς αλλαγή, πατήστε το πλήκτρο MODE . Για να κλείσετε το μενού,
πατήστε το πλήκτρο MENU .
Delete (Διαγραφή)
Όταν καλείτε αυτή τη λειτουργία μενού, μπορείτε στη συνέχεια με τα πλήκτρα ▲▼
/ να διαγράψετε το μόλις επιλεγμένο βίντεο („Delete this file“), „Delete all
files“ ή „Cancel“. Επιβεβαιώστε την επιλογή σας με το πλήκτρο / .
Εάν επιβεβαιώσετε την επακόλουθη ερώτηση ασφαλείας με το „OK“, διεξάγεται
η επιλεγμένη λειτουργία διαγραφής και κλείνει το μενού. Εάν αντίθετα εμφανιστεί
το „This file is write-protected“, πρέπει πρώτα να ακυρώσετε την προστασία με τη
λειτουργία που περιγράφεται στο απόσπασμα „Write protection“.
Write protection (Προστασία εγγραφής)
Εάν καλέσετε αυτή τη λειτουργία μενού, μπορείτε στη συνέχεια με τα πλήκτρα ▲▼
/ να επιλέξετε εάν το μόλις επιλεγμένο αρχείο θα πρέπει να προστατευθεί
από διαγραφή („Write-protect this file“), εάν η προστασία του μόλις επιλεγμένου
αρχείου πρέπει να ακυρωθεί („Unlock this file“), εάν πρέπει να προστατευθούν
όλα τα αρχεία έναντι διαγραφής („Write-protect all files“) ή εάν πρέπει να
ακυρωθεί η προστασία όλων των αρχείων έναντι διαγραφής („Unlock all files“).
Επιβεβαιώστε την επιλογή σας με το πλήκτρο / . Στη συνέχεια η ένδειξη
επιστρέφει στη λίστα των στοιχείων μενού.
ΥΠΟΔΕΙΞΗ
►
Η χρήση αυτών των λειτουργιών σε πλήθος αρχείων μπορεί να διαρκεί
μερικά δευτερόλεπτα.
Προβολή εγγραφών σε εξωτερική οθόνη
ΥΠΟΔΕΙΞΗ
►
Η κάμερα μπορεί να μεταφέρει την εικόνα βίντεο σε μια εξωτερική οθόνη ή
στην είσοδο βίντεο μιας συσκευής τηλεόρασης. Προσέξτε επ' αυτού και τις
οδηγίες της εκάστοτε συσκευής αναπαραγωγής.
♦ Για αυτό συνδέστε μια κατάλληλη οθόνη μέσω του εσώκλειστου καλωδίου
AV στην υποδοχή σύνδεσης AV . Σε αυτόν τον τύπο σύνδεσης μεταφέρεται επίσης η ζωντανή εικόνα της κάμερας.
Page 76

73
CR 5 A1
GR
CY
♦ Εναλλακτικά μπορείτε επίσης να ανοίξετε στα πλάγια το κάλυμμα και να
συνδέσετε την υποδοχή σύνδεσης Mini-HDMI της κάμερας μέσω ενός
καλωδίου Mini-HDMI (δεν αποστέλλεται μαζί) με μια κατάλληλη οθόνη.
Σε αυτόν τον τύπο σύνδεσης μεταφέρονται μόνο τα αποθηκευμένα βίντεο.
Η ενσωματωμένη οθόνη απενεργοποιείται τότε και ανάβει μόνο η πράσινη
ένδειξη λειτουργίας.
♦ Εκκινήστε την αναπαραγωγή.
Μεταφορά εγγραφών σε έναν υπολογιστή
Τοποθετήστε το βύσμα Mini-USB του απεσταλμένου καλωδίου USB στην
υποδοχή σύνδεσης της κάμερας και το βύσμα USB σε μια ελεύθερη
υποδοχή σύνδεσης USB ενός ενεργοποιημένου υπολογιστή. Αυτός αναγνωρίζει
τώρα τη συσκευή ως "Μαζική μνήμη", στη συνέχεια συνδέεται η κάμερα με τον
υπολογιστή και κατόπιν εμφανίζεται το περιεχόμενο της κάρτας Micro-SD στην
κάμερα ως νέα μονάδα δίσκου στον υπολογιστή. Διεξάγετε στη συνέχεια τις
επιθυμητές λειτουργίες αρχείων.
Επαναφορά της συσκευής
Εάν η συσκευή δε λειτουργεί όπως περιγράφεται σε αυτές τις οδηγίες ή εάν δεν
αντιδρά στους χειρισμούς σας, πατήστε με ένα αιχμηρό αντικείμενο, π.χ. με έναν
συνδετήρα, προσεκτικά στο διακόπτη πίσω από το άνοιγμα RESET
στο περί-
βλημα, ώστε να την εκκινήσετε εκ νέου.
Αλλαγή ασφάλειας
Στον αντάπτορα οχήματος υπάρχει μια ασφάλεια. Εάν η συσκευή δε λειτουργεί,
μπορεί η ασφάλεια να είναι ελαττωματική. Αντικαταστήστε την τότε με μια εφεδρική
ασφάλεια του ίδιου τύπου (βλ. επίσης το Κεφάλαιο Τεχνικά χαρακτηριστικά).
♦ Για αυτό τραβήξτε τον αντάπτορα οχήματος από την υποδοχή αναπτήρα.
♦ Ανοίξτε τον αντάπτορα οχήματος , ξεβιδώνοντας προσεκτικά αριστε-
ρόστροφα το αυλακωτό βιδωτό ένθεμα (C) ενδεχομένως με μια πένσα και
απομακρύνοντας το.
♦ Τώρα αφαιρέστε την ακμή βύσματος (Β) από την ασφάλεια (Α), βγάλτε έξω
την ασφάλεια (Α) και φυλάξτε την.
♦ Τοποθετήστε τώρα τη νέα ασφάλεια στον αντάπτορα οχήματος , τοπο-
θετήστε την ακμή του βύσματος (Β) επάνω στο άκρο της ασφάλειας που
προεξέχει ελαφρώς και βιδώστε πάλι το βιδωτό ένθεμα (C) που απομακρύνατε προηγουμένως.
Page 77

74
CR 5 A1
GR
CY
ΥΠΟΔΕΙΞΗ
►
Εάν η συσκευή συνεχίζει να μη λειτουργεί ή εάν καεί και η επόμενη ασφάλεια, η συσκευή είναι ελαττωματική. Σε αυτήν την περίπτωση απευθυνθείτε
στην ανοικτή τηλεφωνική γραμμή εξυπηρέτησης (βλ. Κεφάλαιο Σέρβις).
Καθαρισμός
ΠΡΟΣΟΧΗ
Ζημιά στη συσκευή!
► Βεβαιωθείτε ότι κατά τον καθαρισμό δεν εισέρχεται υγρασία μέσα στη
συσκευή, ώστε να αποφύγετε ανεπανόρθωτη ζημιά της.
■ Καθαρίζετε τις επιφάνειες της συσκευής με ένα απαλό, στεγνό πανί.
Σε επίμονους ρύπους χρησιμοποιείτε απορρυπαντικά του εμπορίου και
νερό. Προσέχετε ώστε να μην διεισδύει νερό μέσα στη συσκευή.
Διόρθωση σφαλμάτων
Σε αυτό το κεφάλαιο λαμβάνετε σημαντικές υποδείξεις για τον εντοπισμό και τη
διόρθωση βλαβών. Προσέξτε τις υποδείξεις για να αποφύγετε κινδύνους και
φθορές.
ΠΡΟΕΙΔΟΠΟΙΗΣΗ
Τηρείτε τις ακόλουθες υποδείξεις ασφαλείας, ώστε να αποφεύγετε κινδύνους
και υλικές ζημιές:
► Επισκευές στις ηλεκτρικές συσκευές επιτρέπεται να πραγματοποιούνται
μόνο από εξειδικευμένα άτομα, τα οποία έχουν εκπαιδευτεί από τον
κατασκευαστή. Εξαιτίας επισκευών μη σύμφωνων με τους κανονισμούς
μπορεί να προκύψουν σημαντικοί κίνδυνοι για το χρήστη και φθορές στη
συσκευή.
Page 78

75
CR 5 A1
GR
CY
Αιτίες σφαλμάτων και διόρθωση
Ο επόμενος πίνακας βοηθά στον εντοπισμό και στη διόρθωση μικρότερων
βλαβών:
Σφάλμα Πιθανή αιτία Διόρθωση
Η κάμερα δεν λειτουργεί
μέσω του ενσωματωμένου
συσσωρευτή.
Ο συσσωρευτής
είναι αποφορτισμένος.
Φορτίστε τον ενσωματωμένο συσσωρευτή
με τη βοήθεια ενός συνδεδεμένου με
την
υποδοχή σύνδεσης της
συσκευής και ενεργοποιημένου υπολογιστή ή με το δίκτυο ενός οχήματος.
Η κάμερα δεν λειτουργεί
στο όχημα.
Η μπαταρία
οχήματος είναι
αποφορτισμένη.
Φορτίστε τη μπαταρία του οχήματος.
Η ασφάλεια στον
αντάπτορα οχήματος
είναι
ελαττωματική.
Αντικαταστήστε την ασφάλεια (βλ.
Κεφάλαιο Αλλαγή ασφάλειας).
Η κάμερα δεν καταγράφει κατά τη διαδρομή
σωστά.
Προκύπτουν
βλάβες με τον
ενσωματωμένο
αισθητήρα
κίνησης.
Ενεργοποιήστε τον ενσωματωμένο αισθητήρα κίνησης (Λειτουργία „Motion
detection“ στο μενού εγκατάστασης)
μόνο σε σταθμευμένο όχημα.
Αυξήστε την ευαισθησία του αισθητήρα
κίνησης.
Η συσκευή δεν αντιδρά
καθόλου ή όχι όπως
αναμένεται κατά το χειρισμό της.
Υπάρχει κάποια
βλάβη.
Με ένα λεπτό αντικείμενο πατήστε
προσεκτικά στο διακόπτη πίσω από το
άνοιγμα RESET
στο περίβλημα, ώστε
να την εκκινήσετε εκ νέου.
Η βεντούζα δεν πιάνει
καλά.
Η χρησιμοποιούμενη επιφάνεια
δεν είναι καθαρή.
Καθαρίστε την επιφάνεια. Μπορείτε να
αυξήσετε την απορροφητικότητα υγραίνοντας τη βεντούζα.
ΥΠΟΔΕΙΞΗ
►
Εάν δεν μπορείτε να λύσετε το πρόβλημα με τα ανωτέρω βήματα, απευθυνθείτε
στο τμήμα εξυπηρέτησης πελατών.
Page 79

76
CR 5 A1
GR
CY
Αποθήκευση / Απόρριψη
Αποθήκευση
Εάν δεν πρόκειται να χρησιμοποιήσετε τη συσκευή για μεγάλο χρονικό διάστημα,
αποθηκεύστε την σε ένα καθαρό, στεγνό σημείο χωρίς απευθείας ηλιακή ακτινοβολία. Σε αυτή την περίπτωση πρέπει να φορτίζετε τον ενσωματωμένο συσσωρευτή
από καιρού εις καιρόν.
Απόρριψη συσκευής
Το παρακείμενο σύμβολο ενός διαγραμμένου κάδου απορριμμάτων σε ρόδες
δείχνει ότι αυτή η συσκευή υπόκειται στην Οδηγία 2012/19/ΕU. Σύμφωνα με
αυτήν την Οδηγία δεν επιτρέπεται να απορρίψετε αυτή τη συσκευή μετά τη χρήση
της στα κανονικά οικιακά απορρίμματα, αλλά σε ειδικά διαμορφωμένα σημεία
συλλογής, κέντρα ανακυκλώσιμων υλικών ή επιχειρήσεις απόρριψης.
Ο ενσωματωμένος συσσωρευτής δεν μπορεί να απομακρυνθεί.
Αυτή η απόρριψη είναι δωρεάν. Φροντίζετε το περιβάλλον και
απορρίπτετε τα διάφορα υλικά σωστά.
Μπορείτε να λάβετε περισσότερες πληροφορίες από τον τοπικό φορέα διαχείρισης
απορριμμάτων ή τη δημοτική ή κοινοτική διοίκηση σας.
Παράρτημα
Υποδείξεις για τη Δήλωση συμμόρφωσης
Αυτή η συσκευή αντιστοιχεί αναφορικά με τη συμφωνία στις βασικές απαιτήσεις και τις άλλες σχετικές προδιαγραφές της Ευρωπαϊκής Οδηγίας για την
ηλεκτρομαγνητική συμβατότητα 2004/108/EC, καθώς και της Οδηγίας RoHS
2011/65/EU (Σχετικά με τον περιορισμό της χρήσης ορισμένων επικίνδυνων
ουσιών σε είδη ηλεκτρικού και ηλεκτρονικού εξοπλισμού).
Η πλήρης και γνήσια Δήλωση Συμμόρφωσης διατίθεται από τον εισαγωγέα.
Page 80

77
CR 5 A1
GR
CY
Τεχνικά χαρακτηριστικά
Καταγραφικό μηχάνημα αυτοκινήτου
Τάση λειτουργίας
5V
, μέσω ενσωματωμένου συσσωρευτή
λιθίου-ιόντων (3,7V/350mAh) ή υποδοχής
σύνδεσης USB
Τάση εισόδου του
αντάπτορα οχήματος
12V/24V
, μέγ. 700mA μέσω
του δικτύου οχήματος
Ασφάλεια του
αντάπτορα οχήματος
T2AL / 250V
Τάση εξόδου του
αντάπτορα οχήματος
5V
,1A
Μέσο αποθήκευσης
Υποστηρίζονται κάρτα Micro-SD, σύστημα
δεδομένων FAT, κάρτες μεγέθους έως 32 GB
Οθόνη
Έγχρωμη οθόνη υγρών κρυστάλλων 2,7“ TFT
(περ. 6,8 εκ. διαγώνιος εικόνας)
Ανάλυση φωτογραφιών
5 MPixel, 3 MPixel, 2 MPixel, 1,3 MPixel,
0,3 MPixel (7 MPixel και 12 MPixel με παρεμβολή)
Μορφή λήψης
φωτογραφίας
JPEG
Ευκρίνεια βίντεο
Ευκρ. 1: 1920 x 1080 Pixel / Ρυθμός μετάδοσης
εικόνων 25 fps (Δεδομένα: 1 GB / 5 λεπτά)
Ευκρ. 2: 1280 x 720 Pixel, Ρυθμός μετάδοσης
εικόνων 30 fps
Ευκρ. 3: 640 x 480 Pixel, Ρυθμός μετάδοσης
εικόνων 30 fps
Μορφή εγγραφής βίντεο AVI
Γωνία εγγραφής
οριζόντια
59° Βίντεο 1920 x 1080
82° Φωτογραφία 2592 x 1944
κάθετα
30° Βίντεο 1920 x 1080
56° Φωτογραφία 2592 x 1944
Γωνία στηρίγματος
βεντούζας
μετωπικά κλίση κατά περ. 156°
πλευρικά κλίση κατά περ. 153°
Θερμοκρασία
λειτουργίας
15°C έως 40°C
Θερμοκρασία
αποθήκευσης
5°C έως 40°C
Υγρασία
(καμία συμπύκνωση)
5 έως 75 %
Διαστάσεις (Π x Β x Υ) περ. 7,5 x 4,8 x 3,2 εκ.
Βάρος Κάμερα περ. 67 γρ., Πλήρες σετ περ. 310 γρ.
Page 81

78
CR 5 A1
GR
CY
Εγγύηση
Έχετε για αυτή τη συσκευή 3 χρόνια εγγύηση από την ημερομηνία αγοράς.
Η συσκευή κατασκευάστηκε και ελέγχθηκε προσεκτικά πριν από την αποστολή.
Παρακαλούμε φυλάξτε την απόδειξη ταμείου ως απόδειξη για την αγορά. Σε
περίπτωση εγγύησης ελάτε σε επικοινωνία με το τμήμα του σέρβις τηλεφωνικά.
Μόνο έτσι μπορεί να εξασφαλιστεί μια δωρεάν αποστολή του εμπορεύματός σας.
ΥΠΟΔΕΙΞΗ
►
Η απόδοση εγγύησης ισχύει μόνο για σφάλματα υλικού ή κατασκευής, όχι
ωστόσο για ζημιές από τη μεταφορά, για εξαρτήματα φθοράς ή για ζημιές
σε εύθραυστά εξαρτήματα, π.χ. διακόπτες.
Το προϊόν προορίζεται μόνο για την ιδιωτική και όχι για την επαγγελματική χρήση.
Σε περίπτωση κακής μεταχείρισης και ακατάλληλης χρήσης, σε χρήση βίας και
σε παρεμβάσεις οι οποίες δεν διεξήχθησαν από το εξουσιοδοτημένο μας τμήμα
σέρβις, η εγγύηση παύει να ισχύει.
Τα νομικά σας δικαιώματα δεν περιορίζονται μέσω αυτής της εγγύησης. Ο χρόνος
εγγύησης δεν επεκτείνεται μέσω της εγγύησης. Αυτό ισχύει και για εξαρτήματα τα
οποία έχουν αντικατασταθεί και επισκευαστεί.
Ενδεχόμενες ήδη υπάρχουσες κατά την αγορά ζημιές και ελλείψεις πρέπει να
ανακοινώνονται αμέσως μετά την αποσυσκευασία, το αργότερο όμως δύο ημέρες
μετά την ημερομηνία αγοράς.
Μετά τη λήξη του χρόνου εγγύησης χρεώνονται οι εμφανιζόμενες επισκευές.
Σέρβις
Σέρβις Ελλάδα
Tel.: 801 5000 019 (0,03 EUR/Min.)
E-Mail: kompernass@lidl.gr
IAN 47583
CY
Σέρβις Κύπρος
Tel.: 8009 4409
E-Mail: kompernass@lidl.com.cy
IAN 47583
Τηλεφωνικό κέντρο (Hotline): Δευτέρα έως Παρασκευή, 8:00 – 20:00 (CET)
Εισαγωγέας
KOMPERNASS HANDELS GMBH
BURGSTRASSE 21
44867 BOCHUM
GERMANY
www.kompernass.com
Page 82

79
CR 5 A1
DE
AT
CH
Inhaltsverzeichnis
Einführung . . . . . . . . . . . . . . . . . . . . . . . . . . . . . . . . . . . . . . . . . . . . . . . . . . .80
Informationen zu dieser Bedienungsanleitung . . . . . . . . . . . . . . . . . . . . . . . . . . . . . . . . . . .80
Urheberrecht . . . . . . . . . . . . . . . . . . . . . . . . . . . . . . . . . . . . . . . . . . . . . . . . . . . . . . . . . . . .80
Bestimmungsgemäße Verwendung . . . . . . . . . . . . . . . . . . . . . . . . . . . . . . . . . . . . . . . . . . .80
Verwendete Warnhinweise . . . . . . . . . . . . . . . . . . . . . . . . . . . . . . . . . . . . . . . . . . . . . . . . .80
Sicherheit . . . . . . . . . . . . . . . . . . . . . . . . . . . . . . . . . . . . . . . . . . . . . . . . . . . .81
Grundlegende Sicherheitshinweise . . . . . . . . . . . . . . . . . . . . . . . . . . . . . . . . . . . . . . . . . . .81
Mögliche Verletzung von Rechten Dritter . . . . . . . . . . . . . . . . . . . . . . . . . . . . . . . . . . . . . . .83
Bedienelemente . . . . . . . . . . . . . . . . . . . . . . . . . . . . . . . . . . . . . . . . . . . . . . .84
Lieferumfang und Transportinspektion . . . . . . . . . . . . . . . . . . . . . . . . . . . . . . . . . . . . . . . . .85
Entsorgung der Verpackung . . . . . . . . . . . . . . . . . . . . . . . . . . . . . . . . . . . . . . . . . . . . . . . .85
Inbetriebnahme . . . . . . . . . . . . . . . . . . . . . . . . . . . . . . . . . . . . . . . . . . . . . . .86
Micro-SD-Karte einstecken / entfernen . . . . . . . . . . . . . . . . . . . . . . . . . . . . . . . . . . . . . . . . .86
Kamera an der Windschutzscheibe montieren . . . . . . . . . . . . . . . . . . . . . . . . . . . . . . . . . .87
Stromversorgung herstellen . . . . . . . . . . . . . . . . . . . . . . . . . . . . . . . . . . . . . . . . . . . . . . . . .87
Bedienung und Betrieb . . . . . . . . . . . . . . . . . . . . . . . . . . . . . . . . . . . . . . . . . 88
Ein- und Ausschalten, Einstellungen vornehmen . . . . . . . . . . . . . . . . . . . . . . . . . . . . . . . . . .88
Grundeinstellungen . . . . . . . . . . . . . . . . . . . . . . . . . . . . . . . . . . . . . . . . . . . . . . . . . . . . . . .88
Setup Menü . . . . . . . . . . . . . . . . . . . . . . . . . . . . . . . . . . . . . . . . . . . . . . . . . . . . . . . . . .88
Video-Aufnahmebereitschaft . . . . . . . . . . . . . . . . . . . . . . . . . . . . . . . . . . . . . . . . . . . . .91
Aufnahme starten / beenden . . . . . . . . . . . . . . . . . . . . . . . . . . . . . . . . . . . . . . . . . . . . .91
Foto-Aufnahmebereitschaft . . . . . . . . . . . . . . . . . . . . . . . . . . . . . . . . . . . . . . . . . . . . . . .94
Foto aufnehmen . . . . . . . . . . . . . . . . . . . . . . . . . . . . . . . . . . . . . . . . . . . . . . . . . . . . . . .94
Wiedergabemodus . . . . . . . . . . . . . . . . . . . . . . . . . . . . . . . . . . . . . . . . . . . . . . . . . . . .95
Aufnahmen auf externem Monitor anzeigen . . . . . . . . . . . . . . . . . . . . . . . . . . . . . . . . . . . .98
Aufnahmen auf einen Computer überspielen . . . . . . . . . . . . . . . . . . . . . . . . . . . . . . . . . . .99
Gerät zurücksetzen . . . . . . . . . . . . . . . . . . . . . . . . . . . . . . . . . . . . . . . . . . . . . . . . . . . . . . .99
Sicherungswechsel . . . . . . . . . . . . . . . . . . . . . . . . . . . . . . . . . . . . . . . . . . . . . . . . . . . . . . . .99
Reinigung . . . . . . . . . . . . . . . . . . . . . . . . . . . . . . . . . . . . . . . . . . . . . . . . . . .100
Fehlerbehebung. . . . . . . . . . . . . . . . . . . . . . . . . . . . . . . . . . . . . . . . . . . . . .100
Fehlerursachen und -behebung . . . . . . . . . . . . . . . . . . . . . . . . . . . . . . . . . . . . . . . . . . . . 100
Lagerung / Entsorgung . . . . . . . . . . . . . . . . . . . . . . . . . . . . . . . . . . . . . . . .102
Lagerung . . . . . . . . . . . . . . . . . . . . . . . . . . . . . . . . . . . . . . . . . . . . . . . . . . . . . . . . . . . . . 102
Gerät entsorgen . . . . . . . . . . . . . . . . . . . . . . . . . . . . . . . . . . . . . . . . . . . . . . . . . . . . . . . . 102
Anhang . . . . . . . . . . . . . . . . . . . . . . . . . . . . . . . . . . . . . . . . . . . . . . . . . . . . .102
Hinweise zur Konformitätserklärung . . . . . . . . . . . . . . . . . . . . . . . . . . . . . . . . . . . . . . . . 102
Technische Daten . . . . . . . . . . . . . . . . . . . . . . . . . . . . . . . . . . . . . . . . . . . . . . . . . . . . . . . 103
Garantie . . . . . . . . . . . . . . . . . . . . . . . . . . . . . . . . . . . . . . . . . . . . . . . . . . . . . . . . . . . . . 104
Service . . . . . . . . . . . . . . . . . . . . . . . . . . . . . . . . . . . . . . . . . . . . . . . . . . . . . . . . . . . . . . . 104
Importeur . . . . . . . . . . . . . . . . . . . . . . . . . . . . . . . . . . . . . . . . . . . . . . . . . . . . . . . . . . . . . 104
Page 83

80
CR 5 A1
DE
AT
CH
Einführung
Informationen zu dieser Bedienungsanleitung
Herzlichen Glückwunsch zum Kauf Ihres neuen Gerätes.
Sie haben sich damit für ein hochwertiges Produkt entschieden. Die Bedie-
nungsanleitung ist Bestandteil dieses Produkts. Sie enthält wichtige Hinweise für
Sicherheit, Gebrauch und Entsorgung. Machen Sie sich vor der Benutzung des
Produkts mit allen Bedien- und Sicherheitshinweisen vertraut. Benutzen Sie das
Produkt nur wie beschrieben und für die angegebenen Einsatzbereiche. Händigen Sie bei Weitergabe oder Verkauf des Produktes an Dritte alle Unterlagen
inkl. dieser Bedienungsanleitung mit aus.
Urheberrecht
Diese Dokumentation ist urheberrechtlich geschützt.
Jede Vervielfältigung, bzw. jeder Nachdruck, auch auszugsweise, sowie die
Wiedergabe der Abbildungen, auch im veränderten Zustand ist nur mit schriftlicher
Zustimmung des Herstellers gestattet.
Bestimmungsgemäße Verwendung
Dieser Cockpit-Rekorder ist ein Gerät der Informationselektronik und dient zum
digitalen Aufzeichnen von Fotos und Videos, speziell während der Fahrt in Kraftfahrzeugen. Eine andere oder darüber hinausgehende Benutzung gilt als nicht
bestimmungsgemäß. Das Gerät ist nicht zur Verwendung in gewerblichen oder
industriellen Bereichen vorgesehen. Ansprüche jeglicher Art wegen Schäden
aus nicht bestimmungsgemäßer Verwendung, unsachgemäßen Reparaturen,
unerlaubt vorgenommener Veränderungen oder Verwendung nicht zugelassener
Ersatzteile sind ausgeschlossen. Das Risiko trägt allein der Benutzer.
Verwendete Warnhinweise
In der vorliegenden Bedienungsanleitung werden folgende Warnhinweise
verwendet:
GEFAHR
Ein Warnhinweis dieser Gefahrenstufe kennzeichnet eine
drohende gefährliche Situation.
Falls die gefährliche Situation nicht vermieden wird, kann dies zum Tod oder
zu schweren Verletzungen führen.
► Die Anweisungen in diesem Warnhinweis befolgen, um die Gefahr des
Todes oder schwerer Verletzungen von Personen zu vermeiden.
Page 84

81
CR 5 A1
DE
AT
CH
WARNUNG
Ein Warnhinweis dieser Gefahrenstufe kennzeichnet eine
mögliche gefährliche Situation.
Falls die gefährliche Situation nicht vermieden wird, kann dies zu Verletzungen
führen.
► Die Anweisungen in diesem Warnhinweis befolgen, um Verletzungen von
Personen zu vermeiden.
ACHTUNG
Ein Warnhinweis dieser Gefahrenstufe kennzeichnet einen
möglichen Sachschaden.
Falls die Situation nicht vermieden wird, kann dies zu Sachschäden führen.
► Die Anweisungen in diesem Warnhinweis befolgen, um Sachschäden zu
vermeiden.
HINWEIS
►
Ein Hinweis kennzeichnet zusätzliche Informationen, die den Umgang mit
dem Gerät erleichtern.
Sicherheit
In diesem Kapitel erhalten Sie wichtige Sicherheitshinweise im Umgang mit dem
Gerät.
Dieses Gerät entspricht den vorgeschriebenen Sicherheitsbestimmungen.
Ein unsachgemäßer Gebrauch kann zu Personen- und Sachschäden führen.
Grundlegende Sicherheitshinweise
Beachten Sie für einen sicheren Umgang mit dem Gerät die folgenden Sicherheitshinweise:
■ Kontrollieren Sie das Gerät vor der Verwendung auf äußere sichtbare Schäden.
Nehmen Sie ein beschädigtes oder heruntergefallenes Gerät nicht in Betrieb.
■ Bei Beschädigung der Kabel oder Anschlüsse lassen Sie diese von autorisier-
tem Fachpersonal oder dem Kundenservice austauschen.
■ Lassen Sie Reparaturen am Gerät nur von autorisierten Fachbetrieben oder
dem Kundenservice durchführen. Durch unsachgemäße Reparaturen können
Gefahren für den Benutzer entstehen. Zudem erlischt der Garantieanspruch.
■ Defekte Bauteile dürfen nur gegen Original-Ersatzteile ausgetauscht werden.
Nur bei diesen Teilen ist gewährleistet, dass sie die Sicherheitsanforderungen
erfüllen.
■ Öff nen Sie niemals das Gerät und nehmen Sie keine Reparaturen daran vor.
Page 85

82
CR 5 A1
DE
AT
CH
■ Schützen Sie das Gerät vor Spritz- und Tropfwasser und dem Eindringen von
Flüssigkeiten.
■ Setzen Sie das Gerät nie extremer Hitze oder hoher Luftfeuchtigkeit aus. Dies
gilt insbesondere für eine Lagerung im Auto. Bei längeren Standzeiten und
warmer Witterung mit Sonneneinstrahlung entstehen Temperaturen von mehr
als 40°C in Innenraum und Handschuhfach. Entfernen Sie elektrische und
elektronische Geräte aus dem Fahrzeug.
■ Stellen Sie bei der Montage der Halterung sicher, dass diese keine Behinde-
rung beim Steuern, Bremsen oder für die Einsatzfähigkeit anderer Betriebssysteme des Fahrzeugs (z.B. Airbags) darstellen, oder Ihr Sichtfeld beim
Fahren einschränken.
GEFAHR
Platzieren Sie die Halterung nicht im Entfaltungsbereich des Airbags oder in
dessen Nähe, da dieser die Halterung im Falle einer Auslösung durch den
Innenraum des Fahrzeuges schleudern würde und schwere Verletzungen
verursachen kann.
WARNUNG
Die Kamera darf keinesfalls so montiert werden, dass Sie oder andere Insassen
im Falle eines Unfalls von der Kamera getroff en werden können. Dies könnte
schwerwiegende Verletzungen verursachen.
■ Personen, die aufgrund ihrer körperlichen, geistigen, motorischen oder sen-
sorischen Fähigkeiten nicht in der Lage sind das Gerät sicher zu bedienen,
dürfen das Gerät nur unter Aufsicht oder Anweisung durch eine verantwortliche Person benutzen.
GEFAHR
Verpackungsmaterialien sind von Kindern fernzuhalten und dürfen nicht zum
Spielen verwendet werden. Es besteht Erstickungsgefahr.
■ Gestatten Sie Kindern die Benutzung des Gerätes nur unter Aufsicht. Kinder
können mögliche Gefahren nicht immer richtig erkennen.
■ Stellen Sie keine Gegenstände auf das Gerät.
■ Das Gerät nicht in der Nähe von off enen Flammen (z.B. Kerzen) betreiben.
■ Wenn Sie am Gerät Brandgeruch oder Rauchentwicklung feststellen, trennen
Sie es sofort von der Stromversorgung.
WARNUNG
Der Rauch darf keinesfalls eingeatmet werden, da dieser gesundheitsschädlich ist.
■ Überprüfen Sie regelmäßig, ob der Saugnapf fest mit der Windschutzschei-
be verbunden ist. Dies ist insbesondere in Gegenden wichtig, in denen die
Außentemperatur häufi g hohen Schwankungen unterliegt.
Page 86

83
CR 5 A1
DE
AT
CH
■ Beachten Sie alle vor Ort geltenden Gesetze. Die Verwendung einer
Cockpitkamera ist in einigen Ländern verboten und ggf. strafbar. Während
der Fahrt darf die Kamera nicht bedient werden. Die Verkehrssicherheit muss
beim Fahren immer Vorrang haben. Verwenden Sie das Gerät nur, wenn
keine Gefahr in irgendeiner Fahrsituation entstehen kann.
■ Im Gerät ist ein Lithium-Ionen Akku verbaut, deshalb darf das Gerät nicht ins
Feuer geworfen werden. Es besteht Explosionsgefahr!
■ Üben Sie keinen Druck auf das Display aus. Sollte es zerbrechen, kann die
Berührung scharfer Kanten zu Verletzungen führen.
Mögliche Verletzung von Rechten Dritter
Bei der Benutzung der Cockpitkamera müssen Sie folgende Hinweise beachten:
Urheberschutz
Grundsätzlich hat jede Person das Recht am eigenen Bild. Nach dem Urheberrechtsgesetz dürfen Bilder ohne Einwilligung der Betroff enen nur dann veröff entlicht werden, wenn die Personen lediglich als Beiwerk neben einer Landschaft
oder sonstigen Örtlichkeiten erscheinen. Die Beantwortung der Frage, ob eine
Person nur Beiwerk ist, hängt von den Umständen des Einzelfalls ab.
Schutz der Privatsphäre
Die Privatsphäre Anderer darf durch die aufgenommenen Bilder nicht verletzt
werden. Richten Sie Ihre Kamera nicht in den Garten oder auf die Eingangstür
Ihrer Nachbarwohnung, auch wenn diese Orte aus dem Fahrzeug oder von
öff entlichen Standorten aus einsehbar sind. Dies berechtigt nicht zur Veröff entlichung dieser Einsichten.
Personelle Bestimmbarkeit
Eine personelle Bestimmbarkeit liegt vor, wenn festgestellt werden kann, dass
eine bestimmte Person zu einer bestimmten Zeit an einem bestimmten Ort war.
Die Identifi kation kann dabei auch über ein personenbezogenes Kennzeichen,
wie z.B. das Fahrzeugkennzeichen, erfolgen. Eine personelle Bestimmbarkeit von
Personen ist unbedingt zu vermeiden.
Überwachungskameras am Arbeitsplatz
Die Überwachung am Arbeitsplatz untersteht in Deutschland besonders strengen
Aufl agen. Arbeitgeber sollten auf Überwachungskameras am Arbeitsplatz
vollständig verzichten, solange eine mögliche Rechtsverletzung nicht vollständig
ausgeschlossen werden kann.
Beachten Sie zu möglichen Verletzungen von Rechten Dritter immer die gesetzlichen
Bestimmungen des jeweiligen Einsatzlandes. Wegen der möglichen Verletzung
von Persönlichkeitsrechten Dritter ist es illegal, Aufnahmen mit Fremden oder Autokennzeichen unautorisiert zu veröff entlichen, z.B. im Internet. Erlaubt ist die Verwendung der Aufnahmen ausschließlich zur Beweisführung nach einem Unfall.
Page 87

84
CR 5 A1
DE
AT
CH
Bedienelemente
(Abbildungen siehe Ausklappseite)
Abbildung A:
Verriegelungshebel
Halterung mit Saugnapf
Rändelschrauben zur dreidimensionalen Arretierung
Abbildung B:
Kameraobjektiv
▲-Taste
▼-Taste
MENU-Taste
MODE-Taste
Mikrofon
USB*-Anschluss
RESET-Öff nung
AV-Anschluss
Lautsprecher
Infrarot-LEDs
Abbildung C:
Betriebsanzeige
Abdeckung
Mini-HDMI-Anschluss
Micro-SD-Karteneinschub
Bildschirm
Abbildung D:
Gewinde zur Aufnahme der Stativhalterung
Ein-/Aus-Taste
/ -Taste zum Starten /Stoppen der Videoaufnahme, zum Auslösen
einer Fotoaufnahme oder Aufrufen von Menüpunkten
Abbildung E:
USB-Buchse zur Stromversorgung über den Kfz-Adapter
Betriebsleuchte
12/24 V Kfz-Adapter
USB* auf Mini-USB Kabel
AV-Kabel (3,5 mm Klinke auf Cinch-Stecker)
Schutzgehäuse
Bedienungsanleitung
*USB
®
ist ein eingetragenes Warenzeichen von USB Implementers Forum, Inc.
Page 88

85
CR 5 A1
DE
AT
CH
Lieferumfang und Transportinspektion
Bitte prüfen Sie den Lieferumfang (siehe Ausklappseite). Der Lieferumfang besteht
aus folgenden Komponenten:
● Cockpit-Rekorder CR5A1
● Schutzgehäuse
● Halterung mit Saugnapf
● USB* auf Mini-USB Kabel
● 12/24 V Kfz-Adapter
● AV-Kabel (3,5 mm Klinke auf Cinch-Stecker)
● Diese Bedienungsanleitung
*USB® ist ein eingetragenes Warenzeichen von USB Implementers Forum, Inc.
♦ Entnehmen Sie alle Teile des Gerätes und die Bedienungsanleitung aus
der Verpackung und prüfen Sie den Lieferumfang auf Vollständigkeit und
sichtbare Schäden (siehe Ausklappseite).
♦ Entfernen Sie sämtliches Verpackungsmaterial sowie die Schutzfolien von
Bildschirm und Kameraobjektiv .
HINWEIS
►
Bei einer unvollständigen Lieferung oder Schäden infolge mangelhafter
Verpackung oder durch Transport wenden Sie sich an die Service-Hotline
(siehe Kapitel Service).
Entsorgung der Verpackung
Die Verpackung schützt das Gerät vor Transportschäden. Die Verpackungsmaterialien
sind nach umweltverträglichen und entsorgungstechnischen Gesichtspunkten
ausgewählt und deshalb recyclebar.
Die Rückführung der Verpackung in den Materialkreislauf spart Rohstoff e und
verringert das Abfallaufkommen. Entsorgen Sie nicht mehr benötigte Verpackungsmaterialien gemäß den örtlich geltenden Vorschriften.
HINWEIS
►
Heben Sie wenn möglich die Originalverpackung während der Garantiezeit
des Gerätes auf, um das Gerät im Garantiefall ordnungsgemäß verpacken
zu können.
Page 89

86
CR 5 A1
DE
AT
CH
Inbetriebnahme
Micro-SD-Karte einstecken / entfernen
ACHTUNG
►
Installieren und entfernen Sie die Micro-SD-Karte (nicht im Lieferumfang
enthalten) nicht, während das Gerät eingeschaltet ist. Dies kann zu Datenverlust auf der Micro-SD-Karte führen.
♦ Stecken Sie eine Micro-SD-Karte so in den Micro-SD-Karteneinschub ,
dass die goldenen Kontakte in Richtung Display zeigen. Drücken Sie die
Micro-SD-Karte soweit hinein, bis sie spürbar einrastet.
♦ Um die Micro-SD-Karte zu entfernen, drücken Sie sanft auf die Kante der
Micro-SD-Karte. Die Micro-SD-Karte wird ein kleines Stück ausgeworfen und
kann aus dem Gerät entnommen werden.
HINWEIS
►
Die Kamera verfügt über keinen internen Speicher. Aufnahmen können
daher nur mit eingelegter Speicherkarte angefertigt werden.
Aus der folgenden Tabelle können Sie die maximale Aufzeichnungsdauer in
Abhängigkeit von der Speicherkapazität der Micro-SD-Karte und der eingestellten
Aufl ösung entnehmen:
Aufl ösung
Speicherkapazität der
Micro-SD-Karte
Ungefähre Aufzeichnungsdauer
1080P
4 GB ca. 0 Std. 19 Min.
8 GB ca. 0 Std. 39 Min.
16 GB ca. 1 Std. 18 Min.
32 GB ca. 2 Std. 08 Min.
720P
4 GB ca. 0 Std. 29 Min.
8 GB ca. 1 Std. 00 Min.
16 GB ca. 1 Std. 58 Min.
32 GB ca. 4 Std. 01 Min.
VGA
4 GB ca. 0 Std. 47 Min.
8 GB ca. 1 Std. 37 Min.
16 GB ca. 3 Std. 11 Min.
32 GB ca. 6 Std. 29 Min.
Page 90

87
CR 5 A1
DE
AT
CH
Kamera an der Windschutzscheibe montieren
1) Um den Schutz für die Kamera zu erhöhen,
können Sie die Kamera in das Schutzgehäuse
einsetzen und leicht hineindrücken, bis die
Kamera spürbar einrastet.
2) Schrauben Sie die Halterung
in das Gewinde der Kamera ein. Positionieren Sie den
Saugnapf an der Windschutzscheibe. Achten
Sie darauf, dass der Saugnapf fl ach aufl iegt.
3) Setzen Sie den Saugnapf fest auf die
Wind schutzscheibe und drücken Sie den
Verriegelungshebel
in Richtung der Windschutzscheibe. Dadurch wird ein Unterdruck
erzeugt und der Saugnapf fest an die Windschutzscheibe gezogen. Bewegen Sie den
Verriegelungshebel entgegengesetzt, um
den Saugnapf wieder von der Windschutzscheibe zu lösen.
4) Nachdem Sie die Kamera mit dem Saugnapf
an der Windschutzscheibe befestigt haben,
lösen Sie nacheinander die Schrauben A - C und justieren die Kamera nach Ihren
Wünschen.
5) Sind gewünschte Position und Ausrichtung gefunden, ziehen Sie die Rändelschrauben
wieder handfest an.
ACHTUNG
►
Die Kamera muss so positioniert werden, dass das Sichtfeld des Fahrers
immer frei ist.
Stromversorgung herstellen
ACHTUNG
►
Verwenden Sie zur Stromversorgung des Gerätes ausschließlich den
mitgelieferten Kfz-Adapter.
1) Schließen Sie den Kfz-Adapter
an die Bordspannung (ZigarettenanzünderBuchse) Ihres Fahrzeugs an. Die Betriebsleuchte am Kfz-Adapter zeigt die
Betriebsbereitschaft an, wenn die Bordspannung an der Buchse anliegt.
2) Verbinden Sie das mitgelieferte USB-Kabel
mit der USB-Buchse am
Kfz-Adapter und dem USB-Anschluss der Kamera. Sobald die Kamera
über die Bordspannung mit Spannung versorgt wird, startet die Videoaufnahme
und die Betriebsanzeige blinkt abwechselnd rot und grün. Wenn der interne
Geräteakku geladen wird, erscheint das Batterieladesymbol auf dem
Bildschirm .
Page 91

88
CR 5 A1
DE
AT
CH
ACHTUNG
►
Bei Fahrzeugen, bei denen der Zigarettenanzünder auch bei ausgeschalteter Zündung funktioniert, muss das Gerät nach der Nutzung von
der Zigarettenanzünder-Buchse getrennt werden. Anderenfalls kann die
Fahrzeugbatterie über einen längeren Zeitraum entladen werden, da das
Gerät auch im Ruhezustand Strom aufnimmt. Der Fahrzeugmotor könnte
dann nicht mehr gestartet werden.
► Bei Fahrzeugen, in denen der Zigarettenanzünder nicht abgeschaltet wird,
wird auch die Aufnahme nicht automatisch unterbrochen. Schalten Sie in
diesem Fall die Kamera manuell ab.
Bedienung und Betrieb
In diesem Kapitel erhalten Sie wichtige Hinweise zu Bedienung und Betrieb des
Gerätes.
Ein- und Ausschalten, Einstellungen vornehmen
Drücken Sie die Ein-/Aus-Taste , um das Gerät einzuschalten. Das Kamerabild erscheint auf dem Bildschirm und die Betriebsanzeige leuchtet grün.
Das Gerät ist nun in Video-Aufnahmebereitschaft.
Um das Gerät auszuschalten, halten Sie die Ein-/Aus-Taste 3 Sekunden
lang gedrückt.
Grundeinstellungen
Setup Menü
Um im Setup-Menü die Grundeinstellung für das Gerät vornehmen zu können,
drücken Sie die MENU-Taste gefolgt von der MODE-Taste . Das Setup-Menü
öff net sich:
Mit den ▲▼-Tasten / können Sie den Auswahlbalken auf den gewünschten
Eintrag verschieben und diese Menüfunktion dann mit der / -Taste aufrufen. Um einen aufgerufenen Menüpunkt ohne Änderung wieder zu verlassen,
drücken Sie die MODE-Taste . Unten rechts wird die aktuelle Menütafel sowie
die Gesamtzahl der Menütafeln angezeigt. Um das Menü zu schließen, drücken
Sie die MENU-Taste .
Page 92

89
CR 5 A1
DE
AT
CH
Zeit & Datum
Wenn Sie diese Menüfunktion aufrufen, können Sie anschließend mit den
▲▼-Tasten
/ auswählen, ob die Aufnahmen mit oder ohne eingeblendetes
Datum gespeichert werden. Wählen Sie „Zeit- & Datums-Stempel ein“, um diese
Funktion zu aktivieren, oder „Zeit- & Datums-Stempel aus“ um sie zu deaktivieren.
Rufen Sie zum Einstellen des aktuellen Datums „Zeit & Datum einstellen“ auf.
Dann stellen Sie mit den ▲▼-Tasten
/ die Jahreszahl des aktuellen Datums
ein. Drücken Sie die MODE-Taste , um mit den ▲▼-Tasten / den Monat
einzustellen. Drücken Sie die MODE-Taste , um mit den ▲▼-Tasten / den
Tag einzustellen. Drücken Sie die MODE-Taste , um mit den ▲▼-Tasten /
die Stundenzahl der aktuellen Uhrzeit einzustellen. Drücken Sie die MODE-Taste
, um mit den ▲▼-Tasten / die Minutenzahl einzustellen. Drücken Sie die
MODE-Taste , um mit den ▲▼-Tasten / die Sekundenzahl einzustellen.
Drücken Sie die MODE-Taste , um mit den ▲▼-Tasten / das gewünschte
Datumsformat einzustellen:
Dabei steht „YY/MM/DD“ für die zweistellige Datumsanzeige in der Reihenfolge „Jahr / Monat / Tag“, „MM/DD/YY“ steht für die zweistellige Datumsanzeige in der Reihenfolge „Monat / Tag / Jahr“ und „DD/MM/YY“ steht für die
zweistellige Datumsanzeige in der Reihenfolge „Tag / Monat / Jahr“.
Bestätigen Sie Ihre Auswahl mit der
/ -Taste . Anschließend kehrt die
Anzeige zur Liste der Menüpunkte zurück.
Automatische Abschaltung
Wenn Sie diese Menüfunktion aufrufen, können Sie anschließend mit den ▲▼-Tasten
/ auswählen, ob sich das Gerät nach „1 Min“, „3 Min“ oder „5 Min“
Inaktivität automatisch abschaltet. Wenn Sie „Aus“ auswählen, wird sich das Gerät
nicht automatisch abschalten. Bestätigen Sie Ihre Auswahl mit der / -Taste .
Anschließend kehrt die Anzeige dann zur Liste der Menüpunkte zurück.
Aufprall-Sensor (G-Sensor)
Wenn Sie diese Menüfunktion aufrufen, können Sie anschließend mit den
▲▼-Tasten
/ die Empfi ndlichkeit des eingebauten Aufprall-Sensors auswählen: „Sehr gering“, „Gering“, „Mittel“, „Hoch“ und „Sehr hoch“ stehen zur Auswahl. Diese Funktion schützt die aktuell laufende Video-Aufnahme bei Erkennung
einer Erschütterung, die auf ein Unfallereignis schließen lässt, automatisch gegen
das Überschreiben in der Endlosschleife. Bestätigen Sie Ihre Auswahl mit der
/ -Taste . Anschließend kehrt die Anzeige dann zur Liste der Menüpunkte
zurück.
Akustisches Signal
Wenn Sie diese Menüfunktion aufrufen, können Sie anschließend mit den
▲▼-Tasten
/ auswählen, ob das Gerät das Drücken der Tasten sowie das
Ein- und Ausschalten mit akustischen Signalen quittiert („Ein“), oder nicht („Aus“).
Bestätigen Sie Ihre Auswahl mit der / -Taste . Anschließend kehrt die
Anzeige dann zur Liste der Menüpunkte zurück.
Page 93

90
CR 5 A1
DE
AT
CH
Display-Abschaltung
Wenn Sie diese Menüfunktion aufrufen, können Sie anschließend mit den
▲▼-Tasten
/ die Zeitspanne auswählen, nach deren Ablauf sich das
Display automatisch abschaltet: „1 Min.“, „3 Min.“ und „5 Min.“ stehen dazu
zur Auswahl. Wählen Sie „Display immer an“, wenn sich das Display nicht
abschalten soll. Um das Display nach der automatischen Abschaltung wieder
einzuschalten, drücken Sie eine der ▲▼-Tasten / , die MODE-Taste oder
die
/ -Taste .
Sprache
Wenn Sie diese Menüfunktion aufrufen, können Sie anschließend mit den
▲▼-Tasten
/ „Englisch“ oder „Deutsch“ als Sprache für die Bildschirmmenüs auswählen. Bestätigen Sie Ihre Auswahl mit der / -Taste . Anschließend kehrt die Anzeige dann zur Liste der Menüpunkte zurück.
Display Symbol Drehung
Wenn Sie diese Menüfunktion aufrufen, können Sie anschließend mit den
▲▼-Tasten
/ einstellen, ob die Darstellung der Display-Symbole und der
Menüs normal („Aus“) oder um 180° gedreht („Ein“) angezeigt werden sollen.
Welche Einstellung hier sinnvoll ist, richtet sich danach, wie Sie die Kamera
angebracht haben.
Speicherkarte formatieren
Wenn Sie diese Menüfunktion aufrufen, können Sie anschließend mit den
▲▼-Tasten
/ die eingesetzte Micro-SD-Karte formatieren. Bei diesem Prozess gehen sämtliche Daten auf der Micro-SD-Karte unwiederbringlich verloren,
auch die gegen Löschen geschützten Dateien. Um die Formatierung durchzuführen, wählen Sie mit den ▲▼-Tasten / „OK“ an und drücken die /
-Taste . Daraufhin wird die Formatierung durchgeführt.
Werkseinstellungen
Wenn Sie diese Menüfunktion aufrufen, können Sie anschließend sämtliche
Einstellungen des Gerätes auf die Werkseinstellungen zurücksetzen. Wählen Sie
mit den ▲▼-Tasten
/ „OK“ aus und bestätigen Sie Ihre Auswahl mit der
/ -Taste . Anschließend kehrt die Anzeige dann zur Liste der Menüpunkte
zurück. Alle zuvor von Ihnen vorgenommenen Einstellungen sind nun auf die
Werkseinstellungen zurücksetzt.
Um das Setup-Menü zu schließen, drücken Sie die MENU-Taste
.
Page 94

91
CR 5 A1
DE
AT
CH
Video-Aufnahmebereitschaft
In der Video-Aufnahmebereitschaft zeigt der Bildschirm folgende Übersicht an:
A – Anzeige der Rest-Aufzeichnungsdauer in Abhängigkeit von Aufl ösung und
verfügbarem Speicherplatz
B – Aktuelle Video-Aufl ösung
C – Symbol für eingesetzte Micro-SD-Karte
D – Ladezustandsanzeige des internen Geräteakkus
E – Datumsanzeige (nur bei aktivierter Funktion „Zeit- & Datums-Stempel“)
F – Uhrzeitanzeige (nur bei aktivierter Funktion „Zeit- & Datums-Stempel“)
G – Symbol für Bewegungserkennung (nur sichtbar, wenn Funktion aktiviert ist)
H – Symbol für Aufnahme in Endlosschleife sowie deren Länge in Minuten
(hier 3 Minuten)
I – Anzeige für Belichtungskorrektur
J – Symbol für Video-Aufnahmebereitschaft
K – Roter Punkt blinkt während der Aufnahme
L – Symbol für eine gegen Löschen geschützte Datei
Aufnahme starten / beenden
Drücken Sie ggf. wiederholt die ▲-Taste , um das Motiv heranzuzoomen.
Halten Sie diese Taste für schnelles Zoomen gedrückt. Mit der ▼-Taste können
Sie auf gleiche Weise herauszoomen. Drücken Sie die / -Taste , um die
Videoaufnahme zu starten. Während der Videoaufnahme blinkt die Betriebsanzeige grün und rot. Drücken Sie diese Taste erneut, um die Aufnahme zu
beenden.
Wenn Sie während der Aufnahme die MODE-Taste
drücken, erscheint das
-Symbol und aktuelle Aufnahme wird gegen Löschen geschützt.
HINWEIS
►
Sobald die Kamera über das Kfz-Bordnetz versorgt wird, startet die Aufnahme. Um die Aufnahme dann zu beenden, drücken Sie die / -Taste .
Page 95

92
CR 5 A1
DE
AT
CH
Wenn Sie in der Video-Aufnahmebereitschaft die MENU-Taste drücken, öff net
sich das folgende Menü:
Mit den ▲▼-Tasten / können Sie den Auswahlbalken auf den gewünschten
Eintrag verschieben und diese Menüfunktion dann mit der / -Taste aufrufen. Um einen aufgerufenen Menüpunkt ohne Änderung wieder zu verlassen,
drücken Sie die MODE-Taste . Unten rechts wird die aktuelle Menütafel sowie
die Gesamtzahl der Menütafeln angezeigt. Wenn der unterste Menüeintrag auf
einer Menütafel angewählt ist, auf die noch eine weitere Tafel folgt, drücken Sie
die ▼ Taste , um zum ersten Eintrag auf der folgenden Menütafel zu springen.
Um das Menü zu schließen, drücken Sie die MENU-Taste .
Aufl ösung
Wenn Sie diese Menüfunktion aufrufen, können Sie anschließend die VideoBildgröße festlegen: „1920x1080P (HD)“, „1280 x 720P“ und „640 x 480P“
stehen zu Auswahl. Wählen Sie mit den ▲▼-Tasten
/ die gewünschte Aufl ösung aus und bestätigen Sie Ihre Auswahl mit der / -Taste , um dann zur
Liste der Menüpunkte zurückzukehren.
Belichtung
Wenn Sie diese Menüfunktion aufrufen, können Sie anschließend die VideoBelichtung in drei Schritten nach oben (von +1 bis +3, heller), bzw. nach unten
(von -1 – -3, dunkler) korrigieren. In der Einstellung „0“ fi ndet keine Belichtungskorrektur statt. Wählen Sie mit den ▲▼-Tasten
/ die gewünschte Video-
Belichtungskorrektur aus und bestätigen Sie Ihre Auswahl mit der / -Taste
, um dann zur Liste der Menüpunkte zurückzukehren.
Video Länge
Wenn Sie diese Menüfunktion aufrufen, können Sie anschließend die Dauer der
Endlosschleife für die Videoaufnahme festlegen: „3 Min“, „5 Min“, „10 Min“
oder „Aufnahme-Schleife aus“ stehen zu Auswahl. Wählen Sie mit den ▲▼-Tasten
/ den gewünschten Wert für die Loop-Aufnahme aus und bestätigen
Sie Ihre Auswahl mit der / -Taste , um dann zur Liste der Menüpunkte
zurückzukehren.
Bedenken Sie dabei, dass die verwendete Micro-SD-Karte in Abhängigkeit von
der eingestellten Video-Bildgröße eine ausreichende Kapazität haben muss,
um die gewünschte Dauer der Endlosschleife erreichen zu können. Wenn Sie
„Aufnahme-Schleife aus“ wählen, endet die Aufnahme bei Erreichen der Kapazitätsgrenze der Micro-SD-Karte. Wenn das Ende der Aufnahme erreicht wird,
beginnt das Gerät eine neue Aufnahme mit der eingestellten Länge.
Page 96

93
CR 5 A1
DE
AT
CH
Reicht die Kapazität der eingesetzten Speicherkarte nicht für die eingestellte Dauer
der Endlosschleife, wird die Aufnahme abgebrochen. Verringern Sie dann die
Dauer der Endlosschleife oder verwenden Sie eine Speicherkarte mit größerer
Kapazität.
Bewegungserkennung (Motion-Detection)
Wenn Sie diese Menüfunktion aufrufen, können Sie anschließend diese Funktion
mit den ▲▼-Tasten
/ ein- oder ausschalten. Bestätigen Sie Ihre Auswahl mit
der / -Taste , um dann zur Liste der Menüpunkte zurückzukehren.
Bei eingeschalteter Funktion beendet das Gerät die Videoaufnahme automatisch,
wenn keine bewegten Bilder mehr aufgezeichnet werden. Registriert das Gerät
wieder Bewegungen, beginnt das Gerät automatisch mit einer neuen Aufnahme.
Bei ausgeschalteter Funktion unterbricht das Gerät die Aufnahme nicht, wenn
Bewegungen ausbleiben.
HINWEIS
►
Diese Funktion sollten Sie nur aktivieren, während das Fahrzeug geparkt
steht, um z.B. einen Aufbruchsversuch oder ein gegnerisches Fahrzeug nach
einer Kollision automatisch zu fi lmen.
► Die erste Aufnahme muss auch bei eingeschalteter Funktion manuell gestartet
werden.
Tonaufnahme
Wenn Sie diese Menüfunktion aufrufen, können Sie anschließend die Audioaufnahme über das eingebaute Mikrofon mit den ▲▼-Tasten
/ ein- oder
ausschalten. Bestätigen Sie Ihre Auswahl mit der / -Taste , um dann zur
Liste der Menüpunkte zurückzukehren.
Page 97

94
CR 5 A1
DE
AT
CH
Foto-Aufnahmebereitschaft
Bei geschlossenem Menü drücken Sie in der Video-Aufnahmebereitschaft die
MODE-Taste
, um in die Foto-Aufnahmebereitschaft umzuschalten. Das Gerät
zeigt dann folgende Übersicht auf dem Bildschirm :
A – Anzeige der Fotoanzahl, die in Abhängigkeit von Aufl ösung und verfügbarem
Speicherplatz noch aufgenommen werden können
B – Aktuelle Foto-Aufl ösung
C – Symbol für eingesetzte Micro-SD-Karte
D – Ladezustandsanzeige des internen Geräteakkus
E – Datumsanzeige (nur bei aktivierter Funktion „Zeit- & Datums-Stempel“)
F – Uhrzeitanzeige (nur bei aktivierter Funktion „Zeit- & Datums-Stempel“)
G – Symbol für Selbstauslöser (hier 5 Sekunden; nur sichtbar, wenn Funktion
aktiviert ist)
H – Symbol für Belichtungskorrektur
I – Anzeige für Foto-Aufnahmebereitschaft
J – Anzeige für Serienbildfunktion (nur sichtbar, wenn Funktion aktiviert ist)
Foto aufnehmen
Drücken Sie ggf. wiederholt die ▲-Taste , um das Motiv heranzuzoomen.
Halten Sie diese Taste für schnelles Zoomen gedrückt. Mit der ▼-Taste können
Sie auf gleiche Weise herauszoomen. Drücken Sie die / -Taste , um ein
Foto aufzunehmen.
Wenn Sie in der Foto-Aufnahmebereitschaft die MENU-Taste
drücken, öff net
sich das folgende Menü:
Mit den ▲▼-Tasten / können Sie den Auswahlbalken auf den gewünschten
Eintrag verschieben und diese Menüfunktion dann mit der / -Taste aufrufen. Um einen aufgerufenen Menüpunkt ohne Änderung wieder zu verlassen,
Page 98

95
CR 5 A1
DE
AT
CH
drücken Sie die MODE-Taste . Unten rechts wird die aktuelle Menütafel sowie
die Gesamtzahl der Menütafeln angezeigt. Wenn der unterste Menüeintrag auf
einer Menütafel angewählt ist, auf die noch eine weitere Tafel folgt, drücken Sie
die ▼ Taste
, um zum ersten Eintrag auf der folgenden Menütafel zu springen.
Um das Menü zu schließen, drücken Sie die MENU-Taste
.
Aufl ösung
Wenn Sie diese Menüfunktion aufrufen, können Sie anschließend mit den
▲▼-Tasten
/ die gewünschte Größe für die Fotos einstellen: „12MP
(interp.*)“, „7MP (interp.*)“, „5MP“, „3MP“, „2MP“, „1,3MP“ oder „0,3MP“
stehen zu Auswahl. „MP“ steht dabei für Mega-Pixel, z.B. erzeugt die Einstellung
„5MP“ ein Bild von 2592 × 1944 Pixel, was ungefähr 5 Millionen Pixeln entspricht. Je größer die Bilder sind, umso höher ist die Detaildichte. Jedoch erreicht
die Micro-SD-Karte bei hoher Fotogröße eher ihre Kapazitätsgrenze. Bestätigen
Sie Ihre Auswahl mit der / -Taste , um dann zur Liste der Menüpunkte
zurückzukehren.
* Interpolation = rechnerische Erhöhung der Bildpunktemenge
Belichtung
Wenn Sie diese Menüfunktion aufrufen, können Sie anschließend die FotoBelichtung in drei Schritten nach oben (von +1 bis +3, heller), bzw. nach unten
(von –1 bis –3, dunkler) korrigieren. Wählen Sie mit den ▲▼-Tasten
/ die
gewünschte Foto-Belichtungskorrektur aus und bestätigen Sie Ihre Auswahl mit
der / -Taste , um dann zur Liste der Menüpunkte zurückzukehren.
3 Fotos in Serie
Wenn Sie diese Menüfunktion aufrufen, können Sie anschließend mit den
▲▼-Tasten
/ diese Funktion zur Aufnahme von 3 Fotos in schneller Folge
ein- oder ausschalten. Bestätigen Sie Ihre Auswahl mit der / -Taste , um
dann zur Liste der Menüpunkte zurückzukehren.
Selbstauslöser
Wenn Sie diese Menüfunktion aufrufen, können Sie anschließend mit den
▲▼-Tasten
/ eine Auslöseverzögerung von 2, 5 oder 10 Sekunden einstellen. Das Bild wird dann erst mit der eingestellen Verzögerung nach Drücken
der / -Taste aufgenommen. Wählen Sie „Direktaufnahme“, um die
Auslöseverzögerung zu deaktivieren. Bestätigen Sie Ihre Auswahl mit der /
-Taste , um dann zur Liste der Menüpunkte zurückzukehren.
Wiedergabemodus
Bei geschlossenem Menü drücken Sie in der Foto-Aufnahmebereitschaft die
MODE-Taste , um in den Wiedergabemodus umzuschalten. Mit den ▲/▼-Tasten / können Sie durch die gespeicherten Aufnahmen schalten. Wenn Sie
ein Foto anwählen und die / -Taste drücken, werden alle gespeicherten
Fotos in einer endlosen Diashow angezeigt. Drücken Sie die / -Taste
erneut, um die Diashow zu beenden. Wenn Sie ein Video anwählen und die
/ -Taste drücken, wird das Video wiedergegeben.
Page 99

96
CR 5 A1
DE
AT
CH
Wenn Sie ein Foto anwählen, zeigt der Bildschirm diese Übersicht an:
A – Anzeige der aktuellen Aufnahmenummer / Gesamtzahl der Aufnahmen
B – Aufl ösung des gerade angewählten Fotos
C – Ladezustandsanzeige des internen Geräteakkus
D – Datums- / Zeitstempel
E – Symbol für den Wiedergabemodus
F – Symbol für eine gegen Löschen geschützte Datei
Wenn Sie jetzt die MENU-Taste
drücken, öff net sich das folgende Menü:
Mit den ▲▼-Tasten / können Sie den Auswahlbalken auf den gewünschten
Eintrag verschieben und diese Menüfunktion dann mit der / -Taste aufrufen. Um einen aufgerufenen Menüpunkt ohne Änderung wieder zu verlassen,
drücken Sie die MODE-Taste . Unten rechts wird die aktuelle Menütafel sowie
die Gesamtzahl der Menütafeln angezeigt. Um das Menü zu schließen, drücken
Sie die MENU-Taste .
Löschen
Wenn Sie diese Menüfunktion aufrufen, können Sie anschließend mit den
▲▼-Tasten
/ das gerade angewählte Bild löschen („Diese Datei löschen“),
„Alle Dateien löschen“ oder „Abbrechen“. Bestätigen Sie Ihre Auswahl mit
der / -Taste . Wenn Sie die nachfolgende Sicherheitsabfrage mit „OK“
bestätigen, wird die gewählte Löschfunktion ausgeführt und das Menü geschlossen. Sollte hingegen „Die Datei ist schreibgeschützt“ angezeigt werden, müssen
Sie zunächst mit der im Abschnitt „Schreibschutz“ beschriebenen Funktion den
Schutz aufheben.
Page 100

97
CR 5 A1
DE
AT
CH
Schreibschutz
Wenn Sie diese Menüfunktion aufrufen, können Sie anschließend mit den
▲▼-Tasten
/ auswählen, ob die gerade angewählte Datei gegen Löschen
geschützt werden soll („Diese Datei schreibschützen“), der Schutz der gerade
angewählte Datei aufgehoben werden soll („Diese Datei entsperren“), alle Dateien
gegen Löschen geschützt werden sollen („Alle Dateien schreibschützen“) oder
der Schutz aller Dateien gegen Löschen aufgehoben werden soll („Alle Dateien
entsperren“). Bestätigen Sie Ihre Auswahl mit der
/ -Taste . Anschließend
kehrt die Anzeige dann zur Liste der Menüpunkte zurück.
HINWEIS
►
Die Anwendung dieser Funktionen auf eine Vielzahl von Dateien kann einige
Sekunden dauern.
Wenn Sie mit den ▲/▼-Tasten
/ ein Video anwählen, zeigt der Bildschirm
diese Übersicht an:
A – Anzeige der aktuellen Aufnahmenummer / Gesamtzahl der Aufnahmen
B – Aufl ösung des gerade angewählten Videos
C – Dauer des Videos
D – Ladezustandsanzeige des internen Geräteakkus
E – Funktionssymbol für die MODE-Taste
: Video- bzw. Fotowiedergabe stoppen
F – Funktionssymbol für die / -Taste : Video- bzw. Fotowiedergabe
starten / anhalten
G – Symbol für den Wiedergabemodus
H – Symbol für eine gegen Löschen geschützte Datei
Wenn Sie jetzt die MENU-Taste
drücken, öff net sich das folgende Menü:
 Loading...