

Page 1

UK
Kompernaß GmbH · Burgstrasse 21 · D-44867 Bochum
www.kompernass.com
ID No.: KH1121-08/06-V2
KH1121_IB_UK.qxd 26.09.2006 17:06 Uhr Seite 1
Page 2

Sandwich Maker KH 1121
Operating instructions
KH1121_IB_UK.qxd 26.09.2006 17:06 Uhr Seite 2
Page 3

KH1121_IB_UK.qxd 26.09.2006 17:06 Uhr Seite 3
Page 4
KH 1121
KH1121_IB_UK.qxd 26.09.2006 17:07 Uhr Seite 4
Page 5

- 3 -
KH 1121
Read the operating instructions carefully before using the appliance for the first time
and preserve this booklet for later reference. Also include the instructions if you pass
the appliance on to anyone else.
Sandwich Maker Page
Intended use 4
Technical data 4
Operating elements 4
Delivery Contents 4
Safety instructions 4
Before the first use 5
Operation 6
Cleaning & care 7
Storage 7
Disposal 7
Warranty & customer service 7
Recipe suggestions 8
KH1121_IB_UK.qxd 26.09.2006 17:07 Uhr Seite 3
Page 6

- 4 -
KH 1121
Sandwich Maker
Intended use
The Sandwich Maker is intended for preparing filled sandwiches in private households.
Technical data
Rated voltage: 220-240V ~ 50Hz
Power consumption : 700 W
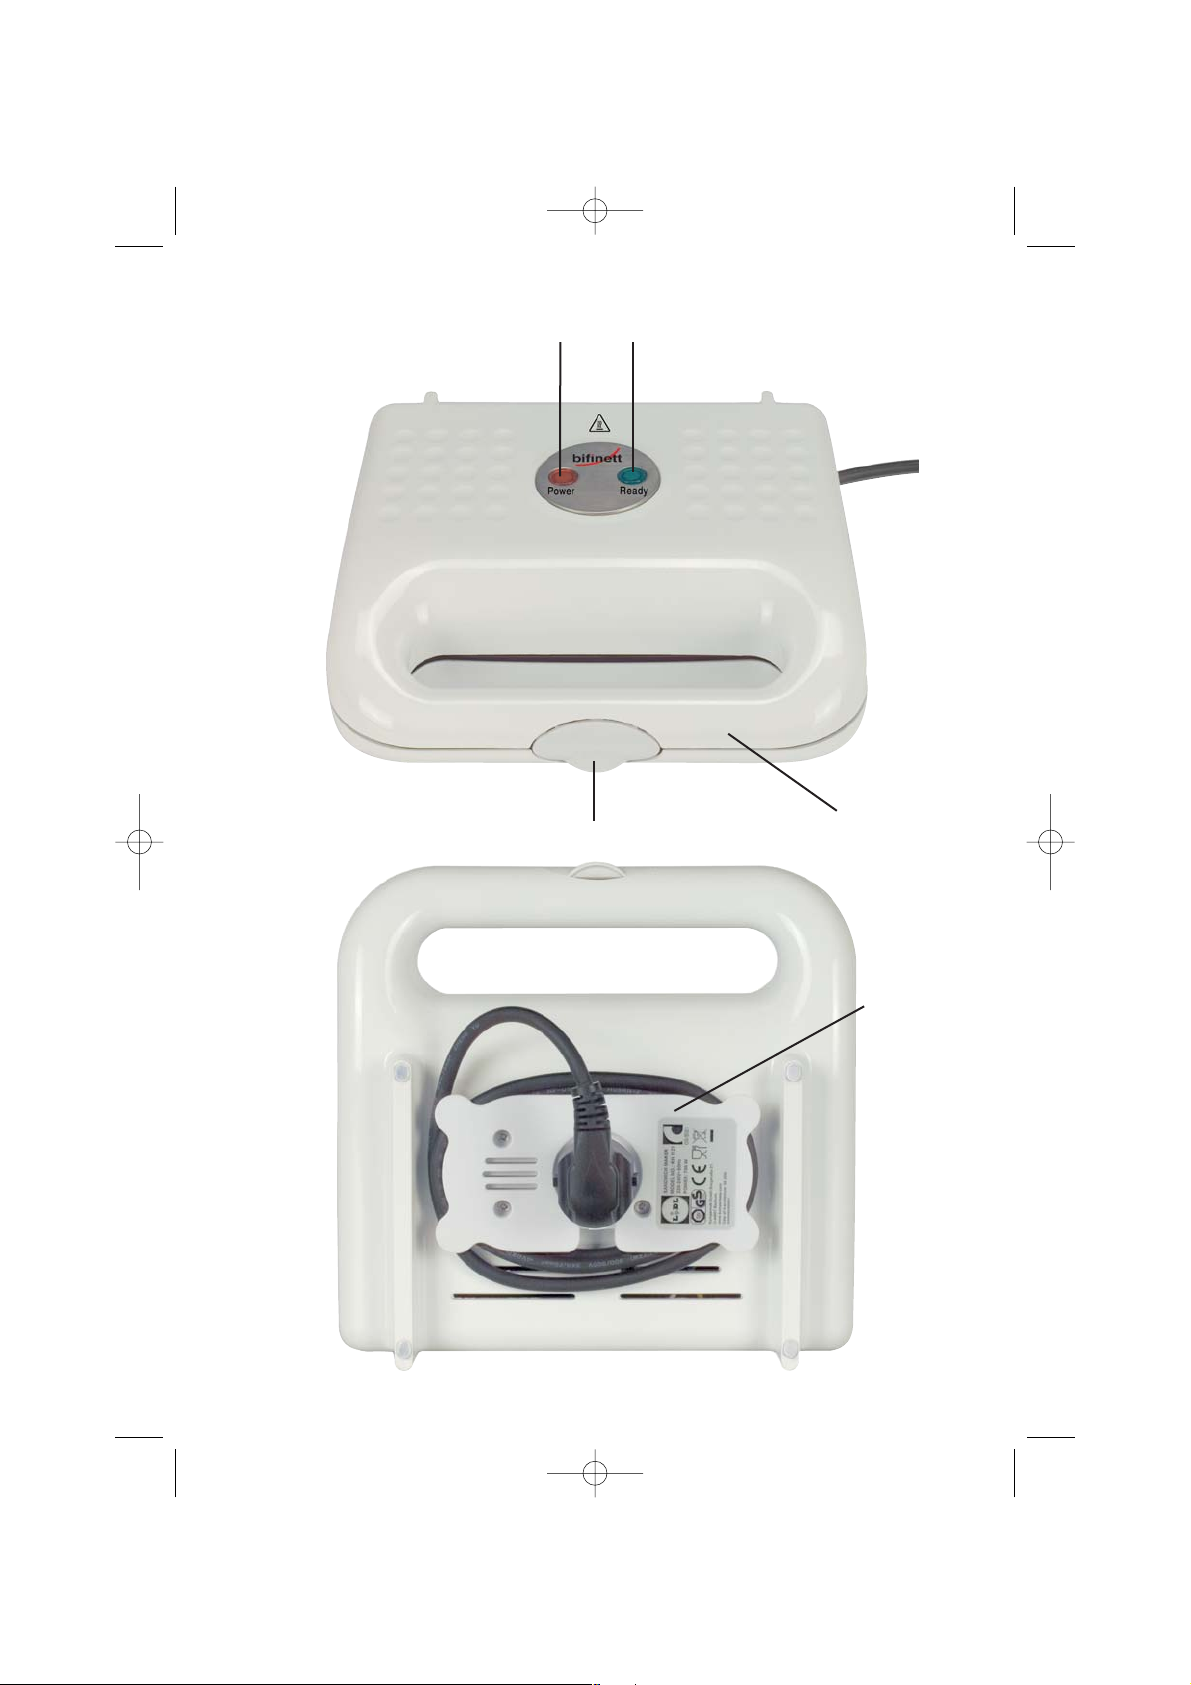
Operating elements
Operation light POWER
Operation light READY
Handle
Fastener
Winding the cable
Delivery Contents
Sandwich Maker
Operating instructions
Warranty card
Safety instructions
• Read these instructions carefully before
using your Sandwich Maker for the
first time.
• Keep the instructions in an appropriate
place near the appliance. Also include
the instructions if you pass the appliance
on to anyone else.
• Only use the Sandwich Maker for its intended purpose and only according to
these operating instructions.
Danger of electrical shock!
• The Sandwich Maker may only be used
in dry rooms indoors. Keep the appliance away from splashing water – even
while turned off.
• You must only use this appliance when
the local mains voltage corresponds to
the appliances rated voltage (220-240V
~ 50 Hz)
• Do not connect the appliance to a multiple connection power socket on
which other electrical devices are operating at the same time; this could lead
to overloading of the power circuit.
• Turn off the appliance after every use.
Also pull the power plug.
• When cleaning, make certain that no
water penetrates inside the appliance.
Never clean the appliance under running water. Never submerse the appliance in water.
• Protect the power cord from damage.
Be careful not to pinch it, and keep it
away from hot objects. Do not allow
the power cord to hang loosely off a
table or counter.
• Always wrap the power cable up completely from the cable rewinder.
• Never open the casing of the appliance.
• Never use the appliance with a damaged power cord or power plug or if
water has entered the appliance. In
these cases, the appliance must be repaired.
• Repairs may only be performed by specialised dealers authorised by the manufacturer or by experienced experts
(see "Warranty & service").
KH1121_IB_UK.qxd 26.09.2006 17:07 Uhr Seite 4
Page 7

- 5 -
Fire danger / Danger of injury
• Place your Sandwich Maker on a flat,
slip-proof and heat-resistant surface
and not next to other appliances that
could radiate significant heat (e.g. toasters, kitchen ovens).
• Do not operate the appliance in the
area of easily flammable objects, such
as under curtains or next to rolls of
paper towels.
• Even when used properly, some parts
of the appliance become very hot (such
as the top and bottom casing panels).
Be careful not to touch these surfaces
until they have cooled down completely
after the appliance is turned off.
• During operation, the Sandwich Maker
can be opened and closed without
danger using the heat-insulated grip.
• Never leave the appliance unattended
when it is
in use. Make sure that children and
people in need of supervision do not
use this appliance unsupervised.
• Be careful when taking out the pre-pared sandwich. The appliance as
well as the sandwiches are very hot.
• Allow the appliance to cool completely
after switching it off before cleaning
and storing it.
In order to avoid damaging the
appliance
• Remove your sandwiches only with a
plastic or wooden spatula or with another suitable, non-metallic object to
avoid damaging the non-stick coating
of the Sandwich Maker.
• For the same reason, do not use abrasive
cleansers and sharp objects to clean
the appliance.
Before the first use
1. Take your new Sandwich Maker out
of the packaging. Remove all additional transport packing, e.g. plastic
wrap or cable holders.
2. Check before initial operation that
the package contents are complete
and for possible visible damages.
3. Read these operating instructions
carefully.
4. Set up the appliance according to
the safety instructions.
Vapours can develop when the
Sandwich Maker is heated up for
the first time. These vapours are not
hazardous to your health, but may
affect the taste of your sandwich.
For this reason, we recommend turning on the Sandwich Maker once
before preparing the first sandwich
and allowing it to heat up for several
minutes without food.
KH 1121
KH1121_IB_UK.qxd 26.09.2006 17:07 Uhr Seite 5
Page 8

- 6 -
KH 1121
Operation
We recommend that you have all
the sandwiches ingredients already
accordingly prepared before you
switch on the sandwich maker. We
recommend using toast bread for
your sandwiches. In addition to wheat
bread, also try full grain or multi-grain
bread.
1. Open the lid of the Sandwich Maker.
To do this pull the fastener on the
handle forward and lift the lid up
to its fullest extent. If necessary,
remove any dust from the toasting
surfaces with a dry cloth.
2. Grease the toasting surfaces with
some vegetable oil or butter.
3. Close the lid of the Sandwich Maker.
The appliance is closed when the
fastener on the handle audibly
locks into place.
4. Insert the power plug into a socket
to turn on the appliance. The
Sandwich Maker immediately begins
to heat up. The red operation light
"POWER" on the lid lights up.
5. Wait approximately 3 minutes until
the green operation light "READY"
lights up. This indicates the end
of the preheating: The appliance has
now reached the operating temperature.
6. Open the lid until it reaches the stop
and lay in your prepared sandwich
ingredients in the correct order:
• Place the bread on the lower toast
surface.
• Now place the other ingredients on
the bread.
• Cover your sandwich with another slice
of toast bread.
Make sure that the filling is distributed
evenly.
7. Close the lid carefully until the fastener
on the handle audibly locks into
place.
Your sandwich will now be toasted.
During preparation the green
operation light "READY" can, at
times, go out because the built in
thermostat constantly readjusts the
temperature.
8. Open the Sandwich Maker after
about 2–3 minutes. Check whether
your sandwich is sufficiently brown.
Vary the cooking time for your sand-
wich depending on the amount and
type of ingredients and your personal taste. Try various cooking times.
9. Remove your sandwiches with a wo-
oden spatula or any other suitable
non-metallic object.
10. To create more sandwiches, close the
lid and repeat steps 5 to 9.
11. Turn the Sandwich Maker off by
pulling the mains plug out of the
socket. Both operation lights will
go out.
KH1121_IB_UK.qxd 26.09.2006 17:07 Uhr Seite 6
Page 9

- 7 -
KH 1121
12. Open the lid until it reaches the
stop. Be careful of hot parts of the
appliance! Allow the appliance to
cool completely, then clean the
toasting surfaces, for instance
with a damp cloth.
Cleaning & care
Before cleaning, pull the power plug
and wait until the appliance has cooled
completely.
Never clean the appliance under running
water, and never submerge it into water.
Do not use abrasive cleansers or sharp
objects.
To avoid damaging the non-stick coating
of the Sandwich Maker, use only
a cloth dampened with hot water for
thorough cleaning. Then wipe off with a
dry cloth. A damp cloth is also sufficient
for cleaning the outer surfaces of the
appliance. Be sure to allow all parts to
dry completely before using the
Sandwich Maker again.
Storage
You can store the Sandwich Maker lying
flat or standing upright.
The Sandwich Maker has an intergrated
cable reel on the bottom of the casing
where you can wind the mains cable
when the appliance is not in use. In this
way you avoid clamping or soiling the
mains cable or creating a source of danger
from a loose hanging cable.
Disposal
Under no circumstances is the
appliance to be disposed of in the
normal household waste.
Dispose of the appliance through an
approved disposal centre or at your
community waste facility.
Observe the currently applicable regulations. In case of doubt, please contact
your waste disposal centre.
Warranty & customer service
Please read the conditions for warranty
and service centre addresses on the
warranty card.
Kompernaß GmbH
Burgstrasse 21
D-44867 Bochum
www.kompernass.com
KH1121_IB_UK.qxd 26.09.2006 17:07 Uhr Seite 7
Page 10

- 8 -
Recipe suggestions
Dutch Tomato Toast
Ingredients:
• 4 slices of toast bread
• Water
• Spring onions
• 1 medium tomato
• Herb butter
• 2 slices of cooked ham
• Salt
• Freshly ground pepper
• 2 slices of young Gouda cheese
1. Wash the spring onions and let them
drip dry. Halve the spring onions
lengthwise and cut them into large
pieces. Bring the water with salt to
boil in a pot. Add the spring onions
and blanch for about 1 minute. Then
place in a colander, run cold water
over them and let drip dry.
2. Wash the tomato and towel dry, slice
in half and remove the stem.
Cut the tomato into slices.
3. Coat a slice of bread with herb butter.
Place a folded slice of ham on the
buttered toast slice. Lay spring onion
pieces and tomato slices over the
ham. Season with salt and pepper.
Cut cheese slices in half and place
them on the prepared bread slice.
Coat another slice of toast with some
garlic butter and place it on your
sandwich with the buttered side
down.
Italian Toast
Ingredients:
• 4 slices of toast bread
• 4 tbsp. tomato paste
• 2 tbsp. salad mayonnaise
• Salt
• Herbs de Provence
• Freshly ground pepper
• 1 medium tomato
• 1 package Mozzarella cheese
• Freshly ground coloured pepper
1. Stir the tomato paste, mayonnaise,
salt, herb de Provence and pepper
together. Coat the toast slices on the
subsequently upper facing side with
this mixture.
2. Wash the tomato and towel dry, slice
in half and remove the stem. Cut the
tomato into slices.
3 Let the Mozzarella cheese drain in
a colander and cut it into slices. Cut
these in half. Now lay the tomato and
Mozzarella slices on the coated slice
and season with pepper.
• Cover your sandwich with a slice of
toast bread.
KH 1121
KH1121_IB_UK.qxd 26.09.2006 17:07 Uhr Seite 8
Page 11

- 9 -
Scandia Toast
Ingredients:
• 4 slices of toast bread
• Dill
• 125 g yoghurt salad cream
• 1 tsp. Dijon mustard
• 1 tsp. liquid honey
• 20 g real salmon cream
(tube from the refrigerated aisle)
• 1 cucumber
• 1 package Mozzarella cheese
• 100 g smoked salmon, sliced
• Freshly ground pepper
1. Rinse off the dill and towel it dry.
Pluck the tips from the dill stalks.
Chop the tips finely. Mix the yoghurt
salad cream with the mustard, honey,
salmon cream and dill.
2. Then peel the cucumber and cut off
the ends. Slice the cucumber in half
lengthwise and scoop out the seeds
with a teaspoon. Cut the cucumber
halves into slices. Then let the
Mozzarella drain in a colander and
cut it into slices.
3. Now coat a toast slice with yoghurt
salad cream and place it on the
Sandwich Maker. Lay a piece of
cucumber on the coated bread slice.
Evenly lay salmon slices on top, followed
by the cheese slices. Season with pepper.
Cover your sandwich with a slice of
toast bread.
Hawaiian Toast
Ingredients:
• 4 slices of toast bread
• 1 pineapple slice (from the can)
• Butter
• 2 slices of cooked ham
• 2 cheese slices
As desired:
• 2 drained emperor cherrys
(out of the glass)
1. Let the pineapples drain in a colander.
Now coat the toast slice with butter.
Place the toast slice in the Sandwich
Maker and overlay it with the ham
and pineapple. Lay the cheese on the
pineapple as the last ingredient.
If you wish you can place the cherrys
in the middle of the toast.
Cover your sandwich with a slice of
toast bread.
KH 1121
KH1121_IB_UK.qxd 26.09.2006 17:07 Uhr Seite 9
Page 12

- 10 -
Curry Turkey Breast Toast
Ingredients:
• 4 slices of toast bread
• 25 g butter
• Sliced turkey breast
• Plums
• Cocktail curry sauce
• Curry powder
1. Stir the butter with the curry sauce
and the curry powder.
Wash the plums, dry them and remove
the pits.
Cut the plums in half and slice the
halves into thin slices.
2. Subsequently coat a toast slice with
the curry butter. Place the toast slice
on the Sandwich Maker.
Now overlay the coated toast slice
with the sliced turkey breast and
plum slices. Cover your sandwich
with another toast slice.
KH 1121
KH1121_IB_UK.qxd 26.09.2006 17:07 Uhr Seite 10
Page 13

- 11 -
KH 1121
KH1121_IB_UK.qxd 26.09.2006 17:07 Uhr Seite 11
 Loading...