

Kolcraft Transitional 4 Drawer Dresser, Transitional 3 Drawer Dresser Assembly Instructions Manual
Q035-R3
Transitional 4 Drawer Dresser Assembly Instructions
(KQ002)
Manufactured by:
Kolcraft Enterprises
1100 W Monroe St
Chicago, IL 60607
www.kolcraft.com
(800) 453-7673
Record manufacturing date from
product label here:
THIS INSTRUCTION BOOKLET CONTAINS IMPORTANT SAFETY INFORMATION. PLEASE READ AND KEEP FOR
FUTURE REFERENCE
READ INSTRUCTIONS CAREFULLY BEFORE ASSEMBLY

Care and Maintenance
l
become loose over time, so it is your responsibility to periodically check the tightness of all
fasteners as long as you use the nursery furniture.
lAfter completing assembly, use the provided wall mounting kit to secure your dresser to the
wall.
l Wood is a natural material and as such it can be affected by changes in temperature and
humidity. Extreme changes in humidity and temperature can cause the wood to warp, swell,
crack or shrink, thus compromising the structural integrity of the furniture and making it
dangerous to use.
l Furniture should always be stored indoors in climate controlled, dry locations. Use care when
using a vaporizer or humidifier around the furniture. Do not aim the vapor at the crib or any other
wooden furniture in the nursery. Avoid using vaporizers or humidifiers for extended periods of
time.
l To clean the furniture, wipe with a damp cloth and immediately dry the surface. Do not use any
chemical cleaners or polishes. Such products can leave a residue on the finish and come in
contact with your child.
l Your furniture has a durable and protective non-toxic finish, however if you decide to refinish it,
you must use a non-toxic finish specified for children's products. Do not use any toxic stripping
methods to remove the old finish.
l Please refer to your furniture’s instruction manual for proper assembly. Instruction manuals
can be downloaded from Kolcraft.com, MiraStudios.com, and Sealybaby.com.
After completing assembly, check that all bolts and screws are secure and tight. Hardware can

Thank you for purchasing a Kolcraft Enterprises, Inc. designed nursery furniture piece including Mira Studios,
Payson Studios, Sealy and any other applicable private label products.
What is the warranty for my nursery furniture?
Kolcraft Enterprises, Inc. warrants all nursery furniture to be free of defects in materials and workmanship
from the date of purchase from an authorized retailer or distributor. All nursery furniture will have a ONE
YEAR warranty from the date of purchase.
What will Kolcraft Enterprises, Inc. do?
Kolcraft will repair or replace, at its option, the defective product. If you have a problem with or are not
satisfied with your product, please contact the Customer Service Department at Kolcraft. Repair or
replacement as provided under this warranty is the exclusive remedy of the consumer. Kolcraft shall not be
liable for any incidental or consequential damages for breach of any express or implied warranty on this
product, except to the extent this exclusion is prohibited by applicable law. Some states do not allow the
exclusion or limitation of incidental or consequential damages, so the above limitation or exclusion may not
apply to you. This warranty gives you specific legal rights, and you may also have other rights which vary
from state to state.
Any implied warranty of merchantability or fitness for a particular purpose on this product is limited in
duration to the duration of this warranty.
What does the nursery furniture warranty cover?
The manufacturer warrants that all structural elements of this product, including hardware, joints, bolts and
mechanical devices shall be free of any defects under normal household use and will be replaced or repaired
free of charge for ONE YEAR from the date of purchase. You must be the original owner of the item and
must properly use and care for the product as indicated in Section 2 below. Information and/or photographs
of the nursery furniture may be requested to verify correct model and condition.
What is not covered by the nursery furniture warranty?
This warranty shall not apply to damages arising from neglect, misuse, abuse, accidental damage, or
commercial use of the product. This warranty excludes the finish or paint coating, and is limited to repair or
replacement of defective parts only. Products purchased through an unauthorized retailer or distributor, any
floor models, or second-hand purchases do not qualify for the warranty.
What if I am a customer located outside of the U.S.?
Product warranties are only valid for the country in which they are purchased. Kolcraft Enterprises, Inc. may
not ship replacement products or parts to countries where such products do not comply with local
regulations, even in the event that the original product was purchased in the U.S. Replacement products that
do comply with local regulations may incur a shipping fee and are subject to customs, taxes and duties of the
country in which the product is being shipped to. If the product was sold through an authorized distributor,
Kolcraft Enterprises, Inc. will provide appropriate distributor information and replacements may only be
offered through your local distributor.
How do I contact Kolcraft Enterprises, Inc. for warranty service?
To obtain warranty service, please contact Kolcraft's Customer Service Department. If the product is
returned to Kolcraft's Customer Service Department for repair or replacement, it must be shipped prepaid
and adequately insured.
Please direct any comments, questions or requests to: Kolcraft Enterprises, Inc. Customer Service
Department, 1100 West Monroe Street, Chicago, IL 60607, 1-800-453-7673 in the U.S. and Canada, 1-312361-6315 outside the U.S. and Canada, Monday-Thursday 8 a.m.- 5 p.m. and Friday 8 a.m. – 3 p.m. Central
Standard Time.
Kolcraft Nursery Furniture Limited Warranty
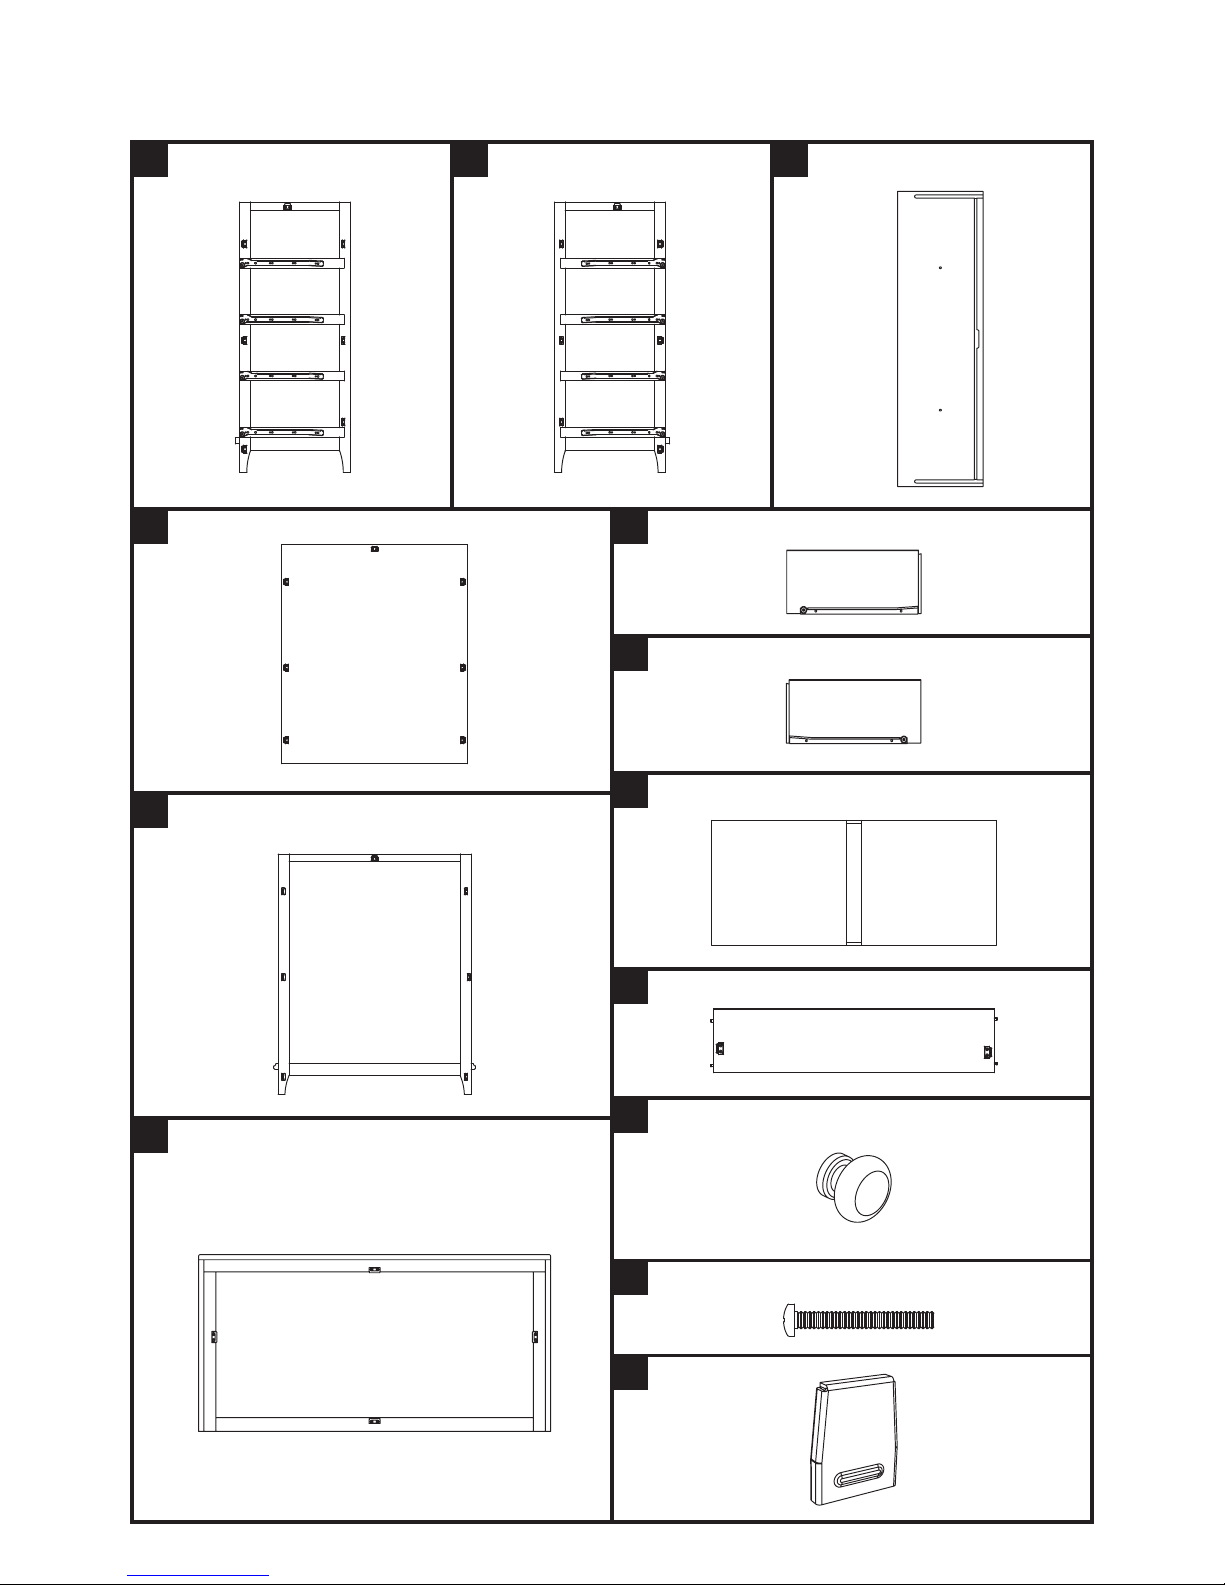
Parts:
Left Side
A
Right Side
B
4x Drawer Front
F
Back
C
Face Frame
D
Top
E
4x Drawer Back
J
4x Drawer Bottom
I
8x Drawer Knob
K
8x Drawer Knob Screw
L
24x Metal Clip
M
4x Left Drawer Side
G
4x Right Drawer Side
H

QuickBlocks:
(H) Metal Clip
Your new Kolcraft dresser uses our unique QuickBlock system: the easiest, fastest,
strongest tool-free furniture assembly hardware available anywhere.
QuickBlocks consist of three parts: a male block, a female block, and a metal clip.
To assemble a joint, slide the two blocks together, then press the Metal Clip (M) over the
two pieces until it’s tight. When applying the metal clips throughout the dresser assembly,
always slide the end with the raised bump onto the blocks first.
For help during assembly, scan here.
Photographiez ce code pour obtenir de l’aide au moment de l’assemblage
Para obtener ayuda durante el montaje, escanea aquí.
F3 FRUSTRATION FREE FURNITURE
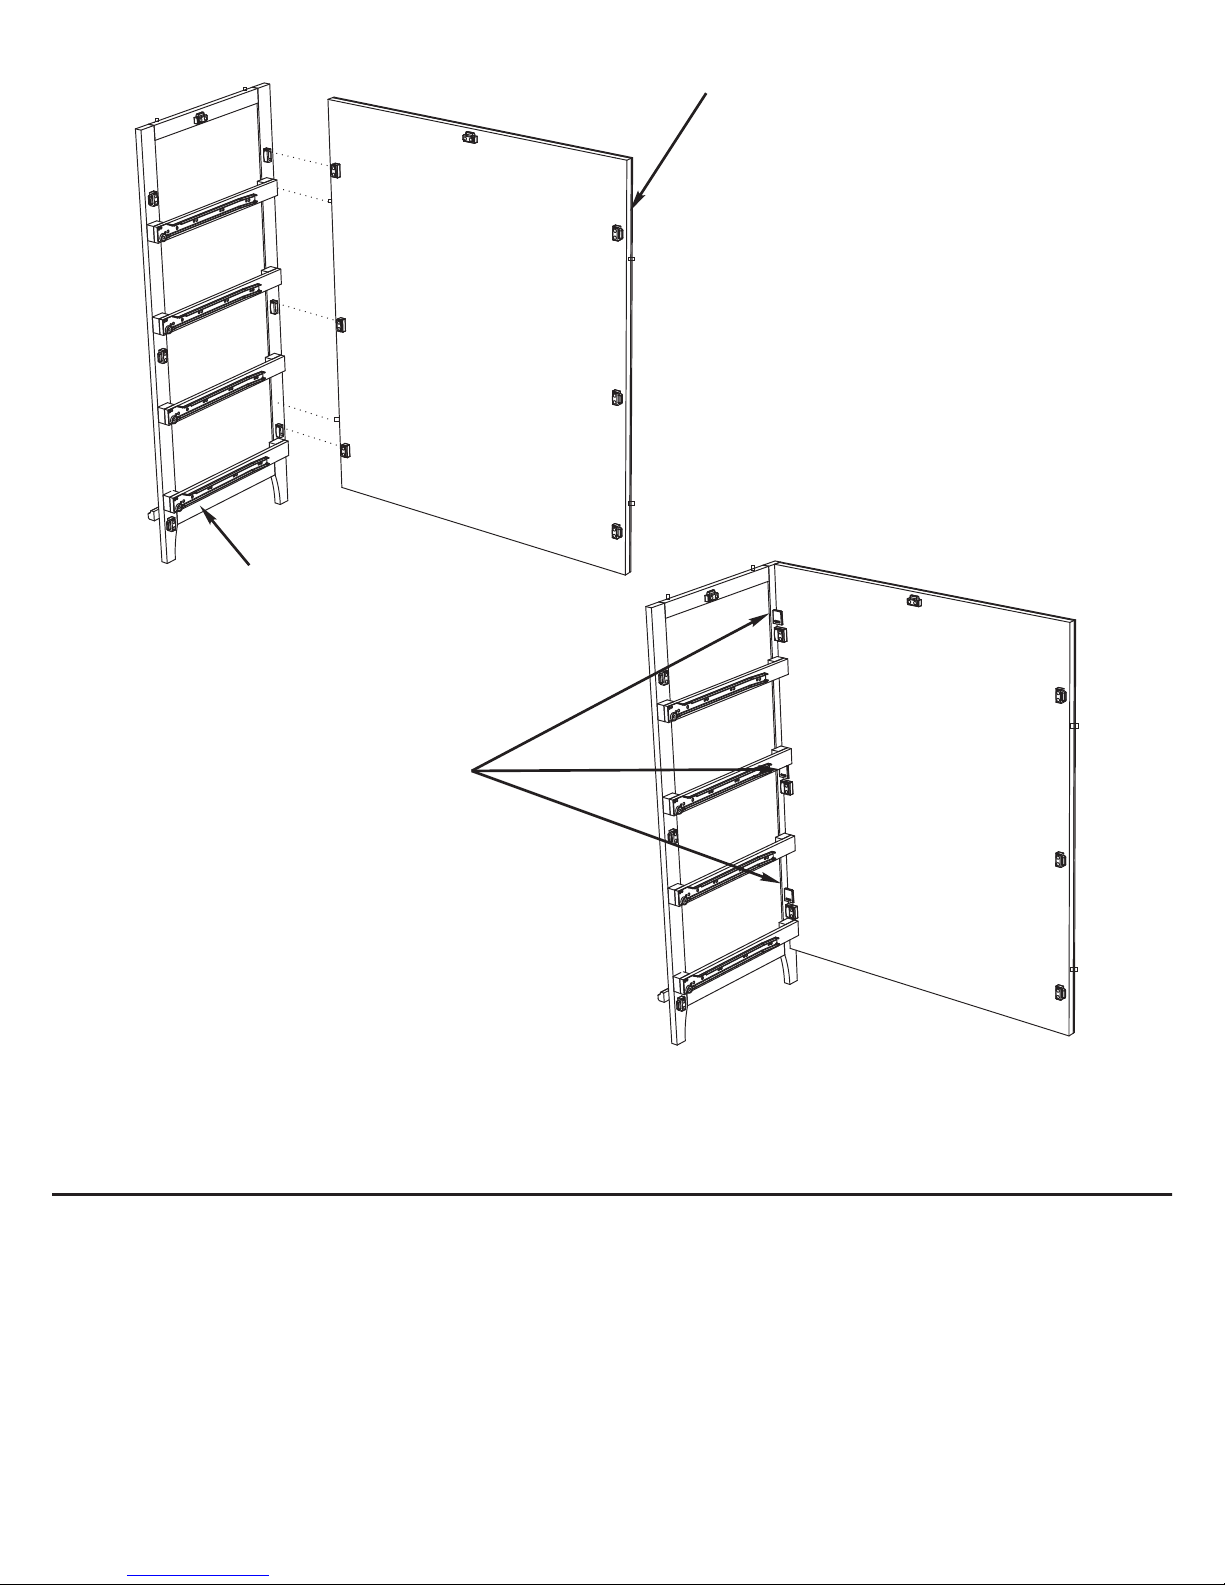
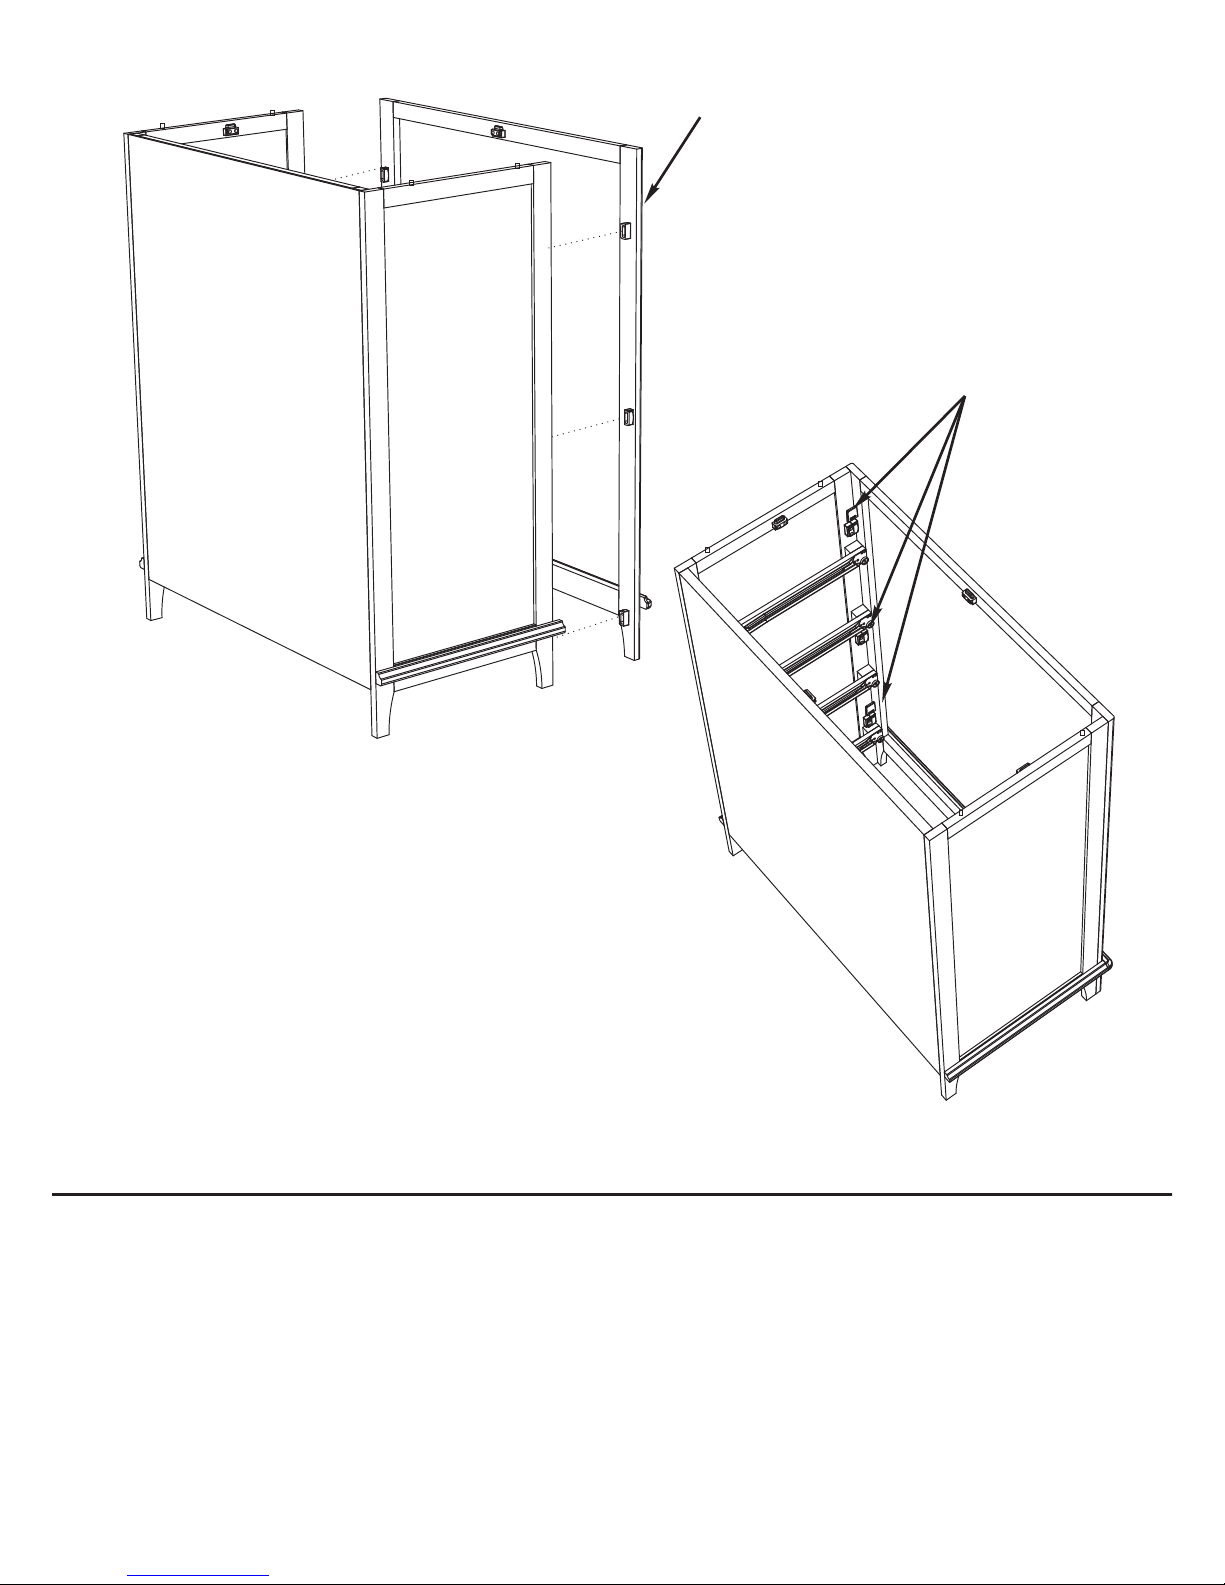
Step 1:
(A) Left Side
(C) Back
(M) Metal Clips
To prevent scratching, assembly on carpet or another soft surface is recommended.
A. Align the Left Side (A) with the Back (C) and slide the blocks together.
B. Slide a Metal Clip (M) over each joint to secure the connection, remembering to slide the
end with the raised bump onto the blocks first.
A. Align the Right Side (B) with the Back (C) and slide the blocks together.
B. Slide a Metal Clip (M) over each joint to secure the connection.
Step 2:
(B) Right Side
(C) Back
(M) Metal Clips
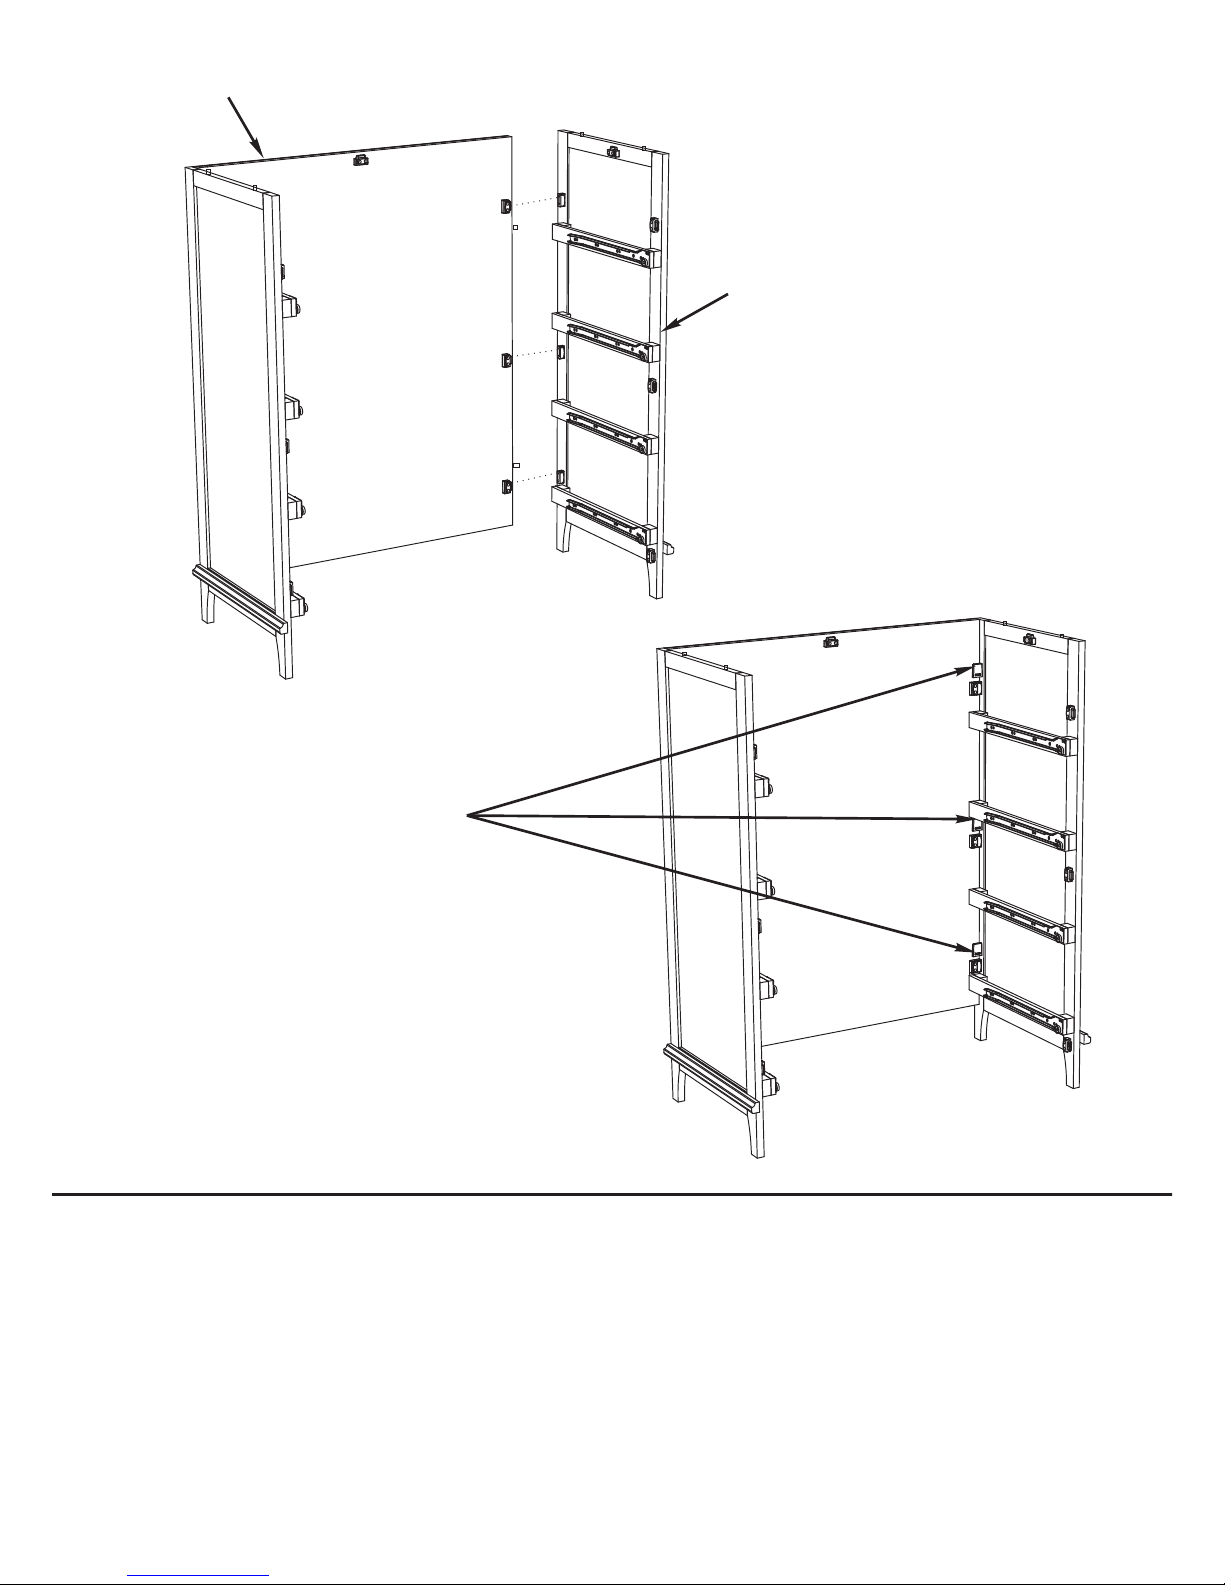
A. Align the Face Frame (D) with the sides and slide the blocks together.
B. Slide a Metal Clip (M) over each joint to secure the connection.
Step 3:
(D) Face Frame
(M) Metal Clips
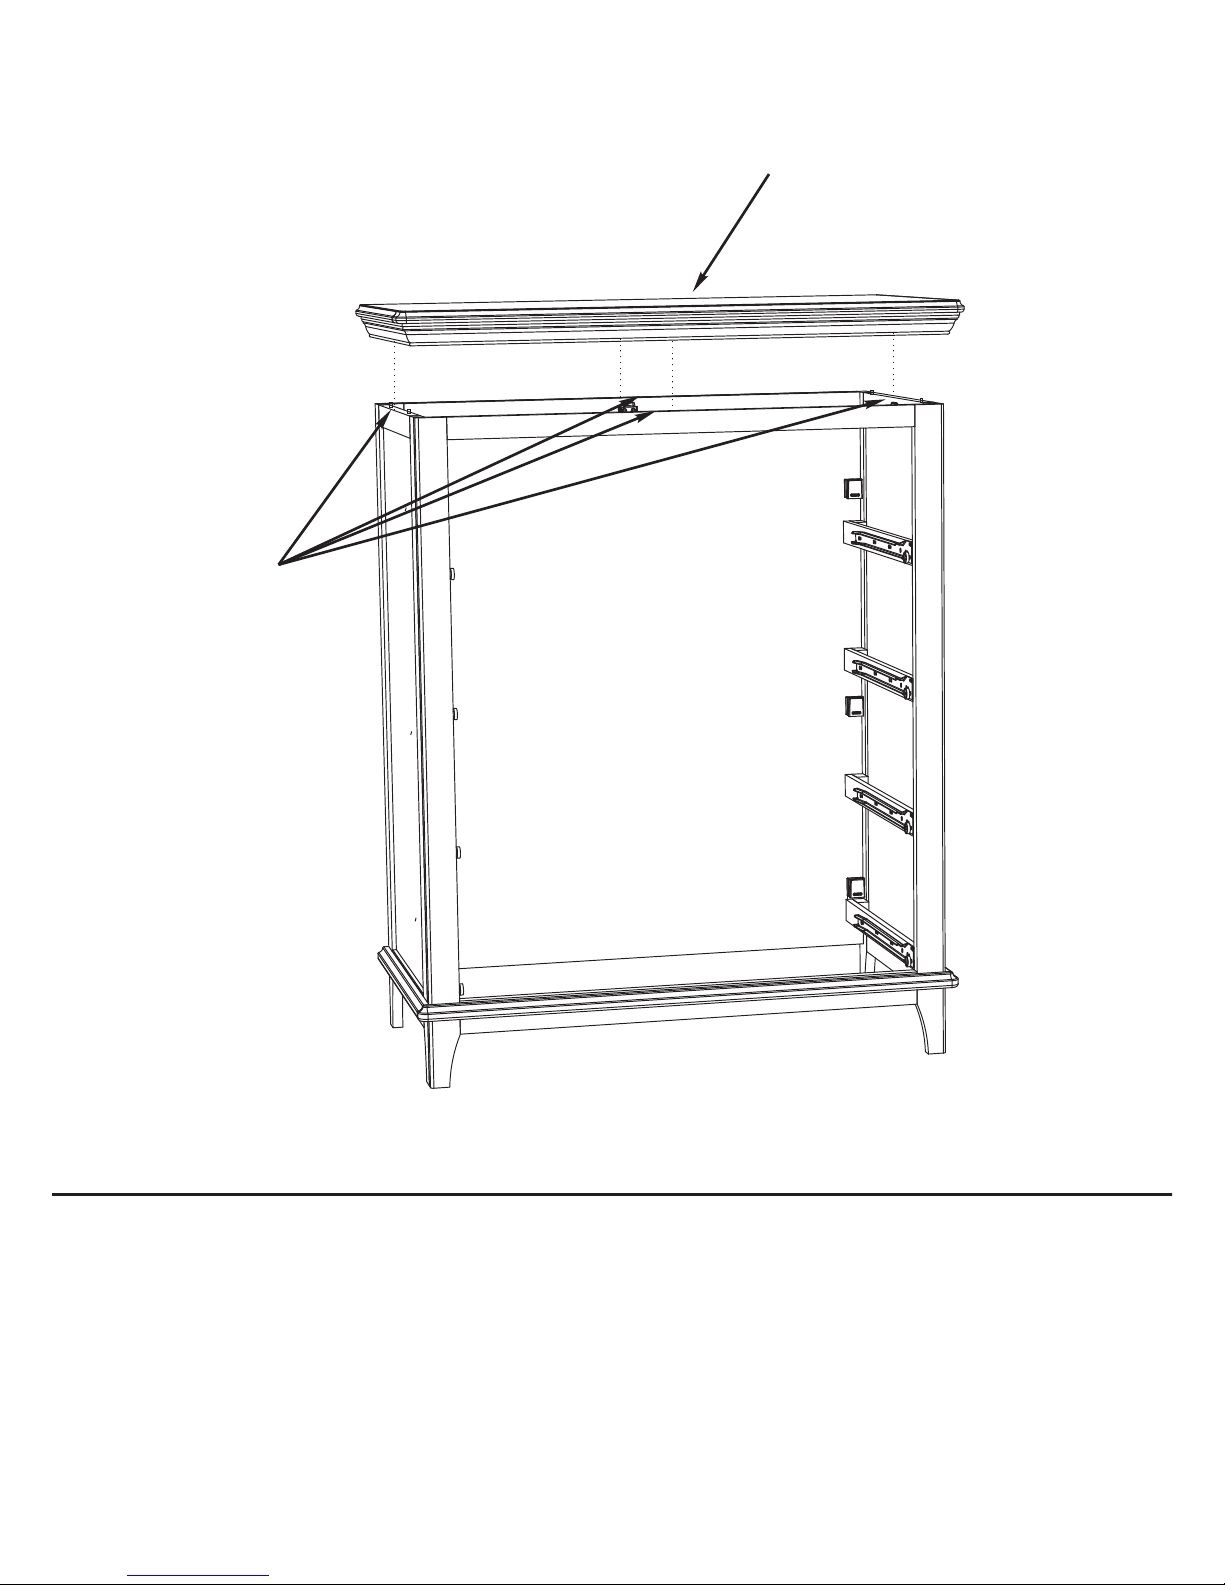
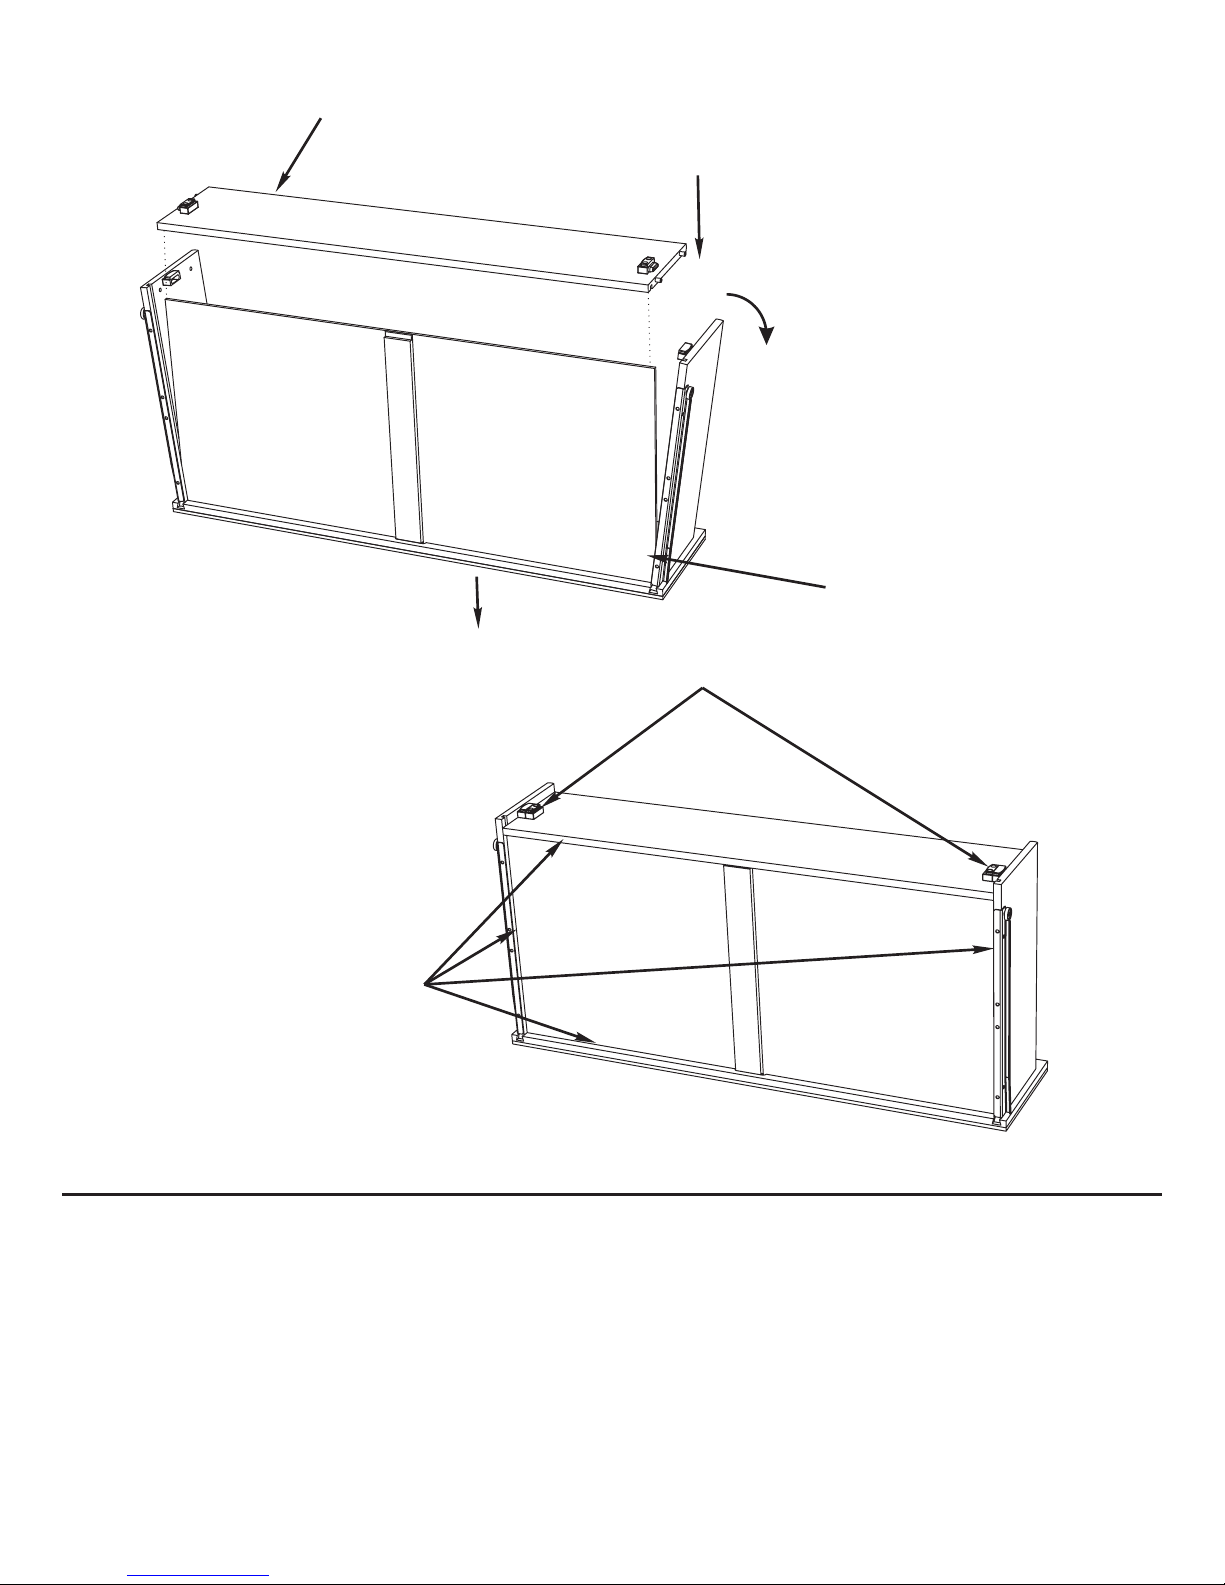
Step 4:
(E) Top
Attach all four
QuickBlocks
A. Align the Top (E) with the rest of the dresser and slide the blocks together.
B. Reach in and slide a Metal Clip (M) over each joint to secure the connection,
remembering to slide the end with the raised bump first. There are four joints in total- one is
located on the front face of the dresser.
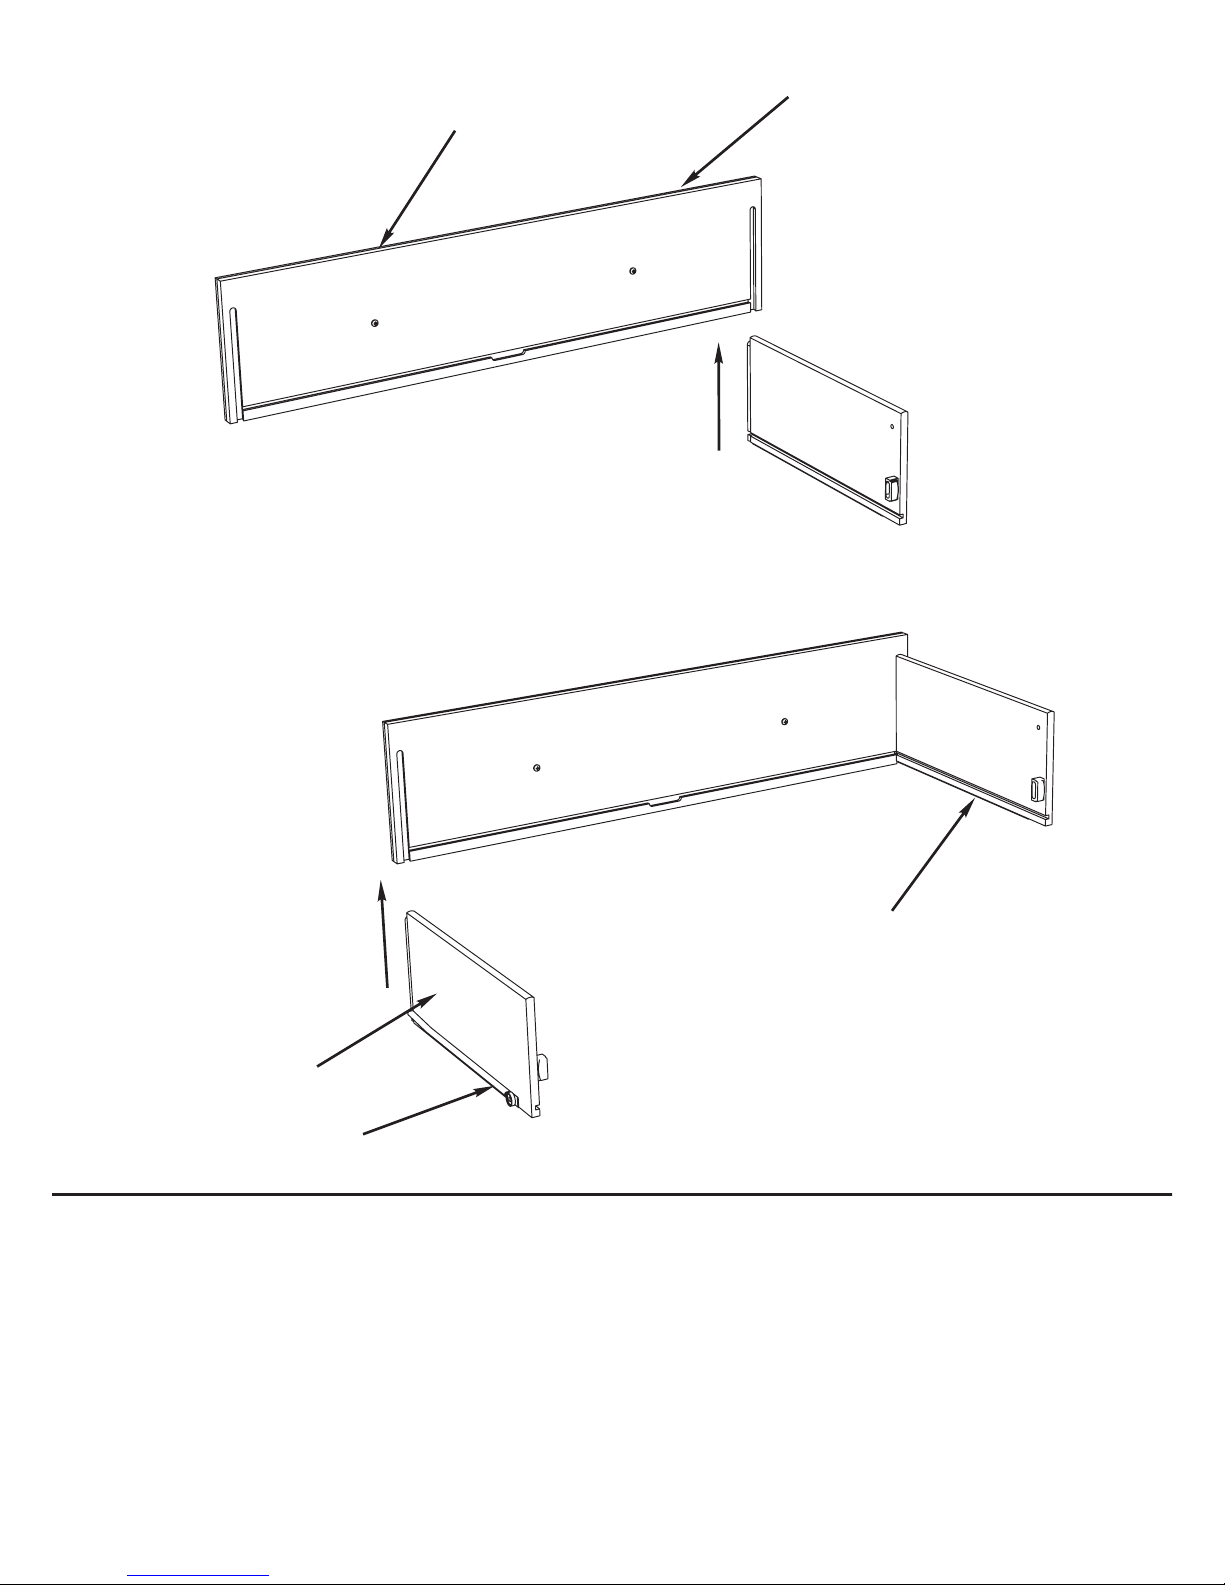
A. Slide the Left Drawer Side (G) into the groove on the Drawer Front (F). Make sure the
drawer glide faces out.
B. Slide the Right Drawer Side (H) into the other groove. Make sure the drawer glide faces
out.
Drawer Assembly Step 1:
(H) Right Drawer Side
(F) Drawer Front
Top of drawer front
Drawer groove faces in
Drawer glide faces out
A. Slide the Drawer Bottom (I) into the grooves along the bottoms of the drawer sides and
drawer front, with the support board facing out.
B. The drawer bottom should be completely secured in the groove of the drawer front.
Drawer Assembly Step 2:
(I) Drawer Bottom
Support board faces out
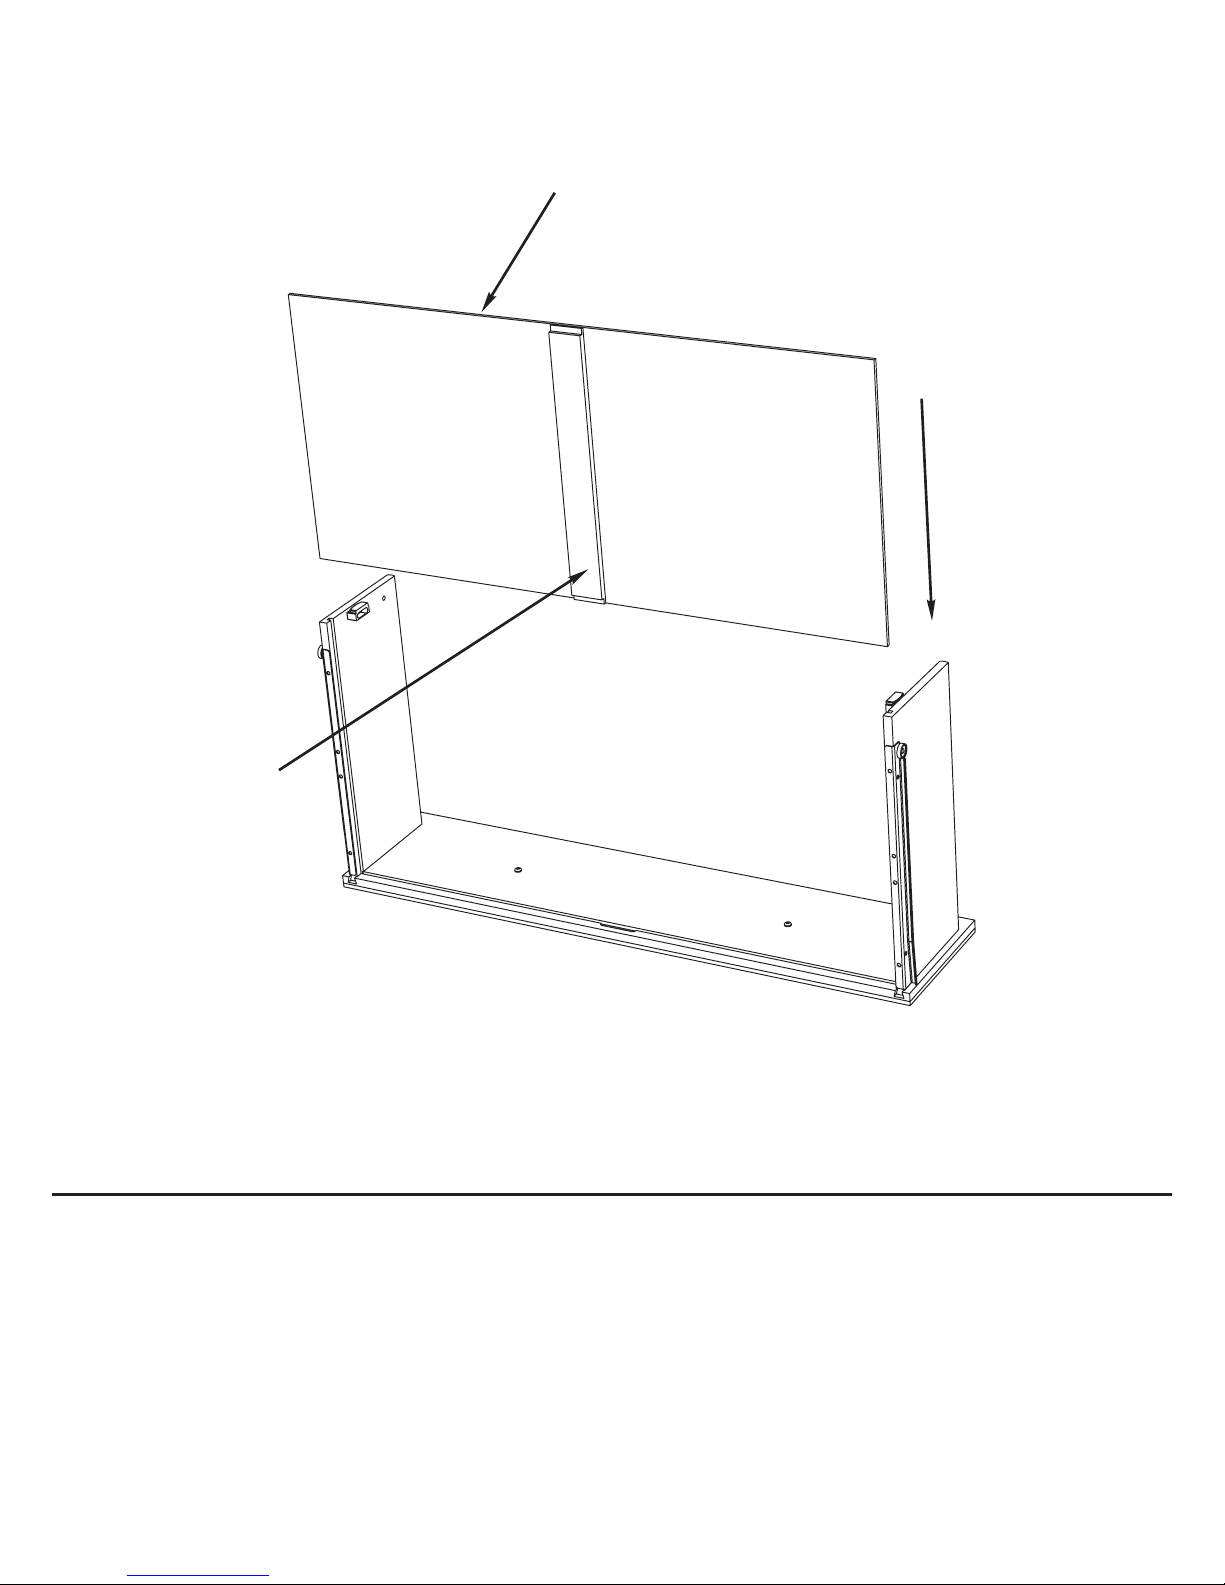
A. Rotate the drawer sides outwards slightly to give some clearance room to assemble the
drawer back.
B. Starting on one end, slide the Drawer Bottom (I) into the Drawer Back (J) groove. Align
the QuickBlock and dowels, pressing firmly together to connect the two pieces.
C. Carefully work your way to the other drawer side, making sure the drawer bottom is
securely aligned in the drawer back groove. Align the QuickBlock and dowels, pressing firmly
together to connect the two pieces.
D. Slide a Metal Clip (M) over both QuickBlocks to secure the connection.
Drawer Assembly Step 3:
Seat drawer bottom firmly in groove
Drawer Back should be
seated in all four grooves
Rotate drawer sides outward slightly
(I) Drawer Bottom
QuickBlocks
should be aligned
(J) Drawer Back
Slide the drawer bottom into the
groove of the drawer back.
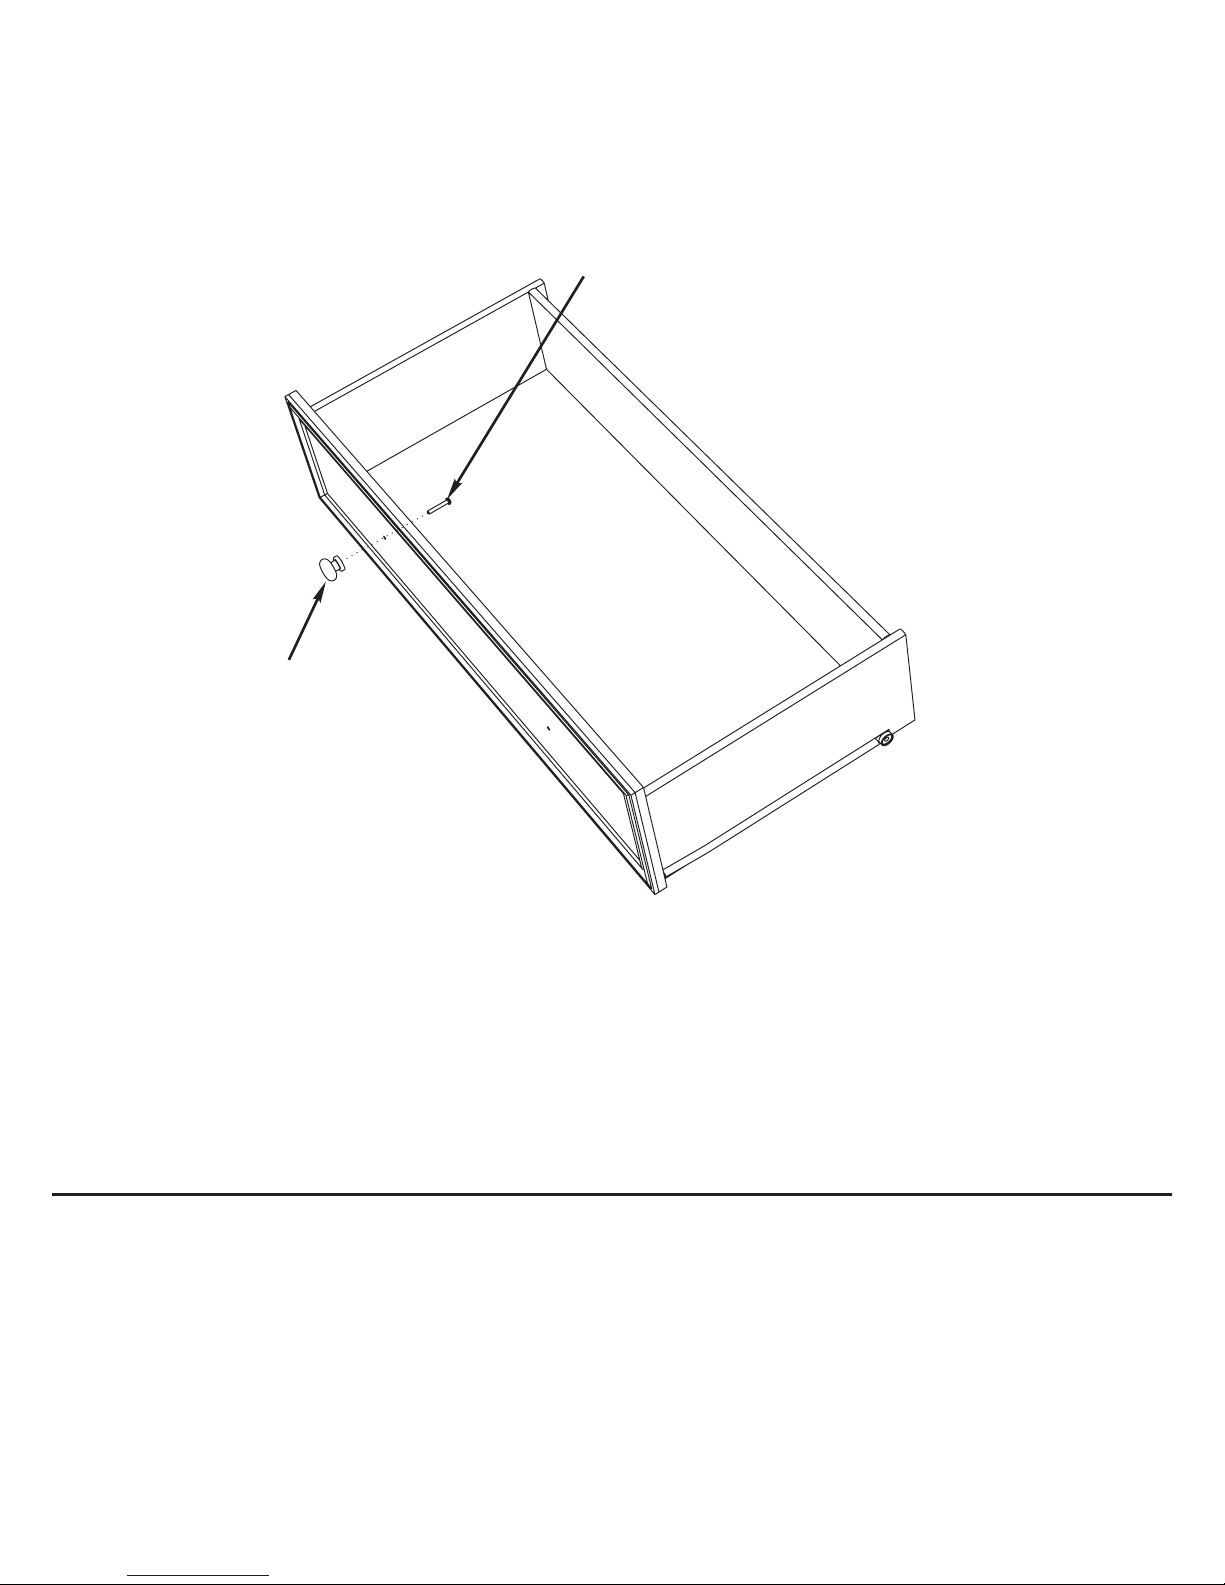
A. Align the Drawer Knob (K) with the holes in the Drawer Front and thread the Drawer
Knob Screw (L) into the knob.
B. Repeat for the other knob.
C. Tighten the screws with a Phillips screwdriver.
D. Repeat Drawer Assembly Steps 1-4 for the other three drawers.
Drawer Assembly Step 4:
(K) Drawer Knob
(L) Drawer Knob Screw

A. Slide an assembled drawer into the tracks, tipping it up first to align the wheels with the
runners. The drawers should open and close smoothly.
B. Repeat for the other three drawers.
C. A wall mounting kit is provided with your dresser. Please install it using the instructions
included in the kit.
Step 5:
Align rear wheel on drawer with drawer track.
 Loading...