

Kolcraft S82-R3 User Manual
Contours®Options®/ Optima™Tandem Stroller Instruction Sheet
Hoja de instrucciones de la carriola Contours
®
Options®/ Optima™Tandem
©2012 Kolcraft®Enterprises, Inc. S82-R3 11/11

WARNING
AAvvooiidd sseerriioouuss iinnjjuurryy ffrroomm ffaalllliinngg oorr sslliiddiinngg oouutt.. AAllwwaayyss uussee RReessttrraaiinntt SSyysstteemm..
Your ch
you follow these instructions. DO NOT USE STROLLER UNTIL YOU READ AND
UNDERSTAND THESE INSTRUCTIONS.
HHooww ttoo KKeeeepp YYoouurr CChhiilldd SSaaffee WWhhiillee UUssiinngg tthhiiss SSttrroolllleerr
•
•
•
•
• Only use this stroller with children who each weigh less than 40 lbs. (18.14 kg)
•
• Always place the child in the front seat before placing another in the back seat.
WWhhaatt ttoo AAvvooiidd WWhhii
•
•
•
•
•
•
• Only use replacement parts supplied by the manufacturer.
•
•
ild's safety depends on you. Proper stroller use cannot be assured unless
IIMMPPOORRTTAANNTT SSAAFFEETTYY IINNFFOORRMMAATTIIOONN::
AAdduulltt AAsssseemmbbllyy RReeqquuiirreedd..
NNeevveerr lleeaavvee yyoouurr cchhiilldd uunnaatttteennddeedd wwhhiillee iinn ssttrroolllleerr..
Accidents can happen
quickly while your back is turned. You must always keep your child in view while
your child is in the stroller, even when sleeping. Do not use this product as a bed.
Your child may become tangled in straps or pads and suffocate.
AAllwwaayyss uussee rreessttrraaiinntt ssyysstteemm ttoo kkeeeepp cchhiilldd ffrroomm ssttaannddiinngg uupp oorr ffaalllliinngg oouutt ooff
tthhee ssttrroolllleerr..
AAllwwaayyss lloocckk tthhee ssttrroolllleerr ooppeenn bbeeffoorree aalllloowwiinngg yyoouurr cchhiilldd iinn oorr nneeaarr tthhee ssttrroolllleerr..
TThhiiss pprreevveennttss iinnjjuurriieess ccaauusseedd bbyy ssttrroolllleerr ccoollllaappssiinngg..
and whose head rests below the top of the seat back. Use by larger children may
damage the stroller, or cause a hazardous unstable condition to exist. Use this
stroller in the reclined position until child can sit up unassisted.
AAllwwaayyss sseett tthhee wwhheeeell bbrraakkeess wwhheenn ssttrroolllleerr iiss nnoott mmoovviinngg,, eessppeecciiaallllyy oonn aann
iinncclliinnee
. This prevents the stroller from rolling away.
When removing children, always remove the child in the back seat first before
removing the child in the front. Failure to do so may cause the stroller to become
unstable and tip.
llee UUssiinngg tthhiiss SSttrroolllleerr
AAllwwaayyss bbaallaannccee tthhee wweeiigghhtt ooff tthhee ssttrroolllleerr eevveennllyy..
Do not place parcels or
accessory items on the stroller canopy, seat, or over the handle. Do not allow
children to play with or hang onto the stroller.
NNeevveerr uussee tthhiiss ssttrroolllleerr oonn ssttaaiirrwwaayyss oorr eessccaallaattoorrss..
TThhiiss iiss nnoott aann eexxeerrcciissee ssttrroolllleerr!!
Do not use this product while running, jogging,
in-line skating or participating in other athletic activities.
TTaakkee ccaarree wwhheenn ffoollddiinngg aanndd uunnffoollddiinngg ttoo pprreevveenntt ffiinnggeerr ppiinncchhiinngg..
MMaakkee ssuurree cchhiillddrreenn aarree cclleeaarr ooff aannyy mmoovviinngg ppaarrttss
if you adjust the stroller,
otherwise they may be injured.
DDOO NNOOTT
allow children to climb into stroller unassisted. Stroller may tip over and
injure child.
DDOO NNOOTT ppuutt cchhiilldd iinn bbaasskkeett..
DDOO NNOOTT lliifftt bbyy ttrraayy//bbaarr oorr ttooyyss..
Consumer Service: 1.800.453.7673
www.kolcraft.com/contours
2
Continued on next page

HHooww ttoo UUssee tthhiiss SSttrroolllleerr wwiitthh YYoouurr iinnffaanntt ccaarr sseeaatt
• To ensure your infant car seat is properly installed on the stroller, make sure it is:
- Facing the person pushing the stroller.
- Tightly secured to the stroller with the car seat restraint straps.
• If at any time your infant car seat does not secure properly to the stroller, or if
you have questions about assembly or use of the stroller,
DDOO NNOOTT
use this
product. Call Kolcraft at 1-800-453-7673.
OOnnllyy ttrraannssppoorrtt iinnffaannttss tthhaatt aarree wwiitthhiinn tthhee ssiizzee aanndd wweeiigghhtt lliimmiittaattiioonnss ooff yyoouurr iinnffaanntt
•
ccaarr sseeaatt,, aass ddeessccrriibbeedd iinn tthhee iinnssttrruuccttiioonn mmaannuuaall pprroovviiddeedd bbyy tthhee iinnffaanntt ccaarr sseeaatt
mmaannuuffaaccttuurreerr..
•• TTHHEE FFOOLLLLOOWWIINNGG IINNFFAANNTT CCAARR SSEEAATTSS CCAANN BBEE UUSSEEDD WWIITTHH TTHHIISS SSTTRROOLLLLEERR::
-Britax®Chaperone
-
Chicco®KeyFit
-
Chicco®KeyFit 30
-Combi®Shuttle 33
®
-Cosco
First Ride DX
®
-Cosco
Starter
-
Evenflo®Discovery
-
Evenflo®Discovery 5
IIff yyoouurr iinnffaanntt ccaarr sseeaatt iiss nnoott oonnee ooff tthhee mmooddeellss lliisstteedd aabboovvee,, DDOO NNOOTT uussee yyoouurr
•
™
™
-
Evenflo®Embrace
-
Evenflo®Embrace™ 5
-
Evenflo®Embrace™ 5 LX
-
Evenflo®Serenade
-
Graco®Safe Seat
-
Graco®SnugRide®Infant
-
Graco®SnugRide®30
-
Graco®SnugRide®32
iinnffaanntt ccaarr sseeaatt wwiitthh tthhiiss ssttrroolllleerr.. OOtthheerr iinnffaanntt ccaarr sseeaatt mmooddeellss wwiillll nnoott
™
™
-
Graco®SnugRide®35
-
Maxi-Cosi®Mico
-
Peg Pérego®Primo Viaggio
-
Peg Pérego®Primo Viaggio SIP
-
Peg Pérego®Primo Viaggio SIP 30-30
-
Safety 1st®Designer®22
-
Safety 1st®onBoard™35
-
Safety 1st®onBoard™35 Air
™
ffiitt pprrooppeerrllyy
aanndd mmaayy rreessuulltt iinn sseerriioouuss iinnjjuurryy ttoo yyoouurr cchhiilldd..
•• WWhheenn uussiinngg tthhiiss pprroodduucctt wwiitthh oonnllyy 11 cchhiilldd,, oonnllyy uussee tthhee ssttrroolllleerr sseeaatt oorr
iinnffaanntt ccaarr sseeaatt aaddaapptteerr iinn tthhee ffrroonntt ppoossiittiioonn..
•• DDOO NNOOTT
use stroller seat and
infant car seat adapter in the same seating location
at the same time.
Britax®, Chicco®, Combi®, Cosco®, Evenflo®, Graco®, Maxi-Cosi®, Peg Pérego®and Safety 1st®are
trademarks of their respective owners. They are not associated with Kolcraft Enterprises, Inc. and no
approval by them is to be implied.
Consumer Service: 1.800.453.7673
www.kolcraft.com/contours
3
Continued on next page

ADVERTENCIA
EEvviittee ddaaññooss sseerriiooss ccaauussaaddooss ppoorr ccaaííddaass oo aall ddeesslliizzaarrssee ddeell aassiieennttoo..
SSiieemmpprree uussee eell ssiisstteemmaa ddee cciinnttuurroonneess..
No se puede asegurar un uso apropiado de la carriola a menos que usted siga
estas instrucciones. NO USE LA CARRIOLA HASTA QUE USTED HAYA LEIDO Y COMPRENDIDO ESTAS INSTRUCCIONES.
IINNFFOORRMMAACCIIÓÓNN IIMMPPOORRTTAANNTTEE DDEE SSEEGGUURRIIDDAADD::
CCóómmoo mmaanntteenneerr aa ssuu hhiijjoo sseegguurroo mmiieennttrraass uuttiilliizzaa ééssttaa ccaarrrriioollaa
EEnnssaammbbllaaddoo ppoorr uunn aadduullttoo eess nneecceessaarriioo..
•
NNuunnccaa ddeejjee aa ssuu nniiññoo ssoolloo eenn llaa ccaarrrriioollaa..
•
repentinamente mientras usted se encuentra de espaldas. Debe mantener a su
niño siempre a la vista minetras esté en la carriola, incluso esté durmiendo. No
utilice esté producto como cama. Su niño pudiera quedar atrapado entre las
correas o sofocarse con los colchoncitos.
SSiieemmpprree uussee eell ssiisstteemmaa ddee ssuujjeecciióónn ppaarraa eevviittaarr qquuee ssuu nniiññoo ssee ppaarree eenn llaa
•
ccaarrrriioollaa oo ssee ccaaiiggaa..
SSiieemmpprree aasseegguurree llaa ccaarrrriioollaa eenn ppoossiicciióónn ddeesspplleeggaaddaa aanntteess ddee ppeerrmmiittiirr qquuee
•
ssuu nniiññoo ssee aacceerrqquuee aa eellllaa oo ssee mmoonnttee eenn eellllaa.. EEssttoo eevviittaarráá qquuee ssee cciieerrrree
ssúúbbiittaammeennttee yy ccaauussee lleessiióónn aall nniiññoo..
• El uso de esta carriola es solo para niños que pesen menos de 18.14 kg (40
libras) y quiénes su cabeza descansen hacia abajo de lo arriba de la trasera de el
asiento. Uso por niños mas grandes pueden dañar la carriola, o causar un
inestable condición peligrosa que existe. Use esta carriola en la posicion
reclinable hasta que el niño pueda sentarse sin ayuda.
SSiieemmpprree ppoonnggaa eell ffrreennoo ddee llaass rruueeddaass ccuuaannddoo ll
•
mmoovviimmiieennttoo,, eessppeecciiaallmmeennttee ccuuaannddoo eessttáá eenn uunnaa ssuuppeerrffiicciiee iinncclliinnaaddaa..
evitará que la carriola ruede accidentalmente.
• Siempre ponga el niño en el asiento delantero antes de colocar otro niño en el
asiento trasero. Cuando saque los niños, comience siempre por el niño que se
encuentra en el asiento trasero antes de quitar el que se encuentra en el asiento
delantero. De otra manera la carriola es inestable y podría voltearse si usted saca
los niños en el orden equivocado.
QQuuéé ddeebbee eevviittaarr mmiieennttrraass uuttiilliizzaa ééssttaa ccaarrrriioollaa
SSiieemmpprree mmaanntteennggaa eell ppeessoo ddee llaa ccaarrrriioollaa rreeppaarrttiiddoo ppoorr iigguuaall..
•
paquetes ni accesorios sobre la sombrilla, los asientos o la manija. No permita
que los niños jueguen con la carriola o se cuelguen de ella.
NNuunnccaa uuttiilliiccee eessttaa ccaarrrriioollaa eenn eessccaalleerraass oo eessccaalleerraass aauuttoommááttiiccaass..
•
¡¡EEssttaa ccaarrrriioollaa nnoo eessttáá ddiisseeññaaddaa ppaarraa hhaacceerr eejjeerrcciicciioo!!
•
para correr, trotar, patinar o participar en otras actividades atléticas.
TToommee ccuuiiddaaddoo ccuuaannddoo eessttee ddoobbllaannddoo oo ddeessddoobbllaannddoo ppaarraa pprreevveenniirr ppeelllliizzccooss
•
aa llooss ddeeddooss..
Consumer Service: 1.800.453.7673
www.kolcraft.com/contours
seguridad de su hijo/a depende de usted.
La
Pueden ocurrir accidentes
aa ccaarrrriioollaa nnoo eessttéé eenn
Esto
No coloque
No debe ser utilizada
Continuación en la página siguiente
4

SSii nneecceessiittaarraa aajjuussttaarr llaa ccaarrrriioollaa,, aasseeggúúrreessee ddee qquuee llooss nniiññooss nnoo eessttéénn eenn
•
ccoonnttaaccttoo ccoonn llaass ppiieezzaass mmóóvviilleess
NNoo
•
permita que el niño se suba por sí solo en la carriola. La carriola se puede
, de lo contrario podrían lesionarse.
voltear y el niño puede lesionarse.
• Use únicamente piezas de reemplazo del fabricante.
NNoo ppoonnggaa ssuu nniiññoo eenn llaa ccaannaassttaa..
•
NNOO lloo ssuubbaa ccoonn bbaannddeejjaa//bbaarrrraa oo jjuugguueetteess..
•
CCóómmoo uuttiilliizzaarr eessttaa ccaarrrriioollaa ccoonn eell aassiieennttoo iinnffaannttiill ppaarraa aauuttoo
• Para asegurarse que el asiento infantil de auto este bien instalado en la carriola
asegure que:
- Se encuentre de frente a la persona empujando la carriola.
- Este apretado a segurado a la carriola con los cinturones rojos de seguridad.
• Si su asiento infantil no se encuentra bien asegurado a la base o si tiene alguna
duda sobre el ensamblaje o uso del portaasientos,
NNOO UUSSEE
este producto.
Llame a Kolcraft al 1-800-453-7673.
TTrraannssppoorrttee úúnniiccaammeennttee nniiññooss ddeell ttaammaaññoo yy ppeessoo llíímmiittee eessppeecciiffiiccaaddooss eenn ssuu
•
aassiieennttoo iinnffaannttiill,, ccoommoo ssee ddeessccrriibbee eenn eell mmaannuuaall ddee iinnssttrruucccciioonneess ddee ssuu
ffaabbrriiccaannttee..
•• LLOOSS SSIIGGUUIIEENNTTEE AASSIIEENNTTOOSS DDEE AAUUTTOOMMÓÓVVIILL PPAARRAA BBEEBBÉÉSS SSEE PPUUDDEENN UUTTIILLIIZZEERR
CCOONN EESSTTAA CCAARRRRIIOOLLAA::
-Britax®Chaperone
-
Chicco®KeyFit
-
Chicco®KeyFit 30
-Combi®Shuttle 33
®
-Cosco
First Ride DX
®
-Cosco
Starter
-
Evenflo®Discovery
-
Evenflo®Discovery 5
-
Evenflo®Embrace
-
Evenflo®Embrace™ 5
-
Evenflo®Embrace™ 5 LX
-
Evenflo®Serenade
-
Graco®Safe Seat
-
™
™
Graco®SnugRide®Infant
-
Graco®SnugRide®30
-
Graco®SnugRide®32
™
™
-
Graco®SnugRide®35
-
Maxi-Cosi®Mico
-
Peg Pérego®Primo Viaggio
-
Peg Pérego®Primo Viaggio SIP
-
Peg Pérego®Primo Viaggio SIP 30-30
-
Safety 1st®Designer®22
-
Safety 1st®onBoard™35
-
Safety 1st®onBoard™35 Air
™
SSii ssuu aassiieennttoo iinnffaannttiill ppaarraa aauuttoo nnoo eess nniinngguunnoo ddee llooss mmooddeellooss aanntteerriioorreess,, nnoo
•
uussee eessttee aassiieennttoo iinnffaannttiill ppaarraa aauuttoo eenn eessttaa ccaarrrriioollaa.. OOttrrooss mmooddeellooss ddee
aassiieennttooss
ddee aauuttoo nnoo ssee aajjuussttaarráánn ccoorrrreeccttaammeennttee yy ppuueeddeenn ccaauussaarr lleessiioonneess
ggrraavveess aa ssuu nniiññoo..
CCuuaannddoo uussee eessttee pprroodduuccttoo ssóólloo ccoonn uunn nniiññoo,, uussee ssóólloo eell aassiieennttoo oo aaddaappttaaddoorr
•
ddee aauuttoommóóvviill eenn llaa ppoossiicciióónn ffrroonnttaall..
NNOO UUTTIILLIICCEE
•
iento y el adaptador de la asiento de coche del infante en la
el as
misma asiento al mismo tiempo.
Britax®, Chicco®, Combi®, Cosco®, Evenflo®, Graco®, Maxi-Cosi®, Peg Pérego®y Safety 1st®son
marcas registradas de sus respectivos dueños. No están asociados con Kolcraft Enterprises, Inc. y
no existe ninguna aprobación implícita.
Consumer Service: 1.800.453.7673
www.kolcraft.com/contours
5
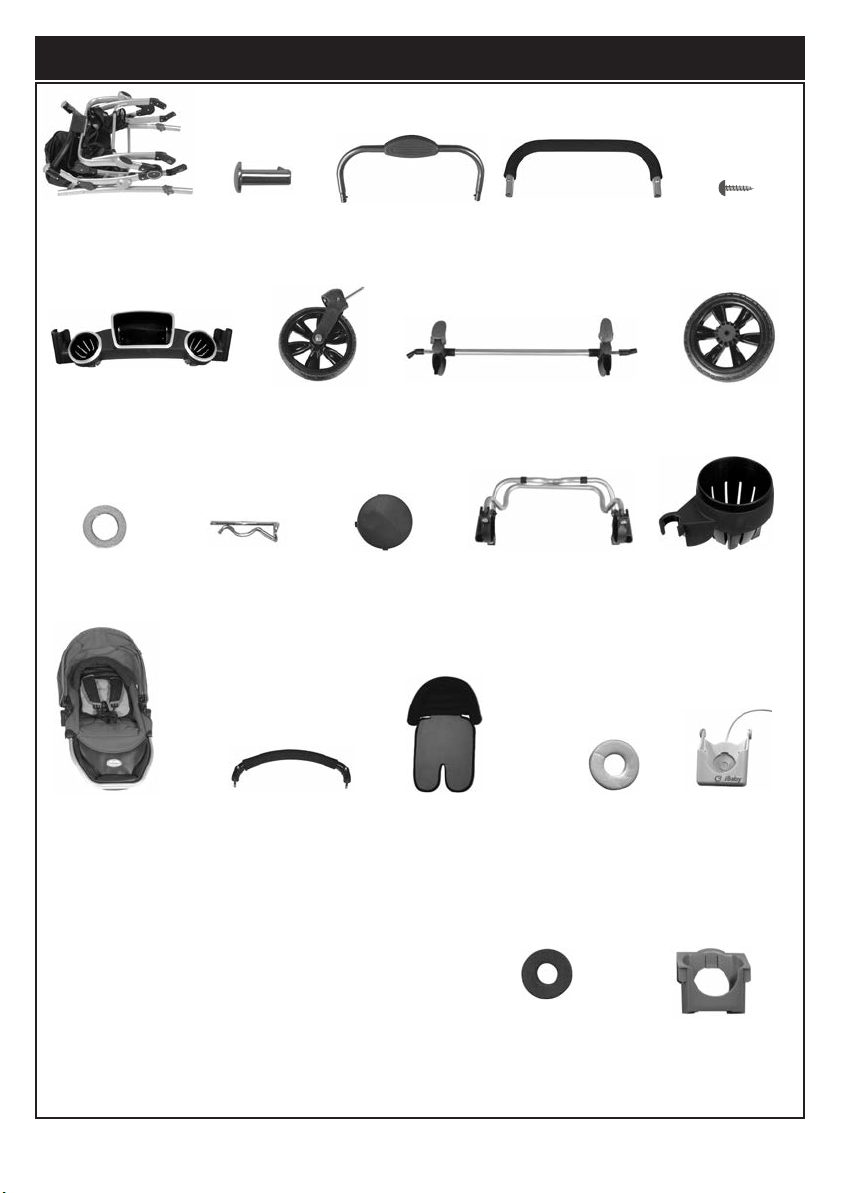
PPAARRTTSS LLIISSTT || LLIISSTTAA DDEE PPAARRTTEESS
Stroller Frame with
Basket
Estructura de la carriola
con canastilla
Parent Tray
Charola para adultos
Washers (2)
Arandelas (2)
Pins (2)
(Select Models)
Alfileres (2)
(modelos selectos)
Front Wheels (2)
Cotter Pins (2)
Pasadors (2)
Ruedas
delanteras (2)
Basket Tube
Tubo de la
canastilla
Hub Caps (2)
Tapóns del
cubo (2)
Stroller Handle
Asa de la carriola
Brake Assembly with Rear Axle
Montaje de freno con eje trasero
Infant Car Seat Adapter
(Select Models)
Adaptador de asiento de
auto infantil (modelos selectos)
Screws (2)
Tornillos (2)
Rear Wheels (2)
Ruedas traseras (2)
Cupholder (2)
(select models)
Soporte de vaso
(2) (modelos selectos)
Reversible Seats (2)
Asientos reversibles (2)
Consumer Service: 1.800.453.7673
www.kolcraft.com/contours
Front Bars (2)
Barras frontales (2)
Infant Neck Rolls (2)
(Select Models)
Soporte del cuello (2)
(modelos selectos)
6
Protection Pad
Almohadilla de
Thick iPod
Protection Pad
(select models)
Almohadilla de
protectíon iPod
grueso
(modelos selectos)
®
Thin iPod
(select models)
protectíon
iPod®grueso
(modelos selectos)
®
®
iPod®Dok
(select models)
(modelos selectos)
iPod®Mini Adapter
(select models)
iPod®Mini
Adaptador
(modelos selectos)
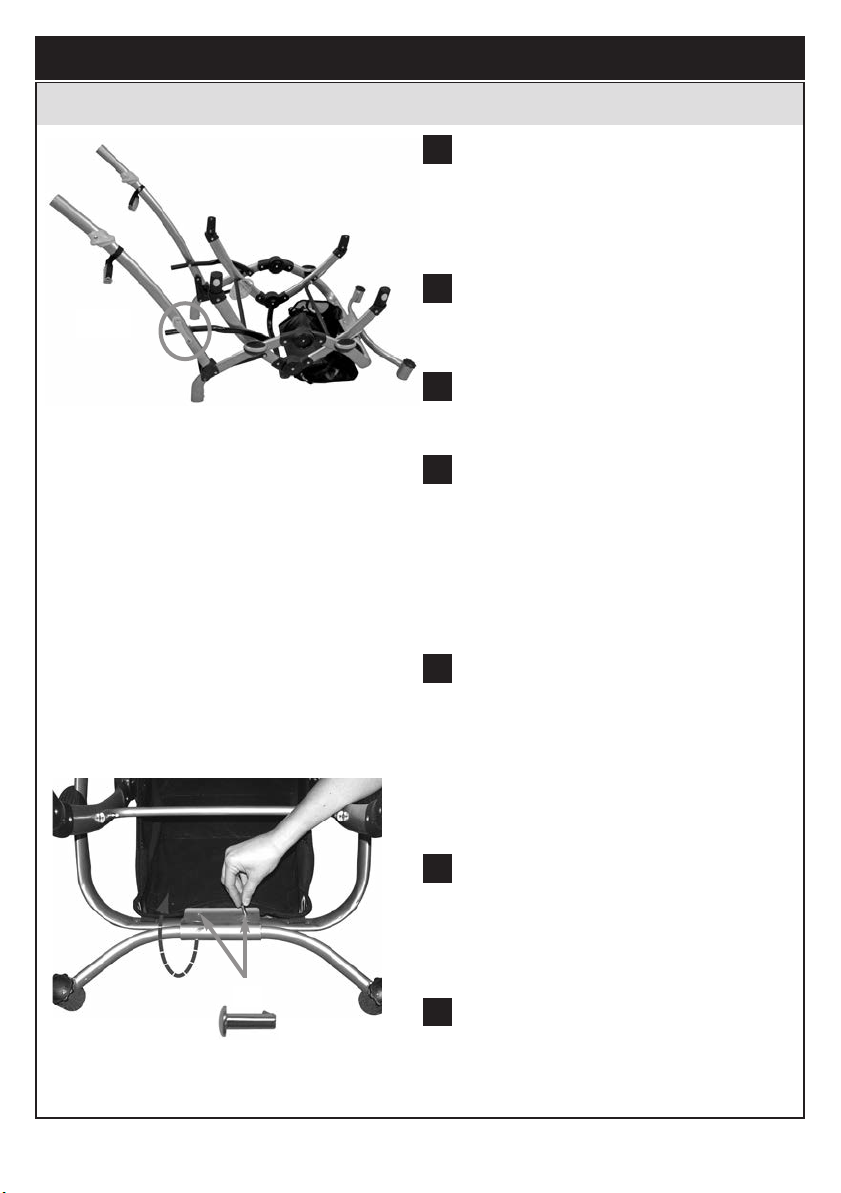
HHOOWW TTOO AASSSSEEMMBBLLEE YYOOUURR SSTTRROOLLLLEERR || CCÓÓMMOO EENNSSAAMMBBLLAARR SSUU CCAARRRRIIOOLLAA
To Open Stroller | Para abrir carriola
Remove any cardboard inserts or plastic ties
11
used to protect the product during shipment.
Remueva cualquier inserción de cartón o plástico
puesto para proteger el producto durante el envío.
Sttrroolllleerr FFrraammee
S
®
Optima™tandem
®
Optima
11 -- 33
Release the locking latch on the
22
Suelte el seguro en la estructura de la carriola.
Unfold to full open position.
33
Despliégue la carriola completamente.
If you own the Contours
44
stroller, please skip to page 8. Proceed to Step
5 for all other models.
Si usted posee la carriola Contours
tándem, salte por favor para la página 8.
Procede al paso 5 para el resto de los modelos.
.
™
55 66
Consumer Service: 1.800.453.7673
www.kolcraft.com/contours
Remove the sticker from the Front Wheel
55
Assembly. Remove and discard both screws
from the Front Wheel Assembly.
Remueva las calcomanía del ensamblaje de la
rueda frontal. Remueva ambos tornillos y
desecha del ensamblaje de la rueda frontal y
gírelo hacia arriba.
Rotate Front Wheel Assembly upward, until you
66
hear a click.
Dar le vueltas al ensamblaje de la rueda frontal,
hasta que escuche un clic.
Secure the Front Wheel Assembly into the
77
stroller frame with 2 notched Pins.
Asegure el ensamblaje de la rueda frontal con las
afileres en la estructura de la carriola.
7
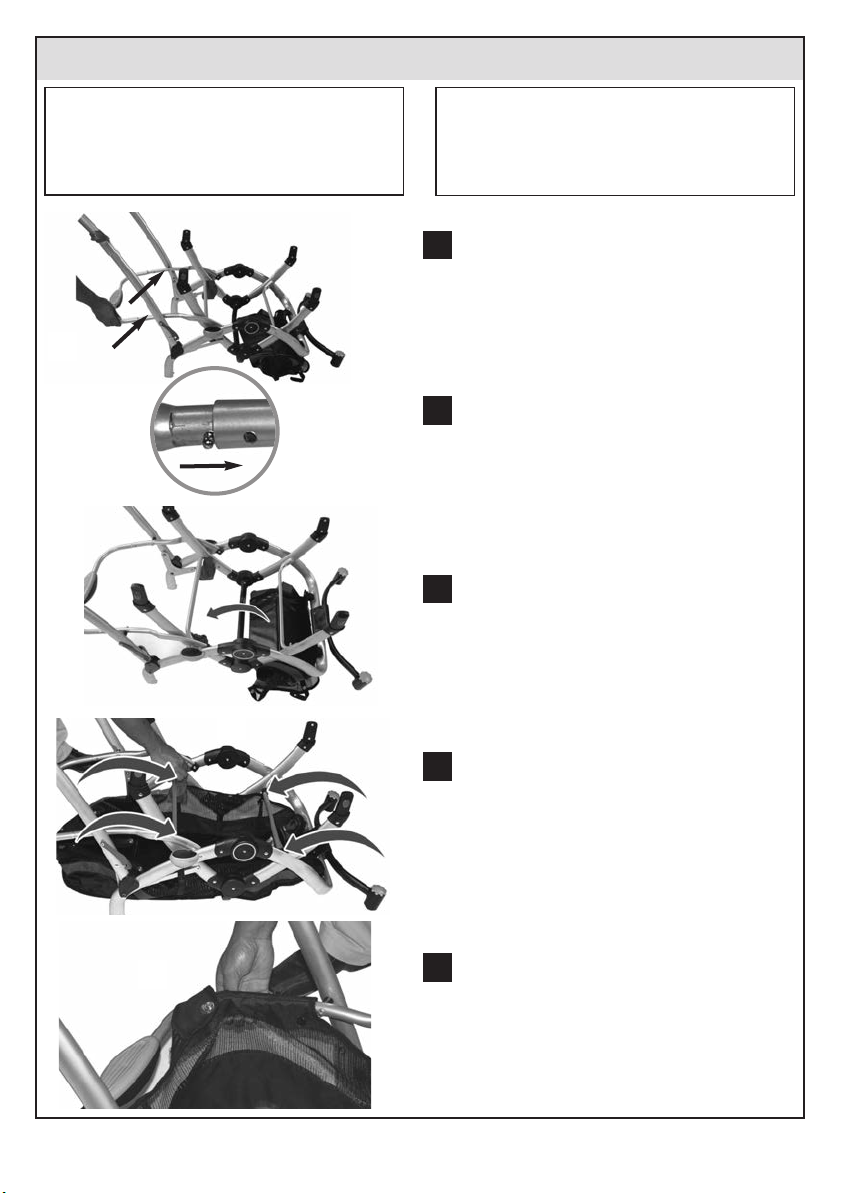
To Attach Basket | Para instalar la canastilla
WARNING
To prevent the stroller from becoming unstable
or tipping, do not put more than 10 lbs (4.54
kg) in the basket.
11
22
33
ADVERTENCIA
Para impedir que la carriola se vuelva
inestable o se caiga, no ponga objetos que
pesen más de 4,54 kg (10 lbs) en la canasta.
Align the
11
the rear of the stroller as shown.
Alinée el tubo de la canastilla con la estructura
de la canastilla en la parte trasera de la carriola,
como se muestra.
Press in spring loaded buttons on
22
and slide into the Basket Frame until both
buttons click into place.
Presione los botones de resorte en el tubo de la
canastilla y deslícelo en la estructura de la
canastilla hasta que ambos botones encajen en
su sitio con un clic.
Unroll the basket over center bar of stroller
33
frame as shown.
Desenrrolle la canastilla sobre la barra central de
la estructura de la carriola como se muestra.
BBaasskkeett TTuubbee
with the Basket Frame in
BBaasskkeett TTuubbee
55
Consumer Service: 1.800.453.7673
www.kolcraft.com/contours
44
In the middle & front of the stroller, secure 4
44
sets of snaps on the basket around the stroller
frame.
En la parte central y delantera de la carriola, asegure los cuatro juegos de cierre de la canastilla
alrededor de la estructura de la carriola.
Secure 6 sets of snaps at the back end of the
55
basket around the Basket Tube as shown.
Asegure las 6 juegos de cierre en la parte trasera
de la canastilla alrededor de la estructura como
se muestra.
8
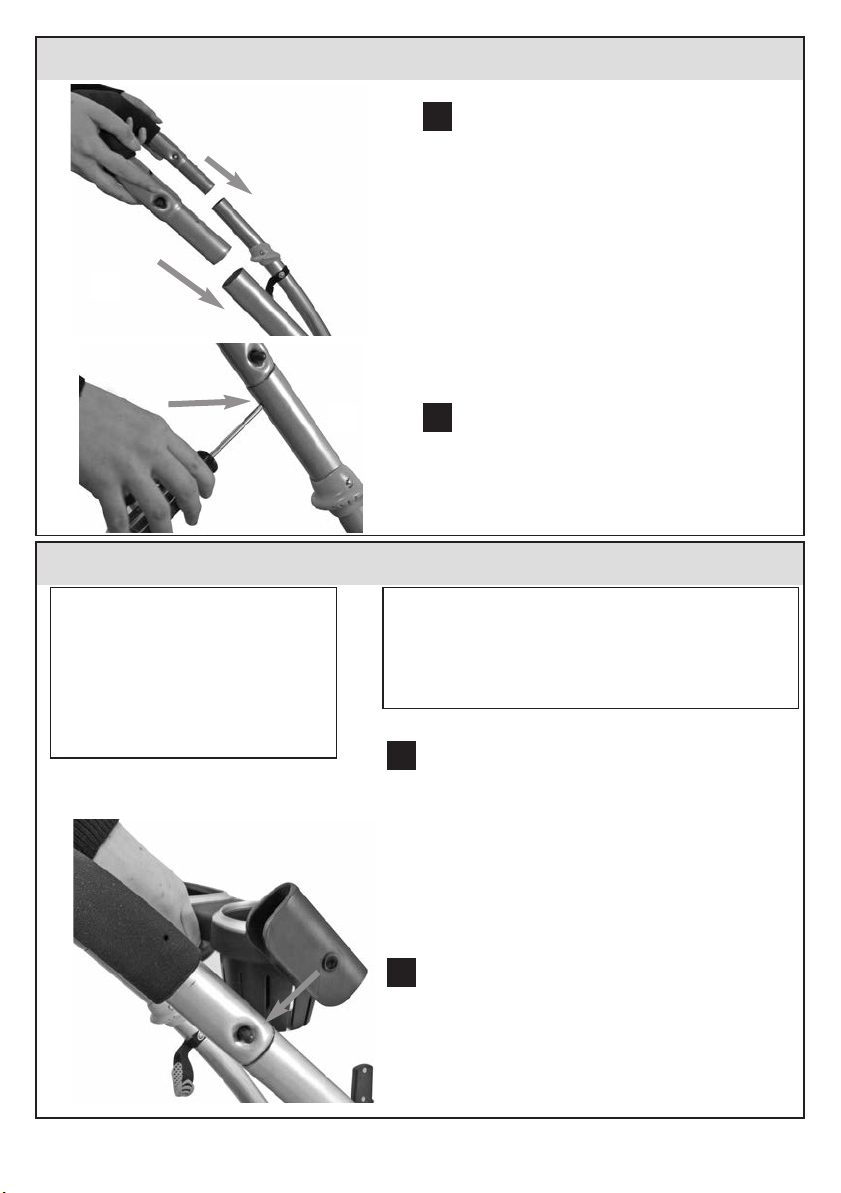
To Attach Stroller Handle | Para instalar el asa de la carriola
Slide the Stroller Handle down onto the stroller
11
frame, until the holes on each side of the
Stroller Handle can be seen in the frame.
Deslice el asa de la carriola en la estructura de la
carriola hasta que los agujeros en cada lado del
asa de la carriola se puedan ver en la estructura.
11
To Attach Parent Tray | Para instalar la charola para adultos
WARNING
To prevent the stroller from becoming unstable or tipping, do not place
more than 3 lbs. (1.36 kg) in the
parent tray.
Do not place hot liquids in this tray.
Hot liquids can burn your child.
11
22
Secure the Stroller Handle with a screw on
22
each side of the frame.
Asegure el asa de la carriola con un tornillo en
cada lado de la estructura.
ADVERTENCIA
Para impedir que la carriola se vuelva inestable o se
tropiece, no coloque más de 1.36 kg (3 lb) en la bandeja
primaria. No coloque liquidos calientes en esta bandeja.
Liquidos calientes pueden quemar a su niño.
Place the Parent Tray onto the bar underneath the
11
Stroller Handle and align the Parent Tray over the
pins. Snap the Parent Tray to the stroller frame as
shown.
Ponga la charola para adultos en la barra de abajo de
la asa de la carriola y alinea la charola para adultos
sobre los alfileres. Coloque la charola para adultos a la
estructura de la carriola como demostrado.
To remove Parent Tray, pull on both sides of the parent
22
tray, and lift over the pins. For cleaning, Parent Tray is
top rack dishwasher safe.
Consumer Service: 1.800.453.7673
www.kolcraft.com/contours
Para remover la charola para adultos, jale en los dos
lados de la charola para adultos y levante sobre los
alfileres.
Puede lavarse en la bandeja superior del
lavaplatos.
9

To Attach Front Wheels |
Para ensamblar las ruedas delanteras
Align Front Wheel as shown.
11
Alinée la unidad de las ruedas delanteras como se
muestra en el dibujo.
Push Front Wheel up into the Front Wheel Assembly until a
22
“Click” is heard.
Empuje la unidad de las ruedas en la pata de la
carriola hasta que quede bien ajustada en su lugar.
11 && 22
Repeat for other wheel. Tug firmly on each wheel to
33
be sure they are securely in place.
Repita la operación con las otras ruedas. Jale duro las
ruedas para cerciorarse de que estén bien ajustadas
en su lugar.
33
NOTE: To remove Front Wheels, twist top of Front
Wheel Asembly as shown, and pull wheel off.
NOTA: Para quitar las ruedas, apriete la lengüeta y
sáquelas.
To Assemble Rear Wheels | Para ensamblar las ruedas traseras
Turn stroller over as shown. Remove protective
Brake Levers
Palancas de freno
22
11
sleeve from ends of brake assembly with rear axle.
Darle vuelta a la carriola como demostrado. Quite el
plástico protector de los extremos del eje trasero.
33
Button
Botone
Consumer Service: 1.800.453.7673
www.kolcraft.com/contours
Position Brake Assembly as shown, with rear brake levers
22
pointing towards stroller handle.
Coloque el eje trasero en la posición que se muestra,
con las palancas del freno orientadas hacia el mango
de la carriola.
Push both brake assemblies onto rear leg tubes at the
33
same time until spring loaded buttons click into place.
Coloque ambos frenos en los tubos traseros
simultáneamente, hasta que los botones con resortes
queden asegurados en su sitio.
NOTE: If brake assemblies do not click and hold in
place, the spring button is stuck and not protruding
through the hole in the tube. Use a screwdriver or
pliers to move the button so that it protrudes out of
the hole in the tube.
NOTA: Si las monturas de los frenos no están firmes en
su sitio, el botón con resorte está atorado y no sale por
el agujero del tubo. Use un desarmador o pinzas para
mover el botón y que pueda salir por el agujero del tubo.
Continued on next page
10
Continuación en la página siguiente
 Loading...