

Kolcraft Jeep Overland Limited Instructions Manual

©2006 Kolcraft® Enterprises, Inc. All Rights Reserved. S56J-A 3/06
Jeep®Overland Limited Jogging Stroller Instructions
S56J-A.qxd 03/06/2006 9:51 AM Page 1
by

2
Your child's safety depends on you. Proper stroller usage cannot be assured
unless you follow these instructions.
DO NOT USE STROLLER UNTIL YOU READ AND FOLLOW
THE MANUFACTURER’S INSTRUCTIONS.
IIMMPPOORRTTAANNTT SSAAFFEETTYY IINNFFOORRMMAATTIIOONN::
HHooww ttoo KKeeeepp YYoouurr CChhiilldd SSaaffee WWhhiillee UUssiinngg tthhiiss SSttrroolllleerr
•
NNEEVVEERR LLEEAAVVEE YYOOUURR CCHHIILLDD UUNNAATTTTEENNDDEEDD WWHHIILLEE IINN SSTTRROOLLLLEERR
.
Accidents can happen quickly while your back is turned. You must
always keep your child in view while your child is in the stroller,
even when sleeping. Do not use this product as a bed. Your child
may become tangled in straps or pads and suffocate.
•
AAllwwaayyss uussee rreessttrraaiinntt ssyysstteemm ttoo kkeeeepp cchhiilldd ffrroomm ssttaannddiinngg uupp oorr
ffaalllliinngg oouutt ooff tthhee ssttrroolllleerr.. UUssee tthhiiss hhaarrnneessss aatt aallll ttiimmeess..
Do not use
product without full 5 point Harness Restraint. Removing the
shoulder straps will not adequately restrain child.
•• TThhiiss ssttrroolllleerr iiss ffoorr uussee wwiitthh cchhiillddrreenn wwhhoo ccaann ssiitt uupp uunnaassssiisstteedd aanndd
wwhhoo wweeiigghh lleessss tthhaann 4455 llbbss.. ((2200..44 kkgg)) aanndd wwhhoossee hheeaadd rreessttss
bbeellooww tthhee ttoopp ooff tthhee sseeaatt bbaacckk..
Use by larger children may
damage the stroller, or cause a hazardous unstable condition to
exist.
•• NNoott rreeccoommmmeennddeedd ffoorr aa cchhiilldd uunnddeerr 66 mmoonntthhss oolldd..
•• DDOO NNOOTT
use any infant car seat with this stroller. Serious injury
may occur.
•• AAllwwaayyss lloocckk tthhee ssttrroolllleerr ooppeenn bbeeffoorree aalllloowwiinngg yyoouurr cchhiilldd iinn oorr nneeaarr
tthhee ssttrroolllleerr..
This prevents injuries caused by stroller collapsing.
•• AAllwwaayyss sseett tthhee wwhheeeell bbrraakkeess wwhheenn ssttrroolllleerr iiss nnoott mmoovviinngg,, eessppeecciiaallllyy
oonn aann iinncclliinnee..
This prevents the stroller from rolling away.
••
Always use tether strap while jogging with this stroller.
••
Do not use your stroller until you have thoroughly tested and
calibrated your hand brake. Adjustments must be made
periodically due to cable stretch and wear on the rubberbrake
shoes. See “To Adjust Hand Brake” for details.
••
To avoid serious injury from the wheel falling off, make sure to
properly install and adjust the quick release hub located on the
front wheel.
WARNING
Continued on next page
S56J-A.qxd 03/06/2006 9:51 AM Page 2

WWhhaatt ttoo AAvvooiidd WWhhiillee UUssiinngg tthhiiss SSttrroolllleerr
••SSUUFFFFOOCCAATTIIOONN HHAAZZAARRDD::
••
Never leave child unattended while using weather shield. Only
use with this product. When using weather shield, canopy must
be open.
DDOO NNOOTT
leave child in sun under weather shield, as
child may overheat.
AALLWWAAYYSS
store weather shield out of child’s
reach in the provided bag.
DDOO NNOOTT
allow children to play with
weather shield,
IITT IISS NNOOTT AA TTOOYY
.
•
AAllwwaayyss bbaallaannccee tthhee wweeiigghhtt ooff tthhee ssttrroolllleerr eevveennllyy..
To prevent the
stroller from becoming unstable or tipping:
• Do not place parcels or accessory items on the stroller canopy,
seat, or over the handle.
• This stroller is designed for one child only.
• Do not put more than 10 lbs. (4.54 kg) in the basket.
• Do not allow children to play with or hang onto the stroller.
•• NNeevveerr uussee tthhiiss ssttrroolllleerr oonn ssttaaiirrwwaayyss oorr eessccaallaattoorrss..
•
DDoo nnoott aallllooww cchhiilldd ttoo ssttaanndd oonn sseeaatt oorr ssiitt oonn ffoooottrreesstt..
•
PPuutt oonn aallll bbrraakkeess wwhheenneevveerr yyoouu ppaarrkk tthhee ssttrroolllleerr,, eessppeecciiaallllyy oonn aann
iinncclliinnee..
This prevents the stroller from rolling away.
•• DDOO NNOOTT lliifftt bbyy ttrraayy..
•• DDOO NNOOTT ppuutt cchhiilldd iinn bbaasskkeett..
•• DDOO NNOOTT
allow children to climb into stroller unassisted. Stroller
may tip over and injure child.
••
Keep wheels at a recommended tire pressure of 35 p.s.i. (241 kPa)
or as specified on the tire wall.
••
Only use replacement parts supplied by the manufacturer. If you
have a flat tire, you may use a standard bicycle tire repair kit or
take it to a bicycle shop to be repaired.
•
DDoo nnoott ccaarrrryy eexxttrraa cchhiillddrreenn oorr uussee aacccceessssoorriieess ootthheerr tthhaann tthhoossee
aapppprroovveedd bbyy tthhee vveehhiiccllee mmaannuuffaaccttuurreerr..
•
TThhee ssttrroolllleerr sshhoouulldd nnoott bbee uusseedd nneeaarr aann ooppeenn ffiirree oorr eexxppoosseedd
ffllaammee..
•
MMaakkee ssuurree cchhiillddrreenn aarree cclleeaarr ooff aannyy mmoovviinngg ppaarrttss iiff yyoouu aaddjjuusstt tthhee
ssttrroolllleerr,, ootthheerrwwiissee tthheeyy mmaayy bbee iinnjjuurreedd..
3
S56J-A.qxd 03/06/2006 9:51 AM Page 3
4
To Open Stroller
Remove any cardboard inserts or plastic ties
used to protect the product during shipment.
Release the locking latch.
Unfold, making sure both side locks snap into
place.
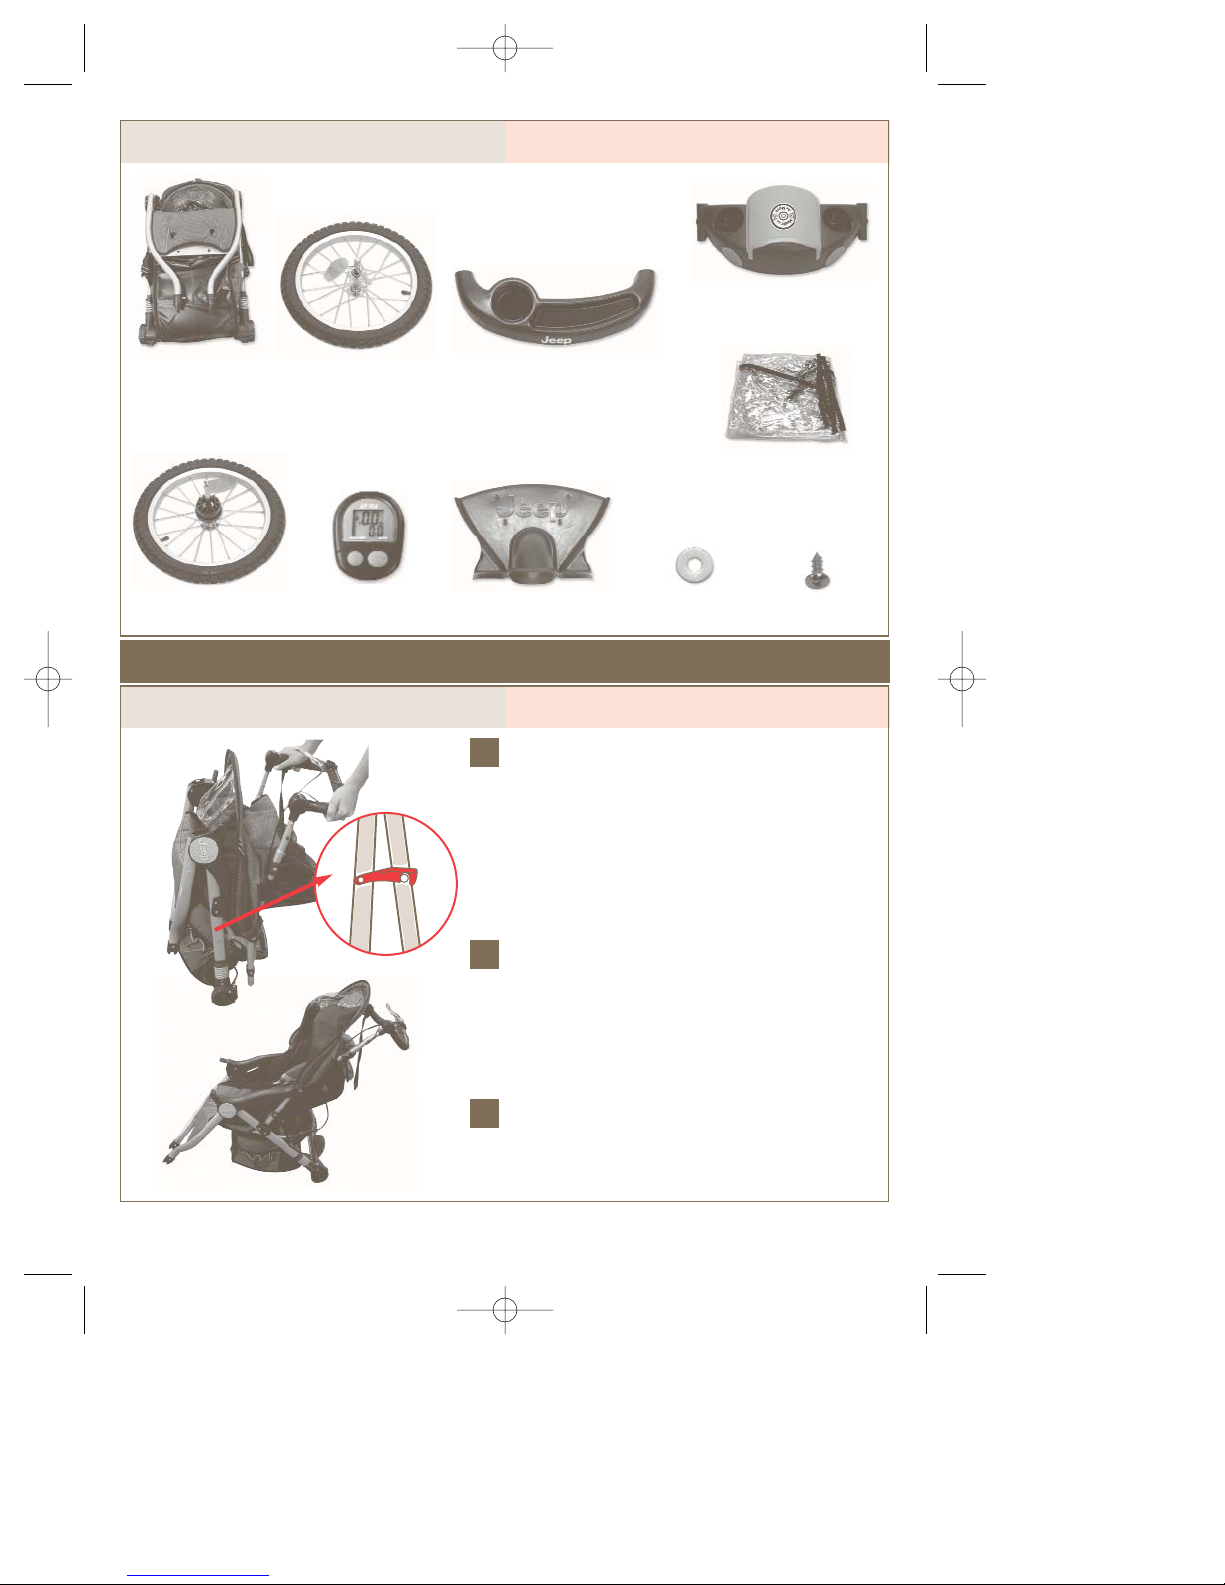
Parts List
2
3
2
3
How to Assemble Your Stroller
SSttrroolllleerr FFrraammee FFrroonntt WWhheeeell ((11))
RReeaarr WWhheeeellss ((22))
FFrroonntt TTrraayy
MMuussiicc OOnn TThhee MMoovvee
®®
1
WWaasshheerrss ((44))OOddoommeetteerr FFoooottrreesstt SSccrreewwss ((44))
WWeeaatthheerr SShhiieelldd
S56J-A.qxd 03/06/2006 9:52 AM Page 4
5
To Assemble Rear Wheels
Lay stroller on its side.
Slide wheel pins into axle hole as shown.
Push down on wheel until you hear a click.
Pull up on wheel to make sure it is properly
secured.
Repeat for second side.
TTOO RREEMMOOVVEE WWHHEEEELL::
Lift up on tab
underneath rear axle as shown and slide the
wheel off.
NNOOTTEE::
Keep wheels at a recommended tire
pressure of 35 p.s.i. (241 kPa) or as specified
on the tire wall.
1
2
4
5
3
2
TTaabb
To Assemble Front Wheel
1
Place the stroller back on its handle bar.
Locate the front wheel, and find the magnet
located on one of the spokes. Align the
wheel so that the magnet on the spoke is
positioned on the same side as the sensor,
located on the frame.
2
2
MMaaggnneett
SSeennssoorr
Continued on next page
5
S56J-A.qxd 03/06/2006 9:52 AM Page 5
6
Loosen the round nut on the wheel enough
for the wheel to slide onto the frame. If the
round nut comes all the way off, be sure to
reassemble it with the spring as shown.
Position wheel lever, 90° angle from wheel as
shown, and slide wheel axle onto frame.
Tighten round nut clockwise, as tight as
possible.
Push lever toward frame as shown. Lever must
be very tight. If it isn’t tight, open lever to 90
°
angle from wheel
and retighten the round
nut. Push lever toward frame until it is tight.
TTEESSTT::
Shake wheel back and forth to be sure
it is tight on the frame.
TTOO RREEMMOOVVEE WWHHEEEELL::
Open lever to the 90°
angle position. Rotate round nut on opposite
side counter clockwise until the wheel can
slide off of the frame.
3
4
5
3
4
5
RRoouunndd NNuutt
SSpprriinngg
LLeevveerr
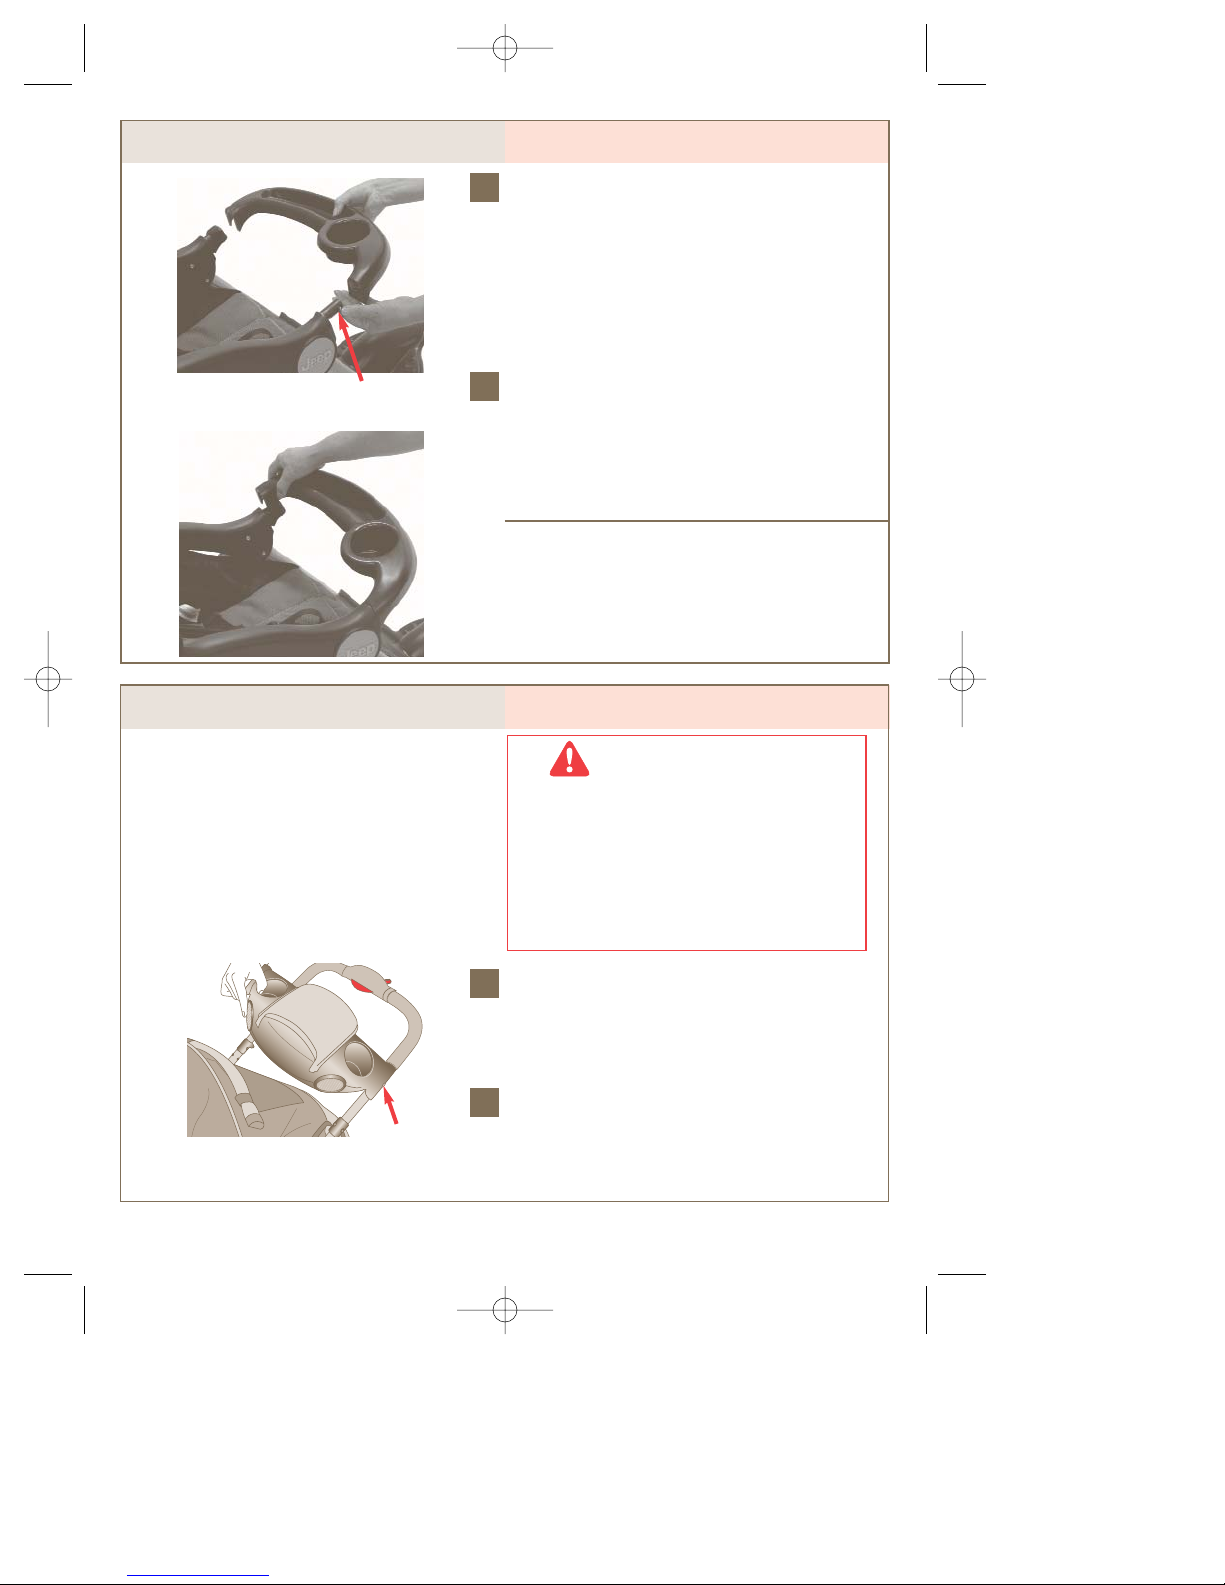
To Adjust Handle
1
1
Press buttons on handle frame in with your
thumbs and rotate handle up or down until
you find your desired height.
S56J-A.qxd 03/06/2006 9:52 AM Page 6
7
To Adjust Odometer Magnet
1
TTOO AADDJJUUSSTT OODDOOMMEETTEERR MMAAGGNNEETT
In order for the odometer to function
properly, the magnet on the front wheel must
be in the correct position. The magnet may
have shifted during shipping.
Using a screwdriver, loosen the screw on the
back of the magnet.
Slide the magnet along the spoke so that it is
as close as possible to the two lines on the
bottom of the sensor.
Rotate the magnet so that it faces the sensor.
2
3
To Attach Footrest
SSccrreeww
SSeennssoorr
Position stroller upside down.
Align the posts on the footrest through the
4 holes on the frame over the front wheel.
Using the screws and washers provided,
fasten the footrest to the stroller frame, until
washers are tight.
Stand stroller upright.
1
2
1
3
2
3
4
S56J-A.qxd 03/06/2006 9:52 AM Page 7
8
To Attach Front Tray
Slide tray onto round post while pushing in
spring loaded buttons, and a click is heard.
Make sure there is no gap between stroller
frame and front tray.
Push down on the right side of the tray until
the plastic button on the stroller frame pops
out through the hole on the front tray.
TTOO OOPPEENN TTRRAAYY::
Press the plastic button on
the right side of the tray and rotate the tray
upwards.
1
2
1
2
To Attach Music On The Move
®
Parent Tray
To assemble Music On The Move®, align tray
holes with posts on handle and snap on.
To remove Music On The Move
®
, pull each
side up and out.
1
WARNING
• Loud volume can damage your
child’s hearing. When turning on
music, gradually adjust the volume
to a comfortable listening level so
child is not startled.
• Do not place more than 3 lbs. (1.36
kg) in this tray to avoid tipping!
• Do not place hot liquids in this tray.
Hot liquids can burn your child.
2
1
PPoossttss
BBuuttttoonnss
S56J-A.qxd 03/06/2006 9:52 AM Page 8
 Loading...