

Page 1

Elmo Tiny Steps®2-in-1 Walker
Instruction Sheet
Hoja de instrucciones para
andadera de Elmo Tiny Steps
2-en-1
®
©2012 Kolcraft®Enterprises, Inc. All Rights Reserved. W025-R2 11/11
Page 2
WARNING
Read all instructions BEFORE assembly and USE of this walker.
Keep instructions for future use.
IIMMPPOORRTTAANNTT SSAAFFEETTYY IINNFFOORRMMAATTIIOONN::
HHooww ttoo KKeeeepp YYoouurr CChhiilldd SSaaffee WWhhiillee UUssiinngg tthhiiss PPrroodduucctt
NNEEVVEERR
•
CCAAUUTTIIOONN:: TTooyyss iinntteennddeedd ttoo bbee aasssseemmbblleedd bbyy aadduulltt!!
•
leave child unattended. Always keep child in view while
SSTTAAIIRR HHAAZZAARRDD
• Avoid serious injury or death. Block stairs/steps securely before using this walker.
• Use only on flat surfaces free of objects that could cause this walker to tip over.
Never use near stairs, steps, thresholds, hills, roadways, or pools.
• To avoid burns, keep child away from hot liquids, stoves, radiators, space heaters,
fireplaces, etc.
• Discontinue using this walker should it become damaged or broken.
• Never carry this walker with child in it. Never adjust seat while child is in product.
DDOO NNOOTT
•
DDOO NNOOTT
•
lift or carry by tray or toys.
use this walker until baby can sit up unassisted.
• To reduce the chance of child slipping out of seat, check that both feet of child
touch the floor.
• Discontinue use of activity walker (seated stage) if child can climb out or walk
unassisted.
IINN WWAALLKKEERR
.
OOnnllyy uussee tthhiiss aaccttiivviittyy wwaallkkeerr ((sseeaatteedd ssttaaggee)) iiff yyoouurr cchhiilldd MMEEEETTSS AALLLL ooff tthhee
rreeqquuiirreemmeennttss bbeellooww::
1. Can support body weight with legs
2. Weight is between 15 and 26 pounds (6.8 and 11.8 kgs)
3. Height is less than 32 inches (80 cms)
• To maintain stopping performance, clean friction strips regularly with damp cloth.
FFCCCC SSttaatteemmeenntt ((UUnniitteedd SSttaatteess OOnnllyy))
This equipment has been tested and found to comply with the limits for a Class B
digital device, pursuant to Part 15 of the FCC Rules. These limits are designed to
provide reasonable protection against harmful interference in a residential installation. This equipment generates, uses and can radiate radio frequency energy and, if
not installed and used in accordance with the instructions, may cause harmful interference to radio communications. However, there is no guarantee that interference will
Consumer Service: 1.800.453.7673
www.kolcraft.com/sesamestreet
2
Continued on next page
Page 3

not occur in a particular installation. If this equipment does cause harmful interference to
radio or television reception, which can be determined by turning the equipment off and
on, the user is encouraged to try to correct the interference by one or more of the following measures:
• Reorient or relocate the receiving antenna.
• Increase the separation between the equipment and receiver.
• Consult the dealer or experienced radio / TV technician for help.
NNoottee
: Changes or modifications not expressively approved by the manufacturer
responsible for compliance could void the user’s authority to operate the equipment.
This device complies with part 15 of the FCC Rules. Operation is subject to the
following two conditions: (1) This device may not cause harmful interference,
and (2) this device must accept any interference received, including interference
that may cause undesired operation.
Consumer Service: 1.800.453.7673
www.kolcraft.com/sesamestreet
3
Page 4
ADVERTENCIA
Lea todas las instrucciones ANTES de armar y USAR la andadera.
Guarde las instrucciones para futura referencia.
IINNFFOORRMMAACCIIÓÓNN IIMMPPOORRTTAANNTTEE DDEE SSEEGGUURRIIDDAADD::
CCóómmoo mmaanntteenneerr aa ssuu hhiijjoo sseegguurroo mmiieennttrraass eessttáá uuttiilliizzaannddoo eessttee pprroodduuccttoo
NNOO
•
deje nunca al niño solo. Tenga al niño siempre a la vista mientras utiliza la
AANNDDAADDEERRAA
•• PPRREECCAAUUCCIIÓÓNN:: LLooss jjuugguueetteess eessttáánn pprreetteennddiiddooss ppaarraa eennssaammbbllaarr ppoorr eell aadduullttoo..
PPEELLIIGGRROO EENN EESSCCAALLEERRAASS
• Evite heridas graves o mortales. Bloquée las escaleras / escalones antes de
utilizar esta andadera.
• Utilice solo en superficies planas sin objetos que puedan hacer que la andadera
vuelque. Nunca utilice cerca de escaleras, escalones, umbrales, colinas,
carreteras o piscinas.
• Para evitar quemaduras, mantenga al niño lejos de líquidos calientes, estufas,
radiadores, calefacciones, chimeneas etc.
• Si la andadera se rompe o se daña, deje de utilizarla.
• Nunca acarrée la andadera con el niño adentro. Nunca ajuste el asiento con el
niño adentro.
NNOO
•
la levante o la cargue por medio de la bandeja o los juguetes.
NNOO
•
utilice este producto hasta que el niño se pueda sentar sin ayuda.
• Para reducir la posibilidad de que el niño se resbale fuera del asiento, compruebe
que sus pies tocan el suelo.
• Si el niño/a puede salirse o andar sin ayuda, deje de utilizar la andadera de
actividades (etapa de asiento).
.
UUttiilliiccee eessttaa aannddaaddeerraa ddee aaccttiivviiddaaddeess ssoollaammeennttee ssii ssuu hhiijjoo//aa CCUUMMPPLLEE TTOODDOOSS
llooss rreeqquueerriimmiieennttooss aabbaajjoo::
1. Puede soportar su propio peso con las piernas.
2. Pesa entre 6.8 y 11.8 kgs. (15 y 26 libras)
3. Mide menos de 80 cms. (32 pulgadas).
• Para mantener la función de parar, limpie las tiras de fricción con regularidad con
un trapo húmedo.
NNOOTTAA FFCCCC ((VVáálliiddoo ssóólloo eenn llooss EEssttaaddooss UUnniiddooss))
Este equipo ha sido probado y se ha hallado que cumple con los límites para el
Consumer Service: 1.800.453.7673
www.kolcraft.com/sesamestreet
4
Continuación en la página siguiente
Page 5

dispositivo digital de la clase B, en cumplimiento de la Parte 15 de las reglas de la
FCC. Estos límites están diseñados para proporcionar una protección razonable
contra la interferencia dañina en una instalación residencial. Este equipo genera,
usa y puede radiar energía de radio frecuencia y, si no se instala de acuerdo con
las instrucciones, puede causar una interferencia dañina con las comunicaciones de
radio. Sin embargo, no hay garantía de que la interferencia no ocurrirá en una
instalación en particular. Se puede determinar si este equipo causa inter ferencias
dañinas a un receptor de radio o televisión, apagando el equipo y encendiéndolo de
nuevo. El usuario puede corregir la interferencia tomando una o más de las siguientes medidas:
• Reorientar o relocalizar la antena de recepción.
• Incrementar la separación entre el equipo y el receptor.
• Consulte a un vendedor o técnico experimentado de radio/televisión para
obtener ayuda.
NNoottaa::
Los cambios o modificaciones que no estén expresamente aprobados por el
fabricante responsable del cumplimiento pueden anular la autoridad del usuario
para operar el equipo.
Este dispositivo se conforma con parte 15 de las Reglas de FCC. La operación es
susceptible al siguiente dos condiciones: (1) Este dispositivo no puede causar
interferencia perjudicial, y (2) este dispositivo debe aceptar ninguna interferencia
recibida, inclusive interferencia que puede causar operación indeseable.
Consumer Service: 1.800.453.7673
www.kolcraft.com/sesamestreet
5
Page 6
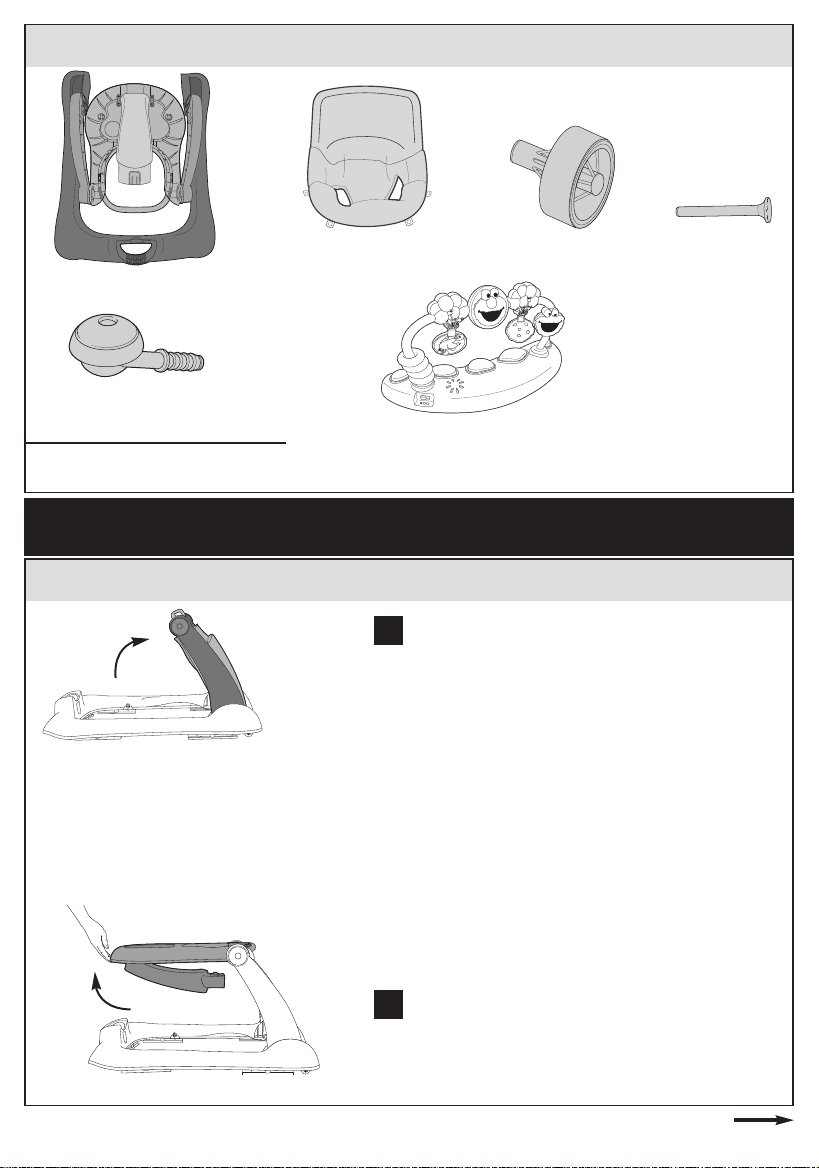
Parts List Lista de piezas
Seat Pad
Cojín del asiento
Walker Frame
Marco de Andadera
Front Casters (2)
Ruedecillas delanteras
(2)
Tool Needed: Phillips Screwdriver
Herramienta necesitado: Destornillador de estrella
HOW TO ASSEMBLE YOUR WALKER
CÓMO ARMAR SU ANDADERA
To Unfold and Assemble Walker
11
Rear Wheels (2)
Ruedas traseras (2)
Electronic Play Tray
Charola de jugar electrónica
(select models)
(modelos selectos)
*Toys may vary
*Juguetes pueden variar
Axles (2)
Ejes (2)
Para desdoblar y ensamblar la
andadera
To unfold walker, pull up sharply on the tray. Raise
11
upward.
Para desdoblar la andadera, jale para arriba duramente
de la charola. Levante hacia arriba
.
22
Consumer Service: 1.800.453.7673
www.kolcraft.com/sesamestreet
Rotate top tray forward.
22
Darle vuelta hacia adelante a la bandeja.
Continued on next page
6
Continuación en la página siguiente
Page 7

Insert the front leg into the slot in the base. Press
33
33
Front Leg Button
Botón de la pata
delantera
down on the top tray until the front leg button locks
into the base.
Inserta la pata delantera en la ranura de el base.
Presione hacia abajo en lo de arriba de la bandeja
hasta que el botón de la pata delantera se cierre en el
base.
Attach Seat Pad Para colocar el cojín del asiento
High Back Support
Soporte Alto
de Espalda
11
Tabs
Lengüetas
Place seat pad into seat ring located on tray. Align it
11
so that high back support aligns with back of walker
ring.
Sitúe el cojín del asiento en el anillo del asiento situado en la bandeja. Alinéelo de forma que el soporte alto
de espalda esté alineado con el trasero del anillo de la
andadera.
Insert the 4 tabs on the seat pad into slots located
22
22
around the front of the seat ring. Slide tabs through
holes.
Inserte las cuatro lengüetas en las ranuras situadas
alrededor de la área delantera del asiento. Deslice las
lengüetas a través de los agujeros.
Consumer Service: 1.800.453.7673
www.kolcraft.com/sesamestreet
Continued on next page
7
Continuación en la página siguiente
Page 8

33
Lengüetas
44
Tabs
Grooves
Ranuras
Underneath the tray, pull tabs and align into grooves.
33
Abajo de la bandeja, estire las lengüetas y alinée en
las ranuras.
Snap the back of the seat pad around the rear of the
44
seat ring.
Coloca el trasero de el cojín del asiento alrededor del
trasero de el anillo del asiento.
TTeesstt::
Push down hard on seating area of seat pad to
make sure seat is securely in place.
PPrruueebbaa::
Empuje en el medio del cojín para asegurarse
de que está en su sitio.
CCAAUUTTIIOONN::
not secured properly, otherwise child may fall
through walker.
PPRREECCAAUUCCIIÓÓNN::
lengüetas y broches no están aseguradas adecuadamente. En caso contrario el niño podría caerse de la
andadera.
Do not use walker if all tabs and snaps are
No utilice la andadera si todas las
Attach Rear Wheels Unión de las ruedas traseras
Flip base over to expose underside. Locate rear
11
wheel opening in base of the walker.
Tab
Lengüeta
Voltée la base para exponer la parte de abajo. Localice
la abertura de la rueda trasera en la base de la
andadera.
Align holes of wheel with corresponding axle holes
22
on the base of the walker. Plastic tab may need to
be pushed to the side to expose the axle hole. The
stem of the wheel should be facing the inside of the
base.
Alinee los agujeros de las ruedas con los agujeros del
eje correspondientes en la base de la andadera. Puede
que sea necesario empujar la pestaña de plástico para
que se vea el agujero del eje. El tubo de la rueda debe
de estar opuesta adentro de el base.
Slide metal axle into holes until the head of it passes
33
the plastic tab and clicks into place.
Consumer Service: 1.800.453.7673
www.kolcraft.com/sesamestreet
Deslice el eje de metal en los agujeros hasta que la
cabeza pase por la pestaña de plástico y encaje en su
lugar.
Repeat for other wheel.
44
Repita el proceso en la otra rueda.
8
Page 9

Attach Front Casters Unión de las ruedecillas delanteras
Turn the base over and insert the stem of one of
11
the front casters into the hole in one of the front
corners. Push firmly until the caster snaps (locks)
into place.
Top Lip of
Caster Threads
Labio superior
de los ribetes
de la rueda
Voltee la base y inserte el tubo de unas de las
ruedecillas delanteras en la agujero de unas de la
esquinas delanteras. Empuje firmemente hasta que la
pieza se coloca (asegure) en su lugar.
Correct
Assembly
Ensamblaje
correcto
Incorrect
Assembly
Ensamblaje
incorrecto
To Assemble Electronic Play Tray
CCAAUUTTIIOONN::
base. The top lip of the caster threads should be
flush with the base hole. Nothing below this lip
should be visible.
PPRREECCAAUUCCIIÓÓNN::
mente insertada en la base. La tapa de la parte de
arriba de los ribetes de la rueda debe estar alineada
con el agujero de la base. No se debe ver nada por
debajo de este labio.
Be sure the caster is inserted fully into the
asegúrese de que la rueda está total-
Para asamblear la charola
electónica de jugar
Insert the Toy Arch into the Electronic Play Tray Base.
11
Inserta el arco de juguete a la charola electrónica de
jugar.
Consumer Service: 1.800.453.7673
www.kolcraft.com/sesamestreet
9
Page 10

To Install Batteries in electronic play
tray
(select models)
11
Para instalar las pilas en el juguete
electrónico
Requires 2 “AA” batteries (Not Included). To insert
11
batteries, use a Phillips head screwdriver to unfasten
battery cover. Insert batteries as shown. Secure
battery cover.
Requiere 2 “AA” pilas (No Incluídas). Para insertar las
pilas, use un destornillador con punta de cruz para
quitar la tapa del compartimiento de pilas. Inserte las
pilas como se ve en el dibujo. Vuelva asegurar la tapa.
(modelos selectos)
CCAAUUTTIIOONN::
or rechargeable) should not be mixed. Different type
batteries should not be mixed. Remove batteries
before storing the toy.
PPRREECCAAUUCCIIÓÓNN::
mezcle pilas de tipo diferente. Saque las pilas antes de
guardar los juguete.
This toy has 2 levels of volume. Move switch to the
22
middle position for low volume and to the far right
22
for high volume. To turn off, move switch to “O”
position.
Este juguete tiene 2 niveles de volumen. Mueva el
interruptor a la posición media para volumen más bajo
y todo hasta la derecha para subir el volumen. Para
desconectar, sitúe el interruptor en la posición “O”.
Old and new batteries (alkaline, standard
No mezcle pilas nuevas y usadas. No
Consumer Service: 1.800.453.7673
www.kolcraft.com/sesamestreet
10
Page 11

To Attach Electronic Play Tray
(select models)
Para unir los juguetes electrónicos
(modelos selectos)
WARNING
Do Not lift walker by toys or tray.
11
22
ADVERTENCIA
No levante la andadera por los juguetes o la bandeja.
Insert the electronic toy bolts into the tray openings
11
as shown.
Inserte las tuercas del juguete electrónico en las
aberturas de la bandeja como se muestra.
To secure the electronic toy, flip tray over and tighten
22
each small nut until they are against the tray.
Para asegurar el juguete electrónico, dele la vuelta a la
bandeja y asegure cada tuerca chica hasta que esten
contra la bandeja.
CCAAUUTTIIOONN::
PPRREECCAAUUCCIIÓÓNN::
los ensamble un adulto!
Toys intended to be assembled by adult!
¡los juguetes están diseñados para que
To Convert to Walk-Behind Walker Para convertir en andadera para empujar
As your child grows, your Tiny Steps®Walker can be
converted to a Walk-Behind Walker.
Mientras su niño crece su Tiny Steps
puede convertir en andadera para empujar.
22
Remove the seat pad by unfastening the 4 seat tabs
11
from the tray and unsnapping the rear of the seat
pad.
®
andadera se
22
Consumer Service: 1.800.453.7673
www.kolcraft.com/sesamestreet
Remueva el asiento desbrochando las cuatro lengüetas
de la charola y desbrochando la trasera del el asiento.
Rotate the rear of the seat ring forward until it locks
22
into place, to become the Walk-Behind handle. Your
child can now stand behind the walker.
Gire el trasero de el anillo del asiento hacia adelante
hasta que encaje en su lugar, para hacer la hasa de la
andadera para empujar. Su niño puede ahora pararse
tras la andadera.
11
Page 12

To Adjust Seat Pad Height
Para ajustar la altura del asiento
WARNING
DDOO NNOOTT
baby is sitting in or near product. Always
make sure seat pad is adjusted to the
correct height position before placing child
in product.
disassemble or adjust height while
11
ADVERTENCIA
O
NNO
desarme a ajuste la altura mientrás el bebé
está sentado en o cerca del producto. Asegúrese
siempre de que la almohadilla del asiento está
ajustada en la posición de altura adecuada antes
de situar al bebé en el producto.
NNOOTTEE::
As your child begins to grow, adjust height of
walker via the seat pad so that their feet touch the
ground when seated. To determine correct height
after assembly, place child in walker and make sure
both feet touch the ground.
NNOOTTAA::
A medida que su hijo/a crezca, ajuste la altura
de la andadera de manera que sus pies toquen el
suelo cuando esté sentado. Para determinar la altura
después de armarla, sitúe al niño/a en la andadera y
asegúerse de que ambos pies tocan el suelo.
CCAAUUTTIIOONN::
adjustment.
PPRREECCAAUUCCIIÓÓNN
durante el ajuste.
After seat pad is attached to tray, flip unit upside
11
down to access the restraint strap on underside of
seat pad.
Después de que la almohadilla del asiento esté unida a
la charola, voltée la unidad al revés para tener acceso
al cinturón de seguridad en la parte inferior de la
almohadilla del asiento.
Child should not be in the walker during
: El niño/a no debe estar en la andadera
22
Consumer Service: 1.800.453.7673
www.kolcraft.com/sesamestreet
Please note, to ensure proper operation, you will
22
need to periodically adjust the seat restraint to
accommodate your childs increased height. For
ssmmaalllleerr bbaabbiieess
lowest position. To adjust seat height, push button in
on restraint strap to release restraint.
Por favor, para asegurar el funcionamiento adecuado,
tendrá que ajustar periódicamente el cinturón de
seguridad para que se acomode al crecimiento de su
hijo. Para los
extenderse hasta la posición más bajo. Para ajustar la
altura del asiento, presione el botón en el cinturón de
seguridad para soltarlo.
As baby grows, raise seat by tightening belt. This
33
helps to prevent the child from placing their feet flat
on ground and prevents your child from climbing
out.
A medida que su bebé crece, eleve el asiento ajustando el cinturón. Esto ayuda para impedir que el niño
pueda apoyar completamente sus pies e impedir que
su niño pueda salirse del producto.
, seat pad should be extended to its
bbeebbééss mmááss ppeeqquueeññooss
, el asiento puede
12
Page 13

To Fold Walker Para plegar la andadera
The walker folds easily for travel & storage.
La andadera se pliega con facilidad para viajar y
11
Front Leg Button
Botón de la pata
delantera
22
almacenarlo.
Release the front leg from the base by pressing the
11
leg release button and pulling up firmly on the front
leg.
Suelte la pata frontal de la base presionando el botón
para soltar la pata y estirando firmemente hacia arriba
de la pata delantera.
NNOOTTEE::
If in walk-behind mode, rotate the handle
back to the original (activity walker) position before
folding.
NNOOTTAA
: Si esta en modo de andadera para empujar voltea la hasa para atras a la posición original (andadera)
antes de doblar.
Fold the front leg under the tray until it locks onto
22
the tray itself.
Pliegue la pata frontal debajo de la charola hasta que
se encaje en la propia charola.
33
Consumer Service: 1.800.453.7673
www.kolcraft.com/sesamestreet
Rotate the tray down and to the rear of the walker.
33
Voltea la charola hace abajo y al trasero de la
andadera.
13
Page 14

CARE & MAINTENANCE / CUIDADO & MANTENINIENTO
1. Wipe plastic parts with a damp cloth using
mild soap.
2. Machine wash seat pad in cold water in
gentle cycle. Do not use harsh detergents or
bleach. Do not dry clean.
3. Air or line dry.
FFrriiccttiioonn SSttrriippss
Tiras de Fricción
1. Limpie con un paño húmedo, empleando un jabón
suave.
2. Lava a maquina el cojín del asiento en agua sría y
en ciclo suave. No utilice detergentes fuertes ni
blanqueador. No seque a maquina.
3. Tiéndala a secar.
NNOOTTEE::
To maintain stopping performance, clean
friction strips regularly with damp cloth.
NNOOTTAA::
Para mantener la función de parar, limpie las
tiras de fricción con regularidad con un trapo húmedo.
Consumer Service: 1.800.453.7673
www.kolcraft.com/sesamestreet
14
Page 15

LIMITED WARRANTY / GARANTÍA LIMITADA
Sesame Workshop®, Sesame Street®, and associated characters, trademarks and design elements are
owned and licensed by Sesame Workshop.
© 2012 Sesame Workshop. All rights reserved.
®
Kolcraft
of ONE YEAR from the date of purchase, Kolcraft will repair or replace, at its option, the defective product. If
you have a problem or are not satisfied with this product, please contact the Consumer Service Department
at Kolcraft.
REPAIR OR REPLACEMENT AS PROVIDED UNDER THIS WARRANTY IS THE EXCLUSIVE REMEDY OF THE CONSUMER. KOLCRAFT SHALL NOT BE LIABLE FOR ANY INCIDENTAL OR CONSEQUENTIAL DAMAGES FOR
BREACH OF ANY EXPRESS OR IMPLIED WARRANTY ON THIS PRODUCT, EXCEPT TO THE EXTENT REQUIRED BY
APPLICABLE LAW. ANY IMPLIED WARRANTY OF MERCHANTABILITY OR FITNESS FOR A PARTICULAR PURPOSE ON THIS PRODUCT IS LIMITED TO THE DURATION OF THIS WARRANTY.
Some states do not allow the exclusion or limitation of warranties set forth above, so the above exclusions
may not apply to you. This warranty gives you specific legal rights, and you may also have other rights
which vary from state to state. We sincerely thank you for your purchase of this Kolcraft product.
To obtain warranty service, please call Kolcraft’s Consumer Service Department at 1-800-453-7673 in U.S.
and Canada, 1-910-944-9345 outside U.S. and Canada or contact us via email at customerservice@kolcraft.com.
If the product is returned to Kolcraft’s Consumer Service Department for repair or replacement, it must be
shipped prepaid and adequately insured.
For further information visit www.kolcraft.com.
RREECCAALLLL WWEEBBSSIITTEE::
your child or any of your child's toys have been recalled.
Sesame Workshop
diseño son propiedad y tienen licencia de Sesame Workshop. ©2012 Sesame Workshop. Todos los derechos
reservados.
Kolcraft
era: Por un período de UN AÑO después de la fecha de compra, Kolcraft reparará o reemplazará, a su opción, el
producto defectuoso. Si usted tiene un problema o no está satisfecho con este producto, por favor diríjase al
Departamento de Servicio al Consumidor de Kolcraft.
LA REPARACIÓN O EL REEMPLAZO SEGÚN SE DISPONE EN ESTA GARANTÍA ES EL REMEDIO EXCLUSIVO DE
CONSUMIDOR. KOLCRAFT NO SE HARÁ RESPONSABLE DE NINGÚN DAÑO INCIDENTAL O EMERGENTE POR
VIOLACIÓN DE CUALQUIER GARANTÍA EXPRESA O IMPLÍCITA DE ESTE PRODUCTO, SALVO EN LA MEDIDA
REQUERIDA POR LA LEY APLICABLE. CUALQUIER GARANTÍA IMPLÍCITA DE COMERCIABILIDAD O IDONEIDAD
PARA UN FIN EN PARTICULAR DE ESTE PRODUCTO ESTÁ LIMITADA EN DURACIÓN AL TÉRMINO DE ESTA
GARANTÍA.
Algunos estados no permiten la exclusión o limitación de garantías según se dispone anteriormente, de manera
que es posible que las antedichas exclusiones no sean aplicables a usted. Esta garantía le otorga derechos
legales específicos y es posible que también disponga de otros derechos, los cuales pueden variar de un estado
a otro. Le agradecemos sinceramente por haber comprado este producto Kolcraft.
Para obtener servicio de garantía, llame al Departamento de Servicio al Consumidor de Kolcraft al 1-800-4537673 en Estados Unidos y Canada; fuera de Estados Unidos y Canada: 1-910-944-9345 o envianos un mensaje
por correo electrónico a customerservice@kolcraft.com.
Si el producto se devuelve al Departamento de Servicio al Consumidor de Kolcraft para ser arreglado o reemplazado, debe mandarse con el flete pagado y debidamente asegurado.
Para mayor información visítenos en www.kolcraft.com.
SSIITTIIOO DDEE WWEEBB DDEE HHAACCEERR VVOOLLVVEERR::
cualquiera de los productos que utiliza con su hijo o cualquiera de sus juguetes han sido retirados.
warrants this product to be free of defects in materials and workmanship, as follows: For a period
HELP KEEP YOUR CHILD SAFE. Check www.recall.gov to see if any products you use with
®
, Sesame Street®, y otros personajes asociados, marcas registradas y elementos de
®
garantiza que este producto estará libre de defectos en materiales y fabricación de la siguiente man-
MANTENGA A SU HIJO SEGURO. Compruebe www.recall.gov para ver si
Consumer Service: 1.800.453.7673
www.kolcraft.com/sesamestreet
15
Page 16

PERSONAL RECORD CARD / TARJETA DE REGISTRO PERSONAL
Once in a while, we are less than perfect and one of our products with a problem reaches a customer. In
most cases, we can solve your problem with replacement parts. Please contact us before you return one
of our products to the store. Once a product is returned, it cannot be resold. The materials and the energy
used to make it are wasted.
Please fill in the information in the space provided and attach a copy of your purchase receipt. You will
need this information to obtain warranty service.
You will need this information to obtain warranty service. You can find Model Number and Date of
Manufacture on a sticker located underneath the base ring.
Ocasionalmente no logramos la perfección y uno de nuestros productos presenta algún problema al llegar
al cliente. En la mayor parte de los casos podemos resolver el problema con piezas de reemplazo. Sírvase
ponerse en contacto con nosotros antes de devolver uno de nuestros productos a la tienda. Una vez que se
devuelve un producto, no se pude volver a vender. Se desperdician los materiales y la energía que se usó en
su fabricación.
Por favor escriba la información en el espacio provisto y adjunte una copia de su recibo de compra. Usted
necesitará esta información para obtener los servicios incluidos en la garantía.
Usted encontrará el Número de Modelo y la Fecha de Fabricación en una etiqueta bajo el anillo de la base.
PPlleeaassee ddiirreecctt aannyy ccoommmmeennttss,, qquueessttiioonnss oorr rreeppllaacceemmeenntt ppaarrtt rreeqquueessttss ttoo::
Favor de remitir cualquier comentario, preguntas o pedidos de piezas de
respuesto a:
Kolcraft®Enterprises, Inc. Consumer Service Department
10832 NC Highway 211East
Aberdeen, NC 28315
1-800-453-7673 in U.S. & Canada, 1-910-944-9345 outside U.S. & Canada
Eastern Standard Time, 8 am-6:45 pm Monday - Thursday, 8 am-3:30 pm Friday
1-800-453-7673 en los Estados Unidos y en Canada, 1-910-944-9345 fuera de los Estados Unidos y Canada
tiempo estándar del este, 8 am-6:45 pm Lunes - Jueves, 8 am-3:30 pm Viernes
ffaaxx //
fax: 910-944-3490
ee--mmaaiill //
correo electrónico: customerservice@kolcraft.com
Model / Style Number:
Número de Modelo/Estilo: _________________________
Date of Manufacture:
Fecha de fabricación: ______________________________
Date of Purchase:
Fecha de compra: _________________________________
Consumer Service: 1.800.453.7673
www.kolcraft.com/sesamestreet
16
Turn to page 17 to see a list of
replacement parts and for
ordering information
Vaya a la página 17 para ver la lista
de repuestos para obtener información sobre pedidos
Page 17

RREEPPLLAACCEEMMEENNTT PPAARRTTSS LLIISSTT // LLIISSTTAA DDEE PPIIEEZZAASS DDEE RREEPPUUEESSTTOO
TTOO OORRDDEERR PPAARRTTSS::
• 1-800-453-7673 in U.S.A. & Canada
1-910-944-9345 outside U.S.A. &
Canada
• Visit “Order Replacement Parts”
page on www.kolcraft.com
•
Email customerservice@kolcraft.com
Walker Frame
Marco de Andadera
$27.00
Seat Pad
Cojín del asiento
$12.00
PPAARRAA PPEEDDIIRR RREEPPUUEESSTTOOSS::
• Llame al 1-800-453-7673 en EE. UU.
y Canadá, y al 1-910-944-9345 fuera
de EE. UU. y Canadá
• Visite la página “Pedir repuestos” en
www.kolcraft.com
• Envíe un correo electrónico a
customerservice@kolcraft.com
Rear Wheel and Axle
Ruedas traseras y
tornillo
$3.00
Ruedecilla delantera
Front Caster
$2.00
Electronic Play Tray
Charola de jugar electrónica
$20.00
*Toys may vary
*Juguetes pueden variar
Consumer Service: 1.800.453.7673
www.kolcraft.com/sesamestreet
Small Nut
Tuerca chica
$2.00
17
Page 18

Consumer Service: 1.800.453.7673
www.kolcraft.com/sesamestreet
18
 Loading...