

Kolcraft Deluxe Walker Instruction Sheet
©2005 Kolcraft® Enterprises, Inc. All Rights Reserved. W06-R5 9/05
Deluxe Walker Instruction Sheet
Hoja de instrucciones de la andadera de lujo
W06-R5.qxd 09/13/2005 9:37 AM Page 1
2
Read all instructions BEFORE assembly and USE of this walker.
Keep instructions for future use.
IIMMPPOORRTTAANNTT SSAAFFEETTYY IINNFFOORRMMAATTIIOONN::
HHooww ttoo KKeeeepp YYoouurr CChhiilldd SSaaffee WWhhiillee UUssiinngg tthhiiss PPrroodduucctt
•
NNEEVVEERR
leave child unattended. Always keep child in view while
UUSSIINNGG WWAALLKKEERR
.
•
CCAAUUTTIIOONN:: TTooyyss iinntteennddeedd ttoo bbee aasssseemmbblleedd bbyy aadduulltt!!
SSTTAAIIRR HHAAZZAARRDD
• Avoid serious injury or death. Block stairs & steps securely before
using this walker.
• Use only on flat surfaces free of objects that could cause this
walker to tip over. Never use near stairs, steps, thresholds, hills,
roadways, or pools.
• To avoid burns, keep child away from hot liquids, stoves, radiators,
space heaters, fireplaces, etc.
• Discontinue using this walker should it become damaged or
broken.
• Never carry this walker with child in it. Never adjust seat while child
is in product.
•
DDoo nnoott
lift or carry by tray, music center, or toys.
•
DDoo nnoott
use this walker until baby can sit up unassisted.
• To reduce the chance of child slipping out of seat, check that both
feet of child touch the floor.
• Discontinue using this walker when your child can stand unaided or
walk unassisted.
OOnnllyy uussee tthhiiss wwaallkkeerr iiff yyoouurr cchhiilldd MMEEEETTSS AALLLL ooff tthhee rreeqquuiirreemmeennttss
bbeellooww::
1. Can support body weight with legs
2. Weight is between 15 and 26 pounds (6.8 and 11.8 kgs)
3. Height is less than 32 inches (80 cms)
• To maintain stopping performance, clean friction strips regularly
with damp cloth.
WARNING
W06-R5.qxd 09/13/2005 9:37 AM Page 2
3
ADVERTENCIA
Lea todas las instrucciones ANTES de armar y USAR
la andadera
. Guarde
las instrucciones para futura referencia.
IINNFFOORRMMAACCIIÓÓNN IIMMPPOORRTTAANNTTEE DDEE SSEEGGUURRIIDDAADD::
CCóómmoo mmaanntteenneerr aa ssuu hhiijjoo sseegguurroo mmiieennttrraass eessttáá uuttiilliizzaannddoo eessttee pprroodduuccttoo
•
NNOO
deje nunca al niño solo. Tenga al niño siempre a la vista
mientras utiliza la
AANNDDAADDEERRAA
.
•• PPRREECCAAUUCCIIÓÓNN:: LLooss jjuugguueetteess eessttáánn pprreetteennddiiddooss ppaarraa eennssaammbbllaarr ppoorr
eell aadduullttoo..
PPEELLIIGGRROO EENN EESSCCAALLEERRAASS
• Evite heridas graves o mortales. Bloquée las escaleras y escalones
antes de utilizar esta andadera.
• Utilice solo en superficies planas sin objetos que puedan hacer
que la andadera vuelque. Nunca utilice cerca de escaleras,
escalones, umbrales, colinas, carreteras o piscinas.
• Para evitar quemaduras, mantenga al niño lejos de líquidos
calientes, estufas, radiadores, calefacciones, chimeneas etc.
• Si la andadera se rompe o se daña, deje de utilizarla.
• Nunca acarrée la andadera con el niño adentro. Nunca ajuste el
asiento con el niño adentro.
•
NNoo
la levante o la cargue por medio de la bandeja, el centro musi-
cal o los juguetes.
•
NNoo
utilice este producto hasta que el niño se pueda sentar sin
ayuda.
• Para reducir la posibilidad de que el niño se resbale fuera del
asiento, compruebe que sus pies tocan el suelo.
• Deje de usar la andadera cuando el niño pueda ponerse de pie o
andar sin ayuda.
UUssee llaa aannddaaddeerraa ssoollaammeennttee ssii eell nniiññoo CCUUMMPPLLEE CCOONN TTOODDOOSS llooss
ssiigguuiieenntteess rreeqquuiissiittooss::
1. Puede soportar su propio peso con las piernas.
2. Pesa entre 6.8 y 11.8 kgs. (15 y 26 libras)
3. Mide menos de 80 cms. (32 pulgadas).
• Para mantener la función de parar, limpie las tiras de fricción con
regularidad con un trapo húmedo.
W06-R5.qxd 09/13/2005 9:37 AM Page 3
Attach Seat Pad Para colocar el cojín del asiento
4
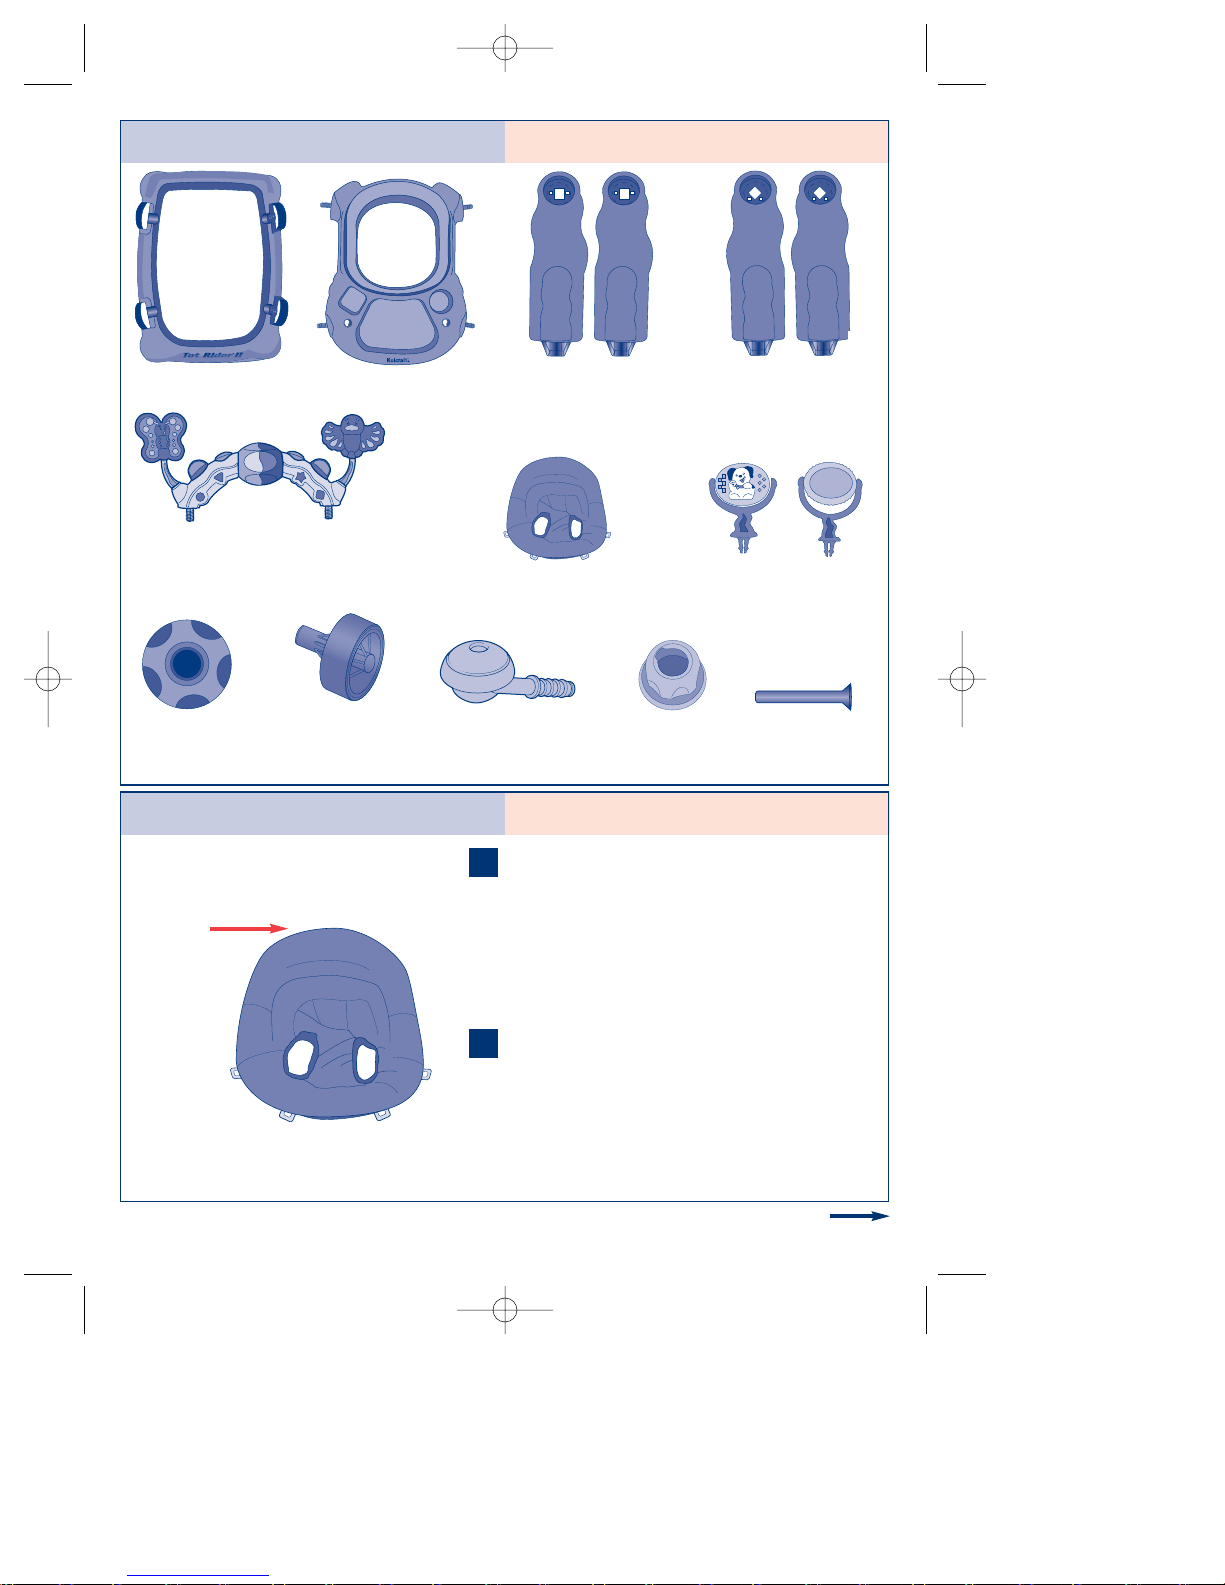
Parts List Lista de piezas
1
Push crotch portion of seat pad inside out to
form seat, so that the fabric is on inside of
seat pad.
Empuje la parte del cojín del asiento adentro
hacia afuera para formar el asiento, de manera que el tejido quede en la parte interior
del cojín del asiento.
Place seat pad into seat ring located on tray.
Align it so that the highest point of the seat
pad aligns with back of walker ring.
Sitúe el cojín del asiento en el anillo del
asiento situado en la bandeja. Alinéelo de
forma que el punto más alto del cojín del
asiento esté alineado con el trasero del anillo
de la andadera.
Continued on next page
Continuación en la página siguiente
1
2
Back
Trasera
Base
Base
Tray
Bandeja
Seat Pad
Cojín del asiento
A B
C D
Electronic Toy
(select models)
Juguete electrónico
(modelos selectos)
Small Nuts (2)
Tuercas chica (2)
Axles (2)
Tornillos (2)
Large Nuts (4)
Tuercas grande (4)
Rear Wheels (2)
Ruedas traseras (2)
Front Casters (2)
Ruedecillas
delanteras (2)
Upright Toys (2)
(select models)
Juguetes parados (2)
(modelos selectos)
Right Legs Square Hole
(2)
Patas derechas agujero
cuadrado (2)
Left Legs
Diamond Hole (2)
Patas izquierdas
agujero de
diamante (2)
W06-R5.qxd 09/13/2005 9:37 AM Page 4
BD
A
C
5
3
4
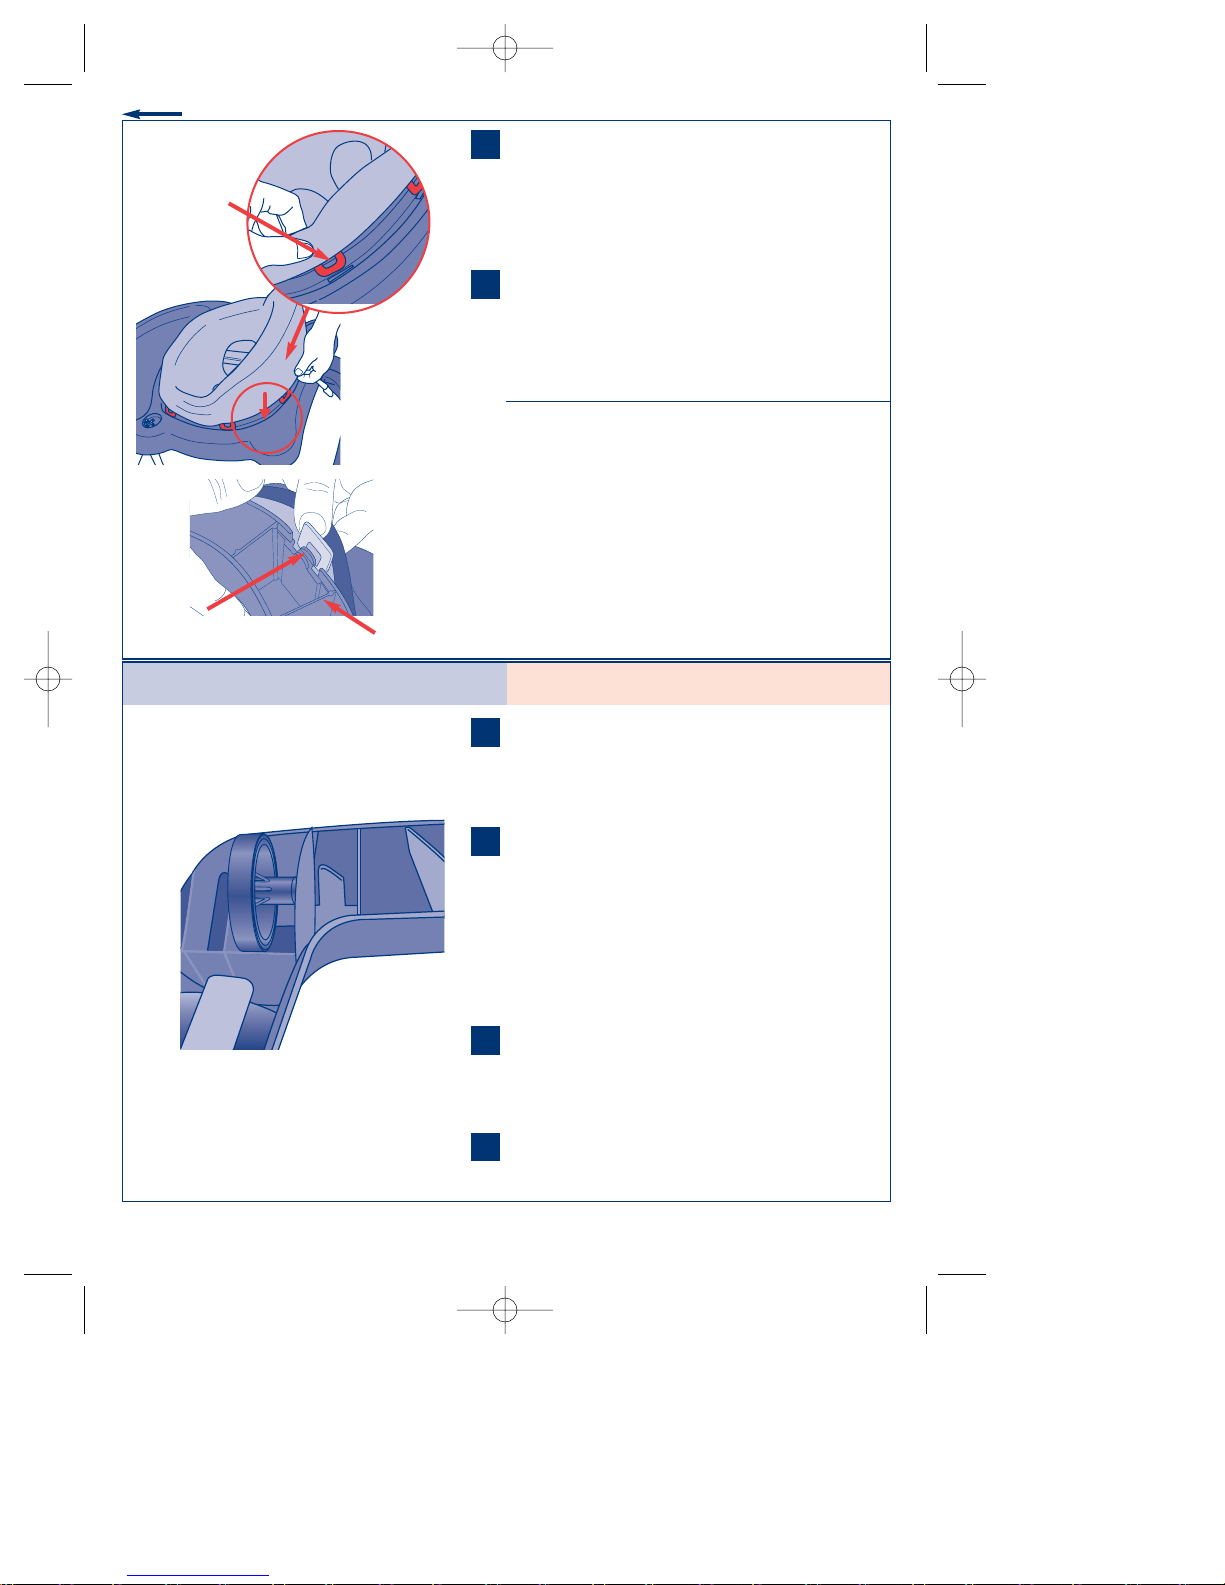
Insert the 8 round tabs on the seat pad into
slots located around the seat ring. Slide tabs
through holes.
Inserte las ocho lengüetas en las ranuras
situadas alrededor del área del asiento.
Deslice las lengüetas a través de los agujeros.
Turn tray up side down. Pull tabs and align
into grooves. You may have to push tabs
from top of walker to properly fasten.
Voltee la bandeja. Estire las lengüetas y
alinée las en las ranuras. Puede que tenga
que empujar las lengüetas desde la parte de
arriba para que se ajusten adecuadamente.
TTeesstt::
Push down hard on seating area of seat
pad to make sure seat is securely in place.
PPrruueebbaa::
Empuje en el medio del cojín para
asegurarse de que está en su sitio.
CCAAUUTTIIOONN::
Do not use walker if all tabs are
not secured properly, otherwise child may fall
through walker.
PPRREECCAAUUCCIIÓÓNN::
No utilice la andadera si
todas las lengüetas no están aseguradas adecuadamente. En caso contrario el niño podría
caerse de la andadera.
3
4
Tabs
Lengüetas
Tabs
Lengüetas
Grooves
Ranuras
Attach Rear Wheels Unión de las ruedas traseras
Flip base over to expose underside. Locate
rear wheel opening in base of the walker.
Voltée la base para exponer la parte de
abajo. Localice la abertura de la rueda trasera
en la base de la andadera.
Align holes of wheel with corresponding axle
holes on the base of the walker. Plastic tab
may need to be pushed to the side to
expose the axle hole. The stem of the wheel
should be facing the inside of the base.
Alinee los agujeros de las ruedas con los
agujeros del eje correspondientes en la base
de la andadera. Puede que sea necesario
empujar la pestaña de plástico para que se
vea el agujero del eje. El tubo de la rueda
debe de estar opuesta adentro de el base.
Slide metal axle into holes until the head of it
passes the plastic tab and clicks into place.
Deslice el eje de metal en los agujeros hasta
que la cabeza pase por la pestaña de plástico
y encaje en su lugar.
Repeat for other wheel.
Repita el proceso en la otra rueda.
1
2
3
4
3
W06-R5.qxd 09/13/2005 9:37 AM Page 5
 Loading...