

Page 1

©2012 Kolcraft®Enterprises, Inc. All Rights Reserved. B036-R1 9/11
Contours®Classique™3-in-1Bassinet Instructions
Instrucciones para el moisés Contours
®
Classique
™
All manuals and user guides at all-guides.com
all-guides.com
Page 2

2
Consumer Service: 1.800.453.7673
www.kolcraft.com/contours
WARNING
Continued on next page
READ ALL INSTRUCTIONS BEFORE ASSEMBLY AND USE OF PRODUCT. Failure to
follow these warnings and instructions could result in serious injury or death. Make
sure bassinet is fully assembled and secure before use. ADULT ASSEMBLY
REQUIRED. KEEP INSTRUCTIONS FOR FUTURE USE.
IIMMPPOORRTTAANNTT SSAAFFEETTYY IINNFFOORRMMAATTIIOONN::
WWhheenn NNOOTT ttoo UUssee YYoouurr BBaassssiinneett
•
NNEEVVEERR lleeaavvee cchhiilldd uunnaatttteennddeedd..
• FALL HAZARD - To help prevent falls, DO NOT use this product when the infant
begins to push up on hands and knees or is 3 months old or weighs 15 lbs.
(6.8 kg), whichever comes first.
• Accidents can happen quickly, so check your child frequently.
PPrreeppaarriinngg YYoouurr BBaassssiinneett ffoorr aa SSaaffee SSlleeeepp EEnnvviirroonnmmeenntt
• AVOID SUFFOCATION HAZARDS: Use ONLY bassinet pad and sheet provided by
Kolcraft.
• Infants can suffocate in gaps between an extra pad and side of bassinet and on
soft bedding.
• NEVER USE additional mattresses, pillows, comforters, padding or sheets.
• If a sheet is used with the pad, use only the one provided by Kolcraft with this
product or call Kolcraft Consumer Services for a replacement.
• NEVER place the changing table on bassinet when child is in the bassinet.
•
SSTTRRAANNGGUULLAATTIIOONN HHAAZZAARRDDSS::
Strings can cause strangulation! Do not place
items with a string around a child’s neck, such as hood strings or pacifier cords.
Do not suspend strings over a bassinet or cradle or attach strings to toys.
• DO NOT place more than one infant in bassinet.
• ALWAYS attach all provided clips to the bassinet support tubes according to
instructions.
FFoorr SSaaffee CChhaannggiinngg TTaabbllee UUssee::
• Do not use changing table if it is damaged or broken.
•
FFAALLLL HHAAZZAARRDD
- To prevent death or serious injury, always keep child within
arm’s reach.
• STOP using the changing table when your infant weighs more than 25 lbs. (11.3
kg) or when child is able to roll or push up on hands and knees.
• Make sure clips are securely attached to the bassinet. DO NOT use if any clips
are broken or missing.
• NEVER use changing table on a bed, floor or other surfaces.
• The changing table is designed for use ONLY with this bassinet.
• Always keep objects in parent organizer out of child's reach.
• NEVER allow children to play with or hang on to parent organizer.
All manuals and user guides at all-guides.com
Page 3
3
Consumer Service: 1.800.453.7673
www.kolcraft.com/contours
• NEVER place more than 10 lbs. (4.5 kg) in the parent organizer.
FFoorr SSaaffee MMoosseess BBaasskkeett UUssee::
• NEVER use near stairs or steps.
• Child’s movement can slide Moses Basket. NEVER place Moses Basket near
edges of counter tops, tables, or other elevated surfaces.
• NEVER use the Moses Basket as a means to transport an infant in a motor
vehicle.
• Your Moses Basket can roll over on soft surfaces and suffocate child. NEVER
place bassinet on beds, sofas, or other soft surfaces.
OOtthheerr TThhiinnggss ttoo AAvvooiidd
• DO NOT carry or move bassinet with child in it.
• DO NOT use around pets or other children without wheel locks on.
• DO NOT use in a motor vehicle.
• NEVER use near stairs or steps.
• To reduce the risk of SIDS (Sudden Infant Death Syndrome), pediatricians
recommend healthy infants be placed on their backs to sleep unless otherwise
advised by a physician.
•
DDOO NNOOTT
add additional strings or straps to attach to bassinet.
• Check this bassinet regularly before using it and do not use it if any parts are
loose or missing or if there are any signs of damage. Do not substitute parts.
Contact the manufacturer if replacement parts or additional instructions are
needed.
All manuals and user guides at all-guides.com
Page 4
4
Consumer Service: 1.800.453.7673
www.kolcraft.com/contours
ADVERTENCIA
LEA TODAS LAS INSTRUCCIONES ANTES DE ENSAMBLAR Y USAR ESTE PRODUCTO.
El no cumplir con las instrucciones y las advertencias podria causar lesiones graves
y hasta la muerte. Asegúrese de que el moisés está completamente ensamblado y
asegurado antes de usar. SE REQUIERE ENSAMBLAJE POR PARTE DE UN ADULTO.
GUARDE LAS INSTRUCCIONES PARA FUTURA REFERENCIA.
IINNFFOORRMMAACCIIÓÓNN IIMMPPOORRTTAANNTTEE DDEE SSEEGGUURRIIDDAADD::
CCuuáánnddoo NNOO uussaarr eell mmooiissééss oo eell ccoollcchhóónn iinncclliinnaaddoo
•• NNuunnccaa ddeejjee aa ssuu nniiññoo ssoolloo..
• PELIGRO DE CAÍDA - Para ayudar a evitar caídas, NO UTILICE este producto
cuando el niño empiece a empujarse con las manos y las rodillas o tenga 3
meses de edad o pese 15 libras (6.8 kg), cualquiera que sea lo que ocurra
primero.
• Los accidentes pueden suceder en un instante. Vigile a su bebé con frecuencia.
CCóómmoo pprreeppaarraarr eell mmooiissééss ppaarraa qquuee ssuu bbeebbéé dduueerrmmaa eenn uunn aammbbiieennttee sseegguurroo
• EVITE PELIGROS DE ASFIXIA: Use ÚNICAMENTE el colchón y la sábana provista
por Kolcraft.
• El bebé se puede asfixiar en los huecos entre un extra colchón y los lados del
moisés/el colchón inclinado y en la colchonetas.
• NUNCA USE colchónes adicionales, alcolchonados, almohadas, colchonetas o
sábanas.
• Si una sábana se utiliza con el colchón, use solamente el proporcionado por
Kolcraft con este product o llame a los servicios de consumidor de Kolcraft para
un reemplazo.
• NUNCA coloque la mesa de cambiar pañales en el moisés cuando el niño este en
el moisés.
•
EEVVIITTEE DDAAÑÑOOSS PPOORR EESSTTRRAANNGGUULLAAMMIIEENNTTOO::
¡Las tiras pueden causar
estrangulación! No coloque artículos con tiras alrededor del cuello del niño, tales
como capuchas con tiras o chupones con tiras. No coloque tiras colgando sobre
el moisés o cuna o adjunta las cuerdas al juguete.
• NO coloque más de un bebé en el moisés.
•
UUNNAA SSIIEEMMPPRREE
todos los clips que se proporcionan a los tubos de soporte del
moisés, siguiendo las instrucciones.
PPaarraa UUttiilliizzaarr llaa MMeessaa ddee CCaammbbiiaarr PPaaññaalleess ddee MMaanneerraa SSeegguurraa::
• No use la mesa para cambiar pañales si tiene daños o esta roto.
•
RRIIEESSGGOO DDEE CCAAÍÍDDAA
- Para evitar riesgos de muerte o lesiones graves, siempre
mantenga al niño al alcance de su mano.
• Pare de usar la mesa de cambiar pañales cuando su niño pese mas de 25 libras
(11,3 kg) o cuando el niño sepa rotar o empujar hacia arriba con las manos y
rodillas.
Continuación en la página siguiente
All manuals and user guides at all-guides.com
Page 5
5
Consumer Service: 1.800.453.7673
www.kolcraft.com/contours
• Asegúrese de que los clips estén adheridos a al moisés.
• El moisés puede rodar sobre superficies blandas y asfixiar al niño. NUNCA
coloque la mesa de cambiar sobre camas, sofás, ni ninguna otra superficie
blanda.
• La mesa de cambiar está diseñada sólo para su utilización con este moisés.
• Mantenga siempre los objetos en el organizador para padres, fuera del alcance
de los niños.
• NUNCA permita que los niños jueguen con el organizador para padres.
• NUNCA coloque más de 10 libras (4,5 Kg.) en el organizador para padres.
PPaarraa UUttiilliizzaarr eell MMooiissééss ddee MMaanneerraa SSeegguurraa::
• NUNCA lo utilice cerca de escaleras o peldaños.
• El movimiento del niño puede hacer deslizar el moisés. NUNCA ubique el moisés
cerca de los bordes de los gabinetes de la cocina, mesas, ni sobre ninguna otra
superficie elevada.
• NUNCA utilice el moisés como un medio para transportar a un bebé en un
vehículo motorizado.
• Su cesta de el moisés se puede rodar encima en superficies suaves y sofocar al
niño. Nunca coloque la cuna en camas, sofás, o otras superficies suaves.
OOttrraass ccoossaass aa eevviittaarr
• NO transporte o mueva el moisés con el bebé adentro.
• NO USE el moisés cerca de animales domésticos o de otros niños sin asegurar
los frenos.
• NO USE el moisés dentro de un vehículo de motor.
• NUNCA USE el moisés cerca de escaleras o escalones.
• Para reducir el riesgo de SIDS (Muerte Súbita del Bebé), los pediatras
recomiendan que los infantes sanos sean situados en su espalda para dormir, a
menos que se aconseje lo contrario por el médico.
•
NNOO
añada cuerdas o tiras tradicionales para unirlas al moisés.
• Compruebe el moisés regularmente antes de usarlo y no lo utilice si algunas
partes son flojas o faltan o si hay algunas muestras de daño. No use partes
subsitutes. Pongase en contacto con el fabricante si las partes de recambio o
instrucciones adicionales son necesarias.
All manuals and user guides at all-guides.com
Page 6
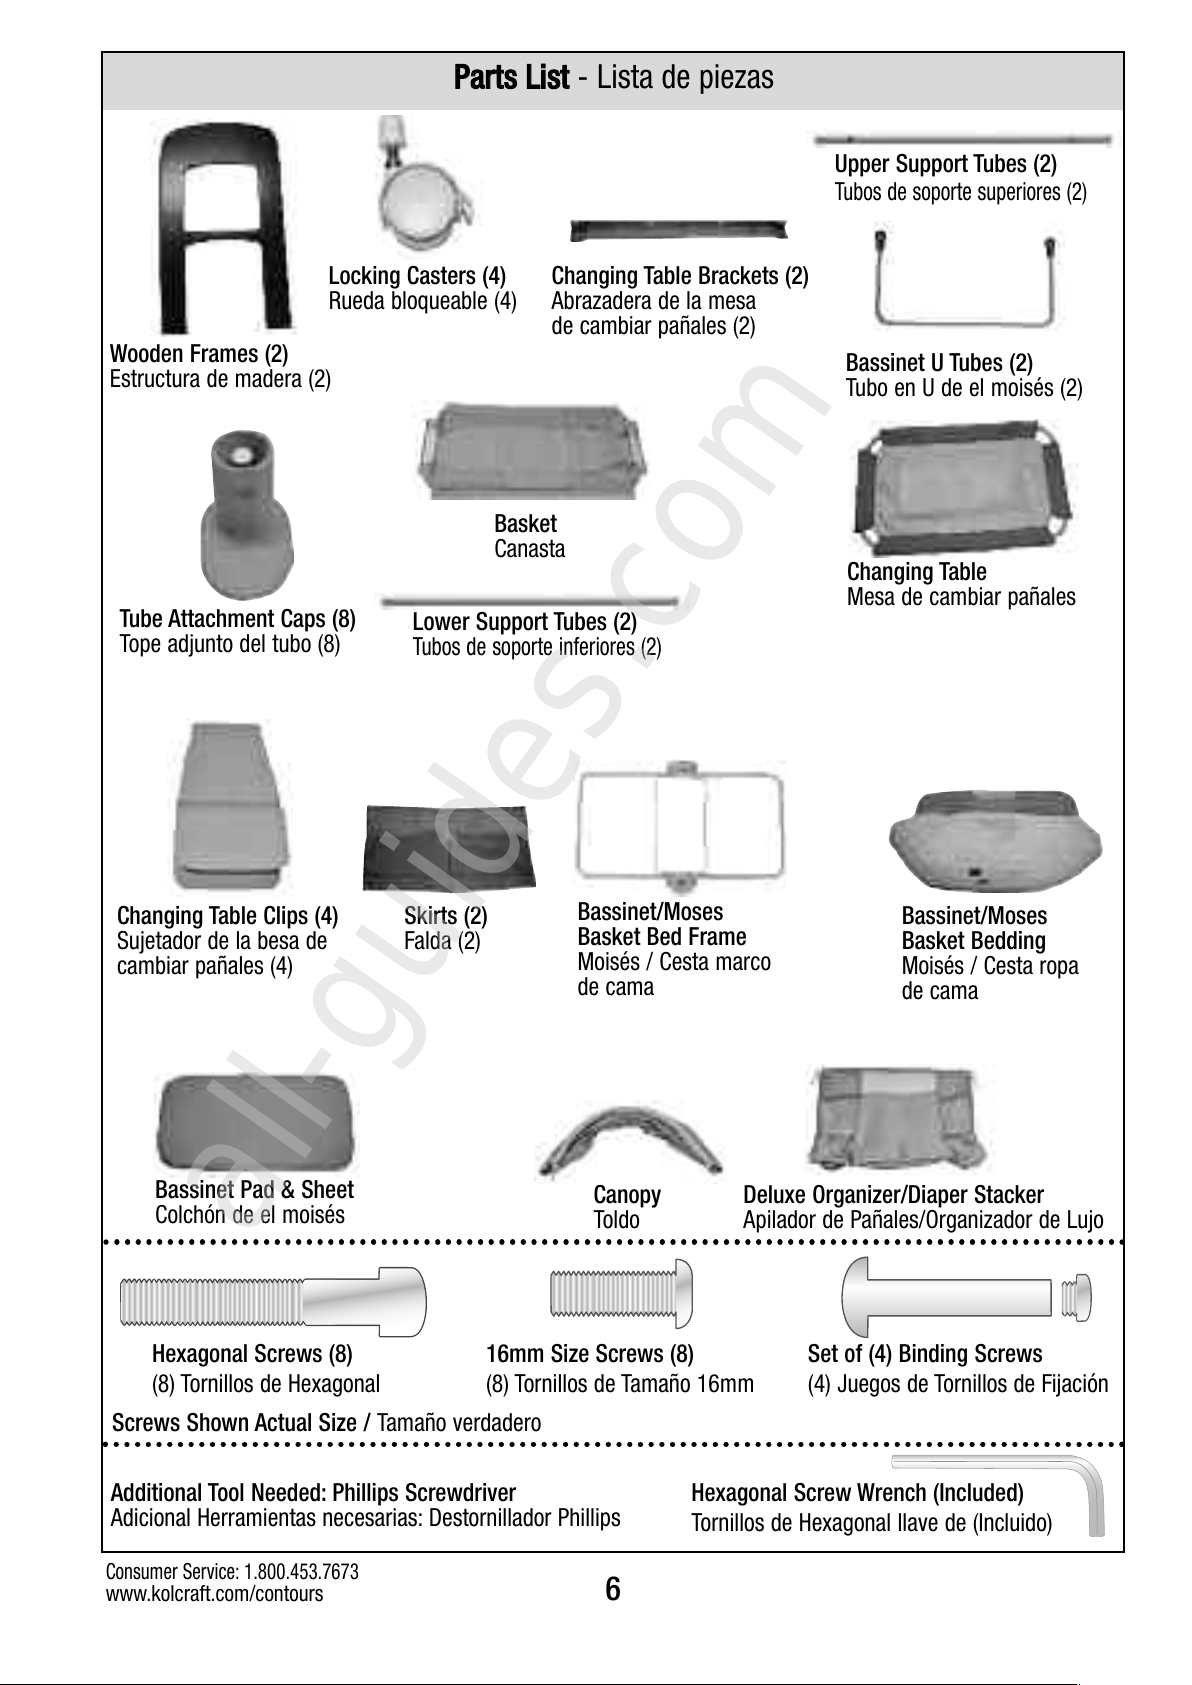
PPaarrttss LLiisstt
- Lista de piezas
6
Consumer Service: 1.800.453.7673
www.kolcraft.com/contours
Wooden Frames (2)
Estructura de madera (2)
Set of (4) Binding Screws
(4) Juegos de Tornillos de Fijación
Upper Support Tubes (2)
Tubos de soporte superiores (2)
Tube Attachment Caps (8)
Tope adjunto del tubo (8)
Bassinet U Tubes (2)
Tubo en U de el moisés (2)
Bassinet/Moses
Basket Bedding
Moisés / Cesta ropa
de cama
Canopy
Toldo
Changing Table
Mesa de cambiar pañales
Changing Table Clips (4)
Sujetador de la besa de
cambiar pañales (4)
Deluxe Organizer/Diaper Stacker
Apilador de Pañales/Organizador de Lujo
Changing Table Brackets (2)
Abrazadera de la mesa
de cambiar pañales (2)
Bassinet Pad & Sheet
Colchón de el moisés
Hexagonal Screws (8)
(8) Tornillos de Hexagonal
16mm Size Screws (8)
(8) Tornillos de Tamaño 16mm
Skirts (2)
Falda (2)
Hexagonal Screw Wrench (Included)
Tornillos de Hexagonal llave de (Incluido)
Additional Tool Needed: Phillips Screwdriver
Adicional Herramientas necesarias: Destornillador Phillips
Lower Support Tubes (2)
Tubos de soporte inferiores (2)
Basket
Canasta
Screws Shown Actual Size / Tamaño verdadero
Bassinet/Moses
Basket Bed Frame
Moisés / Cesta marco
de cama
Locking Casters (4)
Rueda bloqueable (4)
All manuals and user guides at all-guides.com
all-guides.com
Page 7
To Assemble Frame - Para ensamblar la estructura del moisés
HOW TO ASSEMBLE YOUR BASSINET / CÓMO ENSAMBLAR SU MOISÉS
7
Consumer Service: 1.800.453.7673
www.kolcraft.com/contours
11
22
22
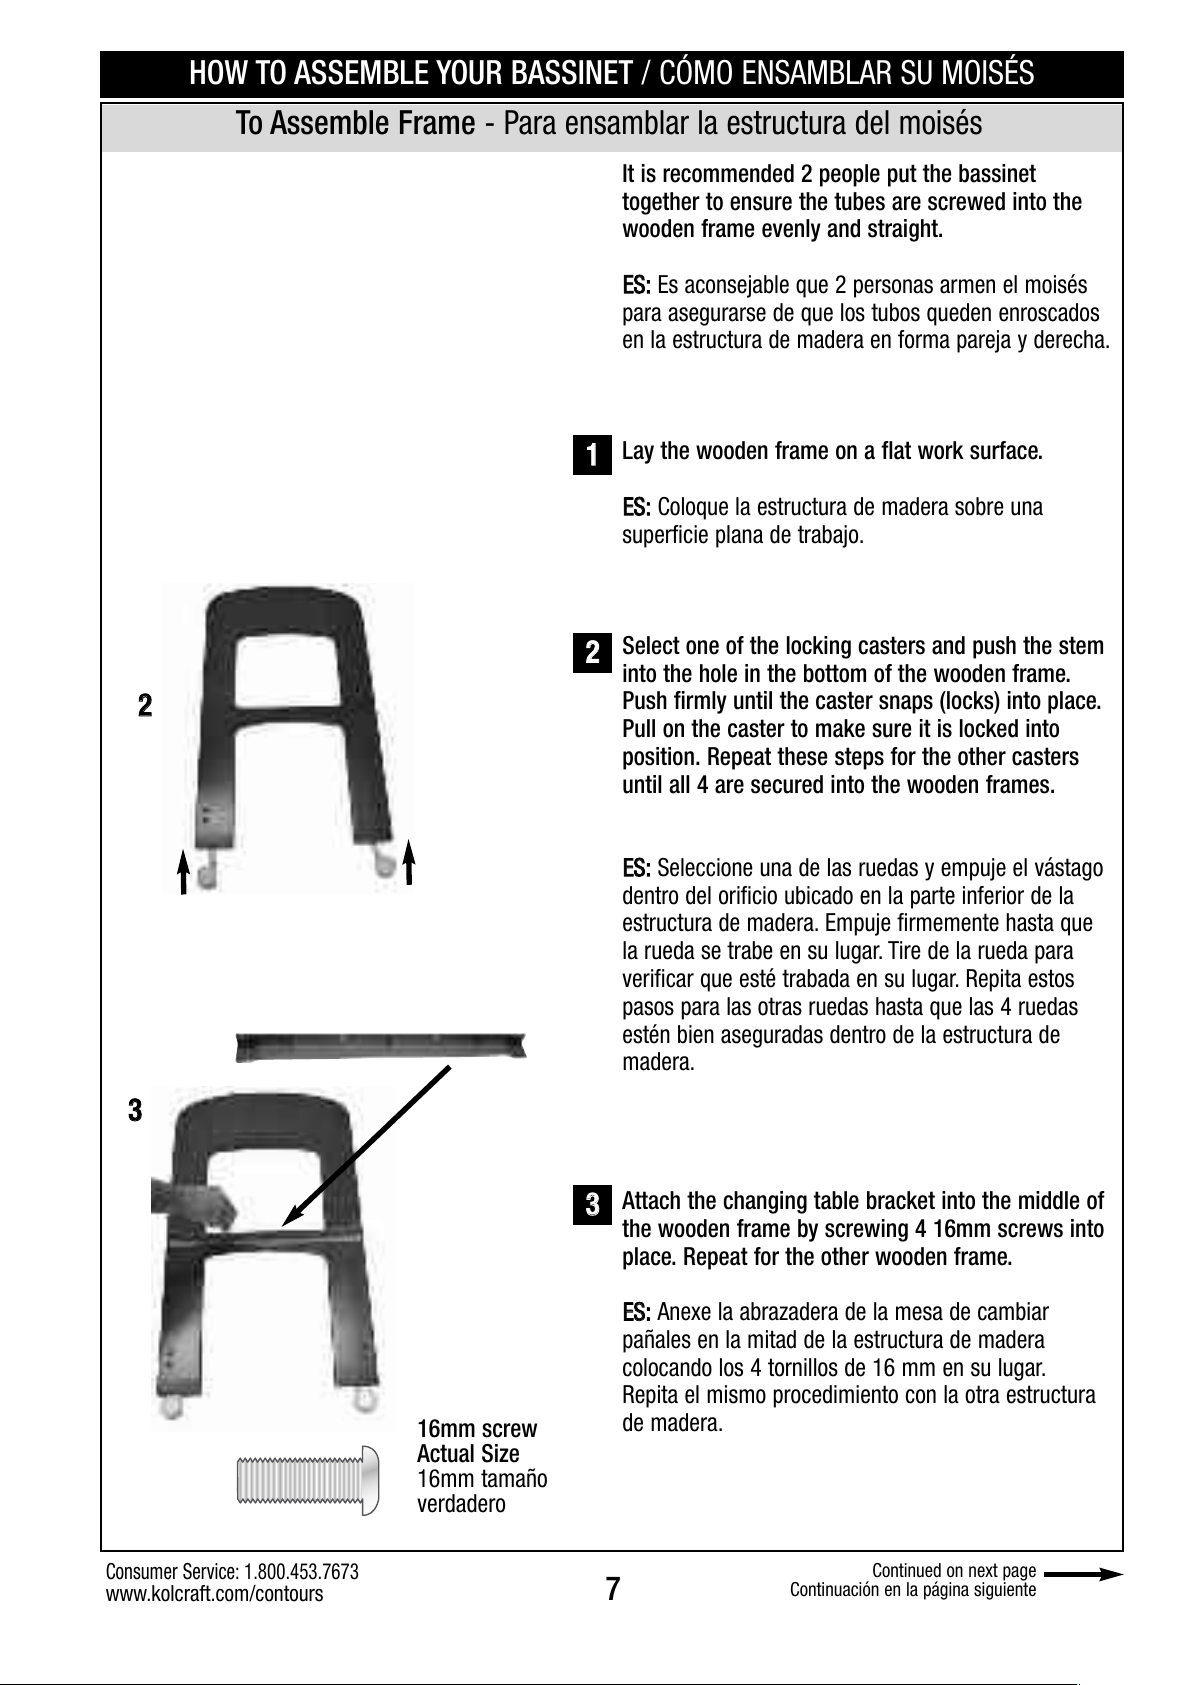
It is recommended 2 people put the bassinet
together to ensure the tubes are screwed into the
wooden frame evenly and straight.
EESS::
Es aconsejable que 2 personas armen el moisés
para asegurarse de que los tubos queden enroscados
en la estructura de madera en forma pareja y derecha.
Lay the wooden frame on a flat work surface.
EESS::
Coloque la estructura de madera sobre una
superficie plana de trabajo.
Select one of the locking casters and push the stem
into the hole in the bottom of the wooden frame.
Push firmly until the caster snaps (locks) into place.
Pull on the caster to make sure it is locked into
position. Repeat these steps for the other casters
until all 4 are secured into the wooden frames.
EESS::
Seleccione una de las ruedas y empuje el vástago
dentro del orificio ubicado en la parte inferior de la
estructura de madera. Empuje firmemente hasta que
la rueda se trabe en su lugar. Tire de la rueda para
verificar que esté trabada en su lugar. Repita estos
pasos para las otras ruedas hasta que las 4 ruedas
estén bien aseguradas dentro de la estructura de
madera.
Attach the changing table bracket into the middle of
the wooden frame by screwing 4 16mm screws into
place. Repeat for the other wooden frame.
EESS::
Anexe la abrazadera de la mesa de cambiar
pañales en la mitad de la estructura de madera
colocando los 4 tornillos de 16 mm en su lugar.
Repita el mismo procedimiento con la otra estructura
de madera.
Continued on next page
Continuación en la página siguiente
33
16mm screw
Actual Size
16mm tamaño
verdadero
33
All manuals and user guides at all-guides.com
Page 8

Binding Screw
Juego de tornillo de fijación
Rigid Screw B
Inserte el tornillo rígido B
Flat Screw A
Tornillo plano A
Tighten Screw B
into Screw A
Ajuste el tornillo B
dentro del tornillo A
44
44
Align holes on
support tubes
with U tubes
Alinee los orificios de los
tubos de soporte con los
tubos en U
Slide
Deslice
8
Consumer Service: 1.800.453.7673
www.kolcraft.com/contours
Find the 2 upper support tubes. The upper support
tubes have holes along the length of the tube. Slide
the 2 bassinet U-tubes onto the 2 upper support
tubes. Align the 2 holes on the upper support tubes
with the holes on the 2 bassinet U-tubes.
EESS::
Ubique los 2 tubos de soporte superiores. Los
tubos de soporte superiores tienen orificios a lo largo
de todo el tubo. Deslice los 2 tubos en U de la cuna
sobre los 2 tubos de soporte superiores. Alinee los 2
orificios de los tubos de soporte superiores con los
orificios de los 2 tubos en U de la cuna.
Unscrew the double binding screw to separate.
Using the double binding screws, insert the flat
screw into the bassinet U-tube hole. Insert the rigid
screw into the flat screw and tighten with a Phillips
screwdriver until secured through the frame support
tube. Note that the U-tube should not slide along the
frame support tubes.
EESS::
Desenrosque el doble tornillo de unión para
separar. Para utilizar los tornillos de doble ligadura,
inserte el tornillo plano dentro del orificio del tubo en U
de el moisés. Inserte el tornillo rígido dentro del tornillo
plano y ajuste con un destornillador Phillips hasta que
estén seguros en el tubo de soporte de la estructura.
Note que el tubo en U no debe deslizarse a lo largo de
los tubos de soporte de la estructura.
Continued on next page
Continuación en la página siguiente
Insert Rigid Screw B
Inserte el tornillo rígido B
55
55
Insert Flat Screw A
Inserte el Tornillo Plano A
All manuals and user guides at all-guides.com
Page 9

9
Consumer Service: 1.800.453.7673
www.kolcraft.com/contours
Take 4 tube attachment caps and place them on the
ends of the upper support tubes.
EESS::
Tome los 4 topes de sujeción de los tubos y
colóquelos en los extremos de los tubos de soporte
superiores.
Align the tube attachment caps at the end of the
upper support tubes with the upper holes on the
inside of the wood panel.
EESS::
Alinee los topes de sujeción de los tubos con los
extremos de los tubos de soporte superiores con los
orificios superiores dentro del panel de madera.
To secure the upper support tubes to the wood
panel, use the hex screw wrench to screw one
hexagonal screw into the upper hole on the outside
of the wood panel. Repeat for other upper support
tube.
EESS::
Para fijar los tubos de soporte superiores al panel
de madera, utilice una llave hexagonal para atornillar
uno de los tornillos hexagonales al orificio superior de
la parte externa del panel de madera. Repita este
procedimiento para los demás tubos de soporte
superiores.
Slide the lower support tubes into the sleeves on the
basket. Be sure the snaps and basket walls are
above the lower support tubes.
EESS::
Deslice los tubos de soporte inferiores dentro de
las fundas de la canasta. Asegúrese de que los
broches y las paredes de la canasta queden debajo de
los tubos de soporte inferiores.
77
Hexagonal screw Actual Size
Tornillos de Hexagonal tamaño verdadero
66
Continued on next page
Continuación en la página siguiente
77
88
99
Use Allen Wrench (included)
Utilice la llave hexagonal (incluida)
66
Tube Attachment Caps
Tope adjunto del tubo
88
99
All manuals and user guides at all-guides.com
Page 10

10
Consumer Service: 1.800.453.7673
www.kolcraft.com/contours
1122
1111
Take the remaining 4 tube attachment caps and
place on the ends of the remaining lower support
tubes.
NOTE: You must attach the basket before attaching
the wood panel.
EESS::
Tome los 4 topes restantes de sujeción de los
tubos y colóquelos en los extremos de los tubos de
soporte inferiores restantes.
NOTA: Antes de colocar el otro panel de madera, debe
colocar la canasta.
Align the tube attachment caps at the end of the
lower support tubes with the lower holes on the
inside of the wood end panel. Be sure the snaps
and basket walls are above the lower support tubes.
EESS::
Alinee los topes de sujeción de los tubos con los
extremos de los tubos de soporte inferiores con los
orificios inferiores dentro del panel de madera.
Asegúrese de que los broches y las paredes de la
canasta queden debajo de los tubos de soporte
inferiores.
To secure lower support tubes to the wood panel,
use the hexagonal screw wrench to screw one
hexagonal screw into the lower hole on the outside
of the wood panel.
EESS::
Para fijar los tubos de soporte inferiores al panel
de madera, utilice una llave hexagonal para atornillar
uno de los tornillos hexagonales al orificio inferior de la
parte externa del panel de madera.
1100
Continued on next page
Continuación en la página siguiente
1100
1111
1122
All manuals and user guides at all-guides.com
Page 11

11
Consumer Service: 1.800.453.7673
www.kolcraft.com/contours
Align the other wood panel, with the 4 tube
attachment caps on the other end of the frame.
EESS::
Alinee el otro panel de madera con los 4 topes de
sujeción en el otro extremo de la estructura.
Using the hexagonal screw wrench, secure the other
wood panel to the support tubes by screwing 4
hexagonal screws into the 4 holes on the exterior of
the wood panel.
EESS::
Con una llave hexagonal, fije el otro panel de
madera a los tubos de soporte atornillando los 4
tornillos hexagonales a los 4 orificios de la parte
externa del panel de madera.
To assemble the basket, secure the 4 snaps to the
wood end panels.
EESS::
Para sujetar la canasta, fije los 4 broches a los
extremos de los paneles de madera.
1155
1133
1144
1133
1144
1155
All manuals and user guides at all-guides.com
all-guides.com
Page 12

12
Consumer Service: 1.800.453.7673
www.kolcraft.com/contours
To Assemble the Changing Table - Para armar la mesa de cambiar panales
11
22
Turn the changing table upside down on a flat
surface.
EESS::
Invierta la mesa de cambiar pañales sobre una
superficie plana.
The changing table clips have a small tab on one
side. Slide the tab into the groove located in the
opening of the fabric. Slide the changing table clip
all the way into the groov until it locks into place.
Repeat for other 3 clips.
EESS::
Los sujetadores de la mesa de cambiar pañales
tienen una pequeña lengüeta en uno de los costados.
Deslice la lengüeta en el surco que se encuentra en
la abertura del tejido. Deslice el sujetador de la mesa
para cambiar pañales todo a lo largo del surco hasta
que quede fijo en su lugar. Repita este procedimiento
para los otros 3 sujetadores.
The changing table is stored on top of the 2
changing table brackets. With the clips facing
upward, slide the changing table onto the 2
changing table brackets so the changing table
rests evenly.
EESS::
La mesa de cambiar pañales está almacenada
sobre las 2 abrazaderas de la mesa. Con los
sujetadores hacia abajo, deslice la mesa sobre las 2
abrazaderas de la misma para que la mesa de
cambiar pañales se apoye uniformemente.
NNOOTTEE::
The changing table is NOT removable from
its frame for washing.
EESS:: NNOOTTAA::
La mesa para cambiar pañales no se
desmonta de su estructura para lavar.
11
33
33
Insert side
with tab
Inserte el costado
con la "nervadura"
22
All manuals and user guides at all-guides.com
Page 13

22
To Assemble Bassinet - Para ensamblar el moisés
Attach the bassinet skirt by wrapping the Velcro
around the top frame support tube. Repeat for the
other side.
EESS::
Anexe la falda de el moisés adjuntando el Velcro
alrededor del tubo de soporte de la estructura superior.
Repita el mismo procedimiento con el otro lado.
Place folded bassinet frame on floorboard and inside
bassinet cover.
EESS::
Ubique la estructura de el moisés doblada sobre la
tablilla del piso.
Open the support wires and clip each into the hooks
on the floorboard.
EESS::
Abra las barras de soporte y ajuste cada pata en
los enganches en la tabla del suelo.
Fasten all the snaps on bassinet cover to floorboard.
CCAAUUTTIIOONN
: Do not use this product if all snaps cannot
be completely fastened. Failure to follow these
warnings and instructions could result in serious
injury or death.
EESS::
Asegure todos los broches de la cubierta del
moises a la tabla de la base.
PPRREECCAAUUCCIIÓÓNN
: No use este producto si los broches no
estan completamente asegurados. El no cumplir con
las instrucciones y las advertencias podria causar
lesiones graves y hasta la muerte.
22
33
44
Hooks
Ganchos
44
Support wires
Alambres de soporte
33
13
Consumer Service: 1.800.453.7673
www.kolcraft.com/contours
11
11
Continued on next page
Continuación en la página siguiente
All manuals and user guides at all-guides.com
Page 14

To Attach Canopy - Para sujetar el toldo
55
55
14
Consumer Service: 1.800.453.7673
www.kolcraft.com/contours
Snap canopy onto frame.
EESS::
Abroche el toldo a la estructura.
Velcro canopy pieces to the bassinet fabric.
EESS::
Adhiera las piezas de Velcro del toldo a los
artículos suaves de el moisés.
Pull back canopy fabric over bassinet frame.
EESS::
Retire hacia atrás el género del toldo de la
estructura de el moisés.
11
22
33
Close cover above floor securely with Velcro.
EESS::
Cierre la cubierta sobre el suelo y asegura con el
Velcro.
Place bassinet pad in bassinet, making sure pad is
flat and firmly in place.
CCAAUUTTIIOONN
: Fitted bassinet sheet should securely wrap
at least 2” (5 cm) beneath entire pad to reduce
chance of entanglement.
EESS::
Ponga el colchoncito dentro del moisés. Presione
el colchoncito asegurándose que esté plano y se
encuentre fijo en su sitio.
PPRREECCAAUUCCIIÓÓNN
: La sábana ceñida del moisés debe
quedar bien sujeta 5 cm. (2 pulgadas) por debajo y
alrededor del colchón para disminuir el riesgo de que
el bebé quede enredado.
66
11
22
33
All manuals and user guides at all-guides.com
Page 15

15
Consumer Service: 1.800.453.7673
www.kolcraft.com/contours
Ensure the handles for Moses Basket use are
accessible through the top of the fabric.
EESS::
Asegúrese de que el uso de las agarraderas del
Canasto de Moisés quede accesible en la parte
superior de los artículos suaves de el moisés.
Place the Moses Basket onto the 2 U-tubes evenly.
NNOOTTEE::
The Moses Basket should rest snugly and
evenly in the bassinet frame.
TThhee hhaannddlleess aarree nnoott
rreemmoovvaabbllee..
EESS::
Ubique el moisés sobre los tubos en U de manera
uniforme.
EESS:: NNOOTTAA::
El canasto de Moisés debe apoyarse cómo-
da y uniformemente en la estructura de el moisés. Las
agarraderas no son movibles.
11
22
Moses basket - Canasto de moisés
22
11
Handles
las agarraderas
Unfold the deluxe organizer/diaper stacker and snap
to the exterior of the wood panel.
EESS::
Despliegue el organizador de lujo/apilador de
pañales y aplique presión hacia el exterior del panel
de madera.
The diaper stacker and compartments will hold up to
10 lbs.
EESS::
Llene el apilador de pañales y los compartimentos
con artículos de hasta 10 libras.
11
To Assemble Deluxe Organizer/Diaper Stacker - Para armar el organizador de
lujo/apilador de pañales
22
All manuals and user guides at all-guides.com
Page 16

Completed Bassinet - Moises Terminada
To Use Moses Basket - Para usar el canasto de moisés
16
Consumer Service: 1.800.453.7673
www.kolcraft.com/contours
Lift Moses Basket out of the bassinet frame using
both handles.
EESS::
Levante el canasto de Moisés de la estructura de
el moisés utilizando ambas agarraderas.
11
11
All manuals and user guides at all-guides.com
all-guides.com
Page 17

17
Consumer Service: 1.800.453.7673
www.kolcraft.com/contours
NOTE: Use the changing table when the Moses
Basket is not
in the bassinet frame.
EESS:: NNOOTTAA::
Utilizar la mesa de cambiar pañales cuando
el Canasto de Moisés no se encuentre en la estructura
de el moisés.
Remove Moses Basket.
EESS::
Quite el canasto de Moisés.
Remove changing table from storage position.
EESS::
Quite la mesa de cambiar pañales de la posición
de almacenamiento.
To secure changing table, place the changing table
clips onto the top of the frame support tubes and
press down. Ensure that the changing table lays flat
and even and the clips are securely hooked to frame
support tubes.
EESS::
Para asegurar la mesa de cambiar pañales, ubique
los sujetadores de la misma sobre la parte superior de
los tubos de soporte de la estructura y presione hacia
abajo. Asegúrese de que la mesa de cambiar pañales
permanezca en una posición plana y uniforme.
To remove changing table, lift one of the changing
table clips up over the top of the frame support tube
and pull up to remove entire changing table. Store
on changing table bracket as described on pg. 15.
EESS::
Para quitar la mesa de cambiar pañales, levante
uno de los sujetadores de la misma sobre el tubo de
soporte de la estructura superior y tire hacia arriba
para quitar toda la mesa de cambiar pañales.
Almacene debajo del Canasto de Moisés como se
indicó.
33
11
22
33
22
11
To Use Changing Table - Para utilizar la mesa de cambiar pañales
Continued on next page
Continuación en la página siguiente
44
44
All manuals and user guides at all-guides.com
Page 18

To Use Brakes - Para usar los frenos
18
Consumer Service: 1.800.453.7673
www.kolcraft.com/contours
22
11
Locked
Cerrado
Unlocked
Abierto
Push levers on wheels down to lock.
EESS::
Oprima las palancas en las ruedas, hacia abajo
para asegurarlas.
Pull levers up to unlock.
EESS::
Jale las palancas hacia arriba para soltarlas.
WARNING
Avoid accidents. Do not use the
bassinet with the wheels
unlocked around stairs or other
children.
ADVERTENCIA
Evite accidentes. No use el
moisés cerca de escaleras o
de otros niños sin poner los
frenos.
All manuals and user guides at all-guides.com
Page 19

19
Consumer Service: 1.800.453.7673
www.kolcraft.com/contours
TTOO RREEMMOOVVEE BBAASSSSIINNEETT CCOOVVEERR
PPAARRAA QQUUIITTAARR LLAA CCUUBBIIEERRTTAA DDEE EELL MMOOIISSÉÉSS
Remove Moses Basket from U-tubes.
EESS::
Para quitar la cubierta de el moisés de los tubos
en U.
Remove canopy and bassinet pad.
EESS::
Quite el toldo y el colchón de el moisés.
Open floor cover and unsnap from bassinet floor
board.
EESS::
Abra la cubierta del piso y desabróchela de la
tablilla del piso de el moisés.
Unhook the frame from the clips.
EESS::
Desenganche la estructura de los sujetadores.
Remove frame.
EESS::
Quite la estructura.
11
22
11
22
33
44
55
33
44
55
CARE & MAINTENANCE / CUIDADO & MANTENINIENTO
Continued on next page
Continuación en la página siguiente
All manuals and user guides at all-guides.com
Page 20

20
Consumer Service: 1.800.453.7673
www.kolcraft.com/contours
Remove floorboard.
EESS::
Quite la tablilla del piso.
NNOOTTEE::
The Moses Basket handles are permanently
attached to the bassinet frame.
EESS:: NNOOTTAA::
Las agarraderas del Canasto de Moisés
están permanentemente anexadas a la estructura de el
moisés.
TTOO WWAASSHH BBAASSSSIINNEETT CCOOVVEERR
PPAARRAA LLAAVVAARR LLAA CCUUBBIIEERRTTAA DDEE EELL MMOOIISSÉÉSS
• Hand wash bassinet cover with water and
mild soap.
• Line Dry. Do not dry this bassinet cover in
clothes dryer. This may shrink the cover.
CAUTION: For the safety of your child, it is
vital that the bassinet cover is remounted completely
and correctly.
EESS::
• Lave a mano la cubierta de el moisés con jabón
suave y agua.
• Deje Secar en la Cuerda. No seque esta cubierta de
cuna en el secador de ropas. Esto podría encoger la
cubierta.
PRECAUCIÓN: Para la seguridad de su niño, es de vital
importancia que la cubierta de el moisés se vuelva a
montar completa y correctamente.
66
66
Continued on next page
Continuación en la página siguiente
All manuals and user guides at all-guides.com
Page 21

21
Consumer Service: 1.800.453.7673
www.kolcraft.com/contours
TTOO CCLLEEAANN CCHHAANNGGIINNGG TTAABBLLEE
PPAARRAA LLIIMMPPIIAARR LLAA MMEESSAA DDEE CCAAMMBBIIAARR PPAAÑÑAALLEESS
• Wipe surfaces clean using water and mild
bleach-free soap.
• Do not use scouring powders, or abrasive
cleaners.
• Wipe dry using a soft, clean cloth or air dry.
EESS::
• Limpie la superficie utilizando un jabón suave, libre
de blanqueadores y agua.
• No utilice polvos para fregar o abrasivos
limpiadores.
• Seque utilizando un paño suave y limpio o deje
secar al aire.
TTOO PPRROOPPEERRLLYY RREE--MMOOUUNNTT TTHHEE BBAASSSSIINNEETT CCOOVVEERR
PPAARRAA VVOOLLVVEERR AA MMOONNTTAARR LLAA CCUUBBIIEERRTTAA DDEE EELL MMOOIISSÉÉSS
AAPPRROOPPIIAADDAAMMEENNTTEE
Replace floorboard into bassinet cover with snaps
and hooks facing up.
EESS::
Vuelva a colocar la tablilla del piso dentro de el
moisés con los broches y los ganchos hacia arriba.
Place folded bassinet frame on floorboard and inside
bassinet cover.
EESS::
Ubique la estructura de el moisés doblada sobre la
tablilla del piso.
11
22
11
22
Continued on next page
Continuación en la página siguiente
Voir page suivante
All manuals and user guides at all-guides.com
all-guides.com
Page 22

22
Consumer Service: 1.800.453.7673
www.kolcraft.com/contours
55
44
55
Pull up bassinet frame to unfold support bars and
clip each support leg into the hooks on the
floorboard.
EESS::
Levante la estructura de el moisés para desplegar
las barras de soporte y sujete cada pata de apoyo a
los ganchos de la tablilla del piso.
Snap cover to floorboard and close floor securely
with Velcro.
EESS::
Presione la cubierta hacia la tabla y ciérrela sobre
el suelo con velcro.
Insert bassinet pad.
EESS::
Inserte el colchón de el moisés.
Re-attach canopy.
EESS::
Vuelva a anexar el toldo.
66
66
33
33
Continued on next page
Continuación en la página siguiente
44
All manuals and user guides at all-guides.com
Page 23

23
Consumer Service: 1.800.453.7673
www.kolcraft.com/contours
TTOO RREEMMOOVVEE BBAASSSSIINNEETT CCAANNOOPPYY FFRROOMM FFRRAAMMEE FFOORR
CCLLEEAANNIINNGG
PPAARRAA RREEMMOOVVEERR EELL TTOOLLDDOO DDEELL MMOOIISSÉÉSS DDEE LLAA EESSTTRR--
RRUUCCTTUURRAA PPAARRAA LLIIMMPPIIAADDOO
To remove the canopy from the canopy frame, hold
the clip area and pull up or back on the canopy
frame until the notch on the frame pops out of the
clip.
EESS::
Para remover el toldo de la estructura del toldo,
sujete el área del clip y jale hacia arriba o hacia atrás
en la estructura del toldo hasta que la ranura en la
estructura salga del clip.
Slide the canopy off the frame.
EESS::
Deslice el toldo fuera de la estructura.
To clean, hand wash canopy with water and mild
soap. Line dry. Do not dry canopy in clothes dryer. It
may shrink canopy.
EESS::
Pliegue el toldo con agua y jabón suave. Seque
colgado. No seque el toldo en la secadora de ropa.
Puede que haga encoger el toldo.
11
22
Canopy Clip
Clip del toldo
11
22
Continued on next page
Continuación en la página siguiente
Voir page suivante
Canopy Frame
El toldo de la
estructra
All manuals and user guides at all-guides.com
Page 24

24
Consumer Service: 1.800.453.7673
www.kolcraft.com/contours
22
11
33
Notch Locks
Cierres de la
ranura
TTOO PPRROOPPEERRLLYY RREE--MMOOUUNNTT TTHHEE BBAASSSSIINNEETT CCAANNOOPPYY
OONNTTOO FFRRAAMMEE
PPAARRAA VVOOLLVVEERR IINNSSTTAALLAARR EELL TTOOLLDDOO DDEELL MMOOIISSÉÉSS EENN LLAA
EESSTTRRUUCCTTUURRAA
To place canopy back onto frame, slide canopy frame
through small stitch holes at the bottom of the
canopy end pieces.
EESS::
Para situar el toldo de nuevo en la estructura,
deslice la estructura del toldo a través de los pequeños
agujeros en las piezas en el extremo del toldo.
Push the canopy frame back into the canopy clips
until you hear a snap that signals the notch is in
place and the canopy is secure.
EESS::
Sitúe el marco del toldo de nuevo en los clips del
toldo hasta que escuche un sonido de ajuste que le
señale que la ranura está en su lugar y que el toldo
está asegurado.
The canopy clipnotch locks must face inward in
order for the frame to be assembled properly.
EESS::
Los cierres de la ranura del clip del toldo deben
estar mirando hacia adentro, para que la estructura
pueda montarse de la forma adecuada.
CCAAUUTTIIOONN
: For the safety of your child, it is vital that
the bassinet canopy is remounted completely and
correctly.
EESS:: PPRREECCAAUUCCIIÓÓNN
: Para la seguridad de sus niños, es
de vital importancia que la cubierta del moisés y el
toldo sean vueltan a instalar completamente y en la
forma correcta.
11
22
33
All manuals and user guides at all-guides.com
Page 25

25
Consumer Service: 1.800.453.7673
www.kolcraft.com/contours
LLIIMMIITTEEDD WWAARRRRAANNTTYY // GGAARRAANNTTÍÍAA LLIIMMIITTAADDAA
Kolcraft®warrants this product to be free of defects in materials and workmanship, as follows: For a period
of ONE YEAR from the date of purchase, Kolcraft will repair or replace, at its option, the defective product. If
you have a problem or are not satisfied with this product, please contact the Consumer Service Department
at Kolcraft.
REPAIR OR REPLACEMENT AS PROVIDED UNDER THIS WARRANTY IS THE EXCLUSIVE REMEDY OF THE CON-
SUMER. KOLCRAFT SHALL NOT BE LIABLE FOR ANY INCIDENTAL OR CONSEQUENTIAL DAMAGES FOR
BREACH OF ANY EXPRESS OR IMPLIED WARRANTY ON THIS PRODUCT, EXCEPT TO THE EXTENT REQUIRED BY
APPLICABLE LAW. ANY IMPLIED WARRANTY OF MERCHANTABILITY OR FITNESS FOR A PARTICULAR PUR-
POSE ON THIS PRODUCT IS LIMITED TO THE DURATION OF THIS WARRANTY.
Some states do not allow the exclusion or limitation of warranties set forth above, so the above exclusions
may not apply to you. This warranty gives you specific legal rights, and you may also have other rights
which vary from state to state. We sincerely thank you for your purchase of this Kolcraft product.
To obtain warranty service, please call Kolcraft’s Consumer Service Department at 1-800-453-7673 in U.S.
and Canada, 1-910-944-9345 outside U.S. and Canada or contact us via email at customerser-
vice@kolcraft.com
If the product is returned to Kolcraft’s Consumer Service Department for repair or replacement, it must be
shipped prepaid and adequately insured.
For further information visit www.kolcraft.com
RREECCAALLLL WWEEBBSSIITTEE::
HELP KEEP YOUR CHILD SAFE. Check www.recall.gov to see if any products you use with
your child or any of your child's toys have been recalled.
Kolcraft
®
garantiza que este producto estará libre de defectos en materiales y fabricación de la siguiente
manera: Por un período de UN AÑO después de la fecha de compra, Kolcraft reparará o reemplazará, a su
opción, el producto defectuoso. Si usted tiene un problema o no está satisfecho con este producto, por favor
diríjase al Departamento de Servicio al Consumidor de Kolcraft.
LA REPARACIÓN O EL REEMPLAZO SEGÚN SE DISPONE EN ESTA GARANTÍA ES EL REMEDIO EXCLUSIVO DE
CONSUMIDOR. KOLCRAFT NO SE HARÁ RESPONSABLE DE NINGÚN DAÑO INCIDENTAL O EMERGENTE POR
VIOLACIÓN DE CUALQUIER GARANTÍA EXPRESA O IMPLÍCITA DE ESTE PRODUCTO, SALVO EN LA MEDIDA
REQUERIDA POR LA LEY APLICABLE. CUALQUIER GARANTÍA IMPLÍCITA DE COMERCIABILIDAD O IDONEIDAD
PARA UN FIN EN PARTICULAR DE ESTE PRODUCTO ESTÁ LIMITADA EN DURACIÓN AL TÉRMINO DE ESTA
GARANTÍA.
Algunos estados no permiten la exclusión o limitación de garantías según se dispone anteriormente, de manera
que es posible que las antedichas exclusiones no sean aplicables a usted. Esta garantía le otorga derechos
legales específicos y es posible que también disponga de otros derechos, los cuales pueden variar de un estado
a otro. Le agradecemos sinceramente por haber comprado este producto Kolcraft.
Para obtener servicio de garantía, llame al Departamento de Servicio al Consumidor de Kolcraft al
1-800-453-7673 en Estados Unidos y Canada; fuera de Estados Unidos y Canada: 1-910-944-9345
o envianos un mensaje por correo electrónico a customerservice@kolcraft.com.
Si el producto se devuelve al Departamento de Servicio al Consumidor de Kolcraft para ser arreglado o
reemplazado, debe mandarse con el flete pagado y debidamente asegurado.
Para mayor información visítenos en www.kolcraft.com
SSIITTIIOO DDEE WWEEBB DDEE HHAACCEERR VVOOLLVVEERR::
MANTENGA A SU HIJO SEGURO. Compruebe www.recall.gov para ver si
cualquiera de los productos que utiliza con su hijo o cualquiera de sus juguetes han sido retirados.
All manuals and user guides at all-guides.com
Page 26

26
Consumer Service: 1.800.453.7673
www.kolcraft.com/contours
Once in a while, we are less than perfect and one of our products with a problem reaches a customer. In
most cases, we can solve your problem with replacement parts. Please contact us before you return one of
our products to the store. Once a product is returned, it cannot be resold. The materials and the energy
used to make it are wasted.
Please fill in the information in the space provided and attach a copy of your purchase receipt. You will
need this information to obtain warranty service.
You can find the Model Number and Date of Manufacture on a sticker located on the rear stroller leg, or
sewn on the back of the seat.
Ocasionalmente no logramos la perfección y uno de nuestros productos presenta algún problema al llegar al
cliente. En la mayor parte de los casos podemos resolver el problema con piezas de reemplazo. Sírvase ponerse
en contacto con nosotros antes de devolver uno de nuestros productos a la tienda. Una vez que se devuelve un
producto, no se pude volver a vender. Se desperdician los materiales y la energía que se usó en su fabricación.
Por favor escriba la información en el espacio provisto y adjunte una copia de su recibo de compra. Usted
necesitará esta información para obtener los servicios incluidos en la garantía.
Usted puede encontrar el número del modelo y la fecha de fabricación en una etiqueta situada en la parte
trasera de la pata de la carriola o cocido en la parte posterior del asiento.
PPlleeaassee ddiirreecctt aannyy ccoommmmeennttss,, qquueessttiioonnss oorr rreeppllaacceemmeenntt ppaarrtt rreeqquueessttss ttoo::
FFaavvoorr ddee rreemmiittiirr ccuuaallqquuiieerr ccoommeennttaarriioo,, pprreegguunnttaass oo ppeeddiiddooss ddee ppiieezzaass ddee rreessppuueessttoo aa::
Kolcraft®Enterprises, Inc. Consumer Service Department
10832 NC Highway 211 East
Aberdeen, NC 28315
1-800-453-7673 in U.S. & Canada, 1-910-944-9345 outside U.S. & Canada
Eastern Standard Time, 8 am-6:45 pm Monday - Thursday, 8 am-3:30 pm Friday
1-800-453-7673 en los Estados Unidos y en Canada, 1-910-944-9345 fuera de los Estados Unidos y Canada
tiempo estándar del este, 8 am-6:45 pm Lunes - Jueves, 8 am-3:30 pm Viernes
ffaaxx //
fax: 910-944-3490
ee--mmaaiill //
correo electrónico: customerservice@kolcraft.com
Model / Style Number:
Número de Modelo/Estilo: ___________________________
Date of Manufacture:
Fecha de fabricación: ______________________________
Date of Purchase:
Fecha de compra: _________________________________
Turn to page 27 to see a list of
replacement parts.
Diríjase a la página 27 para ver una lista
de piezas de repuesto
PPEERRSSOONNAALL RREECCOORRDD CCAARRDD // TTAARRJJEETTAA DDEE RREEGGIISSTTRROO PPEERRSSOONNAALL
All manuals and user guides at all-guides.com
all-guides.com
Page 27

TTOO OORRDDEERR PPAARRTTSS::
• 1-800-453-7673 in U.S.A. & Canada
1-910-944-9345 outside U.S.A. &
Canada
• Visit “Order Replacement Parts”
page on www.kolcraft.com
•
Email customerservice@kolcraft.com
PPAARRAA PPEEDDIIRR RREEPPUUEESSTTOOSS::
• Llame al 1-800-453-7673 en EE. UU.
y Canadá, y al 1-910-944-9345 fuera
de EE. UU. y Canadá
• Visite la página “Pedir repuestos” en
www.kolcraft.com
• Envíe un correo electrónico a
customerservice@kolcraft.com
RREEPPLLAACCEEMMEENNTT PPAARRTTSS LLIISSTT // LLIISSTTAA DDEE PPIIEEZZAASS DDEE RREEPPUUEESSTTOO
27
Consumer Service: 1.800.453.7673
www.kolcraft.com/contours
Wooden Frame
Estructura de madera
$ 15 each / cada uno
Tube Attachment Caps
Tope adjunto del tubo
$ 2 each / cada uno
Bassinet U Tube
Tubo en U de el moisés
$ 5 each / cada uno
Bassinet/Moses Basket
Canasto de moisés/cuna
$ 20
Canopy
Toldo
$ 15
Changing Table
Mesa de cambiar pañales
Table à langer
$ 15
Changing Table Clip
Sujetador de la besa de
cambiar pañales
$ 2
each / cada uno
Deluxe Organizer/ Diaper Stacker
Apilador de pañales/organizador de lujo
$ 15
Changing Table Bracket
Abrazadera de la besa de
cambiar pañales
$ 2
each / cada uno
Bassinet Pad
Colchón de el moisés
$ 14
Skirt
Falda
$ 27 each / cada uno
Bassinet Sheet
Sábana de el moisés
$ 9
Canopy Clips
Clip del toldo
$ 2 each
Basket
Canasta
$ 15
Upper Support Tubes
Tubos de soporte superiores
$ 3
each / cada uno
Lower Support Tubes
Tubos de soporte inferiores
$ 3 each / cada uno
Bassinet/Moses
Basket Bed Frame
Moisés / Cesta marco
de cama
$ 20
Locking Caster
Rueda bloqueable
$3 each / cada uno
All manuals and user guides at all-guides.com
Page 28

28
Consumer Service: 1.800.453.7673
www.kolcraft.com/contours
All manuals and user guides at all-guides.com
 Loading...