

Kohler Toobi 8963T-B9, Toobi 8962T-B9 Installation Instructions Manual

SERVICE PARTS
TOOBI
INSTALLATION INSTRUCTIONS
TOOBI
1170944**
3010689**
8962T-B9 Wall-Mount Shower Faucet
8963T-B9 Wall-Mount Bath & Shower Faucet
1059041**
1297467**
1218659
870992
864471
3010697**
3010698
831727**
1240266
1030624
77420
880010
8962T-B9 Wall-Mount Shower Faucet
8963T-B9 Wall-Mount Bath & Shower Faucet
BEFORE YOU BEGIN
All information is based on the latest product information available at the time of publication. Kohler Co. reserves
the right to make changes in product characteristics, packaging, or availability at any time without notice.
Please leave these instructions for the consumer. They contain important information.
NOTES:
1.Flush the water supply pipes thoroughly to remove debris.
2.The minimum inlet water pressure for the diverter is 0.05MPa(0.5bar).
3. The highest working pressure for handshower & showerhead is 0.5MPa(5bar). If it exceeds 0.5MPa(5bar),
a pressure reducer is needed. The highest water and environment temperature is 60ºC. Please keep handshower,
showerhead and shower arm away from heater, or it may become damaged and cause injury to the user.
STANDARD APPLICABLE
Special model meets or exceeds the following at date of manufacture: TIS
HANDLE OPERATION
833438
834705**
1152362-A**
3010715
3010970**
1086390
1146844-A**
834705**
864922**
834791**
3011113
834460
870721
3010213
880084
880085
3012713**
3010690**
Green:3010756
White:3013331
Green:3010692
White:3013329
For 8962T-B9, push the handle back, turn clockwise for cold water, counter-clockwise for hot water.
For 8963T-B9, push the handle down, turn clockwise for cold water, counter-clockwise for hot water, bath spout
works; lift the diverter gently, turn clockwise for shower; shut off the faucet, turn counter-clockwise until it stops.
ROUGH-IN DIMENSIONS
Bracket
Ø61
G1/2˝
150±15
153~160
223
G1/2˝
64º
283
Ø61
G1/2˝
150±15
40º
G1/2˝
84~91
Handshower
Ø28
293
240
22.5
250
40
G1/2˝
50
Hose
1500
**Color code must be specified when ordering.
NOTE: For all Asia pacific regions (excluding China) add SP (SPxxxxxxx**) in front of the part number when ordering.
1338604-2A-A 4
G1/2˝
8963T-B9
8962T-B9
G1/2˝
1338604-2A-A 1
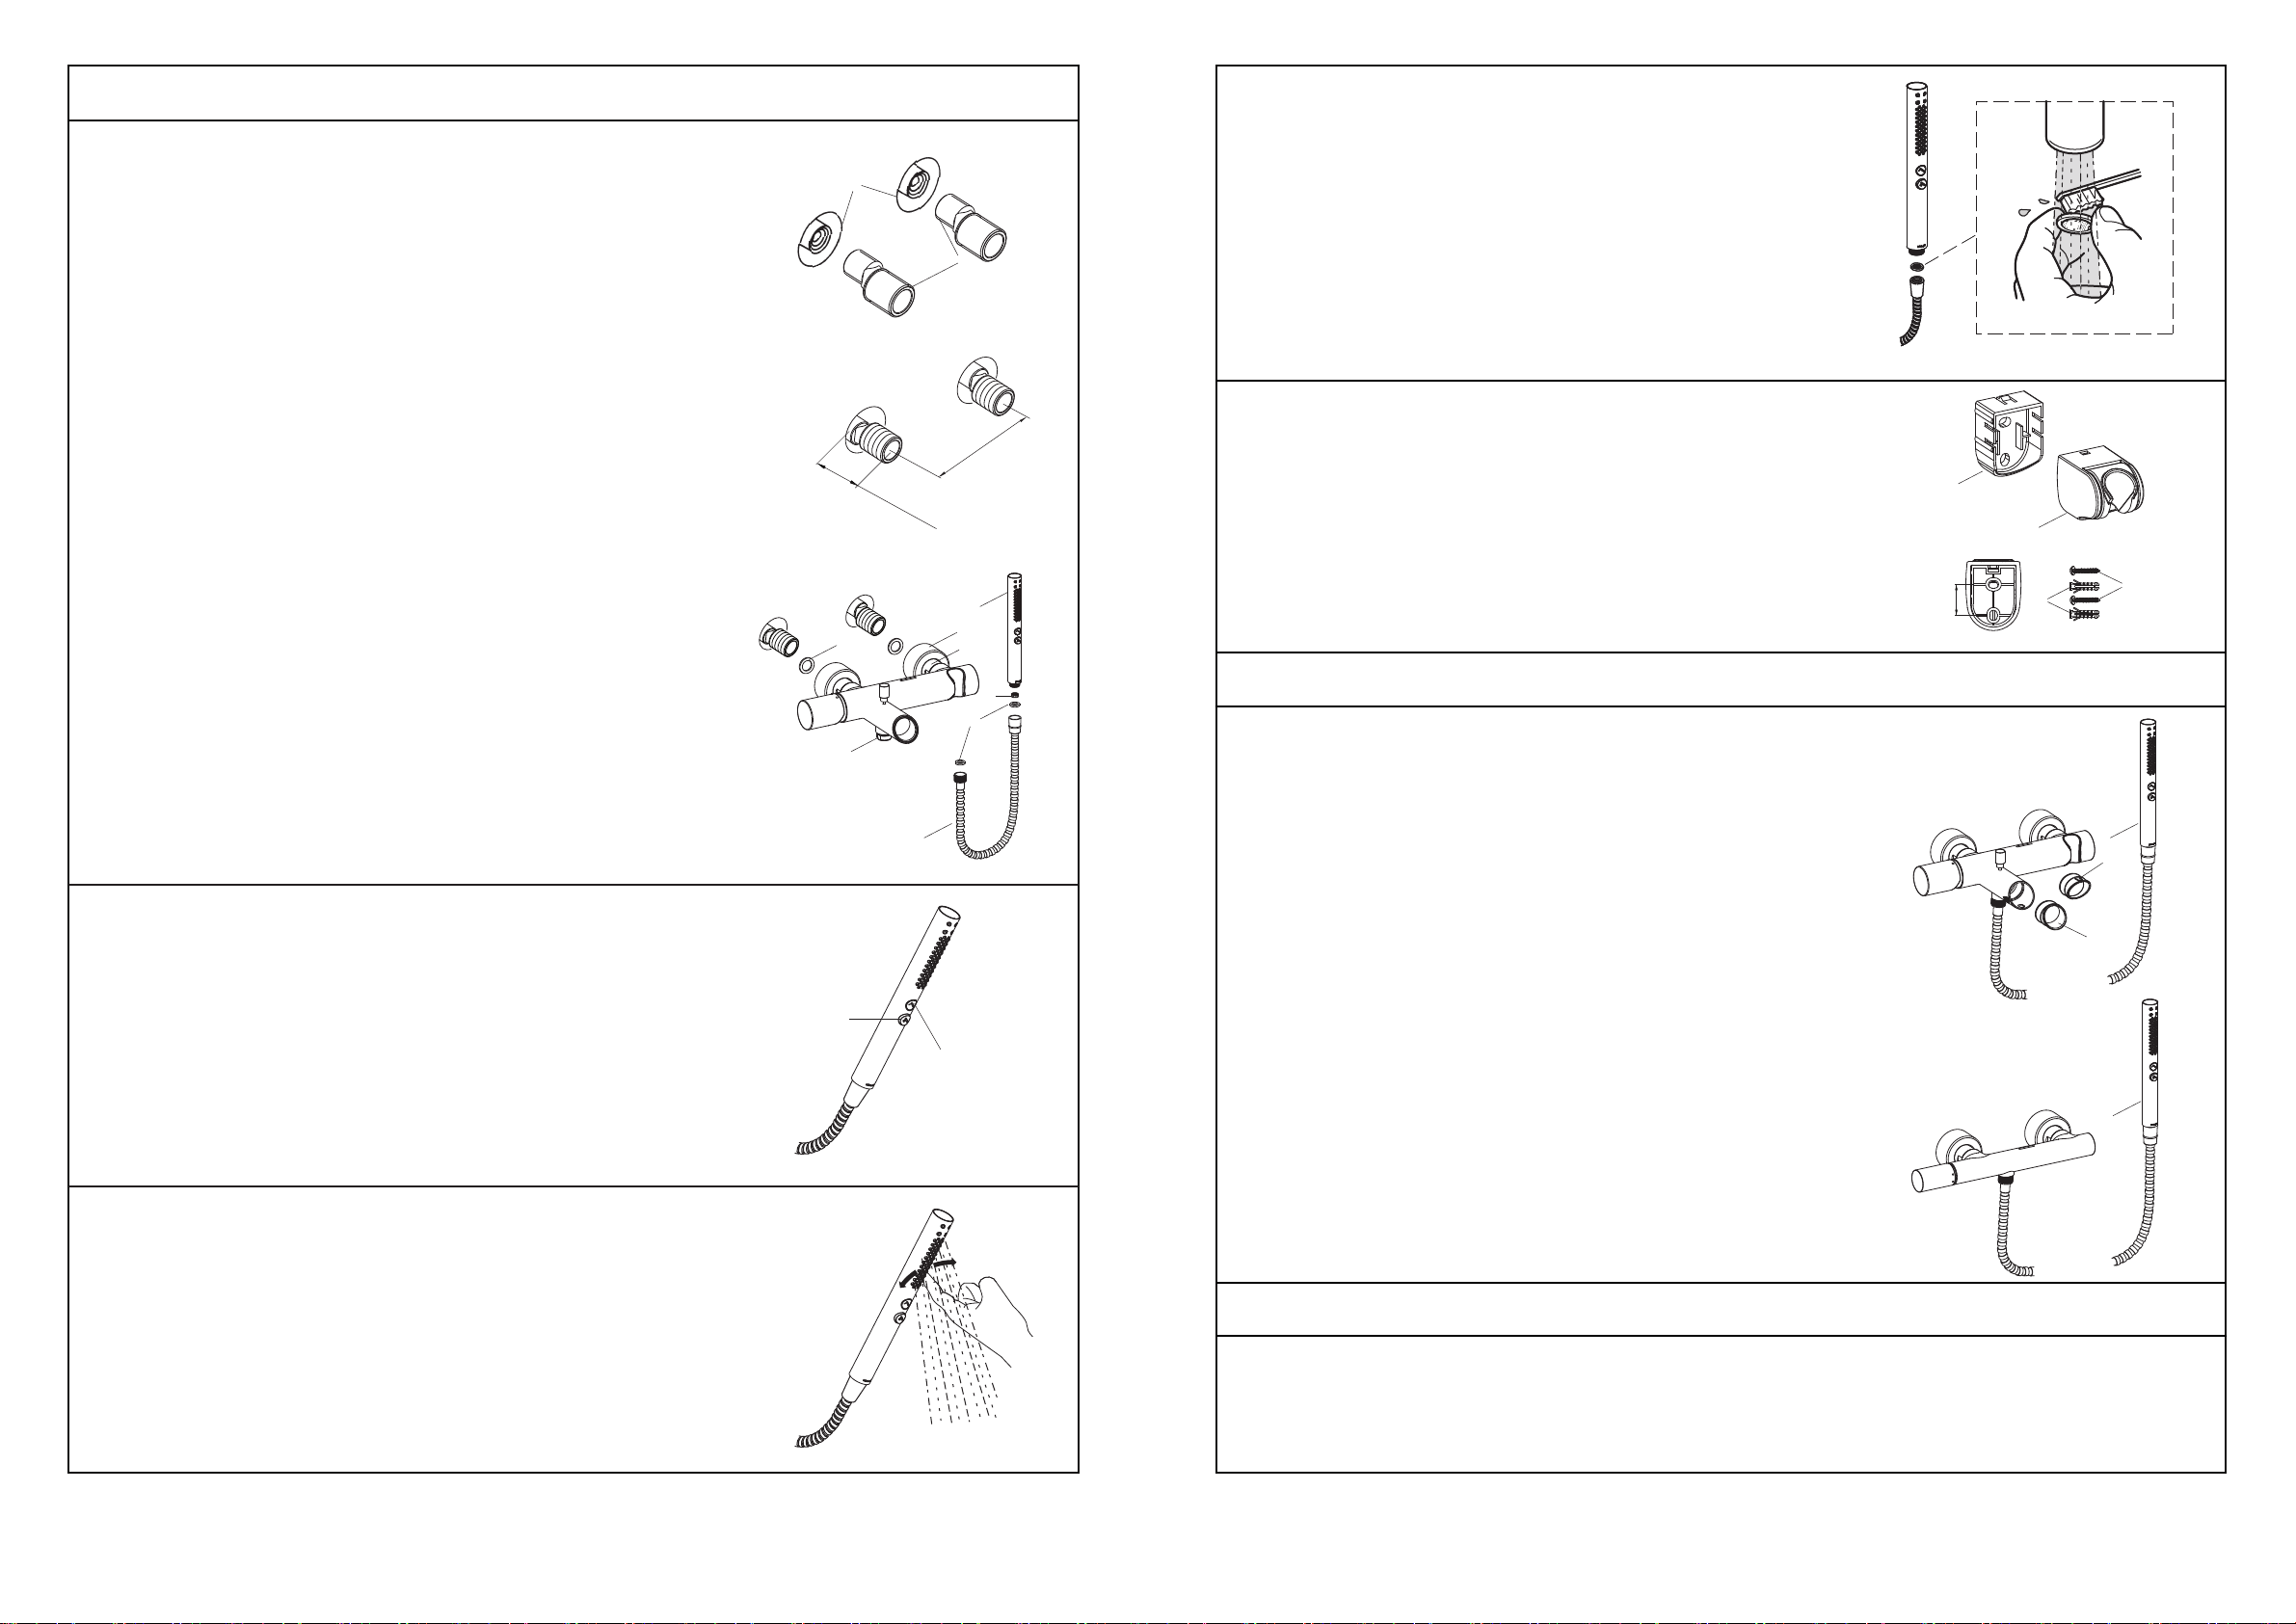
INSTALLATION
Remove and clean the screen washer.
How to Install the Faucet
To perform installation, installer must provide G1/2˝ female supply
fittings(1), spaced 150mm apart and horizontal. The supply fittings should
be vertical and not beyond the finished wall. Hot supply pipe must be
located on the left.
Install the two offset connectors(2) into the hot and cold supply pipes.
Use appropriate thread sealants or thread tape on pipe threads.
Adjust the center-to-center distance between the connectors to 150mm
and horizontal. They should extend 36 to 47mm beyond the finished wall.
Slide the escutcheons(3) onto the nuts(4). Put the washers(5) into the
nuts, thread the nuts to connectors. Tighten the nuts with strap wrench or
soft cloth between product and regular wrench. Push the escutcheon
against the finished wall.
Install the restrictor(10) into the handshower(9) inlet if needed.Connect
hose(6) to the faucet outlet(8), and to the handshower with washers(7).
Hot
Hot
1
5
8
Cold
36-47mm
6
Cold
2
150mm
3
4
How to Install the Bracket
Determine a suitable location on the finished wall to install the bracket.
Mark bracket base mounting hole locations on the wall according to the
dimension. Drill two holes on the finished wall, the holes should match
the anchors(11). Install the anchors. Tighten screws(12) to secure
bracket base(13) to the finished wall. Put the bracket(14) onto the bracket
base and lock by stopper. Hang the handshower on the shower bracket.
9
10
7
INSTALLATION CHECKOUT
Ensure that all connections are tight. Ensure that the handle is in the off
position.
Turn on the drain and main water supply, and check for leaks. Repair as
needed.
13
14
12
11
22.5mm
9
15
How to Operate the Handshower
Press the buttons of the handshower to change the water flow.
How to Maintain the Handshower
Any debris or mineral build-up may cause the flow stream to become
distorted or reduce the flow rate. To remove the debris or mineral build-up,
run water through the handshower, firmly press or rub your finger back
and forth across the rubber nozzles.
Katalyst Air
Intense Massage
For 8963T-B9
Bath & Shower Faucet
16
Remove the handshower(9). Press the bulge(15) of the aerator(16) on
the underside of the spout, Remove the aerator. Turn on the faucet. Run
the water through the spout about one minute to remove any debris.
Check for leaks. Remove any debris from the aerator. Shut off the faucet.
Reinstall the handshower and aerator.
For 8962T-B9
9
Shower Faucet
Remove the handshower(9). Turn on the faucet. Run the water through
the spout about one minute to remove any debris. Check for leaks. Shut
off the faucet. Reinstall the handshower.
CLEANING INSTRUCTIONS
All Finishes: Clean the finish with mild soap and warm water. Wipe entire surface completely dry with clean soft
cloth. Many cleaners may contain chemicals, such as ammonia, chlorine, toilet cleaner etc. which could adversely
affect the finish and are not recommended for cleaning.
Do not use abrasive cleaners or solvents on Kohler faucets and fittings.
1338604-2A-A 2
1338604-2A-A 3
 Loading...