

Page 1

Shower Panels
Important! This manual is the property of the customer
and must be retained with the product for maintenance and
operational purposes.
Product Manual
1
Page 2
INTRODUCTION
Rada Shower Panels are specied to meet the highest standards of safety, comfort
and economy as demanded by today’s users. All Rada products are designed,
manufactured and supported in accordance with accredited BS EN ISO 9001:2000
Quality Systems.
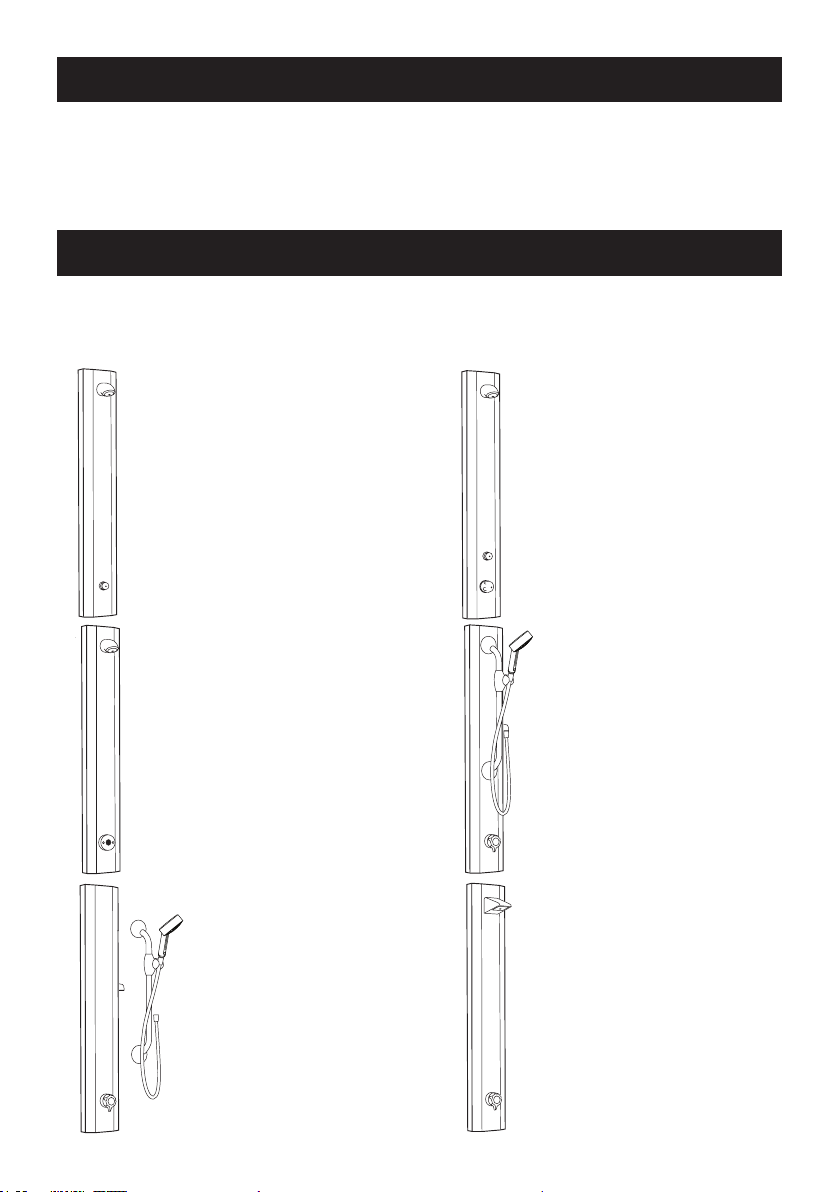
DESCRIPTION
A range of shower panels designed to deliver water consistently at a desired
temperature. All Rada Shower Panels in the range are available in a Stainless Steel
or White nish. Product Ranges (covered by this guide):
Rada PA-TF (stainless)
Rada PA-TFW (white)
A Rada Shower Panel with a TF 503
Timed Flow Control and a VR105 Shower
Head.
Rada PA-15TF (stainless)
Rada PA-15TFW (white)
A Rada Shower Panel with a Meynell
15/3 Shower Control, a TF 503 Timed
Flow Control and a VR105 Shower Head.
Rada PA-215TF (stainless)
Rada PA-215TFW (white)
A Rada Shower Panel with a Rada
215-t3 Shower Control, a TF 503
Timed Flow Control and a VR105
Shower Head.
Rada PA-ETF (stainless)
Rada PA-ETFW (white)
A Rada Shower Panel with a Rada Pulse
129 Sensor for connection to the Rada
Pulse Control Box.
Rada PA-V8F-LL & LR (stainless)
Rada PA-V8FW-LL & LR (white)
A Rada Shower Panel with a
Meynell V8 Shower Control and
a separate Adjustable Shower
Fittings kit. The fittings can be
connected on the left-hand (LL) or
right-hand (LR) side of the panel.
Rada PA-V8F (stainless)
Rada PA-V8FW (white)
A Rada Shower Panel with a Meynell
V8 shower Control and an Adjustable
Shower Fittings Kit.
Rada PA-V8VR2 (stainless)
Rada PA-V8VR2W (white)
A Rada Shower Panel with a Meynell
V8 Shower Control and a VR2 Shower
Head.
2
Page 3

INSTALLATION
General
Installation must be carried out in accordance with these instructions, and must be
conducted by designated, qualied and competent personnel.
The installation must comply with the “Water Supply Regulations 1999 (Water Fittings)”
or any particular regulations and practices, specied by the local water company or
water undertakers.
Important! The instructions contained in this Product Manual refer to the installation
of the Shower Panel only. A separate Product Manual is supplied which contains in
more detail, the installation requirements, commissioning procedures and operating
instructions of the tted components. Read both Product Manuals before installing
your Shower Panel.
Installing the Shower Panel
1. Decide on a suitable location for the Panel, taking into account the height of
users of the Shower.
Important! If you are installing a pipe shroud accessory, refer to the pipe shroud
accessory installation instructions before continuing with the installation of your
shower panel.
2. Position the Mounting Bracket for the top of the Shower Panel on the wall, and
mark the position of the holes.
Note! Use a spirit level to make sure that the Mounting Bracket is horizontal.
3. For solid walls, drill with a 7 mm Masonry Drill (not supplied) and plug using
the Wall Plugs (supplied).
Note! For other types of wall structure alternative xings may be required.
4. Fix the Mounting Bracket to the wall using the Securing Screws (supplied).
5. Locate the Shower Panel onto the Mounting Bracket and mark the position of
the bottom holes.
6. For solid walls, drill with a 7 mm Masonry Drill (not supplied) and plug using
the Wall Plugs (supplied).
3
Page 4
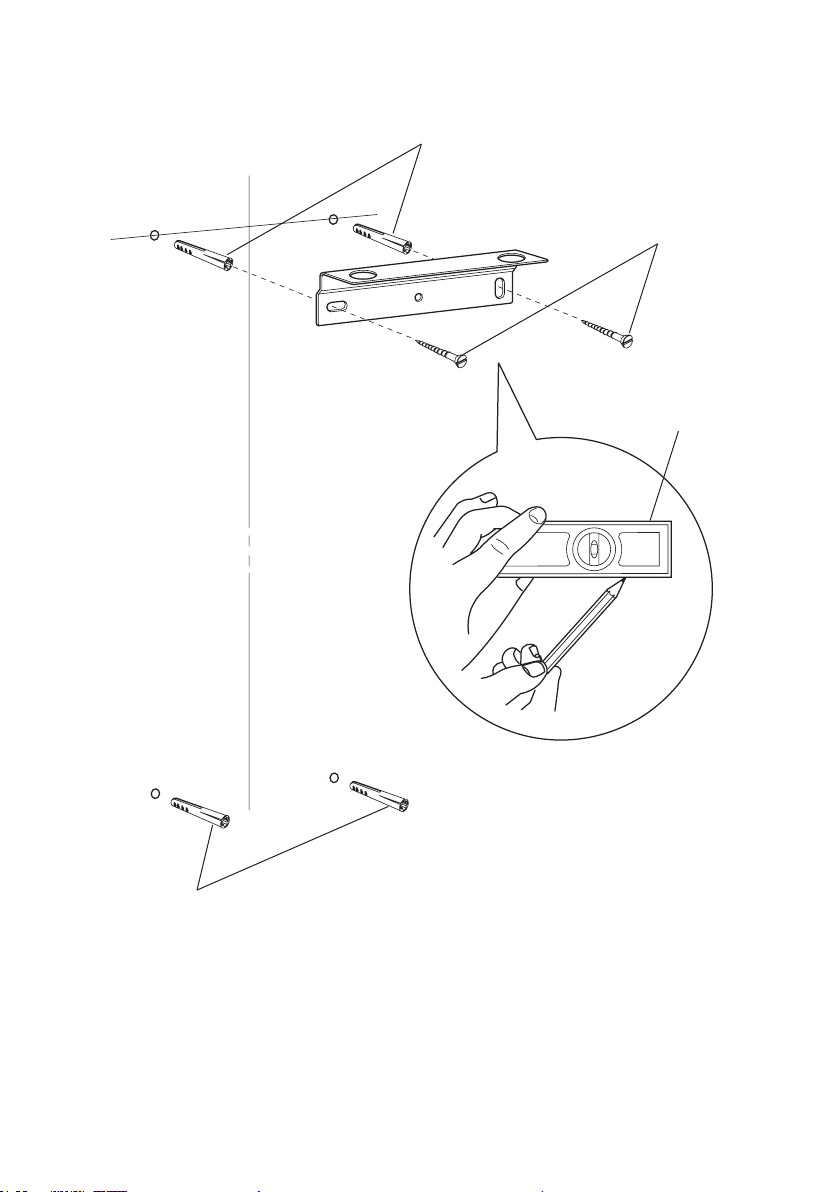
Wall Plugs
Securing Screws
Spirit Level
Wall Plugs
4
Page 5

7. Run the supply pipe(s) through the Mounting Bracket.
Note! Make sure that the supply pipe(s) are securely xed to prevent movement
when connected to the Flexible Hoses inside the Panel.
8. Fit the Isolating Valve(s) to the pipework.
9. Turn on the water supply and open the Isolating Valve(s) to ush through the
supply pipe(s).
10. Close the Isolating Valve(s).
11. Using the Hook (as illustrated) hang the Shower Panel on the Mounting
Bracket.
12. Connect the Flexible Hose(s) to the Isolating valve(s).
13. Open the Isolating Valve(s) and check for leaks.
Hook
Supply Pipe(s)
(Securely Fixed)
50 mm
Isolating
Valve(s)
Copper Pipe
Inlet Hose(s)
Note! Product may vary from
illustration, depending on model
5
Page 6

Rada PA ETF / PA ETFW Panels Only
Plastic Conduit
(not supplied)
Supply Pipe
Earth Terminal
1. Run the supply cable through the Mounting Bracket.
Note! The cable through the Mounting Bracket must be routed through Plastic
Conduit of suitable diameter (not supplied). The Plastic Conduit must be
securely xed.
2. Make the connection between the 2 core cable and the Rada Pulse Control
Box using the plug-in connector (supplied).
Refer to the Rada Electronic Washroom Product Manual for instructions.
3. The Shower Panel must be earthed by connecting the earth conductor to the
Earth Terminal inside the Panel.
Supplementary bonding: within the shower room, all accessible conductive
parts of electrical equipment and extraneous conductive parts (metal parts) that
are likely to introduce earth potential, must be electrically bonded to earth using
a minimum cable size of 4.0 mm² if the cable is not mechanically protected,
(2.5 mm² if mechanically protected).
6
Page 7

Rada PA-V8F / PA-V8FW-LL and LR Panels Only
The outlet elbow can be moved from the right hand side (RH) to the left hand side
(LH) to suit the installation of the shower ttings.
Blanking Plug
Washer
Nut
Outlet Hose
Nut
Elbow
1. Disconnect the outlet hose from the elbow.
2. Remove the nut that holds the elbow in position and remove the elbow.
3. Remove the nut and the washer that hold the blanking plug in position and
remove the blanking plug.
4. Ret the elbow in the opposite side of the panel and secure in position with the
nut.
5. Fit the blanking plug in the other hole and secure in position with the washer
and the nut.
6. Connect the outlet hose to the elbow.
7
Page 8

Finish the Installation
1. Remove the Shower Panel and the Hook and locate the Shower Panel onto
the Mounting Bracket.
Note! Retain the Hook inside the Shower Panel for servicing purposes.
2. Fix the bottom of the Shower Panel to the wall using the Securing Screws
(supplied).
Securing Screws
3. This completes the installation of your Rada Shower Panel.
Refer to the separate Product Manual for details on the commissioning and
operating procedures for the individual product requirements.
Rada PA-V8F / PA-V8FW-LL and LR Panels
Only
Install the Shower Fittings
The slide bar should be xed to the wall to one
side of the shower panel, at an appropriate
height. It should be positioned so that the handset
discharges across the opening of any shower
cubicle and should be directed away from the
shower panel.
Note! The clamp bracket assembly is preassembled to the slide bar and should not need
to be removed.
Slide Bar
Assembly
1. Slide the end covers back from each end
of the slide bar.
2. Hold the slide bar assembly against the
wall in the desired position and make sure
that it is level and upright.
3. Using the slide bar assembly as a
template, mark the positions of the xing
holes.
8
End Cover
Page 9

Caution! Make sure that you avoid buried
pipes and cables when you drill the wall.
4. Drill the six xing holes.
Note! The installer should use an
appropriate wall xing arrangement to suit
the wall type or surface (wall xings not
supplied).
5. Secure the slide bar assembly to the
wall.
6. Fit the end covers over the end supports,
making sure that they locate correctly.
7. Attach the hose to the handset. Make
sure that the hose washer is tted. Do
not overtighten.
8. Place the handset in the clamp bracket.
9. Attach the hose to the outlet of the shower
panel. Make sure that the hose washer is
tted. Do not overtighten.
End Cover
9
Page 10

MAINTENANCE
General
Rada products are precision-engineered and should give continued superior and
safe performance, provided:
1. They are installed, commissioned, operated and maintained in accordance with
these recommendations.
2. Periodic attention is given as necessary to maintain the product in good
functional order.
Cleaning
Many household cleaners contain abrasive and chemical substances, and should
not be used for cleaning plated or plastic ttings. These nishes should be cleaned
with a mild washing up detergent or soap solution, and then wiped dry using a soft
cloth.
ACCESSORIES
Various Pipe Shroud accessories are available for concealing the inlet pipe(s) to
the top of your Shower Panel for vandal resistance and/or aesthetic purposes. For
details contact Rada Customer Care.
10
Page 11

1613 007 Support Bracket
SPARE PARTS
1613 136 Isolating Valve
1613 039 Installation Hook
1613 136
Rada PA-TF / PA-TFW
1613 018 Hose (Inlet to Timed Flow Control)
1613 019 Hose (Outlet to Showerhead)
Rada PA-15TF / PA-15TFW
1613 023 Hose (Inlet to Shower Control - Hot)
1613 024 Hose (Inlet to Shower Control - Cold)
1613 025 Hose (Intermediate to Timed Flow Control)
1613 019 Hose (Outlet to Showerhead)
Rada PA-215TF / PA-215TFW
1613 020 Hose (Inlets to Shower Control)
1613 050 Hose (Outlet to Showerhead)
Rada PA-V8F / PA-V8FW / (-LL & LR)
1613 020 Hose (Inlets to Shower Control)
1613 022 Hose (Outlet to Showerhead)
1613 035 Riser Rail
1613 036 Handset Holder
1603.137 Hose
1613 086 Elbow
1613 035
1613 110 Blanking Plug and Nut
1703.351 Handset
1613 007
1613 039
1613 036
1703.351
1603.137
Rada PA-V8VR2/ PA-V8VR2W
1613.020 Hose (Inlets to Shower Control)
1613.145 Hose (Outlet to Showerhead)
Rada PA-ETF / PA-ETFW
1613 028 Hose (Inlet to Solenoid)
1613 029 Hose (Outlet to Showerhead)
11
1613 086
1613 110
Page 12

CUSTOMER CARE
Guarantee
Your product has the bene t of our manufacture's
guarantee which starts from date of purchase.
the guarantee period we will resolve defects in
materials or workmanship, free of charge, by repairing
or replacing parts or product as we may choose.
This guarantee is in addition to your statutory
rights and is subject to the following conditions:
● The product must be installed and maintained
in accordance with the instructions given in this
user guide.
● Servicing must only be undertaken by us or our
appointed representative. Note! If a service visit
is required the product must be fully installed and
connected to services.
● Repair under this guarantee does not extend
the original expiry date. The guarantee on any
replacement parts or product ends at the original
expiry date.
● For shower ttings or consumable items we
reserve the right to supply replacement parts only.
The guarantee does not cover:
● Call out charges for non product faults (such as
damage or performance issues arising from
incorrect installation, improper use, inappropriate
cleaning, lack of maintenance, build up of
limescale, frost damage, chemical attack,
corrosion, system debris or blocked lters) or
where no fault has been found with the product.
● Water or electrical supply, waste and isolation
issues.
● Compensation for loss of use of the product or
consequential or indirect loss of any kind.
● Damage or defects caused if the product is
repaired or modi ed by persons not authorised by
us or our appointed representative.
● Routine maintenance or replacement parts to
comply with the requirements of the TMV2 or
TMV3 healthcare schemes
● Accidental or wilful damage.
● Products purchased ex-showroom display.
Within
What to do if something goes wrong
If your product does not work correctly refer to this
manual for fault diagnosis and check that it is installed and commissioned in accordance with our
instructions.If this does not resolve the issue, contact
us for help and advice.
Technical Helpdesk Service
Contact our Customer Services Team for
product advice, to purchase spare parts or
accessories or to set up service visit. You can contact
us via phone or e-mail - contact details below.
Please provide your model name, power rating (if
applicable) and date of purchase.
Rada Website (www.radacontrols.com)
From our website you can view our full product
catalogue or download a brouchure.
Spares and Accessories
We hold the largest stocks of genuine Rada
spares and accessories.
Service/Repairs
No one knows our products better than our
nationwide team of Service Technicians. We
can carry out service or repair work to your product
both during and after the guarantee period.
You have the assurance of a fully trained Technician,
genuine Rada spare parts and a 12 month guarantee
on any chargeable work done.
Service Contracts
Regular servicing ensures your product continues to
operate at the peak of performance. We offer annual
or bi-annual servicing carried out by our fully trained
technicians subject to site survey
To Contact Us - UK Customer Service &
Specifi cation Enquiries
0844 571 1777
Calls cost 7p per minute plus your phone company’s
access charge
Fax: 0844 472 3076
Email – Visit
rada_technical@mirashowers.com
By Post:
Cheltenham, Gloucestershire GL52 5EP
To Contact Us: Eire Only
Rada Controls, Cromwell Road,
01 531 9337
E-mail:
CustomerServiceEire@mirashowers.com
Rada is a registered trade mark of
Kohler Mira Limited.
The company reserves the right to alter
product specifi cations without notice.
1057515-W2-H (K83A-J) © Kohler Mira Limited, May 2016
12
14648
 Loading...