

Page 1
Homeowners Guide
Bath Whirlpool
K-812-N1
M product numbers are for Mexico (i.e. K-12345M)
Los números de productos seguidos de M corresponden a México
(Ej. K-12345M)
Français, page “Français-1”
Español, página “Español-1”
1019490-5-C
Page 2
Important Information
INSTRUCTIONS PERTAINING TO A RISK OF FIRE,
ELECTRICAL SHOCK, OR INJURY TO PERSONS
READ AND FOLLOW ALL INSTRUCTIONS
SAVE THESE INSTRUCTIONS
WARNING: When using electrical products, basic precautions should always be followed,
including the following:
DANGER: Risk of personal injury. To reduce the risk of injury, do not permit children to use this
unit unless they are closely supervised at all times.
WARNING: Risk of personal injury. To avoid injury, exercise care when entering or exiting the
whirlpool.
WARNING: Risk of electric shock. Do not permit electric appliances (such as a hair dryer, lamp,
telephone, radio, or television) within 5’ (1.5 m) of this whirlpool.
WARNING: The use of alcohol, drugs, or medication can greatly increase the risk of fatal
hyperthermia. Prolonged immersion in hot water may induce hyperthermia. Hyperthermia occurs
when the internal temperature of the body reaches a level several degrees above the normal body
temperature of 98.6°F (37°C). The symptoms of hyperthermia include an increase in the internal
temperature of the body, dizziness, lethargy, drowsiness, and fainting. The effects of hyperthermia
include: (a) failure to perceive heat, (b) failure to recognize the need to exit the bath, (c)
unawareness of impending hazard, (d) fetal damage in pregnant women, (e) physical inability to
exit the bath, and (f) unconsciousness resulting in the danger of drowning.
WARNING: Risk of hyperthermia. People using medications and/or having an adverse medical
history should consult a physician before using a whirlpool equipped with a heater.
WARNING: Risk of scalding. Do not allow the water temperature in the whirlpool to exceed 104°F
(40°C).
The heater will automatically maintain the water temperature when the whirlpool is running, as long as the
water temperature does not exceed 104°F (40°C). The heater will disengage at higher temperatures.
An equipment grounding terminal is provided in the field wiring compartment. To reduce the risk of electric
shock, this terminal must be connected to the grounding means provided in the electric supply panel with a
conductor equivalent in size to the circuit conductors supplying this whirlpool.
A pressure wire connector is provided on the exterior of the pump or control within this unit to permit
connection of a bonding conductor between this unit and all other exposed metal in the vicinity, as needed to
comply with local requirements.
Use this whirlpool only for its intended purpose as described in this guide. Do not use attachments not
recommended by the manufacturer.
Never drop or insert any object into any opening. Keep small objects such as bath toys and bathing
accessories out of the whirlpool while the unit is running.
Do not operate this unit without the guard (cover) over the suction fitting.
The whirlpool must be connected only to a supply circuit that is protected by a Ground-Fault
Circuit-Interrupter (GFCI) or Residual Current Device (RCD). Such a GFCI or RCD should be provided by
the installer and should be tested on a routine basis. To test the GFCI or RCD, press the test button. The
GFCI or RCD should interrupt power. Press the reset button. Power should be restored. If the GFCI or RCD
fails to operate in this manner, the GFCI or RCD is defective. If the GFCI or RCD interrupts power to the
bath without the test button being pressed, a ground current is flowing, indicating the possibility of an
1019490-5-C 2 Kohler Co.
Page 3
Important Information (cont.)
electric shock. Do not use this whirlpool bath. Disconnect the whirlpool and have the problem corrected by a
qualified service representative before using.
Flush your whirlpool system twice a month or more depending upon usage, as described in the ″Flush
System″ section of this guide.
Repeated use of personal care products containing oils can damage plastic whirlpool components. Do not use
heavy, vegetable-based shampoos or bath oils.
Whirlpool hydro-massage action can cause even a small amount of bubble bath, bath soap, shampoo, or bath
oil to foam excessively. For this reason, please don’t use these products during whirlpool operation.
Thank You For Choosing Kohler Company
Thank you for choosing Kohler Company. Your Kohler Company product reflects the true passion for design,
craftsmanship, artistry, and innovation Kohler Company stands for. We are confident its dependability and
beauty will surpass your highest expectations, satisfying you for years to come.
All information in this guide is based upon the latest product information available at the time of
publication. At Kohler Company, we strive to fulfill our mission of improving the level of gracious living for
each person who is touched by our products and services. We reserve the right to make changes in product
characteristics, packaging, or availability at any time without notice.
Please take a few minutes to review this guide. Pay special attention to the care and cleaning instructions.
Components
Your new whirlpool is designed to stimulate, invigorate, and energize your body with comforting
hydro-massage therapy. The whirlpool consists of the following components:
Bath - Acts as a reservoir for water, and provides a location for the hydro-massage action.
User Keypad - Located within easy reach, the user keypad allows you to turn the pump and heater
on and off and regulate the water flow through the jets.
Pump Motor - Provides quiet, variable speed power to circulate the water and create the soothing
hydro-massage action.
Adjustable Jets - Positioned to optimize their hydro-massage effect, the jets allow you to adjust the
air and water flow and control the flow direction as you desire.
Heater - Designed to automatically help maintain the temperature of the water up to 104°F (40°C) to
enhance your hydro-massage experience. The heater turns on automatically when the whirlpool is
operating, and turns off when the pump motor is turned off. The heater may be turned off through
the keypad, at any time while the pump is operating.
Neckjets and Pillow - Controlled through the user keypad, the neckjets deliver massaging water to
the back of your neck. The pillow provides a comfortable place to rest your head as you relax. To
prevent water spills, a built-in switch stops the neckjet action if the pillow is removed during
operation.
ADA Compliant - When installed with seat at head end.
Kohler Co. 3 1019490-5-C
Page 4
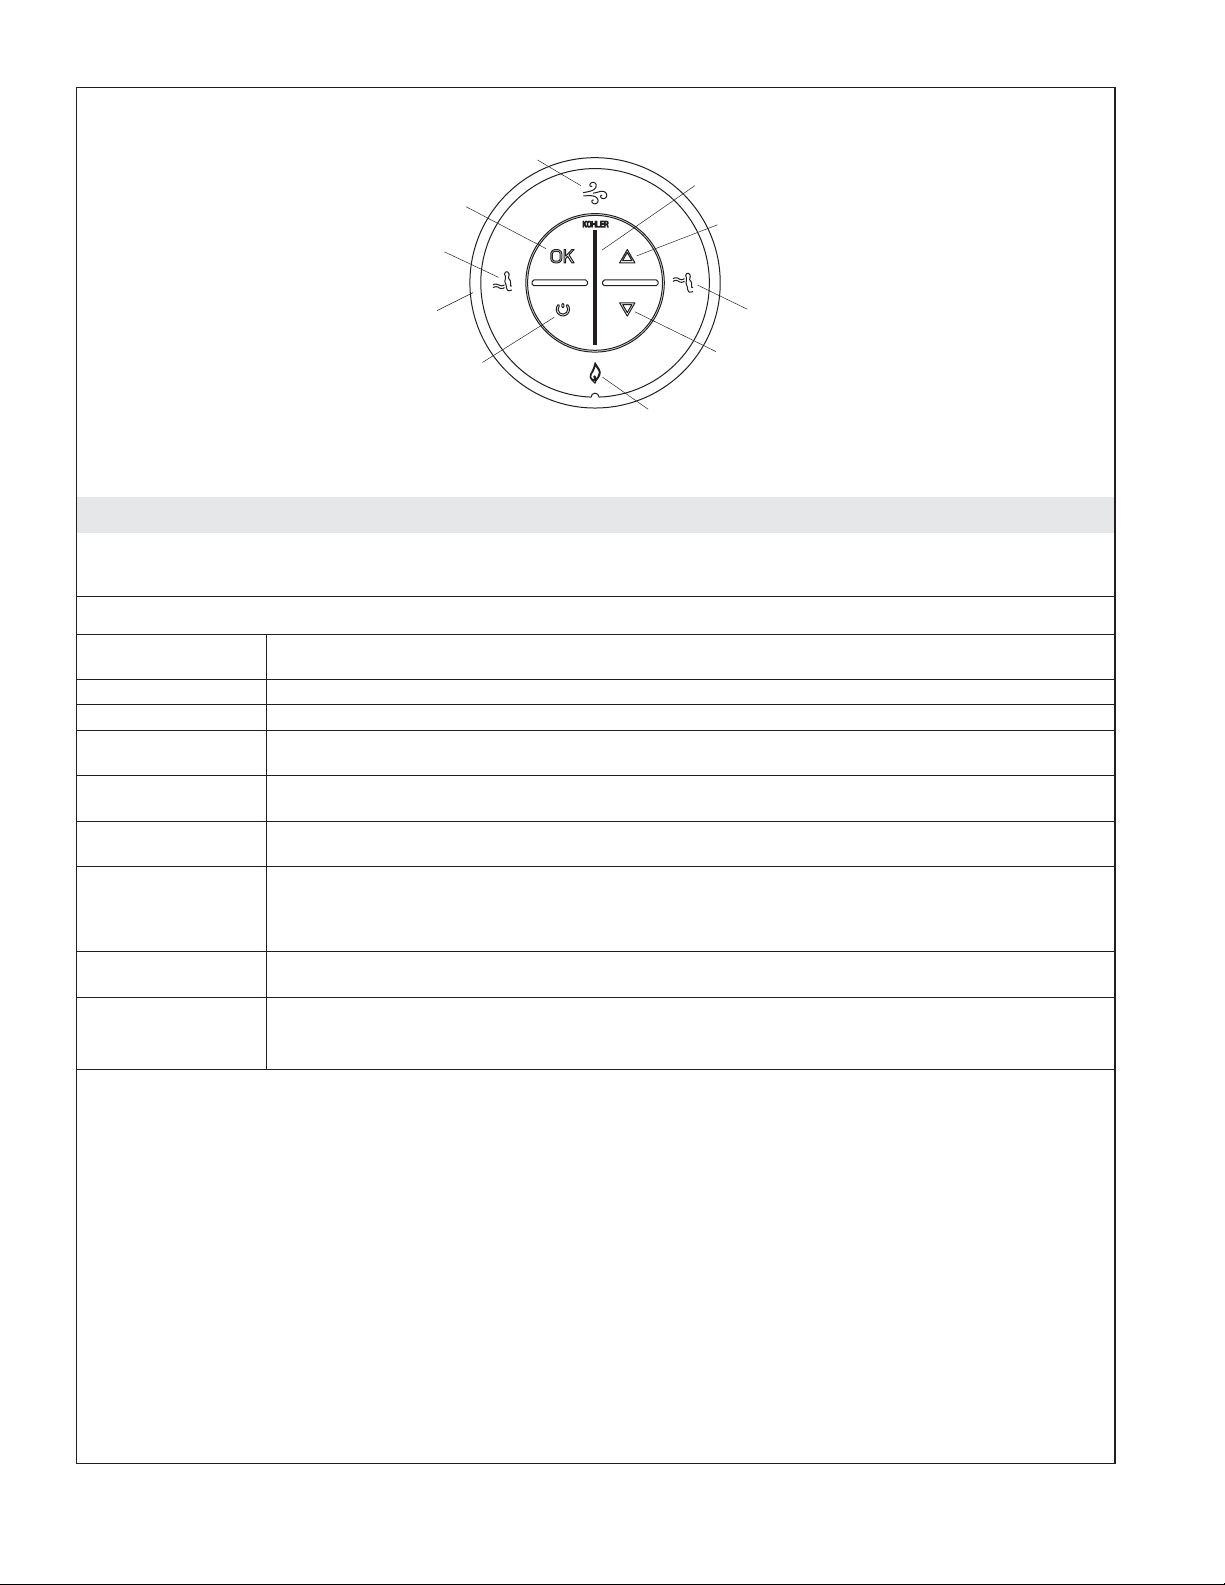
Flexjet Flow Mode
Activates Mode Selected
Backjet Mode-Adjust Pulse
Indicator Bar - Shows waterflow
volume or pulse speed
Increases Flow or Pulse
Rotate outer ring to
Neckjet Mode-Adjust Pulse
access desired mode.
Power On/Off
Heater
Lighted User Keypad
Decreases Flow or Pulse
User Keypad
NOTE: The illustration of the user keypad differs slightly from the user keypad equipped with your
model. The Backjet Mode is not equipped with your model.
Available modes will be illuminated in blue. Active modes will be illuminated in green.
Power Turns the whirlpool pump on and off. Icons illuminated in blue indicate available
Outer Ring Rotate the outer ring to the desired mode. The selected mode will flash blue.
OK Activates the desired mode.
Flexjet Flow
Mode
Up Arrow Increases the water flow when the Flexjet flow mode is active. Increases the pulse speed
Indicator Bar Displays the water flow volume in the Flexjet flow mode. Displays the pulse speed in the
Neckjet Mode Rotate the outer ring to select this mode. Press OK, then press the up or down arrow to
Down Arrow Decreases the water flow when the Flexjet flow mode is active. Decreases the pulse speed
Heater Automatically engages when the power icon is selected. Rotate the outer ring until the
modes/features. Modes which are operating will be illuminated in green.
Rotate the outer ring to select this mode. Press OK, then press the up or down arrow to
increase or decrease the jet water flow.
when the neckjet or backjet mode is active.
neckjet or backjet mode.
increase or decrease the pulsing action. Rotate the outer ring to the Flexjet mode, press OK
to activate the mode, then press the up or down arrow on the keypad to increase or
decrease water flow to the neckjets and all other active modes.
when the neckjet or backjet mode is active.
heater mode is flashing, then press OK to turn the heater off. Press OK again to turn the
heater back on.
1019490-5-C 4 Kohler Co.
Page 5
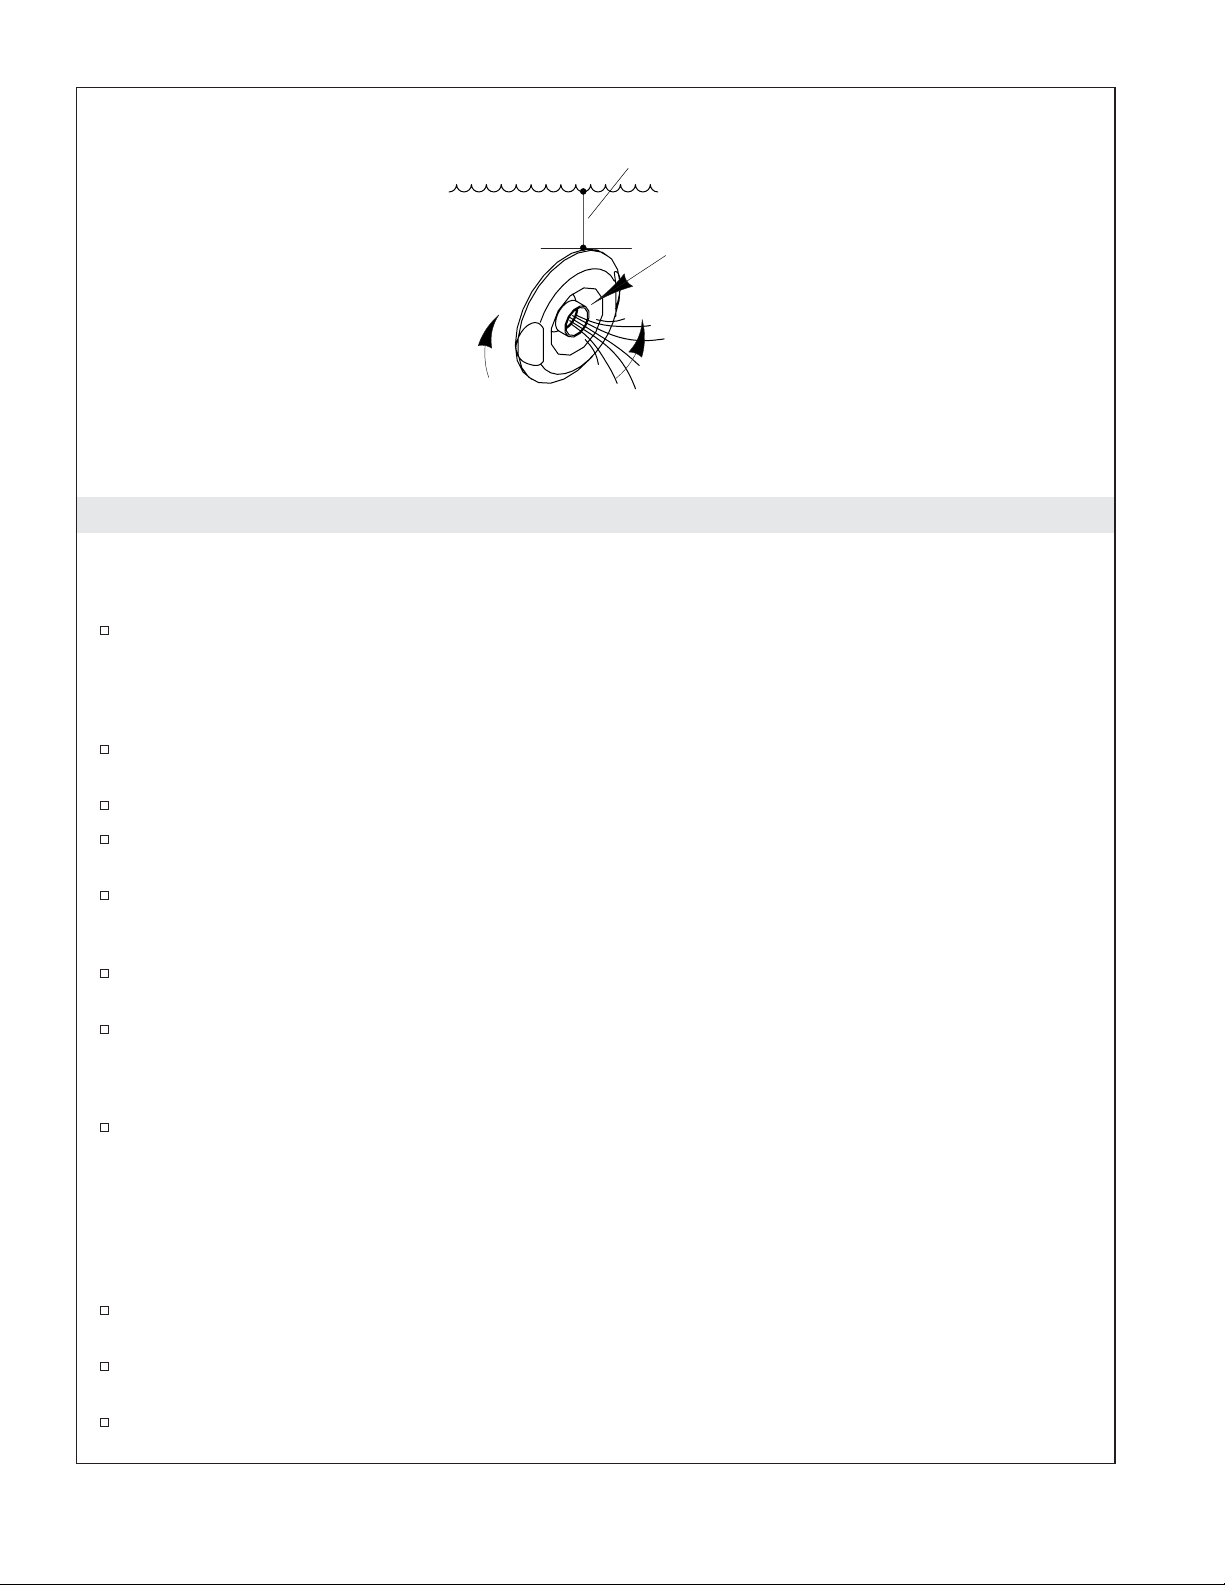
Fill with water at least 2" (5.1 cm)
above the highest jet.
Turn the jet trim ring
clockwise to
decrease the flow.
Position the jet
nozzles to direct
the water flow as
desired.
Turn the jet trim ring counterclockwise
to increase the flow.
Operation
NOTE: If the whirlpool is not operating properly, consult the ″Troubleshooting″ section of this guide
before calling a qualified service representative.
Turn the jet trim fully counterclockwise. Position the jet nozzles so they face down toward the basin.
NOTICE: Do not allow the water temperature in the whirlpool to exceed 104°F (40°C). The heater will
automatically maintain the water temperature when the whirlpool is running, as long as the water
temperature does not exceed 104°F (40°C). The heater will disengage at higher temperatures.
Close the drain, then fill the whirlpool to a level at least 2″ (5.1 cm) above the highest jet. Using
your hand, test the water temperature for comfort and safety. Carefully enter the bath.
Press the power icon to turn on the whirlpool pump and heater. Water will flow at medium volume.
Press the up or down arrow icons to increase or decrease the water flow. The indicator bar will
display the water flow volume.
Adjust the jets for optimum air/water mixture. Turn the jet trim clockwise to reduce the flow or
counterclockwise to increase the flow. If desired, position the jet nozzles to direct the water flow to
maximize your hydro-massage experience.
If desired, turn the heater off by pressing the heater icon. Press the button a second time to turn the
heater back on.
Press the power icon a second time to turn off the whirlpool pump and heater.
NOTE: The pump and heater will automatically stop after approximately 20 minutes of continuous
operation. If desired, press the power icon to reactivate the pump and heater.
Carefully exit the bath, then open the drain to empty the whirlpool.
Neckjets
NOTE: Before activating the neckjets, make sure the slip cover is in place on the pillow and the pillow is
attached to the neckjet body. If the pillow is not properly installed the neckjets will stop. The neckjet icon
and indicator bar on the user keypad will flash. The neckjets will automatically restart when the pillow is
properly installed.
Rotate the outer ring to select the neckjet mode, then press OK to activate the neckjets. The neckjet
pulsing action will start at medium speed. Press the up or down arrow to adjust the pulsing action.
Rotate the outer ring until the flow mode is flashing, the press OK. Press the up or down arrow to
adjust the water flow volume of the neckjets.
Press ″OK″ while the neckjet mode is active, to turn off the neckjets.
Kohler Co. 5 1019490-5-C
Page 6
Operation (cont.)
NOTE: To activate or deactivate functions while the neckjets are operating, rotate the outer ring until the
desired function is flashing and press ″OK.″
Care and Cleaning
For best results, keep the following in mind when caring for your KOHLER product:
•
Always test your cleaning solution on an inconspicuous area before applying to the entire surface.
•
Wipe surfaces clean and rinse completely with water immediately after applying cleaner. Rinse and
dry any overspray that lands on nearby surfaces.
•
Do not allow cleaners to soak on surfaces.
•
Use a soft, dampened sponge or cloth. Never use an abrasive material such as a brush or scouring
pad to clean surfaces.
•
The ideal cleaning technique is to rinse thoroughly and blot dry any water from the surface after
each use.
•
Use a soft nylon brush on Safeguard
(dissolves 100% in water).
For detailed cleaning information and products to consider, visit www.kohler.com/clean. To order Care &
Cleaning information, call 1-800-456-4537.
slip-resistant surfaces. Be sure to use a water-soluble cleaner
®
Flush System
NOTE: Flush your whirlpool system twice a month or more, depending upon usage.
Turn the jet trim rings fully clockwise to remove air induction.
Fill the whirlpool with warm water to a level at least 2″ (5.1 cm) above the highest jets, or leave
water in the whirlpool after using.
Add 2 teaspoons (10 ml) of a low-foaming, powder automatic dishwasher detergent and 20 ounces
(590 ml) of household bleach (5% - 6% sodium hypochlorite) to the water.
Run the whirlpool for 5 to 10 minutes. Turn off the whirlpool and drain.
If desired, rinse the bath surfaces with water.
Rinse the surfaces of the jets, faucet, handrails, and drain, and wipe them dry with a soft cloth.
Warranty
ONE-YEAR LIMITED WARRANTY
KOHLER plumbing products are warranted to be free of defects in material and workmanship for one year
from date of installation.
Kohler Co. will, at its election, repair, replace or make appropriate adjustment where Kohler Co. inspection
discloses any such defects occurring in normal usage within one (1) year after installation. Kohler Co. is not
responsible for removal or installation costs. Use of in-tank toilet cleaners will void the warranty.
To obtain warranty service contact Kohler Co. either through your Dealer, Plumbing Contractor, Home
Center or E-tailer, or by writing Kohler Co., Attn.: Customer Care Center, 444 Highland Drive, Kohler, WI
53044, USA, or by calling 1-800-4KOHLER (1-800-456-4537) from within the USA and Canada, and
001-877-680-1310 from within Mexico.
IMPLIED WARRANTIES INCLUDING THAT OF MERCHANTABILITY AND FITNESS FOR A
PARTICULAR PURPOSE ARE EXPRESSLY LIMITED IN DURATION TO THE DURATION OF THIS
WARRANTY. KOHLER CO. AND/OR SELLER DISCLAIM ANY LIABILITY FOR SPECIAL,
INCIDENTAL OR CONSEQUENTIAL DAMAGES. Some states/provinces do not allow limitations on how
long an implied warranty lasts, or the exclusion or limitation of special, incidental or consequential damages,
so these limitations and exclusions may not apply to you. This warranty gives you specific legal rights. You
may also have other rights which vary from state/province to state/province.
1019490-5-C 6 Kohler Co.
Page 7

Warranty (cont.)
This is Kohler Co.’s exclusive written warranty.
Warranty
Kohler Co. warrants the cast iron components of products manufactured after February 10, 2000, to be free of
defects in material and workmanship during normal residential use for as long as the original consumer
purchaser owns his or her home. Gloss reduction, scratching, staining and alkaline etching of the finish over
time due to use, cleaning practices or water or atmospheric conditions, are not manufacturing defects but are
indicative of normal wear and tear. This warranty applies only for KOHLER Cast Iron products installed in
the United States of America, Canada or Mexico (North America).
If a defect is found in normal residential use, Kohler Co. will, at its election, repair, replace or make
appropriate adjustment. Damage caused by accident, misuse, or abuse is not covered by this warranty.
Improper care and cleaning will void the warranty. Proof of purchase (original sales receipt) must be
provided to Kohler Co. with all warranty claims. Kohler Co. is not responsible for labor charges, installation,
or other incidental or consequential costs. In no event shall the liability of Kohler Co. exceed the purchase
price of the product.
If the cast iron product is used commercially or is installed outside of North America, Kohler Co. warrants
the cast iron product to be free from defects in material and workmanship for one (1) year from the date the
product is installed, with all other terms of this warranty applying except duration. All other components
other than the enameled cast iron carry Kohler Co.’s one-year limited warranty unless otherwise specified.
If you believe that you have a warranty claim, contact Kohler Co., either through your Dealer, Plumbing
Contractor, Home Center or E-tailer, or by writing: Kohler Co., Attn.: Customer Service Department, 444
Highland Drive, Kohler, WI 53044, USA. Please be sure to provide all pertinent information regarding your
claim, including a complete description of the problem, the product, model number, color, finish, the date the
product was purchased and from whom the product was purchased. Also include your original invoice. For
other information, or to obtain the name and address of the service and repair facility nearest you call
1-800-4-KOHLER from within the USA, 1-800-964-5590 from within Canada, and 001-877-680-1310 from
within Mexico.
Kohler Co. and/or seller are providing this warranty in lieu of all other warranties, expressed or implied,
including but not limited to the implied warranties of merchantability and fitness for a particular
purpose. Kohler Co. and/or seller disclaims any liability for special, incidental or consequential damages.
Some states/provinces do not allow limitations on how long an implied warranty lasts, or the exclusion or
limitation of special, incidental or consequential damages, so these limitations and exclusions may not apply
to you. This warranty gives the consumer specific legal rights. You may also have other rights, which vary,
from state/province to state/province. This warranty is to the original consumer purchaser only, and
excludes product damage due to installation error, product abuse, or product misuse, whether performed by
a contractor, service company or the consumer.
This is Kohler Co.’s exclusive written warranty.
Warranty
KOHLER CO.
It is recommended that at the time of purchase, you verify that all accessories and components are complete
in this package.
This Kohler product is warranted to be free of defects in material and workmanship for one (1) year from the
date of purchase as shown on the invoice or receipt.
1. Kohler Co. will only service its commercialized products through its authorized distributors.
2. To obtain warranty service, please present the invoice and corresponding warranty.
3. Through its authorized distributors, Kohler Co. promises to repair the defective product or provide a new
replacement or an equivalent model (in those cases that the model has been discontinued) when the product
is beyond repair, without any charge to the consumer.
4. The time of repair will not exceed six (6) weeks commencing on the date the product is received.
Kohler Co. 7 1019490-5-C
Page 8

Warranty (cont.)
5. It is recommended that the consumer save the invoice or receipt as additional protection, as it may
substitute the warranty in the case that there is a discrepancy in the validity of the warranty.
EXCEPTIONS AND RESTRICTIONS
The Warranty will not be valid in the following cases:
1. When the product is not operated in accordance with the instructions concerning use and operation set
forth in the owner’s manual or installation instructions, and when the recommendations and warnings
included are not observed.
2. When the product has been modified or dismantled partially or totally; or has been used in a negligent
fashion and as a consequence has suffered damages attributable to the consumer, individual, or hardware not
authorized by Kohler Co.
3. This warranty does not cover the damages as a result of disaster such as fire or acts of God, including
flooding, earthquake, or electric storms, etc. To obtain a list of distributors in your area where you can
exercise your rights under this warranty, please call 001-877-680-1310.
KOHLER CO., KOHLER, WI 53044 U.S.A.
IMPORTER:
INTERNACIONAL DE CERÁMICA, S.A.B. DE C.V.
AV. CARLOS PACHECO NO. 7200
CHIHUAHUA, CHIH., MEXICO C.P. 31060
TEL: 52 (14) 29-11-11
1019490-5-C 8 Kohler Co.
Page 9

Remove the Jets
Reinstall the Jets
Insert the tool hook as shown and pull the jet out of the
housing. The jet should be facing up when this is done.
Housing
Inspect and
lubricate the O-ring.
Slide the O-ring
onto the first
shoulder of the jet.
Insert the jet into the housing, and lightly
push and rotate until it snaps in position.
Troubleshooting
NOTICE: This section is for general aid only. A Kohler Authorized Service Representative or qualified
electrician should correct any electrical problems. For warranty service, contact your dealer or wholesale
distributor.
Remove the Jets
Position the ball nozzle of the jet facing up. This will ensure the jet tool will not slip off.
Position the jet tool (provided) with the hook facing up.
Insert the jet tool into the opening of the jet and hook the inside top of the nozzle.
Place your thumb against the whirlpool wall while firmly grasping the jet tool.
Steadily pull the jet tool until the jet assembly pulls free from the housing. Be careful not to lose the
O-ring.
Reinstall the Jets
NOTE: To allow easy rotation and proper operation of the jet, the O-ring must be: (1) correctly positioned,
(2) lubricated, and (3) in good condition.
Install the O-ring onto the first shoulder of the jet.
Using the silicone lube packet (provided), lubricate the O-ring to prevent noisy operation of the jet.
Carefully insert the jet into the housing, then lightly push and rotate the jet until it snaps into
position. Do not force the jet.
Verify the jet is installed correctly. The jet should turn smoothly both clockwise and
counterclockwise. Remove and reinstall, if necessary.
Symptoms Probable Causes Recommended Action
1. User keypad does
not illuminate when
power button is
pressed or outer ring
is rotated.
2. Motor starts, but all
jets are not
functioning.
A. No power to control. A. Check wiring and connect power.
B. GFCI or RCD tripped. B. Reset GFCI or RCD.
C. Wiring harness from user
keypad to control is loose,
disconnected or damaged.
D. User keypad does not work. D. Replace user keypad.
E. Control does not work. E. Replace control.
A. Jet is closed. A. Rotate jet trim counterclockwise to
B. Jet not installed correctly. B. Reinstall jet; check for O-ring damage.
C. Jets are blocked. C. Remove blockage.
C. Check wiring for proper connections.
Replace wiring harness if necessary.
open.
Kohler Co. 9 1019490-5-C
Page 10

Troubleshooting (cont.)
Symptoms Probable Causes Recommended Action
3. User keypad is
illuminated, but does
not respond to
buttons or outer ring.
4. User keypad
indicator bar keeps
scanning at
power-up.
5. User keypad is
illuminated, but
pump won’t start.
6. Motor runs but
pump won’t prime
(cavitates).
7. Pump stops before
18 minutes.
8. Pump does not
automatically stop
after 22 minutes.
9. Pump won’t turn off
when the power
button on user
keypad is pressed.
10. Pump operates but
variable speed
feature does not
work.
11. Bath water cools
while pump is
operating.
12. Noisy operation. A. Pump banding straps have not
A. Control program is locked. A. Reset GFCI or RCD.
B. Wiring harness from user
keypad to control is loose,
disconnected or damaged.
C. User keypad does not work. C. Replace user keypad.
D. Control does not work. D. Replace control.
A. Control program is locked. A. Reset GFCI or RCD.
B. Wiring harness from user
keypad to control is loose,
disconnected or damaged.
C. User keypad does not work. C. Replace user keypad.
D. Control does not work. D. Replace control.
A. Power cord from pump to
control is loose, disconnected or
damaged.
B. Pump does not work. B. Replace pump.
C. Control does not work. C. Replace control.
A. Pump is shimmed too high. A. Lower pump/control to subfloor level.
B. Small air leak at pump inlet. B. Securely tighten nut(s) on intake side of
C. Motor/pump does not work. C. Replace motor/pump.
D. Control does not work. D. Replace control.
A. GFCI or RCD tripped. A. Identify source of fault, and correct.
B. Suction is blocked. B. Remove obstruction.
C. Jets are blocked. C. Remove blockage.
D. Motor overheated and protection
device activated.
A. 20-minute timer inadvertently
disabled.
A. User keypad does not work. A. Replace user keypad.
B. Control does not work. B. Replace control.
A. Motor/pump does not work. A. Replace motor/pump.
B. Control does not work. B. Replace control.
A. Water temperature above 104°F
(40°C).
B. Heater is turned off on user
keypad.
C. Wiring from heater to control is
loose, disconnected or damaged.
D. Heater does not work. D. Replace heater.
E. Control does not work. E. Replace control.
been cut.
B. Dry or dislodged jet O-ring
(squeal).
B. Check wiring for proper connections.
Replace wiring harness if necessary.
B. Check wiring for proper connections.
Replace wiring harness if necessary.
A. Check wiring for proper connections.
pump.
Reset GFCI or RCD.
D. Check for blockage at suction and/or
jets. Remove blockage and allow motor
to cool.
A. See service manual.
A. Allow bath water to cool.
B. Turn heater on.
C. Check wiring for proper connections.
A. Cut pump banding straps with tin
snips.
B. Remove jet, replace and lubricate
O-ring, and reinstall jet.
Remote Control
1019490-5-C 10 Kohler Co.
Page 11
Troubleshooting (cont.)
Symptoms Probable Causes Recommended Action
1. Remote control does not
work.
Backjet System
Symptoms Probable Causes Recommended Action
1. Backjets do not operate. A. Whirlpool pump is not
2. Backjets do not pulse. A. Pulse canister does not work. A. Check for loose connections or
A. Batteries improperly installed or
dead.
B. Antenna on wiring harness is
damaged.
C. Remote control not programmed
correctly.
D. Remote control does not work. D. Replace remote control.
E. Control does not work. E. Replace control.
operating.
B. Backjet butterfly valve does not
open.
C. Not enough water in whirlpool. C. Fill whirlpool so water level
D. Actuator switch does not work. D. Replace actuator switch. Refer to
E. Power from pump motor to
control is off.
F. Backjet pipe is blocked. F. Remove obstruction.
G. Switch wire from switch to
control is disconnected.
B. Switch does not work. B. Replace switch. Refer to
C. Switch wire from switch to
control is disconnected.
A. Replace batteries.
B. Replace wiring harness.
C. See homeowners guide or service
manual.
A. Turn on pump.
B. Check for loose connections or
wires leading from backjet pulse
canister to control. Replace backjet
pulse canister or control if
necessary. Refer to installer/dealer.
sensors are covered.
installer/dealer.
E. Check for loose connections or
wires leading from pump motor to
control. Refer to installer/dealer.
G. Reconnect or replace switch wires
that use modular plug. Refer to
installer/dealer.
wires leading from pulse canister to
control. Replace pulse canister or
control if necessary. Refer to
installer/dealer.
installer/dealer.
C. Reconnect or replace switch wires
that use modular plug. Refer to
installer/dealer.
Neckjet System
Symptoms Probable Causes Recommended Action
1. Keypad does not respond
when neckjet mode is
selected.
2. Pump operates but
neckjets do not turn on.
Indicator bar on user
keypad is flashing.
Kohler Co. 11 1019490-5-C
A. User keypad does not work. A. Replace user keypad.
A. Pillow is not installed. A. Make sure the pillow is properly
B. Reed switch does not work. B. Check reed switch wiring and
C. Wiring harness from neckjet to
control is loose, disconnected or
damaged.
attached to the neckjet body.
replace if necessary.
C. Check wiring for proper
connections. Replace wiring
harness if necessary.
Page 12
Troubleshooting (cont.)
Symptoms Probable Causes Recommended Action
3. Pump operates but
neckjets do not turn on.
Indicator bar on user
keypad is NOT flashing.
A. Neckjet line is blocked. A. Disconnect neckjet hoses and
remove blockage.
B. Wiring harness from neckjet to
control is loose, disconnected or
damaged.
B. Check wiring for proper
connections. Replace wiring
harness if necessary.
C. Butterfly valve does not work. C. Replace butterfly valve.
D. Control does not work. D. Replace control.
4. Water flows from neckjets,
but neckjets do not pulse.
A. Wiring harness from neckjet
pulse canister to control is loose,
disconnected or damaged.
A. Check wiring for proper
connections. Replace wiring
harness if necessary.
B. Pulse canister does not work. B. Replace pulse canister.
C. Control does not work. C. Replace control.
1019490-5-C 12 Kohler Co.
Page 13
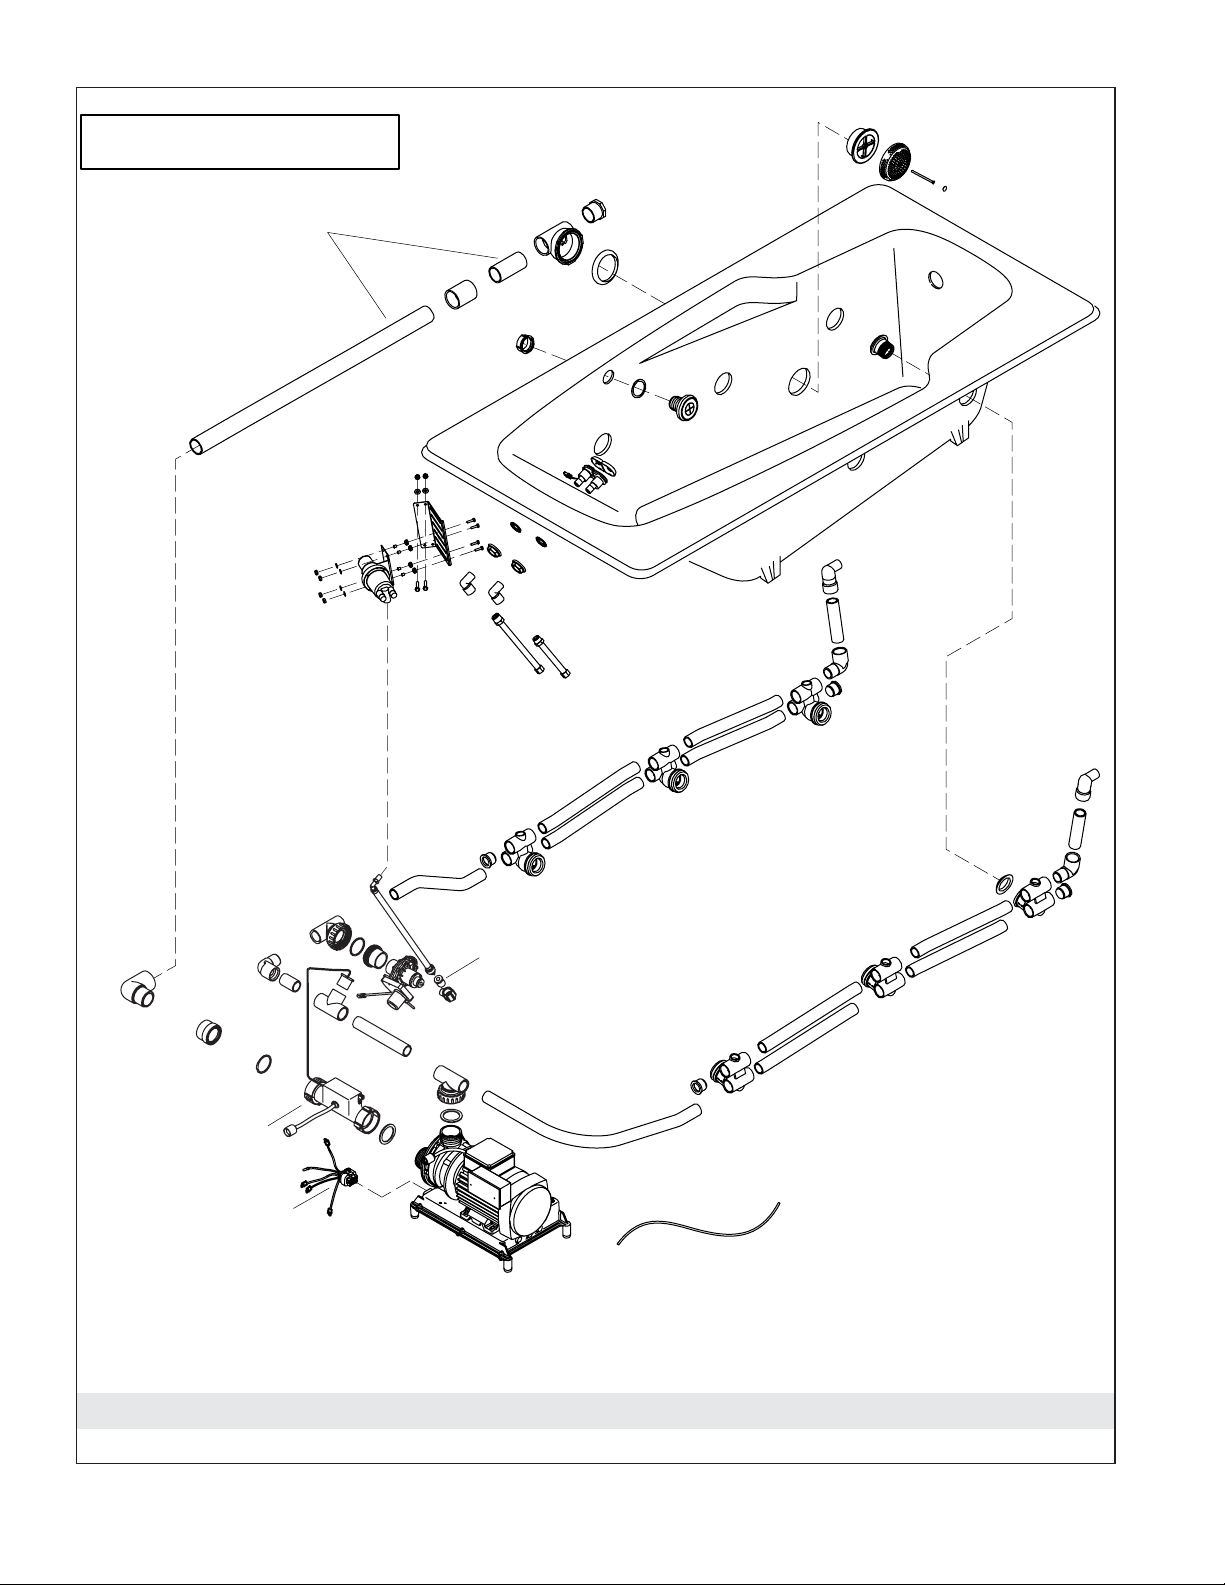
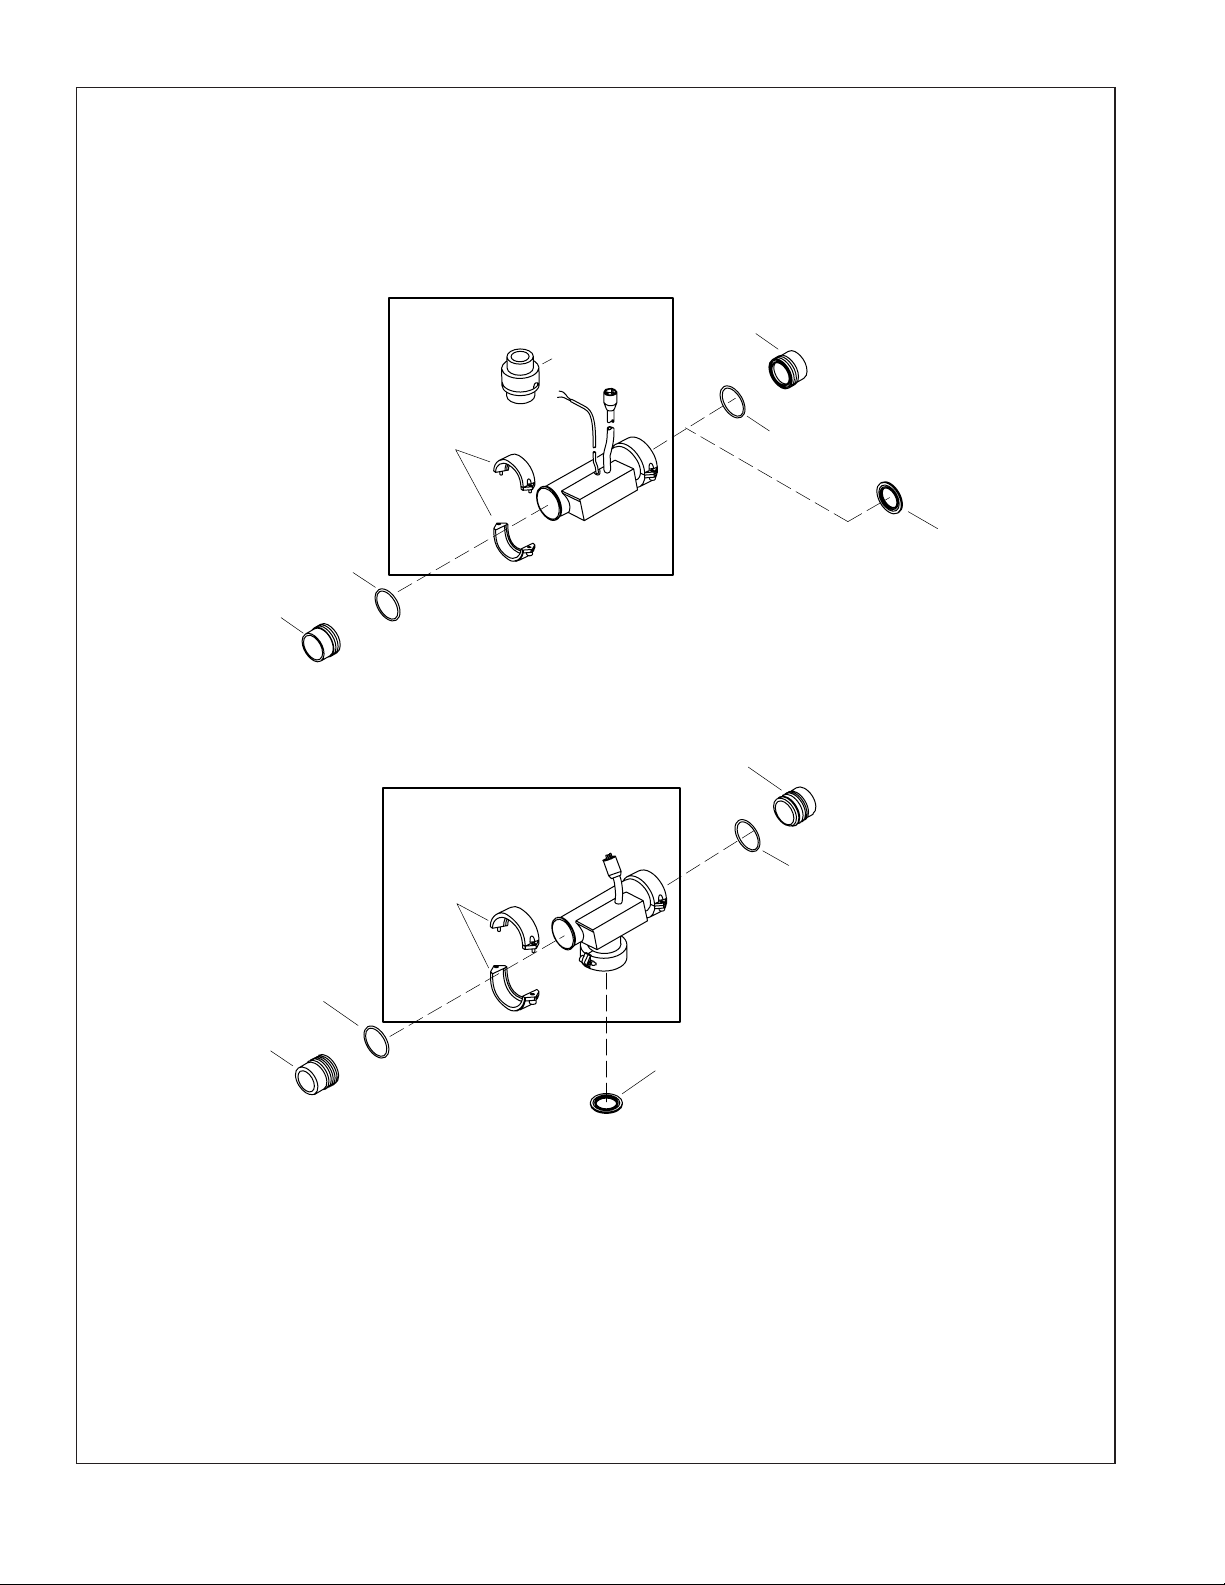
*Note: All tubing 1" unless otherwise noted.
1-1/2" Tubing
94268
Reducer
In-line Heater
1015007
Wire Harness
**Finish/color code must be specified when ordering.
Service Parts
Kohler Co. 13 1019490-5-C
Page 14
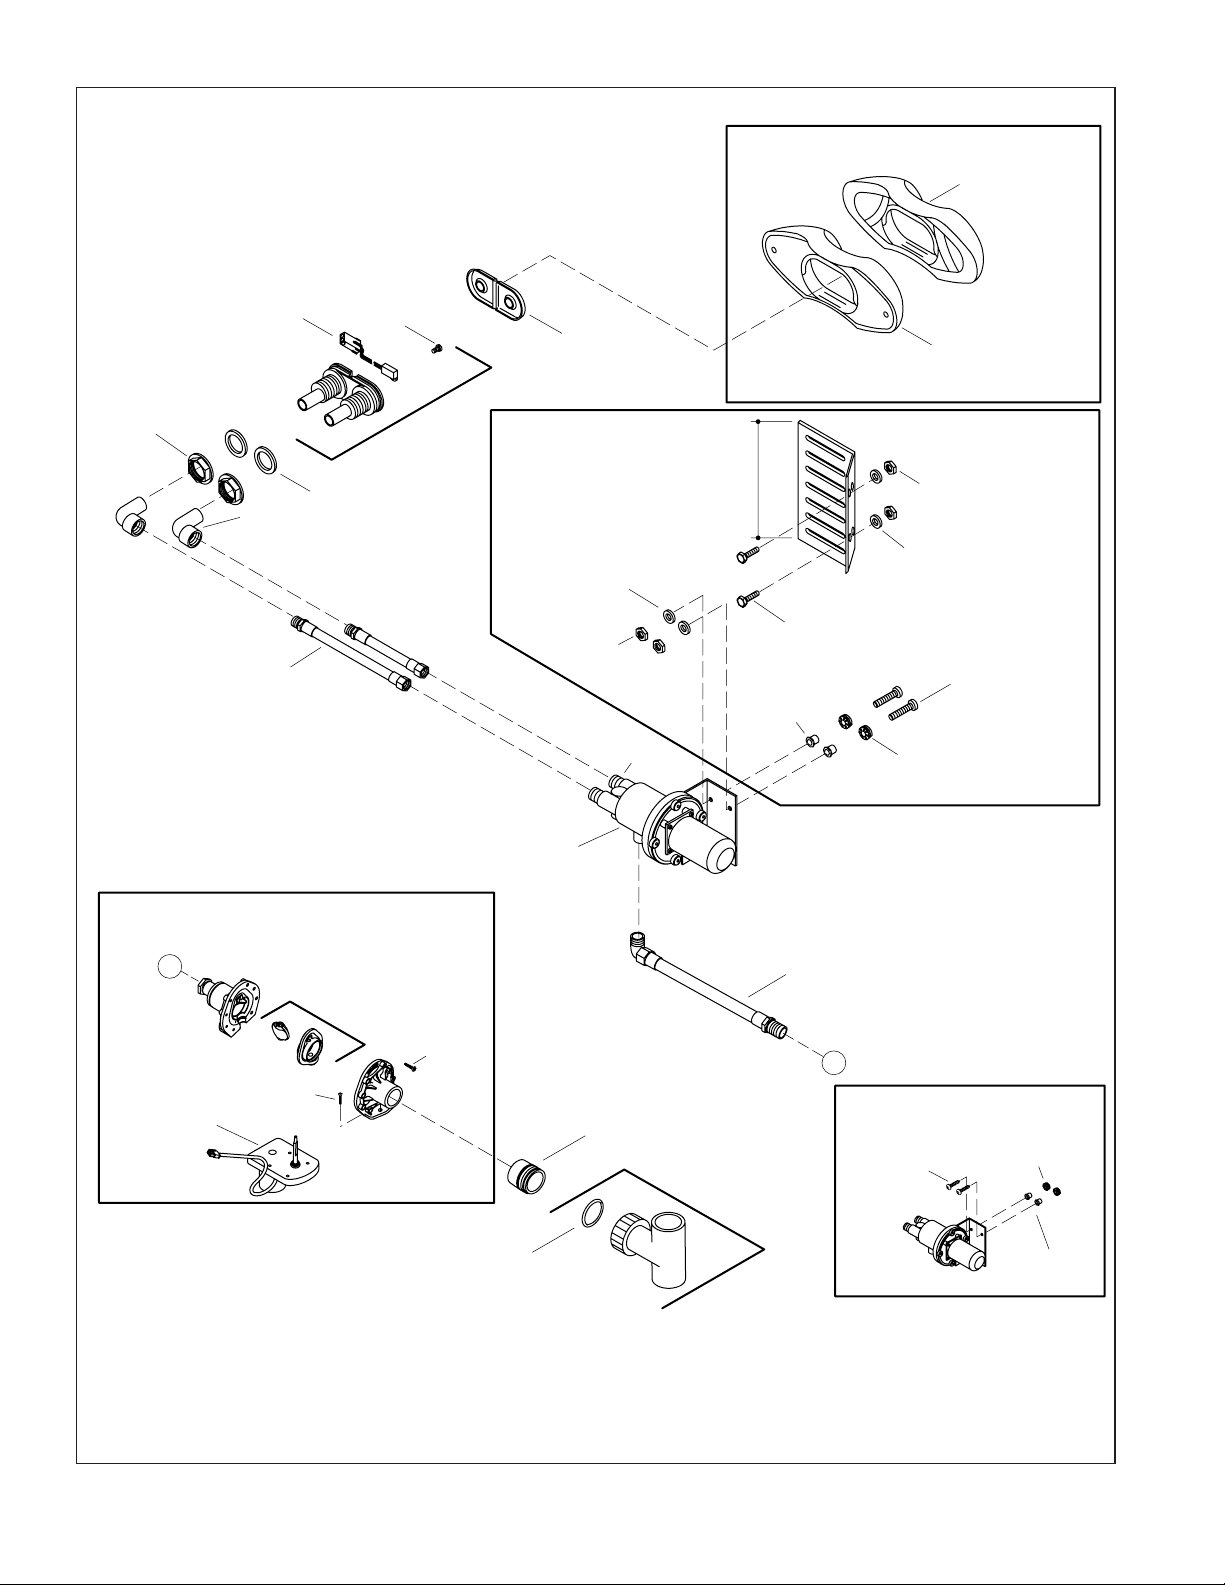
94496
(Curved)
94497 (Flat)
Pillow Kit
94726-A
94726-B
Cover
(White)
(Black)
93823
Nut
93948-A1
93948-B1
93948-C1
93948-D1
93948-E1
Hose
[8-3/8" (21.3 cm)]
[9-7/8" (25.1 cm)]
[6-7/8" (17.5 cm)]
[6" (15.2 cm)]
[4-5/8" (11.7 cm)]
94275-A
94275-B (K-812)
Butterfly Valve
C
1019439
Sensor
93848
Elbow
1016534
1016536
1016535
Neck Valve Assy.
1016466
Motor
93931
Screw
93590-A
Manifold
93542
Gasket
(Ports Facing Left)
(Ports Facing Right)
(K-1339, K-1375, K-1418, K-1457 Models)
96956
Butterfly
1111726
Screw
63149
Screw
Cast Iron Shell Neck
Valve Hardware
93511**
Cover
94387-A
94387-B
Plate
63270
Washer
60170
Nut
1018965
Adapter
[6" (15.2 cm)]
[4-3/8" (11.1 cm)]
Port
1080775
Tee
91820
Sleeve
1000054
Screw
94318-A2
94318-B2
94318-C2
94318-D2
94318-E2
94318-F2
94318-G2
Hose
C
Acrylic Shell Neck
Valve Hardware
94377
94495 (Flat)
Pillow
90153
Locknut
64212
Washer
60982
Screw
91819
Grommet
[16-1/2" (41.9 cm)]
[15-1/2" (39.4 cm)]
[13-1/2" (34.3 cm)]
[7-1/2" (19.1 cm)]
[5-1/2" (14 cm)]
[18-1/4" (46.4 cm)]
[10-1/2" (26.7 cm)]
95045
Screw
91819
Grommet
(Curved)
94821
O-Ring
**Finish/color code must be specified when ordering.
91820
Sleeve
1019490-5-C 14 Kohler Co.
Page 15
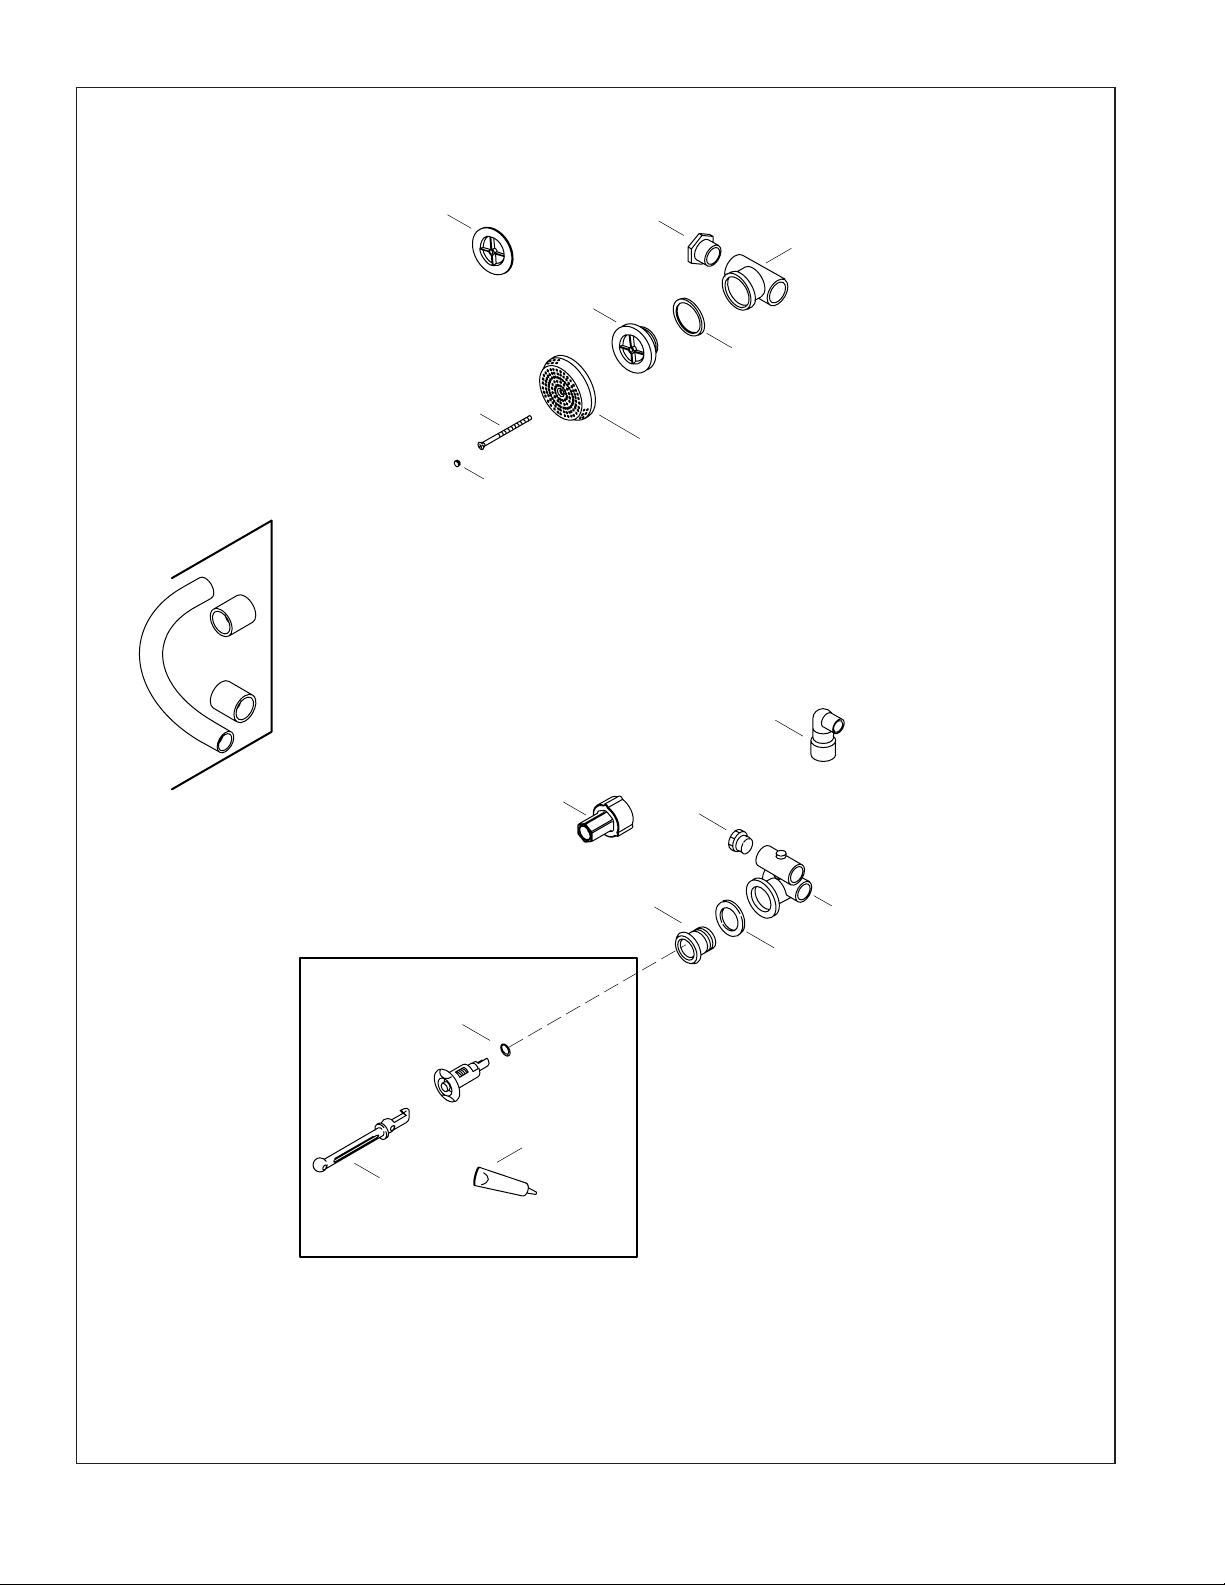
1003065
Suction Flange
Removal Tool
93836 (1/2")
93837 (3/4")
93838 (1")
93839 (1-1/4")
94853 (1-1/2")
Tube (w/Couplings)
65054**
Screw
65226**
Suction Cover Plug
96708
Flange
73518
Plug
96895**
65061**
Cover
65886
60050
Gasket
(Colored Finishes)
(Metal Finishes)
91967
Check Valve
93685
Housing
(Acrylic and FRP)
(Cast Iron)
1086350
Flange Removal Wrench
34353
O-Ring
1045715-P
Silicone Lube
Packet
30739
Jet Tool
67665
Plug
67429
Flange
65885 (Acrylic and FRP)
67668 (Cast Iron)
Gasket
Single Jet For Whirlpools
With 5 or Less Jets
88532**
(Colored Finishes)
88531**
(Metal Finishes)
Jet
Single Jet For Whirlpools
With 6 or More Jets
88530**
(Colored Finishes)
88529**
(Metal Finishes)
Jet
67889
Jet Housing
**Finish/color code must be specified when ordering.
Kohler Co. 15 1019490-5-C
Page 16
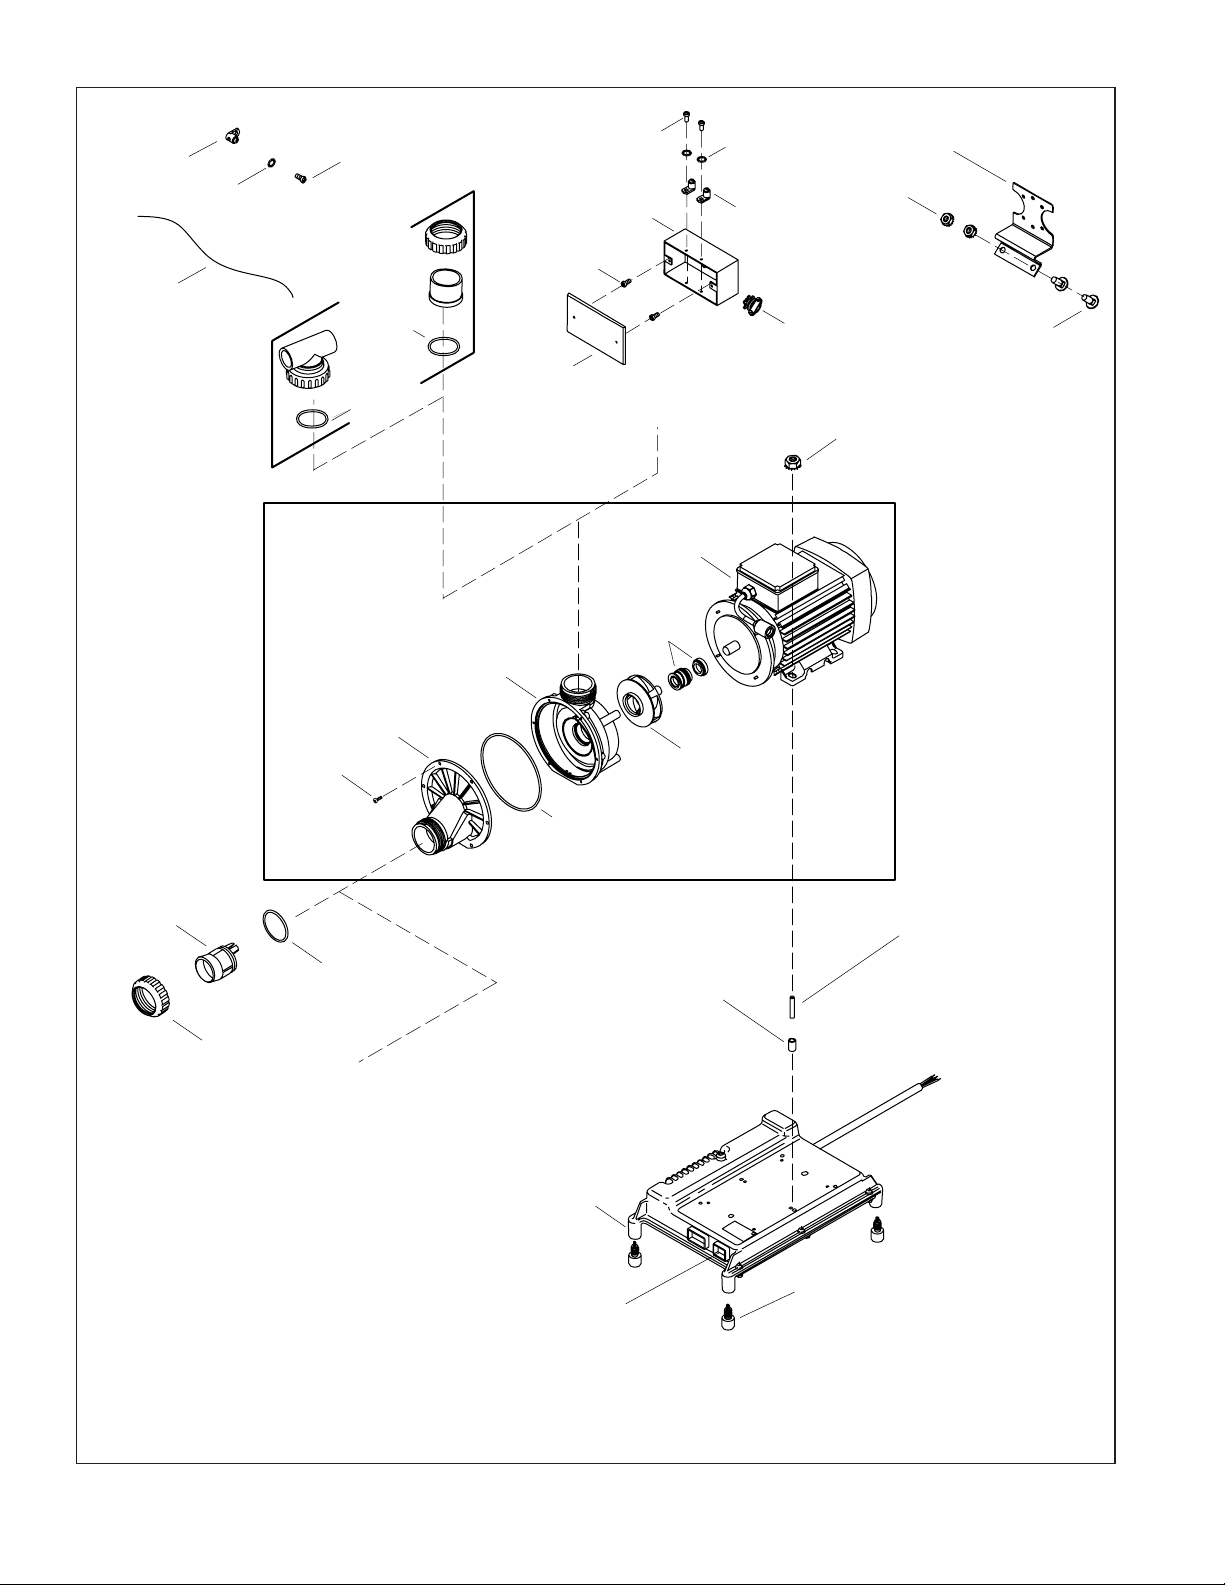
67065
Ground Lug
61776
Lock Washer
61845-K
Copper Grounding Wire
1080775
Pump Tee
60320
Screw
94821
O-Ring
94821
O-Ring
1080774
Union Assy
93893
Cover
1033678
Screw
93892-A
Electrical Box
60320
Screw
To Tee Heater
61776
Lock Washer
67065
Ground Lug
93003
Strain Relief
1018964
Bracket
90153
Locknut
1019432
Carriage Bolt
90154
Locknut
1019719
Connector
1012855
Nut
1016957
Pump
1010676
Cover
1010677
Screw
94821
O-Ring
To In-line Heater
1010548
Volute
1016958
Motor
1010673
Seal
1016960
Impeller
1010675
O-Ring
1019444-A [3/4" (1.9 cm)]
1019444-B [1-3/4" (4.4 cm)]
1019444-C [2" (5.1 cm)]
1019444-D [1-1/2" (3.8 cm)]
1019444-E [1" (2.5 cm)]
1019444-F [1-1/4" (3.2 cm)]
1019444-G [2-1/4" (5.7 cm)]
1019444-H [2-1/2" (6.4 cm)]
1019444-J [2-3/4" (7 cm)]
1019444-K [3" (7.6 cm)]
1019444-L [1/2" (1.3 cm)]
1019444-M [1/4" (6 mm)]
Spacer
1019445-A [1-3/4" (4.4 cm)]
1019445-B [2-3/4" (7 cm)]
1019445-C [3" (7.6 cm)]
1019445-D [2-1/2" (6.4 cm)]
1019445-E [2" (5.1 cm)]
1019445-F [2-1/4" (5.7 cm)]
1019445-G [3-1/4" (8.3 cm)]
1019445-H [3-1/2" (8.9 cm)]
1019445-J [3-3/4" (9.5 cm)]
1019445-K [4" (10.2 cm)]
1019445-L [1-1/2" (3.8 cm)]
1019445-M [1-1/4" (3.2 cm)]
Stud
1018661
1018663
Control
**Finish/color code must be specified when ordering.
(One Outlet)
(Two Outlets)
Outlet
1019447-A [1/4" (6 mm)]
1019447-B [1/2" (1.3 cm)]
1019447-C [3/4" (1.9 cm)]
Isolation Mount
1019490-5-C 16 Kohler Co.
Page 17
1022408
In-line Heater
1032545
Housing
1012653
Adapter
1012653
Adapter
94821
O-Ring
94821
O-Ring
1012916
Nut w/Screws
1018710
Tee Heater
1012916
Nut with Screws
94821
O-Ring
1011679
Gasket
1012977
Adapter
94821
O-Ring
1012977
Adapter
**Finish/color code must be specified when ordering.
1011679
Gasket
Kohler Co. 17 1019490-5-C
Page 18

1023381
Wrench
Carefully study decal and cover
detail below for proper service
part identification.
1013452**
Dial Trim
1013453
Spring
1020677
Gasket
65157
Nut
1013499
Housing
91639
O-Ring
1020678-A
Cover/Circuit Board
(w/Wrench)
1020678-C
Cover/Circuit Board
(w/Wrench)
1020678-E
Cover/Circuit Board
(w/Wrench)
1020678-N
Cover/Circuit Board
(w/Wrench)
1013497-A
Decal
1013497-C
Decal
1013497-E
Decal
91639
O-Ring
91639
O-Ring
91639
O-Ring
1020678-B
Cover/Circuit Board
(w/Wrench)
1020678-D
Cover/Circuit Board
(w/Wrench)
1020678-M
Cover/Circuit Board
(w/Wrench)
1020678-P
Cover/Circuit Board
(w/Wrench)
1013497-B
Decal
1013497-D
Decal
1013497-M
Decal
91639
O-Ring
91639
O-Ring
91639
O-Ring
91639
1013497-N
Decal
**Finish/color code must be specified when ordering.
O-Ring
1013497-P
Decal
91639
O-Ring
1019490-5-C 18 Kohler Co.
Page 19

Guide du propriétaire
Baignoire à hydromassage
Informations importantes
INSTRUCTIONS RELATIVES AUX RISQUES
D’INCENDIE, D’ÉLECTROCUTION OU DE
BLESSURES CORPORELLES
LIRE ET SUIVRE TOUTES LES INSTRUCTIONS
CONSERVER CES INSTRUCTIONS
AVERTISSEMENT : Lors de l’utilisation des produits électriques, des précautions de base
doivent toujours être observées, incluant ce qui suit :
DANGER : Risque de blessures corporelles. Afin de réduire les risques de blessures, ne jamais
permettre à un enfant d’utiliser cet appareil sans surveillance.
AVERTISSEMENT : Risque de blessures corporelles. Pour éviter les blessures corporelles, entrer
et sortir avec précaution de la baignoire à hydromassage.
AVERTISSEMENT : Risque d’électrocution. Ne pas raccorder d’appareils électriques (tels que
sèche-cheveux, lampe, téléphone, radio ou télévisions) dans les 5’ (1,5 m) de cette baignoire à
hydromassage.
AVERTISSEMENT : La consommation d’alcool, de drogues ou de médicaments peuvent
augmenter considérablement le risque fatal d’hyperthermie. Une immersion prolongée dans l’eau
chaude peut provoquer l’hyperthermie. L’hyperthermie a lieu lorsque la température corporelle
interne atteint plusieurs degrés au dessus de la température normale de 98,6°F (37°C). Les
symptômes d’hyperthermie comprennent la hausse de la température corporelle, l’étourdissement,
la léthargie, la somnolence et l’évanouissement. Les effets de l’hyperthermie comprennent: (a)
défaut de percevoir la chaleur, (b) défaut de s’apercevoir du besoin de sortir de la baignoire, (c)
incapacité de reconnaître le danger, (d) dommages au foetus dans le cas des femmes enceintes, (e)
incapacité physique de sortir de la baignoire et (f) inconscience et danger conséquent de noyade.
AVERTISSEMENT : Risque d’hyperthermie. Les personnes sous médicaments ou qui sont en
observation médicale doivent consulter leur médecin avant d’utiliser des baignoires à hydromassage
équipées de chauffe-eau.
AVERTISSEMENT : Risque de brûlures. Ne pas laisser la température de la baignoire à
hydromassage excéder 104° F (40°C).
Un chauffe-eau maintient automatiquement la température d’eau quand la baignoire à hydromassage est en
marche, et tant que la température d’eau ne dépasse pas 104°F (40°C). Le chauffe-eau s’arrêtera aux
températures plus hautes.
Une borne de mise à la terre est incluse dans le boîtier du câblage. Afin de réduire les risques
d’électrocution, ce terminal doit être raccordé à la borne de mise à la terre du panneau du service électrique,
avec un câble ayant le même calibre que celui du circuit de contrôle qui alimente cet équipement.
Un connecteur à pression par câble est prévu à l’extérieur de la pompe ou de la commande de cet appareil
afin de permettre la connexion entre l’appareil et toutes autres surfaces de métal avoisinantes, tel que requis
par les normes locales.
Kohler Co. Français-1 1019490-5-C
Page 20

Informations importantes (cont.)
Utiliser cette baignoire à hydromassage uniquement pour un usage tel que décrit dans ce guide. Ne pas
utiliser des fixations non recommandées par le fabricant.
Ne jamais faire tomber ou insérer d’objet quelconque dans les ouvertures. Ne pas laisser de petits objets tels
que des jouets ou accessoires pour le bain dans la baignoire à hydromassage lorsqu’elle est en marche.
Ne pas utiliser cet appareil sans ses protecteurs (couvercles) sur ses raccords d’aspiration.
La baignoire à hydromassage doit être raccordée uniquement à une prise de terre, protégée par un
disjoncteur différentiel (GFCI) ou un appareil de courant résiduel (RCD). De tels disjoncteurs GFCI ou RCD
devraient être fournis par l’installateur et vérifiés régulièrement. Appuyer sur le bouton de test pour tester
les disjoncteurs GFCI ou RCD. Le GFCI ou RCD devraient couper le courant. Appuyer sur le bouton de
ré-initialisation. L’alimentation devrait être restituée. Si les disjoncteurs GFCI or RCD ne fonctionnent pas de
cette façon, l’un ou l’autre est défectueux. Si les disjoncteurs GFCI ou RCD stoppent l’alimentation électrique
à la baignoire sans que le bouton test ne soit utilisé, il y a donc un court circuit indiquant la possibilité de
choc électrique. Ne pas utiliser pas cette baignoire à hydromassage. Débrancher la baignoire à hydromassage
et la faire réviser par un technicien qualifié avant son utilisation.
Purger le système d’hydromassage deux fois par mois ou plus souvent selon la fréquence d’usage, tel que
décrit dans la section « Purger le système » de ce guide.
L’utilisation répétée de produits d’hygiène et de beauté contenant des huiles peut endommager les
revêtements en plastique des composants de la baignoire à hydromassage. Ne pas utiliser de shampoings ou
d’huiles de bains à bases végétales.
L’action de la baignoire à hydromassage peut considérablement faire mousser une quantité de produit
moussant, même très petite, de savon, de shampoing ou d’huile pour le bain. Pour cette raison, nous vous
conseillons de ne pas utiliser ces produits dans votre baignoire à hydromassage.
Merci d’avoir choisi la compagnie Kohler
Merci d’avoir choisi la compagnie Kohler. Votre produit de la compagnie Kohler reflète la véritable passion
du design, d’artisanat, d’art et d’innovation représentant la compagnie Kohler. Nous sommes confiants que
sa fiabilité et beauté surpasseront vos exigences les plus élevées, vous satisfaisant pendant les années à venir.
Toute information contenue dans ce guide est basée sur l’information la plus récente du produit disponible
au moment de la publication. A la compagnie Kohler, nous aspirons à remplir notre mission d’améliorer le
niveau de vie gracieux pour chaque individu affecté par nos produits et services. Nous nous réservons le
droit d’apporter des modifications aux caractéristiques, aux emballages et à la disponibilité des produits à
tout moment, et ce sans préavis.
Veuillez prendre s’il vous plaît quelques minutes pour étudier ce guide. Prêter une attention toute
particulière aux instructions d’entretien et de nettoyage.
Composants
Votre nouvelle baignoire à hydromassage est conçue pour relaxer, stimuler, revigorer et tonifier votre corps.
La baignoire à hydromassage consiste en les éléments suivants:
Baignoire - Agit comme un réservoir d’eau, et fournit un espace pour l’action d’hydromassage.
Clavier de l’utilisateur - Localisé à portée de main, le clavier permet d’arrêter ou de démarrer la
pompe et le chauffe-eau ainsi que de régulariser le débit d’eau dans les jets.
Moteur de pompe - Silencieux et à vitesse variable, pour faire circuler l’eau et créer l’action
relaxante d’hydromassage.
Jets réglables - Positionnés de manière stratégique pour optimiser l’effet d’hydromassage, ils
permettent d’ajuster le débit d’air et d’eau, ainsi que de contrôler la direction du jet selon le désir.
1019490-5-C Français-2 Kohler Co.
Page 21

Composants (cont.)
Chauffe-eau - Conçu pour aider à maintenir automatiquement la température de l’eau jusqu’à 104°F
(40°C) et pour améliorer votre expérience de bain à hydromassage. Le chauffe-eau s’active
automatiquement lorsque la baignoire à hydromassage est en service, et s’éteint lorsque le moteur
de la pompe est arrêté. Le chauffe-eau peut être mis en arrêt, par le clavier, à tout moment quand la
pompe est en fonction.
Jets pour le cou et oreiller - Contrôlés par le clavier, les jets pour le cou produisent une eau
massante pour le dos et le cou. L’oreiller fournit l’endroit parfait pour reposer la tête et se relaxer.
Pour éviter que l’eau ne déborde, un interrupteur intégré arrête le mode jet pour le cou si l’oreiller
est retiré pendant son opération.
Conforme ADA - Lors de l’installation avec le siège du côté de la tête.
Kohler Co. Français-3 1019490-5-C
Page 22

Mode débit jets de type Flexjet
Active le mode sélectionné
Mode jet dorsal - Régler l'impulsion
Barre d'indication - Elle indique le volume
du débit d'eau ou la vitesse de pulsation
Augmente le débit d'impulsion
Tourner la bague extérieure
Mode jet pour le cou - Régler l'impulsion
pour accéder au mode désiré.
Marche/arrêt
Chauffe-eau marche/arrêt
Clavier de l'utilisateur illuminé
Diminue le débit ou l'impulsion
Clavier de l’utilisateur
REMARQUE : L’illustration du clavier utilisateur varie légèrement du clavier dont est équipé votre
modèle. Le mode de jet dorsal n’est pas inclus avec votre modèle.
Les modes disponibles sont allumés en bleu. Les modes actifs seront illuminés en vert.
Alimentation Met les pompes de la baignoire à hydromassage en marche et arrêt. Les symboles
Anneau extérieur Tourner la bague extérieure pour accéder au mode désiré. Le mode sélectionné clignotera
OK Active le mode désiré.
Mode débit jets
de type Flexjet
Flèche haut Augmente le débit d’eau quand le mode Flexjet est actif. Augmente la vitesse de pulsation
Barre indicatrice Indique le volume du débit d’eau sous le mode Flexjet. Indique la puissance de pulsation
Mode jets pour
le cou
Flèche bas Augmente le débit de l’eau quand le mode Flexjet est actif. Diminue la vitesse de
Chauffe-eau S’active automatiquement lorsque la baignoire à hydromassage est mise en service. Pivoter
illuminés en bleu indiquent la disponibilité des modes/fonctions. Les modes en opération
seront illuminés en vert.
(en bleu).
Tourner la bague extérieure pour sélectionner ce mode. Appuyer sur OK, puis appuyer sur
la flèche vers le haut ou vers le bas pour augmenter ou réduire le débit d’eau du jet.
quand le mode d’hydromassage du cou ou dorsal est activé.
du jet pour le cou ou dos.
Tourner la bague extérieure pour sélectionner ce mode. Appuyer sur OK, puis appuyer sur
la flèche vers le haut ou vers le bas pour augmenter ou réduire l’action de pulsation. Faire
tourner la bague extérieure sur le mode Flexjet, appuyer sur OK pour activer le mode,
puis appuyer sur la flèche vers le haut ou vers le bas du clavier pour augmenter ou
réduire le débit d’eau pour les jets pour le cou et pour tous les autres modes activés.
pulsation quand le mode hydromassage du cou ou dorsal est actif.
la bague extérieure jusqu’à que le mode débit clignote et appuyer sur ″OK″. Appuyer
encore une fois sur « OK » pour remettre le chauffe-eau en fonction.
1019490-5-C Français-4 Kohler Co.
Page 23

Remplir d'eau au-moins à 2" (5,1 cm)
au-dessus du jet le plus élevé.
Tourner la bague
du jet vers la
droite pour
diminuer le débit.
Orienter les jets
pour diriger le
débit d'eau en
position désirée.
Tourner la bague du jet vers la gauche
pour augmenter le débit d'eau.
Opération
REMARQUE : Si la baignoire à hydromassage ne fonctionne pas correctement, consulter la section «
Dépannage » de ce guide avant d’appeler un représentant en service qualifié.
Tourner complètement la bague du jet vers la gauche. Orienter les buses des jets vers le fond du
bassin.
AVIS : Ne pas laisser la température de la baignoire à hydromassage excéder 104° F (40°C). Un chauffe-eau
maintient automatiquement la température d’eau quand la baignoire à hydromassage est en marche, et
tant que la température d’eau ne dépasse pas 104°F (40°C). Le chauffe-eau s’arrêtera aux températures plus
hautes.
Fermer le drain, puis remplir la baignoire à hydromassage à un niveau d’au moins 2″ (5,1 cm)
au-dessus du jet le plus élevé. Utiliser votre main pour tester la température de l’eau pour le confort
et la sécurité. Entrer dans la baignoire avec précaution.
Appuyer sur l’icône de marche pour démarrer la pompe et le chauffe-eau de la baignoire à
hydromassage. Le débit d’eau aura un volume moyen.
Presser les flèches haut/bas pour augmenter ou diminuer le volume de débit d’eau. La barre
indicatrice affiche le volume du débit d’eau.
Ajuster les jets pour un mélange optimal de l’eau et de l’air. Tourner la bague du jet vers la droite
pour réduire le débit, ou vers la gauche l’augmenter. Le cas échéant, orienter les jets pour diriger le
débit d’eau vers la direction désirée pour optimiser l’action d’hydromassage.
Si désiré, éteindre le chauffe-eau en appuyant sur le bouton chauffage. Appuyer une deuxième fois
sur le bouton pour redémarrer le chauffe-eau.
Presser l’icône de démarrage une deuxième fois pour arrêter la pompe et le chauffe-eau.
REMARQUE : Votre pompe et le chauffe-eau s’arrête automatiquement après environ 20 minutes de
fonctionnement. Si désiré, appuyer sur l’icône de démarrage pour réactiver la pompe et le chauffe-eau.
Sortir doucement de la baignoire à hydromassage, et ouvrir le drain pour la vider.
Jets pour le cou
REMARQUE : Avant d’activer les jets pour le cou, s’assurer que la housse soit bien placée sur l’oreiller et
que celui-ci soit attaché sur le corps du jet pour le cou. Si l’oreiller n’est pas correctement installé, les jets
pour le cou s’arrêteront. L’indicateur du jet pour le cou et la barre d’indication du clavier clignoteront. Les
jets pour le cou redémarreront quand l’oreiller sera correctement installé.
Tourner la bague extérieure pour sélectionner le mode jets pour le cou, puis appuyer sur « OK »
pour activer les jets. Les pulsations des jets pour le cou commenceront à une vitesse moyenne.
Appuyer sur les flèches haut ou bas pour ajuster l’action de pulsation.
Kohler Co. Français-5 1019490-5-C
Page 24

Opération (cont.)
Pivoter la bague extérieure jusqu’à que le mode débit clignote et appuyer sur « OK ». Appuyer
sur les flèches haut ou bas pour ajuster le débit d’eau des jets sur le cou.
Appuyer sur « OK » quand le mode jet pour le cou est actif pour arrêter ces jets.
REMARQUE : Pour activer ou désactiver des fonctions quand le mode d’hydromassage pour le cou est en
fonction, tourner la bague extérieure jusqu’à ce que le voyant désiré clignote, puis appuyer sur « OK
».
Entretien et nettoyage
Pour de meilleurs résultats, prendre ce qui suit en considération lors de l’entretien de votre produit
KOHLER:
•
Toujours tester la solution de nettoyage sur une surface la moins évidente avant de l’appliquer sur
la totalité de la surface.
•
Essuyer les surfaces et rincer complètement avec de l’eau immédiatement après l’application du
nettoyant. Rincer et sécher tout éclaboussement sur les surfaces avoisinantes.
•
Ne pas laisser les nettoyants sur les surfaces.
•
Utiliser une éponge ou un chiffon doux et humide. Ne jamais utiliser de matériau abrasif tel que
brosse ou éponges à récurer pour nettoyer les surfaces.
•
La technique idéale de nettoyage est de bien rincer et de sécher toute eau de la surface après chaque
usage.
•
Utiliser une brosse douce en nylon sur les surfaces anti-dérapantes Safeguard
un nettoyant à base diluable à l’eau (qui se dissout à 100% dans l’eau).
. S’assurer d’utiliser
®
Pour l’information détaillée de nettoyage et des produits à considérer, visiter www.kohler.com/clean. Pour
commander des informations d’entretien et de nettoyage, composer le 1-800-456-4537.
Système de chasse
REMARQUE : Purger le système d’hydromassage deux fois par mois ou plus, selon la fréquence
d’utilisation.
Tourner les bagues de garniture du jet complètement dans le sens des aiguilles d’une montre pour
supprimer l’admission d’air.
Remplir la baignoire à hydromassage avec de l’eau chaude à un niveau d’au moins 2″ (5,1 cm)
au-dessus des jets les plus élevés, ou laisser l’eau dans la baignoire à hydromassage après l’usage.
Ajouter à l’eau 2 petites cuillères (10 ml) d’un détergent pour lave-vaisselle peu moussant et 20
onces (590 ml) d’eau de javel domestique (5% - 6% d’hypochlorite de sodium).
Faire fonctionner la baignoire à hydromassage pendant5à10minutes. Arrêter la baignoire à
hydromassage et purger.
Si désiré, rincer les surfaces de la baignoire avec de l’eau.
Rincer les surfaces des jets, le robinet, les barres d’appuis et le drain, et sécher avec un chiffon
doux.
Garantie
GARANTIE LIMITÉE D’UN AN
Les produits de plomberie KOHLER sont garantis contre tout défaut matériel et de fabrication pour un an, à
partir de la date de l’installation.
Kohler Co. jugera à sa discrétion, de la réparation, du remplacement ou du réglage approprié et ceci après
toute inspection faite par Kohler Co. de tous défauts dus à une utilisation normale et ceci pendant un (1) an
à partir de la date d’installation. Kohler Co. n’est pas responsable des coûts de démontage ou d’installation.
1019490-5-C Français-6 Kohler Co.
Page 25

Garantie (cont.)
L’utilisation de nettoyants à l’intérieur du réservoir annulera la garantie.
Pour obtenir un service-garantie, contacter Kohler Co. par l’intermédiaire de votre vendeur, plombier, centre
de rénovation, revendeur par internet ou par écrit à Kohler Co. à l’attention de: Customer Care Center
(Service d’assistance à la clientèle), 444 Highland Drive, Kohler, WI 53044, USA, ou composer le
1-800-4KOHLER (1-800-456-4537) à partir des États-Unis et du Canada, et le 001-877-680-1310 à partir du
Mexique.
LA DURÉE DES GARANTIES TACITES, Y COMPRIS CELLES DE QUALITÉ MARCHANDE ET
D’APTITUDE À UN EMPLOI PARTICULIER, SE LIMITE EXPRESSÉMENT À LA DURÉE DE LA
PRÉSENTE GARANTIE. KOHLER CO. ET/OU LE REVENDEUR DÉCLINENT TOUTE
RESPONSABILITÉ CONTRE LES DOMMAGES PARTICULIERS, IMPRÉVUS OU DE CIRCONSTANCE.
Certains états/provinces ne permettent pas la limitation sur la durée de la garantie implicite, ou l’exclusion
ou la limitation de dommages spéciaux, accessoires ou indirects, et, par conséquent, ces limitations et
exclusions pourraient ne pas s’appliquer dans votre cas. Cette garantie vous donne des droits légaux
spécifiques. Vous pouvez également avoir d’autres droits qui varient d’un état/province à l’autre.
Ceci constitue la garantie écrite exclusive de Kohler Co.
Garantie
Kohler garantit que les composants en fonte des produits fabriqués après le 10 Février 2000, sont exempts de
tout défaut de matériel et de fabrication pour usage normal domestique, aussi longtemps que l’acquéreur
d’origine demeure propriétaire de son habitation. Les ternissements, les fissures, les taches et les attaques
alcalines sur la finition au fil du temps; les pratiques de nettoyage ou les conditions atmosphériques ou de
l’eau ne sont pas considérés comme défauts de fabrication, mais plutôt comme signes d’usure normale. Cette
garantie s’applique uniquement aux produits en fonte Kohler installés aux États-Unis d’Amérique, au
Canada ou au Mexique (Amérique du Nord).
Si un défaut est décelé en cours d’usage normal domestique, Kohler Co. décidera, à son choix, de réparer, de
remplacer ou d’effectuer les réglages appropriés. Un endommagement causé par un accident, mauvais usage
ou mauvais traitement n’est pas couvert par cette garantie. Un entretien et un nettoyage inappropriés
annuleront cette garantie. Une preuve d’achat (ticket de caisse original) doit être présentée à Kohler Co. avec
tous les recours en garantie. Kohler Co. n’est pas responsable des coûts de main-d’œuvre, d’installation ou
d’autres frais accessoires ou indirects. La responsabilité de Kohler Co. n’excédera en aucun cas le prix d’achat
du produit.
Si le produit en fonte est utilisé dans un commerce ou bien est installé hors d’Amérique du Nord, Kohler Co.
garantit le produit en fonte contre tout défaut de matériel et de fabrication pour un (1) an à partir de la date
d’installation, en plus de respecter tous les autres termes de cette garantie, sauf la durée. Tous les autres
composants autres que ceux en fonte émaillée auront une garantie limitée d’un an de Kohler Co., sauf contre
indication.
Pour vous prévaloir d’une indemnisation en vertu de cette garantie, veuillez contacter Kohler Co. par
l’intermédiaire de votre vendeur, plombier, centre de rénovation ou revendeur par internet, ou bien par écrit
à l’adresse suivante: Kohler Co., A l’attention de: Customer Service Department, 444 Highland Drive, Kohler,
WI 53044, USA. Veuillez vous assurer de fournir tous les renseignements pertinents à votre demande
d’indemnité, y compris une description complète du problème, du produit, du numéro de modèle, de la
couleur, de la finition et de la date et du lieu d’achat du produit. Joindre également l’original de la facture.
Pour plus de renseignements ou pour demander les coordonnées du centre de réparation le plus proche,
composer le 1-800-4-KOHLER à partir des É.U., le 1-800-964-5590 à partir du Canada ou le 001-877-680-1310
à partir du Mexique.
Kohler Co. et/ou le vendeur fournissent cette garantie qui remplace toutes les autres, garanties expresses
ou tacites, y compris, mais sans s’y limiter aux garanties implicites marchandes et d’aptitude à un emploi
particulier. Kohler Co. et/ou le vendeur déclinent toutes responsabilités contre tous dommages
occasionnés, imprévisibles ou corrélatifs.
Certains états/provinces ne permettent pas la limitation sur la durée de la garantie implicite, ou l’exclusion
ou la limitation de dommages spéciaux, accessoires ou indirects, et, par conséquent, ces limitations et
exclusions pourraient ne pas s’appliquer dans votre cas. La présente garantie accorde au consommateur des
droits légaux spécifiques. Vous pouvez également avoir d’autres droits qui varient d’un état/province à
Kohler Co. Français-7 1019490-5-C
Page 26

Garantie (cont.)
l’autre. Cette garantie est accordée uniquement à l’acquéreur initial et exclut tous dommages dus à une
installation erronée, un usage abusif ou une mauvaise utilisation du produit, qu’ils soient effectués par un
entrepreneur, une société de services ou le consommateur.
Ceci constitue la garantie écrite exclusive de Kohler Co.
1019490-5-C Français-8 Kohler Co.
Page 27

Retirer les jets
Insérer l’outil en crochet comme indiqué, et retirer le
jet hors de son logement. Le gicleur devrait être vers
le haut quand cela sera terminé.
Réinstaller les jets
Logement
Inspecter et lubrifier
le joint torique
Glisser le joint torique
sur le premier
épaulement du jet
Insérer le jet dans son logement, tourner
et pousser doucement jusqu’à ce qu’il
s’enclenche en position
Dépannage
AVIS : Cette section est seulement destinée à une aide générale. Seul un agent agréé de Kohler ou un
électricien qualifié devrait corriger tous les problèmes électriques. Pour une réparation sous garantie,
contacter le vendeur ou distributeur.
Retirer les jets
Positionner la buse de gicleur du jet vers le haut. Ceci assure que l’outil pour le jet ne glissera pas.
Placer l’outil pour jet (fourni) avec le crochet tourné vers le haut.
Insérer l’outil pour jet dans l’ouverture du jet et accrocher la partie supérieure intérieure du gicleur.
Placer le pouce contre la paroi de la baignoire à hydromassage tout en saisissant fermement l’outil
pour jet.
Tirer avec force sur l’outil pour jet jusqu’à ce que l’ensemble du jet sorte du boîtier. Faire attention à
ne pas perdre le joint torique.
Réinstaller les jets
REMARQUE : Pour permettre une rotation aisée et un fonctionnement correct des jets, le joint torique doit
être : (1) correctement placé, (2) lubrifié, et (3) en bonne condition.
Installer le joint torique sur le premier épaulement du jet.
Lubrifier le joint torique avec le paquet de lubrifiant silicone (fourni), afin d’éviter le fonctionnement
bruyant du jet.
Insérer délicatement le jet dans le logement, puis pousser et pivoter légèrement jusqu’à ce qu’il
s’enclenche en place. Ne pas forcer le jet.
L’appareil n’est pas installé correctement. Le jet devrait pivoter aisément dans les deux sens. Retirer
et réinstaller si nécessaire.
Symptômes Causes probables Action recommandée
1. Le clavier ne
s’illumine pas quand
le bouton est pressé
ou quand la bague
extérieure est
tournée.
A. Pas d’alimentation au contrôle. A. Vérifier le câblage et connecter
B. Les disjoncteurs GFCI ou RCD
se déclenchent.
C. Le harnais du câblage du clavier
est desserré, débranché ou
endommagé.
D. Le clavier ne fonctionne pas. D. Remplacer le clavier.
E. Le contrôle ne fonctionne pas. E. Remplacer le contrôle.
l’alimentation électrique.
B. Réinitialiser le GFCI ou le RCD.
C. Vérifier que les connexions du câblage
soient correctes. Remplacer le harnais
du câblage si nécessaire.
Kohler Co. Français-9 1019490-5-C
Page 28

Dépannage (cont.)
Symptômes Causes probables Action recommandée
2. Le moteur démarre,
mais tous les jets ne
fonctionnent pas.
3. Le clavier est
illuminé mais, ne
répond pas aux
boutons ou bague
extérieure.
4. La barre d’indication
du clavier continue
le balayage au
démarrage.
5. Le clavier est
illuminé, mais la
pompe de démarre
pas.
6. Le moteur fonctionne
mais la pompe ne
pompe pas (pompe
cavitante).
7. La pompe s’arrête
automatiquement
avant 18 minutes.
8. La pompe ne s’arrête
pas
automatiquement
après 22 minutes.
9. La pompe ne s’arrête
pas quand le bouton
de marche du clavier
est pressé.
10. La pompe
fonctionne, mais la
fonction de vitesse
variable ne
fonctionne pas.
A. Le jet est fermé. A. Tourner la bague du jet vers la gauche
B. Le jet n’est pas installé
correctement.
C. Les jets sont bloqués. C. Retirer le blocage.
A. Le programme de contrôle est
verrouillé.
B. Le harnais du câblage du clavier
est desserré, débranché ou
endommagé.
C. Le clavier ne fonctionne pas. C. Remplacer le clavier.
D. Le contrôle ne fonctionne pas. D. Remplacer le contrôle.
A. Le programme de contrôle est
verrouillé.
B. Le harnais du câblage du clavier
est desserré, débranché ou
endommagé.
C. Le clavier ne fonctionne pas. C. Remplacer le clavier.
D. Le contrôle ne fonctionne pas. D. Remplacer le contrôle.
A. Le câble de la pompe est
desserré, déconnecté ou
endommagé.
B. Le pompe ne fonctionne pas. B. Remplacer la pompe.
C. Le contrôle ne fonctionne pas. C. Remplacer le contrôle.
A. La pompe est trop élevée. A. Baisser la pompe/contrôle au niveau
B. Petite fuite d’air à l’entrée de la
pompe.
C. Le moteur/pompe ne fonctionne
pas.
D. Le contrôle ne fonctionne pas.
A. Les disjoncteurs GFCI ou RCD
se déclenchent.
B. L’aspiration est bloquée. B. Retirer l’obstruction.
C. Les jets sont bloqués. C. Retirer le blocage.
D. Moteur surchauffé et système de
protection activé.
A. La minuterie de 20 minutes
s’arrête par inadvertance.
A. Le clavier ne fonctionne pas. A. Remplacer le clavier.
B. Le contrôle ne fonctionne pas. B. Remplacer le contrôle.
A. Le moteur/pompe ne fonctionne
pas.
B. Le contrôle ne fonctionne pas. B. Remplacer le contrôle.
pour ouvrir.
B. Réinstaller le jet; s’assurer que le joint
torique ne soit pas endommagé.
A. Réinitialiser le GFCI ou le RCD.
B. Vérifier que les connexions du câblage
soient correctes. Remplacer le harnais
du câblage si nécessaire.
A. Réinitialiser le GFCI ou le RCD.
B. Vérifier que les connexions du câblage
soient correctes. Remplacer le harnais
du câblage si nécessaire.
A. Vérifier que les connexions du câblage
soient correctes.
du plancher.
B. Serrer soigneusement le(s) écrou(s) des
tuyaux de l’admission de la pompe.
C. Remplacer le moteur/la pompe.
D. Remplacer le contrôle.
A. Identifier la source du problème, puis y
remédier. Réinitialiser le GFCI ou le
RCD.
D. Vérifier s’ilyaunblocage à l’aspiration
et/ou aux jets. Retirer l’obstruction et
laisser le moteur refroidir.
A. Consulter le manuel de service.
A. Remplacer le moteur/la pompe.
1019490-5-C Français-10 Kohler Co.
Page 29

Dépannage (cont.)
Symptômes Causes probables Action recommandée
11. L’eau de la baignoire
se refroidit pendant
le fonctionnement de
la pompe.
12. Fonctionnement
bruyant.
Télécommande
Symptômes Causes probables Action recommandée
1. La télécommande ne
fonctionne pas.
A. La température de l’eau
au-dessus de 104°F (40°C).
B. Le chauffe-eau est arrêté par le
clavier.
C. Le câblage du chauffe-eau est
desserré, débranché ou
endommagé.
D. Le chauffe-eau ne fonctionne pas. D. Remplacer le chauffe-eau.
E. Le contrôle ne fonctionne pas. E. Remplacer le contrôle.
A. Les sangles de retenue de la
pompe n’ont pas été coupées.
B. Joint torique sec ou délogé
(crissement).
A. Les piles sont mal installées ou
épuisées.
B. L’antenne du câblage électrique
est endommagée.
C. La télécommande n’est pas
correctement programmée.
D. La télécommande ne fonctionne
pas.
E. Le contrôle ne fonctionne pas. E. Remplacer le contrôle.
A. Laisser l’eau du bain refroidir.
B. Mettre le chauffe-eau en marche.
C. Vérifier que les connexions du câblage
soient correctes.
A. Couper les sangles de retenue avec des
cisailles de ferblantier.
B. Retirer le jet, remplacer et lubrifier le
joint torique, et réinstaller le jet.
A. Remplacer les piles.
B. Remplacer le faisceau de câblage.
C. Consulter le guide du propriétaire
ou le manuel d’entretien.
D. Remplacer la télécommande.
Système de jet dorsal
Symptômes Causes probables Action recommandée
1. Les jets dorsaux ne
fonctionnent pas.
A. La pompe de la baignoire à
hydromassage ne fonctionne
pas.
B. La valve papillon du jet dorsal
ne s’ouvre pas.
C. Il n’y a pas suffisamment d’eau
dans la baignoire à
hydromassage.
D. L’interrupteur de l’actionneur
ne fonctionne pas.
E. L’alimentation du moteur de la
pompe au contrôle est arrêtée.
F. Les tuyaux des jets dorsaux sont
bouchés.
G. Le câblage de l’interrupteur
entre l’interrupteur et la
commande est déconnecté.
A. Activer la pompe.
B. Vérifier s’il y a des connexions ou
des câbles desserrés depuis la
cartouche d’impulsion dorsale et
jusqu’au contrôle. Remplacer la
cartouche d’impulsion des jets
dorsaux ou le contrôle si
nécessaire. Contacter
l’installateur/vendeur.
C. Remplir la baignoire à
hydromassage de façon à ce que les
capteurs de niveau soient couverts.
D. Remplacer l’interrupteur de
l’actionneur. Contacter
l’installateur/vendeur.
E. Vérifier s’il y a des connections ou
câbles desserrés, depuis le moteur
de la pompe jusqu’au contrôle.
Contacter l’installateur/vendeur.
F. Retirer l’obstruction.
G. Raccorder ou remplacer les câbles
de l’interrupteur qui emploient une
fiche modulaire. Contacter
l’installateur/vendeur.
Kohler Co. Français-11 1019490-5-C
Page 30

Dépannage (cont.)
Symptômes Causes probables Action recommandée
2. Les jets dorsaux ne
fonctionnent pas.
Système de jets pour le cou
Symptômes Causes probables Action recommandée
1. Le clavier ne répond pas
quand le mode jets pour
le cou est sélectionné.
2. La pompe fonctionne
mais les jets pour le cou
ne fonctionnent pas. La
barre indicatrice du
clavier clignote.
3. La pompe fonctionne
mais les jets pour le cou
ne fonctionnent pas. La
barre indicatrice du
clavier NE clignote PAS.
4. L’eau coule des jets pour
le cou, mais pas
d’impulsion.
A. La cartouche d’impulsion ne
fonctionne pas.
B. L’interrupteur ne fonctionne
pas.
C. Le câblage de l’interrupteur
entre l’interrupteur et la
commande est déconnecté.
A. Le clavier ne fonctionne pas. A. Remplacer le clavier.
A. Le coussin n’est pas installé. A. S’assurer que le coussin soit bien
B. L’interrupteur bilame ne
fonctionne pas.
C. Le câblage du jet pour le cou est
desserré, débranché ou cassé.
A. Le conduit du jet pour le cou
est bouché.
B. Le câblage du jet pour le cou est
desserré, débranché ou cassé.
C. La valve papillon ne fonctionne
pas.
D. Le contrôle ne fonctionne pas. D. Remplacer le contrôle.
A. Le câblage des jets
d’hydromassage pour le cou au
boîtier de contrôle est desserré
ou endommagé.
B. La cartouche d’impulsion ne
fonctionne pas.
C. Le contrôle ne fonctionne pas. C. Remplacer le contrôle.
A. Vérifier s’il y a des connexions ou
des câbles desserrés depuis la
cartouche d’impulsion au contrôle.
Remplacer la cartouche
d’impulsion ou le contrôle si
nécessaire. Contacter
l’installateur/vendeur.
B. Remplacer l’interrupteur. Contacter
l’installateur/vendeur.
C. Raccorder ou remplacer les câbles
de l’interrupteur qui emploient une
fiche modulaire. Contacter
l’installateur/vendeur.
attaché au jet pour le cou.
B. Vérifier le câblage l’interrupteur
bilame et remplacer si nécessaire.
C. Vérifier que les connexions du
câblage soient correctes. Remplacer
le harnais du câblage si nécessaire.
A. Déconnecter les conduits du jet
pour le cou et déboucher.
B. Vérifier que les connexions du
câblage soient correctes. Remplacer
le harnais du câblage si nécessaire.
C. Remplacer la valve papillon.
A. Vérifier que les connexions du
câblage soient correctes. Remplacer
le harnais du câblage si nécessaire.
B. Remplacer la cartouche
d’impulsion.
1019490-5-C Français-12 Kohler Co.
Page 31

*Remarque: Toute la tuyauterie de 1" à
moins qu'indiqué autrement.
Tuyauterie de 1-1/2"
94268
Réducteur
Chauffe-eau
en ligne
1015007
Harnais de
câblage
**Vous devez spécifier les codes de la finition/couleur lors de la commande.
Pièces de rechange
Kohler Co. Français-13 1019490-5-C
Page 32

94496
(Courbé)
94497
(Plat)
Kit de coussin
94726-A
94726-B
Couvercle
(Blanc)
(Noir)
93823
Écrou
93948-A1
93948-B1
93948-C1
93948-D1
93948-E1
Tuyau
[8-3/8" (21,3 cm)]
[9-7/8" (25,1 cm)]
[6-7/8" (17,5 cm)]
[6" (15,2 cm)]
[4-5/8" (11,7 cm)]
94275-A
94275-B (K-812)
Valve papillon
C
1016466
Moteur
1019439
Capteur
93848
Coude
1016534
1016536
1016535
Ensemble de la valve du cou.
93542
Joint
(Sortie vers la gauche)
(Sortie vers la droite)
(Modèles K-1339, K-1375, K-1418, K-1457)
63149
Vis
93931
Vis
93590-A
Distributeur
96956
Papillon
1111726
Vis
93511**
Couvercle
Enveloppe en fonte du corps
de la valve du cou
94387-A
94387-B
Plaque
63270
Rondelle
[6" (15,2 cm)]
[4-3/8" (11,1 cm)]
60170
Écrou
Port
1018965
Adaptateur
1080775
T
91820
Manchon
90153
Contre-écrou
64212
Rondelle
1000054
Vis
91819
Oeillet
94318-A2
94318-B2
94318-C2
94318-D2
94318-E2
94318-F2
94318-G2
Tuyau
[16-1/2" (41,9 cm)]
[15-1/2" (39,4 cm)]
[13-1/2" (34,3 cm)]
[7-1/2" (19,1 cm)]
[5-1/2" (14 cm)]
[18-1/4" (46,4 cm)]
[10-1/2" (26,7 cm)]
C
Cou d'enveloppe en acrylique
Boulonnerie de valve
95045
Vis
94377
(Courbé)
94495 (Plat)
Oreiller
60982
Vis
91819
Oeillet
94821
Joint torique
**Vous devez spécifier les codes de la finition/couleur lors de la commande.
91820
Manchon
1019490-5-C Français-14 Kohler Co.
Page 33

1003065
Outil d'extraction de
la bride d'aspiration
93836 (1/2")
93837 (3/4")
93838 (1")
93839 (1-1/4")
94853 (1-1/2")
Tuyau (avec couplages)
96708
Bride
65054**
Vis
65226**
Capuchon de la vis
du couvercle d'aspiration
91967
Valve clapet de non-retour
73518
Bouchon
(Finitions colorées)
96895**
(Finitions métalliques)
65061**
Couvercle
93685
Logement
(Acrylique et FRP)
65886
(Fonte)
60050
Joint
1086350
Clé d'extraction de bride
34353
Joint torique
30739
Outil pour le jet
1045715-P
Paquet de
lubrifiant
silicone
67665
Bouchon
67429
Bride
67889
Logement du jet
65885 (Acrylique et FRP)
67668 (Fonte)
Joint
Jet unique pour baignoires à
hydromassage avec 5 jets ou moins
88532**
(Finitions colorées)
88531**
(Finitions métalliques)
Jet
Jet unique pour baignoires à
hydromassage avec 6 jets ou plus
88530**
(Finitions colorées)
88529**
(Finitions métalliques)
Jet
**Vous devez spécifier les codes de la finition/couleur lors de la commande.
Kohler Co. Français-15 1019490-5-C
Page 34

67065
Borne de mise
à la terre
61845-K
Câble de mise
à la terre en cuivre
61776
Contre-écrou
1080775
T de pompe
60320
Vis
94821
Joint
torique
94821
Joint
torique
93892-A
Boîtier électrique
1080774
Ensemble
d'union
93893
Couvercle
1033678
Vis
60320
Vis
Au T du chauffe-eau
61776
Contre-écrou
90153
Contre-écrou
67065
Borne de mise à la terre
93003
Réducteur de tension
90154
Contre-écrou
1018964
Support
1019432
Boulon de
carrosserie
1019719
Connecteur
1012855
Écrou
1016957
Pompe
1010676
Couvercle
1010677
Vis
94821
Joint torique
Au chauffe-eau en ligne
1010548
Volute
1016958
Moteur
1010673
Joint
1016960
Roue à aubes
1010675
Joint torique
1019444-A [3/4" (1,9 cm)]
1019444-B [1-3/4" (4,4 cm)]
1019444-C [2" (5,1 cm)]
1019444-D [1-1/2" (3,8 cm)]
1019444-E [1" (2,5 cm)]
1019444-F [1-1/4" (3,2 cm)]
1019444-G [2-1/4" (5,7 cm)]
1019444-H [2-1/2" (6,4 cm)]
1019444-J [2-3/4" (7 cm)]
1019444-K [3" (7,6 cm)]
1019444-L [1/2" (1,3 cm)]
1019444-M [1/4" (6 mm)]
Espaceur
1019445-A [1-3/4" (4,4 cm)]
1019445-B [2-3/4" (7 cm)]
1019445-C [3" (7,6 cm)]
1019445-D [2-1/2" (6,4 cm)]
1019445-E [2" (5,1 cm)]
1019445-F [2-1/4" (5,7 cm)]
1019445-G [3-1/4" (8,3 cm)]
1019445-H [3-1/2" (8,9 cm)]
1019445-J [3-3/4" (9,5 cm)]
1019445-K [4" (10,2 cm)]
1019445-L [1-1/2" (3,8 cm)]
1019445-M [1-1/4" (3,2 cm)]
Montant
1018661
1018663
Contrôle
**Vous devez spécifier les codes de la finition/couleur lors de la commande.
(Une sortie)
(Deux prises)
Sortie
1019447-A [1/4" (6 mm)]
1019447-B [1/2" (1,3 cm)]
1019447-C [3/4" (1,9 cm)]
Montant isolation
1019490-5-C Français-16 Kohler Co.
Page 35

1022408
Chauffe-eau en ligne
1012916
Écrous
avec vis
1032545
Logement
1012653
Adaptateur
94821
Joint torique
1012653
Adaptateur
94821
Joint torique
1012977
Adaptateur
94821
Joint torique
1018710
Chauffe-eau en T
1012916
Écrou avec vis
1011679
Joint
1012977
Adaptateur
94821
Joint torique
1011679
Joint
**Vous devez spécifier les codes de la finition/couleur lors de la commande.
Kohler Co. Français-17 1019490-5-C
Page 36

1023381
Clé
Étudier avec une grande
attention les décalcomanies et
les détails ci-après pour
l'identification des pièces de
rechange.
1013452**
Bague du cadran
1013453
Ressort
1020677
Joint
65157
Écrou
1013499
Logement
91639
Joint torique
1020678-A
Couvercle /circuit
Imprimé (avec clé)
1020678-C
Couvercle /circuit
imprimé (avec clé)
1020678-E
Couvercle /circuit
imprimé (avec clé)
1020678-N
Couvercle / circuit
Imprimé (avec clé)
1013497-A
Décalcomanie
1013497-C
Décalcomanie
1013497-E
Décalcomanie
91639
Joint
torique
91639
Joint
torique
91639
Joint
torique
1020678-B
Couvercle / circuit
imprimé (avec clé)
1020678-D
Couvercle /circuit
Imprimé (avec clé)
1020678-M
Couvercle / circuit
imprimé (avec clé)
1020678-P
Couvercle / circuit
imprimé (avec clé)
1013497-B
Décalcomanie
1013497-D
Décalcomanie
1013497-M
Décalcomanie
91639
Joint
torique
91639
Joint
torique
91639
Joint
torique
91639
1013497-N
Décalcomanie
**Vous devez spécifier les codes de la finition et/ou de la couleur quand vous passez votre commande.
Joint
torique
1013497-P
Décalcomanie
91639
Joint
torique
1019490-5-C Français-18 Kohler Co.
Page 37

Guía del usuario
Bañera de hidromasaje
Información importante
INSTRUCCIONES RELATIVAS AL RIESGO DE
INCENDIO, DESCARGA ELÉCTRICA O LESIONES
PERSONALES
LEA Y SIGA TODAS LAS INSTRUCCIONES
GUARDE ESTAS INSTRUCCIONES
ADVERTENCIA: Al usar aparatos eléctricos, siga siempre las precauciones básicas, incluyendo
las siguientes:
PELIGRO: Riesgo de lesiones personales. Para reducir el riesgo de lesiones, no permita que los
niños usen este producto sin la estricta supervisión en todo momento.
ADVERTENCIA: Riesgo de lesiones personales. Para evitar lesiones, tenga cuidado al entrar y
salir de la bañera de hidromasaje.
ADVERTENCIA: Riesgo de descarga eléctrica. No coloque aparatos eléctricos (como secador de
pelo, lámparas, teléfono, radio o televisión) a menos de 5’ (1,5 m) de esta bañera de hidromasaje.
ADVERTENCIA: El uso de alcohol, drogas o medicamentos puede aumentar enormemente el
riesgo de sufrir hipertermia fatal. La inmersión prolongada en agua caliente puede producir
hipertermia. La hipertermia ocurre cuando la temperatura interna del cuerpo alcanza un nivel
superior a la temperatura corporal normal de 98,6°F (37°C). Los síntomas de la hipertermia incluyen
el aumento de la temperatura corporal interna, mareos, letargo, somnolencia y desfallecimiento. Los
efectos de la hipertermia incluyen: (a) incapacidad para percibir calor, (b) incapacidad para
reconocer la necesidad de salir de la bañera, (c) inconsciencia de un peligro inminente, (d) daño al
feto en mujeres embarazadas, (e) inhabilidad física para salir de la bañera y (f) pérdida del
conocimiento con peligro de ahogarse.
ADVERTENCIA: Riesgo de hipertermia. Las personas bajo tratamiento médico o que padezcan de
alguna condición médica deben consultar con un médico antes de utilizar una bañera de
hidromasaje equipada con un calentador.
ADVERTENCIA: Riesgo de quemaduras. La temperatura del agua en la bañera no debe exceder
los 104°F (40°C).
El calentador mantendrá automáticamente la temperatura del agua mientras la bañera de hidromasaje esté en
funcionamiento, siempre y cuando la temperatura no sobrepase los 104°F (40°C). El calentador se apagará a
temperaturas superiores.
El compartimiento de cables tiene un terminal de conexión a tierra para el equipo. Para reducir el riesgo de
descarga eléctrica, este terminal se debe conectar a la conexión de tierra provista en el panel de suministro
eléctrico con un conductor del mismo tamaño que los conductores del circuito que alimentan esta bañera de
hidromasaje.
En el exterior de la bomba o control de esta unidad se incluye un conector de presión para permitir la
conexión de un conductor de puesta a tierra entre esta unidad y el metal expuesto en las proximidades, tal
como lo requieran las normas locales.
Kohler Co. Español-1 1019490-5-C
Page 38

Información importante (cont.)
Use esta bañera de hidromasaje únicamente con el fin para el que se ha fabricado, tal como se explica en esta
guía. No utilice accesorios que no estén recomendados por el fabricante.
No deje caer ni introduzca objetos en ninguna de las aberturas. Mantenga los objetos pequeños tales como
los juguetes y accesorios de baño fuera de la bañera de hidromasaje cuando esté en funcionamiento.
No permita que esta unidad funcione sin la tapa protectora (tapadera) en la conexión de succión.
La bañera de hidromasaje debe conectarse solamente a un circuito protegido con un interruptor de circuito
con pérdida a tierra (GFCI) o por un dispositivo de corriente residual (RCD). El instalador debe proveer el
interruptor de protección GFCI o RCD, cuyo funcionamiento debe probarse de manera rutinaria. Para probar
el interruptor de protección GFCI o RCD, oprima el botón de prueba (test). El interruptor de protección GFCI
o RCD debe interrumpir la alimentación eléctrica. Oprima el botón (reset) de restablecer la alimentación
eléctrica. Esto debe restablecer la alimentación eléctrica. Si el interruptor de protección GFCI o RCD no
funciona de este modo, significa que está averiado. Si el interruptor de protección GFCI o RCD, interrumpe
la alimentación eléctrica a la bañera sin haber oprimido el botón de prueba, significa que existe corriente a
tierra y la posibilidad de una descarga eléctrica. No utilice esta bañera de hidromasaje. Desconecte la bañera
de hidromasaje, y antes de usarla, haga que un representante de servicio autorizado solucione el problema.
Limpie el sistema de hidromasaje dos o más veces al mes, dependiendo del uso, tal como se describe en la
sección ″Limpieza del sistema″ de esta guía.
El uso constante de productos de higiene personal que contengan aceites puede dañar los componentes
plásticos de la bañera de hidromasaje. No utilice champús a base de productos vegetales ni aceites de baño.
La acción del hidromasaje puede hacer que una pequeña cantidad de líquidos para hacer burbujas, champú,
jabón o aceite de baño espume en exceso. Por esta razón, no utilice estos productos durante el
funcionamiento de la bañera de hidromasaje.
Gracias por elegir los productos Kohler
Gracias por elegir los productos Kohler. Su producto de Kohler Company refleja la verdadera pasión por el
diseño, la mano de obra, la artesanía y la innovación que forman parte de Kohler Company. Estamos seguros
que su confiabilidad y belleza excederán sus más altas expectativas, dándole satisfacción por años.
Toda la información que aparece en la guía está basada en la información más reciente disponible al
momento de publicación. En Kohler Company, nos esforzamos por alcanzar nuestra misión de mejorar el
nivel del buen vivir de quienes disfrutan de nuestros productos y servicios. Nos reservamos el derecho de
efectuar cambios en las características, embalaje o disponibilidad del producto en cualquier momento, sin
previo aviso.
Dedique unos minutos para leer esta guía. Preste especial atención a las instrucciones de cuidado y
limpieza.
Componentes
Su nueva bañera de hidromasaje está diseñada para estimular, vigorizar y dar energía a su cuerpo con una
terapia de hidromasaje reconfortante. La bañera de hidromasaje consta de los siguientes componentes:
Bañera - Actúa como un depósito de agua y es el lugar de acción del hidromasaje.
Teclado - El teclado, de fácil alcance, le permite encender y apagar la bomba y el calentador, así
como regular el flujo de agua a través de los jets.
Motor bomba - Provee potencia de velocidad variable y silenciosa para circular el agua y crear la
acción calmante del hidromasaje.
Jets ajustables - Colocados de manera que optimizan el efecto del hidromasaje, los jets le permiten
ajustar el flujo de aire y agua, así como controlar la dirección del flujo como usted lo desee.
1019490-5-C Español-2 Kohler Co.
Page 39

Componentes (cont.)
Calentador - Diseñado para ayudar a mantener automáticamente la temperatura del agua en hasta
104°F (40°C) para aumentar el placer de la experiencia del hidromasaje. El calentador se enciende
automáticamente cuando la bañera de hidromasaje está en funcionamiento y se apaga cuando el
motor bomba se apaga. El calentador se puede apagar con el teclado en cualquier momento
mientras la bomba esté funcionando.
Jets para el cuello y almohada - Los jets para el cuello, controlados con el teclado, entregan agua de
masaje a la parte posterior del cuello. La almohada ofrece un lugar cómodo para apoyar la cabeza
mientras se relaja. Para evitar que el agua salpique, un interruptor integral detiene la acción de los
jets para el cuello si se quita la almohada durante el funcionamiento.
Cumple con las normas de ADA - Cuando se instala con el asiento en el lado de la cabeza
Kohler Co. Español-3 1019490-5-C
Page 40

Modo de flujo Flexjet
Activa el modo seleccionado
Modo de jets para la espalda - Ajusta
la pulsación
Gire el anillo externo para
Barra indicadora - Muestra el caudal del
flujo de agua o velocidad de pulsación
Aumenta el flujo o la pulsación
Modo de jets para el cuello - Ajusta
la pulsación
entrar al modo deseado.
Encendido/apagado principal
Encendido/apagado del calentador
Teclado iluminado
Disminuye el flujo o la pulsación
Teclado
NOTA: La ilustración del teclado es ligeramente diferente del teclado que viene con su modelo. El modo
de jet para la espalda no viene con su modelo.
Los modos disponibles se iluminarán en azul. Los modos activos se iluminarán en verde.
Encendido/Apagado
principal
Anillo externo Gire el anillo externo al modo deseado. El modo seleccionado se encenderá de forma
OK Activa el modo deseado.
Modo de flujo
Flexjet
Flecha hacia
arriba
Barra indicadora Muestra el caudal del flujo de agua en el modo de flujo Flexjet. Muestra la velocidad de
Modo de jets
para el cuello
Flecha hacia
abajo
Calentador Se activa automáticamente cuando se selecciona el icono de encendido/apagado. Gire el
Enciende y apaga la bomba de la bañera de hidromasaje. Los iconos iluminados en azul
indican los modos/funciones disponibles. Los modos en funcionamiento se iluminarán en
verde.
intermitente en azul.
Gire el anillo externo para seleccionar este modo. Presione OK, luego oprima la flecha
hacia arriba o hacia abajo para aumentar o disminuir el flujo de agua del jet.
Aumenta el flujo de agua cuando el modo de flujo Flexjet está activado. Aumenta la
velocidad de pulsación cuando el modo de los jets para el cuello o la espalda está activo.
pulsación en el modo de jets para el cuello o la espalda.
Gire el anillo externo para seleccionar este modo. Presione OK, luego oprima la flecha
hacia arriba/abajo para aumentar o disminuir la acción de pulsación. Gire el anillo externo
al modo Flexjet, oprima OK para activar el modo, luego oprima la flecha hacia arriba o
hacia abajo en el teclado para aumentar o disminuir el flujo de agua a los jets para el
cuello y todos los demás modos activos.
Disminuye el flujo de agua cuando el modo de flujo Flexjet está activo. Disminuye la
velocidad de pulsación cuando el modo de los jets para el cuello o la espalda está activo.
anillo exterior hasta que el modo de calentador esté parpadeando, luego presione OK para
apagar el calentador. Vuelva a presionar OK para volver a encender el calentador.
1019490-5-C Español-4 Kohler Co.
Page 41

Llene de agua por lo menos 2" (5,1 cm)
arriba del jet más alto.
Gire el anillo
decorativo del jet hacia
la derecha para
disminuir el flujo.
Oriente las
boquillas de los
jets para dirigir el
flujo de agua en
la dirección
deseada.
Gire el anillo decorativo del jet hacia la
izquierda para aumentar el flujo.
Funcionamiento
NOTA: Si la bañera de hidromasaje no funciona correctamente, consulte la sección ″para resolver
problemas″ de esta guía antes de llamar a un representante de servicio calificado.
Gire la guarnición del jet totalmente hacia la izquierda. Coloque las boquillas de los jets de manera
que miren hacia abajo en la bañera.
AVISO: La temperatura del agua en la bañera no debe exceder los 104°F (40°C). El calentador mantendrá
automáticamente la temperatura del agua mientras la bañera de hidromasaje esté en funcionamiento,
siempre y cuando la temperatura no sobrepase los 104°F (40°C). El calentador se apagará a temperaturas
superiores.
Cierre el desagüe, luego llene la bañera de hidromasaje a un nivel de por lo menos 2″ (5,1 cm)
arriba del jet más alto. Pruebe la temperatura del agua con la mano para su confort y seguridad.
Entre con cuidado a la bañera.
Oprima el icono de encendido/apagado para encender la bomba de hidromasaje y el calentador. El
agua fluirá a un caudal medio.
Presione los iconos de las flechas hacia arriba/abajo para aumentar o disminuir el flujo de agua. La
barra indicadora mostrará el caudal de flujo de agua.
Ajuste los jets para obtener una mezcla óptima de aire/agua. Gire la guarnición del jet hacia la
derecha para reducir el flujo o hacia la izquierda para aumentarlo. Si desea, oriente las boquillas de
los jets para dirigir el flujo de agua y aprovechar al máximo la experiencia del hidromasaje.
Si desea, apague el calentador presionando el icono del calentador. Oprima el botón por segunda
vez para volver a encender el calentador.
Oprima el icono de encendido/apagado una segunda vez para apagar la bomba de hidromasaje y el
calentador.
NOTA: La bomba y el calentador se apagarán automáticamente tras 20 minutos de funcionamiento
continuo. Si desea, oprima el icono de encendido/apagado para volver a activar la bomba y el calentador.
Salga con cuidado de la bañera, luego abra el desagüe para vaciar la bañera de hidromasaje.
Jets para el cuello
NOTA: Antes de activar los jets del cuello, verifique que la funda esté bien colocada en la almohada y que
la almohada esté bien sujeta al cuerpo del jet para el cuello. Si la almohada no está instalada correctamente
los jets para el cuello no funcionarán. El icono del jet para el cuello y la barra indicadora en el teclado
parpadearán. Los jets para el cuello se reactivarán automáticamente cuando la almohada se instale
correctamente.
Kohler Co. Español-5 1019490-5-C
Page 42

Funcionamiento (cont.)
Gire el anillo exterior para seleccionar el modo de jets del cuello, luego oprima OK para activar los
jets para el cuello. La acción de pulsación de los jets para el cuello comenzará a velocidad media.
Presione la flecha hacia arriba o hacia abajo para ajustar la acción de pulsación.
Gire el anillo externo hasta que el modo de flujo parpadee y oprima OK. Oprima la flecha hacia
arriba o hacia abajo para ajustar el caudal de flujo de agua de los jets para el cuello.
Oprima ″OK″ mientras esté activo el modo de los jets para el cuello para así apagarlo.
NOTA: Para activar o desactivar funciones mientras los jets para el cuello estén en marcha, gire el anillo
externo hasta que la función deseada se ilumine intermitente y oprima ″OK″.
Cuidado y limpieza
Para obtener los mejores resultados, tenga presente lo siguiente al limpiar su producto KOHLER:
•
Siempre pruebe la solución de limpieza en un área oculta antes de aplicarla a toda la superficie.
•
Limpie con un trapo las superficies y enjuague completa e inmediatamente con agua después de
aplicar el limpiador. Enjuague y seque las superficies cercanas que se hayan rociado.
•
No deje por tiempo prolongado los limpiadores en las superficies.
•
Utilice una esponja o trapo suave y húmedo. Nunca utilice materiales abrasivos como cepillos o
estropajos de tallar para limpiar las superficies.
•
La técnica de limpieza ideal es enjuagar completamente y secar dando toques suaves el agua de la
superficie después de cada uso.
•
Utilice un cepillo de nylon suave en la superficie resistente al resbalamiento Safeguard
de utilizar un limpiador soluble en agua (que disuelva al 100% en el agua).
. Asegúrese
®
Para obtener información detallada de limpieza y los limpiadores a considerar, visite www.kohler.com/clean.
Para solicitar información sobre el cuidado y la limpieza, llame al 1-800-456-4537.
Limpieza del sistema
NOTA: Limpie el sistema de hidromasaje dos o más veces al mes, dependiendo del uso.
Gire los anillos decorativos de los jets totalmente hacia la derecha para eliminar la inducción de aire.
Llene la bañera con agua tibia hasta que sobrepase 2″ (5,1 cm) como mínimo por encima de los jets
más altos o deje agua en la bañera cuando termine de usarla.
Añada al agua 2 cucharaditas (10 ml) de detergente para lavaplatos automática que espume poco y
20 onzas (590 ml) de blanqueador para uso doméstico (5% - 6% hipoclorito sódico).
Haga funcionar la bañera de hidromasaje de5a10minutos. Luego, apague y vacíe la bañera.
Si lo desea, enjuague las superficies de la bañera con agua.
Enjuague las superficies de los jets, la grifería, las agarraderas y el desagüe y seque con un paño
suave.
Garantía
GARANTÍA LIMITADA DE UN AÑO
Se garantiza que los productos de plomería KOHLER están libres de defectos de material y mano de obra
por un año a partir de la fecha de instalación.
Kohler Co., a su criterio, reparará, reemplazará o realizará los ajustes pertinentes en los casos en que la
inspección realizada por Kohler Co. determine que dichos defectos ocurrieron durante el uso normal en el
transcurso de un (1) año a partir de la fecha de la instalación. Kohler Co. no se hace responsable de los
gastos de desinstalación o instalación. El uso de limpiadores de inodoro que se colocan dentro del tanque
anulará la garantía.
1019490-5-C Español-6 Kohler Co.
Page 43

Garantía (cont.)
Para obtener el servicio de garantía, comuníquese con Kohler Co. a través de su distribuidor, contratista de
plomería o distribuidor a través de Internet, o escriba directamente a: Kohler Co., Attn.: Customer Care
Center, 444 Highland Drive, Kohler, WI 53044, U.S.A. o llame al 1-800-4KOHLER (1-800-456-4537) desde los
Estados Unidos y Canadá, o al 001-877-680-1310 desde México.
TODA GARANTÍA IMPLÍCITA EN RELACIÓN A PRODUCTOS DE USO COMERCIAL, INCLUYENDO
LA COMERCIALIZACIÓN E IDONEIDAD DEL PRODUCTO PARA UN USO DETERMINADO, SE
LIMITA EXPRESAMENTE A LA DURACIÓN DE LA PRESENTE GARANTÍA. KOHLER CO. Y/O EL
VENDEDOR NO SE HACEN RESPONSABLES POR CONCEPTO DE DAÑOS PARTICULARES,
INCIDENTALES O INDIRECTOS. Algunos estados/provincias no permiten limitaciones en cuanto a la
duración de una garantía implícitaoalaexclusión o limitación de daños particulares, incidentales o
indirectos, por lo que estas limitaciones y exclusiones pueden no aplicar a su caso. Esta garantía le otorga
ciertos derechos legales específicos. Además, usted puede tener otros derechos que varían de estado a estado
y provincia a provincia.
El presente documento constituye la garantía exclusiva por escrito de Kohler Co.
Garantía
Kohler Co. garantiza que los componentes de hierro fundido de productos fabricados después del 10 de
febrero del 2000 están libres de defectos de material o mano de obra durante el uso residencial normal,
mientras el comprador consumidor original sea el propietario de la casa. La reducción del brillo, las
raspaduras, las manchas y el ataque alcalino que puedan aparecer con el tiempo como consecuencia del uso,
prácticas de limpieza o condiciones atmosféricas o del agua, no serán considerados como defectos de
fabricación, sino como señal de desgaste normal. Esta garantía aplica sólo a los productos de hierro fundido
KOHLER instalados en los Estados Unidos de América, Canadá y México (Norteamérica).
En caso de que se presente algún defecto durante el uso residencial normal, Kohler Co., a su criterio,
reparará, reemplazará o realizará los ajustes pertinentes. Los daños causados por accidentes, uso indebido o
abuso no están cubiertos en la presente garantía. El cuidado y la limpieza indebidos anularán la presente
garantía. Al presentar las reclamaciones de garantía a Kohler Co., es necesario incluir la prueba de compra
(recibo original). Kohler Co. no se hace responsable por los gastos de mano de obra, instalación u otros
gastos incidentales o indirectos. En ningún caso la responsabilidad de Kohler Co. excederá el precio de
compra del producto.
En caso de que el producto de hierro fundido sea utilizado comercialmente o instalado fuera del territorio de
Norteamérica, Kohler Co. garantiza la carencia de defectos de material o mano de obra por un (1) año, a
partir de la fecha de instalación del producto, estando en efecto todas las demás condiciones de la presente
garantía, excepto la duración. Todos los demás componentes, excepto el hierro fundido esmaltado, llevan la
garantía limitada de un año de Kohler Co., a menos que se especifique lo contrario.
Si usted considera que tiene una reclamación en virtud de la garantía, comuníquese con Kohler Co., ya sea a
través de su distribuidor, contratista de plomería o distribuidor a través de Internet, o escriba a la siguiente
dirección: Kohler Co., Attn.: Customer Service Department, 444 Highland Drive, Kohler, WI 53044, USA. Por
favor, asegúrese de proporcionar toda la información pertinente a su reclamación, incluyendo una
descripción completa del problema, producto, número de modelo, color, acabado, fecha y lugar de compra
del producto. También incluya el recibo de compra original. Para información adicional, o para obtener el
nombre y dirección del lugar de reparación y servicio más cercano a usted, llame al 1-800-4-KOHLER desde
los Estados Unidos, al 1-800-964-5590 desde Canadá y al 001-877-680-1310 desde México.
Kohler Co. y/o el vendedor proveen esta garantía que sustituye todas las demás garantías, expresas o
implícitas, incluyendo, entre otras, las garantías implícitas de comercialización e idoneidad para un
propósito en particular. Kohler Co. y/o el vendedor no se hacen responsables por concepto de daños
particulares, incidentales o indirectos.
Algunos estados/provincias no permiten limitaciones en cuanto a la duración de una garantía implícita o a
la exclusión o limitación de daños particulares, incidentales o indirectos, por lo que estas limitaciones y
exclusiones pueden no aplicar a su caso. La presente garantía otorga al consumidor ciertos derechos legales
específicos. Además, usted puede tener otros derechos que varían de estado a estado y provincia a provincia.
Esta garantía está destinada únicamente para el comprador consumidor original y excluye todo daño al
producto como resultado de errores de instalación, abuso del producto o uso indebido del mismo, bien sea
por parte de un contratista, compañía de servicios o el consumidor mismo.
Kohler Co. Español-7 1019490-5-C
Page 44

Garantía (cont.)
El presente documento constituye la garantía exclusiva por escrito de Kohler Co.
Garantía
KOHLER CO.
Al adquirir el producto, se recomienda verificar que todos los accesorios y componentes estén completos en
la caja.
Kohler Co. garantiza que el material y la mano de obra de este producto están libres de defectos, por un (1)
año, a partir de la fecha de compra que aparece en la factura o recibo.
1. Kohler Co. prestará servicio únicamente a los productos comercializados a través de sus distribuidores
autorizados.
2. A fin de obtener el servicio de garantía, favor de presentar la factura de compra y la garantía
correspondiente.
3. Kohler Co., a través de sus distribuidores autorizados, se compromete a reparar el producto defectuoso o a
reemplazarlo por uno nuevo o equivalente (en caso de que el producto esté descontinuado) cuando no sea
posible la reparación, sin ningún cargo al consumidor.
4. El tiempo de reparación no excederá de seis (6) semanas, a partir de la fecha de recepción del producto.
5. Se recomienda al consumidor que conserve el recibo o factura de compra como protección adicional, pues
el mismo puede sustituir a la garantía, en caso de que exista discrepancia en cuanto a la validez de la misma.
EXCEPCIONES Y RESTRICCIONES
La garantía no tendrá validez en los siguientes casos:
1. Cuando el producto no se haya utilizado conforme a las instrucciones de uso y funcionamiento incluidas
en el manual del usuario o en las instrucciones de instalación y cuando no se hayan observado las
recomendaciones y advertencias allí contenidas.
2. Cuando el producto se haya modificado o desmantelado parcial o totalmente; o manipulado de manera
negligente y, como consecuencia, haya sufrido daños atribuibles al consumidor, persona o herrajes no
autorizados por Kohler Co.
3. Esta garantía no cubre los daños que resulten de desastres naturales, tales como incendios o casos de
fuerza mayor, incluyendo inundaciones, terremotos, tormentas eléctricas, etc. Para obtener una lista de
distribuidores cerca de usted y así hacer valer sus derechos bajo esta garantía, llame al 001-877-680-1310.
KOHLER CO., KOHLER, WI 53044 U.S.A.
IMPORTADOR:
INTERNACIONAL DE CERÁMICA, S.A.B. DE C.V.
AV. CARLOS PACHECO NO. 7200
CHIHUAHUA, CHIH., MÉXICO C.P. 31060
TEL: 52 (14) 29-11-11
1019490-5-C Español-8 Kohler Co.
Page 45

Extraiga los jets
Vuelva a instalar los jets
Inserte el gancho de la herramienta tal como
se ilustra y saque el jet del alojamiento. Al
realizar este paso el jet debe estar orientado
hacia arriba.
Alojamiento
Revise y lubrique
el arosello.
Deslice el arosello
en el primer reborde
del jet.
Inserte el jet en el alojamiento, empuje y gire el jet
levemente hasta que encaje en su lugar.
Procedimiento para resolver problemas
AVISO: Esta sección es sólo para ayuda general. Un representante de servicio autorizado de Kohler o un
electricista calificado debe resolver todos los problemas eléctricos. Para obtener servicio cubierto por la
garantía, póngase en contacto con el vendedor o el distribuidor mayorista.
Extraiga los jets
Coloque la boquilla de bola del jet hacia arriba. Esto asegurará que la herramienta para jets no se
resbale.
Coloque la herramienta para el jet (provista) con el gancho hacia arriba.
Inserte la herramienta para jet en la abertura del jet y enganche la parte superior interna en la
boquilla.
Coloque su dedo pulgar contra la pared de la bañera mientras agarra con firmeza la herramienta
para jet.
Jale uniformemente la herramienta para jet hasta que el montaje del jet salga del alojamiento. Tenga
cuidado de no perder el arosello (O-ring).
Vuelva a instalar los jets
NOTA: Para permitir que el jet gire fácilmente y funcione correctamente, el arosello (O-ring) debe estar: (1)
bien colocado, (2) lubricado y (3) en buenas condiciones.
Instale el arosello (O-ring) en el primer reborde del jet.
Utilice el paquete del tubo de silicona (provisto) para lubricar el arosello con el fin de evitar un
funcionamiento ruidoso del jet.
Inserte con cuidado el jet en el alojamiento, luego empuje levemente y gire el jet hasta que encaje en
su lugar. No fuerce el jet.
Verifique que el jet esté instalado correctamente. El jet debe girar sin problemas en ambos sentidos.
Retire y vuelva a instalar, si es necesario.
Kohler Co. Español-9 1019490-5-C
Page 46

Procedimiento para resolver problemas (cont.)
Síntomas Causas probables Acción recomendada
1. El teclado no se
ilumina cuando se
oprime el botón de
encendido o se hace
girar el anillo
externo.
2. El motor se enciende,
pero no todos los jets
funcionan.
3. El teclado está
iluminado, pero no
responde a los
botones o anillo
externo.
4. Al encender la
unidad, la barra
indicadora del
teclado continúa en
modo de búsqueda.
5. El teclado está
iluminado pero la
bomba no se
enciende.
6. El motor funciona
pero la bomba no
hace el cebado (se
produce cavitación).
7. La bomba se detiene
antes de funcionar
durante 18 minutos.
8. La bomba no se
apaga
automáticamente
después de 22
minutos.
A. El control no tiene alimentación
eléctrica.
B. El interruptor GFCI o RCD se ha
disparado.
C. El arnés de cables del teclado al
control está suelto, desconectado
o dañado.
D. El teclado no funciona. D. Reemplace el teclado.
E. El control no funciona. E. Reemplace el control.
A. El jet está cerrado. A. Gire la guarnición del jet hacia la
B. El jet no está instalado
correctamente.
C. Los jets están obstruidos. C. Elimine la obstrucción.
A. El programa del control está
bloqueado.
B. El arnés de cables del teclado al
control está suelto, desconectado
o dañado.
C. El teclado no funciona. C. Reemplace el teclado.
D. El control no funciona. D. Reemplace el control.
A. El programa del control está
bloqueado.
B. El arnés de cables del teclado al
control está suelto, desconectado
o dañado.
C. El teclado no funciona. C. Reemplace el teclado.
D. El control no funciona. D. Reemplace el control.
A. El cable eléctrico de la bomba al
control está suelto, desconectado
o dañado.
B. La bomba no funciona. B. Reemplace la bomba.
C. El control no funciona. C. Reemplace el control.
A. La bomba se ha acuñado
demasiado.
B. Pequeña fuga de aire en la
entrada de la bomba.
C. El motor/bomba no funciona. C. Reemplace el motor/bomba.
D. El control no funciona. D. Reemplace el control.
A. El interruptor GFCI o RCD se ha
disparado.
B. La succión está obstruida. B. Elimine la obstrucción.
C. Los jets están obstruidos. C. Elimine la obstrucción.
D. El motor se ha sobrecalentado,
activando el dispositivo de
protección.
A. El temporizador de 20 minutos
se ha desactivado
inadvertidamente.
A. Verifique el cableado y conecte el
suministro eléctrico.
B. Oprima el botón de restablecer el
interruptor GFCI o RCD.
C. Revise que los cables estén
correctamente conectados. Reemplace el
arnés de cables de ser necesario.
izquierda para abrirlo.
B. Vuelva a instalar el jet; revise que el
arosello (O-ring) no esté dañado.
A. Oprima el botón de restablecer el
interruptor GFCI o RCD.
B. Revise que los cables estén
correctamente conectados. Reemplace el
arnés de cables de ser necesario.
A. Oprima el botón de restablecer el
interruptor GFCI o RCD.
B. Revise que los cables estén
correctamente conectados. Reemplace el
arnés de cables de ser necesario.
Revise que los cables estén
A.
correctamente conectados.
A. Baje la bomba/control al nivel del
subpiso.
B. Apriete firmemente la(s) tuerca(s) del
lado de admisión de la bomba.
A. Identifique la causa de la falla y corrija.
Oprima el botón de restablecer el
interruptor GFCI o RCD.
D. Verifique que no haya obstrucciones en
la succión y/o jets. Elimine la
obstrucción y deje enfriar el motor.
A. Consulte el manual de mantenimiento.
1019490-5-C Español-10 Kohler Co.
Page 47

Procedimiento para resolver problemas (cont.)
Síntomas Causas probables Acción recomendada
9. La bomba no se
A. El teclado no funciona. A. Reemplace el teclado.
apaga cuando se
oprime el botón de
encendido/apagado
B. El control no funciona. B. Reemplace el control.
en el teclado.
10. La bomba funciona
A. El motor/bomba no funciona. A. Reemplace el motor/bomba.
pero la opción de
velocidad variable no
B. El control no funciona. B. Reemplace el control.
funciona.
11. El agua de la bañera
se enfría mientras la
bomba está
funcionando.
A. La temperatura del agua
sobrepasa los 104°F (40°C).
B. El botón del calentador está
apagado en el teclado.
C. El cable del calentador al control
está suelto, desconectado o
A. Deje enfriar el agua de la bañera.
B. Encienda el calentador.
C. Revise que los cables estén
correctamente conectados.
dañado.
D. El calentador no funciona. D. Reemplace el calentador.
E. El control no funciona. E. Reemplace el control.
12. Funcionamiento
ruidoso.
A. Las cintas metálicas de la bomba
no se han cortado.
B. El arosello (O-ring) del jet está
mal colocado o seco (ruidoso).
A. Corte las cintas metálicas con unas
tijeras para chapa.
B. Extraiga el jet, reemplace y lubrique el
arosello (O-ring); vuelva a instalar el
jet.
Control remoto
Síntomas Causas probables Acción recomendada
1. El control remoto no
funciona.
A. Pilas mal instaladas o
descargadas.
B. La antena del arnés de cables
A. Reemplace las pilas.
B. Reemplace el arnés de cables.
está dañada.
C. El control remoto no se ha
programado correctamente.
C. Consulte la guía del usuario o el
manual de mantenimiento.
D. El control remoto no funciona. D. Reemplace el control remoto.
E. El control no funciona. E. Reemplace el control.
Sistema de jets para la espalda
Kohler Co. Español-11 1019490-5-C
Page 48

Procedimiento para resolver problemas (cont.)
Síntomas Causas probables Acción recomendada
1. Los jets para la espalda
no funcionan.
2. Los jets para la espalda
no pulsan.
A. La bomba de la bañera de
hidromasaje no funciona.
B. La válvula de mariposa de los
jets para la espalda no se abre.
C. No hay suficiente agua en la
bañera de hidromasaje.
D. El interruptor del accionador no
funciona.
E. No hay corriente eléctrica desde
el motor bomba al control.
F. El tubo del jet para la espalda
está obstruido.
G. El cable que conecta el
interruptor al control está
desconectado.
A. La caja de pulsación no
funciona.
B. El interruptor no funciona. B. Reemplace el interruptor. Consulte
C. El cable que conecta el
interruptor al control está
desconectado.
A. Encienda la bomba.
B. Verifique que no haya conexiones o
cables sueltos desde la caja de
pulsación de los jets para la
espalda hasta el control. Reemplace
el control o la caja de pulsación de
los jets para la espalda de ser
necesario. Consulte al
distribuidor/instalador.
C. Llene la bañera de hidromasaje
hasta que se cubran los sensores
del nivel de agua.
D. Reemplace el interruptor del
accionador. Consulte al
distribuidor/instalador.
E. Verifique que no haya conexiones o
cables sueltos desde el motor
bomba al control. Consulte al
distribuidor/instalador.
F. Elimine la obstrucción.
G. Vuelva a conectar o reemplace los
cables del interruptor que emplean
un enchufe modular. Consulte al
distribuidor/instalador.
A. Verifique que no haya conexiones o
cables sueltos desde la caja de
pulsación hasta el control.
Reemplace la caja de pulsación o el
control de ser necesario. Consulte
al distribuidor/instalador.
al distribuidor/instalador.
C. Vuelva a conectar o reemplace los
cables del interruptor que emplean
un enchufe modular. Consulte al
distribuidor/instalador.
Sistema de jets para el cuello
Síntomas Causas probables Acción recomendada
1. El teclado no responde
cuando el modo de los
jets para el cuello está
seleccionado.
2. La bomba funciona pero
los jets para el cuello no
se encienden. La barra
indicadora del teclado
está parpadeando.
1019490-5-C Español-12 Kohler Co.
A. El teclado no funciona. A. Reemplace el teclado.
A. La almohada no está instalada. A. Asegúrese de que la almohada esté
B. El interruptor de láminas no
funciona.
C. El arnés de cables del jet para el
cuello al control está suelto,
desconectado o dañado.
correctamente colocada al cuerpo
del jet para el cuello.
B. Revise los cables del interruptor de
láminas y reemplácelos si es
necesario.
C. Revise que los cables estén
correctamente conectados.
Reemplace el arnés de cables de ser
necesario.
Page 49

Procedimiento para resolver problemas (cont.)
Síntomas Causas probables Acción recomendada
3. La bomba funciona pero
los jets para el cuello no
se encienden. La barra
indicadora del teclado NO
está parpadeando.
A. La tubería de los jets para el
cuello está obstruida.
B. El arnés de cables del jet para el
cuello al control está suelto,
desconectado o dañado.
A. Desconecte las mangueras de los
jets para el cuello y elimine la
obstrucción.
B. Revise que los cables estén
correctamente conectados.
Reemplace el arnés de cables de ser
necesario.
C. La válvula de mariposa no
C. Reemplace la válvula de mariposa.
funciona.
D. El control no funciona. D. Reemplace el control.
4. El agua fluye por los jets
para el cuello, pero éstos
no pulsan.
A. El arnés de cables que existe
entre la caja de pulsación del jet
para el cuello y el control está
suelto, desconectado o dañado.
B. La caja de pulsación no
A. Revise que los cables estén
correctamente conectados.
Reemplace el arnés de cables de ser
necesario.
B. Reemplace la caja de pulsación.
funciona.
C. El control no funciona. C. Reemplace el control.
Kohler Co. Español-13 1019490-5-C
Page 50

*Nota: Todos los tubos son de 1" a menos
que se indique lo contrario.
Tubo de 1-1/2"
94268
Reductor
Calentador en línea
1015007
Arnés de
cables
**Se debe especificar el código del acabado/color con el pedido.
Piezas de repuesto
1019490-5-C Español-14 Kohler Co.
Page 51

(Curva)
94496
94497 (Plano)
Kit de
almohada
94726-A
94726-B
Tapa
(Blanco)
(Negro
93823
Tuerca
93948-A1
93948-B1
93948-C1
93948-D1
93948-E1
Manguera
[8-3/8" (21,3 cm)]
[9-7/8" (25,1 cm)]
[6-7/8" (17,5 cm)]
[6" (15,2 cm)]
[4-5/8" (11,7 cm)]
94275-A
94275-B (K-812)
Válvula de mariposa
C
1016466
Motor
1019439
Sensor
93848
Codo
1016534
1016536
1016535
Montaje de la válvula del cuello
(Puertos hacia la izquierda)
(Puertos hacia la derecha)
(Modelos K-1339, K-1375, K-1418, K-1457)
63149
Tornillo
93931
Tornillo
93590-A
Distribuidor
93542
Empaque
96956
Mariposa
1111726
Tornillo
93511**
Tapa
Herrajes para la válvula del cuello
en cuerpo de hierro fundido
94387-A
94387-B
Placa
63270
Arandela
[6" (15,2 cm)]
[4-3/8" (11,1 cm)]
60170
Tuerca
Puerto
1018965
Adaptador
1080775
T
91820
Manga
1000054
Tornillo
94318-A2
94318-B2
94318-C2
94318-D2
94318-E2
94318-F2
94318-G2
Manguera
[16-1/2" (41,9 cm)]
[15-1/2" (39,4 cm)]
[13-1/2" (34,3 cm)]
[7-1/2" (19,1 cm)]
[5-1/2" (14 cm)]
[18-1/4" (46,4 cm)]
[10-1/2" (26,7 cm)]
C
Cuello en cuerpo acrílico
Herrajes de la válvula
95045
Tornillo
94377
94495 (Plano)
Almohada
90153
Contratuerca
64212
Arandela
60982
Tornillo
91819
Ojal
(Curva)
91819
Ojal
94821
Arosello
**Se debe especificar el código del acabado/color con el pedido.
91820
Manga
Kohler Co. Español-15 1019490-5-C
Page 52

1003065
Herramienta para extraer
la brida de succión
65054**
Tornillo
93836 (1/2")
93837 (3/4")
93838 (1")
93839 (1-1/4")
94853 (1-1/2")
Tubo (con acopladores)
96708
Brida
65226**
Tapón de la
tapa de succión
73518
Tapón
96895**
(Acabados de color)
65061**
(Acabados metálicos)
Tapa
91967
Válvula
de retención
93685
Alojamiento
(Acrílico y fibra de vidrio)
65886
(Hierro fundido)
60050
Empaque
34353
Arosello
30739
Herramienta
del jet
1086350
Llave de extracción
de bridas
67429
Brida
1045715-P
Paquete de
lubricante de
silicona
67665
Tapón
67889
Alojamiento del jet
65885 (Acrílico y fibra de vidrio)
67668 (Hierro fundido)
Empaque
Un solo jet para bañeras de
hidromasaje con 5 o menos jets
88532**
(Acabados de color)
88531**
(Acabados metálicos)
Jet
Un solo jet para bañeras de
hidromasaje con 6 o más jets
88530**
(Acabados de color)
88529**
(Acabados metálicos)
Jet
**Se debe especificar el código del acabado/color con el pedido.
1019490-5-C Español-16 Kohler Co.
Page 53

67065
Lengüeta de
conexión a tierra
61845-K
Cable de cobre
para puesta a tierra
1080775
T de la bomba
61776
Arandela de fijación
60320
Tornillo
94821
Arosello
94821
Arosello
1080774
Montaje
de unión
93892-A
Caja eléctrica
60320
Tornillo
93893
Tapa
1033678
Tornillo
Al calentador en T
61776
Arandela de fijación
90153
Contratuerca
67065
Lengüeta de
conexión a tierra
93003
Protector
contra tirones
90154
Contratuerca
1018964
Soporte
1019432
Perno de
cabeza de hongo
1019719
Conector
1012855
Tuerca
1016957
Bomba
1010676
Tapa
1010677
Tornillo
94821
Arosello
Al calentador en línea
1010548
Helicoide
1016958
Motor
1010673
Sello
1016960
Impulsor
1010675
Arosello
1019444-A [3/4" (1,9 cm)]
1019444-B [1-3/4" (4,4 cm)]
1019444-C [2" (5,1 cm)]
1019444-D [1-1/2" (3,8 cm)]
1019444-E [1" (2,5 cm)]
1019444-F [1-1/4" (3,2 cm)]
1019444-G [2-1/4" (5,7 cm)]
1019444-H [2-1/2" (6,4 cm)]
1019444-J [2-3/4" (7 cm)]
1019444-K [3" (7,6 cm)]
1019444-L [1/2" (1,3 cm)]
1019444-M [1/4" (6 mm)]
Espaciador
1019445-A [1-3/4" (4,4 cm)]
1019445-B [2-3/4" (7 cm)]
1019445-C [3" (7,6 cm)]
1019445-D [2-1/2" (6,4 cm)]
1019445-E [2" (5,1 cm)]
1019445-F [2-1/4" (5,7 cm)]
1019445-G [3-1/4" (8,3 cm)]
1019445-H [3-1/2" (8,9 cm)]
1019445-J [3-3/4" (9,5 cm)]
1019445-K [4" (10,2 cm)]
1019445-L [1-1/2" (3,8 cm)]
1019445-M [1-1/4" (3,2 cm)]
Varilla roscada
1018661
1018663
Control
**Se debe especificar el código del acabado/color con el pedido.
(Un tomacorriente)
(Dos tomacorrientes)
Tomacorriente
1019447-A [1/4" (6 mm)]
1019447-B [1/2" (1,3 cm)]
1019447-C [3/4" (1,9 cm)]
Montura aislante
Kohler Co. Español-17 1019490-5-C
Page 54

1022408
Calentador en línea
1012916
Tuerca con
tornillos
1032545
Alojamiento
1012653
Adaptador
94821
Arosello
1012653
Adaptador
1012977
Adaptador
94821
Arosello
94821
Arosello
1018710
Calentador en T
1012916
Tuerca con
tornillos
1011679
Empaque
1012977
Adaptador
94821
Arosello
1011679
Empaque
**Se debe especificar el código del acabado/color con el pedido.
1019490-5-C Español-18 Kohler Co.
Page 55

1023381
Llave
Revise detenidamente el detalle
de la calcomanía y de la tapa que
se presenta abajo para identificar
correctamente las piezas de
repuesto.
1013452**
Disco decorativo
1013453
Resorte
1020677
Empaque
65157
Tuerca
1013499
Alojamiento
91639
Arosello
1020678-A
Tapa/placa de
circuitos (con llave)
1020678-C
Tapa/placa de
circuitos (con llave)
1020678-E
Tapa/placa de
circuitos (con llave)
1020678-N
Tapa/placa de
circuitos (con llave)
1013497-A
Calcomanía
1013497-C
Calcomanía
1013497-E
Calcomanía
91639
Arosello
91639
Arosello
91639
Arosello
1020678-B
Tapa/placa de
circuitos (con llave)
1020678-D
Tapa/placa de
circuitos (con llave)
1020678-M
Tapa/placa de
circuitos (con llave)
1020678-P
Tapa/placa de
circuitos (con llave)
1013497-B
Calcomanía
1013497-D
Calcomanía
1013497-M
Calcomanía
91639
Arosello
91639
Arosello
91639
Arosello
91639
1013497-N
Calcomanía
**Se debe especificar el código del acabado/color con el pedido.
Arosello
1013497-P
Calcomanía
91639
Arosello
Kohler Co. Español-19 1019490-5-C
Page 56

USA/Canada: 1-800-4KOHLER
México: 001-877-680-1310
kohler.com
©2009 Kohler Co.
1019490-5-C
 Loading...