

Page 1

Installation and Care Guide
DTV II Conversion to DTV+
Français, page ″Français-1″
Español, página ″Español-1″
1256292-2-B
Page 2
IMPORTANT INSTRUCTIONS
WARNING: When using electrical products, basic
precautions should always be followed, including the
following:
WARNING: Risk of electric shock. Disconnect power before
servicing.
WARNING: Risk of injury or property damage. Please read
all instructions thoroughly before beginning installation.
NOTICE: Follow all plumbing, electrical, and building codes.
Before Operating the System For the First Time:
Download and install the latest software. This may take an hour or
more to complete based on system configuration and internet
connection speed. Do not disconnect the power from the controller
during software download and installation.
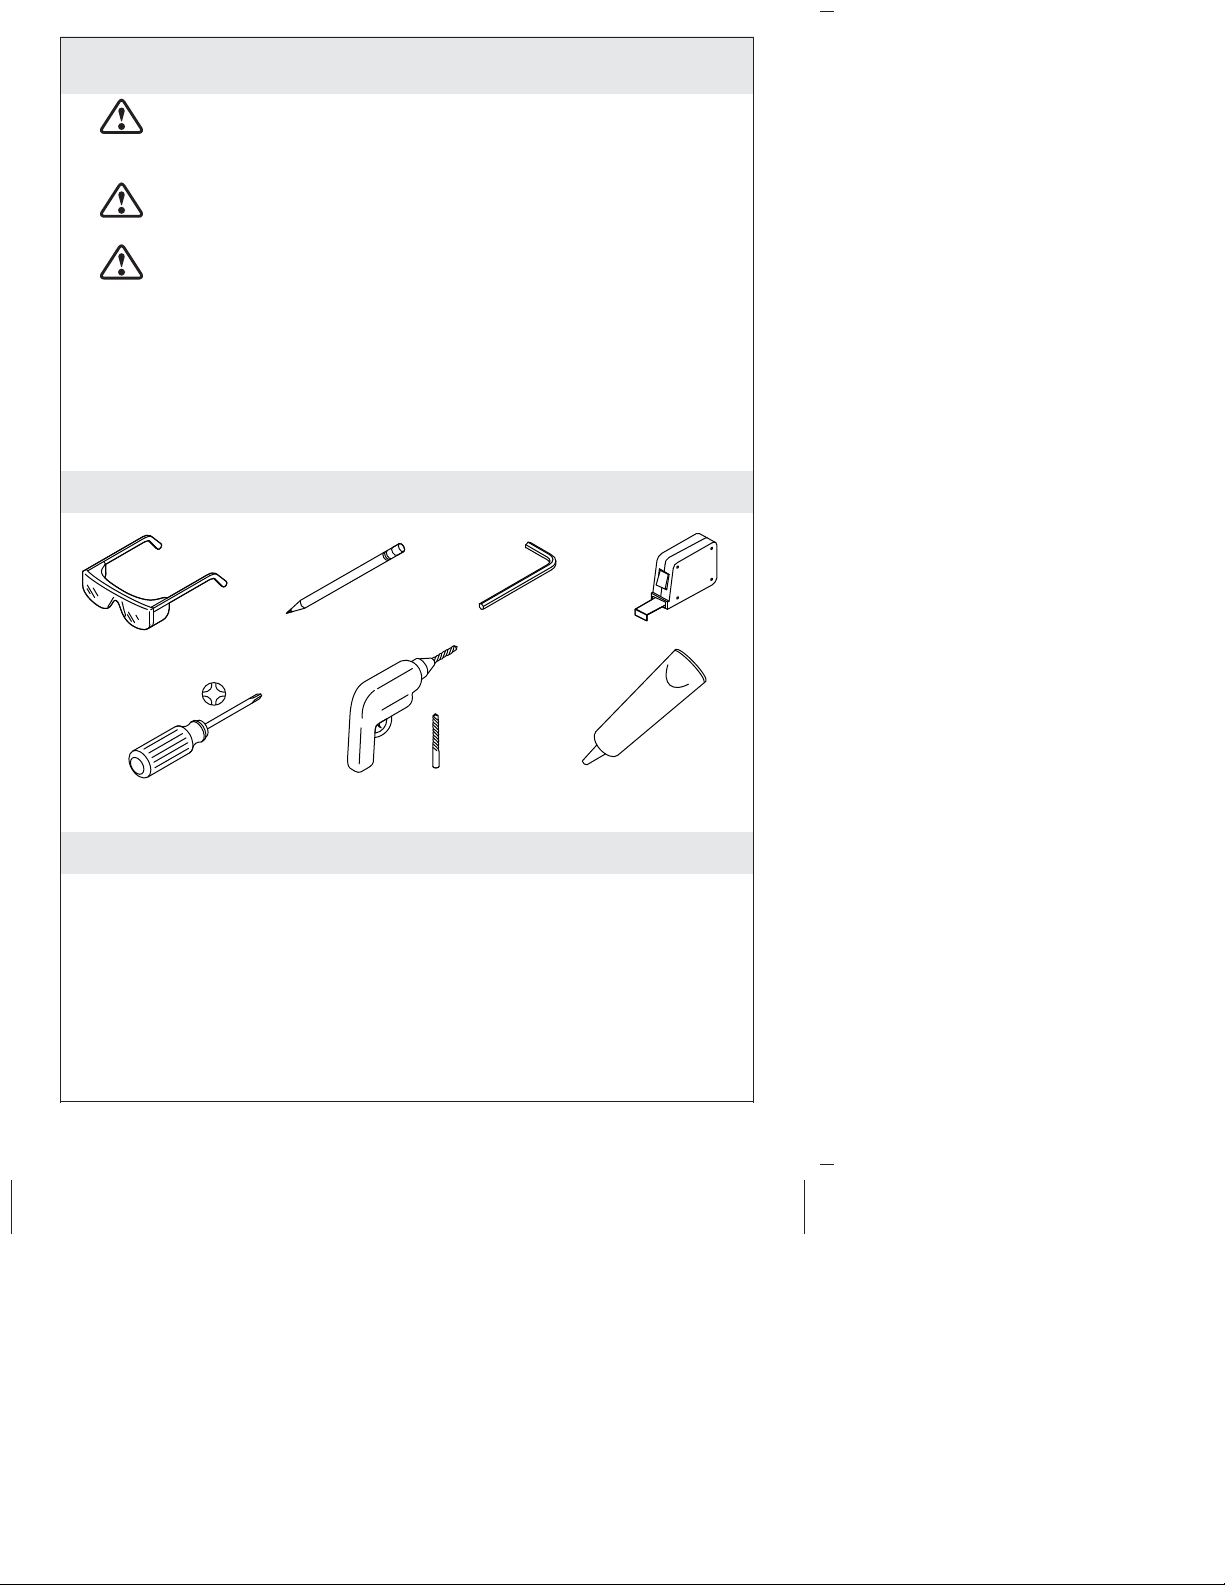
Tools and Materials
3/32"
Silicone Sealant1/4"
Before You Begin
CAUTION: Risk of product damage: Disconnect the power from
all components before beginning this installation.
NOTICE: An existing DTV II system should already be in place to
complete this installation.
NOTICE: The K-99695 system controller and the K-99693 digital
interface are required to complete this installation.
1256292-2-B 2 Kohler Co.
Page 3
Before You Begin (cont.)
Observe all local plumbing, building, and electrical codes.
Read these instructions and determine all required components
along with their installation locations before beginning this
installation.
Kohler Co. 3 1256292-2-B
Page 4
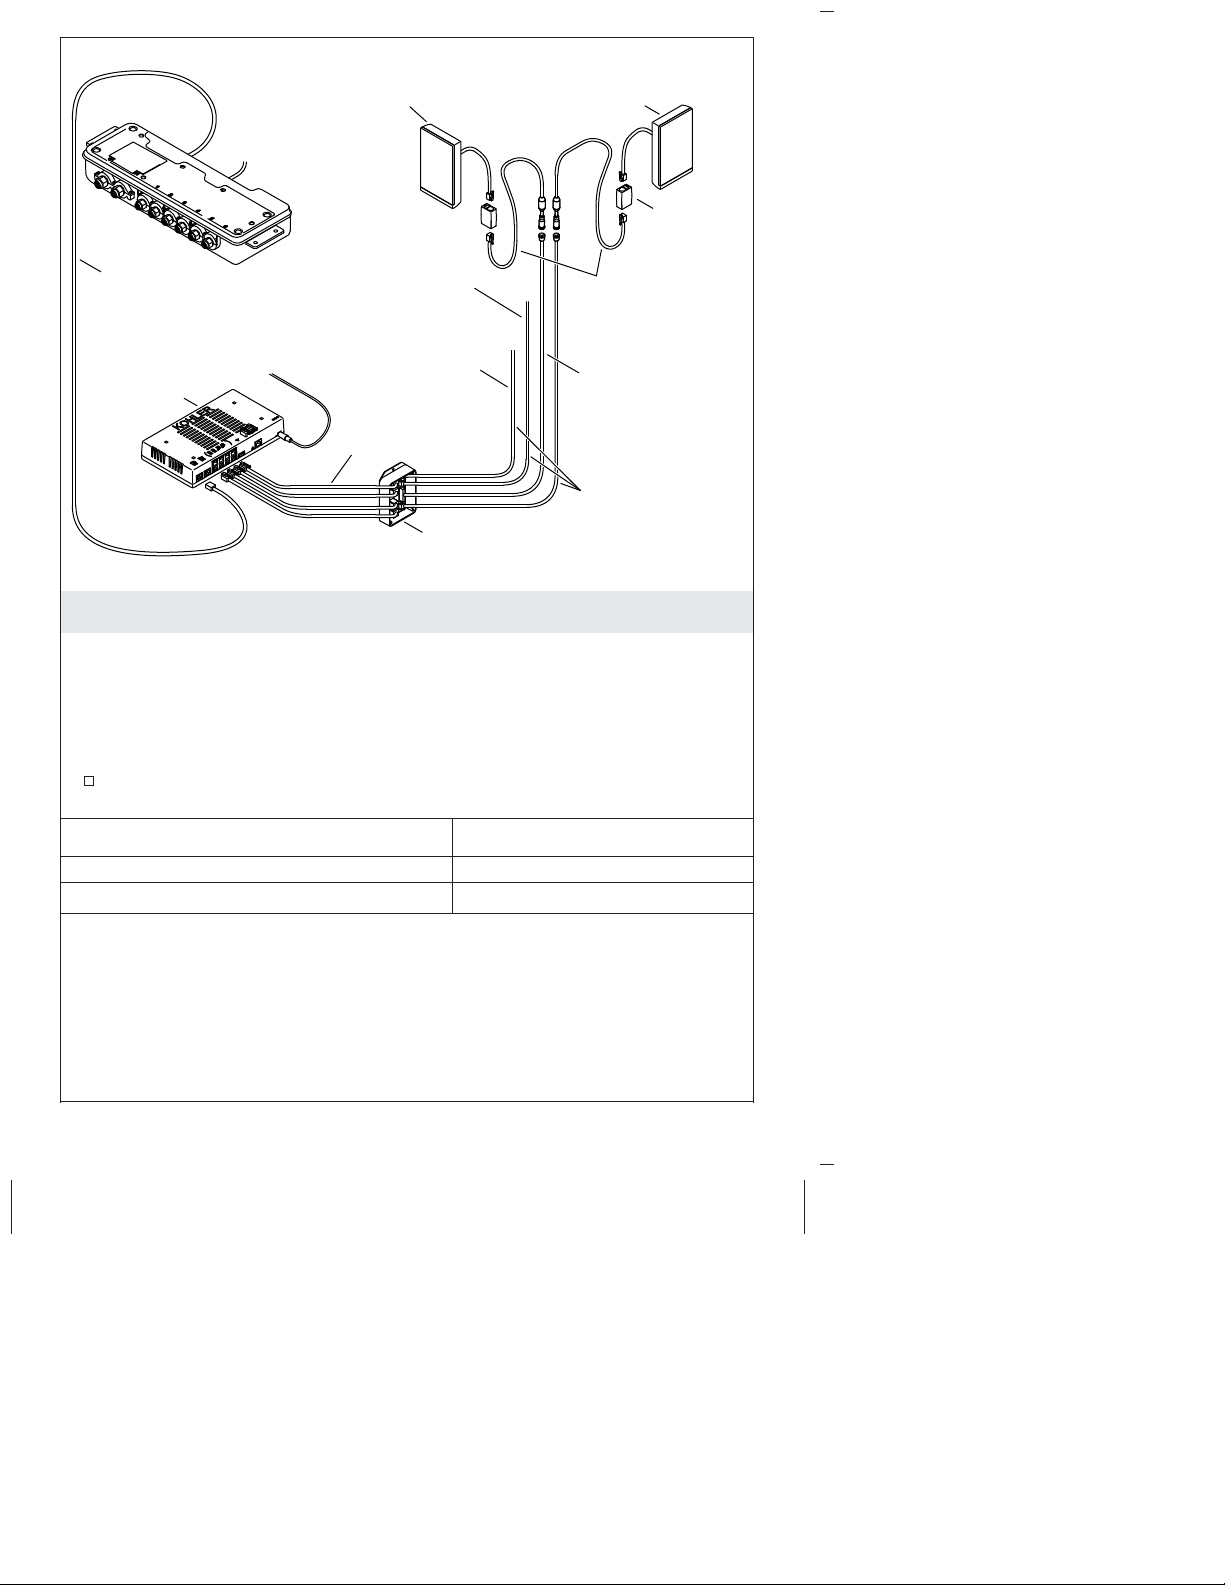
Accessory
Interface (Optional)
18" (457 mm)
Retrofit Cable
30' (9.1 m)
8-pin Cable
30' (9.1 m)
4-pin Cable
Adapter
30' (9.1 m)
Data Cable
Controller
To
AC Power
To
AC Power
Master
Interface
To Steam
Generator
To Rain
Panel
Controller
6' (1.8 m)
Data Cables
1. Plan the System
NOTE: The controller powers the interface(s) and controls the
digital valve(s) and other system components.
Coupler
NOTE: The data cable connecting the adapter to the controller is 6’
(1.8 m) long. The adapter installation location must be within 5’ (1.5
m) of the controller.
Refer to the installation guides packed with each product for
specific installation needs.
Retrofit Cable Length 18″ (457 mm)
Data Cable Length 6’ (1.8 m)
Valve Cable Length 30’ (9.1 m)
1256292-2-B 4 Kohler Co.
Page 5
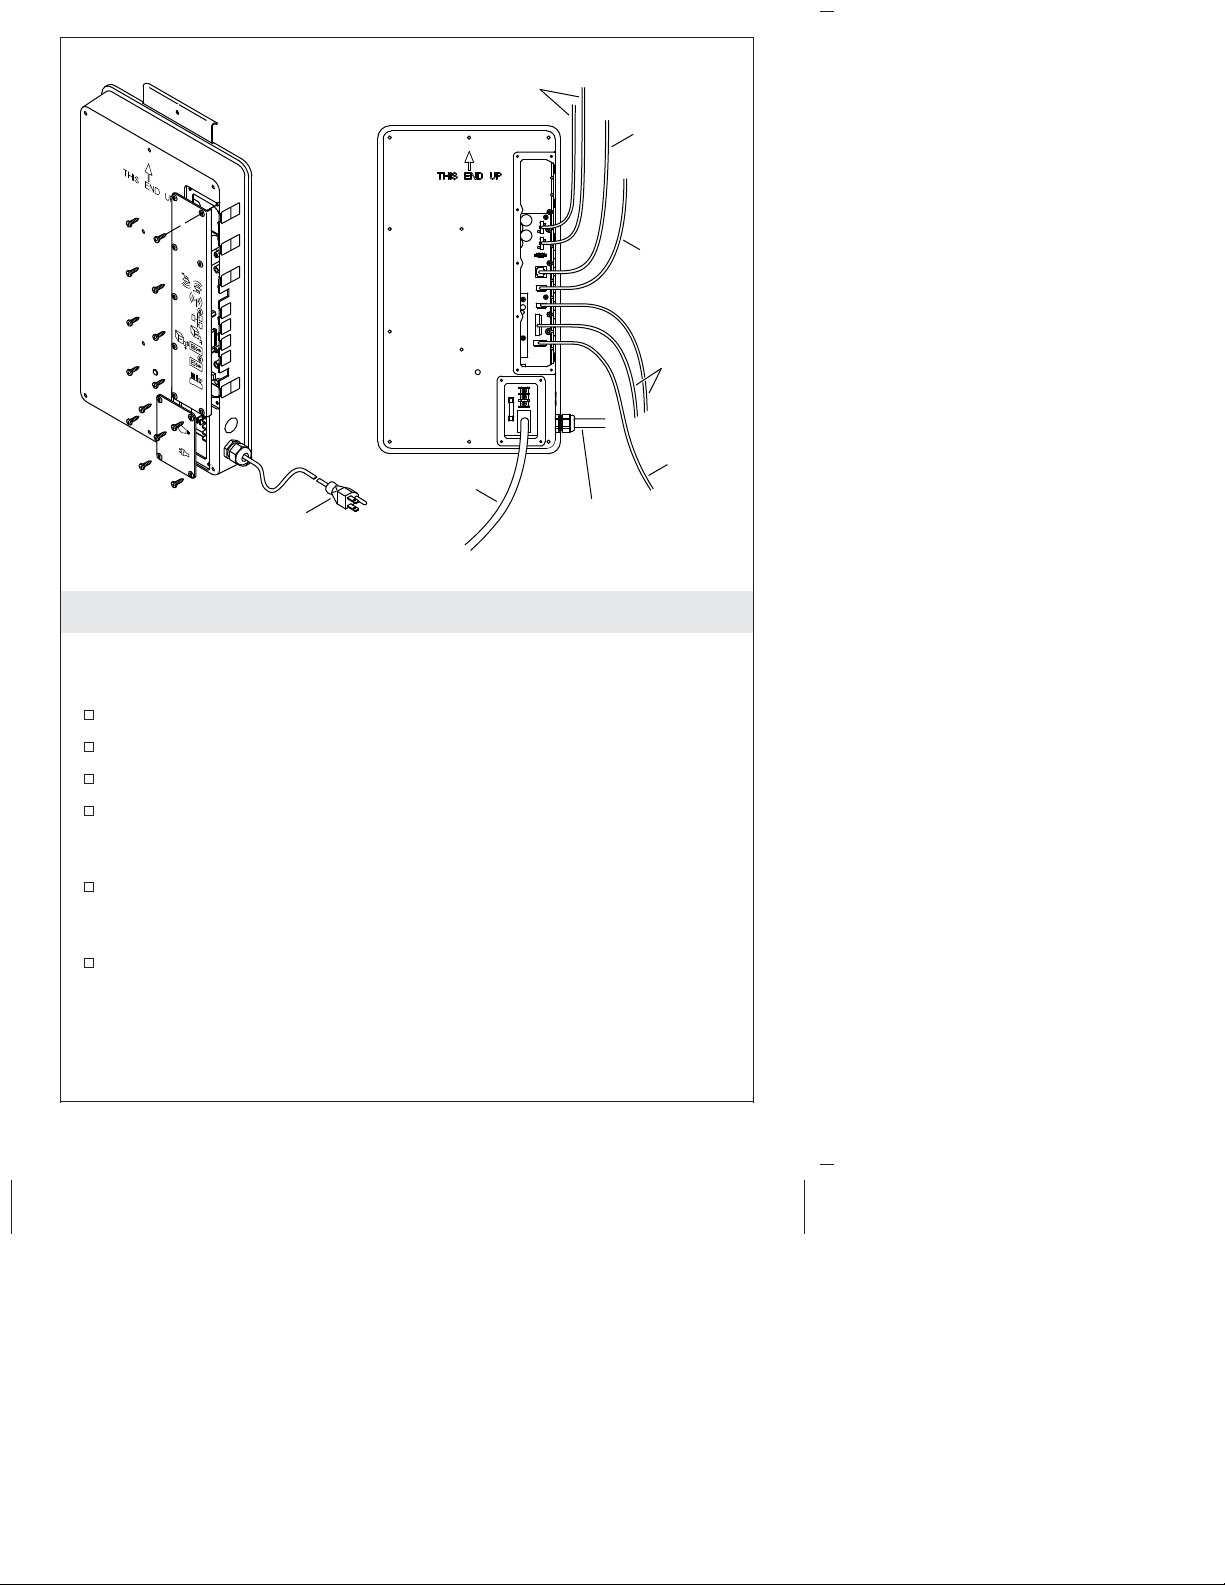
Speaker Wires
Ethernet
Steam,
Rain Panel
Interface
Cables
Valve
Cable
Lighting
Disconnect power
before removing covers.
Power
Cord
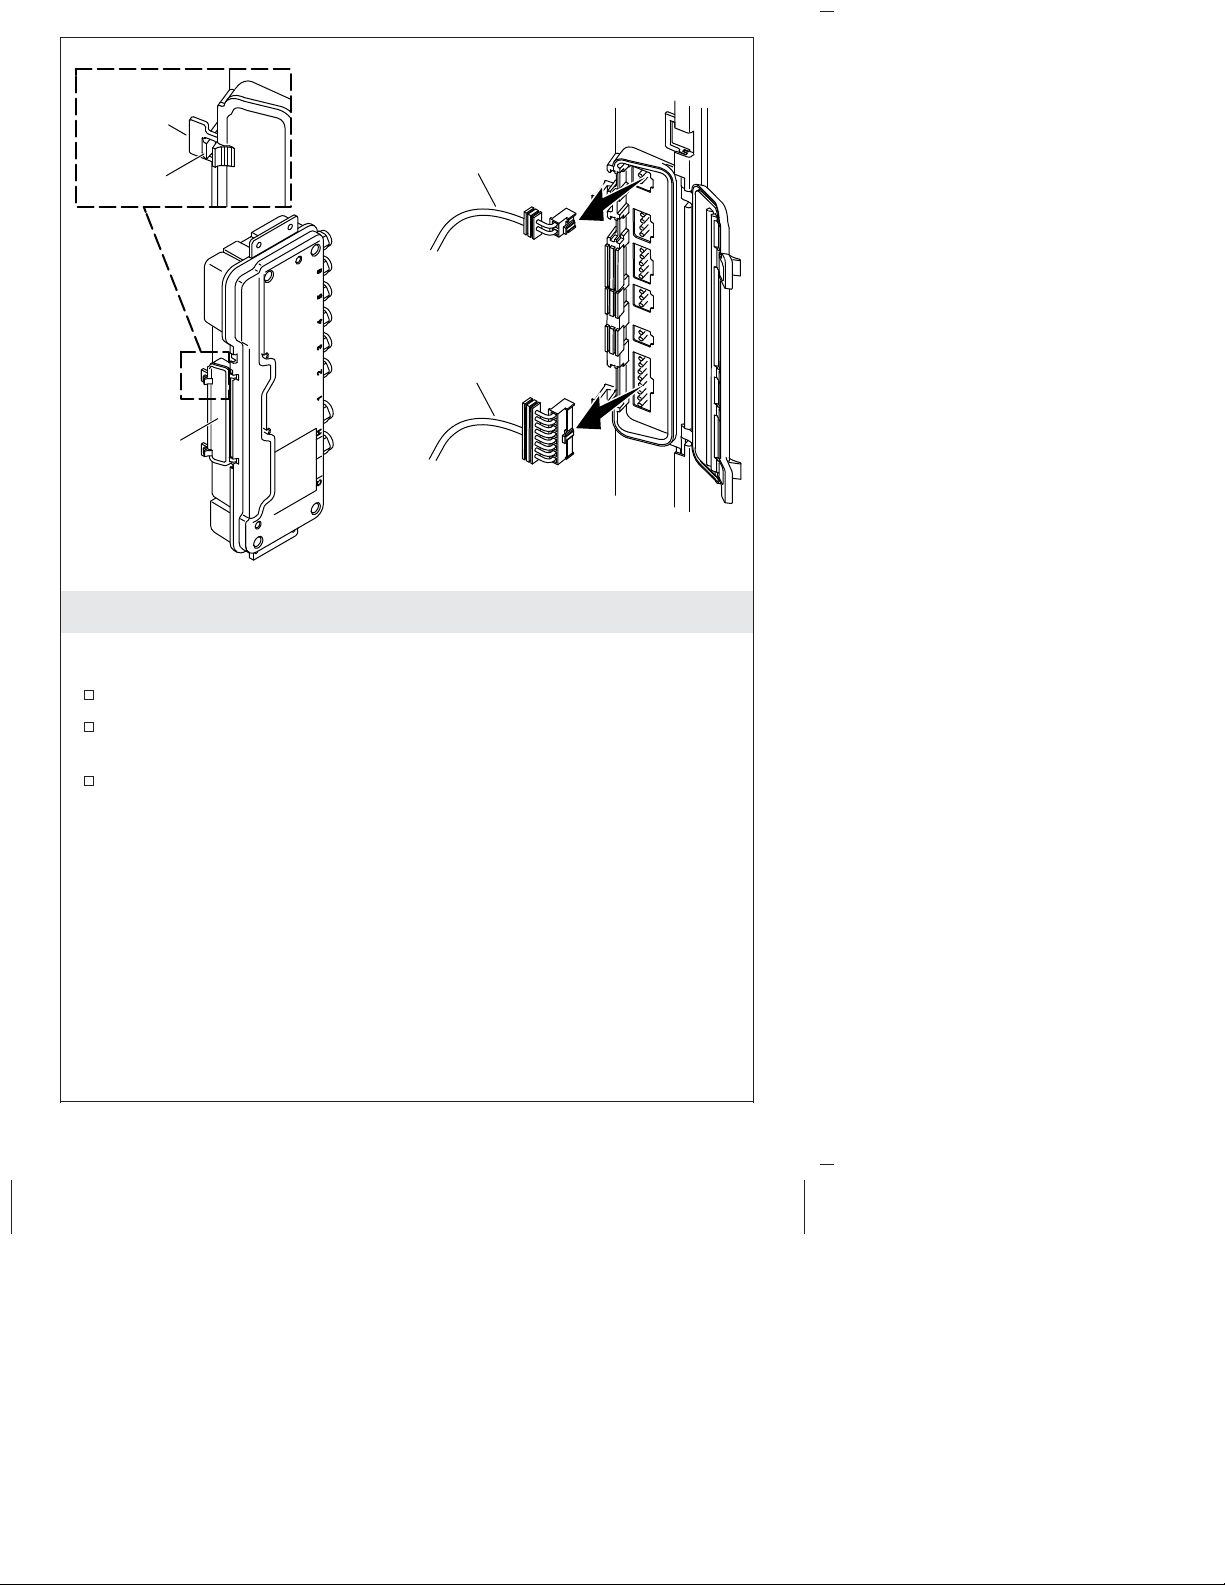
2. Disconnect the Cables from the Module
IMPORTANT! Disconnect the power from the media module before
removing the access covers.
Remove the tall access cover on the media module.
Disconnect the valve cable and discard.
Disconnect the remaining cables.
Disconnect any speaker wires from the media module, then
reconnect them to the K-99696 amplifier. Refer to the instructions
packed with the amplifier.
If incandescent lighting is installed to the media module, remove
the small access cover, disconnect the hardwired lighting cable,
then reconnect to a light switch.
Remove the media module.
Kohler Co. 5 1256292-2-B
Page 6
Tab
Power
Clip
Door
Cable
Media
Module
Cable
3. Disconnect the Cables from the Valve
IMPORTANT! Disconnect the power from the valve before
disconnecting the cables.
Press the clips to release and open the door on the valve.
To remove the door, slide the hinge side of the door in either
direction until it slips free.
Disconnect the power cable and media module cable from the
valve.
1256292-2-B 6 Kohler Co.
Page 7

Foam
Gasket
Apply
silicone
sealant.
Install
Remove
4. Install the DTV+ Interface to the Housing
NOTE: The K-99693 digital interface is required to complete this
installation.
Apply silicone sealant to the inside edges of the foam gasket near
the bottom of the housing.
Feed the interface cable through the hole in the housing.
Tilt the top of the interface onto the tabs in the housing.
Press the bottom of the interface until it clicks in place.
If the interface needs to be removed from the housing, insert a
3/32″ hex wrench to unlatch the bottom, then tilt out.
Kohler Co. 7 1256292-2-B
Page 8
Retainer
Wall Sleeve
Suction Cup
Disconnect the
cable after the
retainer is in place.
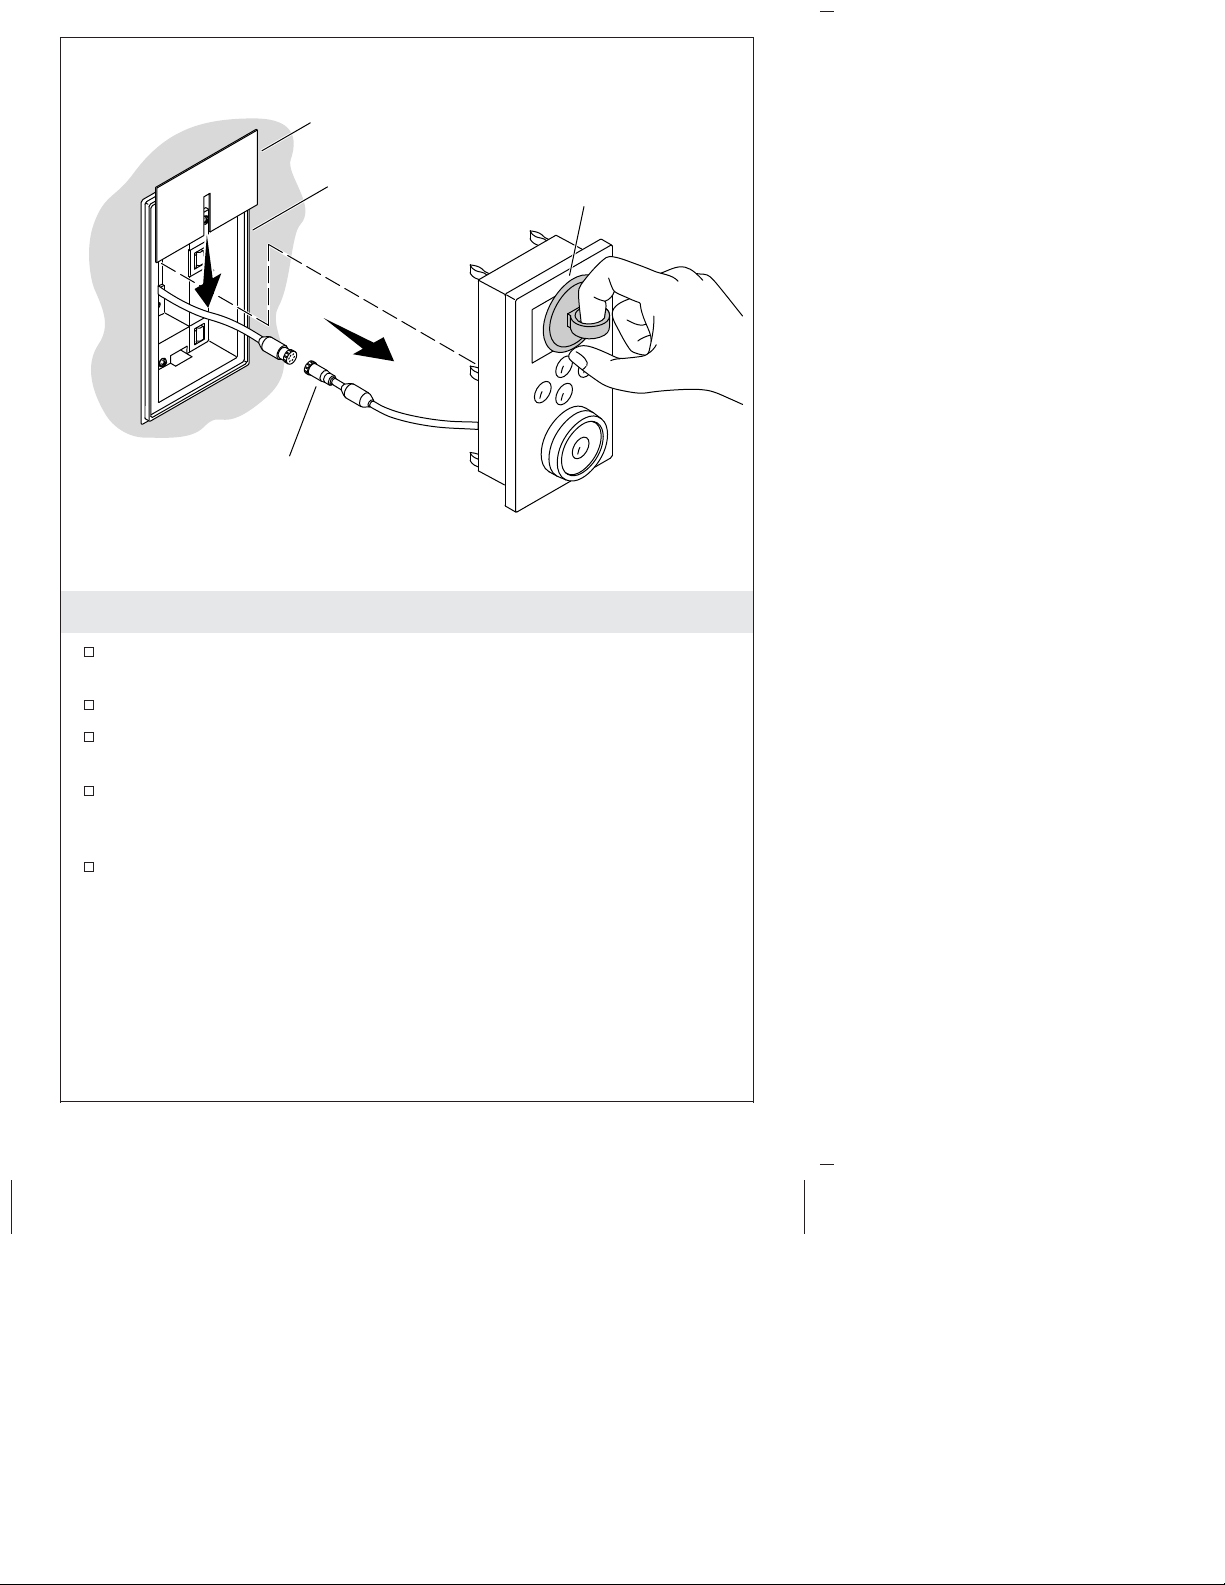
5. Remove the Existing Interface
Attach the suction cup (provided) to the screen of the existing
interface.
Using the suction cup, remove the interface from the wall sleeve.
Carefully pull the cable through the hole in the wall sleeve and
out of the wall cavity.
Slide the cardboard retainer (provided with the DTV+ interface)
over the cable to prevent it from falling back though the hole in
the wall sleeve.
With the retainer in place, disconnect the interface cable from the
cable coming from the wall.
1256292-2-B 8 Kohler Co.
Page 9
Apply grease
in both ends.
18" (457 mm)
Retrofit Cable
Coupler
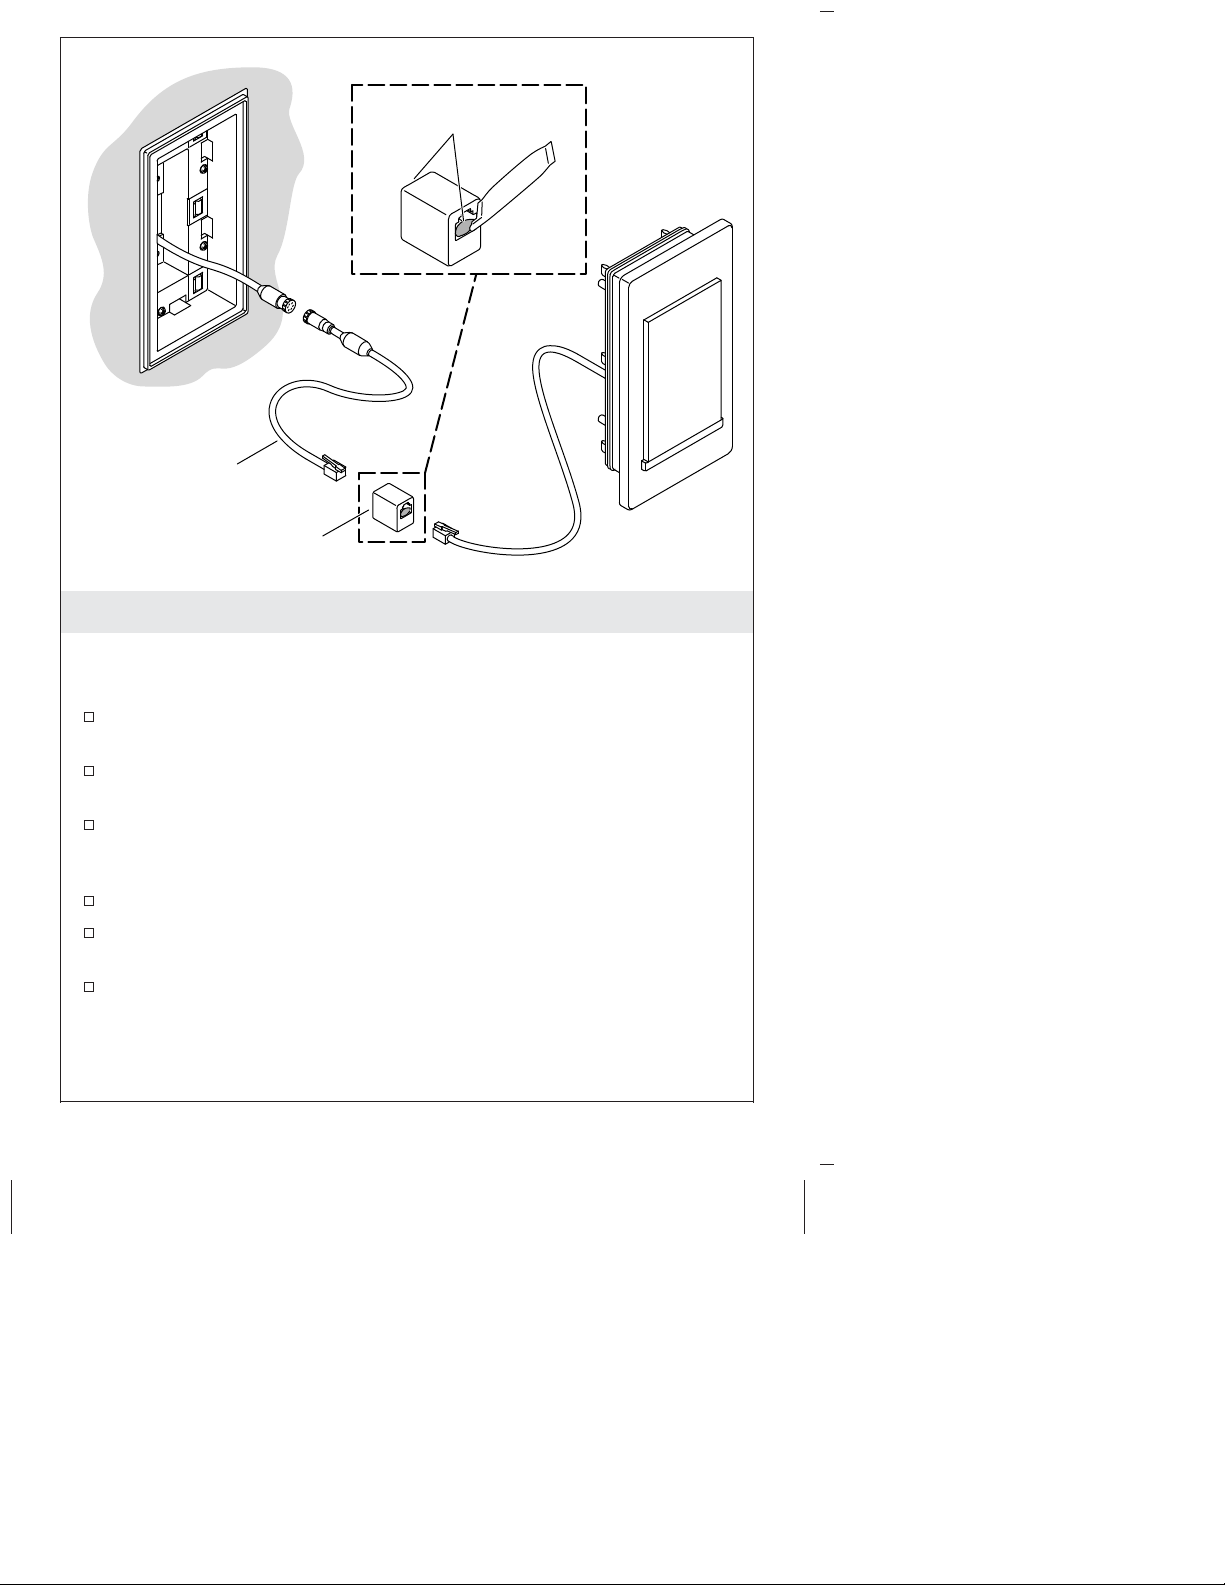
6. Install the Housing Assembly
CAUTION: Risk of product damage: Before proceeding, verify that
both ends of the original cable coming from the wall are
disconnected from any components.
Apply grease (provided with the DTV+ interface) into both ends
of the coupler.
Connect the 18″ (457 mm) retrofit cable and the interface cable to
the coupler. Make sure the cables fully click into the coupler.
Connect the other end of the retrofit cable to the cable from the
wall. Align the white arrows on the connectors and make sure
they fully engage.
Carefully feed the cables and coupler into the hole in the wall.
Firmly press the housing assembly into the wall sleeve until it
snaps in place.
Repeat the steps above for any accessory interfaces.
Kohler Co. 9 1256292-2-B
Page 10
Adapter
Drill holes and
use anchors
where needed.
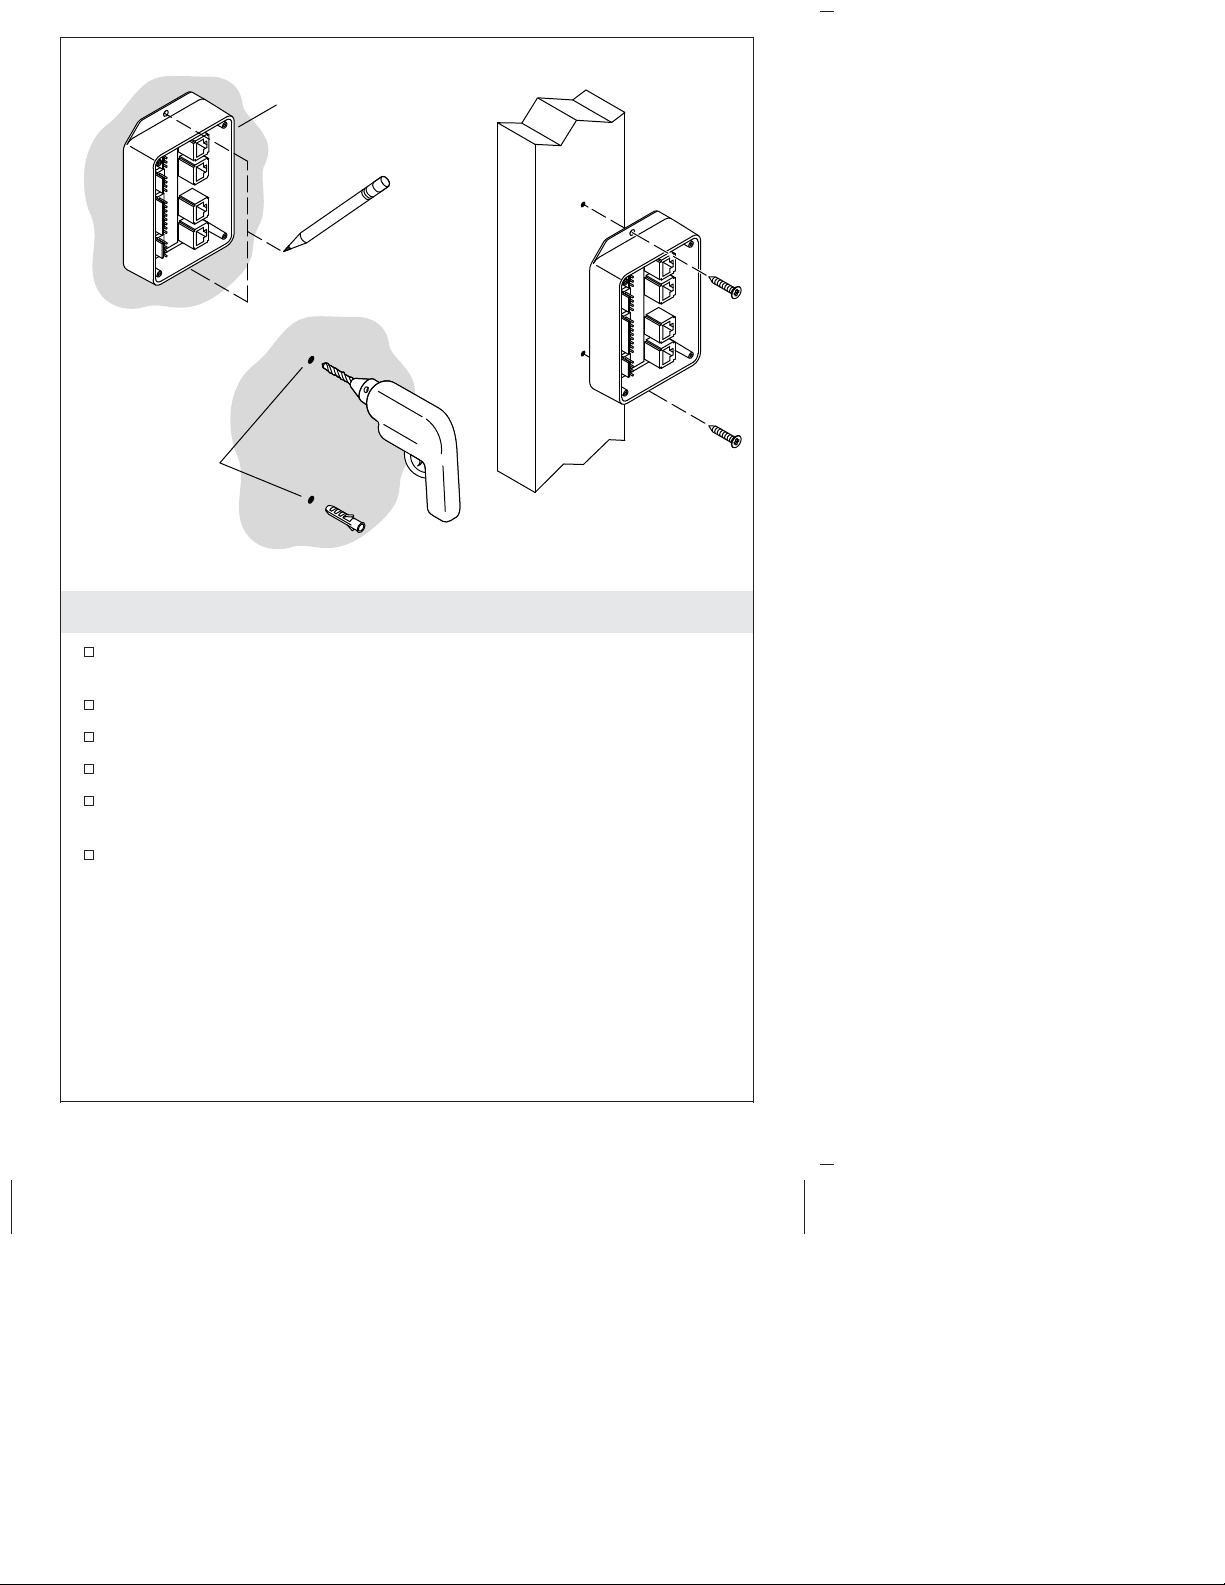
7. Install the Adapter
Install the K-99695 system controller according to the instructions
packed with the product.
Install the adapter within 5’ (1.5 m) of the system controller.
Position the adapter against a wall or 2x4 stud.
Mark the holes.
Use anchors if the marks are not at a stud location. Drill two 1/4″
holes and install the anchors.
Secure the adapter with two screws.
1256292-2-B 10 Kohler Co.
Page 11
6' (1.8 m)
Accessory
Interface Cable
Master
Interface Cable
Steam Adapter Cable
Rain Panel Cable
Data Cable
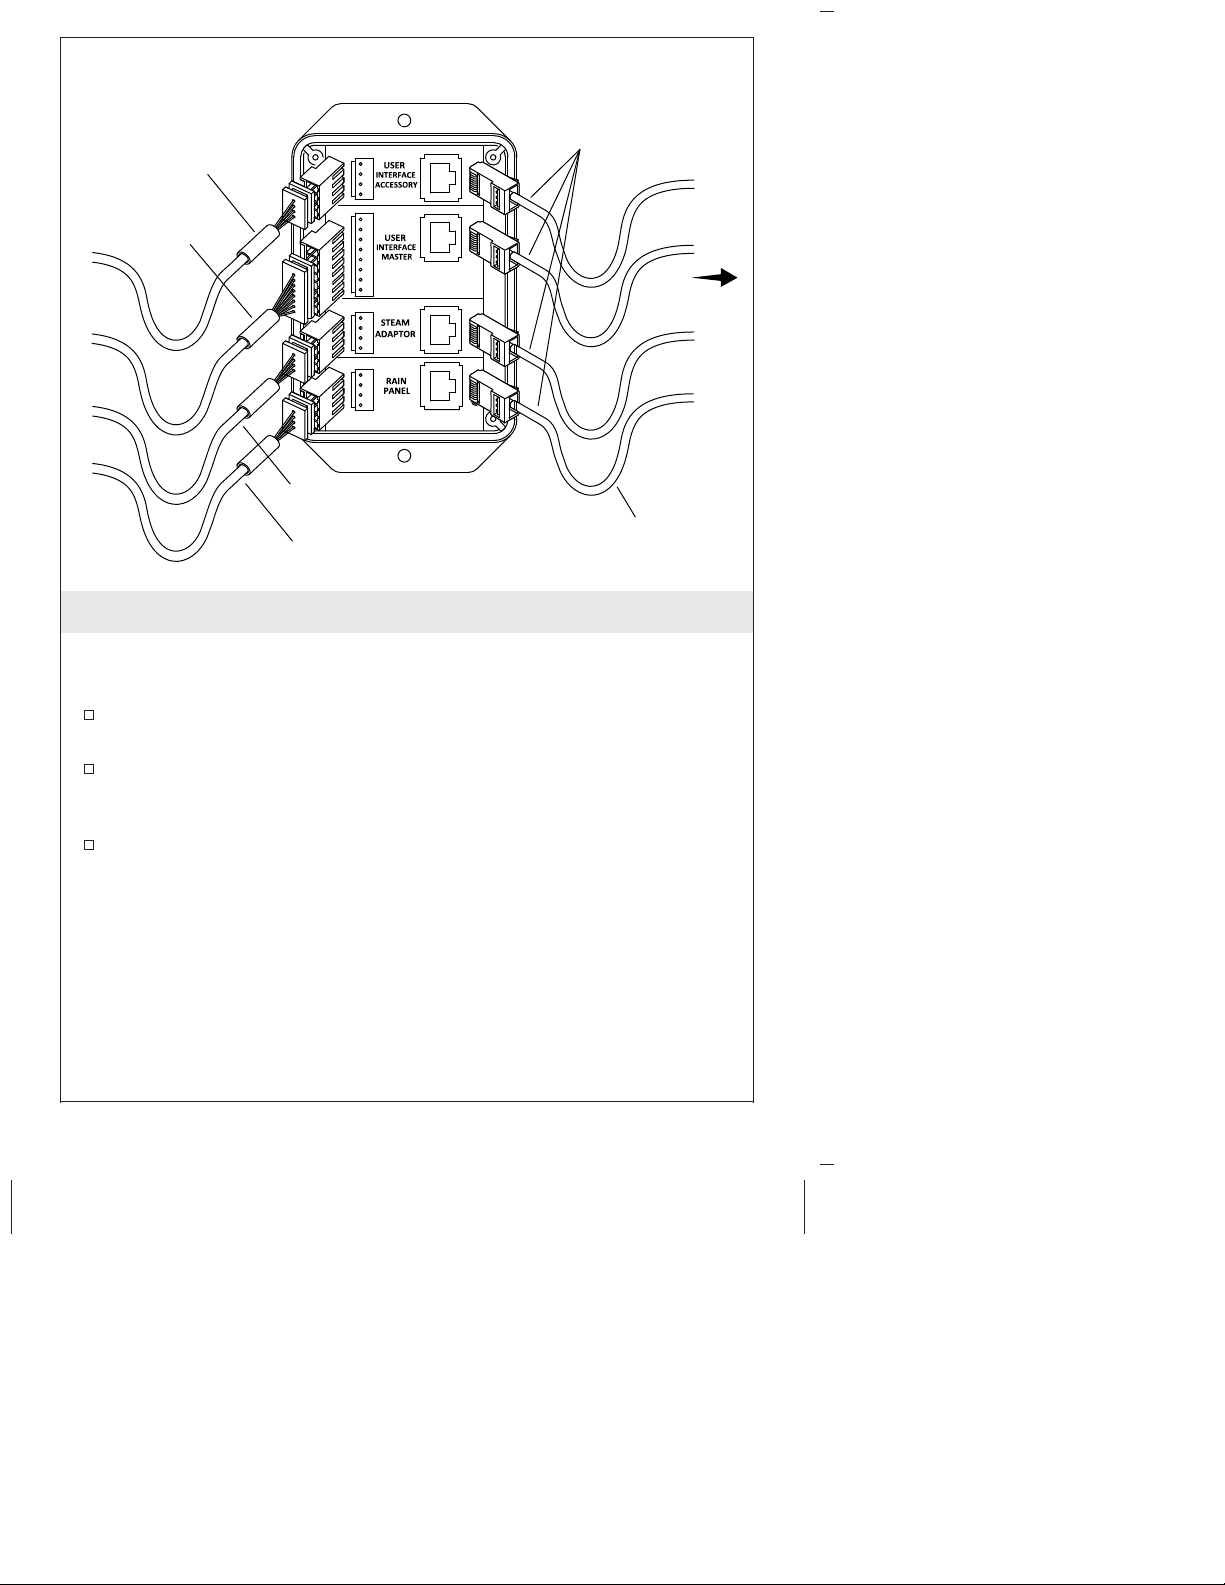
8. Connect the Components
IMPORTANT! Make drip loops in all cables.
IMPORTANT! Make sure all cables fully click into the sockets.
Connect the interface cable(s) to the appropriate master (8-pin) or
accessory (4-pin) interface connector on the adapter.
If your system includes a steam generator and/or rain panel,
connect those cables to the appropriate 4-pin connector on the
adapter.
Connect the 6’ (1.8 m) data cable(s) to the adapter.
To
Controller
Drip Loop
Kohler Co. 11 1256292-2-B
Page 12
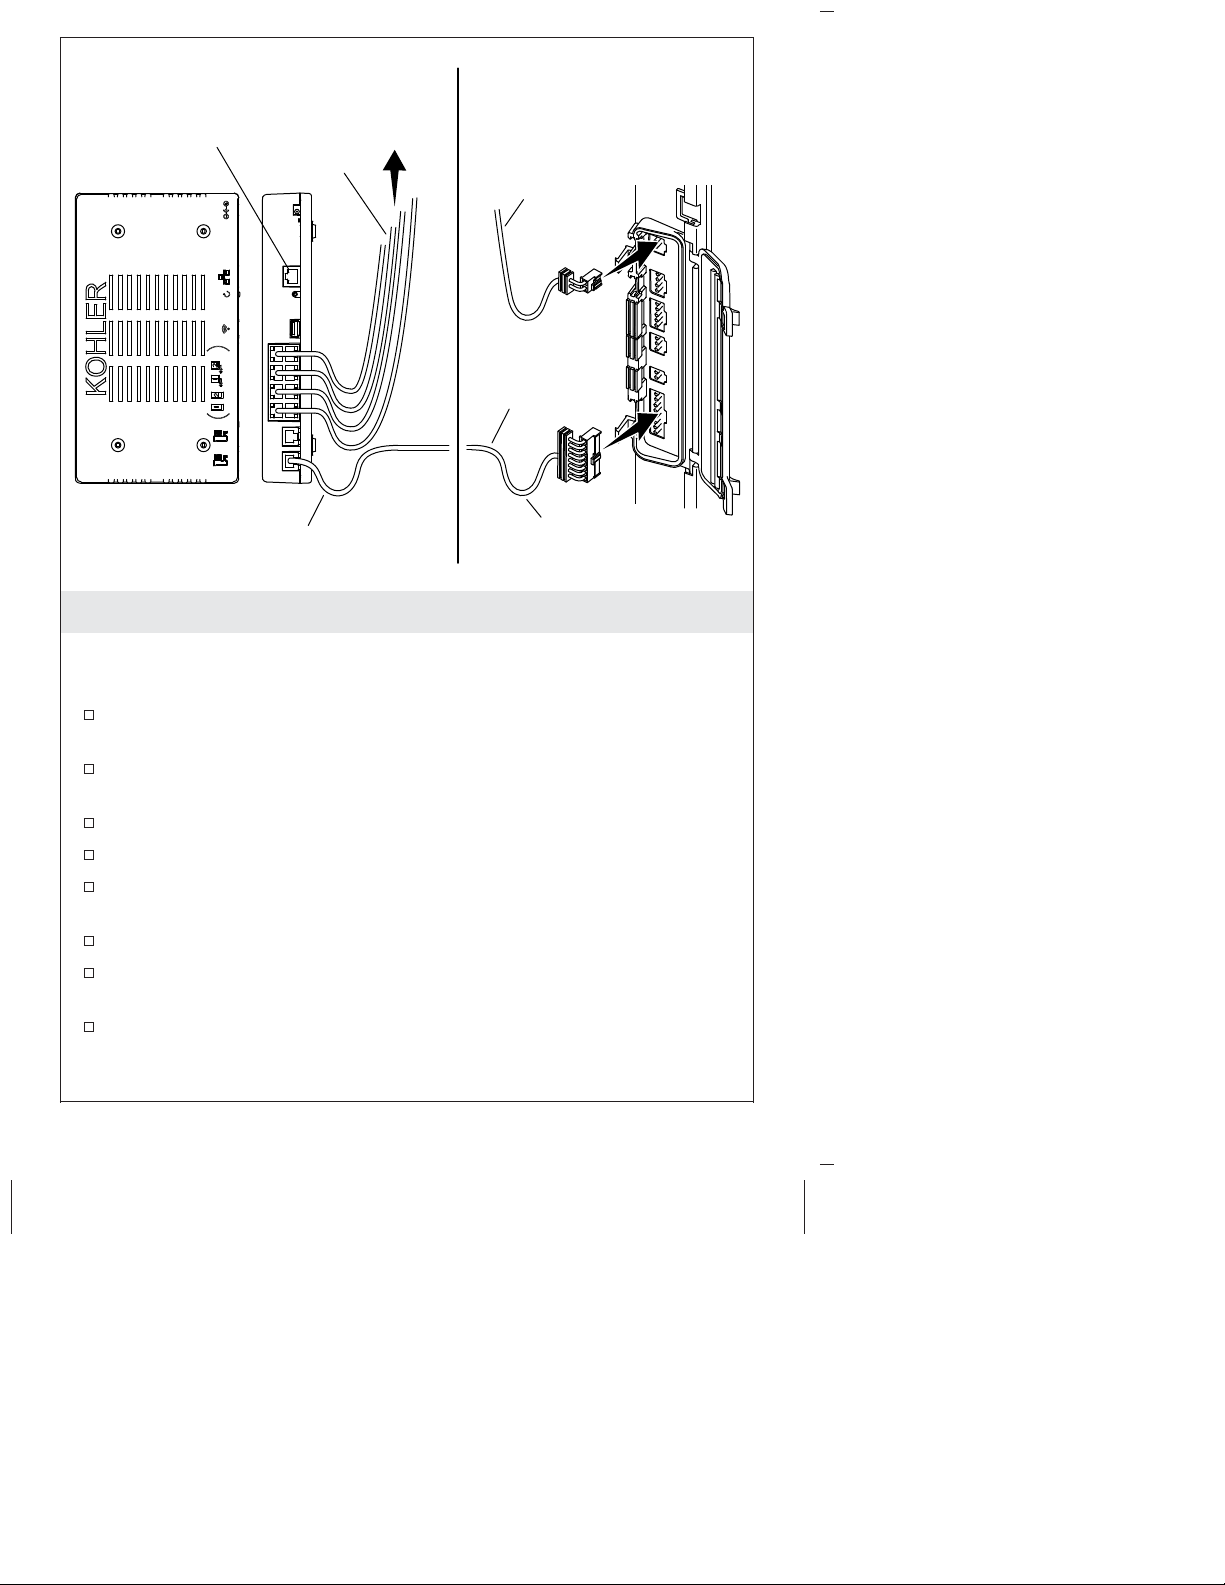
Ethernet
Controller Digital Valve
To
Data
Cables
Adapter
Power
Cable
Valve
Cable
Valve Cable
Drip Loop
9. Complete the Installation
IMPORTANT! Make drip loops in all cables.
IMPORTANT! Make sure all cables fully click into the sockets.
Connect the data cable(s) from the adapter into the eight-port
section of the controller.
Connect the 30’ (9.14 m) valve cable into a valve port on the
controller.
Connect the 8-pin end of the valve cable to the valve.
Reconnect the power cable to the valve.
Verify all grommets are in place, then reinstall the door to the
valve.
To close the door, press on the tabs until the clips snap in place.
Turn on the power to the valve and connect the power to the
controller.
The interface is powered by the controller. The interface should
illuminate when power is connected to the controller.
1256292-2-B 12 Kohler Co.
Page 13
Warranty
KOHLER®Electronic Faucets, Valves and Controls
FIVE-YEAR LIMITED WARRANTY
Kohler Co. warrants that its electronic faucets, valves and controls will
be free of defects in material and workmanship during normal
residential use for five years from the date the product is installed.
This warranty applies only to electronic faucets, valves and controls
installed in the United States of America, Canada and Mexico (″North
America″).
If a defect is found in normal residential use, Kohler Co. will, at its
election, repair, provide a replacement part or product, or make
appropriate adjustment where Kohler Co.’s inspection discloses any
such defect. Damage caused by accident, misuse, or abuse is not
covered by this warranty. Improper care and cleaning will void the
warranty*. Proof of purchase (original sales receipt) must be provided
to Kohler Co. with all warranty claims. Kohler Co. is not responsible
for labor charges, installation, or other incidental or consequential costs
other than those noted above. In no event shall the liability of Kohler
Co. exceed the purchase price of the faucet, valve or control.
If the electronic faucets, valves or controls are used commercially or are
installed outside of North America, Kohler Co. warrants that the
faucet, valve or control will be free from defects in material and
workmanship for one (1) year from the date the product is installed,
with all other terms of this warranty applying except duration.
If you believe that you have a warranty claim, contact your Home
Center, Dealer, Plumbing Contractor or E-tailer. Please be sure to
provide all pertinent information regarding your claim, including a
complete description of the problem, the product, model number, the
date the product was purchased, from whom the product was
purchased and the installation date. Also include your original invoice.
For other information, or to obtain the name and address of the service
and repair facility nearest you, write Kohler Co., Attn: Customer Care
Center, Kohler, Wisconsin 53044 USA, or by calling 1-800-4-KOHLER
(1-800-456-4537) from within the USA and Canada, and
001-800-456-4537 from within Mexico, or visit www.kohler.com within
the USA, www.ca.kohler.com from within Canada, or
www.mx.kohler.com in Mexico.
THE FOREGOING WARRANTIES ARE IN LIEU OF ALL OTHER
WARRANTIES, EXPRESS OR IMPLIED, INCLUDING BUT NOT
LIMITED TO THE IMPLIED WARRANTIES OF
MERCHANTABILITY AND FITNESS FOR A PARTICULAR
PURPOSE.
KOHLER CO. AND/OR SELLER DISCLAIM ANY LIABILITY FOR
Kohler Co. 13 1256292-2-B
Page 14
Warranty (cont.)
SPECIAL, INCIDENTAL OR CONSEQUENTIAL DAMAGES. Some
states/provinces do not allow limitations on how long an implied
warranty lasts or the exclusion or limitation of such damages, so
these limitations and exclusions may not apply to you. This warranty
gives the consumer specific legal rights. You may also have other
rights that vary from state/province to state/province. This warranty
is to the original consumer purchaser only, and excludes product
damage due to installation error, product abuse, or product misuse,
whether performed by a contractor, service company, or the
consumer.
This is Kohler Co.’s exclusive written warranty.
*Never use cleaners containing abrasive cleansers, ammonia, bleach,
acids, waxes, alcohol, solvents or other products not recommended
for chrome. This will void the warranty.
1256292-2-B 14 Kohler Co.
Page 15

Guide d’installation et d’entretien
Conversion de DTV II à DTV+
INSTRUCTIONS IMPORTANTES
AVERTISSEMENT: Lors de l’utilisation de produits
électriques, toujours observer les précautions de base,
notamment:
AVERTISSEMENT: Risque de choc électrique. Déconnecter
l’alimentation électrique avant d’effectuer un entretien.
AVERTISSEMENT: Risque de blessures ou
d’endommagement du matériel. Lire toutes les instructions
avec attention avant de commencer l’installation.
AVIS: Respecter tous les codes de plomberie, d’électricité et de
construction.
Avant de faire fonctionner le système la première fois:
Télécharger et installer le dernier logiciel. Une heure ou plus peuvent
être nécessaires en fonction de la configuration du système et de la
vitesse de connexion internet. Ne pas déconnecter l’alimentation
électrique du module de commande pendant le téléchargement et
l’installation.
Outils et matériel
3/32"
Mastic à la silicone1/4"
Kohler Co. Français-1 1256292-2-B
Page 16

Avant de commencer
ATTENTION: Risque d’endommagement du produit: Déconnecter
l’alimentation de tous les composants avant de commencer cette
installation.
AVIS: Un système DTV II existant doit déjà être en place pour
effectuer cette installation.
AVIS: Le module de commande du système K-99695 et l’interface
numérique K-99693 sont nécessaires pour effectuer cette installation.
Respecter tous les codes électriques, de plomberie et de
construction locaux.
Lire ces instructions et déterminer tous les composants requis
avec leurs emplacements d’installation avant de commencer cette
installation.
1256292-2-B Français-2 Kohler Co.
Page 17

Interface
principale
Vers
l'alimentation c.a.
Interface
d'accessoires
(optionnelle)
Coupleur
Câble de données
30' (9,1 m)
Vers
Module de
commande
l'alimentation c.a.
Vers le générateur
de vapeur
Vers le module
de commande du
panneau pluie
Câbles de données
6' (1,8 m)
Adaptateur
Câble installé
rétroactivement
18' (457 mm)
Câble à 8 broches
30' (9,1 m)
Câble à 4 broches
30' (9,1 m)
1. Planifier le système
REMARQUE: Le module de commande alimente l’interface ou les
interfaces et commande la ou les vannes numériques ainsi que les
autres composants du système.
REMARQUE: La longueur du câble de données qui connecte
l’adaptateur au module de commande est de 6’ (1.8 m).
L’emplacement d’installation de l’adaptateur doit être compris dans
un rayon de 5’ (1,5 m) du module de commande.
Se référer aux guides d’installation accompagnant chaque produit
pour les besoins d’installation spécifiques.
Longueur du câble installé
rétroactivement
Longueur du câble de données 6’ (1,8 m)
Longueur du câble de vanne 30’ (9,1 m)
Kohler Co. Français-3 1256292-2-B
18″ (457 mm)
Page 18

Fils de haut-parleurs
Ethernet
Vapeur,
panneau
pluie
Câbles
d'interface
Câble de
vanne
Éclairage
Déconnecter l'alimentation
avant de retirer les couvercles.
Cordon
d'alimentation
2. Déconnecter les câbles du module
IMPORTANT! Déconnecter l’alimentation électrique du module du
média avant de retirer les couvercles d’accès.
Retirer le couvercle d’accès de grande taille sur le module du
média.
Déconnecter le câble de la vanne et le jeter.
Déconnecter les câbles restants.
Déconnecter tous les fils de haut-parleurs du module du média,
puis les reconnecter à l’amplificateur K-99696. Se reporter aux
instructions accompagnant l’amplificateur.
Si un éclairage incandescent est installé sur le module du média,
retirer le couvercle d’accès plus petit, déconnecter le câble
d’éclairage câblé, puis reconnecter un interrupteur de lampe.
Retirer le module du média.
1256292-2-B Français-4 Kohler Co.
Page 19

Patte
Câble
Clip
Porte
électrique
Câble de
module
de média
3. Déconnecter les câbles de la vanne.
IMPORTANT! Déconnecter l’alimentation électrique de la vanne
avant de déconnecter les câbles.
Appuyer sur les clips pour relâcher et ouvrir la porte sur la
vanne.
Pour retirer la porte, glisser le côté charnière de la porte dans une
direction jusqu’à ce qu’elle soit libérée.
Déconnecter le câble d’alimentation et le câble du module de
média de la vanne.
Kohler Co. Français-5 1256292-2-B
Page 20

Joint statique
en mousse
Appliquer
du mastic
à la silicone.
Instalar
Retire
4. Installer l’interface DTV+ sur le boîtier
REMARQUE: L’interface numérique K-99693 est requise pour
effectuer cette installation.
Appliquer du mastic à la silicone sur les bords intérieurs du joint
statique en mousse, à proximité du bas du boîtier.
Acheminer le câble d’interface à travers le trou dans le boîtier.
Incliner le haut de l’interface sur les pattes se trouvant dans le
boîtier.
Appuyer sur le bas de l’interface jusqu’à ce qu’elle s’enclenche en
place.
Si l’interface doit être retirée du boîtier, insérer une clé
hexagonale de 3/32″ pour déverrouiller le bas, puis incliner pour
la faire sortir.
1256292-2-B Français-6 Kohler Co.
Page 21

Dispositif de retenue
Manchon de mur
Ventouse
Déconnecter le câble
une fois que le dispositif
de retenue est en place.
5. Retirer l’interface existante
Attacher la ventouse (fournie) sur l’écran de l’interface existante.
Retirer l’interface du manchon du mur en utilisant la ventouse.
Tirer avec précaution le câble à travers le trou dans le manchon
du mur pour le faire sortir de la cavité du mur.
Faire glisser le dispositif de retenue en carton (fourni avec
l’interface DTV+) par-dessus le câble pour l’empêcher de
retomber en arrière à travers le trou dans le manchon du mur.
Avec le dispositif de retenue en place, déconnecter le câble
d’interface du câble en provenance du mur.
Kohler Co. Français-7 1256292-2-B
Page 22

Appliquer de la graisse
dans les deux extrémités.
Câble installé
rétroactivement
18' (457 mm)
Coupleur
6. Installer l’ensemble du boîtier
ATTENTION: Risque d’endommagement du produit: Avant de
commencer, vérifier que les deux extrémités du câble original
arrivant du mur sont déconnectées de tous les composants.
Appliquer de la graisse (fournie avec l’interface DTV+) dans les
deux extrémités du coupleur.
Connecter le câble de 18″ (457 mm) installé rétroactivement et le
câble de l’interface au coupleur. S’assurer que les câbles
s’enclenchent complètement dans le coupleur.
Connecter l’autre extrémité du câble installé rétroactivement au
câble sortant du mur. Aligner les flèches blanches sur les
connecteurs et s’assurer qu’ils sont entièrement engagés.
Acheminer avec précaution les câbles et le coupleur dans le trou
du mur.
Enfoncer fermement l’ensemble du boîtier dans le manchon du
mur jusqu’à ce qu’il s’enclenche en place.
Répéter les étapes ci-dessus pour toutes les interfaces
d’accessoires.
1256292-2-B Français-8 Kohler Co.
Page 23

Adaptateur
Percer des trous et
utiliser des dispositifs
d'ancrage aux
emplacements nécessaires.
7. Installer l’adaptateur
Installer le module de commande du système K-99695 selon les
instructions accompagnant le produit.
Installer l’adaptateur dans un rayon de 5’ (1,5 m) du module de
commande du système.
Positionner l’adaptateur contre un mur ou un montant 2x4.
Marquer les trous.
Utiliser des dispositifs d’ancrage si les repères ne se trouvent pas
à l’emplacement d’un montant. Percer des trous de 1/4″ et
installer les dispositifs d’ancrage.
Sécuriser l’adaptateur avec deux vis.
Kohler Co. Français-9 1256292-2-B
Page 24

Câble d'interface
d'accessoires
Câble d'interface
principale
Câble de données
6' (1,8 m)
Vers le
module de
commande
Câble d'adaptateur de vapeur
Câble de panneau pluie
Boucle d'égouttement
8. Connecter les composants
IMPORTANT! Créer des boucles d’égouttement dans tous les
câbles.
IMPORTANT! S’assurer que tous les câbles s’enclenchent
complètement dans les prises femelles.
Connecter le(s) câble(s) d’interface au connecteur de l’interface
principale (8 broches) ou d’accessoires (4 broches) approprié sur
l’adaptateur.
Si le système en question inclut un générateur de vapeur et/ou
un panneau pluie, connecter ces câbles au connecteurà4broches
approprié sur l’adaptateur.
Connecter le(s) câble(s) de données de 6’ (1,8 m) à l’adaptateur.
1256292-2-B Français-10 Kohler Co.
Page 25

Module de commande Vanne numérique
Vers
Ethernet
Câbles
de données
l'adaptateur
Câble
électrique
Câble de
vanne
Câble de vanne
Boucle d'égouttement
9. Terminer l’installation
IMPORTANT! Créer des boucles d’égouttement dans tous les
câbles.
IMPORTANT! S’assurer que tous les câbles s’enclenchent
complètement dans les prises femelles.
Connecter le(s) câble(s) en provenance de l’adaptateur dans la
section à huit ports du module de commande.
Connecter le câble de vanne de 30’ (9,14 m) dans un port de
vanne se trouvant sur le module de commande.
Connecter l’extrémitéà8broches du câble de la vanne sur la
vanne.
Reconnecter le câble d’alimentation électrique à la vanne.
Vérifier que tous les passe-fils sont en place, puis réinstaller la
porte sur la vanne.
Pour fermer la porte, appuyer sur les pattes jusqu’à ce que les
clips s’enclenchent.
Mettre la vanne sous alimentation électrique et connecter
l’alimentation au module de commande.
Kohler Co. Français-11 1256292-2-B
Page 26

Terminer l’installation (cont.)
L’interface est alimentée par le module de commande. L’interface
doit s’allumer lorsque l’alimentation est connectée au module de
commande.
Garantie
Garantie limitée de cinq ans pour les robinets, valves et contrôles
électroniques KOHLER
Kohler Co. garantit les robinets, valves et contrôles électroniques contre
tout vice de matériau et de fabrication lors d’une utilisation
domestique normale, pendant cinq ans à partir de la date d’installation
du produit. La présente garantie s’applique uniquement aux robinets,
valves et contrôles électroniques installés aux États-Unis, au Canada et
au Mexique (″Amérique du Nord″).
En cas de défectuosité lors d’une utilisation domestique normale,
Kohler Co. choisira, à son gré, la réparation, le remplacement de la
pièce ou du produit, ou la rectification appropriée, dans les cas ou
l’inspection de Kohler révèlerait une telle défectuosité. Tout dommage
causé par un accident, une mauvaise utilisation ou un mauvais
traitement n’est pas couvert par la présente garantie. Un entretien et
un nettoyage inadéquats annulent la garantie*. Une preuve d’achat
(ticket de caisse d’origine) doit être présentée à Kohler Co. avec toutes
les réclamations au titre de la garantie. Kohler Co. n’est pas
responsable des frais de main-d’œuvre, d’installation ou de tout autre
frais particulier accessoire ou indirect que ceux susmentionnés. La
responsabilité de Kohler Co. ne dépassera en aucun cas le prix d’achat
du robinet, de la valve ou du contrôle.
Si les robinets, les valves ou les contrôles électroniques sont utilisés
dans un commerce ou si ces articles sont installés en dehors
d’Amérique du Nord, Kohler Co. garantit les robinets, les valves ou les
contrôles contre tout vice de matériau et de fabrication pendant un (1)
an à partir de la date d’installation dudit produit, et toutes les autres
modalités de la présente garantie s’appliquent à l’exception de sa
durée.
Pour toute réclamation au titre de la présente garantie, contacter le
vendeur, plombier, centre de rénovation ou revendeur par internet.
Fournir tous les renseignements pertinents à la réclamation, dont
notamment une description complète du problème et du produit, le
numéro de modèle, la date et le lieu d’achat du produit, ainsi que la
date de son installation. Joindre également l’original de la facture. Pour
de plus amples renseignements ou pour obtenir les coordonnées du
service de réparation le plus proche, écrire à Kohler Co., Attn:
Customer Care Center, Kohler, Wisconsin 53044, USA, ou appeler le
®
1256292-2-B Français-12 Kohler Co.
Page 27

Garantie (cont.)
1-800-4-KOHLER (1-800-456-4537) à partir des É.-U. et du Canada, et le
001-800-456-4537 à partir du Mexique, ou consulter le site
www.kohler.com aux É.-U., www.ca.kohler.com à partir du Canada, ou
www.mx.kohler.com au Mexique.
LES GARANTIES SUSMENTIONNÉES SONT FOURNIES AU LIEU
ET PLACE DE TOUTES AUTRES GARANTIES, EXPRESSES OU
TACITES, Y COMPRIS LES GARANTIES TACITES DE
COMMERCIALITÉ ET D’ADAPTATION À UN USAGE
PARTICULIER.
KOHLER CO. ET/OU LE REVENDEUR DÉCLINENT TOUTE
RESPONSABILITÉ CONTRE LES DOMMAGES PARTICULIERS,
ACCESSOIRES OU INDIRECTS. Certains états et provinces ne
permettent pas de limite sur la durée de la garantie tacite, ni
l’exclusion ou la limite des dommages, et, par conséquent, lesdites
limites et exclusions peuvent ne pas s’appliquer à votre cas. La
présente garantie accorde au consommateur des droits juridiques
particuliers. Vous pouvez également avoir d’autres droits qui varient
d’un état ou d’une province à l’autre. La présente garantie est
accordée uniquement à l’acquéreur d’origine et exclut tous
dommages dus à une mauvaise installation, un usage abusif ou une
mauvaise utilisation du produit, qu’ils soient effectués par un
entrepreneur, une société de services ou le consommateur.
Ceci constitue la garantie écrite exclusive de Kohler Co.
*Ne jamais utiliser de nettoyants contenant des agents abrasifs, de
l’ammoniaque, de l’eau de Javel, des acides, des cires, de l’alcool, des
dissolvants ou autres produits non recommandés pour le chrome.
Ceci annulera la garantie.
Kohler Co. Français-13 1256292-2-B
Page 28

Guía de instalación y cuidado
Conversión de DTV II a DTV+
INSTRUCCIONES IMPORTANTES
ADVERTENCIA: Al usar aparatos eléctricos siempre
cumpla las precauciones básicas, incluidas las siguientes:
ADVERTENCIA: Riesgo de sacudidas eléctricas. Desconecte
el suministro eléctrico antes de dar servicio.
ADVERTENCIA: Riesgo de lesiones personales o de daños
a la propiedad. Lea atentamente todas las instrucciones antes
de comenzar la instalación.
AVISO: Cumpla todos los códigos de plomería, eléctricos y de
construcción.
Antes de usar el sistema por primera vez:
Descargue e instale el software más reciente. Completar este proceso
puede tomar una hora o más, de acuerdo a la configuración del
sistemayalavelocidad de conexión de Internet. No desconecte el
suministro eléctrico del controlador durante la descarga y la
instalación del software.
Herramientas y materiales
3/32"
Sellador de silicona1/4"
Kohler Co. Español-1 1256292-2-B
Page 29

Antes de comenzar
PRECAUCIÓN: Riesgo de daños al producto: Desconecte el
suministro eléctrico de todos los componentes antes de comenzar la
instalación.
AVISO: Debe haber un sistema DTV II ya instalado para completar
esta instalación.
AVISO: Se requieren el controlador del sistema K-99695 y la
interface digital K-99693 para completar esta instalación.
Cumpla todos los códigos locales de plomería, construcción y
eléctricos.
Antes de comenzar la instalación, lea estas instrucciones y
determine qué componentes se requieren y dónde se deben
instalar.
Kohler Co. Español-2 1256292-2-B
Page 30

Interface
principal
A suministro de CA
Interface de
accesorios
(opcional)
Acoplador
Cable de datos
de 30' (9,1 m)
A suministro de CA
Controlador
Al generador
de vapor
Al controlador
del panel
de lluvia
Cable de datos
de 6' (1,8 m)
Adaptador
Cable de datos
de 18' (457 mm)
Cable de 8 pines
de 30' (9,1 m)
Cable de 4 pines
de 30' (9,1 m)
1. Planee el sistema
NOTA: El controlador provee energía a las interfaces y controla las
válvulas digitales y otros componentes del sistema.
NOTA: El cable de datos que conecta el adaptador al controlador
mide 6’ (1,8 m) de largo. El adaptador debe instalarse a menos de 5’
(1,5 m) del controlador.
Consulte las necesidades específicas de instalación en las guías de
instalación empacadas con cada producto.
Longitud del cable de modernización 18″ (457 mm)
Longitud del cable de datos 6’ (1,8 m)
Longitud del cable de válvulas 30’ (9,1 m)
1256292-2-B Español-3 Kohler Co.
Page 31

Cables de bocinas
Ethernet
Vapor,
panel de lluvia
Cables de
interface
Cable de
válvulas
Iluminación
Desconecte la corriente
antes de quitar las cubiertas.
Cable de
suministro eléctrico
2. Desconecte los cables del módulo
¡IMPORTANTE! Desconecte el suministro eléctrico del módulo de
medios antes de quitar las tapas de acceso.
Retire la tapa de acceso larga en el módulo de medios.
Desconecte el cable de válvula y deséchelo.
Desconecte el resto de los cables.
Desconecte los cables de bocinas del módulo de medios, y vuelva
a conectarlos al amplificador K-99696. Consulte las instrucciones
incluidas con el amplificador.
Si se instala luz incandescente al módulo de medios, retire la tapa
de acceso pequeña, desconecte el cable de iluminación, y luego
vuelva a conectarlo a un interruptor de luz.
Retire el módulo de medios.
Kohler Co. Español-4 1256292-2-B
Page 32

Lengüeta
Cable
Clip
Puerta
eléctrico
Cable de
módulo de
medios
3. Desconecte los cables de la válvula
¡IMPORTANTE! Desconecte el suministro eléctrico de la válvula
antes de desconectar los cables.
Presione los clips para soltar y abrir la puerta en la válvula.
Para desmontar la puerta, deslice el lado de bisagra de la puerta
en cualquier dirección hasta que se suelte.
Desconecte el cable de suministro eléctrico y el cable del módulo
de medios de la válvula.
1256292-2-B Español-5 Kohler Co.
Page 33

Empaque
de espuma
Aplique
sellador de
silicona.
Installer
Retirer
4. Instale la interface DTV+ en el alojamiento
NOTA: Se requiere la interface digital K-99693 para completar esta
instalación.
Aplique sellador de silicona a los bordes interiores del empaque
de espuma cerca del fondo del alojamiento.
Pase el cable de la interface a través del orificio en el alojamiento.
Incline la parte superior de la interface en las lengüetas en el
alojamiento.
Oprima la parte inferior de la interface hasta que haga clic en su
lugar.
Si es necesario retirar la interface del alojamiento, introduzca una
llave hexagonal de 3/32″ para soltar la parte inferior, y luego
sáquela inclinándola hacia fuera.
Kohler Co. Español-6 1256292-2-B
Page 34

Retenedor
Manga mural
Ventosa
Desconecte el cable
después de que el
retenedor quede en su lugar.
5. Retire la interface actual
Coloque una ventosa (incluida) en la pantalla de la interface
actual.
Con la ventosa, retire la interface de la manga mural.
Con cuidado pase el cable a través del orificio en la manga mural
y sáquelo de la cavidad en la pared.
Deslice el retenedor de cartón delgado (incluido con la interface
DTV+) sobre el cable para evitar que caiga hacia atrás por el
orificio en la manga mural.
Con el retenedor en su lugar, desconecte el cable de la interface
del cable que proviene de la pared.
1256292-2-B Español-7 Kohler Co.
Page 35

Aplique grasa en
ambos extremos.
Cable de modernización
de 18' (457 mm)
Acoplador
6. Instale el montaje del alojamiento
PRECAUCIÓN: Riesgo de daños al producto: Antes de seguir
adelante, verifique que ambos extremos del cable original que
proviene de la pared estén desconectados de todos los demás
componentes.
Aplique grasa (provista con la interface DTV+) dentro de ambos
extremos del acoplador.
Conecte el cable de modernización de 18″ (457 mm) y el cable de
la interface en el acoplador. Asegúrese de que los cables encajen
por completo con un clic en el acoplador.
Conecte el otro extremo del cable de modernización al cable que
proviene de la pared. Alinee las flechas blancas en los conectores
y asegúrese de que entren por completo.
Con cuidado pase los cables y el acoplador dentro del orificio en
la pared.
Oprima con firmeza el montaje del alojamiento en la manga
mural hasta que entre a presión en su lugar.
Repita los pasos anteriores con todas las interfaces de accesorios.
Kohler Co. Español-8 1256292-2-B
Page 36

Adaptador
Taladre orificios y
use anclajes
donde sea necesario.
7. Instale el adaptador
Instale el controlador de sistema K-99695 de acuerdo a las
instrucciones incluidas con el producto.
Instale el adaptador a menos de 5’ (1,5 m) del controlador del
sistema.
Coloque el adaptador contra una pared o contra un poste de 2x4.
Marque los orificios.
Use anclajes si las marcas no quedan en donde haya un poste.
Taladre dos orificios de 1/4″ e instale los anclajes.
Fije el adaptador con dos tornillos.
1256292-2-B Español-9 Kohler Co.
Page 37

Cable de datos
Cable de interface
de accesorios
Cable de
interface principal
Cable adaptador de vapor
Cable del panel de lluvia
de 6' (1,8 m)
Al
controlador
Lazo de goteo
8. Conecte los componentes
¡IMPORTANTE! Forme lazos de goteo en todos los cables.
¡IMPORTANTE! Asegúrese de que todos los cables encajen por
completo con un clic en los enchufes.
Conecte los cables de interface al conector de la interface
principal (8 clavijas) o de accesorio (4 clavijas) en el adaptador.
Si su sistema incluye un generador de vapor y/o un panel de
lluvia, conecte esos cables al conector apropiado de 4 clavijas en
el adaptador.
Conecte los cables de datos de 6’ (1,8 m) al adaptador.
Kohler Co. Español-10 1256292-2-B
Page 38

Controlador Válvula digital
Al
Ethernet
Cables
de datos
adaptador
Cable
eléctrico
Cable de
válvulas
Cable de válvulas
Lazo de goteo
9. Termine de hacer la instalación
¡IMPORTANTE! Forme lazos de goteo en todos los cables.
¡IMPORTANTE! Asegúrese de que todos los cables encajen por
completo con un clic en los enchufes.
Conecte los cables de datos del adaptador en la sección de ocho
puertos del controlador.
Conecte el cable de válvula de 30’ (9,14 m) en el puerto de
válvula en el controlador.
Conecte el extremo de 8 clavijas del cable de la válvula a la
válvula.
Vuelva a conectar el cable de suministro eléctrico a la válvula.
Verifique que todos los pasahilos estén en su lugar, y luego
vuelva a instalar la puerta a la válvula.
Para cerrar la puerta, presione las lengüetas hasta que los clips
encajen en su lugar.
Encienda el suministro eléctrico a la válvula y conecte la corriente
al controlador.
1256292-2-B Español-11 Kohler Co.
Page 39

Termine de hacer la instalación (cont.)
La interface recibe su suministro eléctrico del controlador. La
interface se debe iluminar cuando se aplica suministro eléctrico al
controlador.
Garantía
GARANTÍA LIMITADA DE CINCO AÑOS
de griferías, válvulas y controles electrónicos KOHLER
Kohler Co. garantiza las griferías, las válvulas y los controles
electrónicos contra defectos de material y mano de obra durante el uso
normal residencial, durante cinco años a partir de la fecha de
instalación del producto. Esta garantía se aplica solamente a la grifería,
las válvulas y los controles electrónicos instalados en Estados Unidos
de América, Canadá y México (″Norteamérica″).
Si se encuentra un defecto durante el uso residencial normal, Kohler
Co., a su criterio, reparará, proveerá una pieza de repuesto o un
producto, o realizará los ajustes pertinentes en los casos en que la
inspección realizada por Kohler Co. determine dicho defecto. Esta
garantía no cubre daños causados por accidente, abuso o uso indebido.
El cuidado y la limpieza indebidos anulan la garantía*. Al presentar las
reclamaciones de garantía a Kohler Co., es necesario incluir el
comprobante de compra (recibo de venta original). Kohler Co. no se
hace responsable de costos de mano de obra, instalación u otros costos
incidentales o indirectos, aparte de los mencionados arriba. En ningún
caso la responsabilidad de Kohler Co. excederá el precio de compra de
la grifería, la válvula o el control.
Si las griferías, las válvulas o los controles electrónicos se utilizan
comercialmente o si se instalan fuera del territorio de Norteamérica,
Kohler Co. garantiza que la grifería, la válvula o el control está libre de
defectos de material y mano de obra durante un (1) año, a partir de la
fecha de instalación, estando en efecto todas las demás condiciones de
esta garantía, excepto la duración.
Si usted considera que tiene una reclamación en virtud de la garantía,
comuníquese con su centro de remodelación, distribuidor, contratista
de plomería o distribuidor por Internet. Asegúrese de proporcionar
toda la información pertinente a su reclamación, incluida una
descripción completa del problema, el producto, el número de modelo,
la fecha de compra del producto, el lugar de compra del producto, y la
fecha de instalación. También incluya el recibo original. Para obtener
información adicional, o para el nombre y la dirección del lugar de
reparación y servicio más cercano a usted, escriba a Kohler Co.,
Atención: Customer Care Center, Kohler, Wisconsin 53044 USA, o llame
al 1-800-4-KOHLER (1-800-456-4537) desde los EE.UU. y Canadá, y al
®
Kohler Co. Español-12 1256292-2-B
Page 40

Garantía (cont.)
001-800-456-4537 desde México, o visite www.kohler.com desde los
EE.UU., www.ca.kohler.com desde Canadá, o www.mx.kohler.com en
México.
LAS GARANTÍAS ANTERIORMENTE MENCIONADAS
SUSTITUYEN A TODAS LAS DEMÁS GARANTÍAS, EXPRESAS O
IMPLÍCITAS, INCLUIDAS, ENTRE OTRAS, LAS GARANTÍAS
IMPLÍCITAS DE COMERCIALIZACIÓN E IDONEIDAD PARA UN
USO DETERMINADO.
KOHLER CO. Y/O EL VENDEDOR DESCARGAN TODA
RESPONSABILIDAD POR CONCEPTO DE DAÑOS
PARTICULARES, INCIDENTALES O INDIRECTOS. Algunos
estados/provincias no permiten limitaciones en cuanto a la duración
de una garantía implícitaoalaexclusión o limitación de dichos
daños, por lo que es posible que estas limitaciones y exclusiones no
se apliquen a su caso. Esta garantía otorga al consumidor ciertos
derechos legales específicos. Además, usted puede tener otros
derechos que varían de estado a estado y de provincia a provincia.
Esta garantía está destinada únicamente para el comprador
consumidor original y excluye todo daño al producto como resultado
de errores de instalación, abuso del producto o uso indebido del
mismo, bien sea por parte de un contratista, de una compañía de
servicios o del consumidor mismo.
Esta es la garantía exclusiva por escrito de Kohler Co.
*Nunca utilice limpiadores que contengan abrasivos, amoniaco,
blanqueador, ácidos, ceras, alcohol, disolventes u otros productos no
recomendados para el cromo. Esto anula la garantía.
1256292-2-B Español-13 Kohler Co.
Page 41

1256292-2-B
Page 42

1256292-2-B
Page 43

1256292-2-B
Page 44

USA/Canada: 1-800-4KOHLER
México: 001-800-456-4537
kohler.com
©2015 Kohler Co.
1256292-2-B
 Loading...