

Page 1
User Guide
Digital Interface
K-657, K-694 K-658, K-695
M product numbers are for Mexico (i.e. K-12345M)
Los números de productos seguidos de M corresponden a México
(Ej. K-12345M)
1079815-5-A
Page 2

Table of Contents
Interface Anatomy ................................................................ 4
Turn On Your Interface ............................................................. 4
Navigating Through the Menus ....................................................... 4
Operating without the Dial Ring ...................................................... 5
Using Your Shower ............................................................... 6
Turn Water Outlets ON or OFF ....................................................... 8
Choose Massage Function .......................................................... 9
Adjust Cycling Speed ............................................................. 10
Temperature Therapy Options ....................................................... 11
Changing Temperature Therapy Temperatures .......................................... 13
Using Lights .................................................................... 14
Lights ON/OFF ................................................................. 15
Incandescent Brightness .......................................................... 16
Chroma Brightness .............................................................. 17
Choose Color ................................................................... 18
Choose Custom Color ............................................................ 19
Lighting Effects ................................................................. 20
Save Lights Settings ............................................................. 20
Using Music .................................................................... 21
Your Music Library ............................................................... 22
Internet Radio .................................................................. 23
Additional Audio Devices .......................................................... 24
Using Steam ................................................................... 25
Steam On ..................................................................... 26
Save Steam Settings ............................................................. 26
Using User Presets .............................................................. 26
Save As ....................................................................... 28
Main Menu .................................................................... 29
Turn OFF Individual Devices ....................................................... 30
Configurations .................................................................. 31
Frontage ...................................................................... 32
Envelop ....................................................................... 33
Unwind ....................................................................... 34
Linear ........................................................................ 35
Downpour ..................................................................... 36
Surround ...................................................................... 37
Custom ....................................................................... 38
The Settings Menus .............................................................. 39
Interface Settings ................................................................ 40
Settings Lock ................................................................... 41
Clean ........................................................................ 43
Time and Date .................................................................. 44
Contrast ...................................................................... 46
Brightness ..................................................................... 47
Invert Screen ................................................................... 48
Beep ......................................................................... 49
Auto Dim ...................................................................... 50
Auto Return .................................................................... 51
Auto Lock ..................................................................... 52
Select Language ................................................................ 53
Select Temperature Unit
Power OFF .................................................................... 55
User Settings ................................................................... 57
Shower Settings ................................................................. 58
Set the Default Temperature ........................................................ 59
Set the Maximum Temperature ...................................................... 60
Activate the Massage Functions ..................................................... 61
Activate Temperature Therapy ...................................................... 62
Auto Purge .................................................................... 63
........................................................... 54
1079815-5-A 2 Kohler Co.
Page 3

Change Water Outlet List Order ..................................................... 64
Add/Remove Water Outlets from Cycling Pattern ......................................... 65
Cycling Speed .................................................................. 66
Cold Water OFF ................................................................. 67
Select Primary Water Outlet – Custom Only ............................................ 68
Light Settings ................................................................... 69
Activate Light ................................................................... 70
Light Fade ..................................................................... 71
Incandescent Brightness .......................................................... 72
Color Brightness ................................................................ 73
White Light .................................................................... 74
Chroma Lighting Effect Speed ...................................................... 75
Music Settings .................................................................. 76
Volume Preset .................................................................. 77
Treble ........................................................................ 78
Bass ......................................................................... 79
Balance ....................................................................... 80
Shuffle ........................................................................ 81
Repeat ....................................................................... 82
Default Dial .................................................................... 83
Steam Settings ................................................................. 84
Steam Temperature .............................................................. 85
Steam Timer ................................................................... 86
Steam Power Clean .............................................................. 87
System Settings ................................................................. 88
About ........................................................................ 89
Valve ......................................................................... 90
Set the Valve Configuration – Preset Options ........................................... 91
Set the Valve Configuration – Custom Options .......................................... 93
Service ....................................................................... 95
Hospitality Mode ................................................................ 96
Diagnostics .................................................................... 98
Error Log ...................................................................... 99
WiFi Security .................................................................. 100
Update Music Software .......................................................... 101
Roku Agreement ............................................................... 102
Roku Services ................................................................. 103
Roku IP Address ............................................................... 104
Version ...................................................................... 104
Reset Function – User Settings .................................................... 105
Reset Function – System ......................................................... 106
Start-up After System Reset ....................................................... 107
Music Server Set-up – Getting Started ............................................... 108
Compatible Music Servers ........................................................ 108
Enable Music Sharing ........................................................... 109
Adding Internet Stations .......................................................... 110
Kohler Co. 3 1079815-5-A
Page 4

Screen
User 123 Icon
Power Icon
OK Icon
Dial
User 123 Icon
Dial
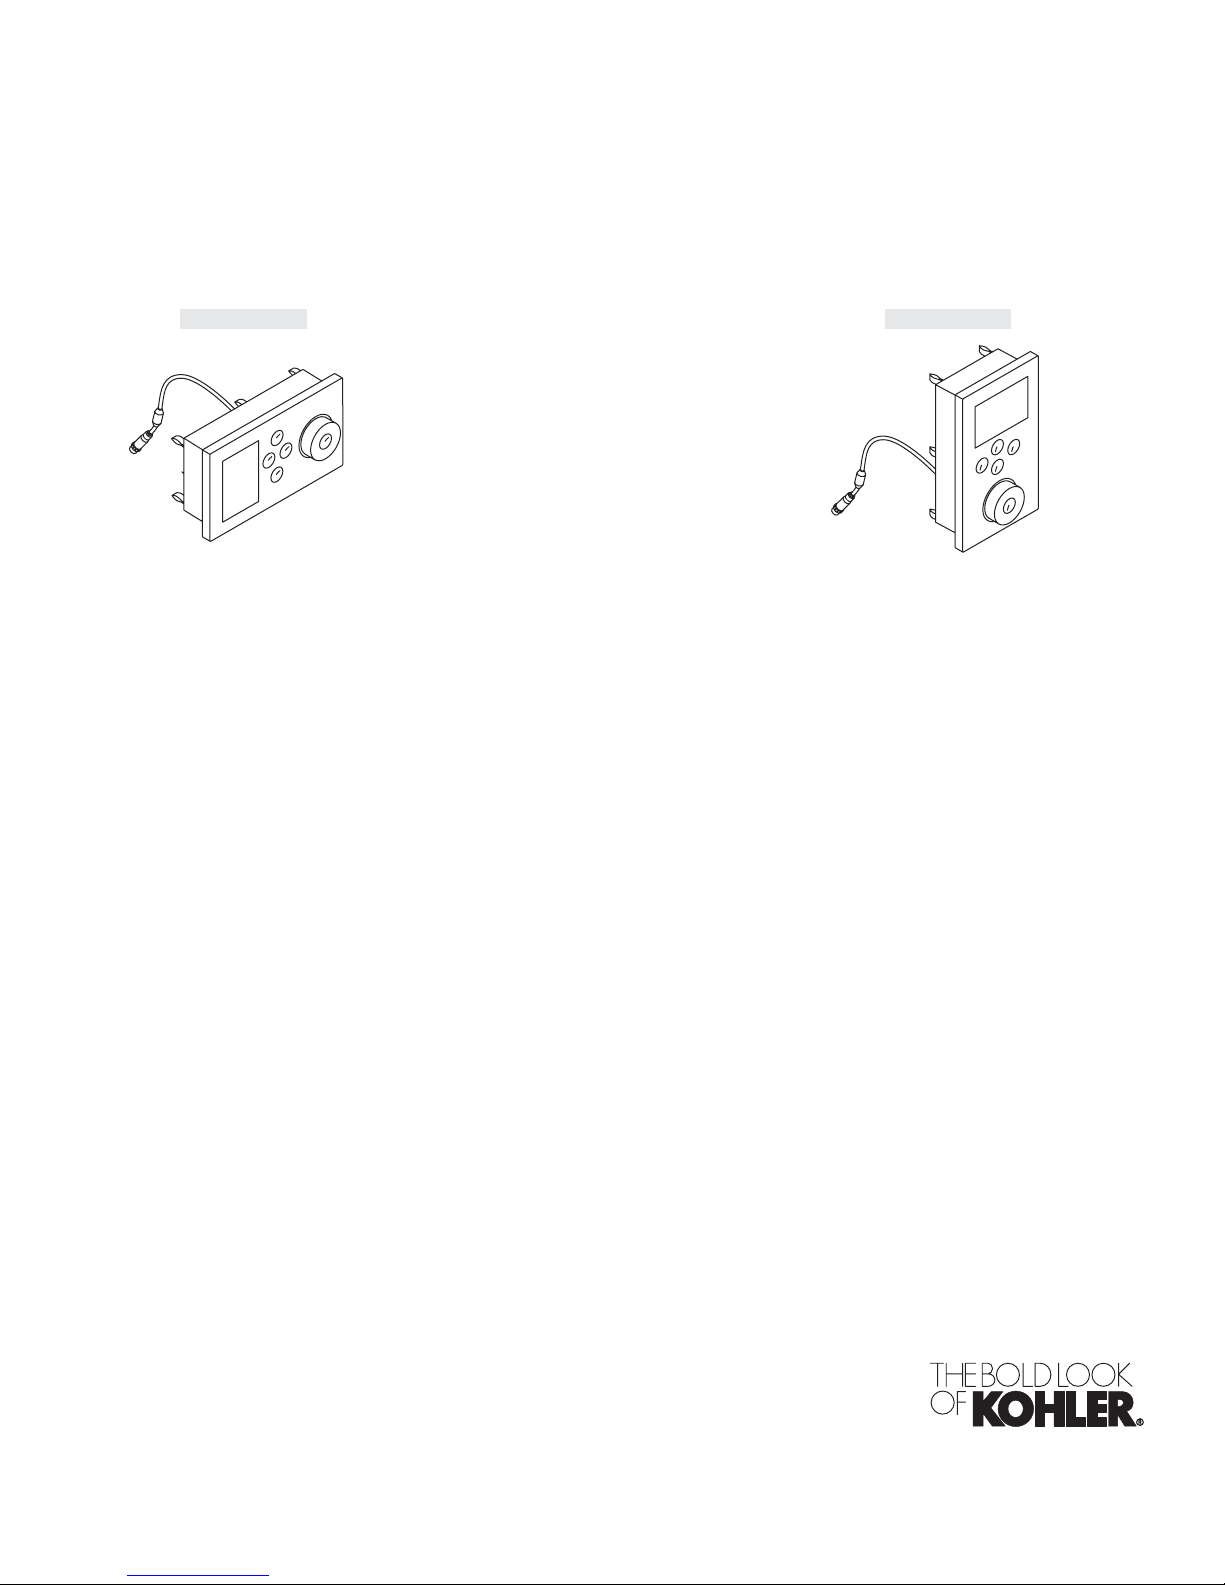
Portrait
Interface Anatomy
Turn On Your Interface
Path: [Power Icon]
Power Icon
User 456 Icon
Back Icon
OK Icon
Screen
User 456 Icon
Landscape
Back Icon
After a period of inactivity, your interface will enter sleep mode. When in sleep mode, the power icon will be
lit by a pulsing green light. If this is not the case, verify the interface(s) and power cables are plugged into
the valve media module and the power supply cord is plugged into the outlet.
Press the [Power Icon] to turn the interface on.
Navigating Through the Menus
Scrolling through the menu items: Use the dial to scroll through and highlight the various menu items.
Selecting the highlighted menu item: Press the [OK Icon] to select the highlighted menu item.
Example path: [Icon] > menu item 1 > menu item 2
The above example path directs you to press the [Icon], then indicates that you would scroll to and then
select “menu item 1” by pressing the [OK Icon], and then scroll to and select “menu item 2.”
1079815-5-A 4 Kohler Co.
Page 5
Portrait Interface Landscape Interface
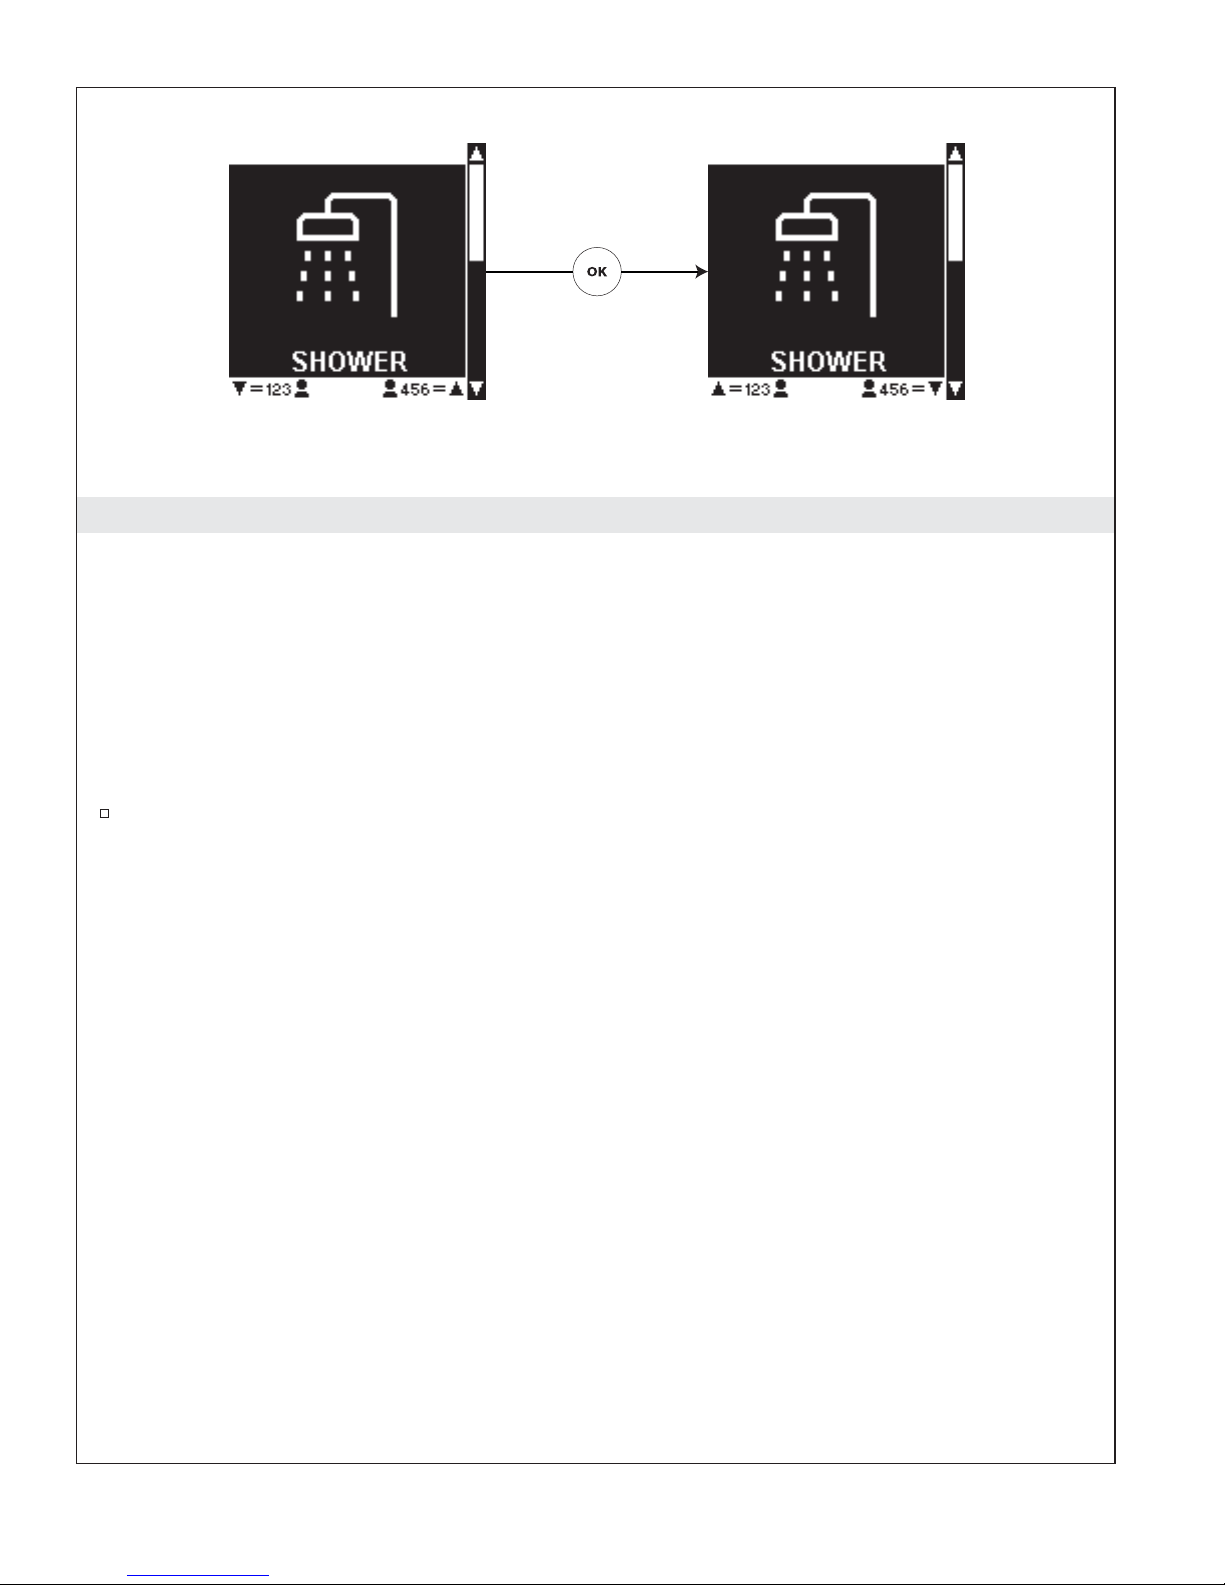
Operating without the Dial Ring
If your dial ring is lost or misplaced, you can still use your interface by activating the alternate scroll mode.
NOTE: When the alternate scroll is activated, the user presets will not be available.
When on the main ″Shower″ or ″Settings″ screen, the alternate scroll mode can be activated by pressing and
holding the [Back Icon] for 8 seconds.
For Portrait Interfaces: Once activated, the [123 User Icon] will allow you to scroll down and the [456 User
Icon] will allow you to scroll up. Press the [OK Icon] to select the highlighted option.
For Landscape Interfaces: Once activated, the [123 User Icon] will allow you to scroll up and the [456 User
Icon] will allow you to scroll down. Press the [OK Icon] to select the highlighted option.
To deactivate the alternate scroll mode, press and hold the [Back Icon] for 8 seconds or replace and
turn the dial ring.
Kohler Co. 5 1079815-5-A
Page 6
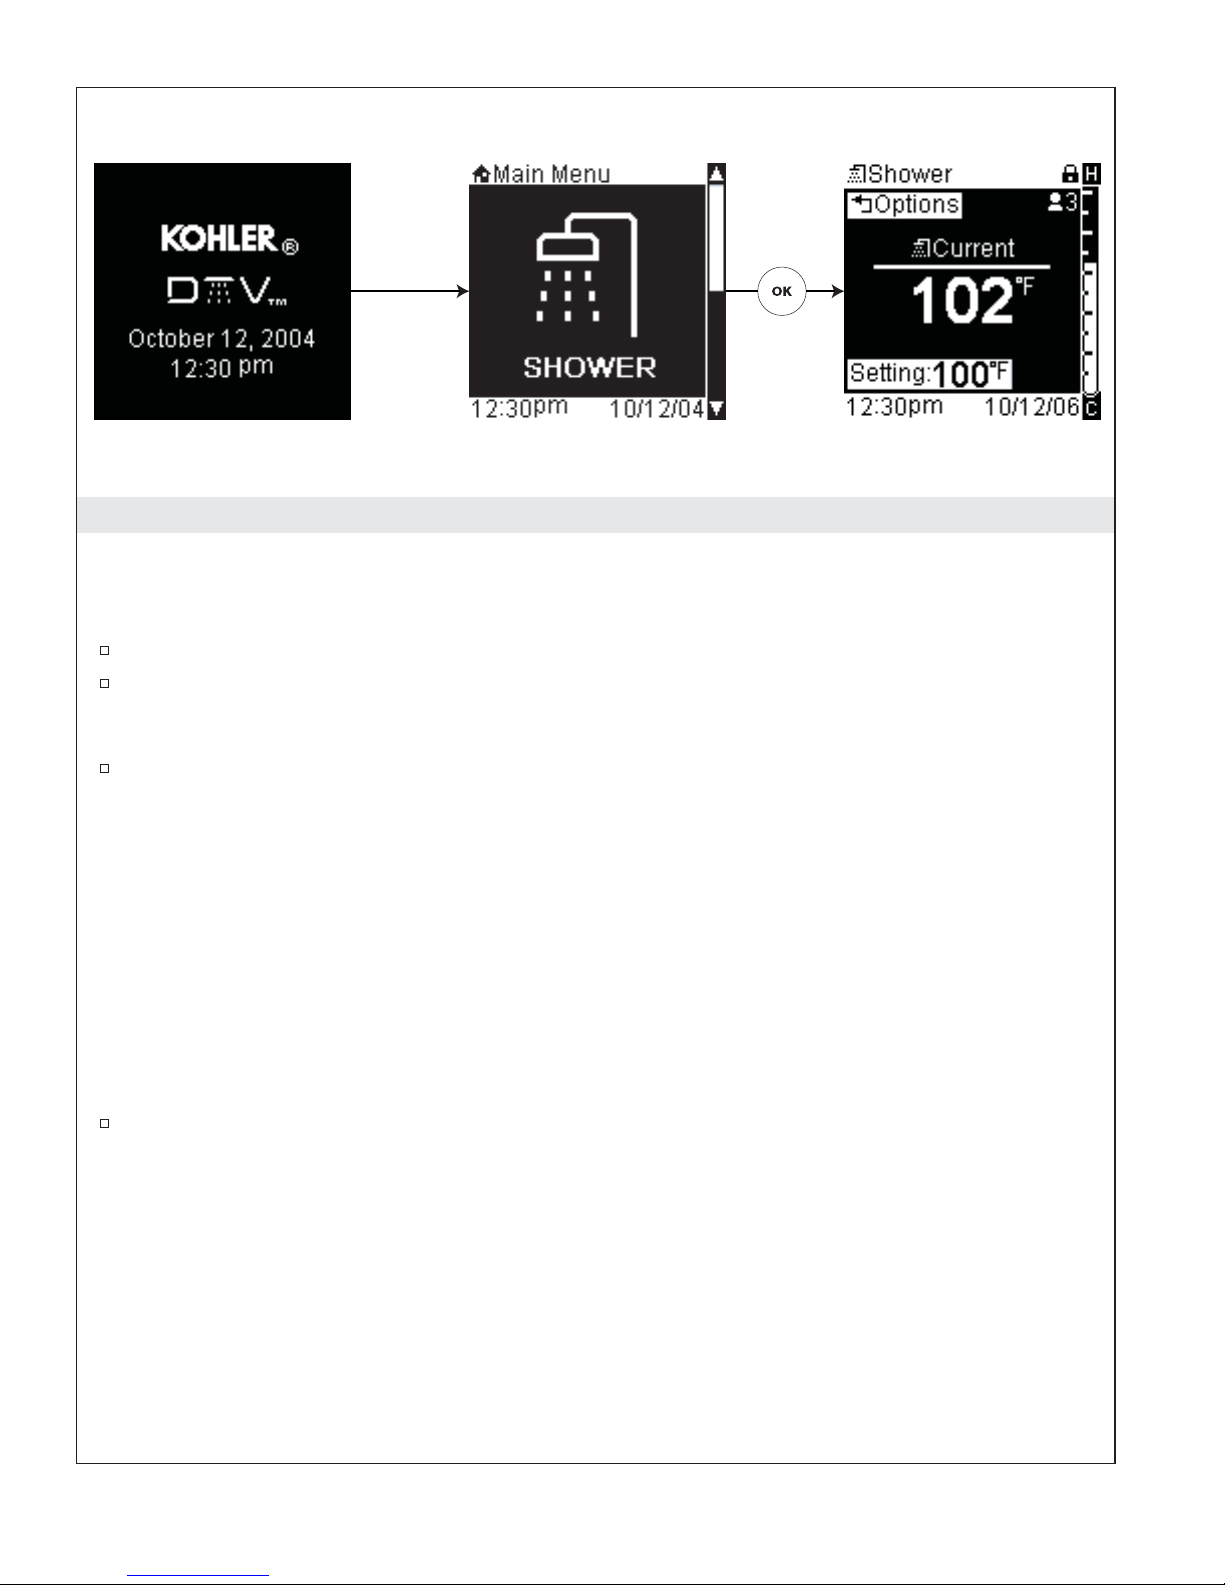
Using Your Shower
IMPORTANT! The interface must be set up according to your chosen valve configurations before
proceeding. If the configuration has not yet been selected in your interface, refer to the ″Set the Valve
Configuration - Preset Options″ or ″Set the Valve Configuration - Custom Options″ section.
To begin using your shower, use the dial to scroll to the shower screen.
Press the [OK Icon] to select and turn on your shower.
If your user presets are already set, refer to the “Using User Presets” section.
At any time, the shower can be turned OFF by pressing the [Power Icon].
The water will turn on and you will see a temperature screen displaying the current temperature and the set
temperature.
If you have the auto purge function activated: All the water outlets (with the exception of any
handshowers) will turn on and remain on until the set temperature is reached. (See the “Auto Purge” section
for instructions to turn this feature ON or OFF.)
Once the set temperature is reached all outlets except the designated primary showerhead will turn off. (See
the “Select Primary Water Outlet” section for more information on selecting or changing your primary water
outlet.)
If the auto purge function is not activated: The primary water outlet, usually a single showerhead, will turn
on. (See the “Select Primary Water Outlet” section for more information on selecting or changing your
primary water outlet.)
Use the dial to adjust the temperature up or down as desired.
In addition to the primary showerhead, you can also turn individual water outlets ON or OFF. Refer to the
“Turn Water Outlets ON or OFF” section.
The shower mode options consist of:
•
All On – turns all water outlets ON or OFF
•
List of Water Outlets – turns specific water outlets ON or OFF
•
Massage – selects massage cycling pattern
•
°F Therapy – selects hot and cold therapy options
•
Lights – turns incandescent and/or chroma lights ON or OFF also allows adjustment of color
(chroma only) and brightness (This menu item is only visible if this component is connected.) Refer
to the “Using Lights” section.
•
Music – allows for the selection of music from a music server, internet radio, or other audio device
connected via the “Line In” jack. Refer to the “Using Music” section.
1079815-5-A 6 Kohler Co.
Page 7

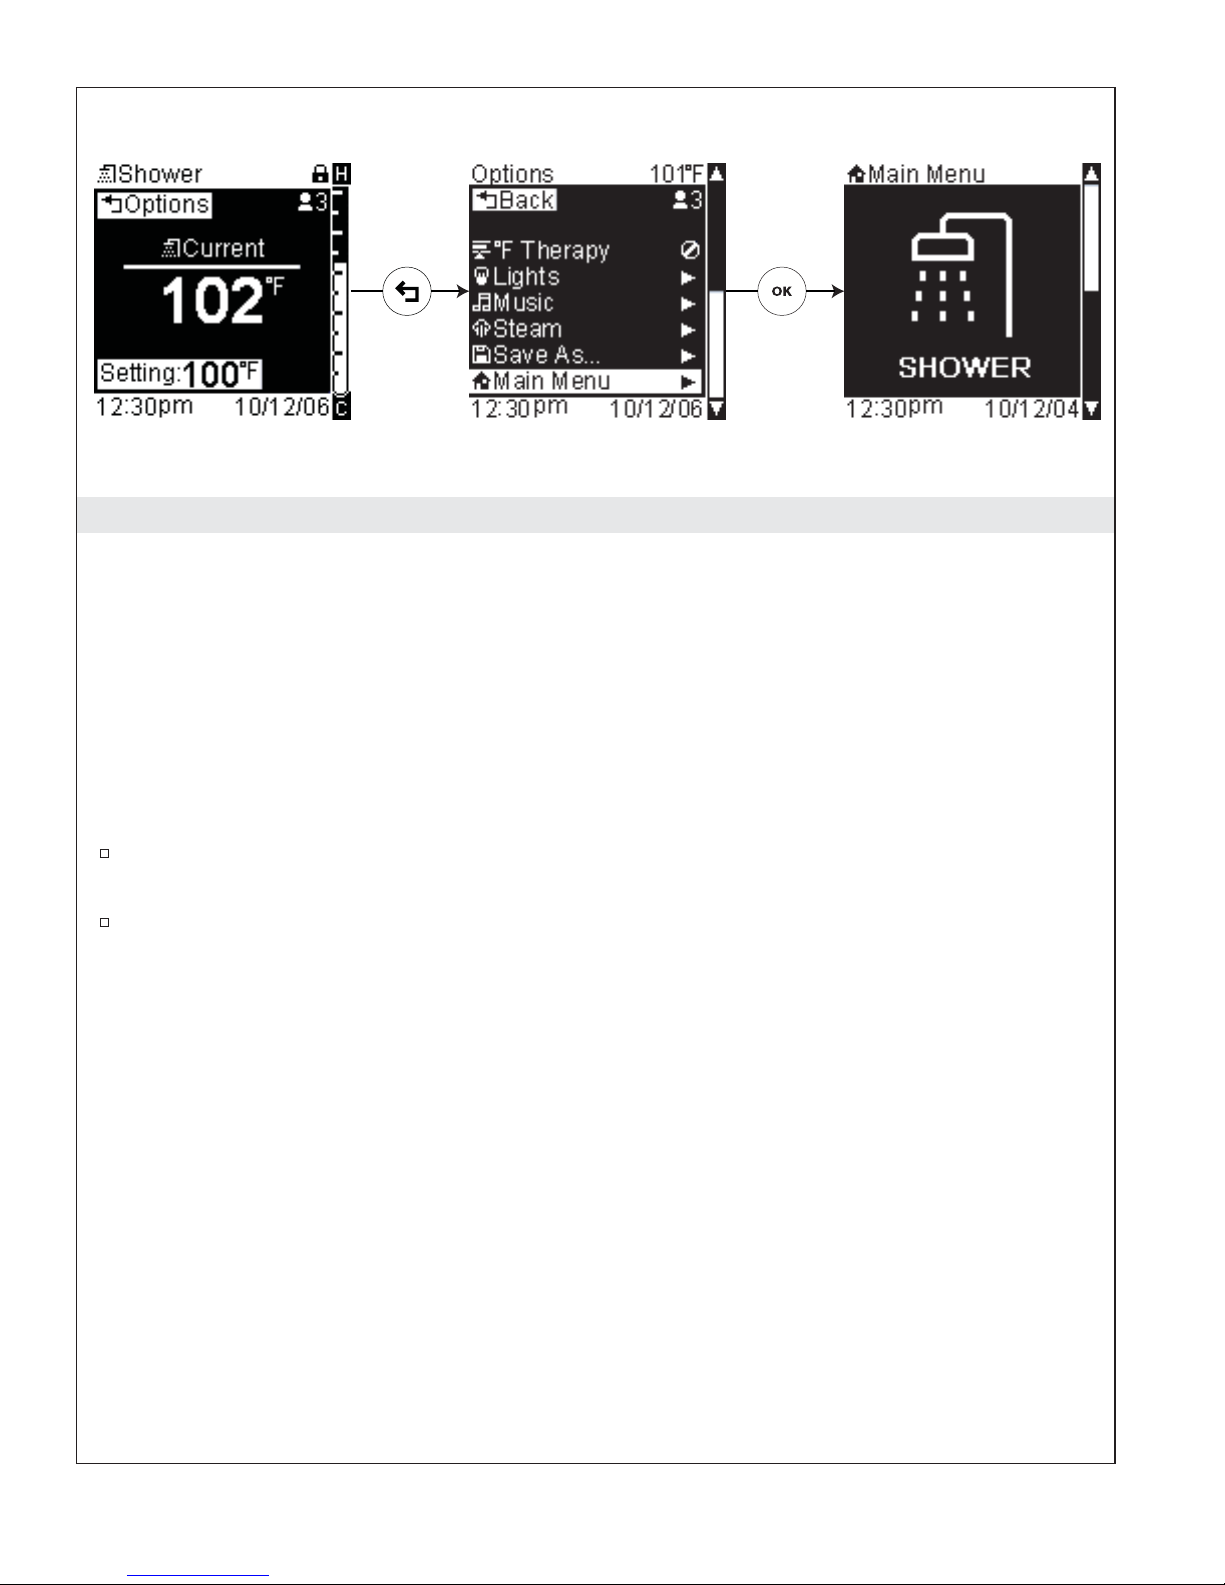
Using Your Shower (cont.)
•
Steam – turns the steam ON or OFF and allows temperature adjustment of steam (This menu item
is only visible if this component is connected.) Refer to the “Using Steam” section.
•
Save As – saves current settings to a user preset
•
Main Menu – returns to the main menu screens and turns OFF your shower
From the main menu, use the dial to scroll to the ″Shower″ screen.
Press the [OK Icon] to enter the shower menu.
Kohler Co. 7 1079815-5-A
Page 8
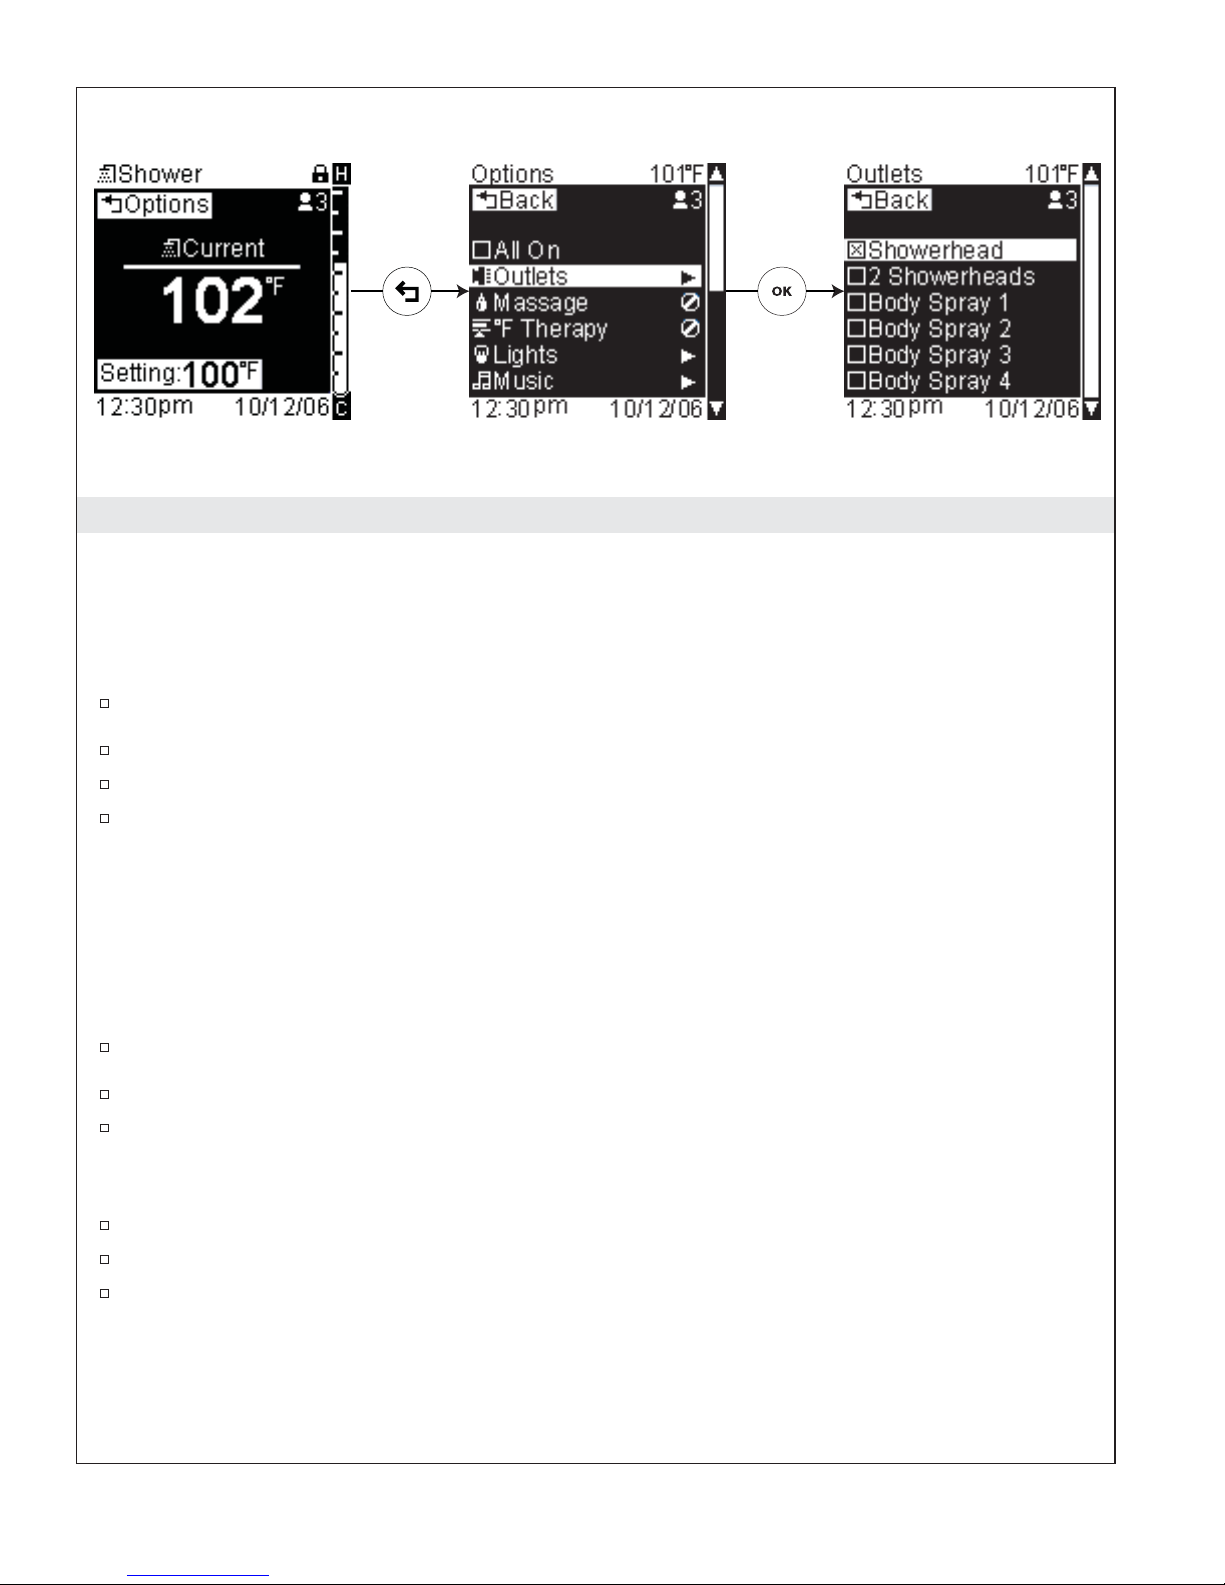
Turn Water Outlets ON or OFF
Turn ON All Outlets
Path: Shower > Temperature > [Back Icon] Options
NOTE: By default, when the shower is first turned ON, after the set temperature is reached, only the
primary showerhead will remain on. Using this screen, you can select “All On”ï to have all water outlets
ON.
From the temperature screen press the [Back Icon].
Highlight “All On.”
Press the [OK Icon] to select; this will turn ON all the water outlets.
Press the [Back Icon] to return to the temperature screen.
Turn ON/OFF Specific Water Outlets
Path: Shower > Temperature > [Back Icon] Options > Outlets
NOTE: The list of water outlets available will vary depending on your specific shower set-up.
NOTE: By default, when the shower is first turned ON, after the set temperature is reached, only the
primary showerhead will remain on. Using this screen, you can select individual water outlets to turn ON
or OFF.
From the temperature screen press the [Back Icon].
Using the dial, scroll to “Outlets.”
Press the [OK Icon] to select. This menu will contain the water outlets available for your chosen
configuration.
NOTE: Available water outlets listed will vary dependent on your chosen configuration.
Scroll to a water outlet such as “Showerhead.”
Press the [OK Icon] to turn the outlet ON or OFF. All checked items will be ON.
Once you have made your selections, press the [Back Icon] twice to return to the temperature
screen.
1079815-5-A 8 Kohler Co.
Page 9
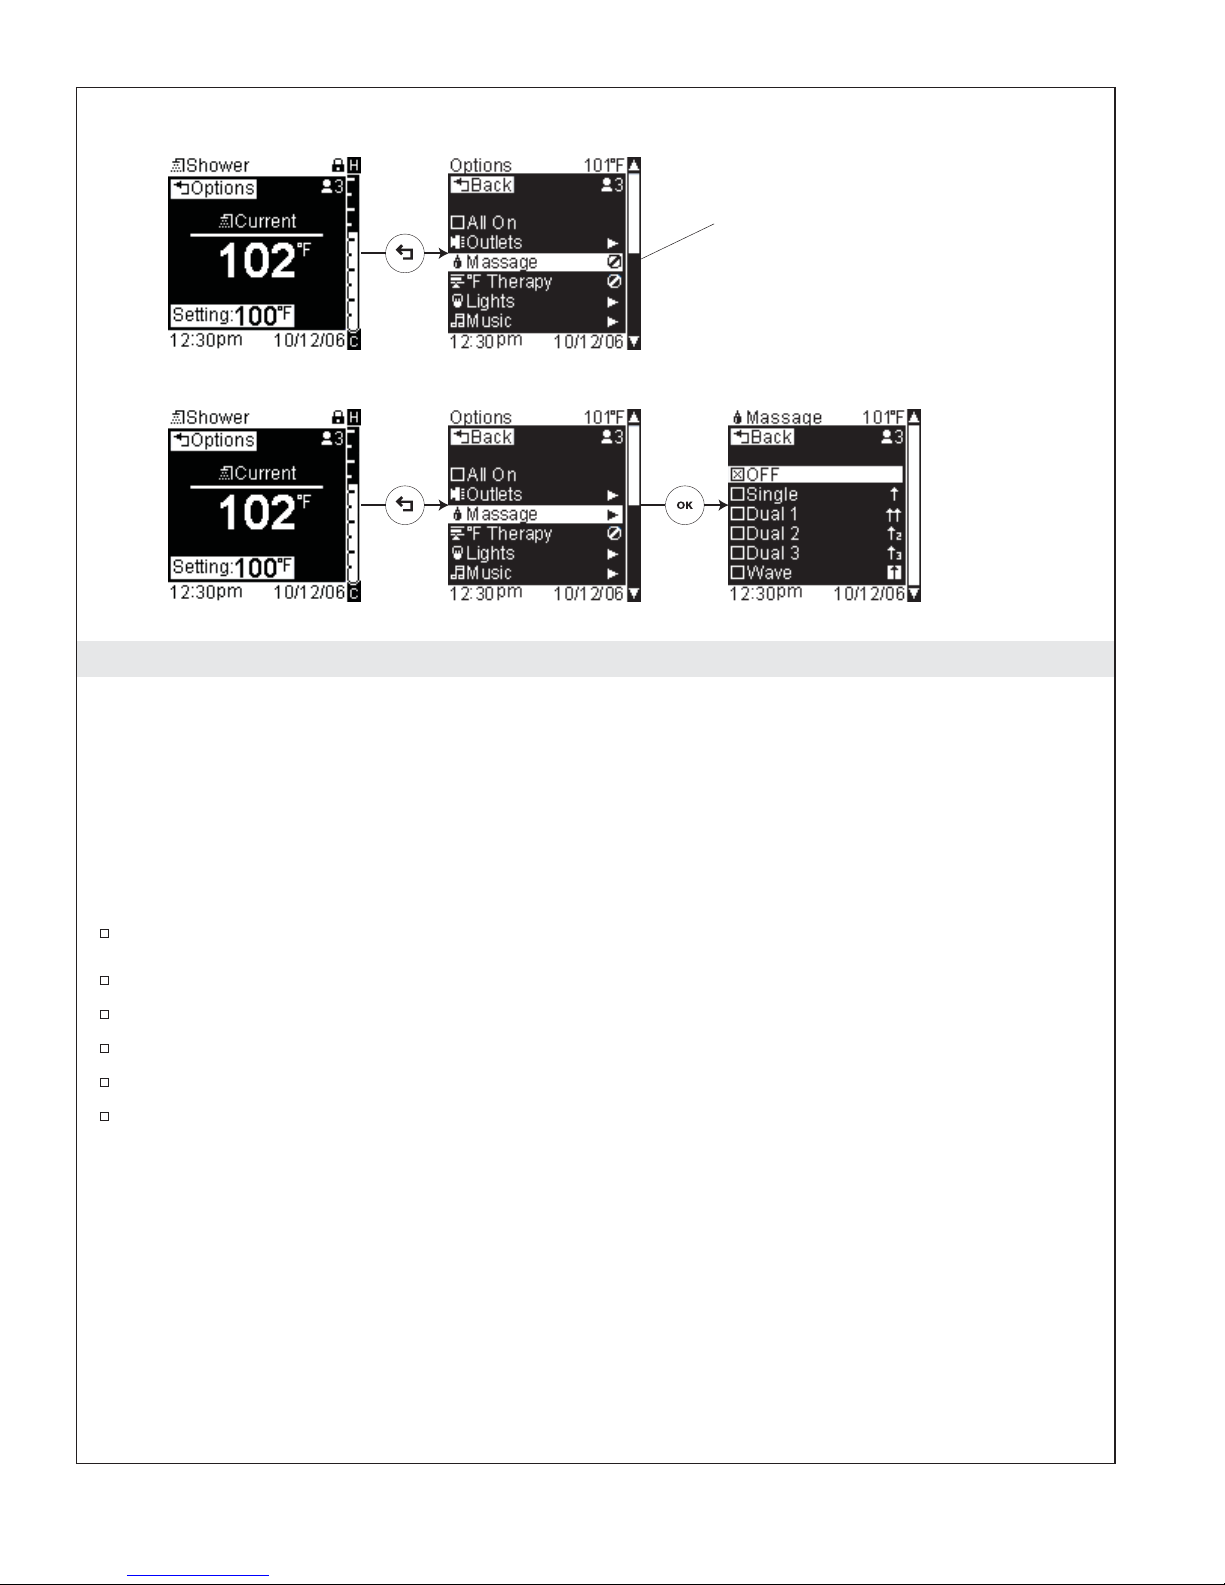
Massage Not Activated
Massage Active
Choose Massage Function
Path: Shower > Temperature > [Back Icon] Options > Massage
Refer to the "Activate the Massage
Functions" section.
This function, when activated, causes the water outlets to cycle ON and OFF in the chosen massage pattern.
NOTE: If the [No Icon] is present following “Massage” instead of an arrow, the massage function is not
yet activated. Refer to the “Activate the Massage Function” in the setting section in this guide to turn on
this function.
NOTE: The available massage cycling options vary dependent on your chosen configuration. For more
information about the available cycling patterns, refer to the section for your particular configuration in
the “Configurations” section of this guide.
To turn ON the massage function, from the temperature screen press the [Back Icon].
Using the dial, scroll to “Massage.”
Press the [OK Icon] to select
Using the dial, scroll to and highlight your desired massage.
Press the [OK Icon] to select and begin massage.
Press the [Back Icon] twice to return to the temperature screen.
Once a massage mode is selected, the body sprays/watertiles will automatically turn on and the water
outlets will begin to cycle ON and OFF in your chosen massage pattern.
Kohler Co. 9 1079815-5-A
Page 10
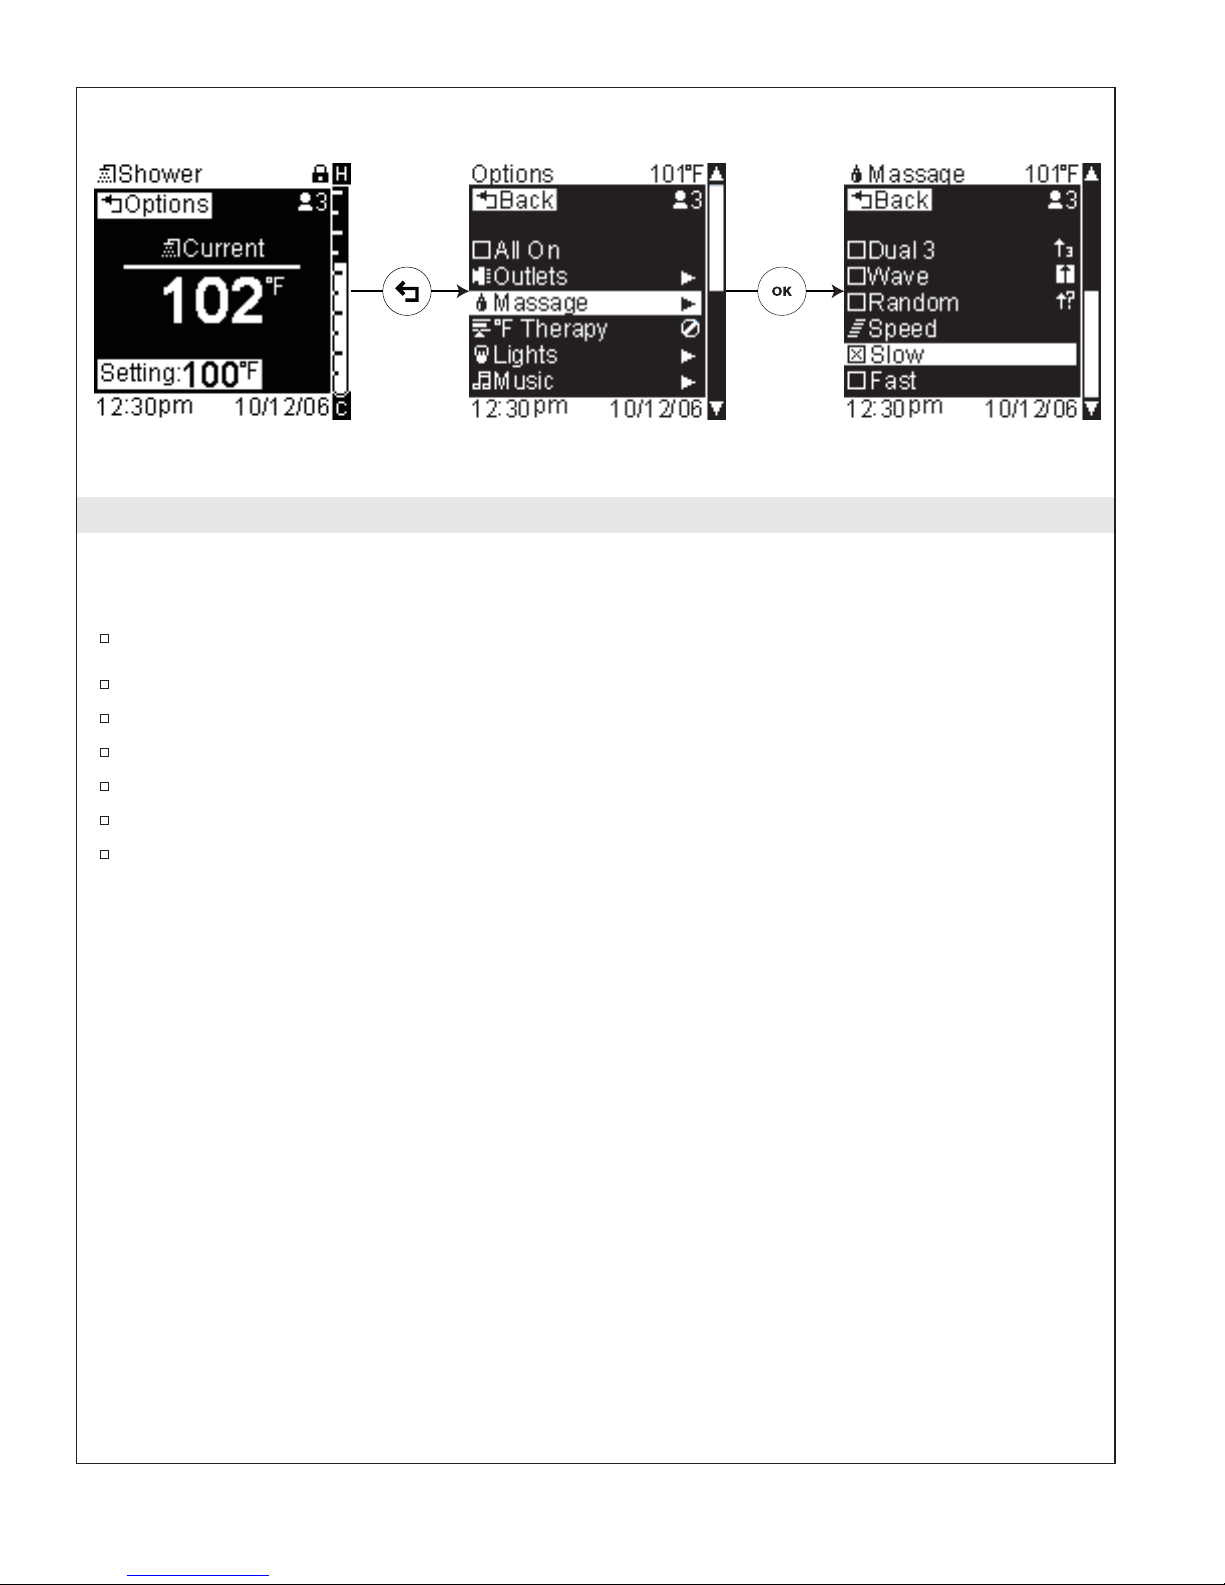
Adjust Cycling Speed
Path: Shower > Temperature > [Back Icon] Options > Massage > Speed > Slow or Fast
Use this function to vary the speed the water outlets cycle during massage.
To adjust the massage cycling speed, from the temperature screen press the [Back Icon].
Using the dial, scroll to “Massage.”
Press the [OK Icon] to select.
Scroll to the bottom of the menu.
Use the dial to scroll to and highlight either “Slow” or “Fast.”
Press the [OK Icon] to set the cycling speed. Your selection will be “checked.”
Press the [Back Icon] twice to return to the temperature screen.
1079815-5-A 10 Kohler Co.
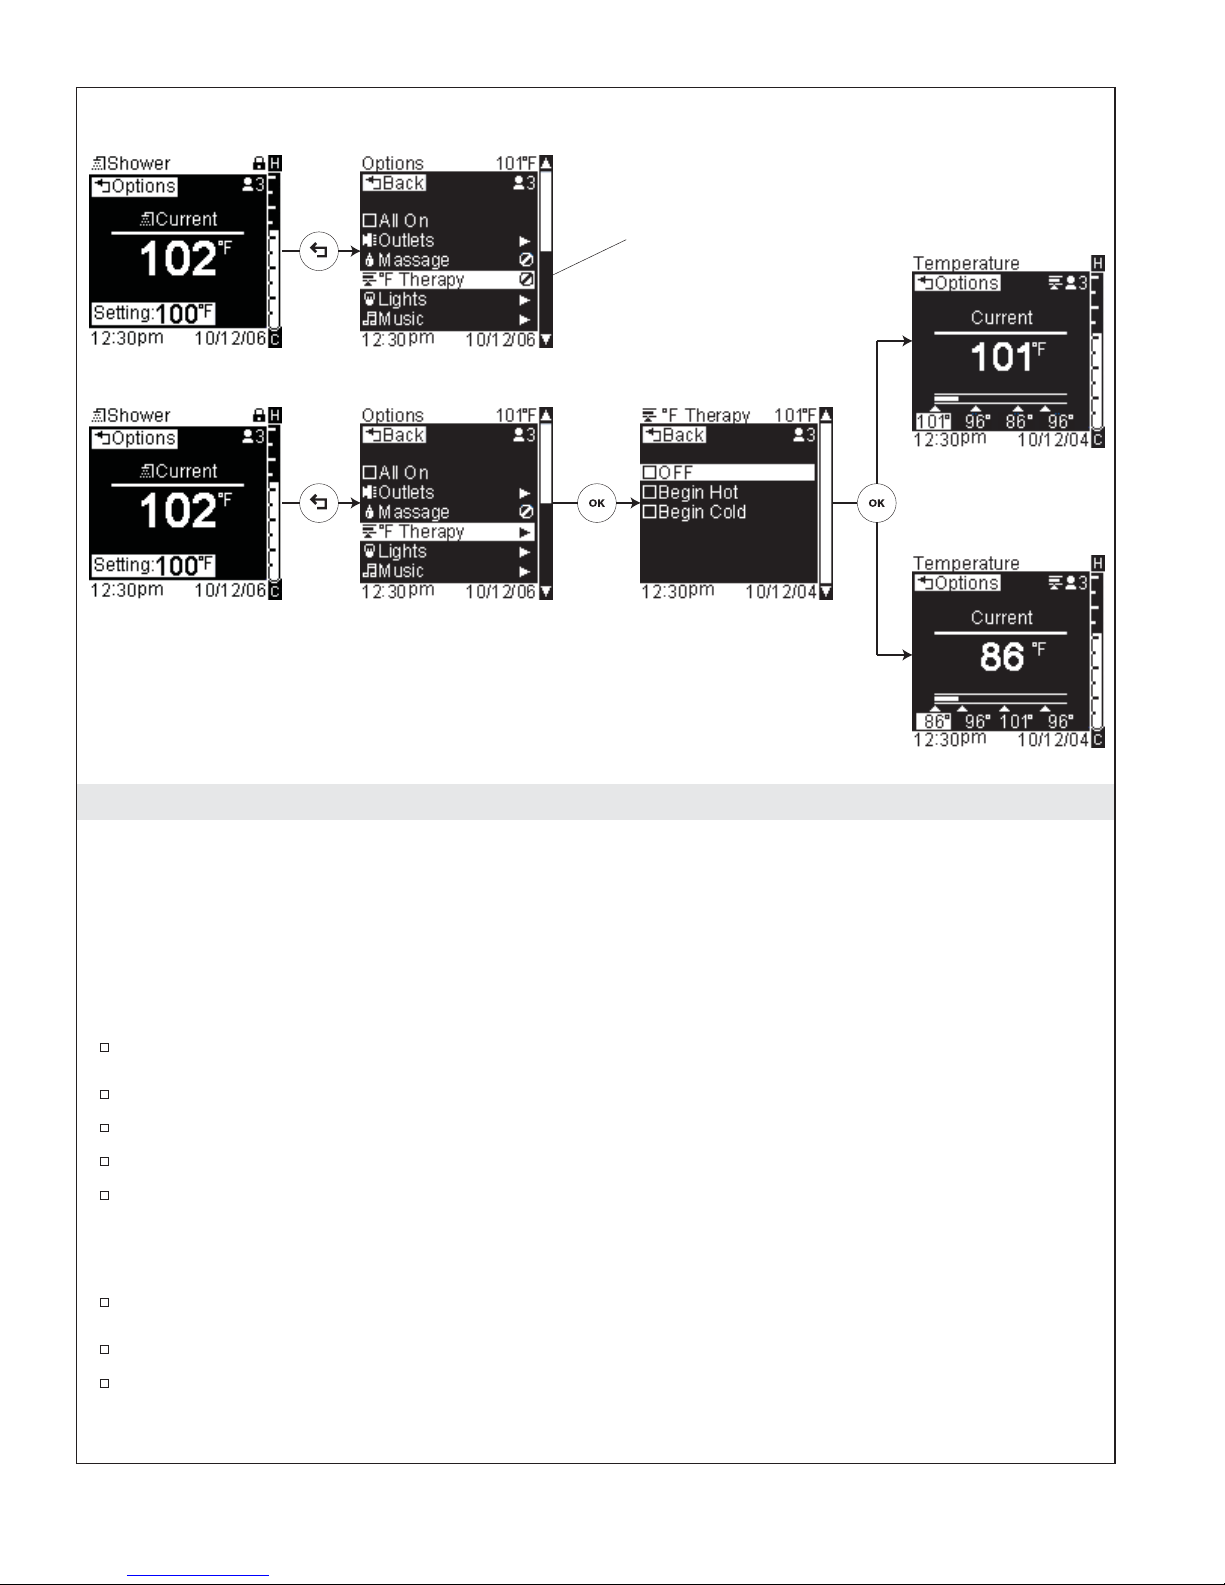
Page 11

Temperature Therapy Not Activated
Temperature Therapy Active
Refer to the "Activate
Temperature Therapy"
section.
Hot Therapy
Cold Therapy
Temperature Therapy Options
Path: Shower > Temperature > [Back Icon] Options > °F Therapy
NOTE: If the [No Icon] is present following “°F Therapy” instead of an arrow, the temperature therapy
function is not yet activated. Refer to the “Activate Temperature Therapy” section to turn on this
function.
This function, when activated, causes the water temperature to cycle from hot to cold to hot or cold to hot to
cold dependent on your chosen therapy.
NOTE: Temperatures can be customized as desired. For the explanation of the therapies, the default
temperatures will be used.
Hot Therapy will start with a water temperature of 101°F (38°C) for 90 seconds, decrease to 96°F (36°C) for
45 seconds, decrease again to 86°F (30°C) for 30 seconds, then step the temperature back up to 96°F (36°C)
for 45 seconds before going back to 101°F (38°C). The water temperature will continue to cycle until this
function is turned OFF.
Cold Therapy will start with a water temperature of 86°F (30°C) for 30 seconds, increase to 96°F (36°C) for
45 seconds, increase again to 101°F (38°C) for 90 seconds, then step the temperature back down to 96°F
(36°C) for 45 seconds before going back to 86°F (30°C). The water temperature will continue to cycle until
this function is turned OFF.
To turn ON the temperature therapy function, from the temperature screen press the [Back Icon].
Using the dial, scroll to “°F Therapy.”
Press the [OK Icon] to select.
Using the dial, scroll to either “Begin Hot” for heat therapy, or “Begin Cold” for cold therapy.
Press the [OK Icon] to select and begin your selected temperature therapy.
Kohler Co. 11 1079815-5-A
Page 12

Temperature Therapy Options (cont.)
The water temperature will continue to cycle until this function is turned OFF.
To customize the temperatures, refer to the “Changing Temperature Therapy Temperatures” section.
1079815-5-A 12 Kohler Co.
Page 13
Temperature Therapy Not Activated
Temperature Therapy Active
Refer to the "Activate
Temperature Therapy"
section.
Hot Therapy
Cold Therapy
Changing Temperature Therapy Temperatures
Path: Shower > Temperature > [Back Icon] Options > °F Therapy
NOTE: If the [No Icon] is present following ″°F Therapy″ instead of an arrow, the massage function is not
yet activated. Refer to the ″Activate Temperature Therapy″ section to turn ON this function.
This function, when activated, causes the water temperature to cycle from hot to cold to hot or cold to hot to
cold dependent on your chosen therapy. High, mid, and low temperatures can be customized.
To customize the temperature therapy temperatures, you must first activate a hot or cold therapy.
To turn ON the temperature therapy function, from the temperature screen press the [Back Icon].
Using the dial, scroll to “°F Therapy.”
Press the [OK Icon] to select.
Using the dial, scroll to either “Begin Hot” for heat therapy, or “Begin Cold” for cold therapy.
Press the [OK Icon] to select and begin your selected temperature therapy.
You will see a temperature screen with the various temperature jumps along the bottom. The beginning
therapy temperature will be highlighted in the bottom left of the screen.
Use the dial to adjust the temperature as desired.
Press the [OK Icon] to set this first temperature and advance to the next temperature.
Repeat for each temperature setting.
NOTE: When adjusting the temperatures, the second and fourth temperature settings will always be the
same; if you adjust one temperature the other will automatically update to the new setting.
Kohler Co. 13 1079815-5-A
Page 14
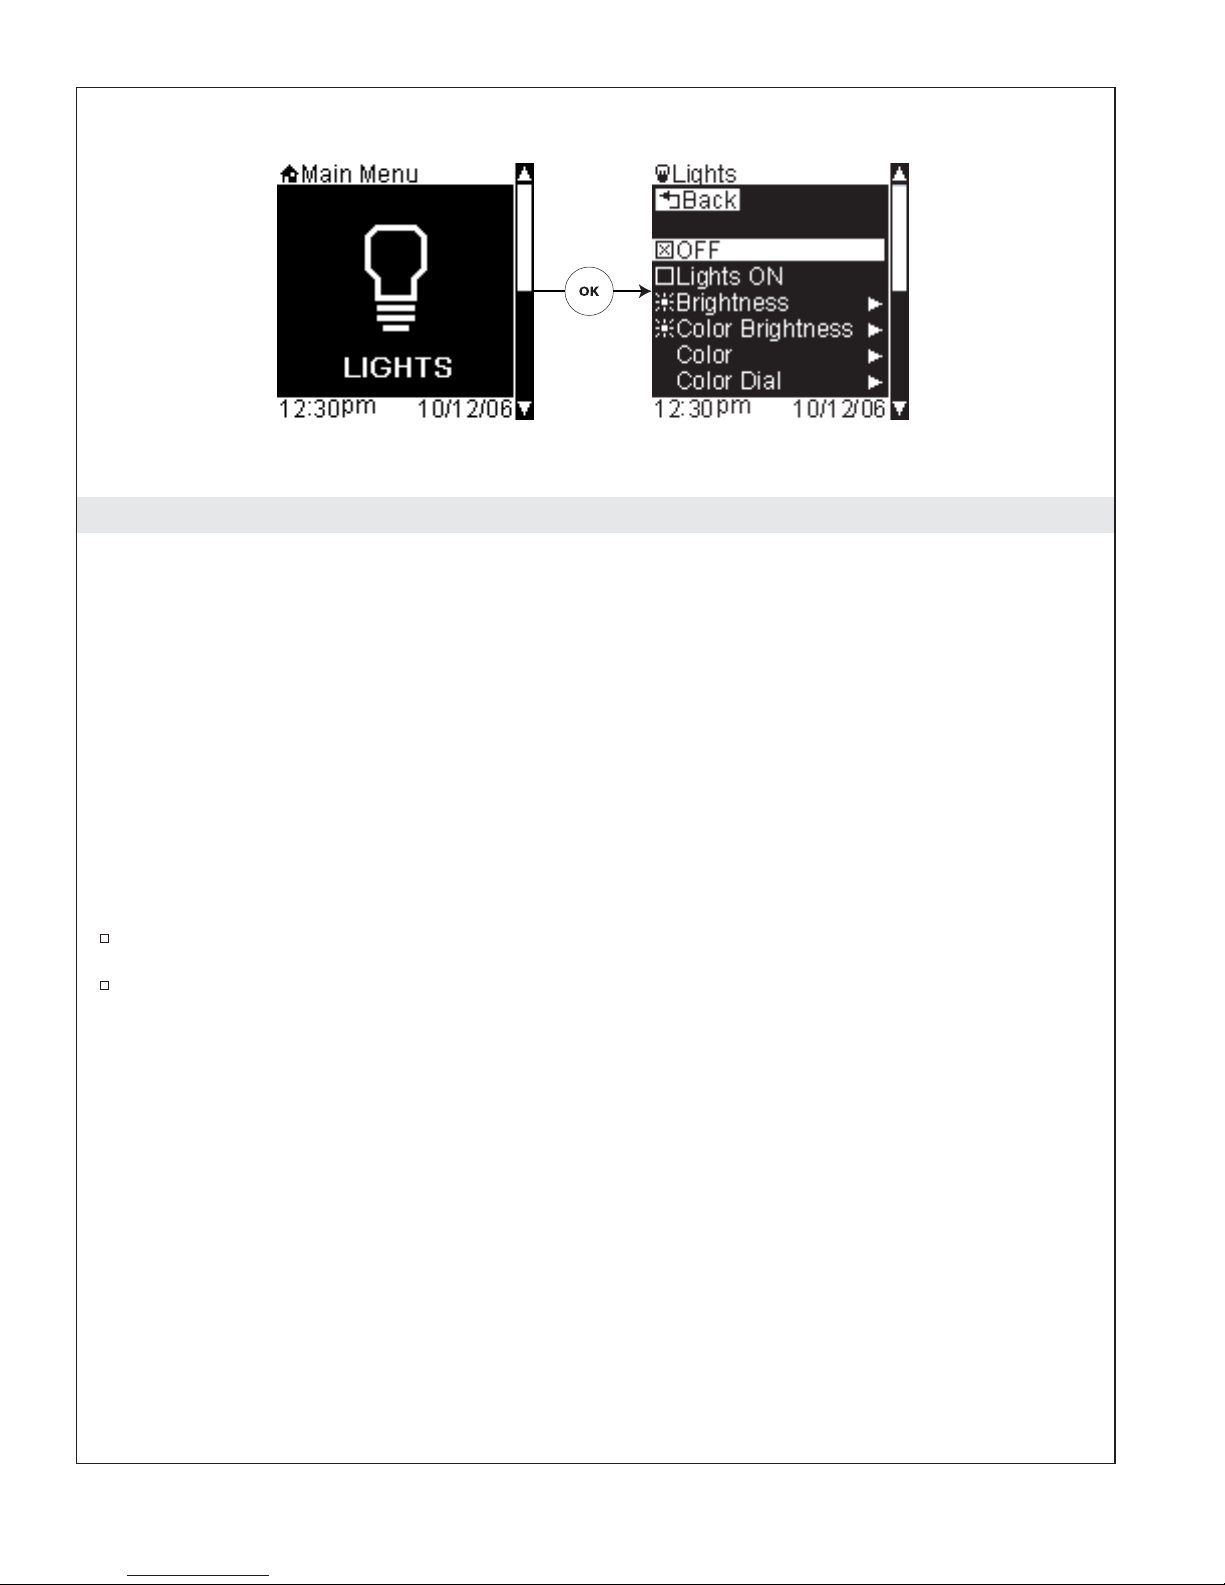
Using Lights
This function controls both the incandescent lighting in your shower as well as the chroma features of your
lighted rain panel.
NOTE: If you do not have a chroma light panel connected or if you have incandescent lighting disabled
(see “Activate Lights” section) the lighting menu options will not be available.
The light mode options consist of:
•
ON/OFF – turns incandescent or chroma lighting ON or OFF
•
Brightness – adjusts the brightness of your incandescent lighting
•
Color Brightness – adjusts the brightness of your chroma lighting
•
Choose Color – sets the chroma lighting to display the color of your choosing
•
Color Dial – sets the chroma lighting to display a custom color of your choosing
•
Effects – sets in motion the lighting effects of your chroma lighting
•
Save As – saves current settings to a user preset (refer to the “Save As” section)
•
Main Menu – returns to the main menu screens and turns OFF your shower (refer to the “Main
Menu” section)
From the main menu, use the dial to scroll to the “Lights” screen.
Press the [OK Icon] to enter the Lights options menu.
1079815-5-A 14 Kohler Co.
Page 15

Lights ON/OFF
Path: Lights > Lights ON
Alternate Path: Shower > [Back Icon] Options > Lights > Lights ON
To turn on your lights:
From the main menu, use the dial to scroll to the “Lights” screen.
Press the [OK Icon] to enter the Lights menu.
Using the dial, scroll to “Lights ON.”
Press the [OK Icon] to select and turn ON the lights.
Kohler Co. 15 1079815-5-A
Page 16

Incandescent Brightness
Path: Lights > Brightness
Alternate Path: Shower > [Back Icon] Options > Lights > Brightness
This feature allows you to adjust and set the brightness of your incandescent lighting.
From the main menu, use the dial to scroll to the “Lights” screen.
Press the [OK Icon] to select.
Scroll to “Brightness.”
Press the [OK Icon] to select.
Once the brightness is set, press the [Back Icon] to return to the lights options menu.
1079815-5-A 16 Kohler Co.
Page 17

Chroma Brightness
Path: Lights > Color Brightness
Alternate Path: Shower > [Back Icon] Options > Lights > Color Brightness
This feature allows you to adjust and set the brightness of your chroma lighting.
From the main menu, use the dial to scroll to the “Lights” screen.
Press the [OK Icon] to select.
Scroll to “Color Brightness.”
Press the [OK Icon] to select.
Turn the dial counterclockwise to dim the lights and clockwise to brighten.
Once the brightness is set, press the [Back Icon] to return to the lights options menu.
Kohler Co. 17 1079815-5-A
Page 18
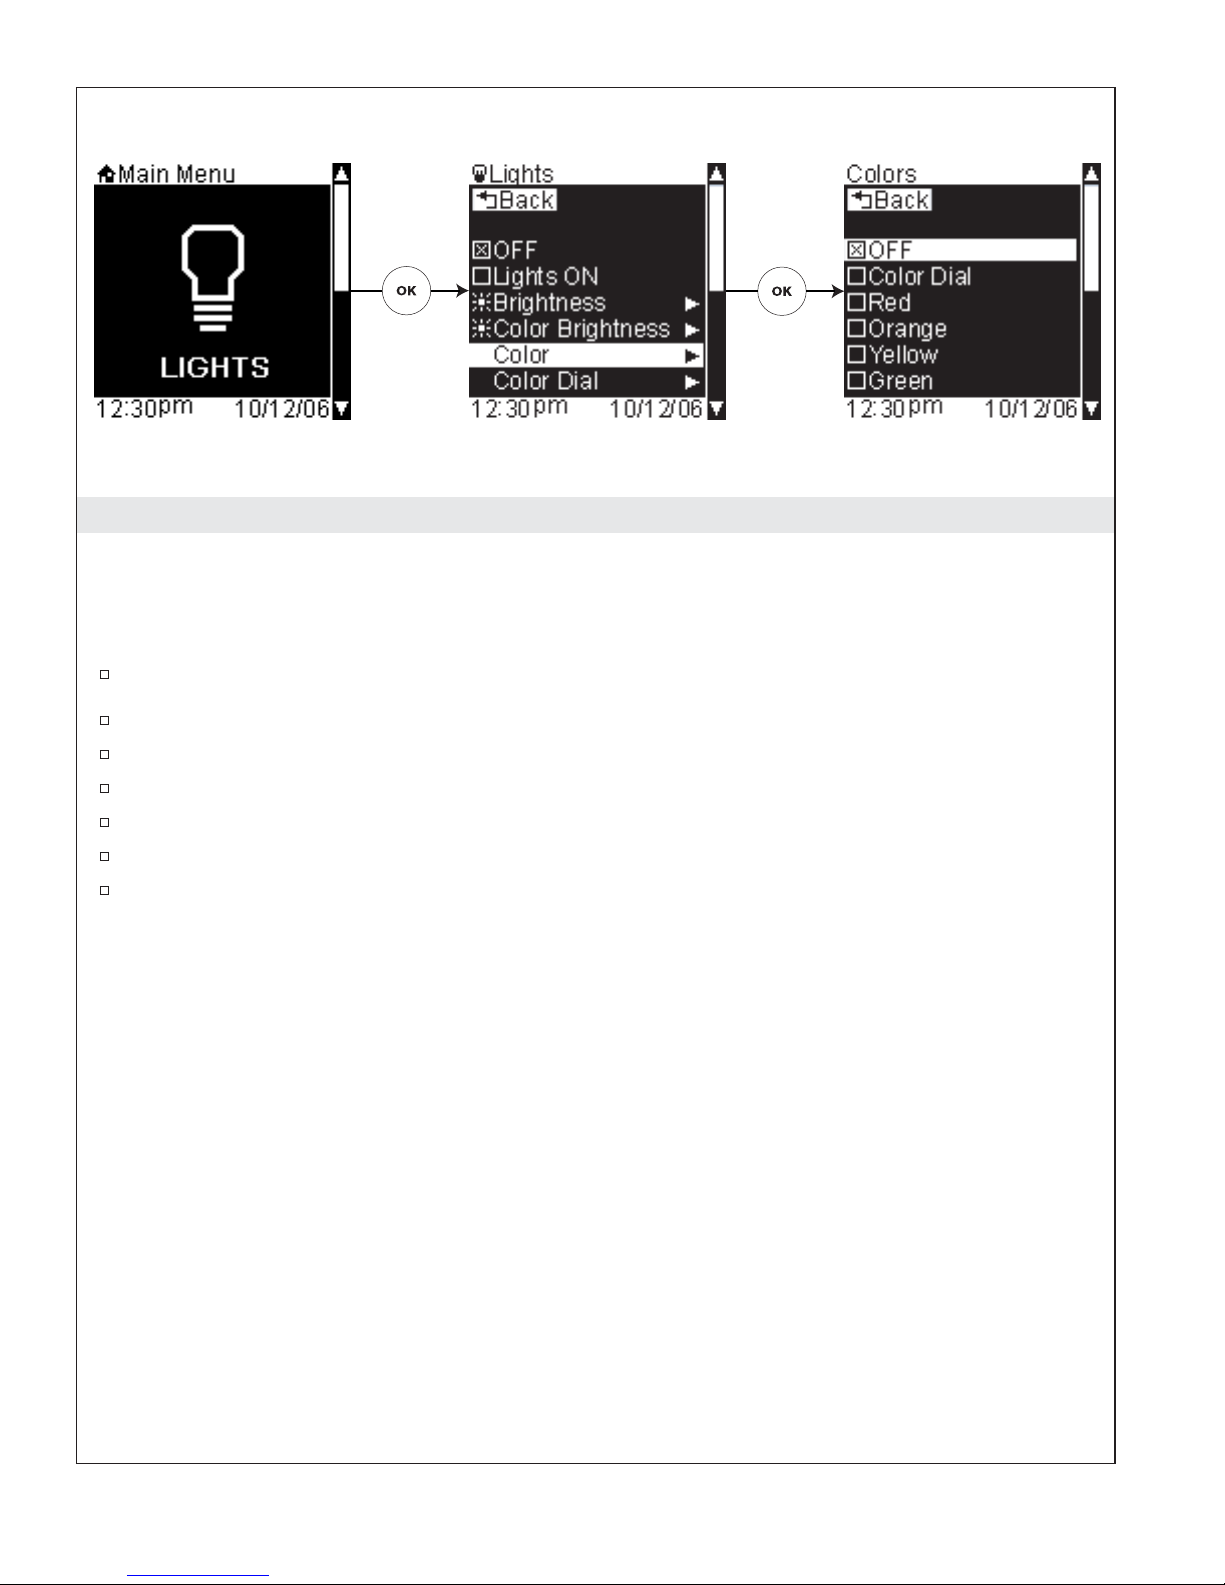
Choose Color
Path: Lights > Color
Alternate Path: Shower > [Back Icon] Options > Lights > Color
The chroma lighting can be set to display the color of your choosing.
From the main menu, use the dial to scroll to the “Lights” screen.
Press the [OK Icon] to select.
Scroll to “Colors.”
Press the [OK Icon] to select.
Using the dial, scroll to your desired color.
Press the [OK Icon] to select; the light will change to your selected color.
Once the color is set as desired, press the [Back Icon] to return to the lights options menu.
1079815-5-A 18 Kohler Co.
Page 19

Choose Custom Color
Path: Lights > Color Dial
Alternate Path: Shower > [Back Icon] Options > Lights > Color Dial
The chroma lighting can be set to display a custom color of your choosing.
From the main menu, use the dial to scroll to the “Lights” screen.
Press the [OK Icon] to select.
Scroll to “Color Dial.”
Press the [OK Icon] to select.
Use the dial to adjust the color up or down by 5° increments.
Once the color is set as desired, press the [Back Icon] to set the custom color under the “Color Dial”
selection in the “Colors” menu and to return to the Light Options screen.
Kohler Co. 19 1079815-5-A
Page 20
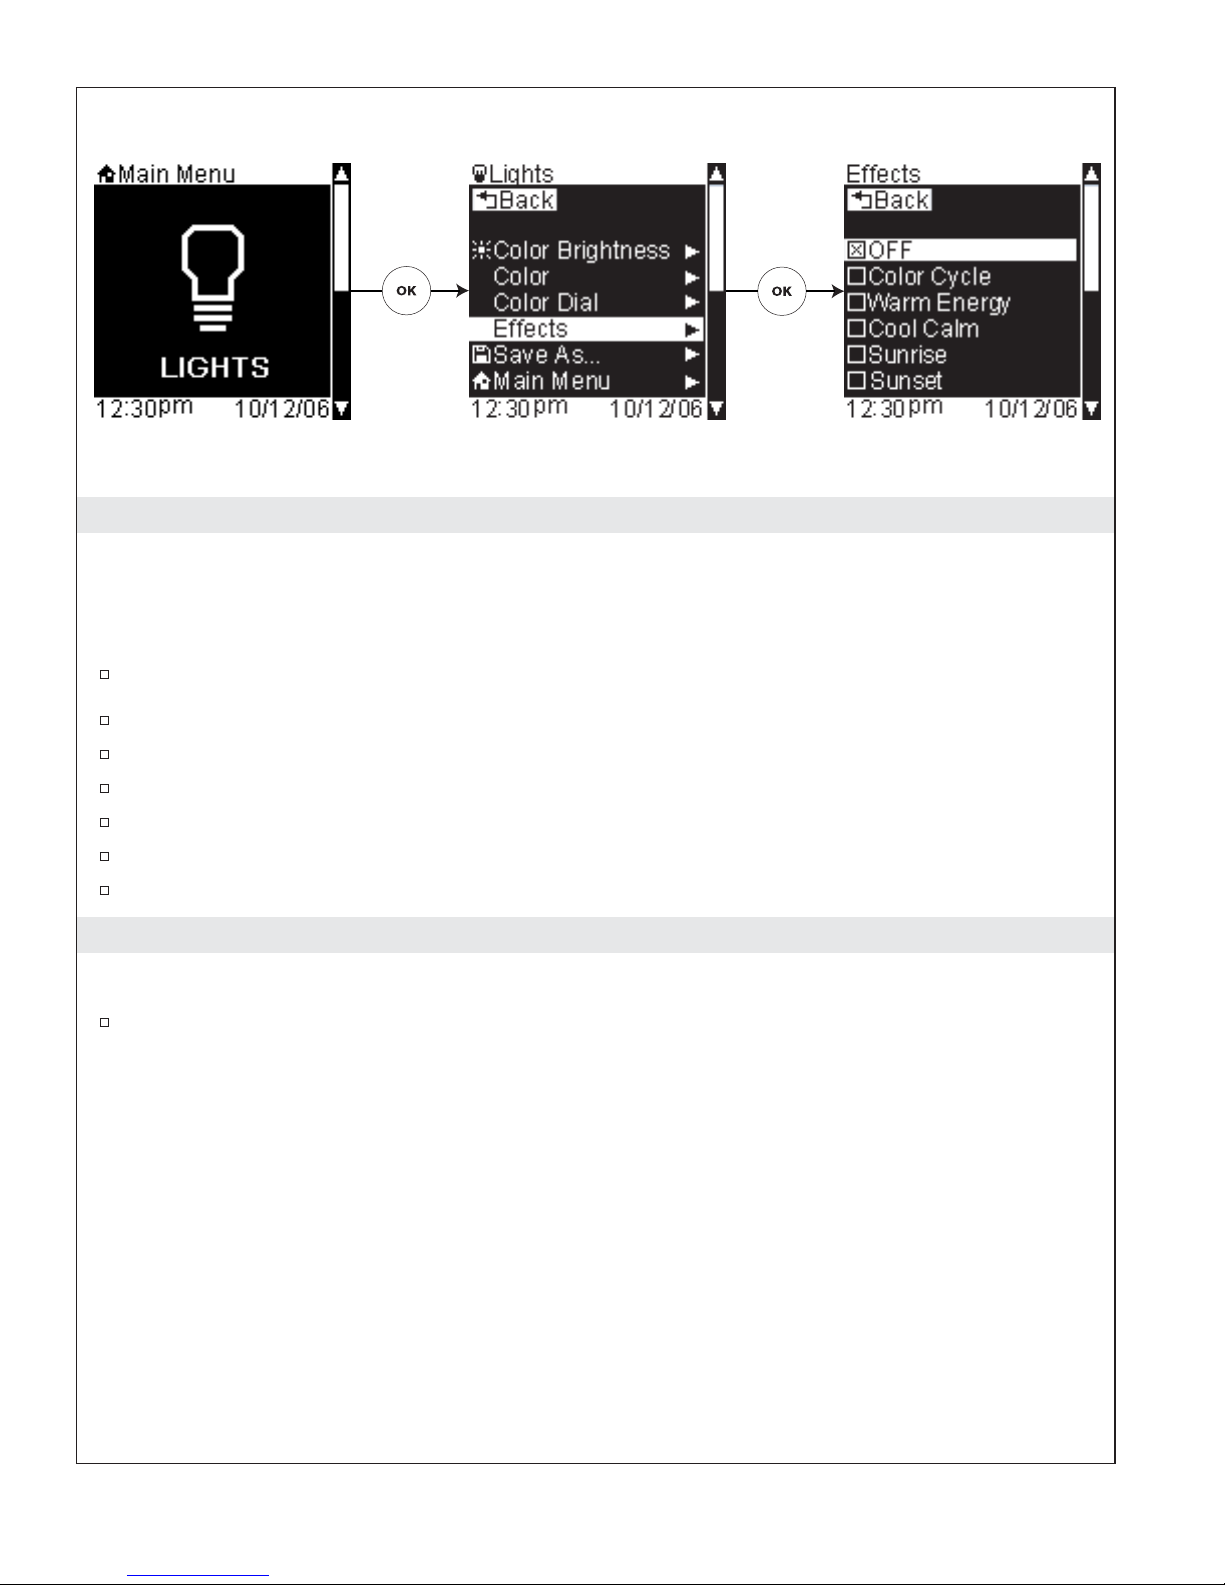
Lighting Effects
Path: Lights > Effects
Alternate Path: Shower > [Back Icon] Options > Lights > Effects
The chroma light comes with multiple lighting effects, such as Sunrise, Sunset, and Water Reflection.
From the main menu, use the dial to scroll to the “Lights” screen.
Press the [OK Icon] to select.
Scroll to “Effects.”
Press the [OK Icon] to select.
Using the dial, scroll to your desired effect.
Press the [OK Icon] to select and begin the chroma lighting effect.
Press the [Back Icon] twice to return to the temperature screen.
Save Lights Settings
Path: Lights > Save As
Refer to the “Save As” section.
1079815-5-A 20 Kohler Co.
Page 21
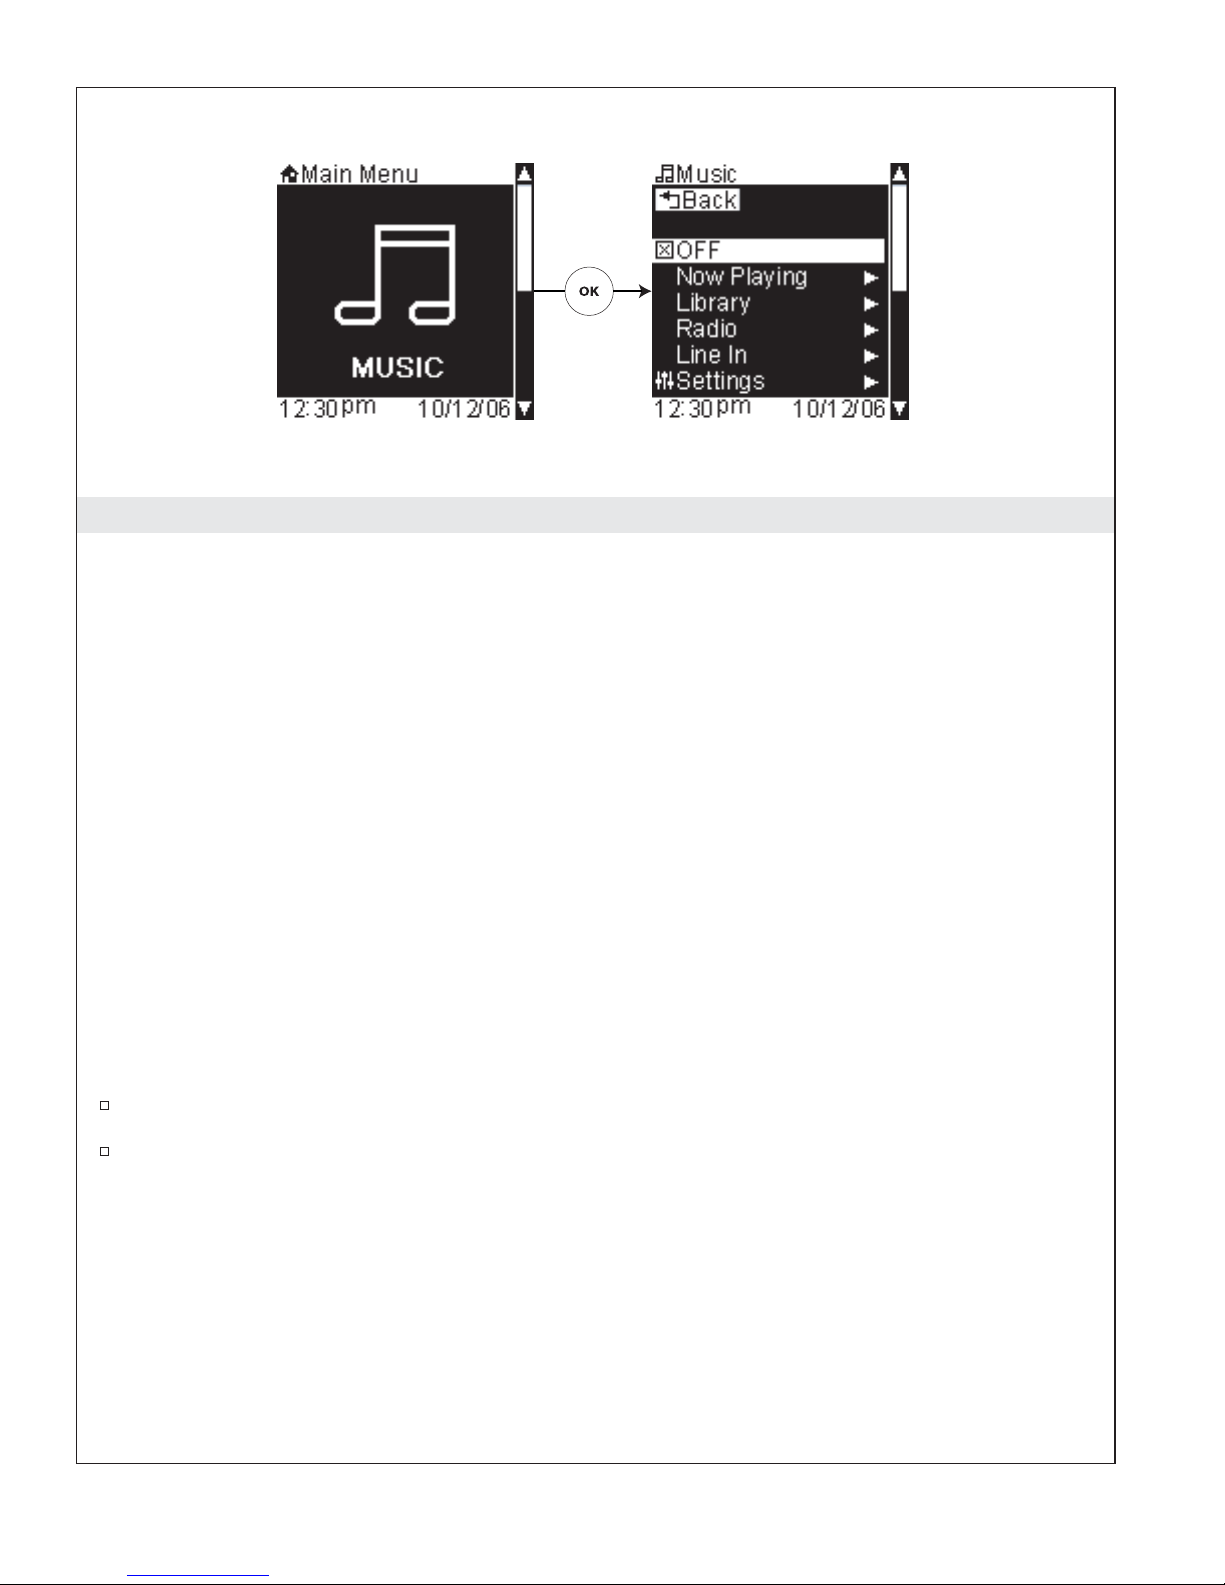
Using Music
IMPORTANT! To stream audio from your home computer to your shower, you must first configure the
music server on your computer. Refer to the ″Music Server Set-up – Getting Started” section for
information on configuring your music server.
IMPORTANT! Music options will not be available unless you have agreed to the Roku terms of agreement
and have also selected your region. If this was not done during the initial set-up, refer to the “Roku
Agreement” section.
A high-speed internet connection is recommended for best performance.
From the music options menu, you can access and play your music files in the “Library” and preconfigured
internet radio stations under “Radio.” Additional audio devices, such as an MP3 player, can be connected via
the Line In jack allowing your interface to control the volume.
The music mode options consist of: (options listed vary dependant on your system set-up)
•
OFF – turns OFF your music
•
Library – links to your configured music servers
•
Radio – links to your configured internet radio stations
•
Line In – allows you to hook up your own audio device to the system
•
Settings – controls the music settings for your system (refer to the “Music Settings” section)
•
Save As – saves current settings to a user preset (refer to the “Save As” section)
•
Main Menu – returns to the main menu screens and turns OFF your shower (refer to the “Main
Menu” section)
From the main menu, use the dial to scroll to the “Music” screen.
Press the [OK Icon] to enter the Music options menu.
Kohler Co. 21 1079815-5-A
Page 22
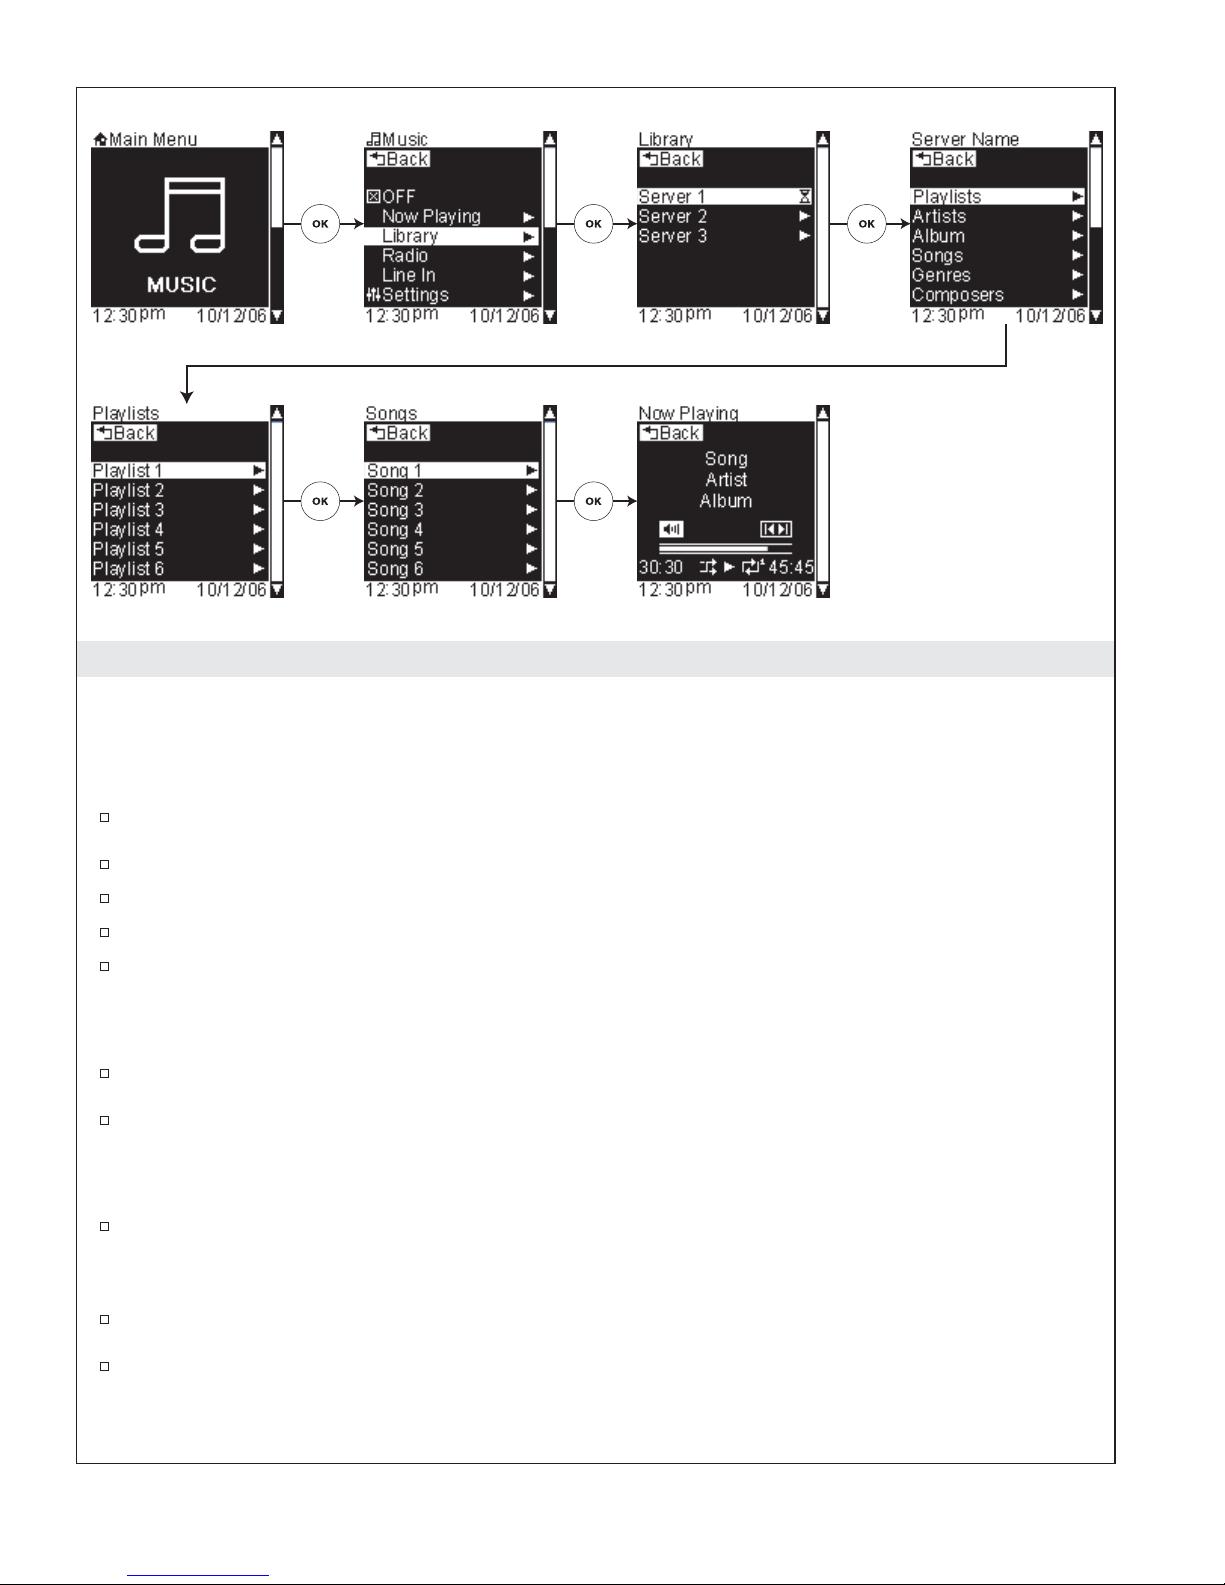
Your Music Library
Path: Music > Library
Alternate Path: Shower > [Back Icon] Options > Music > Library
This function links to your configured music servers to play your music files.
From the main menu, use the dial to scroll to the “Music” screen.
Press the [OK Icon] to enter the Music menu.
To listen to your music files, scroll to “Library.”
Press the [OK Icon] to select.
Scroll to and select your music server.
Dependant upon your music server, your music will be organized by playlist, artist, album, songs, or genre.
Navigate through the menus to a song list.
Use the dial to scroll to and highlight a song.
Press the [OK Icon] to begin playing the selected song.
In the “Now Playing” screen, your song will be displayed with song, artist, and album (if the information is
available).
When the volume icon is highlighted, use the dial to adjust the volume.
To skip forward or backward in your playlist:
Press and hold the [OK Icon] for 3 seconds to switch the highlight to the skip icon.
Use the dial to skip forward or backward in your playlist.
After 10 seconds the dial will revert back to controlling volume.
1079815-5-A 22 Kohler Co.
Page 23
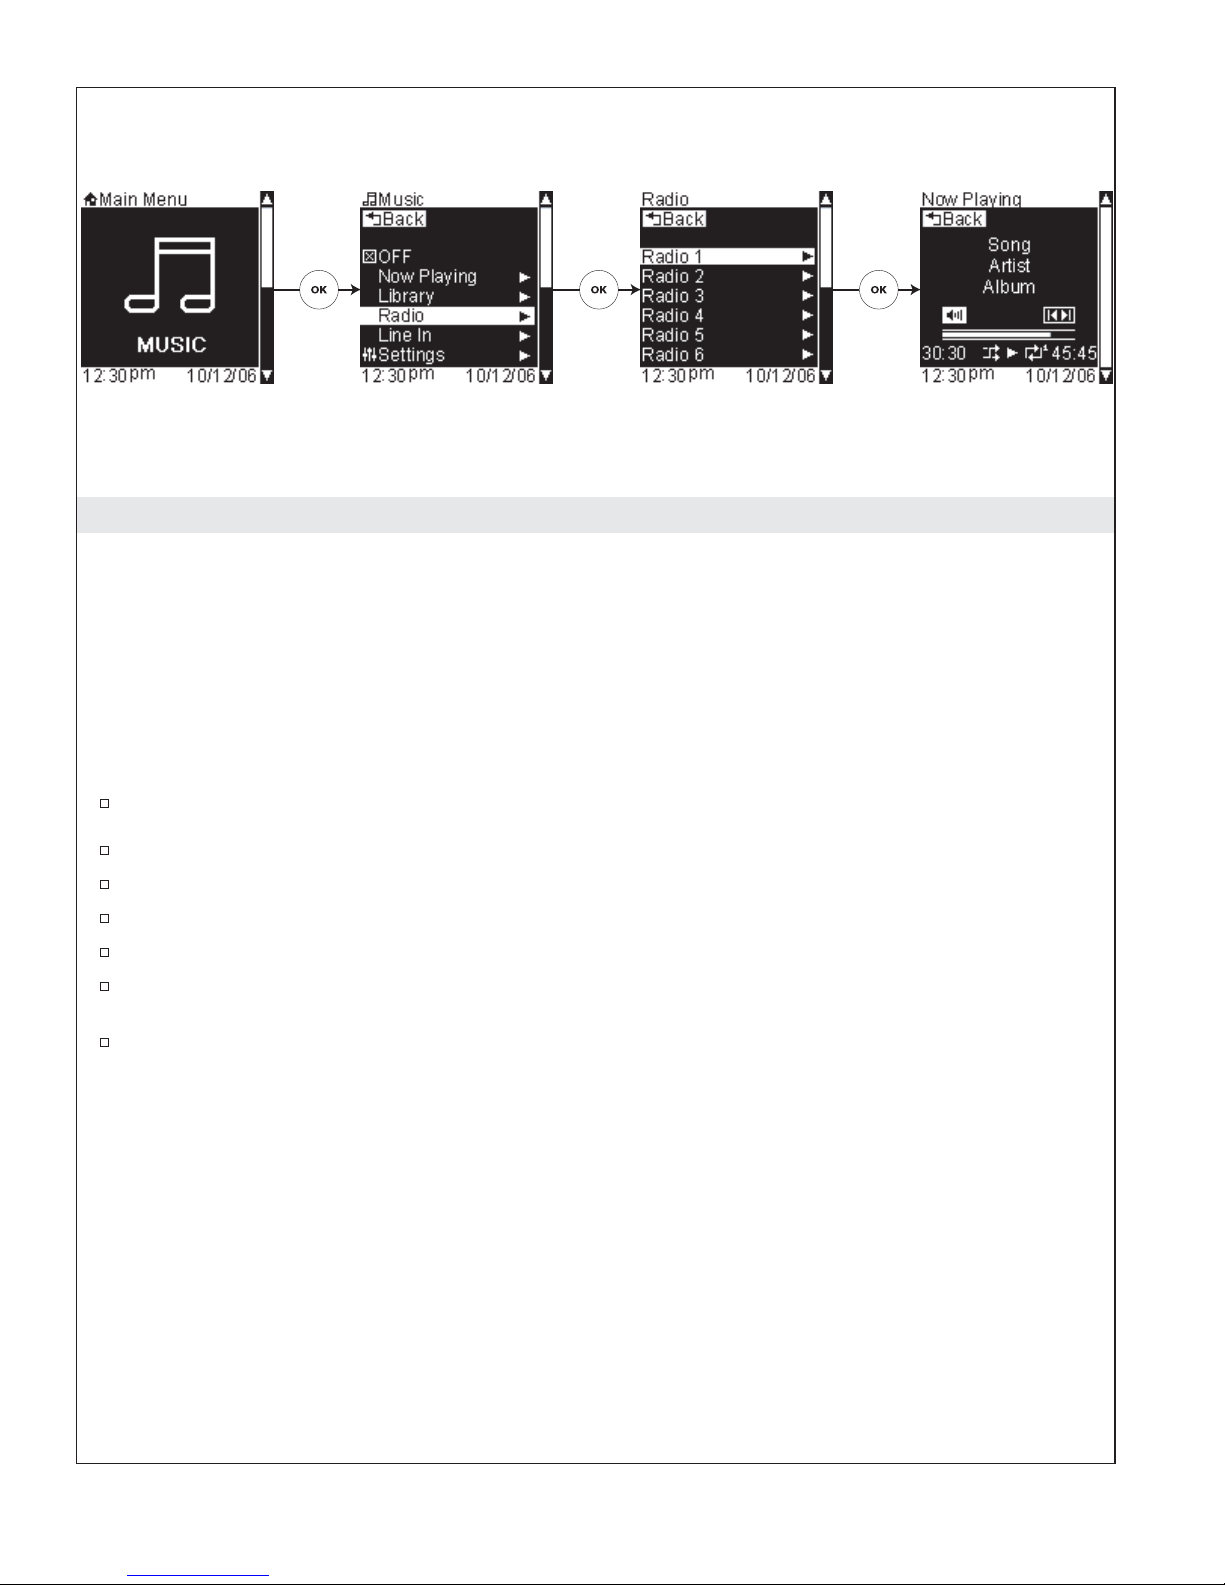
Internet Radio
Path: Music > Radio
Alternate Path: Shower > [Back Icon] Options > Music > Radio
This feature links to and plays your configured Internet radio stations.
Your computer does not need to be on to access the built-in intranet radio stations listed under “Radio.” You
need only to have an active Internet connection to your home network.
To add intranet radio stations to your playlist, refer to the “Adding Internet Stations” section.
To begin playing an Internet radio station:
From the main menu, use the dial to scroll to the “Music” screen.
Press the [OK Icon] to enter the Music menu.
To access an Internet radio station from the music options screen, scroll to “Radio.”
Press the [OK Icon] to select.
Using the dial, scroll through the available stations.
Press the [OK Icon] to begin streaming the radio station. The screen will now display what is “Now
Playing.”
Use the dial to adjust the volume.
Kohler Co. 23 1079815-5-A
Page 24

Additional Audio Devices
IMPORTANT! For best sound quality, adjust the volume on your connected device to a comfortable
listening volume prior to connecting; allow the volume to be adjusted via the interface, not the audio
device.
This feature allows you to play music from another audio device, such as an MP3 player, plug the device in
via the Line In jack.
From the main menu, use the dial to scroll to the “Music” screen.
Press the [OK Icon] to enter the Music menu.
From the music options screen, scroll to “Line In.”
Press the [OK Icon] to select.
Press play on your audio device. The screen will now display “Line-In.”
Use the dial to adjust the volume.
1079815-5-A 24 Kohler Co.
Page 25
Using Steam
Your properly equipped Kohler steam generator can also be controlled via your interface.
Your steam system is set to allow for 600 minutes of usage before a cleaning cycle is required. Refer to the
“Power Clean” section for more information.
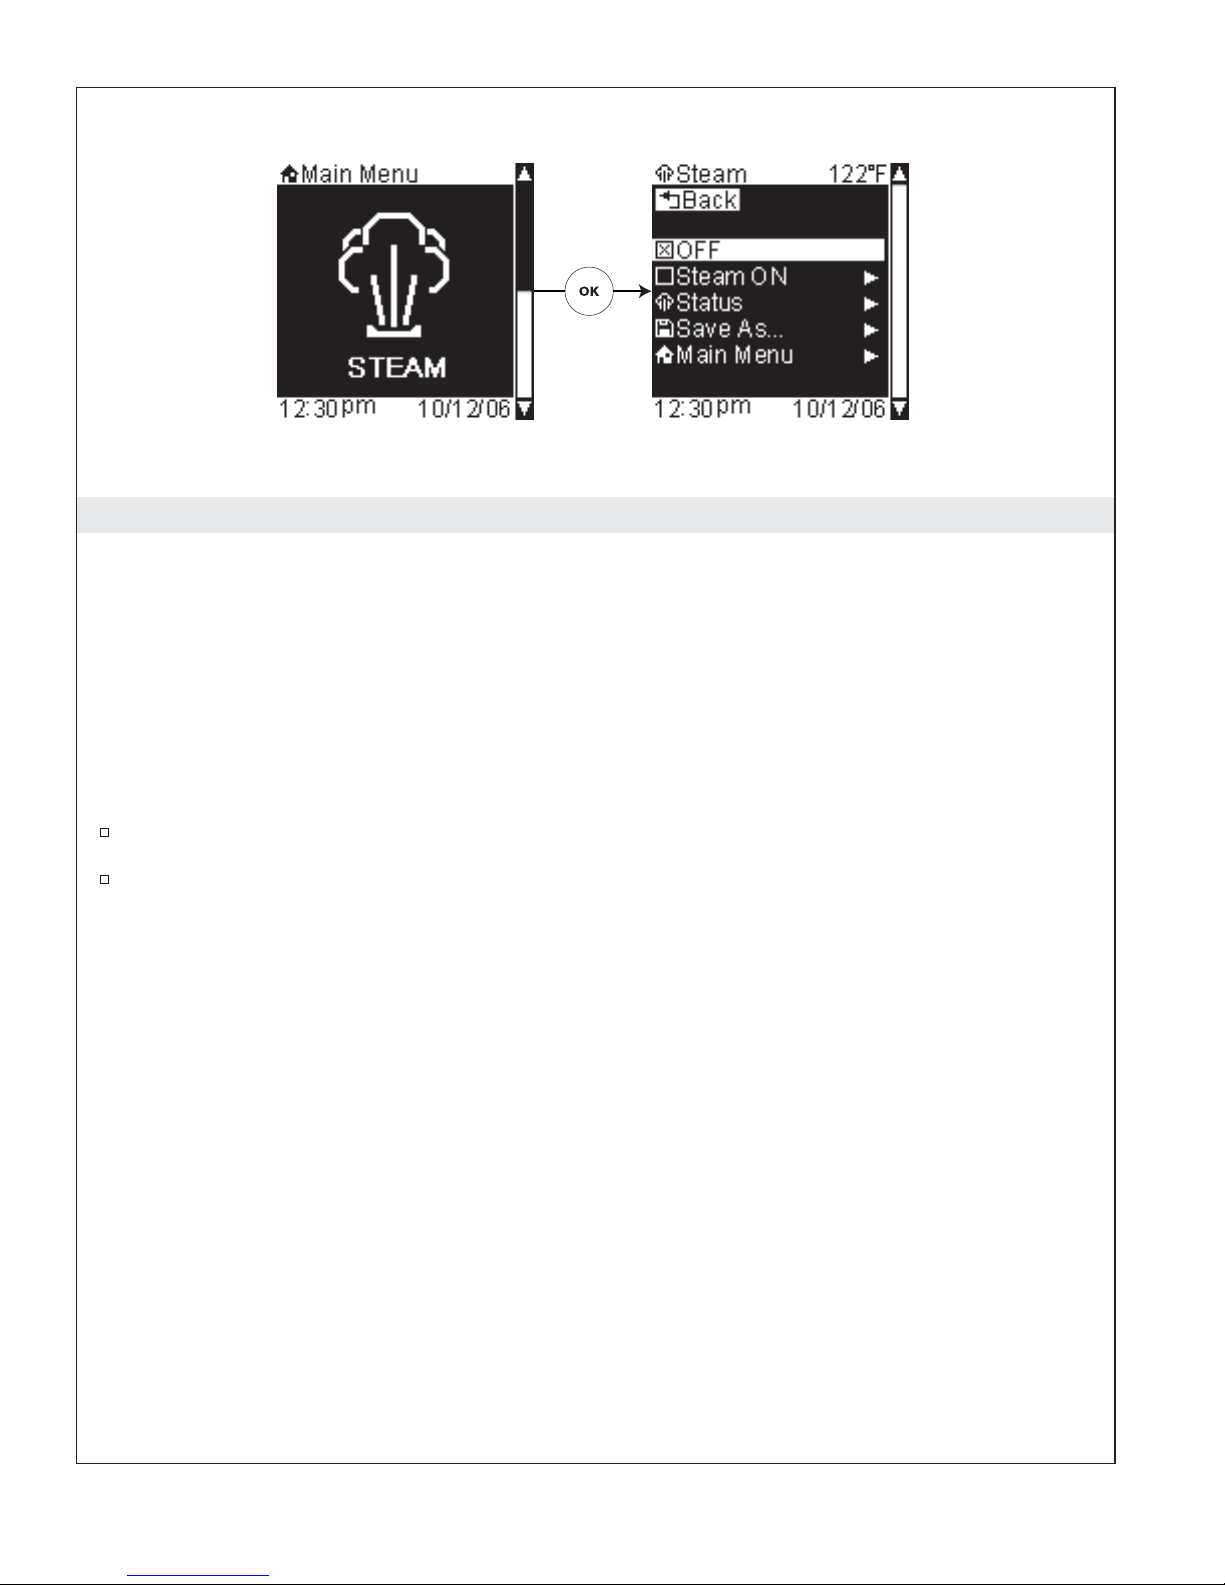
The steam mode options consist of:
•
OFF – turns your steam OFF
•
Steam On – turns ON steam
•
Save As – saves current settings to a user preset (refer to the “Save As” section)
•
Main Menu – returns to the main menu screens and turns OFF your shower (refer to the “Main
Menu” section)
From the main menu, use the dial to scroll to the “Steam” screen.
Press the [OK Icon] to enter the Steam options menu.
Kohler Co. 25 1079815-5-A
Page 26
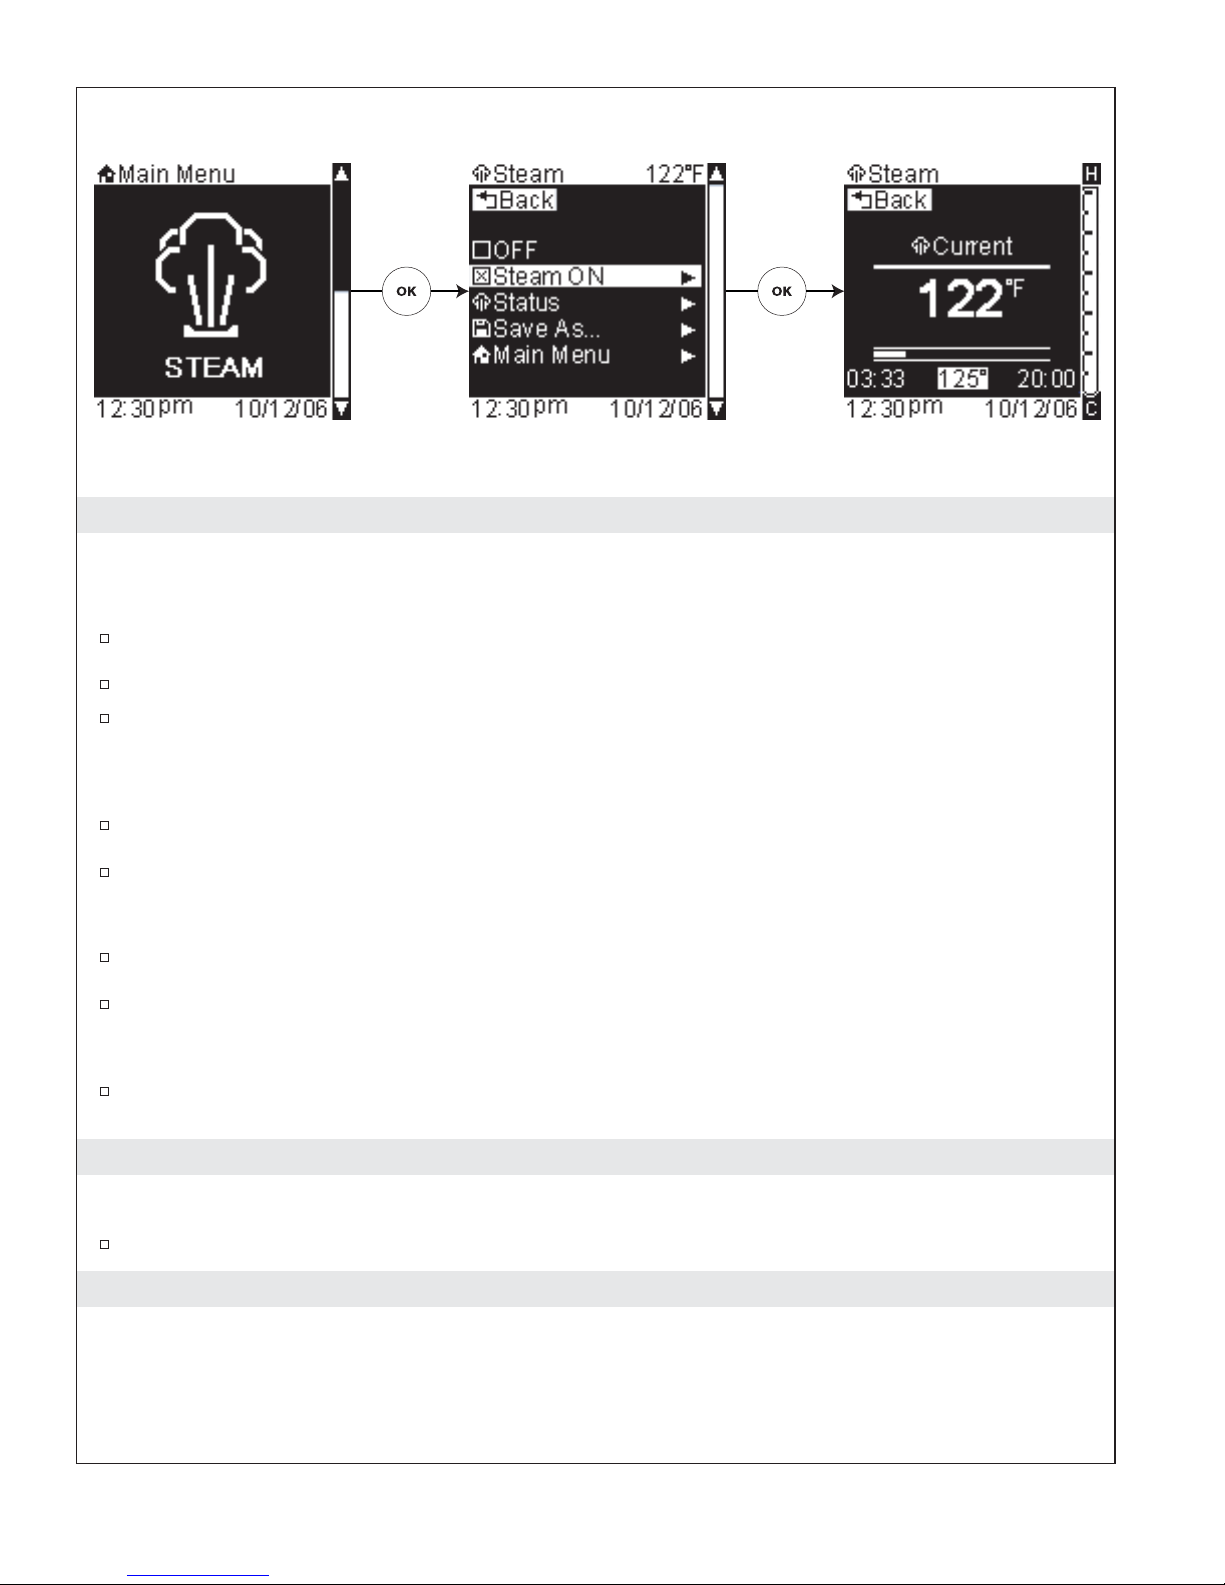
Steam On
Path: Steam > Steam On
Alternate Path: Shower > Steam > Steam On
From the main menu, use the dial to scroll to the “Steam” screen.
Press the [OK Icon] to enter the Steam options menu.
Using the dial, scroll to and select “Steam On.” This will turn your steam ON and bring you to the
steam status screen.
The temperature in the bottom center of the screen will now be highlighted.
Use the dial to adjust the steam temperature.
Press the [OK Icon] to set the temperature.
Now the timer for the steam is highlighted in the bottom right of the screen.
Using the dial, you can increase the duration for the steam up to 10 additional minutes.
Press the [OK Icon] to set the timer. The temperature will be highlighted again.
NOTE: The maximum allowable setting for the timer is 55 minutes.
If you would like to increase the steam timer, press the [OK Icon] again and repeat until the desired
amount of time is displayed.
Save Steam Settings
Path: Steam > Save As
Refer to the “Save As” section.
Using User Presets
User presets allow you to quickly access your saved personal settings for shower, lighting, music and/or
steam.
User presets can be saved at any time while showering, or set up using the settings menu prior to
showering.
1079815-5-A 26 Kohler Co.
Page 27

Using User Presets (cont.)
To access previously set user information, press the [123 User Icon] once for ″User 1,″ twice for
″User 2,″ and three times for ″User 3.″ You would press the [456 User Icon] once for ″User 4,″ twice
for ″User 5,″ and three times for ″User 6.″
An alternate method for accessing user presets: Press the [123 User Icon]or [456 User Icon], scroll
to the desired user and press the [OK Icon] to select.
If you need help customizing your settings, refer to the Shower, Lights, Music, and Steam sections.
For saving user presets, refer to the ″Save As″ section.
Kohler Co. 27 1079815-5-A
Page 28
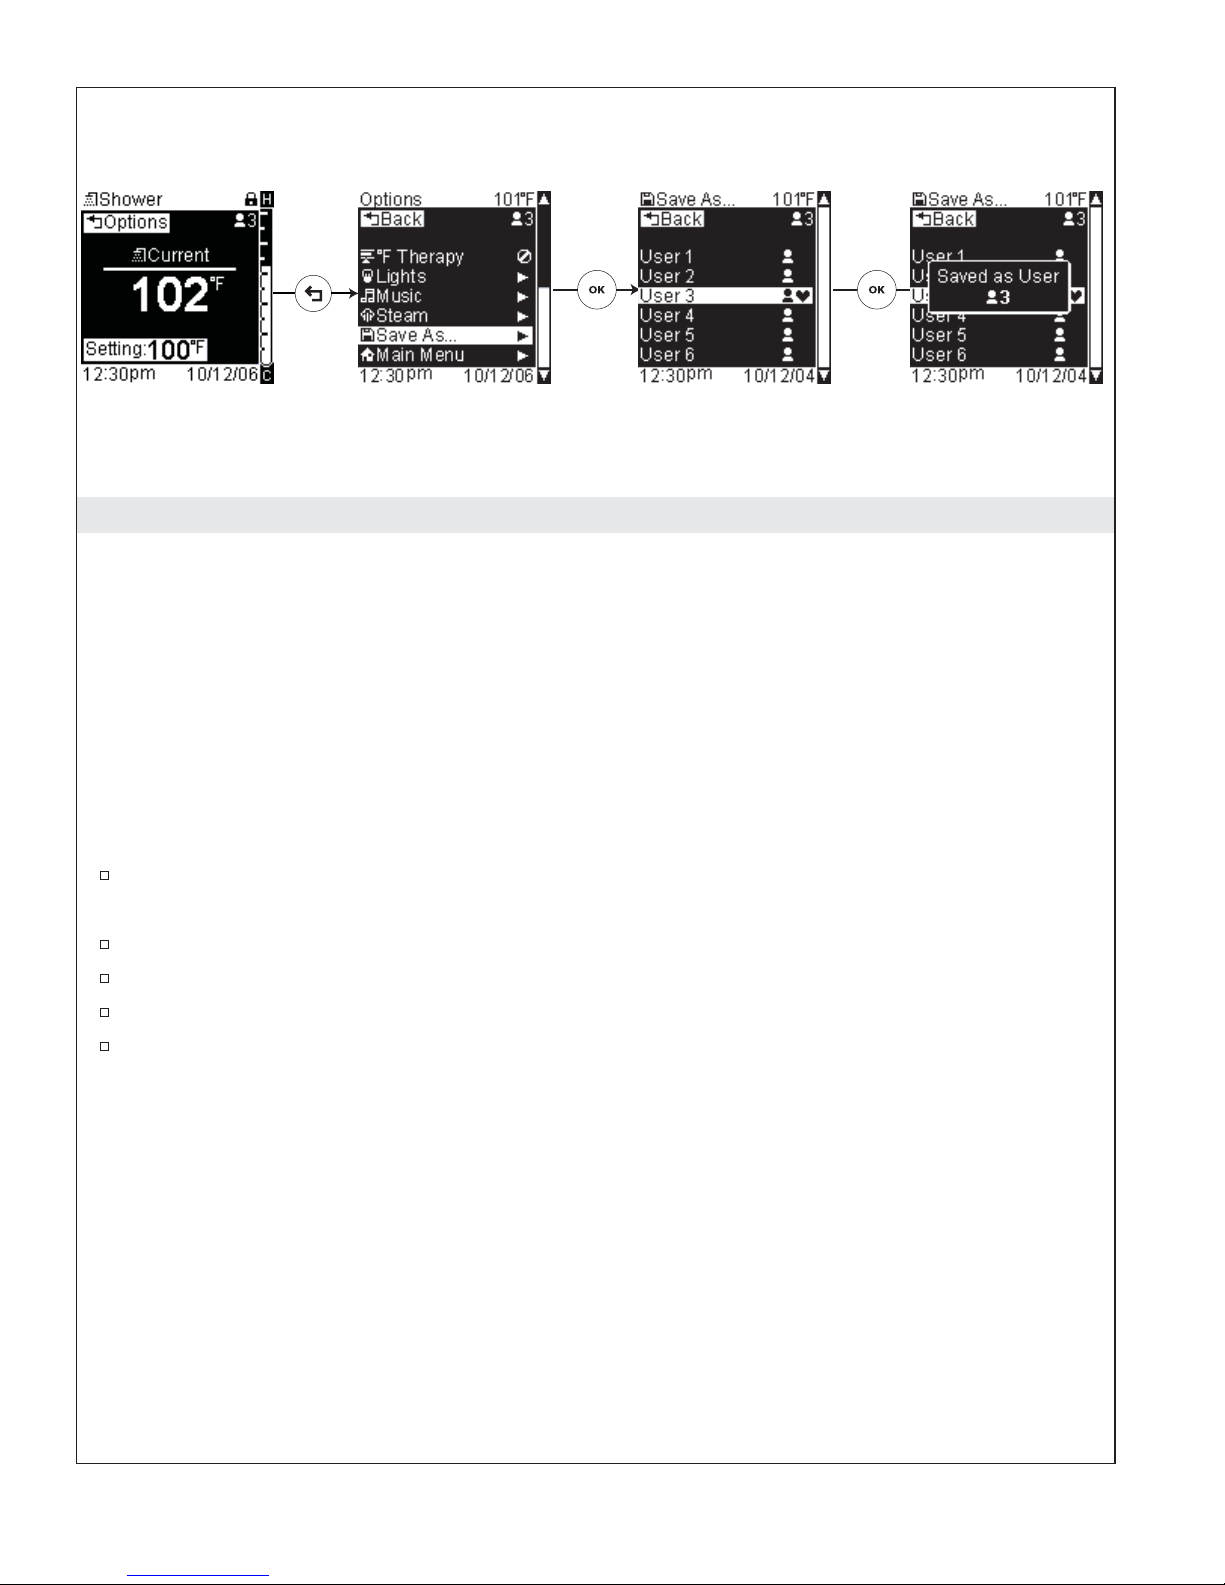
Save As
Path: Shower > Temperature > [Back Icon] Options > Save As...
Alternate Paths:
Lights > Save As
Music > Save As
Steam > Save As
User presets save your personal settings for showering, lights, music, and steam.
User presets can be saved at any time.
If you need help customizing your settings, refer to the: “Shower Settings,” “Light Settings,” “Music
Settings,” and “Steam Settings” sections.
Using the dial, scroll to “Save As...” from the shower, lights, music, or steam options screens (see
paths above).
Press the [OK Icon] to select.
Scroll to a user number. The current active user will be denoted by a heart symbol.
Press the [OK Icon] to save your settings to the highlighted user.
Once saved, a confirmation screen will confirm your saved user profile.
1079815-5-A 28 Kohler Co.
Page 29
Main Menu
Path: Shower > Temperature > [Back Icon] Options > Main Menu
Alternate Paths:
Lights > Main Menu
Shower > [Back Icon] Options > Lights > Main
Music > Main Menu
Shower > [Back Icon] Options > Music > Main Menu
Steam > Main Menu
Shower > [Back Icon] Options > Steam > Main Menu
Using the dial, scroll to “Main Menu” from the shower, lights, music, or steam options screens (see
paths above).
Press the [OK Icon] to select and return to the main menu and turn OFF your shower. Lights, music,
and steam, will remain ON if currently in use.
Kohler Co. 29 1079815-5-A
Page 30
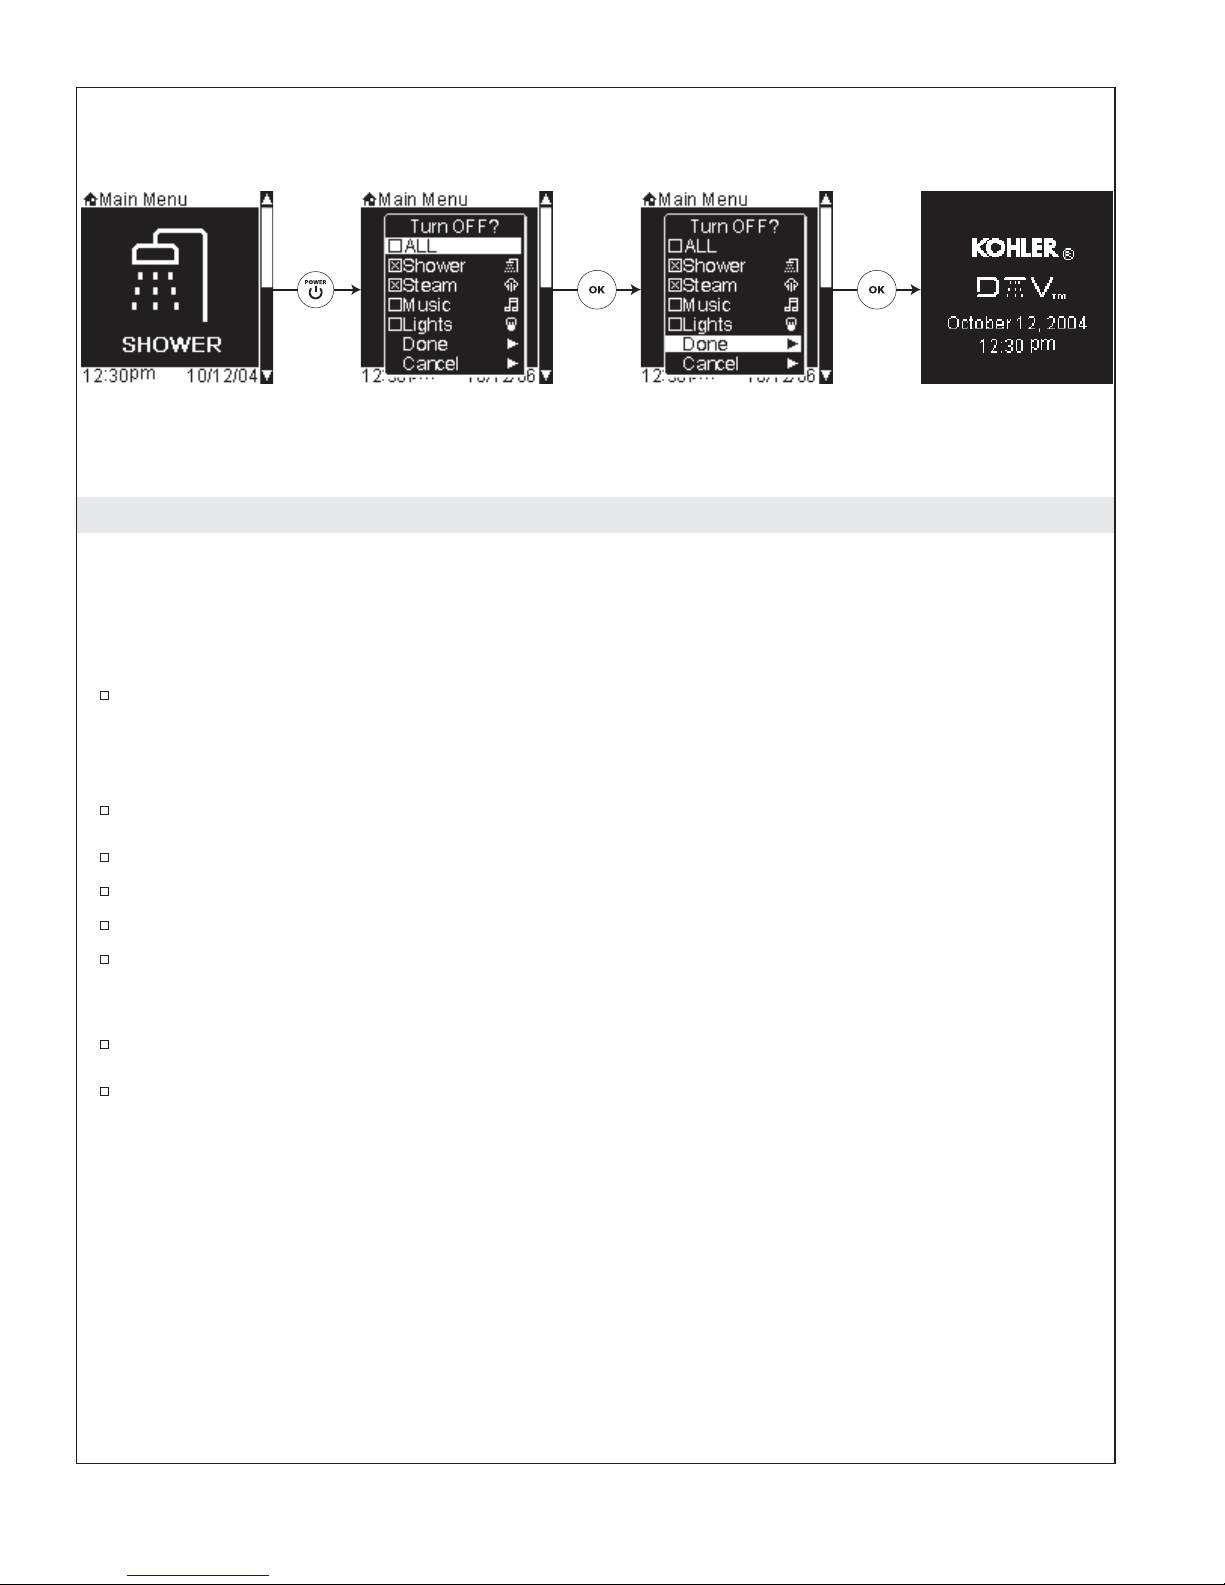
Turn OFF Individual Devices
Path: [Power Icon]
Your system can be set to turn OFF all devices and the shower when the [Power Icon] is pressed or allow
you the option of turning OFF individual devices while leaving others, such as the shower, ON.
Activate the Ask Function
To allow the power down of individual devices, refer to the “Power OFF” section and activate the
“Ask” function.
If the “Ask” Function is Activated – Turn OFF Individual Devices:
Press the [Power Icon]. A pop-up screen will appear showing all features that are currently ON.
Scroll through and highlight the item(s) you want to turn OFF.
Press the [OK Icon] to “check” that item.
Once all items you want to turn OFF are “checked,” scroll to “Done.”
Press the [OK Icon] and all selected items will turn OFF.
If the “Ask” Function is Activated – Turn OFF All Devices:
Press the [Power Icon]. A pop-up screen will appear showing all features that are currently ON.
Press the [Power Icon] again to turn OFF all devices.
1079815-5-A 30 Kohler Co.
Page 31

Frontage Envelop
CH 12 34 5612 34 56
CH
12 34 56CH
Wall 1
Wall 2
Ceiling
Floor
1
22
3
Unwind
2
*
4
5
6
4
56
31
12 34 56
CH
12 34 56
CH
3
Linear
221
4
5
6
Downpour Surround
33
2
*
1
4
5
6
Wall 3
Wall 1
Wall 2
12 34 56
CH
If body sprays, watertiles or watertile
*
showerheads are present in these outlets,
they will not cycle.
2
*
1
4
5
6
Floor
21
4
56
3
3
*
Configurations
NOTE: Preprogrammed component configurations are shown; other options are possible. Use of
configurations other than the preprogrammed options will LIMIT the preprogrammed massage functions.
NOTE: “Random” is a massage option for all configurations. This option will cycle through all the
massage options available for your configuration, running each pattern for 30 seconds.
Kohler Co. 31 1079815-5-A
Page 32

Water Outlet Configuration
1: Showerhead
2: Showerheads
3: Body Spray 1
4: Body Spray 2
5: Body Spray 3
6: Body Spray 4
1
22
4
3
56
Massage Cycling Patterns
CH 12 34 56
Single Dual 1 Dual 2
Dual 3
Wave
= Constant on
= On while cycling
Frontage
Water outlets used = 7
Total gpm (lpm) with a flow rate of 2.2 gpm (8.3 lpm) per outlet = 15.4 gpm (58.3 lpm)
Maximum total gpm (lpm) with a flow rate of 2.5 gpm (9.5 lpm) per outlet = 17.5 gpm (66.2 lpm)
Available Massage Options
•
Single
•
Dual 1
•
Dual 2
•
Dual 3
•
Wave
•
Random
1079815-5-A 32 Kohler Co.
Page 33

Water Outlet Configuration
1: Showerhead
2: Handshower
3: Body Spray 1
4: Body Spray 2
5: Body Spray 3
6: Body Spray 4
Massage Cycling Patterns
12 34 56CH
21
3
4
56
Single Dual 1
Dual 3
Wave
Dual 2
= Constant on
= On while cycling
Envelop
Water outlets used = 6
Total gpm (lpm) with a flow rate of 2.2 gpm (8.3 lpm) per outlet = 13.2 gpm (50 lpm)
Maximum total gpm (lpm) with a flow rate of 2.5 gpm (9.5 lpm) per outlet = 15 gpm (56.8 lpm)
Available Massage Options
•
Single
•
Dual 1
•
Dual 2
•
Dual 3
•
Wave
•
Random
Kohler Co. 33 1079815-5-A
Page 34

Water Outlet Configuration
2
1: Showerhead
2: Overhead
3: Handshower
4: Body Spray 1
5: Body Spray 2
6: Body Spray 3
Massage Cycling Patterns
Single Dual
31
4
5
6
12 34 56
CH
Wave
= Constant on
= On while cycling
Unwind
Water outlets used = 6
Total gpm (lpm) with a flow rate of 2.2 gpm (8.3 lpm) per outlet = 13.2 gpm (50 lpm)
Maximum total gpm (lpm) with a flow rate of 2.5 gpm (9.5 lpm) per outlet = 15 gpm (56.8 lpm)
Available Massage Options
•
Single
•
Dual
•
Wave
•
Random
1079815-5-A 34 Kohler Co.
Page 35

Water Outlet Configuration
1: WaterTile S.H.
2: 2 WaterTile S.H.
3: Handshower
4: WaterTile 1
5: WaterTile 2
6: WaterTile 3
Massage Cycling Patterns
Single Dual Wave
12 34 56
CH
3
221
4
5
6
= Constant on
= On while cycling
Linear
Water outlets used = 7
Total gpm (lpm) with a flow rate of 2.2 gpm (8.3 lpm) per outlet = 15.4 gpm (58.3 lpm)
Maximum total gpm (lpm) with a flow rate of 2.5 gpm (9.5 lpm) per outlet = 17.5 gpm (66.2 lpm)
Available Massage Options
•
Single
•
Dual
•
Wave
•
Random
Kohler Co. 35 1079815-5-A
Page 36

Water Outlet Configuration
1: Handshower
2: WaterTile
3: 2 WaterTiles
4: WaterTile 1
5: WaterTile 2
6: WaterTile 3
Massage Cycling Patterns
Single Dual Wave
12 34 56
CH
33
2
1
4
5
6
= Constant on
= On while cycling
Downpour
Water outlets used = 7
Total gpm (lpm) with a flow rate of 2.2 gpm (8.3 lpm) per outlet = 15.4 gpm (58.3 lpm)
Maximum total gpm (lpm) with a flow rate of 2.5 gpm (9.5 lpm) per outlet = 17.5 gpm (66.2 lpm)
Available Massage Options
•
Single
•
Dual
•
Wave
•
Random
1079815-5-A 36 Kohler Co.
Page 37

Water Outlet Configuration
1: Showerhead 1
2: Showerhead 2
3: Showerhead 3
4: Body Spray 1
5: Body Spray 2
6: Body Spray 3
Massage Cycling Patterns
Single Dual Wave
312
4
5
6
12 34 56
CH
= Constant on
= On while cycling
Surround
Water outlets used = 6
Total gpm (lpm) with a flow rate of 2.2 gpm (8.3 lpm) per outlet = 13.2 gpm (50 lpm)
Maximum total gpm (lpm) with a flow rate of 2.5 gpm (9.5 lpm) per outlet = 15 gpm (56.8 lpm)
Available Massage Options
•
Single
•
Dual
•
Wave
•
Random
Kohler Co. 37 1079815-5-A
Page 38

Water Outlet Configuration
1: Outlet 1
(Primary Showerhead)
2: Outlet 2
3: Outlet 3
4: Outlet 4
5: Outlet 5
6: Outlet 6
Massage Cycling Patterns
Single
NOTE: Primary outlets and any outlets designated as
handshowers will not be included in the cycling pattern. For
installations that include both body sprays and watertiles, the
outlets designated as watertiles will not cycle.
12 34 56CH
12 34 56
CH
Wave
= Constant on
= On while cycling
Custom
General Guidelines for Custom Configurations:
Outlet 1 is always recommended to be the primary showerhead. Custom mode will allow the user to select a
different port as the primary, but it is not recommended.
When cycling during massage functions, the body sprays/watertiles will cycle from Outlet 1 to Outlet 6,
regardless of which port is designated as the primary outlet.
The installer must determine the water outlet cycling order for the“ Single” massage function and plumb
each water outlet accordingly.
Use the above diagrams to draw in the components for your custom shower.
Draw lines from the valve to each component as your shower is plumbed.
NOTE: Only water outlets designated as body sprays or watertiles will be allowed to cycle. Any outlets
with 2 fittings, such as 2 Body Sprays or 2 WaterTiles will not cycle. Also any instance where watertiles
and body sprays are used in the same configuration, only the body sprays will cycle.
Available Massage Options
•
Single
•
Wave
•
Random
1079815-5-A 38 Kohler Co.
Page 39

The Settings Menus
Path: Settings
The settings menu is broken down into seven categories listed below allowing you to quickly and easily
customize your showering experience.
•
Interface
•
Users
•
Shower
•
Lights
•
Music
•
Steam
•
System
From the main menu, use the dial to scroll to the “Settings” screen.
Press the [OK Icon] to enter the settings menu.
Kohler Co. 39 1079815-5-A
Page 40

Interface Settings
Path: Settings > Interface
The interface settings menu consists of:
•
Settings Lock – locks the settings menus
•
Clean – locks the “keys” for cleaning
•
Time and Date – sets and displays the date and time
•
Contrast – adjusts the screen contrast
•
Brightness – adjusts the screen brightness
•
Invert Screen – inverts the screen colors
•
Beep – adjusts volume of interface beeps
•
Auto Dim – sets screen to dim after 30 seconds of inactivity
•
Auto Return – sets the screen to return to the screen of highest precedence after 30 seconds of
inactivity
•
Auto Lock – locks the auxiliary interface once the primary interface is used
•
Language – selects the interface display language
•
Units – sets the temperature unit
•
Power OFF – This function allows you to set the functionality of the [Power Icon]
To access the Interface Settings options, from the Main Menu scroll to “Settings.”
Press the [OK Icon] to select.
Scroll to and select “Interface.”
1079815-5-A 40 Kohler Co.
Page 41

Settings Lock
Lock
Unlock
Settings Lock
Path: Settings > Interface >
This function locks all the settings menus to prevent saving over current settings. When entering the settings
menu you can temporarily unlock the menu by providing the four-digit code when prompted. Once
unlocked, the system will allow you to change and save settings until you exit the settings menu.
From the Main Menu scroll to “Settings.”
Press the [OK Icon] to select.
Using the dial, scroll to and select “Interface.”
Press the [OK Icon] to select.
Scroll to “Settings Lock.”
Press the [OK Icon] to select.
Activate
To activate the settings lock function you need to input the 4 digit code 1012.
Use the dial to set the first number.
Press the [OK Icon] to set that number and proceed to the next number.
Repeat for each additional number until the code is entered.
Deactivate
To temporarily deactivate the settings lock function you need to input the 4 digit code 1012.
Use the dial to set the first number.
Press the [OK Icon] to set that number and proceed to the next number.
Repeat for each additional number until the code is entered.
Kohler Co. 41 1079815-5-A
Page 42

Settings Lock (cont.)
To deactivate the settings lock function you need to input the 4 digit code 1012.
Using the dial, scroll to and select “Interface.”
Press the [OK Icon] to select.
Scroll to “Settings Lock.”
Press the [OK Icon] to select.
Reenter the four-digit code.
1079815-5-A 42 Kohler Co.
Page 43

Clean
Path: Settings > Interface > Clean
This function allows you to lock the “keys” or icons of the interface for cleaning.
From the Main Menu scroll to “Settings.”
Press the [OK Icon] to select.
Using the dial, scroll to and select “Interface.”
Press the [OK Icon] to select.
Scroll to “Clean.”
Press the [OK Icon] to select and lock the “keys.”
Press and hold the [OK Icon] for 10 seconds to unlock. After five minutes the “keys” will
automatically unlock.
Kohler Co. 43 1079815-5-A
Page 44

Time and Date
Path: Settings > Interface > Time & Date
To change the time and date settings, from the Main Menu scroll to “Settings.”
Press the [OK Icon] to select.
Using the dial, scroll to and select “Interface.”
Press the [OK Icon] to select.
Scroll to “Time and Date.”
Press the [OK Icon] to select.
Turn the display OFF
Path: Settings > Interface > Time and Date > OFF
You can choose to have the date and time display ON or OFF. The default setting is ON.
Use the dial to choose “ON” or “OFF.”
Press the [OK Icon] to select.
If you choose OFF, the date and time will no longer be displayed and the screen will default back to the
settings menu.
Choose 12- or 24-hour time
Path: Settings > Time and Date > ON > 12-hour time/24-hour time
If you selected to have the display ON, continue to select either 12- or 24-hour time.
Use the dial to choose “12-hour time” or “24-hour time.”
Press the [OK Icon] to select.
Set the Time
1079815-5-A 44 Kohler Co.
Page 45

Time and Date (cont.)
NOTE: For 12-hour time, the hour setting controls AM or PM.
After you select either 12- or 24-hour time, rotate the dial to change the hour.
Press the [OK Icon] to set the hour.
Repeat for the minute setting.
Once the time is set, the date format screen will appear.
Set the Date
Rotate the dial to select your preferred date format. For this example MM/DD/YY is shown:
MM/DD/YY: Month / Day / Year,
DD/MM/YY: Day / Month / Year, or
YY/MM/DD: Year / Month / Day.
Press the [OK Icon] to select.
Once your format is selected, rotate the dial to select the month.
Press the [OK Icon] to set the month and proceed to the next number.
Repeat to set the day and year.
Once the year is set, press the [OK Icon] to set and return to the Interface Settings screen.
Kohler Co. 45 1079815-5-A
Page 46

Contrast
Path: Settings > Interface > Contrast
To adjust the screen contrast, from the Main Menu scroll to “Settings.”
Press the [OK Icon] to select.
Using the dial, scroll to and select “Interface.”
Press the [OK Icon] to select.
Scroll to “Contrast.”
Press the [OK Icon] to select.
Use the dial to adjust the screen contrast to the desired level.
Press the [Back Icon] to set.
Press the [Back Icon] to return to the Interface Settings menu.
1079815-5-A 46 Kohler Co.
Page 47

Brightness
Path: Settings > Interface > Brightness
To adjust the screen brightness, from the Main Menu scroll to “Settings.”
Press the [OK Icon] to select.
Using the dial, scroll to and select “Interface.”
Press the [OK Icon] to select.
Scroll to “Brightness.”
Press the [OK Icon] to select.
Use the dial to adjust the screen brightness to the desired level.
Press the [Back Icon] to set.
Press the [Back Icon] to return to the Interface Settings menu.
Kohler Co. 47 1079815-5-A
Page 48

Invert Screen
Path: Settings > Interface > Invert Screen > OFF/ON
Invert Screen is defaulted to “OFF.”
When “OFF” is selected, the screen is set to a blue background with white text and icons.
When the Invert Screen is “ON” the screen is set to a white background with blue text and icons.
To turn “Invert Screen” ON or OFF, from the Main Menu scroll to “Settings.”
Press the [OK Icon] to select.
Using the dial, scroll to and select “Interface.”
Press the [OK Icon] to select.
Scroll to “Invert Screen.”
Press the [OK Icon] to select.
Scroll to and highlight “ON” or “OFF.”
Press the [OK Icon] to set.
Press the [Back Icon] to return to the Interface Settings menu.
1079815-5-A 48 Kohler Co.
Page 49

Beep
Path: Settings > Interface > Beep > OFF, Low, or High
The beep volume is defaulted to “High.”
Use this function to turn off or adjust the volume of the interface beeps.
To change the beep volume, from the Main Menu scroll to “Settings.”
Press the [OK Icon] to select.
Using the dial, scroll to and select “Interface.”
Press the [OK Icon] to select.
Scroll to “Beep.”
Press the [OK Icon] to select.
Use the dial to scroll to “OFF,” “Low,” or “High.”
Press the [OK Icon] to set.
Press the [Back Icon] to return to the Interface Settings menu.
Kohler Co. 49 1079815-5-A
Page 50

Auto Dim
Path: Settings > Interface > Auto Dim > ON or OFF
The factory default is “ON.”
When activated, this feature dims the screen and icon lights after 30 seconds of inactivity.
To activate this function, from the Main Menu scroll to “Settings.”
Press the [OK Icon] to select.
Using the dial, scroll to and select “Interface.”
Press the [OK Icon] to select.
Scroll to “Auto Dim.”
Press the [OK Icon] to select.
Scroll to “ON” to enable or “OFF” to disable this function.
Press the [OK Icon] to set.
Press the [Back Icon] to return to the Interface Settings menu.
1079815-5-A 50 Kohler Co.
Page 51

Auto Return
Path: Settings > Interface > Auto Return > ON or OFF
The factory default is “ON.”
If within the Shower, Lights, Music, or Steam Options Screens: When activated, based on the order of
precedence, the system will return to the screen of the highest active system after 30 seconds of inactivity.
Order of system precedence is: Shower, Steam, Music, then Lights. Return screen in order of precedence is:
Shower Temperature, Steam Status, Music Now Playing, then Lights Options.
If within the Setting Screens: When activated, the screen will automatically return to the logo screen after
one minute of inactivity.
To activate this function, from the Main Menu scroll to “Settings.”
Press the [OK Icon] to select.
Using the dial, scroll to and select “Interface.”
Press the [OK Icon] to select.
Scroll to “Auto Return.”
Press the [OK Icon] to select.
Scroll to “ON” to enable or “OFF” to disable this function.
Press the [OK Icon] to set.
Press the [Back Icon] to return to the Interface Settings menu.
Kohler Co. 51 1079815-5-A
Page 52

Auto Lock
Path: Settings > Interface > Auto Lock > ON or OFF
The auto lock function is defaulted to “OFF.”
This function is intended for installations where both a primary (inside shower) and auxiliary (outside
shower) interface are used.
When activated, the auxiliary interface will be “locked” once an icon is pressed or the dial is turned on the
primary interface; only the [Power Icon] will remain enabled on the auxiliary interface.
To activate this function, from the Main Menu scroll to “Settings.”
Press the [OK Icon] to select.
Using the dial, scroll to and select “Interface.”
Press the [OK Icon] to select.
Scroll to “Auto Lock.”
Press the [OK Icon] to select.
Scroll to “ON” to enable or “OFF” to disable this function.
Press the [OK Icon] to set.
Press the [Back Icon] to return to the Interface Settings menu.
1079815-5-A 52 Kohler Co.
Page 53

Select Language
Path: Settings > Interface > Languages
The interface gives the option of displaying in eight different languages.
Available Languages:
•
English
•
British English
•
French
•
German
•
Italian
•
Portuguese
•
Spanish
•
Russian
Selecting a Language
From the Main Menu scroll to “Settings.”
Press the [OK Icon] to select.
Using the dial, scroll to and select “Interface.”
Press the [OK Icon] to select.
Scroll to “Languages.”
Press the [OK Icon] to select.
Using the dial, scroll through and highlight a language.
Press the [OK Icon] to select the highlighted language.
Press the [Back Icon] to return to the Interface Settings menu.
Kohler Co. 53 1079815-5-A
Page 54

Select Temperature Unit
Path: Settings > Interface > Units
This feature allows you to display the temperature in Fahrenheit or Celsius.
From the Main Menu scroll to “Settings.”
Press the [OK Icon] to select.
Using the dial, scroll to and select “Interface.”
Press the [OK Icon] to select.
Scroll to “Units.”
Press the [OK Icon] to select.
Use the dial to scroll to either Fahrenheit or Celsius.
Press the [OK Icon] to select the temperature unit.
Press the [Back Icon] to return to the Interface Settings menu.
1079815-5-A 54 Kohler Co.
Page 55

Power OFF
Path: Settings > Interface > Power OFF
This function allows you to set the functionality of the [Power Icon].
All OFF
Path: Settings > Interface > Power OFF > All OFF
If “All OFF” is activated, when the [Power Icon] is pressed all devices will turn off (shower, lights, music,
and steam)
To activate this function, from the Main Menu scroll to “Settings.”
Press the [OK Icon] to select.
Using the dial, scroll to and select “Interface.”
Press the [OK Icon] to select.
Scroll to “Power OFF.”
Press the [OK Icon] to select.
Scroll to “All OFF.”
Press the [OK Icon] to set.
Press the [Back Icon] to return to the Interface Settings menu.
Ask
Path: Settings > Interface > Power OFF > Ask
If “Ask” is activated, when the [Power Icon] is pressed your shower and steam will turn OFF and you will
be prompted to select the devices you would like to turn OFF. If the [Power Icon] is pressed again all devices
will turn OFF.
To activate this function, from the Main Menu scroll to “Settings.”
Press the [OK Icon] to select.
Using the dial, scroll to and select “Interface.”
Press the [OK Icon] to select.
Scroll to “Power OFF.”
Press the [OK Icon] to select.
Kohler Co. 55 1079815-5-A
Page 56

Power OFF (cont.)
Scroll to “Ask.”
Press the [OK Icon] to set.
Press the [Back Icon] to return to the Interface Settings menu.
1079815-5-A 56 Kohler Co.
Page 57

User Settings
Path: Settings > Users > [choose user 1-6]
This menu allows you to customize your user preferences all within one menu. For more information
regarding specific settings refer to the “Shower Settings,” ″Lights Settings,” “Music Settings,” or “Steam
Settings” sections.
The user settings menu consists of:
User # – saves custom user presets for:
Shower – sets up user preferences for systems that include a digital thermostatic valve
Steam – sets up user preferences for systems that have steam and do not include a digital thermostatic valve
NOTE: You do not have to set all the settings at one time. You can scroll to “Save As...” at any time to
save your current settings. Refer to the “Save as a User Preset” section.
Kohler Co. 57 1079815-5-A
Page 58

Shower Settings
Path: Settings > Shower >
This menu is only available when a Kohler digital thermostatic mixing valve is connected to the system.
The shower settings menu consists of:
•
Default °F – sets default temperature at start-up
•
Maximum °F – sets maximum allowable temperature
•
Massage – activates the massage function
•
°F Therapy – activates temperature therapy
•
Auto Purge – turns on all water outlets at start-up until the default temperature is reached
•
Order – changes the display order of the various water outlets
•
Not Cycling – selects which outlets to not include in the massage cycling pattern
•
Speed – sets the cycling speed during massage
•
Cold Water-OFF – shuts down the shower when there is no longer enough hot water to maintain
the set temperature
•
Primary – sets the outlet to be used for normal showering
To access the Shower Settings options, from the Main Menu scroll to “Settings.”
Press the [OK Icon] to select.
Scroll to and select “Shower.”
To return to the Main Menu press the [Back Icon].
1079815-5-A 58 Kohler Co.
Page 59

Set the Default Temperature
Path: Settings > Shower > Default °F
This feature sets the default water temperature for normal showering. The factory default setting is 102°F
(39°C).
From the Main Menu scroll to “Settings.”
Press the [OK Icon] to select.
Using the dial, scroll to and select “Shower.”
Press the [OK Icon] to select.
Scroll to “Default °F” from the shower settings menu.
Press the [OK Icon] to select.
Use the dial to adjust the default temperature.
Press the [Back Icon] to set and return to the Shower Settings Screen.
Kohler Co. 59 1079815-5-A
Page 60

Set the Maximum Temperature
Path: Settings > Shower > Maximum °F
This feature allows you to set a maximum water temperature limit up to 120°F (49°C). The factory default is
115°F (46°C).
From the Main Menu scroll to “Settings.”
Press the [OK Icon] to select.
Using the dial, scroll to and select “Shower.”
Press the [OK Icon] to select.
Scroll to “Maximum °F” from the shower settings menu.
Press the [OK Icon] to select.
Use the dial to adjust the maximum water temperature limit.
Press the [Back Icon] to set and return to the Shower Settings screen.
1079815-5-A 60 Kohler Co.
Page 61

Activate the Massage Functions
Path: Settings > Shower > Massage > ON
IMPORTANT! Please read the following information regarding the possible risks associated with
massage. Consult your physician before any hydrotherapy treatment, especially if you are pregnant, have
cancer or heart disease. As with many types of therapies and massages, hydromassage can be unsafe if a
person has certain types of illnesses. Consult a physician to determine whether hydromassage is suitable
for your case when a condition is persistent or recurrent. Elderly people and young children may be prone
to exhaustion by too much heat and should avoid long full body heat treatments.
Activating the Massage Function
NOTE: The massage functions are defaulted to “OFF.” In order for this function to be available for use
while showering, it must be first activated in the settings menu.
NOTE: You may experience temperature variations during massage mode dependent on your particular
installation.
From the Main Menu scroll to “Settings.”
Press the [OK Icon] to select.
Using the dial, scroll to and select “Shower.”
Press the [OK Icon] to select.
Scroll to “Massage” from the shower settings menu.
Press the [OK Icon] to select.
Scroll to “ON” and press the [OK Icon] to select. Your selection will be “checked” and the massage
functions will be activated.
Once activated/deactivated, press the [Back Icon] until you return to the settings menu.
Kohler Co. 61 1079815-5-A
Page 62

Activate Temperature Therapy
Path: Settings > Shower > °F Therapy
IMPORTANT! Please read the following information regarding the possible risks associated with
temperature therapy.Consult your physician before any hydrotherapy treatment, especially if you are
pregnant, have cancer or heart disease. Prolonged exposure to heat is not recommended for those with
diabetes, women who are pregnant or anyone with abnormally high or low blood pressure. Elderly people
and young children may be prone to exhaustion by too much heat and should avoid long full body heat
treatments.
Activating Temperature Therapy
NOTE: The temperature therapy is defaulted to “OFF.” In order for this function to be available for use
while showering, it must be first activated in the settings menu.
From the Main Menu scroll to “Settings.”
Press the [OK Icon] to select.
Using the dial, scroll to and select “Shower.”
Press the [OK Icon] to select.
Scroll to “°F Therapy” from the shower settings menu.
Press the [OK Icon] to select.
Scroll to “ON.”
Press the [OK Icon] to select. Your selection will be “checked” and the temperature therapy
functions will be activated.
Once activated/deactivated, press the [Back Icon] until you return to the settings menu.
1079815-5-A 62 Kohler Co.
Page 63

Auto Purge
Path: Settings > Shower > Auto Purge
The auto purge function is defaulted to “07 seconds.”
This function turns on all water outlets, except any handshowers, to purge the cold water from the shower
lines and reach the set temperature faster. Once the auto purge has run for the set amount of time, the user
preset will determine which outlets remain on.
The auto purge function will only activate if the shower has been inactive for 30 minutes or longer.
From the Main Menu scroll to “Settings.”
Press the [OK Icon] to select.
Using the dial, scroll to and select “Shower.”
Press the [OK Icon] to select.
Scroll to “Auto Purge.”
Press the [OK Icon] to select.
Scroll to either 07 seconds, 15 seconds, 30 seconds, 45 seconds, 60 seconds or “OFF.”
Press the [OK Icon] to select. Your selection will be “checked” and the auto purge function will be
activated.
Press the [Back Icon] to return to the Shower Settings screen.
Kohler Co. 63 1079815-5-A
Page 64

Change Water Outlet List Order
Path: Settings > Shower > Order
This function allows you to adjust the order the water outlets are displayed.
NOTE: By default, the water outlets are cycled in the order displayed. Changing the display order will not
change the cycling order.
From the Main Menu scroll to “Settings.”
Press the [OK Icon] to select.
Using the dial, scroll to and select “Shower.”
Press the [OK Icon] to select.
Scroll to “Order″ from the shower settings menu.
Press the [OK Icon] to select.
Scroll to the name of the water outlet that you would like to move.
Press the [OK Icon] to select that water outlet.
Use the dial to move the water outlet either up or down in the list order.
Press the [OK Icon] to drop that water outlet in the new position.
Repeat for other water outlets as desired.
Press the [Back Icon] to return to the Shower Settings screen.
1079815-5-A 64 Kohler Co.
Page 65

Add/Remove Water Outlets from Cycling Pattern (For Massage Functions)
Path: Settings > Shower > Not Cycling
This function sets the water outlets that will not cycle when the massage functions are activated. Only water
outlets designated as body sprays or watertiles will be allowed to cycle, all other outlets will be checked as
not cycling.
NOTE: Checking outlets that are designated to cycle will limit your massage functions.
From the Main Menu scroll to “Settings.”
Press the [OK Icon] to select.
Using the dial, scroll to and select “Shower.”
Press the [OK Icon] to select.
Scroll to “Not Cycling”ï from the shower settings menu.
Press the [OK Icon] to select.
Using the dial, scroll through the water outlets to an outlet that you do not want to cycle during
massage.
Press the [OK Icon] to check the water outlets that you do not want to cycle.
When a checked water outlet is highlighted, pressing the [OK Icon] will uncheck the water outlet
and enable that water outlet to cycle.
Press the [Back Icon] to return to the Shower Settings screen.
Kohler Co. 65 1079815-5-A
Page 66

Cycling Speed (For Massage Functions)
Path: Settings > Shower > Speed > Slow or Fast
This setting adjusts the default cycling speed of the water outlets during the massage functions. The factory
default setting is “Slow.”
From the Main Menu scroll to “Settings.”
Press the [OK Icon] to select.
Using the dial, scroll to and select “Shower.”
Press the [OK Icon] to select.
Scroll to “Speed” from the shower settings menu.
Press the [OK Icon] to select.
Use the dial to choose either “Slow” or “Fast.”
Press the [OK Icon] to set the cycling speed.
Press the [Back Icon] to return to the Shower Settings screen.
1079815-5-A 66 Kohler Co.
Page 67

Cold Water OFF
Path: Settings > Shower > Cold Water-OFF
This function allows you to set the length of time that the shower will continue to run once the system
detects there is not enough hot water to maintain the set temperature.
From the Main Menu scroll to “Settings.”
Press the [OK Icon] to select.
Using the dial, scroll to and select “Shower.”
Press the [OK Icon] to select.
Scroll to “Cold Water-OFF” from the shower settings menu.
Press the [OK Icon] to select.
Scroll to either 02 minutes, 05 minutes, 10 minutes, or 20 minutes.
Press the [OK Icon] to select. Your selection will be “checked.”
Press the [Back Icon] to return to the Shower Settings screen.
Kohler Co. 67 1079815-5-A
Page 68

Select Primary Water Outlet – Custom Only
Path: Settings > Shower > Primary
This menu is only available if a custom configuration is selected. Refer to the ″Configurations″ section.
This sets the water outlet that the user will use to take regular showers. This is the water outlet that will
constantly be on, usually labeled “Showerhead.” This water outlet will not cycle during massage.
From the Main Menu scroll to “Settings.”
Press the [OK Icon] to select.
Using the dial, scroll to and select “Shower.”
Press the [OK Icon] to select.
Scroll to “Primary” from the shower settings menu.
Press the [OK Icon] to select.
Scroll to the water outlet that you wish to designate as the primary water outlet.
Press the [OK Icon] to set the primary water outlet.
1079815-5-A 68 Kohler Co.
Page 69

Light Settings
Path: Settings > Lights
The lights settings menu consists of:
•
Activate Light – activates the light menu, for systems where incandescent lighting is not connected
via the media module the incandescent lighting menus can be set to not display
•
Light Fade – when activated, this function controls the speed the lights (incandescent and chroma)
will fade ON or OFF
•
Brightness – sets the brightness level for incandescent lights
•
Color Brightness – (only displayed when a chroma lighting is present) - sets the brightness level for
chroma lights
•
White Light – (only displayed when a chroma lighting is present) - sets the warmth for chroma
lights
•
Effect Speed – (only displayed when a chroma lighting is present) – sets the speed of movement for
the chroma lighting effects
To access the light settings options, from the Main Menu scroll to “Settings.”
Press the [OK Icon] to select.
Scroll to and select “Lights.”
To return to the Main Menu press the [Back Icon].
Kohler Co. 69 1079815-5-A
Page 70

Activate Light
Path: Settings > Lights > Activate Light
This function activates the light menu. If “OFF” is selected, the incandescent lighting menus will not be
displayed. Choose “OFF” if your incandescent lighting is not connected via the media module. The factory
default for this setting is ″ON.″
From the Main Menu scroll to “Settings.”
Press the [OK Icon] to select.
Using the dial, scroll to and select “Lights.”
Press the [OK Icon] to select.
Highlight “Activate Light.”
Press the [OK Icon] to select.
Scroll to and select “ON.” Your selection will be “checked.”
The incandescent lighting menu will now be available.
Press the [Back Icon] to return to the Light Settings screen.
1079815-5-A 70 Kohler Co.
Page 71

Light Fade
Path: Settings > Lights > Light Fade
This menu item is only available if “Activate Light” is not turned OFF and/or chroma lighting is connected
to the system.
This function, when activated, controls the speed the lights (both incandescent and chroma lighting) will fade
ON or OFF.
Light Fade options include OFF, Slow, and Fast. “OFF” turns the lights ON or OFF immediately without
fade. “Slow” gradually fades the lights ON or OFF. “Fast” quickly fades the lights ON or OFF.
From the Main Menu scroll to “Settings.”
Press the [OK Icon] to select.
Using the dial, scroll to and select “Lights.”
Press the [OK Icon] to select.
Using the dial, scroll to and highlight “Light Fade.”
Press the [OK Icon] to select.
Scroll to and select “OFF,” “Slow,” or“ Fast.” Your selection will be “checked.”
Press the [Back Icon] to return to the Light Settings screen.
Kohler Co. 71 1079815-5-A
Page 72

Incandescent Brightness
Path: Settings > Lights > Brightness
This menu item is only available if “Activate Light” is not turned OFF.
This function allows you to adjust the brightness of your incandescent lighting.
From the Main Menu scroll to “Settings.”
Press the [OK Icon] to select.
Using the dial, scroll to and select “Lights.”
Press the [OK Icon] to select.
Using the dial, scroll to “Brightness.”
Press the [OK Icon] to select.
Turn the dial counterclockwise to dim the lights and clockwise to brighten.
Once the brightness is set press the [Back Icon] to return to the Light Settings screen.
1079815-5-A 72 Kohler Co.
Page 73

Color Brightness
Path: Settings > Lights > Color Brightness
This menu item is only available if chroma lighting is connected to the system.
This function allows you to adjust the brightness of your chroma lighting.
From the Main Menu scroll to “Settings.”
Press the [OK Icon] to select.
Using the dial, scroll to and select “Lights.”
Press the [OK Icon] to select.
Using the dial, scroll to “Color Brightness.”
Press the [OK Icon] to select.
Turn the dial counterclockwise to dim the lights and clockwise to brighten.
Once the brightness is set as desired, press the [Back Icon] to return to the Light Settings screen.
Kohler Co. 73 1079815-5-A
Page 74

White Light
Path: Settings > Lights > White Light
This menu item is only available if chroma lighting is connected to the system.
This function allows you to adjust the tone of your chroma lighting.
From the Main Menu scroll to “Settings.”
Press the [OK Icon] to select.
Using the dial, scroll to and select “Lights.”
Press the [OK Icon] to select.
Use the dial to scroll to “White Light.”
Press the [OK Icon] to select.
Scroll to and highlight “Cool,” “Neutral,” or “Warm.”
Press the [OK Icon] to make your selection. Your selection will be “checked.”
Press the [Back Icon] to return to the Light Settings screen.
1079815-5-A 74 Kohler Co.
Page 75

Chroma Lighting Effect Speed
Path: Settings > Lights > Effect Speed
This menu item is only available if chroma lighting is connected to the system.
This function allows you to adjust the speed of your chroma lighting effects.
From the Main Menu scroll to “Settings.”
Press the [OK Icon] to select.
Using the dial, scroll to and select “Lights.”
Press the [OK Icon] to select.
Using the dial, scroll to “Effect Speed.”
Press the [OK Icon] to select.
Scroll to and highlight “Slow,” “Medium,” or “Fast.”
Press the [OK Icon] to make your selection. Your selection will be “checked.”
Press the [Back Icon] to return to the Light Settings screen.
Kohler Co. 75 1079815-5-A
Page 76

Music Settings
Path: Settings > Music
The music settings menu consists of:
•
Volume Preset – sets the volume the music will be when the music is first turned ON
•
Treble – sets the music treble level
•
Bass – sets the music bass level
•
Balance – sets the left to right speaker balance
•
Shuffle – sets whether the music will play a playlist in list order or random
•
Repeat – sets whether music will play once, repeat one song, or repeat all
•
Default Dial – sets whether the dial will control volume adjustment or song selection
To access the Music Settings options, from the Main Menu scroll to “Settings” and press the [OK
Icon] to select.
Scroll to and select “Music.”
To return to the Main Menu press the [Back Icon].
1079815-5-A 76 Kohler Co.
Page 77

Volume Preset
Path: Settings > Music > Volume Preset
The preset volume is the default volume the music will be when the music is first turned ON.
From the Main Menu scroll to “Settings.”
Press the [OK Icon] to select.
Using the dial, scroll to and select “Music.”
Press the [OK Icon] to select.
Highlight “Volume Preset.”
Press the [OK Icon] to select.
Use the dial to adjust the volume level.
Press the [Back Icon] to set and return to the Music Settings screen.
Kohler Co. 77 1079815-5-A
Page 78

Treble
Path: Settings > Music > Treble
This function sets the default music treble level.
From the Main Menu scroll to “Settings.”
Press the [OK Icon] to select.
Using the dial, scroll to and select “Music.”
Press the [OK Icon] to select.
Use the dial to scroll to “Treble.”
Press the [OK Icon] to select.
Use the dial to adjust the treble level.
Press the [Back Icon] to set and return to the Music Settings screen.
1079815-5-A 78 Kohler Co.
Page 79

Bass
Path: Settings > Music > Bass
This function sets the default the music bass level.
From the Main Menu scroll to “Settings.”
Press the [OK Icon] to select.
Using the dial, scroll to and select “Music.”
Press the [OK Icon] to select.
Scroll to “Bass” and press the [OK Icon] to select.
Use the dial to adjust the bass level.
Press the [Back Icon] to set and return to the Music Settings screen.
Kohler Co. 79 1079815-5-A
Page 80

Balance
Path: Settings > Music > Balance
This function sets the default left to right speaker balance.
From the Main Menu scroll to “Settings.”
Press the [OK Icon] to select.
Using the dial, scroll to and select “Music.”
Press the [OK Icon] to select.
Use the dial to scroll to “Balance.”
Press the [OK Icon] to select.
Use the dial to adjust the left to right speaker balance.
Press the [Back Icon] to set and return to the Music Settings screen.
1079815-5-A 80 Kohler Co.
Page 81

Shuffle
Path: Settings > Music > Shuffle
This setting controls whether the Library music will play a song list in list order or random.
From the Main Menu scroll to “Settings.”
Press the [OK Icon] to select.
Using the dial, scroll to and select “Music.”
Press the [OK Icon] to select.
Use the dial to scroll to “Shuffle.”
Press the [OK Icon] to select.
Scroll to and select “ON” to activate shuffle, or “OFF” to disable. Your selection will be “checked.”
Press the [Back Icon] to set and return to the Music Settings screen.
Kohler Co. 81 1079815-5-A
Page 82

Repeat
Path: Settings > Music > Repeat
This setting controls whether music will play once, repeat one song, or repeat all.
From the Main Menu scroll to “Settings.”
Press the [OK Icon] to select.
Using the dial, scroll to and select “Music.”
Press the [OK Icon] to select.
Use the dial to scroll to “Repeat.”
Press the [OK Icon] to select.
Scroll to and select “OFF,” “Repeat One,” or “Repeat All.” Your selection will be “checked.”
Press the [Back Icon] to set and return to the Music Settings screen.
1079815-5-A 82 Kohler Co.
Page 83

Default Dial
Path: Settings > Music > Default Dial
This setting controls whether the dial will control volume adjustment or song selection.
From the Main Menu scroll to “Settings.”
Press the [OK Icon] to select.
Using the dial, scroll to and select “Music.”
Press the [OK Icon] to select.
Use the dial to scroll to “Default Dial.”
Press the [OK Icon] to select.
Scroll to and select “Adjust Volume” or “Adjust Song.” Your selection will be “checked.”
Press the [Back Icon] to set and return to the Music Settings screen.
Kohler Co. 83 1079815-5-A
Page 84

Steam Settings
Path: Settings > Steam
The steam settings menu consists of:
•
Temperature – sets the temperature of the steam when the steam function is first turned ON
•
Timer – sets the duration the steam will remain ON
•
Power Clean – activates an automatic cleaning function for proper, safe maintenance of your steam
generator
To access the Steam Settings options, from the Main Menu scroll to “Settings” and press the [OK
Icon] to select.
Scroll to and select “Steam.”
To return to the Main Menu press the [Back Icon].
1079815-5-A 84 Kohler Co.
Page 85

Steam Temperature
Path: Settings > Steam > Temperature
This function sets the default temperature of the steam when the steam function is first turned ON.
From the Main Menu scroll to “Settings.”
Press the [OK Icon] to select.
Using the dial, scroll to and select “Steam.”
Press the [OK Icon] to select.
Highlight “Temperature” and press the [OK Icon] to select.
Use the dial to adjust the temperature as desired
Press the [Back Icon] to set and return to the Steam Settings screen.
Kohler Co. 85 1079815-5-A
Page 86

Steam Timer
Path: Settings > Steam > Timer
This function sets the default duration the steam will remain ON.
From the Main Menu scroll to “Settings.”
Press the [OK Icon] to select.
Using the dial, scroll to and select “Steam.”
Press the [OK Icon] to select.
Use the dial to scroll to “Timer.”
Press the [OK Icon] to select.
Use the dial to set the duration the steam will run at start-up. The maximum allowable time is 20
minutes.
Press the [Back Icon] to set and return to the Steam Settings screen.
1079815-5-A 86 Kohler Co.
Page 87

Steam Power Clean
Path: Settings > Steam > Power Clean
This function activates an automatic cleaning function for proper, safe maintenance of your steam generator.
NOTICE: Your steam system is set to allow for 600 minutes of usage before a cleaning cycle is required.
After 600 minutes you will be notified that three steam uses are available before a “Power Clean” cycle is
required. If after the three uses a cleaning cycle has not been run, your system will bring you directly to
the “Power Clean” screen. The cleaning cycle must be completed in order to reset the 600-minute counter
and enable steam use.
NOTICE: Power clean will run for 45 minutes. Once activated, you must remain out of the shower until
the cleaning cycle has completed.
From the Main Menu scroll to “Settings.”
Press the [OK Icon] to select.
Using the dial, scroll to and select “Steam.”
Press the [OK Icon] to select.
Use the dial to scroll to “Start Power Clean.”
Press the [OK Icon] to begin the cleaning cycle. Exit the shower immediately.
Kohler Co. 87 1079815-5-A
Page 88

System Settings
Path: Settings > System
The system settings menu consists of:
•
About – displays the logo screen and software versions
•
Valve – sets the configuration of your shower installation
•
Hospitality – disables and removes all save functions, locks all current device settings and saved
user settings
•
Diagnostics – system performs a check of all device connections and provides a status
•
Error Log – displays any applicable error code information
•
WiFi Security – input your WEP or WPA network password to allow system access to your music
server (This menu item will not be visible if the system detects an Ethernet connection.
•
Music Software – checks for software updates available for download, activation of internet radio
quality monitoring, and display of the IP address
•
Version – Factory Use Only
•
Reset – restores original interface settings or clears all user settings
To access the System Settings options, from the Main Menu scroll to “Settings.”
Press the [OK Icon] to select.
Scroll to and select “System.”
To return to the Main Menu press the [Back Icon].
1079815-5-A 88 Kohler Co.
Page 89

About
Path: Settings > System > About
Select this option to display the logo and software version currently running on your interface.
From the Main Menu scroll to “Settings.”
Press the [OK Icon] to select.
Using the dial, scroll to and select “System.”
Press the [OK Icon] to select.
Scroll to “About.”
Press the [OK Icon] to select.
Scroll to the bottom of the screen to view the current software versions for all components currently
connected to your system.
Press the [Back Icon] to return to the system settings menu.
Kohler Co. 89 1079815-5-A
Page 90

Valve
Path: Settings > System > Valve
This function sets the configuration of your shower installation.
Refer to the “Set the Valve Configuration – Preset Options” or “Set the Valve Configuration –
Custom Options” section.
1079815-5-A 90 Kohler Co.
Page 91

Set Valve Configurations - Preset Options
Set the Valve Configuration – Preset Options
Path: Settings > System > Valve > Configurations > Choose your configuration
Sets the configuration of you shower installation.*
From the Main Menu scroll to “Settings.”
Press the [OK Icon] to select.
Using the dial, scroll to and select “System.”
Press the [OK Icon] to select.
Scroll to “Valve.”
Press the [OK Icon] to select.
Scroll to “Configurations.”
Press the [OK Icon] to select.
Scroll to the configuration* of your shower.
Press the [OK Icon] to select.
NOTE: Your outlet names will be listed in order from outlet 1 to outlet 6. This screen allows you to change
the outlet display name only and will not change the outlet cycling order during massage.
If the outlet names listed are correct for your system, press the [Back Icon] twice to exit the initial
set-up sequence.
To rename outlets display names:
Scroll to the outlet to be renamed.
Press the [OK Icon] to select.
Scroll to the new outlet name.
Press the [OK Icon] to select. The new name will now be displayed.
Kohler Co. 91 1079815-5-A
Page 92

Set the Valve Configuration – Preset Options (cont.)
Repeat for remaining outlets as needed.
* Refer to the “Configurations” section for illustrations and descriptions of the preconfigured options. For
Custom configurations, proceed to “Set the Valve Configuration - Custom Options.”
1079815-5-A 92 Kohler Co.
Page 93

Set Valve Configurations - Custom
Set the Valve Configuration – Custom Options
Path: Settings > System > Valve > Configurations > Custom
Set the outlet names of your custom configuration to match your shower installation.
From the Main Menu scroll to “Settings.”
Press the [OK Icon] to select.
Using the dial, scroll to and select “System.”
Press the [OK Icon] to select.
Scroll to “Valve.”
Press the [OK Icon] to select.
Scroll to “Custom.” For preprogrammed configurations, refer to the “Set the Valve Configuration Preset Options.”
Press the [OK Icon] to select.
Scroll to “Outlet 1.”
Press the [OK Icon] to select.
Using the dial, scroll through the list of available water outlet options (see “Available Water Outlet
Options” list), highlight the appropriate water outlet name for your shower configuration.
Press the [OK Icon] to set the new water outlet name.
Repeat for all remaining water outlets as needed.
Available Water Outlet Options:
•
Showerhead
•
2 Showerheads
•
Showerhead 1
•
Showerhead 2
•
Showerhead 3
Kohler Co. 93 1079815-5-A
Page 94

Set the Valve Configuration – Custom Options (cont.)
•
Showerhead 4
•
Showerhead 5
•
Showerhead 6
•
Handshower
•
2 Handshowers
•
Handshower 1
•
Handshower 2
•
Handshower 3
•
Handshower 4
•
Handshower 5
•
Handshower 6
•
Bodyspray
•
2 Bodysprays
•
Bodyspray 1
•
Bodyspray 2
•
Bodyspray 3
•
Bodyspray 4
•
Bodyspray 5
•
Bodyspray 6
•
Overhead
•
2 Overheads
•
Overhead 1
•
Overhead 2
•
Overhead 3
•
Overhead 4
•
Overhead 5
•
Overhead 6
•
WaterTile
•
2 WaterTiles
•
WaterTile 1
•
WaterTile 2
•
WaterTile 3
•
WaterTile 4
•
WaterTile 5
•
WaterTile 6
•
WaterTile S.H.
•
2 WaterTiles S.H.
•
WaterTile S.H. 1
•
WaterTile S.H. 2
•
WaterTile S.H. 3
•
WaterTile S.H. 4
•
WaterTile S.H. 5
•
WaterTile S.H. 6
•
WaterTile Rain
•
WaterTile Rain 1
•
WaterTile Rain 2
•
WaterTile Rain 3
•
WaterTile Rain 4
1079815-5-A 94 Kohler Co.
Page 95

Service
Path: Settings > System > Valve > Service
IMPORTANT! Do not attempt to service the system yourself. Please consult an authorized Kohler Co.
service representative for any servicing needs.
Kohler Co. 95 1079815-5-A
Page 96

Hospitality Mode
Hospitality Mode
Path: Settings > System > Hospitality
Activate
Deactivate
Hospitality mode disables and removes all save functions, locks all current settings and saved user settings
from being changed.
When the hospitality mode is active, only the following options will be available from the settings menu:
About, Clean, Hospitality, and Diagnostics.
From the Main Menu scroll to “Settings.”
Press the [OK Icon] to select.
Using the dial, scroll to and select “System.”
Press the [OK Icon] to select.
Scroll to “Valve.”
Scroll to “Hospitality.”
Press the [OK Icon] to select.
Activate
To activate the hospitality function, input the four-digit code 1012.
Use the dial to scroll to the first digit in the code.
Press the [OK Icon] to set the selected number and proceed to the next digit.
Repeat for all four digits of the code.
Deactivate
To deactivate the hospitality function, input the four-digit code 1012.
Use the dial to scroll to the first digit in the code.
1079815-5-A 96 Kohler Co.
Page 97

Hospitality Mode (cont.)
Press the [OK Icon] to set the selected number and proceed to the next digit.
Repeat for all four digits of the code.
Kohler Co. 97 1079815-5-A
Page 98

Diagnostics
Path: Settings > System > Diagnostics
Upon entering this screen your system will begin a check of all device connections and display the status of
those connections. This information is provided to assist an authorized Kohler Co. service representative in
servicing your system.
From the Main Menu scroll to “Settings.”
Press the [OK Icon] to select.
Using the dial, scroll to and select “System.”
Press the [OK Icon] to select.
Scroll to “Diagnostics.”
Press the [OK Icon] to select to display the results of the diagnostics check.
1079815-5-A 98 Kohler Co.
Page 99

Error Log
Path: Settings > System > Error Log
This screen will display any applicable error code information and assist an authorized Kohler Co. service
representative in servicing your system.
From the Main Menu scroll to “Settings.”
Press the [OK Icon] to select.
Using the dial, scroll to and select “System.”
Press the [OK Icon] to select.
Scroll to “Error Log.”
Press the [OK Icon] to select and display the error log.
Kohler Co. 99 1079815-5-A
Page 100

WiFi Security
Path: Settings > System > WiFi Security
This menu item will not be visible if the system detects an Ethernet connection.
Your WiFi network password (WEP/WPA key) can be obtained from the software provided with your
wireless access point. You will have either a WEP key or a WPA key, not both. Your network may also be
configured without a WEP/WPA key; in this case select OFF when prompted to select a key type. “OFF” is
the default for each detected server.
From the Main Menu scroll to “Settings.”
Press the [OK Icon] to select.
Using the dial, scroll to and select “System.”
Press the [OK Icon] to select.
Scroll to “WiFi Security.”
Press the [OK Icon] to select. All detected servers will be listed.
Scroll to the server that you want to access.
Press the [OK Icon] to select.
Scroll to and select “OFF,” ”WEP Key,” or “WPA Key.”
Use the dial to scroll to the first digit in the code.
Press the [OK Icon] to set the selected number and proceed to the next digit.
Repeat for all digits of the code.
Once the last digit of the code is selected, press and hold the [OK Icon] for 2 seconds to set.
If a valid WEP/WPA key has been entered, you will return to the server selection screen. If an invalid key is
entered, the screen will be cleared allowing you to re-enter the key.
1079815-5-A 100 Kohler Co.
 Loading...