

Page 1

Installation
Guide
Self-Rimming/Undercounter Cast Iron Sinks
K-6493, K-6494, K-6496,
K-6497, K-6558,K-6565,
K-6584, K-6585, K-6586,
K-6587, K-6588
M product numbers are for Mexico (i.e. K-12345M)
Los números de productos seguidos de
M corresponden a México (Ej.
K-12345M)
Français, page “Français-1”
Español, página “Español-1”
1019947-2-C
Page 2
Thank You For Choosing Kohler Company
We appreciate your commitment to Kohler quality. Please take a few
minutes to review this manual before you start installation. If you
encounter any installation or performance problems, please don’t
hesitate to contact us. Our phone numbers and website are listed on
the back cover. Thanks again for choosing Kohler Company.
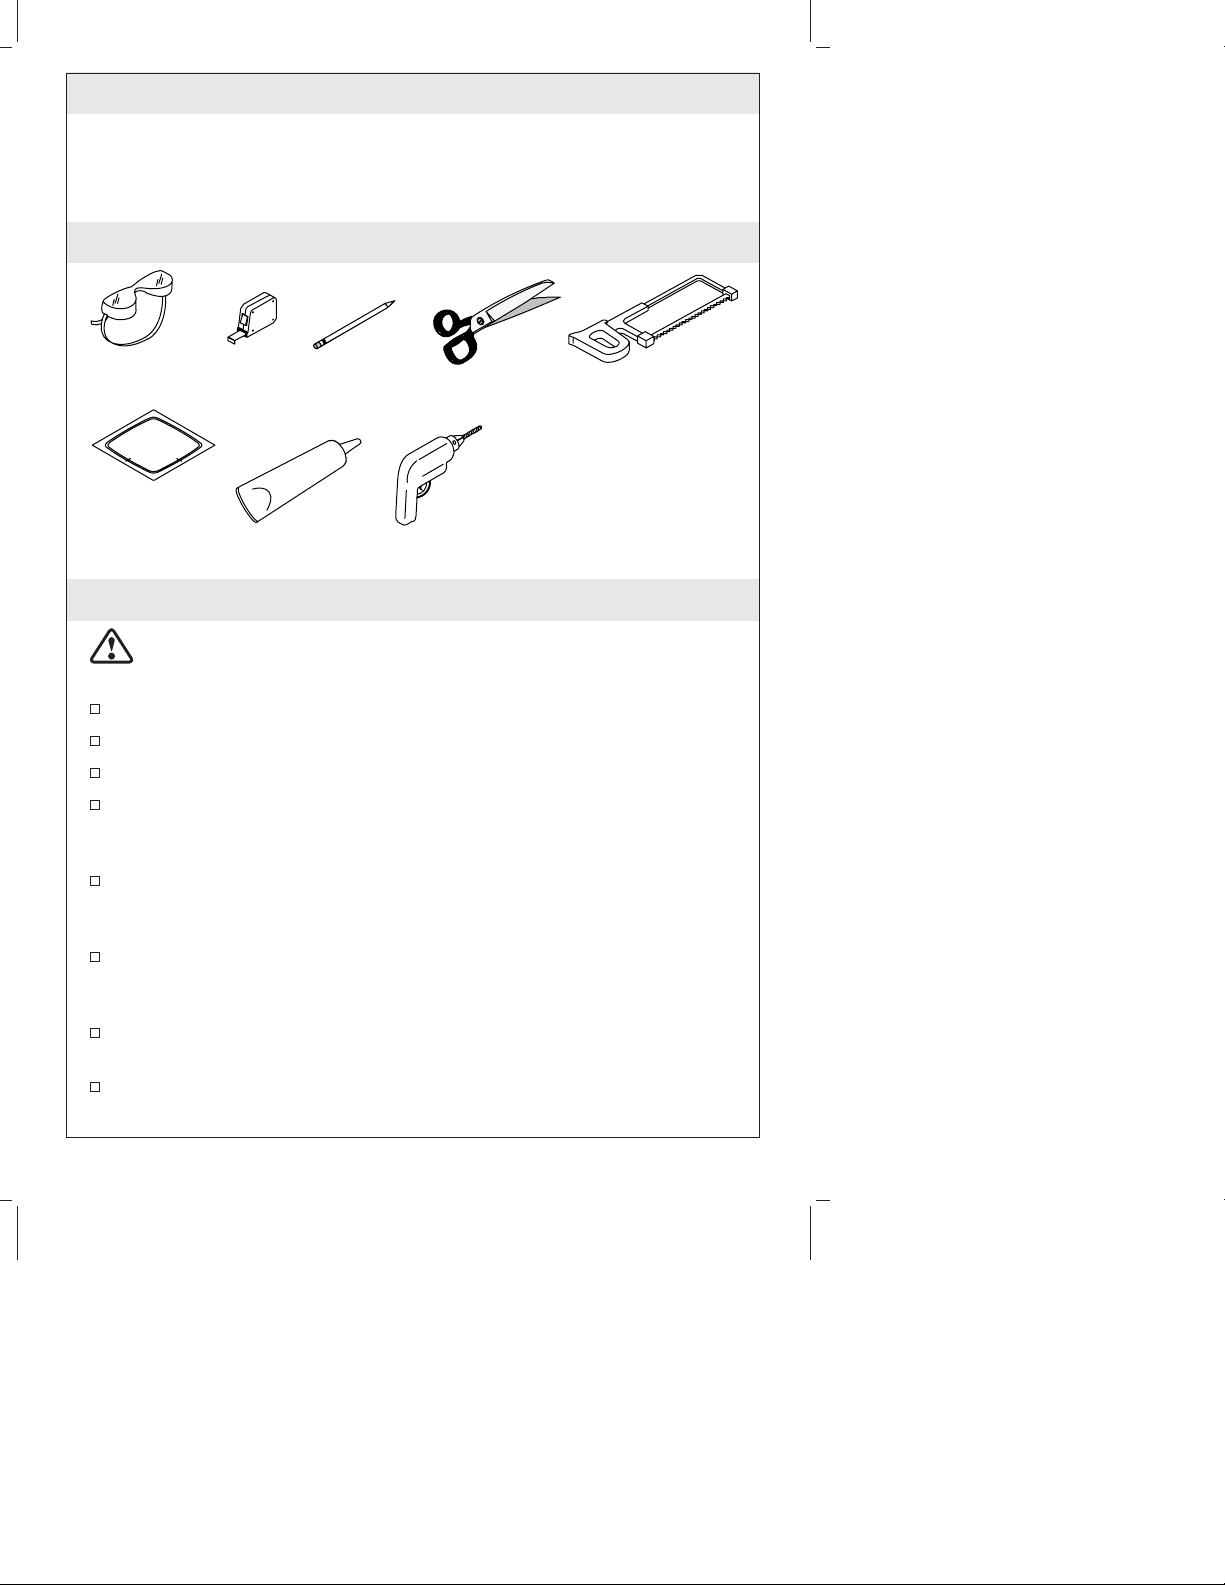
Tools and Materials
Safety
Glasses
Template
(supplied)
Tape
Measure
Pencil
Sealant
Scissors
Drill
Hacksaw
Plus:
• Hole saw 1-3/8"
Before You Begin
CAUTION: Risk of personal injury or product damage. Cast
iron sinks are very heavy. Get assistance lifting the sink into
place.
Observe all local plumbing and building codes.
Shut off the hot and cold water supplies.
Inspect the drain and supply tubing. Replace if necessary.
Prior to installation, unpack the new sink and inspect it for
damage. Return the sink to its protective carton until you are
ready to install it.
Use these instructions for self-rimming and undercounter
installations. Follow only the instructions that apply to your
installation.
Due to the nature of undercounter installations, Kohler Co.
recommends that undercounter sink installations be performed by
trained and experienced installers.
To ensure a safe and damage-free installation, two people should
install the sink.
Plan the sink installation so future removal from underneath the
countertop is possible without damaging the countertop.
1019947-2-C 2 Kohler Co.
Page 3

Before You Begin (cont.)
For multiple-bowl installations, additional support will be
required between bowls installed in countertops that are less than
1″ (2.5 cm) thick.
For multiple-bowl, undercounter installations, a minimum
distance of 3-3/8″ (8.6 cm) is required between the cutouts.
A minimum countertop thickness of 1″ (2.5 cm) is required if
using the anchors provided.
Do not use adhesives or adhesive sealants with this product.
All information in these instructions is based on the latest product
information available at the time of publication. Kohler Co.
reserves the right to make revisions in the design of products
without notice, as specified in the Price Book.
Kohler Co. 3 1019947-2-C
Page 4
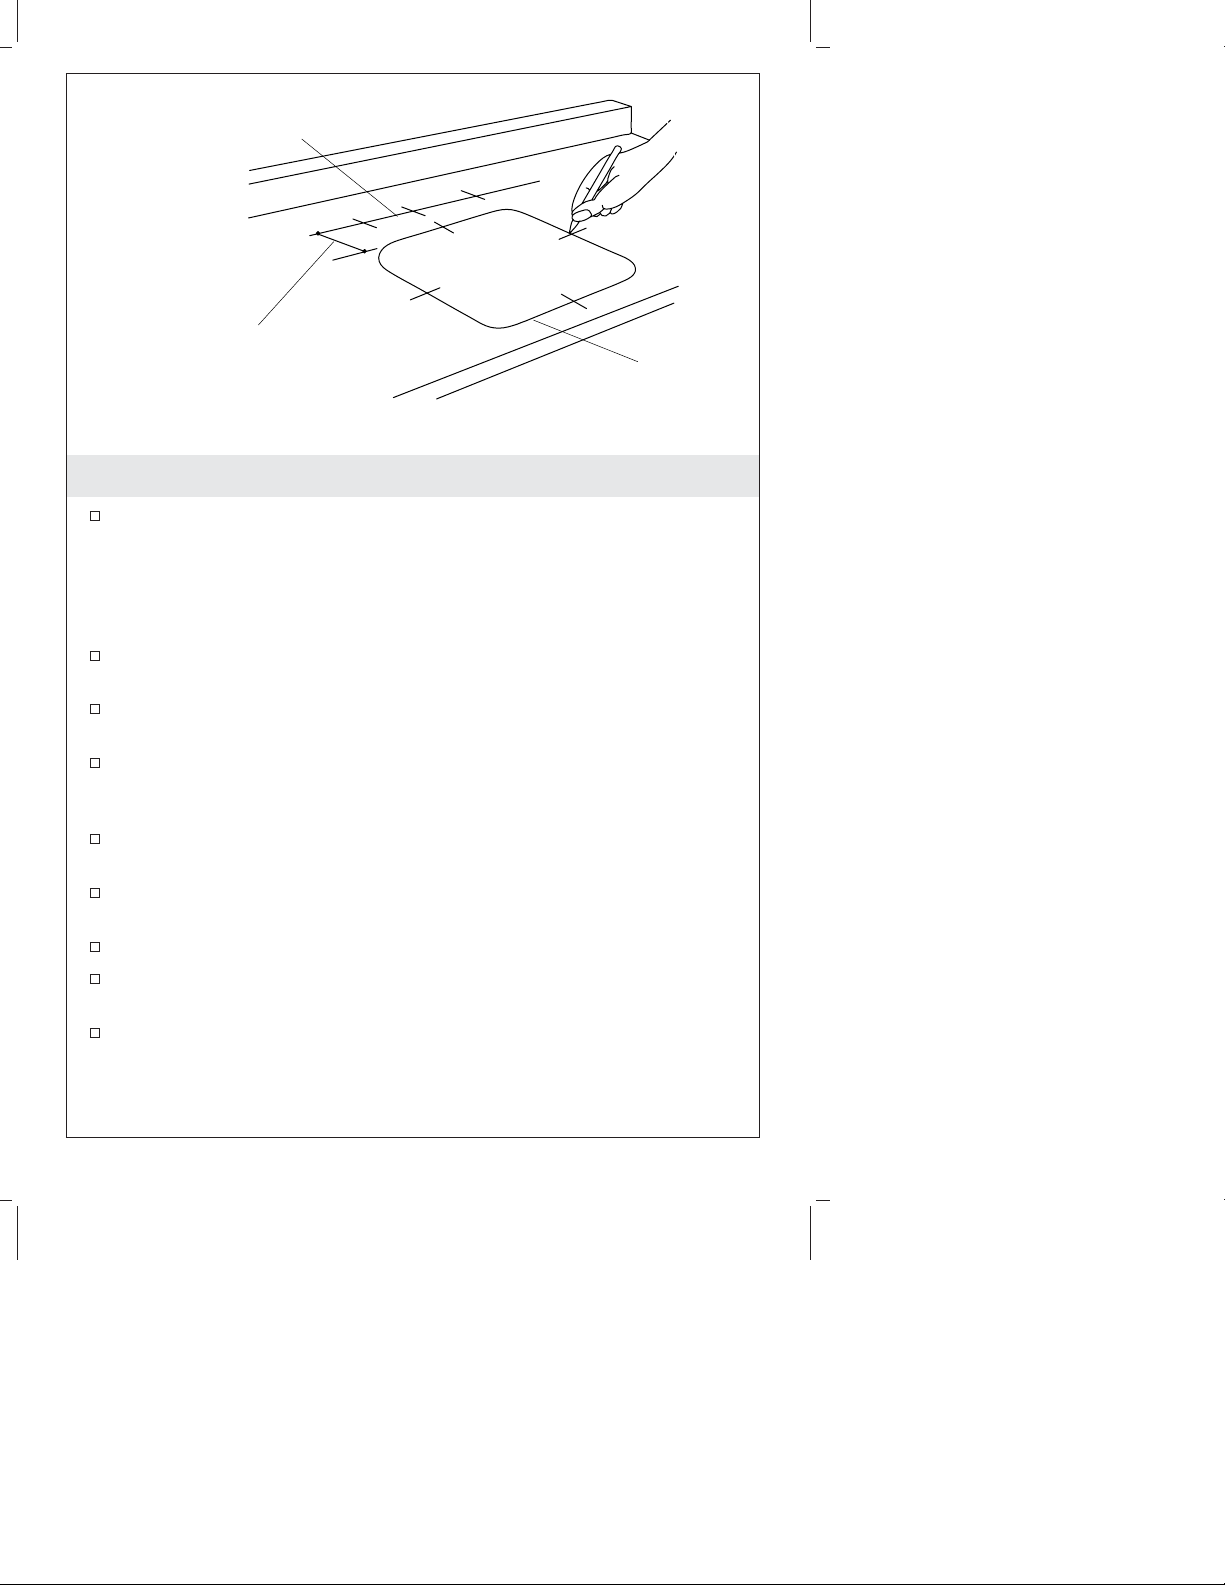
Faucet Centerline
(Most Models)
TEMPLATE
Undercounter - 2-7/8" (7.3 cm)
Self-Rimming - 1-7/8" (4.8 cm)
Minimum
1. Preparation
Install the water supplies and drain piping according to the
roughing-in information.
NOTE: You may require different, more specialized tools to install
this sink to countertop materials other than wood or wood
composites.
Cut along the inside of the template line where indicated for the
countertop opening.
Position the template on the countertop. Check for adequate
clearance between the sink, faucet, backsplash and cabinet.
For multiple-bowl installations, additional support will be
required between bowls installed in countertops that are less than
1″ (2.5 cm) thick.
For multiple-bowl, undercounter installations, a minimum
distance of 3-3/8″ (8.6 cm) is required between cut-outs.
Trace around the template on the countertop with a pencil.
Centerlines are provided to help align the opening.
Mark the faucet hole centerline on the countertop.
Verify there is adequate clearance between the sink, faucet,
backsplash and cabinet.
For most undercounter installations: A minimum distance of
2-7/8” (7.3 cm) is required between the faucet centerline and the
edge of the template.
Cutting Line
1019947-2-C 4 Kohler Co.
Page 5

Preparation (cont.)
For self-rimming installations: A minimum distance of 1-7/8”
(4.8 cm) is required between the faucet centerline and the edge of
the template.
Adjust the template as needed.
Kohler Co. 5 1019947-2-C
Page 6

Countertop Opening - Bottom View
Anchor
Edge
Clamp
Screw
2" (5.1 cm)
Countertop
Opening
Clamp
Bottom View
Screw
2. Undercounter Installation
CAUTION: Risk of product damage. Do not cut, drill, or sand
the countertop while it is positioned over the fixture.
Cut out the opening by carefully following the pencil line traced
from the template.
Equally space the appropriate number of clamps, and mark the
clamp-mounting holes on the underside of the countertop.
For Wood Countertops
Pre-drill the wood screw holes at the marked locations.
Waterproof any exposed areas of wood.
For Marble/Stone Countertops
Countertop
Sealant
Sink
Position the countertop upside down on foam padding to protect
the surface. Drill 3/8″ holes 5/8″ (1.6cm) deep at the marked
locations to accomodate the anchors provided.
Use a setting tool and hammer to secure the anchors flush with
the countertop bottom surface.
Install the clamps.
1019947-2-C 6 Kohler Co.
Page 7
Undercounter Installation (cont.)
For All Installations
If the countertop has not been installed, install it at this time.
Drill the faucet holes according to the faucet installation
instructions.
Install the faucet to the countertop according to the faucet
manufacturer’s instructions.
Install the strainer to the sink according to the strainer
manufacturer’s instructions.
Turn the clamps parallel to the opening to allow for easy
installation of the sink.
Clean the top of the sink rim with a non-abrasive cleaner.
Clean the underside of the countertop around the cut-out area,
making sure the surface is smooth, clean, and free of defects.
Apply a generous bead of sealant to the top surface of the sink
rim.
CAUTION: Risk of personal injury or product damage. Cast
iron sinks are very heavy. Get help lifting the sink into place.
Position and align the sink with the countertop cut-out.
Rotate the clamps over the sink rim, and carefully tighten them
until they are just snug.
Check the alignment of the sink with the cut-out. Then securely
tighten the clamps.
Optional: Apply a bead of sealant between the countertop and
the top of the sink rim.
Immediately wipe away any excess sealant, and fill any voids as
needed.
Allow the sealant to cure for at least 30 minutes before
proceeding.
Connect and tighten the trap to the strainer, and complete the
water supply connections to the faucet according to the
instructions packed with the faucet.
Run water into the sink and check for leaks.
Clean up with a non-abrasive cleaner.
Kohler Co. 7 1019947-2-C
Page 8
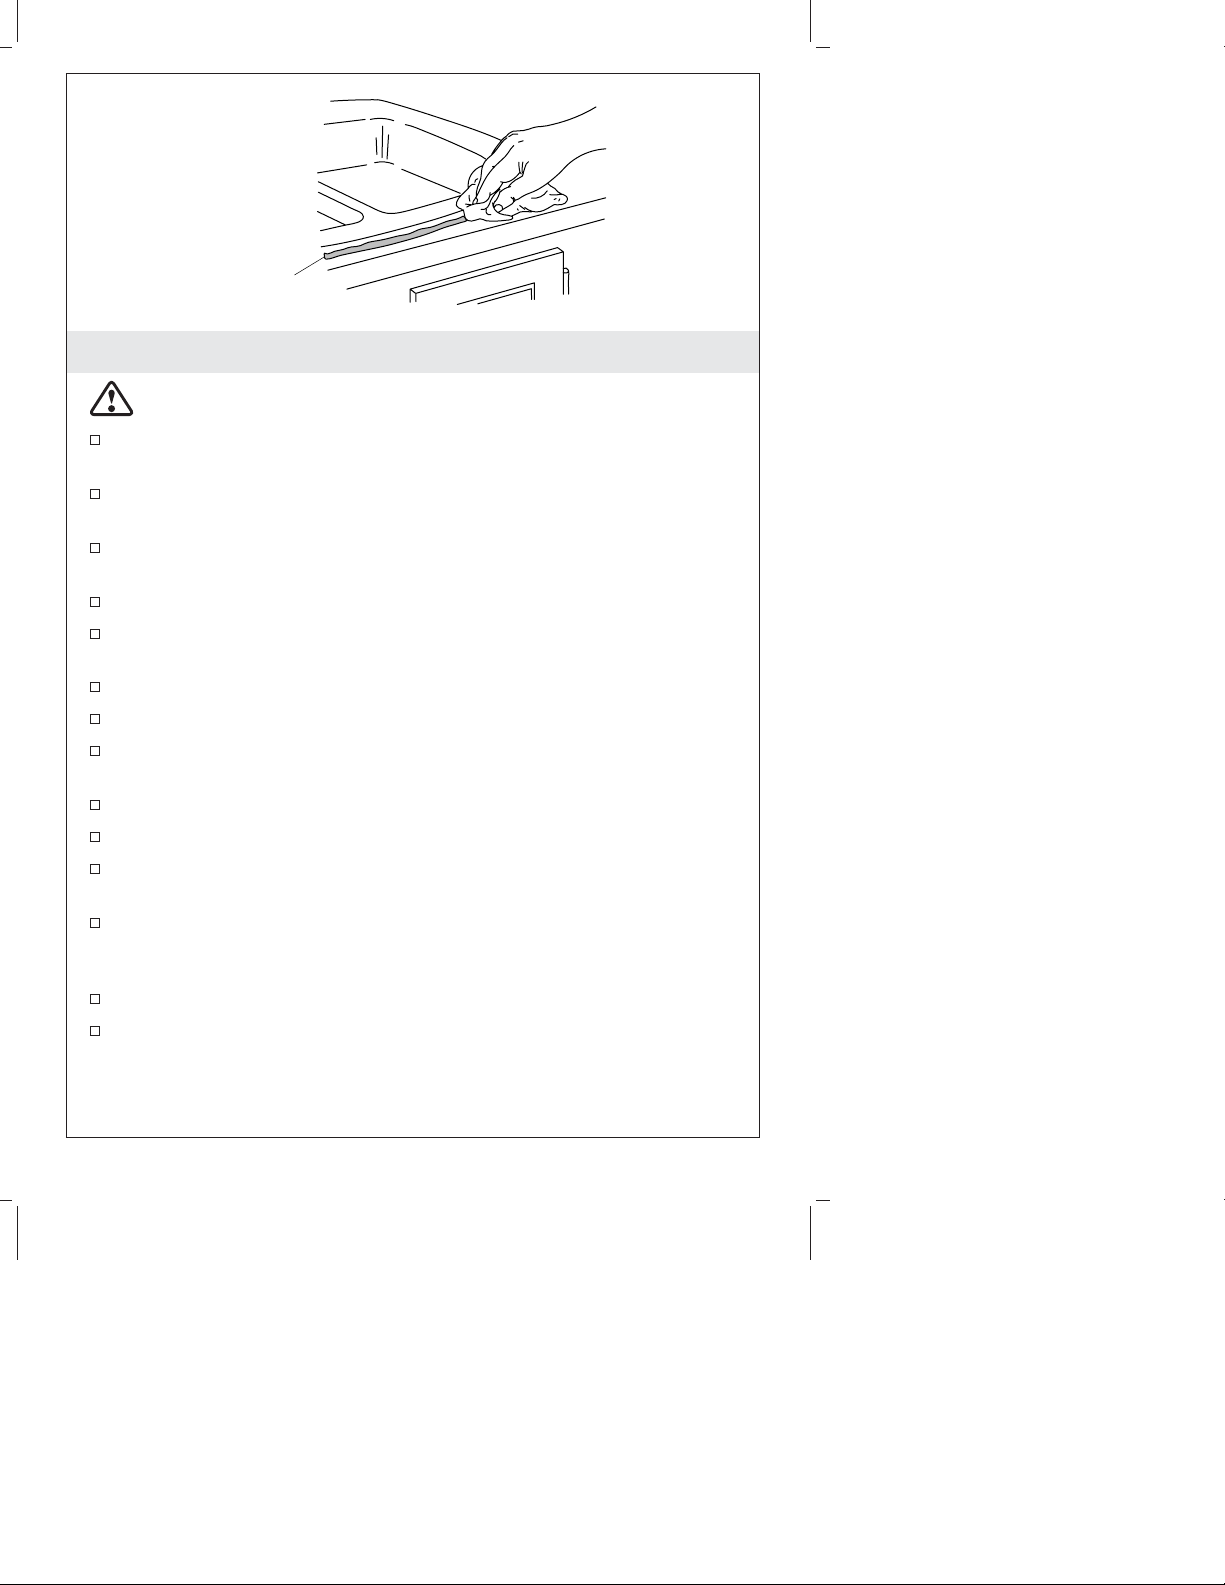
Sealant
3. Self-Rimming Installation
CAUTION: Risk of personal injury or property damage. Cast
iron sinks are very heavy. Get help lifting the sink into place.
Cut out the opening by carefully following the pencil line traced
from the template.
Drill the faucet holes, and install the faucet to the countertop
according to the faucet manufacturer’s instructions.
Install the strainer to the sink according to the manufacturer’s
instructions.
Clean the countertop.
Carefully position the sink into the countertop opening so the
“Kohler” logo is to the back.
Verify the fit and position. Make any needed adjustments.
Apply a thin continuous bead of sealant around the sink edges.
Immediately wipe away any excess sealant, and fill any voids as
needed.
Verify that the sink has not moved out of position.
Allow the sealant to cure at least 30 minutes before proceeding.
Install the garbage disposal, if desired, according to the
manufacturer’s instructions.
Connect and tighten the trap to the drain assemblies, and
complete the water supply connections to the faucet according to
the instructions packed with the faucet.
Run water into the sink and check for leaks.
Clean up with a non-abrasive cleaner.
1019947-2-C 8 Kohler Co.
Page 9

Guide d’installation
Éviers en fonte à rebord intégré/sous comptoir
Outils et matériels
Lunettes de
protection
Gabarit (fourni)
Ruban à
mesurer
Crayon
Produit
d'étanchéité
Ciseaux
Perceuse
Scie à métaux
Plus:
• Trou de scie de 1-3/8"
Merci d’avoir choisi la compagnie Kohler
Nous apprécions votre engagement envers la qualité Kohler. Veuillez
prendre s’il vous plaît quelques minutes pour lire ce manuel avant de
commencer l’installation. Ne pas hésiter à nous contacter en cas de
problème d’installation ou de performance. Nos numéros de téléphone
et notre adresse du site internet sont au verso. Merci encore d’avoir
choisi la compagnie Kohler.
Avant de commencer
ATTENTION : Risque de blessure corporelle ou
d’endommagement du produit. Les éviers en fonte sont très
lourds. Demander de l’assistance pour mettre l’évier en place.
Respecter tous les codes de plomberie et de bâtiment locaux.
Couper les alimentations d’eau chaude et d’eau froide.
Inspecter le drain et la tuyauterie d’alimentation. Remplacer si
nécessaire.
Avant l’installation, déballer le nouvel évier et l’examiner pour en
déceler tout dommage. Remettre l’évier dans son emballage
jusqu’à être prêt à l’installer.
Kohler Co. Français-1 1019947-2-C
Page 10

Avant de commencer (cont.)
Utiliser ces instructions pour rebord intégré et installations sous
comptoir. Suivre uniquement les instructions qui s’appliquent à
votre installation.
Vu la nature particulière des installations sous comptoir, Kohler
Co. recommande que les installations des éviers sous comptoir
soient effectuées par des installateurs formés et expérimentés.
Pour assurer une installation sécurisée et sans dommage, deux
personnes devraient installer l’évier.
Planifier l’installation de l’évier de façon à ce qu’un futur
démontage d’en-dessous le comptoir soit possible sans
dommages.
Pour des installations à cuvettes multiples, un support
additionnel sera nécessaire entre les cuvettes installées sur des
comptoirs d’une épaisseur de moins de 1″ (2,5 cm).
Pour les cuvettes multiples, les installations sous comptoir, une
distance minimum de 3-3/8″ (8,6 cm) est requise entre les
découpes.
Une épaisseur de comptoir minimum de 1″ (2,5 cm) est requise si
les ancrages fournis sont utilisés.
Ne pas utiliser pas de matériaux d’étanchéité ou adhésifs avec ce
produit.
Toutes les informations contenues dans ces instructions sont
basées sur les données les plus récentes relatives au produit au
moment de la publication. Kohler Co. se réserve le droit
d’apporter toutes modifications sur le design des produits et ceci
sans préavis, tel que spécifié dans le catalogue des prix.
1019947-2-C Français-2 Kohler Co.
Page 11

Ligne centrale du robinet
(plupart des modèles)
GABARIT
Sous comptoir - 2-7/8" (7.3 cm)
Lavabo à rebord incorporé - 1-7/8"
(4.8 cm) Min
1. Préparation
Installer les alimentations d’eau et tuyauterie du drain selon
l’information du plan de raccordement.
REMARQUE : Des outils plus spécialisés pour installer cet évier sur
un comptoir autre qu’en bois ou en bois de synthèse peuvent être
requis.
Découper le long de la ligne intérieure du gabarit pour
l’ouverture du comptoir.
Placer le gabarit sur le comptoir. Vérifier l’espacement adéquat
entre l’évier, le robinet le dosseret et le meuble.
Pour des installations à cuvettes multiples, un support
additionnel sera nécessaire entre les cuvettes installées sur des
comptoirs d’une épaisseur de moins de 1″ (2,5 cm).
Pour les cuvettes multiples, les installations sous comptoir, un
espace minimum de 3-3/8″ (8,6 cm) est requis entre les découpes.
Tracer au crayon le gabarit sur le comptoir. Les lignes centrales
sont fournies pour aider à aligner l’ouverture.
Marquer l’axe central de l’orifice du robinet sur le comptoir.
Vérifier qu’il y ait un espace adéquat entre l’évier, le robinet, le
dosseret et le meuble.
Pour la plus part des installations sous comptoir: Une distance
minimale de 2-7/8″ (7,3 cm) est requise entre l’axe central du
robinet et le bord de l’ouverture du comptoir.
Ligne de
coupe
Kohler Co. Français-3 1019947-2-C
Page 12

Préparation (cont.)
Pour des installations à rebord incorporé: Une distance minimale
de 1-7/8″ (4,8 cm) est requise entre l’axe central du robinet et le
bord de l’ouverture du comptoir.
Ajuster le gabarit selon le besoin.
1019947-2-C Français-4 Kohler Co.
Page 13

Ouverture du comptoir - Vue de dessous Vue de dessous
Ancrage
Reborde de
Pince
Vis
2" (5,1 cm)
l'ouverture
du comptoir
Pince
Vis
2. Installation sous comptoir
ATTENTION : Risque d’endommagement du produit. Ne pas
couper, percer, ni poncer le comptoir lorsqu’il est positionné sur
l’appareil.
Découper l’ouverture en suivant soigneusement la ligne tracée au
crayon du gabarit.
Espacer de manière égale le nombre de pinces, et marquer les
orifices de montage des pinces sous le comptoir.
Pour les comptoirs en bois
Percer les orifices aux endroits indiqués
Imperméabiliser toutes les surfaces exposées du bois.
Comptoir
Matériau
d'étanchéité
Évier
Pour les comptoirs en marbre/pierre
Placer le comptoir à l’envers sur une surface coussinée pour en
protéger sa surface. Percer des orifices de Ø 3/8″ (1 cm) et de Ø
5/8″ (1,6 cm) aux emplacements indiqués.
Utiliser un outil pour la pose et marteler les attaches.
Installer les pinces.
Kohler Co. Français-5 1019947-2-C
Page 14

Installation sous comptoir (cont.)
Pour toutes les installations
Installer le comptoir, si cela n’est pas déjà fait.
Percer les orifices pour les robinets selon la notice d’installation.
Installer le robinet sur le comptoir selon la notice du fabricant qui
accompagne le produit.
Assembler le robinet et le tuyau d’évacuation à l’évier
conformément à la notice du fabricant.
Pivoter les pinces de façon parallèle à l’ouverture, à fin de
faciliter l’installation de l’évier.
Nettoyer le dessus de l‘évier avec un produit non abrasif.
Nettoyer autour de l’ouverture et vérifier que la surface soit libre
de tout défauts et irrégularités.
Appliquer du mastic d’étanchéité à la partie supérieure de la
surface du rebord de l’évier.
ATTENTION : Risque de blessures ou d’endommagement du
produit. Les éviers en fonte sont très lourds. Demander de l’aide
pour soulever et mettre en place cet évier.
Placer et aligner l’évier sur l’ouverture du comptoir.
Pivoter et bien serrer les pinces sur le rebord de l’évier.
Vérifier l’alignement de l’évier avec son ouverture. Bien serrer les
attaches uniquement après.
Facultatif : Appliquez du mastic d’étanchéité sous du rebord de
l’évier.
Essuyez immédiatement tout excédent de matériau et appliquer
de l’étanchéité sur toutes les cavités au besoin.
Avant de continuer, laisser prendre le mastic pour au moins 30
minutes.
Raccorder et fixer le siphon au drain, puis compléter les raccords
d’arrivée d’eau au robinet, selon les instructions qui
accompagnent le robinet.
Laisser couler l’eau dans le lavabo et vérifier s’il y a des fuites.
Nettoyer avec des nettoyants non abrasifs.
1019947-2-C Français-6 Kohler Co.
Page 15

Matériau
d'étanchéité
3. Installation à rebord intégré
ATTENTION : Risque de blessures ou d’endommagement du
produit. Les éviers en fonte sont très lourds. Demander de l’aide
pour soulever et mettre en place l’évier.
Découper l’ouverture en suivant soigneusement la ligne tracée au
crayon du gabarit.
Percer les orifices requis pour le robinet et monter le robinet sur
le plan de travail selon les instructions du fabricant.
Installer la bonde à l’évier conformément aux instructions du
fabricant.
Nettoyer le comptoir.
Placer avec précaution l’évier dans l’ouverture du comptoir de
façon à ce que le logo ″Kohler″ soit vers l’arrière.
Vérifier l’ajustage et la position. Faire tous les ajustages
nécessaires.
Appliquer un boudin mince et continu d’un mastic de qualité au
long des bords de l’évier.
Essuyer immédiatement tout excès de matériau d’étanchéité et
combler tout vide au besoin.
S’assurer que l’évier ne se soit pas déplacé de sa position.
Avant de continuer, laisser sécher le mastic pendant au moins 30
minutes.
Installer le broyeur de déchets, si désiré, conformément aux
instructions du fabricant.
Connecter et bien serrer le siphon aux ensembles de drain et
compléter les connexions d’alimentation d’eau au robinet selon
les instructions emballées avec le robinet.
Kohler Co. Français-7 1019947-2-C
Page 16

Installation à rebord intégré (cont.)
Laisser couler l’eau dans l’évier et vérifier s’il y a des fuites.
Nettoyer avec un agent nettoyant non-abrasif.
1019947-2-C Français-8 Kohler Co.
Page 17

Guía de instalación
Fregaderos de hierro fundido con borde
terminado/instalación bajo cubierta
Herramientas y materiales
Lentes de
seguridad
Plantilla
(incluida)
Cinta para
medir
Sellador Taladro
Lápiz
Tijeras
Más:
• Corona perforadora
de 1-3/8"
Sierra para
metal
Gracias por elegir los productos de Kohler
Le agradecemos que haya elegido la calidad de Kohler. Dedique unos
minutos para leer este manual antes de comenzar la instalación. En
caso de problemas de instalación o de funcionamiento, no dude en
contactarnos. Nuestros números de teléfono y nuestro sitio web se
encuentran en la cubierta posterior de esta guía. Gracias nuevamente
por escoger a Kohler.
Antes de comenzar
PRECAUCIÓN: Riesgo de lesiones personales o daños al
producto. Los fregaderos de hierro fundido son muy pesados.
Obtenga ayuda para colocar el fregadero en su lugar.
Cumpla con todos los códigos locales de plomería y construcción.
Cierre el suministro del agua fría y caliente.
Examine las tuberías de suministro y de desagüe. Reemplace de
ser necesario.
Antes de la instalación, desembale el fregadero nuevo y verifique
que no esté dañado. Coloque el fregadero en la caja como
protección hasta el momento de la instalación.
Kohler Co. Español-1 1019947-2-C
Page 18

Antes de comenzar (cont.)
Utilice estas instrucciones para las instalaciones de borde
terminado y bajo cubierta. Siga las instrucciones correspondientes
a su instalación.
Debido a la naturaleza de las instalaciones bajo cubierta, Kohler
Co. recomienda que estas instalaciones sean realizadas por un
personal calificado y con experiencia.
Para asegurar una instalación segura y sin daños, se recomienda
que dos personas instalen el fregadero.
Planee la instalación del fregadero de manera que en el futuro se
pueda desmontar por debajo de la cubierta sin causar daños a la
cubierta.
Para instalaciones de fregaderos múltiples, necesitará un soporte
adicional entre las pilas instaladas en cubiertas de menos de 1″
(2,5 cm) de espesor.
Para instalaciones bajo cubierta de fregaderos múltiples, se
requiere una distancia mínima de 3-3/8″ (8,6 cm) entre las
aberturas.
Si utiliza los anclajes incluidos, se requiere una cubierta con un
espesor mínimo de 1″ (2,5 cm).
No utilice adhesivos ni selladores adhesivos con este producto.
Toda la información contenida en estas instrucciones está basada
en la información más reciente disponible al momento de su
publicación. Kohler Co. se reserva el derecho de modificar el
diseño de los productos sin previo aviso, tal como se especifica en
la lista de precios.
1019947-2-C Español-2 Kohler Co.
Page 19

Línea central de la grifería
(mayoría de los modelos)
Bajo cubierta - 2-7/8" (7,3 cm)
Con borde terminado 1-7/8" (4,8 cm)
mínimo
Línea
de recorte
1. Preparación
Instale las tuberías de suministro de agua y de desagüe conforme
a la información del diagrama de instalación.
NOTA: Es posible que requiera herramientas diferentes o más
especializadas para instalar este fregadero en materiales de cubierta
distintos a la madera o compuestos de madera.
Corte por el interior de línea marcada en la plantilla para la
abertura de la cubierta.
Coloque la plantilla sobre la cubierta. Asegúrese de que haya
suficiente espacio entre el fregadero, la grifería, el protector contra
salpicaduras y el gabinete.
Para instalaciones de fregaderos múltiples, necesitará un soporte
adicional entre las pilas instaladas en cubiertas de menos de 1″
(2,5 cm) de espesor.
Para instalaciones bajo cubierta de fregaderos múltiples, es
necesario dejar una distancia mínima de 3-3/8″ (8.6 cm) entre las
aberturas.
Trace el contorno de la plantilla sobre la cubierta con un lápiz. La
línea central sirve para alinear la abertura.
Marque en la cubierta la línea central del orificio para la grifería.
Verifique que haya suficiente espacio entre el fregadero, la
grifería, el protector contra salpicaduras y el gabinete.
Para la mayoría de las instalaciones bajo cubierta: Se requiere
una distancia mínima de 2-7/8″ (7,3 cm) entre la línea central de
la grifería y el borde de la plantilla.
Kohler Co. Español-3 1019947-2-C
Page 20

Preparación (cont.)
Para las instalaciones de borde terminado: Se requiere una
distancia mínima de 1-7/8″ (4,8 cm) entre la línea central de la
grifería y el borde de la plantilla.
Ajuste la plantilla según sea necesario.
1019947-2-C Español-4 Kohler Co.
Page 21

Abertura de la cubierta
Anclaje
Grapa
Tornillo
- Vista por debajo
Borde de la
abertura de
la cubierta
2" (5,1 cm)
Vista por debajo
Grapa
Tornillo
2. Instalación bajo cubierta
PRECAUCIÓN: Riesgo de daños al producto. No corte, taladre
o lije la cubierta cuando ésta esté sobre el fregadero.
Corte la abertura con cuidado siguiendo la línea trazada de la
plantilla.
Coloque la cantidad apropiada de grapas a distancias iguales y
marque los orificios de fijación de las grapas debajo de la
cubierta.
Para cubiertas de madera
Taladre los orificios de los tornillos para madera en los lugares
marcados.
Impermeabilice todas las áreas expuestas de la madera.
Cubierta
Sellador
Fregadero
Para cubiertas de mármol/piedra
Coloque la cubierta boca abajo sobre material protector de
espuma para proteger la superficie. Taladre orificios de 3/8″ con
una profundidad de 5/8″ (1,6cm) en los lugares marcados para
los anclajes provistos.
Utilice una herramienta de fijación y un martillo para fijar los
anclajes al ras con la superficie inferior de la cubierta.
Instale las grapas.
Kohler Co. Español-5 1019947-2-C
Page 22

Instalación bajo cubierta (cont.)
Para todas las instalaciones
Si no se ha instalado la cubierta, instálela en este momento.
Taladre los orificios para la grifería según las instrucciones del
fabricante de la grifería.
Instale la grifería en la cubierta según las instrucciones del
fabricante de la grifería.
Instale la coladera en el fregadero según las instrucciones del
fabricante de la coladera.
Coloque las grapas paralelas a la abertura para facilitar la
instalación del fregadero.
Limpie la parte superior del borde del fregadero con un producto
de limpieza no abrasivo.
Limpie la parte inferior de la cubierta, a lo largo del área de corte,
para asegurarse de que la superficie esté lisa, limpia y sin
irregularidades.
Aplique una tira abundante de sellador en la superficie superior
del borde del fregadero.
PRECAUCIÓN: Riesgo de lesiones personales o daños al
producto. Los fregaderos de hierro fundido son muy pesados.
Obtenga ayuda para colocar el fregadero en su lugar.
Coloque y alinee el fregadero sobre la abertura de la cubierta.
Gire las grapas sobre el borde del fregadero y apriételas con
cuidado hasta que queden ajustadas.
Verifique que el fregadero quede alineado con la abertura. Luego
apriete bien las grapas.
Opcional: Aplique una tira de sellador entre la cubierta y la parte
superior del borde del fregadero.
Limpie inmediatamente el exceso de sellador y rellene los huecos
según sea necesario.
Antes de continuar, deje secar el sellador durante 30 minutos
como mínimo.
Conecte y apriete la trampa a la coladera y termine las conexiones
del suministro de agua a la grifería, conforme a las instrucciones
incluidas con la grifería.
Haga circular agua al fregadero y verifique que no haya fugas.
Limpie con productos de limpieza no abrasivos.
1019947-2-C Español-6 Kohler Co.
Page 23

Sellador
3. Instalación con borde terminado
PRECAUCIÓN: Riesgo de lesiones personales o daños a la
propiedad. Los fregaderos de hierro fundido son muy pesados.
Obtenga ayuda para colocar el fregadero en su lugar.
Corte la abertura con cuidado siguiendo la línea trazada de la
plantilla.
Taladre los orificios requeridos para la grifería e instale la grifería
en la cubierta según las instrucciones del fabricante.
Instale la coladera en el fregadero según las instrucciones del
fabricante.
Limpie la cubierta.
Coloque con cuidado el fregadero en la abertura de la cubierta de
manera que el logo ″Kohler″ esté orientado hacia atrás.
Verifique el ajuste y la posición. Realice los ajustes necesarios.
Aplique un tira fina y continua de sellador alrededor de los
bordes del fregadero.
Limpie inmediatamente el exceso de sellador y rellene los huecos
según sea necesario.
Verifique que el fregadero no se haya movido de posición.
Antes de continuar, permita que el sellador se seque durante 30
minutos como mínimo.
Instale el triturador de desperdicios de comida, si lo desea,
siguiendo las instrucciones del fabricante.
Conecte y apriete la trampa a los montajes de desagüe y termine
las conexiones del suministro de agua a la grifería, conforme a las
instrucciones incluidas con la grifería.
Haga circular agua al fregadero y verifique que no haya fugas.
Limpie con productos de limpieza no abrasivos.
Kohler Co. Español-7 1019947-2-C
Page 24

USA: 1-800-4-KOHLER
Canada: 1-800-964-5590
México: 001-877-680-1310
kohler.com
©2006 Kohler Co.
1019947-2-C
 Loading...