

Page 1

Installation and Care Guide
Touchless Flush
K-4000, K-6418, K-6419,
K-18202, K-99249, K-99250
Français, page “Français-1”
Español, página “Español-1”
1224637-2-D
Page 2
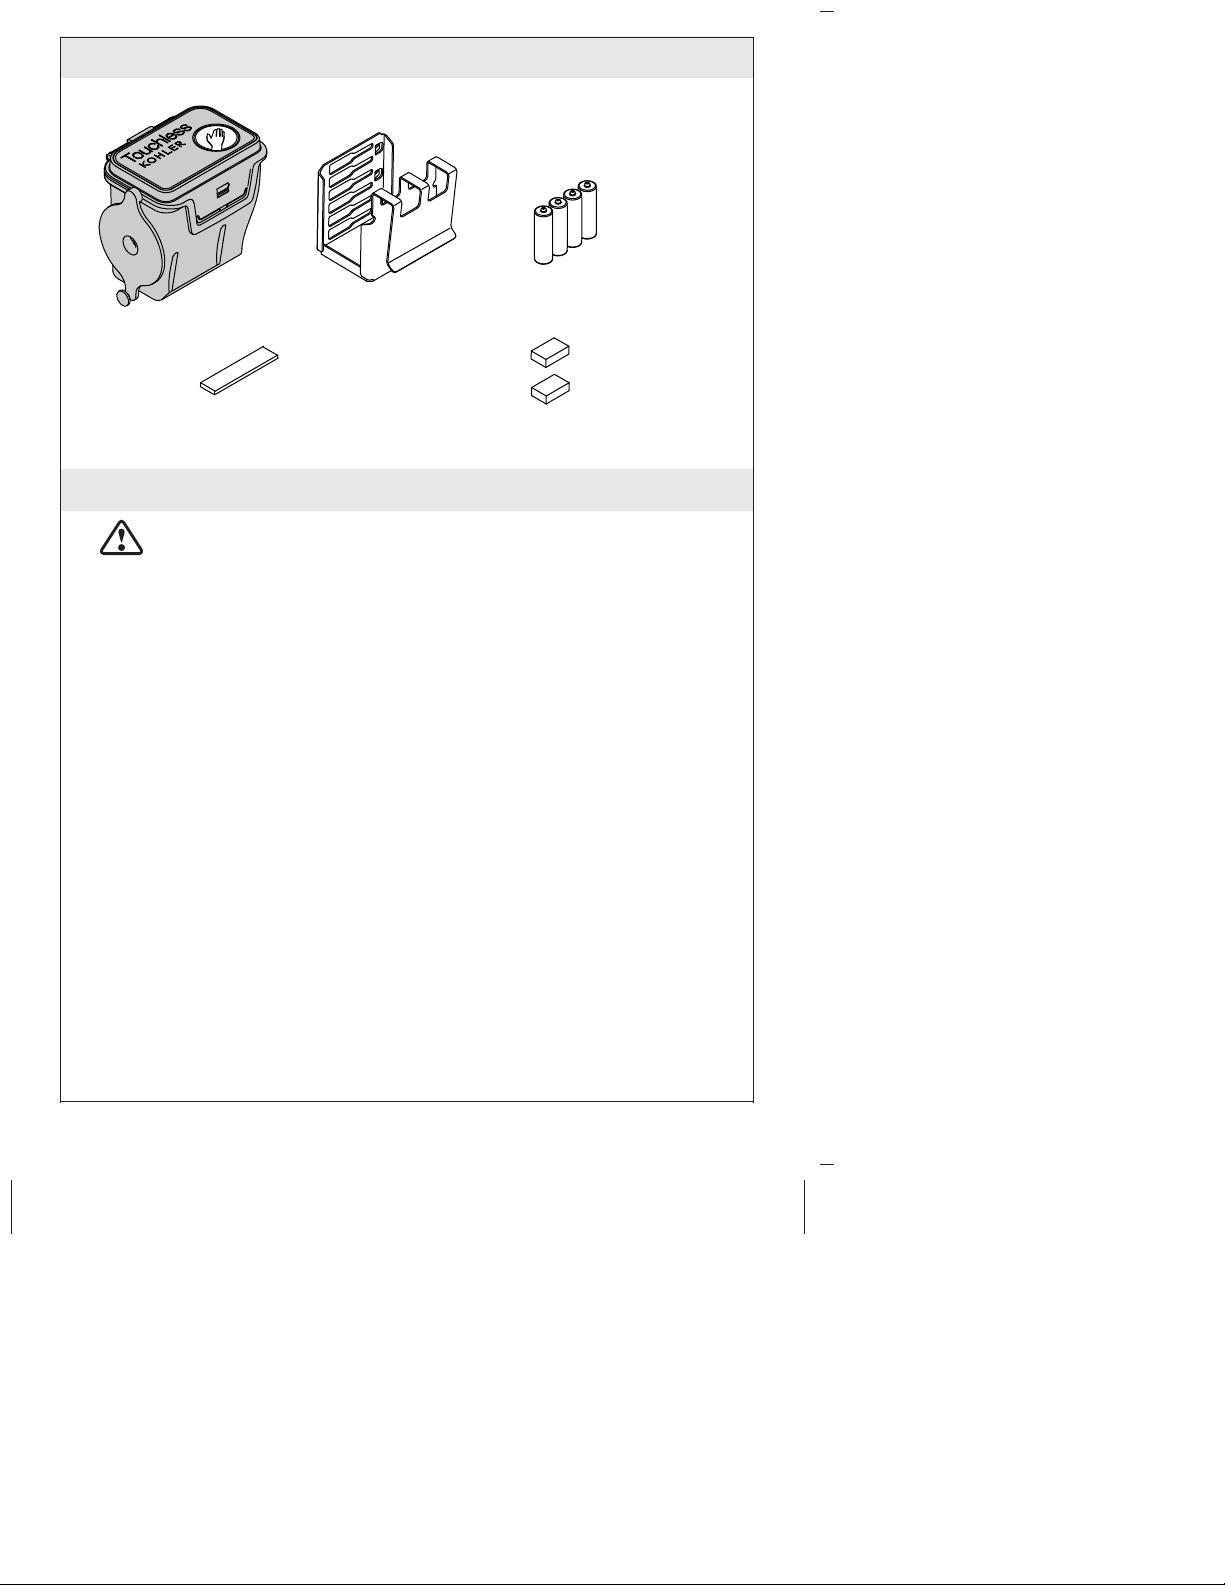
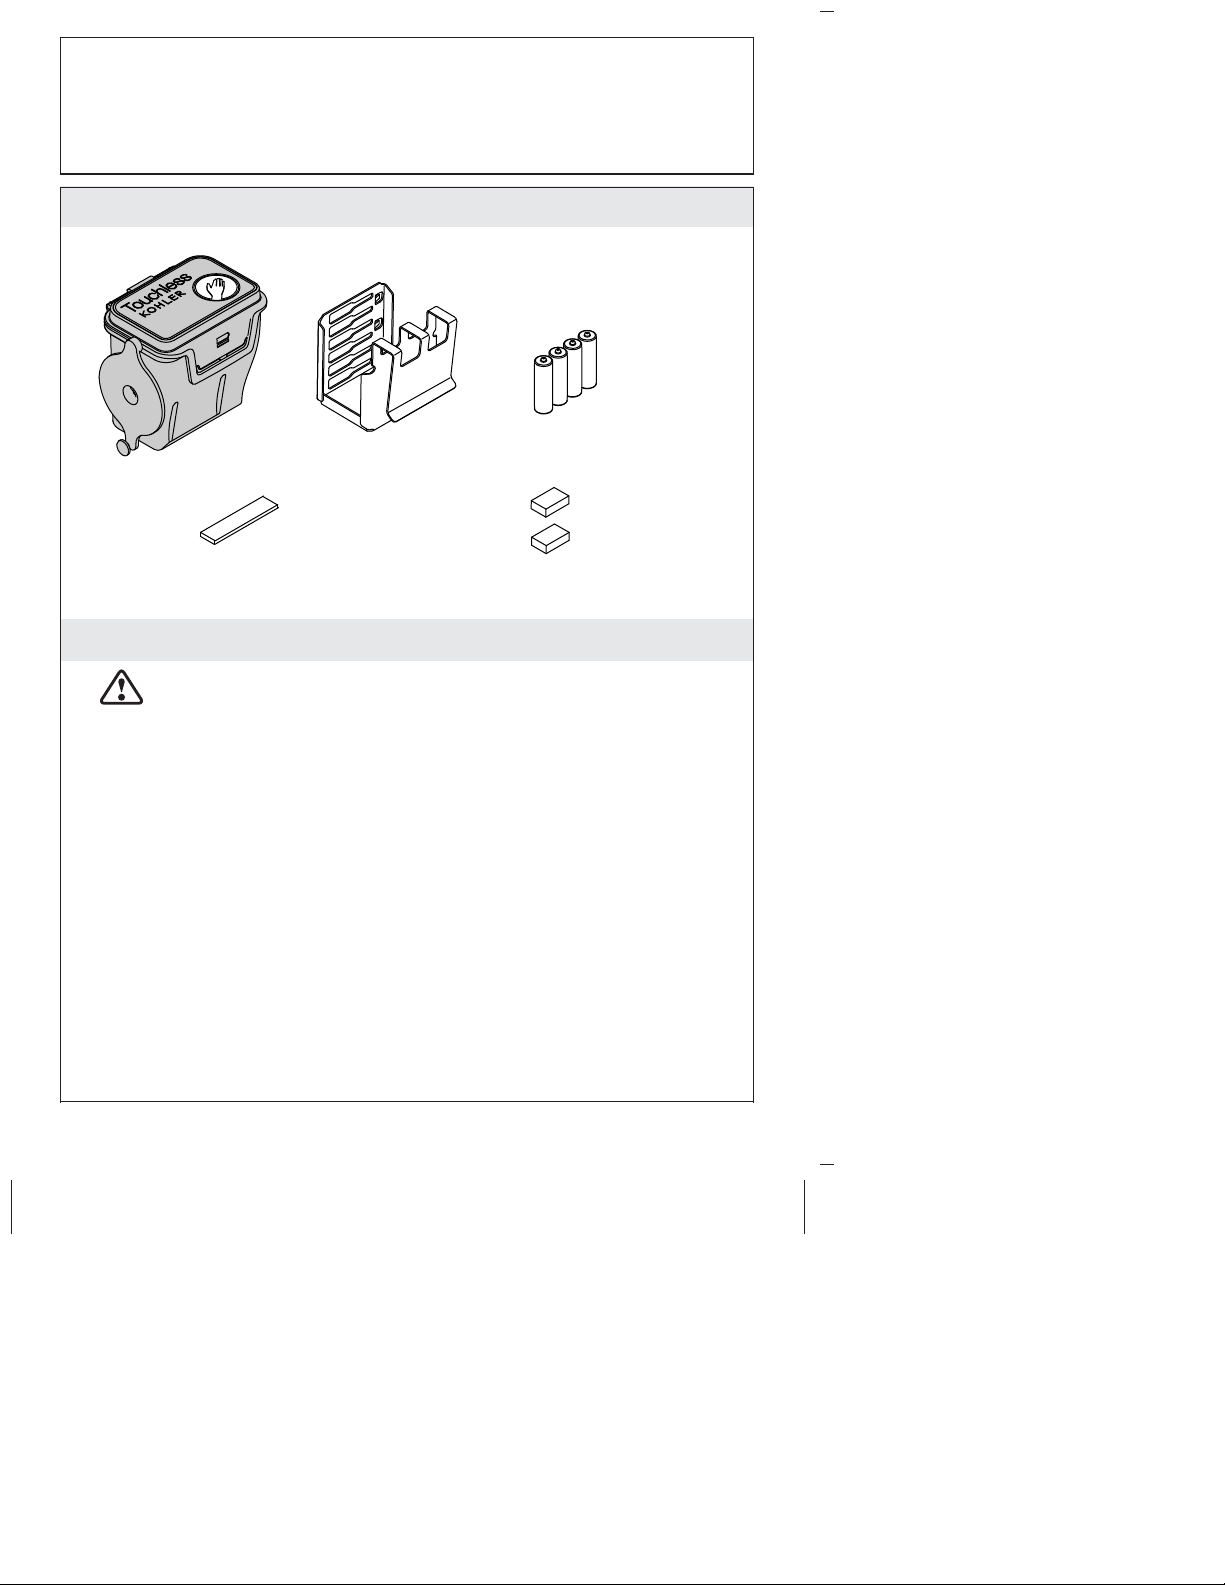
Provided Components
1
2
3
4
5
6
Provided Components
Module
Vent Bridge
Bracket
(4) AA Batteries
Pads
Before You Begin
CAUTION: Risk of property damage: Do not use lithium
ion batteries with this product. Exposing lithium ion batteries
to water can result in a fire.
NOTICE: Risk of property damage. If the toilet is plugged, turn off
the water supply before attempting to unplug it. The sensor can be
inadvertently activated while unplugging the toilet, resulting in an
overflow.
NOTICE: Risk of product damage. Use of in-tank toilet cleaners
will damage this product. In-tank cleaners emit gases which will
damage the seals and corrode the interior components. Damage due
to use of in-tank cleaners voids the warranty.
For product videos and more information visit
KOHLER.com/TouchlessToilet.
This device complies with part 15 of the FCC Rules. Operation is
subject to the following two conditions: (1) This device may not cause
harmful interference, and (2) this device must accept any interference
received, including interference that may cause undesired operation.
This Class B digital apparatus complies with Canadian ICES-003.
1224637-2-D 2 Kohler Co.
Page 3

Module
Bracket
1
2
3
4
5
6
2
3
Slot
4
5
6
Bottom Tab
1. Determine the Bracket Location
NOTE: The model number of your toilet can be found on the
packaging or stamped on the inside of the tank on the back wall.
Check the table below to determine the bottom tab location.
Install the bracket on the module, with the bottom tab in the slot
indicated in the table below.
Model Bottom Tab Bracket Location
K-4000 Slot #5
K-6418, K-6419 Slot #5
K-18202 Slot #5
K-99249, K-99250 Slot #5
Kohler Co. 3 1224637-2-D
Page 4
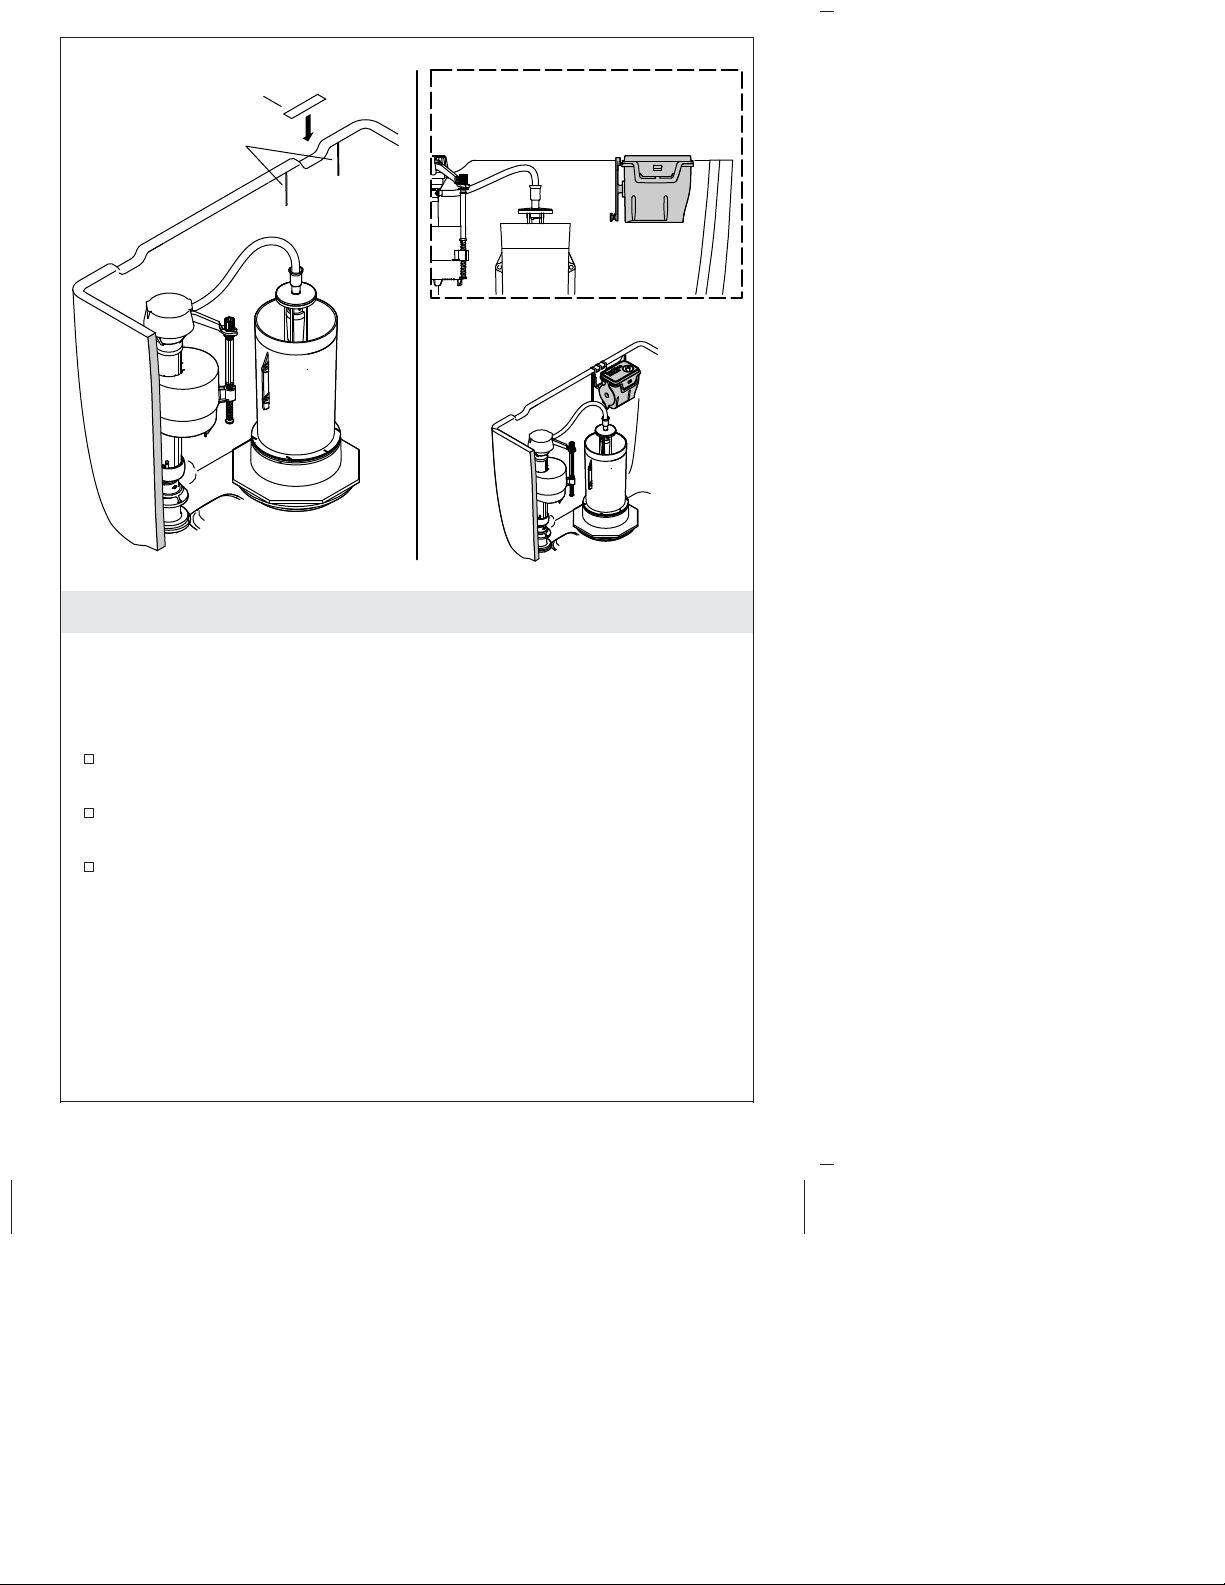
Bridge
Bracket Marks
2. Install and Connect the Module
NOTE: If the toilet tank does not have vent holes, discard the
bridge.
NOTE: The orientation of the bracket location marks to the vent or
other tank features will vary on different models of toilets.
If a vent is present, install the bridge over the vent if the vent is
aligned with the bracket marks.
Install the module with the bracket aligned with the bracket
marks.
Connect the chain from the canister to the wheel.
1224637-2-D 4 Kohler Co.
Page 5
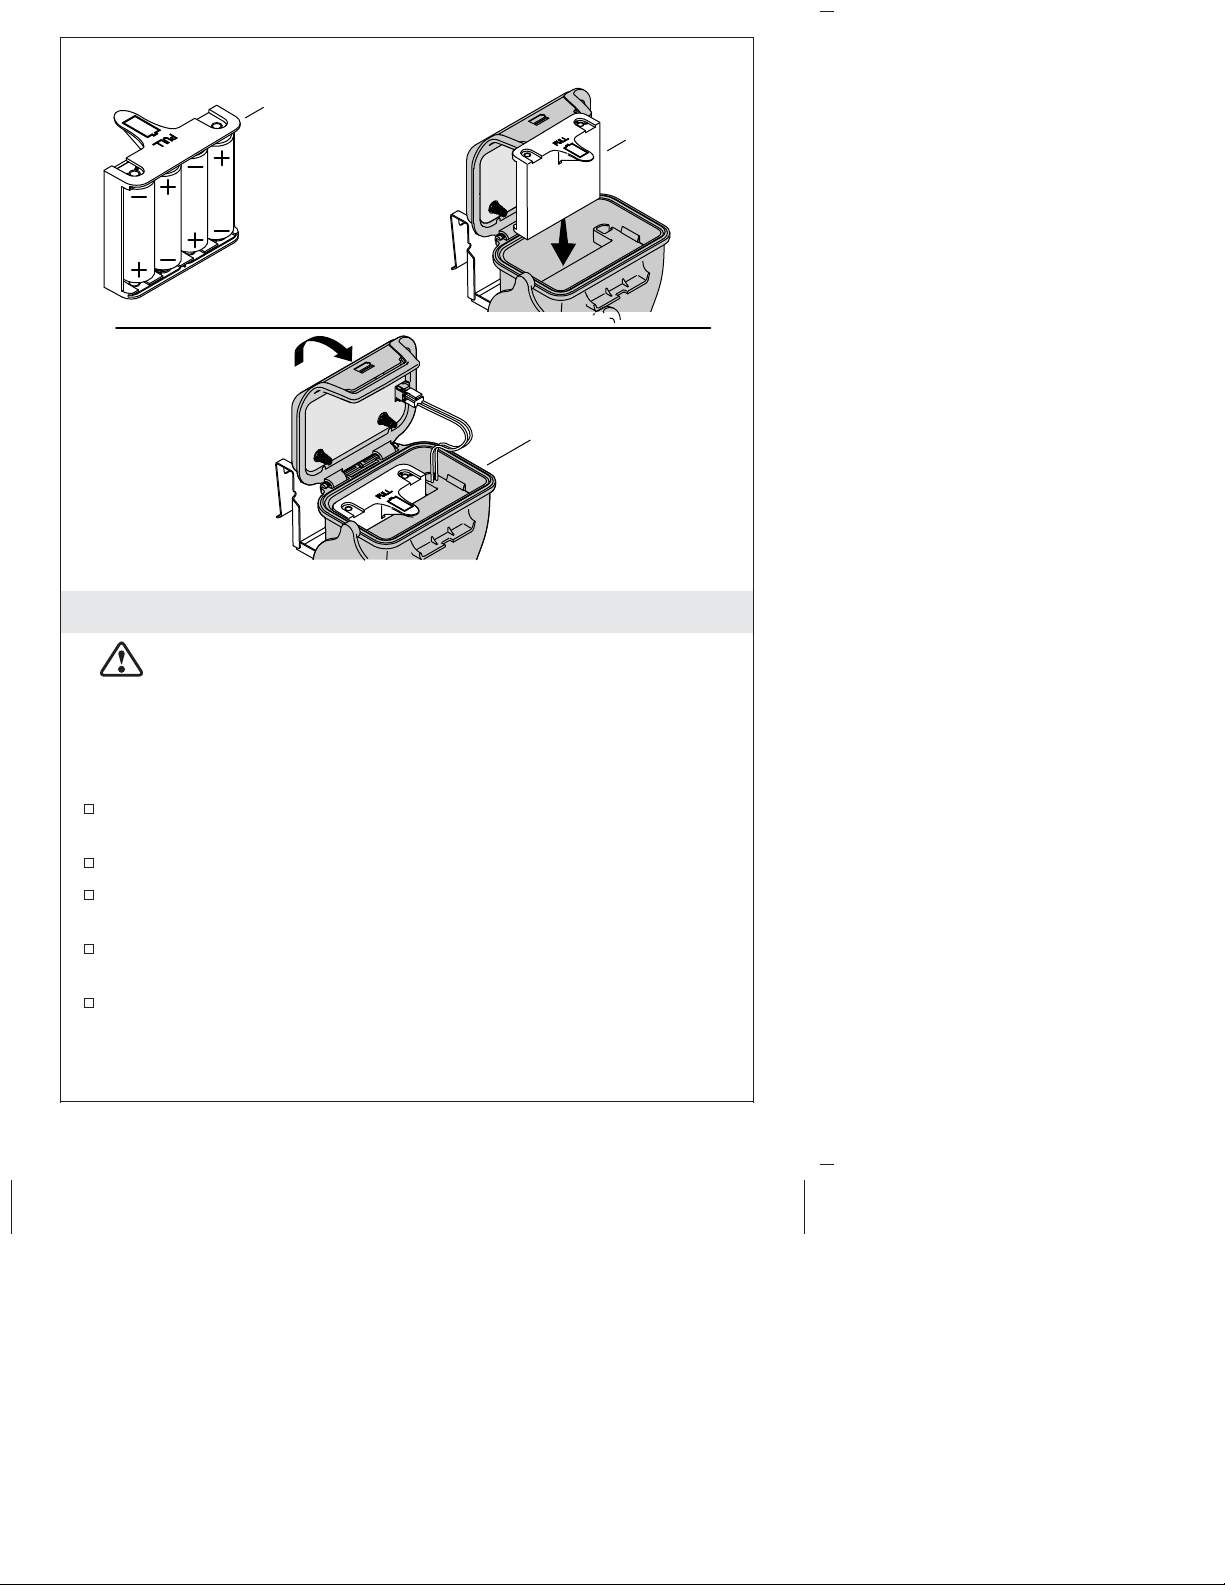
Battery Holder
Press.
3. Install the Batteries
CAUTION: Risk of property damage: Do not use lithium
ion batteries with this product. Exposing lithium ion batteries
to water can result in a fire.
Position
as shown.
Rim
NOTE: When the batteries are low, the unit will beep five times at
half second intervals when activated. Replace the batteries when this
happens.
Install the batteries in the battery holder. Orient them as shown in
the diagram on the battery holder.
Open the module lid.
Install the battery holder with the open side facing the back of
the module and press down until it stops.
Confirm the top edge of the battery holder is below the rim of the
module.
Close the module lid and press on the front ledge until the clasp
engages.
Kohler Co. 5 1224637-2-D
Page 6

4. Check Operation
Turn the water supply back on. Allow the tank to fill.
Check for leaks.
Flush the toilet repeatedly using the module.
Observe the canister.
Does the canister fully close when the flush is complete? If not,
adjust the bracket location.
Observe the movement of the wheel.
Does the wheel come in contact with anything when rotating?
Adjust the bracket location as needed.
1224637-2-D 6 Kohler Co.
Page 7
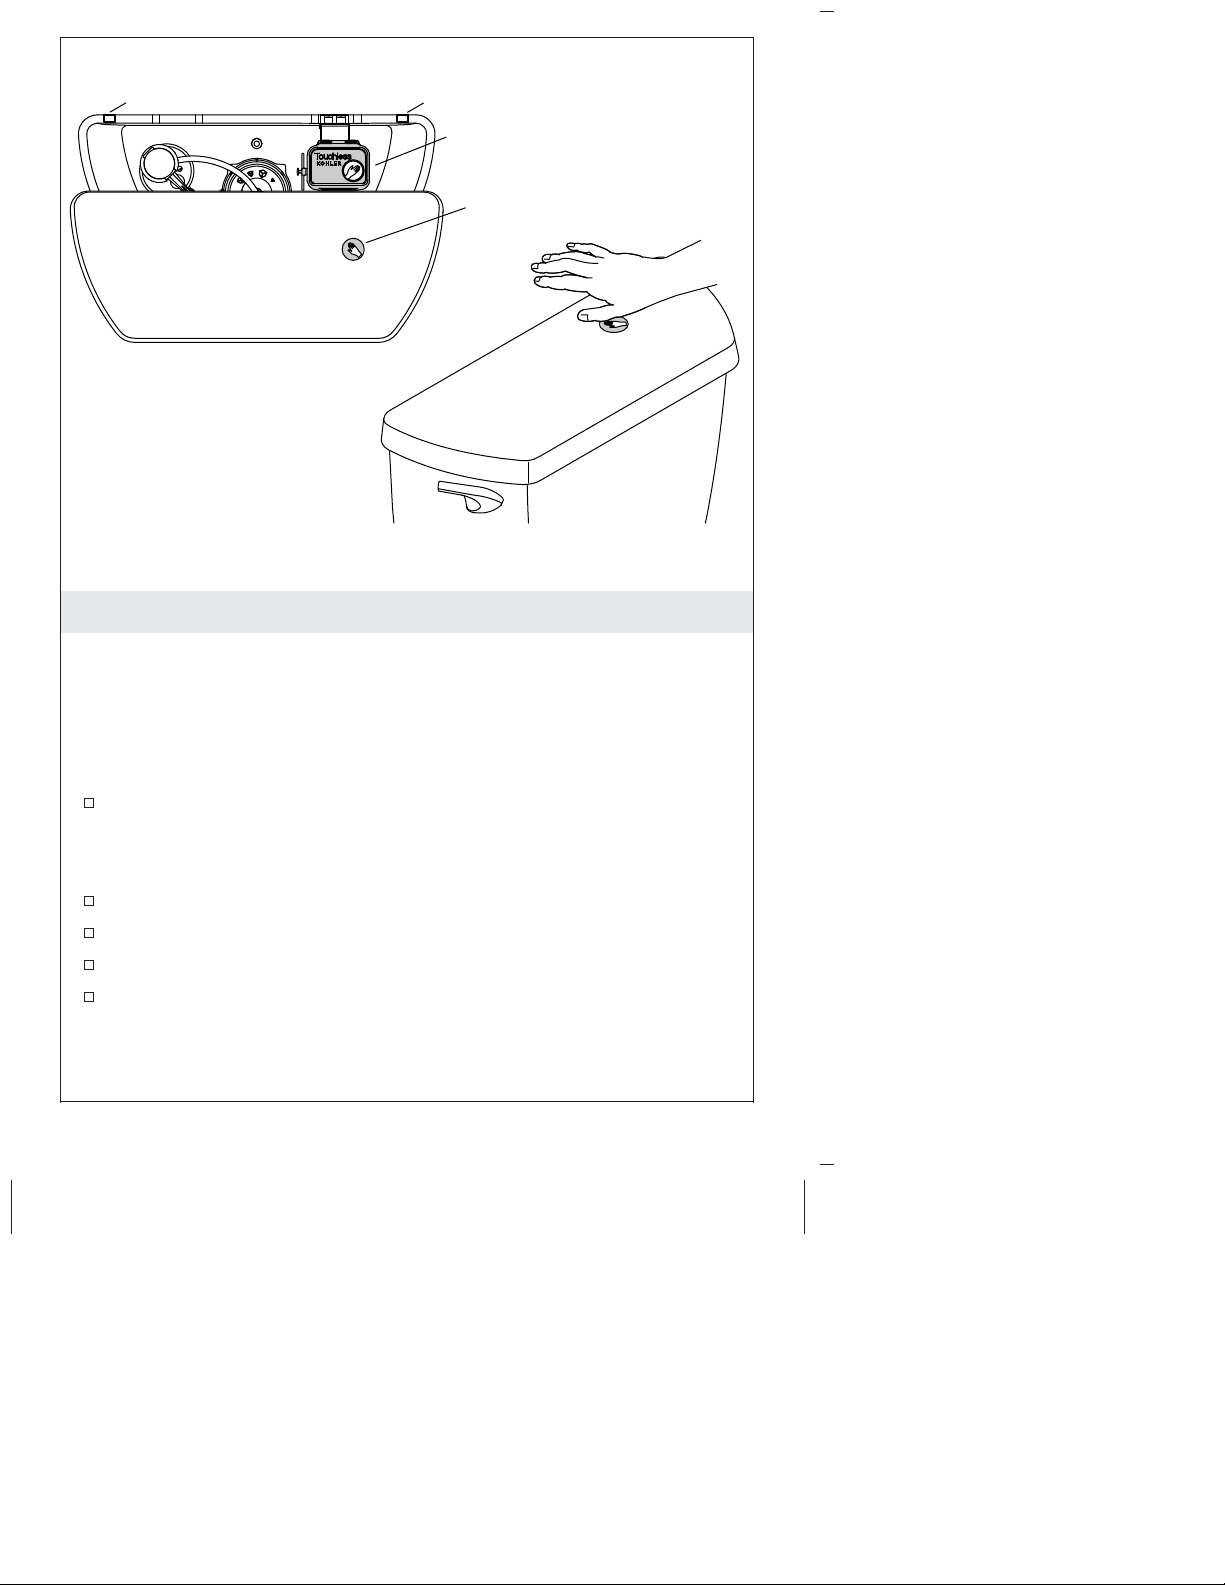
Pad
Pad
Sensor Indicator
Emblem
5. Complete the Installation
IMPORTANT! Wait at least 10 seconds after the last test flush
before installing the tank lid. Hold your hand over the sensor for 1-2
seconds after installing the lid to confirm proper operation.
NOTE: If you are unable to activate the sensor immediately after
installing the tank lid, wait a minimum of 5 minutes for the sensor
to calibrate.
For tank lid stability, install four pads, two on the front (not
shown) and two on the back, near each corner of the tank lid or
tank rim where the lid contacts the tank rim. The pads stabilize
the lid, helping stop false flushes when the lid is bumped.
Install the tank lid.
Hold your hand approximately 1″ (25 mm) above the module.
The toilet will flush.
Consult the troubleshooting chart for operation or performance
issues.
Kohler Co. 7 1224637-2-D
Page 8

Troubleshooting
NOTICE: Risk of property damage. If the toilet is plugged, turn off
the water supply before attempting to unplug it. The sensor can be
inadvertently activated while unplugging the toilet, resulting in an
overflow.
NOTE: For service parts information, visit your product page at
www.kohler.com/serviceparts.
Symptoms Recommended Action
1. Toilet is blocked. A. Turn off the water supply. Clear
2. Nothing happens when I
try to activate the sensor.
3. The module works, I hear
a beep, the wheel rotates,
the chain moves, but the
toilet does not flush.
4. The wheel contacts the
canister when flushing.
5. The toilet flushes, but the
flush is weak.
6. The sensor is not sensitive
enough (does not activate
when hand is within 1″ (25
mm)-2″ (51 mm).
7. The toilet flushes when I
am sitting on it.
the blockage using a plunger.
Consult the toilet troubleshooting
for further information.
A. Confirm the batteries are correctly
installed.
B. Confirm the batteries have a
charge.
A. Confirm the chain is attached to
the wheel and canister.
B. Remove any twists in the chain.
A. Relocate the module further from
the canister to allow room for
operation.
A. Consult the toilet troubleshooting.
A. Move the module up one notch on
the bracket if the gap is more than
1/4″ (6 mm).
B. Confirm the sensor emblem is
located directly above the icon on
the module. Relocate the emblem
if it is not located correctly.
A. Are you leaning back and
bumping the tank lid? Moving the
tank lid may cause the toilet to
flush.
B. Are pads installed on the tank rim
or lid? Install the provided foam
pads on the tank rim or lid to
stabilize the tank lid.
1224637-2-D 8 Kohler Co.
Page 9

Troubleshooting (cont.)
Symptoms Recommended Action
8. The toilet flushes when
opening the seat cover.
A. Does the seat or lid strike the tank
lid when they are opened? Moving
the tank lid may cause the toilet to
flush.
B. Are pads installed on the tank rim
or lid? Install the provided foam
pads on the tank rim or lid to
stabilize the tank lid.
Warranty
ONE-YEAR LIMITED WARRANTY
KOHLER plumbing products are warranted to be free of defects in
material and workmanship for one year from date of installation.
Kohler Co. will, at its election, repair, replace or make appropriate
adjustment where Kohler Co. inspection discloses any such defects
occurring in normal usage within one (1) year after installation. Kohler
Co. is not responsible for removal or installation costs. Use of in-tank
toilet cleaners will void the warranty.
To obtain warranty service contact Kohler Co. either through your
Dealer, Plumbing Contractor, Home Center or E-tailer, or by writing
Kohler Co., Attn.: Customer Care Center, 444 Highland Drive, Kohler,
WI 53044, USA, or by calling 1-800-4-KOHLER (1-800-456-4537) from
within the USA and Canada, and 001-800-456-4537 from within Mexico,
or visit www.kohler.com within the USA, www.ca.kohler.com from
within Canada, or www.mx.kohler.com in Mexico.
IMPLIED WARRANTIES INCLUDING THAT OF
MERCHANTABILITY AND FITNESS FOR A PARTICULAR
PURPOSE ARE EXPRESSLY LIMITED IN DURATION TO THE
DURATION OF THIS WARRANTY. KOHLER CO. AND/OR
SELLER DISCLAIM ANY LIABILITY FOR SPECIAL, INCIDENTAL
OR CONSEQUENTIAL DAMAGES. Some states/provinces do not
allow limitations on how long an implied warranty lasts, or the
exclusion or limitation of special, incidental or consequential damages,
so these limitations and exclusions may not apply to you. This
warranty gives you specific legal rights. You may also have other
rights which vary from state/province to state/province.
This is Kohler Co.’s exclusive written warranty.
Kohler Co. 9 1224637-2-D
Page 10
Guide d’installation et d’entretien
Chasse sans contact
Composants fournis
Composants fournis
1
2
3
4
5
6
Module
Pont d'évent
Support
(4) piles AA
Coussinets
Avant de commencer
ATTENTION: Risque de dommages matériels: Ne pas
utiliser de piles aux ions de lithium avec ce produit.
L’exposition de piles aux ions de lithium à l’eau peut
entraîner un incendie.
AVIS: Risque de dommages matériels. Si la toilette est bouchée,
couper l’arrivée d’eau avant d’essayer de la déboucher. Le capteur
peut être activé par accident pendant que l’on débouche la toilette,
ce qui entraîne un débordement.
AVIS: Risque d’endommagement du produit. L’utilisation de
nettoyants de toilette dans le réservoir endommage ce produit. Les
nettoyants dans le réservoir émettent des gaz qui endommagent les
joints et corrodent les composants intérieurs. Les endommagements
dûs aux nettoyants à l’intérieur du réservoir annulent la garantie.
Pour des vidéos sur le produit et pour obtenir de l’information
supplémentaire, visiter le site KOHLER.com/TouchlessToilet.
Cet appareil est conforme à la section 15 des réglementations de la
Kohler Co. Français-1 1224637-2-D
Page 11

Avant de commencer (cont.)
FCC. Le fonctionnement de l’appareil est soumis aux deux conditions
suivantes: (1) Cet appareil ne peut pas créer un brouillage nuisible, et
(2) cet appareil doit accepter tous les brouillages captés, y compris les
brouillages qui pourraient créer un fonctionnement non souhaité.
Cet appareillage numérique de classe B est conforme à la norme
canadienne NMB-003.
Kohler Co. Français-2 1224637-2-D
Page 12

Module
Support
1
2
3
4
5
6
2
3
Encoche
4
5
6
Patte inférieure
1. Déterminer l’emplacement du support
REMARQUE: Le numéro de modèle de la toilette peut être trouvé
sur l’emballage ou est tamponné sur l’intérieur du réservoir sur le
mur arrière.
Consulter le tableau ci-dessous pour déterminer l’emplacement de
la patte inférieure.
Installer le support sur le module, avec la patte inférieure dans la
fente indiquée dans le tableau ci-dessous.
Modèle Emplacement du support de patte inférieure
K-4000 Fente n° 5
K-6418, K-6419 Fente n° 5
K-18202 Fente n° 5
K-99249, K-99250 Fente n° 5
1224637-2-D Français-3 Kohler Co.
Page 13

Pont
Repères de support
2. Installer et connecter le module
REMARQUE: Jeter le pont si le réservoir de la toilette ne comprend
pas de trous d’évent.
REMARQUE: L’orientation des repères du support par rapport à
l’évent ou à d’autres caractéristiques du réservoir varient sur les
divers modèles de toilettes.
Si un évent est présent, installer le pont par-dessus l’évent si ce
dernier est aligné sur les repères du support.
Installer le module avec le support aligné sur les repères du
support.
Connecter la chaîne entre la cartouche et la roue.
Kohler Co. Français-4 1224637-2-D
Page 14

Porte-piles
Appuyer.
3. Installer les piles
ATTENTION: Risque de dommages matériels: Ne pas
utiliser de piles aux ions de lithium avec ce produit.
L’exposition de piles aux ions de lithium à l’eau peut
entraîner un incendie.
Positionner
tel qu'indiqué.
Rebord
REMARQUE: Lorsque les piles sont faibles, l’appareil émet 5 bips à
des intervalles d’une demi-seconde lorsqu’il est activé. Remplacer
les piles lorsque ceci se produit.
Installer les piles dans le porte-piles. Orienter les piles tel
qu’indiqué dans le diagramme sur le porte-piles.
Ouvrir le couvercle du module.
Installer le porte-piles avec le côté ouvert tourné vers l’arrière du
module et appuyer dessus jusqu’à ce qu’il s’arrête.
Vérifier que le bord supérieur du porte-piles se trouve sous le
rebord du module.
Fermer le couvercle du module et appuyer sur le rebord avant
jusqu’à ce que l’agrafe s’engage.
1224637-2-D Français-5 Kohler Co.
Page 15

4. Vérifier le fonctionnement
Réouvrir l’arrivée d’eau. Laisser le réservoir se remplir.
Rechercher des fuites.
Passer la chasse à plusieurs reprises en utilisant le module.
Observer la cartouche.
La cartouche se ferme-t-elle complètement lorsque la chasse est
terminée? Si ceci n’est pas le cas, ajuster l’emplacement du
support.
Observer le mouvement de la roue.
Est-ce que la roue entre en contact avec quoi que ce soit
lorsqu’elle tourne? Ajuster l’emplacement du support selon les
besoins.
Kohler Co. Français-6 1224637-2-D
Page 16

Coussinet
Coussinet
Indicateur de capteur
Emblème
5. Terminer l’installation
IMPORTANT! Attendre 10 secondes au moins après la dernière
chasse avant d’installer le couvercle du réservoir. Tenir la main
par-dessus le capteur pendant1à2secondes après avoir installé le
couvercle afin de vérifier que le système fonctionne correctement.
REMARQUE: S’il n’est pas possible d’activer le capteur
immédiatement après avoir installé le couvercle du réservoir,
attendre 5 minutes au minimum que le capteur soit étalonné.
Pour la stabilité du couvercle de réservoir, installer quatre
coussinets, deux à l’avant (non illustré) et deux à l’arrière, à
proximité de chaque coin du couvercle du réservoir ou du rebord
du réservoir, à l’emplacement où le couvercle entre en contact
avec le rebord du réservoir. Les coussinets stabilisent le couvercle,
en aidant à arrêter les fausses chasses lorsque l’on cogne le
couvercle.
Installer le couvercle du réservoir.
Tenir la main à environ 1″ (25 mm) au-dessus du module.
La chasse de la toilette se met en marche.
1224637-2-D Français-7 Kohler Co.
Page 17

Terminer l’installation (cont.)
Consulter le tableau de dépannage en cas de problèmes de
fonctionnement ou de performance.
Dépannage
AVIS: Risque de dommages matériels. Si la toilette est bouchée,
couper l’arrivée d’eau avant d’essayer de la déboucher. Le capteur
peut être activé par accident pendant que l’on débouche la toilette,
ce qui entraîne un débordement.
REMARQUE: Pour tout renseignement sur les pièces de rechange,
visiter la page du produit à www.kohler.com/serviceparts.
Symptômes Action recommandée
1. La toilette est bloquée. A. Fermer l’alimentation en eau.
2. Rien ne se passe lorsque
j’essaie d’activer le capteur.
3. Le module fonctionne,
j’entends un bip, la roue
tourne, la chaîne se
déplace, mais la chasse de
la toilette n’a pas lieu.
4. La roue entre en contact
avec la cartouche lors de la
chasse.
5. La chasse a lieu, mais elle
est faible.
6. Le capteur n’est pas assez
sensible (ne s’active pas
lorsque la main est dans
un rayon de 1″ (25 mm) 2″ (51 mm).
Dégager le blocage en utilisant un
plongeur. Consulter le tableau de
dépannage pour obtenir de
l’information supplémentaire.
A. Vérifier que les piles sont installées
correctement.
B. Vérifier que les piles sont chargées.
A. Vérifier que la chaîne est connectée
à la roue et à la cartouche.
B. Supprimer toute torsion dans la
chaîne.
A. Repositionner le module plus loin
de la cartouche pour créer de
l’espace pour le fonctionnement.
A. Consulter le tableau de dépannage
de la toilette.
A. Déplacer le module d’un cran sur
le support si l’écart est supérieur à
1/4″ (6 mm).
B. Vérifier que l’emblème du capteur
se trouve directement au-dessus de
l’icône sur le module.
Repositionner l’emblème s’il n’est
pas positionné correctement.
Kohler Co. Français-8 1224637-2-D
Page 18

Dépannage (cont.)
Symptômes Action recommandée
7. La chasse est passée
lorsque je suis assis(e) sur
la toilette.
8. La chasse se met en
marche lors de l’ouverture
de l’abattant du siège.
A. Vous penchez-vous vers l’arrière et
cognez-vous le couvercle du
réservoir? Le déplacement du
couvercle du réservoir pourrait
faire passer la chasse.
B. Des coussinets sont-ils installés sur
le rebord ou le couvercle du
réservoir? Installer les coussinets
en mousse fournis sur le rebord ou
le couvercle du réservoir pour
stabiliser le couvercle de celui-ci.
A. Le siège ou l’abattant frappent-ils
le couvercle du réservoir lorsqu’on
les ouvre? Le déplacement du
couvercle du réservoir pourrait
faire passer la chasse.
B. Des coussinets sont-ils installés sur
le rebord ou le couvercle du
réservoir? Installer les coussinets
en mousse fournis sur le rebord ou
le couvercle du réservoir pour
stabiliser le couvercle de celui-ci.
Garantie
GARANTIE LIMITÉE D’UN AN
Les produits de plomberie KOHLER sont garantis contre tout vice de
matériau et de fabrication pendant un an à partir de la date de
l’installation.
Si un vice est découvert au cours d’une utilisation normale, Kohler Co.
choisira, à sa discrétion, la réparation, le remplacement ou la
rectification appropriée après inspection desdits vices par Kohler Co.
pendant un (1) an à partir de la date d’installation. Kohler Co. n’est
pas responsable des frais d’enlèvement ou d’installation. L’utilisation
de nettoyants à l’intérieur du réservoir annule la garantie.
Pour obtenir le service de garantie, contacter Kohler Co., par
l’intermédiaire du vendeur, plombier, centre de rénovation ou
revendeur par internet, ou bien par écrit à l’adresse suivante Kohler
Co., Attn.: Customer Care Center, 444 Highland Drive, Kohler, WI
53044, USA, ou appeler le 1-800-4-KOHLER (1-800-456-4537) à partir
des É.-U. et du Canada, et le 001-800-456-4537 à partir du Mexique, ou
consulter le site www.kohler.com aux É.-U., www.ca.kohler.com à
1224637-2-D Français-9 Kohler Co.
Page 19

Garantie (cont.)
partir du Canada, ou www.mx.kohler.com au Mexique.
LES GARANTIES TACITES, Y COMPRIS CELLES DE
COMMERCIALITÉ ET D’ADAPTATION À UN USAGE
PARTICULIER, SONT EXPRESSÉMENT LIMITÉE À LA DURÉE DE
LA PRÉSENTE GARANTIE. KOHLER CO. ET/OU LE REVENDEUR
DÉCLINENT TOUTE RESPONSABILITÉ CONTRE LES
DOMMAGES PARTICULIERS, ACCESSOIRES OU INDIRECTS.
Certains états et provinces ne permettent pas de limite sur la durée de
la garantie tacite, ni l’exclusion ou la limite des dommages particuliers,
accessoires ou indirects, et, par conséquent, lesdites limites et
exclusions peuvent ne pas s’appliquer à votre cas. Cette garantie vous
donne des droits juridiques particuliers. Vous pouvez également avoir
d’autres droits qui varient d’un état ou d’une province à l’autre.
Ceci constitue la garantie écrite exclusive de Kohler Co.
Kohler Co. Français-10 1224637-2-D
Page 20

Guía de instalación y cuidado
Descarga sin contacto
Componentes provistos
Componentes provistos
1
2
3
4
5
6
Módulo
Soporte
(4) pilas AA
Puente para hueco
de ventilación
Protectores
Antes de comenzar
PRECAUCIÓN: Riesgo de daños a la propiedad: No utilice
pilas de iones de litio con este producto. Exponer pilas de
iones de litio al agua puede ocasionar un incendio.
AVISO: Riesgo de daños a la propiedad. Si el inodoro está tapado,
cierre el suministro de agua antes de intentar destaparlo. El sensor
podría ser activado inadvertidamente al destapar el inodoro, lo que
ocasionaría un desbordamiento.
AVISO: Riesgo de daños al producto. El uso de limpiadores de
inodoro que se colocan dentro del tanque causa daños a este
producto. Los limpiadores que se colocan dentro del tanque emiten
gases que dañan los sellos y corroen los componentes internos. Los
daños debidos a limpiadores que se colocan dentro del tanque
anulan la garantía.
Para ver videos del producto y más información, visite
KOHLER.com/TouchlessToilet.
Este dispositivo cumple con lo establecido en la sección 15 de las
Kohler Co. Español-1 1224637-2-D
Page 21

Antes de comenzar (cont.)
normas de la FCC. La operación de este equipo está sujeta a las
siguientes dos condiciones: (1) Este equipo o dispositivo no cause
interferencia perjudicial y (2) Este equipo o dispositivo debe aceptar
cualquier interferencia, incluyendo la que pueda causar su operación
no deseada.
Este aparato digital Clase B cumple la norma canadiense ICES-003.
Kohler Co. Español-2 1224637-2-D
Page 22

Módulo
Soporte
1
2
3
4
5
6
2
3
Ranura
4
5
6
Lengüeta inferior
1. Determine la ubicación del soporte
NOTA: El número de modelo de su inodoro puede encontrarse en
el material de empaque o estampado en el interior del tanque en la
pared posterior.
Revise la siguiente tabla para determinar la ubicación de la
lengüeta inferior.
Instale el soporte en el módulo, con la lengüeta inferior en la
ranura indicada en la siguiente tabla.
Modelo Ubicación de la lengüeta inferior del soporte
K-4000 Ranura #5
K-6418, K-6419 Ranura #5
K-18202 Ranura #5
K-99249, K-99250 Ranura #5
1224637-2-D Español-3 Kohler Co.
Page 23

Puente
Marcas de
ubicación del
soporte
2. Instale y conecte el módulo
NOTA: Si el tanque del inodoro no tiene huecos de ventilación,
deseche el puente.
NOTA: La orientación de las marcas de ubicación del soporte con
respecto al hueco de ventilación o a otras características del tanque
varía en distintos modelos de inodoros.
Si hay un hueco de ventilación, instale el puente sobre el hueco
de ventilación si este hueco queda alineado con las marcas del
soporte.
Instale el módulo con el soporte alineado a las marcas del
soporte.
Conecte la cadena del cilindro a la rueda.
Kohler Co. Español-4 1224637-2-D
Page 24

Portapilas
Oprima.
3. Instale las pilas
PRECAUCIÓN: Riesgo de daños a la propiedad: No utilice
pilas de iones de litio con este producto. Exponer pilas de
iones de litio al agua puede ocasionar un incendio.
Coloque como
se muestra.
Reborde
NOTA: Cuando las pilas están bajas, al activar la unidad ésta emite
cinco sonidos de bip a intervalos de medio segundo. Cambie las
pilas cuando esto suceda.
Instale las pilas en el portapilas. Oriéntelas como se indica en el
diagrama en el portapilas.
Abra la tapa del módulo.
Instale el portapilas con el lado abierto hacia la parte posterior
del módulo y presione hacia abajo hasta que se detenga.
Confirme que el borde superior del portapilas quede abajo del
reborde del módulo.
Cierre la tapa del módulo y oprima en el reborde delantero hasta
que se encaja la traba.
1224637-2-D Español-5 Kohler Co.
Page 25

4. Verifique el funcionamiento
Vuelva a abrir el suministro de agua. Deje que el tanque se llene.
Verifique que no haya fugas.
Accione la descarga del inodoro varias veces por medio del
módulo.
Observe el cilindro.
¿Se cierra el cilindro por completo cuando se completa una
descarga? De no ser así, ajuste la ubicación del soporte.
Observe el movimiento de la rueda.
¿Entra en contacto la rueda con alguna cosa al girar? Ajuste la
ubicación del soporte según sea necesario.
Kohler Co. Español-6 1224637-2-D
Page 26

Protector
Protector
Indicador de sensor
Emblema
5. Termine la instalación
¡IMPORTANTE! Espere por lo menos 10 segundos después de la
última descarga antes de instalar la tapa del tanque. Coloque la
mano sobre el sensor durante 1-2 segundos después de instalar la
tapa para confirmar el funcionamiento correcto.
NOTA: Si no le es posible activar el sensor de inmediato después
de instalar la tapa del tanque, espere un mínimo de 5 minutos
mientras el sensor se calibra.
Para que la tapa del tanque quede estable, instale cuatro
protectores, dos en el frente (no se muestran) y dos en la parte
posterior, cerca de cada una de las esquinas de la tapa del tanque
o del reborde del tanque donde la tapa hace contacto con el
reborde del tanque. Los protectores estabilizan la tapa, y ayudan
a evitar descargas falsas cuando se golpea levemente la tapa.
Instale la tapa del tanque.
Coloque la mano aproximadamente 1″ (25 mm) sobre el módulo.
El inodoro debe efectuar una descarga.
1224637-2-D Español-7 Kohler Co.
Page 27

Termine la instalación (cont.)
Consulte asuntos de funcionamiento o rendimiento en la tabla de
resolución de problemas.
Guía para resolver problemas
AVISO: Riesgo de daños a la propiedad. Si el inodoro está tapado,
cierre el suministro de agua antes de intentar destaparlo. El sensor
podría ser activado inadvertidamente al destapar el inodoro, lo que
ocasionaría un desbordamiento.
NOTA: Para consultar información sobre piezas de repuesto, visite
la página de su producto en www.kohler.com/serviceparts.
Síntomas Acción recomendada
1. El inodoro está obstruido. A. Cierre el suministro de agua. Quite
2. No sucede nada cuando
trato de activar el sensor.
3. El módulo funciona,
escucho un sonido de bip,
la rueda gira, la cadena se
mueve, pero el inodoro no
efectúa la descarga.
4. La rueda hace contacto con
el cilindro al momento en
que se efectúa la descarga.
5. El inodoro efectúa la
descarga pero ésta es débil.
6. El sensor no tiene la
sensibilidad suficiente (no
se activa cuando hay una
mano a menos de 1″ (25
mm)a2″ (51 mm) del
sensor).
la obstrucción con un
destapacaños. Consulte más
información en la guía para
resolver problemas del inodoro.
A. Confirme que las pilas estén
correctamente instaladas.
B. Confirme que las pilas tengan
carga.
A. Confirme que la cadena esté
conectada a la rueda y al cilindro.
B. Desenrolle la cadena si está
enrollada.
A. Cambie de lugar el módulo, más
alejado del cilindro para dejar
espacio para el funcionamiento.
A. Consulte la guía para resolver
problemas del inodoro.
A. Mueva el módulo una muesca
hacia arriba en el soporte si la
separación es mayor de 1/4″ (6
mm).
B. Confirme que el emblema del
sensor quede directamente sobre el
icono en el módulo. Cambie de
lugar el emblema si no está
ubicado correctamente.
Kohler Co. Español-8 1224637-2-D
Page 28

Guía para resolver problemas (cont.)
Síntomas Acción recomendada
7. El inodoro efectúa una
descarga mientras yo estoy
sentado en él.
8. El inodoro inicia una
descarga cuando se abre la
tapa del asiento.
A. ¿Se está usted recargando hacia
atrás y golpeando levemente la
tapa del tanque? Si se mueve la
tapa del tanque se puede ocasionar
que se active la descarga.
B. ¿Hay protectores instalados en el
reborde o en la tapa del tanque?
Instale los protectores de espuma
provistos en el borde o en la tapa
del tanque para estabilizar la tapa
del tanque.
A. ¿Golpea levemente el asiento o la
tapa del asiento la tapa del tanque
al abrirlos? Si se mueve la tapa del
tanque se puede ocasionar que se
active la descarga.
B. ¿Hay protectores instalados en el
reborde o en la tapa del tanque?
Instale los protectores de espuma
provistos en el borde o en la tapa
del tanque para estabilizar la tapa
del tanque.
Garantía
GARANTÍA LIMITADA DE UN AÑO
Se garantizan productos de plomería KOHLER contra defectos de
material y mano de obra durante un año a partir de la fecha de
instalación.
Kohler Co., a su criterio, reparará, reemplazará o realizará los ajustes
pertinentes en los casos en que la inspección realizada por Kohler Co.
determine que dichos defectos ocurrieron durante el uso normal en el
transcurso de un (1) año a partir de la fecha de la instalación. Kohler
Co. no se hace responsable de costos de desinstalación o de instalación.
El uso de limpiadores de inodoro que se colocan dentro del tanque
anula la garantía.
Para obtener el servicio de garantía, comuníquese con Kohler Co. a
través de su distribuidor, contratista de plomería, centro de
remodelación o distribuidor por Internet, o escriba a Kohler Co., Attn.:
Customer Care Center, 444 Highland Drive, Kohler, WI 53044, EE.UU.,
o llame al 1-800-4-KOHLER (1-800-456-4537) desde los EE.UU. y
Canadá, y al 001-800-456-4537 desde México, o visite www.kohler.com
1224637-2-D Español-9 Kohler Co.
Page 29

Garantía (cont.)
desde los EE.UU., www.ca.kohler.com desde Canadá, o
www.mx.kohler.com en México.
TODA GARANTÍA IMPLÍCITA, INCLUIDA LA DE
COMERCIALIZACIÓN E IDONEIDAD DEL PRODUCTO PARA UN
USO DETERMINADO, SE LIMITA EXPRESAMENTE A LA
DURACIÓN DE ESTA GARANTÍA. KOHLER CO. Y/O EL
VENDEDOR DESCARGAN TODA RESPONSABILIDAD POR
CONCEPTO DE DAÑOS PARTICULARES, INCIDENTALES O
INDIRECTOS. Algunos estados/provincias no permiten limitaciones
en cuanto a la duración de una garantía implícitaoalaexclusión o
limitación de daños particulares, incidentales o indirectos, por lo que
estas limitaciones y exclusiones pueden no aplicar a su caso. Esta
garantía le otorga ciertos derechos legales específicos. Además, usted
también puede tener otros derechos que varían de estado a estado y de
provincia a provincia.
Esta es la garantía exclusiva por escrito de Kohler Co.
Kohler Co. Español-10 1224637-2-D
Page 30

1224637-2-D
Page 31

1224637-2-D
Page 32

USA/Canada: 1-800-4KOHLER
México: 001-800-456-4537
kohler.com
©2014 Kohler Co.
1224637-2-D
 Loading...