

Page 1

Installation Guide
Shower Column
K-45209, K-45210,
K-45211, K-45212,
K-45386, K-45387,
K-45388, K-45389
M product numbers are for Mexico (i.e. K-12345M)
Los números de productos seguidos de
M corresponden a México (Ej.
K-12345M)
Français, page “Français-1”
Español, página “Español-1”
1184491-2-A
Page 2
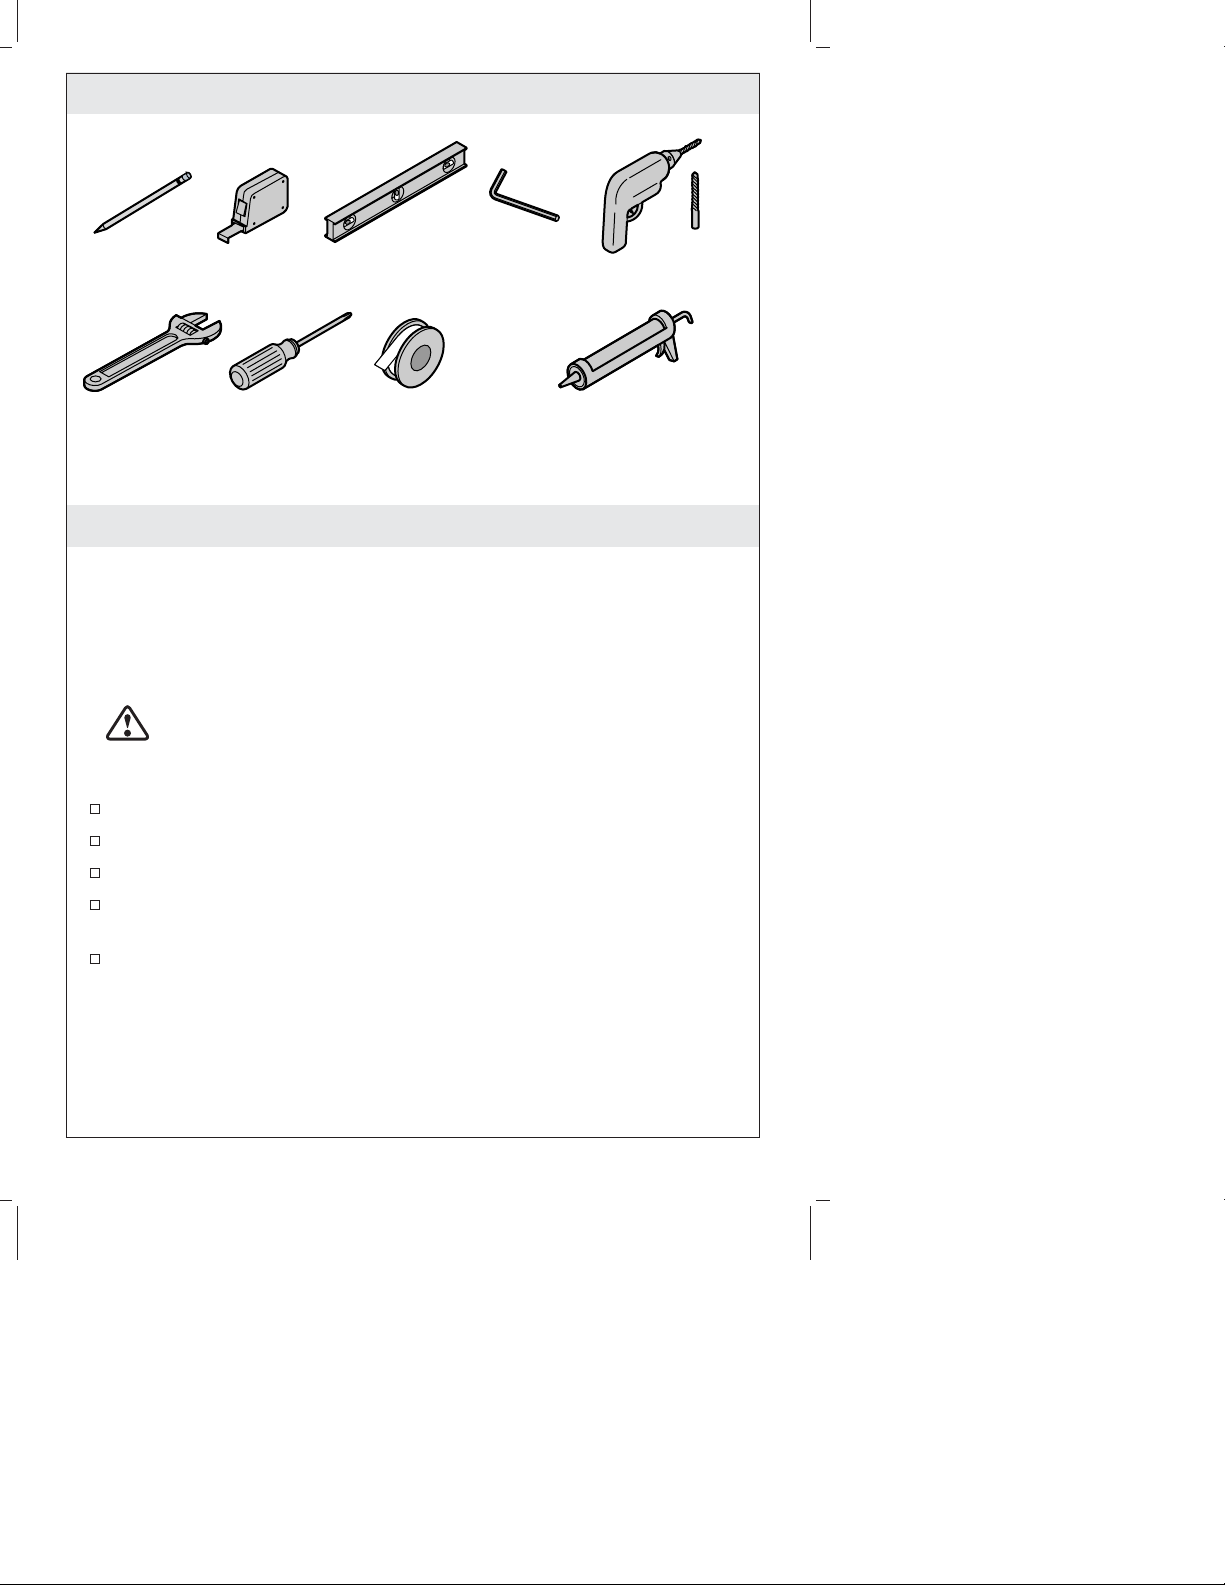
Tools and Materials
3/8"
Phillips
Screwdriver
Sealant Tape
100% Silicone Sealant
Before You Begin
NOTE: This guide includes the installation sequence for the shower
column only. Install the mixing valve, mixing valve trim, and spout
according to the manufacturer’s instructions.
NOTICE: Risk of product damage. Do not apply excessive weight
or downward force to the shower column.
CAUTION: Risk of property damage. Water leakage may
occur if supply piping allows movement. Ensure the supply
piping and 1/2″-14 NPT elbow fitting are securely fastened to
braces in the stud framing.
Please read all instructions before you begin.
Observe all local plumbing and building codes.
Shut off the water supply.
Inspect the existing supply piping and wall materials. Replace if
necessary.
The shower column is supplied with toggle anchor fasteners for
installation onto a finished wall surface. The finished wall
thickness must be a minimum of 5/8″ (16 mm) and must be
adequate in strength. Two toggle anchor fasteners are required
per mounting collar.
1/2"
IMPORTANT! If the supplied toggle anchor fasteners are not used
to install the shower column:
1184491-2-A 2 Kohler Co.
Page 3

Before You Begin (cont.)
Ensure that adequate strength wall backing materials and stud
bracing are properly positioned behind the finished wall.
Obtain proper fasteners (not provided) taking into account the
type of stud bracing material and thickness of the mounting
collar, finished wall, wall backing, and stud bracing.
Fasteners must be corrosion-resistant and capable of 300 lbs (136
kg) load bearing per fastener.
A minimum of two fasteners are required per mounting collar.
Fasteners must be securely anchored into the stud bracing to
adequately support the product.
IMPORTANT! For retrofit/remodel installations: Check the existing
shower enclosure for adequate clearances before proceeding with the
shower column installation. Refer to the Roughing-in for the shower
column and Rain showerhead.
Verify the distances between:
•
The ceiling and the center of the existing shower arm at the
finished wall surface.
•
The shower floor and the center of the existing shower arm at the
finished wall surface. Ensure sufficient clearance under the Rain
showerhead.
•
The center of the existing shower arm and the center of the
mixing valve trim.
Kohler Co. 3 1184491-2-A
Page 4
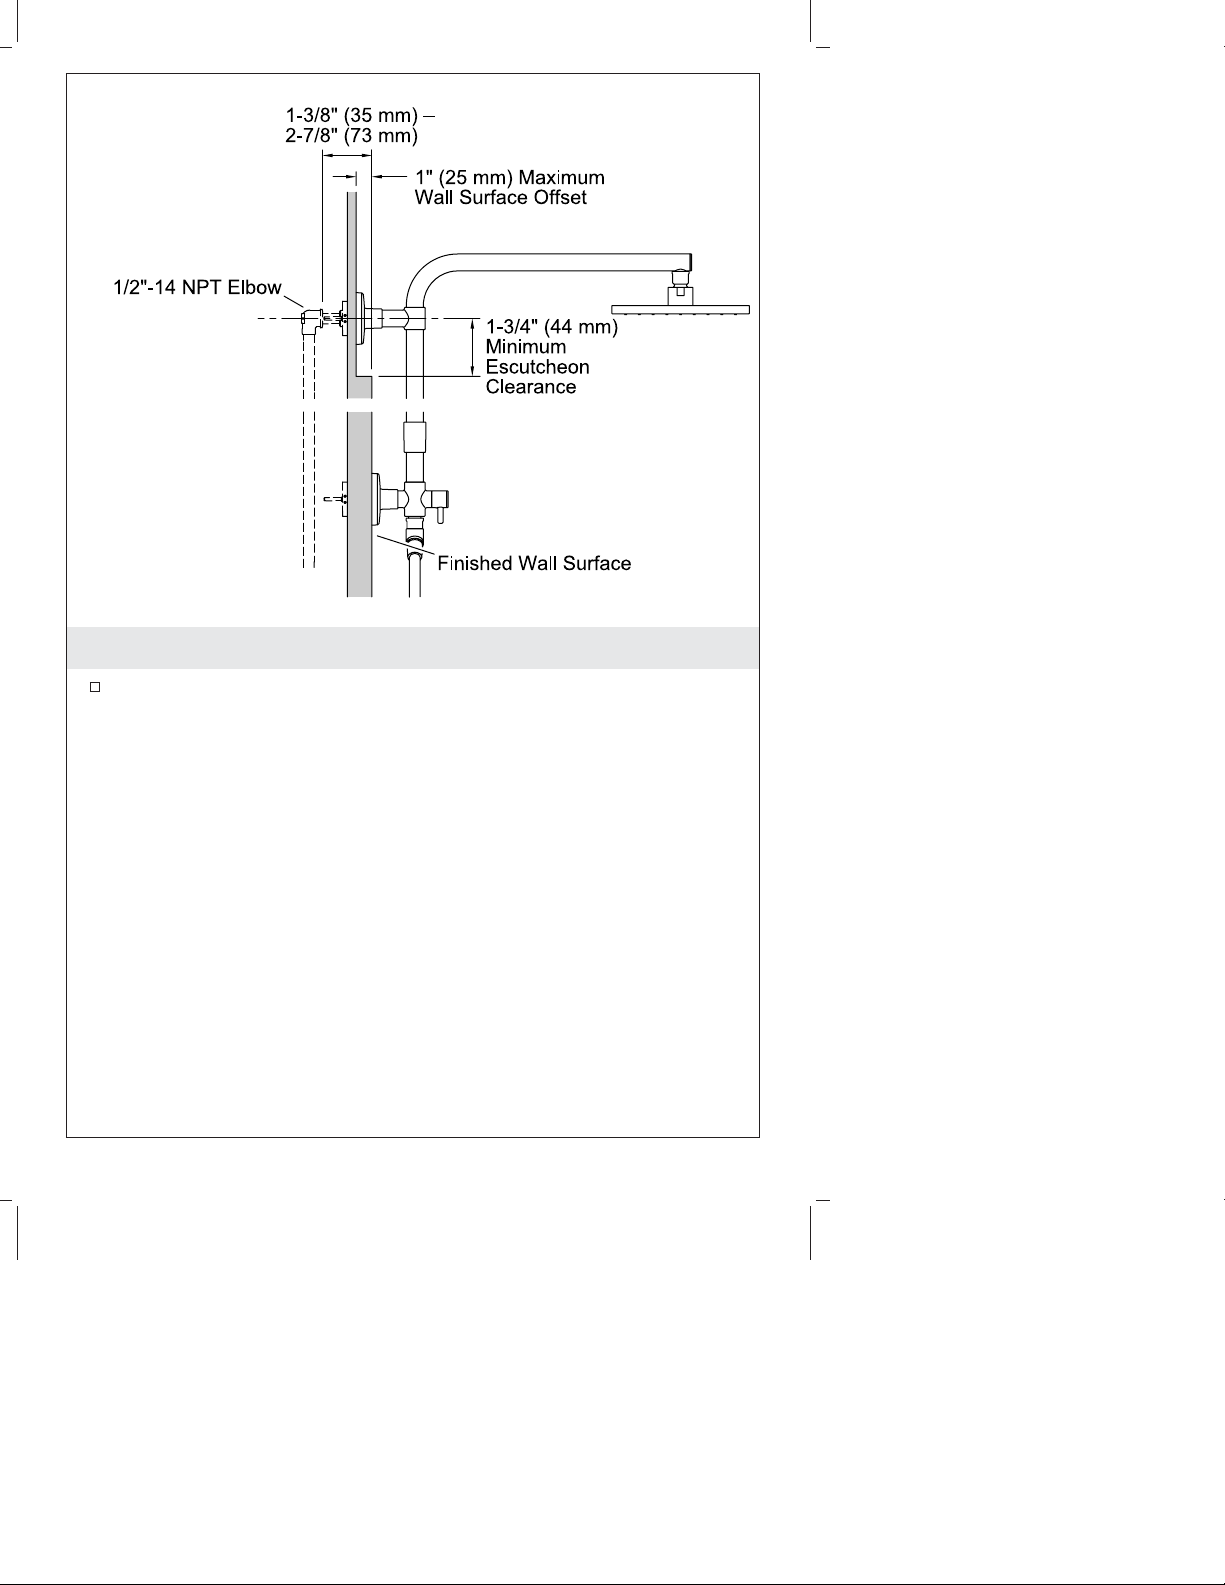
Roughing-In - Upper Supply Connection
Measure the distance between the 1/2″-14 NPT elbow and the
finished wall surface. The distance must be between 1-3/8″ (35
mm) and 2-7/8″ (73 mm). The shower column connection will not
seal properly if the distance exceeds 2-7/8″ (73 mm).
1184491-2-A 4 Kohler Co.
Page 5
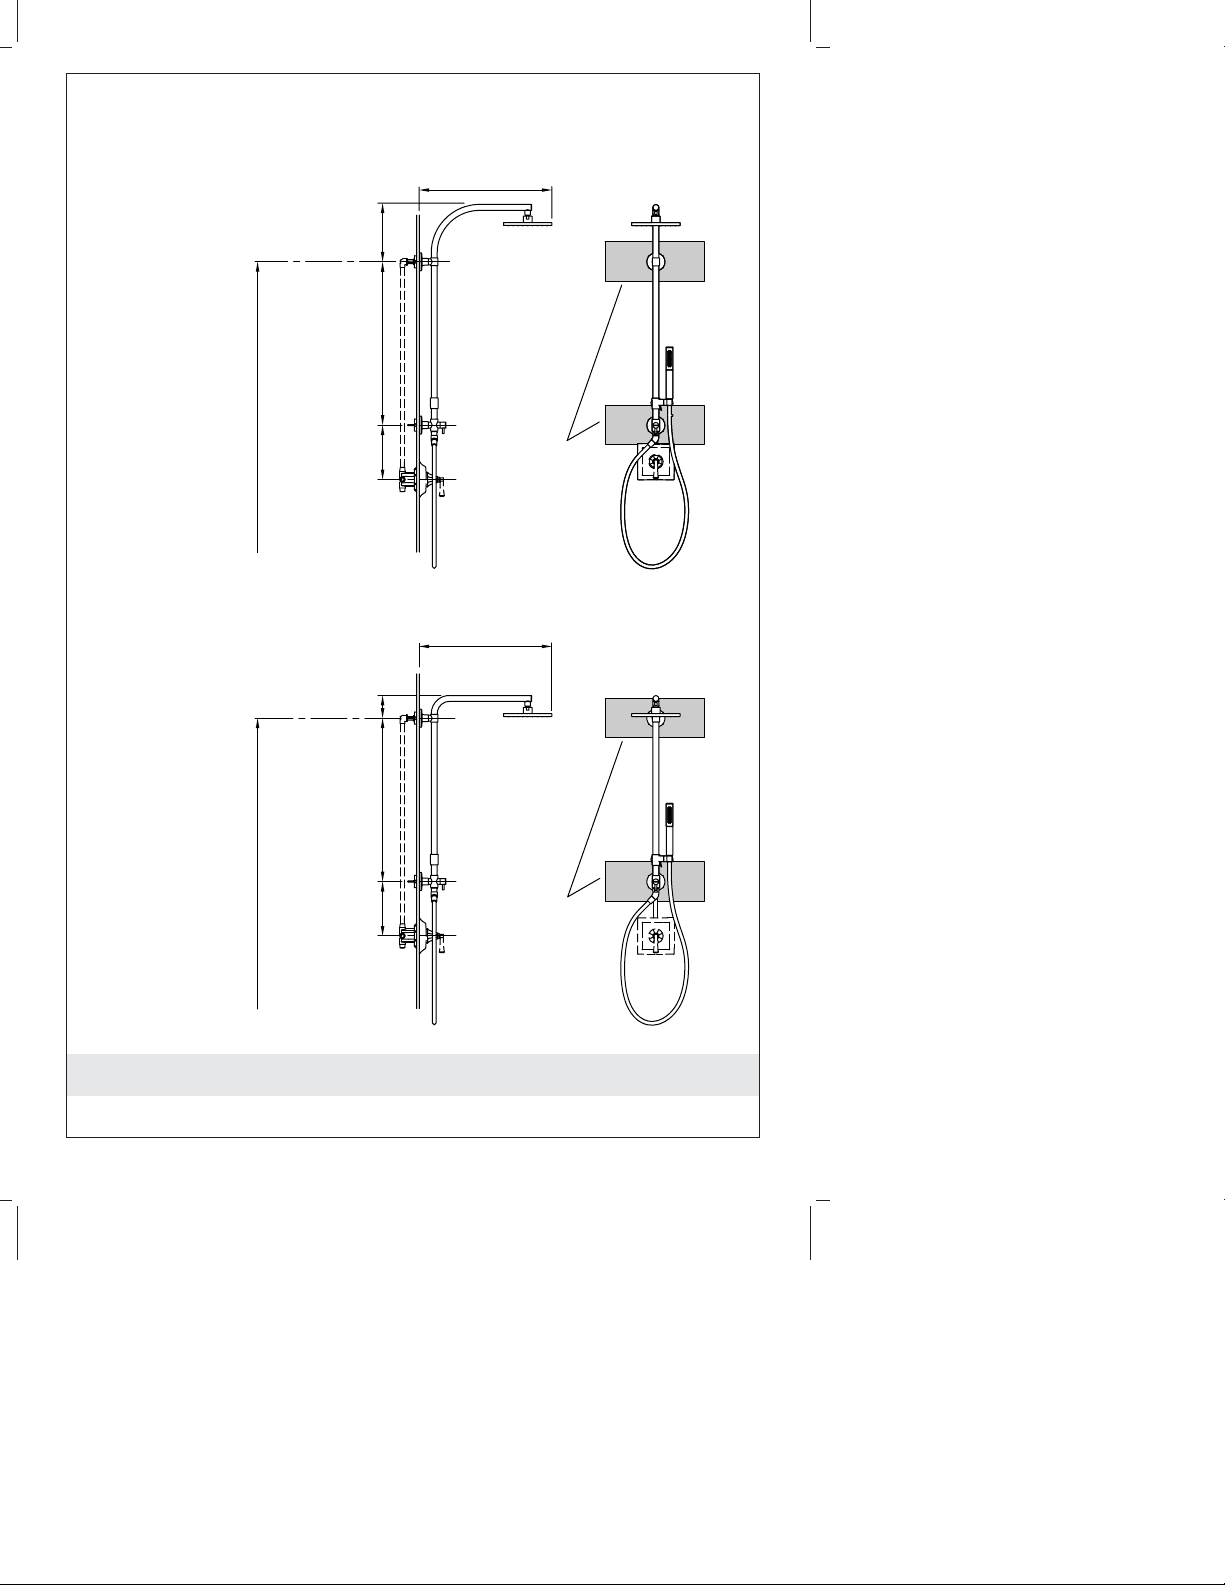
K-45386
K-45209
75" (1905 mm)
Recommended
72" (1829 mm)
Minimum
(Shown)
(Less Showerhead and Handshower)
9-1/2"
(241 mm)
27"
(686 mm)
6" (152 mm)
Minimum
21-15/16" (557 mm)
Backing
Material
K-45387
K-45210
80" (2032 mm)
Recommended
75" (1905 mm)
Minimum
(Shown)
(Less Showerhead and Handshower)
Roughing-In
3-3/4"
(95 mm)
27"
(686 mm)
6" (152 mm)
Minimum
21-15/16" (557 mm)
Backing
Material
Kohler Co. 5 1184491-2-A
Page 6
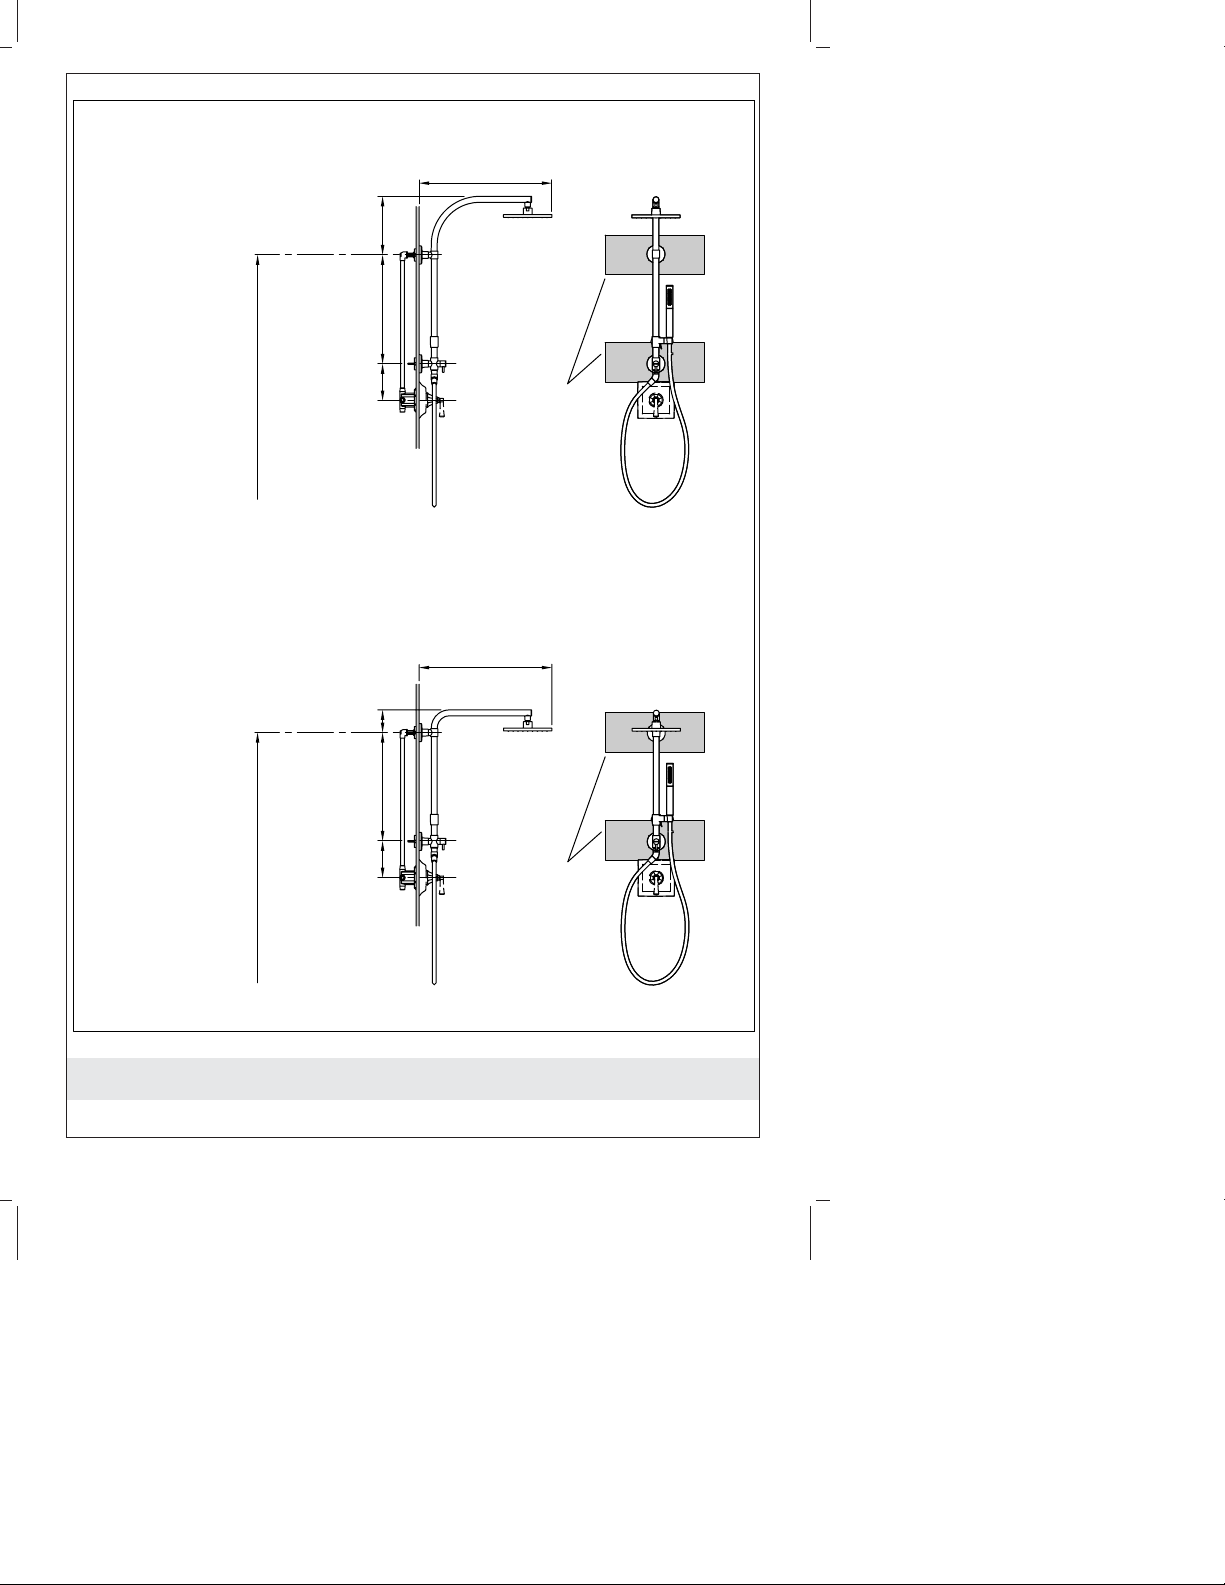
K-45388
K-45211
(Shown)
(Less Showerhead and Handshower)
21-15/16" (557 mm)
9-1/2"
(241 mm)
18"
(457 mm)
75" (1905 mm)
Recommended
72" (1829 mm)
Minimum
K-45389
K-45212
78" (1981 mm)
Recommended
75" (1905 mm)
Minimum
(Shown)
(Less Showerhead and Handshower)
6" (152 mm)
Minimum
3-3/4"
(95 mm)
18"
(457 mm)
6" (152 mm)
Minimum
Backing
Material
21-15/16" (557 mm)
Backing
Material
Roughing-In
1184491-2-A 6 Kohler Co.
Page 7
1/2"-14 NPT Elbow
Supply Piping
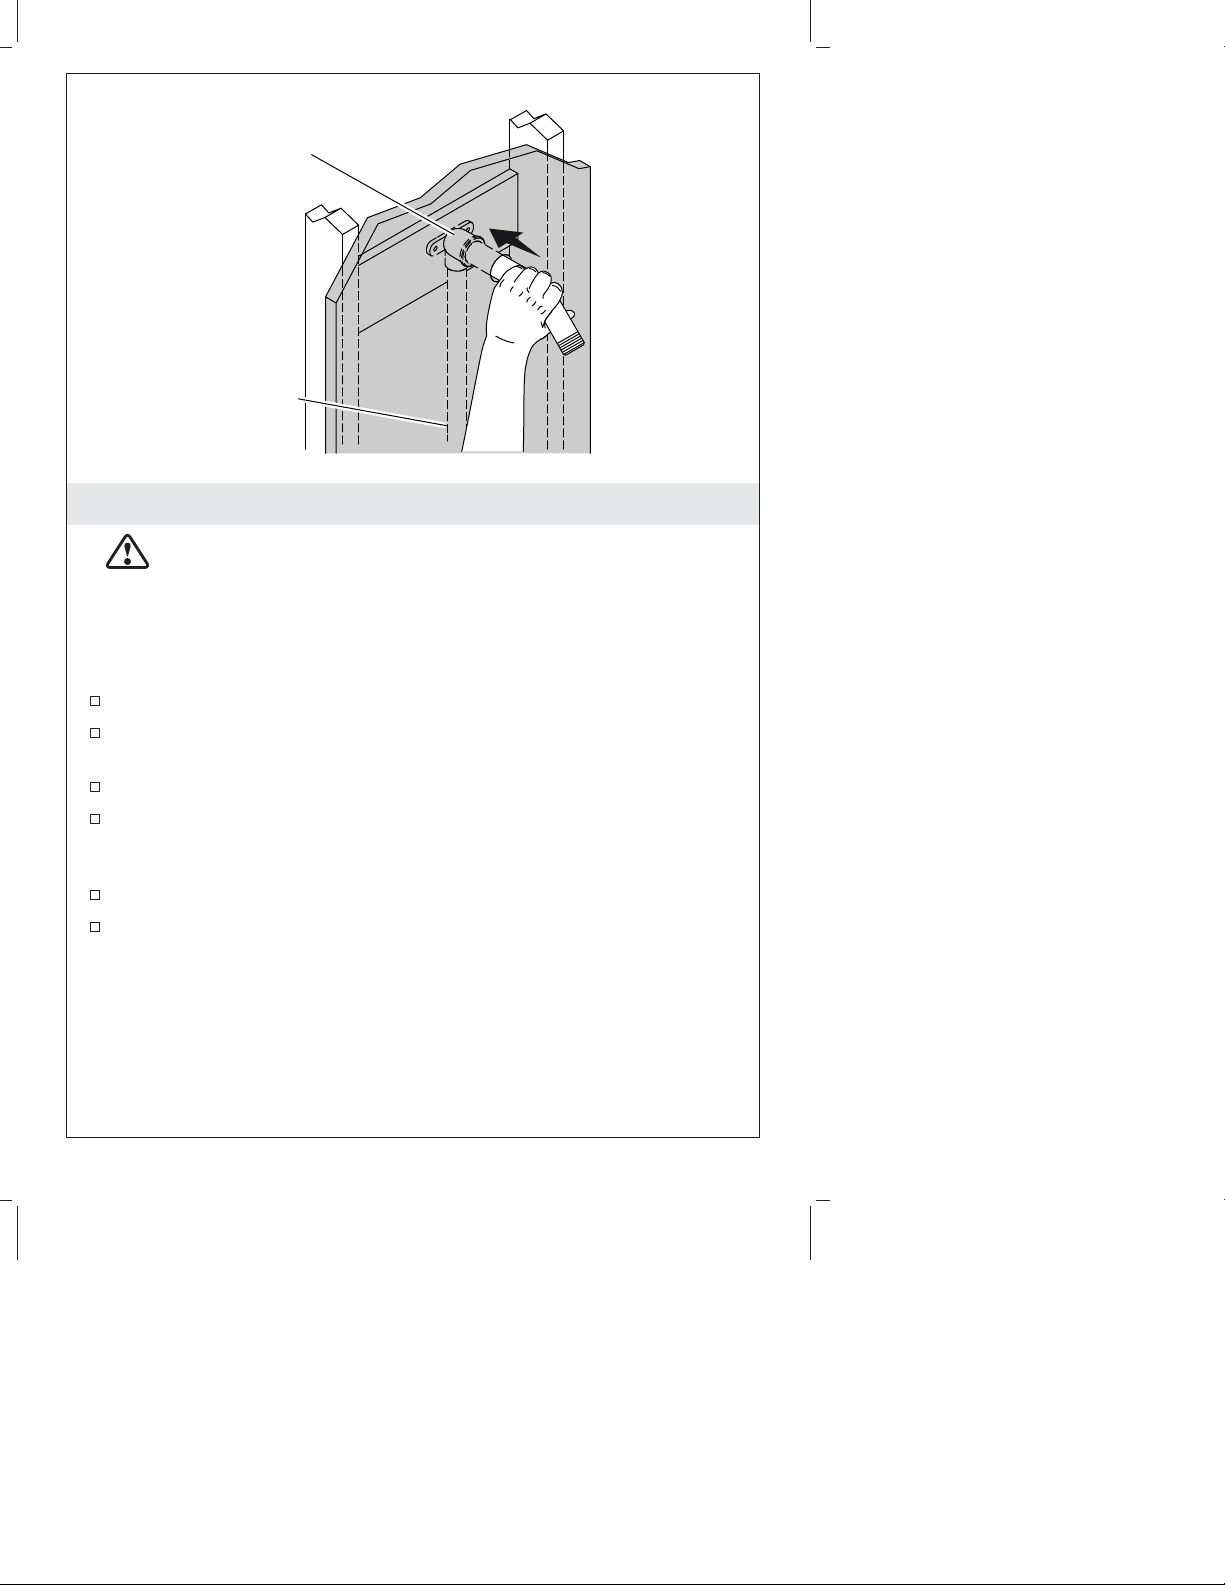
1. Retrofit/Remodel Installation
CAUTION: Risk of property damage. Water leakage may
occur if supply piping allows movement. Ensure the supply
piping and 1/2″-14 NPT elbow fitting are securely fastened to
braces in the stud framing.
IMPORTANT! Check the existing shower enclosure for adequate
clearances as described in section ″Before You Begin.″
Remove the existing showerhead and shower arm escutcheon.
Carefully push the existing shower arm toward the finished wall
surface.
Check for inward movement of the supply piping.
If inward movement is possible, securely fasten the supply piping
to braces in the stud framing before beginning the shower column
installation.
Remove the existing shower arm.
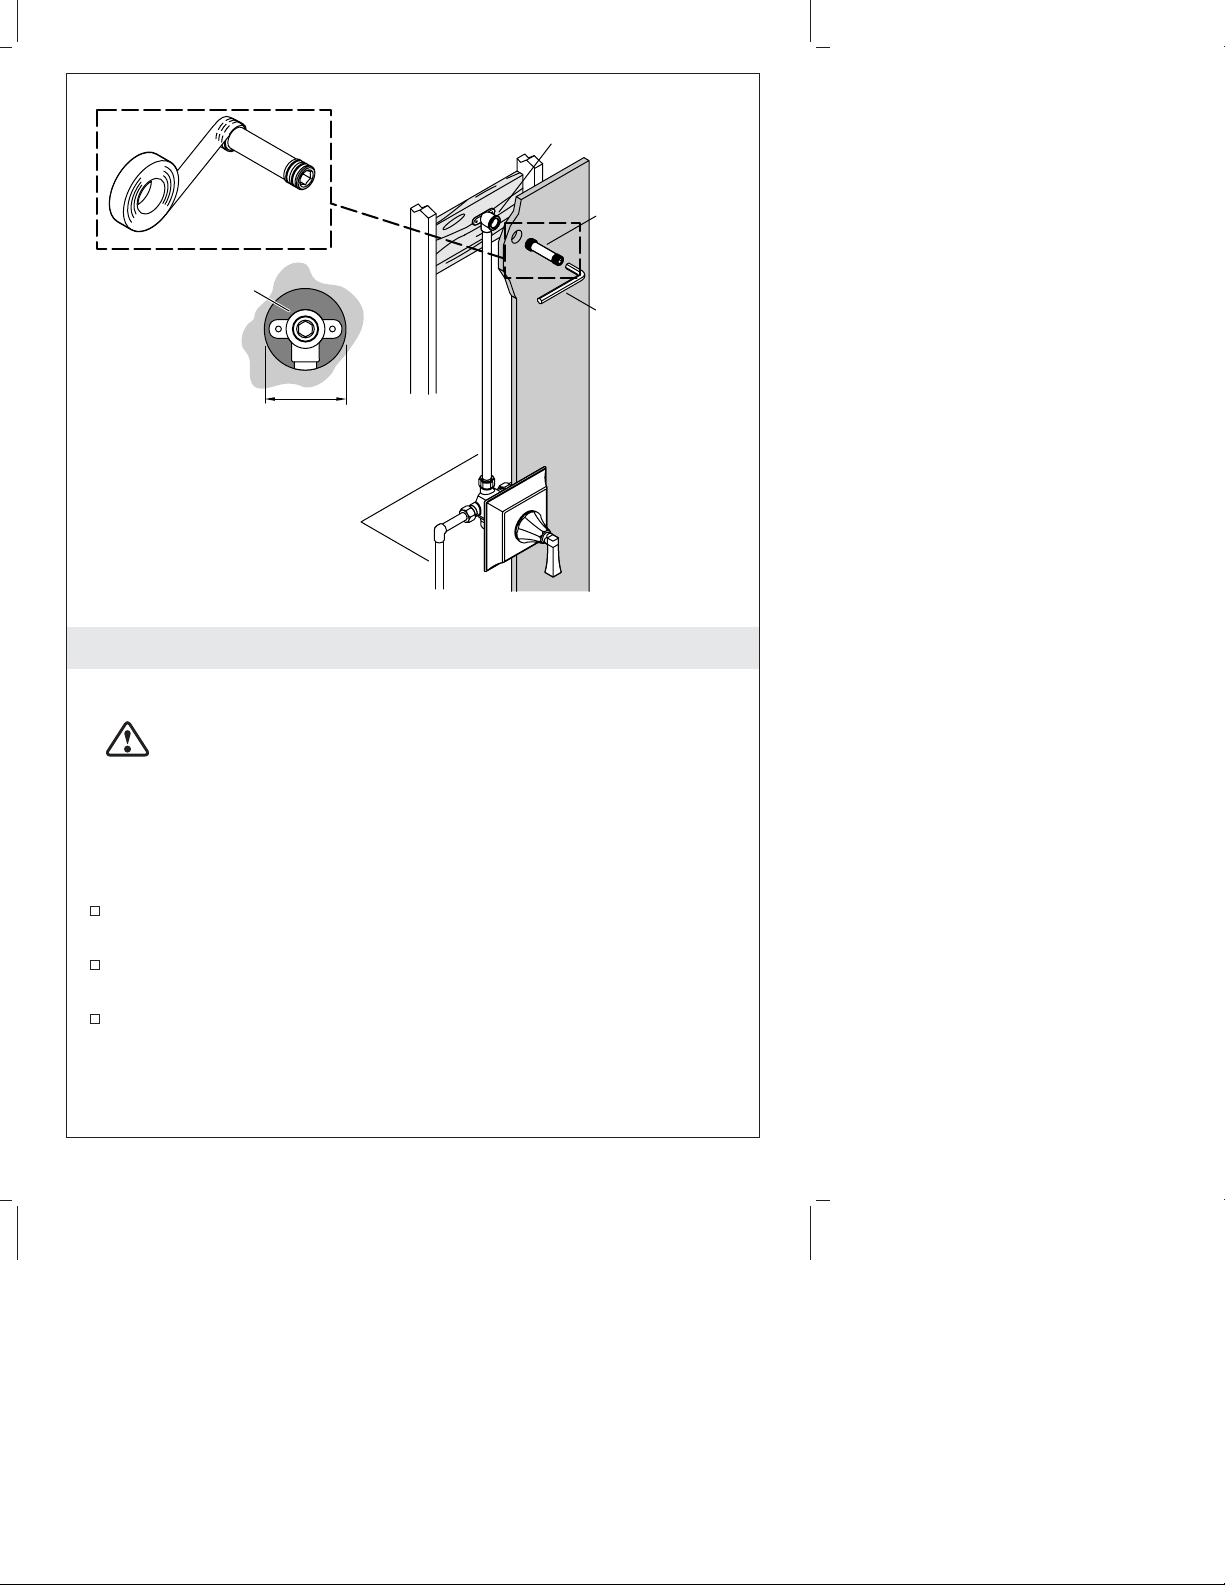
Measure the existing shower arm hole. Ensure that the finished
wall material has an upper supply connection hole diameter
between 1″ (25 mm) minimum and 1-1/4″ (32 mm) maximum,
and the hole is centered on the outlet of the 1/2″-14 NPT elbow
fitting. Repair the wall surfaces if the existing shower arm hole is
not centered or exceeds the recommended dimensions.
Kohler Co. 7 1184491-2-A
Page 8
1/2"-14 NPT Elbow
1" (25 mm)
Minimum –
1-1/4" (32 mm)
Maximum
Supply Piping
2. Install the Supply Adapter
For New Construction Installations
1/2"-14 NPT Elbow
Supply
Adapter
3/8" Hex
Wrench
CAUTION: Risk of property damage. Water leakage may
occur if supply piping allows movement. Ensure the supply
piping and 1/2″-14 NPT elbow fitting are securely fastened to
braces in the stud framing.
IMPORTANT! This guide includes the installation sequence for the
shower column only. Refer to the manufacturer’s instructions for
installation of the mixing valve, mixing valve trim, and spout.
Rough-in the mixing valve, supply piping, and bath spout
connection appropriate for your installation.
Refer to the ″Roughing-in″ section in this guide for proper
location of the 1/2″-14 NPT elbow fitting inside the wall.
Ensure that the supply piping and 1/2″-14 NPT elbow fitting are
securely fastened to the stud framing.
1184491-2-A 8 Kohler Co.
Page 9

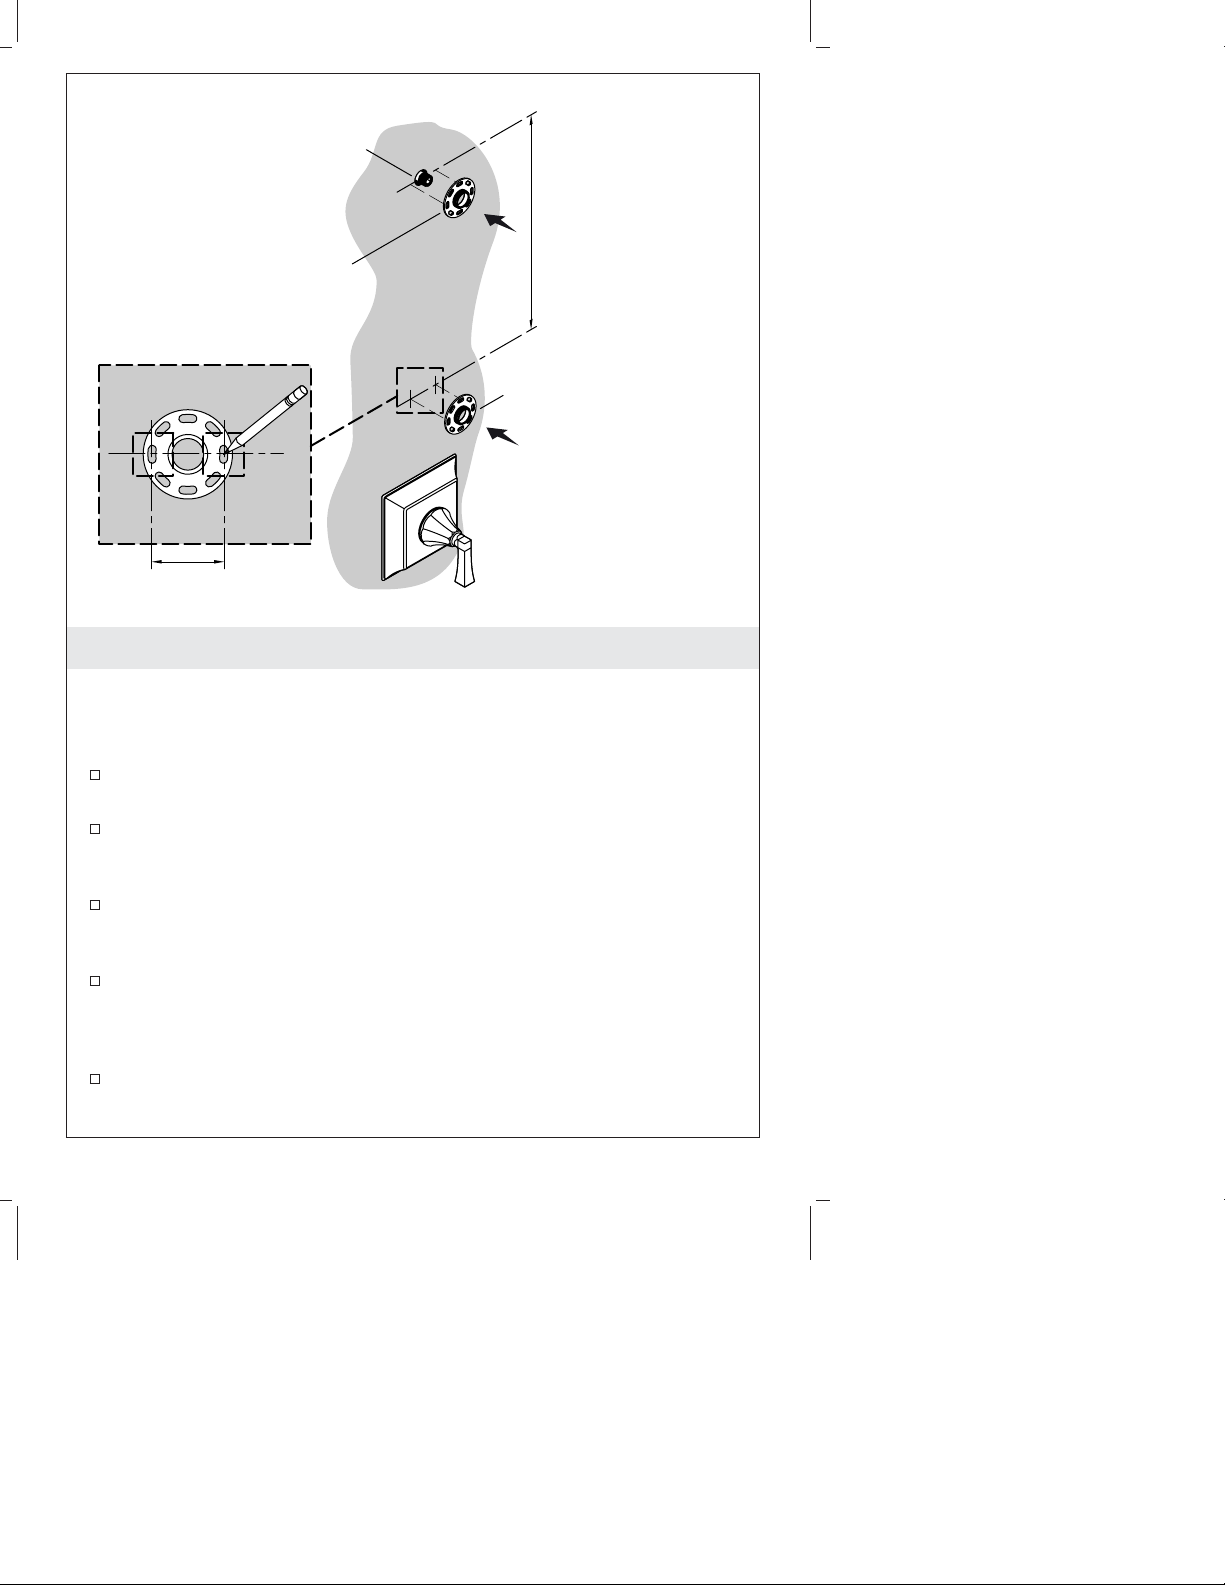
Install the Supply Adapter (cont.)
Ensure that the finished wall material has an upper supply
connection hole diameter between 1″ (25 mm) minimum and
1-1/4″ (32 mm) maximum, and the hole is centered on the outlet
of the 1/2″-14 NPT elbow fitting.
Install the finished wall material.
Install the mixing valve trim and bath spout according to the
manufacturer’s instructions.
For New Construction and Retrofit Installations
Apply sealant tape to the supply adapter thread.
The supply adapter has an internal 3/8″ hex socket. Thread the
supply adapter into the 1/2″-14 NPT elbow using a 3/8″ hex
wrench.
Kohler Co. 9 1184491-2-A
Page 10
Supply Adapter
K-45209, K-45210,
K-45386, K-45387
27" (686 mm)
K-45211, K-45212,
Mounting Collar
2" (51 mm)
K-45388, K-45389
18" (457 mm)
Mounting Collar
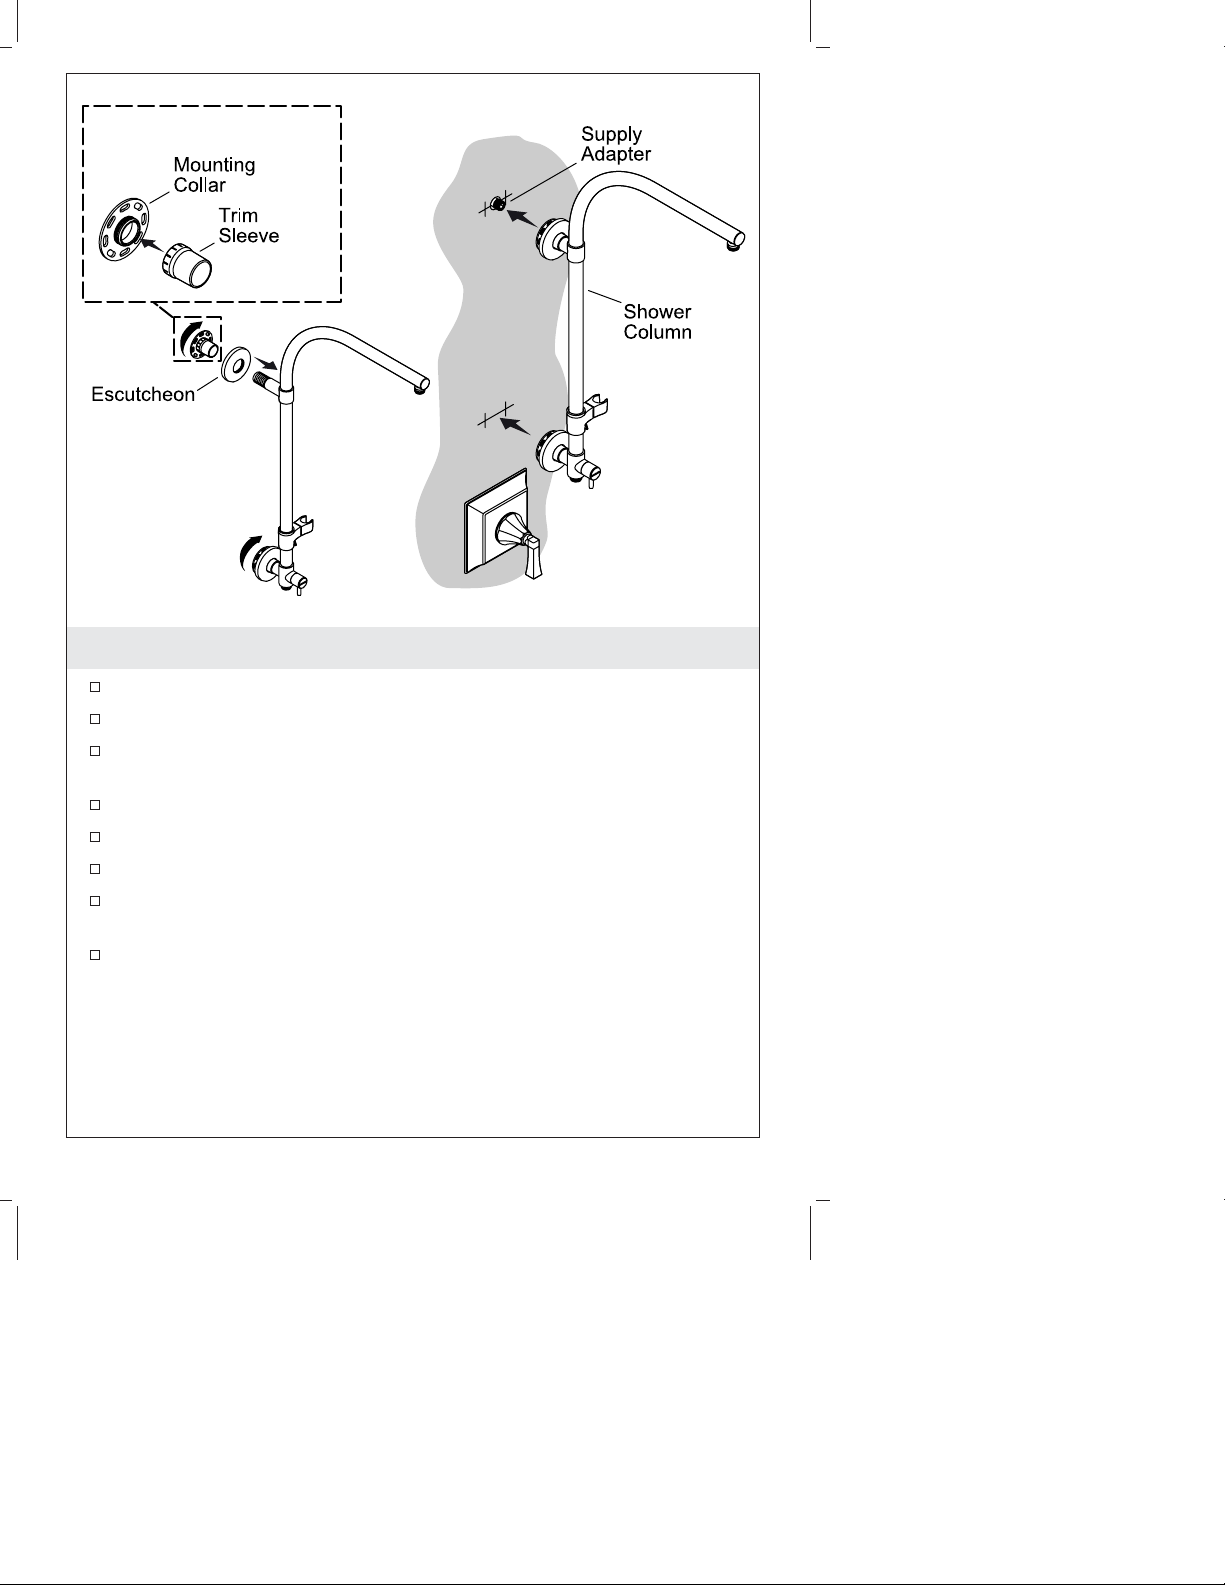
3. Mark the Mounting Hole Locations
NOTE: The upper mounting collar must be centered on the supply
adapter. The distance between the upper and lower mounting collar
centers should be 18″ (457 mm) or 27″ (686 mm) depending on the
length of your shower column.
Center the mounting collar on the supply adapter. Mark the left
and right mounting holes.
For K-45209/K-45210/K-45386/K-45387 only: From the center of
the supply adapter, measure down 27″ (686 mm) and mark the
horizontal measurement with a pencil.
For K-45211/K-45212/K-45388/K-45389 only: From the center of
the supply adapter, measure down 18″ (457 mm) and mark the
horizontal measurement with a pencil.
Center the mounting collar on the horizontal line. Measure and
mark the left and right mounting holes. Ensure the upper and
lower mounting hole locations are level and plumb to one
another.
Do not drill mounting holes until instructed to do so.
1184491-2-A 10 Kohler Co.
Page 11
4. Dry Fit the Shower Column
Snap a trim sleeve onto each mounting collar.
Verify that an O-ring is installed in each escutcheon.
Carefully slide an escutcheon onto the upper connection
assembly.
Thread a mounting collar onto the upper connection assembly.
Repeat steps for the lower mounting collar and escutcheon.
Carefully slide the shower column onto the supply adapter.
Ensure the lower mounting collar is tight against the finished
wall.
Proceed to section ″Plumb the Shower Column.″
Kohler Co. 11 1184491-2-A
Page 12
Adjust for
level.
Verify mounting
holes align with
marked locations.
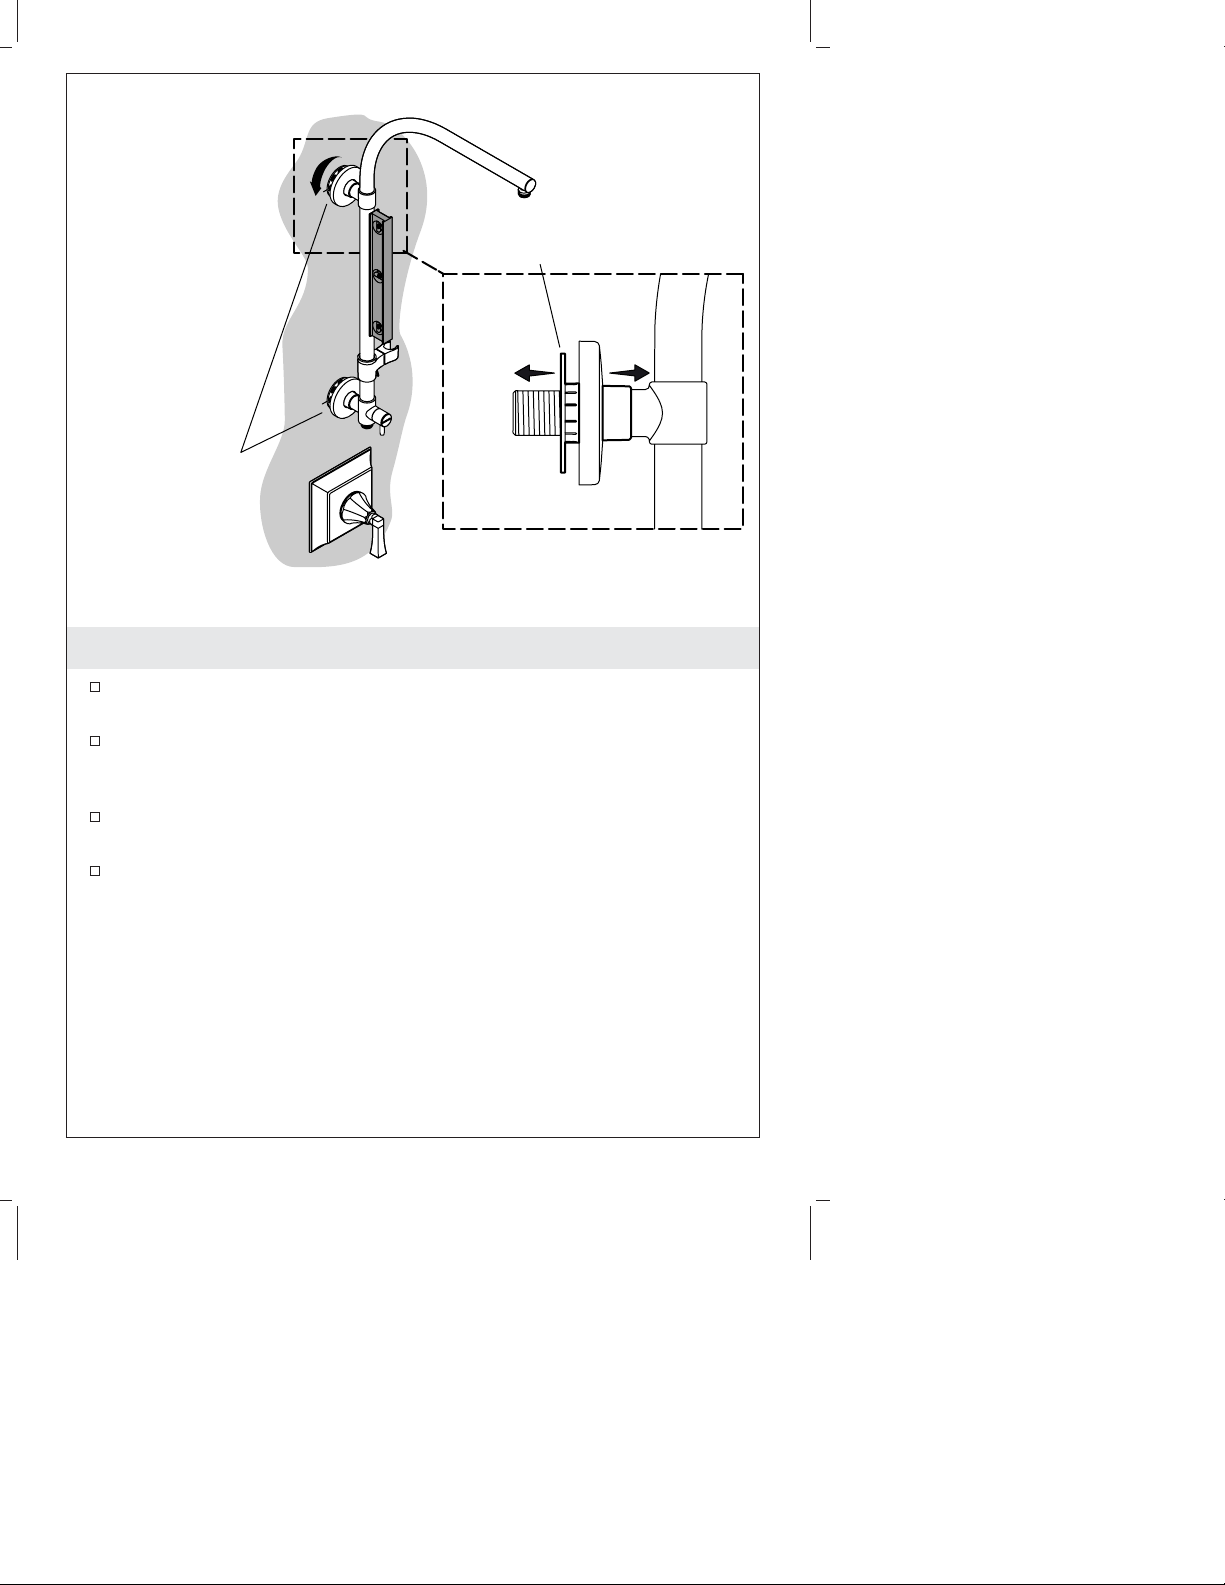
5. Plumb the Shower Column
Using a level, check the position of the shower column to ensure
it is plumb.
The upper mounting collar is adjustable to account for level and
wall surface offset. Turn the mounting collar until the shower
column is plumb.
Verify that the mounting collar slots align with the pencil
markings on the finished wall. Make any adjustments as needed.
Remove the shower column from the supply adapter.
1184491-2-A 12 Kohler Co.
Page 13
Drill 1/2" (13 mm)
holes at each
marked location.
1-7/8"
(48 mm)
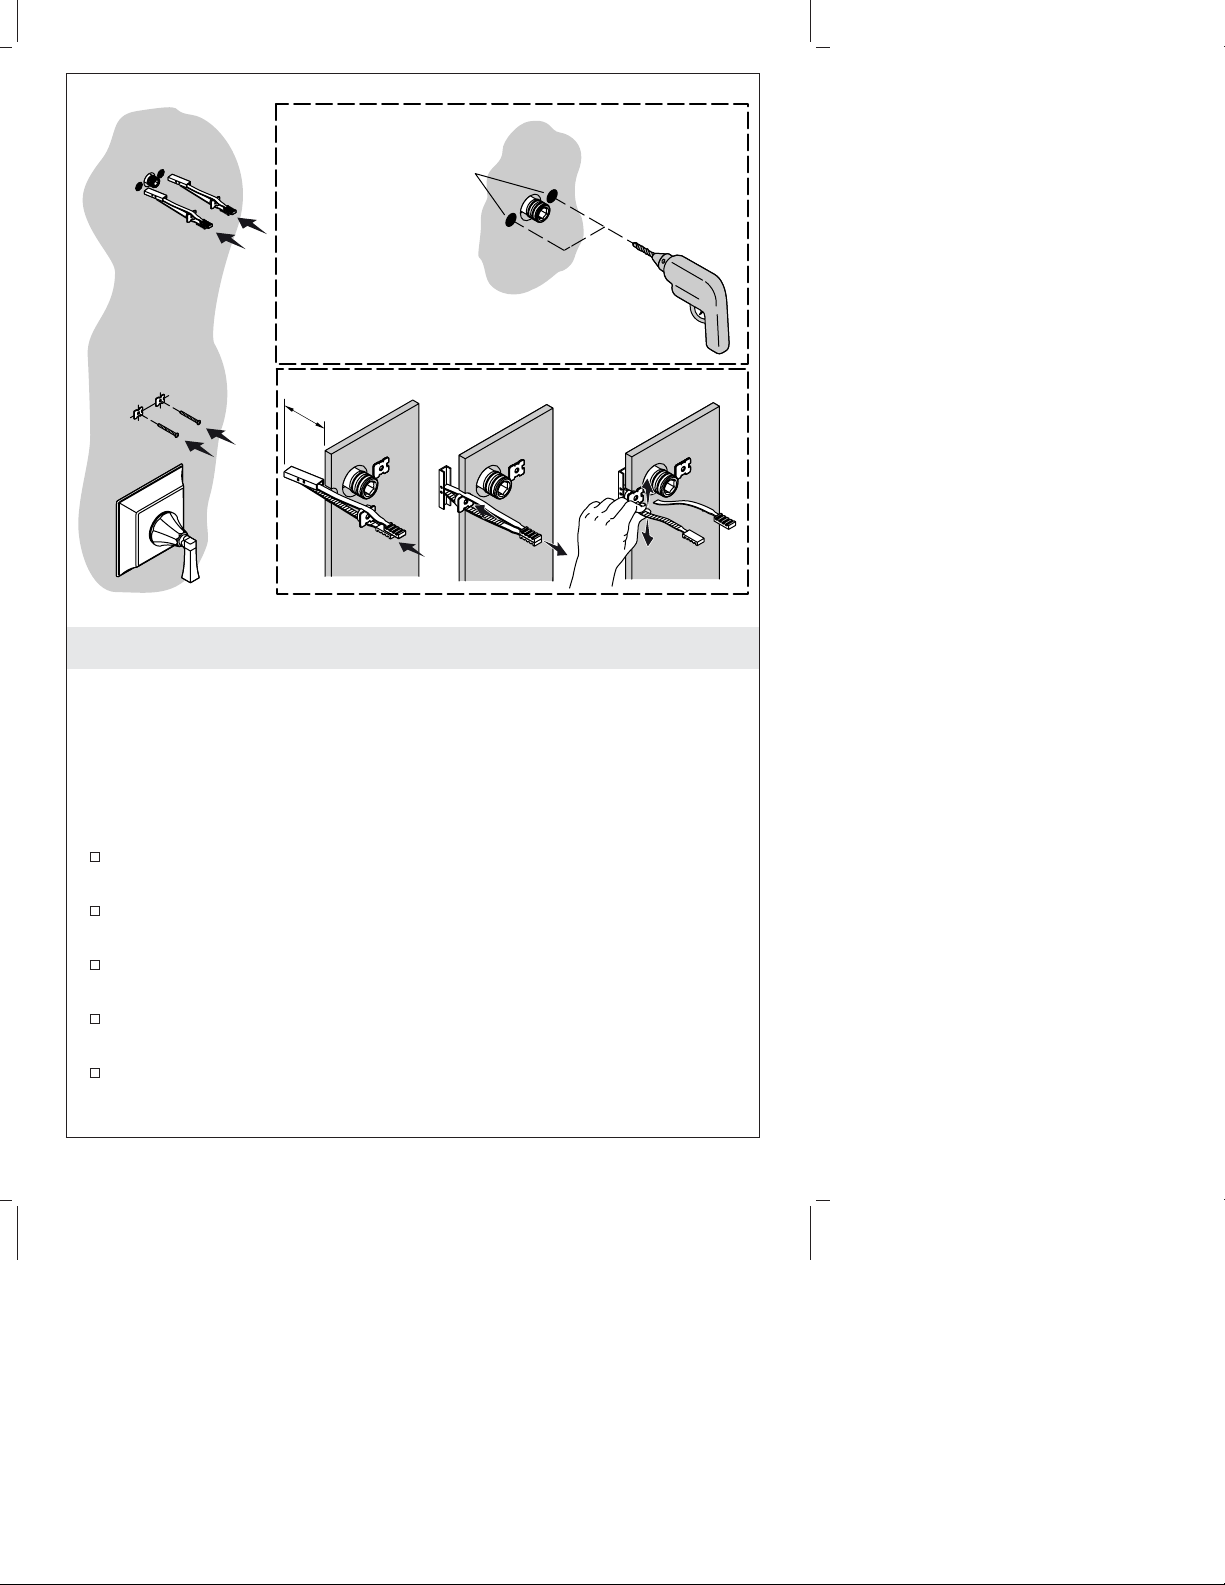
6. Install with Anchors
IMPORTANT! If the supplied toggle anchor fasteners are not used,
refer to section ″Before You Begin″ for fastener requirements.
NOTE: Anchor installation requires 1-7/8″ (48 mm) minimum
clearance behind the wall. The finished wall thickness must be a
minimum of 5/8″ (16 mm) and must be adequate in strength.
Install the Anchors
Drill two 1/2″ (13 mm) diameter holes for each mounting collar
at the pencil markings on the finished wall.
Hold the metal channel of the anchor flat alongside the plastic
straps and slide the channel through the drilled holes.
Realign the handles of the straps to straighten the channel behind
the wall.
With one hand, pull the finger grips straight out (do not pull at
an angle) so that the metal channel rests flush behind the wall.
Slide the clip along the straps with your other hand until the
flange of the clip is flush with the wall.
Kohler Co. 13 1184491-2-A
Page 14

Install with Anchors (cont.)
Place your thumb between the plastic straps. Wiggle the straps up
and down until they snap off at the wall.
Align the mounting collar with the anchor clips.
Insert the bolt through the mounting collar and tighten until it is
flush with the wall.
1184491-2-A 14 Kohler Co.
Page 15
Apply
silicone
sealant.
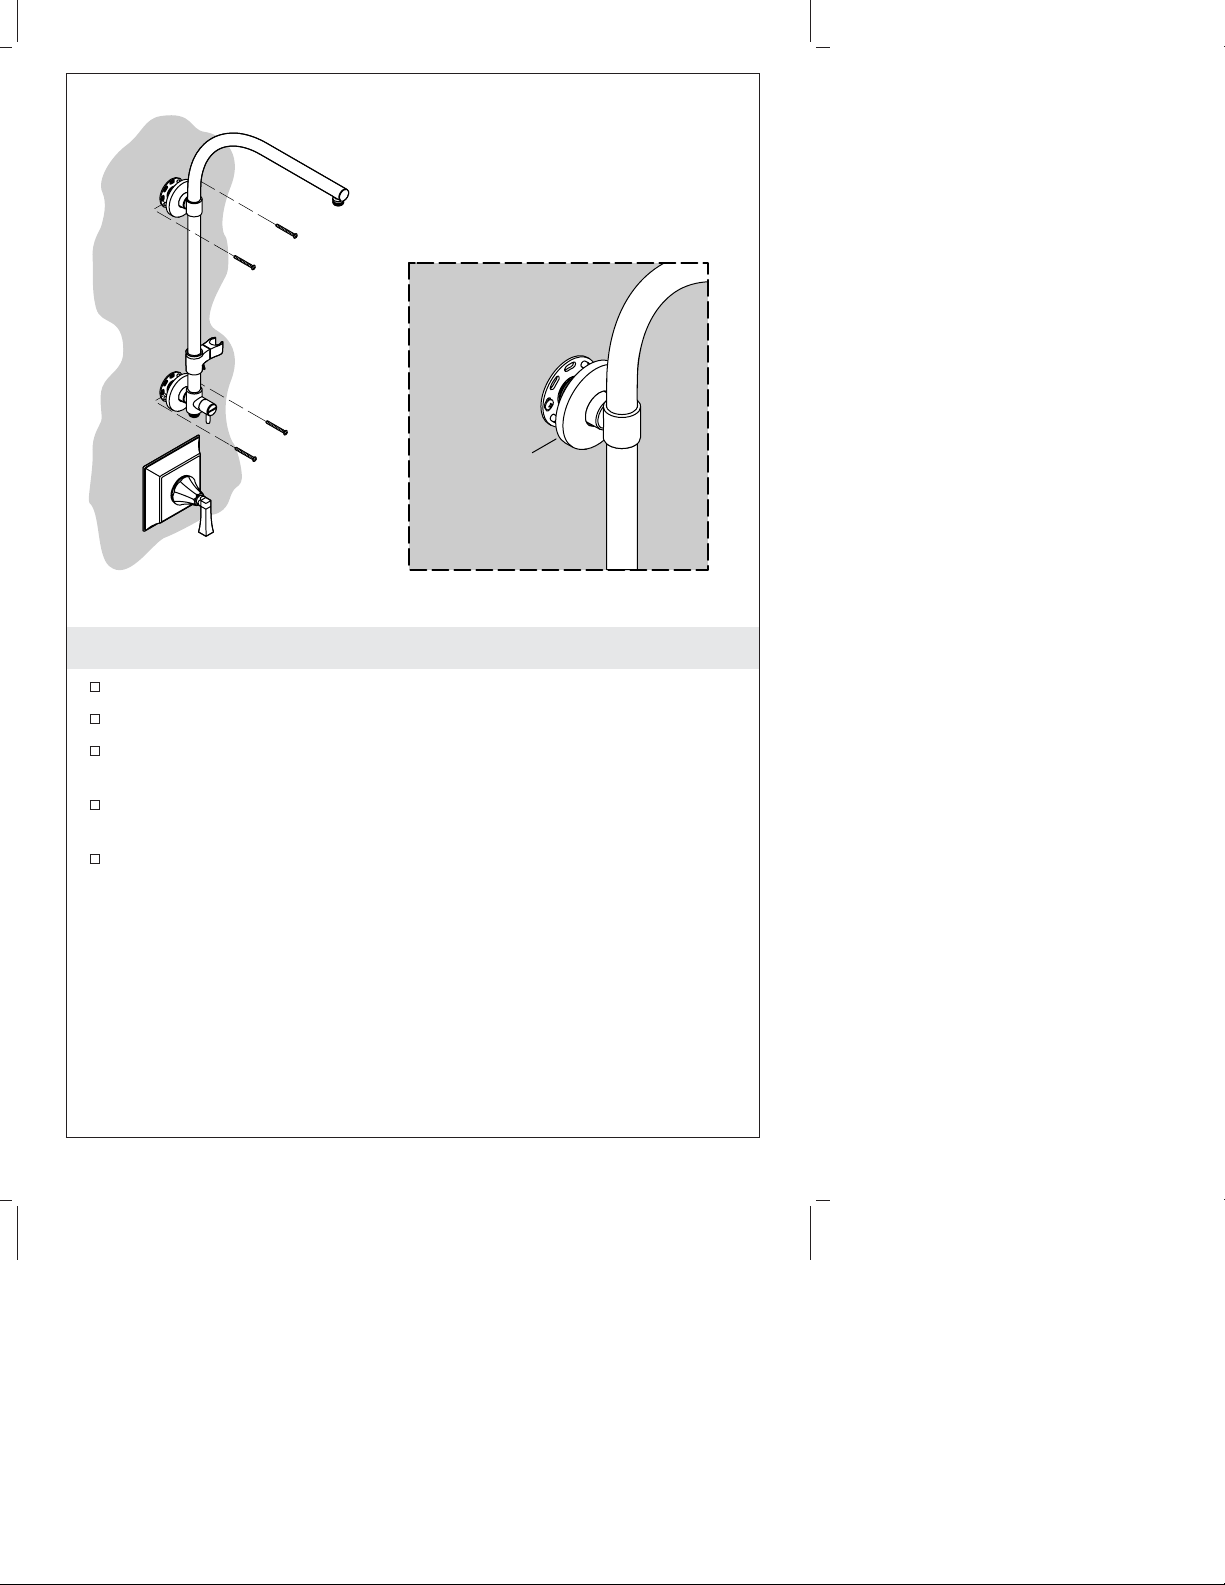
7. Secure the Shower Column
Reinstall the shower column to the supply adapter.
Secure the shower column with the four fasteners.
Apply a bead of silicone sealant to the back edge of each
escutcheon.
Slide the escutcheons over the mounting collars and press the
escutcheons tight against the finished wall.
Wipe away any excess silicone sealant from the escutcheons and
finished wall.
Kohler Co. 15 1184491-2-A
Page 16
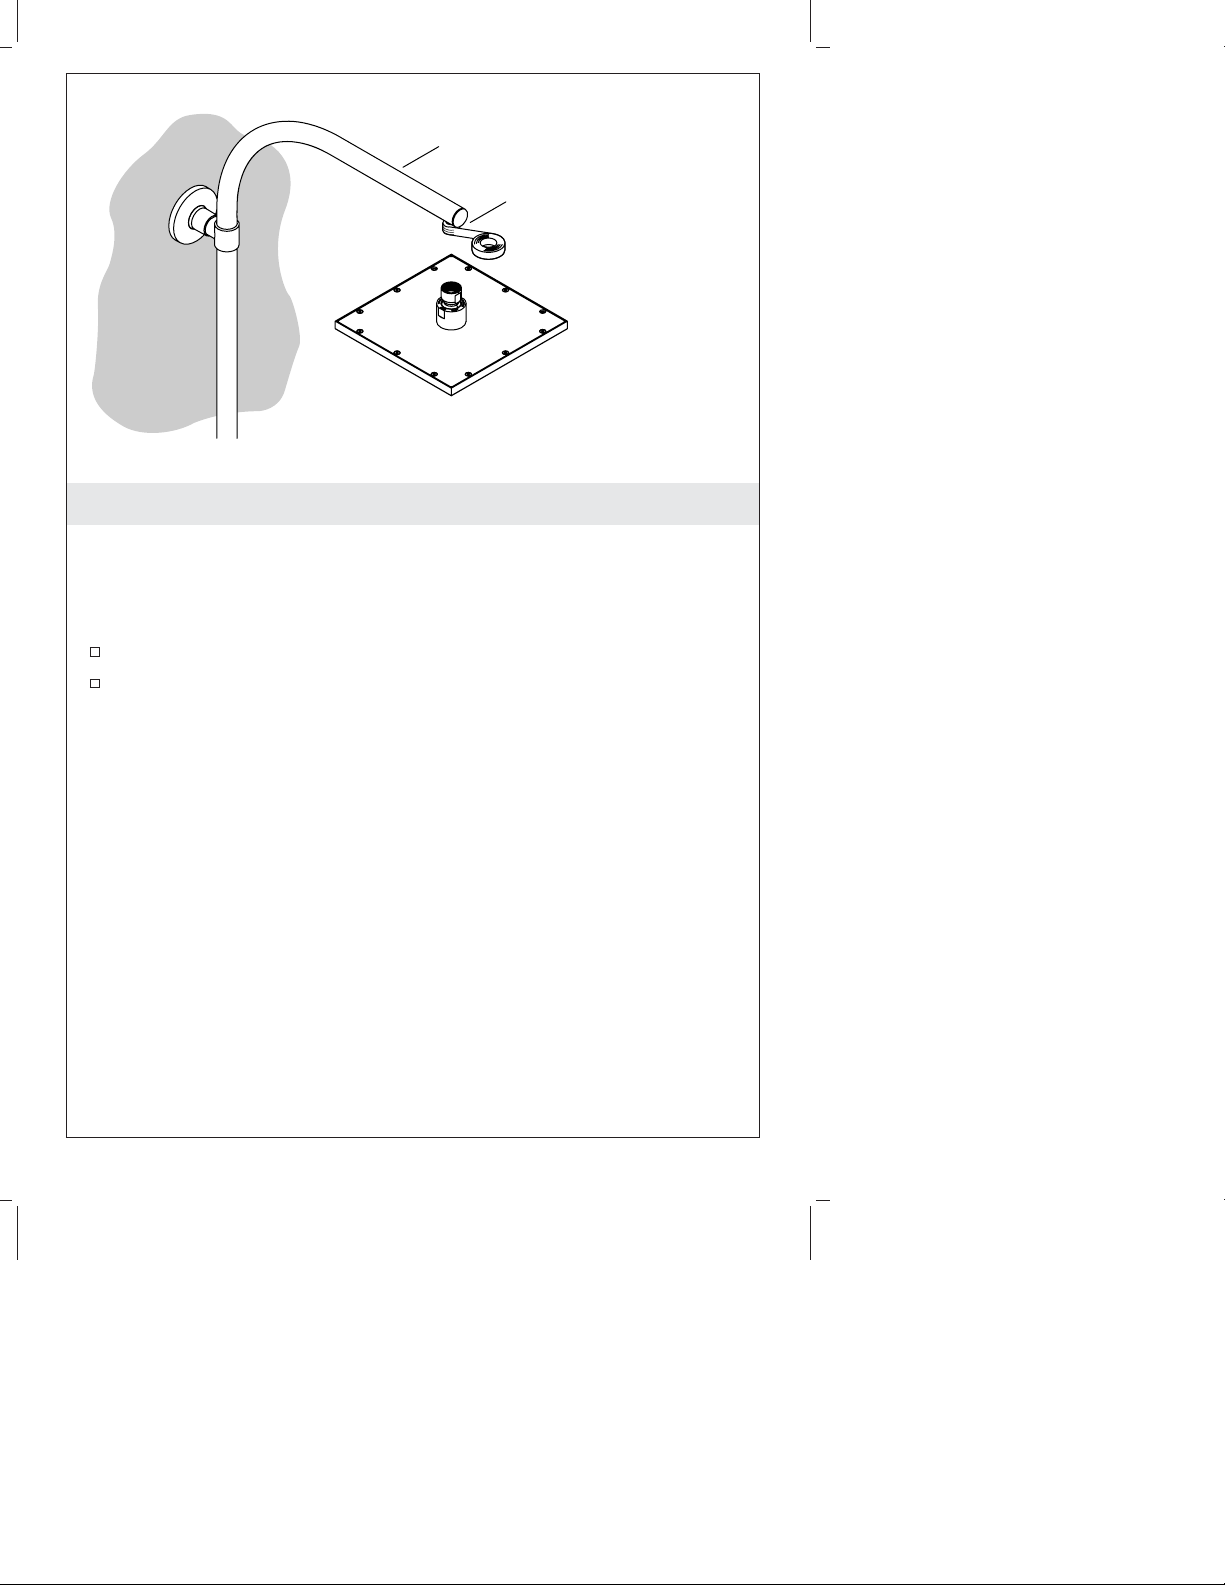
Shower Column Overhang
Apply sealant tape.
8. Install the Showerhead
CAUTION: Risk of product damage. Product damage could occur if
the shower column overhang is not carefully supported during the
showerhead installation. Do not apply excessive weight or force to
the shower column overhang.
Apply sealant tape to the shower column overhang outlet.
Carefully thread the showerhead onto the shower column
overhang outlet.
1184491-2-A 16 Kohler Co.
Page 17
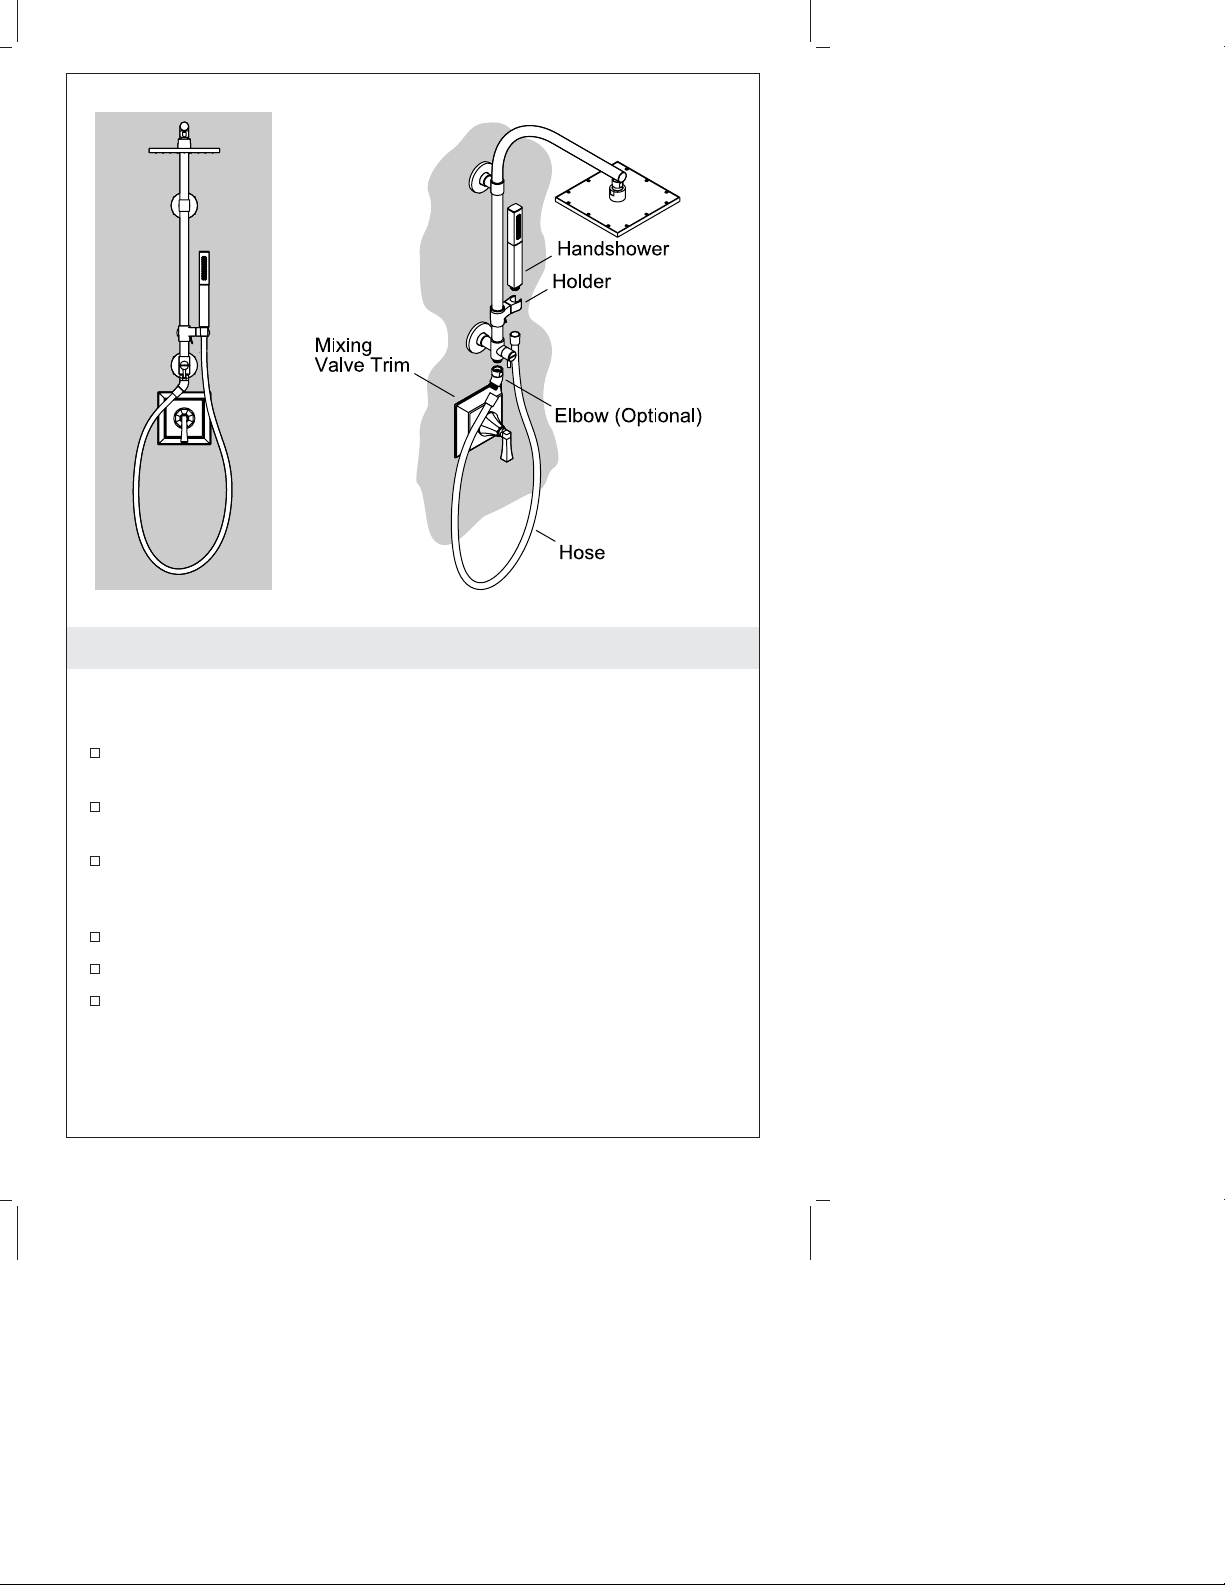
9. Install the Handshower
NOTE: Elbow installation is optional and allows the hose to drape
around the mixing valve trim. The shower hose can also be installed
directly onto the shower column if desired.
With gasket installed, thread the elbow onto the bottom of the
shower column.
With gasket installed, thread the check valve end of the shower
hose to the elbow.
Position the handshower holder and the elbow opposite each
other. This allows the hose to drape around the mixing valve
trim.
Thread the hose through the holder.
With screen washer installed, thread the hose to the handshower.
Place the handshower into the holder.
Kohler Co. 17 1184491-2-A
Page 18

Handle
Handle
Handle
Flow to
Showerhead
Flow to
Handshower
Partial Flow
to Both
10. Using Your Shower Column
NOTE: If water does not flow through the handshower or shower
hose, the shower hose was incorrectly installed. To correct, reinstall
the shower hose ensuring the end of the hose containing the check
valve is attached to the elbow or shower column.
NOTE: This product is not designed to stop water flow. Positioning
the handle to the left will result in partial flow from both the
showerhead and handshower.
To use the showerhead, turn the handle to the upward position.
To use the handshower, turn the handle to the downward
position.
11. Check for Leaks
Turn on the water.
Turn the handle upward and check connections for leaks.
Turn the handle downward and check connections for leaks.
1184491-2-A 18 Kohler Co.
Page 19

Guide d’installation
Colonne de douche
Outils et matériels
3/8"
Tournevis à
pointe
cruciforme
Ruban
d'étanchéité
Mastic à la
silicone à 100%
Avant de commencer
REMARQUE: Ce guide inclut la séquence d’installation pour la
colonne de douche seulement. Installer le mitigeur, la garniture du
mitigeur, et le bec conformément aux instructions du fabricant.
AVIS: Risque d’endommagement du produit. Ne pas appliquer de
poids excessif ou de force vers le bas sur la colonne de la douche.
ATTENTION: Risque d’endommagement du matériel. Une
fuite d’eau peut se produire si la tuyauterie d’alimentation
permet un déplacement. S’assurer que la tuyauterie
d’alimentation et qu’un raccord de coude NPT 1/2″-14 sont
bien fixés sur les supports dans l’encadrement des montants.
Veuillez lire toutes les instructions avant de commencer.
Respecter tous les codes de plomberie et de bâtiment locaux.
Couper l’alimentation d’eau.
Inspecter la tuyauterie d’alimentation existante ainsi que les
matériaux des murs. Remplacer si nécessaire.
1/2"
Kohler Co. Français-1 1184491-2-A
Page 20

Avant de commencer (cont.)
La colonne de la douche est fournie avec des dispositifs d’ancrage
à bascule pour une installation sur une surface de mur fini.
L’épaisseur de mur fini doit être égale à une épaisseur minimum
de 5/8″ (16 mm) et doit être d’une force adéquate. Deux
dispositifs d’attache à bascule sont requis par collier de fixation.
IMPORTANT! Si les dispositifs d’ancrage fournis ne sont pas
utilisés pour installer la colonne de la douche:
S’assurer que les matériaux de renfort de mur sont d’une force
adéquate et que le renfort des montants sont bien positionnés à
l’arrière du mur fini.
Obtenir les dispositifs d’attache adéquats (non fournis) en tenant
compte du type de matériel de renfort de montants et de
l’épaisseur du collier de fixation, du mur fini, du renfort de mur
et du support de montants.
Les dispositifs de fixation doivent résister à la corrosion et
doivent être capables de supporter une charge de 300 lb (136 kg)
par dispositif d’attache.
Deux dispositifs d’attache au minimum sont requis par collier de
fixation.
Les dispositifs d’attache doivent être bien ancrés dans le renfort
des montants pour supporter le produit de manière adéquate.
IMPORTANT! Pour les installations rétroactives/de remodelage:
Inspecter l’encadrement de la douche pour vérifier que les
dégagements sont adéquats avant de continuer l’installation de la
colonne de la douche. Se reporter à la section sur le raccordement
pour la colonne de douche et la pomme de douche Pluie.
Vérifier les distances entre:
•
le plafond et le centre du bras de douche existant au niveau de la
surface de mur fini.
•
Le plancher de la douche et le centre du bras de douche existant
au niveau de la surface de mur fini. S’assurer que le dégagement
est suffisant sous la pomme de douche Pluie.
•
Le centre du bras de douche existant et le centre de la garniture
du mitigeur.
1184491-2-A Français-2 Kohler Co.
Page 21

Raccordement - Connexion d’alimentation supérieure
Mesurer la distance entre le coude NPT 1/2″-14 NPT et la surface
de mur fini. La distance doit se trouver entre 1-3/8″ (35 mm) et
2-7/8″ (73 mm). La connexion de la colonne de douche ne se
scelle pas correctement si la distance dépasse 2-7/8″ (73 mm).
Kohler Co. Français-3 1184491-2-A
Page 22

K-45386
K-45209
75" (1905 mm)
recommandé
72" (1829 mm)
minimum
(Illustré)
(Sans la pomme de douche et la douchette)
9-1/2"
(241 mm)
27"
(686 mm)
6" (152 mm)
minimum
21-15/16" (557 mm)
Matériau
de support
K-45387
K-45210
80" (2032 mm)
recommandé
75" (1905 mm)
minimum
(Illustré)
(Sans la pomme de douche et la douchette)
3-3/4"
(95 mm)
27"
(686 mm)
6" (152 mm)
minimum
Plan de raccordement
21-15/16" (557 mm)
Matériau
de support
1184491-2-A Français-4 Kohler Co.
Page 23

K-45388
K-45211
(Illustré)
(Sans la pomme de douche et la douchette)
21-15/16" (557 mm)
9-1/2"
(241 mm)
18"
(457 mm)
75" (1905 mm)
recommandé
72" (1829 mm)
minimum
K-45389
K-45212
78" (1981 mm)
recommandé
75" (1905 mm)
minimum
(Illustré)
(Sans la pomme de douche et la douchette)
6" (152 mm)
minimum
3-3/4"
(95 mm)
18"
(457 mm)
6" (152 mm)
minimum
Matériau
de support
21-15/16" (557 mm)
Matériau
de support
Plan de raccordement
Kohler Co. Français-5 1184491-2-A
Page 24

1/2" Coude NPT -14
Tuyauterie
d'alimentation
1. Installation rétroactive/de remodelage
ATTENTION: Risque d’endommagement du matériel. Une
fuite d’eau peut se produire si la tuyauterie d’alimentation
permet un déplacement. S’assurer que la tuyauterie
d’alimentation et qu’un raccord de coude NPT 1/2″-14 sont
bien fixés sur les supports dans l’encadrement des montants.
IMPORTANT! Vérifier que l’encadrement de douche existant
comprend les dégagements adéquats tel que décrit dans la section
″Avant de commencer.″
Retirer la pomme de douche et l’applique de bras de douche
existants.
Pousser avec précaution le bras de douche existant vers la surface
de mur fini.
Essayer de détecter un mouvement vers l’intérieur du tuyau
d’alimentation.
Si le mouvement vers l’intérieur est possible, sécuriser le tuyau
d’alimentation sur les renforts dans l’encadrement des montants
avant de commencer l’installation de la colonne de douche.
Retirer le bras de douche existant.
1184491-2-A Français-6 Kohler Co.
Page 25

Installation rétroactive/de remodelage (cont.)
Mesurer le trou du bras de douche existant. S’assurer que le
matériau du mur fini comprend un trou de connexion
d’alimentation supérieure d’un diamètre compris entre 1″ (25
mm) minimum et 1-1/4″ (32 mm) maximum, et que le trou est
centré sur la sortie du raccord de coude NPT de 1/2″-14. Réparer
les surfaces de mur si le trou du bras de douche existant ne sont
pas centrés ou s’ils dépassent les dimensions recommandées.
Kohler Co. Français-7 1184491-2-A
Page 26

1/2" Coude
NPT -14
1" (25 mm)
minimum –
1-1/4" (32 mm)
maximum
Tuyauterie d'alimentation
2. Installer l’adaptateur d’alimentation
Pour des nouvelles installations de construction
1/2" Coude NPT -14
Adaptateur
d'alimentation
3/8"
Clé
hexagonale
ATTENTION: Risque d’endommagement du matériel. Une
fuite d’eau peut se produire si la tuyauterie d’alimentation
permet un déplacement. S’assurer que la tuyauterie
d’alimentation et qu’un raccord de coude NPT 1/2″-14 sont
bien fixés sur les supports dans l’encadrement des montants.
IMPORTANT! Ce guide inclut la séquence d’installation pour la
colonne de douche seulement. Se reporter aux instructions du
fabricant pour l’installation du mitigeur, de la garniture du mitigeur,
et du bec.
Raccorder le mitigeur, le tuyau d’alimentation, et la connexion du
bec de la baignoire appropriés pour votre installation.
Se reporter à la section ″Plan de raccordement″ dans ce guide
pour trouver l’emplacement approprié du coude NPT 1/2″-14 à
l’intérieur du mur.
1184491-2-A Français-8 Kohler Co.
Page 27

Installer l’adaptateur d’alimentation (cont.)
S’assurer que la tuyauterie d’alimentation et qu’un raccord de
coude NPT 1/2″-14 sont bien fixés sur l’encadrement des
montants.
S’assurer que le matériau du mur fini comprend un trou de
connexion d’alimentation supérieure d’un diamètre compris entre
1″ (25 mm) minimum et 1-1/4″ (32 mm) maximum, et que le trou
est centré sur la sortie du raccord de coude NPT de 1/2″-14.
Installer le matériau du mur fini.
Installer la garniture du mitigeur et le bec de la baignoire
conformément aux instructions du fabricant.
Pour les installations de nouvelle construction et rétroactives
Appliquer un ruban d’étanchéité sur le filet de l’adaptateur
d’alimentation.
L’adaptateur d’alimentant est doté d’une douille à six pans creux
interne de 3/8″. Enfiler l’adaptateur d’alimentation dans le coude
NPT 1/2″-14 en utilisant une clé hexagonale de 3/8″.
Kohler Co. Français-9 1184491-2-A
Page 28

Adaptateur
d'alimentation
K-45209, K-45210,
K-45386, K-45387
27" (686 mm)
K-45211, K-45212,
Collier de
fixation
2" (51 mm)
K-45388, K-45389
18" (457 mm)
Collier de
fixation
3. Marquer les emplacements des trous de fixation
REMARQUE: Le collier de fixation supérieur doit être centré sur
l’adaptateur d’alimentation. La distance entre les centres supérieur et
inférieur du collier de fixation doit être égale à 18″ (457 mm) ou 27″
(686 mm), selon la longueur de la colonne de douche.
Centrer le collier de fixation sur l’adaptateur d’alimentation.
Marquer les trous de fixation de gauche et de droite.
Pour K-45209/K-45210/K-45386/K-45387 seulement: À partir du
centre de l’adaptateur d’alimentation, mesurer 27″ (686 mm) vers
le bas et marquer la mesure horizontale avec un crayon.
For K-45211/K-45212/K-45388/K-45389 seulement: À partir du
centre de l’adaptateur d’alimentation, mesurer 18″ (457 mm) vers
le bas et marquer la mesure horizontale avec un crayon.
Centrer le collier de fixation sur la ligne horizontale. Mesurer et
marquer les trous de fixation de gauche et de droite. S’assurer
que les emplacements des trous de fixation du haut et du bas
sont à niveau et d’aplomb avec l’un l’autre.
Ne pas percer les trous de fixation avant que les instructions ne le
demandent.
1184491-2-A Français-10 Kohler Co.
Page 29

4. Adapter la colonne de la douche
Enclencher un manchon de garniture sur chaque collier de
fixation.
Vérifier que le joint torique est installé dans chaque applique.
Faire glisser avec précaution une applique sur la connexion
supérieure.
Enfiler un collier de fixation sur la connexion supérieure.
Répéter les étapes pour le collier de fixation inférieur et
l’applique.
Faire glisser la colonne avec précaution sur l’adaptateur
d’alimentation.
S’assurer que le collier de fixation inférieur est bien ajusté contre
le mur fini.
Passer à la section ″Mettre la colonne de douche d’aplomb″.
Kohler Co. Français-11 1184491-2-A
Page 30

Ajuster pour mettre à
niveau.
Vérifier que tous
les trous de
fixation sont
alignés sur les
emplacements
marqués.
5. Mettre la colonne de douche d’aplomb
Utiliser un niveau pour vérifier la position de la colonne de la
douche pour assurer qu’elle est d’aplomb.
Le collier de fixation supérieur est réglable pour tenir compte de
la mise à niveau et du décalage de la surface du mur. Tourner le
collier de fixation jusqu’à ce que la colonne de la douche soit
d’aplomb.
Vérifier que les fentes du collier de fixation sont alignées avec les
marques du crayon sur le mur fini. Faire les réglages nécessaires.
Retirer la colonne de la douche de l’adaptateur d’alimentation.
1184491-2-A Français-12 Kohler Co.
Page 31

Percer des trous
de 1/2" (13 mm) à
chaque
emplacement
marqué.
1-7/8"
(48 mm)
6. Installer avec des dispositifs d’ancrage
IMPORTANT! Si les dispositifs d’ancrage fournis ne sont pas
utilisés, se reporter à la section ″Avant de commencer″ pour les
conditions requises pour les dispositifs d’ancrage.
REMARQUE: L’installation des dispositifs d’ancrage exige un
dégagement minimum de 1-7/8″ (48 mm) à l’arrière du mur.
L’épaisseur de mur fini doit être égale à une épaisseur minimum de
5/8″ (16 mm) et doit être d’une force adéquate.
Installer les dispositifs d’ancrage
Percer deux trous d’un diamètre de 1/2″ (13 mm) pour chaque
collier de fixation au niveau des marques de crayon sur le mur
fini.
Tenir le canal en métal du dispositif d’ancrage à plat le long des
sangles en plastique et faire glisser le canal à travers les trous
percés.
Réaligner les poignées des sangles pour redresser le canal à
l’arrière du mur.
Kohler Co. Français-13 1184491-2-A
Page 32

Installer avec des dispositifs d’ancrage (cont.)
D’une main, tirer les brides pour les doigts tout droit pour les
faire sortir (ne pas tirer en angle) de sorte que le canal métallique
repose à affleurement à l’arrière du mur.
Faire glisser le capuchon de plastique le long des sangles jusqu’à
ce qu’il soit à égalité avec le mur.
Placer le pouce entre les sangles en plastique. Bouger les sangles
vers le haut et vers le bas, jusqu’à ce qu’elles se dégagent sur le
mur.
Aligner le collier de fixation avec les clips des dispositifs
d’ancrage.
Insérer le boulon à travers le collier de fixation et serrer jusqu’à ce
qu’il soit à ras du mur.
1184491-2-A Français-14 Kohler Co.
Page 33

Appliquer
du mastic
à la
silicone.
7. Sécuriser la colonne de la douche
Réinstaller la colonne de la douche sur l’adaptateur
d’alimentation.
Sécuriser la colonne de la douche avec les quatre dispositifs
d’attache.
Appliquer un boudin de mastic à la silicone sur le bord arrière de
chaque applique.
Faire glisser les appliques sur les colliers de fixation et bien
appuyer les appliques contre le mur fini.
Essuyer tout excès de mastic d’étanchéité à la silicone des
appliques et du mur fini.
Kohler Co. Français-15 1184491-2-A
Page 34

Surplomb de colonne de douche
Appliquer du ruban
d'étanchéité.
8. Installer la pomme de douche
ATTENTION: Risque d’endommagement du produit. Le produit
pourrait subir des dommages si le surplomb de la colonne de
douche n’est pas supporté avec soin pendant l’installation de la
pomme de douche. Ne pas appliquer de poids ou de force excessifs
sur le surplomb de la colonne de la douche.
Appliquer du ruban d’étanchéité sur la sortie du surplomb de la
colonne de la douche.
Enfiler avec soin la pomme de la douche sur la sortie du
surplomb de la colonne de la douche.
1184491-2-A Français-16 Kohler Co.
Page 35

9. Installer la douchette
REMARQUE: Une installation de coude est optionnelle et permet de
draper le tuyau autour de la garniture du mitigeur. Le tuyau de la
douche peut également être installé directement sur la colonne de la
douche si souhaité.
Avec le joint installé, enfiler le coude sur le bas de la colonne de
la douche.
Avec le joint installé, enfiler l’extrémité du clapet de non retour
du tuyau de la douche sur le coude.
Positionner le support de la douchette et le coude à l’opposé de
l’un l’autre. Ceci permet de draper le tuyau autour de la garniture
du mitigeur.
Enfiler le tuyau à travers le support.
Avec la rondelle à grille installée, enfiler le tuyau sur la
douchette.
Placer la douchette dans le support.
Kohler Co. Français-17 1184491-2-A
Page 36

Poignée
Poignée
Poignée
Débit vers la
pomme de
douche
Débit vers la
douchette
Débit partiel
vers les
deux
10. Utilisation de la colonne de douche
REMARQUE: Si l’eau ne coule pas à travers la douchette ou le
tuyau de la douche, ce dernier n’a pas été installé correctement.
Pour rectifier, réinstaller le tuyau de la douche en s’assurant que
l’extrémité du tuyau qui comprend le clapet de non retour est
attachée sur le coude ou la colonne de la douche.
REMARQUE: Ce produit n’est pas destiné à arrêter le débit de
l’eau. Le positionnement de la poignée sur la gauche résulte en débit
partiel en provenance de la pomme de la douche et de la douchette.
Pour utiliser la pomme de la douche, tourner la poignée en
position vers le haut.
Pour utiliser la douchette, tourner la poignée en position vers le
bas.
11. Vérifier s’il y a des fuites
Ouvrir l’eau.
Tourner la poignée vers le haut et inspecter les connexions pour
s’assurer de l’absence de fuites.
Tourner la poignée vers le bas et inspecter les connexions pour
s’assurer de l’absence de fuites.
1184491-2-A Français-18 Kohler Co.
Page 37

Guía de instalación
Columna de ducha
Herramientas y materiales
3/8"
Destornillador
Phillips
Cinta selladora
Sellador 100%
de silicona
Antes de comenzar
NOTA: Esta guía sólo incluye la secuencia de instalación para la
columna de ducha. Instale válvula mezcladora, la guarnición de la
válvula mezcladora y el surtidor según las instrucciones del
fabricante.
AVISO: Riesgo de daños al producto. No aplique peso excesivo ni
fuerza hacia abajo a la columna de ducha.
PRECAUCIÓN: Riesgo de daños a la propiedad. Pueden
ocurrir fugas de agua si la tubería de suministro permite
movimiento. Asegúrese de que la tubería de suministro y la
conexión de codo de 1/2″-14 NPT se fijen con seguridad a los
refuerzos en la estructura de postes de madera.
Lea todas las instrucciones antes de comenzar.
Cumpla con todos los códigos locales de plomería y construcción.
Cierre el suministro de agua.
Revise las tuberías de suministro existentes y los materiales de
pared. Reemplace si es necesario.
1/2"
Kohler Co. Español-1 1184491-2-A
Page 38

Antes de comenzar (cont.)
La columna de ducha se provee con herrajes de sujetadores
mariposa para la instalación a una superficie de pared acabada.
La pared acabada debe tener un espesor mínimo de 5/8″ (16 mm)
y una resistencia adecuada. Se requieren dos sujetadores mariposa
por collarín de montaje.
¡IMPORTANTE! Si los sujetadores mariposa provistos no se usan
para instalar la columna de ducha:
Asegúrese de que los materiales de refuerzo de la pared de
resistencia adecuada y los refuerzos de los postes de madera se
coloquen correctamente detrás de la pared acabada.
Obtenga los herrajes correctos (no provistos) tomando en cuenta
el tipo de material de refuerzo de los postes de madera y el
grosor del collarín de montaje, la pared acabada, el soporte de la
pared y el refuerzo de los postes de madera.
Los herrajes deben ser resistentes a la corrosión y capaces de
soportar una carga de 300 lbs (136 kg) por herraje.
Se requieren un mínimo de dos herrajes por collarín de montaje.
Los herrajes de deben anclar bien en el refuerzo de postes de
madera para soportar adecuadamente el producto.
¡IMPORTANTE! Para instalaciones de conversión/remodelación:
Verifique que la mampara de ducha existente tenga el espacio
adecuado antes de continuar con la instalación de la columna de
ducha. Consulte el diagrama de instalación para la columna de
ducha y la cabeza de ducha de lluvia.
Verifique las distancia entre:
•
El techo y el centro del brazo de ducha existente en la superficie
de la pared acabada.
•
El piso de la ducha y el centro del brazo de ducha existente en la
superficie de la pared acabada. Asegúrese de que haya suficiente
espacio debajo de la cabeza de ducha de lluvia.
•
El centro del brazo de ducha existente y el centro de la
guarnición de la válvula mezcladora.
1184491-2-A Español-2 Kohler Co.
Page 39

Diagrama de instalación-Conexión suministro superior
Mida la distancia entre el codo de 1/2″-14 NPT y la superficie de
la pared acabada. La distancia debe estar entre 1-3/8″ (35 mm) y
2-7/8″ (73 mm). La conexión de la columna de ducha no sellará
correctamente si la distancia excede de 2-7/8″ (73 mm).
Kohler Co. Español-3 1184491-2-A
Page 40

K-45386
K-45209
Se
recomienda75"
(1905 mm),
72" (1829 mm)
mínimo
(Ilustrado)
(Sin cabeza de ducha ni ducha de mano)
9-1/2"
(241 mm)
27"
(686 mm)
6" (152 mm)
mínimo
21-15/16" (557 mm)
Material
de
refuerzo
K-45387
K-45210
Se
recomienda80"
(2032 mm),
75" (1905 mm)
mínimo
(Ilustrado)
(Sin cabeza de ducha ni ducha de mano)
3-3/4"
(95 mm)
27"
(686 mm)
6" (152 mm)
mínimo
Diagrama de instalación
21-15/16" (557 mm)
Material
de
refuerzo
1184491-2-A Español-4 Kohler Co.
Page 41

K-45388
K-45211
(Ilustrado)
(Sin cabeza de ducha ni ducha de mano)
21-15/16" (557 mm)
9-1/2"
(241 mm)
18"
(457 mm)
Se
recomienda75"
(1905 mm),
72" (1829 mm)
mínimo
K-45389
K-45212
Se
recomienda78"
(1981 mm),
75" (1905 mm)
mínimo
(Ilustrado)
(Sin cabeza de ducha ni ducha de mano)
6" (152 mm)
mínimo
3-3/4"
(95 mm)
18"
(457 mm)
6" (152 mm)
mínimo
Material
de
refuerzo
21-15/16" (557 mm)
Material
de
refuerzo
Diagrama de instalación
Kohler Co. Español-5 1184491-2-A
Page 42

Codo de 1/2"-14 NPT
Tubería de suministro
1. Instalación de conversión/remodelación
PRECAUCIÓN: Riesgo de daños a la propiedad. Pueden
ocurrir fugas de agua si la tubería de suministro permite
movimiento. Asegúrese de que la tubería de suministro y la
conexión de codo de 1/2″-14 NPT se fijen con seguridad a los
refuerzos en la estructura de postes de madera.
¡IMPORTANTE! Verifique que la mampara de ducha existente tenga
el espacio adecuado según se describe en la sección ″Antes de
comenzar″.
Retire la cabeza de ducha y el chapetón del brazo de ducha
existentes.
Con cuidado empuje el brazo de ducha existente hacia la
superficie de pared acabada.
Revise si hay movimiento hacia dentro de las tuberías de
suministro.
Si hay movimiento hacia dentro, fije con seguridad la tubería de
suministro a los refuerzos en los postes de madera antes de
comenzar la instalación de la columna de ducha.
Retire el brazo de ducha existente.
1184491-2-A Español-6 Kohler Co.
Page 43

Instalación de conversión/remodelación (cont.)
Mida el orificio del brazo de ducha existente. Asegúrese de que el
material de la pared acabada tenga un orificio para la conexión
del suministro superior de diámetro entre 1″ (25 mm) mínimo y
1-1/4″ (32 mm) máximo, y que el orificio esté centrado en la
salida de la conexión de codo de 1/2″-14 NPT. Repare las
superficies de la pared si el orificio existente para el brazo de
ducha no está centrado o excede de las dimensiones
recomendadas.
Kohler Co. Español-7 1184491-2-A
Page 44

Codo de
1/2"-14 NPT
1" (25 mm)
Mínimo –
1-1/4" (32 mm)
Máximo
Tubería de suministro
2. Instale el adaptador del suministro
Para instalaciones en construcciones nuevas
Codo de 1/2"-14 NPT
Adaptador de
suministro
Llave
hexagonal
de 3/8"
PRECAUCIÓN: Riesgo de daños a la propiedad. Pueden
ocurrir fugas de agua si la tubería de suministro permite
movimiento. Asegúrese de que la tubería de suministro y la
conexión de codo de 1/2″-14 NPT se fijen con seguridad a los
refuerzos en la estructura de postes de madera.
¡IMPORTANTE! Esta guía sólo incluye la secuencia de instalación
para la columna de ducha. Consulte las instrucciones de instalación
del fabricante de la válvula mezcladora, la guarnición de la válvula
mezcladora y el surtidor.
Haga las conexiones de la válvula mezcladora, la tubería de
suministro y el surtidor de la bañera adecuadas para su
instalación.
Consulte la sección ″Diagrama de instalación″ de esta guía para la
ubicación correcta de la conexión del codo de 1/2″-14 NPT dentro
de la pared.
1184491-2-A Español-8 Kohler Co.
Page 45

Instale el adaptador del suministro (cont.)
Asegúrese de que la tubería de suministro y la conexión de codo
de 1/2″-14 NPT queden fijadas con seguridad a la estructura de
postes de madera.
Asegúrese de que el material de la pared acabada tenga un
orificio para la conexión del suministro superior de diámetro
entre 1″ (25 mm) mínimo y 1-1/4″ (32 mm) máximo, y que el
orificio esté centrado en la salida de la conexión de codo de
1/2″-14 NPT.
Instale el material de acabado de la pared.
Instale la guarnición de la válvula mezcladora y el surtidor de
bañera según las instrucciones del fabricante.
Para instalaciones en construcciones nuevas y de conversión
Aplique cinta selladora de roscas a las roscas del adaptador de
suministro.
El adaptador de suministro tiene un casquillo hexagonal interno
de 3/8″. Enrosque el adaptador de suministro en el codo de
1/2″-14 NPT utilizando una llave hexagonal de 3/8″.
Kohler Co. Español-9 1184491-2-A
Page 46

Adaptador de
suministro
Collarín de
montaje
2" (51 mm)
K-45209, K-45210,
K-45386, K-45387
27" (686 mm)
K-45211, K-45212,
K-45388, K-45389
18" (457 mm)
Collarín de
montaje
3. Marque los lugares de los orificios de fijación
NOTA: El collarín de montaje superior debe quedar centrado en el
adaptador de suministro. La distancia entre los centros de los
collarines de montaje superior e inferior debe ser de 18″ (457 mm) ó
27″ (686 mm) dependiendo de la longitud de su columna de ducha.
Centre el collarín de montaje en el adaptador de suministro.
Marque los orificios de fijación izquierdo y derecho.
Sólo para K-45209/K-45210/K-45386/K-45387: A partir del centro
del adaptador de suministro, mida hacia abajo 27″ (686 mm) y
marque la medida horizontal con un lápiz.
Sólo para K-45211/K-45212/K-45388/K-45389: A partir del centro
del adaptador de suministro, mida hacia abajo 18″ (457 mm) y
marque la medida horizontal con un lápiz.
Centre el collarín de montaje en la línea horizontal. Mida y
marque los orificios de fijación izquierdo y derecho. Asegúrese de
que los lugares de los orificios de fijación superior e inferior estén
a nivel y a plomo uno con el otro.
No taladre los orificios de fijación hasta que se le indique.
1184491-2-A Español-10 Kohler Co.
Page 47

4. Instale en seco la columna de ducha
Encaje una manga de guarnición en cada collarín de montaje.
Verifique que un arosello esté instalado en cada chapetón.
Con cuidado deslice un chapetón en el montaje de conexión
superior.
Enrosque un collarín de montaje en el montaje de conexión
superior.
Repita estos pasos para el collarín de montaje inferior y el
chapetón.
Deslice con cuidado la columna de ducha en el adaptador de
suministro.
Asegúrese de que el collarín de montaje inferior esté apretado
contra la pared acabada.
Continúe en la sección ″Aplome la columna de ducha″.
Kohler Co. Español-11 1184491-2-A
Page 48

Ajuste hasta
nivelar.
Verifique que los
orificios de fijación
estén alineados
con los lugares
marcados.
5. Aplome la columna de ducha
Con un nivel, revise la posición de la columna de ducha para
asegurar que esté a plomo.
El collarín de montaje superior es ajustable para tomar en cuenta
el nivel y el descentrado de la superficie de la pared. Gire el
collarín de montaje hasta que la columna de ducha quede
aplomo.
Verifique que la ranuras del collarín de montaje se alineen con las
marcas de lápiz en la pared acabada. Haga los ajustes necesarios.
Retire la columna de ducha del adaptador de suministro.
1184491-2-A Español-12 Kohler Co.
Page 49

Taladre orificios
de 1/2" (13 mm)
en cada lugar
marcado.
1-7/8"
(48 mm)
6. Instale con anclajes
¡IMPORTANTE! Si los sujetadores mariposa provistos no se usan,
consulte la sección ″Antes de comenzar″ para los requisitos de los
herrajes.
NOTA: La instalación de los anclajes requiere un espacio libre
mínimo detrás de la pared de 1-7/8″ (48 mm). La pared acabada
debe tener un espesor mínimo de 5/8″ (16 mm) y una resistencia
adecuada.
Instale los anclajes
Taladre dos orificios de 1/2″ (13 mm) de diámetro para cada
collarín de montaje en los lugares marcados con lápiz en la pared
acabada.
Sostenga el canal de metal del anclaje plano a lo largo de las tiras
de plástico y deslice el canal a través de los orificios taladrados.
Vuelva a alinear las manijas de las tiras para enderezar el canal
detrás de la pared.
Kohler Co. Español-13 1184491-2-A
Page 50

Instale con anclajes (cont.)
Con una mano, jale las asas hacia afuera de manera recta (no jale
en ángulo) para que el canal de metal descanse al ras detrás de la
pared.
Con la otra mano, deslice el clip a los largo de las tiras hasta que
el reborde del clip esté al ras con la pared.
Coloque su dedo pulgar entre las tiras plásticas. Mueva hacia
arriba y hacia abajo las tiras hasta que se desprendan en la pared.
Alinee el collarín de montaje con los clips de anclaje.
Inserte el perno a través del collarín de montaje y apriete hasta
que esté al ras con la pared.
1184491-2-A Español-14 Kohler Co.
Page 51

Aplique
sellador de
silicona.
7. Fije la columna de ducha
Vuelva a instalar la columna de ducha al adaptador de
suministro.
Fije la columna de ducha con los cuatro herrajes.
Aplique una tira de sellador de silicona al filo posterior de cada
chapetón.
Deslice los chapetones sobre los collarines de montaje y presione
los chapetones apretados contra la pared acabada.
Limpie el exceso de sellador de silicona de los chapetones y la
pared acabada.
Kohler Co. Español-15 1184491-2-A
Page 52

Voladizo de la columna de ducha
Aplique cinta selladora.
8. Instale la cabeza de ducha
PRECAUCIÓN: Riesgo de daños al producto. Puede ocurrir daño al
producto si el voladizo de la columna de ducha no se soporta con
cuidado durante la instalación de la cabeza de ducha. No aplique
peso excesivo ni fuerza al voladizo de la columna de ducha.
Aplique cinta selladora a la salida del voladizo de la columna de
ducha.
Con cuidado enrosque la cabeza de ducha a la salida del voladizo
de la columna de ducha.
1184491-2-A Español-16 Kohler Co.
Page 53

9. Instale la ducha de mano
NOTA: La instalación del codo es opcional y permite que la
manguera cuelgue alrededor de la guarnición de la válvula
mezcladora. La manguera de la ducha también se puede instalar
directamente a la columna de ducha, si lo desea.
Con el empaque instalado, enrosque el codo en la parte inferior
de la columna de ducha.
Con el empaque instalado, enrosque el extremo de la válvula de
retención de la manguera de ducha al codo.
Coloque el soporte portador de la ducha de mano y el codo
opuestos uno al otro. Esto permite que la manguera cuelgue
alrededor de la guarnición de la válvula mezcladora.
Enrosque la manguera a través del soporte portador.
Con la arandela de rejilla instalada, enrosque la manguera a la
ducha de mano.
Coloque la ducha de mano en el soporte portador.
Kohler Co. Español-17 1184491-2-A
Page 54

Manija
Manija
Manija
Flujo a la
cabeza de
ducha
Flujo a la
ducha de
mano
Flujo parcial
a ambas
10. Uso de la columna de ducha
NOTA: Si no fluye agua a través de la ducha de mano a de la
manguera de ducha, la manguera de ducha se instaló
incorrectamente. Para corregir, vuelva a instalar la manguera de
ducha asegurándose de que el extremo de manguera que tiene la
válvula de retención quede conectada al codooalacolumna de
ducha.
NOTA: Este producto no está diseñado para parar el flujo de agua.
El colocar la manija hacia la izquierda resultará en un flujo parcial
de ambas la cabeza de ducha y la ducha de mano.
Para usar la cabeza de ducha, gire la manija a la posición hacia
arriba.
Para usar la ducha de mano, gire la manija a la posición hacia
abajo.
11. Verifique que no haya fugas
Abra el agua.
Gire la manija hacia arriba y verifique que las conexiones no
presenten fugas.
Gire la manija hacia abajo y verifique que las conexiones no
presenten fugas.
1184491-2-A Español-18 Kohler Co.
Page 55

1184491-2-A
Page 56

USA/Canada: 1-800-4KOHLER
México: 001-800-456-4537
kohler.com
©2011 Kohler Co.
1184491-2-A
 Loading...