

Page 1

Installation Guide
Wall-Mount Lavatory Valve
K-410
M product numbers are for Mexico (i.e. K-12345M)
Los números de productos seguidos de
M corresponden a México (Ej.
K-12345M)
Français, page “Français-1”
Español, página “Español-1”
1015916-2-E
Page 2

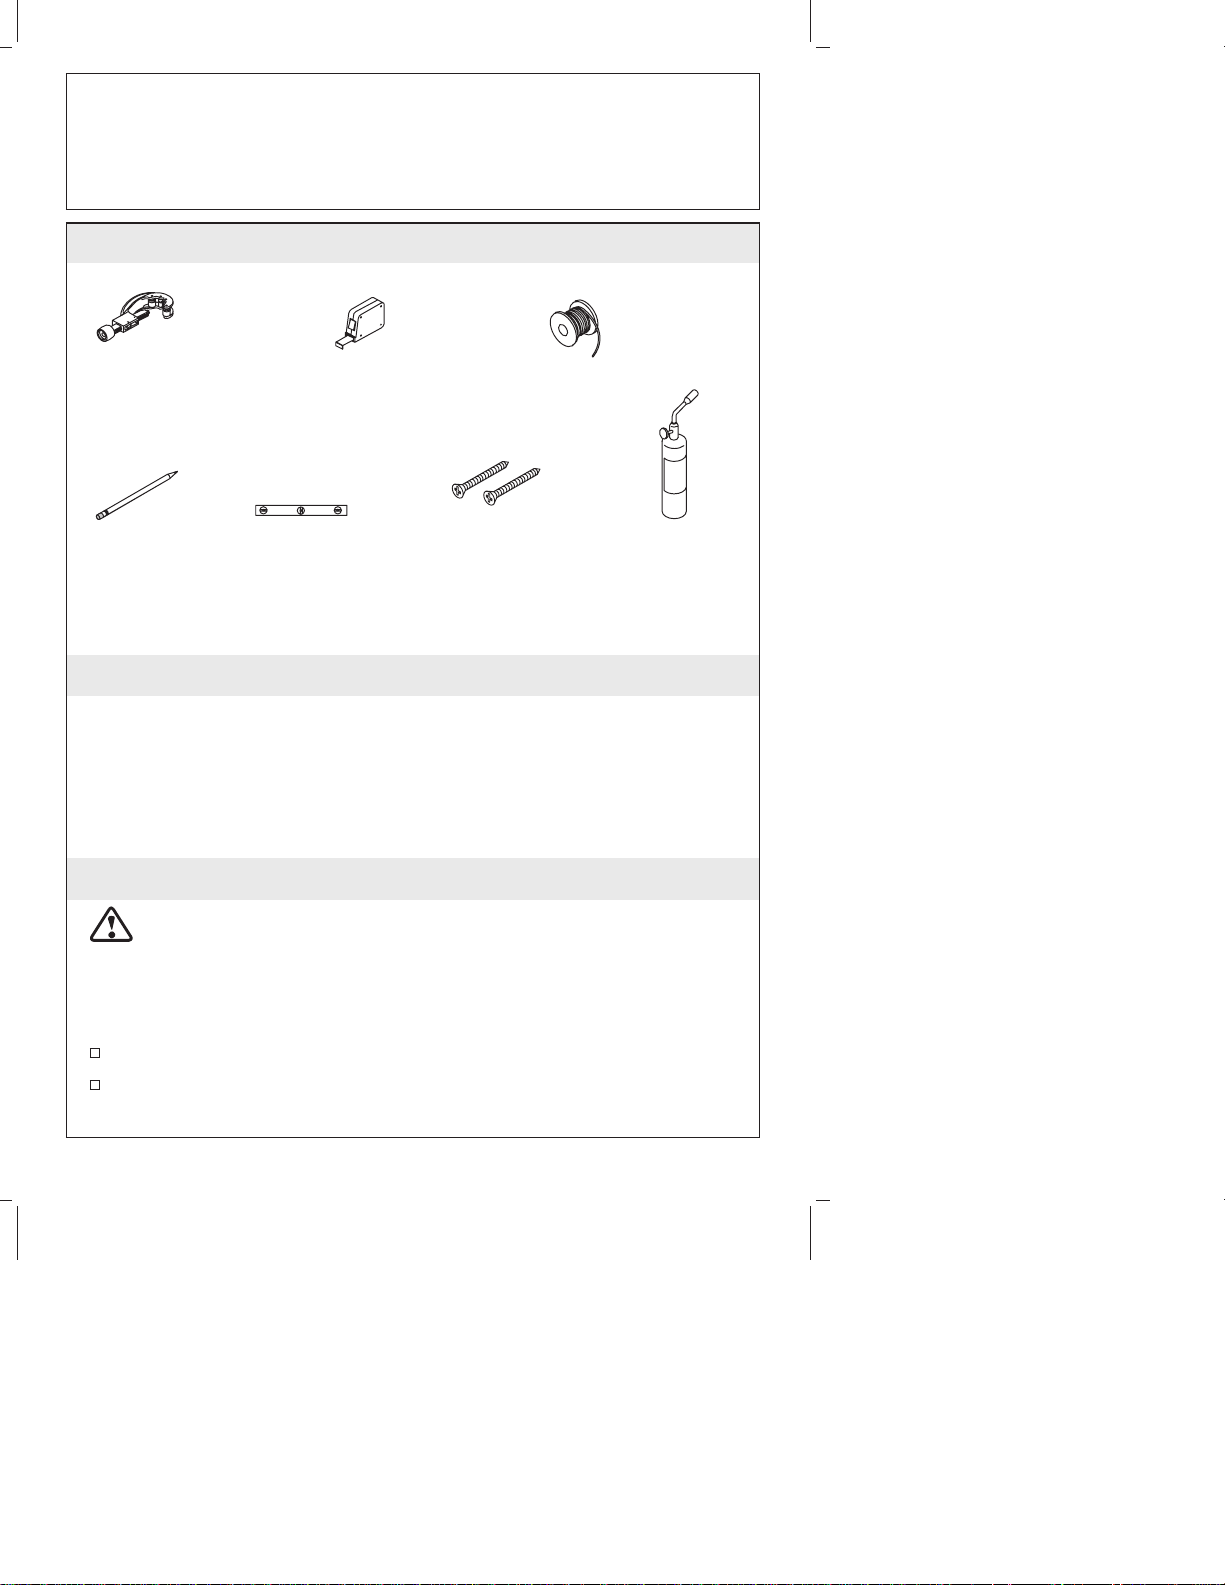
Tools and Materials
Level
Tape
Measure
#10 x 1"
Woodscrews
Solder
Propane
Torch
Tube Cutter
Pencil
Thank You For Choosing Kohler Company
We appreciate your commitment to Kohler quality. Please take a few
minutes to review this manual before you start installation. If you
encounter any installation or performance problems, please don’t
hesitate to contact us. Our phone numbers and website are listed on
the back cover. Thanks again for choosing Kohler Company.
Before You Begin
CAUTION: Risk of property damage. Do not use plumbers
putty on marble or plastic, as it may stain the surface.
NOTE: Follow the installation dimensions precisely as there is no
deep rough-in kit available for this product.
Shut off the main water supply.
Observe all local plumbing and building codes.
Give special consideration to the exact location desired for your
faucet. This product is designed to give you the opportunity to be
creative and flexible with the installation.
Site preparation and wall finishing may require additional tools
and materials.
Kohler Co. reserves the right to make revisions in the design of
faucets without notice, as specified in the Price Book.
1015916-2-E 2 Kohler Co.
Page 3
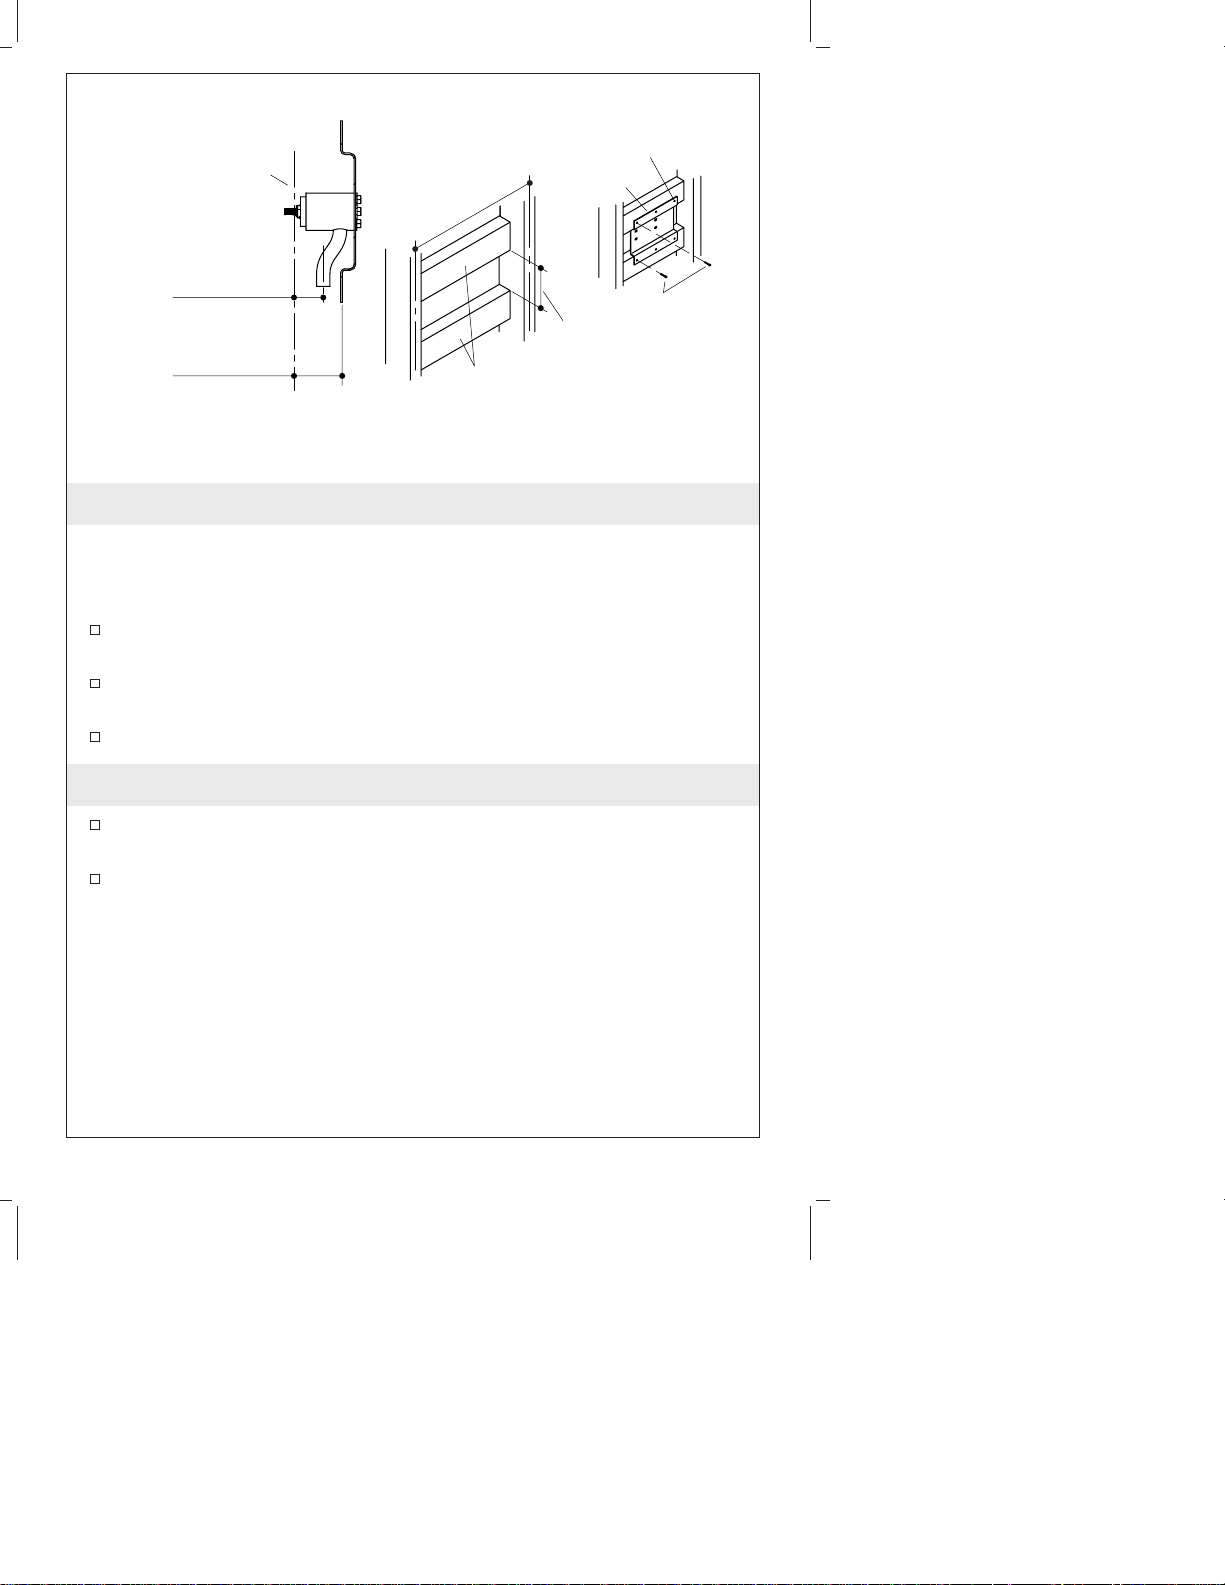
Six Round Holes
(Typical)
Finished Wall
1-3/8" (3.5 cm) Min.
2-5/8" (6.7 cm) Max.
2-1/4" (5.7 cm) Min.
3-1/2" (8.9 cm) Max.
16"
(40.6 cm)
2x4 Stud
Framing
Wall Plate
Screws
5-5/8"
(14.3 cm)
1. Prepare the Site
NOTE: The wall plate requires special framing and support
considerations. Pay special attention to minimum and maximum
faucet height recommendations noted in the roughing-in sheet.
Refer to the roughing-in dimensions for additional mounting
information.
A suggested framing example is shown. Each installation may
have different framing requirements than those shown.
Construct the framing for your installation.
2. Attach the Wall Plate
Loosely attach the wall plate to the stud framing with six #10 x 1″
panhead wood screws (not provided).
Verify that the installation is correct and level and firmly secure
the wall plate to the studs.
Kohler Co. 3 1015916-2-E
Page 4

Spout
Shank
1/2" Hot
Supply
Plaster
Guards
1/2" Cold
Supply
Finished
Wall
3. Install the Supplies
Install 1/2″ hot and cold supply piping to the mixer valve.
Temporarily pull the plaster guards from the handle and spout
shanks. Do not discard them at this time.
Position a bucket in front of the spout shank, and turn on the
water supplies to the mixer valve.
Slowly open the mixer valve stems, and allow the hot and cold
water to flow from the spout shank for about a minute.
Close the valve, and carefully inspect all connections for leakage.
Repair if necessary.
Turn off the water supplies. Open the valve stems to relieve the
water pressure.
Reattach the plaster guards to the handle and spout shanks.
4. Finish the Wall
NOTE: To ensure proper fit and appearance, do not oversize the
spout and handle shank holes.
Complete the finished wall with three 1-1/2″ (3.8 cm) diameter
holes for the spout and handle shanks. Space the hole centers 4″
(10.2 cm) apart.
Remove and discard the plaster guards when the finished wall is
complete.
1015916-2-E 4 Kohler Co.
Page 5
Guide d’installation
Valve de lavabo à montage mural
Outils et matériels
Coupe tubes
Mètre ruban
Fer à
souder
Crayon
Niveau à
bulle
Vis à bois
#10x1"
Chalumeau
à propane
Merci d’avoir choisi la compagnie Kohler
Nous apprécions votre engagement envers la qualité Kohler. Veuillez
prendre s’il vous plaît quelques minutes pour lire ce manuel avant de
commencer l’installation. Ne pas hésiter à nous contacter en cas de
problème d’installation ou de fonctionnement. Nos numéros de
téléphone et notre adresse du site internet sont au verso. Merci encore
d’avoir choisi la compagnie Kohler.
Avant de commencer
ATTENTION : Risque d’endommagement du matériel. Ne pas
utiliser de mastic d’étanchéité sur le marbre ou le plastique, sous
peine de tacher le matériau.
REMARQUE : Respecter avec précision les dimensions d’installation
sachant qu’il n’y a pas de kit de raccordement pour ce produit.
Couper l’alimentation d’eau principale.
Respecter tous les codes de plomberie et de bâtiment locaux.
Kohler Co. Français-1 1015916-2-E
Page 6

Avant de commencer (cont.)
Prêter une attention particulière à l’emplacement précis désiré du
robinet. Ce produit est conçu de manière à offrir au
consommateur une opportunité de créativité et flexibilité
d’installation.
Des matériaux additionnels pourraient être nécessaires pour la
préparation du site et la finition du mur.
Kohler Co. se réserve le droit d’apporter toutes modifications au
design des robinets et ceci sans préavis, comme spécifié dans le
catalogue des prix.
1015916-2-E Français-2 Kohler Co.
Page 7

Mur fini
16"
(40,6 cm)
Six orifices
arrondis (Typique)
Plaque
murale
1-3/8" (3,5 cm) Min.
2-5/8" (6,7 cm) Max.
2-1/4" (5,7 cm) Min.
3-1/2" (8,9 cm) Max.
5-5/8"
(14,3 cm)
Cadrage du
montant de 2x4
Vis
1. Préparer le site
REMARQUE : L’applique murale requiert un cadrage spécial et des
considérations de support. Prêter une attention particulière aux
recommandations de hauteur minimale et maximale du robinet
mentionnées dans les dimensions de raccordement.
Se référer aux dimensions du plan de raccordement pour les
informations dimensionnelles.
La structure est illustrée à titre d’exemple. Votre installation
pourrait nécessiter une structure différente de celle illustrée.
Construire le cadrage pour votre installation.
2. Installer l’applique murale
Fixer sans serrer l’applique murale au montant avec six vis à tête
cylindrique bombée #10 x 1″ (non fournies).
S’assurer que l’installation soit correcte et nivelée puis sécuriser
fermement l’applique murale aux montants.
Kohler Co. Français-3 1015916-2-E
Page 8

Manche
du bec
Mur fini
Renforts
de plâtre
Alimentation
d'eau chaude
de 1/2" (1,3 cm)
Alimentation
d'eau froide de
1/2" (1,3 cm)
3. Installer les alimentations
Installer la tuyauterie d’alimentation d’eau chaude et froide de
1/2″ au mitigeur.
Retirer provisoirement les renforts de plâtre des tiges, des
poignées, et des manches du bec. Ne pas les jeter à ce moment.
Placer un seau devant le manche du bec et ouvrir les
alimentations d’eau du mitigeur.
Ouvrir doucement les tiges du mitigeur et laisser couler l’eau
chaude et l’eau froide de la tige du bec pendant environ une
minute.
Fermer la valve et vérifier s’il y a des fuites dans les connexions.
Réparer si nécessaire.
Fermer les alimentations d’eau. Ouvrir les tiges de la valve pour
libérer la pression d’eau.
Réinstaller les renforts de plâtre aux tiges de poignée et du bec.
4. Finir le mur
REMARQUE : Pour assurez le bon positionnement et la finition de
l’ensemble, ne pas surdimensionner les orifices destinés aux valves
et au bec.
Compléter le mur fini avec trois orifices de Ø1-1/2″ (3,8 cm) pour
y passer le bec et les tiges de poignée. Écarter le centre des
orifices de 4″ (10,2 cm) les uns des autres.
1015916-2-E Français-4 Kohler Co.
Page 9

Finir le mur (cont.)
Retirer et jeter les renforts de plâtre après avoir terminé le mur.
Kohler Co. Français-5 1015916-2-E
Page 10

Guía de instalación
Válvula mural de lavabo
Herramientas y materiales
Nivel
Cinta
métrica
Tornillos para
madera del
nº 10 x 1"
Soldadura
Soplete de
propano
Cortatubos
Lápiz
Gracias por elegir los productos de Kohler
Apreciamos su elección por la calidad de Kohler. Dedique unos
minutos para leer este manual antes de comenzar la instalación. En
caso de problemas de instalación o de funcionamiento, no dude en
contactarnos. Nuestros números de teléfono y nuestra página web se
encuentran en la última página. Gracias nuevamente por escoger a
Kohler.
Antes de comenzar
PRECAUCIÓN: Riesgo de daños a la propiedad. No utilice
masilla en superficies de mármol o plástico, pues puede producir
manchas.
NOTA: Siga las dimensiones de instalación con precisión, pues no
hay ningún juego de instalación profunda disponible para este
producto.
Cierre el suministro principal de agua.
Kohler Co. Español-1 1015916-2-E
Page 11

Antes de comenzar (cont.)
Cumpla con todos los códigos locales de plomería y de
construcción.
Preste especial atención al lugar deseado para la instalación de la
grifería. Este producto le permite ser creativo y flexible con la
instalación.
La preparación de la instalación y el acabado de la pared pueden
requerir herramientas y materiales adicionales.
La empresa Kohler se reserva el derecho de modificar el diseño
de la grifería sin previo aviso, tal como se especifica en la lista de
precios.
Kohler Co. Español-2 1015916-2-E
Page 12

Pared
acabada
16"
(40,6 cm)
Seis orificios
(típico)
Placa
mural
1-3/8" (3,5 cm) Mín.
2-5/8" (6,7 cm) Máx.
2-1/4" (5,7 cm) Mín.
3-1/2" (8,9 cm) Máx.
Estructura de
postes de 2x4
Tornillos
5-5/8"
(14,3 cm)
1. Preparación de la instalación
NOTA: La placa mural requiere una estructura y soporte especiales.
Preste especial atención a las recomendaciones sobre la altura
mínima y máxima de la grifería indicadas en la hoja con el
diagrama de instalación.
Consulte el diagrama de instalación para más información sobre
el montaje.
Se ha ilustrado un ejemplo de la estructura aconsejada. Cada
instalación puede tener requisitos distintos a los ilustrados.
Construya la estructura para su instalación.
2. Monte la placa mural
Monte la placa mural a la estructura de postes sin fijar con seis
tornillos para madera de cabeza redonda del n° 10 x 1″ (no
incluidos).
Verifique que la instalación sea correcta y esté nivelada, y luego
fije bien la placa mural a los postes.
1015916-2-E Español-3 Kohler Co.
Page 13

Vástago
del surtidor
Suministro de
agua caliente
de 1/2"
Protectores
de yeso
Suministro de
agua fría de 1/2"
Pared
acabada
3. Instale los suministros
Instale las tuberías de suministro del agua fría y caliente de 1/2″
en la válvula mezcladora.
Retire provisionalmente los protectores de yeso de los vástagos
del surtidor y la manija. No los deseche en este momento.
Coloque un balde frente al vástago del surtidor y abra los
suministros de agua en la válvula mezcladora.
Abra lentamente la espigas de la válvula mezcladora y deje correr
agua fría y caliente por el vástago del surtidor durante un
minuto.
Cierre la válvula y verifique que no haya fugas en las conexiones.
Repare de ser necesario.
Cierre los suministros de agua. Abra las espigas de la válvula
para aliviar la presión de agua.
Vuelva a montar los protectores de yeso en los vástagos del
surtidor y de la manija.
4. Acabe la pared
NOTA: Para asegurar un buen ajuste y apariencia, no perfore
orificios demasiado grandes para el vástago del surtidor y las
manijas.
Kohler Co. Español-4 1015916-2-E
Page 14
Acabe la pared (cont.)
Termine la pared acabada con tres orificios de 1-1/2″ (3,8 cm) de
diámetro para los vástagos del surtidor y las manijas. Coloque los
centros de los orificios a 4″ (10,2 cm) de distancia.
Retire y deseche los protectores de yeso una vez terminada la
pared.
1015916-2-E Español-5 Kohler Co.
Page 15

1015916-2-E
Page 16

USA: 1-800-4-KOHLER
Canada: 1-800-964-5590
México: 001-877-680-1310
kohler.com
©2004 Kohler Co.
1015916-2-E
 Loading...