

Page 1
Installation Guide
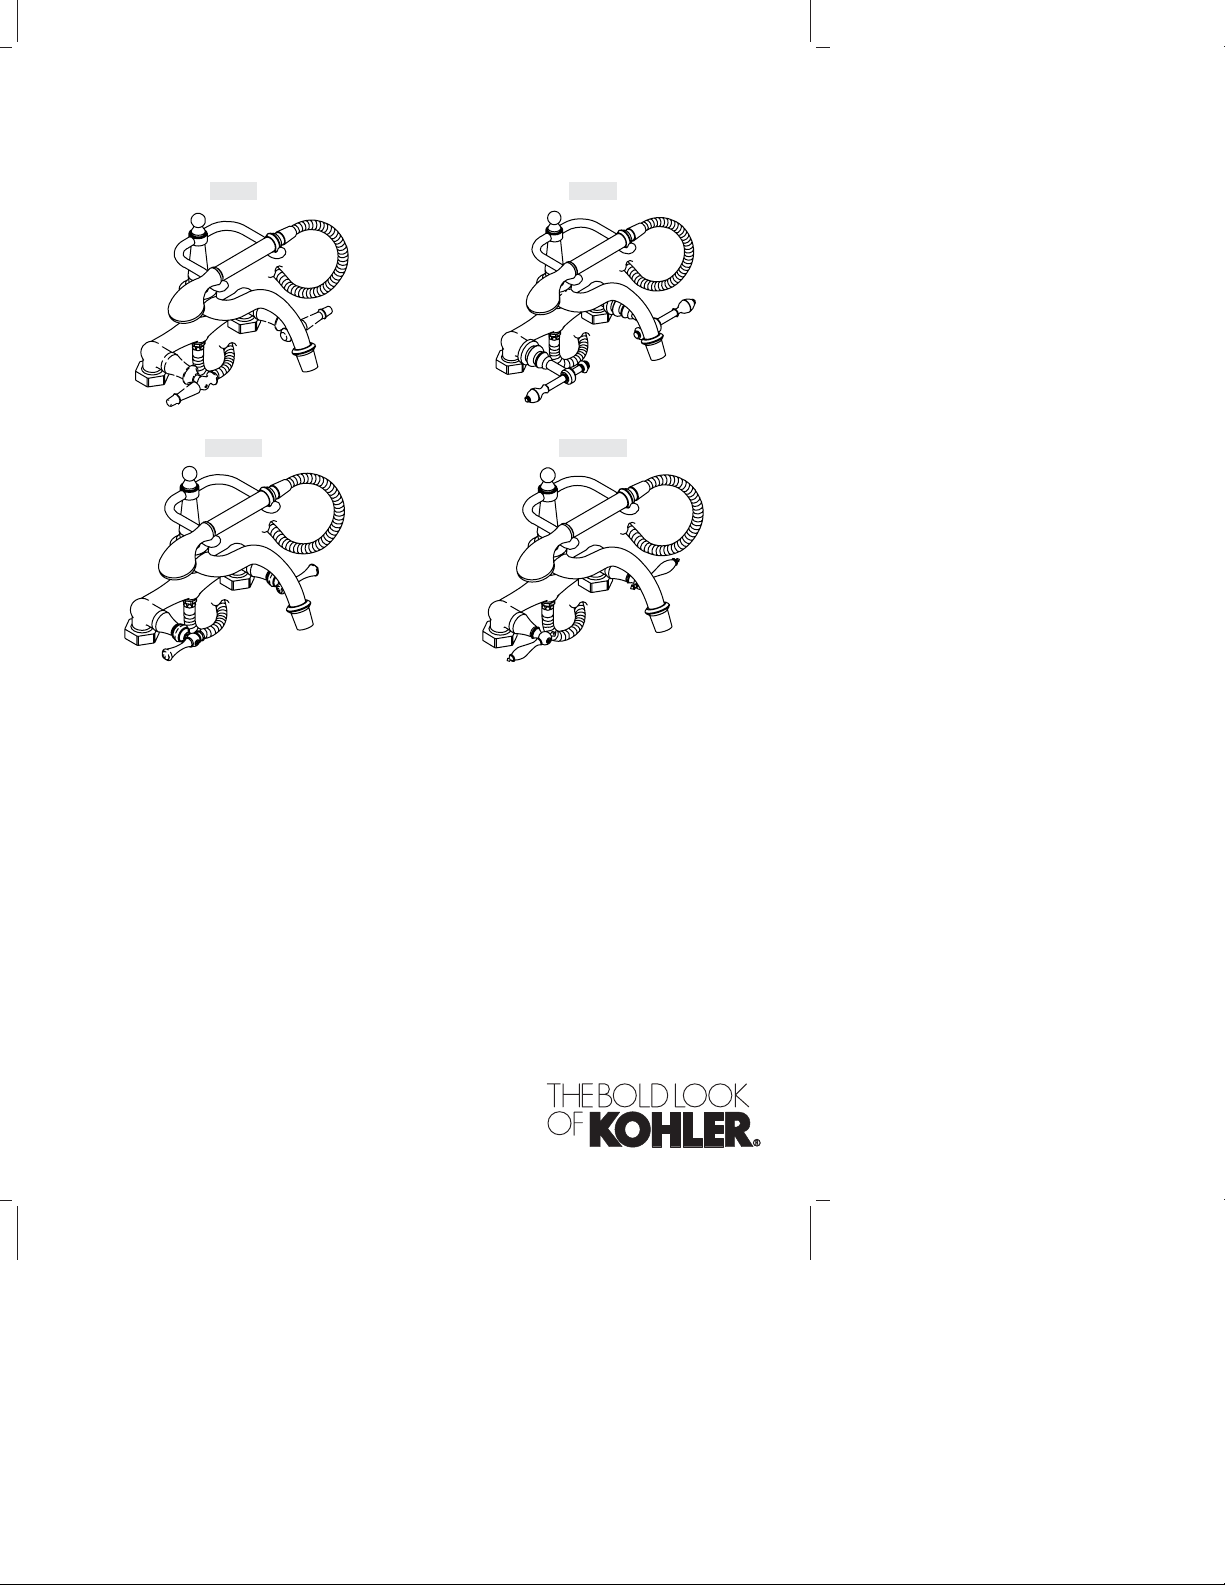
Deck/Wall-Mount Bath Faucet
K-110 K-331
K-6905 K-16210
M product numbers are for Mexico (i.e. K-12345M)
Los números de productos seguidos de
M corresponden a México (Ej.
K-12345M)
Français, page “Français-1”
Español, página “Español-1”
1008209-2-G
Page 2

Tools and Materials
Level
Thread
Sealant
Drill and
Bits
Strap
Wrench
Propane
Torch
Solder
Plus:
• Adjustable Arc Pliers
• 1/2" Piping
• Threaded 1/2" Adapters
• 1/2" Union Elbows
• Bath Shower Ells
• K-6525 Wall-Mount Bracket
Assorted
Screwdrivers
Adjustable
Wrench
Assorted Hex
Wrenches
Before You Begin
WARNING: Risk of personal injury. This product is not
designed or intended for use as a grab or support bar. Do not
install in a location where this product may be inadvertently
used as a grab or support bar.
Please read all instructions before you begin.
Observe all local plumbing and building codes.
Shut off the main water supply.
Inspect the waste and supply tubing and replace as needed.
Install or relocate the supplies as necessary to conform to the
roughing-in dimensions.
This faucet can be installed in freestanding, deck-mount or wall
mount configurations. Follow only the instructions that apply to
your installation.
An optional wall-mount bracket is available to adapt the
handshower to a stationary location.
Kohler Co. reserves the right to make revisions in the design of
faucets without notice, as specified in the Price Book.
1008209-2-G 2 Kohler Co.
Page 3
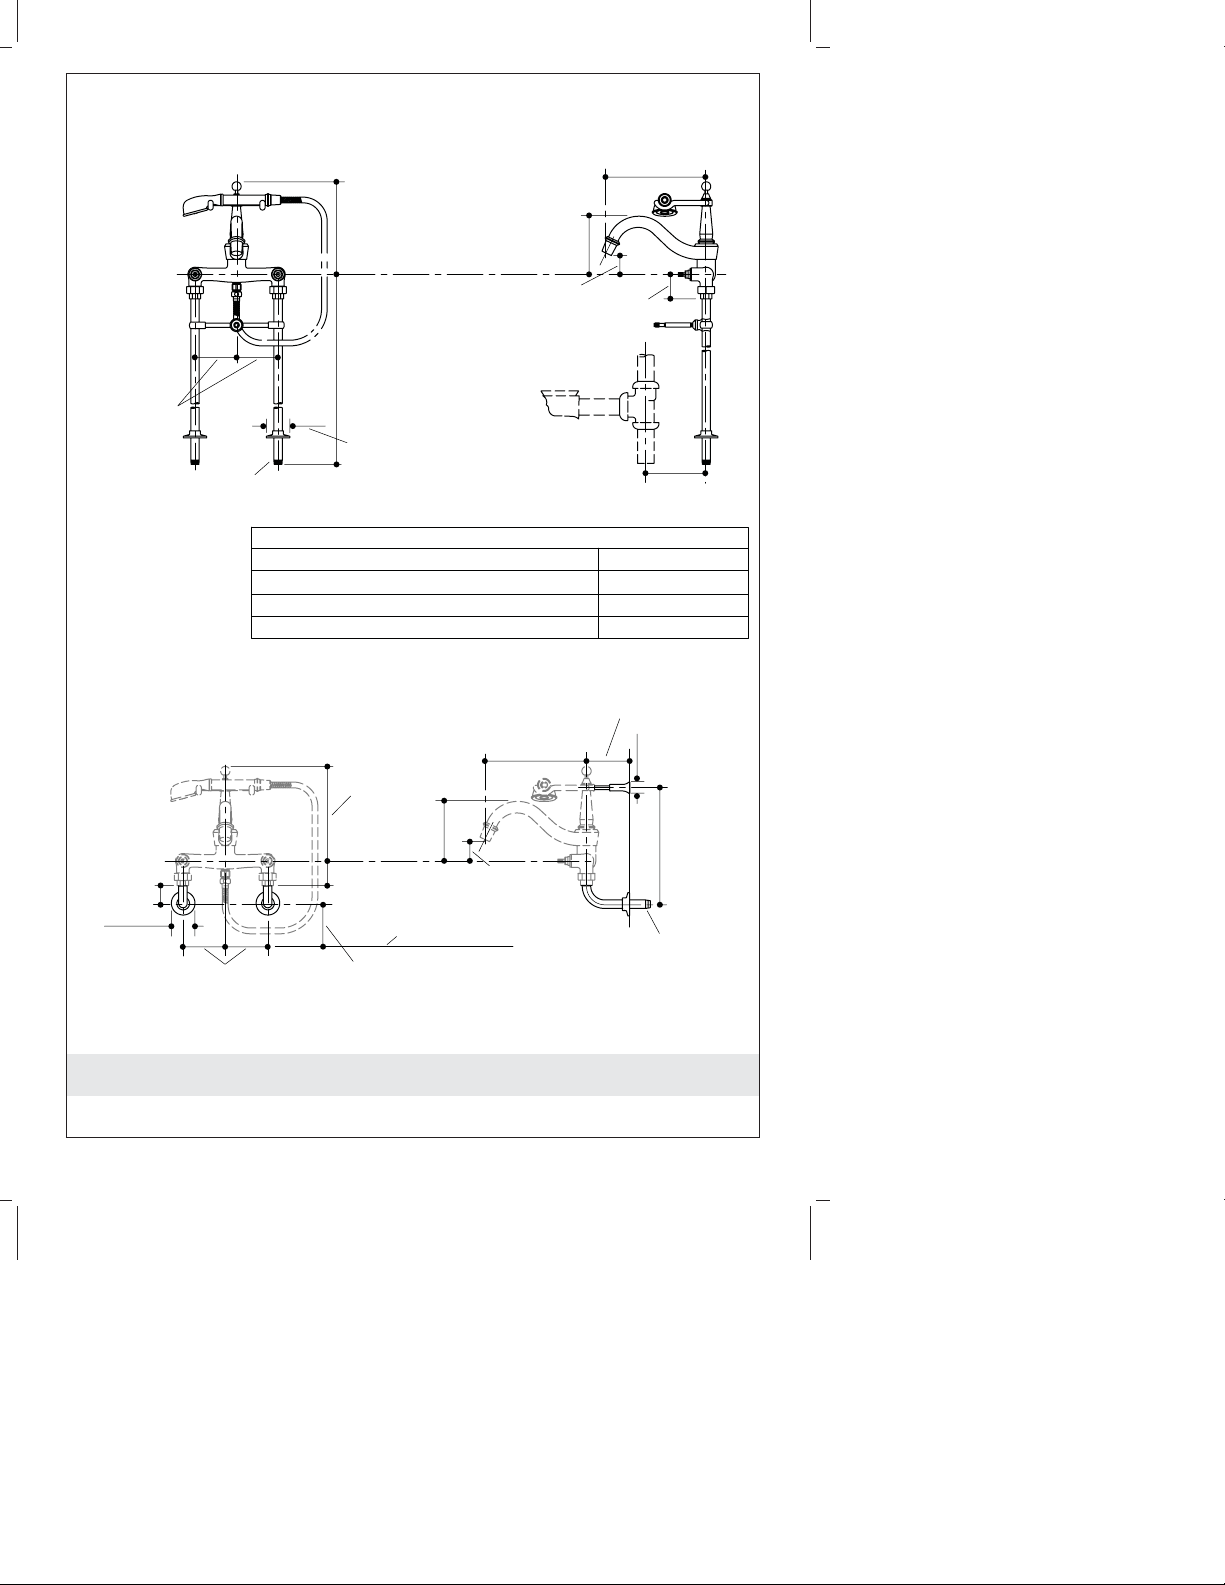
Roughing-In DimensionsFree-Standing and Deck-Mount
9-5/8"
(24.4 cm)
4"
(10.2 cm)
1/2"
NPT
Bath drain to faucet
Bath Models
K-100
K-700, K-702
K-710, K-711, K-712, K-726, K-727
Roughing-In DimensionsWall-Mount Kit
8-15/16"
(22.7 cm) D.
K-126, K-127
27-7/8"
(70.8 cm)
K-128
31-1/2"
(80 cm)
2-1/4"
(5.7 cm) D.
8-15/16"
(22.7 cm)
5-5/8"
(14.3 cm)
1-13/16"
(4.6 cm)
9-5/8"
(24.4 cm)
2-3/8"
(6 cm)
X
X
5-7/8" (14.9 cm)
6-3/8" (16.2 cm)
4-3/8" (11.1 cm)
3" (7.6 cm) Min
4-1/4" (10.8 cm) Max
1-1/8"
(2.9 cm) D.
2-7/16"
(6.2 cm)
2-1/4"
(5.7 cm) D.
4"
(10.2 cm)
5-5/8"
(14.3 cm)
2-3/8"
(6 cm)
Top of Rim
4"
(10.2 cm) Min
1-13/16"
(4.6 cm)
K-101
11-3/8"
(28.9 cm)
1/2"
NPT
Roughing-In
Kohler Co. 3 1008209-2-G
Page 4
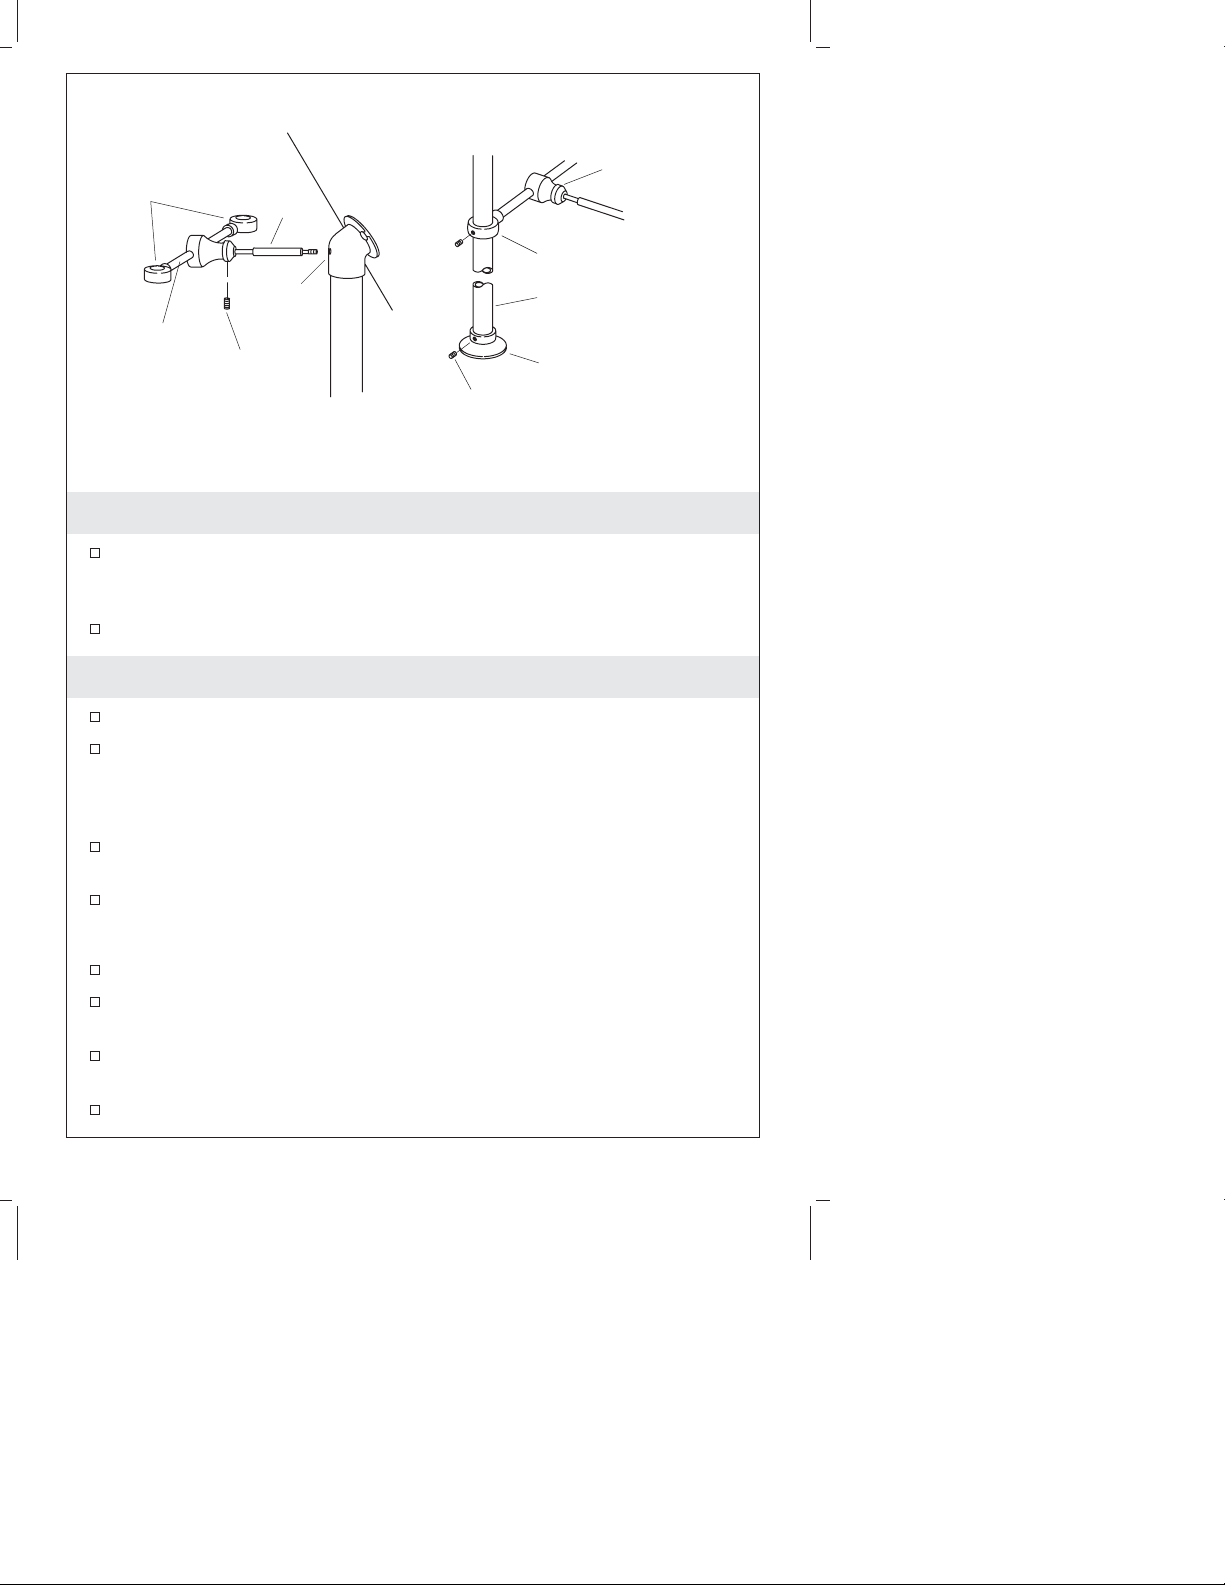
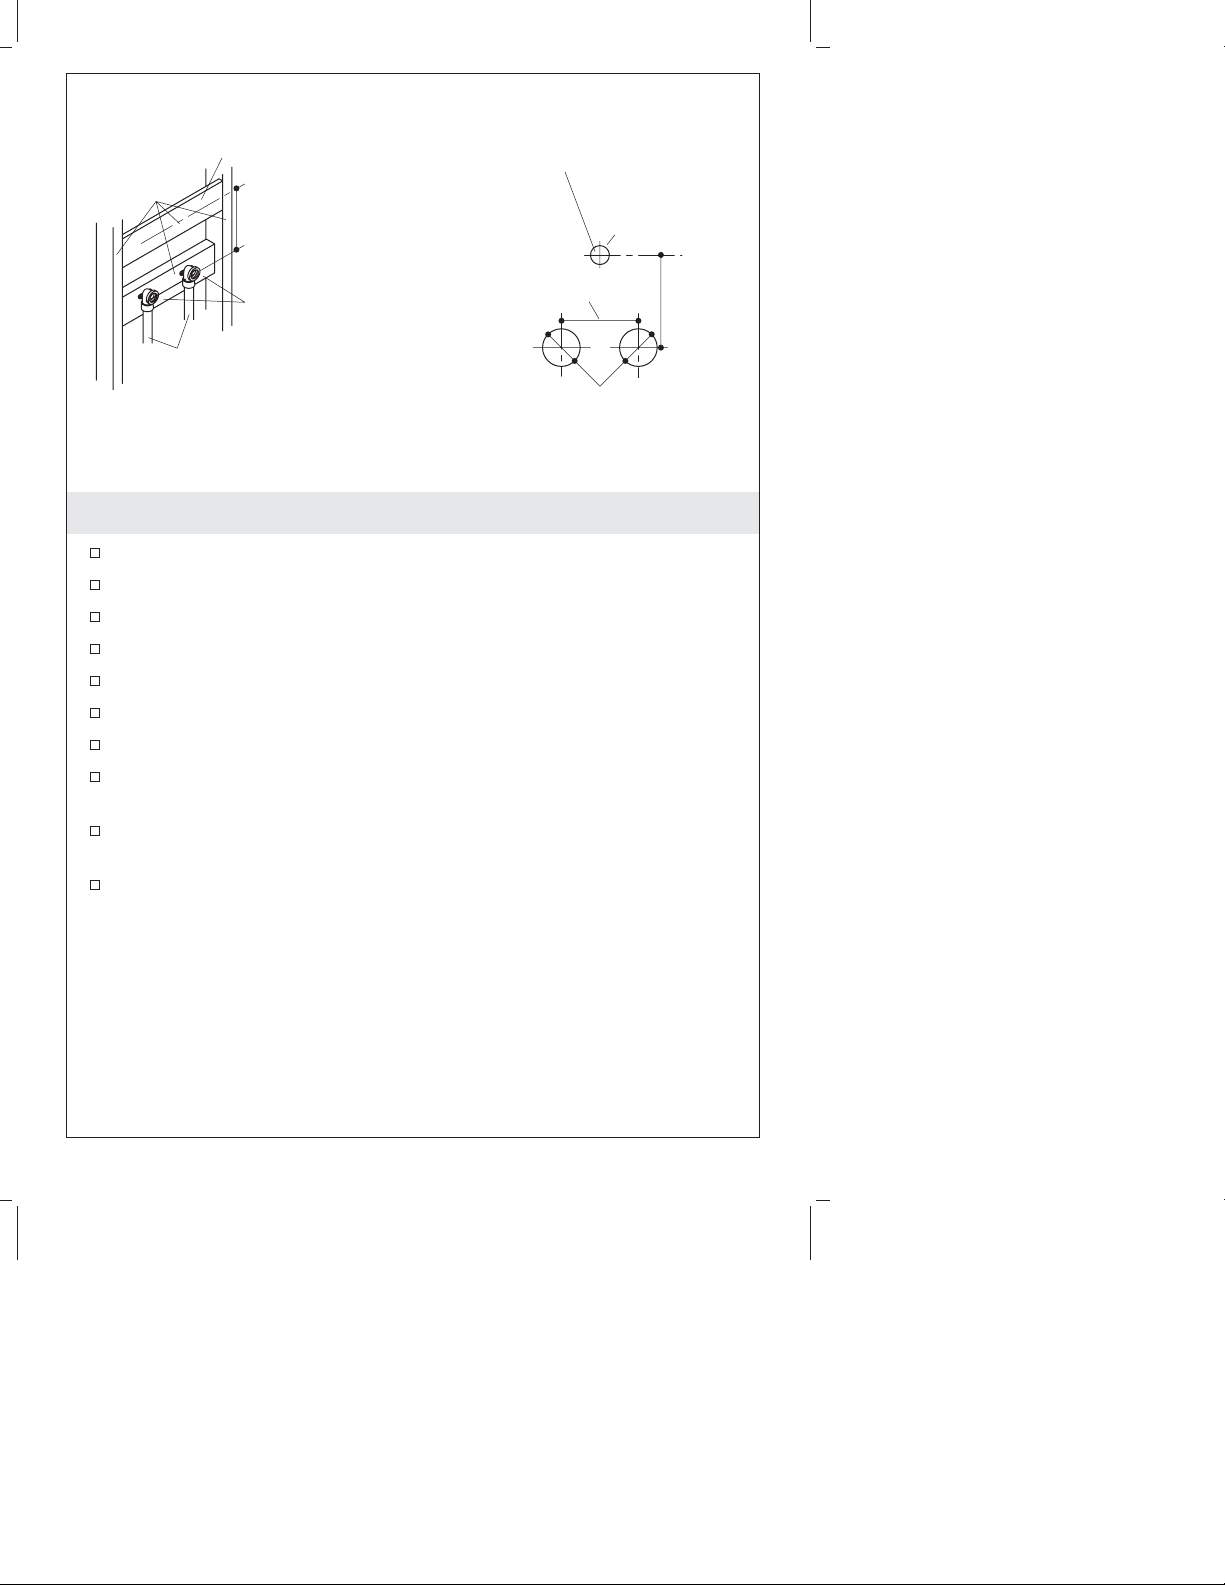
Pipe
Holder
Tee Bracket
Rod
Pipe
Holder
Plated Supply Pipe
Flange
Tee
Bracket
Overflow
Elbow
Setscrew
Setscrew
1. Prepare the Site
If not already installed, install or relocate the water supplies as
needed to conform to the roughing-in dimensions for your
particular installation.
Use thread sealant on all the threaded connections.
2. Freestanding Supply Installation
Remove the temporary plugs from the water supply couplings.
Replace the long rod with the short rod for Kohler models
K-710, K-711, K-712, K-726 and K-727. To determine the bath to
drain faucet measurement for your model bath refer to the
″Roughing-In″ section of this manual.
Thread the tee bracket into the hole in the back of the overflow
elbow.
Insert the rod into the tee bracket and secure with the setscrew.
Install the Supply Tubes
Loosen the setscrews in the pipe holder and flange.
Carefully slide the plated supply pipe through the pipe holder
and flange.
Thread the supply pipe into the supply rough-in and tighten it
with a strap wrench.
Tighten the setscrews in the pipe holder and flange.
1008209-2-G 4 Kohler Co.
Page 5

Freestanding Supply Installation (cont.)
Repeat for the second supply tube.
Kohler Co. 5 1008209-2-G
Page 6
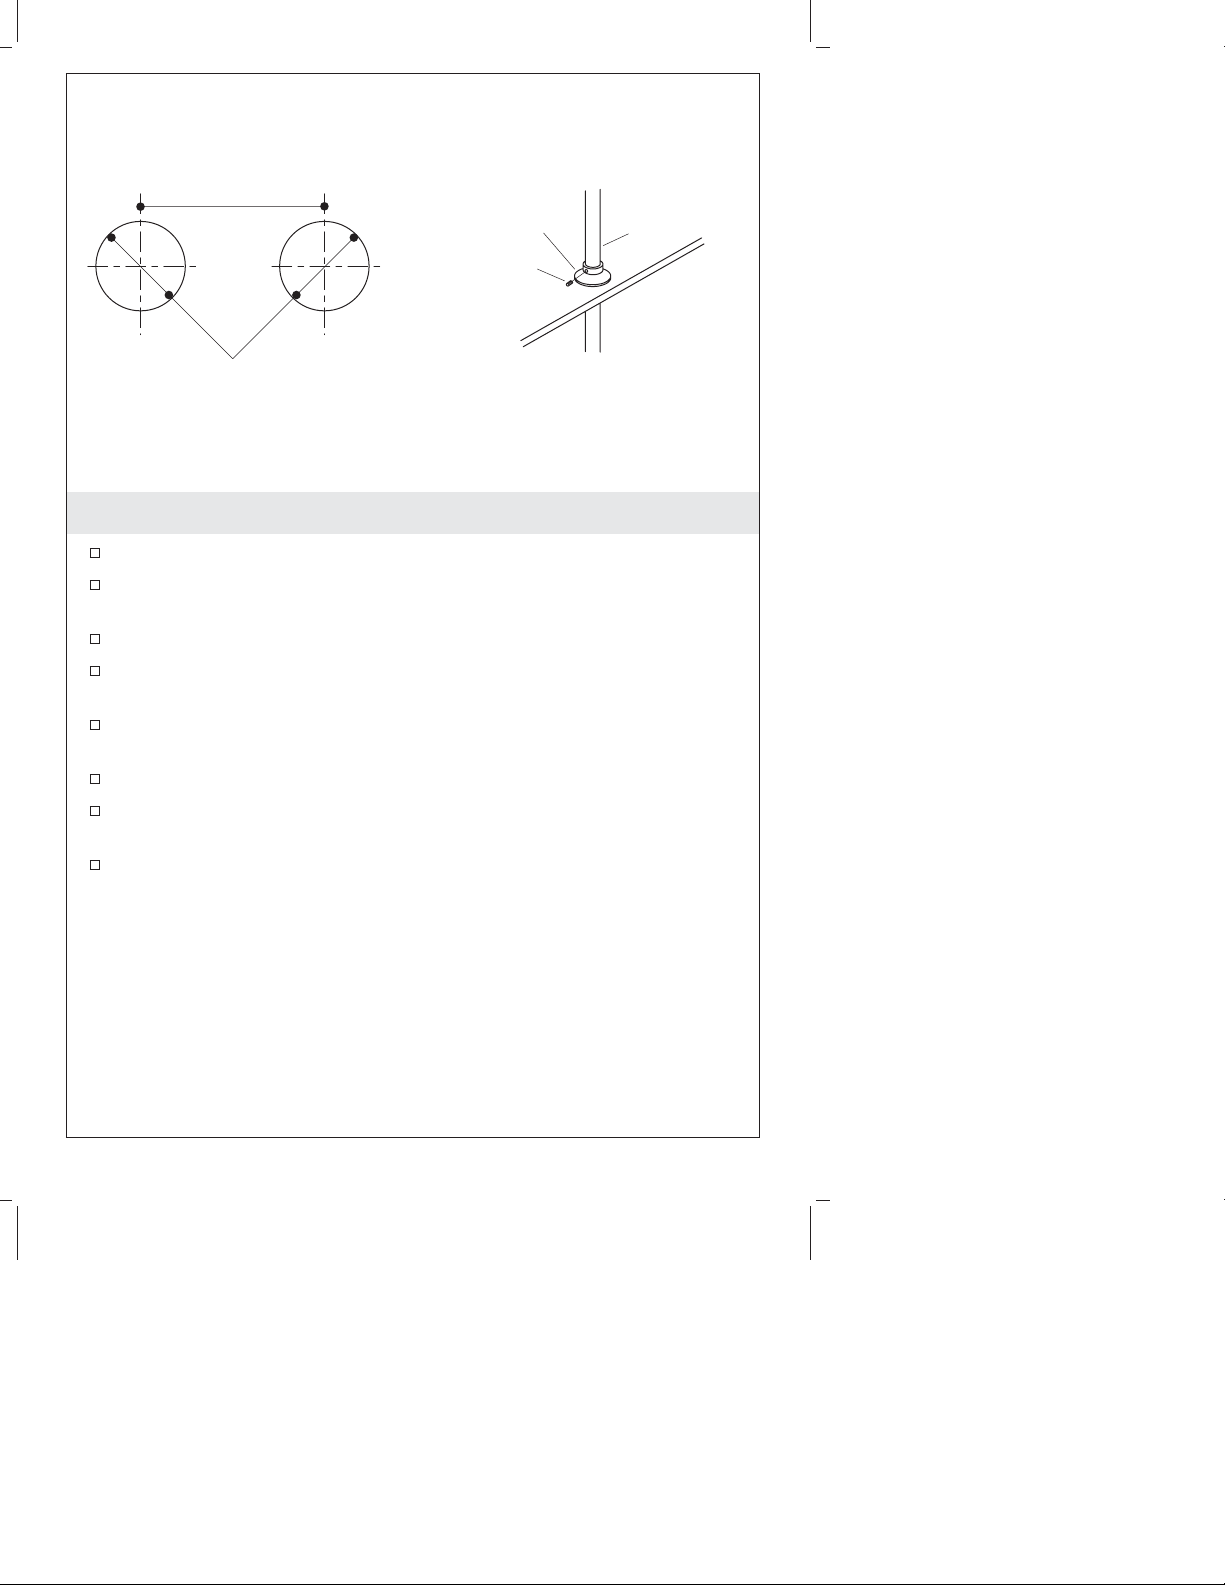
8" (20.3 cm) Center-to-Center
Flange
Setscrew
1" (2.5 cm) Diameter Holes
Plated
Supply
Pipe
3. Deck-Mount Supply Installation
Remove the temporary plugs from the water supply couplings.
Construct a frame for the deck with two 1″ (2.5 cm) holes
measuring 8″ (20.3 cm) apart from the center of each hole.
Carefully slide the plated supply pipe through the holes.
Thread the supply pipe into the supply rough-in and tighten with
a strap wrench.
Securely strap the supply pipes to the framing below the bath
deck.
Loosen the setscrew in the flange.
Carefully slide the flange down the supply pipe so it rests on the
bath deck.
Tighten the flange setscrew.
1008209-2-G 6 Kohler Co.
Page 7

Plug
Button
O-Ring
Spout
Assembly
Washer
Flanged
Union
Nut
Cradle
Plated
Supply Pipe
4. Freestanding and Deck-Mount Faucet Installation
Carefully slip the O-ring into the groove in the plug button.
Press the plug button into the hole in the back of the cradle.
Apply thread sealant to the threads of the plated supply pipes.
Slide a nut onto one of the plated supply pipes. Be careful to
avoid scratching the plated finish.
Thread the flanged union onto the supply pipe. Verify that the
flanged union is level.
Set the washer on top of the flanged union.
Repeat for the other supply pipe.
Set the spout assembly on both washers.
Thread the nuts up onto the spout assembly to secure it to the
supply tubes.
Kohler Co. 7 1008209-2-G
Page 8
Support
Framing
Minimum 1/2"
Plywood
11-3/8"
(28.9 cm)
This hole must be centered,
and must be through
plywood support.
1/2" (1.3 cm)
Diameter Holes
8" (20.3 cm)
Supply Ells
1/2"
Copper
Tubing
Center-to-Center
1" (2.5 cm) Diameter Holes
5. Wall-Mount Supply Installation
Determine the faucet installation location.
Install support framing at the installation location as shown.
Secure the piping to the framing.
Install temporary plugs in the supply ells.
Turn on the water supplies and check for leaks.
Turn off the water supplies.
Complete the finished wall.
In the finished wall, drill two 1″ (2.5 cm) holes measuring 8″
(20.3 cm) apart from the center of each hole.
Drill a 1/2″ (1.3 cm) hole at the exact location illustrated. This
hole must be through the plywood support.
Remove the temporary plugs from the water supply ells.
11-3/8"
(28.9 cm)
1008209-2-G 8 Kohler Co.
Page 9
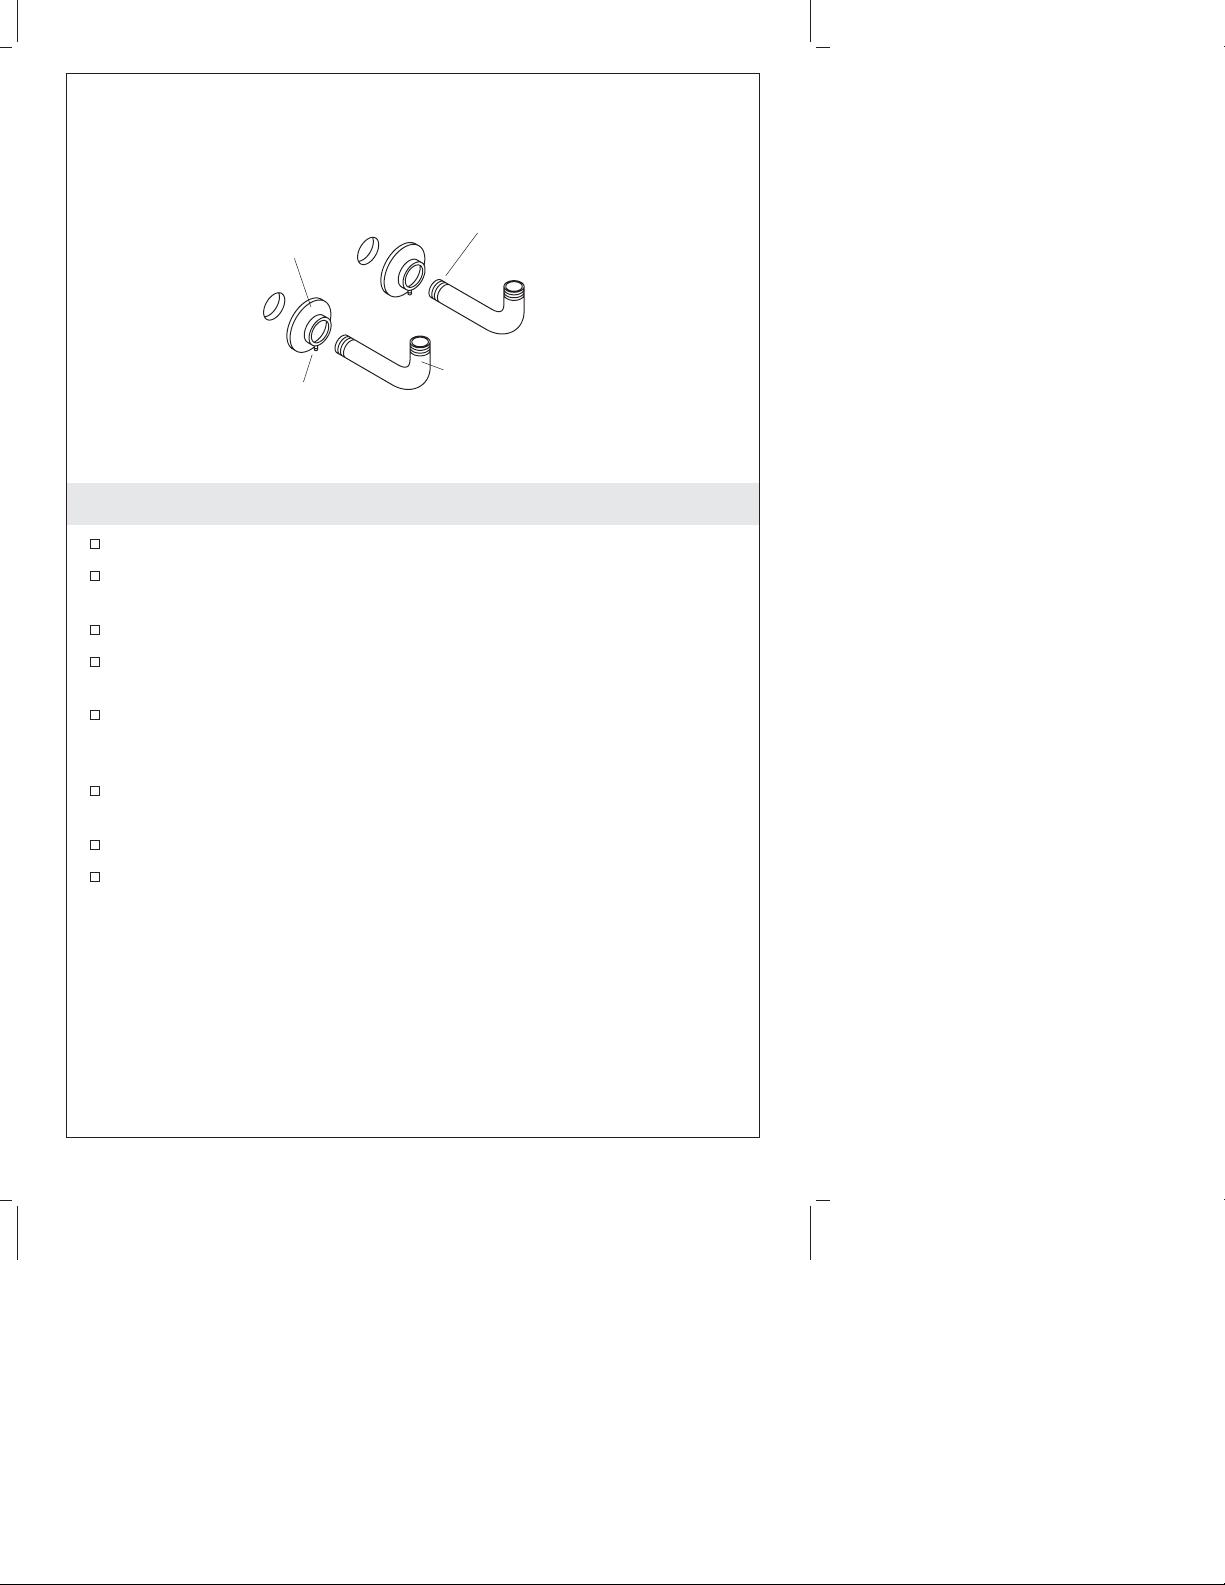
Flange
Apply thread
sealant here.
Setscrew
Plated Elbow
6. Wall-Mount Elbow Installation
Loosen the flange setscrews.
Carefully slide a flange onto one of the plated elbows. Be careful
to avoid scratching the plated finish.
Apply thread sealant to the threads of the plated elbows.
Insert one of the plated elbows through the wall and into a
supply ell.
Thread the plated elbow into the supply ell and tighten with a
clean strap wrench. Position the plated elbows with the opening
facing up.
Carefully slide the flange over the plated elbow and up against
the finished wall.
Tighten the flange setscrew.
Repeat for the other plated elbow.
Kohler Co. 9 1008209-2-G
Page 10

Install the Anchors
Anchor
Loop
Anchor Hole
Anchor Channel
Strap
Loop
Clip
Support
Flange
Screw
7. Wall-Mount Support Installation
Pivot the metal anchor channel so the plastic straps touch.
Insert the channel into the 1/2″ (1.3 cm) hole in the finished wall.
Pull on the strap ring until the metal anchor channel is flush on
the inside of the finished wall.
Slide the plastic cap along the straps until it is flush with the
wall.
Break the straps off flush with the finished wall.
Insert the screw through the support flange.
Thread the screw and support flange into the anchor. Securely
hand tighten.
Loosely thread the support bolt completely into the support
flange.
Support
Bolt
1008209-2-G 10 Kohler Co.
Page 11

Turn support
bolt
couterclockwise
to unthread.
Setscrew
Cradle
Washer
Flanged
Union
Nut
Spout
Assembly
Plated
Elbow
8. Wall-Mount Faucet Installation
Verify that thread sealant has been applied to the threads of the
plated elbows. If not, apply thread sealant at this time.
Slide a nut onto one of the plated elbows. Be careful to avoid
scratching the plated finish.
Thread the flanged union onto the plated elbow. Verify that the
flanged union is level.
Set the washer on top of the flanged union.
Repeat for the other plated elbow.
Set the spout assembly on both washers.
Thread the nuts up onto the spout assembly to secure it to the
plated elbows.
NOTE: Make sure the faucet is installed parallel with the finished
wall. Do not force the faucet when installing the support bolt into
the cradle.
Unthread the support bolt until it enters the hole in the back of
the cradle.
Secure the support bolt in place with the cradle setscrew.
Kohler Co. 11 1008209-2-G
Page 12
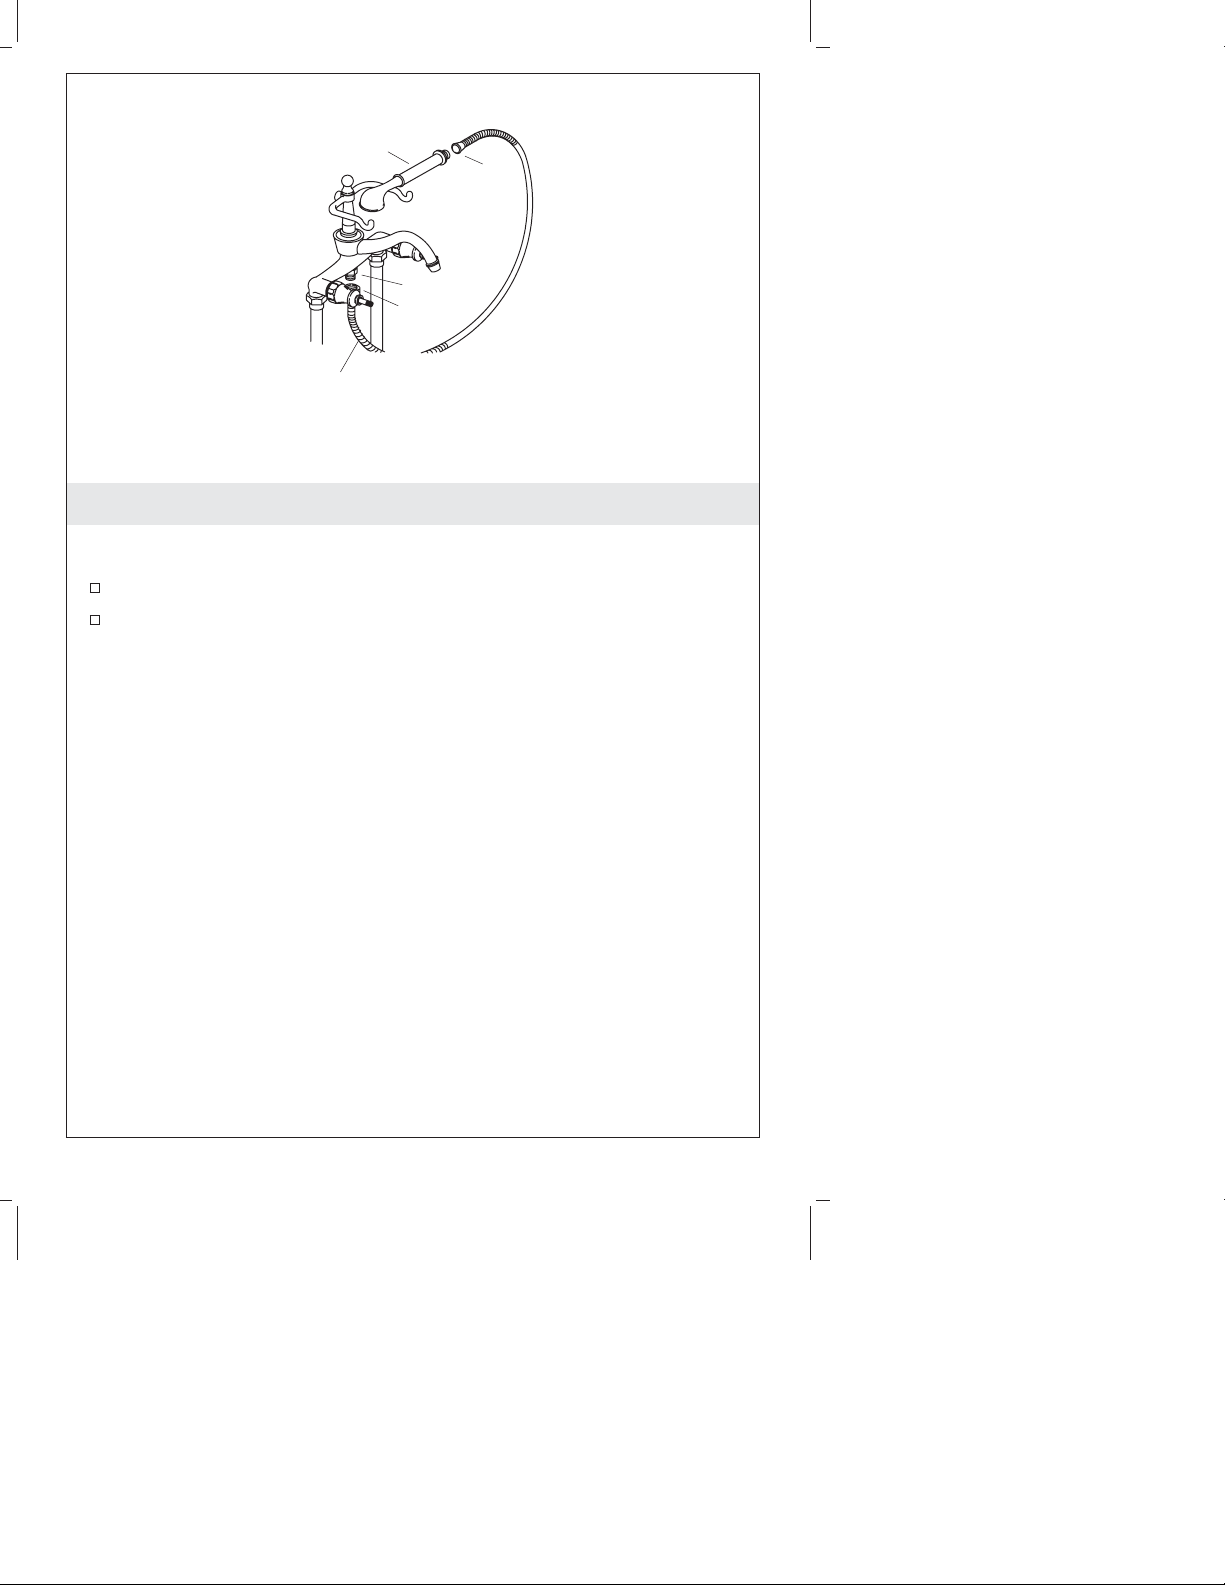
Showerhead
Assembly
A
Nipple
B
Shower Hose
Deck-Mount
Installation is Shown
9. Install the Handshower – All Installations
NOTE: Only deck-mount installation is shown in the illustration.
The handshower installs the same for all faucet installation types.
Thread the end of the shower hose with the nut onto the nipple.
Thread the handshower onto the other end of the shower hose.
1008209-2-G 12 Kohler Co.
Page 13

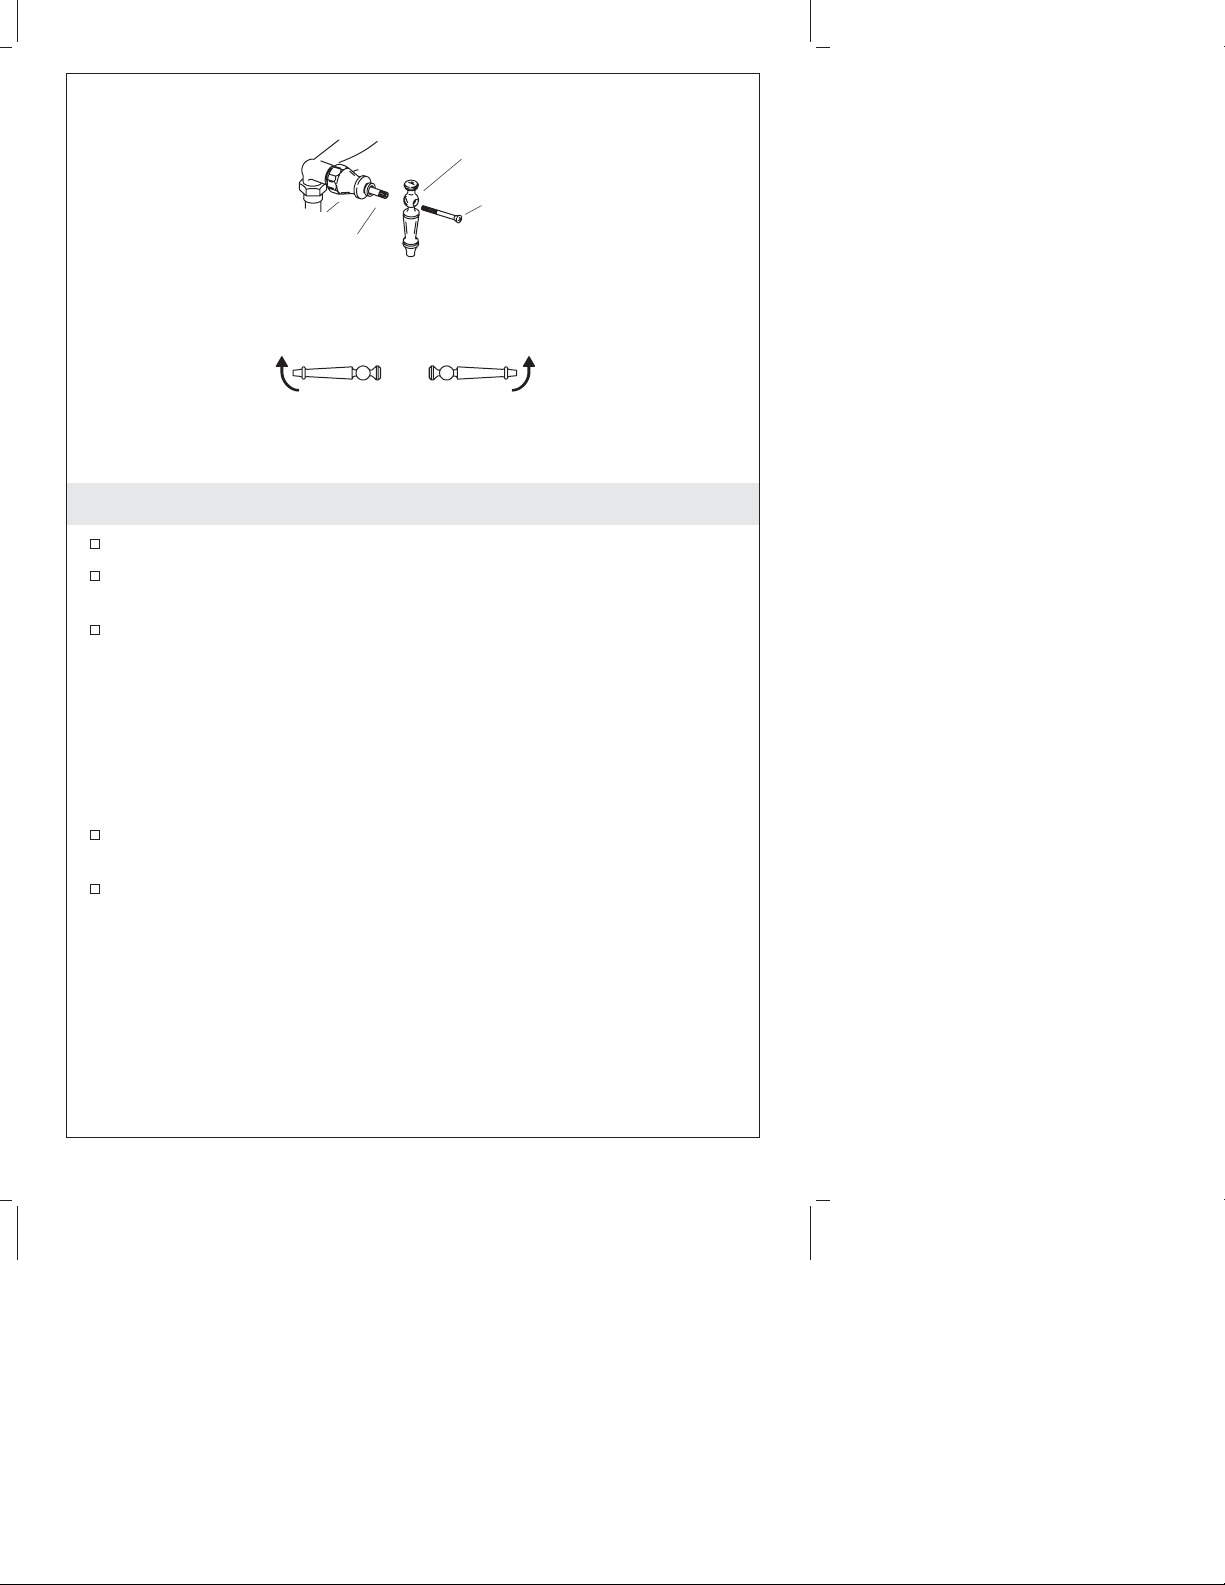
Bonnet
Stem
Extension
Open
Stem
Screw
Handle
Screw
Hot Cold
Ceramic
Insert
Setscrew
Oval
Handle
Open
Close
Shown in Closed Position
Close
10. Oval Handle Installation
Verify that the valves are in the closed position.
NOTICE: Risk of product damage. Do not overtighten.
Overtightening will damage the handle.
Insert the stem screw into the stem extension and tighten with a
screwdriver.
Place the ceramic insert into the oval handle.
Secure the insert with the handle screw. Do not overtighten.
Loosen the setscrew.
Position the handle assembly on the stem extension.
Verify that the handle is in an even horizontal position. If needed,
remove the handle and adjust its position on the splines of the
stem extension until horizontal. For fine adjustment, pull out the
stem extension until it disengages from the valve, rotate, and
return it to its original position. Do not pull the stem extension
completely out.
Tighten the setscrew.
Repeat for the other handle.
Kohler Co. 13 1008209-2-G
Page 14
Bonnet
Lever
Handle
Stem
Screw
Stem
Extension
Open
Close
Hot Cold
Shown in Closed Position
Open
Close
11. One-Piece Lever Handle Installation
Verify that the valves are in the closed position.
Insert the handle onto the stem extension so the handle is
positioned horizontally.
Verify that the handle is in an even horizontal position. If needed,
remove the handle and adjust its position on the splines of the
stem extension until horizontal. For fine adjustment, pull out the
stem extension until it disengages from the valve, rotate, and
return it to its original position. Do not pull the stem extension
completely out.
NOTICE: Risk of product damage. Do not overtighten.
Overtightening will damage the handle.
Insert the stem screw into the stem extension and tighten with a
screwdriver.
Repeat for the other handle.
1008209-2-G 14 Kohler Co.
Page 15

Bonnet
Stem
Screw
Stem
Extension
Setscrew
Six Prong
Handle
Open
Close
Shown in Closed Position
Open
Close
12. Six Prong Handle Installation
Verify that the valves are in the closed position.
NOTICE: Risk of product damage. Do not overtighten.
Overtightening will damage the handle.
Insert the stem screw into the stem extension and tighten with a
screwdriver.
Loosen the setscrew.
Position the handle assembly on the stem extension.
Verify that the handle label is in an even horizontal position. If
needed, remove the handle and adjust its position on the splines
of the stem extension until horizontal. For fine adjustment, pull
out the stem extension until it disengages from the valve, rotate,
and return it to its original position. Do not pull the stem
extension completely out.
Tighten the setscrew.
Repeat for the other handle.
Kohler Co. 15 1008209-2-G
Page 16
Endcap
Washer
Bonnet
Stem
Extension
Bath Adapter
Open
Short Sleeve
Stem Screw
Skirt Cap
O-Ring
Long Sleeve
Handle Arm
Open
Close
Shown in Closed Position
Close
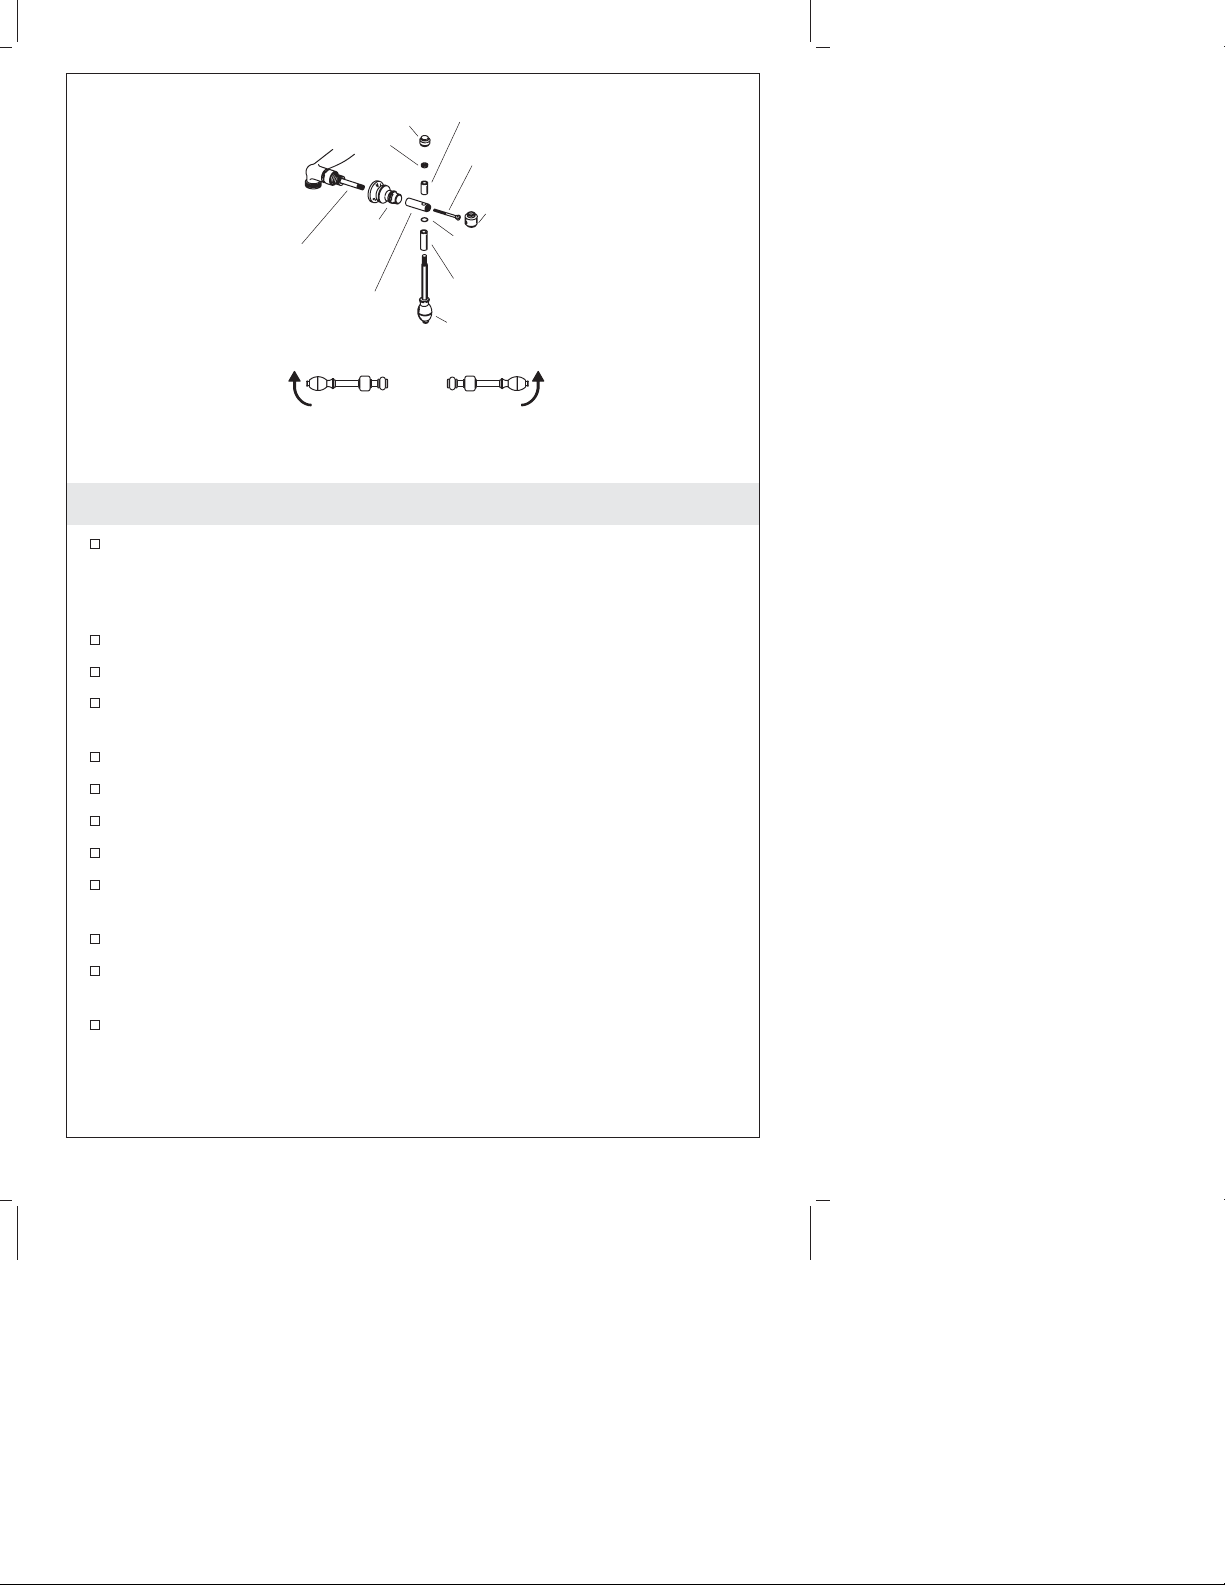
13. Multi-Piece Lever Handle Installation
Verify that the valves are in the closed position.
NOTICE: Risk of product damage. Do not overtighten.
Overtightening will damage the handle.
Install the stem extension to the valve stem.
Thread the bonnet onto the valve body.
Align the bath adapter over the stem extension so that the holes
line up horizontally. Secure with the screw.
Install the skirt cap to the end of the bath adapter.
Position the long sleeve over the handle arm.
Slide the O-ring onto the handle arm down to the long sleeve.
Insert the handle arm through the bath adapter.
Slide the short sleeve onto the handle arm up to rest on the bath
adapter.
Slide the washer onto the handle arm down to the short sleeve.
Thread the end cap onto the end of the handle arm to secure the
assembly.
Repeat for the other handle.
1008209-2-G 16 Kohler Co.
Page 17

14. Complete the Installation
Open the supplies.
Turn on the hot and cold water.
Run the water through both the handshower and the faucet.
Check for leaks.
Turn off the water.
Kohler Co. 17 1008209-2-G
Page 18

Guide d’installation
Robinet de baignoire à montage sur
comptoir/mural
Outils et matériels
Clé à
molette
Clés
hexagonales
assorties
Joint d'étanchéité
pour filetage
Clé à
sangle
Chalumeau
à propane
Soudure
Plus:
• Pinces à arc réglable
• Tuyauterie de 1/2"
• Adaptateurs filetés 1/2"
• Coudes union de 1/2"
• Coudes baignoire douche
• Support montage mural
K-6525
Tournevis
assortis
Avant de commencer
AVERTISSEMENT : Risque de blessures corporelles. Ce
produit n’est pas destiné ou conçu pour servir de barre
d’appui ou de support. Ne pas installer dans un
emplacement où le produit pourrait être utlisé comme barre
d’appui ou de support.
Veuillez lire toutes les instructions avant de commencer.
Respecter tous les codes de plomberie et de bâtiment locaux.
Couper l’alimentation d’eau principale.
Inspecter l’état de la tuyauterie d’évacuation et d’alimentation et
remplacer selon la nécessité.
Installer ou déplacer les alimentations au besoin pour confirmer
les dimensions de raccordement.
Ce robinet peut être installé en configuration autoportante, sur
comptoir ou montage mural. Suivre uniquement les instructions
qui s’appliquent à votre installation.
Kohler Co. Français-1 1008209-2-G
Page 19

Avant de commencer (cont.)
Un support mural optionnel est disponible pour adapter la
douchette sur un emplacement fixe.
Kohler Co. se réserve le droit d’apporter toutes modifications au
design des robinets et ceci sans préavis, comme spécifié dans le
catalogue des prix.
Kohler Co. Français-2 1008209-2-G
Page 20

Dimensions de raccordement Sans support et montage sur
comptoir
9-5/8"
(24,4 cm)
8-15/16"
(22,7 cm) D.
K-126, K-127
27-7/8"
(70,8 cm)
4"
(10,2 cm)
1/2"
NPT
Drain de baignoire au robinet
Modèles de baignoire
K-100
K-700, K-702
K-710, K-711, K-712, K-726, K-727
Dimensions de raccordement kit montage mural
K-128
31-1/2"
(80 cm)
2-1/4"
(5,7 cm) D.
8-15/16"
(22,7 cm)
5-5/8"
(14,3 cm)
1-13/16"
(4,6 cm)
9-5/8"
(24,4 cm)
2-3/8"
(6 cm)
X
X
5-7/8" (14,9 cm)
6-3/8" (16,2 cm)
4-3/8" (11,1 cm)
3" (7,6 cm) Min
4-1/4" (10,8 cm) Max
1-1/8"
(2,9 cm) D.
2-7/16"
(6,2 cm)
2-1/4"
(5,7 cm) D.
4"
(10,2 cm)
5-5/8"
(14,3 cm)
2-3/8"
(6 cm)
Dessus du rebord
4"
(10,2 cm) Min
1-13/16"
(4,6 cm)
K-101
11-3/8"
(28,9 cm)
1/2"
NPT
Plan de raccordement
1008209-2-G Français-3 Kohler Co.
Page 21

Support
de tuyau
Support
en T
Tige
Coude de
trop-plein
Vis de
retenue
Support de
tuyau
Tuyau d'alimentation
plaqué
Bride
Vis de retenue
Support en T
1. Préparer le site
Installer ou relocaliser les alimentations d’eau au besoin pour se
conformer aux dimensions de raccordement de l’installation
particulière si celà n’a pas déjà été fait.
Utiliser du ruban d’étanchéité sur toutes les connexions filetées.
2. Installation alimentation autoportante
Retirer les bouchons temporaires des couplages d’alimentation
d’eau.
Remplacer la longue tige avec la courte pour les modèles
Kohler K-710, K-711, K-712, K-726 and K-727. Pour déterminer la
mesure du robinet de la baignoire au drain du modèle de
baignoire, se référer à la section ″Raccordement″ de ce manuel.
Visser le support en T dans l’orifice à l’arrière du coude de
trop-plein.
Insérer la tige dans le support en T et sécuriser avec la vis de
retenue.
Installer les tubes d’alimentation
Desserrer les vis de retenue dans le dispositif de maintien du
tuyau et la bride.
Faire glisser soigneusement le tuyau d’alimentation plaqué à
travers le dispositif de maintien du tuyau et la bride.
Kohler Co. Français-4 1008209-2-G
Page 22

Installation alimentation autoportante (cont.)
Ajuster le tuyau d’alimentation dans le raccordement
d’alimentation et serrer avec un clé à sangle.
Serrer les vis de retenue dans le support du tuyau et la bride.
Faire de même avec le deuxième tube d’alimentation.
1008209-2-G Français-5 Kohler Co.
Page 23

8" (20,3 cm) Centre-à-centre
Bride
Vis de
retenue
Orifices Ø 1" (2,5 cm)
Tuyau
d'alimentation
plaqué
3. Installation d’alimentation sur comptoir
Retirer les bouchons temporaires des couplages d’alimentation
d’eau.
Construire un cadre pour le comptoir avec deux orifices de 1″ (2,5
cm) de diamètre distancés de 8″ (20,3 cm) du centre de chaque
orifice.
Glisser le tuyau d’alimentation plaqué à travers les orifices.
Visser le tuyau d’alimentation dans le raccordement
d’alimentation et serrer avec un clé à sangle.
Attacher les tuyaux d’alimentation au cadrage sous le comptoir
de baignoire.
Dévisser la vis de retenue sur la bride.
Glisser avec précaution la bride sur le tuyau d’alimentation de
manière à ce qu’elle repose sur le comptoir de baignoire.
Serrer la vis de retenue de la bride.
Kohler Co. Français-6 1008209-2-G
Page 24

Bouchon
Joint torique
Ensemble
du bec
Rondelle
Union
bridée
Écrou
Berceau
Tuyau
d'alimentation
plaqué
4. Installation autoportante et sur comptoir de robinet
Glisser délicatement le joint torique dans la rainure du bouchon.
Presser le bouchon capsule dans l’orifice à l’arrière du berceau.
Appliquer un ruban d’étanchéité pour filetage sur les tuyaux
d’alimentation plaqués.
Glisser un écrou sur un des tuyaux d’alimentation plaqués. Faire
attention pour éviter de rayer la finition plaquée.
Visser l’union bridée sur le tuyau d’alimentation. Vérifier que
l’union bridée soit nivelée.
Placer la rondelle sur l’union bridée.
Répéter la même procédure avec l’autre tuyau d’alimentation.
Placer l’ensemble du bec sur les deux rondelles.
Visser les écrous sur l’ensemble du bec pour les sécuriser aux
tuyaux d’alimentation.
1008209-2-G Français-7 Kohler Co.
Page 25

Contreplaqué de
1/2", minimum
Cadrage
de support
11-3/8"
(28,9 cm)
Coudes
d'alimentation
Tuyauterie en
cuivre de 1/2"
Cet orifice doit être centré
et à travers le support de
contreplaqué.
Orifices
Ø 1/2" (1,3 cm)
8" (20,3 cm)
Centre à centre
Orifices Ø 1" (2,5 cm)
5. Installation de l’alimentation à montage mural
Déterminer l’emplacement d’installation du robinet.
Installer le cadrage de support à l’emplacement d’installation tel
qu’illustré.
Sécuriser la tuyauterie au cadrage.
Installer des bouchons temporaires dans les coudes
d’alimentation.
Ouvrir les alimentations d’eau et vérifier s’il y a des fuites.
Fermer les alimentations d’eau.
Compléter le mur fini.
Dans le mur fini, percer deux orifices de 1″ (2,5 cm) distancés de
8″ (20,3 cm) du centre de chaque trou.
Percer un orifice de 1/2″ (1,3 cm) à l’emplacement exact illustré.
Cet orifice doit être à travers le support contreplaqué.
Retirer les bouchons temporaires des coudes d’alimentation d’eau.
11-3/8"
(28,9 cm)
Kohler Co. Français-8 1008209-2-G
Page 26

Bride
Appliquer un
ruban
d'étanchéité
pour filetage ici.
Vis de retenue
Coude plaqué
6. Installation du coude à montage mural
Dévisser les vis de retenue de la bride.
Glisser avec précaution la bride sur l’un des coudes plaqués. Faire
attention pour éviter de rayer la finition plaquée.
Appliquer un ruban d’étanchéité pour filetage sur les coudes
plaqués.
Insérer un des coudes plaqués à travers le mur et dans un coude
d’alimentation.
Visser le coude plaqué dans le coude d’alimentation et serrer avec
une clé à sangle propre. Positionner les coudes plaqués avec
l’ouverture vers le haut.
Glisser délicatement la bride sur le coude plaqué et contre le mur
fini.
Serrer la vis de retenue de la bride.
Répéter les procédures pour l’autre coude plaqué.
1008209-2-G Français-9 Kohler Co.
Page 27

Installer les ancrages
Orifice
d'ancrage
Dispositif
Boucle
d'ancrage
articulé
Clip
Ancrage
Bride de
support
Vis
Boulon de
support
Sangle
Boucle
7. Installation du support à montage mural
Pivoter l’ancrage métallique de manière à ce que les sangles en
plastic touchent.
Insérer le canal dans l’orifice de 1/2″ (1,3 cm) du mur fini.
Tirer sur l’anneau de la sangle jusqu’à ce que le canal d’ancrage
en métal soit d’égalité à l’intérieur du mur fini.
Faire glisser le capuchon de plastique le long des sangles jusqu’à
ce qu’il soit à égalité avec le mur.
Couper les sangles à égalité avec le mur fini.
Insérer la vis de retenue à travers la bride de support.
Serrer la vis et la bride de support dans l’ancrage. Bien serrer à la
main.
Visser légèrement le boulon de support dans la bride de support.
Kohler Co. Français-10 1008209-2-G
Page 28

Berceau
Dévisser le
boulon de
support.
Vis de
retenue
Rondelle
Union
bridée
Écrou
Ensemble
du bec
Coude
plaqué
8. Installation robinet à montage mural
S’assurer que le ruban d’étanchéité pour filetage ait été appliqué
aux coudes plaqués. Dans le cas échéant, appliquer du ruban
d’étanchéité à ce moment.
Glisser un écrou sur un des coudes plaqués. Faire attention pour
éviter de rayer la finition plaquée.
Visser l’union bridée sur le coude plaqué. Vérifier que l’union
bridée soit nivelée.
Placer la rondelle sur l’union bridée.
Répéter les procédures pour l’autre coude plaqué.
Placer l’ensemble du bec sur les deux rondelles.
Visser les écrous sur l’ensemble du bec pour les sécuriser aux
coudes plaqués.
REMARQUE : S’assurer que le robinet soit parallèlement installé
avec le mur fini. Ne pas forcer le robinet lors de l’installation du
boulon de support dans le berceau.
Dévisser le boulon de support de manière à ce qu’il pénètre dans
l’orifice à l’arrière du berceau.
Sécuriser le boulon de support avec la vis de retenue du berceau.
1008209-2-G Français-11 Kohler Co.
Page 29

Ensemble pomme
de douche
A
Mamelon
B
Flexible de douche
Montage sur comptoir
Installation illustrée
9. Installer la douchette -Toutes les installations
REMARQUE : Seule l’installation sur comptoir est illustrée. La
douchette s’installe de la même manière que tous les types
d’installation de robinet.
Visser l’extrémité du tuyau flexible de douche avec l’écrou sur le
mamelon.
Visser la douchette sur l’autre extrémité du flexible de douche.
Kohler Co. Français-12 1008209-2-G
Page 30

Chapeau
Extension
de la tige
Ouvrir
Vis de
tige
Vis de
poignée
Chaud Froid
Vis de retenue
Insertion en
céramique
Poignée
ovale
Ouvrir
Fermer
Illustré en position fermée
Fermer
10. Installation de poignée ovale
Vérifier que les valves soient en position fermée.
AVIS : Risque d’endommagement du produit. Ne pas trop serrer.
Le serrage excéssif peut endommager la poignée.
Insérer la vis de tige dans l’extension et serrer avec un tournevis.
Placer l’insertion en céramique dans la poignée ovale.
Sécuriser l’insertion avec la vis de poignée. Ne pas trop serrer.
Desserrer la vis de retenue.
Positionner l’ensemble de la poignée sur l’extension de la tige.
Vérifier que la poignée soit nivelée à l’horizontale. Si besoin,
retirer la poignée et en ajuster la position sur les cannelures de
l’extension de la tige jusqu’à l’horizontale. Pour un bon réglage,
retirer l’extension de tige jusqu’à ce qu’elle se retire de la valve,
pivoter et remettre à sa place. Ne pas tirer complétement
l’extension de tige.
Serrer la vis de retenue.
Répéter les procédures pour l’autre poignée.
1008209-2-G Français-13 Kohler Co.
Page 31

Chapeau
Extension
de la tige
Chaud Froid
Ouvrir
Poignée
du levier
Vis de
tige
Ouvrir
Fermer
Illustré en position fermée
Fermer
11. Installation poignée de levage mono-pièce
Vérifier que les valves soient en position fermée.
Insérer le levier sur la rallonge de tige, en position horizontale.
Vérifier que la poignée soit nivelée à l’horizontale. Si besoin,
retirer la poignée et en ajuster la position sur les cannelures de
l’extension de la tige jusqu’à l’horizontale. Pour un bon réglage,
retirer l’extension de tige jusqu’à ce qu’elle se retire de la valve,
pivoter et remettre à sa place. Ne pas tirer complètement
l’extension de tige.
AVIS : Risque d’endommagement du produit. Ne pas trop serrer.
Le serrage excessif peut endommager la poignée.
Insérer la vis de tige dans l’extension et serrer avec un tournevis.
Répéter les procédures pour l’autre poignée.
Kohler Co. Français-14 1008209-2-G
Page 32

Chapeau
Extension
de la tige
Vis de
retenue
Vis de tige
Ouvrir
Fermer
Illustré en position fermée
Poignée à
six broches
Ouvrir
Fermer
12. Installation de poignée à six broches
Vérifier que les valves soient en position fermée.
AVIS : Risque d’endommagement du produit. Ne pas trop serrer.
Le serrage excéssif peut endommager la poignée.
Insérer la vis de tige dans l’extension et serrer avec un tournevis.
Desserrer la vis de retenue.
Positionner l’ensemble de la poignée sur l’extension de la tige.
Vérifier que l’étiquette de la poignée soit nivelée à l’horizontale.
Si besoin, retirer la poignée et en ajuster la position sur les
cannelures de l’extension de la tige jusqu’à l’horizontale. Pour un
bon réglage, retirer l’extension de tige jusqu’à ce qu’elle se retire
de la valve, pivoter et remettre à sa place. Ne pas tirer
complétement l’extension de tige.
Serrer la vis de retenue.
Répéter les procédures pour l’autre poignée.
1008209-2-G Français-15 Kohler Co.
Page 33

Couvercle d'extrémité
Rondelle
Chapeau
Extension
de la tige
Adaptateur
de baignoire
Ouvrir
Manchon
court
Vis de tige
Capuchon
de jupe
Joint torique
Manchon
long
Bras de
poignée
Ouvrir
Fermer
Illustré en position fermée
Fermer
13. Installation poignée de levage multi-pièces
Vérifier que les valves soient en position fermée.
AVIS : Risque d’endommagement du produit. Ne pas trop serrer.
Le serrage excéssif peut endommager la poignée.
Installer l’extension de tige sur la tige de valve.
Visser le chapeau sur le corps de valve.
Aligner l’adaptateur de baignoire sur l’extension de la tige de
manière à ce que les orifices s’alignent horizontalement. Sécuriser
avec la vis.
Installer le capuchon de jupe sur l’extrémité de l’adaptateur de
baignoire.
Positionner le long manchon sur le bras de la poignée.
Glisser le joint torique dans le bras de poignée jusqu’au manchon
long.
Insérer le bras de poignée à travers l’adaptateur de baignoire.
Glisser le manchon court sur le bras de poignée afin de reposer
sur l’adaptateur de baignoire.
Glisser la rondelle dans le bras de poignée jusqu’au manchon
long.
Visser le capuchon d’extrémité sur l’extrémité du bras de poignée
pour sécuriser l’ensemble.
Répéter les procédures pour l’autre poignée.
Kohler Co. Français-16 1008209-2-G
Page 34

14. Compléter l’installation
Ouvrir les alimentations.
Ouvrir l’alimentation d’eau chaude et froide.
Faire couler l’eau à travers la douchette et le robinet.
Vérifier s’il y a des fuites.
Couper l’eau.
1008209-2-G Français-17 Kohler Co.
Page 35

Guía de instalación
Grifería de bañera de montaje en cubierta/a la
pared
Herramientas y materiales
Llave
ajustable
Surtido de llaves
hexagonales
Cinta selladora
de roscas
Nivel
Taladro y
brocas
Llave de
correa
Soplete de
propano
Suelda
Más:
• Pinzas ajustables de tubería
• Tubería de 1/2"
• Adaptadores roscados de
1/2"
• Codos de unión de 1/2"
• Codos de bañera o ducha
• Soporte de montaje a la
pared K-6525
Destornilladores
surtidos
Antes de comenzar
ADVERTENCIA: Riesgo de lesiones personales. Este
producto no está diseñado o pensado para usarse como
agarradera o barra de soporte. No lo instale donde pueda
utilizarse inadvertidamente como agarradera o barra de
soporte.
Lea todas las instrucciones antes de comenzar.
Cumpla con todos los códigos locales de plomería y construcción.
Cierre el suministro principal de agua.
Revise las tuberías de alimentación y desagüe para ver si están
dañadas; cámbielas si es necesario.
Instale o cambie los suministros de lugar según sea necesario
para cumplir con las dimensiones de la instalación.
Esta grifería se puede instalar en configuraciones autosoportadas,
en cubierta o en pared. Siga las instrucciones correspondientes a
su instalación.
Kohler Co. Español-1 1008209-2-G
Page 36

Antes de comenzar (cont.)
Se puede adquirir un soporte de montaje a la pared opcional para
adaptar la ducha de mano a una posición estacionaria.
Kohler Co. se reserva el derecho de modificar el diseño de la
grifería sin previo aviso, tal como se especifica en la lista de
precios.
1008209-2-G Español-2 Kohler Co.
Page 37

Dimensiones de instalaciónautosoportada y de montaje en cubierta
9-5/8"
(24,4 cm)
4"
(10,2 cm)
Rosca NPT
de 1/2"
Desagüe de bañera a la grifería
Modelos de bañeras
K-100
K-700, K-702
Dimensiones de instalaciónKit de montaje a la pared
8-15/16"
(22,7 cm) D.
K-126, K-127
27-7/8"
(70,8 cm)
K-128
31-1/2"
(80 cm)
2-1/4"
(5,7 cm) D.
8-15/16"
(22,7 cm)
5-5/8"
(14,3 cm)
1-13/16"
(4,6 cm)
9-5/8"
(24,4 cm)
2-3/8"
(6 cm)
X
X
5-7/8" (14,9 cm)
6-3/8" (16,2 cm)
4-3/8" (11,1 cm)K-710, K-711, K-712, K-726, K-727
3" (7,6 cm) Mín
4-1/4" (10,8 cm) Máx
1-1/8"
(2,9 cm) D.
2-7/16"
(6,2 cm)
2-1/4"
(5,7 cm) D.
4"
(10,2 cm)
5-5/8"
(14,3 cm)
2-3/8"
(6 cm)
Parte superior del borde
4"
(10,2 cm) Mín
1-13/16"
(4,6 cm)
K-101
11-3/8"
(28,9 cm)
Rosca NPT
de 1/2"
Diagrama de instalación
Kohler Co. Español-3 1008209-2-G
Page 38

Soporte de
tubería
Soporte
en T
Varilla
Codo de
rebosadero
Tornillo
de fijación
Soporte de tubería
Tubería enchapada
de suministro
Brida
Tornillo de fijación
Soporte en T
1. Prepare el sitio
Si aún no lo ha hecho, instale o cambie los suministros de agua
de lugar según sea necesario para cumplir con las dimensiones de
su instalación en particular.
Utilice cinta selladora de roscas en todas las conexiones roscadas.
2. Instalación del suministro autosoportado
Retire los tapones provisionales de los acopladores de suministro.
Reemplace la varilla larga con la varilla corta para los modelos
Kohler K-710, K-711, K-712, K-726 y K-727. Para determinar la
medida de la bañera a la grifería del desagüe para el modelo de
su bañera, consulte la sección ″Diagrama de instalación″ en este
manual.
Enrosque el soporte en T en el orificio de la parte posterior del
codo del rebosadero.
Inserte la varilla en el soporte en T y fije con el tornillo de
fijación.
Instale las tuberías de suministro
Afloje los tornillos de fijación en el soporte de tubería y en la
brida.
Deslice la tubería de suministro a través del soporte de tubería y
de la brida.
1008209-2-G Español-4 Kohler Co.
Page 39

Instalación del suministro autosoportado (cont.)
Enrosque la tubería de suministro en la conexión de suministro y
apriete con una llave de correa.
Apriete los tornillos de fijación en el soporte de tubería y en la
brida.
Repita este procedimiento con la segunda tubería de suministro.
Kohler Co. Español-5 1008209-2-G
Page 40

8" (20,3 cm) de centro a centro
Brida
Tornillo de
fijación
Orificios de 1" (2,5 cm) de diámetro
Tubería
enchapada
de suministro
3. Instalación del suministro de montaje en cubierta
Retire los tapones provisionales de los acopladores de suministro.
Construya una estructura para la cubierta con dos orificios de 1″
(2,5 cm) de diámetro, a 8″ (20,3 cm) de distancia desde el centro
de cada orificio.
Deslice con cuidado la tubería enchapada de suministro a través
de los orificios.
Enrosque la tubería de suministro en la conexión de suministro y
apriete con una llave de correa.
Ate bien las tuberías de suministro a la estructura bajo la cubierta
de la bañera.
Afloje el tornillo de fijación en la brida.
Deslice con cuidado la brida por la tubería de suministro de
manera que se apoye en la cubierta de la bañera.
Apriete el tornillo de fijación de la brida.
1008209-2-G Español-6 Kohler Co.
Page 41

Tapón
Arosello
Montaje
del surtidor
Arandela
Unión
bridada
Tuerca
Soporte
Tubo
enchapado
de suministro
4. Instalación de la grifería autosoportada y cubierta
Deslice con cuidado el arosello (O-ring) en la ranura del tapón.
Presione el tapón en el orificio que se encuentra en la parte
posterior del soporte.
Aplique cinta selladora de rosca a las roscas de las tuberías
enchapadas de suministro.
Deslice una tuerca por una de las tuberías enchapadas de
suministro. Tenga cuidado de no rayar el acabado enchapado.
Enrosque la unión bridada en la tubería de suministro. Verifique
que la unión bridada esté nivelada.
Coloque la arandela sobre la unión bridada.
Repita esta operación con la otra tubería de suministro.
Coloque el montaje del surtidor en ambas arandelas.
Enrosque las tuercas por el montaje del surtidor para fijarlo a las
tuberías de suministro.
Kohler Co. Español-7 1008209-2-G
Page 42

Estructura
de soporte
Madera
contrachapada de
1/2" mínimo
11-3/8"
(28,9 cm)
Codos de
suministro
Tubo de cobre
de 1/2"
Este orificio debe estar centrado y
debe perforarse a través del soporte
de madera contrachapada.
Orificios de
1/2" (1,3 cm)
de diámetro
8" (20,3 cm)
De centro a centro
Orificios de 1" (2,5 cm)
de diámetro
5. Instalación del suministro de montaje a la pared
Determine el lugar de instalación de la grifería.
Instale la estructura de soporte en el lugar de instalación como se
muestra.
Fije la tubería a la estructura de postes de madera.
Instale tapones provisionales en los codos de suministro.
Abra los suministros de agua y verifique que no haya fugas.
Cierre los suministros de agua.
Termine la pared acabada.
En la pared acabada, taladre dos orificios de 1″ (2,5 cm) con 8″
(20,3 cm) de separación desde el centro de cada orificio.
Taladre un orificio de 1/2″ (1,3 cm) en el lugar exacto como se
ilustra. Este orificio debe perforarse a través del soporte de
madera contrachapada.
Retire los tapones provisionales de los codos de suministro.
11-3/8"
(28,9 cm)
1008209-2-G Español-8 Kohler Co.
Page 43

Brida
Aplique cinta
selladora de
roscas aquí.
Tornillo
de fijación
Codo
enchapado
6. Instalación del codo de montaje a la pared
Afloje los tornillos de fijación de la brida.
Deslice con cuidado una brida por uno de los codos enchapados.
Tenga cuidado de no rayar el acabado enchapado.
Aplique cinta selladora de rosca a las roscas de los codos
enchapados.
Inserte uno de los codos enchapados a través de la pared y en el
codo de suministro.
Enrosque el codo enchapado en el codo de suministro y apriete
con una llave de correa limpia. Coloque los codos enchapados
con la abertura orientada hacia arriba.
Haga pasar la brida con cuidado por el codo enchapado y contra
la pared acabada.
Apriete el tornillo de fijación de la brida.
Repita esta operación con el otro codo enchapado.
Kohler Co. Español-9 1008209-2-G
Page 44

Instale los anclajes
Canal de anclaje
Bucle
Orificio de
fijación
Clip
Anclaje
Brida de
soporte
Tornillo
Perno de
soporte
Correa
Bucle
7. Instalación del soporte de montaje a la pared
Pivotee el canal de anclaje de metal de manera que las correas de
plástico hagan contacto.
Inserte el canal en el orificio de 1/2″ (1,3 cm) en la pared
acabada.
Tire del anillo de la correa hasta que el canal de anclaje de metal
esté al ras en el interior de la pared acabada.
Deslice la tapa de plástico a lo largo de las correas hasta que esté
al ras de la pared.
Rompa las correas de manera que estén al ras de la pared
acabada.
Inserte el tornillo a través de la brida de soporte.
Enrosque el tornillo y la brida de soporte en el anclaje. Apriete
bien con la mano.
Enrosque el perno de soporte completamente en la brida de
soporte sin apretar.
1008209-2-G Español-10 Kohler Co.
Page 45

Gire a la
Soporte
izquierda el
perno de
soporte para
desenroscar.
Tornillo de
fijación
Arandela
Unión
bridada
Tuerca
Montaje
del
surtidor
Codo
enchapado
8. Instalación de la grifería de montaje a la pared
Verifique que se haya aplicado cinta selladora de rosca a las
roscas de los codos enchapados. Si no es así, aplique cinta
selladora de roscas en este momento.
Deslice una tuerca por uno de los codos enchapados. Tenga
cuidado de no rayar el acabado enchapado.
Enrosque la unión bridada en el codo enchapado. Verifique que la
unión bridada esté nivelada.
Coloque la arandela sobre la unión bridada.
Repita esta operación con el otro codo enchapado.
Coloque el montaje del surtidor en ambas arandelas.
Enrosque las tuercas por el montaje del surtidor para fijarlo a los
codos enchapados.
NOTA: Verifique que la grifería esté paralela a la pared acabada. No
force la grifería al instalar el perno del soporte en el soporte.
Desenrosque el perno de soporte de manera que entre en el
orificio de la parte posterior del soporte.
Fije el perno de soporte en su lugar con el tornillo de fijación del
soporte.
Kohler Co. Español-11 1008209-2-G
Page 46

Montaje de
la cabeza de
la ducha
Niple
B
Manguera de la ducha
Se muestra la instalación
de montaje en cubierta
A
9. Instale la ducha de mano - Todas las instalaciones
NOTA: Sólo se ha ilustrado la instalación de montaje en cubierta. La
ducha de mano se instala de la misma forma con todos los tipos de
griferías.
Enrosque el extremo de la manguera de ducha con la tuerca en el
niple.
Enrosque la ducha de mano en el otro extremo de la manguera
de la ducha.
1008209-2-G Español-12 Kohler Co.
Page 47

Tornillo
de espiga
Bonete
Extensión
de espiga
Tornillo de manija
Agua caliente
Abrir
Tornillo de fijación
Manija
ovalada
Pieza de
cerámica
Agua fría
Abrir
Cerrar
Ilustrado en la posición cerrada
Cerrar
10. Instalación de la manija ovalada
Verifique que las válvulas estén en posición cerrada.
AVISO: Riesgo de daños al producto. No apriete demasiado. El
apretar demasiado dañará la manija.
Inserte el tornillo de espiga en la extensión de espiga y apriete
con un destornillador.
Coloque la pieza de inserción de cerámica en la manija ovalada.
Fije la pieza de inserción con el tornillo de la manija. No apriete
demasiado.
Afloje el tornillo de fijación.
Coloque el montaje de la manija sobre la extensión de espiga.
Verifique que la manija esté colocada horizontalmente y nivelada.
De ser necesario, retire la manija y ajuste la posición en las
ranuras de la extensión de espiga hasta que esté horizontal. Para
un ajuste fino, tire de la extensión de espiga hasta que se suelte
de la válvula, gire y vuelva a colocarla en la posición original. No
saque la extensión de espiga por completo.
Apriete el tornillo de fijación.
Repita el procedimiento con la otra manija.
Kohler Co. Español-13 1008209-2-G
Page 48

Bonete
Extensión
de espiga
Manija de
palanca
Tornillo
de espiga
Agua caliente
Abrir
Cerrar
Ilustrado en la
posición cerrada
Agua fría
Abrir
Cerrar
11. Instalación de la manija de palanca de una pieza
Verifique que las válvulas estén en posición cerrada.
Inserte la manija en la extensión de espiga de manera que quede
en posición horizontal.
Verifique que la manija esté colocada horizontalmente y nivelada.
De ser necesario, retire la manija y ajuste la posición en las
ranuras de la extensión de espiga hasta que esté horizontal. Para
un ajuste fino, tire de la extensión de espiga hasta que se suelte
de la válvula, gire y vuelva a colocarla en la posición original. No
saque la extensión de espiga por completo.
AVISO: Riesgo de daños al producto. No apriete demasiado. El
apretar demasiado dañará la manija.
Inserte el tornillo de espiga en la extensión de espiga y apriete
con un destornillador.
Repita el procedimiento con la otra manija.
1008209-2-G Español-14 Kohler Co.
Page 49

Bonete
Extensión
de espiga
Tornillo de
fijación
Abrir
Cerrar
Tornillo de
espiga
Ilustrado en la
posición cerrada
Manija de
seis aspas
Abrir
Cerrar
12. Instalación de la manija de seis aspas
Verifique que las válvulas estén en posición cerrada.
AVISO: Riesgo de daños al producto. No apriete demasiado. El
apretar demasiado dañará la manija.
Inserte el tornillo de espiga en la extensión de espiga y apriete
con un destornillador.
Afloje el tornillo de fijación.
Coloque el montaje de la manija sobre la extensión de espiga.
Verifique que la etiqueta de la manija esté colocada
horizontalmente y nivelada. De ser necesario, retire la manija y
ajuste la posición en las ranuras de la extensión de espiga hasta
que esté horizontal. Para un ajuste fino, tire de la extensión de
espiga hasta que se suelte de la válvula, gire y vuelva a colocarla
en la posición original. No saque la extensión de espiga por
completo.
Apriete el tornillo de fijación.
Repita el procedimiento con la otra manija.
Kohler Co. Español-15 1008209-2-G
Page 50

Tapón terminal
Arandela
Bonete
Extensión
de espiga
Adaptador de
la bañera
Abrir
Manga corta
Tornillo de
espiga
Tapa de
la base
Arosello
Manga larga
Brazo de
la manija
Abrir
Cerrar
Ilustrado en la posición cerrada
Cerrar
13. Instalación de la manija de palanca de múltiples pieza
Verifique que las válvulas estén en posición cerrada.
AVISO: Riesgo de daños al producto. No apriete demasiado. El
apretar demasiado dañará la manija.
Instale la extensión de espiga en la espiga de válvula.
Enrosque el bonete en el cuerpo de la válvula.
Alinee el adaptador de bañera sobre la extensión de espiga de
manera que los orificios estén alineados horizontalmente. Fije con
el tornillo.
Instale la tapa de la base en el extremo del adaptador de la
bañera.
Coloque la manga larga sobre el brazo de la manija.
Deslice el arosello (O-ring) por el brazo de la manija hasta llegar
a la manga larga.
Inserte el brazo de la manija por el adaptador de la bañera.
Deslice la manga corta por el brazo de la manija para apoyarla en
el adaptador de la bañera.
Deslice la arandela por el brazo de la manija hasta llegar a la
manga corta.
Enrosque el tapón terminal por el extremo del brazo de manija
para fijar el montaje.
Repita el procedimiento con la otra manija.
1008209-2-G Español-16 Kohler Co.
Page 51

14. Termine la instalación
Abra los suministros.
Abra el agua fría y caliente.
Haga circular agua por la ducha de mano y la grifería.
Verifique que no haya fugas.
Cierre el agua.
Kohler Co. Español-17 1008209-2-G
Page 52

USA: 1-800-4-KOHLER
Canada: 1-800-964-5590
México: 001-877-680-1310
kohler.com
©2007 Kohler Co.
1008209-2-G
 Loading...