

Page 1

Installation Guide
3/4″ High-Flow Deck/Rim Mount Bath Valve
K-301
M product numbers are for Mexico (i.e. K-12345M)
Los números de productos seguidos de
M corresponden a México (Ej.
K-12345M)
Français, page “Français-1”
Español, página “Español-1”
113969-2-AC
Page 2
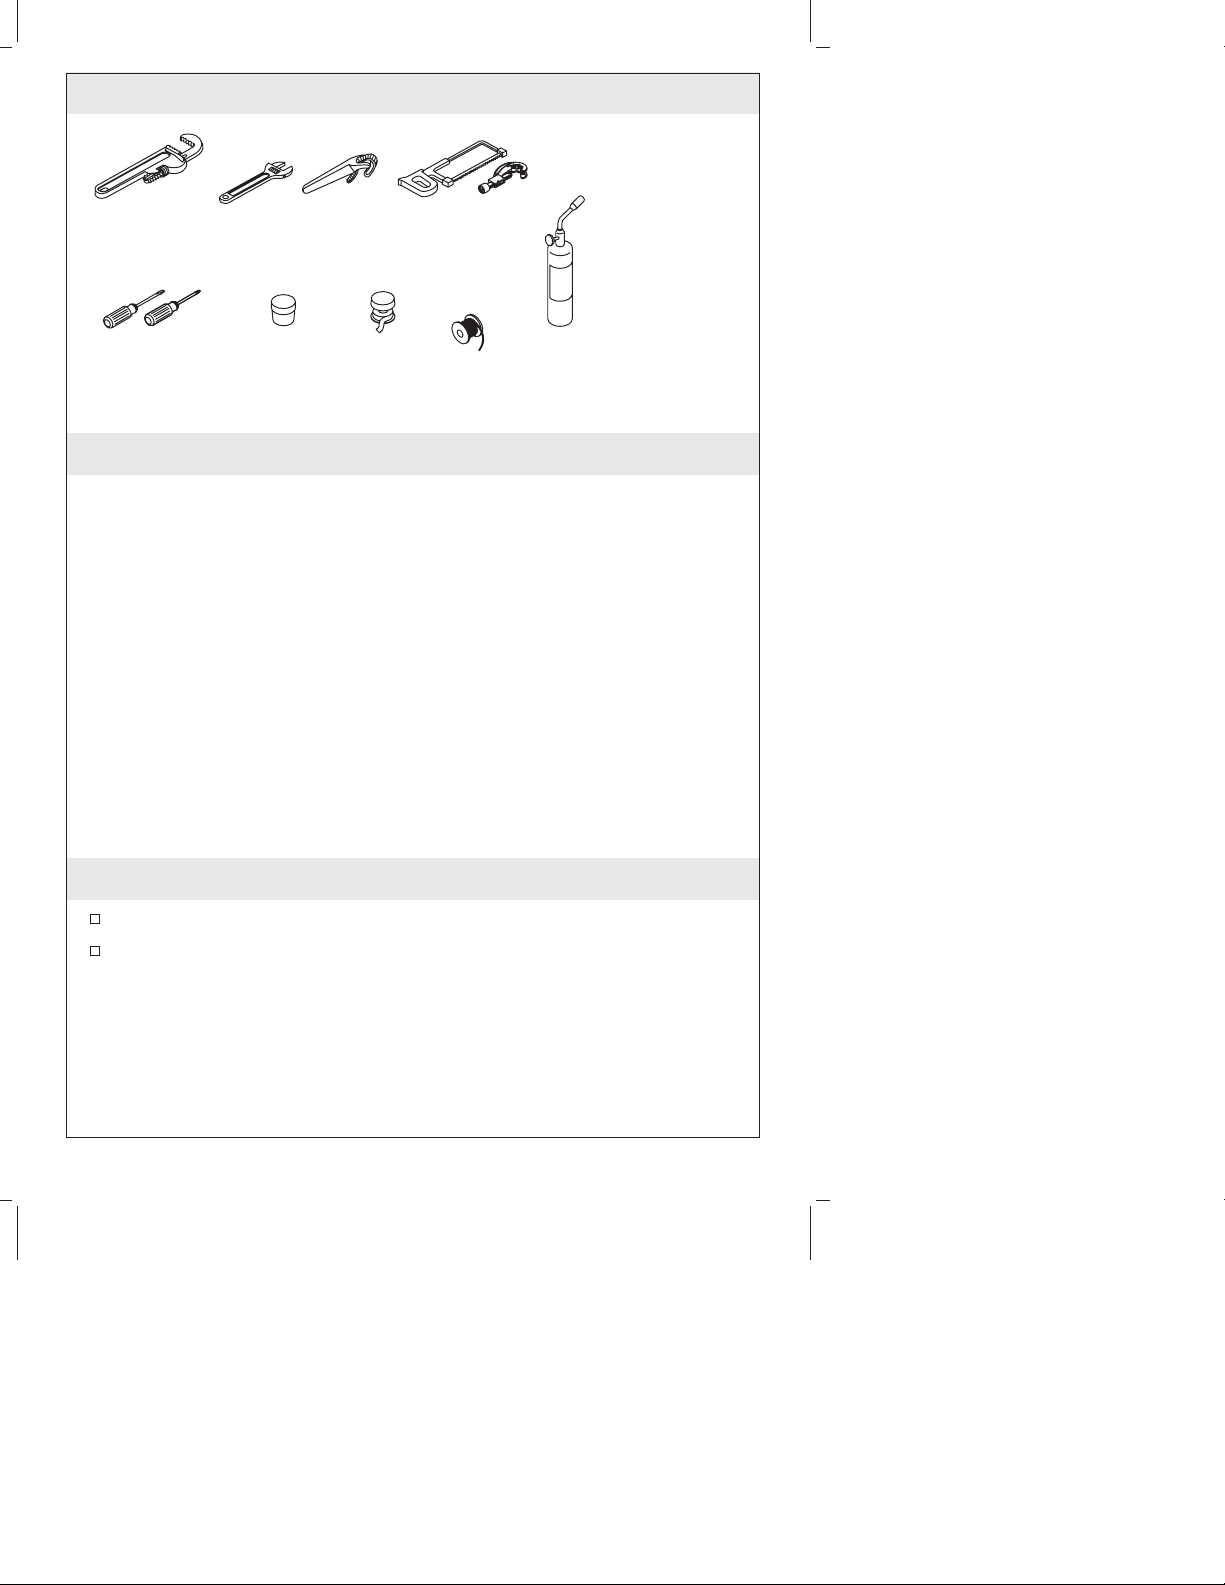
Tools and Materials
Pipe
Wrench
Adjustable
Wrench
Strap
Wrench
Plus:
• Wood Screws
• Rags
Hacksaw or
Tubing Cutter
Assorted
Screwdrivers
Plumbers
Putty
Thread
Sealant
Solder
Propane
Torch
Thank You For Choosing Kohler Company
Thank you for choosing Kohler Company. Your Kohler Company
product reflects the true passion for design, craftsmanship, artistry, and
innovation Kohler Company stands for. We are confident its
dependability and beauty will surpass your highest expectations,
satisfying you for years to come.
All the information in this guide is based upon the latest product
information available at the time of publication. At Kohler Company,
we strive to fulfill our mission of improving the level of gracious living
for each person who is touched by our products and services. We
reserve the right to make changes in product characteristics, packaging,
or availability at any time without notice.
Please take a few minutes to review this guide. If you encounter any
installation or performance problems, please call 1-800-4KOHLER
(1-800-456-4537) from within the USA and Canada, or 001-877-680-1310
from within Mexico.
Before You Begin
Observe all local plumbing and building codes.
Shut off the water supply.
113969-2-AC 2 Kohler Co.
Page 3

Before You Begin (cont.)
Instructions are given for installations with 8″ (20.3 cm) centers.
For wider installations, adjust all roughing-in dimensions and
copper tube lengths accordingly. If the spout is to be installed
more than 24″ (61 cm) from the valves, Kohler recommends
installing a Sioux Chief 652-AD water hammer arrestor designed
for this type of installation. Install the water hammer arrestor
close to the outlet ports of the valves. For more information
contact Sioux Chief at www.siouxchief.com.
Products purchased separately may change valve placement and
alignment.
These instructions cover two methods of installation: installation
on finished deck or rim, and installation on rough (unfinished)
deck. Follow the sections and directions that pertain to your
installation.
Provide an access panel to the valves for servicing.
Installer-supplied copper tubing is to be: 5/8″ OD (1/2″ Nom.);
and 7/8″ OD (3/4″ Nom.) for inlets.
Plaster guard diameters are approximately 1-5/8″ (4.1 cm) for the
valve, and 7/8″ (2.2 cm) for the spout.
The finished deck material must fit closely to the diameters of the
plastic guards.
The spout plaster guard diameter is 7/8″ (2.2 cm) for the spout.
Leave the protective sleeve on the spout supply tube until spout
installation. This is an O-ring sealing surface which may be
damaged when unprotected.
Kohler Co. reserves the right to make revisions in the design of
faucets without notice, as specified in the Price Book.
Kohler Co. 3 113969-2-AC
Page 4
7/8" D.
Y
1-13/16"
(4.6 cm)
1-5/16" D.
7/8" I.D.
(3/4" Nom.)
1-5/16" D.
7/8" I.D.
(3/4" Nom.)
Rough Deck Plus Finished Deck (Tile) Roughing-In
5/8" O.D. Tubing (1/2" Nom.)
Finished Deck And Rim Mount Roughing-In
Y
5/8" O.D. Tubing
(1/2" Nom.)
4-5/8"
(11.7 cm)
7/8" D.
5-5/8"
(14.3 cm)
2-1/16"
(5.2 cm)
1/2" (1.3 cm) Min.
2-1/8" (5.4 cm) Max.
Deck Thickness
1/8" (3 mm) Min.
2-1/8" (5.4 cm) Max.
Rim Thickness
1-1/4" (3.2 cm) Max.
Tile Thickness
1/2" (1.3cm) Min.
2-1/8" (5.4 cm) Max.
Rough Deck
Thickness
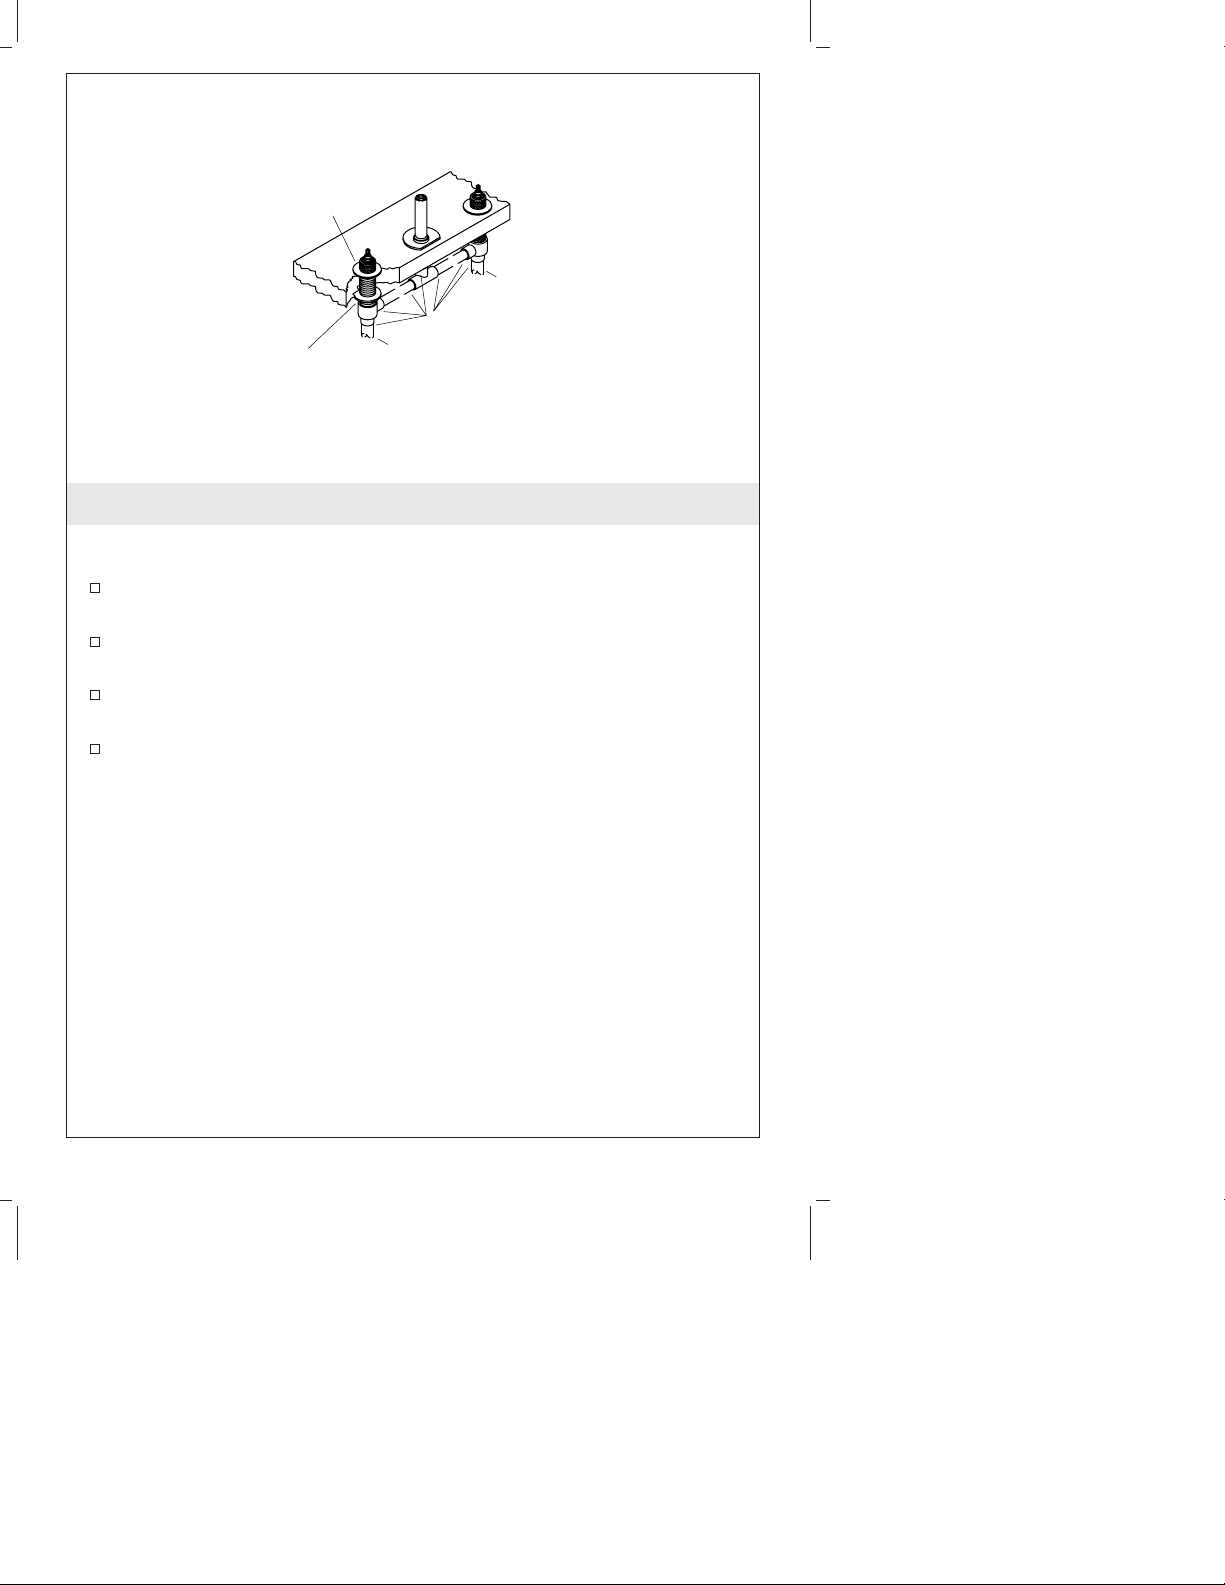
1. Prepare the Site
X=the distance from the centerline of the spout inlet base to the
front of the spout base plus 1/2″ (2.5 cm).
Y=the distance between the valve centerlines varies. Check the
handle and spout installation instructions for exact dimensions.
Install or relocate the water supplies as needed.
Protect the surfaces of the bath/deck during installation.
Ensure that holes drilled into the deck are not oversized. The
spout and valves require adequate base material strength and
maximum contact area with the deck.
X
X
X
NOTE: Reinforcing material may be required if the deck or rim is
thin. Install 1/2″ exterior grade plywood before proceeding.
NOTE: For installations to be covered with tile, the tile thickness
must not exceed 1-1/4″ (3.2 cm).
For installations with 8″ (20.3 cm) centers using copper tubing
(1/2″ nominal, 5/8″ OD), cut two 2-7/8″ (7.3 cm) pieces and one
2-3/8″ (6 cm) piece of tubing.
113969-2-AC 4 Kohler Co.
Page 5

Prepare the Site (cont.)
The diameter of the spout hole should be 1-1/8″ (2.9 cm)
maximum.
The diameter of the valve holes should be 1-1/2″ (3.8 cm)
maximum.
Kohler Co. 5 113969-2-AC
Page 6
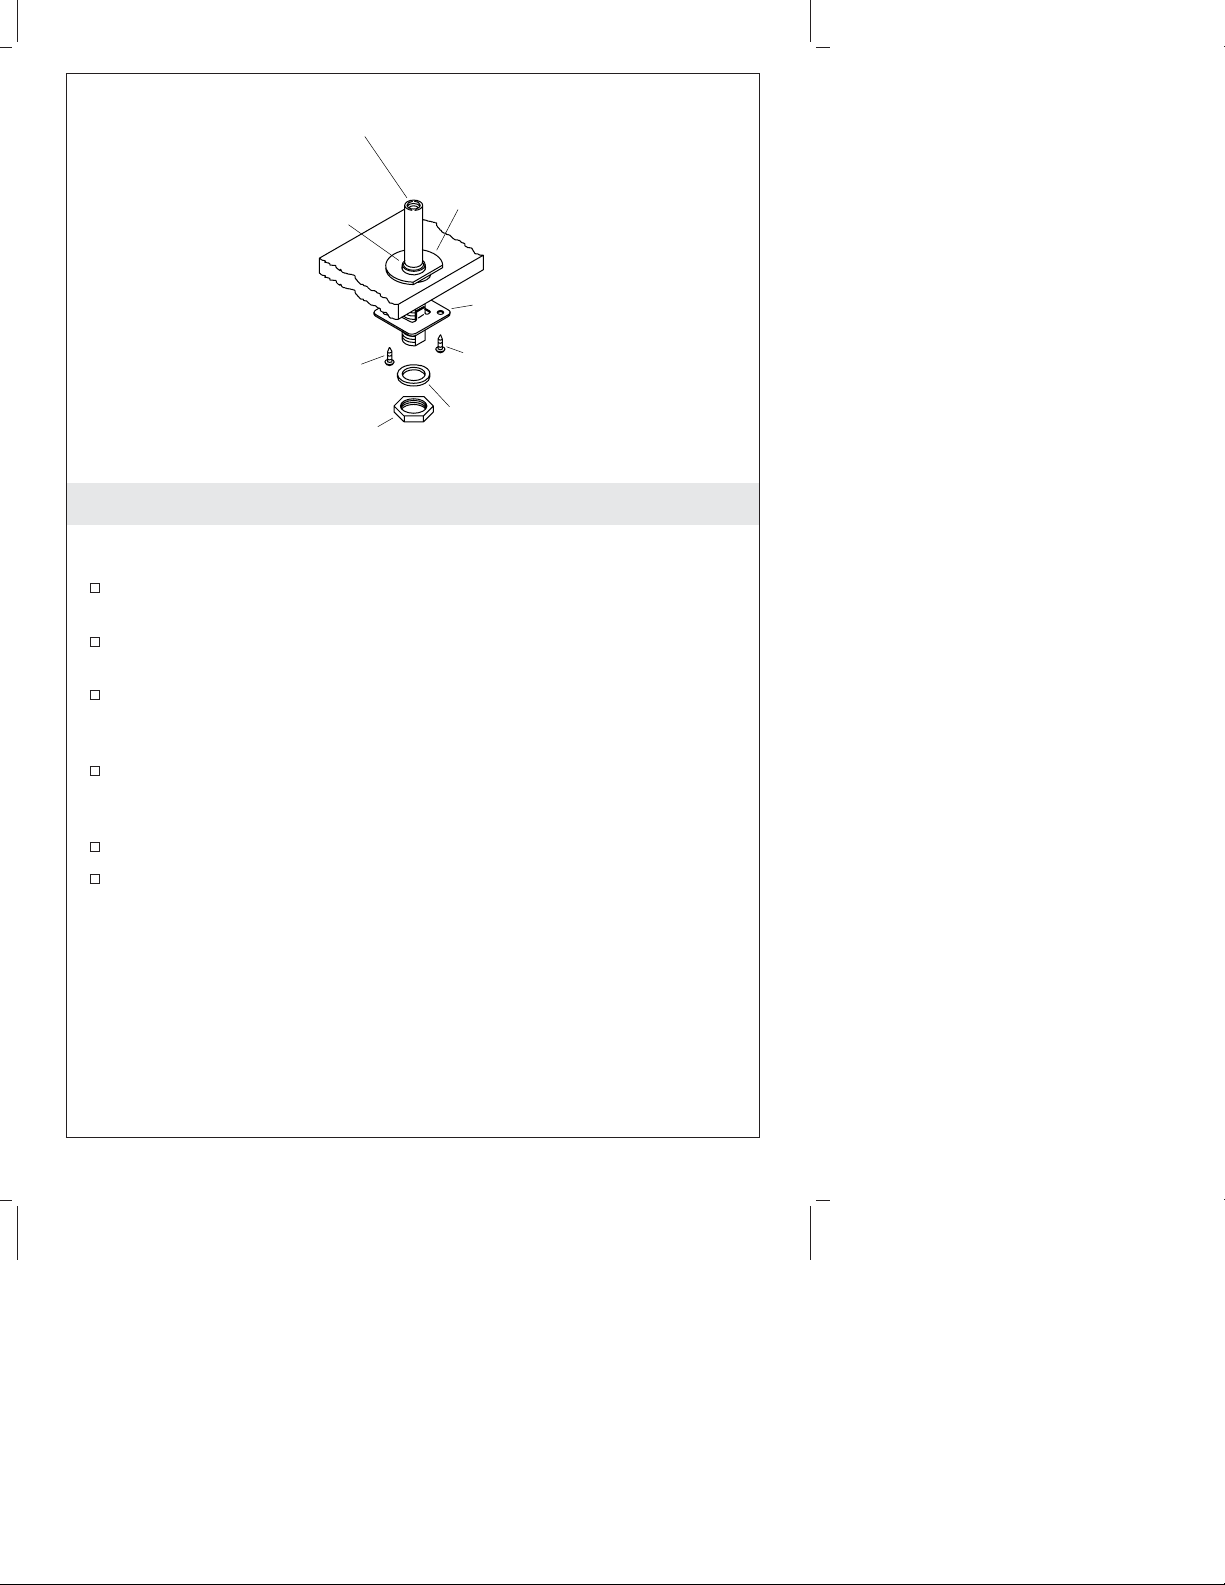
Spout Supply Tube
Spout
Supply
Shoulder
Wood
Screw
Nut
Brass
Washer
Plate
Wood
Screw
Washer
2. Install the Spout Supply Tube
NOTE: Leave the protective sleeve on the spout supply tube until
the spout installation.
Slide the brass washer from the bottom of the spout supply tube
over the threads until it reaches the spout supply shoulder.
Insert the spout supply tube through the mounting hole from the
top of the deck/bath rim.
The flat portion of the brass washer should face forward, and the
countersunk holes should face up. The spout supply tube will be
suspended by the brass washer.
Slide the plate (oriented with the tabs toward the deck) and
washer onto the spout supply tube from the bottom and thread
on the nut.
Tighten the nut.
Secure the plate to the rough deck with two wood screws.
113969-2-AC 6 Kohler Co.
Page 7
2-3/8" (6 cm) Copper
Tube (Finished Deck
or Bath Rim
Installation Only)
Rubber
Washer
Fiber
Washer
Mounting
Nut
1/2"
Tee
2-7/8" (7.3 cm)
Copper Tubes
Valve Body
Valve Stem
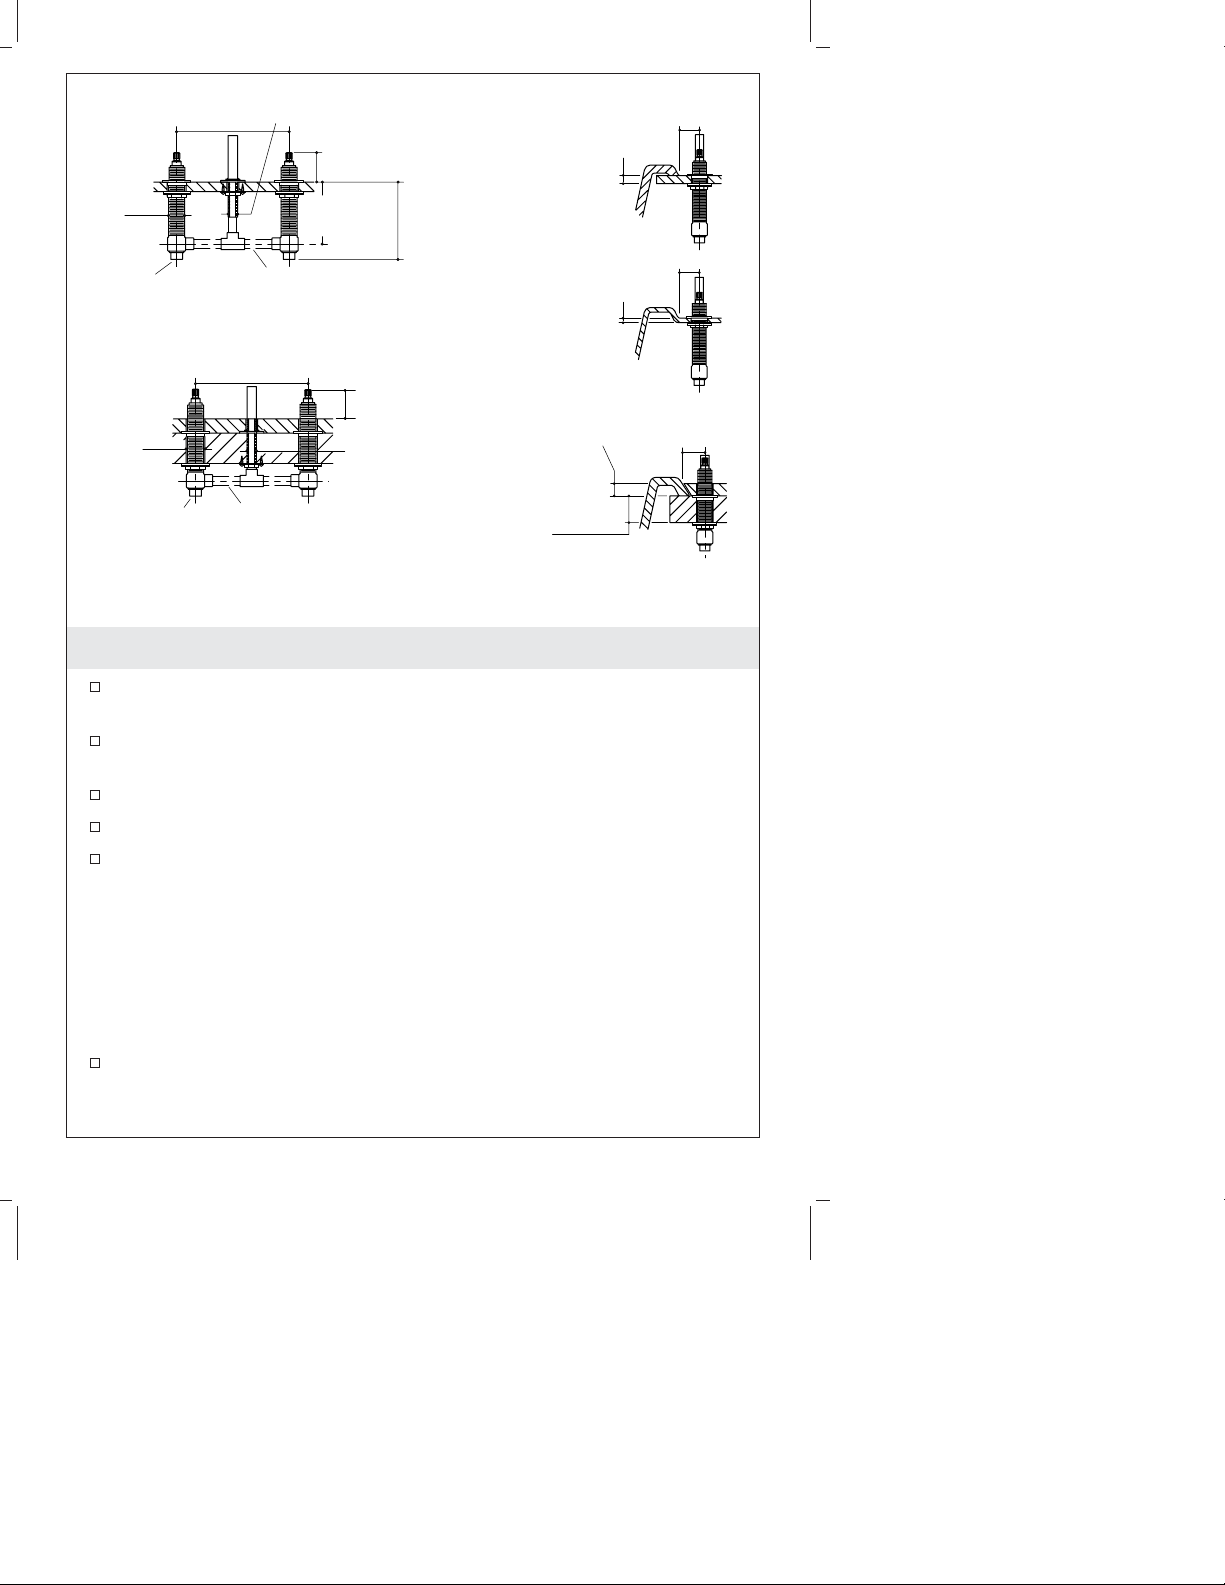
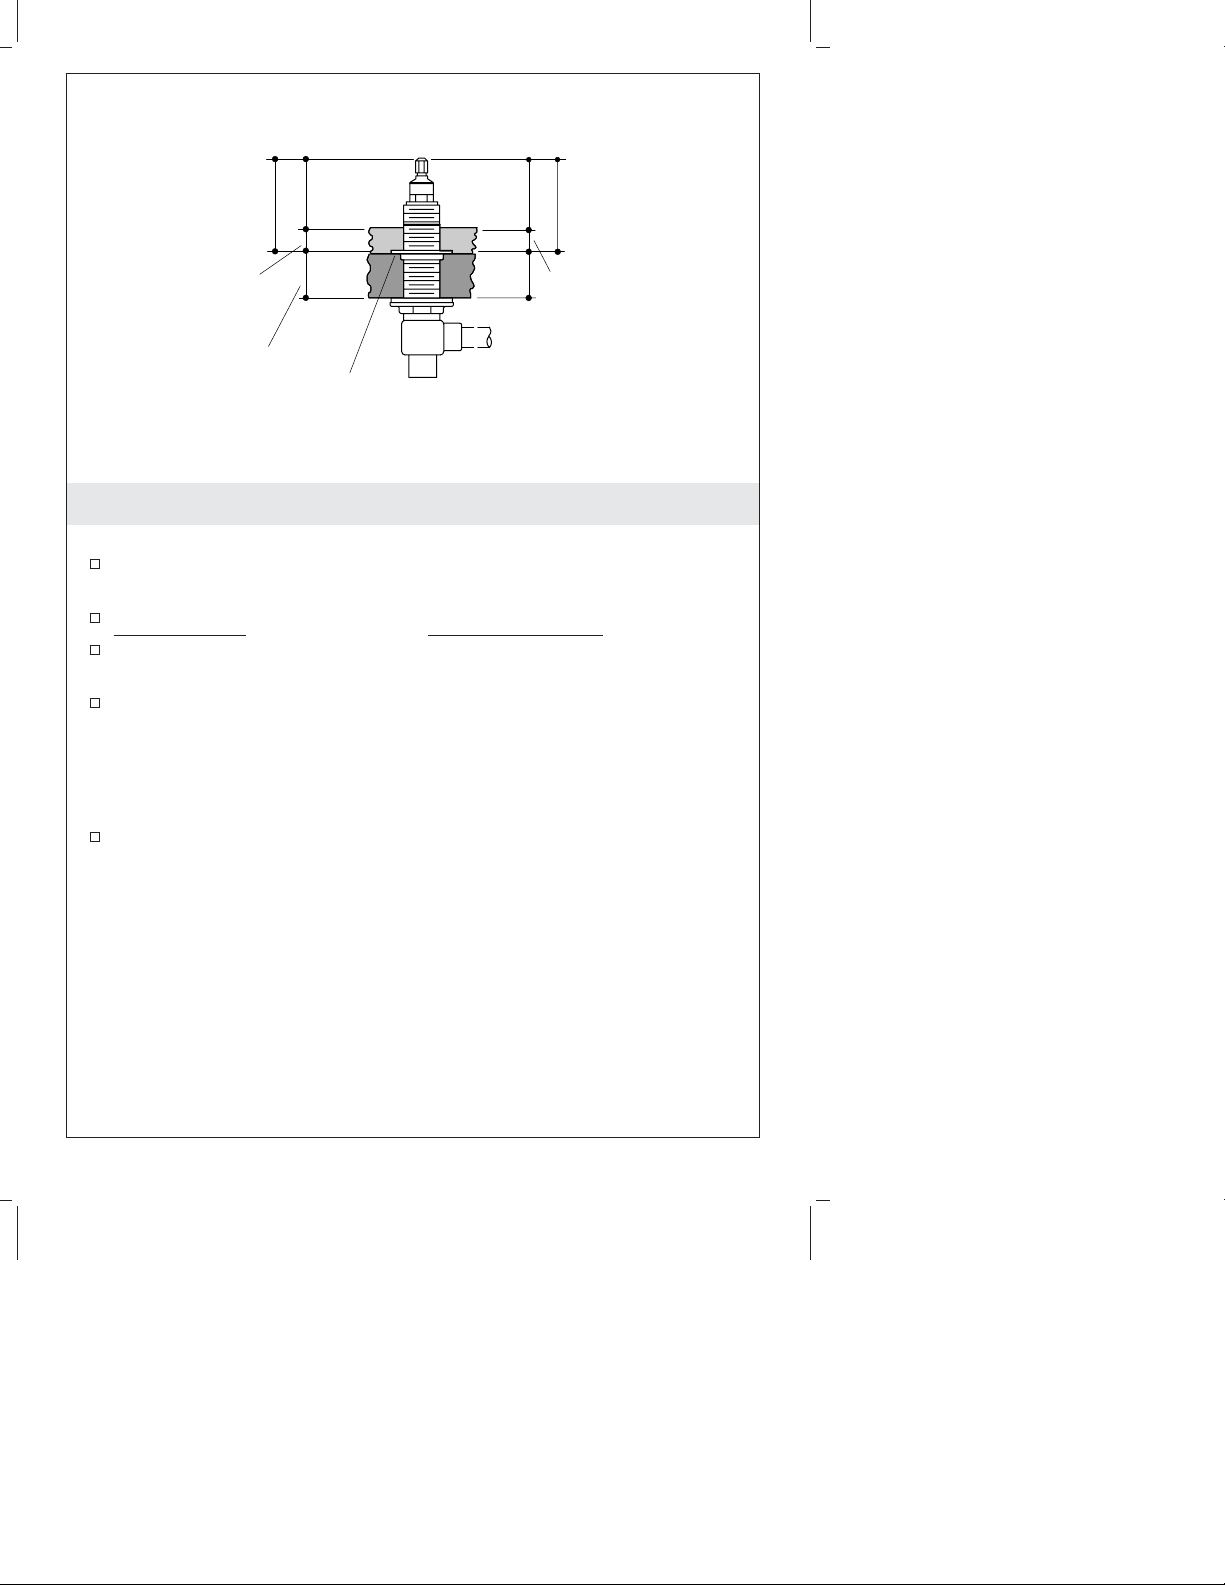
3. Install the Valves
IMPORTANT! Do not solder the connections during this step.
Thread one mounting nut, flange side up, followed by one fiber
washer and one rubber washers onto each valve body.
Insert the 2-7/8″ (7.3 cm) long copper tubes between the valve
bodies and 1/2″ tee.
For a finished deck or bath rim installation only, insert the 2-3/8″
(6 cm) long copper tube into the top of the tee.
1-13/16"
(4.6 cm)
Collar
NOTE: Orient the valve body marked “COLD” so it is on the right
when facing the front of the faucet.
Insert the valve bodies through the mounting holes from the
bottom of the deck/rim.
Hold the tube in place.
Place a collar, flange side up, on each valve body and thread
them down to at least 1-13/16″ (4.6 cm) from the top of the valve
stem.
Kohler Co. 7 113969-2-AC
Page 8
Collar
Cold
Supply
Mounting
Nut
Solder
Hot
Supply
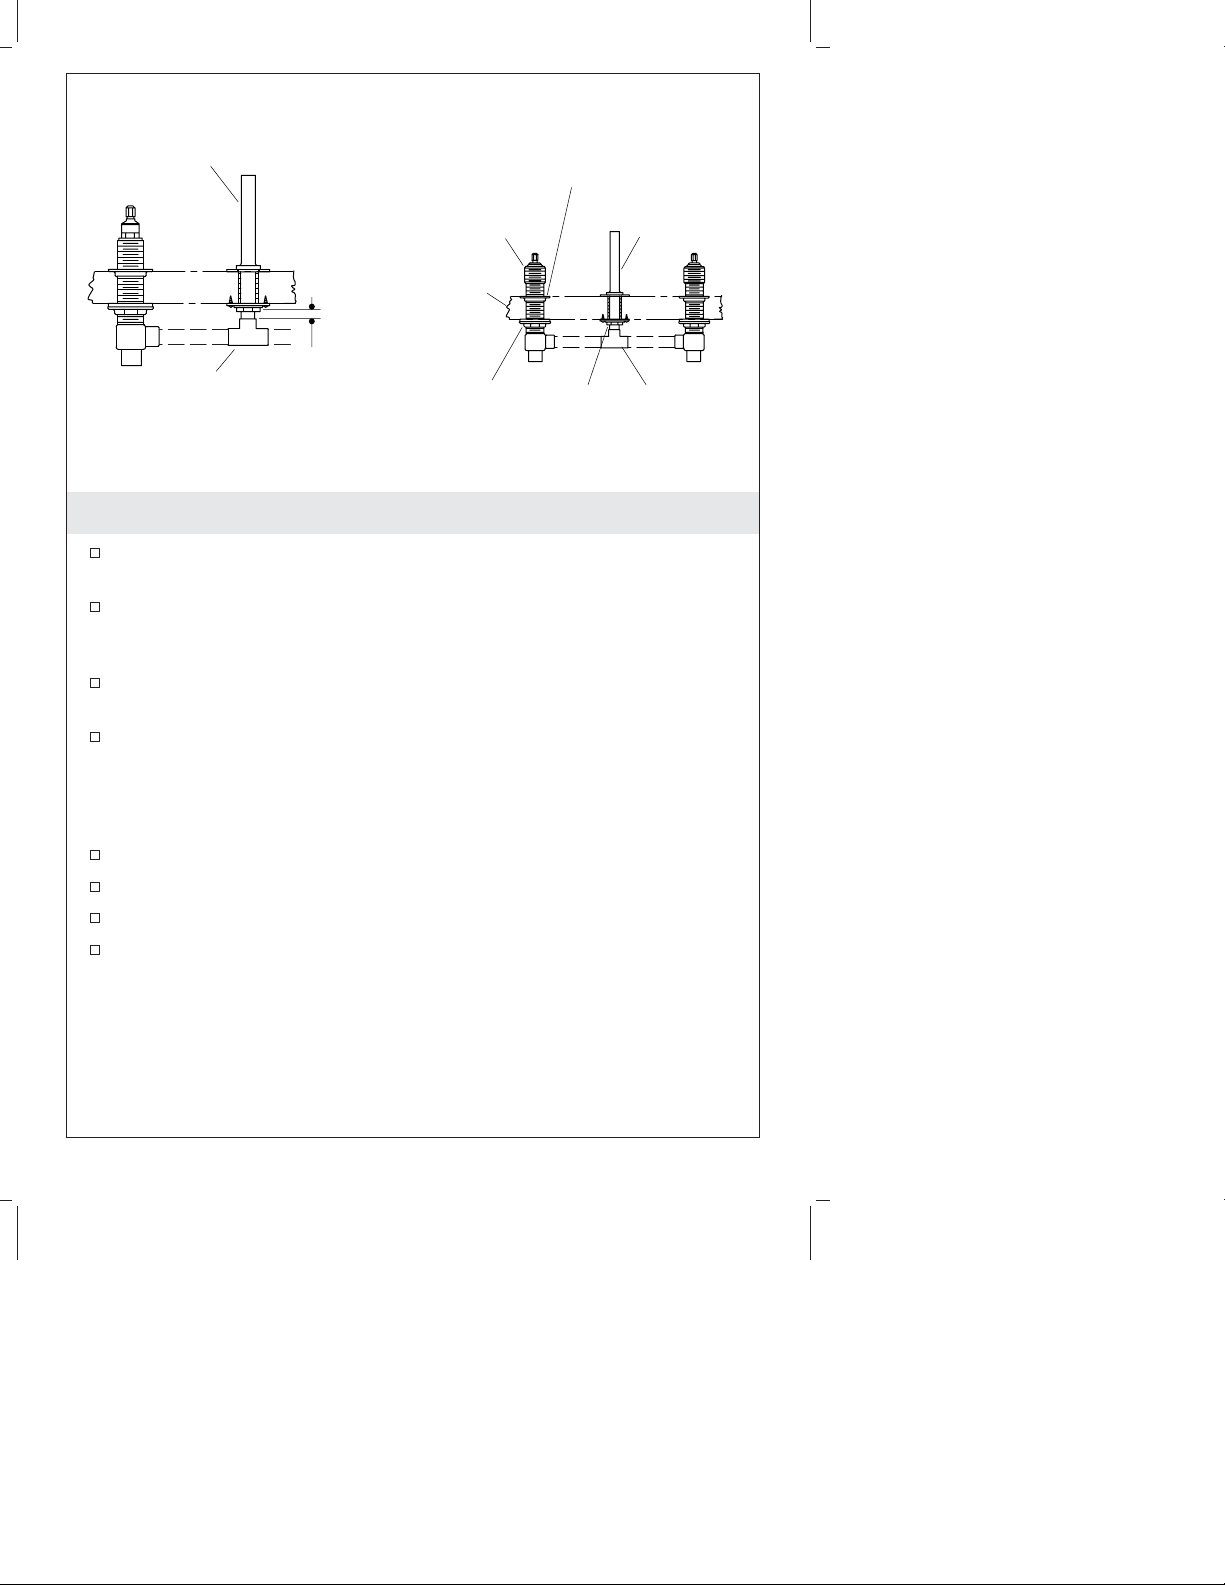
4. Installation on Finished Deck or Rim
NOTE: For installation on a rough (unfinished) deck, proceed to the
″Installation on Rough (Unfinished) Deck″ section.
Tighten the mounting nuts on each valve body from underneath
the deck/rim.
Solder the copper tubes to the valve bodies, tee and spout supply
tube.
Solder the hot and cold water tubes to the valve body inlets (not
shown). Make sure that the cold supply is on the right side.
Go to the ″Check Operation of Valves″ section.
113969-2-AC 8 Kohler Co.
Page 9
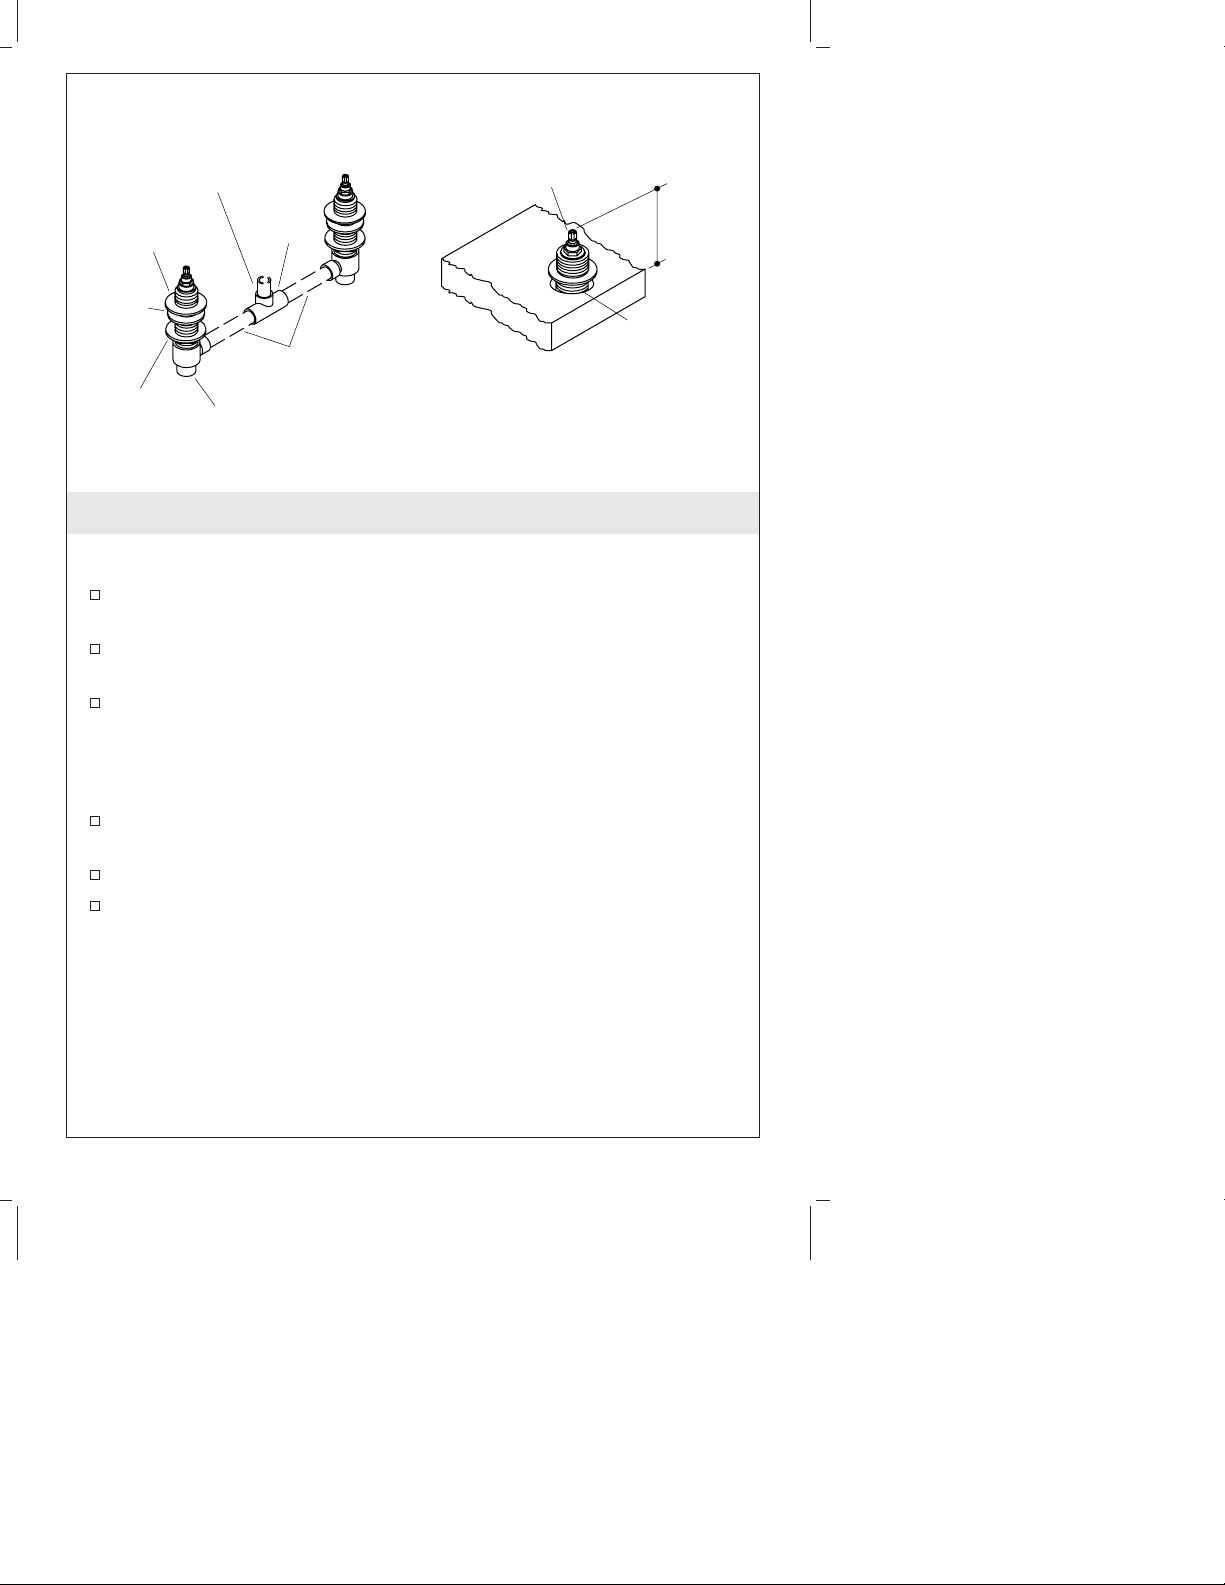
Top of Valve Stem
Calculated
Valve Body
Clearance
Deck thickness less
than 1" (2.5 cm)
Rough Unfinished
Deck 2-1/8" (5.4 cm)
Max.
2-1/16"
(5.2 cm)
Threaded
Collar
3–1/6" (7.8 cm)
Valve Body
Clearance
Deck thickness
between 1" (2.5 cm)
and 1–1/4" (3.2 cm)
5. Installation on Rough Deck
When the tile or deck material is less than 1” (2.5 cm) thick:
Add the thickness of the tile/deck material to 2-1/16″ (5.2 cm) to
get the installation height for the valve bodies.
Deck Material+ 2-1/16″ (5.2 cm) =Installation Height
Note this dimension. You will need to use it again after
connecting the supply tube.
Adjust the threaded collar until the dimension from the top of the
valve stem to the top of the rough deck surface equals the
determined clearance.
When the tile or deck material is between 1” (2.5 cm) to 1–1/4” (3.2
cm) thick:
Thread the collar down onto each of the valve bodies until the
top of the valve stem is 3-1/16″ (7.8 cm) above the surface of the
rough deck.
Kohler Co. 9 113969-2-AC
Page 10
Spout Supply
Tube
Tee
A
Measure
Distance
Sleeve
Rough
Deck
Mounting
Nut
Threaded
Collar
Spout Supply
Tube
Copper
Tube
6. Install the Tubing - Rough Deck Installations
Measure the distance from the bottom of the spout supply tube to
the top of the tee.
Add 1″ (2.5 cm) to this measurement, and cut a piece of 1/2″
Nom. (5/8″ O.D.) copper tubing to fit into the supply tube and
tee port.
Back off the threaded collars as far as possible without removing
them.
Pivot the valve bodies enough to remove the tee and two pieces
of tubing.
Tee
NOTE: If the valve body holes are smaller than recommended, it
may be necessary to remove the entire valve body assembly.
Install the tubing into the tee.
Mate the copper tube from the tee with the spout supply tube.
Pivot the valve bodies onto the two pieces of copper tubing.
DO NOT solder at this time.
113969-2-AC 10 Kohler Co.
Page 11
Tile
Thickness
Pre-Determined
Clearance
Requirement
Top of
Sleeve
Rough
Deck
Valve
Body
Copper
Tube
Spout
Supply
Tube
Threaded
Collar
Rough
Deck
Mounting
Nut
Solder
Hot
Supply
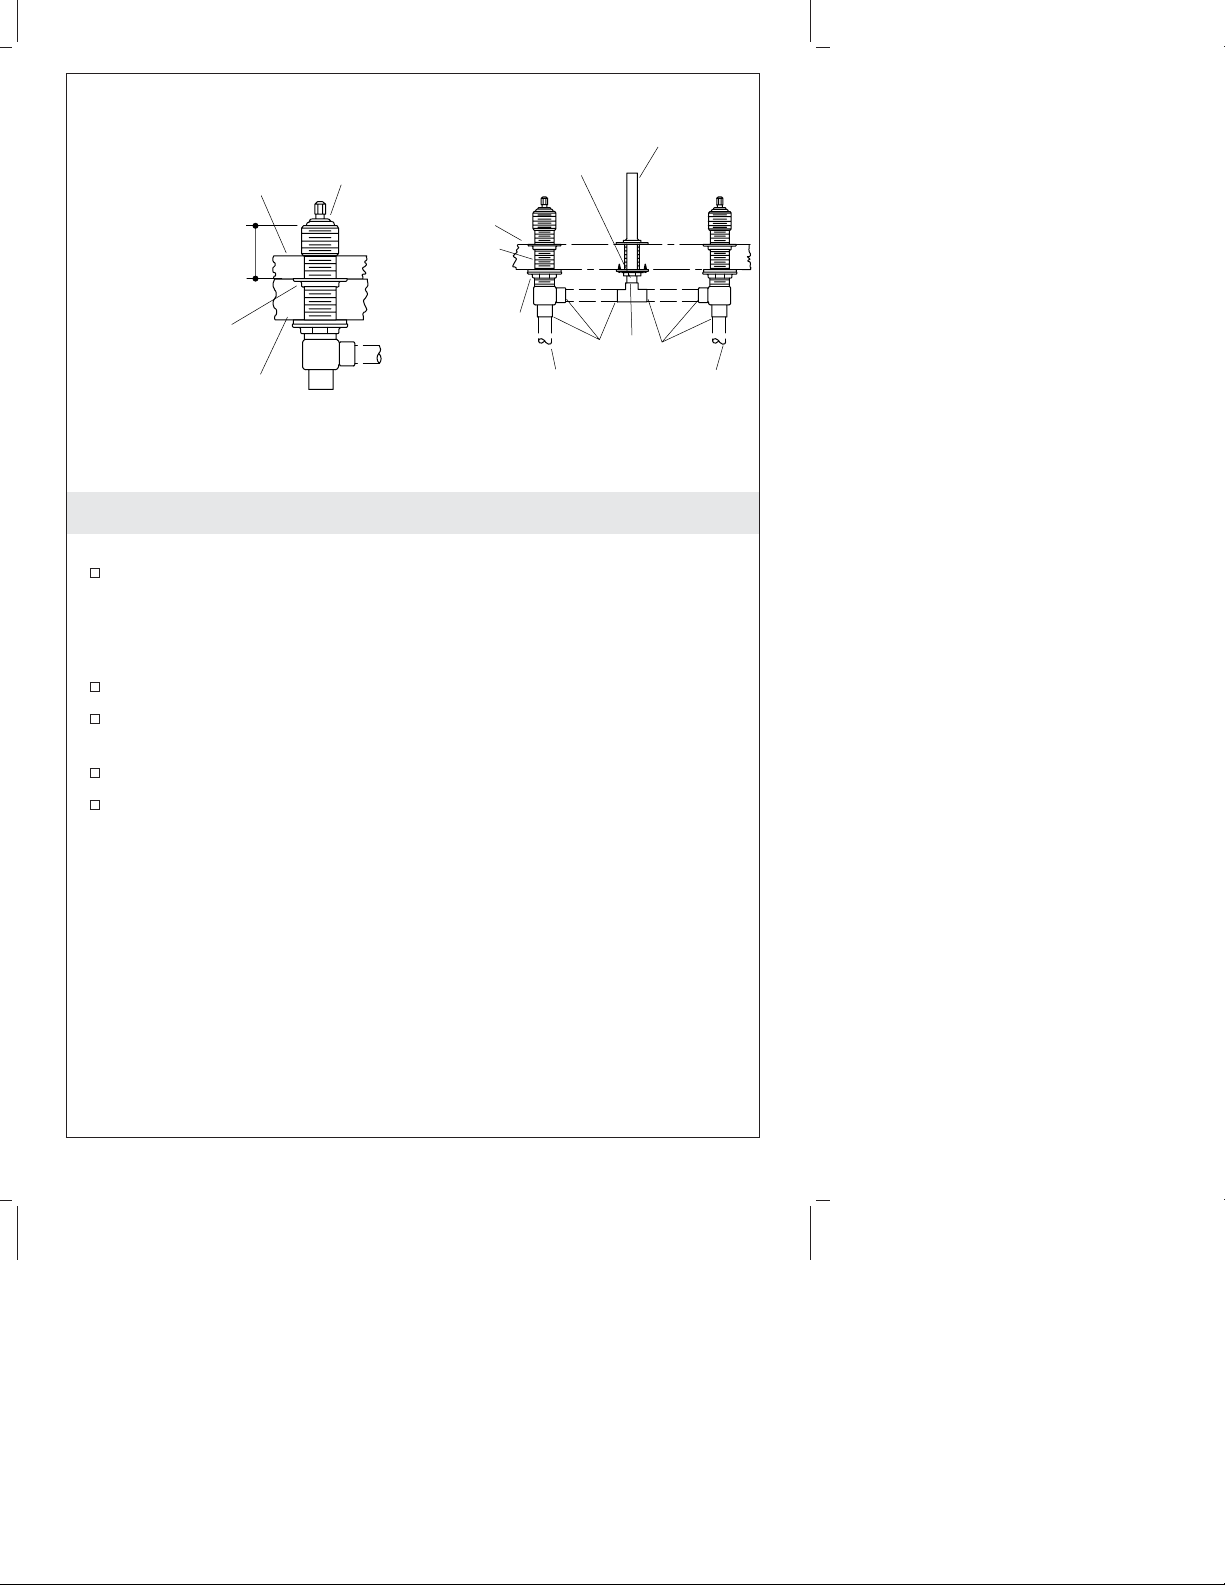
7. Complete Installation on Rough Deck
Reset the Valve Body Height
Adjust the threaded collars until the dimension from the top of
the sleeve to the top of the rough deck equals the clearance
requirement calculated earlier.
Solder the Connections
Tighten the mounting nuts on each valve body under the deck.
Solder the copper tubes to the valve bodies, tee and spout supply
tube.
Make sure that the cold supply is on the right side.
Solder the hot and cold water supply tubes to the valve body
inlets.
Cold
Supply
Kohler Co. 11 113969-2-AC
Page 12
3/8" Pipe Plug
Close Hot
Close Cold
8. Check Operation of Valves
WARNING: Risk of personal injury. Wrap a cloth towel
around the pipe plug to prevent water spray. Water will
purge from the supply tube when you remove the plug.
Thread a 3/8″ pipe plug into the top of the spout supply tube.
Ensure that the valves are in the closed position. Turn the cold
valve fully counterclockwise. Turn the hot valve fully clockwise.
Turn on the main water supply.
Check the complete installation for leaks with the valves closed
and open.
Repair leaks as needed.
Close both valves and turn off the main water supply.
Carefully loosen the pipe plug to remove pressure.
Thread the pipe plug back into the spout supply tube.
Install the cardboard plaster guards over both valves and the
spout supply tube.
113969-2-AC 12 Kohler Co.
Page 13

Valve
Shoulder
Tile
3/4" (1.9 cm) Min.
1-1/4" (3.2 cm) Max.
9. Install Tile (If Applicable)
Verify that there will be a 3/4″ (1.9 cm) to 1-1/4″ (3.2 cm)
distance from the top of the valve shoulder to the top of the tile.
If there is not, correct the valve clearance as described earlier.
Install the tile up to the plaster guards on the valves and the
spout supply tube.
Kohler Co. 13 113969-2-AC
Page 14

Guide d’installation
Valve de baignoire à fixation sur
rebord/comptoir haut débit de 3/4″
Outils et matériels
Plus:
• Vis à bois
• Chiffons
Clé à
tuyau
Clé à
molette
Clé à
sangle
Scie à
métaux ou
coupe tubes
Tournevis
assortis
Mastic de
plombier
Joint
d'étanchéité
pour filetage
Soudure
Chalumeau
à propane
Merci d’avoir choisi la compagnie Kohler
Merci d’avoir choisi la compagnie Kohler. Votre produit de la
compagnie Kohler reflète la véritable passion du design, d’artisanat,
d’art et d’innovation représentant la compagnie Kohler. Nous sommes
confiants que sa fiabilité et beauté surpasseront vos exigences les plus
élevées, vous satisfaisant pendant les années à venir.
Toute l’information dans ce guide est basée sur la dernière disponible
au moment de la publication. A la compagnie Kohler, nous aspirons à
remplir notre mission d’améliorer le niveau de vie gracieux pour
chaque individu affecté par nos produits et services. Nous nous
réservons le droit d’apporter des modifications aux caractéristiques,
aux emballages et à la disponibilité des produits à tout moment, et ce
sans préavis.
Veuillez prendre s’il vous plaît quelques minutes pour étudier ce
guide. En cas de problème d’installation ou de performance, veuillez
composer le 1-800-4-KOHLER (1-800-456-4537) à partir des É.U., et
Canada, ou le 001-877-680-1310 à partir du Mexique.
Avant de commencer
Respecter tous les codes de plomberie et de bâtiment locaux.
Couper l’alimentation d’eau.
Kohler Co. Français-1 113969-2-AC
Page 15

Avant de commencer (cont.)
Des instructions correspondent aux installations avec des centres
de 8″ (20,3 cm). Pour des installations plus larges, ajuster les
dimensions d’installation et la longueur de la tuyauterie en cuivre
en conséquence. Si le bec doit être installé à plus de 24″ (61 cm)
des valves, Kohler recommande d’installer un dispositif antibélier
Sioux Chief 652-AD conçu pour ce type d’installation. Installer
l’antibélier à proximité des orifices de sortie des valves. Pour
obtenir de l’information supplémentaire, consulter le site de Sioux
Chief à www.siouxchief.com.
Des produits achetés séparément peuvent influencer
l’emplacement et l’alignement de la valve.
Ces instructions couvrent deux méthodes d’installation:
Installation sur rebord ou comptoir fini et installation sur
comptoir brut (non fini). Suivre les étapes et directives qui
s’appliquent à votre installation.
Fournir un panneau d’accès au service des valves.
Le tuyau en cuivre fourni par l’installateur doit être de: Ø 5/8″
Ext. (1/2″ Nom.); et de Ø 7/8″ Ext. (3/4″ Nom.) pour les entrées.
Les diamètres du renfort de plâtre sont d’environ 1-5/8″ (4,1 cm)
pour la valve et de 7/8″ (2,2 cm) pour le bec.
Le matériau du comptoir fini doit bien s’ajuster aux diamètres des
protections en plastique.
Le diamètre du renfort en plâtre doit être à 7/8″ (2,2 cm) pour le
bec.
Laisser en place les manchons de protection du tube
d’alimentation du bec jusqu’à l’installation du bec. C’est une
surface d’étanchéité par joint torique qui devrait être protégée
pour ne pas l’endommager.
Kohler Co. se réserve le droit d’apporter toutes modifications au
design des robinets et ceci sans préavis, comme spécifié dans le
catalogue des prix.
Kohler Co. Français-2 113969-2-AC
Page 16

Ø 7/8"
Y
1-13/16"
(4,6 cm)
1/2" (1,3 cm) Min.
2-1/8" (5,4 cm) Max.
Épaisseur comptoir
X
Ø 1-5/16"
Ø 7/8"
(3/4" Nom.)
Plan de raccordement comptoir fini et montage rebord
Ø 1-5/16"
Ø 7/8" Int.
(3/4" Nom.)
Plan de raccordement comptoir brut fini (carrelage)
Tuyauterie Ø 5/8"
Ext. (1/2" Nom)
Y
Tuyauterie Ø 5/8"
Ext. (1/2" Nom)
4-5/8"
(11,7 cm)
2-1/16"
(5,2 cm)
Ø 7/8"
5-5/8"
(14,3 cm)
1/2" (1,3cm) Min.
2-1/8" (5,4 cm) Max.
Épaisseur comptoir
brut
1/8" (3 mm) Min.
2-1/8" Épaisseur
rebord (5,4 cm)
Max.
Épaisseur carrelage
1-1/4" (3,2 cm) Max.
1. Préparer le site
X=la distance de l’axe central de la base d’entrée du bec à
l’avant de la base du bec plus 1/2″ (2,5 cm).
Y=la distance entre les lignes centrales des valves varie.
Consulter les instructions d’installation de la poignée et du bec
pour les dimensions exactes.
Installer ou déplacer les alimentations d’eau au besoin.
Protéger les surfaces de la baignoire/du comptoir pendant
l’installation.
S’assurer que les trous percés dans le comptoir ne sont pas
surdimensionnés. Le bec et les valves nécessitent un support
solide adéquat et un contact maximal avec le comptoir.
X
X
REMARQUE : Un matériau de renfort peut être requis si le rebord
ou le comptoir est fin. Installer un contre-plaqué extérieur de 1/2″
avant de continuer.
REMARQUE : Pour des installations carrelées, l’épaisseur des
carreaux ne doit pas dépasser 1-1/4″ (3,2 cm).
113969-2-AC Français-3 Kohler Co.
Page 17

Préparer le site (cont.)
Pour des installations à entraxe de 8″ (20,3 cm) avec des tubes en
cuivre (1/2″ nom, Ø 5/8″ Ext.), couper deux tubes de 2-7/8″ (7,3
cm) et un autre de 2-3/8″ (6 cm).
Le diamètre de l’orifice du bec devrait être de 1-1/8″ (2,9 cm)
maximum.
Le diamètre des orifices de valve devrait être de 1-1/2″ (3,8 cm)
maximum.
Kohler Co. Français-4 113969-2-AC
Page 18

Tuyau d'alimentation
du bec
Épaule
alimentation
bec
Rondelle
en laiton
Plaque
Vis à
bois
Écrou
Vis à
bois
Rondelle
2. Installer le tube d’alimentation du bec
REMARQUE : Laisser en place le manchon de protection du tube
d’alimentation du bec jusqu’à l’installation de ce dernier.
Glisser une rondelle en laiton sur le bas du tube d’alimentation
du bec et le filetage jusqu’à atteindre le coude d’alimentation du
bec.
Insérer le tuyau d’alimentation du bec à travers l’orifice de
fixation à partir du dessus du rebord de comptoir/baignoire.
La portion plate de la rondelle en laiton devrait faire face vers
l’avant, et les orifices fraisés vers le haut. Le tube d’alimentation
du bec sera suspendu à l’aide d’une rondelle en laiton.
Glisser la plaque (avec les pattes orientées vers le comptoir) et la
rondelle sur le tuyau d’alimentation du bec à partir de la partie
inférieure puis visser l’écrou.
Serrer l’écrou.
Sécuriser la plaque au comptoir brut au moyen de deux vis à
bois.
113969-2-AC Français-5 Kohler Co.
Page 19

Tuyau en cuivre de 2-3/8" (6 cm)
(Comptoir fini ou installation
rebord baignoire uniquement)
Rondelle en
caoutchouc
Rondelle
en fibres
Écrou de
fixation
Corps de valve
T"
1/2
Tubes cuivre
2-7/8" (7,3 cm)
Tige de
la valve
3. Installer les valves
IMPORTANT ! Ne pas souder les connexions à ce stade.
Visser un écrou d’assemblage, côté profilé vers le haut, suivi
d’une rondelle en fibres et d’une rondelle en caoutchouc, sur
chaque corps de valve.
Insérer les tubes en cuivre de 2-7/8″ (7,3 cm) entre les corps de
valve et le raccord en T de 1/2″.
Pour l’installation de comptoir fini ou rebord de baignoire
uniquement, insérer le tube cuivre de 2-3/8″ (6 cm) de longueur
dans l’orifice supérieur du raccord en T.
1-13/16"
(4,6 cm)
Collier
REMARQUE : Orienter le corps de valve marqué ″COLD” (froid) de
façon à ce qu’il soit sur la droite lorsque l’on se place de face au
robinet.
Insérer les corps de valve par les orifices de fixation à partir du
bas du comptoir/rebord.
Maintenir le tube en place.
Placer un collier, bride vers le haut, sur chaque corps de valve et
les visser de façon à laisser environ 1-13/16″ (4,6 cm) de filetage
en évidence à la partie supérieure.
Kohler Co. Français-6 113969-2-AC
Page 20

Collier
Alimentation
eau froide
Fer à
Écrou de
fixation
souder
Alimentation
eau chaude
4. Installation sur comptoir fini ou rebord
REMARQUE : Pour une installation sur un comptoir brut (non fini),
procéder à la section « Installation sur comptoir brut (non fini) ».
D’en-dessous du comptoir/rebord, serrer les écrous de montage
de chaque corps de robinet.
Souder les tubes en cuivre aux corps des valves, au raccord en T
et au tuyau d’alimentation du bec.
Souder les tuyaux d’alimentation d’eau chaude et d’eau froide
aux entrées de corps de valve (non illustrées). S’assurer que
l’alimentation d’eau froide soit du côté droit.
Aller à la section « Vérifier l’opération des valves ».
113969-2-AC Français-7 Kohler Co.
Page 21

Dessus de tige de valve
Espacement
calculé de
corps de valve
Épaisseur comptoir
moins de 1" (2,5 cm)
Comptoir non fini
brut de 2-1/8"
(5,4 cm) Max.
2-1/16"
(5,2 cm)
Collier fileté
Espacement corps
de valve de 3-1/6"
(7,8 cm)
Épaisseur comptoir
entre 1" (2,5 cm) et
1-1/4" (3,2 cm)
5. Installation sur comptoir brut
Lorsque le carrelage ou matériau est d’une épaisseur inférieure à 1″
(2.5 cm):
Ajouter l’épaisseur du carreau/matériau du comptoir à 2-1/16″
(5,2 cm) pour obtenir la hauteur d’installation pour les corps de
valves.
Matériau du comptoir+ 2-1/16″ (5,2 cm) =Hauteur d’installation
Relever cette dimension. Ce chiffre sera de nouveau utilisé
suivant le raccordement du tube d’alimentation d’eau.
Ajuster les colliers filetés de façon à ce que la distance depuis le
haut de la tige de la valve au haut de la surface du comptoir brut
soit égale à votre espacement calculé requis.
Lorsque l’épaisseur du carrelage ou du matériau du comptoir est
entre 1″ (2,5 cm) et 1-1/4″ (3,2 cm):
Visser le collier sur chacun des corps de valve jusqu’à ce que le
haut de la tige de valve soit à 3-1/16″ (7,8 cm) au-dessus de la
surface du comptoir brut.
Kohler Co. Français-8 113969-2-AC
Page 22

Tuyau
d'alimentation
du bec
T
A
Mesurer la
distance
Manchon
Comptoir
brut
Écrou de
fixation
Collier fileté
Tube en
cuivre
Tuyau
d'alimentation
du bec
T
6. Installer la tuyauterie - Installations de comptoir brut
Mesurer la distance entre la partie inférieure du tube
d’alimentation du bec et le dessus du raccord en T.
Ajouter 1″ (2,5 cm) à cette mesure, et découper une pièce de Ø
1/2″Nom. (Ø Ext. 5/8″) de tube en cuivre pour s’ajuster dans le
tube d’alimentation et le port en T.
Reculer le plus possible les colliers filetés, sans les retirer.
Faire pivoter suffisamment les corps des valves pour retirer le T et
les deux pièces de tuyau.
REMARQUE : Si les orifices percés pour le corps de robinet sont
plus petits que prévus, il sera nécessaire de retirer l’ensemble du
corps de valve.
Installer la tuyauterie dans le raccord en T.
Relier le tube en cuivre du raccord en T au tube d’alimentation
du bec.
Faire pivoter les corps de valves sur les deux pièces de tube en
cuivre.
NE PAS souder à ce moment.
113969-2-AC Français-9 Kohler Co.
Page 23

Tube en
cuivre
Fer à
souder
Alimentation
eau chaude
Épaisseur des
carreaux
Dégagement
prédéterminé
requis
Collier
fileté
Comptoir
brut
Dessus du
manchon
Comptoir
brut
Corps
de
valve
Écrou de
fixation
7. Compléter l’installation sur le comptoir brut
Régler à nouveau la hauteur du corps de valve
Ajuster les colliers filetés jusqu’à ce que la dimension entre le
haut du manchon et la partie supérieure du comptoir brut soit
égale à l’espacement requis et calculé auparavant.
Souder les connexions
Serrer les écrous de fixation sur chaque corps de valve sous le
comptoir.
Souder les tubes en cuivre aux corps des valves, au raccord en T
et au tuyau d’alimentation du bec.
S’assurer que l’alimentation d’eau froide soit du côté droit.
Souder les tubes d’alimentation d’eau chaude et d’eau froide aux
corps des orifices d’entrée des corps de valves.
Tuyau
d'aliment
ation du
Alimentation
eau froide
Kohler Co. Français-10 113969-2-AC
Page 24

Bouchon du tuyau de 3/8"
Fermer l'eau
chaude
Fermer
l'eau froide
8. Vérifier le fonctionnement des valves
AVERTISSEMENT : Risque de blessures corporelles.
Enrouler une serviette autour du bouchon du tuyau pour
empêcher l’eau de gicler. L’eau purgera du tube
d’alimentation lorsque le bouchon sera retiré.
Visser un bouchon de 3/8″ (1 cm) sur le tuyau d’alimentation du
bec.
S’assurer que les valves soient en position fermée. Tourner la
valve d’eau froide complètement vers la gauche. Tourner la valve
d’eau chaude complètement vers la droite.
Ouvrir l’alimentation d’eau principale.
Vérifier qu’il n’y ait pas de fuites dans l’installation avec les
valves fermées et ouvertes.
Réparer les fuites au besoin.
Fermer les deux valves et l’alimentation d’eau principale.
Dévisser le bouchon du tuyau avec précaution afin de relâcher la
pression.
Revisser le bouchon du tuyau sur le tube d’alimentation du bec.
Installer les renforts en plâtre sur les deux valves et le tuyau
d’alimentation du bec.
113969-2-AC Français-11 Kohler Co.
Page 25

Épaule de
Carreau
3/4" (1,9 cm) Min.
1-1/4" (3,2 cm) Max.
valve
9. Installer le carrelage (si applicable)
S’assurer de prévoir une distance de 3/4″ (1,9 cm) à 1-1/4″ (3,2
cm) entre le dessus de l’épaule de valve et le dessus du carrelage.
Si l’espace n’est pas satisfaisant, le-corriger tel que décrit avant.
Installer les carreaux jusqu’aux renforts de plâtre sur les valves et
sur le tube d’alimentation du bec.
Kohler Co. Français-12 113969-2-AC
Page 26

Guía de instalación
Válvula de montaje en cubierta/borde de alto
flujo de 3/4″
Herramientas y materiales
Más:
• Tornillos para
madera
• Trapos
Llave
para
tubos
Llave
ajustable
Llave de
correa
Sierra para
metales o
cortatubos
Destornilladores
surtidos
Masilla de
plomería
Sellador
de roscas
Suelda
Soplete de
propano
Gracias por elegir los productos Kohler
Gracias por elegir los productos Kohler. Su producto de Kohler
Company refleja la verdadera pasión por el diseño, la mano de obra, la
artesanía y la innovación que forman parte de Kohler Company.
Estamos seguros que su confiabilidad y belleza excederán sus más altas
expectativas, dándole satisfacción por años.
Toda la información que aparece en la guía está basada en la
información más reciente disponible al momento de publicación. En
Kohler Company, nos esforzamos por alcanzar nuestra misión de
mejorar el nivel del buen vivir de quienes disfrutan de nuestros
productos y servicios. Nos reservamos el derecho de efectuar cambios
en las características, embalaje o disponibilidad del producto en
cualquier momento, sin previo aviso.
Dedique unos minutos para leer esta guía. Si tiene algún problema de
instalación o funcionamiento, llámenos al 1-800-4-KOHLER
(1-800-456-4537) desde los EE.UU. y Canadá, ó 001-877-680-1310 desde
México.
Antes de comenzar
Cumpla con todos los códigos locales de plomería y construcción.
Cierre el suministro de agua.
Kohler Co. Español-1 113969-2-AC
Page 27

Antes de comenzar (cont.)
Las instrucciones incluidas son para la instalación con centros a 8″
(20,3 cm). Para instalaciones con los orificios a mayor distancia,
ajuste todas las dimensiones de instalación y las longitudes de los
tubos de cobre según corresponda. Si el surtidor se va a instalar a
más de 24″ (61 cm) de las válvula, Kohler recomienda la
instalación de un amortiguador de golpe de ariete Sioux Chief
652-AD diseñado para este tipo de instalación. Instale el
amortiguador de golpe de ariete cerca de los puertos de salida de
las válvulas. Para obtener más información, comuníquese con
Sioux Chief en www.siouxchief.com.
Los productos adquiridos por separado pueden cambiar el lugar
de instalación de la válvula, así como la alineación.
Estas instrucciones incluyen dos métodos de instalación:
instalación sobre el borde o la cubierta acabada y la instalación
sobre la cubierta no acabada. Siga las secciones e instrucciones
correspondientes a su instalación.
Provea un panel de acceso a las válvulas para su mantenimiento.
El tubo de cobre suministrado por el instalador debe tener:
Diámetro exterior de 5/8″ (1/2″ Nom.) y 7/8″ (3/4″ Nom.) para
las entradas.
Los diámetros de los protectores de yeso son aproximadamente
1-5/8″ (4,1 cm) para la válvula y 7/8″ (2,2 cm) para el surtidor.
El material de la cubierta acabada debe ser adecuado para los
diámetros de los protectores de yeso.
El diámetro del protector de yeso del surtidor es de 7/8″ (2,2 cm).
Deje la manga protectora en el tubo de suministro hasta instalar
el surtidor. La superficie de sellado del arosello (O-ring) puede
sufrir daños si no se protege.
Kohler Co. se reserva el derecho de modificar el diseño de la
grifería sin previo aviso, tal como se especifica en la lista de
precios.
Kohler Co. Español-2 113969-2-AC
Page 28

7/8" D.
Y
1-13/16"
(4,6 cm)
1-5/16" D.
7/8" D.I.
(3/4" Nom.)
Diagrama de montaje en cubierta acabada y borde
1-5/16" D.
7/8" D.I.
(3/4" Nom.)
Diagrama de la cubierta no acabada revestida de azulejos
Tubo de 5/8" D.E. (1/2" Nom.)
Y
Tubo de 5/8" D.E.
(1/2" Nom.)
4-5/8"
(11,7 cm)
2-1/16"
(5,2 cm)
7/8" D.
1/2" (1,3 cm) Mín.
2-1/8" (5,4 cm) Espesor
máximo de la cubierta
5-5/8"
(14,3 cm)
1/8" (3 mm) Mín.21/8" (5,4 cm)
Espesor máximo del
borde
Grosor máximo del
azulejo de 1-1/4"
(3,2 cm)
1/2" (1,3 cm) Mín.
2-1/8" (5,4 cm)
Espesor máximo de la
cubierta acabada
1. Prepare el sitio
X=la distancia desde la línea central de la base de entrada del
surtidor a la parte frontal de la base del surtidor más 1/2″ (2,5
cm).
Y=la distancia entre las líneas centrales de las válvulas varía.
Verifique las instrucciones de instalación de las manijas y del
surtidor, para obtener las dimensiones exactas.
Cuando sea necesario instale o cambie de lugar los suministros de
agua.
Proteja las superficies de la bañera o de la cubierta durante la
instalación.
Asegúrese de que los orificios taladrados en la cubierta no sean
demasiado grandes. El surtidor y las válvulas requieren un
material de apoyo que ofrezca una resistencia adecuada y el
máximo de contacto con la cubierta.
X
X
X
NOTA: Es posible que necesite un material de refuerzo si la cubierta
o el borde tienen poco espesor. Instale madera contrachapada para
exteriores de 1/2″ antes de continuar.
113969-2-AC Español-3 Kohler Co.
Page 29

Prepare el sitio (cont.)
NOTA: En las instalaciones que se vayan a revestir de azulejos, el
grosor del azulejo no debe exceder de 1-1/4″ (3,2 cm).
Para las instalaciones con orificios a 8″ (20,3 cm) de distancia que
utilizan tubos de cobre (1/2″ nominal, 5/8″ D.E.), corte dos trozos
de tubo de 2-7/8″ (7,3 cm) y un trozo de 2-3/8″ (6 cm).
El diámetro del orificio del surtidor debe ser 1-1/8″ (2,9 cm) como
máximo.
El diámetro de los orificios de la válvula debe ser 1-1/2″ (3,8 cm)
como máximo.
Kohler Co. Español-4 113969-2-AC
Page 30

Tubo de suministro del surtidor
Reborde del
suministro
del surtidor
Tornillo
para madera
Tuerca
Arandela
de latón
Placa
Tornillo para
madera
Arandela
2. Instale el tubo de suministro del surtidor
NOTA: Deje la manga protectora en el tubo de suministro del
surtidor hasta instalar el surtidor.
Deslice la arandela de latón desde la parte inferior del tubo de
suministro del surtidor y por las roscas hasta que alcance el
reborde del suministro del surtidor.
Inserte el tubo de suministro del surtidor por el orificio de
fijación, desde la parte superior de la cubierta/borde de la bañera.
La parte plana de la arandela de latón debe estar orientada hacia
el frente y los orificios avellanados deben estar orientados hacia
arriba. El tubo de suministro del surtidor estará suspendido por
la arandela de latón.
Deslice la placa (con las lengüetas hacia la cubierta) y la arandela
por el tubo de suministro del surtidor desde la parte inferior y
enrósquela en la tuerca.
Apriete la tuerca.
Fije la placa a la cubierta no acabada con dos tornillos para
madera.
113969-2-AC Español-5 Kohler Co.
Page 31

Tubo de cobre de 2-3/8" (6 cm)
(sólo para las instalaciones en
cubierta acabada o borde de la
bañera)
Arandela
de goma
Arandela
de fibra
Tuerca de
montaje
Cuerpo de válvula
T de
1/2"
Tubos de cobre de
2-7/8" (7,3 cm)
Espiga de
la válvula
3. Instale las válvulas
¡IMPORTANTE! En este paso, no suelde las conexiones.
Enrosque una tuerca de montaje, con la brida hacia arriba,
seguida de una arandela de fibra y una arandela de goma en
cada cuerpo de válvula.
Inserte los tubos de cobre de 2-7/8″ (7,3 cm) entre los cuerpos de
válvula y la T de 1/2″.
Para instalaciones en cubierta acabada o borde de la bañera,
inserte el tubo de cobre de 2-3/8″ (6 cm) de largo en la parte
superior de la T.
1-13/16"
(4,6 cm)
Collarín
NOTA: Viendo el frente de la grifería, oriente el cuerpo de la válvula
marcado ″COLD″ (agua fría) hacia la derecha.
Por debajo de la cubierta/borde, inserte los cuerpos de las
válvulas en los orificios de montaje.
Sostenga el tubo en su lugar.
Coloque un collarín, con el reborde hacia arriba, en cada cuerpo
de válvula y enrósquelo hasta que esté a 1-13/16″ (4,6 cm) como
mínimo de la parte superior de la espiga de válvula.
Kohler Co. Español-6 113969-2-AC
Page 32

Collarín
Suministro
de agua
fría
Soldadura
Suministro de
Tuerca de
montaje
agua caliente
4. Instalación en borde o cubierta acabada
NOTA: Para las instalaciones sobre la cubierta no acabada, prosiga a
la sección ″Instalación sobre cubierta no acabada″.
Apriete las tuercas de montaje en cada cuerpo de válvula por
debajo de la cubierta o el borde.
Suelde los tubos de cobre a los cuerpos de válvula, a laTyal
tubo de suministro del surtidor.
Suelde los tubos de agua fría y caliente a las entradas de los
cuerpos de válvula (no se muestran). Verifique que el suministro
de agua fría esté a la derecha.
Vaya a la sección ″Verifique el funcionamiento de las válvulas″.
113969-2-AC Español-7 Kohler Co.
Page 33

Parte superior de la espiga de la válvula
Espacio libre
calculado para el
cuerpo de la válvula
Espesor de la
cubierta de menos
de 1" (2,5 cm)
Cubierta no
acabada de 2-1/8"
(5,4 cm) Máx.
2-1/16"
(5,2 cm)
Collarín
roscado
Espacio libre para el
cuerpo de la válvula
de 3-1/6" (7,8 cm)
Espesor de la
cubierta entre 1" (2,5
cm) y 1-1/4" (3,2 cm)
5. Instalación en cubierta no acabada
Cuando el azulejo o el material de la cubierta tenga un espesor
inferior a 1″ (2,5 cm):
Añada 2-1/16″ (5,2 cm) al grosor del azulejo/material de la
cubierta para obtener la altura de instalación de los cuerpos de
las válvulas.
Material de cubierta+ 2-1/16” (5,2 cm) =Altura de instalación
Anote esta dimensión. La necesitará después de conectar el tubo
de suministro.
Ajuste el collarín roscado hasta que la medida desde la parte
superior de la espiga de la válvula hasta la parte superior de la
cubierta no acabada sea igual al espacio libre determinado
previamente.
Cuando el azulejo o el material de la cubierta tenga un espesor entre
1″ (2,5 cm) y 1-1/4″ (3,2 cm):
Enrosque el collarín hacia abajo en cada cuerpo de válvula hasta
que la parte superior de la espiga de la válvula sobresalga
3-1/16″ (7,8 cm) de la superficie de la cubierta no acabada.
Kohler Co. Español-8 113969-2-AC
Page 34

Tubo de suministro
del surtidor
T
A
Mida la
distancia
Manga
Cubierta no
acabada
Tuerca de
montaje
Collarín
roscado
Tubo de
cobre
6. Instale los tubos - Inst en cubierta no acabada
Mida la distancia entre la parte inferior del tubo de suministro
del surtidor y la parte superior de la T.
Añada 1″ (2,5 cm) a esta medida, y corte un trozo del tubo de
cobre de 1/2″ nominal (5/8″ D.E.) para que encaje en el tubo de
suministro y el puerto de la T.
Desenrosque los collarines roscados lo máximo posible sin
retirarlos.
Pivotee los cuerpos de válvula lo suficiente para retirar laTylos
dos trozos de tubo.
Tubo de
suministro
del surtidor
T
NOTA: Si los orificios de los cuerpos de válvula son más pequeños
de lo aconsejado, es posible que se deba retirar todo el montaje de
los cuerpos de válvula.
Instale el tubo en la T.
Conecte el tubo de cobre de la T en el tubo de suministro del
surtidor.
Pivotee los cuerpos de válvula sobre los dos trozos de tubo de
cobre.
NO suelde en este momento.
113969-2-AC Español-9 Kohler Co.
Page 35

Tubo de
suministro
del surtidor
Suministro de
agua fría
Grosor del
azulejo
Requisito
predeterminado de
espacio libre
Collarín
roscado
Cubierta no
acabada
Parte
superior de
la manga
Cubierta
no
acabada
Cuerpo
de
válvula
Tuerca de
montaje
Suministro de
agua caliente
Tubo de
cobre
Soldadura
7. Termine la instalación sobre la cubierta no acabada
Restablezca la altura del cuerpo de la válvula
Ajuste el collarín roscado hasta que la dimensión desde la parte
superior de la manga hasta la parte superior de la cubierta no
acabada sea igual al espacio libre calculado anteriormente.
Suelde las conexiones
Apriete las tuercas de montaje en cada cuerpo de válvula por
debajo de la cubierta.
Suelde los tubos de cobre a los cuerpos de válvula, a laTyal
tubo de suministro del surtidor.
Verifique que el suministro de agua fría esté a la derecha.
Suelde los tubos de suministro de agua fría y caliente a las
entradas de los cuerpos de válvula.
Kohler Co. Español-10 113969-2-AC
Page 36

Tapón de tubo de 3/8"
Cierre el
agua caliente
Cierre el
agua fría
8. Verifique el funcionamiento de las válvulas
ADVERTENCIA: Riesgo de lesiones personales. Envuelva el
tapón de tubo con una toalla de tela para evitar que rocíe
agua. Al quitar el tapón saldrá agua del tubo de suministro.
Enrosque un tapón de tubo de 3/8″ en la parte superior del tubo
de suministro del surtidor.
Asegúrese de que las válvulas estén en la posición cerrada. Gire
la válvula de agua fría completamente a la izquierda. Gire la
válvula de agua caliente completamente a la derecha.
Abra el suministro principal de agua.
Revise la instalación completa para verificar que no haya fugas
con las válvulas cerradas y abiertas.
Repare la fugas según sea necesario.
Cierre ambas válvulas y el suministro principal de agua.
Con cuidado afloje el tapón para aliviar la presión.
Vuelva a enroscar el tapón de tubo en el tubo de suministro del
surtidor.
Instale los protectores de yeso sobre ambas válvulas y el tubo de
suministro del surtidor.
113969-2-AC Español-11 Kohler Co.
Page 37

Borde de
la válvula
Azulejo
3/4" (1,9 cm) Mín.
1-1/4" (3,2 cm) Máx.
9. Instale el azulejo (si aplica)
Verifique que haya una distancia entre 3/4″ (1,9 cm) y 1-1/4″ (3,2
cm) entre la parte superior del reborde de la válvula y la parte
superior del azulejo. De no ser así, corrija el espacio libre de la
válvula tal y como se ha descrito anteriormente.
Instale el azulejo hasta los protectores de yeso de las válvulas y el
tubo de suministro del surtidor.
Kohler Co. Español-12 113969-2-AC
Page 38

113969-2-AC
Page 39

113969-2-AC
Page 40

USA/Canada: 1-800-4KOHLER
México: 001-877-680-1310
kohler.com
©2009 Kohler Co.
113969-2-AC
 Loading...