

Page 1

Installation and Care Guide
Vanity
K-2604
Français, page ″Français-1″
Español, página ″Español-1″
1207226-2-A
Page 2

Tools
Important Information
CAUTION: Risk of property damage. Do not modify the
vanity. Doing so will compromise structural stability and may
cause property damage.
CAUTION: Risk of property damage. Use care when
moving the vanity to avoid impacting, sliding, or
side-loading the legs.
CAUTION: Risk of property damage. Select 250 lb (113.4
kg) load bearing 5/16″ lag bolts with a length to clear
obstacles in the wall and 5/16″ washers. Calculate proper lag
bolt length by adding the following: 1-1/2″ (38 mm) backing
material + wallboard thickness + back rail thickness.
Plus:
• Wood Screws
• 2x6s
• 5/16" Lag Bolts and Washers
[Min 250 lb (113.4 kg) Load Bearing]
• Socket Wrenches
• Siliconized Acrylic Caulk
NOTICE: Siliconized acrylic caulk must be used to secure the sink
to the vanity. Do not use 100% silicone sealant which will damage
the finish of the vanity.
NOTICE: The finished wall must be straight and plumb to ensure
proper support of the vanity and alignment of the sink and door.
Observe all local plumbing and building codes.
Provide 2x6 backing material behind the finished wall to properly
support the vanity.
1207226-2-A 2 Kohler Co.
Page 3

2x6
Backing
Material
32-1/2" (826 mm)
1. Prepare the Site
NOTICE: If the K-2607 bridge cabinet will also be installed, extend
the backing material a minimum of 12″ (305 mm) beyond the width
of the vanity on the side where the bridge will be installed.
NOTICE: To properly secure the vanity, the top of the required 2x6
backing material must be 32-1/2″ (826 mm) from the finished floor.
Measure and mark 32-1/2″ (826 mm) up from the finished floor.
This will be the height from the finished floor to the top of the
2x6 backing material.
Ensure there are no obstructions in the wall (such as wiring or
plumbing) from the marked height down to the floor. If there are
obstructions, select another area to install the vanity.
NOTICE: Extend the backing material beyond the width of the
vanity to the nearest stud to ensure proper support for the vanity.
Front-notch the studs 1-1/2″ (38 mm) to ensure the 2x6 backing
material is flush against the studs.
Secure the 2x6 backing material to the studs with framing nails.
Rough-in the water supply and drain lines into the rough-in
plumbing area of the vanity.
NOTICE: The finished wall must be straight and plumb to ensure
proper support of the vanity and alignment of the sink and door.
Kohler Co. 3 1207226-2-A
Page 4

Prepare the Site (cont.)
Complete the finished wall. Make sure the finished wall is
straight and plumb, and the floor is flat and perpendicular to the
finished wall.
1207226-2-A 4 Kohler Co.
Page 5
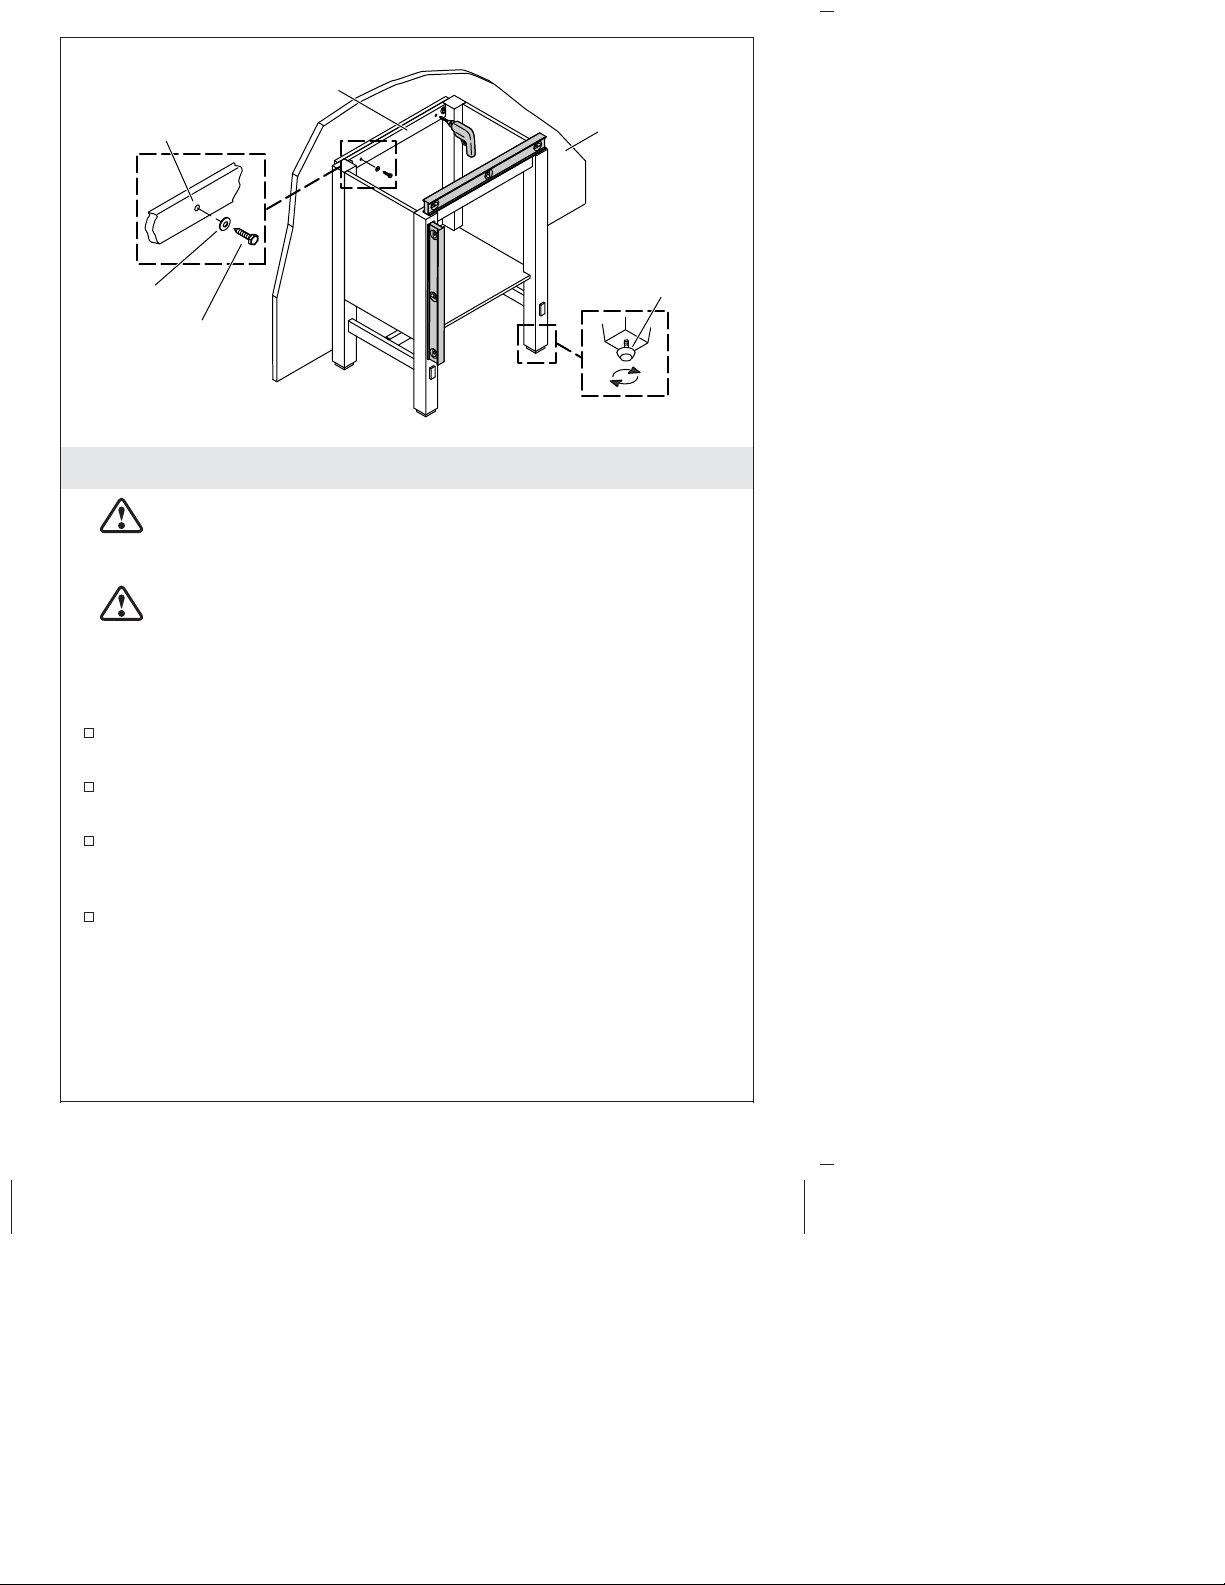
Back Rail
Pilot Hole
Washer
Lag Bolt
Finished Wall
2. Secure the Vanity
CAUTION: Risk of property damage. Use care when
moving the vanity to avoid impacting, sliding, or
side-loading the legs.
CAUTION: Risk of property damage. Select 250 lb (113.4
kg) load bearing 5/16″ lag bolts with a length that can safely
clear obstacles in the wall and 5/16″ washers. Calculate the
proper length of the lag bolts by adding the following: 1-1/2″
(38 mm) backing material + wallboard thickness + back rail
thickness.
With assistance, lift and place the vanity in position against the
finished wall. Do not drag the vanity into position.
Verify the vanity is level and the back rail is plumb against the
wall. If necessary, turn the leveler(s) to adjust the unit.
Using a 1/4″ drill bit, drill two pilot holes through the back rail
and the finished wall. Verify the pilot holes are positioned to
ensure the lag bolts will engage the 2x6 backing material.
Secure the vanity to the finished wall with two 5/16″ lag bolts
and washers (not provided).
Leveler
Kohler Co. 5 1207226-2-A
Page 6

3. Install the Bathroom Sink
CAUTION: Risk of personal injury. Vitreous china sinks are
very heavy. Get help lifting and aligning the sink.
Install the faucet (if applicable) and drain to the sink. Refer to the
faucet and drain manufacturer’s installation instructions.
NOTICE: Siliconized acrylic caulk must be used to secure the sink
to the vanity. Do not use 100% silicone sealant which will damage
the vanity finish.
Run a 1/4″ (6 mm) continuous bead of siliconized acrylic caulk
around the top of the vanity, as illustrated.
NOTE: The sink is properly positioned when: (1) the back edge of
the sink is flush against the finished wall and (2) the overhang on
the left, right, and front side of the sink is equal on each side of the
vanity.
With assistance, lift and properly position the sink on top of the
vanity.
Immediately wipe away any excess caulk that contacts the vanity.
Run a 1/8″ (3 mm) bead of siliconized acrylic caulk along the top
edge of the sink where it contacts the finished wall.
1207226-2-A 6 Kohler Co.
Page 7

Hook
Bracket
Cup
4. Install the Door
NOTE: To ease installation, get assistance supporting the door.
NOTE: The vanity comes with hinges installed on the inside left. To
reverse door swing, use the included template (1181754-7) to mount
brackets to the opposite side of the vanity.
Align the hinge hooks with the cup of the top bracket.
Slide the hinge onto the top bracket.
Clip the hinge onto the bracket to secure.
Repeat for the lower hinge.
Kohler Co. 7 1207226-2-A
Page 8

Screw
Knob
5. Complete the Installation
Install the Door Knob
From the back side of the door, insert the screw through the
predrilled hole.
Thread the knob onto the screw. Tighten securely.
Install the Bridge Cabinet (Optional)
Refer to the installation instructions packed with the K-2607
bridge cabinet.
1207226-2-A 8 Kohler Co.
Page 9

Bracket
Adjustments
Side
Depth
Clip
Height
Door Adjustments
Adjustment
Refer to the illustration and note the screwdriver location for the
desired adjustment.
Removal
Apply a small amount of leverage to the door with one hand to
keep the door in the full open position.
Press the clip to release the hinge from its bracket.
Move the door forward to slide the hinges off the brackets.
Care and Cleaning
For best results, keep the following in mind when caring for your
KOHLER product:
Vitreous China and Fireclay
•
Use a mild detergent such as liquid dishwashing soap and warm
water for cleaning. Do not use abrasive cleaners that may scratch
or dull the surface.
•
Carefully read the cleaner product label to ensure the cleaner is
safe for use on the material.
•
Always test your cleaning solution on an inconspicuous area
before applying to the entire surface.
•
Do not allow cleaners to sit or soak on the surface.
Kohler Co. 9 1207226-2-A
Page 10

Care and Cleaning (cont.)
•
Wipe surfaces clean and rinse completely with water immediately
after cleaner application. Rinse and dry any overspray that lands
on nearby surfaces.
•
Use a soft, dampened sponge or cloth. Never use an abrasive
material such as a brush or scouring pad to clean surfaces.
Wood Surfaces
•
As with any smooth surface, avoid using abrasive cleaners as
they will scratch the surface. Wipe the wood surface regularly to
prevent buildup of soap and scum.
•
To protect against scratches, use felt, leather, or cork under all
items placed on the wood surface. To conceal scratches, a
touch-up marker is available for order. Contact a Kohler
distributor or call 1-800-4-KOHLER for ordering information.
•
Do not expose wood furniture to direct sunlight, drying heat
sources, or dampness.
•
Dust frequently with a soft cloth in the direction of the grain. Use
only products specifically made for cleaning wood. Avoid using
oily polishes or waxes, or products containing silicone. Blot spills
immediately with a soft, damp cloth.
•
Every six months, remove soil buildup by rubbing with a soft
cloth dampened in a 50/50 solution of warm water and an
ammonia-free detergent. Wipe clean with a cloth dampened in
warm water, then wipe dry.
For detailed cleaning information and products to consider, visit
www.kohler.com/clean. To order Care & Cleaning information, call
1-800-456-4537.
Warranty
ONE-YEAR LIMITED WARRANTY
KOHLER plumbing products are warranted to be free of defects in
material and workmanship for one year from date of installation.
Kohler Co. will, at its election, repair, replace or make appropriate
adjustment where Kohler Co. inspection discloses any such defects
occurring in normal usage within one (1) year after installation. Kohler
Co. is not responsible for removal or installation costs. Use of in-tank
toilet cleaners will void the warranty.
To obtain warranty service contact Kohler Co. either through your
1207226-2-A 10 Kohler Co.
Page 11

Warranty (cont.)
Dealer, Plumbing Contractor, Home Center or E-tailer, or by writing
Kohler Co., Attn.: Customer Care Center, 444 Highland Drive, Kohler,
WI 53044, USA, or by calling 1-800-4-KOHLER (1-800-456-4537) from
within the USA and Canada, and 001-800-456-4537 from within Mexico,
or visit www.kohler.com within the USA, www.ca.kohler.com from
within Canada, or www.mx.kohler.com in Mexico.
IMPLIED WARRANTIES INCLUDING THAT OF
MERCHANTABILITY AND FITNESS FOR A PARTICULAR
PURPOSE ARE EXPRESSLY LIMITED IN DURATION TO THE
DURATION OF THIS WARRANTY. KOHLER CO. AND/OR
SELLER DISCLAIM ANY LIABILITY FOR SPECIAL, INCIDENTAL
OR CONSEQUENTIAL DAMAGES. Some states/provinces do not
allow limitations on how long an implied warranty lasts, or the
exclusion or limitation of special, incidental or consequential damages,
so these limitations and exclusions may not apply to you. This
warranty gives you specific legal rights. You may also have other
rights which vary from state/province to state/province.
This is Kohler Co.’s exclusive written warranty.
Kohler Co. 11 1207226-2-A
Page 12

Guide d’installation et d’entretien
Meuble de toilette
Outils
Plus:
• Vis à bois
• Lambourde de 2x6
• Tire-fonds de 5/16" et rondelles
[capacité de charge min 250 lb (113,4 kg)]
• Clés à douilles
• Mastic à l'acrylique siliconée
Informations importantes
ATTENTION: Risque de dommages matériels. Ne pas
modifier le meuble de toilette. Ceci compromettrait la stabilité
structurelle et pourrait causer des dommages matériels.
ATTENTION: Risque de dommages matériels. Procéder
avec précaution lors du déplacement du meuble afin d’éviter
d’avoir un impact sur les pieds, ou de faire glisser ou de
charger ceux-ci sur le côté.
ATTENTION: Risque de dommages matériels. Choisir des
tire-fonds de 5/16″ porteurs de 250 lb (113,4 kg) avec une
longueur adéquate pour dégager les obstacles dans le mur,
ainsi que des rondelles de 5/16″. Calculer une longueur de
tire-fonds adéquate en ajoutant les valeurs suivantes:
matériau de renfort de 1-1/2″ (38 mm) + épaisseur de
panneau mural + épaisseur de rail arrière.
AVIS: Du mastic à l’acrylique siliconisé doit être utilisé pour
sécuriser le lavabo sur le meuble. Ne pas utiliser de matériau
d’étanchéité à la silicone à 100%, car cela endommagera la finition
du meuble.
Kohler Co. Français-1 1207226-2-A
Page 13

Informations importantes (cont.)
AVIS: La finition murale doit être droite et d’aplomb afin d’assurer
un support adéquat du meuble et un alignement correct du lavabo
et de la porte.
Respecter tous les codes de plomberie et de bâtiment locaux.
Fournir un matériau de renfort de 2x6 derrière la finition murale
pour soutenir correctement le meuble.
Kohler Co. Français-2 1207226-2-A
Page 14

Matériau de
renfort 2x6
32-1/2" (826 mm)
1. Préparer le site
AVIS: Si l’armoire pont K-2607 est également installée, prolonger le
matériau de renfort de 12″ (305 mm) minimum au-delà de la largeur
du meuble sur le côté où le pont sera installé.
AVIS: Pour bien fixer le meuble, le dessus du matériau de renfort
2x6 requis doit se trouver à 32-1/2″ (826 mm) du plancher fini.
Mesurer et marquer 32-1/2″ (826 mm) vers le haut à partir du
plancher fini. Ceci sera la hauteur entre le plancher fini et le
dessus du matériau de renfort 2x6.
S’assurer qu’il n’y ait pas d’obstructions dans le mur (comme un
câblage ou la plomberie) à partir de la hauteur marquée vers le
plancher. Si il y a des obstructions, choisir une autre zone dans
laquelle installer le meuble.
AVIS: Étendre le matériau de renfort au-delà de la largeur du
meuble jusqu’au montant le plus proche afin d’assurer un support
adéquat du meuble.
Encocher les montants à l’avant de 1-1/2″ (38 mm) afin d’assurer
que le matériau de renfort 2x6 soit à ras contre les montants.
Sécuriser le matériau de renfort 2x6 aux montants avec des clous
de cadrage.
Raccorder l’alimentation d’eau et les conduites de drain dans la
zone de plomberie du raccordement du meuble.
1207226-2-A Français-3 Kohler Co.
Page 15

Préparer le site (cont.)
AVIS: La finition murale doit être droite et d’aplomb afin d’assurer
un support adéquat du meuble et un alignement correct du lavabo
et de la porte.
Terminer la finition murale. S’assurer que la finition murale est
droite et d’aplomb, et que le sol est plat et perpendiculaire à la
finition murale.
Kohler Co. Français-4 1207226-2-A
Page 16

Rail arrière
Trous-pilotes
Rondelle
Tire-fond
Mur Fini
2. Sécuriser le meuble
ATTENTION: Risque de dommages matériels. Procéder
avec précaution lors du déplacement du meuble afin d’éviter
d’avoir un impact sur les pieds, ou de faire glisser ou de
charger ceux-ci sur le côté.
ATTENTION: Risque de dommages matériels. Choisir des
tire-fonds de 5/16″ porteurs de 250 lb (113,4 kg) avec une
longueur adéquate pour dégager sans danger les obstacles
dans le mur, ainsi que des rondelles de 5/16″. Calculer la
longueur appropriée des tire-fonds en rajoutant ce qui suit:
matériau de renfort de 1-1/2″ (38 mm) + épaisseur de
panneau mural + épaisseur de rail arrière.
Avec de l’assistance, lever et placer le meuble dans l’emplacement
prévu contre la finition murale. Ne pas faire glisser le meuble en
position.
Vérifier que le meuble est à niveau et que le rail arrière est
d’aplomb contre le mur. Si nécessaire, tourner le(s) vérin(s) de
calage pour ajuster l’ensemble.
Utiliser un foret de 1/4″ pour percer deux avant-trous à travers le
rail arrière et la finition murale. Vérifier que les trous pilotes sont
bien en place pour assurer que les tire-fonds seront engagés dans
le matériau de renfort 2x6.
Sécuriser le meuble sur la finition murale à l’aide de deux
tire-fonds de 5/16″ et des rondelles (non fournis).
Levier
1207226-2-A Français-5 Kohler Co.
Page 17

3. Installer le lavabo
ATTENTION: Risque de blessures. Les lavabos en
porcelaine vitrifiée sont très lourds. Demander de l’aide pour
soulever et aligner le lavabo.
Installer le robinet (si applicable) et le drain sur le lavabo. Se
référer aux instructions d’installation du fabricant du robinet et
du drain.
AVIS: Du mastic à l’acrylique siliconisé doit être utilisé pour
sécuriser le lavabo sur le meuble. Ne pas utiliser de mastic
d’étanchéité à la silicone à 100%, car cela endommagera la finition
du meuble.
Faire passer un boudin continu de mastic à l’acrylique siliconé de
1/4″ (6 mm) autour du dessus du meuble, comme sur
l’illustration.
REMARQUE: Le lavabo est positionné correctement lorsque: (1) le
rebord arrière du lavabo est à ras contre la finition murale et (2) le
dépassement à gauche, à droite et à l’avant du lavabo est égal sur
chaque côté du meuble.
Avec de l’assistance, soulever et positionner correctement le
lavabo au-dessus du meuble.
Essuyer immédiatement tout excès de mastic en contact avec le
meuble.
Kohler Co. Français-6 1207226-2-A
Page 18

Installer le lavabo (cont.)
Poser un boudin continu de mastic à l’acrylique siliconé de 1/8″
(3 mm) le long du rebord supérieur du lavabo au point de contact
de celui-ci avec la finition murale.
1207226-2-A Français-7 Kohler Co.
Page 19

Crochet
Support
Récipient
4. Installer la porte
REMARQUE: Pour faciliter l’installation, demander de l’aide pour
supporter la porte.
REMARQUE: Le meuble de toilette est fourni avec les charnières
installées sur le côté gauche intérieur. Pour inverser l’ouverture de
porte, utiliser le modèle fourni (1181754-7) pour monter les supports
sur le côté opposé du meuble.
Aligner les crochets de la charnière avec la coupelle du support
supérieur.
Faire glisser la charnière sur le support supérieur.
Attacher la charnière sur le support pour la sécuriser.
Répéter la procédure pour la charnière inférieure.
Kohler Co. Français-8 1207226-2-A
Page 20

Vis
Poignée
5. Terminer l’installation
Installer le bouton de porte
Insérer la vis à travers le trou percé au préalable, à partir de
l’arrière de la porte.
Enfiler le bouton sur la vis. Bien serrer.
Installer l’armoire pont (optionnel)
Se référer aux instructions d’installation accompagnant l’armoire
pont K-2607.
1207226-2-A Français-9 Kohler Co.
Page 21

Support
Ajustements
Côté
Profondeur
Clip
Hauteur
Ajustements de la porte
Ajustement
Se référer à l’illustration et noter l’emplacement du tournevis
pour le réglage souhaité.
Démontage
Appliquer une petite quantité de levier à la porte avec une main
pour garder la porte en position complètement ouverte.
Appuyer sur le clip pour dégager la charnière de son support.
Déplacer la porte vers l’avant pour faire glisser les charnières
hors des supports.
Entretien et nettoyage
Pour obtenir les meilleurs résultats possibles, prendre ce qui suit en
considération lors de l’entretien de votre produit KOHLER:
Porcelaine vitrifiée et argile réfractaire
•
Utiliser un détergent doux comme du liquide pour vaisselle et de
l’eau chaude pour nettoyer. Ne pas utiliser de nettoyants abrasifs
qui pourraient rayer ou ternir la surface.
•
Lire l’étiquette du produit de nettoyage avec le plus grand soin
pour assurer que celui-ci peut être utilisé sans danger sur le
matériau.
•
Toujours tester la solution de nettoyage sur une surface non
visible avant de l’appliquer sur l’ensemble de la surface.
•
Ne pas laisser les nettoyants reposer ou tremper sur la surface.
Kohler Co. Français-10 1207226-2-A
Page 22

Entretien et nettoyage (cont.)
•
Essuyer les surfaces et rincer complètement avec de l’eau
immédiatement après l’application du nettoyant. Rincer et sécher
tout éclaboussement sur les surfaces avoisinantes.
•
Utiliser une éponge ou un chiffon doux et humide. Ne jamais
utiliser de matériau abrasif tel qu’une brosse ou une éponge à
récurer pour nettoyer les surfaces.
Surfaces en bois
•
Tel que pour toute surface lisse, éviter l’utilisation de nettoyants
abrasifs car ils pourraient rayer la surface. Essuyer régulièrement
la surface en bois pour éviter le dépôt de savon et de mousse.
•
Pour éviter les rayures, utiliser du feutre, du cuir, ou du liège
sous tout article posé sur la surface en bois. Un marqueur de
retouches peut être commandé pour cacher les rayures. Contacter
un distributeur Kohler ou appeler 1-800-4-KOHLER pour obtenir
des renseignements sur les commandes.
•
Ne pas exposer le meuble en bois à la lumière directe du soleil,
aux sources de chaleur de séchage, ou à l’humidité.
•
Épousseter fréquemment avec un chiffon doux dans le sens du
grain. Utiliser uniquement des produits spécifiquement conçus
pour le nettoyage du bois. Éviter d’utiliser des cires ou des
produits à polir à base d’huile, ou des produits contenant de la
silicone. Absorber immédiatement les taches avec un chiffon doux
et humide.
•
Tous les six mois, retirer l’accumulation de saleté en frottant avec
un chiffon doux humidifié dans une solution 50/50 d’eau chaude
et de détergent sans ammoniaque. Bien essuyer avec un chiffon
humidifié dans de l’eau chaude, puis sécher.
Pour obtenir des informations détaillées sur le nettoyage et les produits
à considérer, consulter le site www.kohler.com/clean. Pour commander
des informations sur l’entretien & le nettoyage, appeler le
1-800-456-4537.
Garantie
GARANTIE LIMITÉE D’UN AN
Les produits de plomberie KOHLER sont garantis contre tout vice de
matériau et de fabrication pendant un an à partir de la date de
l’installation.
1207226-2-A Français-11 Kohler Co.
Page 23

Garantie (cont.)
Si un vice est découvert au cours d’une utilisation normale, Kohler Co.
choisira, à sa discrétion, la réparation, le remplacement ou la
rectification appropriée après inspection desdits vices par Kohler Co.
pendant un (1) an à partir de la date d’installation. Kohler Co. n’est
pas responsable des frais d’enlèvement ou d’installation. L’utilisation
de nettoyants à l’intérieur du réservoir annule la garantie.
Pour obtenir le service de garantie, contacter Kohler Co., par
l’intermédiaire du vendeur, plombier, centre de rénovation ou
revendeur par internet, ou bien par écrit à l’adresse suivante Kohler
Co., Attn.: Customer Care Center, 444 Highland Drive, Kohler, WI
53044, USA, ou appeler le 1-800-4-KOHLER (1-800-456-4537) à partir
des É.-U. et du Canada, et le 001-800-456-4537 à partir du Mexique, ou
consulter le site www.kohler.com aux É.-U., www.ca.kohler.com à
partir du Canada, ou www.mx.kohler.com au Mexique.
LES GARANTIES TACITES, Y COMPRIS CELLES DE
COMMERCIALITÉ ET D’ADAPTATION À UN USAGE
PARTICULIER, SONT EXPRESSÉMENT LIMITÉE À LA DURÉE DE
LA PRÉSENTE GARANTIE. KOHLER CO. ET/OU LE REVENDEUR
DÉCLINENT TOUTE RESPONSABILITÉ CONTRE LES
DOMMAGES PARTICULIERS, ACCESSOIRES OU INDIRECTS.
Certains états et provinces ne permettent pas de limite sur la durée de
la garantie tacite, ni l’exclusion ou la limite des dommages particuliers,
accessoires ou indirects, et, par conséquent, lesdites limites et
exclusions peuvent ne pas s’appliquer à votre cas. Cette garantie vous
donne des droits juridiques particuliers. Vous pouvez également avoir
d’autres droits qui varient d’un état ou d’une province à l’autre.
Ceci constitue la garantie écrite exclusive de Kohler Co.
Kohler Co. Français-12 1207226-2-A
Page 24

Guía de instalación y cuidado
Tocador
Herramientas
Más:
• Tornillos para madera
• Postes de madera de 2x6
• Pernos de fijación de 5/16" y arandelas
[para carga mín de 250 lb (113,4 kg)]
• Llaves de dados
• Sellador acrílico siliconado
Información importante
PRECAUCIÓN: Riesgo de daños a la propiedad. No
modifique el tocador. Si lo hace, reducirá la estabilidad
estructural y podría causar daños materiales.
PRECAUCIÓN: Riesgo de daños a la propiedad. Tenga
cuidado al mover el tocador a fin de evitar impactar, deslizar
o cargar lateralmente las patas.
PRECAUCIÓN: Riesgo de daños a la propiedad. Seleccione
pernos de fijación de 5/16″ que soporten una carga de 250 lbs
(113,4 kg) cuya longitud no interfiera con los obstáculos de la
pared y arandelas de 5/16″. Calcule la longitud correcta de
los pernos de fijación sumando lo siguiente: Material de
refuerzo de 1-1/2″ (38 mm) + espesor del panel de pared +
espesor del riel posterior.
AVISO: Se debe utilizar sellador acrílico siliconado para fijar el
lavabo al tocador. No utilice sellador 100% de silicona porque
dañará el acabado del tocador.
AVISO: La pared acabada debe estar recta y aplomo para asegurar
el soporte correcto del tocador y la alineación del lavabo y la puerta.
Kohler Co. Español-1 1207226-2-A
Page 25

Información importante (cont.)
Cumpla con todos los códigos locales de plomería y construcción.
Proporcione material de refuerzo de 2x6 detrás de la pared
acabada para soportar correctamente el tocador.
Kohler Co. Español-2 1207226-2-A
Page 26

Material de
refuerzo de 2x6
32-1/2" (826 mm)
1. Prepare el sitio
AVISO: Si también va a instalar el gabinete puente K-2607, extienda
el material de refuerzo un mínimo de 12″ (305 mm) más allá del
ancho del tocador en el lado donde se instalará el puente.
AVISO: Para fijar correctamente el tocador, la parte superior del
refuerzo de 2x6 requerido debe estar a 32-1/2″ (826 mm) del piso
acabado.
Mida y marque 32-1/2″ (826 mm) hacia arriba desde el piso
acabado. Ésta será la altura desde el piso acabado hasta la parte
superior del refuerzo de 2x6.
Asegúrese de que no haya obstrucciones en la pared (tal como
cables o tuberías) desde la altura marcada hasta el piso. Si existen
obstrucciones, seleccione otro área para instalar el tocador.
AVISO: Extienda el material de soporte más allá del ancho del
tocador al poste de madera más cercano para asegurar el soporte
adecuado para el tocador.
Haga muescas en el frente de los postes espaciadas a 1-1/2″ (38
mm) para asegurar que el material de refuerzo quede al ras con
los postes.
Fije el refuerzo de 2x6 a los postes con clavos para estructuras de
madera.
Instale las líneas del suministro de agua y de desagüe en el área
para la plomería del tocador.
1207226-2-A Español-3 Kohler Co.
Page 27

Prepare el sitio (cont.)
AVISO: La pared acabada debe estar recta y aplomo para asegurar
el soporte correcto del tocador y la alineación del lavabo y la puerta.
Termine la pared acabada. Asegúrese de que la pared acabada
esté recta y a plomo, y que el piso esté plano y perpendicular a la
pared acabada.
Kohler Co. Español-4 1207226-2-A
Page 28

Orificio
guía
Riel posterior
Pared
acabada
Arandela
Perno de
fijación
2. Fije el tocador
PRECAUCIÓN: Riesgo de daños a la propiedad. Tenga
cuidado al mover el tocador a fin de evitar impactar, deslizar
o cargar lateralmente las patas.
PRECAUCIÓN: Riesgo de daños a la propiedad. Seleccione
pernos de fijación de 5/16″ que soporten una carga de 250 lbs
(113,4 kg) cuya longitud, con seguridad, no interfiera con los
obstáculos de la pared y arandelas de 5/16″. Calcule la
longitud correcta de los pernos de fijación sumando lo
siguiente: Material de refuerzo de 1-1/2″ (38 mm) + espesor
del panel de pared + espesor del riel posterior.
Con ayuda, levante y coloque el tocador en posición contra la
pared acabada. No arrastre el tocador para colocarlo en su lugar.
Verifique que el tocador esté a nivel y que el riel posterior esté a
plomo con la pared. Si es necesario, gire el o los niveladores para
ajustar la unidad.
Con una broca de 1/4″, taladre dos orificios guía a través del riel
posterior y la pared acabada. Verifique que el lugar de los
orificios guía asegure que los pernos de fijación encajarán en el
material de refuerzo de 2x6.
Fije el tocador a la pared acabada con dos pernos de fijación de
5/16″ y arandelas (no provistos).
Nivelador
1207226-2-A Español-5 Kohler Co.
Page 29

3. Instale el lavabo de baño
PRECAUCIÓN: Riesgo de lesiones personales. Los lavabos
de porcelana vitrificada son muy pesados. Pida ayuda para
levantar y alinear el lavabo.
Instale la grifería (si aplica) y el desagüe en el lavabo. Consulte
las instrucciones de instalación del fabricante de la grifería y el
desagüe.
AVISO: Se debe utilizar sellador acrílico siliconado para fijar el
lavabo al tocador. No utilice sellador 100% de silicona porque
dañará el acabado del tocador.
Aplique una tira continua de 1/4″ (6 mm) de sellador acrílico
siliconado en la cubierta del tocador, como se ilustra.
NOTA: El lavabo está bien colocado cuando: (1) el filo posterior del
lavabo está al ras contra la pared acabada y (2) el voladizo de la
izquierda, derecha y frente del lavabo tiene la misma distancia a
cada lado del tocador.
Con ayuda, levante y coloque correctamente el lavabo sobre el
tocador.
Elimine inmediatamente el exceso de sellador que tenga contacto
con el tocador.
Aplique una tira de 1/8″ (3 mm) de sellador acrílico siliconado
alrededor del filo superior del lavabo donde hará contacto con la
pared acabada.
Kohler Co. Español-6 1207226-2-A
Page 30

Gancho
Soporte
Copa
4. Instale la puerta
NOTA: Para facilitar la instalación, pida ayuda para soportar la
puerta.
NOTA: El tocador viene con las bisagras instaladas en el interior
izquierdo. Para invertir la apertura de la puerta, utilice la plantilla
incluida (1181754-7) para instalar los soportes en el lado opuesto del
tocador.
Alinee los ganchos de la bisagra con la copa del soporte superior.
Deslice la bisagra sobre el soporte superior.
Ponga el clip de la bisagra en el soporte para fijar.
Repita este procedimiento con la bisagra inferior.
1207226-2-A Español-7 Kohler Co.
Page 31

Tornillo
Perilla
5. Termine la instalación
Instale la perilla de la puerta
Desde el lado posterior de la puerta, inserte el tornillo a través
del orificio pretaladrado.
Enrosque la perilla en el tornillo. Apriete bien.
Instale el gabinete puente (opcional)
Consulte las instrucciones de instalación provistas con el gabinete
puente K-2607.
Kohler Co. Español-8 1207226-2-A
Page 32

Soporte
Ajustes
Lado
Profundidad
Clip
Altura
Ajustes de la puerta
Ajuste
Consulte la ilustración y fíjese donde debe colocar el
destornillador para obtener el ajuste deseado.
Desinstalación
Aplique un poco de palanca a la puerta con una mano para
mantener la puerta en la posición completamente abierta.
Presione el clip para liberar la bisagra de su soporte.
Mueva la puerta hacia delante para deslizar y sacar las bisagras
de los soportes.
Cuidado y limpieza
Para obtener los mejores resultados, tenga presente lo siguiente al
limpiar su producto KOHLER:
Porcelana vitrificada y arcilla refractaria
•
Para la limpieza, utilice solamente un detergente suave como el
jabón líquido para lavar platos y agua tibia. No utilice
limpiadores abrasivos que puedan rayar u opacar la superficie.
•
Lea atentamente la etiqueta del producto de limpieza para
asegurar que no presente riesgos al usarse en el material.
•
Siempre pruebe la solución de limpieza en un área oculta antes
de aplicarla a toda la superficie.
•
No deje por tiempo prolongado los limpiadores en la superficie.
1207226-2-A Español-9 Kohler Co.
Page 33

Cuidado y limpieza (cont.)
•
Limpie con un trapo y enjuague completa e inmediatamente con
agua después de aplicar limpiadores. Enjuague y seque las
superficies cercanas que se hayan rociado.
•
Utilice una esponja o trapo suave y húmedo. Para limpiar las
superficies, nunca utilice materiales abrasivos como cepillos o
estropajos de tallar.
Superficies de madera
•
Como con cualquier superficie lisa, evite los productos de
limpieza abrasivos ya que rayarán la superficie. Limpie la
superficie de madera con regularidad para evitar la acumulación
de jabón y suciedad.
•
Para proteger contra el rayado, utilice fieltro, cuero o corcho
debajo de todos los artículos que coloque sobre la superficie de
madera. Para ocultar rayones en la superficie de madera, hay
disponibles plumones de retocar. Comuníquese con su
distribuidor Kohler o llame al 1-800-4-KOHLER para obtener
información sobre pedidos.
•
No exponga los muebles de madera directamente a la luz del sol,
fuentes de calor o humedad.
•
Limpie el polvo con frecuencia utilizando un paño suave
siguiendo la dirección de la veta. Utilice sólo productos hechos
específicamente para limpiar la madera. Evite el uso de ceras o
productos para pulir aceitosos o productos que contengan
silicona. Seque los derrames de inmediato sin frotar con un paño
suave y húmedo.
•
Elimine la acumulación de suciedad cada seis meses frotando con
un paño suave humedecido en una solución 50/50 de agua tibia
y un detergente sin amoniaco. Limpie con un paño humedecido
en agua tibia y luego seque con un paño.
Para obtener información detallada de limpieza y los limpiadores a
considerar, visite www.kohler.com/clean. Para solicitar información
sobre el cuidado y la limpieza, llame al 1-800-456-4537.
Garantía
GARANTÍA LIMITADA DE UN AÑO
Se garantiza que los productos de plomería KOHLER están libres de
defectos de material y mano de obra por un año a partir de la fecha de
instalación.
Kohler Co. Español-10 1207226-2-A
Page 34

Garantía (cont.)
Kohler Co., a su criterio, reparará, reemplazará o realizará los ajustes
pertinentes en los casos en que la inspección realizada por Kohler Co.
determine que dichos defectos ocurrieron durante el uso normal en el
transcurso de un (1) año a partir de la fecha de la instalación. Kohler
Co. no se hace responsable de costos de desinstalación o instalación. El
uso de limpiadores de inodoro que se colocan dentro del tanque
anulará la garantía.
Para obtener el servicio de garantía, comuníquese con Kohler Co. a
través de su distribuidor, contratista de plomería, centro de
remodelación o distribuidor por Internet, o escriba a Kohler Co., Attn.:
Customer Care Center, 444 Highland Drive, Kohler, WI 53044, USA, o
llame al 1-800-4-KOHLER (1-800-456-4537) desde los EE.UU. y Canadá,
y al 001-800-456-4537 desde México, o visite www.kohler.com desde los
EE.UU., www.ca.kohler.com desde Canadá, o www.mx.kohler.com en
México.
TODA GARANTÍA IMPLÍCITA INCLUYENDO DE
COMERCIALIZACIÓN E IDONEIDAD DEL PRODUCTO PARA UN
USO DETERMINADO, SE LIMITA EXPRESAMENTE A LA
DURACIÓN DE ESTA GARANTÍA. KOHLER CO. Y/O EL
VENDEDOR DESCARGAN TODA RESPONSABILIDAD POR
CONCEPTO DE DAÑOS PARTICULARES, INCIDENTALES O
INDIRECTOS. Algunos estados/provincias no permiten limitaciones
en cuanto a la duración de una garantía implícitaoalaexclusión o
limitación de daños particulares, incidentales o indirectos, por lo que
estas limitaciones y exclusiones pueden no aplicar a su caso. Esta
garantía le otorga ciertos derechos legales específicos. Además, usted
puede tener otros derechos que varían de estado a estado y provincia a
provincia.
Ésta es la garantía exclusiva por escrito de Kohler Co.
1207226-2-A Español-11 Kohler Co.
Page 35

1207226-2-A
Page 36

USA/Canada: 1-800-4KOHLER
México: 001-800-456-4537
kohler.com
©2012 Kohler Co.
1207226-2-A
 Loading...