

Page 1
Installation and Care Guide
Guide d’installation et d’entretien
Guía de instalación y cuidado
Vanity
Meuble
Tocador
K-2517
M product numbers are for Mexico (i.e. K-12345M)
Los números de productos seguidos de M
corresponden a México (Ej. K-12345M)
1082756-2-B
USA/Canada: 1-800-4KOHLER
México: 001-800-456-4537
kohler.com
©2011 Kohler Co.
Page 2

Tools/Outils/Herramientas
Plus/Plus/Más:
Lag Bolts
Tire-fond
2x4 Bracing
2x12
Siliconized Acrylic Caulk
Mastic à l'acrylique siliconée
Sellador acrílico siliconado
Renfort 2x4
Refuerzo de 2x4
Before You Begin
WARNING: Risk of property damage. Do not modify the vanity in any way.
Doing so will compromise the structural stability of the vanity and may cause
property damage.
WARNING: Risk of property damage. Select 250 lb (113.4 kg) load bearing
hanger bolts with a length that can safely clear any obstacles in the wall. Calculate
the proper length of the hanger bolts by adding the following: 1-1/2″ (3.8 cm)
backing material + wallboard thickness + wall bracket thickness.
NOTICE: If a lavatory/vessel will be installed: The plumbing must be roughed into
the plumbing cutout area of the vanity. Refer to the lavatory/vessel roughing-in and
the vanity roughing-in for proper placement. The water supply and drain lines must
be installed before installing the vanity.
NOTICE: Siliconized acrylic caulk must be used to secure the lavatory to the vanity.
Do not use 100% silicone sealant, which will damage the finish of the vanity.
NOTICE: To avoid the risk of product damage, the finished wall must be straight and
plumb, and the floor must be flat and perpendicular to the finished wall. If the
finished wall is not straight and plumb, and the floor is not flat and perpendicular to
the finished wall, the vanity will not be properly supported and will cause
misalignment of the lavatory and drawers.
NOTE: Plumbing fittings will be exposed and visible once the vanity installation is
complete. Plated plumbing fittings are recommended.
NOTE: The dimensions provided in this guide are for a 34-1/2″ (87.6 cm) vanity
height. If an alternate height is desired, calculate the desired height of the backing
material and brackets.
NOTE: Each vanity is hand crafted. Therefore, the placement of the brackets on the
vanity may vary. To successfully install the vanity, measure and record these
dimensions when instructed to do so.
Two people should install this product.
Provide 2x12 backing material behind the finished wall to properly support the
vanity.
Make sure the finished wall is straight and plumb, and the floor is flat and
perpendicular to the finished wall.
Pernos de fijación
Flat Washers 5/16" ID
Rondelles plates Ø 5/16" Int.
Arandelas planas de 5/16" D.E.
Framing Nails
Clous de cadrage
Clavos para estructuras de madera
Finishing Nails and Screws
Clous de finition
Clavos de acabado y tornillos
Wood Shims (optional)
Cales en bois (optionnel)
Cuas de madera (opcional)
1082756-2-B 2 Kohler Co.
Page 3
Before You Begin (cont.)
Remove the drawers and shelf from the vanity before beginning this installation.
Doing so will ease the installation process. Refer to the ″Drawer and Shelf″ section
for proper removal.
Avant de commencer
AVERTISSEMENT: Risque d’endommagement du matériel. Ne pas modifier le
meuble de quelque manière que ce soit. Ceci compromettrait la stabilité du
meuble de toilette et pourrait causer des dommages matériels.
AVERTISSEMENT: Risque d’endommagement du matériel. Sélectionner des
vis-boulons à tables de capacité de charge de 250 lb (113,4 kg) avec une longueur
pouvant dégager les obstacles dans le mur en toute sécurité. Calculer la longueur
appropriée des vis-boulons à table en ajoutant ce qui suit: matériau de renfort de
1-1/2″ (3,8 cm) + épaisseur de mur + épaisseur de support de mur.
NOTICE: Si un lavabo/cuve sera installé: La plomberie doit être raccordée dans la
zone de découpe du meuble. Se référer au raccordement du lavabo/cuve et celui du
meuble pour un bon placement. L’alimentation d’eau et les lignes de drain doivent
être installées avant l’installation du meuble.
NOTICE: Mastic à l’acrylique siliconée doit être utilisé pour sécuriser le lavabo au
meuble. Ne pas utiliser de mastic à la silicone à 100%, car cela endommagera la
finition du meuble.
NOTICE: Afin d’éviter le risque d’endommagement du produit, le mur fini doit être
droit et d’aplomb, et le sol doit être plat et perpendiculaire au mur fini. Si le mur fini
n’est pas droit et d’aplomb et que le sol n’est pas plat et perpendiculaire au mur fini,
le meuble ne sera pas correctement supporté et causera un décalage du lavabo et des
tiroirs.
REMARQUE: Les raccords de plomberie seront exposés et visibles une fois
l’installation du meuble complétée. Des raccords de plomberie plaqués sont
recommandés.
REMARQUE: Les dimensions fournies dans ce guide sont pour une hauteur de
meuble de 34-1/2″ (87,6 cm). Si une hauteur alternative est désirée, calculer la
hauteur désirée du matériau de renfort et des supports.
REMARQUE: Chaque meuble est fabriqué à la main. Ainsi, le placement des
supports sur le meuble peut varier. Pour installer le meuble de manière efficace,
mesurer et enregistrer ces dimensions lorsqu’instruit de le faire.
Deux personnes doivent installer ce produit.
Fournir un matériau de renfort de 2x12 derrière le mur fini pour supporter
correctement le meuble.
S’assurer que le mur fini soit droit et d’aplomb, que le sol soit plat et
perpendiculaire au mur fini.
Retirer les tiroirs et l’étagère du meuble avant de commencer cette installation.
Ceci facilitera le processus d’installation. Se référer à la section ″Tiroir et étagère″
pour un bon démontage.
Antes de comenzar
ADVERTENCIA: Riesgo de daños a la propiedad. No modifique el tocador en
ninguna manera. Si lo hace, reducirá la estabilidad estructural del tocador y
podría causar daños materiales.
Kohler Co. 3 1082756-2-B
Page 4
Antes de comenzar (cont.)
ADVERTENCIA: Riesgo de daños a la propiedad. Seleccione pernos de sujeción
que soporten una carga de 250 lbs (113,4 kg) cuya longitud, con seguridad, no
interfiera con los obstáculos que pueda haber en la pared. Calcule la longitud
correcta de los pernos de sujeción sumando lo siguiente: Material de refuerzo de
1-1/2″ (3,8 cm) + espesor del panel de pared + espesor del soporte de pared.
AVISO: Si va a instalar un lavabo/Vessel: Las tuberías se deben instalar en el área de
la abertura para plomería del tocador. Consulte el diagrama de instalación del
lavabo/Vessel y del tocador para determinar el lugar apropiado. Se deben instalar las
tuberías de suministro de agua y de desagüe antes de instalar el tocador.
AVISO: El sellador acrílico siliconado se debe utilizar para fijar el lavabo al tocador.
No utilice sellador 100% de silicona porque dañará el acabado del tocador.
AVISO: Para evitar el riesgo de daño al producto, la pared acabada debe estar recta y
a plomo, y el piso debe estar plano y perpendicular a la pared acabada. Si la pared
acabada no está rectayaplomo, y el piso no está plano y perpendicular a la pared
acabada, el tocador no quedará bien soportado y causará una mala alineación del
lavabo y los cajones.
NOTA: Una vez que se termine la instalación del tocador, las conexiones de plomería
quedarán expuestas y visibles. Se recomienda utilizar conexiones de enchapadas.
NOTA: Las dimensiones provistas en esta guía son para una altura de tocador de
34-1/2″ (87,6 cm). Si desea otra altura, calcule la altura deseada del material de
refuerzo y de los soportes.
NOTA: Cada tocador es trabajado a mano. Por lo tanto, el lugar de instalación de los
soportes en el tocador puede variar. Para instalar bien el tocador, mida y anote estas
dimensiones cuando se le indique.
Dos personas deben instalar este producto.
Proporcione un listón de refuerzo de 2x12 detrás de la pared acabada para
soportar correctamente el tocador.
Asegúrese de que la pared acabada esté rectayaplomo, y que el piso esté plano
y perpendicular a la pared acabada.
Saque los cajones y el estante del tocador antes de comenzar esta instalación. Esto
facilitará el proceso de instalación. Consulte la sección ″Cajón y estante″ para
sacarlos correctamente.
1082756-2-B 4 Kohler Co.
Page 5
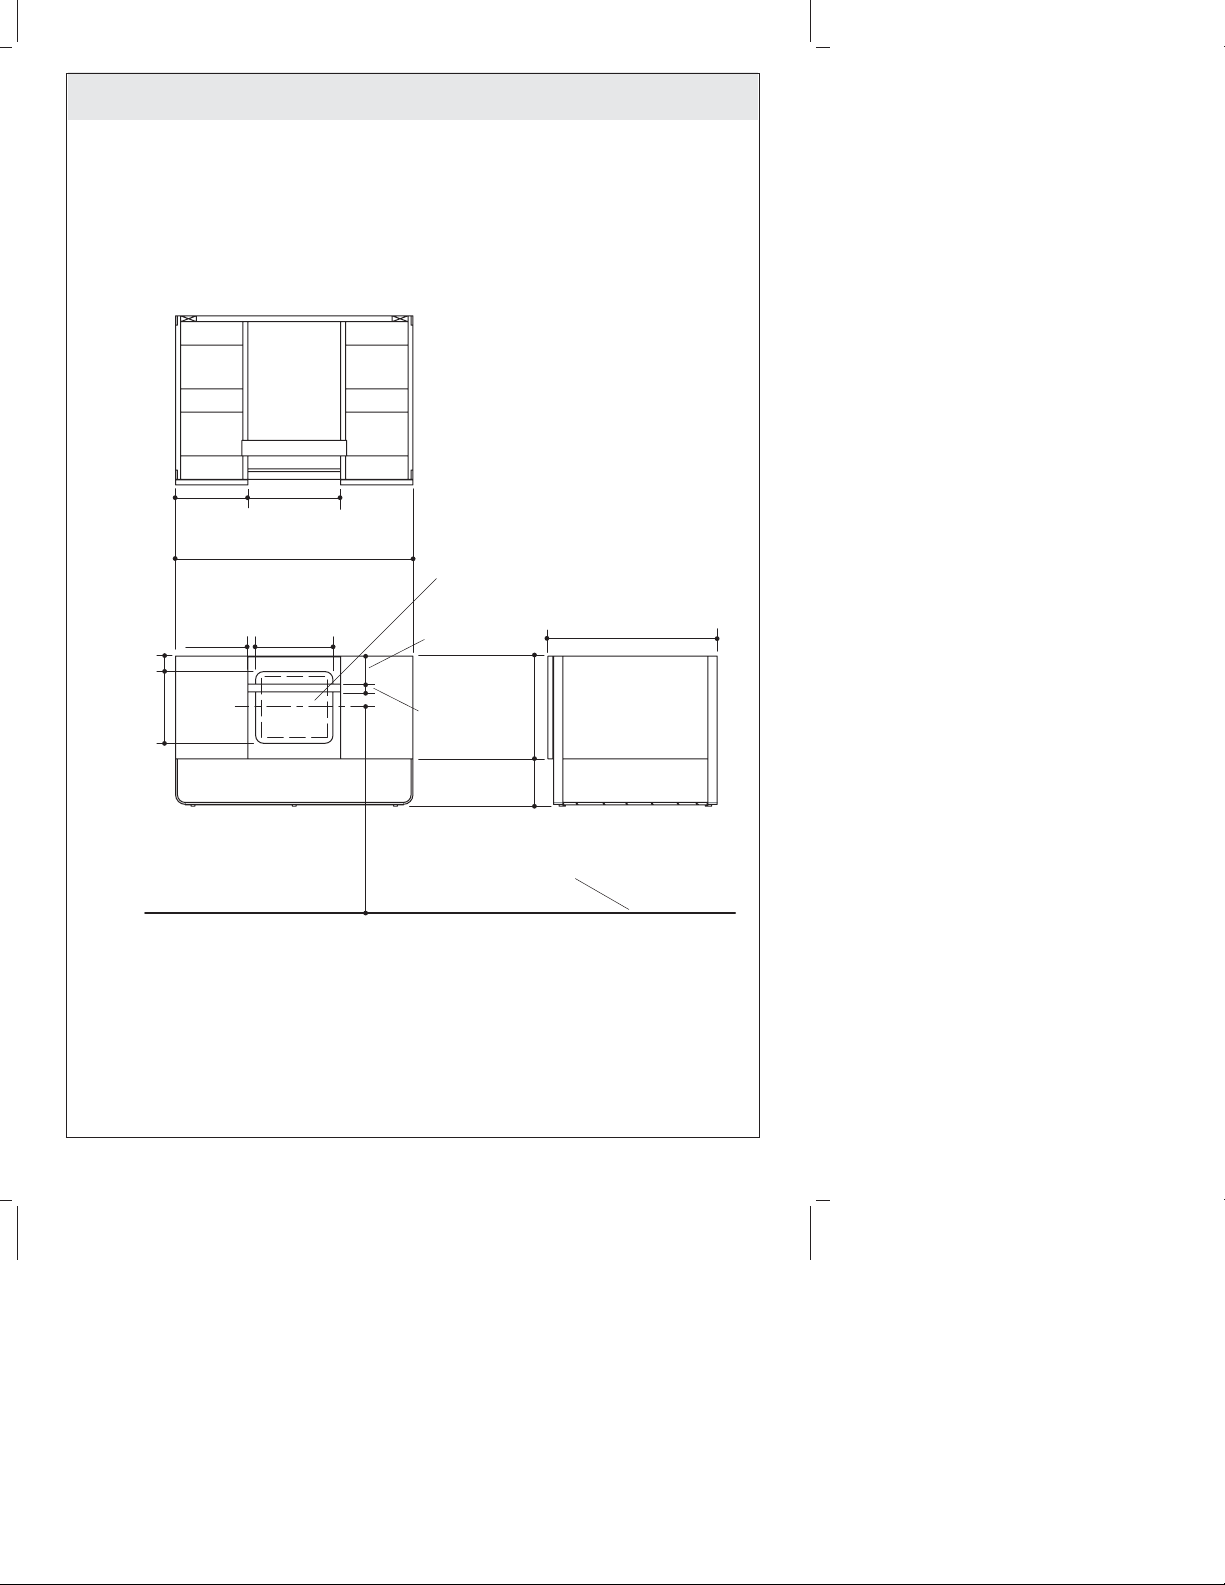
Roughing-In/Plan de raccordement/Diagrama de instalación
General Roughing-In Area
8" (20.3 cm) x 8" (20.3 cm)
9-1/8"
(23.2 cm)
11-3/4"
(29.8 cm)
30" (76.2 cm)
Emplacement général de raccordement
de 8" (20,3 cm) x 8" (20,3 cm)
Área general de instalación
8" (20,3 cm) x 8" (20,3 cm)
2"
(5.1 cm)
9"
(22.9 cm)
1"
(2.5 cm)
9-3/4"
(24.8 cm)
24"
(61 cm)
3-9/16"
(9 cm)
1"
(2.5 cm)
21-3/8" (54.3 cm)
13"
(33 cm)
6"
(15.2 cm)
Finished Floor
Sol fini
Piso acabado
Kohler Co. 5 1082756-2-B
Page 6
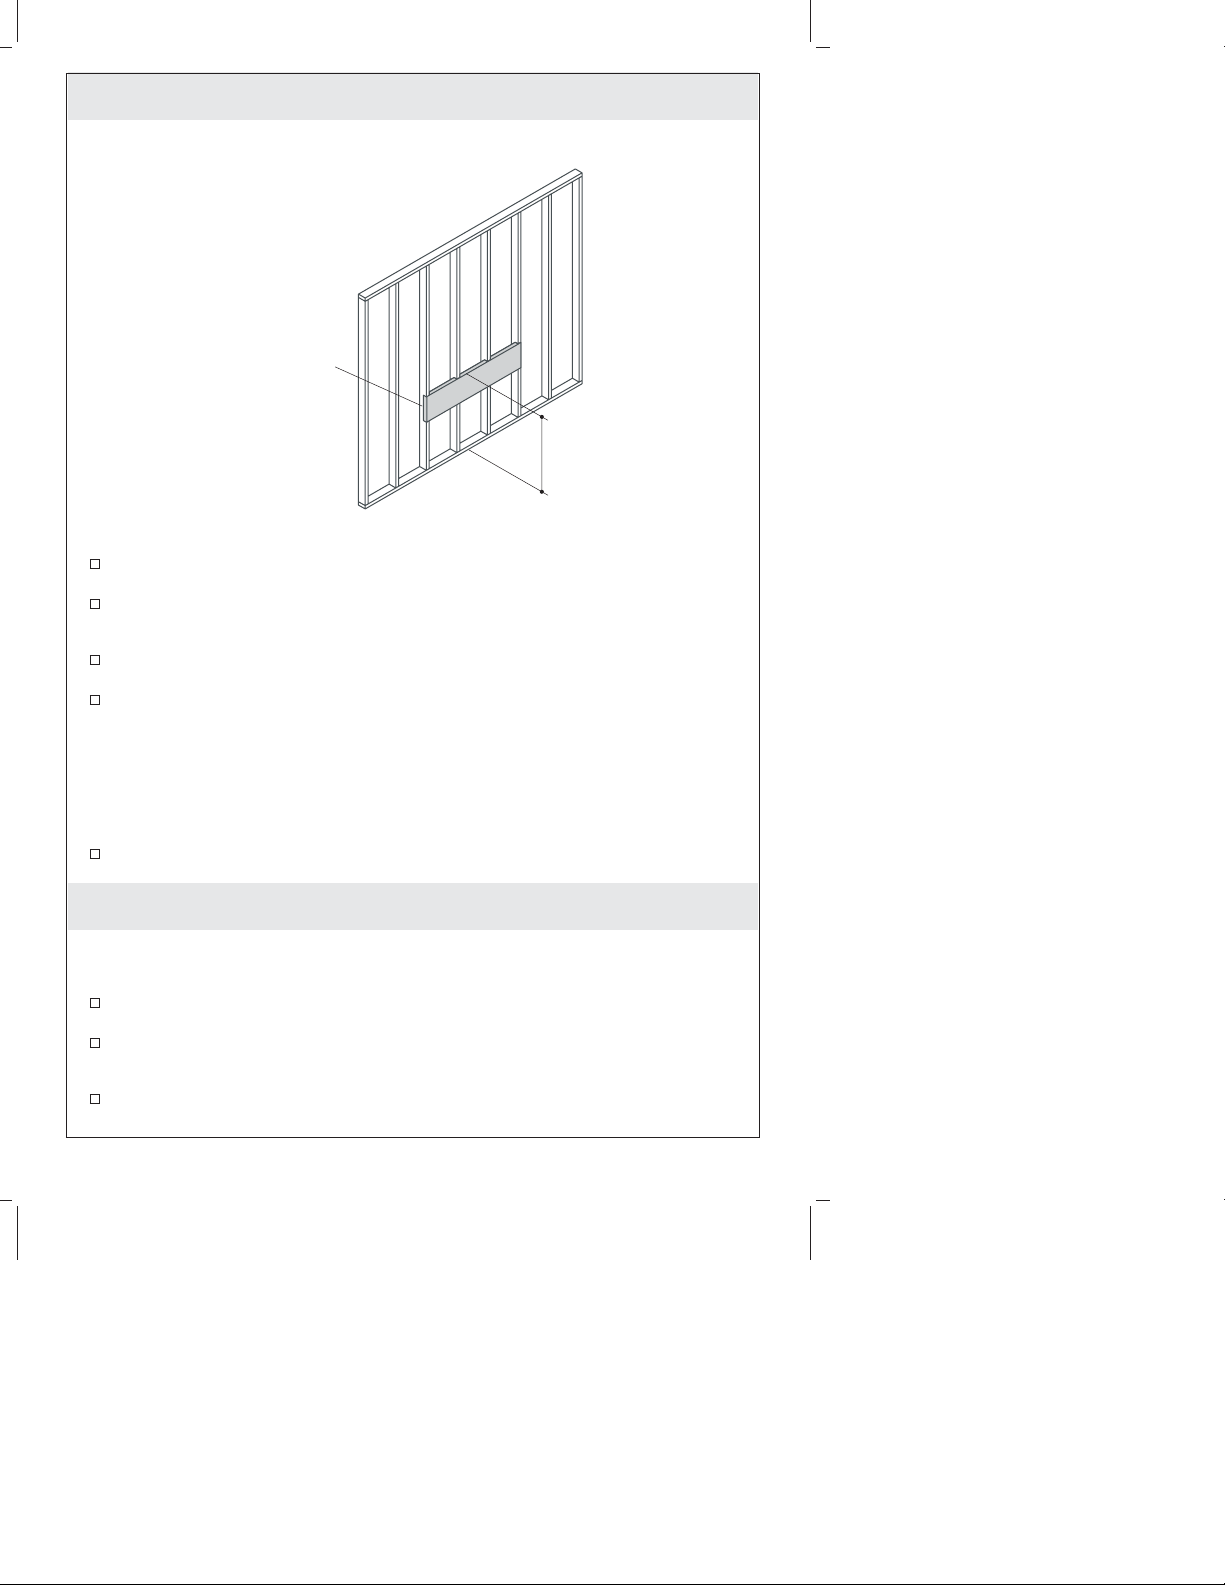
1. Prepare the Site
2x12 Backing Material
Matériau de support 2x12
Listón de refuerzo de 2x12
31" (78.7 cm)
NOTE: The dimension provided is for a 34-1/2″ (87.6 cm) vanity height. If an
alternate height is desired, calculate the desired height of the backing material.
Measure and mark 31″ (78.7 cm) up from the floor. This will be the height from
the top of the 2x12 backing material to the floor.
Ensure there are no obstructions in the wall (such as wiring or plumbing) from
the marked height down to the floor. If there are obstructions, select another area
within the site to install the vanity.
Secure 2x12 backing material to the studs with framing nails. The backing material
should span the length of the vanity.
If a lavatory/vessel will be installed: Rough in the water supply and drain lines
into the plumbing cutout area of the vanity. Refer to the lavatory/vessel
roughing-in and the vanity roughing-in for proper placement.
NOTICE: To avoid the risk of product damage: The finished wall must be straight
and plumb, and the floor flat and perpendicular to the finished wall. If the finished
wall is not straight and plumb, and the floor is not flat and perpendicular to the
finished wall, the vanity will not be properly supported and will cause misalignment
of the lavatory and drawers.
Complete the finished wall. Make sure the finished wall is straight and plumb,
and the floor is flat and perpendicular to the finished wall.
Préparer le site
REMARQUE: La dimension fournie est pour une hauteur de meuble de 34-1/2″ (87,6
cm). Si une hauteur alternative est désirée, calculer la hauteur désirée du matériau de
renfort.
Mesurer et marquer 31″ (78,7 cm) vers le haut à partir du sol. Ceci sera la hauteur
à partir du dessus du matériau de renfort 2x12 au sol.
S’assurer qu’il n’y ait pas d’obstructions dans le mur (telles que câblage ou
plomberie) à partir de la hauteur marquée vers le sol. Si ilyadesobstructions,
sélectionner une autre zone sur le site pour installer le meuble.
Sécuriser le matériau de renfort 2x12 aux montants avec des clous de cadrage. Le
matériau de renfort devrait être la longueur du meuble.
1082756-2-B 6 Kohler Co.
Page 7

Préparer le site (cont.)
Si un lavabo/cuve sera installé: Raccorder l’alimentation d’eau et les conduites de
drain dans la zone de découpe de plomberie du meuble. Se référer au
raccordement du lavabo/cuve et celui du meuble pour un bon placement.
NOTICE: Pour éviter le risque d’endommagement du produit: Le mur fini doit être
droit et d’aplomb, et le plancher doit être à plat et perpendiculaire au mur fini. Si le
mur fini n’est pas droit et d’aplomb et que le sol n’est pas plat et perpendiculaire au
mur fini, le meuble ne sera pas correctement supporté et causera un décalage du
lavabo et des tiroirs.
Terminer le mur fini. S’assurer que le mur fini soit droit et d’aplomb, que le sol
soit plat et perpendiculaire au mur fini.
Prepare el sitio
NOTA: Las dimensiones provistas son para una altura de tocador de 34-1/2″ (87,6
cm). Si desea otra altura, calcule la altura deseada del material de refuerzo.
Mida y marque hacia arriba 31″ (78,7 cm) desde el piso. Ésta será la altura desde
la parte superior del refuerzo de 2x12 hasta el piso.
Asegúrese de que no haya obstrucciones en la pared (tal como cables o tuberías)
desde la altura marcada hasta el piso. Si existen obstrucciones, seleccione otro área
en el lugar para instalar el tocador.
Asegure el refuerzo de 2x12 a los postes con clavos para estructuras de madera. El
listón de refuerzo debe tener la misma longitud del tocador.
Si va a instalar un lavabo/Vessel: Instale las tuberías de agua y las líneas de
desagüe en el área de la abertura para plomería del tocador. Consulte el diagrama
de instalación del lavabo/Vessel y del tocador para determinar el lugar apropiado.
AVISO: Para evitar el riesgo de daños al producto: La pared acabada debe estar
rectayaplomo, y el piso plano y perpendicular a la pared acabada. Si la pared
acabada no está rectayaplomo, y el piso no está plano y perpendicular a la pared
acabada, el tocador no quedará bien soportado y causará una mala alineación del
lavabo y los cajones.
Termine la pared acabada. Asegúrese de que la pared acabada esté recta y a
plomo, y que el piso esté plano y perpendicular a la pared acabada.
Kohler Co. 7 1082756-2-B
Page 8
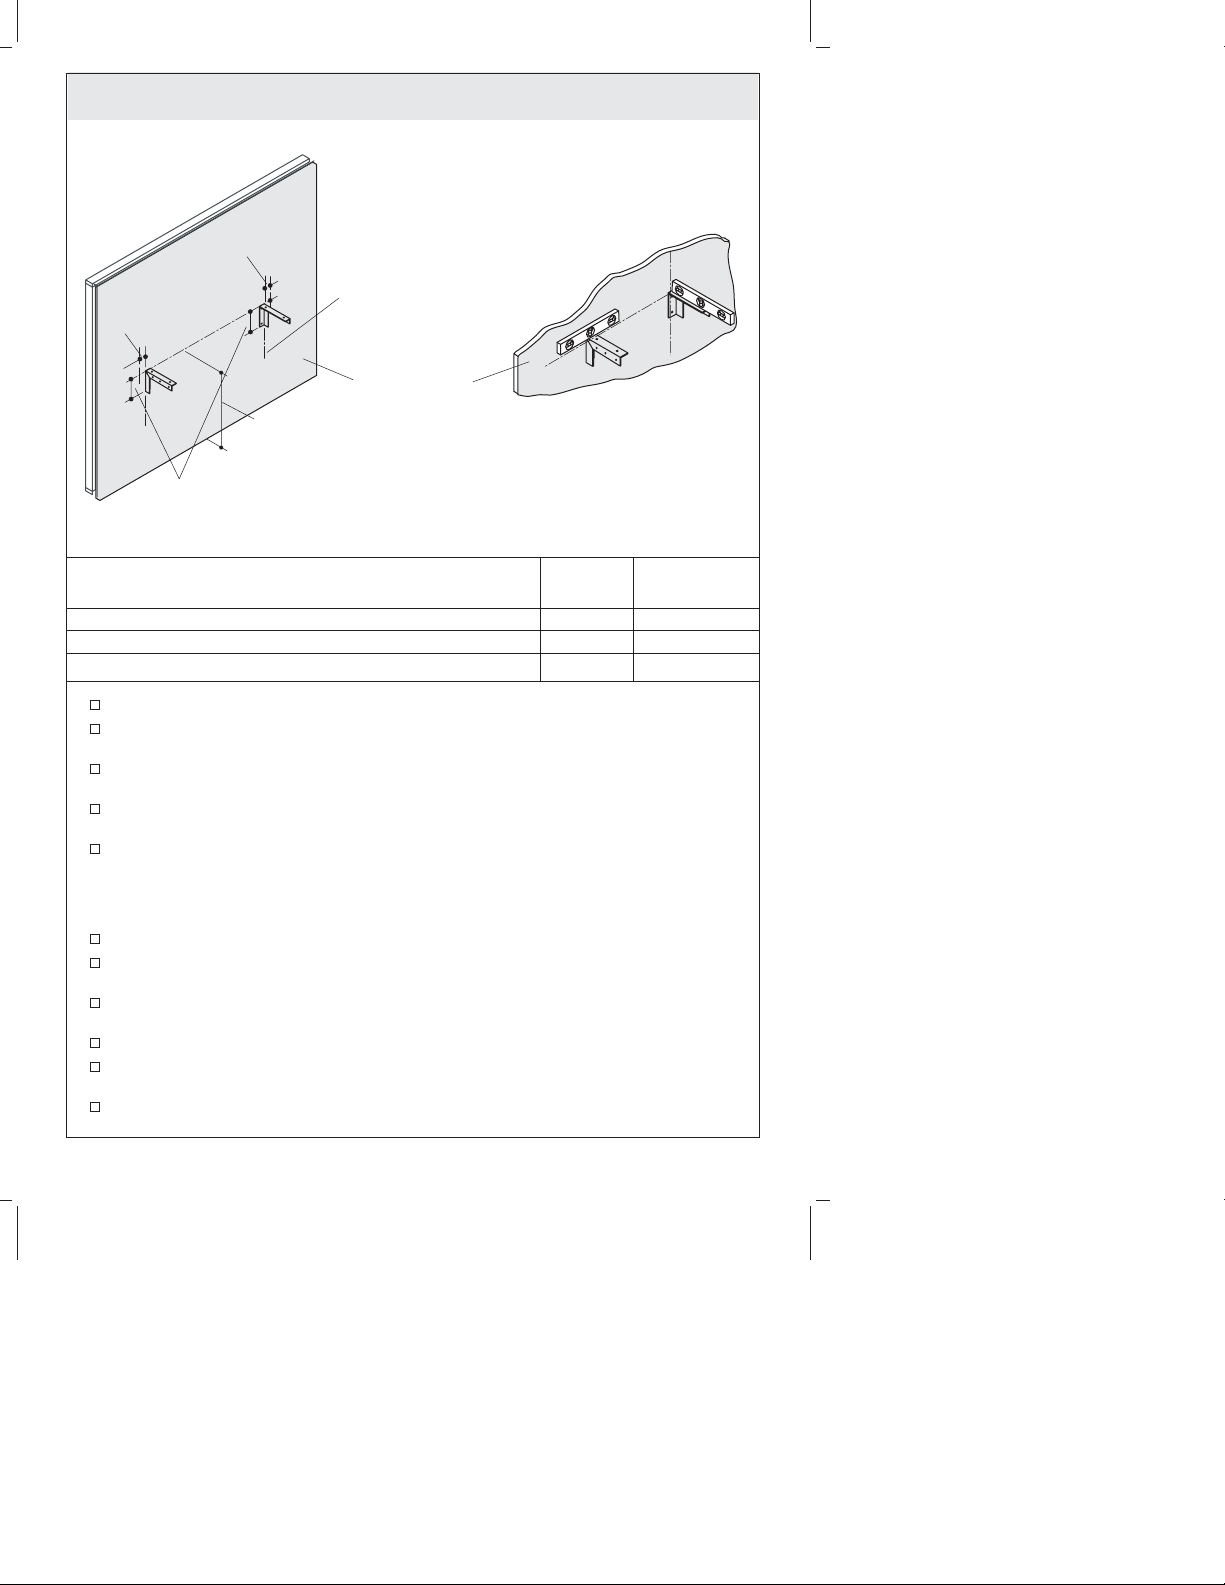
2. Install Brackets
Y
X
NOTICE: The mounting brackets are attached to the back of the unit. Prior to
removing the mounting brackets, several dimensions must be recorded to ensure a
successful installation. Use the table below to record these measurements.
Measurement Description Variable Measured
Outside edge of vanity to outside edge of left bracket X = ________
Outside edge of vanity to outside edge of right bracket Y = ________
Outside edge of left bracket to outside edge of right bracket Z = ________
Locate the 2x12 backing material.
Measure and mark 29-7/8″ (75.9 cm) from the floor to the desired center location
of the vanity.
Using a level, draw a horizontal line the length of ″Z″ through the marked height.
This will note the horizontal position where the vanity will slide onto the brackets.
Using a level, measure and mark the distance of ″X″ and ″Y″ from each respective
edge of the horizontal line ″Z″. This will note the top edge of each bracket.
Marka5″ (12.7 cm) plumb line down from the previous marked point. This will
note the outermost edge of each bracket.
NOTE: A left side bracket and a right side bracket are provided. Ensure that you are
aligning the correct bracket before marking its location.
Remove the brackets from the vanity.
Align the outermost edge of each bracket at the side mark and the top edge of the
bracket at the horizontal mark.
Mark the mounting hole locations of the bracket on the finished wall. Set the
brackets aside.
Drill the marked holes using a 3/16″ drill bit.
Secure each bracket to the finished wall using 5/16″ ID flat washers (not
provided) and lag bolts (not provided).
Verify the brackets are level.
Z
29-7/8"
(75.9 cm)
5" (12.7 cm)
5" (12.7 cm) Plumb Line
Ligne droite de 5" (12,7 cm)
Línea a plomo de 5" (12,7 cm)
Finished Wall
Mur fini
Pared acabada
Verify brackets are level after mounting.
Vérifier que les supports sont nivelés après le
montage.
Verifique que los soportes estén a nivel después
del montaje.
Distance
1082756-2-B 8 Kohler Co.
Page 9

Install Brackets (cont.)
NOTE: If the brackets are not level: Loosen the lag bolts, then insert a wood shim
between the bracket and the wall. Retighten the lag bolts.
Installer les renforts
NOTICE: Les supports de fixation sont attachés à l’arrière de l’unité. Avant de retirer
les supports de fixation, plusieurs dimensions doivent être enregistrées pour assurer
une bonne installation. Utiliser la table ci-dessous pour enregistrer ces mesures.
Description de mesure Variable Distance
Rebord extérieur du meuble au rebord extérieur du la gauche
support
Rebord extérieur du meuble au rebord extérieur du droite
support
Rebord extérieur du la gauche support su rebord extérieur
du droite support
Localiser le matériau de renfort de 2x12.
Mesurer et marquer 29-7/8″ (75,9 cm) entre le sol et l’emplacement central
souhaité du meuble.
Avec un niveau, tracer une ligne horizontale de longueur ″Z″ à travers la hauteur
marquée. Ceci sera la position horizontale où le meuble glissera sur les supports.
Avec un niveau à bulle, mesurer et marquer la distance ″X″ et ″Y″ de chaque
rebord respectif à partir de la ligne horizontale ″Z″. Ceci notera le rebord
supérieur de chaque support.
Marquer une ligne d’aplomb à 5″ (12,7 cm) vers le bas à partir du point marqué
auparavant. Ceci notera le rebord extérieur de chaque support.
REMARQUE: Un support gauche et droit sont fournis. S’assurer que le support
approprié est aligné avant de marquer son emplacement.
Retirer les supports hors du meuble.
Aligner le rebord extrême de chaque support à la marque latérale et le rebord
supérieur du support à la marque horizontale.
Marquer les emplacements d’orifice de fixation du support sur le mur fini. Mettre
les supports de côté.
Percer les orifices marqués à l’aide d’une mèche de 3/16″.
Sécuriser chaque support au mur fini avec des rondelles plates de 5/16″ de
diamètre intérieur (non fournies) et des tire-fonds (non fournis).
Vérifier que tous les supports soient nivelés.
REMARQUE: Si les supports ne sont pas nivelés: Desserrer les tire-fonds puis
insérer une cale en bois entre le support et le mur. Re-serrer les tire-fonds.
X = ________
Y = ________
Z = ________
mesurée
Kohler Co. 9 1082756-2-B
Page 10

Instale los soportes
AVISO: Los soportes de montaje se fijan a la parte posterior de la unidad. Antes de
retirar los soportes de montaje, debe anotar varias dimensiones para asegurar una
instalación correcta. Utilice la tabla siguiente para anotar estas medidas.
Descripción de la medida Variable Distancia
Filo exterior del tocador al filo exterior del soporte izquierdo X = ________
Filo exterior del tocador al filo exterior del soporte derecho Y = ________
Filo exterior del soporte izquierdo al filo exterior del soporte
derecho
Coloque el listón de refuerzo de 2x12.
Mida y marque 29-7/8″ (75,9 cm) desde el piso hasta el lugar central deseado del
tocador.
Con un nivel, trace una línea horizontal de longitud ″Z″ a través de la altura
marcada. Esto marcará la posición horizontal donde el tocador se deslizará sobre
los soportes.
Con un nivel, mida y marque la distancia ″X″ y ″Y″ desde cada filo respectivo de
la línea horizontal ″Z″. Esto marcará el filo superior de cada soporte.
Marque una línea a plomo 5″ (12,7 cm) hacia abajo desde el punto marcado
previamente. Esto marcará el filo más exterior de cada soporte.
NOTA: Se proveen un soporte derecho y uno izquierdo. Asegúrese de alinear el
soporte correcto antes de marcar su lugar de instalación.
Retire los soportes del tocador.
Alinee el filo más exterior de cada soporte con la marca lateral y el filo superior
del soporte con la marca horizontal.
Marque los lugares para los orificios de fijación del soporte en la pared acabada.
Coloque los soportes a un lado.
Taladre los orificios marcados con una broca de 3/16″.
Fije cada soporte a la pared acabada utilizando las arandelas planas de D.I. de
5/16″ (no provistas) y los pernos de fijación (no provistos).
Verifique que los soportes estén a nivel.
NOTA: Si los soportes no están a nivel: Afloje los pernos de fijación, luego inserte
una cuña de madera entre el soporte y la pared. Vuelva a apretar los pernos de
fijación.
Z = ________
medida
1082756-2-B 10 Kohler Co.
Page 11

3. Secure the Vanity
Screws
Vis
Tornillos
Screws
Vis
Tornillos
With assistance, lift and slide the vanity over the brackets.
Ensure the back of the vanity is flush against the finished wall with the brackets
properly seated inside the vanity.
WARNING: Risk of property damage. It is required that wood screws be
installed through the hanger and into the vanity, as shown. This will ensure the
vanity is properly secured.
NOTE: If the vanity is not flush: If the gap is 1/8″ (3 mm) or less, insert wood shims
(not provided) behind the vanity. If the gap is greater than 1/8″ (3 mm), correct the
finished wall until it is plumb.
CAUTION: Risk of property damage. Secure the vanity with all of the screws
illustrated. This will ensure the vanity is secured properly to the finished wall.
From the inside of the vanity, secure the vanity to the brackets with the washers
and screws provided.
Secure the backside of the vanity to the finished wall with 2-1/4″ screws (not
provided).
Install the drawers. Refer to the ″Drawer and Shelf″ section for proper installation.
NOTICE: The top of each drawer must sit just below the top of the vanity. If each
drawer is not at the proper height, the top of each drawer will be damaged or will
not open when the lavatory is installed.
Verify the top of each drawer sits just below the top of the vanity. If necessary,
refer to the ″Drawer and Shelf″ section to properly adjust the height of each
drawer.
Front View
Vue avant
Vista frontal
Screws
Vis
Tornillos
Kohler Co. 11 1082756-2-B
Page 12

Sécuriser le meuble
Avec de l’assistance, soulever et glisser le meuble sur les supports.
S’assurer que l’arrière du meuble est nivelé contre le mur fini et que les supports
soient proprement reposés dans le meuble.
AVERTISSEMENT: Risque d’endommagement du matériel. Il est requis
d’installer les vis à bois à travers le support et dans le meuble, tel qu’illustré. Ceci
assure que le meuble est bien fixé en place.
REMARQUE: Si le meuble n’est pas à égalité: Si l’espace est de 1/8″ (3 mm) ou
moins, insérer des cales en bois (non fournies) à l’arrière le meuble. Si l’espace est
supérieur à 1/8″ (3 mm), rectifier le mur fini jusqu’à ce qu’il soit d’aplomb.
ATTENTION: Risque d’endommagement du matériel. Sécuriser le meuble avec
toutes les vis illustrées. Ceci assurera que le meuble est proprement sécurisé au
mur fini.
De l’intérieur du meuble, sécuriser le meuble aux supports avec les rondelles et
les vis fournies.
Sécuriser l’arrière du meuble au mur fini avec des vis 2-1/4″ (non fournies).
Installer les tiroirs. Se référer à la section ″Tiroir et étagère″ pour une bonne
installation.
NOTICE: Le dessus de chaque tiroir doit reposer juste en-dessous du dessus du
meuble. Si chaque tiroir n’est pas à la bonne hauteur, le dessus de chaque tiroir sera
endommagé ou ne s’ouvrira pas lorsque le lavabo est installé.
Vérifier que le dessus de chaque tiroir repose juste en dessous du dessus du
meuble. Si nécessaire, se référer à la section ″Tiroir et étagère″ pour bien ajuster la
hauteur de chaque tiroir.
Fije el tocador
Con ayuda, levante y deslice el tocador sobre los soportes.
Asegúrese de que la parte posterior del tocador quede al ras contra la pared
acabada y que los soportes queden bien asentados dentro del tocador.
ADVERTENCIA: Riesgo de daños a la propiedad. Es requisito que los tornillos
para madera se instalen a través del soporte de suspensión y dentro del tocador,
como se ilustra. Esto asegurará que el tocador quede asegurado correctamente.
NOTA: Si el tocador no está al ras: Si la separación es 1/8″ (3 mm) o menor, inserte
cuñas de madera (no provistas) detrás del tocador. Si la separación es mayor de 1/8″
(3 mm), corrija la pared acabada hasta que quede a plomo.
PRECAUCIÓN: Riesgo de daños a la propiedad. Fije el tocador con todos los
tornillos ilustrados. Esto asegurará que el tocador quede bien fijo a la pared
acabada.
Desde dentro del tocador, fije el tocador a los soportes con las arandelas y
tornillos provistos.
Fije el lado posterior del tocador a la pared acabada con tornillos de 2-1/4″ (no
provistos).
Instale los cajones. Consulte la sección ″Cajón y estante″ para la instalación
correcta.
AVISO: La parte superior de cada cajón debe quedar justo abajo de la parte superior
del tocador. Si cada cajón no está a la altura correcta, la parte superior de cada cajón
se dañará o no abrirá cuando se instale el lavabo.
1082756-2-B 12 Kohler Co.
Page 13

Fije el tocador (cont.)
Verifique que la parte superior de cada cajón quede justo abajo de la parte
superior del tocador. Si es necesario, consulte la sección ″Cajón y estante″ para
ajustar correctamente la altura de cada cajón.
4. Install the Lavatory
Install the faucet (if applicable) and drain to the lavatory. Refer to the faucet and
drain manufacturer’s installation instructions.
With assistance, lift and properly position the lavatory on top of the vanity.
Verify each drawer opens and closes with ease.
With assistance, remove the lavatory from the vanity. Set the lavatory aside.
If necessary, adjust the height of each drawer. Refer to the ″Drawer and Shelf″
section to properly adjust the height.
NOTICE: Siliconized acrylic caulk must be used to secure the lavatory to the vanity.
Do not use 100% silicone sealant, which will damage the finish of the vanity.
Run a 1/4″ (6 mm) continuous bead of siliconized acrylic caulk around the top of
the vanity, as illustrated.
CAUTION: Risk of personal injury. Vitreous china lavatories are very heavy. Get
help lifting and aligning the lavatory.
NOTE: The lavatory is properly positioned when: (1) the back edge of the lavatory is
flush against the finished wall and (2) the overhang on the left, right, and front side
of the lavatory is equal on each side of the vanity.
With assistance, lift and properly position the lavatory on top of the vanity.
Immediately wipe away any excess caulk that contacts the vanity.
Run a 1/8″ (3 mm) bead of siliconized acrylic caulk along the top edge of the
lavatory where the lavatory contacts the finished wall.
Kohler Co. 13 1082756-2-B
Page 14

Installation du lavabo
Installer le robinet (si applicable) et le drain au lavabo. Se référer aux instructions
d’installation du fabricant du robinet et du drain.
Avec de l’assistance, soulever et positionner correctement le lavabo au-dessus du
meuble.
Vérifier que chaque tiroir ouvre et ferme aisément.
Avec de l’assistance, retirer le lavabo du meuble. Mettre le lavabo de côté.
Si nécessaire, ajuster la hauteur de chaque tiroir. Se référer à la section ″Tiroir et
étagère″ pour proprement ajuster la hauteur.
NOTICE: Mastic à l’acrylique siliconée doit être utilisé pour sécuriser le lavabo au
meuble. Ne pas utiliser de mastic à la silicone à 100%, car cela endommagera la
finition du meuble.
Faire passer un boudin continu de mastic à l’acrylique siliconé de 1/4″ (6 mm)
autour du dessus du meuble, tel qu’illustré.
ATTENTION: Risque de blessures corporelles. Les lavabos en porcelaine vitrifiée
sont très lourds. S’aider lors du levage et de l’alignement du lavabo.
REMARQUE: Le lavabo est proprement positionné lorsque: (1) le rebord arrière du
lavabo est à ras contre le mur fini et (2) le dépassement à gauche, à droite et à l’avant
du lavabo est égal sur chaque côté du meuble.
Avec de l’assistance, soulever et positionner correctement le lavabo au-dessus du
meuble.
Essuyer immédiatement tout excès de mastic en contact avec le meuble.
Faire passer un boudin continu de mastic à l’acrylique siliconé de 1/8″ (3 mm)
autour du rebord supérieur du lavabo au point de contact de celui-ci avec le mur
fini.
Instale el lavabo
Instale la grifería (si aplica) y el desagüe en el lavabo. Consulte las instrucciones
de instalación del fabricante de la grifería y el desagüe.
Con ayuda, levante y coloque correctamente el lavabo sobre la cubierta del
tocador.
Verifique que cada cajón abra y cierre con facilidad.
Con ayuda, retire el lavabo del tocador. Coloque el lavabo a un lado.
Si es necesario, ajuste la altura de cada cajón. Consulte la sección ″Cajón y estante″
para ajustar correctamente la altura.
AVISO: El sellador acrílico siliconado se debe utilizar para fijar el lavabo al tocador.
No utilice sellador 100% de silicona porque dañará el acabado del tocador.
Aplique una tira continua de 1/4″ (6 mm) de sellador acrílico siliconado en la
cubierta del tocador, como se ilustra.
PRECAUCIÓN: Riesgo de lesiones personales. Los lavabos de porcelana
vitrificada son muy pesados. Pida ayuda para levantar y alinear el lavabo.
NOTA: El lavabo está bien colocado cuando: (1) el filo posterior del lavabo debe
quedar al ras contra la pared acabada y (2) el voladizo de la izquierda, derecha y
frente del lavabo debe tener la misma distancia en cada lado del tocador.
Con ayuda, levante y coloque correctamente el lavabo sobre la cubierta del
tocador.
Elimine inmediatamente el exceso de sellador que tenga contacto con el tocador.
1082756-2-B 14 Kohler Co.
Page 15

Instale el lavabo (cont.)
Aplique una tira de 1/8″ (3 mm) de sellador acrílico siliconado alrededor del filo
superior del lavabo donde el lavabo hará contacto con la pared acabada.
5. Drawer and Shelf
Glass Shelf
Release Latch
Loquet de déblocage
Seguro de enganche
Étagère en verre
Estante de vidrio
Rail
Rail
Tab
Riel
Languette
Lengüeta
NOTE: A drawer height adjustment wheel and release latch are located underneath
the front of the drawer at each corner.
Removal
Slide the drawer out on the rails until fully extended.
Pull both release latches toward you, then pull the front of the drawer up off the
rails.
Lift the drawer out from the vanity.
Reinstallation
Fully extend the rails.
Align the grooves on the underside of the drawer with the rails, then set the
drawer into place.
Hold the drawer in place on the rails with one hand. With your other hand, pull
the tab on the bottom front of the rail toward you until you hear the rail ″snap″
into place. Repeat this step for the remaining rail.
Ensure the drawer is locked into place by lightly lifting the front of the drawer
upward. If the drawer does not lift up, it is properly engaged. If the drawer lifts
up, repeat the ″Reinstallation″ procedure.
Slide the drawer in and out of the vanity to ensure smooth operation.
Adjustment
Slide the drawer out on the rails until fully extended.
Underside View
Vue d'en-dessous
Vista por debajo
Tab
Languette
Lengüeta
Tab
Languette
Lengüeta
Kohler Co. 15 1082756-2-B
Page 16

Drawer and Shelf (cont.)
Turn the drawer height adjustment wheels to adjust the drawer height. To lower
the drawer, turn the wheel on the left side of the drawer clockwise and/or the
wheel on the right side of the drawer counterclockwise. Turn the wheel(s) in the
opposite direction to raise the drawer.
Glass Shelf
With assistance, lift the glass shelf into place on the six tabs.
Tiroir et étagère
REMARQUE: Une roue de réglage de hauteur du tiroir et un loquet de déblocage
sont localisés sous l’avant du tiroir à chaque angle.
Démontage
Glisser le tiroir hors des rails en pleine extension.
Tirer les deux loquets de déblocage vers soi, puis tirer l’avant du tiroir vers le
haut, hors des rails.
Soulever le tiroir hors du meuble.
Ré-installation
Étendre complètement les rails.
Aligner les rainures de la base du tiroir avec les rails et mettre le tiroir en place.
Maintenir le tiroir en place sur les rails avec une main. Avec l’autre main, tirer la
languette de la base avant du rail vers soi jusqu’à l’entendre s’enclencher en place.
Répéter cette étape pour le rail restant.
S’assurer que le tiroir soit verrouillé en place en soulevant légèrement l’avant vers
le haut. Si le tiroir ne se soulève pas, il est engagé correctement. Si le tiroir se
soulève, répéter la procédure ″Réinstallation″.
Glisser le tiroir vers l’intérieur et l’extérieur du meuble pour en assurer une bonne
opération.
Ajustement
Glisser le tiroir hors des rails en pleine extension.
Tourner les roues de réglage de hauteur du tiroir pour régler cette dernière. Pour
baisser le tiroir, tourner la roue à gauche du tiroir vers la droite et/ou la roue à
droite du tiroir vers la gauche. Tourner la (les) roue(s) dans la direction opposée
pour élever le tiroir.
Étagère en verre
Avec de l’assistance, soulever l’étagère de verre en place sur les six languettes.
Cajón y estante
NOTA: La rueda de ajuste de altura del cajón y el seguro de enganche se encuentran
debajo del frente del cajón en cada esquina.
Desmontaje
Deslice hacia fuera el cajón hasta que los rieles se extiendan completamente.
Jale ambos seguros de enganche hacia usted, luego jale hacia arriba el frente del
cajón para separarlo de los rieles.
1082756-2-B 16 Kohler Co.
Page 17

Cajón y estante (cont.)
Levante el cajón sacándolo del tocador.
Reinstalación
Extienda completamente los rieles.
Alinee las ranuras del lado inferior del cajón con los rieles, luego coloque el cajón
en su lugar.
Con una mano, mantenga el cajón en su lugar en los rieles. Con la otra mano, jale
la lengüeta de la parte inferior del frente del riel hacia usted hasta que escuche
que el riel ″encaje″ en su lugar. Repita este paso para el otro riel.
Asegúrese de que el cajón esté bien fijo en su lugar levantando levemente el frente
del cajón. Si el cajón no se levanta hacia arriba, está bien encajado. Si el cajón se
levanta hacia arriba, repita el procedimiento de ″Reinstalación″.
Deslice el cajón hacia dentro y hacia fuera del tocador para asegurar que funcione
suavemente.
Ajuste
Deslice hacia fuera el cajón hasta que los rieles se extiendan completamente.
Gire las ruedas de ajuste de la altura del cajón para ajustar la altura del cajón.
Para bajar el cajón, gire hacia la derecha la rueda del lado izquierdo del cajón y/o
gire hacia la izquierda la rueda del lado derecho del cajón. Gire la rueda o ruedas
en la dirección opuesta para subir el cajón.
Estante de vidrio
Con ayuda, levante el estante de vidrio en su lugar sobre las seis lengüetas.
Care and Cleaning
Wood Surfaces
•
As with any smooth surface, avoid using abrasive cleaners as they will scratch the
surface. Wipe the wood surface regularly to prevent buildup of soap and scum.
•
To protect against scratches, use felt, leather, or cork under all items placed on the
wood surface. Do not expose wood furniture to direct sunlight, drying heat
sources, or dampness.
•
Dust frequently with a soft cloth in the direction of the grain. Use only products
specifically made for cleaning wood. Avoid using oily polishes or waxes, or
products containing silicone. Blot spills immediately with a soft, damp cloth.
•
Every six months, remove soil buildup by rubbing with a soft cloth dampened in
a 50/50 solution of warm water and an ammonia-free detergent. Wipe clean with
a cloth dampened in warm water, then wipe dry.
•
Paint pens and touch-up markers are available to conceal scratches on the wood
surface. These products may be purchased from a Kohler distributor or call
1-800-4-KOHLER for ordering information.
For best results, keep the following in mind when caring for your KOHLER product:
Glass and Mirrored Surfaces
•
Use a mild detergent such as liquid dishwashing soap and warm water for
cleaning. Do not use abrasive cleaners that may scratch or dull the surface.
•
Carefully read the cleaner product label to ensure the cleaner is safe for use on the
material.
•
Always test your cleaning solution on an inconspicuous area before applying to
the entire surface.
•
Do not allow cleaners to sit or soak on the surface.
Kohler Co. 17 1082756-2-B
Page 18

Care and Cleaning (cont.)
•
Wipe surfaces clean and rinse completely with water immediately after cleaner
application. Rinse and dry any overspray that lands on nearby surfaces.
•
Use a soft, dampened sponge or cloth. Never use an abrasive material such as a
brush or scouring pad to clean surfaces.
For detailed cleaning information and products to consider, visit www.kohler.com/clean.
To order Care & Cleaning information, call 1-800-456-4537.
Entretien et nettoyage
Surfaces en bois
•
Tel que pour toute surface lisse, éviter l’utilisation de nettoyants abrasifs car ils
pourraient rayer la surface. Essuyer régulièrement la surface en bois pour éviter le
dépôt de savon et saleté.
•
Pour éviter les rayures, utiliser du feutre, cuir, ou liège sous tout article posé sur
la surface en bois. Ne pas exposer le meuble en bois à la lumière du soleil, aux
sources de chaleur, ou à l’humidité.
•
Épousseter fréquemment avec un chiffon doux dans le sens du grain. Utiliser
uniquement des produits spécifiquement conçus pour l’entretien du bois. Éviter
d’utiliser des cires à base d’huile, ou des produits contenant de la silicone.
Éliminer immédiatement les taches avec un chiffon doux et humide.
•
Tous les six mois, retirer le dépôt de saleté en frottant avec un chiffon humidifié
d’une solution 50/50 d’eau chaude et de détergent sans ammoniaque. Bien
essuyer avec un chiffon humidifié d’eau chaude, puis sécher.
•
Les marqueurs de retouche sont disponibles pour dissimuler les rayures sur la
surface en bois. Ces produits peuvent être achetés chez un distributeur Kohler ou
en appelant le 1-800-4-KOHLER pour toute information concernant la commande.
Pour obtenir les meilleurs résultats possibles, prendre ce qui suit en considération lors de
l’entretien de votre produit KOHLER:
Surfaces en verre et à miroir
•
Utiliser un détergent doux tel que liquide pour vaisselle et de l’eau chaude pour
nettoyer. Ne pas utiliser de nettoyants abrasifs car ils pourraient rayer ou abîmer
la surface.
•
Lire l’étiquette du produit de nettoyage avec le plus grand soin pour assurer qu’il
peut être utilisé sans danger sur le matériau.
•
Toujours tester la solution de nettoyage sur une surface non visible avant de
l’appliquer sur l’ensemble de la surface.
•
Ne pas laisser les nettoyants reposer ou tremper sur la surface.
•
Essuyer les surfaces et rincer complètement avec de l’eau immédiatement après
l’application du nettoyant. Rincer et sécher tout éclaboussement sur les surfaces
avoisinantes.
•
Utiliser une éponge ou un chiffon doux et humide. Ne jamais utiliser de matériau
abrasif tel qu’une brosse ou une éponge à récurer pour nettoyer les surfaces.
Pour obtenir des informations détaillées sur le nettoyage et les produits à considérer,
consulter le site www.kohler.com/clean. Pour commander des informations sur
l’entretien & le nettoyage, appeler le 1-800-456-4537.
Cuidado y limpieza
Superficies de madera
•
Como con cualquier superficie lisa, evite los productos de limpieza abrasivos ya
que rayarán la superficie. Limpie la superficie de madera con regularidad para
evitar la acumulación de jabón y suciedad.
1082756-2-B 18 Kohler Co.
Page 19

Cuidado y limpieza (cont.)
•
Para proteger contra el rayado, utilice fieltro, cuero o corcho debajo de todos los
artículos que coloque sobre la superficie de madera. No exponga los muebles de
madera directamente a la luz del sol, fuentes de calor o humedad.
•
Limpie el polvo con frecuencia utilizando un paño suave siguiendo la dirección de
la veta. Utilice sólo productos hechos específicamente para limpiar la madera.
Evite utilizar ceras o productos para pulir aceitosos o productos que contengan
silicona. Seque los derrames de inmediato sin frotar con un paño suave y húmedo.
•
Elimine la acumulación de suciedad cada seis meses frotando con un paño suave
humedecido en una solución 50/50 de agua tibia y un detergente sin amoniaco.
Limpie con un paño humedecido en agua tibia y luego seque con un paño.
•
Hay disponibles plumas de pintura y plumones de retocar para ocultar rayones en
la superficie de madera. Estos productos se pueden comprar de un distribuidor
Kohler o llame al 1-800-4-KOHLER para obtener información sobre pedidos.
Para obtener los mejores resultados, tenga presente lo siguiente al limpiar su producto
KOHLER:
Superficies de vidrio y espejo
•
Para la limpieza, utilice solamente un detergente suave como el jabón líquido para
lavar platos y agua tibia. No utilice limpiadores abrasivos que puedan rayar u
opacar la superficie.
•
Lea atentamente la etiqueta del producto de limpieza para asegurar que no
presente riesgos al usarse en el material.
•
Siempre pruebe la solución de limpieza en un área oculta antes de aplicarla a toda
la superficie.
•
No deje por tiempo prolongado los limpiadores en la superficie.
•
Limpie con un trapo y enjuague completa e inmediatamente con agua después de
aplicar limpiadores. Enjuague y seque las superficies cercanas que se hayan
rociado.
•
Utilice una esponja o trapo suave y húmedo. Para limpiar las superficies nunca
utilice materiales abrasivos como cepillos o estropajos de tallar.
Para obtener información detallada de limpieza y los limpiadores a considerar, visite
www.kohler.com/clean. Para solicitar información sobre el cuidado y la limpieza, llame
al 1-800-456-4537.
Warranty
ONE-YEAR LIMITED WARRANTY
KOHLER plumbing products are warranted to be free of defects in material and
workmanship for one year from date of installation.
Kohler Co. will, at its election, repair, replace or make appropriate adjustment where
Kohler Co. inspection discloses any such defects occurring in normal usage within one
(1) year after installation. Kohler Co. is not responsible for removal or installation costs.
Use of in-tank toilet cleaners will void the warranty.
To obtain warranty service contact Kohler Co. either through your Dealer, Plumbing
Contractor, Home Center or E-tailer, or by writing Kohler Co., Attn.: Customer Care
Center, 444 Highland Drive, Kohler, WI 53044, USA, or by calling 1-800-4-KOHLER
(1-800-456-4537) from within the USA and Canada, and 001-800-456-4537 from within
Mexico, or visit www.kohler.com within the USA, www.ca.kohler.com from within
Canada, or www.mx.kohler.com in Mexico.
IMPLIED WARRANTIES INCLUDING THAT OF MERCHANTABILITY AND
FITNESS FOR A PARTICULAR PURPOSE ARE EXPRESSLY LIMITED IN
DURATION TO THE DURATION OF THIS WARRANTY. KOHLER CO. AND/OR
Kohler Co. 19 1082756-2-B
Page 20

Warranty (cont.)
SELLER DISCLAIM ANY LIABILITY FOR SPECIAL, INCIDENTAL OR
CONSEQUENTIAL DAMAGES. Some states/provinces do not allow limitations on
how long an implied warranty lasts, or the exclusion or limitation of special, incidental
or consequential damages, so these limitations and exclusions may not apply to you.
This warranty gives you specific legal rights. You may also have other rights which vary
from state/province to state/province.
This is Kohler Co.’s exclusive written warranty.
Garantie
GARANTIE LIMITÉE D’UN AN
Les produits de plomberie KOHLER sont garantis contre tout vice de matériau et de
fabrication pendant un an à partir de la date de l’installation.
Si un vice est découvert au cours d’une utilisation normale, Kohler Co. choisira, à sa
discrétion, la réparation, le remplacement ou la rectification appropriée après inspection
desdits vices par Kohler Co. pendant un (1) an à partir de la date d’installation. Kohler
Co. n’est pas responsable des frais d’enlèvement ou d’installation. L’utilisation de
nettoyants à l’intérieur du réservoir annule la garantie.
Pour obtenir le service de garantie, contacter Kohler Co., par l’intermédiaire du vendeur,
plombier, centre de rénovation ou revendeur par internet, ou bien par écrit à l’adresse
suivante: Kohler Co., Attn.: Customer Care Center, 444 Highland Drive, Kohler, WI
53044, États-Unis, ou appeler le 1-800-4-KOHLER (1-800-456-4537) à partir des États-Unis
et du Canada et le 001-800-456-4537 à partir du Mexique, ou consulter le site
www.kohler.com aux États-Unis, www.ca.kohler.com au Canada, ou www.mx.kohler.com
au Mexique.
LES GARANTIES TACITES, Y COMPRIS CELLES DE COMMERCIALITÉ ET
D’ADAPTATION À UN USAGE PARTICULIER, SONT EXPRESSÉMENT LIMITÉE À
LA DURÉE DE LA PRÉSENTE GARANTIE. KOHLER CO. ET/OU LE REVENDEUR
DÉCLINENT TOUTE RESPONSABILITÉ CONTRE LES DOMMAGES
PARTICULIERS, ACCESSOIRES OU INDIRECTS. Certains états et provinces ne
permettent pas de limite sur la durée de la garantie tacite, ni l’exclusion ou la limite des
dommages particuliers, accessoires ou indirects, et, par conséquent, lesdites limites et
exclusions peuvent ne pas s’appliquer à votre cas. Cette garantie vous donne des droits
juridiques particuliers. Vous pouvez également avoir d’autres droits qui varient d’un état
ou d’une province à l’autre.
Ceci constitue la garantie écrite exclusive de Kohler Co.
Garantía
GARANTíA LIMITADA DE UN AÑO
Se garantiza que los productos de plomería KOHLER están libres de defectos de material
y mano de obra por un año a partir de la fecha de instalación.
Kohler Co., a su criterio, reparará, reemplazará o realizará los ajustes pertinentes en los
casos en que la inspección realizada por Kohler Co. determine que dichos defectos
ocurrieron durante el uso normal en el transcurso de un (1) año a partir de la fecha de la
instalación. Kohler Co. no se hace responsable de costos de desinstalación o instalación.
El uso de limpiadores de inodoro que se colocan dentro del tanque anulará la
garantía.
Para obtener el servicio de garantía, comuníquese con Kohler Co. a través de su
distribuidor, contratista de plomería, centro de remodelación o distribuidor por Internet,
1082756-2-B 20 Kohler Co.
Page 21

Garantía (cont.)
o escriba a: Kohler Co., Attn.: Customer Care Center, 444 Highland Drive, Kohler, WI
53044, USA, o llame al 1-800-4-KOHLER (1-800-456-4537) dentro de los Estados Unidos y
Canadá, y 001-800-456-4537 desde México, o visite www.kohler.com dentro de EE.UU.,
www.ca.kohler.com desde Canadá, o www.mx.kohler.com en México.
TODA GARANTÍA IMPLÍCITA INCLUYENDO DE COMERCIALIZACIÓN E
IDONEIDAD DEL PRODUCTO PARA UN USO DETERMINADO, SE LIMITA
EXPRESAMENTE A LA DURACIÓN DE ESTA GARANTÍA. KOHLER CO. Y/O EL
VENDEDOR DESCARGAN TODA RESPONSABILIDAD POR CONCEPTO DE
DAÑOS PARTICULARES, INCIDENTALES O INDIRECTOS. Algunos
estados/provincias no permiten limitaciones en cuanto a la duración de una garantía
implícitaoalaexclusión o limitación de daños particulares, incidentales o indirectos, por
lo que estas limitaciones y exclusiones pueden no aplicar a su caso. Esta garantía le
otorga ciertos derechos legales específicos. Además, usted puede tener otros derechos
que varían de estado a estado y provincia a provincia.
Ésta es la garantía exclusiva por escrito de Kohler Co.
Warranty
For Mexico
KOHLER CO.
It is recommended that at the time of purchase, you verify that all accessories and
components are complete in this package.
This Kohler product is warranted to be free of defects in material and workmanship for
one (1) year from the date of purchase as shown on the invoice or receipt.
1. Kohler Co. will only service its commercialized products through its authorized
distributors.
2. To obtain warranty service, please present the invoice and corresponding warranty.
3. Through its authorized distributors, Kohler Co. promises to repair the defective
product or provide a new replacement or an equivalent model (in those cases that the
model has been discontinued) when the product is beyond repair, without any charge to
the consumer.
4. The time of repair will not exceed six (6) weeks commencing on the date the product
is received.
5. It is recommended that the consumer save the invoice or receipt as additional
protection, as it may substitute the warranty in the case that there is a discrepancy in the
validity of the warranty.
EXCEPTIONS AND RESTRICTIONS
The Warranty will not be valid in the following cases:
1. When the product is not operated in accordance with the instructions concerning use
and operation set forth in the owner’s manual or installation instructions, and when the
recommendations and warnings included are not observed.
2. When the product has been modified or dismantled partially or totally; or has been
used in a negligent fashion and as a consequence has suffered damages attributable to
the consumer, individual, or hardware not authorized by Kohler Co.
3. This warranty does not cover the damages as a result of disaster such as fire or acts of
Kohler Co. 21 1082756-2-B
Page 22

Warranty (cont.)
God, including flooding, earthquake, or electric storms, etc. To obtain a list of
distributors in your area where you can exercise your rights under this warranty, please
call 001-800-456-4537.
KOHLER CO., KOHLER, WI 53044 U.S.A.
IMPORTER:
INTERNACIONAL DE CERÁMICA, S.A.B. DE C.V.
AV. CARLOS PACHECO NO. 7200
CHIHUAHUA, CHIH., MEXICO C.P. 31060
TEL: 52 (14) 29-11-11
Garantía
Para México
KOHLER CO.
Se recomienda que al momento de la compra, verifique que todos los accesorios y
componentes estén completos en esta caja.
Se garantiza que este producto Kohler está libre de defectos en material y mano de obra
por un (1) año, a partir de la fecha de compra que aparezca en la factura o recibo.
1. Kohler Co. prestará servicio únicamente a los productos comercializados a través de
sus distribuidores autorizados.
2. A fin de obtener el servicio de garantía, favor de presentar la factura de compra y la
garantía correspondiente.
3. Kohler Co., a través de sus distribuidores autorizados, se compromete a reparar el
producto defectuoso o, cuando la reparación no sea posible, reemplazarlo por uno nuevo
o un modelo equivalente (en caso de que el producto haya sido descontinuado) sin
ningún cargo al consumidor.
4. El tiempo de reparación no excederá de seis (6) semanas a partir de la fecha de
recepción del producto.
5. Se recomienda al consumidor que conserve el recibo o factura de compra como
protección adicional, pues el mismo puede sustituir a la garantía en caso de que exista
discrepancia en cuanto a la validez de la misma.
EXCEPCIONES Y RESTRICCIONES
La garantía no tendrá validez en los siguientes casos:
1. Cuando el producto no se haya utilizado conforme a las instrucciones de uso y
funcionamiento incluidas en el manual del usuario o en las instrucciones de instalación y
cuando no se hayan observado las recomendaciones y advertencias provistas.
2. Cuando el producto se haya modificado o desmantelado parcial o totalmente; o
manipulado de manera negligente y, como consecuencia, haya sufrido daños atribuibles
al consumidor, persona o herrajes no autorizados por Kohler Co.
3. Esta garantía no cubre los daños que resulten de desastres naturales, tales como
1082756-2-B 22 Kohler Co.
Page 23

Garantía (cont.)
incendios o casos de fuerza mayor, incluyendo inundaciones, terremotos, tormentas
eléctricas, etc. Para obtener una lista de distribuidores cerca de usted y así hacer valer
sus derechos bajo esta garantía, llame al 001-800-456-4537.
KOHLER CO., KOHLER, WI 53044 U.S.A.
IMPORTADOR:
INTERNACIONAL DE CERÁMICA, S.A.B. DE C.V.
AV. CARLOS PACHECO NO. 7200
CHIHUAHUA, CHIH., MÉXICO C.P. 31060
TEL: 52 (14) 29-11-11
Kohler Co. 23 1082756-2-B
Page 24

Service Parts/Pièces de rechange/Piezas de repuesto
1082755
Bracket, Right
Support, droit
Soporte, derecho
1059560**
Touch-Up Marker
1089189
Bracket, Left
Support, gauche
Soporte, izquierdo
1048805
Drawer Slide (Pair)
Coulisse de tiroir (paire)
Corredera del cajón (par)
Marqueur à retouches
Plumn para retocar
1082754
Tray
Plateau
Bandeja
1082747**
Drawer
Tiroir
Cajón
1173807
Bumpers
Butées
Topes
**Finish/color code must be specified when ordering.
**Vous devez spécifier les codes de la finition et/ou de la couleur
**Se debe especificar el código del acabado/color con el pedido.
1082756-2-B
1082753
Glass Shelf
Étagère en verre
Estante de vidrio
quand vous passez votre commande.
 Loading...