

Kohler K-25090T-S, K-23076T-CPS, K-25091T-S, K-24932T-GS, K-23076T-BNS Installation Instructions Manual
...
-1-
BEFORE YOU BEGINBEFORE YOU BEGIN
ESCALE
INSTALLATION INSTRUCTIONS
FLOOR STANDING TOILET
K-25089T-S/K-25090T-S/K-25091T-S/K-24932T-GS
K-23076T-CPS/K-23076T-BNS/K-23077T-CPS/K-23077T-BNS
ORDERING INFORMATION
ESCALE WF Toilet(HT200 PNE IWT) ..................K-25089T-S
Includes Bowl........................................................K-4097T
Includes HYDRO-TOWER 200 PNE
In-Wall Tank W/O Frame .............K-78074T-ESS
Includes ESCALE Quick-Release QC Seat ....K-4417T-2P
ESCALE WF Toilet(HT300 PNE IWT) ..................K-25090T-S
Includes Bowl........................................................K-4097T
Includes HYDRO-TOWER 300 PNE
In-Wall Tank W/O Frame .............K-78077T-ESS
Includes ESCALE Quick-Release QC Seat ....K-4417T-2P
ESCALE WF Toilet(HT300 MEC IWT)..................K-25091T-S
Includes Bowl........................................................K-4097T
Includes HYDRO-TOWER 300
In-Wall Tank W/O Frame .............K-10611T-ESS
Includes ESCALE Quick-Release QC Seat ....K-4417T-2P
ESCALE WF Toilet (BEAM M FV)......................K-24932T-GS
Includes Bowl ...............................................K-21856T-GS
Includes BEAM Manual Toilet/Squat
Flush Valve.......................................K-77681K-G
Includes ESCALE Quick-Release QC Seat ...K-4417T-2P
( 200 ).........K-25089T-S
..................................................................K-4097T
200
....................K-78074T-ESS
................................K-4417T-2P
( 300 ).........K-25090T-S
..................................................................K-4097T
300
....................K-78077T-ESS
................................K-4417T-2P
( 300 ).........K-25091T-S
..................................................................K-4097T
300
...........................K-10611T-ESS
................................K-4417T-2P
( )............K-24932T-GS
..........................................................K-21856T-GS
.........................................................K-77681K-G
................................K-4417T-2P
·
·
·
··Fixture dimensions are nominal and conform to tolerances
established by ASME Standards (A112.19.2-2018).
This product complies with Q/KCI-006-2018 and GB
25502-2017.
Water Efficiency Grade 1 for K-25089T-S/K-25090T-S/K25091T-S/K-23076T-CPS/K-23076T-BNS/K-23077TCPS/K-23077T-BNS.
Water Efficiency Grade 2 for K-24932T-GS.
Please read these instructions carefully to familiarize
yourself with the required tools, materials, and installation
sequences. Follow the sections that pertain to your
particular installation. This will help you avoid costly
mistakes. In addition to proper installation, read all
operating and safety instructions.
All information in these instructions is based upon the
latest product information available at the time of
publication. Kohler China reserves the right to make
changes in product characteristics, packaging, or
availability at any time without notice.
These instructions contain important care, cleaning, and
warranty information -.please leave instructions for the
consumer
·
·
·
·
·
-
ASME (A112.19.2-
2018)
Q/KCI-006-2018 GB 25502-2017
K-25089T-S/K-25090T-S/K-25091T-S/K-23076T-CPS/K23076T-BNS/K-23077T-CPS/K-23077T-BNS 1
K-24932T-GS 2
©©Copyright Kohler China Investment Co., Ltd. 2018
2018
No.2 KOHLER ROAD, SANSHUI CENTRAL INDUSTRIAL PARK, LEPING TOWN, SANSHUI DIST., FOSHAN, GUANGDONG, PRC POST CODE 528137
2 528137
8# MENGSHAN RD, ECONOMIC DEVELOPMENT ZONE OF HUANTAI, ZIBO, SHANDONG, CHINA POST CODE: 256410
8 256410
:
1269084-T01-D

-2-
SAFETY: WARNINGS
Kohler products are precision-engineered and should give
continued superior and safe performance, provided:
1. They are installed, commissioned, operated and
maintained in accordance with the recommendations given
in this Manual.
2. Periodic attention is given, as necessary, to maintain the
product in good functional order. Recommended
guidelines are given in the section.
Carefully inspect the new fixture for any signs of damage.
When installing Kohler Products, manufacturers guidelines for
power tool safety should be followed.
MAINTENANCE
1.
2.
TOOLS AND MATERIALS REQUIRED (Not
supplied)
·
·
·
·
·
·
·
·
·
·
·
·
254mm (10") adjustable wrench
305mm (12") pipe wrench
Metal file (file cut)
Tape measure
Tubing cutter
Level
Hacksaw
Putty knife
Screwdriver
Toilet gasket (wax seal)
Toilet supply shut-off valve
S-TRAP
If the existing toilet does not have a supply shut-off
valve below the tank, install one before installing the new
toilet.
12504A-NA
NOTICE:
·
·
·
·
·
·
·
·
·
·
·
·
254mm
305mm
()
S 12504A-NA
ESCALE WF Toilet (BEAM SR D/CP) .............K-23076T-CPS
Includes Bowl .............................................K-23078T-DPS
Includes BEAM Toilet Sensor (DC) ..............K-30947T-CP
Includes ESCALE Quick-Release QC Seat ....K-4417T-2P
ESCALE WF Toilet
(BEAM SR D/BN) .............................................K-23076T-BNS
Includes Bowl .............................................K-23078T-DNS
Includes BEAM Toilet Sensor (DC) ..............K-30947T-BN
Includes ESCALE Quick-Release QC Seat ....K-4417T-2P
ESCALE WF Toilet (BEAM SR A/CP)..............K-23077T-CPS
Includes Bowl .............................................K-23078T-APS
Includes BEAM Toilet Sensor (DC) ..............K-30948T-CP
Includes ESCALE Quick-Release QC Seat ....K-4417T-2P
ESCALE WF Toilet
(BEAM SR A/BN) .............................................K-23077T-BNS
Includes Bowl .............................................K-23078T-ANS
Includes BEAM Toilet Sensor (DC) ..............K-30948T-BN
Includes ESCALE Quick-Release QC Seat ....K-4417T-2P
( , ).........K-23076T-CPS
........................................................K-23078T-DPS
........................................K-30947T-CP
................................K-4417T-2P
( , / ).................................K-23076T-BNS
.......................................................K-23078T-DNS
........................................K-30947T-BN
................................K-4417T-2P
( , ).........K-23077T-CPS
........................................................K-23078T-APS
........................................K-30948T-CP
................................K-4417T-2P
( , / ).................................K-23077T-BNS
........................................................K-23078T-ANS
........................................K-30948T-BN
................................K-4417T-2P
1269084-T01-D

ROUGHING-IN
3/8" BSP
SPECIFICATION
Plumbing Connections
Recommended inlet connections are 3/8 BSP."
UNIT mm
Reference Value
Fig.#1
1
Kohler reserves the right to change marked dimensions without prior notice.
390
600
435
377
185
160
160
102
O
185
110~130
140
360
P-trap
With 12504A-NA S-trap(For Separate Purchase)
12504A ( )
-NA
Finished Wall
Finished Wall
Install Flushing Mechanism
1. Install The Tank
1) Turn the water supply off before installing the new toilet.
2) Install the concealed tank system in wall before decorating
the wall.
3) Install the tank system per tank's installation instructions.
4) Refer to installation instructions of in-wall tank for SKU of
faceplate.
2. Install Manual Valve Or Sensor
Refer to installation instructions of manual valve or sensor for
the installation of flushing mechanism.
1.
1)
2)
3)
4)
2.
INSTALLATION
Fig.#2
2
-3-
1269084-T01-D
-4-
Fig.#4
4
Install the Toilet
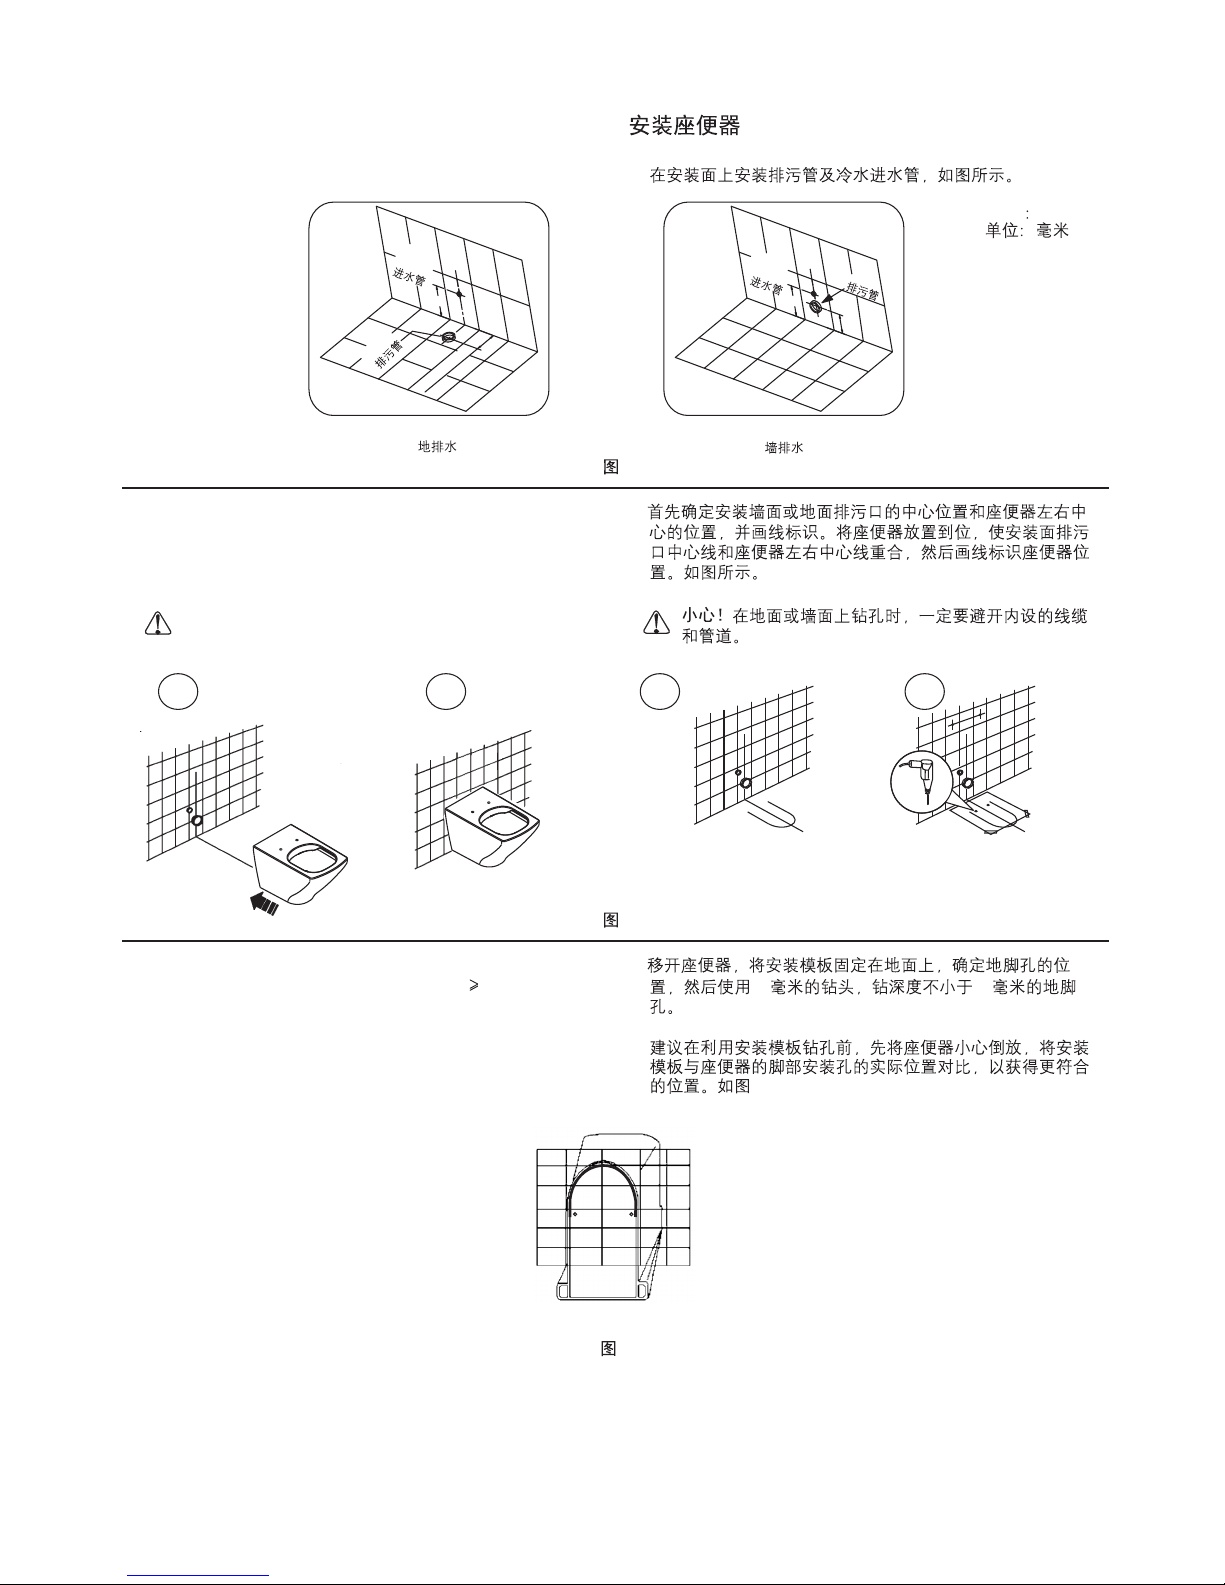
1. Install the waste outlet and water inlet as shown.
2. Put the bowl in position, and using a pencil, mark the
position of the bowl on the floor, as shown. Mark the
positions for the tank attachment bolts on the wall.
Make sure that you avoid hidden cables and
pipes when drilling holes in the floor or wall.
Caution!
2
1
1.
2.
Fig.#3
3
UNIT mm
Water
Supply
345
Outlet
110~130/180
S.trap
345
Outlet
185
Water
Supply
P.trap
4
3
3.
15 38
3. Remove the bowl and place the installation template on
the floor. Drill the anchor bolt hole (depth 38mm) in the
floor with an 15mm dia. drill, then remove the template.
It is suggested to reverse the bowl before drilling with the
template. Compare the actual loacation of installation hole
with the template to map more accurate installation
location, as shown in the following figure.
Fig.#5
5
1269084-T01-D
-5-
4. Adjust the distance between centerline of PVC waste pipe
and the floor (wall) to match it consistent with marked
roughing-in.
Installation of S trap: Fix S trap onto wall with expansion
screw and insert into the reserved drainage pipe(Fig.7).
Push the bowl to insert the drainage hole into the S trap
and also insert the water pipe into the outlet of the in-wall
tank.
4. PVC
7
UNIT mm
Fig.#6
6
Fig.#7
7
185
185
110~130
With 12504A S-trap(For Separate Purchase)
12504A ( )
-NA
-NA
50mm From Floor
50mm
50
185
5. Move the toilet to the field and make sure the bottom
profile matches marked line on the ground.
5.
1269084-T01-D
-6-
Cleaning
Caution! Risk of product damage.
Caution! Risk of product damage.
Caution! Do not use in-tank cleaners.
Many cleaners
contain abrasive and chemical substances, and should
not be used for cleaning stainless steel, enamel,
plated or plastic fittings. These finishes should be
cleaned using a mild washing up detergent or soap
solution, rinsed and then wiped dry with a soft clean
cloth.
Most toilet bowl
cleaners are not harmful to the vitreous china surface
of the toilet bowl. Please follow the bowl cleaner
manufacturer,s instructions carefully.
Products
containing chlorine (calcium hypochlorite) can
seriously damage fittings in the tank. This damage can
cause leakage and property damage.
CAUTION: Don t use any cement while installing
the toilet.
WARNING: Risk of product damage.
Heat expansion of the toilet may damage
the feet of the toilet. Kohler will not be responsible for
any damage because of using cement.
Do not throw into the toilet what is easy to block it,
such as newspaper, paper pilch, sanitary towel.
Do not bump the vitreous china with great force to
prevent it from damaging and leaking.
Do not use the product in the water below 0 C.
o
'
Please do not use hard materials (like
scouring pad) to clean product surface, especially the
product logo.
CAUTION:
0C
o
USER MAINTENANCEUSER MAINTENANCE
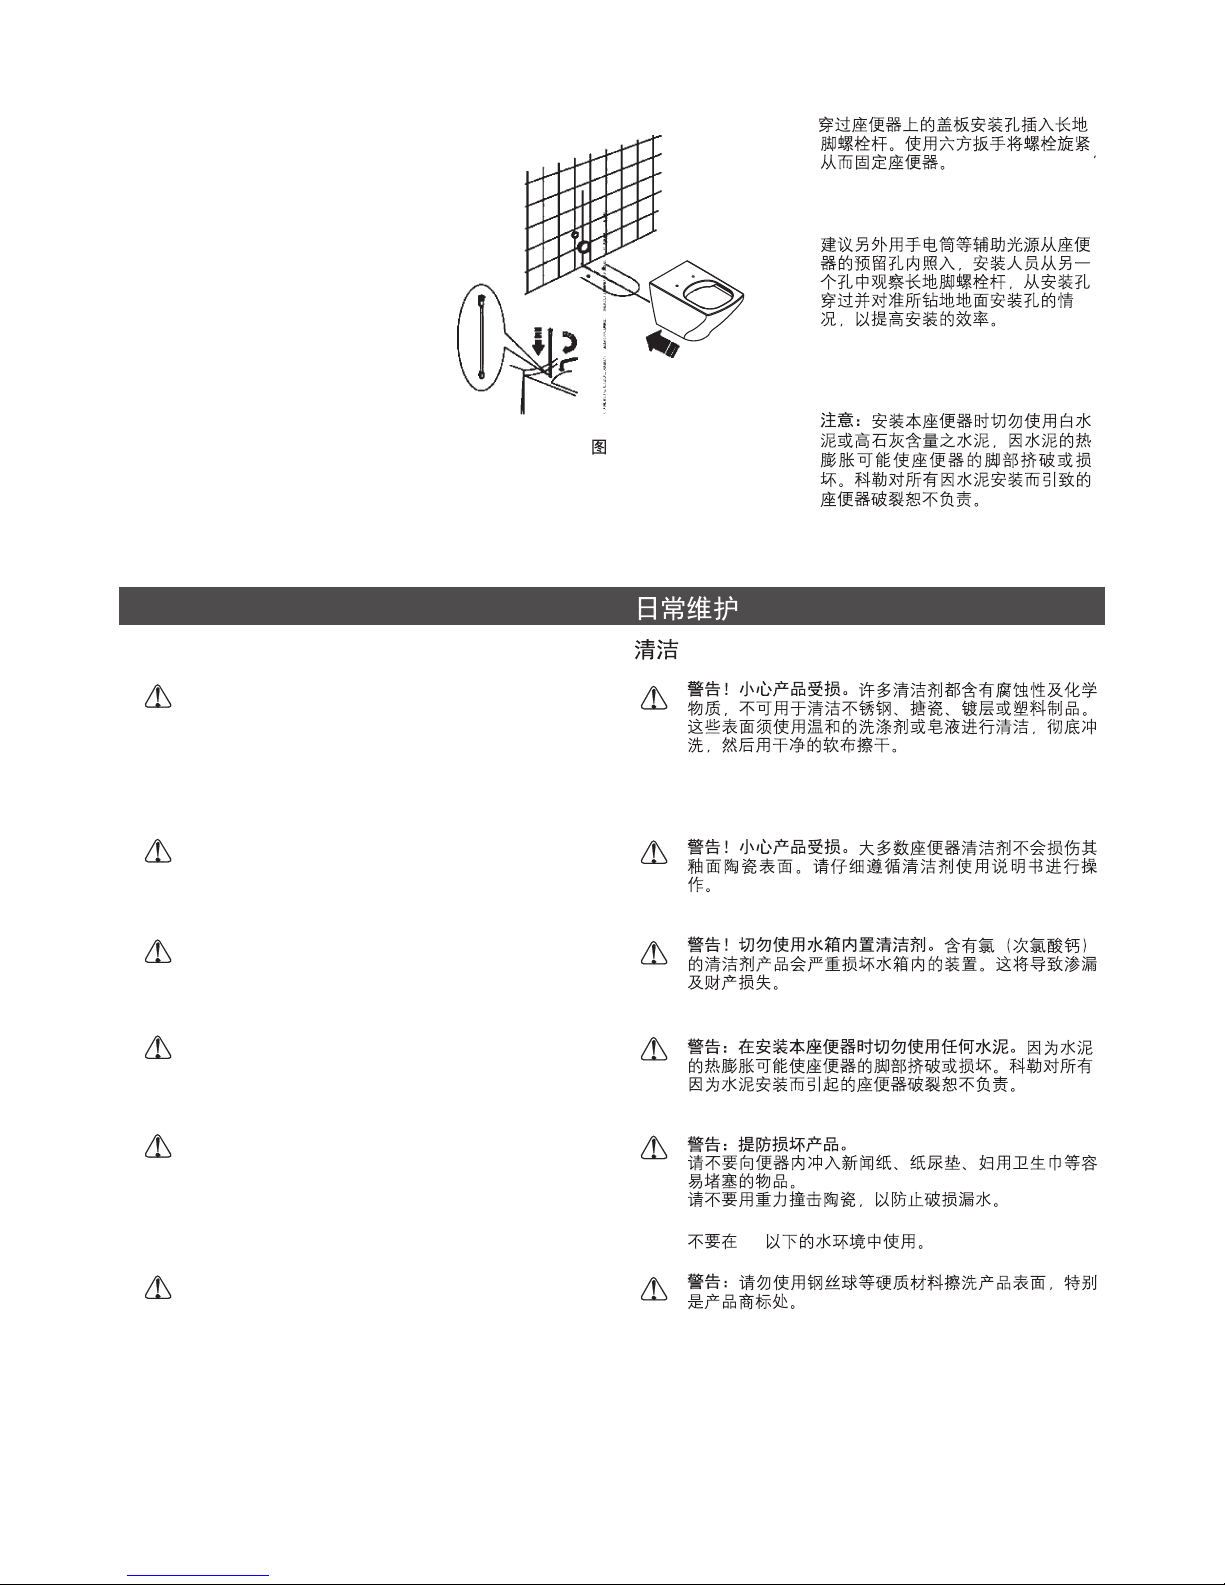
6. Install the threaded rods through
the seat holes in the bowl. Tighten
bolts with hex wrench. Making sure
that they install correctly in the
holes in the floor.
It is suggested to use other auxillary
light such as torch to eluminate one
preserved installation hole of the
toilet. Watch the movement of the
threaded rod through the other
installation hole to better control the
installation process.
6.
Fig.#7
7
NOTE: Do not use white cement or
high lime content cements to install
this toilet. The expansion of cement
due to a rise in temperature may
make the toilet crack or cause
damage. Kohler is not responsible
for any damage caused by
installation with the use of cement.
1269084-T01-D
BEAM
座便器/蹲便器感应冲洗器
TOILET/SQUAT SENSOR
安装说明书
INSTALLATION INSTRUCTIONS
K-30947T (DC/直流型)
K-30948T (AC/交流型)
K-30951T (DC/直流型)
K-30952T (AC/交流型
)
K-30948T-X(AC/交流型/IoT)
Please read these instructions carefully to familiarize
yourself with the required tools, materials, and installation
sequences. Follow the sections that pertain to your
particular installation. This will help you avoid costly
mistakes. In addition to proper installation, read all
operation and safety instructions.
All information in these instructions is based upon the
latest product information available at the time of
publication. Kohler China reserves the right to make
changes in product characteristics, packaging, or
availability at any time without notice.
These instructions contain important care, cleaning, and
warranty information - please leave instructions for the
consumer.
Open end/adjustable wrenches
Tape measure
Basin wrench
Pipe wrench
Square
Level
Pliers
Socket wrench with sockets
Philips driver
Seal tape
Special wrenches
Connection wire
Wire cutter
Insulation tape
Bushing
SENSOR SPECIFICATIONS
BEFORE YOU BEGIN
请详读本说明书,以便熟悉所需工具、材料及安装程序。请
遵照相关章节进行安装,以避免由于安装不当而导致不必要
的贵重损失。除了有关正确的安装方法之外,还务必请阅读
所有操作及安全说明。
本说明书所含一切材料,均以印刷时所有的最新产品为准。
科勒中国公司保留随时更改产品特性、包装或供应情况的权
利,恕不另行通知。
本说明书也包含了有关护理、清洁及保养等重要资料-请交
消费者留存。
安装之前
RECOMMENDED TOOLS AND MATERIALS
所需工具及材料
开口/活动扳手
卷尺
梅花扳手
管扳手
直角尺
水平尺
老虎钳
管钳
十字螺丝刀
生料带
专用扳手
连接线
剥线器
绝缘胶布
电工套管
柏明
感应器规格
1350669-T01-A
型 号
Power
电 源
Liter per flushing
冲洗水量
Temperature
1 ~55
水温:
1 ~45
以内(沿发射角度方向)
Recommended
working pressure
推荐工作压力
K-30947T(3/4.5L) / K-30948T(3/6L)
K-30951T(6/8L) / K-30952T(6/8L)
K-30947T(3/4.5L&3/6L, 直流型)
K-30948T(3/4.5L&3/6L, 交流型)
K-30951T(6/8L, 直流型)
K-30952T(6/8L, 交流型)
K-30948T-X(3/4.5L&3/6L,AC,IoT)
4节5号碱性电池(AA×4)
220V AC 50/60Hz
K-30947T(3/4.5L) / K-30948T(3/6L)
K-30951T(6/8L) / K-30952T(6/8L)
Model
220V AC 50/60 Hz
Environmental temperature:1 ~55
Water temperature:1 ~45
Starting pressure 0.05~0.86MPa
Sensing distance
Flushing delay
Connect dimension
Protective flushing
使用温度
启动压力
环境温度:
0.05~0.86MPa
距感应窗口
人离开约3秒后
进水管
G1
,出水管
G1-1/2
无人使用时每24小时自动冲洗一次
冲洗器进水口动压为
0.1~0.55MPa
推荐
供水管路(包括水表、阀等)内径不小于
25mm
。
Within 85cm from sensing window
(along the direction of transmitting angle)
about 3 seconds after user leave
Inlet pipe G1, Outlet pipeG1-1/2.
Auto flush once every 24h if unused
Sensor inlet dynamic pressure:
0.1~0.55MPa,recommended inner diameter of
water supply (including water meter,valve, etc.)
no less than 25mm.
感应范围
冲洗延时
连接尺寸
设备保护冲洗
85cm
K-30947T(3/4.5L&3/6L, DC)
K-30948T(3/4.5L&3/6L, AC)
K-30951T(6/8L, DC)
K-30952T(6/8L, AC)
K-30948T-X(3/4.5L&3/6L,AC,IoT)
,
2013
Copyright Kohler China Ltd., 2013
版权为科勒中国有限公司所有
科勒(中国)投资有限公司
中国上海市静安区江场三路158号 邮编: 200436
制造商:上海科勒电子科技有限公司
中国上海宝山区丰翔路1955号 邮编:200444
AA size alkaline batteries (4)
 Loading...