

Page 1
Installation Guide
Two-Handle Bath/Shower Faucet
K–16213 K-16214
K-16217
M product numbers are for Mexico (i.e. K-12345M)
Los números de productos seguidos de
M corresponden a México (Ej.
K-12345M)
Français, page“ Français-1”
Español, página“ Español-1”
1025256-2-B
Page 2
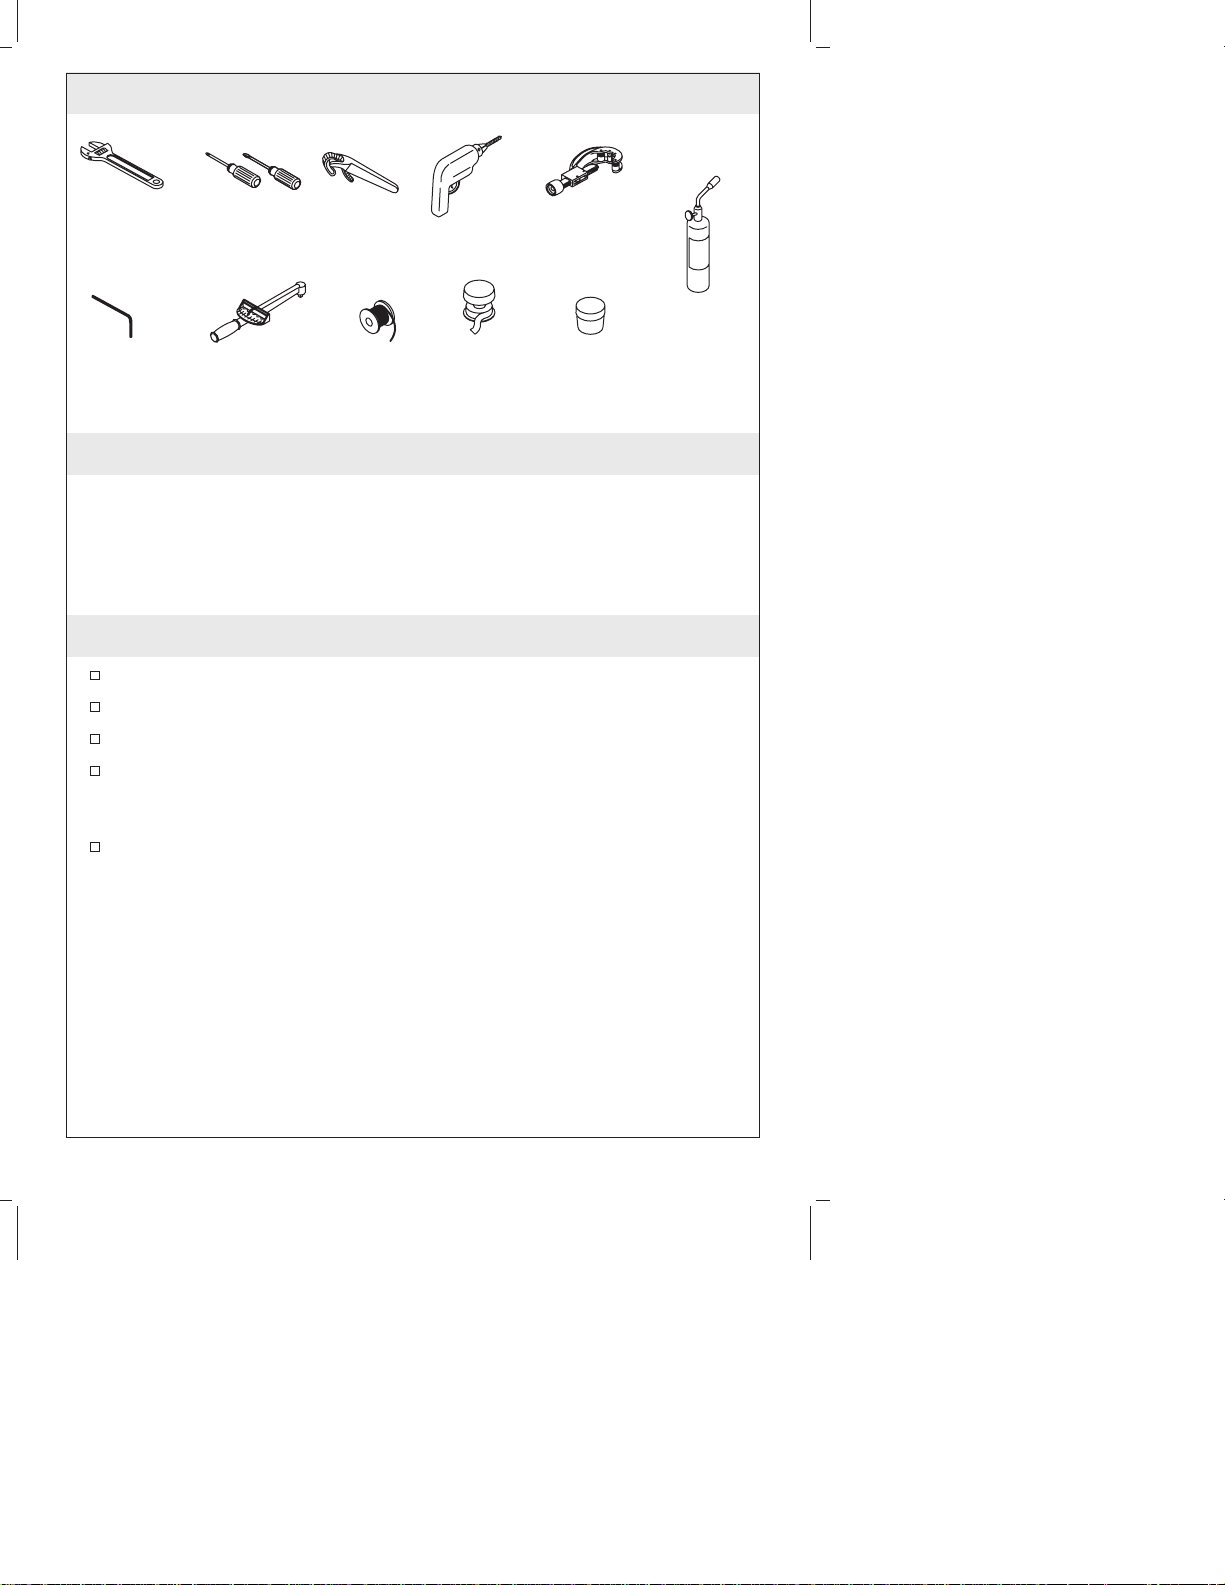
Tools and Materials
Wrench
Hex
Wrench
Assorted
Screwdrivers
Torque
Wrench
Strap
Wrench
Solder
Thread
Sealant
Tube CutterDrillAdjustable
Propane
Torch
Plumbers
Putty
Thank You For Choosing Kohler Company
We appreciate your commitment to Kohler quality. Please take a few
minutes to review this manual before you start installation. If you
encounter any installation or performance problems, please don’t
hesitate to contact us. Our phone numbers and website are listed on
the back cover. Thanks again for choosing Kohler Company.
Before You Begin
Please read all instructions before you begin.
Observe all local plumbing and building codes.
Shut off the main water supply.
Before installation, unpack the new faucet and inspect it for
damage. Return the faucet to the carton until you are ready to
install.
Kohler Co. reserves the right to make revisions in the design of
faucets without notice, as specified in the Price Book.
1025256-2-B 2 Kohler Co.
Page 3
72" (182.9 cm) –
78" (198.1 cm) to
Floor (Typical)
8" (20.3 cm)
4" (10.2 cm)
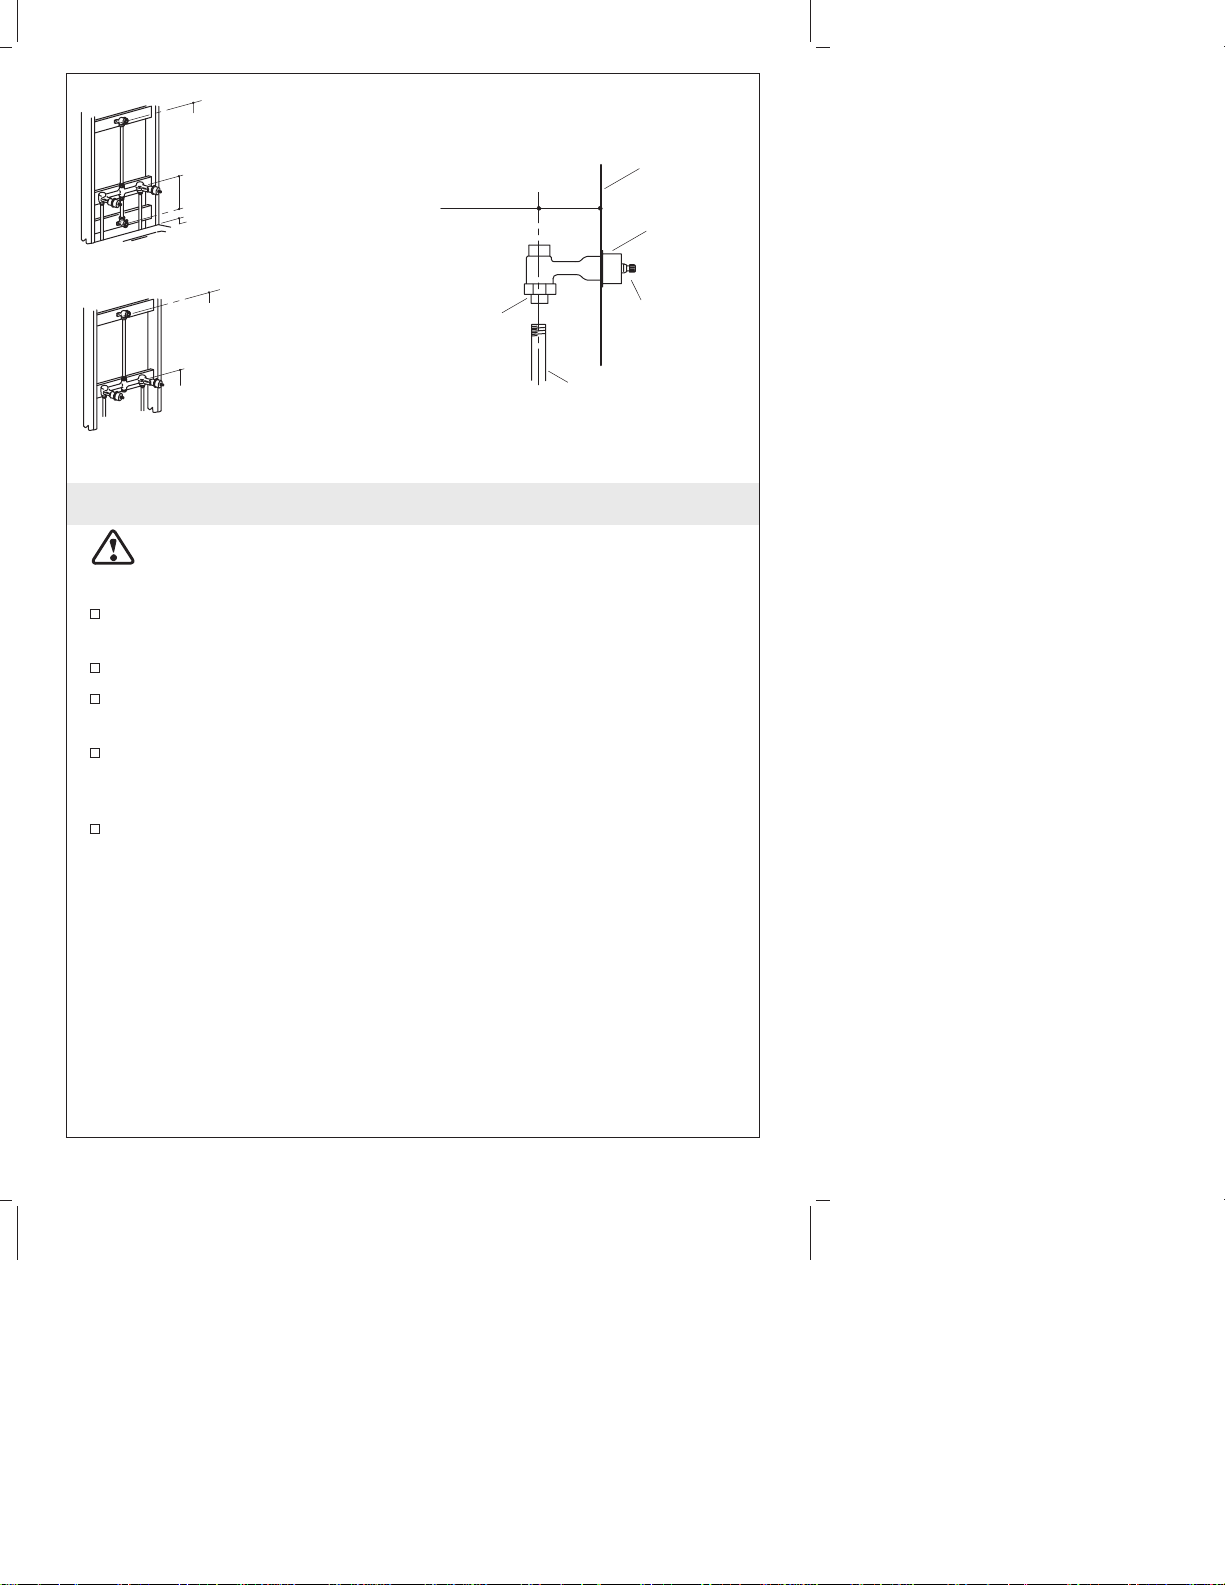
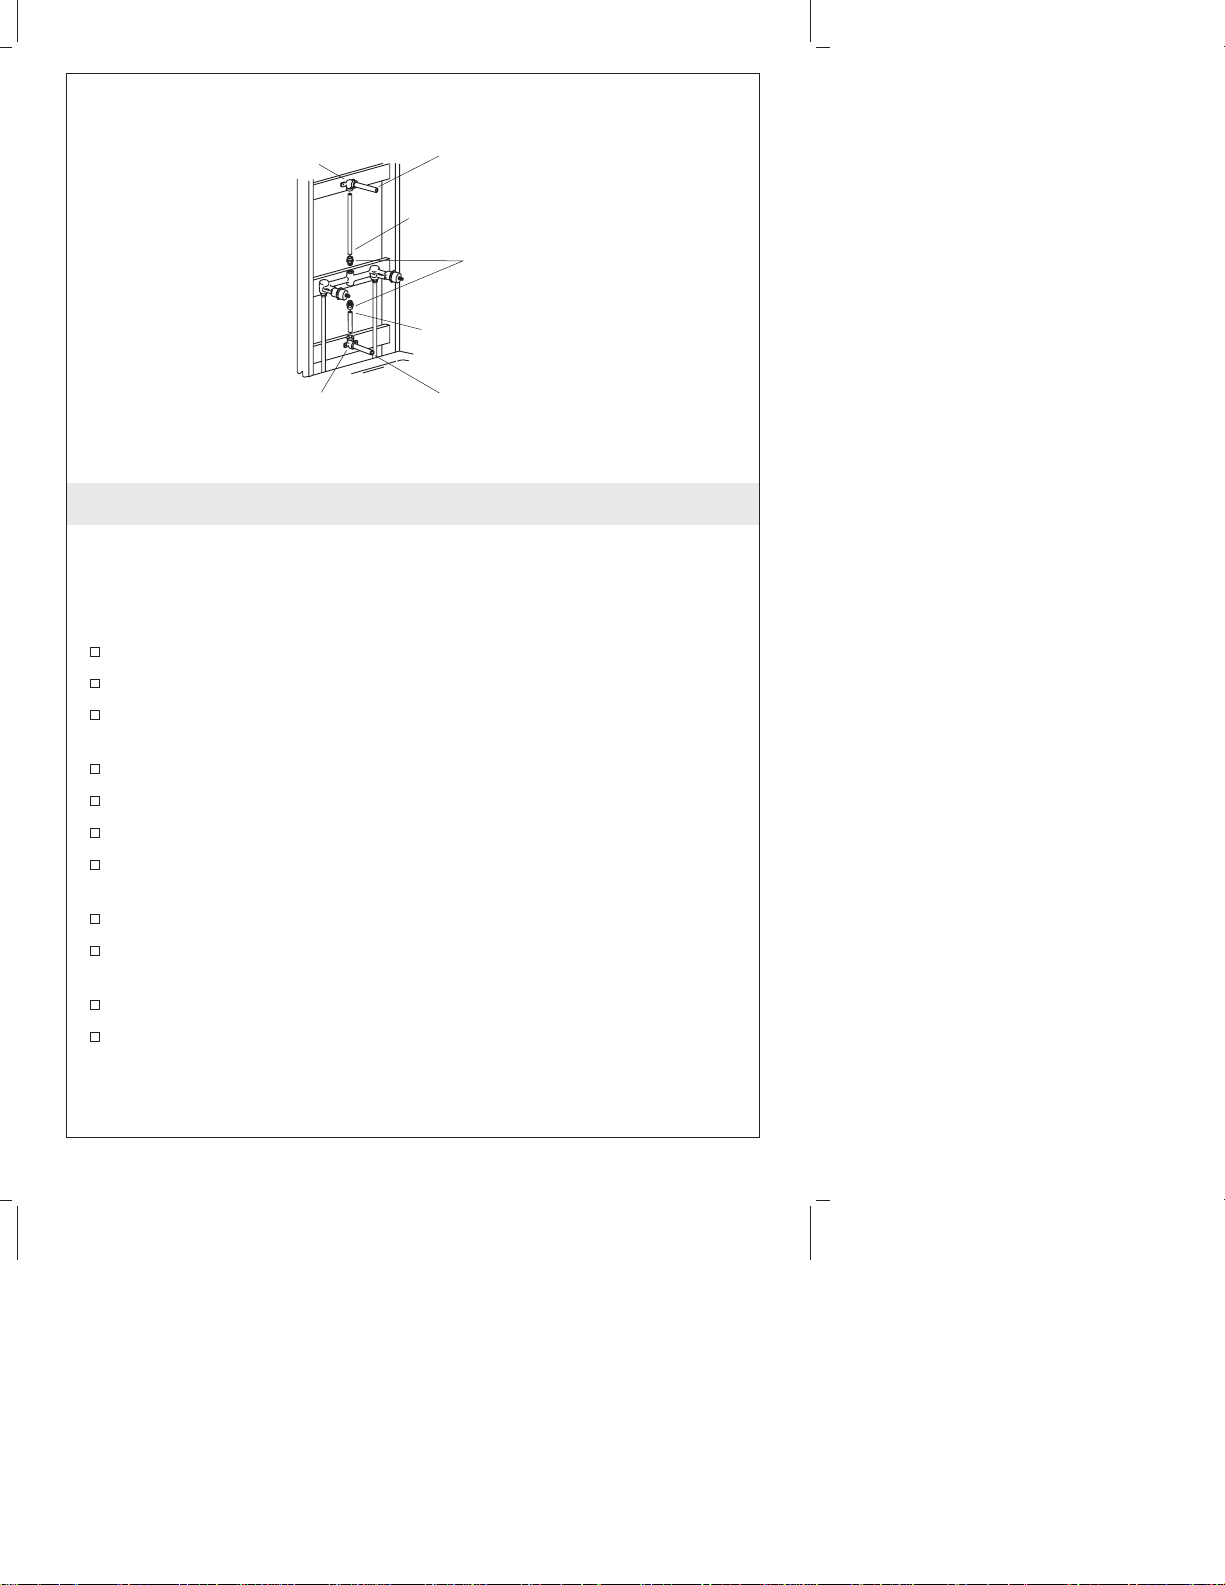
Bath/Shower Installation
2-1/4" (5.7 cm)
Min.
3" (7.6 cm)
Max.
Finished
Wall
Thread
Protector
72" (182.9 cm) –
78" (198.1 cm) to
Floor (Typical)
48" (122 cm) to Floor
Shower Installation
Union
Joints
1/2" NPT Pipe or
Copper Tubing
1. Install the Valve - Floor Supplies
CAUTION: Risk of product damage. Remove the thread
protectors, valve units, and aspirator before applying heat to the
yoke.
Determine the location of the support framing for the yoke,
spout, and the showerhead.
Install the support framing as needed.
The yoke has two union joints that can be used with either 1/2″
N.P.T. pipe or copper tubing.
Connect the hot and cold supplies to the yoke. They should be
2-1/4″ (5.7 cm) minimum and 3″ (7.6 cm) maximum from the
finished wall.
Reinstall everything that was removed before soldering.
Valve Units
Kohler Co. 3 1025256-2-B
Page 4
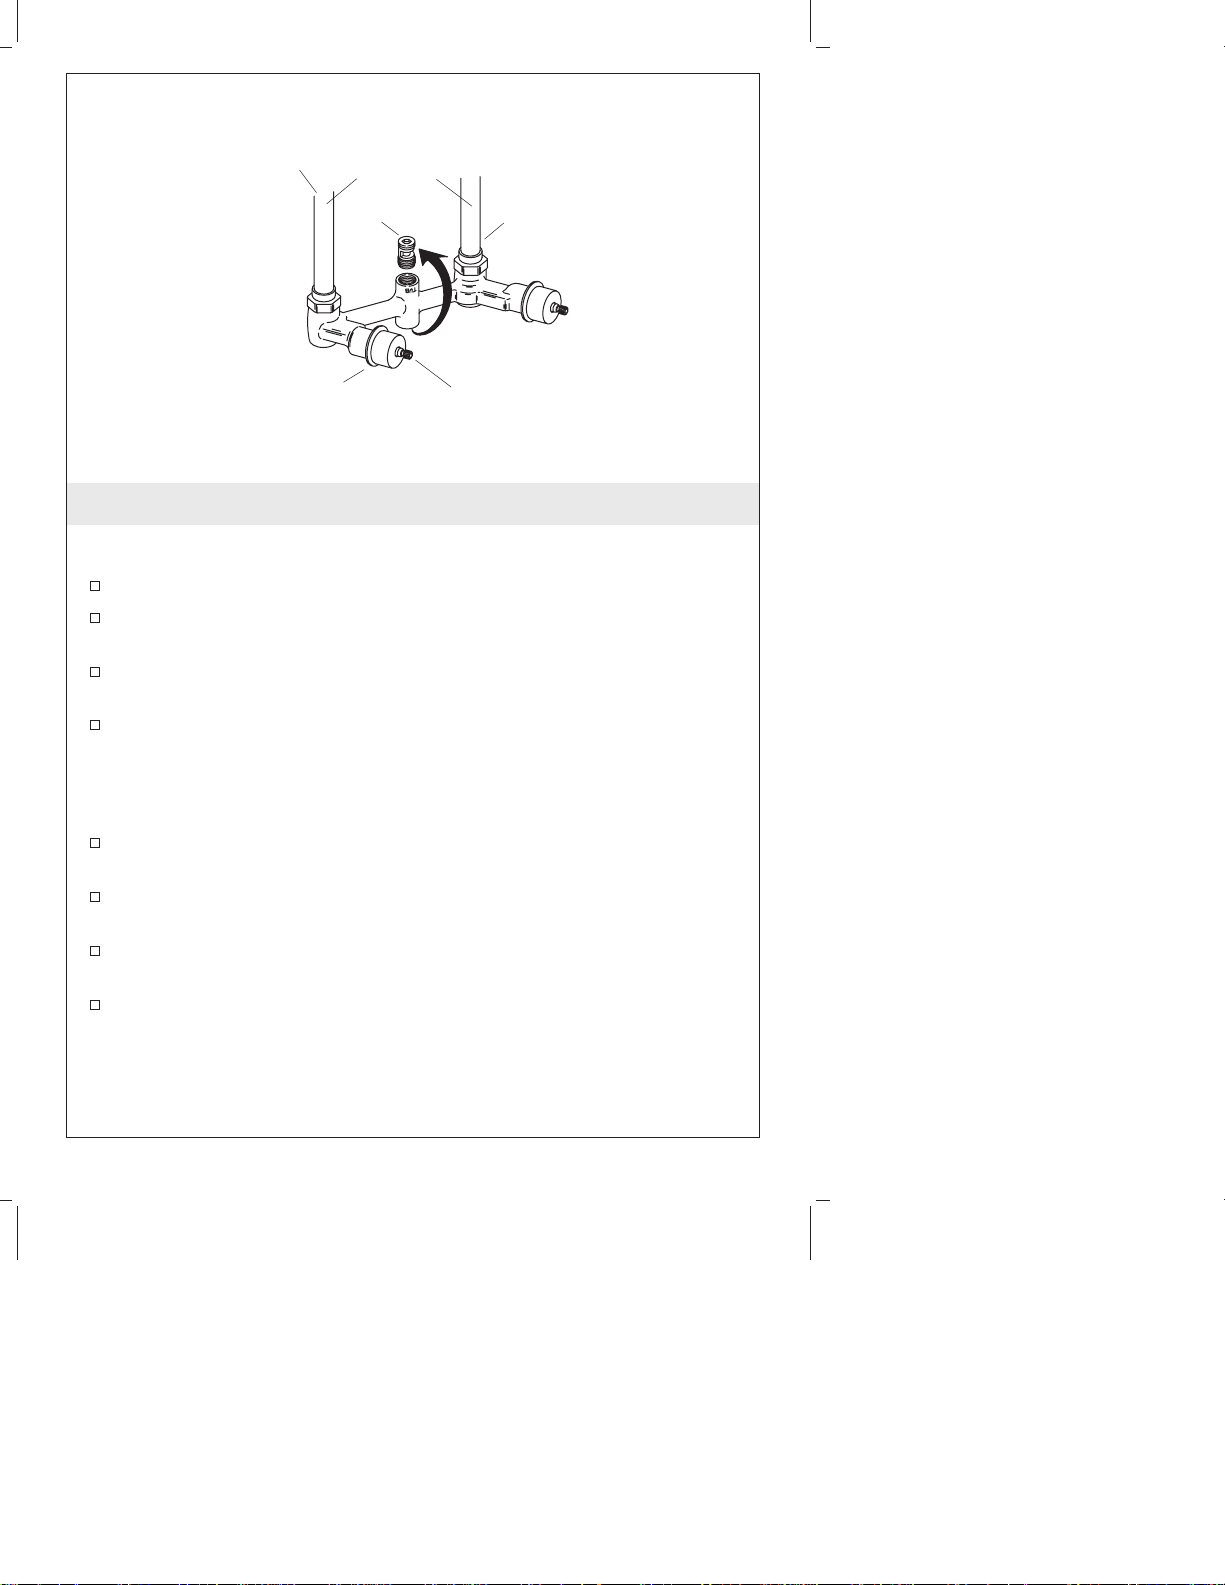
Hot
Ceiling
Supplies
Aspirator
Thread
Protector
Cold
Valve Unit
2. Install the Valve - Ceiling Supplies
NOTE: This section applies to ceiling installations only.
Remove the aspirator with a 3/8″ hex wrench.
Turn the yoke over so that the supplies connect from the top of
yoke.
For bath and shower installations, reinstall the aspirator at the top
of yoke. Do not overtighten.
For bath only or shower only installations, discard the aspirator.
NOTE: Reversing the yoke will reverse the direction the lever
handles close. For proper lever handle operation, reverse the valve
units.
Before removing the valves, make sure they are in the open
position.
Torque the valves to 23-30 ft. lbs. (31-40.6 Newton/m) and turn to
the closed position.
Turn the hot valve counterclockwise and the cold valve clockwise.
Remove the thread protectors and reverse the valves.
Replace the thread protectors.
1025256-2-B 4 Kohler Co.
Page 5
Elbow
Temporary
Nipple
1/2" NPT
Copper Tubing
Adapters
1/2" NPT
Copper Tubing
Elbow
Temporary
Nipple
3. Complete the Valve Installation
NOTE: This section applies to all valve installation styles.
IMPORTANT! For bath-only or shower-only installations: Remove
and discard the aspirator. Apply thread sealant to a plug and install
it into the yoke in place of the shower or bath piping.
Plumb using 1/2″ N.P.T. copper tubing, elbows, and adapters.
Use thread sealant on all threaded connections.
Secure the bath and/or shower piping to the support framing and
install temporary nipples.
Install caps on the temporary nipples.
Turn on the hot and cold water supplies, and check for leaks.
Remove the caps from the temporary nipples.
Open the valve controls and cycle the controls through their
operating range. Check for leaks.
Turn the valve control off.
If the valve has stop valves, rotate both stop adjustments fully
clockwise.
Open the valve controls. Water should not flow.
Close the valve controls, and rotate both stop adjustments fully
counterclockwise.
Kohler Co. 5 1025256-2-B
Page 6
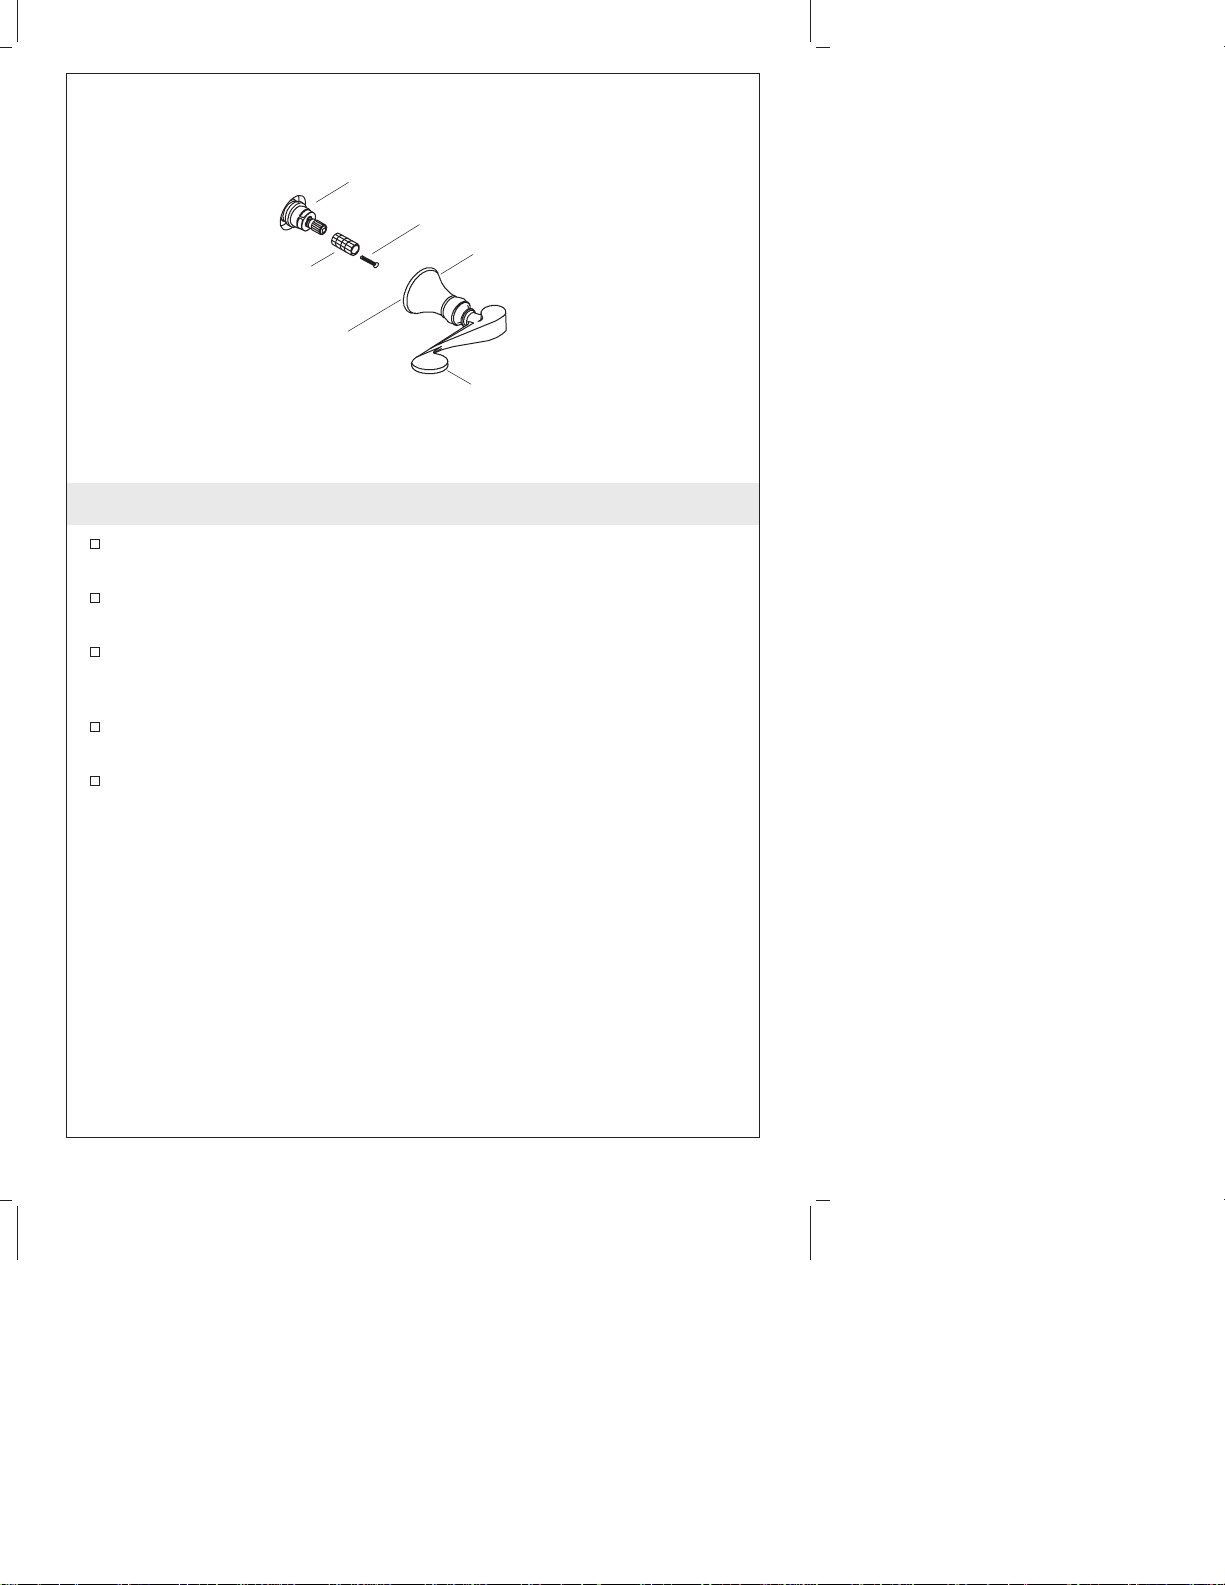
Valve Stem
Screw
Skirt
Stem
Extension
Apply
plumbers
putty.
Handle
4. Install the Handles
Attach the stem extension to the valve stem with the provided
screw.
Place the skirt on the valve stem extension and turn the handle to
the closed position.
Remove the handle assembly, apply a ring of plumbers putty to
the base, and replace it with the handle situated in the desired
closed position.
Hold the handle in place and thread the skirt onto the valve until
it is firmly in place.
Repeat with second handle.
1025256-2-B 6 Kohler Co.
Page 7
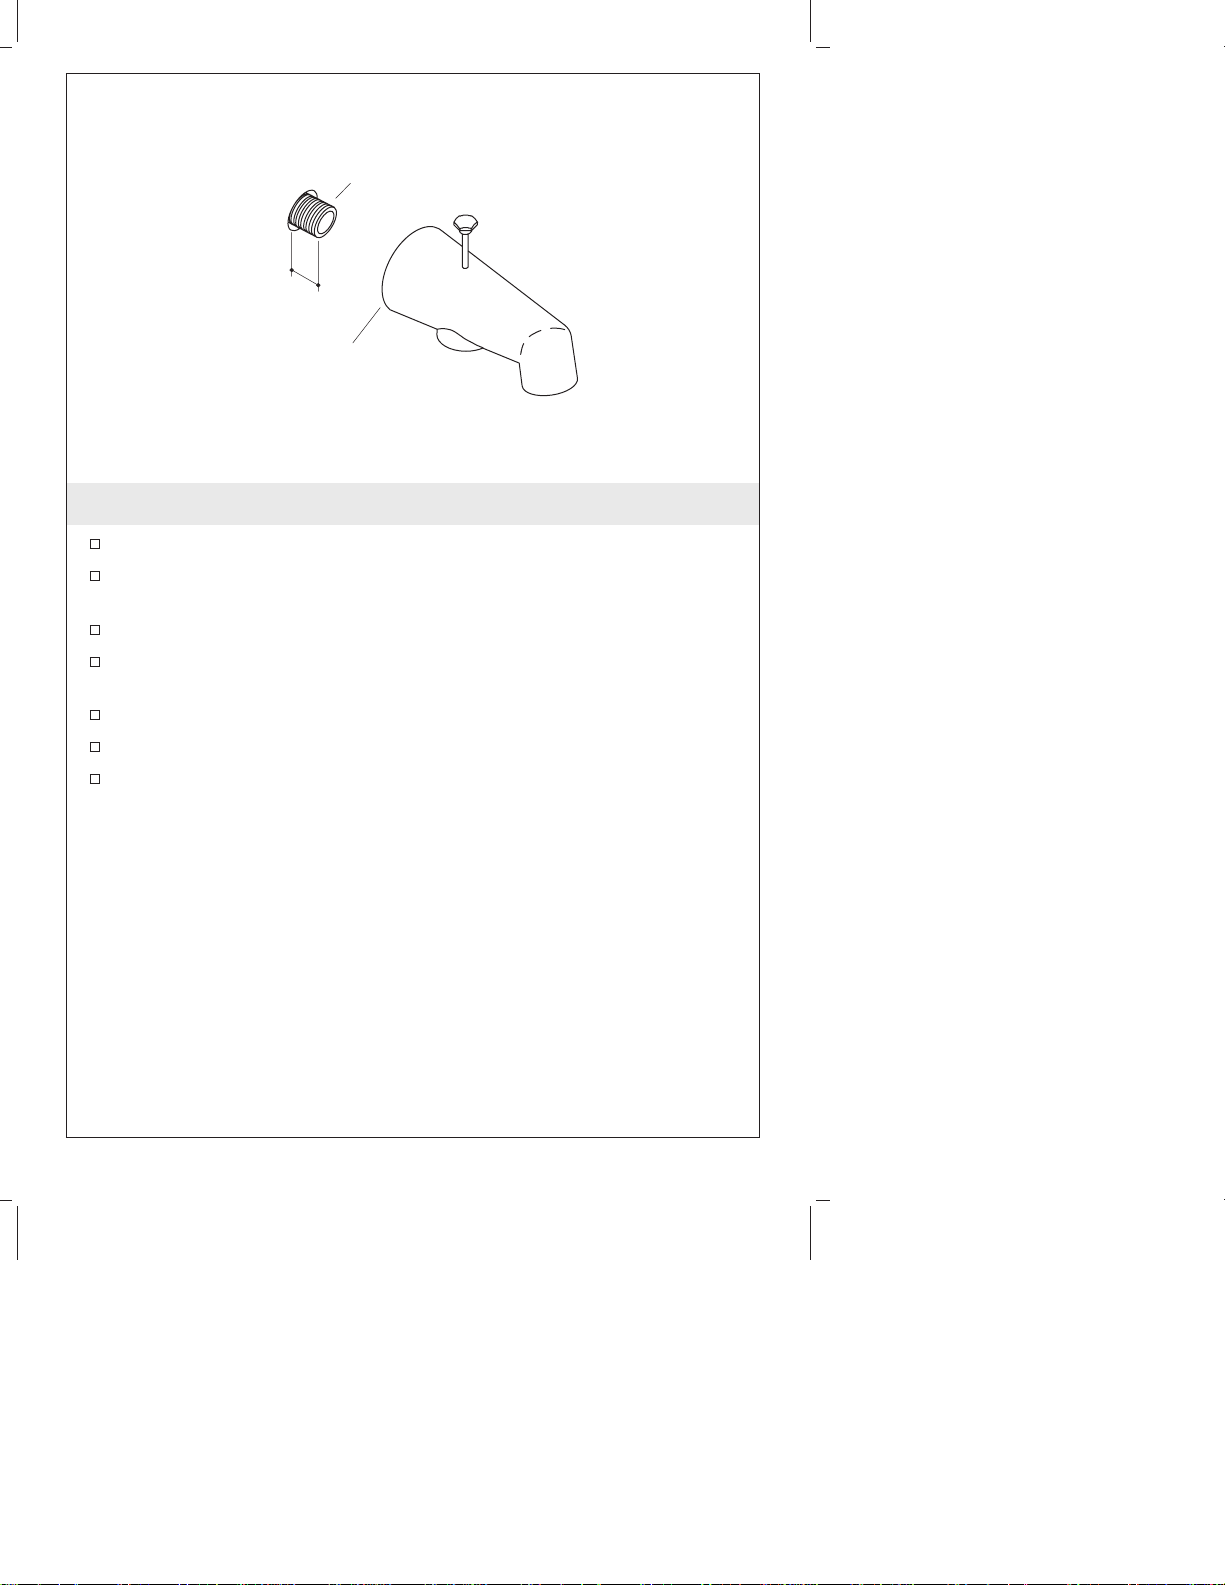
Nipple
1/2"
(1.3 cm)
Apply plumbers putty.
5. Install the Spout
Remove the temporary nipple.
Install a 1/2″ N.P.T. nipple to extend 1/2″ (1.3 cm) beyond the
finished wall.
Apply thread sealant to the nipple threads.
Apply a bead of plumbers putty or other sealant around the inlet
of the spout according to the putty manufacturer’s instructions.
Carefully tighten the spout with a clean strap wrench.
Remove all excess putty.
Flush hot and cold water through the spout for one minute.
Kohler Co. 7 1025256-2-B
Page 8
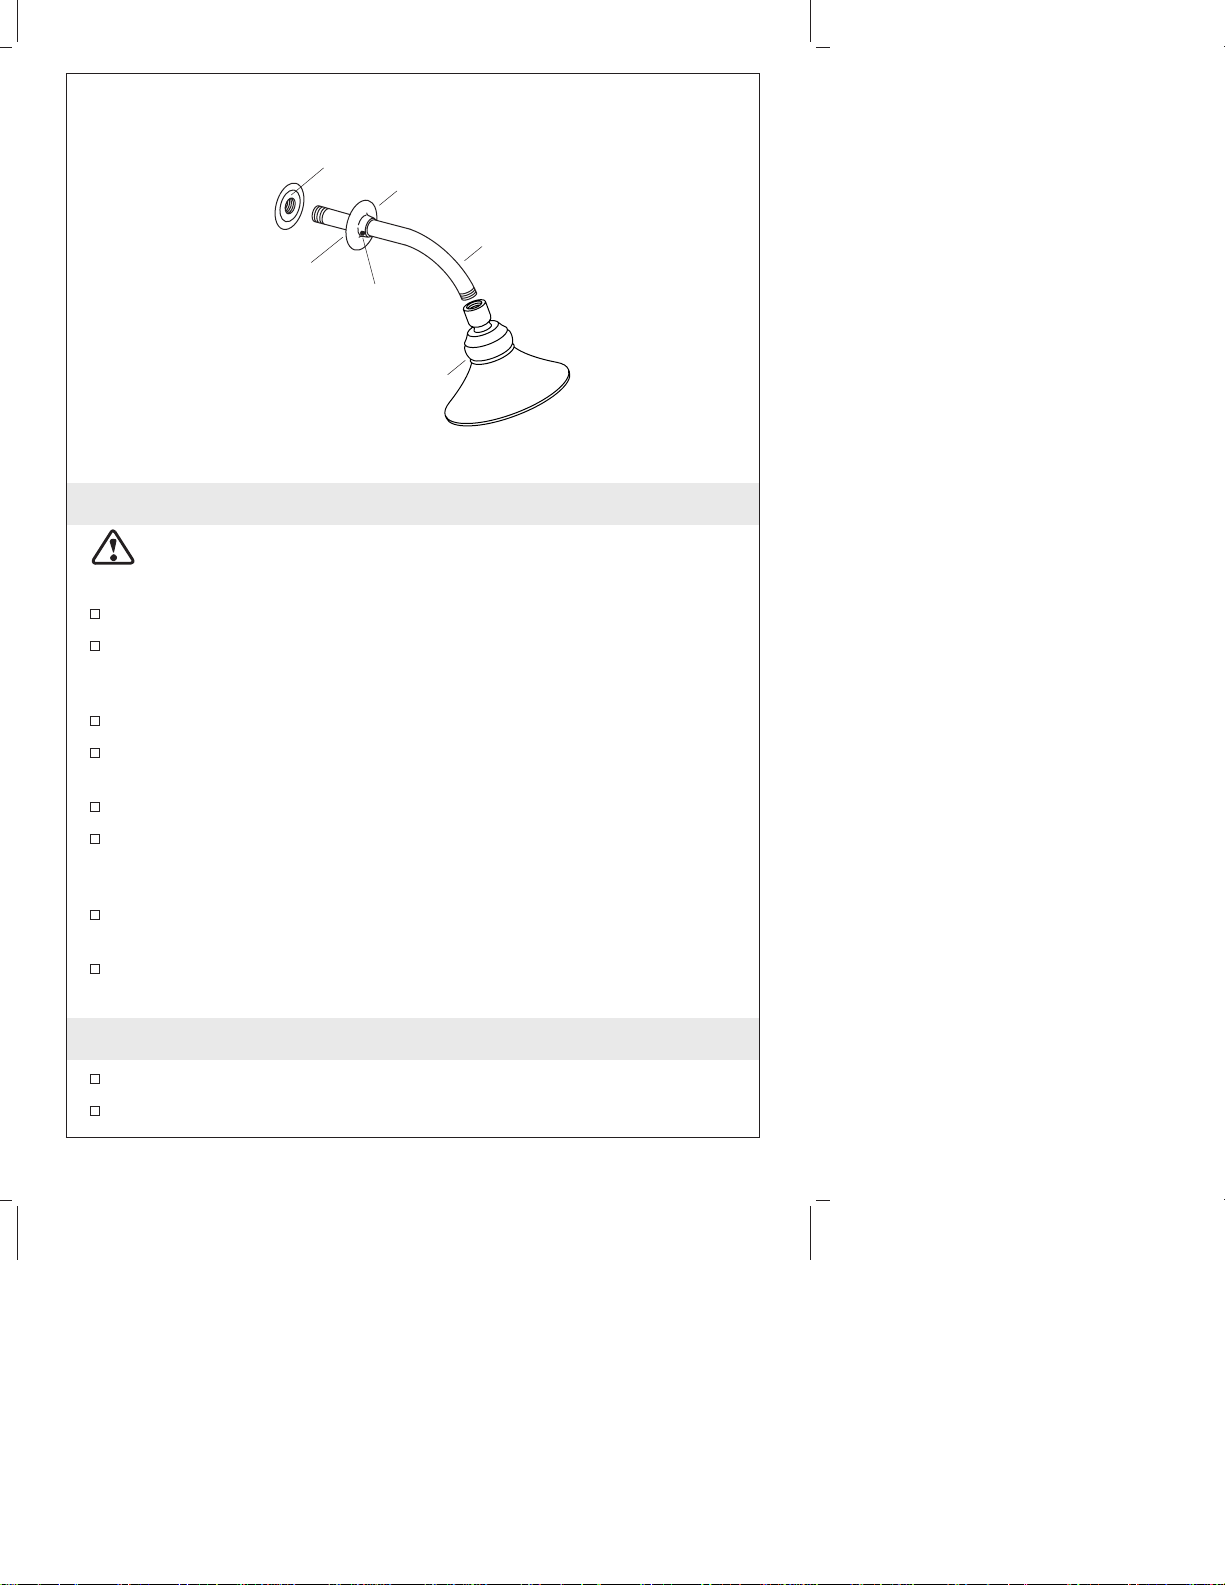
Elbow
Wall Flange
Shower Arm
Apply plumbers
putty
Setscrew
Showerhead
6. Install the Showerhead
CAUTION: Risk of product damage. To avoid plugging the
showerhead spray outlets, use thread sealant tape on the shower
arm threads. Do not use thread sealant compound (pipe dope).
Remove the temporary nipple.
Loosen the setscrew and apply a bead of plumbers putty or other
sealant around the wall flange according to putty manufacturer’s
instructions.
Slip the wall flange over the shower arm.
Place thread sealant on the shower arm threads and thread the
shower arm into the elbow.
Tighten with a clean strap wrench. Do not overtighten.
Flush out the system with the showerhead removed. Apply
thread sealant to the threads, and thread the showerhead onto the
shower arm.
Apply thread sealant to the threads, and thread the showerhead
onto the shower arm.
Press the wall flange tight against the wall and secure with the
setscrew.
7. Complete the Installation
Ensure that all connections are tight.
Open the drain.
1025256-2-B 8 Kohler Co.
Page 9

Complete the Installation (cont.)
Turn on the main water supply and check for leaks.
Open the hot and cold valves and check for leaks.
Run the water for about a minute.
Turn the hot and cold water valves off.
Kohler Co. 9 1025256-2-B
Page 10

Guide d’installation
Robinet à deux poignées baignoire/douche
Outils et matériaux
Clé à
molette
Clé
hexagonale
Tournevis
assortis
Clé
dynamométrique
Clé à
sangle
Soudure
Perceuse
Joint
d'étanchéité
pour filetage
Coupe-tubes
Chalumeau
à propane
Mastic de
plombier
Merci d’avoir choisi la compagnie Kohler
Nous apprécions votre engagement envers la qualité Kohler. Veuillez
s’il vous plaît prendre quelques minutes et lire attentivement ce guide
avant de commencer l’installation. Ne pas hésiter pas à nous contacter
en cas de problème d’installation ou de fonctionnement. Nos numéros
de téléphone et adresse Internet sont au verso. Merci encore d’avoir
choisi un produit Kohler.
Avant de commencer
Veuillez lire toutes les instructions avant de commencer
l’installation.
Respecter tous les codes de plomberie et de bâtiment locaux.
Couper l’alimentation d’eau principale.
Avant l’installation, déballer le nouveau robinet et l’examiner
pour en déceler tout dommage. Remettre le robinet dans
l’emballage de protection en attendant de commencer
l’installation.
Kohler Co.se réserve le droit d’apporter toutes modifications sur
le design des robinets et ceci sans préavis, comme spécifié dans le
Catalogue des Prix.
Kohler Co. Français-1 1025256-2-B
Page 11

72" (182,9 cm) –
78" (198,1 cm) au
sol (Typique)
8" (20,3 cm)
4" (10,2 cm)
Installation de la
baignoire/douche
72" (182,9 cm) –
78" (198,1 cm) au
sol (Typique)
2-1/4" (5,7 cm)
Min.
3" (7,6 cm)
Max.
Joints
d'union
Mur fini
Protecteur
de filetage
Unités
de valve
48" (122 cm) au sol
Installation de la douche
Tuyau en cuivre
ou tube 1/2" NPT
1. Installer la valve - Alimentations sol
ATTENTION : Risque d’endommagement du produit. Retirer
les protecteurs de filets, les valves et l’aspirateur avant de
chauffer l’arcade.
Déterminer l’emplacement du support de l’arcade, le bec et la
pomme de douche.
Installer un cadre de support au besoin.
L’arcade possède deux joints pouvant être utilisés avec soit un
tuyau de 1/2″ N.P.T. ou un tube en cuivre.
Raccorder les robinets d’arrivée d’eau chaude et froide à l’arcade.
Ils devraient être à un minimum de 2-1/4″ (5.7 cm) et à un
maximum de 3″ (7.6 cm) du mur fini.
Réinstaller les composants déposés avant soudage.
Kohler Co. Français-2 1025256-2-B
Page 12

Chaud
Alimentations
au plafond
Aspirateur
Protecteur
de filets
Froid
Unité de
valve
2. Installer la valve - Alimentations plafond
REMARQUE : Cette section s’applique uniquement aux installations
plafond.
Retirer l’aspirateur à l’aide d’une clé hexagonale de 3/8″.
Retourner l’arcade de façon à ce que les alimentations se
raccordent du dessus de l’arcade.
Pour des installations de baignoire et de douche, réinstaller
l’aspirateur au-dessus de l’arcade. Ne pas trop serrer.
Pour des installations de baignoire ou de douche uniquement,
jeter l’aspirateur.
REMARQUE : Inverser l’arcade inversera la direction de fermeture
des poignées. Pour une manipulation correcte du levier à poignée,
inverser les robinets.
Avant de retirer les valves, s’assurer qu’elles soient en position
ouverte.
Serrer les valves à 23-30 pi./lb. (31-40,6 Nm) et tourner à la
position fermée.
Tourner le robinet d’eau chaude vers la gauche et le robinet d’eau
froide vers la droite. Retirer les protecteurs de filets et inverser les
valves.
Remplacer les protecteurs de filets.
1025256-2-B Français-3 Kohler Co.
Page 13

Coude
Mamelon
temporaire
Tube en cuivre
de 1/2" N.P.T.
Adaptateurs
Tube en cuivre
de 1/2" N.P.T.
Coude
Mamelon
temporaire
3. Compléter l’installation de la valve
REMARQUE : Cette section s’applique à tous les types de valves.
IMPORTANT ! Uniquement pour des installations de baignoire ou
de douches: Retirer et jeter l’aspirateur. Appliquer un ruban
d’étanchéité à un bouchon et l’installer dans l’arcade au lieu de la
douche ou de la tuyauterie de la baignoire.
Coupler à l’aide de tube de cuivre de 1/2″ N.P.T., de coudes et
d’adaptateurs.
Utiliser du ruban d’étanchéité sur toutes les connections filetées.
Fixer la tuyauterie de la baignoire/ou de la douche au cadre
d’appui et installer des mamelons temporaires.
Installer des capuchons sur les mamelons temporaires.
Ouvrir les robinets d’alimentation d’eau chaude et froide et
vérifier s’il y a des fuites.
Retirer les capuchons des mamelons temporaires.
Ouvrir les contrôles de valve et faire cycler les contrôles
normalement. Vérifier s’il y a des fuites.
Fermer le contrôle de la valve.
Si la valve est munie d’écrous d’arrêt, tourner les deux
complètement vers la droite.
Ouvrir les contrôles de la valve. L’eau ne devrait pas circuler.
Kohler Co. Français-4 1025256-2-B
Page 14

Compléter l’installation de la valve (cont.)
Fermer les contrôles de valve et tourner les écrous d’arrêt
complètement vers la gauche.
1025256-2-B Français-5 Kohler Co.
Page 15

Tige de la valve
Vis
Jupe
Extension
de la tige
Appliquer du
mastic de
plomberie.
Poignée
4. Installer les poignées
Attacher la tige d’extension à la tige de la valve avec la vis
fournie.
Placer la jupe sur la tige d’extension de la valve et tourner la
poignée à la position fermée.
Retirer l’ensemble de poignée appliquer un anneau de mastic de
plombier à la base, et le replacer avec la poignée en position
désirée.
Maintenir la poignée en place et visser la jupe sur la valve jusqu’à
ce qu’elle soit fermement en place.
Répéter avec le second ensemble.
Kohler Co. Français-6 1025256-2-B
Page 16

Mamelon
1/2"
(1,3 cm)
Appliquer du mastic de plomberie.
5. Installer le bec
Retirer le mamelon temporaire
Installer un mamelon de 1/2″ N.P.T. pour qu’il s’étende de 1/2″
(1,3 cm) du mur fini.
Appliquer un ruban d’étanchéité sur les filets du mamelon.
Appliquer du mastic de plombier ou autre produit d’étanchéité
autour de l’embout du bec selon les instructions du fabricant.
Serrer le bec doucement à l’aide d’une clé à sangle.
Enlever tout excédant de mastic.
Purger les conduites pendant une minute.
1025256-2-B Français-7 Kohler Co.
Page 17

Coude
Bride murale
Bras de douche
Appliquer du
mastic de
plomberie.
Pomme de douche
Vis de
retenue
6. Installer la pomme de douche
ATTENTION : Risque d’endommagement du produit. Pour
éviter de boucher les orifices de la pomme de douche, utiliser du
ruban d’étanchéité sur la tige filetée du bras de douche. Ne pas
utiliser de joint d’étanchéité pour filetage (colle à tuyau).
Retirer le mamelon temporaire
Desserrer la vis d’arrêt et appliquer un bourrelet de mastic de
plombier ou autre joint d’étanchéité autour de la bride murale
selon les directives du fabricant.
Glisser la bride murale sur le bras de douche.
Appliquer du ruban d’étanchéité sur les filets du bras de douche
et visser le bras de douche sur le coude.
Serrer à l’aide d’une clé à sangle. Ne pas trop serrer.
Purger le système avec la pomme de douche retirée. Appliquer
du ruban d’étanchéité sur les filets, et visser la pomme de douche
sur le bras de douche.
Appliquer du ruban d’étanchéité sur les filets, et visser la pomme
de douche sur le bras de douche.
Appuyer fortement la bride contre le mur fini et fixer avec la vis
de retenue.
Kohler Co. Français-8 1025256-2-B
Page 18

7. Compléter l’installation
S’assurer que tous les raccords soient bien serrés.
Ouvrir le drain.
Ouvrir l’alimentation d’eau principale et vérifier s’ilyades
fuites.
Ouvrir les robinets d’eau chaude et froide et vérifier s’ilyades
fuites.
Faire couler l’eau pendant à peu près une minute.
Fermer les valves d’eau chaude et froide.
1025256-2-B Français-9 Kohler Co.
Page 19

Guía de instalación
Grifería de dos manijas para bañera/ducha
Herramientas y materiales
CortatubosTaladroLlave
Soplete de
propano
Masilla de
plomería
ajustable
Llave
hexagonal
Juego de
destornilladores
Llave de
torsión
Soldadura
Llave de
correa
Cinta selladora
de roscas
Gracias por elegir los productos de Kohler
Apreciamos su elección por la calidad de Kohler. Dedique unos
minutos para leer este manual antes de comenzar la instalación. En
caso de problemas de instalación o de funcionamiento, no dude en
contactarnos. Nuestros números de teléfono y nuestra página web se
encuentran en la última página. Gracias nuevamente por escoger a
Kohler.
Antes de comenzar
Lea estas instrucciones atentamente antes de comenzar.
Cumpla con todos los códigos locales de plomería y de
construcción.
Cierre el suministro principal de agua.
Antes de la instalación, desembale la grifería nueva y revise con
cuidado todas las piezas para ver si están dañadas. Luego, vuelva
a poner la grifería en el embalaje hasta el momento de la
instalación.
La empresa Kohler se reserva el derecho de modificar el diseño
de la grifería sin previo aviso, tal como se especifica en la lista de
precios.
Kohler Co. Español-1 1025256-2-B
Page 20

72" (182,9 cm) –
78" (198,1 cm) al
piso (típico)
8" (20,3 cm)
4" (10,2 cm)
Instalación de
bañera/ducha
72" (182,9 cm) –
78" (198,1 cm) al
piso (típico)
2-1/4" (5,7 cm)
Mín.
3" (7,6 cm)
Máx.
Juntas
de unión
Pared
acabada
Protector
de roscas
Válvulas
48" (122 cm) al piso
Instalación de ducha
Tubería de cobre o
tubería con rosca
NPT de 1/2"
1. Instale la válvula - suministros en el piso
PRECAUCIÓN: Riesgo de daños al producto. Retire los
protectores de las roscas, las válvulas y el aspirador antes de
aplicar calor al cuerpo de las manijas.
Determine la ubicación de la estructura de soporte para el cuerpo
de las manijas, el surtidor y la cabeza de la ducha.
Instale la estructura de soporte necesaria.
El cuerpo de las manijas tiene dos juntas de unión que pueden
recibir tuberías con rosca NPT de 1/2″ o tuberías de cobre.
Conecte los suministros del agua fría y caliente al cuerpo de las
manijas. Deben estar a 2-1/4″ (5,7 cm) como mínimoya3″(7,6
cm) como máximo de la pared acabada.
Vuelva a instalar todo lo que haya desmontado antes de soldar.
1025256-2-B Español-2 Kohler Co.
Page 21

Agua
caliente
Suministros
del techo
Aspirador
Agua
fría
Protector
de roscas
Válvula
2. Instale la válvula - suministros en el techo
NOTA: Esta sección se aplica solamente a las instalaciones en el
techo.
Retire el aspirador con una llave hexagonal de 3/8″.
Dé la vuelta al cuerpo de las manijas de manera que los
suministros se puedan conectar desde la parte superior del
cuerpo de las manijas.
En las instalaciones de bañera y ducha, reinstale el aspirador en
la parte superior del cuerpo de las manijas. No apriete
demasiado.
En las instalaciones de bañera o ducha, deseche el aspirador.
NOTA: Si se invierte el cuerpo de las manijas, se invertirá la
dirección en que se cierran las manijas de palanca. Para que las
manijas de palanca funcionen bien, invierta las válvulas.
Antes de desmontar las válvulas, asegúrese de que estén abiertas.
Utilice una llave de torsión para fijar las válvulas entre 23 y 30
libras por pie (31 y 40,6 Neutones/metro) y gire a la posición de
cierre.
Gire la válvula del agua caliente hacia la izquierda y la del agua
fría hacia la derecha. Retire los protectores de roscas e invierta las
válvulas.
Vuelva a colocar los protectores de roscas.
Kohler Co. Español-3 1025256-2-B
Page 22

Niple
Codo
Codo
provisional
Tubería de cobre
con rosca NPT de
1/2"
Adaptadores
Tubería de cobre
con rosca NPT
de 1/2"
Niple
provisional
3. Termine la instalación de la válvula
NOTA: Esta sección atañe a todos los estilos de instalación de
válvulas.
¡IMPORTANTE! Para las instalaciones de bañera o ducha
solamente: Retire el aspirador y deséchelo. Aplique cinta selladora
de roscas a un obturador e instálelo en el cuerpo de las manijas en
lugar de la tubería de la bañera o la ducha.
Realice la conexión de plomería utilizando tuberías de cobre con
rosca NPT de 1/2″, codos y adaptadores.
Utilice cinta selladora de roscas en todas las conexiones roscadas.
Fije la tubería de la bañera y/o ducha a la estructura de soporte e
instale los niples provisionales.
Instale tapones en los niples provisionales.
Abra los suministros de agua fría y caliente y verifique que no
haya fugas.
Quite los tapones de los niples provisionales.
Abra los controles de la válvula y hágalos funcionar por su ciclo
operativo. Verifique que no haya fugas.
Cierre los controles de la válvula.
Si la válvula posee llaves de paso, gire ambas llaves
completamente a la derecha.
Abra los controles de la válvula. No debe salir agua.
1025256-2-B Español-4 Kohler Co.
Page 23

Termine la instalación de la válvula (cont.)
Cierre los controles de la válvula y gire ambas llaves de paso
totalmente a la izquierda.
Kohler Co. Español-5 1025256-2-B
Page 24

Espiga de válvula
Tornillo
Base
Extensión de
espiga
Aplique
masilla de
plomería.
Manija
4. Instale las manijas
Fije la extensión de la espiga en la espiga de la válvula mediante
el tornillo incluido.
Coloque la base sobre la extensión de la espiga de la válvula y
gire la manija a la posición de cierre.
Desmonte el montaje de la manija, aplique una tira de masilla de
plomería a la base y vuelva a colocar el montaje con la manija
situada en la posición de cierre deseada.
Sostenga la manija en su lugar y enrosque la base a la válvula
hasta que quede bien fija en su lugar.
Repita este procedimiento con la segunda manija.
1025256-2-B Español-6 Kohler Co.
Page 25

Niple
1/2"
(1,3 cm)
Aplique
masilla de
plomería.
5. Instale el surtidor
Retire el niple provisional.
Instale un niple con rosca NPT de 1/2″ para que sobresalga 1/2″
(1,3 cm) de la pared acabada.
Aplique cinta selladora de roscas a las roscas del niple.
Aplique masilla de plomería u otro sellador alrededor de la
entrada del surtidor según las instrucciones del fabricante.
Apriete el surtidor cuidadosamente con una llave de correa
limpia.
Elimine el exceso de masilla de plomería.
Haga circular agua caliente y fría por el surtidor durante un
minuto.
Kohler Co. Español-7 1025256-2-B
Page 26

Codo
Brida mural
Brazo de ducha
Aplique masilla
de plomería.
Cabeza de ducha
Tornillo de
fijación
6. Instale la cabeza de ducha
PRECAUCIÓN: Riesgo de daños al producto. Para no obstruir
las salidas del rociador de la cabeza de ducha, utilice cinta
selladora de roscas en las roscas del brazo de la ducha. No
utilice sellador líquido de rosca (pasta lubrificante).
Retire el niple provisional.
Afloje el tornillo de fijación y aplique una tira de masilla de
plomería u otro sellador alrededor de la brida mural, según las
instrucciones del fabricante del sellador.
Deslice la brida mural sobre el brazo de ducha.
Aplique cinta selladora de roscas en las rocas del brazo de ducha
y enrósquelo en el codo.
Apriete con una llave de correa limpia. No apriete demasiado.
Retire la cabeza de ducha y haga circular agua por el sistema.
Aplique cinta selladora de roscas a las roscas y enrosque la
cabeza de ducha en el brazo de ducha.
Aplique cinta selladora de roscas a las roscas y enrosque la
cabeza de ducha en el brazo de ducha.
Presione la brida mural con fuerza contra la pared acabada y fije
el tornillo de fijación.
1025256-2-B Español-8 Kohler Co.
Page 27

7. Termine la instalación
Asegúrese de que todas las conexiones estén apretadas.
Abra el desagüe.
Abra el suministro principal de agua y verifique que no haya
fugas.
Abra las válvulas de agua caliente y fría, y verifique que no haya
fugas.
Deje correr el agua aproximadamente un minuto.
Cierre las válvulas del agua fría y caliente.
Kohler Co. Español-9 1025256-2-B
Page 28

USA: 1-800-4-KOHLER
Canada: 1-800-964-5590
México: 001-877-680-1310
kohler.com
©2004 Kohler Co.
1025256-2-B
 Loading...