

Page 1

Installation and Care Guide
Whirlpool
Retain serial number for reference:
Conserver le numéro de série pour référence:
Guarde el número de serie para
referencia:__________________________
Français, page ″Français-1″
Español, página ″Español-1″
1193346-2-D
Page 2

Installation Instructions
WARNING: When using electrical products, basic precautions should always be followed,
including the following:
DANGER: Risk of electric shock. Connect only to a circuit protected by a Ground-Fault
Circuit-Interrupter (GFCI)*.
Building materials and wiring should be routed away from the pump body and other heat-producing
components of the unit.
Install to permit access for servicing.
A pressure wire connector marked ″Earth/Ground″ is provided within the wiring compartment. To reduce
the risk of electric shock, connect this connector to the grounding terminal of your electric service or supply
panel with copper wire equivalent in size to the circuit conductor supplying this equipment.
Pressure wire connectors are provided on the exterior of the junction box or control within this unit to permit
connection of a bonding conductor between this unit and all other exposed metal in the vicinity, as needed to
comply with local requirements.
Grounding is required. The unit should be installed by a qualified service representative, and grounded.
WARNING: Risk of injury or property damage. Please read all instructions thoroughly before
beginning installation, including the following requirements.
WARNING: Risk of electric shock. A qualified electrician should make all electrical connections.
WARNING: Risk of electric shock. Disconnect power before servicing.
NOTICE: Follow all local plumbing and electrical codes. In Canada, install this unit in accordance with
the Canadian Electrical Code, Part 1.
*Outside North America, this device may be known as a Residual Current Device (RCD).
Product Information
Electrical Requirements
The installation must have a Class A Ground-Fault Circuit-Interrupter (GFCI)*. The GFCI protects against
line-to-ground shock hazard. Use a 120 V, 15 A, 60 Hz dedicated service for the whirlpool.
″H″ models require a separate 120 V, 15 A, 60 Hz dedicated service for the heater.
If the pump supply cord is damaged, it must be replaced by the manufacturer, its service agent or similarly
qualified persons in order to avoid a hazard. The heater supply cord cannot be replaced. If the heater supply
cord is damaged the heater must be replaced.
*Outside North America, this device may be known as a Residual Current Device (RCD).
Product Notices
WARNING: Unauthorized modification may cause unsafe operation and poor performance of
the whirlpool. Do not relocate the whirlpool pump, or make other modifications to the whirlpool
system, as this could adversely affect the performance and safe operation of the whirlpool. Kohler
Co. shall not be liable under its warranty or otherwise for personal injury or damage caused by any
such unauthorized modification.
1193346-2-D 2 Kohler Co.
Page 3
Product Information (cont.)
Features
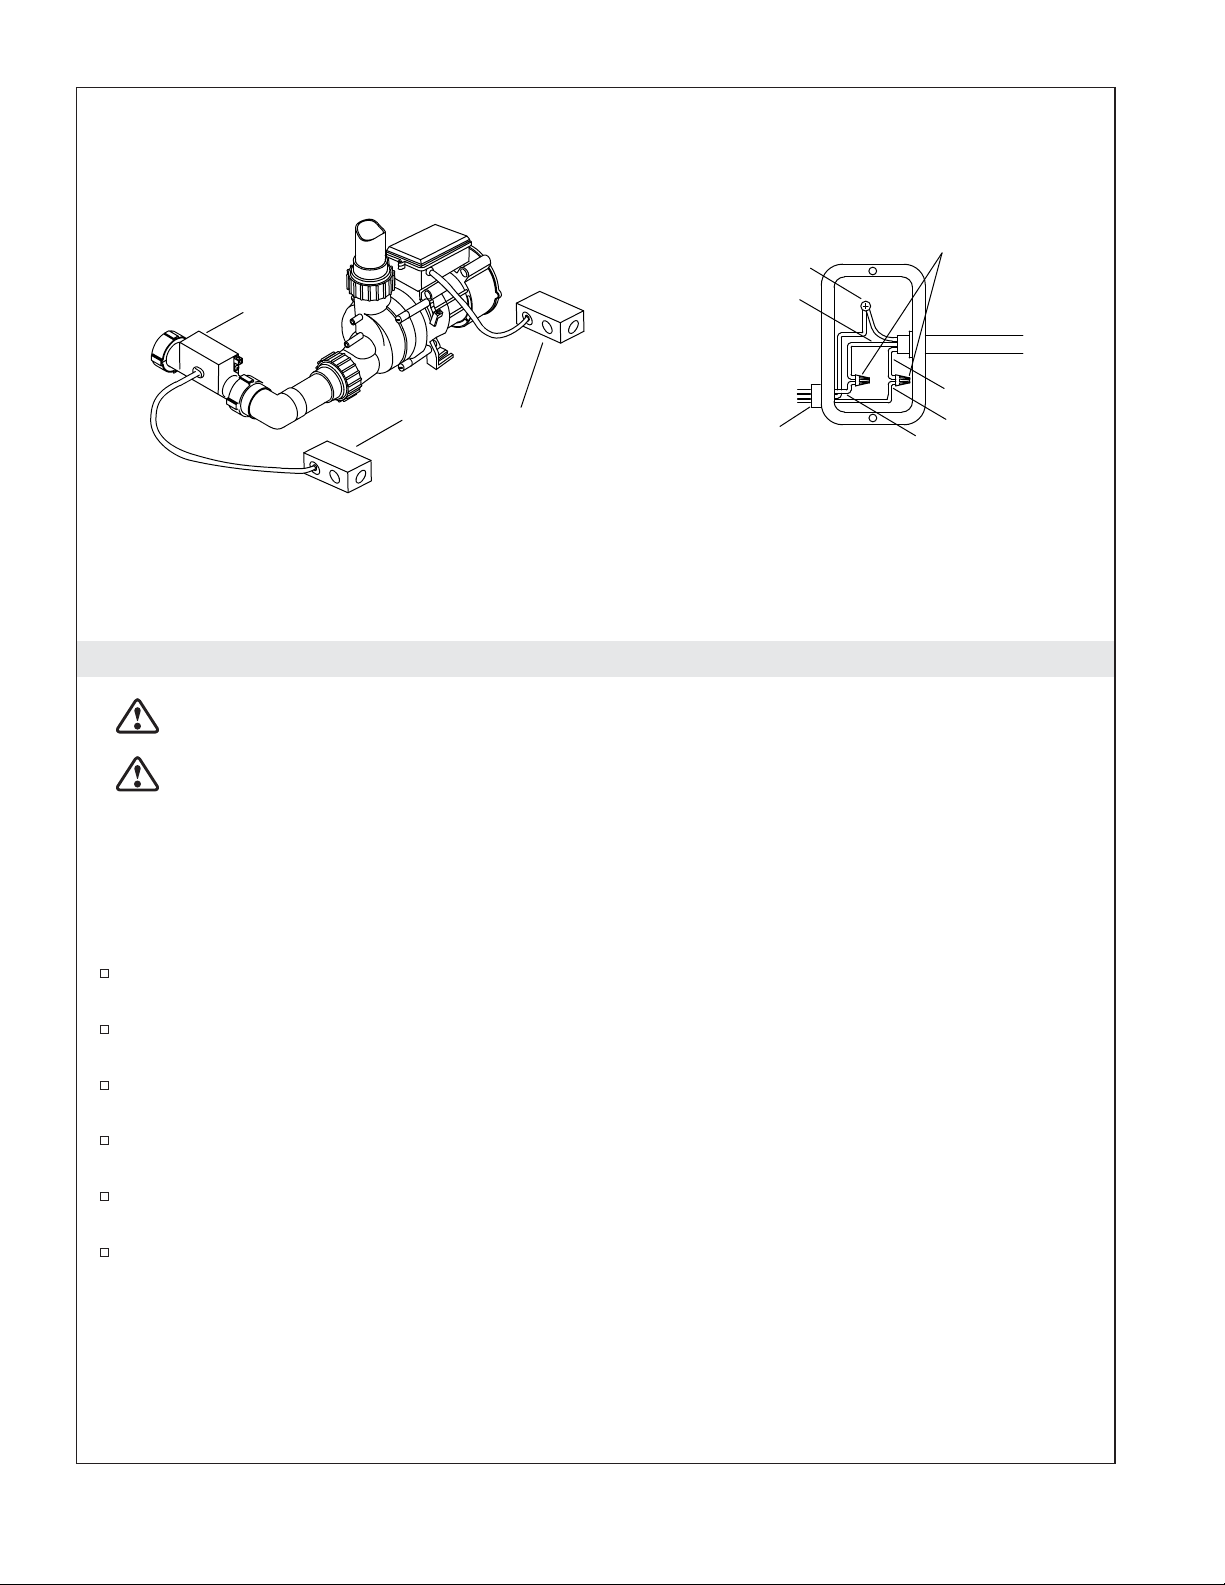
Factory-installed components include a pump with power supply cord and an air switch transmitter.
″H″ models are also supplied with a factory-assembled heater.
The whirlpool pump and piping are factory-assembled.
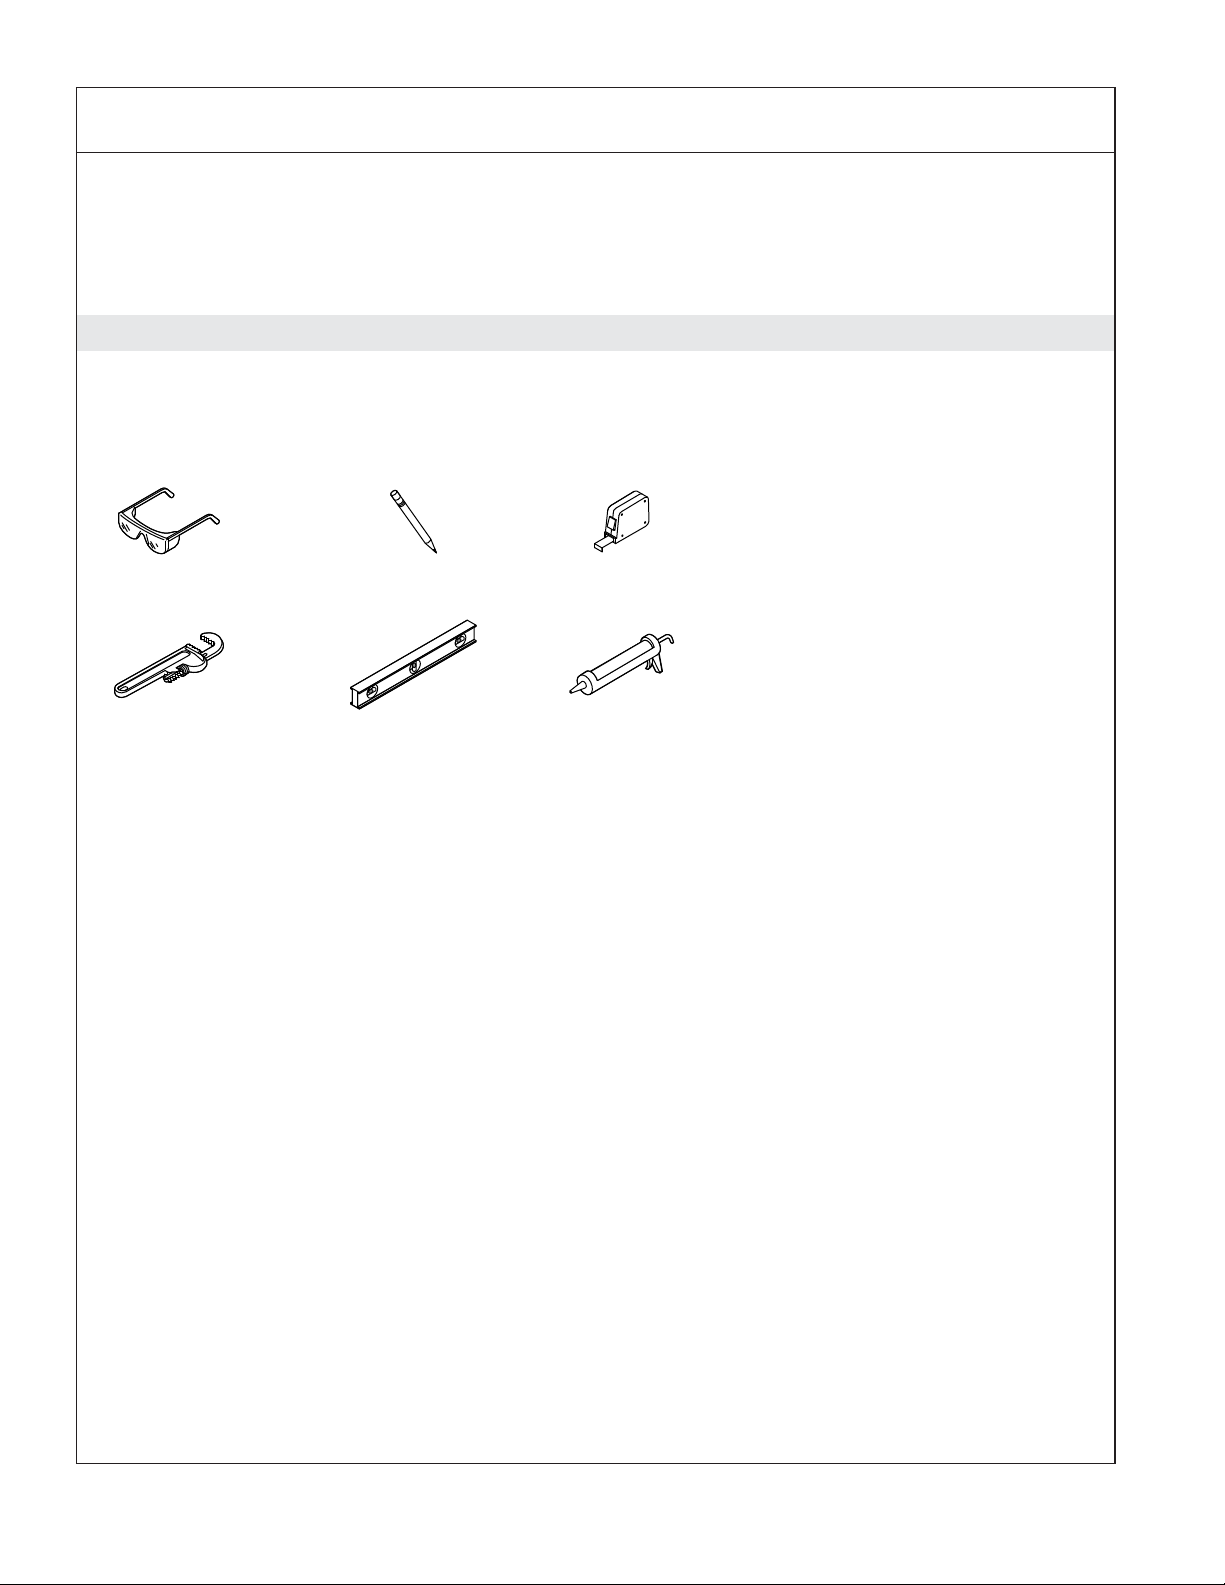
Tools and Materials
Plus:
• Conventional Woodworking
Tools and Materials
• Drop Cloth
• Construction Adhesive (Optional)
• Cement* or Mortar (Optional)
• 2x4s
• Plastic Film (Optional)
• 1/8" (3 mm) Spacers
* Do not use gypsum cement.
100% Silicone Sealant
Kohler Co. 3 1193346-2-D
Page 4
Alcove Drop-In
Position the
rough plumbing.
Construct 2x4
stud framing
according to the
Position the
rough plumbing.
product dimensions.
Construct according
to the product dimensions.
Access
Panel
Verify that the subfloor
offers adequate support,
and is flat and level.
Verify that the subfloor
offers adequate support,
and is flat and level.
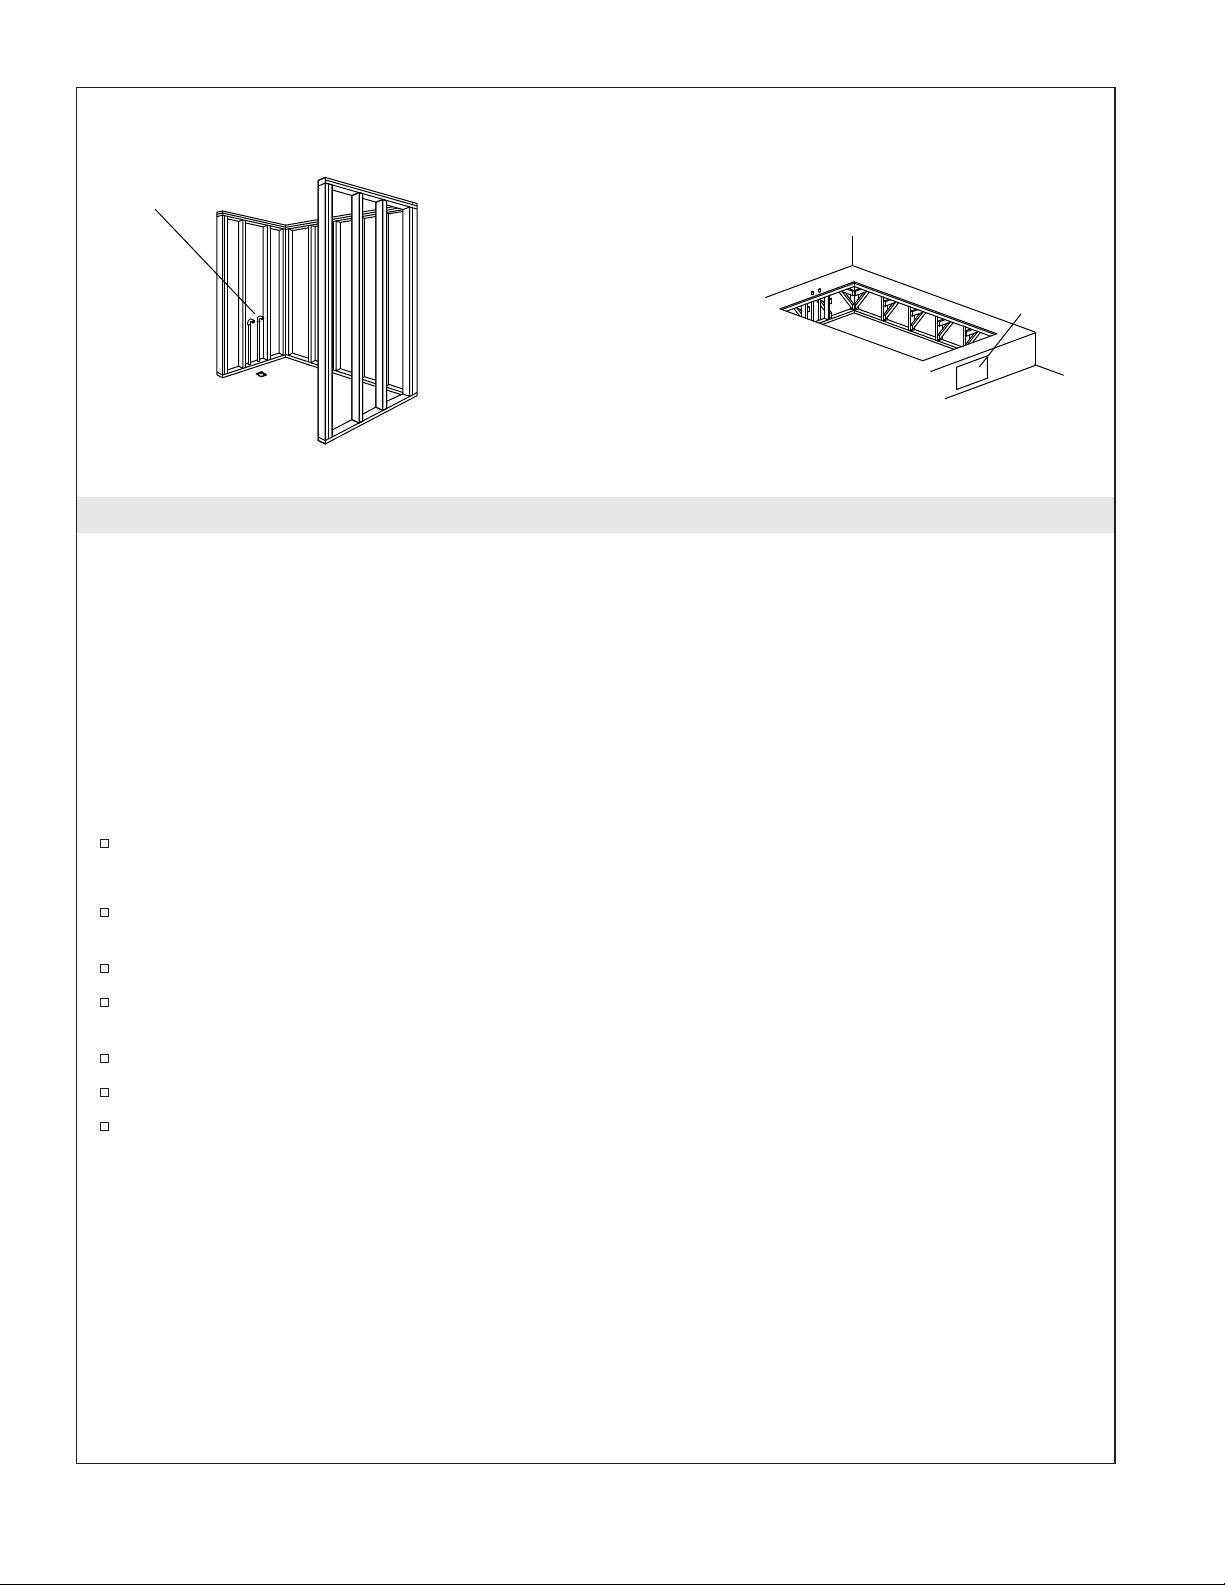
1. Prepare the Site
NOTICE: Measure your actual product for site preparation. Note the model number located on the
whirlpool pump, then visit the product page at kohler.com for additional information.
NOTICE: Provide generous, unrestricted access to the pump. You must provide access for servicing the
pump. The access must be located immediately next to the pump.
NOTICE: Do not lift the whirlpool by the piping or pump, or use the piping or pump for structural
support of the whirlpool. To avoid damage to the whirlpool, lift at the sides of the whirlpool.
NOTICE: Do not support the load weight of the whirlpool by the rim. Plan to shim under the bath as
needed when leveling the bath.
NOTE: Drop-in, alcove, or corner installation is possible, depending on the product chosen.
Carefully unpack and inspect the new whirlpool for damage before installation. If there is damage
do not install the whirlpool; contact your dealer.
Make sure the flooring offers adequate support for your whirlpool, and verify that the subfloor is
flat and level.
Construct 2x4 stud framing.
Install an access panel for future pump servicing. The access panel must be at least 30″ (762 mm)
wide by 15″ (381 mm) high.
Install the rough plumbing.
Install the drain to the whirlpool according to the drain manufacturer’s instructions.
Protect the whirlpool surface by positioning a clean drop cloth in the basin bottom.
1193346-2-D 4 Kohler Co.
Page 5
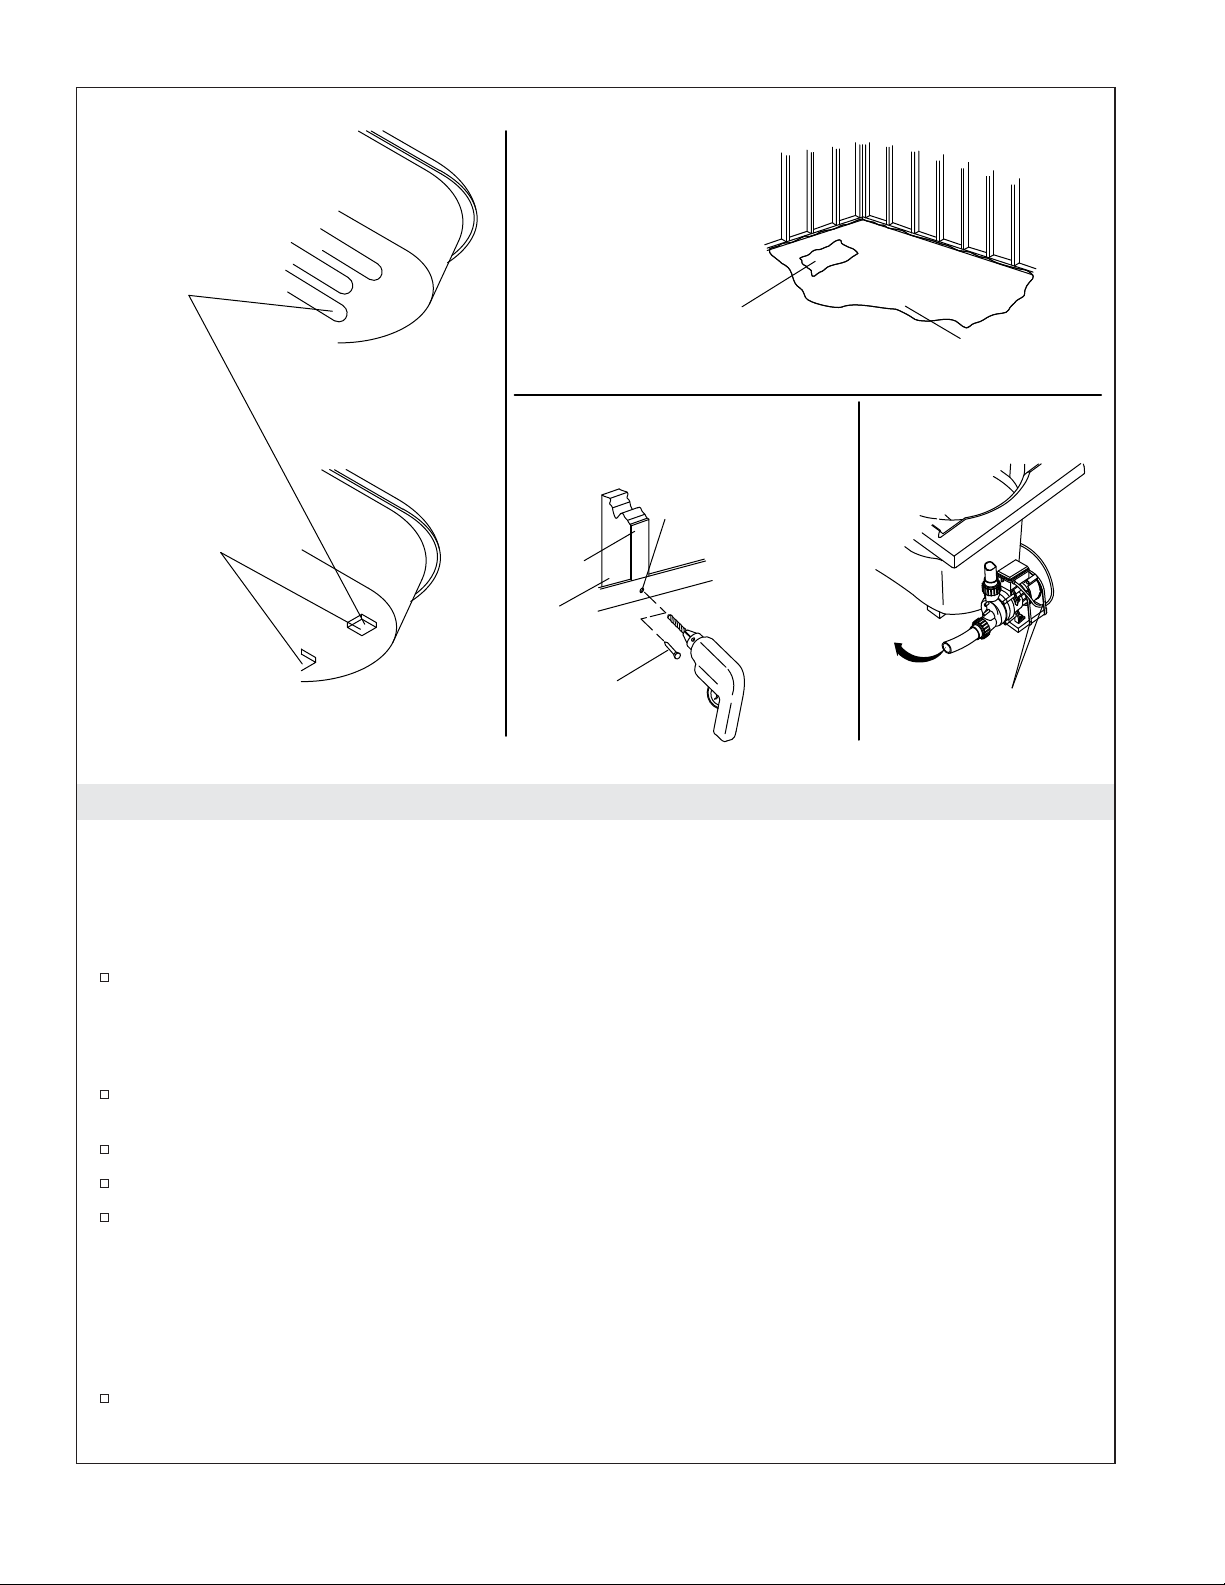
Option 1
Apply construction
adhesive.
Option 2
Clear space for pump.
Cement or
Mortar Bed
Three Wall Alcove or
Corner Installations
Cut the Pump
Banding Straps
Drill a small hole
through the nailing-in
flange at each stud.
Support Blocks
Furring
Strip
Stud
Nail
Banding Straps
2. Install the Whirlpool
IMPORTANT! Use maximum 1/8″ (3 mm) thick spacers under the bath rim to ensure the rim does not
contact the deck.
NOTICE: Do not lift the whirlpool by the piping or pump, or use the piping or pump for structural
support of the whirlpool. To avoid damage to the whirlpool, lift at the sides of the whirlpool.
If the subfloor is not level, shim the whirlpool support blocks or molded supports as necessary.
Option 1: Install Using Construction Adhesive
NOTE: Some models come with support blocks; some models have molded supports.
Apply a generous amount of high-quality construction adhesive to the bottom of the support blocks
or molded supports.
With help, carefully lift the whirlpool into position.
Fit maximum 1/8″ (3 mm) spacers under the bath rim so the rim does not contact the deck.
Apply weight to the bath basin until the adhesive sets.
Option 2: Install Using a Cement or Mortar Bed
NOTE: Do not use gypsum cement or drywall compound for this application, as they will not provide an
acceptable, durable bond.
NOTE: Lay plastic film on wooden subfloors if desired to prevent water absorption.
Set the basin area in 1″ (25 mm) to 2″ (51 mm) of mortar cement.
Kohler Co. 5 1193346-2-D
Page 6

Install the Whirlpool (cont.)
NOTE: The pump support (when the pump banding straps are cut) must rest directly on the subfloor.
The pump control should not be in contact with mortar.
With help, carefully lift the whirlpool into position.
Fit maximum 1/8″ (3 mm) spacers under the bath rim so the rim does not contact the deck.
Apply weight to the bath basin until the mortar sets.
Secure the Nailing-in Flanges (Alcove Units)
Drill a small pilot hole through the nailing-in flange at each stud. Add shims as needed.
Use large-head galvanized nails to secure the nailing-in flange to the studs.
Nail 1/4″ (6 mm) thick furring strips to the studs.
Cut the Pump Banding Straps
IMPORTANT! Perform this step to make the whirlpool operate more quietly.
Cut the two pump banding straps from the whirlpool pump.
NOTE: Do not raise the pump higher than it was before you cut the straps. If the pump is raised too
high, it will not prime properly. Make sure the rubber isolation feet are in place.
Install the Plumbing
Insert the drain tailpiece into the trap. Secure the drain tailpiece to the trap.
Install the faucet valve.
Check the drain connections for leakage.
If required, install the grab bars according to the instructions.
1193346-2-D 6 Kohler Co.
Page 7
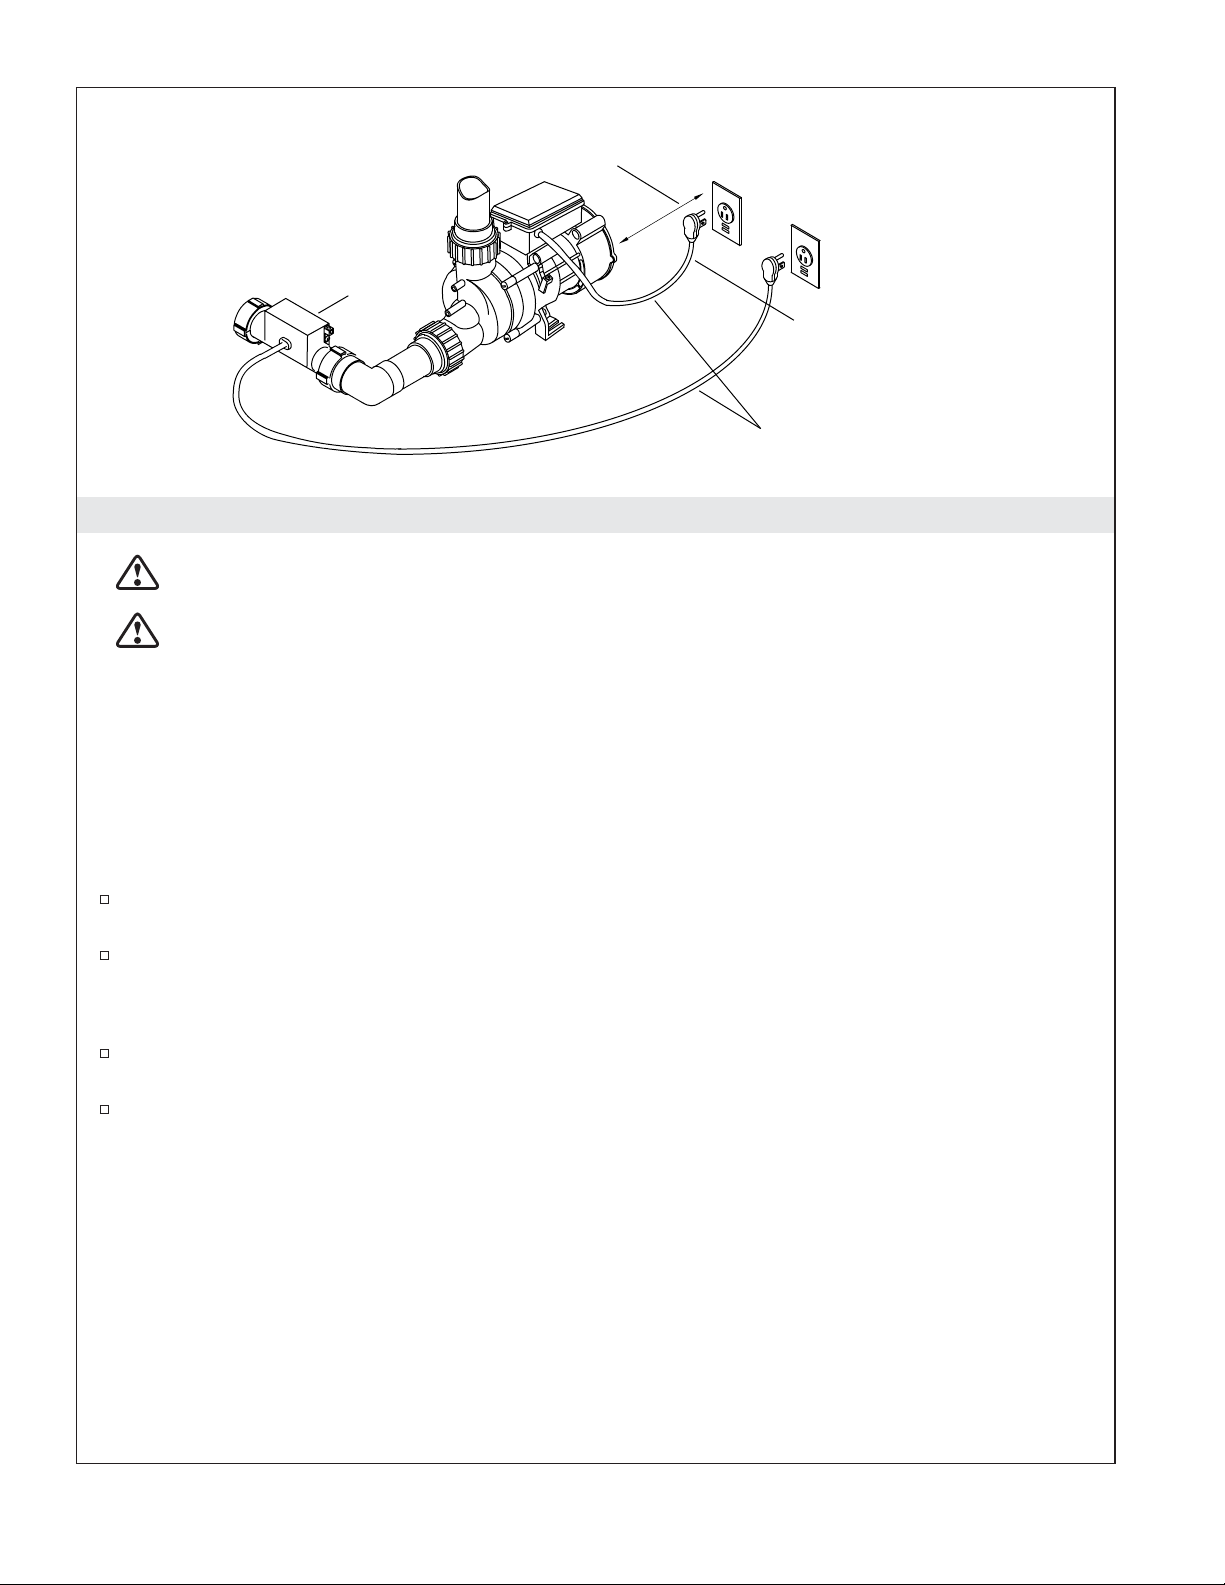
24" (610 mm) Max. Distance
Between Pump and Outlet
Bond in accordance
with applicable codes.
Heater
3. Make the Electrical Connections – USA
WARNING: Risk of electric shock. Make sure the power has been disconnected before performing
the following procedures.
WARNING: Risk of electric shock. Connect the pump and heater (if included) to properly
grounded, grounding-type receptacles protected by Ground-Fault Circuit-Interrupters (GFCI’s) or
Residual Current Devices (RCD’s). Do not remove the grounding pins from the plugs. Do not use
grounding adapters.
Install a second
GFCI-protected outlet for "H"
models for the in-line heater.
Install a GFCI-protected
120 V, 15 A grounded outlet.
24" (610 mm) Power Cord
NOTE: A label identifying the model number and electrical rating of the whirlpool is located near the
whirlpool pump.
NOTICE: The pump and heater (if included) are each equipped with a cord and plug. All wiring for the
heater has been completed at the factory. A qualified electrician must install a GFCI- or RCD-protected, 120
V, 15 A, grounded outlet for the pump, and another for the heater. No other load should be on these
circuits.
Install a dedicated electrical outlet behind the whirlpool, and within 24″ (610 mm) of the pump
power cord.
Plug the pump plug into this outlet.
NOTE: Make sure the air actuator tubing is securely attached to the pump, and is not kinked or
damaged.
For units with heaters, install a second outlet behind the whirlpool and within reach of the 24″ (610
mm) heater power cord.
Plug the heater plug into this outlet.
Kohler Co. 7 1193346-2-D
Page 8
Bond in accordance with applicable codes.
Wire the junction
box as shown.
Heater
Junction Box
Provide suitable
strain relief.
NOTE:
Pump model illustrated may differ from your
actual product.
4. Make the Electrical Connections – Canada
WARNING: Risk of electric shock. Make sure the power has been disconnected before performing
the following procedures.
WARNING: Risk of electric shock. Connect the pump and heater (if included) to a properly
grounded, grounding-type Ground-Fault Circuit-Interrupter (GFCI) or Residual Current Device
(RCD). This will provide additional protection against line-to-ground shock hazard. Do not remove
the grounding pins from the plugs. Do not use grounding adapters.
Ground
Wire Connectors
Neutral
From Pump
Line
Line
Neutral
NOTE: A label identifying the model number and electrical rating of the whirlpool is located near the
whirlpool pump.
NOTICE: If the unit does not include a heater, the pump is equipped with a cord and plug.
Locate and secure each supplied junction box (if included) a minimum of 1-1/2″ (38 mm) above the
subfloor.
The whirlpool controls and system have been prewired at the factory. A qualified electrician should
make a routine service connection to the junction box (if included).
Connect service to the junction box (if included). The 60 Hz model junction box contains line (black)
and neutral (white) wires and a ground lug.
A 120 V, 15 A dedicated circuit is required for the pump. A separate dedicated circuit is required for
the heater (if included). No other load should be on these circuits. Provide a Class A GFCI or RCD.
Provide a separate equipment grounding conductor for the inside ground or ground lug. The
conductor must not be connected to any current-carrying conductor.
Bond in accordance with national and local codes.
1193346-2-D 8 Kohler Co.
Page 9
Fill with water at least 2" (51 mm)
above the highest jet.
Turn the jet trim ring
clockwise to
decrease the flow.
Turn the jet trim ring counterclockwise
to increase the flow.
Position the jet
nozzles to direct
the water flow as
desired.
5. Complete the Installation
Test Run the Whirlpool
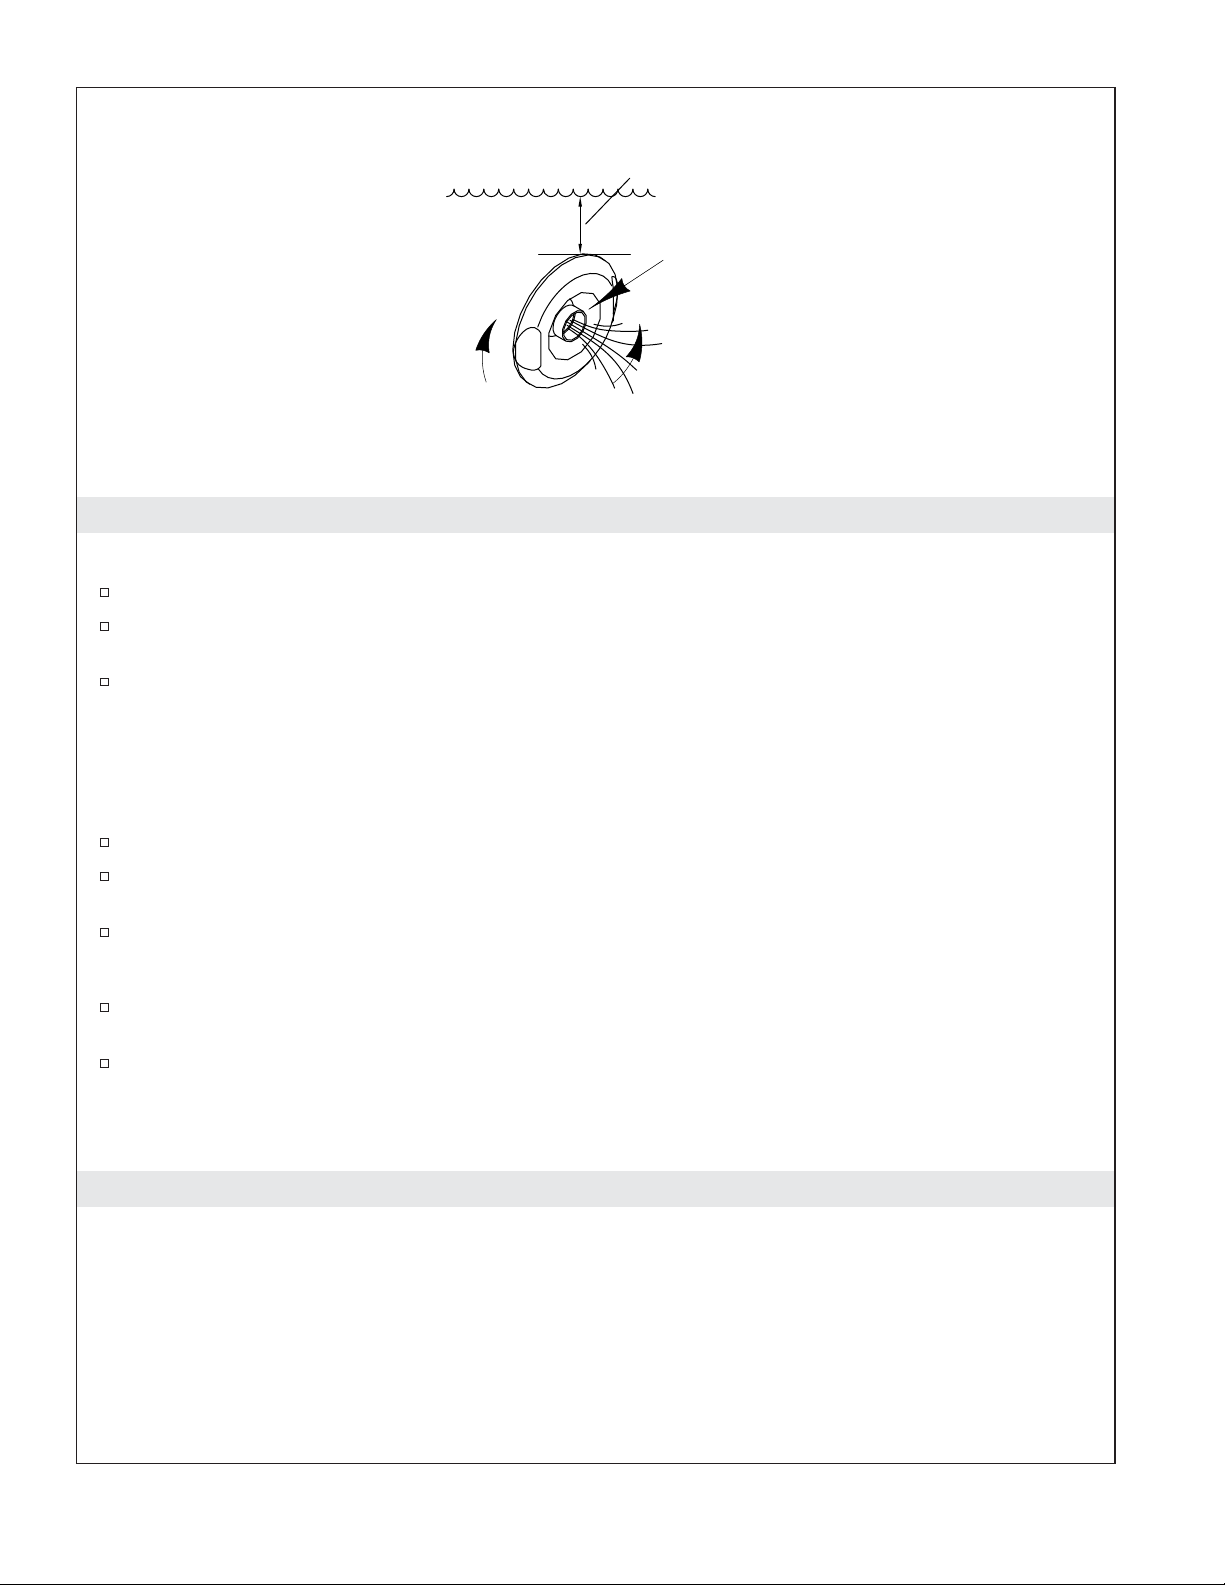
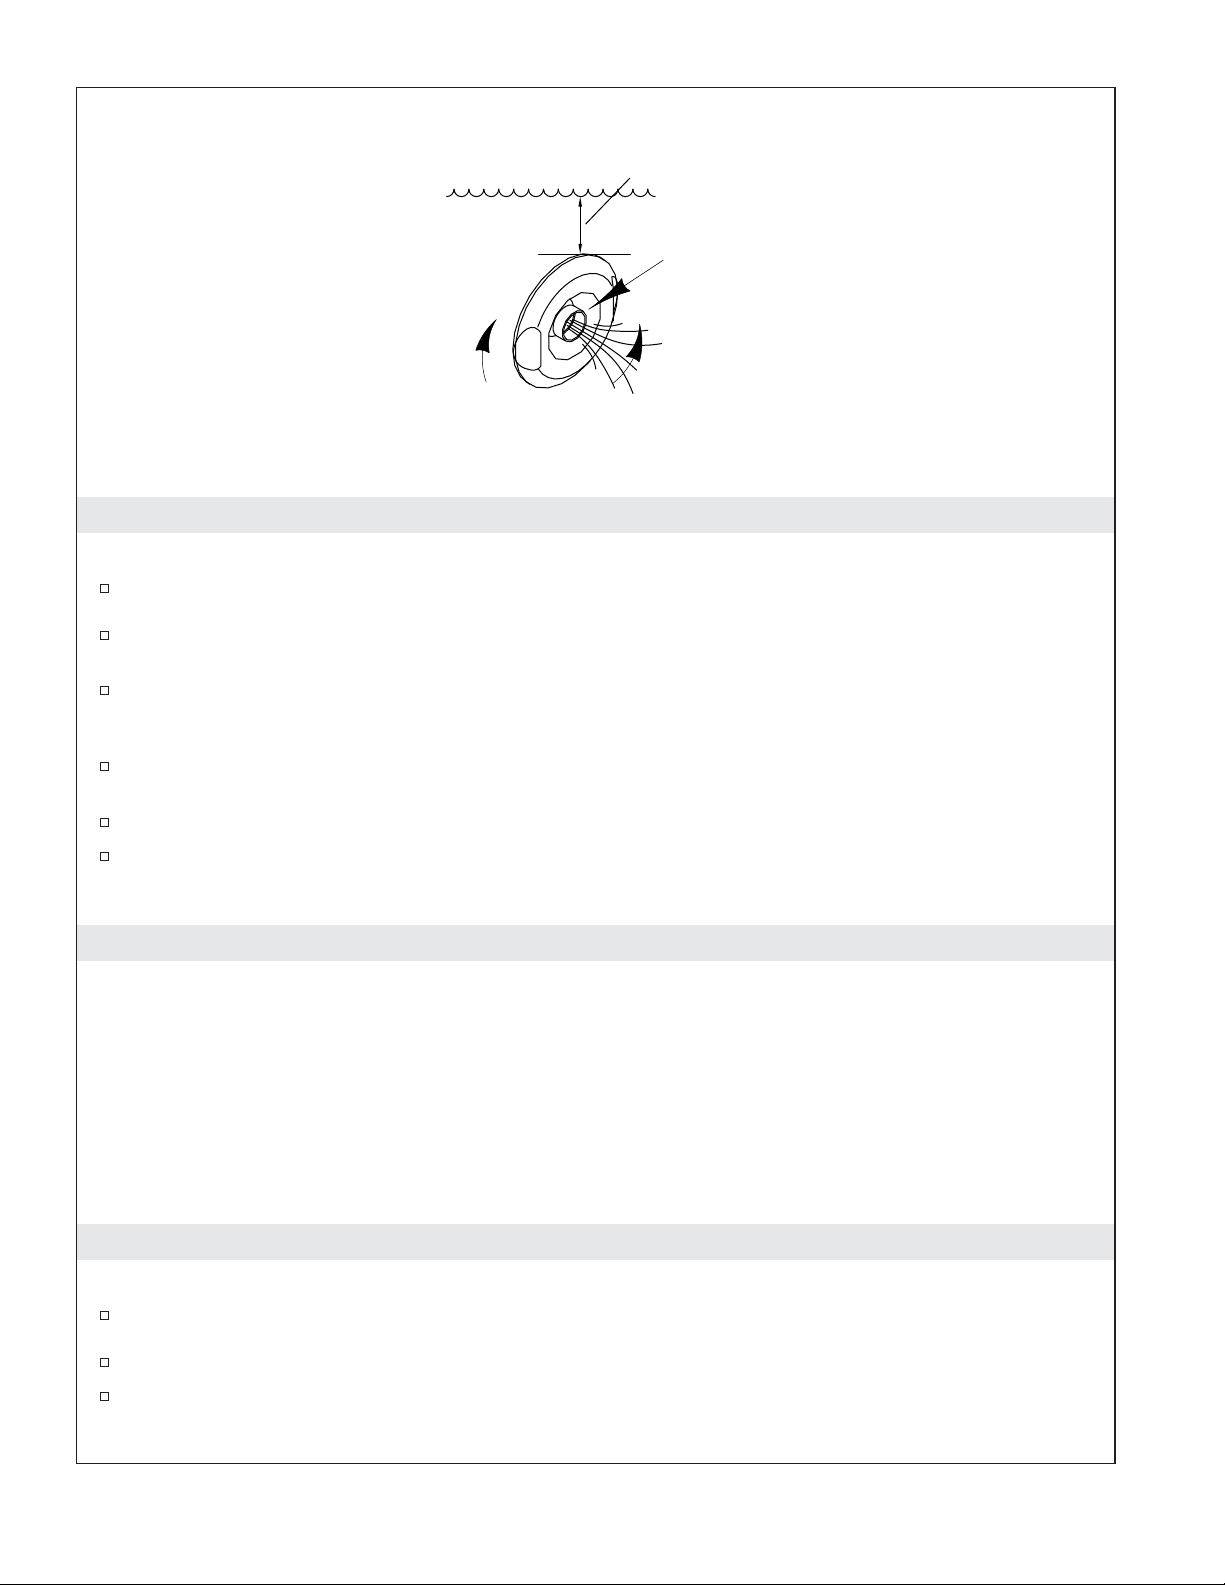
Fill the whirlpool to a level at least 2″ (51 mm) above the top of the highest jet.
Operate the whirlpool for 5 minutes and check all whirlpool piping connections for leaks. Check for
leakage along the front, sides, and back of the whirlpool.
For additional information on whirlpool operation, see the ″Operating Instructions - Whirlpool″
section.
Finish the Installation
IMPORTANT! Kohler Co. strongly recommends the use of 100% silicone sealant as instructed. Other
sealants with high filler contents should be avoided, as they may shrink, separate, and peel over time.
Install water-resistant wallboard and all finished wall, deck, and floor materials.
Apply a minimum 1/8″ (3 mm) bead of 100% silicone sealant to seal all areas where the whirlpool
and finished wall or deck meet.
Install the faucet trim.
Clean-up After Installation
When cleaning up after installation, do not use abrasive cleansers, as they may scratch and dull the
whirlpool surface. Use warm water and a liquid detergent to clean the surface of the whirlpool.
Remove stubborn stains or paint with turpentine or paint thinner. Do not allow cleaners containing
petroleum distillates to remain in contact with any whirlpool surface for long periods of time.
Remove plaster by carefully scraping with a wood edge. Do not use metal scrapers, wire brushes, or
other metal tools. Use a powder-type detergent on a damp cloth to provide mild abrasive action to
any residual plaster.
Important Safety Instructions
READ AND FOLLOW ALL INSTRUCTIONS
SAVE THESE INSTRUCTIONS
INSTRUCTIONS PERTAINING TO A RISK OF FIRE, ELECTRIC SHOCK, OR INJURY TO PERSONS
Kohler Co. 9 1193346-2-D
Page 10
Important Safety Instructions (cont.)
WARNING: When using electrical products, basic precautions should always be followed,
including the following:
DANGER: Risk of accidental injury or drowning. To reduce the risk of injury, do not permit
children to use this unit unless they are closely supervised at all times.
WARNING: Risk of personal injury. To avoid injury, exercise care when entering or exiting the
whirlpool.
WARNING: Risk of electric shock. Do not permit electric appliances (such as a hair dryer, lamp,
telephone, radio, or television) within 5’ (1.5 m) of this whirlpool.
WARNING: The use of alcohol, drugs, or medication can greatly increase the risk of fatal
hyperthermia. Prolonged immersion in hot water may induce hyperthermia. Hyperthermia occurs
when the internal temperature of the body reaches a level several degrees above the normal body
temperature of 98.6°F (37°C). The symptoms of hyperthermia include an increase in the internal
temperature of the body, dizziness, lethargy, drowsiness, and fainting. The effects of hyperthermia
include: (a) failure to perceive heat, (b) failure to recognize the need to exit the whirlpool, (c)
unawareness of impending hazard, (d) fetal damage in pregnant women, (e) physical inability to
exit the whirlpool, and (f) unconsciousness resulting in the danger of drowning.
WARNING: Risk of hyperthermia. People using medications and/or having an adverse medical
history should consult a physician before using a whirlpool equipped with a heater.
WARNING: Risk of fetal injury. Pregnant or possibly pregnant women should consult a physician
before using the whirlpool.
WARNING: Risk of hyperthermia or drowning. Do not use the whirlpool immediately following
strenuous exercise.
WARNING: Risk of hyperthermia or drowning. Water temperature in excess of 100°F (38°C) may
cause injury. Test and adjust the water temperature before use.
WARNING: Risk of personal injury or drowning. Do not operate this unit without the guard
(cover) over the suction fitting.
WARNING: Risk of personal injury. Never drop or insert any object into any opening.
Use this whirlpool only for its intended purpose as described in this guide. Do not use attachments not
recommended by Kohler Co.
The whirlpool must be connected only to a supply circuit that is protected by a Ground-Fault
Circuit-Interrupter (GFCI)*. Such a GFCI should be provided by the installer and should be tested on a
routine basis. To test the GFCI, press the test button. The GFCI should interrupt power. Press the reset
button. Power should be restored. If the GFCI fails to operate in this manner, the GFCI is defective. If the
GFCI interrupts power to the whirlpool without the test button being pressed, a ground current is flowing,
indicating the possibility of an electric shock. Do not use this whirlpool. Disconnect the whirlpool and have
the problem corrected by a qualified service representative before using.
Flush your whirlpool system twice a month or more depending upon usage, as described in the ″Flush the
System″ section of this guide.
Repeated use of personal care products containing oils can damage plastic whirlpool components. Avoid
using bath oils.
Whirlpool hydro-massage action can cause even a small amount of bubble bath, bath soap, shampoo, or bath
oil to foam excessively. For this reason, please do not use these products during whirlpool operation.
Your new KOHLER whirlpool has been listed by Underwriter’s Laboratories, ensuring safety for you and
your family. This whirlpool also conforms to rigid ANSI and IAPMO standards set within the plumbing
industry.
1193346-2-D 10 Kohler Co.
Page 11

Important Safety Instructions (cont.)
*Outside North America, this device may be known as a Residual Current Device (RCD).
Kohler Co. 11 1193346-2-D
Page 12
Fill with water at least 2" (51 mm)
above the highest jet.
Turn the jet trim ring
clockwise to
decrease the flow.
Turn the jet trim ring counterclockwise
to increase the flow.
Position the jet
nozzles to direct
the water flow as
desired.
Operating Instructions
NOTE: The water temperature in the whirlpool should never exceed 104°F (40°C).
Close the drain, then fill the whirlpool at least 2” (51 mm) above the top of the highest jet.
Use your hand to test the water temperature for comfort and safety, then carefully enter the
whirlpool.
Press the air switch to turn on the pump.
NOTE: If equipped, the heater will automatically turn on.
Adjust the jets for optimum air/water mixture. Turn the jet trim rings clockwise to reduce the flow
or counterclockwise to increase the flow. Position the jet nozzles to direct the water flow as desired.
Press the air switch a second time to turn off the pump.
Carefully exit the whirlpool, then open the drain and empty the water.
NOTE: If the whirlpool does not function properly, refer to the ″Troubleshooting Procedures″ section.
Care and Cleaning
For best results, keep the following in mind when caring for your KOHLER product:
•
Always test your cleaning solution on an inconspicuous area before applying to the entire surface.
•
Wipe surfaces clean and rinse completely with water immediately after applying cleaner. Rinse and
dry any overspray that lands on nearby surfaces.
•
Do not allow cleaners to soak on surfaces.
•
Use a soft, dampened sponge or cloth. Never use an abrasive material such as a brush or scouring
pad to clean surfaces.
For detailed cleaning information and products to consider, visit www.kohler.com/clean. To order Care &
Cleaning information, call 1-800-456-4537.
Flush the System
NOTE: Flush your whirlpool system twice a month or more, depending upon usage.
Turn the jet trim rings fully clockwise to reduce air induction.
Fill the whirlpool with hot water to a level at least 2″ (51 mm) above the highest jet.
Add 2 teaspoons (10 ml) of a low-foaming, powder automatic dishwasher detergent and 20 ounces
(590 ml) of household bleach (5% - 6% sodium hypochlorite) to the water.
1193346-2-D 12 Kohler Co.
Page 13

Flush the System (cont.)
Run the whirlpool for 5 to 10 minutes. Turn off the whirlpool and drain.
If desired, rinse the bath surfaces with water.
Rinse the surfaces of the jets, faucet, grab bars, and drain, and wipe them dry with a soft cloth.
Kohler Co. 13 1193346-2-D
Page 14

Remove the Jets
Reinstall the Jets
Insert the tool hook as shown and pull the jet out of the
housing. The jet should be facing up when this is done.
Housing
Inspect and
lubricate the O-ring.
Slide the O-ring
onto the first
shoulder of the jet.
Insert the jet into the housing, and lightly
push and rotate until it snaps in position.
Troubleshooting
NOTICE: This section is for general aid only. A Kohler Co. Authorized Service Representative or
qualified electrician should correct any electrical problems. For warranty service, call 1-800-4KOHLER
from within the USA and Canada, or 001-800-456-4537 from within Mexico.
For service parts information, visit your product page at www.kohler.com.
Remove the Jets
NOTE: A special tool is provided with the replacement jets that will allow you to remove the jets from
the whirlpool. This tool is also supplied with each trim kit.
Position the jet ball nozzle so it is pointing upward.
Insert the removal tool, hooked end up, into the opening of the jet and hook the inside top of the
nozzle.
Grasp the tool firmly and place your thumb against the whirlpool wall. Pull steadily on the tool
until the jet assembly pulls free of the hole. Be careful not to lose the O-ring.
Reinstall the Jets
NOTE: To allow easy rotation and proper operation of the jet, the O-ring must be: (1) correctly positioned,
(2) lubricated, and (3) in good condition.
Install the O-ring onto the first shoulder of the jet.
Using the silicone lube packet (provided), lubricate the O-ring to prevent noisy operation of the jet.
Carefully insert the jet into the housing, then lightly push and rotate the jet until it snaps into
position. Do not force the jet.
Verify the jet is installed correctly. The jet should turn smoothly both clockwise and
counterclockwise. Remove and reinstall, if necessary.
1193346-2-D 14 Kohler Co.
Page 15
Troubleshooting (cont.)
Symptoms Probable Causes Recommended Action
1. Whirlpool does not start
or stop.
2. Motor starts, not all jets
are functioning.
3. Pump does not prime. A. Pump shimmed too high. A. Lower pump support bracket.
4. Noisy operation. A. Pump banding straps have not
5. Heater does not operate.
(“H” models only)
A. No power to motor. A. Check that the pump and heater
B. Air hose is loose or disconnected. B. Check that the hose is connected
C. Air hose is pinched or kinked. C. Adjust hose to clear the
D. Push button assembly is damaged. D. Replace the push button
E. Push button has grease in the
bleed area.
F. Air hose is damaged. F. Replace the air hose.
G. Motor/pump does not work. G. Replace the motor/pump.
A. Jet is closed. A. Rotate jet trim ring
B. Jet not installed correctly. B. Reinstall jet; check for O-ring
C. Jets are blocked. C. Remove blockage.
been cut. (Models with support
blocks only.)
B. Jet O-ring dislodged. B. Remove jet, replace and lubricate
A. No power to heater. A. Reset the GFCI or RCD.
B. Water temperature exceeds 104°F
(40°C).
C. Heater does not work. C. Replace heater.
are plugged in and that the GFCI
or RCD is switched to the correct
position. Plug in or reset the
GFCI/RCD as needed.
at both the receiver/pump end
and to the air switch. Reconnect
if needed.
pinched/kinked area. If the
tubing is pinched/kinked and
cannot be readjusted, or no
noticeable pinch/kink is
apparent, poke a small hole in
the tubing with a tack and try
the system again.
assembly.
E. Disassemble the push button
assembly and wipe away any
excess grease. Reassemble the
button and retry the system.
counterclockwise to open.
damage.
A. Cut pump banding straps with
tin snips.
O-ring, and reinstall jet.
B. Allow water to cool and heater
will re-engage.
Warranty
ONE-YEAR LIMITED WARRANTY
KOHLER plumbing products are warranted to be free of defects in material and workmanship for one year
from date of installation.
Kohler Co. will, at its election, repair, replace or make appropriate adjustment where Kohler Co. inspection
discloses any such defects occurring in normal usage within one (1) year after installation. Kohler Co. is not
responsible for removal or installation costs. Use of in-tank toilet cleaners will void the warranty.
To obtain warranty service contact Kohler Co. either through your Dealer, Plumbing Contractor, Home
Center or E-tailer, or by writing Kohler Co., Attn.: Customer Care Center, 444 Highland Drive, Kohler, WI
53044, USA, or by calling 1-800-4-KOHLER (1-800-456-4537) from within the USA and Canada, and
Kohler Co. 15 1193346-2-D
Page 16

Warranty (cont.)
001-800-456-4537 from within Mexico, or visit www.kohler.com within the USA, www.ca.kohler.com from
within Canada, or www.mx.kohler.com in Mexico.
IMPLIED WARRANTIES INCLUDING THAT OF MERCHANTABILITY AND FITNESS FOR A
PARTICULAR PURPOSE ARE EXPRESSLY LIMITED IN DURATION TO THE DURATION OF THIS
WARRANTY. KOHLER CO. AND/OR SELLER DISCLAIM ANY LIABILITY FOR SPECIAL,
INCIDENTAL OR CONSEQUENTIAL DAMAGES. Some states/provinces do not allow limitations on how
long an implied warranty lasts, or the exclusion or limitation of special, incidental or consequential damages,
so these limitations and exclusions may not apply to you. This warranty gives you specific legal rights. You
may also have other rights which vary from state/province to state/province.
This is Kohler Co.’s exclusive written warranty.
Warranty
For Mexico
KOHLER CO.
It is recommended that at the time of purchase, you verify that all accessories and components are complete
in this package.
This Kohler product is warranted to be free of defects in material and workmanship for one (1) year from the
date of purchase as shown on the invoice or receipt.
1. Kohler Co. will only service its commercialized products through its authorized distributors.
2. To obtain warranty service, please present the invoice and corresponding warranty.
3. Through its authorized distributors, Kohler Co. promises to repair the defective product or provide a new
replacement or an equivalent model (in those cases that the model has been discontinued) when the product
is beyond repair, without any charge to the consumer.
4. The time of repair will not exceed six (6) weeks commencing on the date the product is received.
5. It is recommended that the consumer save the invoice or receipt as additional protection, as it may
substitute the warranty in the case that there is a discrepancy in the validity of the warranty.
EXCEPTIONS AND RESTRICTIONS
The Warranty will not be valid in the following cases:
1. When the product is not operated in accordance with the instructions concerning use and operation set
forth in the owner’s manual or installation instructions, and when the recommendations and warnings
included are not observed.
2. When the product has been modified or dismantled partially or totally; or has been used in a negligent
fashion and as a consequence has suffered damages attributable to the consumer, individual, or hardware not
authorized by Kohler Co.
3. This warranty does not cover the damages as a result of disaster such as fire or acts of God, including
flooding, earthquake, or electric storms, etc. To obtain a list of distributors in your area where you can
exercise your rights under this warranty, please call 001-800-456-4537.
KOHLER CO., KOHLER, WI 53044 U.S.A.
IMPORTER:
COMERCIALIZADORA INTERCERAMIC, S.A. DE C.V.
AV. CARLOS PACHECO NO. 7200, COL. MADERA 65
CHIHUAHUA, CHIH., MEXICO C.P. 31060
R.F.C. CIN141022IE9
TEL: 52 (614) 429-11-11
1193346-2-D 16 Kohler Co.
Page 17

Warranty (cont.)
IMPORTER:
GAMA MATERIALES Y ACEROS, S.A. DE C.V.
AVE LOS ANGELES NO. 1800
COL VALLE DEL NOGALAR, SAN NICOLAS DE LOS GARZA
N.L. MEXICO
R.F.C. GMA901220U11
TEL: 81-1160-5500
Kohler Co. 17 1193346-2-D
Page 18

Guide d’installation et d’entretien
Baignoire à hydromassage
Instructions d’installation
AVERTISSEMENT: Lors de l’utilisation de produits électriques, toujours observer les
précautions de base, notamment:
DANGER: Risque de choc électrique. Raccorder uniquement à un circuit protégé par un
disjoncteur de fuite de terre (GFCI)*.
Les matériaux de construction et le câblage doivent être acheminés loin du corps de la pompe et des autres
composants de l’appareil qui dégagent de la chaleur.
Installer de façon à permettre un accès pour l’entretien.
Un connecteur à pression pour câbles marqué ″Earth/Ground″ (Terre/Masse) est fourni dans le
compartiment de câblage. Afin de réduire les risques de choc électrique, raccorder ce connecteur à une borne
de terre du panneau de service électrique ou du panneau d’alimentation avec un câble en cuivre ayant la
même dimension que le conducteur du circuit qui alimente cet équipement.
Des connecteurs à pression par câble sont fournis sur l’extérieur de la boîte de jonction ou de la commande
incluse dans cet appareil afin de permettre la connexion d’un conducteur de mise à la terre entre cet appareil
et toutes les autres surfaces de métal avoisinantes, tel que requis par les normes locales.
Une mise à la terre est requise. L’appareil doit être installé par un représentant qualifié et doit être mis à la
terre.
AVERTISSEMENT: Risque de blessures ou d’endommagement du matériel. Toutes les
instructions doivent être lues avec la plus grande attention avant de commencer l’installation, et
toutes les conditions suivantes doivent être respectées.
AVERTISSEMENT: Risque de choc électrique. Un électricien qualifié doit effectuer toutes les
connexions électriques.
AVERTISSEMENT: Risque de choc électrique. Déconnecter l’alimentation électrique avant
d’effectuer un entretien.
AVIS: Respecter tous les codes de plomberie et électriques locaux. Installer cet appareil conformément
au Code canadien de l’électricité, Partie 1.
* Hors de l’Amérique du Nord, ce dispositif peut être connu sous le nom de dispositif à courant résiduel
(RCD).
Information sur le produit
Installations électriques requises
Cette installation doit être munie d’un disjoncteur de fuite de terre (GFCI) de classe A*. Le disjoncteur GFCI
protège contre les risques d’électrocution fil sous tension-terre. Utiliser une alimentation de 120 V, 15 A, 60
Hz dédiée à la baignoire à hydromassage.
Les modèles ″H″ exigent une alimentation séparée de 120 V, 15 A, 60 Hz dédiée au chauffe-eau.
Si le câble d’alimentation de la pompe est endommagé, il doit être remplacé par le fabricant, son représentant
ou des professionnels qualifiés dans ce domaine afin d’éviter tout danger. Le cordon d’alimentation du
chauffe-eau ne peut pas être remplacé. Le chauffe-eau doit être remplacé si le cordon d’alimentation du
chauffe-eau est endommagé.
Kohler Co. Français-1 1193346-2-D
Page 19

Information sur le produit (cont.)
* Hors de l’Amérique du Nord, ce dispositif peut être connu sous le nom de dispositif à courant résiduel
(RCD).
Notices du produit
AVERTISSEMENT: Des modifications non approuvées pourraient provoquer un fonctionnement
dangereux et une mauvaise performance de la baignoire à hydromassage. Ne pas déplacer la
pompe de la baignoire à hydromassage et ne pas effectuer d’autres modifications sur le système
d’hydromassage car cela pourrait affecter la performance et la sécurité de la baignoire à
hydromassage. Kohler Co. décline toute responsabilité sous sa garantie et pour toutes blessures ou
tous dommages causés par de telles modifications non autorisées.
Caractéristiques
Les composants installés en usine comprennent une pompe avec câble d’alimentation électrique et un
émetteur de commutateur de débit d’air.
Les modèles ″H″ sont également fournis avec un chauffe-eau assemblé en usine.
La pompe et la tuyauterie de la baignoire à hydromassage ont été assemblées en usine.
Outils et matériel
Mastic à la silicone à 100%
Plus:
• Matériaux et outils à bois classiques
• Toile de protection
• Colle mastic (optionnelle)
• Ciment* ou mortier (optionnel)
• Des 2x4
• Film en plastique (optionnel)
• Espaceurs 1/8" (3 mm)
* Ne pas utiliser de plâtre dur.
Kohler Co. Français-2 1193346-2-D
Page 20

Alcôve
Positionner la plomberie
de raccordement.
À encastrer par le dessus
Construire une charpente
à montants de 2x4
selon les dimensions
du produit.
Positionner la plomberie
de raccordement.
Effectuer la construction selon
les dimensions du produit.
Panneau
d'accès
Vérifier que le sousplancher offre un support
adéquat et qu'il
Vérifier que le sous-plancher
offre un support adéquat et qu'il
est plat et nivelé.
est plat et nivelé.
1. Préparer le site
AVIS: Mesurer le produit en question pour la préparation du site. Noter le numéro de modèle se
trouvant sur la pompe de la baignoire à hydromassage, puis visiter la page du produit sur le site
kohler.com pour obtenir de l’information supplémentaire.
AVIS: Fournir un large espace non restreint pour pouvoir accéder à la pompe. Un accès doit être fourni
pour l’entretien de la pompe. L’accès doit être situé juste à côté de la pompe.
AVIS: Ne pas soulever la baignoire à hydromassage par la tuyauterie ou la pompe et ne pas utiliser la
tuyauterie ou la pompe comme support structurel de la baignoire à hydromassage. Afin d’éviter tout
endommagement de la baignoire à hydromassage, soulever celle-ci par les côtés.
AVIS: Ne pas supporter le poids de charge de la baignoire à hydromassage par le rebord. Prévoir de
placer des cales sous la baignoire au besoin lors du nivellement de la baignoire.
REMARQUE: Une installation à encastrer par le dessus, en alcôve ou en coin est possible, selon le produit
choisi.
Déballer et examiner soigneusement la nouvelle baignoire à hydromassage pour y déceler tout
dommage avant d’effectuer l’installation. Si des dommages sont notés, ne pas installer la baignoire à
hydromassage; contacter le concessionnaire.
S’assurer que le sol offre un support adéquat pour la baignoire à hydromassage et vérifier que le
plancher est plat et de niveau.
Construire une charpente avec des montants de2x4.
Installer un panneau d’accès pour permettre un entretien futur de la pompe. Le panneau d’accès
doit avoir une largeur de 30″ (762 mm) et une hauteur de 15″ (381 mm) au moins.
Installer la tuyauterie de raccordement.
Installer le drain sur la baignoire à hydromassage conformément aux instructions du fabricant du
drain.
Protéger la surface de la baignoire à hydromassage en plaçant une toile de protection propre dans le
bas du bassin.
1193346-2-D Français-3 Kohler Co.
Page 21

Option 1
Appliquer de la colle
mastic.
Option 2
Créer un espace pour la pompe.
Lit de ciment ou
de mortier
Installations en coin ou en
alcôve à trois murs
Couper les sangles
de retenue de la pompe
Percer un petit trou
dans la bride de
cloutage de chaque
montant.
Blocs de support
Tasseau
Goujon
Clou
Sangles de retenue
2. Installer la baignoire à hydromassage
IMPORTANT! Utiliser des espaceurs d’une épaisseur de 1/8″ (3 mm) au maximum sous le rebord de la
baignoire pour assurer que le rebord n’entre pas en contact avec le tablier.
AVIS: Ne pas soulever la baignoire à hydromassage par la tuyauterie ou la pompe et ne pas utiliser la
tuyauterie ou la pompe comme support structurel de la baignoire à hydromassage. Afin d’éviter tout
endommagement de la baignoire à hydromassage, soulever celle-ci par les côtés.
Si le sous-plancher n’est pas de niveau, placer des blocs de renfort ou des supports moulés sous la
baignoire à hydromassage, si nécessaire.
Option 1: Effectuer l’installation en utilisant de la colle mastic
REMARQUE: Certains modèles sont dotés de blocs de support; d’autres modèles ont des supports
moulés.
Appliquer une quantité suffisante de colle mastic de haute qualité sur la base des blocs de support
ou des supports moulés.
Avec de l’aide, lever la baignoire à hydromassage avec précaution pour la mettre en place.
Adapter des espaceurs de 1/8″ (3 mm) maximum sous le rebord de la baignoire de manière à ce
que que le rebord n’entre pas en contact avec le tablier.
Appliquer du poids sur la cuve de la baignoire jusqu’à ce que la colle mastic durcisse.
Option 2: Installer en utilisant un lit de ciment ou de mortier
REMARQUE: Ne pas utiliser de plâtre dur ou un mélange pour cloison sèche pour cette installation, car
ces produits ne fournissent pas de scellement acceptable et durable.
Kohler Co. Français-4 1193346-2-D
Page 22

Installer la baignoire à hydromassage (cont.)
REMARQUE: Poser un film en plastique sur les sous-planchers en bois au besoin afin de prévenir une
absorption d’eau.
Placer la zone du bassin dans du ciment à maçonner de 1″ (25 mm) à 2″ (51 mm).
REMARQUE: Le support de pompe (une fois les sangles de retenue de la pompe coupées) doivent
reposer directement sur le sous-plancher. La commande de la pompe ne doit pas entrer en contact avec
le mortier.
Avec de l’aide, lever la baignoire à hydromassage avec précaution pour la mettre en place.
Adapter des espaceurs de 1/8″ (3 mm) maximum sous le rebord de la baignoire de manière à ce
que que le rebord n’entre pas en contact avec le tablier.
Appliquer du poids sur la cuve de la baignoire jusqu’à ce que le mortier durcisse.
Fixer les brides de cloutage en place (dispositifs en alcôve)
Percer un petit trou-pilote à travers la bride de cloutage de chaque montant. Utiliser des cales selon
les besoins.
Utiliser des clous galvanisés à grande tête pour fixer la bride de cloutage sur les montants.
Clouer des tasseaux de 1/4″ (6 mm) d’épaisseur sur les montants.
Couper les sangles de retenue de la pompe
IMPORTANT! Exécuter cette étape pour que la baignoire à hydromassage fonctionne plus
tranquillement.
Couper les deux sangles de retenue de la pompe situées sur la pompe à hydromassage.
REMARQUE: Ne pas soulever la pompe à un niveau supérieur à celui où elle se trouvait avant d’avoir
coupé les sangles. Si la pompe est trop élevée, elle ne s’amorcera pas correctement. S’assurer que les pieds
isolants en caoutchouc sont en place.
Installer la plomberie
Insérer la pièce de raccordement du drain dans le siphon. Fixer l’about du drain sur le siphon.
Installer la vanne de robinet.
Rechercher des fuites dans les connexions du drain.
Si applicable, installer les barres d’appui selon les instructions.
1193346-2-D Français-5 Kohler Co.
Page 23

Distance max. de 24" (610 mm)
entre la pompe et la prise
Sceller en fonction des codes applicables.
Chauffe-eau
3. Effectuer les connexions électriques – États-Unis
AVERTISSEMENT: Risque de choc électrique. S’assurer que l’alimentation a été débranchée avant
d’effectuer les procédures suivantes.
AVERTISSEMENT: Risque de choc électrique. Connecter la pompe et le chauffe-eau (si inclus) à
des prises avec mise à la terre correctement mises à la terre et protégées par des disjoncteurs de
fuite de terre (GFCI) ou des dispositifs à courant résiduel (RCD). Ne pas retirer les broches de mise
à la terre des fiches. Ne pas utiliser d’adaptateurs de mise à la terre.
Installer une seconde prise
protégée par un dispositif GFCI
pour les modèles "H" pour le
chauffe-eau en ligne.
Installer une prise mise à la terre
de 120 V, 15 A protégée par un
dispositif GFCI.
Cordon d'alimentation de 24" (610 mm)
REMARQUE: Une étiquette qui identifie le numéro de modèle et les caractéristiques électriques de la
baignoire à hydromassage est située à proximité de la pompe de la baignoire à hydromassage.
AVIS: La pompe et le chauffe-eau (si inclus) sont tous les deux munis d’un cordon et d’une fiche. Tous les
câblages du chauffe-eau ont été effectués en usine. Un électricien qualifié doit installer une prise de 120 V,
15 A mise à la terre et protégée par un disjoncteur de fuite de terre (GFCI) ou un dispositif à courant
résiduel (RCD) pour la pompe, et une autre pour le chauffe-eau. Aucune autre charge ne doit se trouver
sur ces circuits.
Installer une prise électrique dédiée à l’arrière de la baignoire à hydromassage et dans un rayon de
24″ (610 mm) du cordon d’alimentation de la pompe.
Brancher la fiche de la pompe sur cette prise.
REMARQUE: S’assurer d’attacher fermement la tubulure de l’actionneur pneumatique à la pompe, et
vérifier qu’elle n’est ni pincée ni endommagée.
Pour les appareils avec chauffe-eau, installer une deuxième prise électrique à l’arrière de la baignoire
à hydromassage et à proximité du cordon d’alimentation du chauffe-eau de 24″ (610 mm).
Brancher la fiche du chauffe-eau sur cette prise.
Kohler Co. Français-6 1193346-2-D
Page 24

Sceller en fonction des codes applicables.
Effectuer les connexions de la
boîte de jonction tel qu'illustré.
Chauffe-eau
Boîte de jonction
Fournir un collier
Neutre
de serrage adéquat.
REMARQUE:
Le modèle de pompe illustré peut
être différent du produit réel.
4. Effectuer les connexions électriques – Canada
AVERTISSEMENT: Risque de choc électrique. S’assurer que l’alimentation a été débranchée avant
d’effectuer les procédures suivantes.
AVERTISSEMENT: Risque de choc électrique. Connecter la pompe et le chauffe-eau (si inclus) à
un disjoncteur de fuite de terre (GFCI) ou à un dispositif à courant résiduel (RCD) mis à la terre de
manière appropriée. Ceci fournira une mesure de protection supplémentaire contre le risque
d’électrocution par tension phase-terre. Ne pas retirer les broches de mise à la terre des fiches. Ne
pas utiliser d’adaptateurs de mise à la terre.
Terre
Connecteurs de fils
À partir de
la pompe
Ligne
Ligne
Neutre
REMARQUE: Une étiquette qui identifie le numéro de modèle et les caractéristiques électriques de la
baignoire à hydromassage est située à proximité de la pompe de la baignoire à hydromassage.
AVIS: Si l’unité n’inclut pas de dispositif de chauffage, la pompe est munie d’un cordon et d’une prise.
Positionner et sécuriser chaque boîte de jonction fournie (si incluse) à un minimum de 1-1/2″ (38
mm) au-dessus du sous-plancher.
Les commandes de la baignoire à hydromassage et le système ont été pré-câblés en usine. Un
électricien qualifié doit faire le branchement d’entretien de routine à la boîte de jonction (si incluse).
Connecter le branchement d’entretien sur la boîte de jonction (si incluse). La boîte de jonction du
modèle 60 Hz comprend des fils de ligne (noir) et neutre (blanc) et une cosse de mise à la terre.
Un circuit dédié de 120 V, 15 A est requis pour la pompe. Un circuit dédié séparé est requis pour le
dispositif de chauffage (si inclus). Aucune autre charge ne doit se trouver sur ces circuits. Fournir un
disjoncteur de fuite de terre (GFCI) ou un dispositif à courant résiduel (RCD) de classe A.
Prévoir un conducteur de terre séparé pour la terre intérieure ou la cosse de mise à la terre. Le
conducteur ne peut pas être raccordé à un autre conducteur d’alimentation électrique.
Raccorder conformément aux codes nationaux et locaux.
1193346-2-D Français-7 Kohler Co.
Page 25

Remplir d'eau jusqu'à 2" (51 mm)
au moins au-dessus du jet le plus élevé.
Tourner la garniture
du jet dans le sens
des aiguilles d'une
montre pour
réduire le débit.
Positionner les
gicleurs des jets
pour diriger le débit
d'eau dans la
position souhaitée.
Tourner la garniture du jet dans le sens
contraire des aiguilles d'une montre pour
augmenter le débit.
5. Terminer l’installation
Effectuer un essai de fonctionnement de la baignoire à hydromassage
Remplir la baignoire à hydromassage à un niveau se trouvant à au moins 2″ (51 mm) au-dessus du
haut du jet le plus élevé.
Faire fonctionner la baignoire à hydromassage pendant 5 minutes et s’assurer qu’aucun des raccords
des tuyaux de la baignoire à hydromassage ne présente de fuites. Rechercher des fuites le long de
l’avant et des côtés de la baignoire à hydromassage, et à l’arrière de celle-ci.
Pour obtenir de l’information supplémentaire sur le fonctionnement de l’hydromassage, se reporter
à la section ″Instructions d’utilisation - Hydromassage″.
Finir l’installation
IMPORTANT! Kohler Co. recommande vivement d’utiliser du mastic d’étanchéité à la silicone,
conformément aux instructions. D’autres mastics d’étanchéité contenant une quantité de matériau de
remplissage plus élevée doivent être évités, car ils pourraient se rétrécir, se séparer,et peler au cours du
temps.
Installer le panneau mural hydrorésistant, ainsi que tous les matériaux du mur fini, du tablier, et du
plancher.
Appliquer un boudin de 1/8″ (3 mm) minimum de mastic d’étanchéité à la silicone à 100% pour
sceller toutes les zones où la baignoire à hydromassage et le mur fini ou le tablier entrent en contact.
Installer la garniture de robinet.
Nettoyer après l’installation
Lors du nettoyage après l’installation, ne pas utiliser de nettoyants abrasifs, vu que ceux-ci
risqueraient de rayer et d’abîmer la surface de la baignoire à hydromassage. Utiliser de l’eau chaude
et un détergent liquide pour nettoyer la surface de la baignoire à hydromassage.
Enlever les taches résistantes ou la peinture avec de l’essence de térébenthine ou un diluant pour
peinture. Ne pas laisser de nettoyants à base de distillats de pétrole rester en contact avec les
surfaces de la baignoire à hydromassage pendant une longue période. Retirer les résidus de plâtre
en raclant avec précaution avec un bord en bois. Ne pas utiliser de grattoirs en métal, de brosses
métalliques ou d’autres outils en métal. Utiliser un détergent en poudre sur un chiffon humide pour
fournir une action abrasive légère sur les résidus de plâtre.
Kohler Co. Français-8 1193346-2-D
Page 26

Instructions Importantes sur la sécurité
LIRE ET SUIVRE TOUTES LES INSTRUCTIONS
CONSERVER CES INSTRUCTIONS
INSTRUCTIONS RELATIVES AUX RISQUES D’INCENDIE, D’ÉLECTROCUTION OU DE BLESSURES
CORPORELLES
AVERTISSEMENT: Lors de l’utilisation de produits électriques, toujours observer les
précautions de base, notamment:
DANGER: Risque de blessures ou de noyade accidentelles Afin de réduire les risques de
blessures, ne jamais permettre à un enfant d’utiliser cet appareil sans surveillance étroite, en tout
temps.
AVERTISSEMENT: Risque de blessures. Pour éviter les blessures corporelles, entrer et sortir avec
précaution de la baignoire à hydromassage.
AVERTISSEMENT: Risque de choc électrique. Ne pas amener les appareils électriques (tels que
des sèche-cheveux, des lampes, des téléphones, des radios ou des télévisions) dans un rayon de 5’
(1,5 m) de cette baignoire à hydromassage.
AVERTISSEMENT: La consommation d’alcool, de drogues ou de médicaments peut augmenter
considérablement le risque fatal d’hyperthermie. Une immersion prolongée dans l’eau chaude
peut provoquer une hyperthermie. Une hyperthermie a lieu lorsque la température corporelle
interne atteint un niveau dépassant de plusieurs degrés la température corporelle normale de 98,6°F
(37°C). Les symptômes d’hyperthermie comprennent une hausse de la température corporelle
interne, les étourdissements, une léthargie, une somnolence et les évanouissements. Les effets de
l’hyperthermie comprennent: (a) défaut de percevoir la chaleur, (b) défaut de s’apercevoir du besoin
de sortir de la baignoire à hydromassage, (c) incapacité de reconnaître le danger, (d) dommages au
fœtus dans le cas des femmes enceintes, (e) incapacité physique de sortir de la baignoire à
hydromassage et (f) inconscience et danger conséquent de noyade.
AVERTISSEMENT: Risque d’hyperthermie. Les personnes sous médicaments et/ou qui sont en
observation médicale doivent consulter leur médecin avant d’utiliser des baignoires à hydromassage
équipées d’un chauffe-eau.
AVERTISSEMENT: Risque de préjudice corporel au fœtus. Les femmes enceintes ou qui
pourraient être enceintes doivent consulter un médecin avant d’utiliser la baignoire à
hydromassage.
AVERTISSEMENT: Risque d’hyperthermie ou de noyade. Ne pas utiliser la baignoire à
hydromassage immédiatement après des exercices physiques rigoureux.
AVERTISSEMENT: Risque d’hyperthermie ou de noyade. Une température d’eau supérieure à
100°F (38°C) peut causer des traumatismes. Vérifier et régler la température de l’eau avant
utilisation.
AVERTISSEMENT: Risque de blessures ou de noyade. Ne pas faire fonctionner cet appareil si le
dispositif de protection (couvercle) n’est pas placé par-dessus le raccord d’aspiration.
AVERTISSEMENT: Risque de blessures. Ne jamais faire tomber ou insérer un objet quelconque
dans les ouvertures.
Utiliser cette baignoire à hydromassage uniquement pour un usage tel que décrit dans ce guide. Ne pas
utiliser de dispositifs d’attache non recommandés par Kohler Co.
La baignoire à hydromassage doit être raccordée uniquement à un circuit d’alimentation qui est protégé par
un disjoncteur de fuite de terre (GFCI)*. L’installateur doit fournir un disjoncteur de fuite de terre de ce type
1193346-2-D Français-9 Kohler Co.
Page 27

Instructions Importantes sur la sécurité (cont.)
et celui-ci doit être inspecté régulièrement. Pour inspecter le disjoncteur de fuite de terre, appuyer sur le
bouton d’essai. Le disjoncteur de fuite de terre doit couper le courant. Appuyer sur le bouton de
réinitialisation. L’alimentation devrait avoir été restaurée. Si le disjoncteur de fuite de terre ne fonctionne pas
de cette manière, le disjoncteur est défectueux. Si le disjoncteur de fuite de terre interrompt l’alimentation de
courant vers la baignoire à hydromassage sans que l’on ait appuyé sur le bouton d’essai, ceci indique qu’un
courant à la terre est en train de circuler, et, par conséquent, il y a possibilité de choc électrique. Ne pas
utiliser cette baignoire à hydromassage. Débrancher la baignoire à hydromassage et la faire réviser par un
technicien qualifié avant de l’utiliser.
Purger le système de la baignoire à hydromassage deux fois par mois ou plus souvent selon la fréquence
d’usage, tel que décrit dans la section ″Purger le système″ de ce guide.
L’utilisation répétée de produits d’hygiène et de beauté contenant des huiles peut endommager les
composants en plastique de la baignoire à hydromassage. Éviter d’utiliser des huiles de bain.
L’action de massage de la baignoire à hydromassage peut considérablement faire mousser les produits de
bain moussant, le savon, les shampoings, ou les huiles pour le bain, même de petite quantité. Pour cette
raison, veiller à ne pas utiliser ces produits pendant le fonctionnement de la baignoire à hydromassage.
Votre nouvelle baignoire à hydromassage KOHLER a été homologuée par l’Underwriter’s Laboratories,
assurant ainsi votre sécurité et celle de votre famille. Cette baignoire à hydromassage est aussi conforme aux
normes sévères de l’ANSI et de l’IAPMO établies pour l’industrie de la plomberie.
* Hors de l’Amérique du Nord, ce dispositif peut être connu sous le nom de dispositif à courant résiduel
(RCD).
Kohler Co. Français-10 1193346-2-D
Page 28

Remplir d'eau jusqu'à 2" (51 mm)
au moins au-dessus du jet le plus élevé.
Tourner la garniture
du jet dans le sens
des aiguilles d'une
montre pour
réduire le débit.
Positionner les
gicleurs des jets
pour diriger le débit
d'eau dans la
position souhaitée.
Tourner la garniture du jet dans le sens
contraire des aiguilles d'une montre pour
augmenter le débit.
Instructions d’utilisation
REMARQUE: La température de l’eau de la baignoire à hydromassage ne doit pas dépasser 104°F (40°C).
Fermer le drain, puis remplir la baignoire à hydromassage à au moins 2” (51 mm) au-dessus du jet
le plus élevé.
Utiliser la main pour tester la température de l’eau pour le confort et la sécurité, puis entrer
doucement dans la baignoire à hydromassage.
Appuyer sur le commutateur de débit d’air pour mettre la pompe en marche.
REMARQUE: S’il est présent, le chauffe-eau se met automatiquement en marche.
Ajuster les jets pour un mélange optimal de l’eau et de l’air. Tourner les bagues de garniture des jets
dans le sens des aiguilles d’une montre pour réduire le débit, ou dans le sens contraire des aiguilles
d’une montre pour augmenter le débit. Orienter les gicleurs des jets pour diriger le débit d’eau dans
la position souhaitée.
Appuyer sur le commutateur de débit d’air une deuxième fois pour arrêter la pompe.
Sortir avec précaution de la baignoire à hydromassage, puis ouvrir le drain pour la vider de son
eau.
REMARQUE: Si la baignoire ne fonctionne pas correctement, se référer à la section ″Procédures de
dépannage″.
Entretien et nettoyage
Pour obtenir les meilleurs résultats possibles, prendre ce qui suit en considération lors de l’entretien de votre
produit KOHLER:
•
Toujours tester la solution de nettoyage sur une surface non visible avant de l’appliquer sur
l’ensemble de la surface.
•
Essuyer les surfaces et rincer complètement avec de l’eau immédiatement après l’application du
nettoyant. Rincer et sécher tout éclaboussement sur les surfaces avoisinantes.
•
Ne pas laisser les nettoyants tremper sur les surfaces.
•
Utiliser une éponge ou un chiffon doux et humide. Ne jamais utiliser de matériau abrasif tel qu’une
brosse ou une éponge à récurer pour nettoyer les surfaces.
Pour obtenir des renseignements détaillés sur le nettoyage et les produits à considérer, consulter le site
www.kohler.com/clean. Pour commander des renseignements sur& le nettoyage, appeler le 1-800-456-4537.
1193346-2-D Français-11 Kohler Co.
Page 29

Purger le système
REMARQUE: Purger le système d’hydromassage deux fois par mois ou plus, selon la fréquence
d’utilisation.
Tourner les bagues de garniture des jets complètement dans le sens des aiguilles d’une montre pour
réduire l’induction d’air.
Remplir la baignoire à hydromassage d’eau chaude à au moins 2″ (51 mm) au-dessus du jet le plus
élevé.
Ajouter à l’eau 2 petites cuillères (10 ml) d’un détergent en poudre pour lave-vaisselle automatique
peu moussant et 20 onces (590 ml) d’eau de javel domestique (5% à 6% d’hypochlorite de sodium).
Faire fonctionner la baignoire à hydromassage pendant5à10minutes. Arrêter la baignoire à
hydromassage et purger.
Si souhaité, rincer les surfaces de la baignoire avec de l’eau.
Rincer les surfaces des jets, le robinet, les barres d’appui et le drain, et les sécher avec un chiffon
doux.
Kohler Co. Français-12 1193346-2-D
Page 30

Retirer les jets
Insérer le crochet de l'outil comme sur l'illustration et
tirer sur le jet pour le faire sortir de son logement.
Le jet doit être tourné vers le haut lorsque ceci
est effectué.
Réinstaller les jets
Logement
Inspecter et lubrifier
le joint torique.
Faire glisser le joint
torique sur le premier
épaulement du jet.
Insérer le jet dans son logement, et pousser
légèrement et tourner jusqu'à ce qu'il
s'enclenche en place.
Dépannage
AVIS: Cette section est seulement destinée à une aide générale. Un représentant du service agréé
Kohler Co. ou un électricien qualifié doit rectifier tous les problèmes électriques. Pour un service de
garantie, appeler le 1-800-4KOHLER à partir des É.-U. et du Canada, ou le 001-800-456-4537 à partir du
Mexique.
Pour tout renseignement sur les pièces de rechange, visiter la page du produit sur le site www.kohler.com.
Retirer les jets
REMARQUE: Un outil spécial est fourni avec les jets de remplacement pour permettre de retirer les
anciens jets de la baignoire à hydromassage. Cet outil est aussi fourni avec chaque kit de garniture.
Positionner le gicleur à sphère du jet de façon à ce qu’il pointe vers le haut.
Insérer l’outil d’extraction, avec son côté crochet vers le haut dans l’ouverture du jet et accrocher la
partie supérieure intérieure du gicleur.
Tenir l’outil fermement et placer le pouce contre le mur de la baignoire à hydromassage. Tirer de
manière uniforme sur l’outil jusqu’à ce que l’ensemble du jet sorte du trou. Faire attention à ne pas
perdre le joint torique.
Réinstaller les jets
REMARQUE: Pour permettre une rotation aisée et un bon fonctionnement des jets, le joint torique doit
être: (1) placé correctement, (2) lubrifié, et (3) en bon état.
Poser le joint torique sur le premier épaulement du jet.
Lubrifier le joint torique avec le paquet de lubrifiant à la silicone (fourni), afin d’éviter un
fonctionnement bruyant du jet.
Insérer délicatement le jet dans le logement, puis pousser légèrement sur le jet et tourner celui-ci
jusqu’à ce qu’il s’enclenche en place. Ne pas forcer le jet.
Vérifier que le jet est installé correctement. Le jet devrait pouvoir tourner sans difficulté dans le sens
des aiguilles d’une montre, et dans le sens contraire. Retirer et réinstaller si nécessaire.
1193346-2-D Français-13 Kohler Co.
Page 31

Dépannage (cont.)
Symptômes Causes probables Action recommandée
1. L’hydromassage ne
démarre pas ou ne
s’arrête pas.
2. Le moteur démarre,
certains jets ne
fonctionnent pas.
3. La pompe ne s’amorce
pas.
4. Fonctionnement bruyant. A. Les sangles de retenue de la
5. Le chauffe-eau ne
fonctionne pas. (Modèles
“H” seulement)
A. Moteur non alimenté. A. Vérifier que la pompe et que le
B. Le tuyau d’air est desserré ou
déconnecté.
C. Le tuyau d’air est pincé ou
déformé.
D. L’ensemble du bouton-poussoir
est endommagé.
E. De la graisse est présente dans la
zone de purge du
bouton-poussoir.
F. Le tuyau d’air est endommagé. F. Remplacer le tuyau d’air.
G. Le moteur/la pompe ne
fonctionne pas.
A. Jet fermé. A. Tourner la bague de garniture du
B. Le jet n’est pas installé
correctement.
C. Jets obstrués. C. Éliminer l’obstruction.
A. Pompe placée trop haut. A. Abaisser la bride de support de
pompe n’ont pas été coupées.
(Modèles avec des blocs de
support uniquement.)
B. Le joint torique est délogé. B. Retirer le jet, remplacer et
A. Chauffe-eau non alimenté. A. Réinitialiser le GFCI ou le RCD.
B. La température de l’eau dépasse
104°F (40°C).
C. Le chauffe-eau ne fonctionne pas. C. Remplacer le chauffe-eau.
chauffe-eau sont branchés et que
le disjoncteur de fuite de terre
(GFCI) ou le dispositif à courant
différentiel (RCD) sont dans la
position correcte. Brancher ou
réinitialiser le dispositif
GFCI/RCD selon les besoins.
B. Vérifier que le tuyau est connecté
aux deux extrémités
receveur/pompe et au
commutateur de débit d’air.
Reconnecter si nécessaire.
C. Ajuster le tuyau pour dégager la
zone pincée/déformée. Si la
tubulure est pincée/déformée et
si elle ne peut être réajustée, ou
si aucun pincement/aucune
déformation évidents ne sont
apparents, percer un petit trou
dans la tubulure avec une
punaise et essayer de nouveau le
système.
D. Remplacer l’ensemble du
bouton-poussoir.
E. Désassembler l’ensemble du
bouton-poussoir et essuyer tout
excès de graisse. Réassembler le
bouton et réessayer de faire
fonctionner le système.
G. Remplacer le moteur/la pompe.
jet dans le sens antihoraire pour
ouvrir.
B. Réinstaller le jet; vérifier l’état du
joint torique.
la pompe.
A. Couper les sangles de retenue de
la pompe avec des cisailles de
ferblantier.
lubrifier le joint torique et
réinstaller le jet.
B. Laisser l’eau se refroidir et le
chauffe-eau redémarrera.
Kohler Co. Français-14 1193346-2-D
Page 32

Garantie
GARANTIE LIMITÉE D’UN AN
Les produits de plomberie KOHLER sont garantis contre tout vice de matériau et de fabrication pendant un
an à partir de la date de l’installation.
Si un vice est découvert au cours d’une utilisation normale, Kohler Co. choisira, à sa discrétion, la réparation,
le remplacement ou la rectification appropriée après inspection desdits vices par Kohler Co. pendant un (1)
an à partir de la date d’installation. Kohler Co. n’est pas responsable des frais d’enlèvement ou d’installation.
L’utilisation de nettoyants à l’intérieur du réservoir annule la garantie.
Pour obtenir le service de garantie, contacter Kohler Co., par l’intermédiaire du vendeur, plombier, centre de
rénovation ou revendeur par internet, ou bien par écrit à l’adresse suivante Kohler Co., Attn.: Customer Care
Center, 444 Highland Drive, Kohler, WI 53044, USA, ou appeler le 1-800-4-KOHLER (1-800-456-4537) à partir
des É.-U. et du Canada, et le 001-800-456-4537 à partir du Mexique, ou consulter le site www.kohler.com aux
É.-U., www.ca.kohler.com à partir du Canada, ou www.mx.kohler.com au Mexique.
LES GARANTIES TACITES, Y COMPRIS CELLES DE COMMERCIALITÉ ET D’ADAPTATION À UN
USAGE PARTICULIER, SONT EXPRESSÉMENT LIMITÉE À LA DURÉE DE LA PRÉSENTE GARANTIE.
KOHLER CO. ET/OU LE REVENDEUR DÉCLINENT TOUTE RESPONSABILITÉ CONTRE LES
DOMMAGES PARTICULIERS, ACCESSOIRES OU INDIRECTS. Certains états et provinces ne permettent
pas de limite sur la durée de la garantie tacite, ni l’exclusion ou la limite des dommages particuliers,
accessoires ou indirects, et, par conséquent, lesdites limites et exclusions peuvent ne pas s’appliquer à votre
cas. Cette garantie vous donne des droits juridiques particuliers. Vous pouvez également avoir d’autres droits
qui varient d’un état ou d’une province à l’autre.
Ceci constitue la garantie écrite exclusive de Kohler Co.
1193346-2-D Français-15 Kohler Co.
Page 33
Guía de instalación y cuidado
Bañera de hidromasaje
Instrucciones de instalación
ADVERTENCIA: Al usar aparatos eléctricos siempre cumpla las precauciones básicas, como las
siguientes:
PELIGRO: Riesgo de sacudidas eléctricas. Solamente conecte a un circuito protegido por un
interruptor de circuito con pérdida a tierra (GFCI)*.
El material de construcción y el cableado se deben colocar lejos del cuerpo de la bomba y de otros
componentes que producen calor.
Instale de manera que quede acceso para dar servicio.
El compartimiento de cables incluye un conector a presión marcado ″Earth/Ground″ (tierra). Para reducir el
riesgo de que se produzca una sacudida eléctrica, conecte este conector al terminal de tierra de su tablero
eléctrico o al panel de suministro eléctrico con un cable de cobre del tamaño equivalente al conductor del
circuito que alimenta este equipo.
Se incluyen conectores a presión en el exterior de la caja de empalmes o del control dentro de esta unidad
para permitir la conexión de un conductor equipotencial entre esta unidad y todo el metal expuesto en la
cercanía, lo que sea necesario para cumplir requisitos locales.
Se requiere conexión a tierra. Un representante autorizado de servicio debe instalar esta unidad y conectarla
a tierra.
ADVERTENCIA: Riesgo de lesiones personales o de daños a la propiedad. Antes de comenzar la
instalación, lea atentamente todas las instrucciones además de los requisitos detallados a
continuación.
ADVERTENCIA: Riesgo de sacudidas eléctricas. Un electricista calificado debe hacer todas las
conexiones eléctricas.
ADVERTENCIA: Riesgo de sacudidas eléctricas. Desconecte el suministro eléctrico antes de dar
servicio.
AVISO: Cumpla todos los códigos locales de electricidad y de plomería. En Canadá, instale la unidad
conforme al Código Eléctrico Canadiense, Parte 1.
*Fuera de Estados Unidos es posible que este dispositivo se conozca como dispositivo de corriente residual
(RCD, por sus siglas en inglés).
Información sobre el producto
Requisitos eléctricos
La instalación debe contar con un interruptor de circuito con pérdida a tierra (GFCI)* de Clase A. El
interruptor GFCI protege contra el peligro de sacudida eléctrica de línea a tierra. Utilice un circuito
dedicado de 120 V, 15 A y 60 Hz para la bañera de hidromasaje.
Los modelos ″H″ requieren un circuito dedicado de 120 V, 15 A y 60 Hz para el calentador.
Si el cable eléctrico de la bomba está dañado, debe ser reemplazado por el fabricante, un agente de servicio
autorizado por el fabricante o personas igualmente calificadas para así evitar un peligro. El cable eléctrico del
calentador no se puede reemplazar. Si el cable eléctrico del calentador está dañado, el calentador se debe
reemplazar.
Kohler Co. Español-1 1193346-2-D
Page 34

Información sobre el producto (cont.)
*Fuera de Estados Unidos es posible que este dispositivo se conozca como dispositivo de corriente residual
(RCD, por sus siglas en inglés).
Avisos sobre el producto
ADVERTENCIA: Las modificaciones no autorizadas pueden causar que la bañera de
hidromasaje funcione de manera peligrosa y que tenga bajo rendimiento. No cambie la ubicación
de la bomba de la bañera de hidromasaje, ni haga otras modificaciones en el sistema de
hidromasaje, ya que esto podría tener un efecto adverso en el rendimiento y en el funcionamiento
seguro de la bañera de hidromasaje. Kohler Co. no será responsable bajo su garantía, o de ninguna
otra forma, de lesiones personales o daños provocados por modificaciones no autorizadas.
Características
Los componentes instalados en la fábrica incluyen una bomba con cable de suministro eléctrico y un
transmisor de interruptor de aire.
Los modelos ″H″ también vienen equipados con un calentador ensamblado en fábrica.
La bomba y las tuberías de la bañera de hidromasaje están ensambladas en fábrica.
Herramientas y materiales
Sellador 100% de silicona
Más:
• Herramientas y materiales
convencionales de carpintería
• Lona
• Adhesivo de construcción (opcional)
• Cemento* o mortero (opcional)
• Postes de madera de 2x4
• Película plástica (opcional)
• Espaciadores de 1/8"(3 mm)
* No utilice cemento de yeso.
1193346-2-D Español-2 Kohler Co.
Page 35

Encajonado entre tres paredes De sobreponer
Coloque las
tuberías de plomería.
Coloque las
tuberías de plomería.
Construya una estructura
de postes de madera
de 2x4 según las
dimensiones del producto.
Construya según
las dimensiones del producto.
Panel de
acceso
Verifique que el subpiso
proporcione suficiente
soporte y que esté plano y a nivel.
Verifique que el subpiso
proporcione suficiente soporte
y que esté plano y a nivel.
1. Prepare el sitio
AVISO: Mida su producto para preparar el lugar. Fíjese en el número de modelo ubicado en la bomba de
la bañera de hidromasaje, y luego visite la página del producto en kohler.com para obtener información
adicional.
AVISO: Deje amplio acceso sin restricciones a la bomba. Debe dejar acceso para dar servicio a la bomba.
El acceso se debe dejar justo al lado de la bomba.
AVISO: No levante la bañera de hidromasaje por los tubos o por la bomba, ni use los tubos ni la bomba
como soporte estructural de la bañera de hidromasaje. Para evitar causar daños a la bañera de
hidromasaje, levántela por los lados.
AVISO: No apoye el peso de la bañera de hidromasaje sobre el reborde. Planee instalar cuñas bajo la
bañera cuando sea necesario para nivelarla.
NOTA: De acuerdo al producto elegido es posible realizar una instalación de sobreponer, encajonada entre
tres paredes o en esquina.
Antes de la instalación, saque las piezas de la caja y revise que la bañera de hidromasaje nueva no
presente daños. Si la bañera de hidromasaje presenta daños, no la instale; comuníquese con su
distribuidor.
Asegúrese de que el piso ofrezca suficiente soporte para su bañera de hidromasaje, y verifique que
el subpiso esté plano y nivelado.
Construya una estructura de postes de madera de 2x4.
Instale un panel de acceso para dar servicio futuro a la bomba. Este panel de acceso debe tener por
lo menos 30″ (762 mm) de ancho y 15″ (381 mm) de alto.
Instale el tendido de plomería.
Instale el desagüe en la bañera de hidromasaje de acuerdo a las instrucciones del fabricante del
desagüe.
Proteja la superficie de la bañera de hidromasaje colocando una lona limpia en el fondo.
Kohler Co. Español-3 1193346-2-D
Page 36

Opción 1
Aplique adhesivo
de construcción.
Opción 2
Limpie el espacio para la bomba.
Capa de cemento o
mortero
Instalaciones de encajonado
entre tres paredes o en esquina
Corte las cintas flejadoras
que sujetan la bomba
Taladre un orificio
pequeño a través del
reborde de clavado
a la altura de cada
Bloques de soporte
Listón de
enrasar
Poste de
madera
Clavo
poste.
Cintas flejadoras
2. Instale la bañera de hidromasaje
¡IMPORTANTE! Use espaciadores con un máximo de 1/8″ (3 mm) de espesor bajo el reborde de la
bañera para asegurar que el reborde no haga contacto con la cubierta.
AVISO: No levante la bañera de hidromasaje por los tubos o por la bomba, ni use los tubos ni la bomba
como soporte estructural de la bañera de hidromasaje. Para evitar causar daños a la bañera de
hidromasaje, levántela por los lados.
Si el subpiso no está nivelado, acuñe los bloques de soporte o los soportes moldeados de la bañera
de hidromasaje según sea necesario.
Opción 1: Instale con adhesivo de construcción
NOTA: Algunos modelos vienen con bloques de soporte; algunos modelos tienen soportes moldeados.
Aplique una cantidad abundante de adhesivo de construcción de alta calidad en la parte inferior de
los bloques de soporte o de los soportes moldeados.
Con ayuda, coloque con cuidado la bañera de hidromasaje en su lugar.
Use espaciadores de un máximo de 1/8″ (3 mm) bajo el reborde de la bañera de manera que el
reborde no haga contacto con la cubierta.
Ponga peso en el fondo de la bañera hasta que el adhesivo cure.
Opción 2: Instale con una capa de cemento o mortero
NOTA: No utilice cemento de yeso o pasta para paneles de yeso con esta aplicación, puesto que no se
produce adherencia aceptable ni duradera.
1193346-2-D Español-4 Kohler Co.
Page 37

Instale la bañera de hidromasaje (cont.)
NOTA: Si lo desea, puede colocar una película plástica sobre subpisos de madera para evitar la absorción
de humedad.
Coloque el área del fondo en una capa de cemento mortero de 1″ (25 mm) a 2″ (51 mm).
NOTA: El soporte de la bomba (cuando se cortan las cintas flejadoras de la bomba) debe descansar
directamente sobre el subpiso. El control de la bomba no debe entrar en contacto con el mortero.
Con ayuda, coloque con cuidado la bañera de hidromasaje en su lugar.
Use espaciadores de un máximo de 1/8″ (3 mm) bajo el reborde de la bañera de manera que el
reborde no haga contacto con la cubierta.
Ponga peso en el fondo de la bañera hasta que el cemento mortero cure.
Fije las pestañas para clavar (unidades para encajonado entre tres paredes)
Taladre un pequeño orificio guía a través de la pestaña para clavar en cada poste de madera.
Agregue cuñas según sea necesario.
Utilice clavos galvanizados de cabeza grande para fijar la pestaña para clavar a los postes.
Clave listones de enrasar de 1/4″ (6 mm) a los postes.
Corte las cintas flejadoras que sujetan la bomba
¡IMPORTANTE! Realice este paso para que la bañera de hidromasaje funcione más silenciosamente.
Corte las dos cintas flejadoras de la bomba en la bañera de hidromasaje.
NOTA: No suba la bomba más arriba de lo que estaba antes de cortar las cintas metálicas. Si la bomba
está demasiado alta, no cebará correctamente. Asegúrese de que las patas aislantes de goma estén en su
lugar.
Instale la plomería
Introduzca el tubo final de desagüe en la trampa. Fije el tubo final de desagüe a la trampa.
Instale la válvula de la grifería.
Revise que no haya fugas en las conexiones de desagüe.
Si se requiere, instale las agarraderas según las instrucciones.
Kohler Co. Español-5 1193346-2-D
Page 38

Distancia máx. de 24" (610 mm)
entre la bomba y el tomacorriente
Cumpla con los
códigos correspondientes.
Calentador
3. Realice las conexiones eléctricas – EE.UU.
ADVERTENCIA: Riesgo de sacudidas eléctricas. Asegúrese de desconectar la corriente eléctrica
antes de realizar los siguientes procedimientos.
ADVERTENCIA: Riesgo de sacudidas eléctricas. Conecte la bomba y el calentador (si provisto) a
un tomacorriente con conexión a tierra que tenga protección mediante un interruptor de circuito
con pérdida a tierra (GFCI) o dispositivo de corriente residual (RCD). No retire las clavijas de
conexión a tierra de los enchufes. No utilice adaptadores de conexión a tierra.
Instale un segundo tomacorriente
protegido por un interruptor GFCI
para el calentador en línea de
los modelos "H".
Instale un tomacorriente conectado
a tierra, de 120 V y 15 A, protegido
con un interruptor GFCI.
Cable eléctrico de 24" (610 mm)
NOTA: Una etiqueta que identifica el número de modelo y la capacidad nominal eléctrica de la bañera de
hidromasaje se encuentra cerca de la bomba de hidromasaje.
AVISO: La bomba y el calentador (si provisto) están equipados con un cable y un enchufe. Todo el
cableado del calentador se ha realizado en fábrica. Un electricista calificado debe instalar un tomacorriente
conectado a tierra de 120 V, 15 A, protegido por un GFCI o RCD para la bomba y otro para el calentador.
El circuito no debe tener ninguna otra carga.
Instale un tomacorriente eléctrico dedicado detrás de la bañera de hidromasaje, y al alcance del
cable de suministro eléctrico de la bomba de 24″ (610 mm).
Enchufe la bomba en este tomacorriente.
NOTA: Asegúrese de que el tubo del accionador de aire esté bien conectado a la bomba y que no esté
doblado ni dañado.
Para unidades con calentadores, instale un segundo tomacorriente eléctrico detrás de la bañera de
hidromasaje, y al alcance del cable eléctrico del calentador de 24″ (610 mm).
Enchufe el calentador en este tomacorriente.
1193346-2-D Español-6 Kohler Co.
Page 39

Cumpla con los códigos correspondientes.
Calentador
Tierra
Neutro
Cablee la caja de
empalmes como se muestra.
Conectores
de cable
Desde la bomba
Caja de empalmes
Provea un
mecanismo de
Línea
Línea
Neutro
protección contra
los tirones adecuado.
NOTA:
Es posible que el modelo de bomba ilustrado sea
diferente al producto que haya adquirido.
4. Realice las conexiones eléctricas – Canadá
ADVERTENCIA: Riesgo de sacudidas eléctricas. Asegúrese de desconectar la corriente eléctrica
antes de realizar los siguientes procedimientos.
ADVERTENCIA: Riesgo de sacudidas eléctricas. Conecte la bomba y el calentador (si provisto) a
un interruptor, con conexión a tierra, de circuito con pérdida a tierra (GFCI) o dispositivo de
corriente residual (RCD). Esto sirve de protección adicional contra el peligro de sacudida eléctrica
de línea a tierra. No retire las clavijas de conexión a tierra de los enchufes. No utilice adaptadores
de conexión a tierra.
NOTA: Una etiqueta que identifica el número de modelo y la capacidad nominal eléctrica de la bañera de
hidromasaje se encuentra cerca de la bomba de hidromasaje.
AVISO: Si la unidad no incluye un calentador, la bomba está equipada con un cable y un enchufe.
Ubique y fije cada caja de empalmes provista (si se incluyen) a un mínimo de 1-1/2″ (38 mm) arriba
del subpiso.
El cableado de los controles y del sistema de la bañera de hidromasaje se ha realizado en la fábrica.
Un electricista calificado debe realizar las conexiones eléctricas a la caja de empalmes (si se incluye).
Conecte el servicio eléctrico a la caja de empalmes (si se incluye). La caja de empalmes de 60 Hz
tiene cables de corriente de línea (negro) y neutro (blanco), y una lengüeta de conexión a tierra.
Se requiere un circuito dedicado de 120 V, 15 A para la bomba. Se requiere un circuito dedicado
independiente para el calentador (si se incluye). El circuito no debe tener ninguna otra carga. Provea
un GFCI Clase A o RCD.
Provea un conductor de conexión a tierra del equipo por separado para la lengüeta de conexión a
tierra o tierra interior. El conductor no debe estar conectado a ningún otro conductor portador de
corriente.
Haga conexiones equipotenciales de acuerdo a los códigos nacionales y locales.
Kohler Co. Español-7 1193346-2-D
Page 40

Llene de agua al menos 2" (51 mm)
arriba del jet más alto.
Gire el anillo decorativo
de los jets hacia la
derecha para
disminuir el flujo.
Gire el anillo decorativo de los jets hacia
la izquierda para aumentar el flujo.
Oriente las boquillas
de los jets para
dirigir el flujo
de agua en la
dirección deseada.
5. Termine de hacer la instalación
Pruebe el funcionamiento de la bañera de hidromasaje
Llene la bañera de hidromasaje a un nivel de por lo menos 2″ (51 mm) arriba del jet más alto.
Deje funcionar la bañera de hidromasaje durante 5 minutos y revise que no haya fugas en las
conexiones de todas las tuberías de la bañera de hidromasaje. Verifique que no haya fugas a lo largo
del frente, los lados y la parte posterior de la bañera de hidromasaje.
Para obtener información adicional sobre el funcionamiento de la bañera de hidromasaje, consulte la
sección ″Instrucciones de funcionamiento - Bañera de hidromasaje″.
Termine de hacer la instalación
¡IMPORTANTE! Kohler Co. Recomienda enfáticamente el uso de sellador 100 % de silicona, como se
indica. Debe evitarse el uso de otros selladores con alto contenido de relleno, ya que pueden encogerse,
separarse o despegarse al paso del tiempo
Instale panel de yeso impermeable y todos los materiales de acabado de la pared, la cubierta y el
piso.
Aplique un hilo continuo de un mínimo de 1/8″ (3 mm) de sellador 100 % de silicona para sellar
todos los lugares donde hace contacto la bañera de hidromasaje con la pared acabada o con la
cubierta.
Instale la guarnición de la grifería.
Limpieza después de la instalación
Al limpiar después de la instalación, no utilice productos de limpieza abrasivos pues pueden rayar
y opacar la superficie de la bañera de hidromasaje. Utilice agua tibia y detergente líquido para
limpiar la superficie de la bañera de hidromasaje.
Limpie las manchas difíciles de quitar o la pintura, con aguarrás o con diluyente de pintura. No
permita que los productos de limpieza que contengan destilados de petróleo permanezcan en
contacto con la superficie de la bañera de hidromasaje durante periodos prolongados. Para retirar
el yeso, raspe con cuidado con un canto de madera. No utilice raspadores de metal, cepillos de
alambre ni otras herramientas metálicas. Se puede utilizar detergente en polvo con un trapo
húmedo para ejercer una acción abrasiva suave en los residuos de yeso.
Instrucciones importantes de seguridad
LEA Y SIGA TODAS LAS INSTRUCCIONES
1193346-2-D Español-8 Kohler Co.
Page 41

Instrucciones importantes de seguridad (cont.)
GUARDE ESTAS INSTRUCCIONES
INSTRUCCIONES RELATIVAS A LOS RIESGOS DE INCENDIO, SACUDIDA ELÉCTRICA O
LESIONES PERSONALES
ADVERTENCIA: Al usar aparatos eléctricos siempre cumpla las precauciones básicas, como las
siguientes:
PELIGRO: Riesgo de lesiones personales o ahogamiento. Para reducir el riesgo de lesiones, no
permita que los niños usen este producto sin supervisión estricta en todo momento.
ADVERTENCIA: Riesgo de lesiones personales. Para evitar lesiones, tenga cuidado al entrar y al
salir de la bañera de hidromasaje.
ADVERTENCIA: Riesgo de sacudidas eléctricas. No coloque aparatos eléctricos (como secador de
pelo, lámparas, teléfono, radio o televisión) a menos de 5’ (1,5 m) de esta bañera de hidromasaje.
ADVERTENCIA: El uso de alcohol, drogas o medicamentos puede aumentar enormemente el
riesgo de sufrir hipertermia fatal. La inmersión prolongada en agua caliente puede producir
hipertermia. Ocurre hipertermia cuando la temperatura interna del cuerpo alcanza un nivel varios
grados más arriba de la temperatura corporal normal de 98,6°F (37°C). Los síntomas de hipertermia
incluyen aumento de temperatura corporal interna, mareos, letargo, somnolencia y desfallecimiento.
Los efectos de hipertermia incluyen: (a) incapacidad para percibir calor, (b) incapacidad para
reconocer la necesidad de salir de la bañera de hidromasaje, (c) inconsciencia de un peligro
inminente, (d) daño al feto en mujeres embarazadas, (e) inhabilidad física para salir de la bañera de
hidromasaje y (f) pérdida del conocimiento con peligro de ahogarse.
ADVERTENCIA: Riesgo de hipertermia. Las personas bajo tratamiento médico o que padezcan de
alguna condición médica deben consultar a un médico antes de utilizar una bañera de hidromasaje
equipada con un calentador.
ADVERTENCIA: Riesgo de lesiones mortales. Las mujeres embarazadas o que posiblemente estén
embarazadas deben consultar a un médico antes de usar la bañera de hidromasaje.
ADVERTENCIA: Riesgo de hipertermia o ahogamiento. No utilice la bañera de hidromasaje
inmediatamente después de hacer ejercicio.
ADVERTENCIA: Riesgo de hipertermia o ahogamiento. La temperatura del agua superior a 100°F
(38°C) puede causar lesiones. Pruebe y ajuste la temperatura del agua antes de usar la bañera.
ADVERTENCIA: Riesgo de lesiones personales o ahogamiento. No permita que esta unidad
funcione sin la guarda (tapa) en el conector de succión.
ADVERTENCIA: Riesgo de lesiones personales. No deje caer ni introduzca objetos en ninguna de
las aberturas.
Use esta bañera de hidromasaje únicamente con el fin para el que se ha fabricado, tal como se explica en esta
guía. No use equipos adicionales que no recomiende Kohler Co.
La bañera de hidromasaje se debe conectar a un circuito protegido por un interruptor de circuito con pérdida
a tierra (GFCI)*. El instalador debe suministrar dicho interruptor GFCI, cuyo funcionamiento debe probarse
en forma rutinaria. Para probar el GFCI, oprima el botón de prueba. El GFCI debe interrumpir el suministro
eléctrico. Oprima el botón de restablecer (Reset). Esto debe restablecer el suministro eléctrico. Si el GFCI no
funciona de esta manera, significa que está averiado. Si el GFCI interrumpe la alimentación eléctrica a la
bañera de hidromasaje sin haber activado el botón de prueba, significa que existe corriente a tierra,
indicando la posibilidad de una sacudida eléctrica. No utilice esta bañera de hidromasaje. Desconecte la
bañera de hidromasaje y, antes de usarla, haga que un representante de servicio autorizado solucione el
problema.
Kohler Co. Español-9 1193346-2-D
Page 42

Instrucciones importantes de seguridad (cont.)
Limpie el sistema de hidromasaje dos o más veces al mes, de acuerdo al uso, tal como se describe en la
sección ″Haga circular agua para limpiar el sistema″ de esta guía.
El uso constante de productos de higiene personal que contengan aceites puede dañar los componentes
plásticos de la bañera de hidromasaje. Evite el uso de aceites de baño.
La acción del hidromasaje puede hacer que una pequeña cantidad de líquidos para hacer burbujas, champú,
jabón o aceite de baño, espume en exceso. Por esta razón, no utilice estos productos durante el
funcionamiento de la bañera de hidromasaje.
Su nueva bañera de hidromasaje KOHLER está incluida en la lista de Underwriter’s Laboratories,
asegurando así su seguridad y la de su familia. Asimismo, esta bañera de hidromasaje cumple las estrictas
normas del ANSI y de IAPMO establecidas dentro de la industria de plomería.
*Fuera de Estados Unidos es posible que este dispositivo se conozca como dispositivo de corriente residual
(RCD, por sus siglas en inglés).
1193346-2-D Español-10 Kohler Co.
Page 43

Llene de agua al menos 2" (51 mm)
arriba del jet más alto.
Gire el anillo decorativo
de los jets hacia la
derecha para
disminuir el flujo.
Gire el anillo decorativo de los jets hacia
la izquierda para aumentar el flujo.
Oriente las boquillas
de los jets para
dirigir el flujo
de agua en la
dirección deseada.
Instrucciones de funcionamiento
NOTA: La temperatura del agua en la bañera de hidromasaje nunca debe exceder de 104°F (40°C).
Cierre el desagüe, luego llene la bañera de hidromasaje por lo menos 2” (51 mm) arriba del jet más
alto.
Pruebe la temperatura del agua con la mano para su confort y seguridad, luego entre con cuidado a
la bañera de hidromasaje.
Oprima el interruptor de aire para encender la bomba.
NOTA: El calentador, si está equipado, se encenderá automáticamente.
Ajuste los jets para obtener una mezcla óptima de aire/agua. Gire los anillos decorativos del jet
hacia la derecha para reducir el flujo o hacia la izquierda para aumentarlo. Oriente las boquillas de
los jets para dirigir el flujo de agua en la dirección deseada.
Oprima el interruptor de aire por segunda vez para apagar la bomba.
Salga con cuidado de la bañera de hidromasaje, luego abra el desagüe para vaciar el agua.
NOTA: Si la bañera de hidromasaje no funciona correctamente, consulte la sección ″Procedimientos para
resolver problemas″.
Cuidado y limpieza
Para obtener los mejores resultados, tenga presente lo siguiente al limpiar su producto KOHLER:
•
Siempre pruebe la solución de limpieza en un área oculta antes de aplicarla a toda la superficie.
•
Limpie con un paño las superficies, y enjuague con agua de forma completa e inmediata después de
haber aplicado algún limpiador. Enjuague y seque las superficies cercanas que hayan recibido
salpicaduras.
•
No deje mucho tiempo los limpiadores en las superficies.
•
Utilice una esponja humedecida, o un paño suave y húmedo. Para limpiar las superficies nunca
utilice materiales abrasivos, como cepillos o estropajos de tallar.
Para obtener información detallada de limpieza y de productos a considerar, visite www.kohler.com/clean.
Para solicitar información sobre el cuidado y la limpieza, llame al 1-800-456-4537.
Haga circular agua para limpiar el sistema
NOTA: Limpie el sistema de hidromasaje dos o más veces al mes, de acuerdo al uso.
Gire los anillos decorativos de los jets completamente hacia la derecha para reducir la inducción de
aire.
Kohler Co. Español-11 1193346-2-D
Page 44

Haga circular agua para limpiar el sistema (cont.)
Llene la bañera de hidromasaje con agua caliente a un nivel por lo menos 2″ (51 mm) arriba del jet
más alto.
Añada al agua 2 cucharaditas (10 ml) de detergente para lavaplatos automático que produzca poca
espuma y 20 onzas (590 ml) de blanqueador para uso doméstico (hipoclorito de sodio al5%a6%).
Haga funcionar la bañera de hidromasaje de5a10minutos. Apague la bañera de hidromasaje y
vacíela.
Si lo desea, enjuague las superficies de la bañera con agua.
Enjuague las superficies de los jets, la grifería, las agarraderas y el desagüe y seque con un paño
suave.
1193346-2-D Español-12 Kohler Co.
Page 45

Retire los jets
Vuelva a instalar los jets
Inserte el gancho de la herramienta tal como se ilustra,
y saque el jet del alojamiento. Al hacer esto, el jet debe
estar orientado hacia arriba.
Alojamiento
Revise y lubrique
el arosello.
Deslice el arosello en
el primer reborde del jet.
Inserte el jet en el alojamiento, y empuje y
gire ligeramente hasta que encaje en su lugar.
Resolución de problemas
AVISO: El propósito de esta sección es solo ayuda general. Todos los problemas eléctricos deben ser
resueltos por un representante de servicio autorizado de Kohler Co. o un electricista calificado. Para
obtener el servicio de garantía, llame 1-800-4KOHLER desde EE.UU. y Canadá, o al 001-800-456-4537
desde México.
Para consultar información sobre piezas de repuesto, visite la página de su producto en www.kohler.com.
Retire los jets
NOTA: Se ha incluido una herramienta especial junto a los jets de repuesto, para retirar los jets de la
bañera de hidromasaje. Esta herramienta también se incluye con cada kit de guarnición.
Coloque la boquilla esférica del jet de manera que apunte hacia arriba.
Inserte la herramienta de extracción, con el gancho hacia arriba, en la abertura del jet y enganche la
parte superior interior de la boquilla.
Sostenga la herramienta con firmeza y coloque el dedo pulgar contra la pared de la bañera de
hidromasaje. Tire de la herramienta de manera uniforme hasta que el ensamblaje de jets salga del
orificio. Tenga cuidado de no perder el arosello (O-ring).
Vuelva a instalar los jets
NOTA: Para permitir que el jet gire fácilmente y funcione correctamente, el arosello debe estar: (1) bien
colocado, (2) lubricado y (3) en buenas condiciones.
Instale el arosello en el primer reborde del jet.
Utilice el paquete del tubo de silicona (que se incluye) para lubricar el arosello, con el fin de evitar
un funcionamiento ruidoso del jet.
Inserte con cuidado el jet en el alojamiento, luego empuje levemente y gire el jet hasta que encaje en
su lugar. No fuerce el jet.
Verifique que el jet esté instalado correctamente. El jet debe girar sin problemas en ambos sentidos.
Retire y vuelva a instalar, si es necesario.
Kohler Co. Español-13 1193346-2-D
Page 46

Resolución de problemas (cont.)
Síntomas Causas probables Acción recomendada
1. La bañera de hidromasaje
no se enciende o no se
apaga.
2. El motor arranca, pero no
todos los jets funcionan.
3. La bomba no ceba. A. La bomba se ha acuñado
4. Funcionamiento ruidoso. A. Las cintas flejadoras de la bomba
5. El calentador no funciona.
(Solo modelos “H”)
A. El motor no recibe alimentación
eléctrica.
B. La manguera de aire está suelta o
desconectada.
C. La manguera de aire está
pellizcada o doblada.
D. El ensamblaje del botón pulsador
está dañado.
E. El botón pulsador tiene grasa en
el área de purga.
F. La manguera de aire está dañada. F. Cambie la manguera de aire.
G. El motor/la bomba no funciona. G. Cambie el motor/la bomba.
A. El jet está cerrado. A. Gire el anillo decorativo del jet
B. El jet no está instalado
correctamente.
C. Los jets están tapados. C. Elimine la obstrucción.
demasiado alto.
no han sido cortadas. (Solo
modelos con bloques de soporte).
B. El arosello del jet está mal
colocado.
A. El calentador no recibe
alimentación eléctrica.
B. La temperatura del agua excede
104°F (40°C).
C. El calentador no funciona. C. Cambie el calentador.
A. Verifique que la bomba y que el
calentador estén enchufados y
que el interruptor GFCI o RCD
esté en la posición correcta.
Enchufe o restablezca (reset) el
interruptor GFCI/RCD, según
sea necesario.
B. Verifique que la manguera esté
conectada tanto al extremo de la
bomba/el receptor como al
interruptor de aire. Vuelva a
conectar si es necesario.
C. Ajuste la manguera para eliminar
el área pellizcada/doblada. Si el
tubo está pellizcado/doblado y
no es posible ajustarlo, o bien no
se ve la sección
pellizcada/doblada, haga un
orificio pequeño en el tubo con
una tachuela y vuelva a probar el
sistema.
D. Cambie el ensamblaje del botón
pulsador.
E. Desensamble el ensamblaje del
botón pulsador y limpie el exceso
de grasa. Vuelva a ensamblar el
ensamblaje del botón pulsador y
vuelva a probar el sistema.
hacia la izquierda para abrirlo.
B. Vuelva a instalar el jet; revise que
el arosello no esté dañado.
A. Baje la ménsula de soporte de la
bomba.
A. Corte las cintas flejadoras de la
bomba con tijeras para chapa.
B. Retire el jet, cambie y lubrique el
arosello, y vuelva a instalar el jet.
A. Restablezca el GFCI o RCD.
B. Deje enfriar el agua y el
calentador se reactivará.
Garantía
GARANTÍA LIMITADA DE UN AÑO
Se garantizan los productos de plomería KOHLER contra defectos de material y mano de obra durante un
año a partir de la fecha de instalación.
Kohler Co., a su criterio, reparará, reemplazará o realizará los ajustes pertinentes en los casos en que la
1193346-2-D Español-14 Kohler Co.
Page 47

Garantía (cont.)
inspección realizada por Kohler Co. determine que dichos defectos hayan ocurrido durante el uso normal en
el transcurso de un (1) año a partir de la fecha de instalación. Kohler Co. no se hace responsable de costos de
desinstalación o de instalación. El uso de limpiadores de inodoro que se colocan dentro del tanque anula
la garantía.
Para obtener el servicio de garantía, comuníquese con Kohler Co. a través de su distribuidor, contratista de
plomería, centro de remodelación o distribuidor por Internet, o escriba a Kohler Co., Atención: Customer
Care Center, 444 Highland Drive, Kohler, WI 53044, EE.UU., o llame al 1-800-4-KOHLER (1-800-456-4537)
desde los EE.UU. y Canadá, o al 001-800-456-4537 desde México, o visite www.kohler.com desde los EE.UU.,
www.ca.kohler.com desde Canadá, o www.mx.kohler.com en México.
TODA GARANTÍA IMPLÍCITA, INCLUIDA LA DE COMERCIALIZACIÓN E IDONEIDAD DEL
PRODUCTO PARA UN USO DETERMINADO, SE LIMITA EXPRESAMENTE A LA DURACIÓN DE
ESTA GARANTÍA. KOHLER CO. Y/O EL VENDEDOR DESCARGAN TODA RESPONSABILIDAD POR
CONCEPTO DE DAÑOS PARTICULARES, INCIDENTALES O INDIRECTOS. Algunos
estados/provincias no permiten limitaciones en cuanto a la duración de una garantía implícitaoala
exclusión o limitación de daños particulares, incidentales o indirectos, por lo que es posible que estas
limitaciones y exclusiones no se apliquen a su caso. Esta garantía le otorga ciertos derechos legales
específicos. Además, usted también puede tener otros derechos que varían de estado a estado y de provincia
a provincia.
Esta es la garantía exclusiva por escrito de Kohler Co.
Garantía
Para México
KOHLER CO.
Se recomienda que al momento de la compra, se verifique que todos los accesorios y componentes estén
completos en esta caja.
Se garantiza este producto Kohler contra defectos en material y mano de obra durante un (1) año a partir de
la fecha de compra que aparezca en la factura o en el recibo.
1. Kohler Co. prestará servicio únicamente a los productos comercializados a través de sus distribuidores
autorizados.
2. Para obtener el servicio de garantía, favor de presentar la factura de compra y la garantía correspondiente.
3. Kohler Co., a través de sus distribuidores autorizados, se compromete a reparar el producto defectuoso o,
cuando la reparación no sea posible, reemplazarlo por uno nuevo o por un modelo equivalente (en caso de
que el producto haya sido descontinuado) sin ningún cargo al consumidor.
4. El tiempo de reparación no excederá seis (6) semanas a partir de la fecha de recepción del producto.
5. Se recomienda al consumidor que conserve el recibo o la factura de compra como protección adicional,
pues el mismo puede sustituir a la garantía en caso de que exista discrepancia en cuanto a la validez de la
misma.
EXCEPCIONES Y RESTRICCIONES
La garantía no tendrá validez en los siguientes casos:
1. Cuando el producto no se utilice conforme a las instrucciones de uso y funcionamiento que se incluyen en
el manual del usuario o en las instrucciones de instalación, y cuando no observen las recomendaciones y las
advertencias provistas.
2. Cuando el producto se haya modificado o desmantelado parcial o totalmente, o manipulado de manera
negligente y, como consecuencia, haya sufrido daños atribuibles al consumidor, a personas o a herrajes no
autorizados por Kohler Co.
3. Esta garantía no cubre los daños que resulten de desastres naturales, tales como incendios o casos de
fuerza mayor, como inundaciones, terremotos, tormentas eléctricas, etc. Para obtener una lista de
Kohler Co. Español-15 1193346-2-D
Page 48

Garantía (cont.)
distribuidores cerca de usted y así hacer valer sus derechos bajo esta garantía, llame al 001-800-456-4537.
KOHLER CO., KOHLER, WI 53044 U.S.A.
IMPORTADOR:
COMERCIALIZADORA INTERCERAMIC, S.A. DE C.V.
AV. CARLOS PACHECO NO. 7200, COL. MADERA 65
CHIHUAHUA, CHIH., MÉXICO C.P. 31060
R.F.C. CIN141022IE9
TEL: 52 (614) 429-11-11
IMPORTADOR:
GAMA MATERIALES Y ACEROS, S.A. DE C.V.
AVE. LOS ÁNGELES NO. 1800
COL. VALLE DEL NOGALAR, SAN NICOLÁS DE LOS GARZA
N.L. MÉXICO
R.F.C. GMA901220U11
TEL: 81-1160-5500
1193346-2-D Español-16 Kohler Co.
Page 49

1193346-2-D
Page 50

1193346-2-D
Page 51

1193346-2-D
Page 52

USA/Canada: 1-800-4KOHLER
México: 001-800-456-4537
kohler.com
©2017 Kohler Co.
1193346-2-D
 Loading...