

Page 1

BEFORE YOU BEGINBEFORE YOU BEGIN
Thank you. You have just purchased the best bath
drain your money can buy. Kohler drains work smoothly
and reliably, and keep their gleaming finishes. For easy
installation, follow these step-by-step instructions.
Carefully read these instructions before you attempt to
remove your old drain or install your new one. Make
sure you have the proper tools and materials listed on
the following page to complete the job. This will help
you avoid unnecessary expense resulting from
improper installation.
Your new Kohler drain has been designed for easy
installation using common household tools.
BATH DRAIN
INSTALLATION INSTRUCTIONS
K-18355T/K-10164T/K-98171T
K-17758T/K-45606T
Tools Required
Sealant
Phillips ScrewdriverBlade Screwdriver Square
Tape MeasurePencilPliers
Safety Glasses
1118231-T01-G
368 201419
-1-
, 2013
Copyright Kohler China Ltd., 2013
Page 2

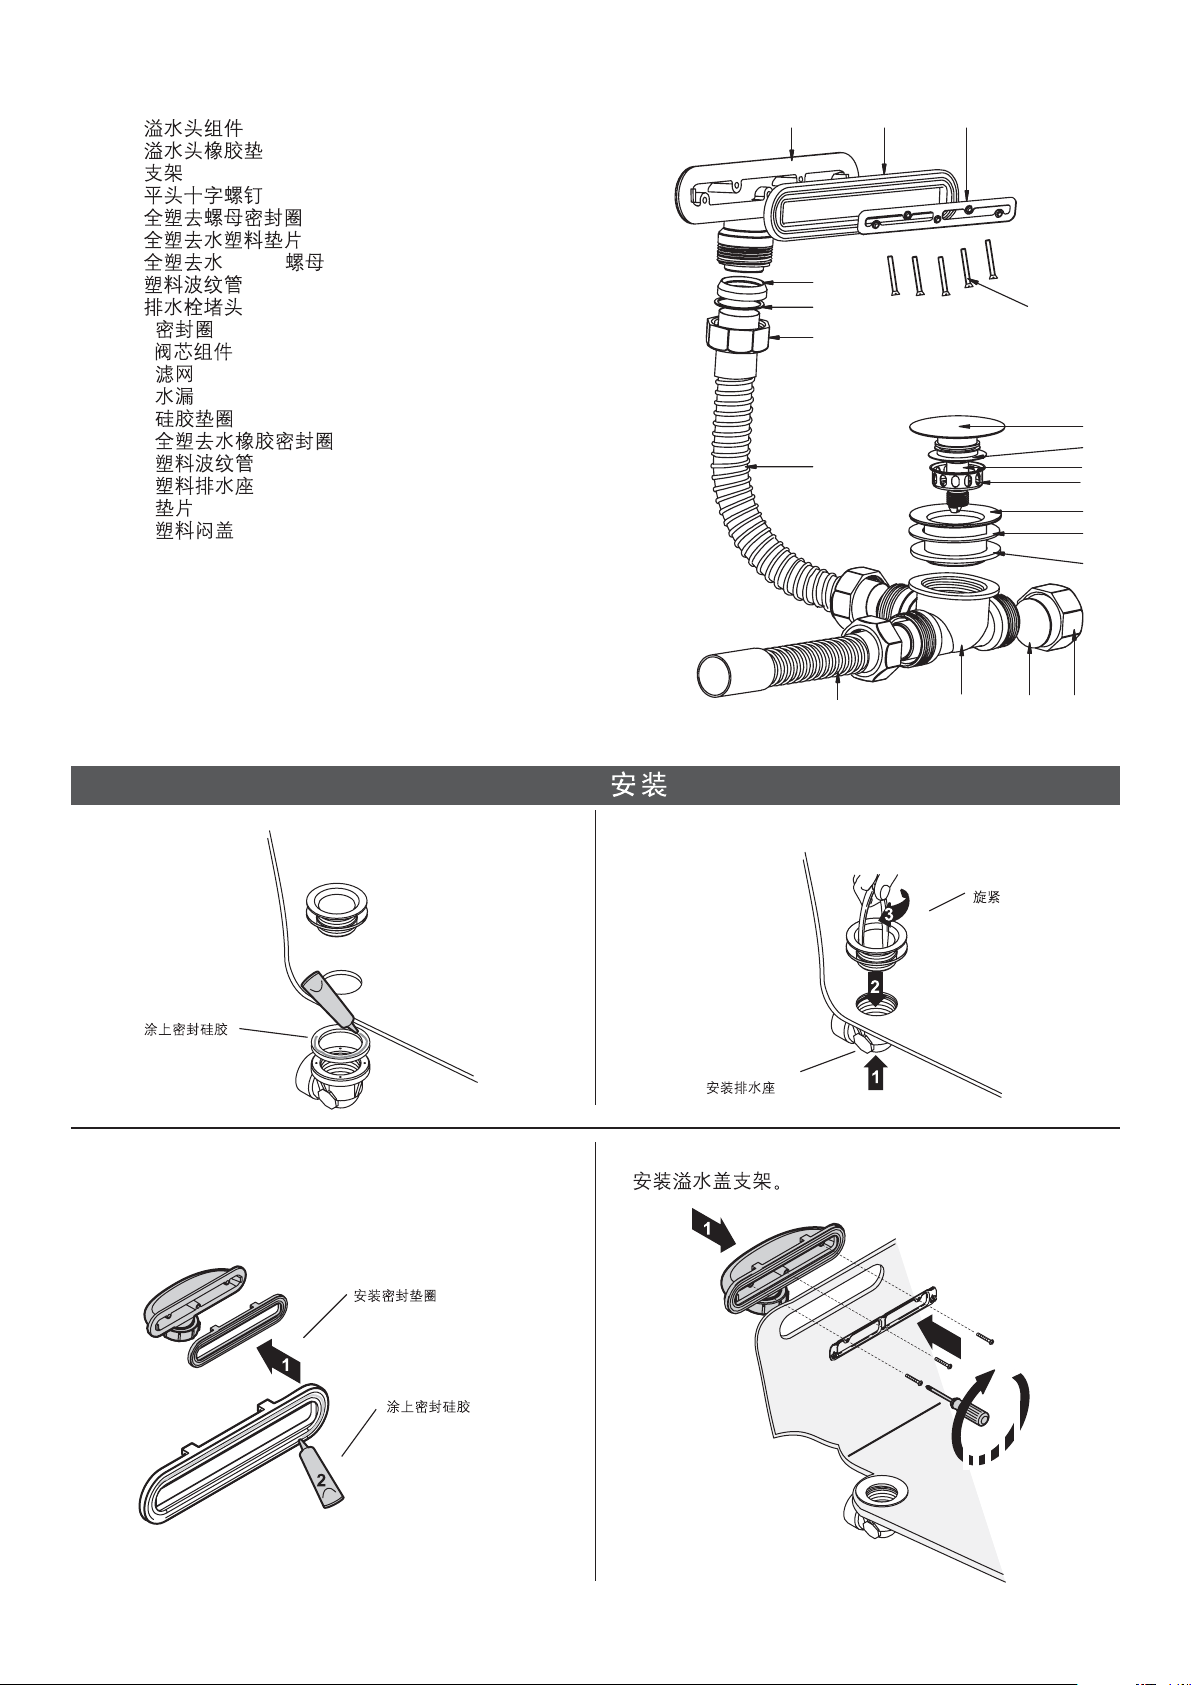
PARTS IDENTIFICATIONPARTS IDENTIFICATION
1.
2.
3.
4.
5.
6.
7.
8.
9. 1-1/4
10.
11.
12.
13.
14.
15.
16.
17.
18.
19.
20.
21.
Overflow Body
Seal, Overflow Body
Overflow Mounting Plate
Overflow Cover
Set Screw
Screw
Connection Seal
Connection Gasket
1-1/4 Nut
Overflow Flexible Pipe
Plug
Seal, Plug
Valve Assy.
Screen
Strainer
Strainer Gasket
Drain Body Gasket
Drain Body Flexible Pipe
Drain Body
Gasket
Plastic Cover
1
7
8
9
10
18
K-18355T, K-10164T, K-98171T
2
3
4
5
6
11
12
13
14
15
16
17
19
21
20
1.
2.
3.
4.
5.
6.
7.
8.
9. 1-1/4
10.
11.
12.
13.
14.
15.
16.
17.
18.
19.
20.
21.
22.
Overflow Body
Seal, Overflow Body
Screw
Overflow Mounting Plate
Overflow Cover
Set Screw
Connection Seal
Connection Gasket
1-1/4 Nut
Overflow Flexible Pipe
Plug
Set Screw
Seal, Plug
Valve Assy.
Screen
Strainer
Strainer Gasket
Drain Body Gasket
Drain Body Flexible Pipe
Drain Body
Gasket
Plastic Cover
1
7
8
9
10
19
3
2
K-17758T
20
4
5
21 22
6
11
12
13
14
15
16
17
18
1118231-T01-G
-2-
Page 3
1.
2.
3.
4.
5.
6.
7. G1-1/4
8.
9.
10.
11.
12.
13.
14.
15.
16.
17.
18.
19.
Overflow Body
Seal, Overflow Body
Overflow Mounting Plate
Screw
Joint Gasket
Connection Gasket
1-1/4 Nut
Overflow Flexible Pipe
Plug
Seal Plug
Valve Assy.
Screen
Strainer
Gasket, Thin, Drain
Gasket, Thick, Drain
Drain Body Flexible Pipe
Drain Body
Gasket
Plastic Cover
1
5
6
7
8
2
3
4
9
10
11
12
13
14
15
16
K-45606T
INSTALLATION
1.
Apply silicone sealant.
3. 4. Attach the overflow mounting plate.
Install the gasket
2.
Install drain ell.
17
Tighten
18
19
1118231-T01-G
Apply silicone sealant.
-3-
Page 4

5.
Attach the Overflow Cover
No Overflow Cover for K-45606T
K-45606T
Install stopper assy.
NOTE: When installing the stopper
assembly of 17758T, you can
rotate the square cover of the
strainer to align it with the rim of
the square drain hole on the
bathtub.
17758T
6. Insert the flex pipe into the outlet pipe of the room.
1118231-T01-G
Apply silicone sealant at the joint of pipes to avoid the
humidity come out.
-4-
Page 5

CARE AND CLEANINGCARE AND CLEANING
For best results, keep the following in mind when caring
for your KOHLER product:
·
Use a mild detergent such as liquid dishwashing
soap and warm water for cleaning. Do not use
abrasive cleaners that may scratch or dull the
surface.
·
Carefully read the cleaner product label to ensure
the cleaner is safe for use on the material.
·
Always test your cleaning solution on an
inconspicuous area before applying to the entire
surface.
·
Do not allow cleaners to sit or soak on the surface.
·
Wipe surfaces clean and rinse completely with water
immediately after cleaner application. Rinse and dry
any overspray that lands on nearby surfaces.
·
Use a soft, dampened sponge or cloth. Never use
an abrasive material such as a brush or scouring
pad to clean surfaces.
·
·
·
·
·
·
1118231-T01-G
-5-
Page 6

BATH DRAIN
SERVICE PARTS PAGE
K-18355T/K-10164T/K-98171T
1118234-**
Overflow Cover Assy, K-18355T&K-10164T
K-18355T&K-10164T
1199516-**
Overflow Cover Assy, K-98171T
K-98171T
1118235-**
Drain Cover Assy Match A
A
1228275
Drain Cover Assy Match B
A
B
-**
B
1118231-T01-G
Color code (-*) or finish (-**)must be specified when ordering.
(-*) (-**)
-6-
Page 7

1145180-**
Overflow Cover Assy
BATH DRAIN
SERVICE PARTS PAGE
K-17758T
1145181-**
Drain Cover Assy Match A
A
1228276
Drain Cover Assy Match B
A
B
-**
B
1118231-T01-G
Color code (-*) or finish (-**)must be specified when ordering.
(-*) (-**)
-7-
Page 8

1180691
Overflow Cover Assy
BATH DRAIN
SERVICE PARTS PAGE
K-45606T
1118235-**
Drain Cover Assy Match A
A
1228275-**
A
B
Drain Cover Assy Match B
B
1118231-T01-G
Color code (-*) or finish (-**)must be specified when ordering.
(-*) (-**)
-8-
 Loading...