

Page 1
-1-
BEFORE YOU BEGINBEFORE YOU BEGIN
·
·
·
·
Please read these instructions carefully to familiarize
yourself with the required tools, materials, and installation
sequences. Follow the sections that pertain to your
particular installation . This will help you avoid costly
mistakes. In addition to proper installation, read all
operating and safety instructions.
All information in these instructions is based upon the
latest product information available at the time of
publication. Kohler China. reserves the right to make
changes in product characteristics, packaging, or
availability at any time without notice.
These instructions contain important care, cleaning, and
warranty information-
Before installation carefully inspect the new fixture for any
signs of damage.
please leave instructions for the
consumer.
·
·
·
·
-
ORDERING INFORMATION
This installation covers the following products in the
BANCROFT, VINTAGE, ELOSIS mirrored cabinet range:
BANCROFT Mirrored Cabinet 2031BAN...............K-3892T
VINTAGE Mirrored Cabinet 2030VAS ...................K-3893T
ELOSIS Mirrored Cabinet 3526...........................K-15239T
2031BAN ...........................................
2030VAS ...........................................K-3893T
3526 ................................................
K-3892T
K-15239T
PARTS
Parts supplied with your cabinet. (For cabinet body and door
replacement, call customer service with model number.) Be
sure to check the cardboard supports in the carton, glass
parts are packed in them.
(),
.
, 2010
Copyright Kohler China Ltd., 2010
INSTALLATION INSTRUCTIONS
MIRRORED CABINET
K-3892T/K-3893T/K-15239T
BANCROFT
VINTAGE
ELOSIS
13-1 528437
1159769-T01-A
Page 2
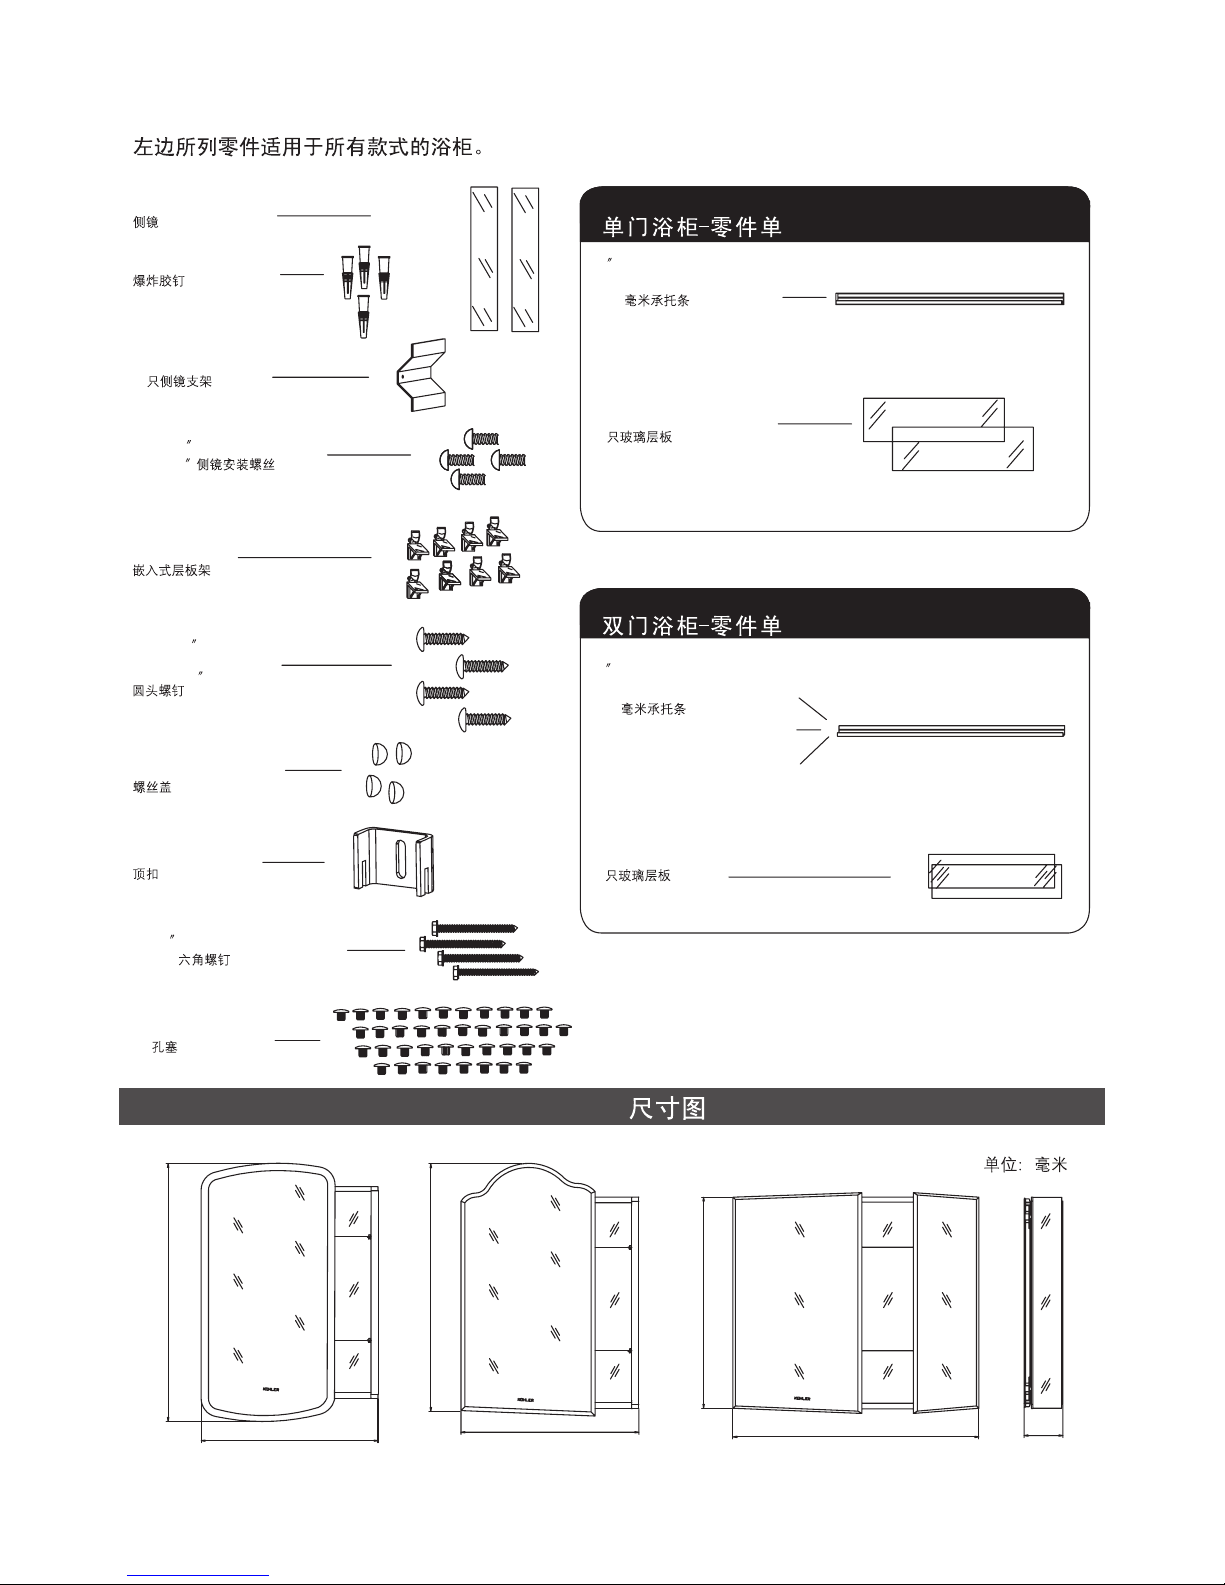
PARTS ON LEFT ARE USED WITH ALL CABINETS.
-2-
# 8 X 3/8 Side Kits Screws
#8 X 1 1/2 Phillips
Head Screws
Side Mirrors
4 Side Kits Brackets
Wall Anchors
Screw Caps S, W
Hole Plugs W
Top Clips
Snap-in Pins
#8 X 2 Hex Head Slotted Screws
4
#8X3/8
#8X11/2
S, W
#8X2
W
2 Glass Shelves
K-3892T, K-3893T
11 Mounting Bar for
K-3892T, K-3893T
ONE DOOR CABINET-Part list
280
K-3892T, K-3893T
2
K-3892T, K-3893T
DOUBLE DOOR CABINET-Part list
31 Mounting Bar for
K-15239T
787
K-15239T
2 Glass Shelves
K-15239T
2
K-15239T
ROUGHING-IN
UNIT : mm
760
508
K-3893T
805
508
K-3892T
664
890
K-15239T
122
1159769-T01-A
Page 3
-3-
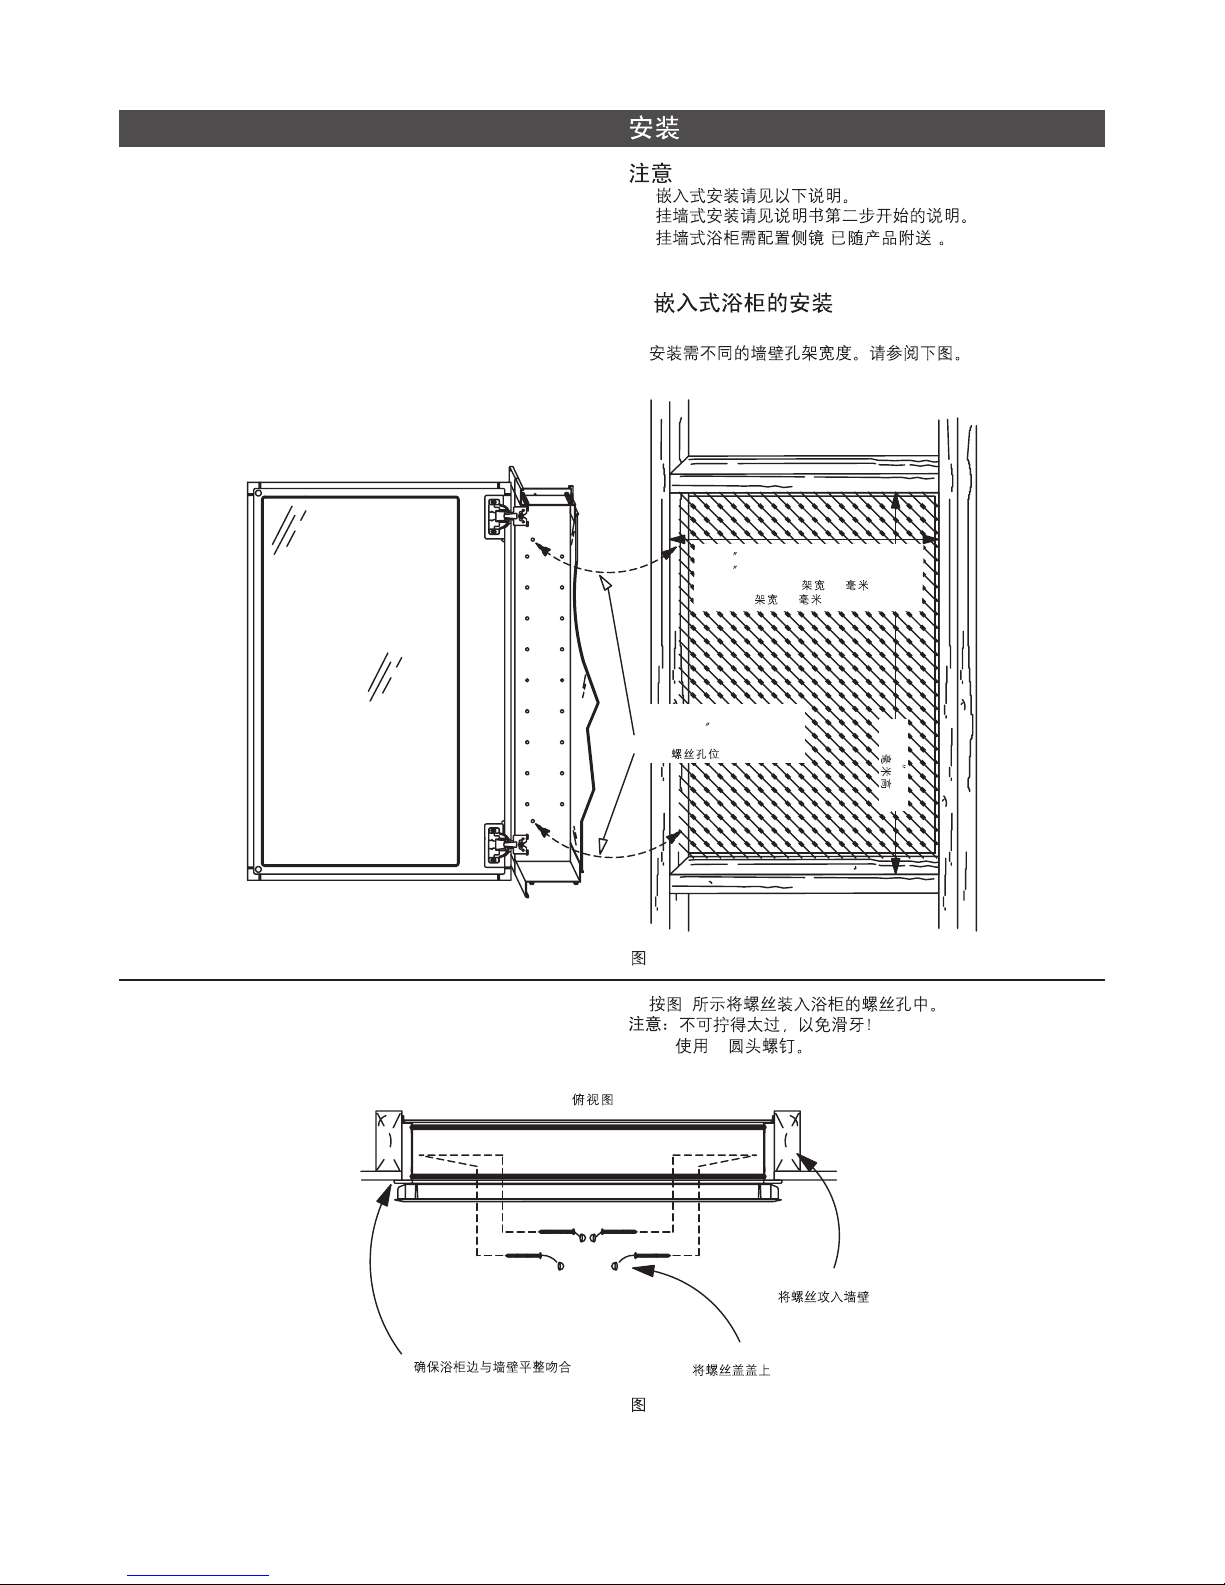
INSTALLATION
NOTE
For recess mount see instructions below.
For surfaces mount instructions see page4.
A surface mounted cabinet requires the optional
Mirror kit supplied with your cabinet.
·
·
·
·
·
·
()
1.
A.
1. Recessing the cabinet into the wall
A. The vertical installation changes the width of the roughout.
Please refer to the picture below.
25 1/4 high
Fig. 1 1
19 1/4 W for K-3892T, K-3893T Models
34 1/4 W for K-15239T Models
K-3892T, K-3893T 489
K-15239T 870
Mounting locationfor
#8x11/2 philips
head screws
#8
642
B. 1
#8
B. Install screws through holes in cabinet as shown in Fig.1
DO NOT OVER- TIGHTEN!
Use #8 x 1 1/2 Phillips head.
Note:
Top View
Stud and wall surface
Install dome caps over screws
Cabinet flange fits flush against wall
Fig. 2 2
1159769-T01-A
Page 4

-4-
2.
A.
()
2. Surface mounting the cabinet on a wall.
NOTE:
A. Install Mounting Bar.
Installing the cabinet on a wall without the door attached can
make installing easier for one person. Do not mount the doors
until the boxes is in or on the wall.
(Step one varies on type of cabinet
you have, see below.)
1) For Single Door
Drill two 3/16 holes in bottom mounting bar at indent location.
Use the supplied anchors or locate studs if possible.
1)
5
K-3892T
K-3893T
4 1/2" from edge side of cabinet
114
K-3893T
3/4" bottom of Cabinet
20
Fig. 3 3
K-3892T
2" bottom of Cabinet
50
2) For Double Door
Drill three 3/16 holes in bottom mounting bar at indent
location. Use the supplied anchors or locate studs if possible.
2)
5
Fig. 4 4
2" from edge side of cabinet
50
3/4 bottom of cabinet
20
K-15239T
3) Drill 1/4 hole in wall for mounting bar anchors at locations
shown in Fig.3.(If you do not use the anchor, drill a 3/32
pilot hole.) After the holes are drilled, fit the mounting bar
of the single door onto wall by referring to Fig.3 and fit the
mounting bar of the double door onto wall by referring to
Fig.4.
3) 3 7
(2)
34
1159769-T01-A
Page 5
-5-
1051705-T01-A
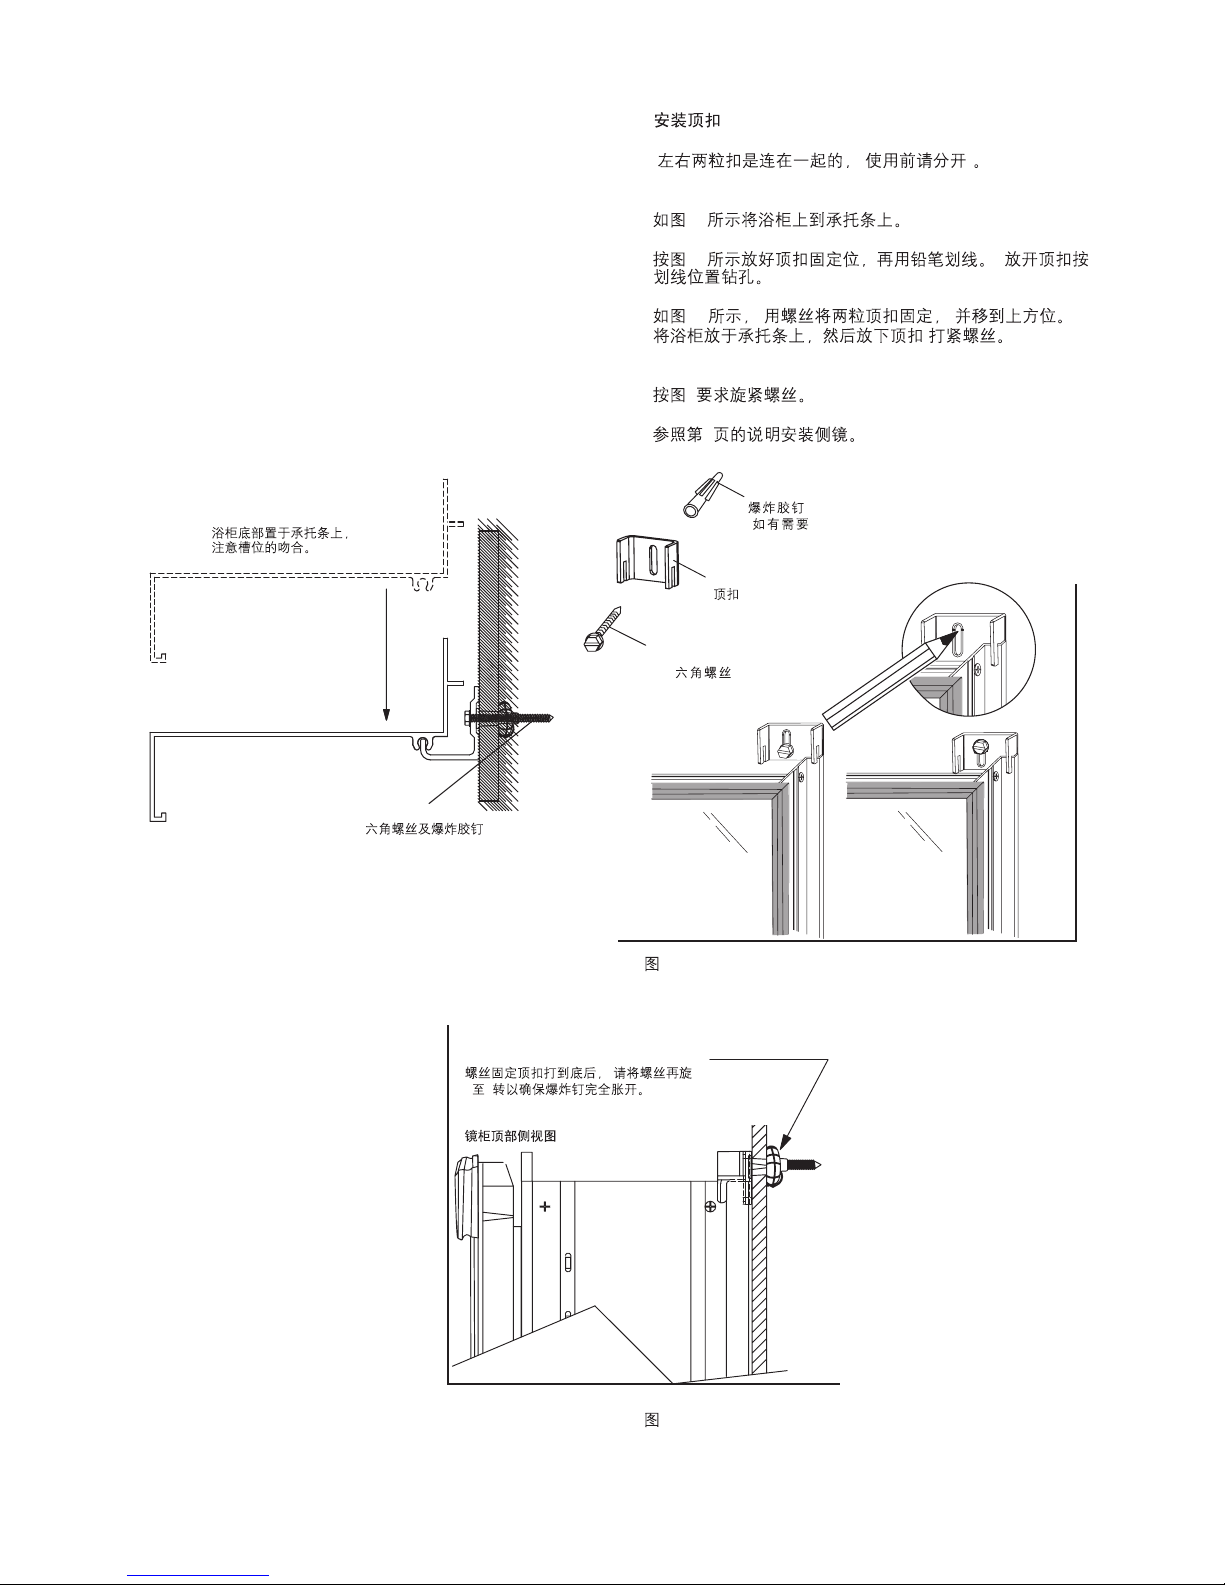
B.
()
1) 5A
2) 5B
3) 5C
,
4) 6
5) 6
B. Install Top Clips
(Left and right top clips come connected, hold both clips
and snap them apart).
1) Fit cabinet into position on mounting bar as shown in
Fig.5A.
2) Place clip in position as shown in Fig.5B and mark with a
pencil. Remove clip and cabinet and drill the pilot or
anchor holes where marked.
3) Fix both the clips into position with a screw, and slide the
clip into the up position. Sit the cabinet on the mounting
bar, then lower and tighten the screws into place, as
shown in Fig 5C.
4) See Fig. 6 on next page for proper turns required for
anchor cinching.
5) See page 6 for Side Kit Mirror application.
Cabinet bottom sits in lip on bottom
mounting bar
#8x2"Hex
Head screw &
Wall anchor
(use driver)
#8
x1/4"
Top mount clip
Wall anchor
(if required)
()
#8x2 Hex head screw
(Use 1/4 driver)
#8 .
"
"
Fig. 5 5
Once Screw is bottomed out on
mount clip, turn screw and additional
5 to 7 turns to fully expand the anchor.
57
Side view at top of cabinet
5A
Fig. 6 6
5B
5C
1159769-T01-A
Page 6

*
A. 10
B. 11
C. ( )
NOTE: BELOW FOR1&2DOOR CABINET ONLY*
A. This screw releases the door from the cabinet and allows
up and down adjustment. Fig.10
B. These screws allow you to plumb the door as shown in
Fig.11
C. The screws you use for attaching the hinges.
(Supplied with hinges)
A
B
B
3.
A.
B. 8
C.
D.
E.
3. Attaching Side Kits to a Surface Mounted
Cabinet
A. DO NOT PEEL RELEASE LINER UNTIL YOU HAVE
TEST FIT THE SIDE KITS ON THE CABINET!
B. Attach the side kit brackets to the cabinet as shown in
Fig.8
C. Test fit the side kits, then cleas the back of the side kits
with rubbing alcohol.
D. Peel the release tape from the brackets and apply the side
kits, push firmly to set.
E. Cover the screw heads with the screw caps.
Align top of side kit with top of flange
#8 x 3/8" screws
self thread into
Side Kit brackets
#8
2 pieces
26" high
660
Side kitbracket
(Fits tightunder the
flange ofcabinet)
()
Side kit brackets
Fig. 7 7
Fig. 8 8
4.
4. Door adjustments
-6-
Fig. 9 9
8-32 x 1/2" (SS829)
6-32 x 3/8" (SS679)
1159769-T01-A
Page 7

A
B
Fig. 10 10 Fig. 11 11
1
2
5. 135. Installing the shelves- see Fig.13
A.
1) Push one side of the shelf into the left or ritht clips
2) Snap the shelf down into the opposite side. If the shelf is
too tight, repeat the process fron the other side.
B.
Push/twist the pins into place
Fill the remaining holes with the plugs.
A.
1)
2)
B.
Fig. 12 12 Fig. 13 13
-7-
1159769-T01-A
Page 8

1.
2.
3.
4.
5. .
6. .
7.
USER MAINTENANCEUSER MAINTENANCE
Warn! Risk of product damage.
1.
2.
3.
4.
5. The mirror cabinet door and interior are constructed of
mirror and aluminum. Use only a damp cloth to clean.
Spray the cloth, not the mirror when cleaning. Mirrors are
damaged by the use of ammonia or vinegar based
cleaners. Rubbing alcohol can be used for stubborn stains.
6. Use no abrasive cleansers on any part of the mirror cabinet.
7. The white frame should be cleaned with a damp cloth only.
Many cleansers contain abrasive and chemical substance
which is not suitable for cleaning stainless steel, enamel,
plating or plastic products. You may use mild cleansers or
soaps to clean the surfaces. Wipe any splashes of cleaner
solutions from the surface with clean soft cloth.
Maintain ventilation in the bathroom, and separate the dry
area from the damp one if conditions permit. Try to open
the door and windows of the bathroom and maintain good
ventilation.
Kohler mirror cabinet are dealt with strict procedures for
damp-proof, whose good damp-proof function ensures
good performance even in bathroom of huge humidity. Yet
do not splash and pour water directly on the mirror cabinet.
Make sure that the bathroom is not over damp and wipe
any splashes from surfaces immediately.
Maintenance of door board: Clean and wipe door board
regularly, and wipe the condensation vapor with dry and
soft cloth.
.
-8-
1159769-T01-A
 Loading...