

KIDS RANGE ROVERINSPIRED RIDE-ON CAR
KARDRVCRPKA, KARDRVCRWHA & KARDRVCRBKA


SAFETY & WARNINGS
• The product should be assembled correctly by an adult before use.
• The car contains small components, which is not suitable for children less than 3
years old.
• Please charge up the battery before using the car. The charging should be
performed by an adult.
• Ensure the battery is fully charged for 10 hours before using the car for the first time
otherwise the battery will get damaged permanently and cannot be repaired.
• Please do not drive the car in dangerous places such as the public roads, streets
and place with various obstacles.
• The car is limited to one child, overloading is not allowed. Maximum load capacity
is 30kg.
• Please fasten the seat belt and make sure the child always sits in the car. Do not
let the child stand or perform dangerous actions while driving.
• Please do not suddenly switch the forward/backward button while the car is in
motion.
• To prevent damaging valuables and the car, please do not drive it in narrow
spaces.
• Please check the car, the charger, the plug, the electric wire, the outer casing and
other components regularly for any evidence of damage. Please stop operating the
car immediately if it is damaged. Please turn off the power supply and unplug the
battery connector if you do not use it for a long time.
• Children should always be supervised when driving the car.
• The remote control must be operated by an adult but not the children.
• The charging stand is at the right side of the car, please turn open the charging
cover first, insert the plug into the charging hole, then plug the charger into a
power outlet to charge. This should be done by an adult, do not let your children
touch the power supply.
• When the driving speed of the car has slowed down significantly, please charge
the car immediately. It should be fully charged for 8-10 hours. (Do not exceed10
hours)
• It is normal for the charger or battery to get hot during charging. (Below 60°C)
• It must be used with a special charger and battery which are equipped with the car
to avoid damage to the charger, battery and electrical cable.
• Please do not operate the car while charging.
• Please check if the cable connection is correct before charging.

• If there is a non-rechargeable battery in the remote control, do not attempt to
charge it. If it is a rechargeable battery, the charging should be done by the adult.
Please do not use different types of batteries in the remote control. Please do not
use old and new batteries at the same time.
• The battery should be placed on the correct electrode.
• Please take out the battery from the remote control when it is used up.
Warnings on the Car
1. The car contains small components which are not suitable for the children less
than 3 years. Suitable age: 37 months - 96 months.
2. Maximum load capacity: 30kg.
3. Children should always be supervised when driving the car.
4. Do not drive the car in a public area or dangerous place, it is better to drive on flat
ground.
ASSEMBLY
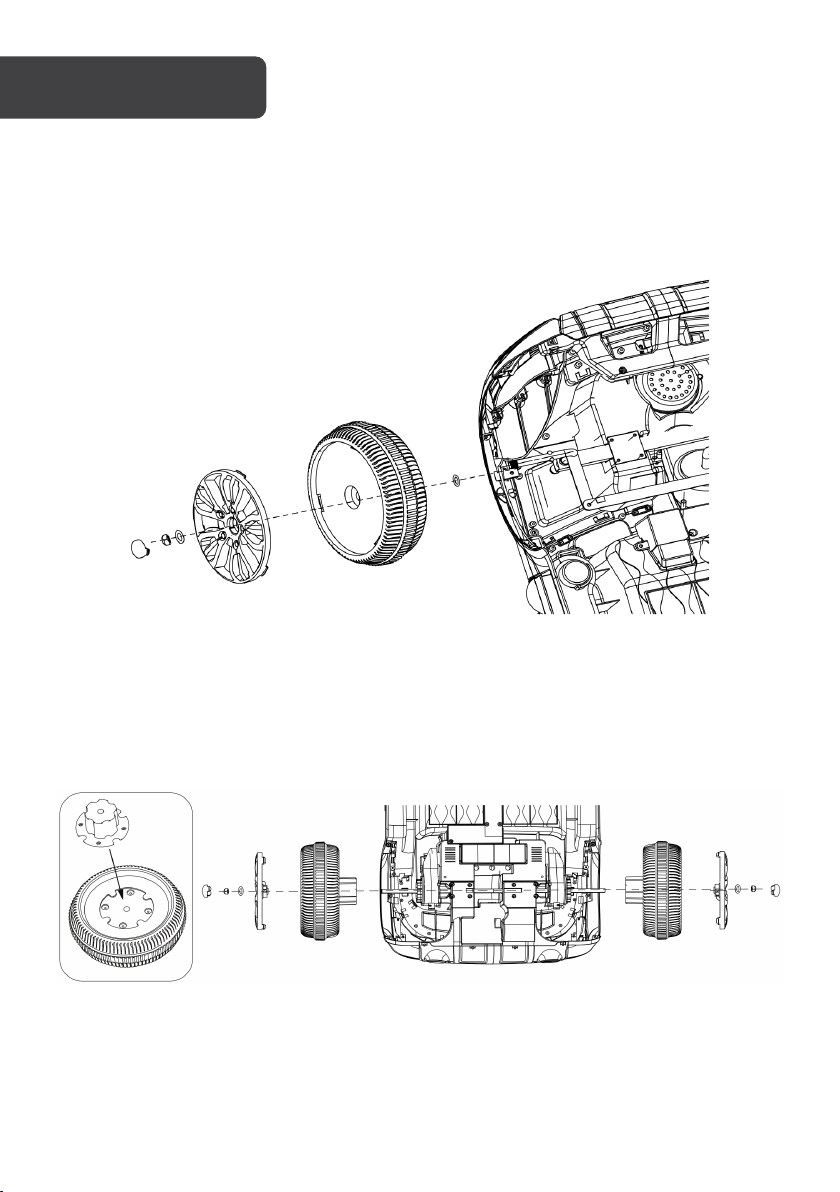
1. Front Wheel
Set the gasket into the front axle and then put the wheel on it. Next, insert the gasket on the
wheel and lock them with the locknut. Finally, affix the wheel cover.
2. Rear Wheel
Place the gear on the rear wheel and attach it with 4pc ST4 0x16 screws. Next, turn the car
over, insert the wheel into the rear axle then put the gasket on it and attach them with the
screws. Finally, cover the wheel with a cap.

3. Wind Shield
Take out the windshield carefully from the box, then insert the windshield into the slot. It is
assembled correctly when you hear a click.
4. Steering Wheel
Connect the connector on the steering wheel with the one on the car, then insert the
steering wheel into the pillar on the dashboard. Finally, attach the steering wheel with a
screw.

5. Car Chair
Connect the positive pole of the power supply before installing the car chair. The hook of the
seat should be aligned in the slot, then tighten the fixing holes on both sides and the front of
the seat with screws turning clockwise. Insert the charger into the charging hole for
charging. Do not operate the car while charging.
6. Adding Batteries to the Remote Control
Remove the screw on the battery cover with a screwdriver and then remove the battery
cover, insert the 2 AAA 1.5V batteries. It needs to match the frequency to control the car.
Refer to the remote control section of this user guide for pairing instructions.

7. Windshield
Remove the windshield carefully from the box, then insert the windshield into the slot: it will
click into place.
9. Battery
Connect the red wire to the storage battery as indicated below:

10. Wheels
i. Place the gasket on the wheel axle.
ii. Place the wheel and then the nut on the axle.
iii. Place the cap on the wheel.

Function details
Aux
SD
USB
Music Console
Music & Horn
Gear Selector
Ignition
1. Turn on the ignition, the car starts with lights on. The display on the car will show
the voltage of the car when the car starts.
2. Switch the Forward/Backward button to the forward position, then step on the
footswitch, the car goes forward. Switch the Forward/Backward button to the
backward position and then step on the footswitch, the car moves backwards.
3. There are a horn button and music button on the steering wheel.
4. On the dashboard, there is a Mode button, Pause/Play button. Next/+ button,
Prev/- button, SPK button. MP3 interface, TF card interface and USB interface.
5. Press the Mode button, the car will play music. Holding down the Next/+ and
Prev/- volume controls on the music player changes the overall volume for all
audio effects with the car, including the horn/SPK
6. Please turn off the power switch and disconnect the battery if the car is not
operated for a long time and ensure that the car is recharged once a month.
Music Console

Accelerate
Back
Brake
Forward
Left
Right
REMOTE CONTROL
When using the unit for the first time, you must pair the frequency of the remote with the
car.
1. Take out the remote control and install the battery.
2. Press and hold the frequency button for 2-4 seconds: the LEDs will flash slowly.
3. Turn on the power of the car and the LEDs will turn solid when pairing is
successful.
4. If the remove and car do not pair, (the LEDs will continue flashing), remove the
battery and repeat steps 1-3.
5. The indicator LED will turn off 10 seconds after the last input to save power.

Battery
2x6V 4.5Ah
Motor
12V 30W,12V 15W
Input: AC220V-240V, 50Hz-60Hz
Output: DC 12V, 1A
Maximum load
30kg
Working hour
Recharge hour 8-12 hour, Working hour: 1-2 hour
Speed
3-5km/hr
Age
37 months-96 months
R/C Battery
AAA 1.5Vx2
R/C Distance
15±5m
Electric car
1 piece
Steering wheel
1 piece
Chair
1 piece
Car Wheel/Cap
4 pieces
Charger
1 piece
MP3 connector
1 piece
User manual
1 piece
Remote control
1 piece
Charger
IN THE BOX

Malfunction
Analysis
Solutions
Low battery voltage
Charge the battery
Battery damage
Replace new battery
Cable connectors are off
Reconnect the connectors
Motor damage
Replace new motor or repair it
Wheel latch is lost
Equip with new wheel latch
Fuse damage
Replace new fuse
The power supply is off
Turn on the power switch
Battery not connected
Follow Assembly instructions
The battery is not fully
charged
Motor damage
Replace new motor
The car is overloaded
Reduce the load capacity
The battery is used up
Replace new battery
Replace a new charger or
battery
Charger socket damage
Replace new socket
The battery is not fully
charged
The battery is used up
Replace new battery
Car shaking while driving
Poor motor contact
Reconnect the circuit
Wheels falling off
Wheels not fully connected
Follow Assembly instructions
The car is noisy while
driving
TROUBLESHOOTING
Before attempting to use the car, make sure the battery is connected under the seat as per
the instructions in assembly.
Car cannot run
Battery should be fully charged
The car is running slowly
The battery cannot be
charged
Running time is short
Charger/battery damage
Battery should be fully charged
Gearbox damage Replace new gearbox


Need more information?
We hope that this user guide has given you
the assistance needed for a simple set-up.
For the most up-to-date guide for your product,
as well as any additional assistance you may require,
head online to help.kogan.com
 Loading...