

PREMIUM 15-IN-1
STEAM MOP
KAMOP151STMA


SAFETY & WARNINGS
• Read all instructions before using the appliance and retain for reference.
• This appliance is not intended for use by persons (including children) with reduced
physical, sensory or mental capabilities or lack of experience and knowledge unless
they have been given supervision or instruction concerning use of the appliance by
a person responsible for their safety.
• Do not use outside of indoor household use as described in this manual.
• Do not use with an extension cord unless necessary and if so, ensure it is suitably
rated and it is handled safely as is the product's power cord,
• Do not allow the power cord to be exposed to water, heat, direct sunlight or
overhang where it can be pulled or otherwise be damaged or pose a hazard.
• To reduce the likelihood of circuit overload; do not operate another high wattage
appliance on the same circuit as this unit.
• Always set the Steam Control Dial to "off" position before plugging or unplugging
the appliance.
• Do not use the unit where aerosol-based products are being used or where oxygen
is being administered.
• Steam can cause injury or damage. Take care where steam is directed, especially
when powering on the appliance and using steam on surfaces for the first time.
• Steaming unsealed floor surfaces such as hardwood is not recommended and may
result in warping or damage to the surface.
• Always allow the appliance to cool completely (at least 30 minutes) before storing.
• This appliance contains no user-serviceable parts. If it suffers any failure or
damage, cease usage and contact Kogan Support after consulting the
troubleshooting section of this manual.
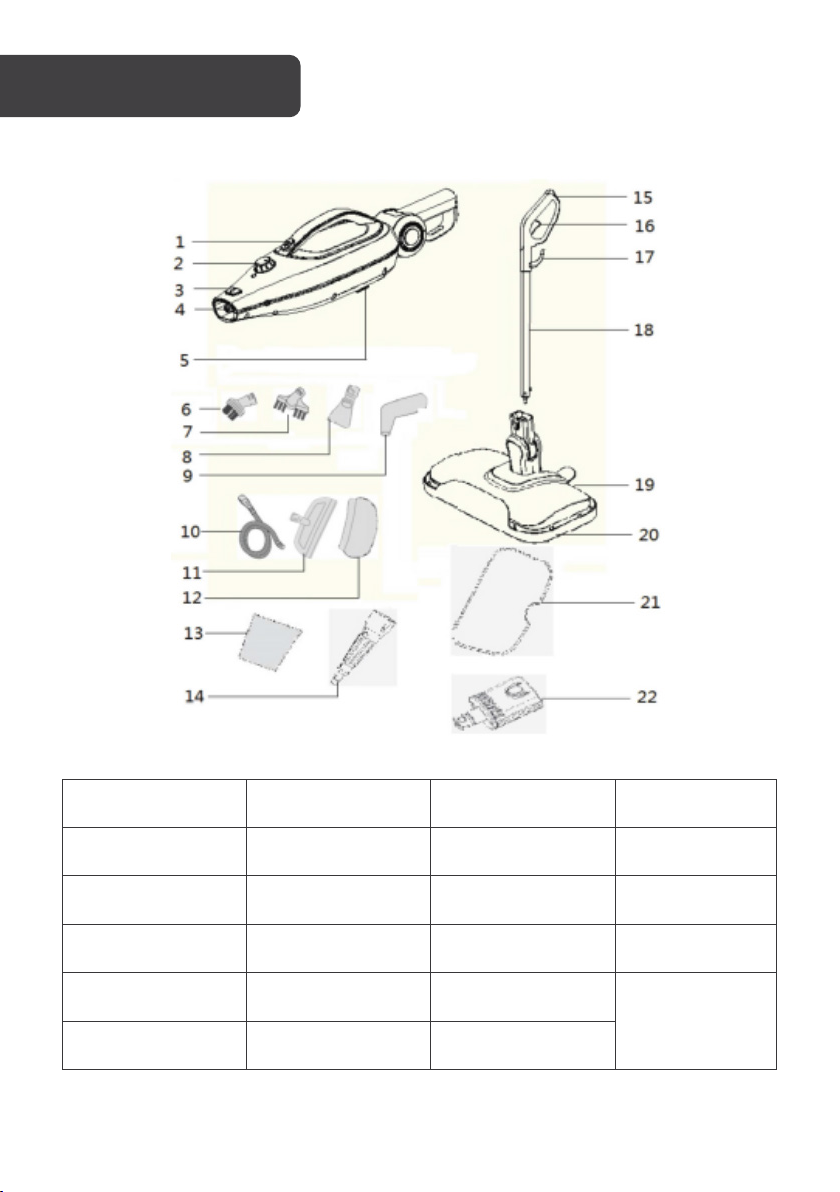
1. Handheld steam
button
2. Steam adjusting
knob
3. Brush release
button
16. Handle steam
button
11. Window /
Upholstery Tool
12. Window /
Upholstery Cloth
OVERVIEW
4. Steam outlet 10. Hose
5. Hard water filter
6. Small plastic brush
7. Grout brush 13. Water tank 19. Floor head
8. Scraper tool 14. Concentration 20. Carpet glider
9. Fine nozzle 15. Handle 21. Microfibre pads
22. Connector
17. Cord hook
18. AL tube
23. Cleaning pin
(not pictured)
Pole Base
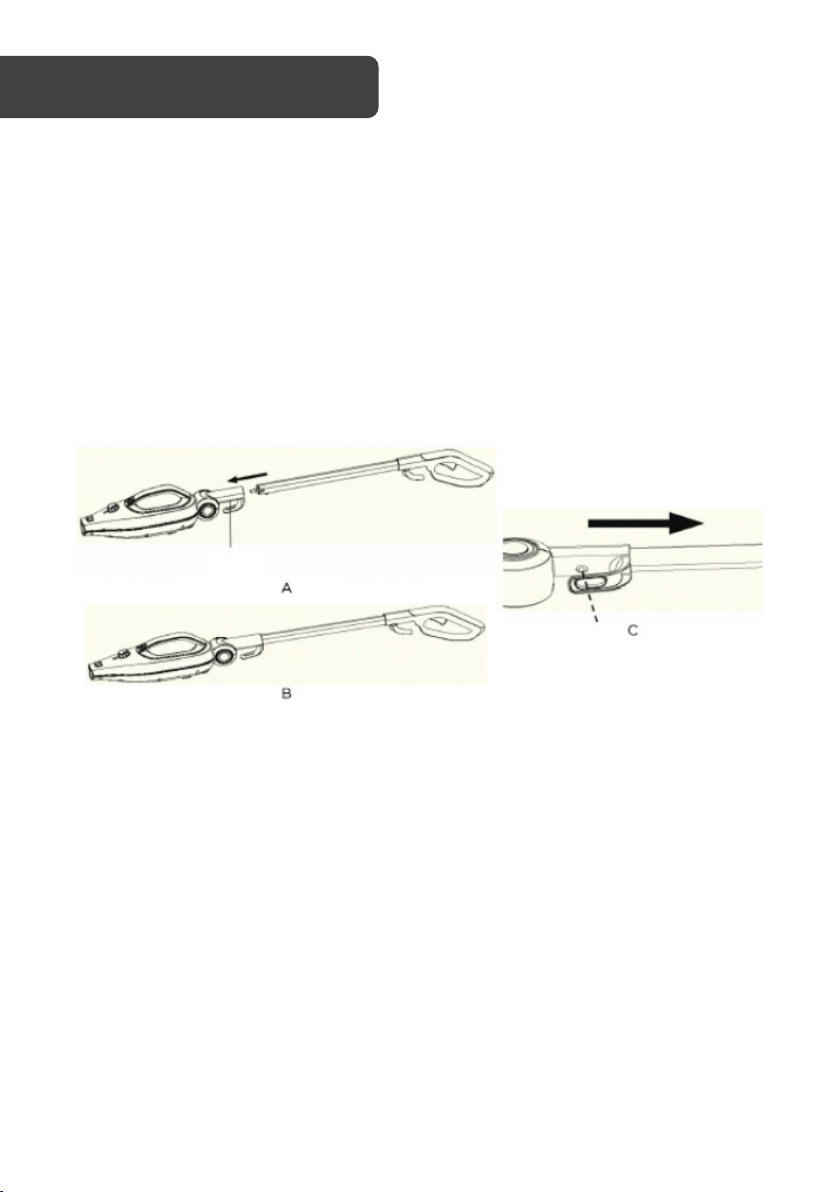
ATTACHMENTS
Extension Pole
1. Insert threaded connector on the bottom of Extension Pole base on the main unit
(A).
2. Assemble the handle (B).
3. To adjust the length of Extension Pole:
• Press the switch button to ensure the metal tube is secured.
• Push it out.

Mop Head
Steam Nozzle
Mop Head Neck
Figure 2
Hole
Release Button
1. Align Mop Head with the main unit as shown (FIGURE 2), neck in line Steam
Nozzle.
2. Slide Mop Head neck into Steam Nozzle, pressing a button firmly until release
button snaps through the hole.
3. To remove Mop Head, press firmly on release button while simultaneously pulling
Mop Head away from Steam Nozzle.

Jet Nozzle
WARNING: The metal tip of the Jet Nozzle becomes hot during use. Do not touch the
Mop Head Neck
Release Button
Hole
Figure 3
tip to avoid burns.
1. Align Jet Nozzle with Steam Nozzle as shown (FIGURE 3).
2. Slide Jet Nozzle into Steam Nozzle, pressing firmly until unit release button snaps
through the hole.
3. To remove the Jet Nozzle, press firmly on the release button while simultaneously
pulling Jet Nozzle away from Steam Nozzle.

Utility Head
Figure 4
1. Align Utility Head with Steam Nozzle as shown (FIGURE 4).
2. Slide Utility Head into Steam Nozzle, pressing firmly unit it slides in.
3. To remove Utility Head, simply grasp it and pull it away from Steam Nozzle.
Note:
The Utility Head does not utilise a release button like the mop head and jet nozzle.

Using Accessory Tools
Concentration nozzle: Concentrated
steam How to lift grime. Use on the car
to tackle stubborn stains. Removes dirt in
hard-to-reach places. Use with handheld
wand and connector for other tools.
Squeegee tool: Clean windows and
mirrors quickly and easily. The Squeegee
disperses steam evenly to clean then
wipe dry to avoid streaks. Use on any
glass surface including shower doors,
oven gloss and in your car.
Brushes: Hard-wearing for use on hard
sealed surfaces. Always test before use.
Upholstery tool: Attach cloth to
window/shower tool for use on upholstery
and clothes.
Grout brush: Wide straight brush to
tackle grout on tiled floors and surfaces.
Lifts embedded dirt from in between tiles
and grouting. Use with the handheld and
wand.
Grout brush: Wide straight brush to tackle
grout on tiled floors and surfaces. Lifts
embedded dirt from in between tiles and
grouting. Use with the handheld and wand.

Utility Brushes
WARNING: The metal tip of the Jet Nozzle becomes hot during use. Allow
connect/disconnect a Utility Brush.
Jet Nozzle to cool for at least 5 minutes before attempting to
1. Align Utility Brush with the tip of Jet Nozzle as shown (A below) and press it firmly
on as far is it will go.
2. Align Utility Brush with the tip of Jet Nozzle as shown (B below) and press it firmly
on as for is it will go.

OPERATION
Before First use
Note that there may be residual water traces in the tank: this is due to quality control testing
and does not indicate a defect with the product.
Filling Water Tank
Note:
Do not remove or cut small rubber air valve on top of Water Tank Cop. Do not turn
unit upside-down when Water Tank is full - some water may leak through the air
1. Make sure Steam Control Dial is set to “off” position.
2. Rotate Water Tank Cap one-quarter turn in "Unlock" direction (counter-clockwise)
indicated by the illustration on cap and remove.
3. Carefully fill Cup with the maximum amount of water and pour into the water tank
through the fill hole. Repeat up to two more times to fill Water Tank to maximum
capacity (Tank holds a maximum of 380ml of water).
Note:
To significantly reduce mineral build-up and prolong the life of your Multi-Purpose
Steamer, use of distilled or de-mineralised water in the unit is highly recommended.
Refer to Cleaning and Care for more information about mineral build-up.
4. Replace Water Tank Cap so that thread grooves on the bottom of Cap (FIGURE
9-B) align with tabs inside fill hole (FIGURE 9-C). Press Water Tank Cop down so
that it sits flush with the top of fill hole (FIGURE 9-D). Rotate one-quarter turn in a
clockwise direction (as indicated by "Lock" illustration on Cap) to lock it in place.
Note:
The tube which transfers water from the Water Tank to the boiler is weighted down
with a brass boll. This is an intentional design to improve the efficiency of water usage.
It is normal for this boll to create a rattling sound inside of Water Tank during use. If
the brass ball has come loose, refer to Troubleshooting for directions to reconnect it.

Using Multi-Purpose Steamer
WARNING: Always be sure that Steam Nozzle and any accessories ore
Note:
Be sure that Water Tank has been filled and all desired accessories are connected
before following these steps.
1. For first-time use, remove protective plastic cover that is shipped on an electrical
plug, Plug power cord into a convenient electrical outlet.
2. Turn Steam Control Dial clockwise from "off" position to one of three settings:
LOW or 1-11GF1 (FIGURE 10). Power Indicator Light will immediately illuminate to
indicate that unit is powered on and heating.
3. After approximately 30 seconds, you will hear o buzzing sound as the unit begins
to emit steam.
4. Direct Steam Nozzle (with any connected accessories) towards the surface you
wish to steam. Refer to Steam Mopping section below, as well as Steam Cleaning
and Fabric Steaming sections on Page 11, for further details.
pointed in a safe direction (away from yourself, other people, pets and plants)
when steam is being emitted. Connect/disconnect a Utility Brush.
For All Usage Modes
• Make sure Extension Pole, Mop I-lead and Cloth ore all properly connected.
• For mopping, make sure Extension Pole is properly connected.
• Follow Using Multi-Purpose Steamer instructions on the previous page to begin
steaming. Choose the steam intensity setting appropriate for the floor surface you
are cleaning.
• For general cleaning convenience, Extension Pole should be removed so that unit
functions as a handheld steam cleaner. However, Pole may be attached for
cleaning hard-to-reach spots, such as floor grout or ceilings. CAUTION: Always
support pole with two hands while lifting.
Steam Settings
Below is a general listing of just some of the possible uses for the Multi-Purpose Steamer,
separated by intensity setting of Steam Control Dial. These are only meant to provide some
general guidelines for using your steamer; you will likely discover a wide variety of other uses
around your home.

LOW
• Varnished/laminate hardwood flooring
• Delicate fabrics
• Wood cabinetry
MEDIUM
• Most flooring (sealed marble, stone & ceramic, vinyl etc.)
• Countertops
• Bath and Kitchen fixtures
• Most routine cleaning tasks
HIGH
• Flooring in high-traffic areas (HIGH setting not recommended for hardwood floors)
• Tough grime and stains (stuck-on grease, etc.)
• Heavy linens and fabrics
Note:
When steaming, it is best to use the lowest possible Steam Control Dial setting that
completes the tusk while remaining easy and convenient. Start with lower settings and
increase only if needed to quickly and easily accomplish the required cleaning task.
Higher steam setting increases the amount of moisture being emitted with the steam.
Steam Mopping
Note:
It is recommended to vacuum floors before mopping in order to remove dust and dirt
particles.
• Use a steady back-and-forth motion over the floor, pushing Mop away and pulling
it back towards you. Work your way back over the floor, to avoid walking over the
freshly mopped area.
• The Cloth will absorb moisture during mopping. Flow ever, depending on the floor
surface and steam intensity setting; some residual moisture may be left behind. In

this case, it is recommended to allow floor time to air-dry. A fan may be directed
towards an area to facilitate drying.
NOTE: Setting Steam Control Dial to LOW setting will help to minimise moisture left on the
floor.
NOTE: To avoid warping or damage caused by heat and moisture, the Multi-Purpose
Steamer should only be used on properly sealed floor surfaces.
• Due to the large size of the Mop Head, it may have difficulty completely cleaning
certain types of floors (such as ceramic tile) that include crevices of grouting. To
more thoroughly clean floor grout, it is recommended to use Multi-Purpose
Steamer in steam cleaning mode. Refer to Steam Cleaning section on page 11 and
12 for details.
Steam Cleaning
• Direct Jet Nozzle towards the surface you wish to steam. Use a slight back-andforth motion over the area to enhance the cleaning process. To sanitise surfaces,
set Steam Control Dial to HIGH and hold Jet Nozzle approximately 1/2 inch from
the surface for at least 5 seconds. This will most effectively kill germs and bacteria.
• When using Squeegee, start by thoroughly steaming entire window or mirror and
then turn steam off. Next, press Squeegee to top of window or mirror and pull
slowly downward. Move slowly from one side of the surface to the other in this
fashion unit entire surface is clean.
• Wipe steamed areas with a clean cloth to remove loosened dirt and grime. Wiping
the area while it is still wet is recommended but use caution when wiping surfaces
such as metal that may still be hot.
Fabric Steaming
• For fabrics and linens, direct Utility Head towards the material you wish to steam
and keep the flow of steam focused three. Using a slight back-and-forth motion
over the area you are steaming will further enhance the steaming process.
For garments:
1. Hong garment from a clean, rust-free hanger.
2. Direct Utility Head towards the bottom of the garment. Steam will rise along inside
and outside of material, removing wrinkles. Slowly slide Utility Head upward from
bottom to top of the garment.
3. Direct Utility Head away from the garment and smooth material with your free
hand.
4. Repeat as the necessary unit garment is fresh and wrinkle-free.

General steaming tips:
1. Curtains and draperies can be steamed while still hanging.
2. To remove wrinkles from towels, handkerchiefs and napkins, drape them over a rod
or towel rack and gently steam them.
3. Heavier fabrics may require repeated steaming to achieve desired results.
4. To remove exceptionally stubborn wrinkles, steam both sides of the fabric.
5. Be especially careful when steaming delicate fabrics and those likely to be
damaged by water spots.
General Steaming Tips
You will find nearly limitless uses for your Multi-Purpose Steamer. There are no rules when it
comes to steam cleaning and / or the attachments you received with your unit. Use
whichever attachment seems to accomplish the intended job quickly and easily.
Below are a few guidelines for starting:
• Many surfaces only require be spraying with the Jet Nozzle to clean and disinfect,
then wiping with a clean dry cloth, towel or paper towel, e.g. kitchen counters,
microwaves, stovetops, bathroom sinks, kitchen and bath fixtures.
• The nylon Utility Brushes can be used on most surfaces for hard-to-remove dirt,
grime spots or stain, e.g. backed on food on ovens and oven doors, baked-on
stovetop spills, bath and/or kitchen grease and grime, a rubber seal on the
refrigerator, under/around the bath and kitchen fixtures, bath tile seams and
grouting.
• The nylon Utility Brushes are also very effective in removing spots and stains and
stains from clothing and upholstery. This can be done with steam alone or with a
stain remover designed for your specific use. Do not put any type of chemical or
liquid product in your steamer; only water is to be used in the unit.
• The Mop Head with Cloth is designed primarily for use on floors, including
linoleum, tile, marble, stone and more. However, it can also be used on upholstery,
depending on the type of fabric being cleaned.
• When dried, some stains (on carpet or other surfaces) may require a bit of extra
scrubbing with one of the Utility Brushes and / or a product designed for stain
removal It is helpful on carpet and cloth surfaces to blot with a clean dry towel to
help removal. It is helpful on carpet and cloth surfaces to blot with a clean dry
towel to help remove the spot/stain.
• The brass Utility Brush is useful for heavy-duty jobs such as your BBQ grill, oven
rack, tire wheels, etc. Do not use this brush on anything that the hard brush bristles
might scratch or damage.
• The Extension Pole should be attached for mopping floors but is also useful for
reaching overhead or otherwise hard-to-reach places. When raising the unit to
reach high places, it is best to grasp Pole with both hands for better support.

CLEANING & CARE
1. Unplug the power cord from the electrical outlet after steaming.
2. Allow unit time to cool (at least 5 minutes).
3. Remove all accessories from the unit.
To remove the mop head, press the side locking button (fig. 1 & 2 below):
4. Remove Water Tank Cap and drain any remaining water from Water Tank into a
sink or tub to minimise potential mineral build-up; replace when done.
5. Collapse Extension Pole to shortest length (if storage space is limited) and wrap
the power cord around Cord Brackets. 6. Store Multi-Purpose Steamer in a cool,
dry location, along with all attachments.
Removing Mineral Build-up
A common maintenance need for steam appliances is the removal of building-up caused by
high mineral content in many municipal water supplies. This mineral build-up may limit the
effectiveness and reduce the life of your Multi-Purpose Steamer.
The best way to minimise mineral build-up is to use distilled or de-mineralised water when
using your Multi-Purpose Steamer. Also, it is recommended that the cleaning procedure
below be followed at least once a month to remove any deposits that form. This will help to
extend the life of your Multi-Purpose Steamer and keep it functioning at its maximum
potential.
1. Follow steps 1-4 above. However, do not replace Water Tank Cap at the end of 4.

2. Insert the tip of Cleaning Pin into the opening of the Steam Nozzle to remove
mineral build-up in the nozzle. Move the pin back and forth at least 10 times (fig. 3
& 4 below).
This may also be done to clean accessories such as the Jet Nozzle.
3. Use Measuring Cup to make a mixture of approximately 100ml distilled water and
50ml vinegar.
4. Slowly pour the water-vinegar solution into Water Tank through fill hole then
replace Water Tank Cap.
5. Plug-in power cord set Steam Control Dial to HIGH and sprays full contents of
Water Tank into a sink or tub.
6. Once Water Tank is drained, turn unit off and refill Tank with 380ml of fresh
distilled water. Set Steam Control Dial back to HIGH and repeat STEP 5. If you
used a water-vinegar solution, you may need to repeat this until vinegar odour
dissipates.
7. Replace Water Tank Cap, unplug the power cord and store Multi-Purpose
Steamer as usual.
IMPORTANT: On average, it is recommended that you follow this procedure once per
month (if the unit is used once a week). More frequent use may require following the
procedure more often to keep you’re the appliance operating at full potential. Do not
exceed 20 hours of use without cleaning out mineral build-up.

Issue
Possible Cause
Steps to Resolve
Residue in the water tank
(first use).
The residue left over from
quality control testing.
This is normal and not cause
for concern.
Plug electrical cord into the
outlet.
Reset circuit breaker/ground
licensed electrician.
Water Tank is empty.
Refill Water Tank.
Refer to Removing Mineral
Build-up section.
The weighted brass ball
come loose.
Increasing the setting of the
flow of steam.
Refer to Removing Mineral
Build-up section.
At the HIGH setting, small
reduce this water spotting.
The weighted brass ball is an
Tank.
TROUBLESHOOTING
Unit is not plugged in.
Unit fails to heat up or power
indicator does not illuminate.
The unit heats up but fails to
steam (NOTE: Always allow
time for the unit to heat up
begin producing steam.)
The steam output is weak or
intermittent.
Unit is emitting water in the
steam flow.
Rattling sound from Water
Tank.
Household circuit breaker/
ground fault interrupter has
tripped or blown a fuse.
Mineral build-up in the unit.
connected to end of water
tube inside Water Tank has
Steam Control Dial is set to
LOW.
Mineral build-up in the unit.
Steam Control Dial is set to
HIGH.
Sound is being caused by
weighted brass ball
connected to end of water
tube inside Tank.
fault interrupter or replace
the fuse. If you need
assistance, contact a
Reattach it by snapping it
back onto black nozzle at
end of tube.
Steam Control Dial to
MEDIUM or HIGH will result
in a stronger (and wetter)
amounts of water may be
released along with the
steam. Decreasing the
setting of the Steam Control
Dial to MEDIUM or LOW will
intentional design that helps
the unit more efficiently
utilise all water inside of


Need more information?
We hope that this user guide has given you
the assistance needed for a simple set-up.
For the most up-to-date guide for your product,
as well as any additional assistance you may require,
head online to help.kogan.com
 Loading...