

Page 1
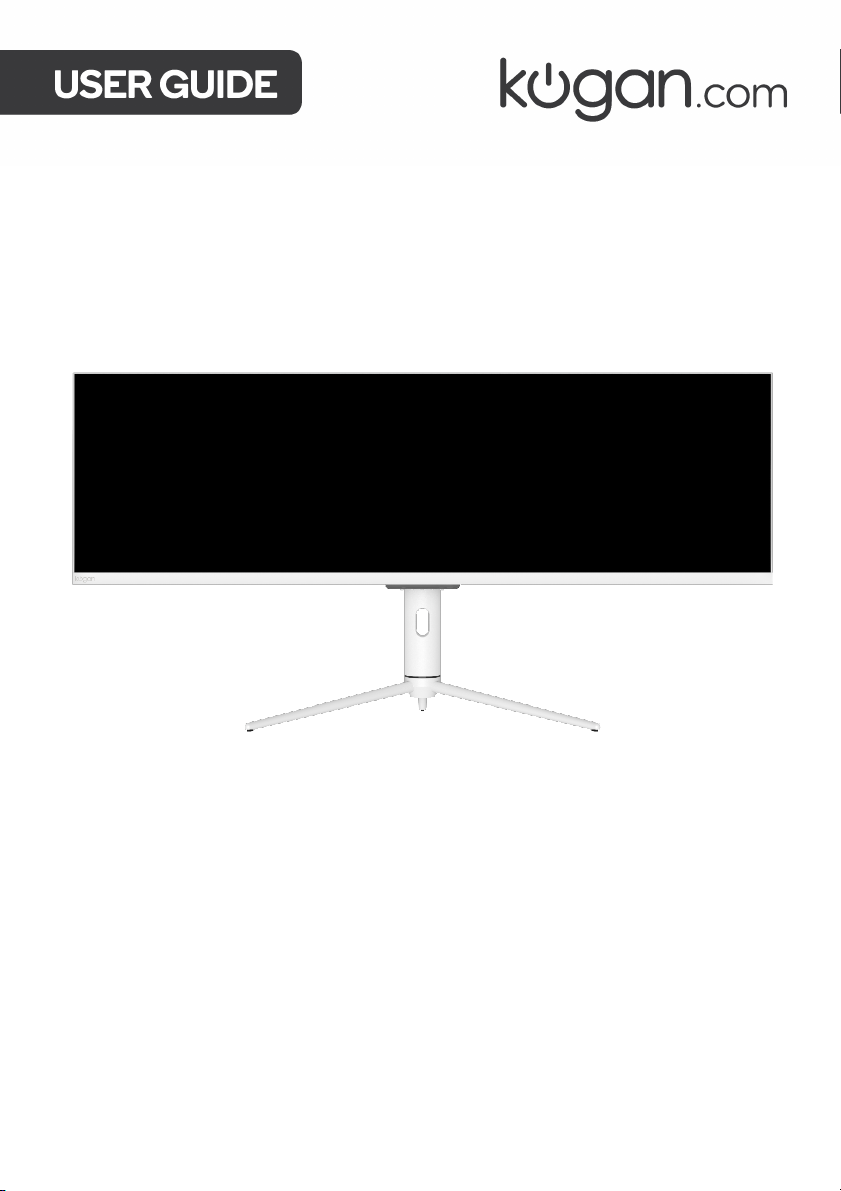
44" ULTRAWIDE USB-C
FREESYNC HDR MONITOR
(3840 x 1080 120Hz)
KAMN44UWCLA
Page 2

Page 3
SAFETY & WARNINGS
• Read all instructions before using the appliance and retain for reference.
• Unplug the monitor before cleaning it.
• Use a clean, slightly-dampened cloth to wipe the main monitor body.
• To c l e a n t h e s c r e e n : t u r n i t o f f , u n p l u g i t a n d w a i t f o r i t t o c o o l c o m p l e t e l y , t h e n w i f e
it with a dry microfibre cloth.
• Do not use cleaning alcohol, ammonia-based liquids or other harsh cleaners.
• This monitor is designed with ventilation holes on the back of the casing. Do not
cover or block them.
• Do not insert any object or spray any liquid into the vents.
• Avoid placing the monitor near heaters, stoves, fireplaces or other sources of heat,
as well as in rooms lacking adequate ventilation.
• Do not position the monitor in unsafe locations. If the monitor falls, it may be
damaged and may injure nearby people.
• Unplug the monitor if it is not going to be used for an extended period.
• Do not place heavy objects on the monitor, its power cord or any connected cable.
• Do not open the back panel of the monitor, as it contains a high-voltage current
even when not plugged in.
The terms HDMI and HDMI High-Definition Multimedia Interface,
and the HDMI Logo are trademarks or registered trademarks of
HDMI Licensing Administrator, Inc. in the United States and other
countries.
Page 4
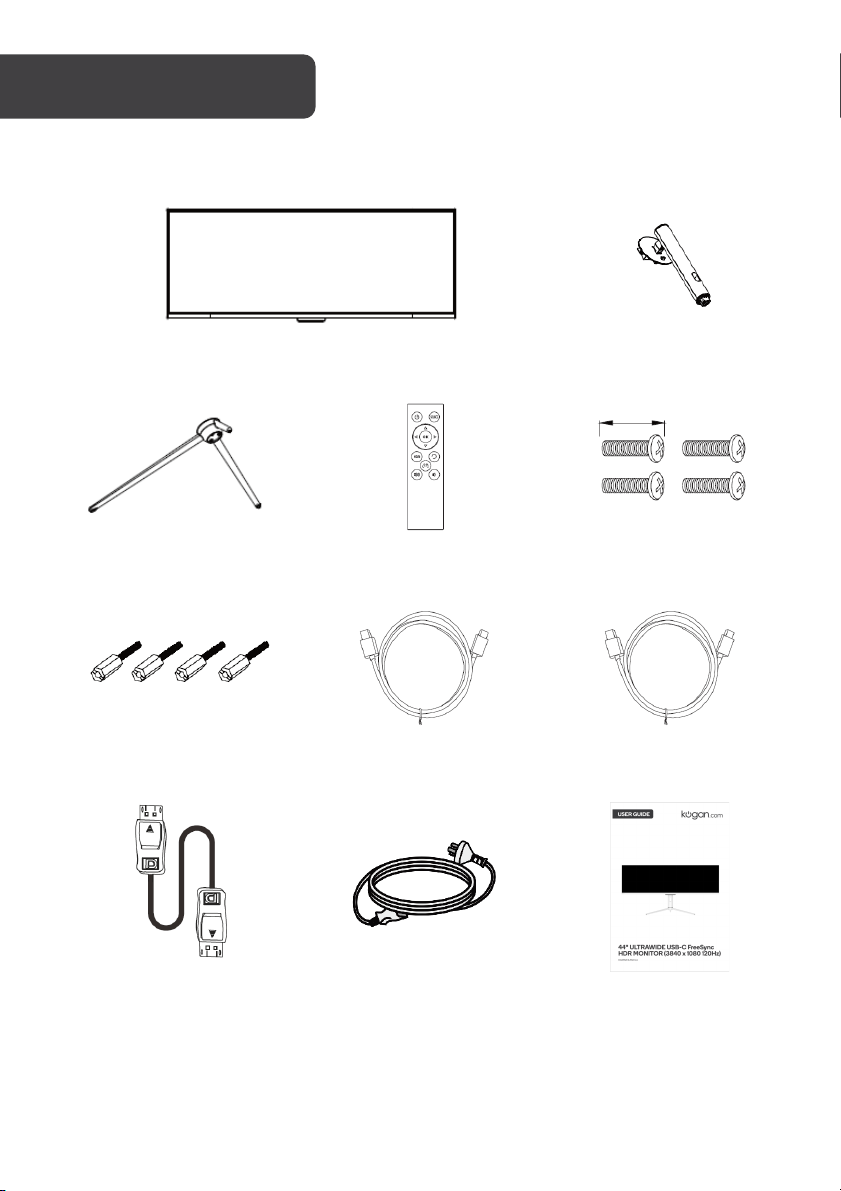
Monitor
Stand stem
Stand base
Remote control
M5x15 screws (x4)
VESA screws (x4)
USB cable
USB-C cable
DisplayPort cable
Power cable
User guide
COMPONENTS
M5x15mm
Page 5
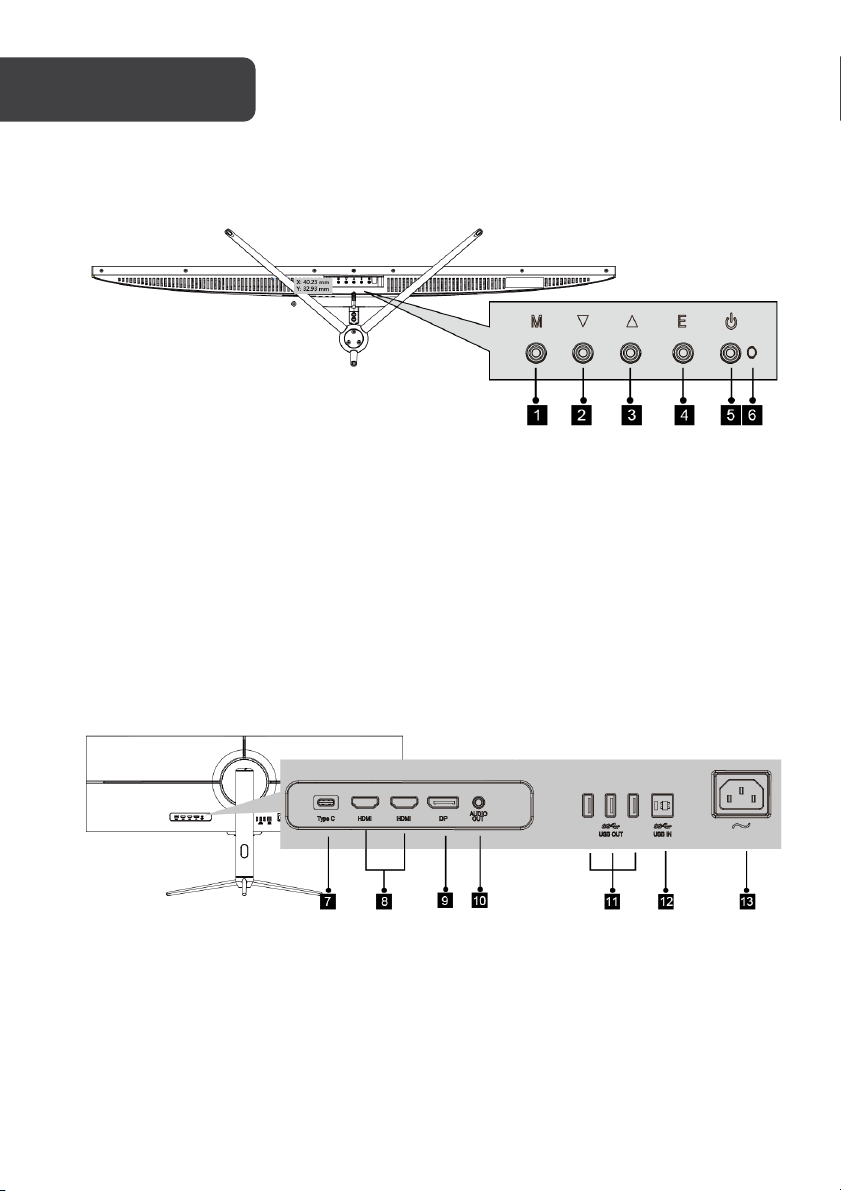
Controls
1. Menu/Enter
2. Down
3. Up
4. Exit
5. Power On/Off
6. LED indicator
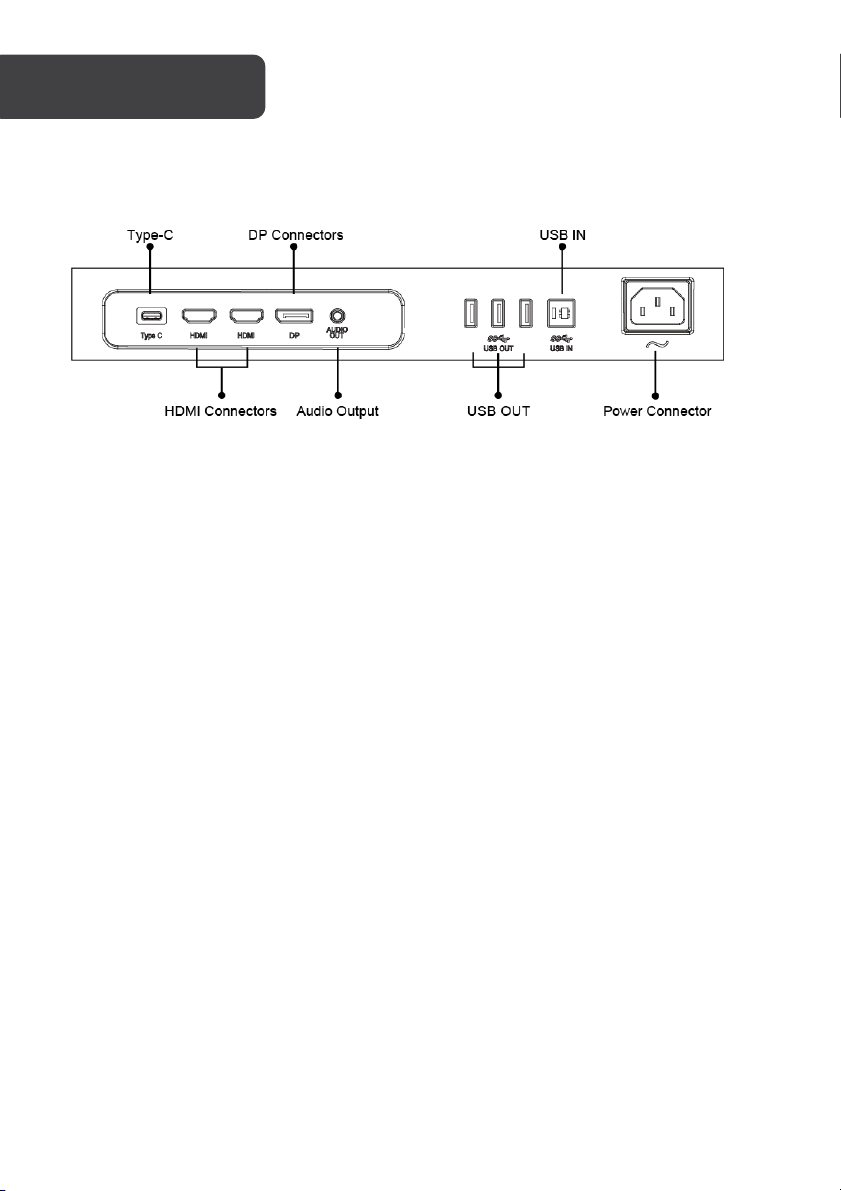
Ports
7. Ty p e -C input 12. USB IN (Type-B input)
8. HDMI input 13. Power input
9. DisplayPort input
10. Audio output
11. USB OUT (Type-A output)
OVERVIEW
Page 6
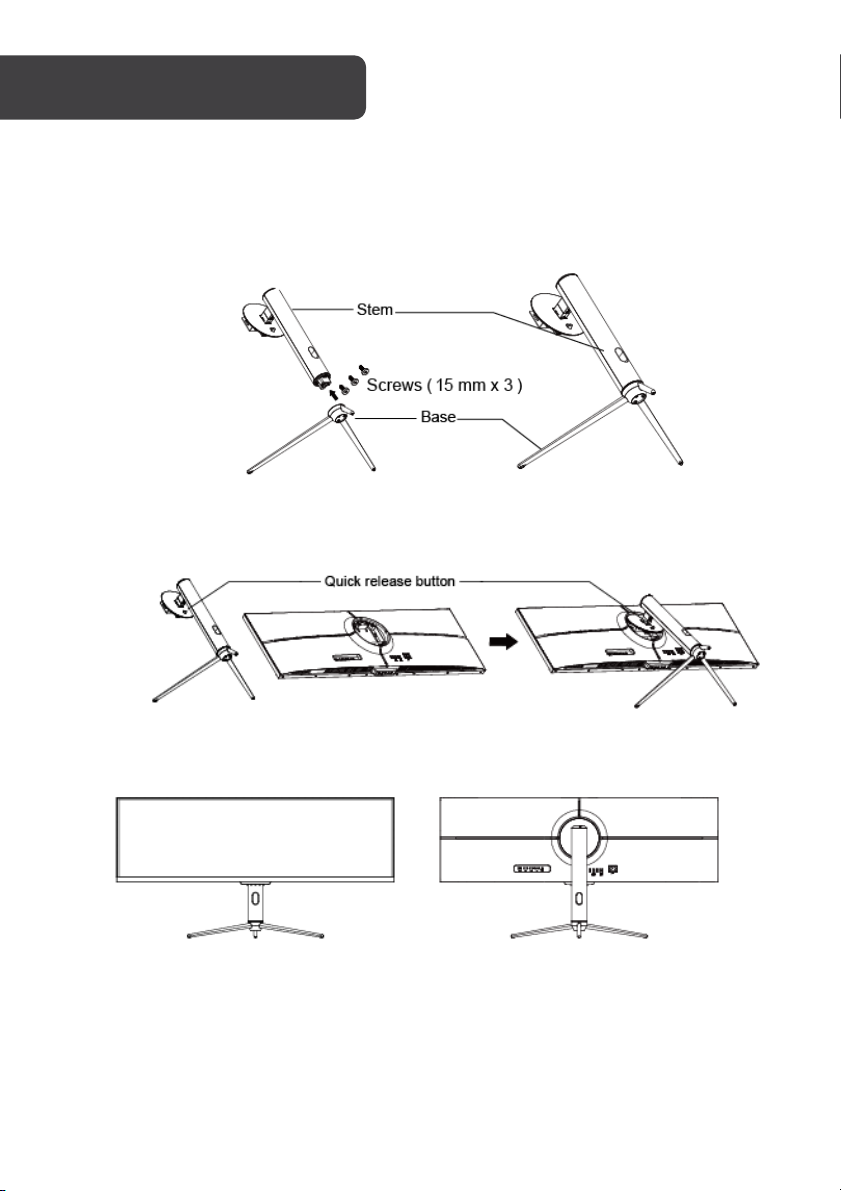
Installing the Stand Base
1. Ta k e o u t t h e t w o m a i n p a r t s o f t h e s t a n d . T h e n u s e t h e s c r e w d r i v e r a n d t h e s c r e w s
to fasten base to the stem.
2. Ta k e o u t t h e m o n i t o r a n d put it on the flat foam, insert the stand on the back of
monitor.
3. Use both hands to stand the assembled monitor on a flat desktop.
Page 7
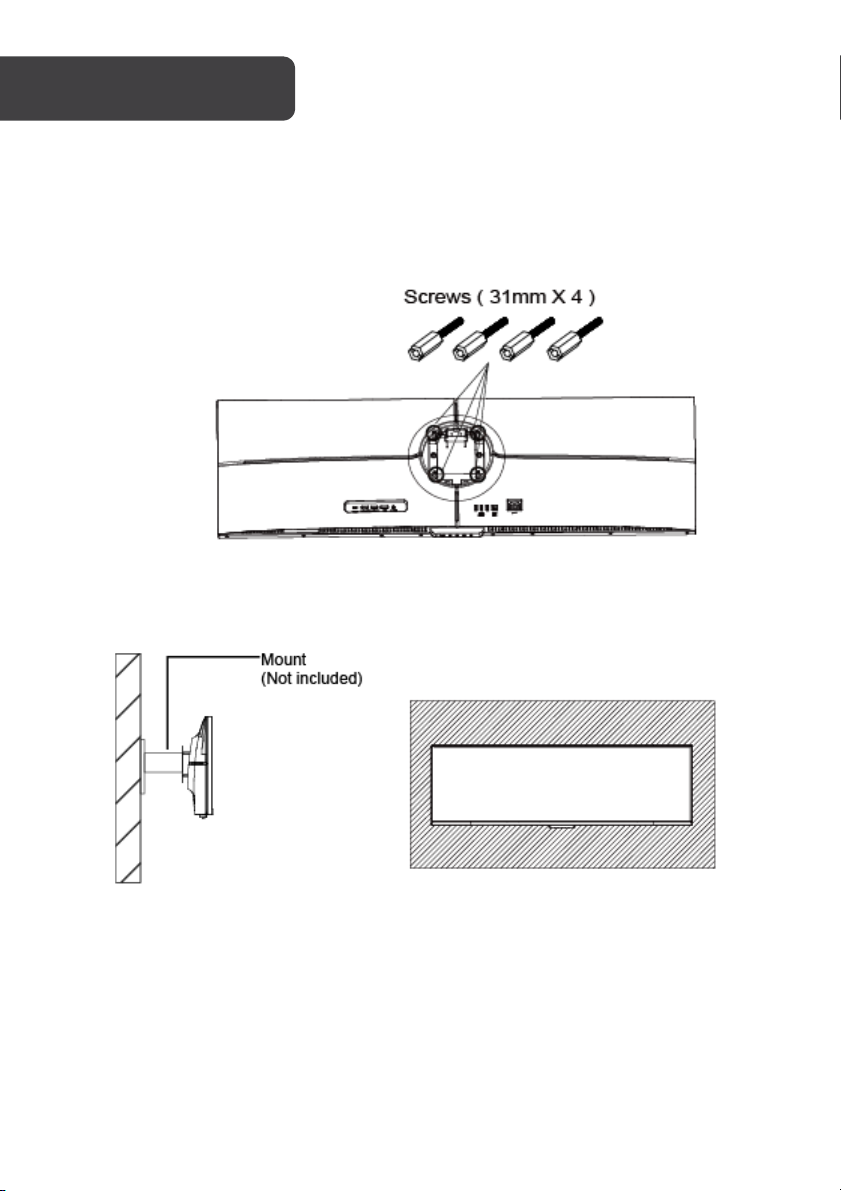
VESA MOUNT
Fol lo w th e st eps b el ow t o in sta ll o nt o a mo ni tor a rm o r w al l mo un t (no t in cl ud ed )
1. Press the button to remove the adapter on back of monitor, then tighten the
included four VESA screws onto the mounting holes on back of monitor.
2. Fol low the dir ect ions supplied with your mount, stand, or accessory and install the
monitor on the wall or fixture as desired.
Page 8
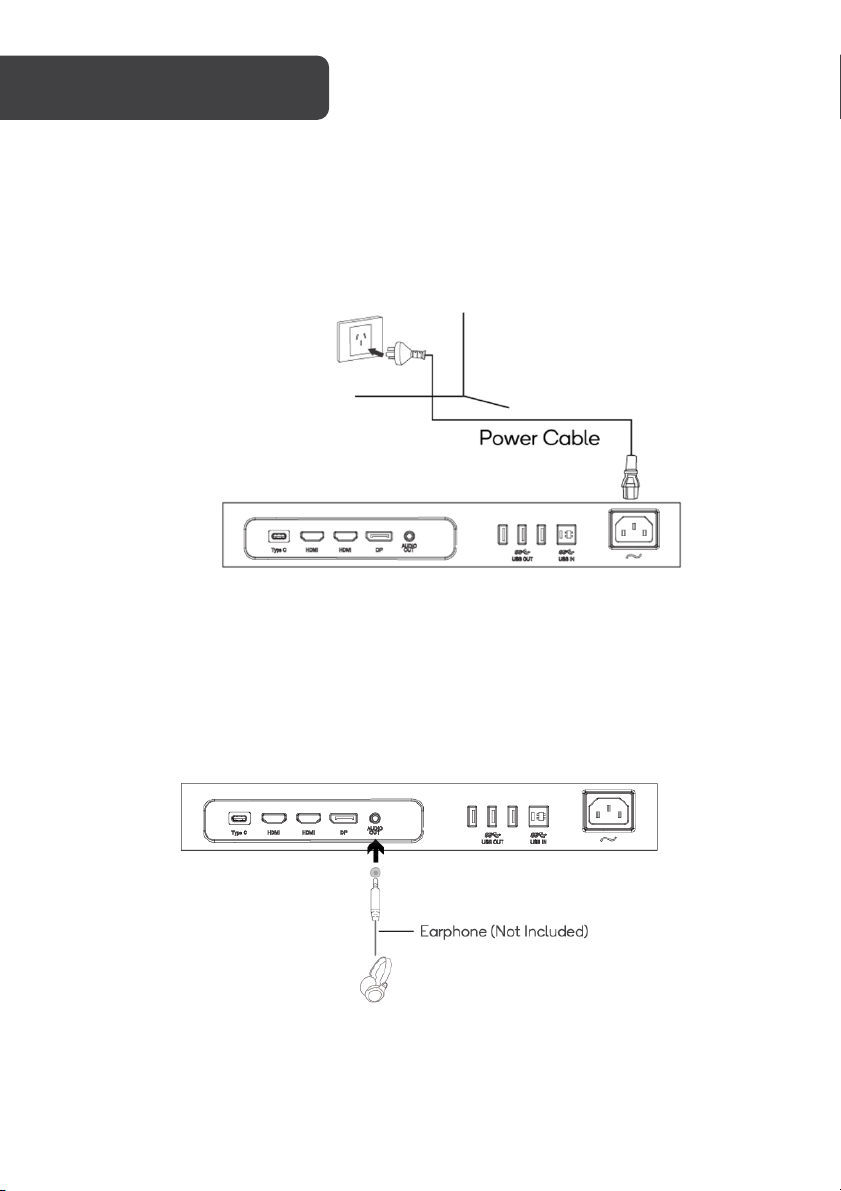
CONNECTIVITY
Power Cable
Connect the included power cable to the power connector, then plug the other end into the
power outlet.
3.5mm Audio Out
Connect earphones or a set of external speakers to the 3.5mm port on the monitor to
receive audio signals from your monitor. Yo u m a y n e e d t o s e t t h e m o n it o r t o be y ou r PC ’ s
sound output. Earphones and other audio devices are not included.
Page 9
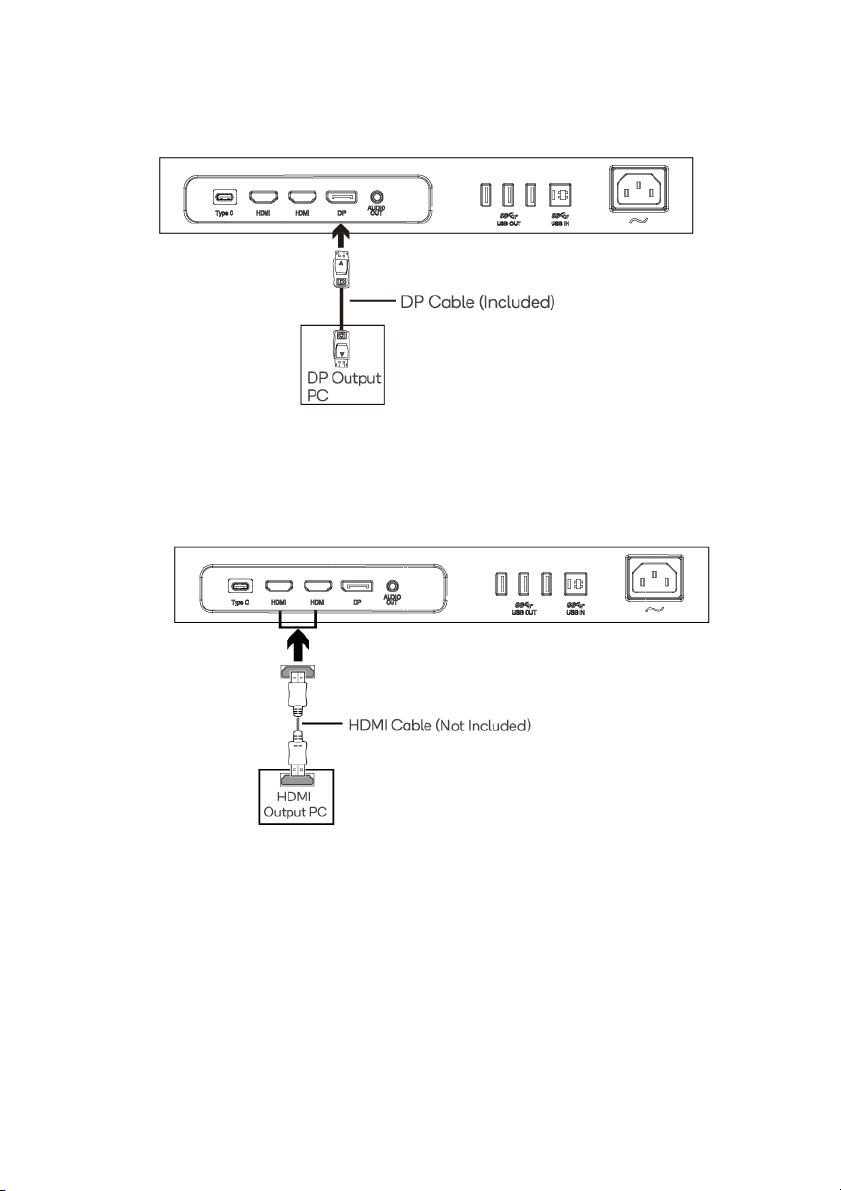
DisplayPort
Connect your computer to the monitor using the included DisplayPort cable.
HDMI
Connect your computer to the monitor using an HDMI cable.
USB hub
To u s e t h e m o n i t o r ’ s i n t e g r a t e d U S B h u b f u n c t i o n a l i t y , u se the included USB-A to USB-B
cable to connect a USB-A port on your PC to the monitor’s USB IN port.
Yo u c a n n o w c o n ne ct devices like a mouse, keyboard and flash drive.
Page 10
OPERATION
1. Connect your computer to the monitor as outlined in Connectivity.
2. Connect the power cable to your monitor, then connect the other end to your
power source. It is recommended that you use a surge protector with adequate
voltage if a wall outlet cannot be reached directly.
3. Locate the power button on the monitor and press it to turn the monitor on.
FreeSync
The feature itself is off by default. In order to use this feature, please note you must have
hardware with FreeSync capability, a DisplayPort or HDMI cable and the latest graphic
drivers. To use this feature, connect your computer and monitor with DisplayPort or HDMI.
After connecting, you may receive a prompt to enable the feature on your computer. If you
do not receive the prompt, you may need to enable the function in your graphics card menu.
See your graphics card manufacturer’s documentation for instructions on how to turn on
and/or enable FreeSync.
Page 11
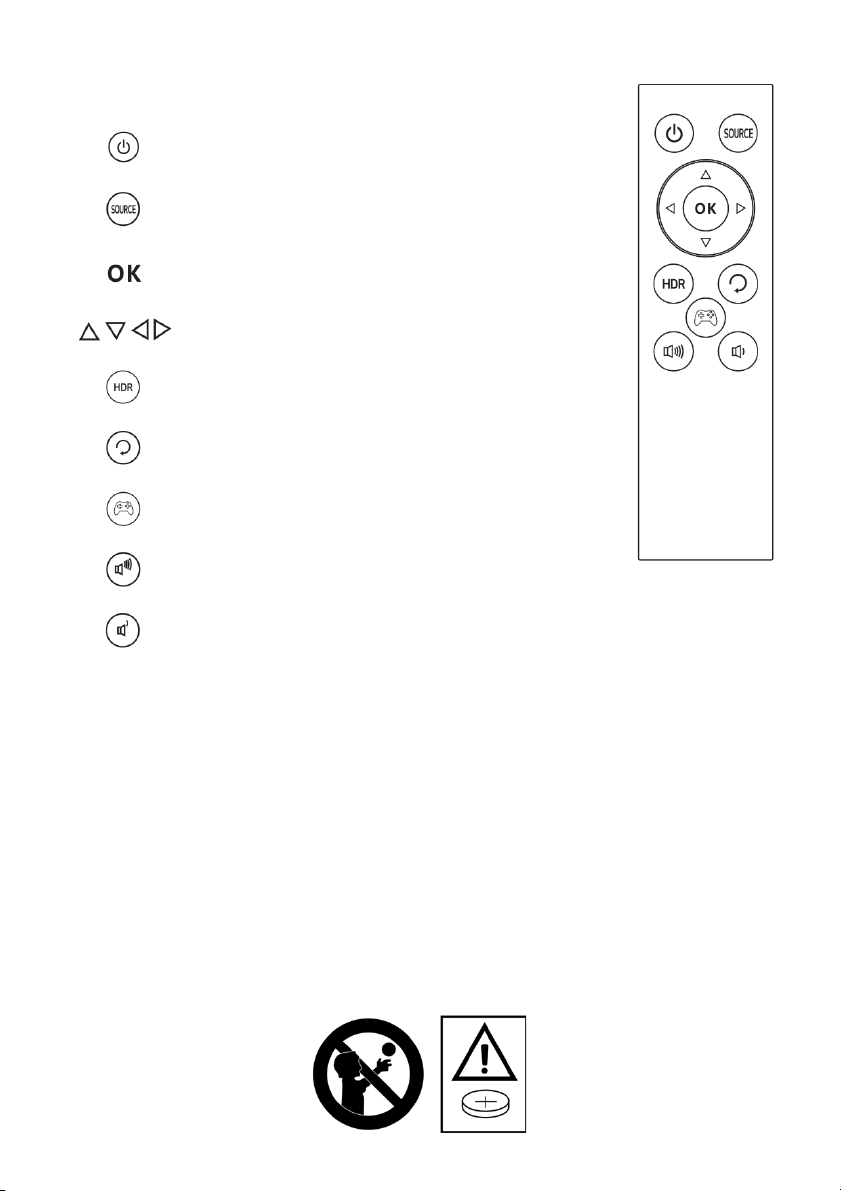
Press to turn the monitor on or off.
Press to switch display input.
Press to enter the OSD menu and confirm setting.
Press to navigate OSD menu.
Press to turn HDR on or off.
Press to exit the OSD menu or return to the
previous menu.
Press to turn Gameplus mode on or off.
Press to increase volume
Press to decrease volume.
Remote control
• Avoid pressing two remote buttons simultaneously as this may cause
malfunctions.
• Avoid using the remote in areas with extreme temperature fluctuations.
• If the remote will not be used for extended periods of time, remove the battery.
• The remote control's range is approximately 16.4-23 feet. Use it within this range.
• Use 3V lithium battery (CR2032 or equivalent).
Remember: small batteries are easily swallowed by young children. Keep batteries away
from children. Call 000 if you believe a battery was ingested.
Page 12
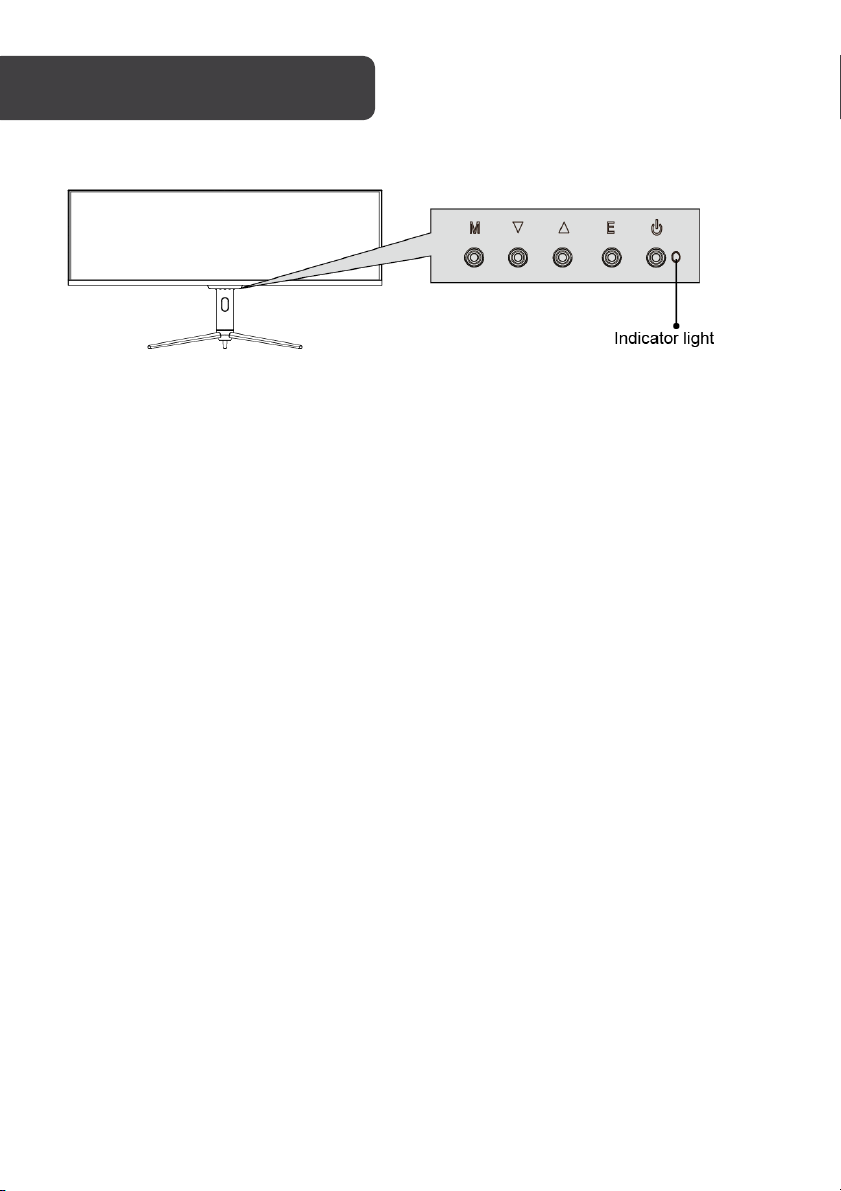
INDICATOR LIGHT
A solid blue light indicates that power is on and the monitor is operating normally.
A flashing blue light indicates no video input has been detected: ensure your computer is on
and all video cables are fully inserted and/or connected.
Page 13
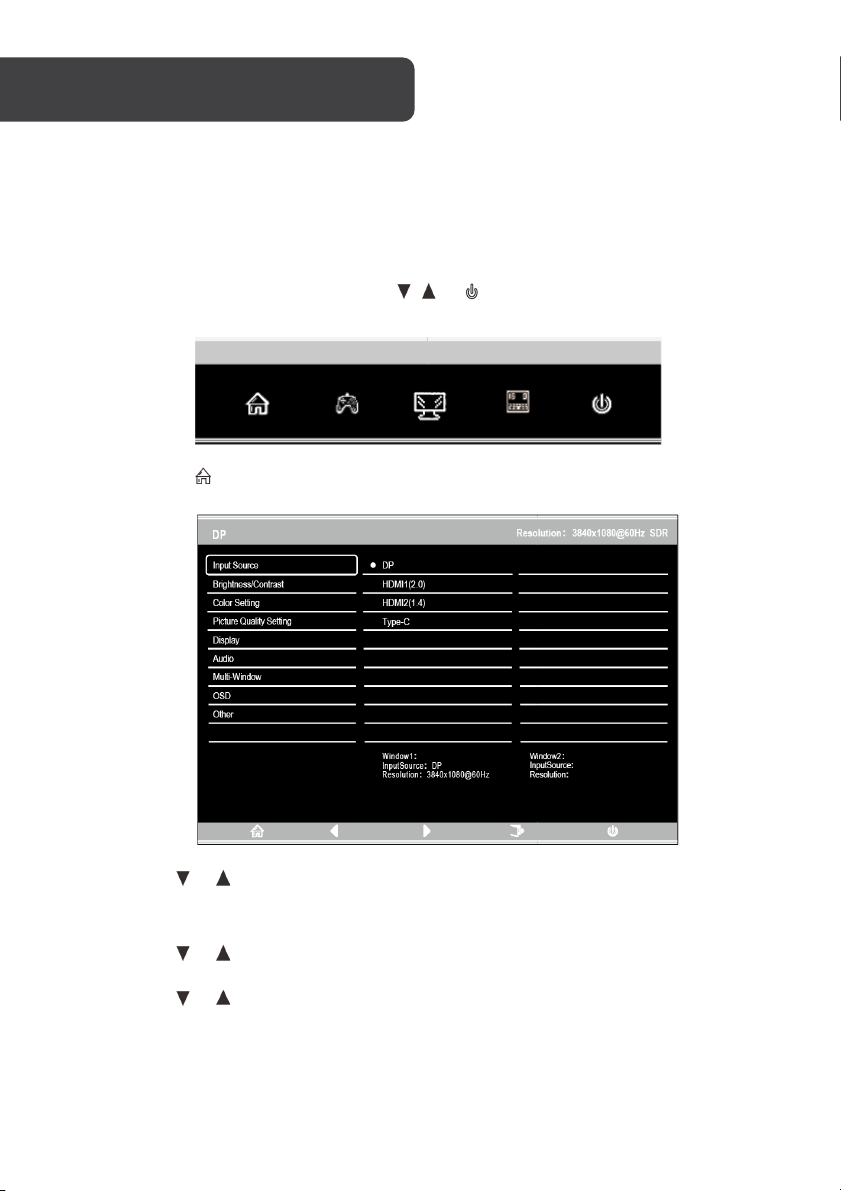
The On-Screen Display (OSD) menu may be used to adjust your monitor’s settings and
appears on screen after turning on the monitor and pressing the M button.
When using the monitor for the first time, the monitor will automatically be configured to
optimal settings according to the graphics card detected.
1. Press any one of the buttons(M/ / /E/ )to activate the navigation window.
2. Press M to enter the OSD menu.
3. Press or to browse functions.
Highlight the desired function, then press M to enter the sub-menu.
Press or to browse sub-menus, then press M to highlight the desired function.
Press or to highlight an option, then press M to confirm the settings and exit
the current screen.
4. Press E to exit the current screen.
Page 14
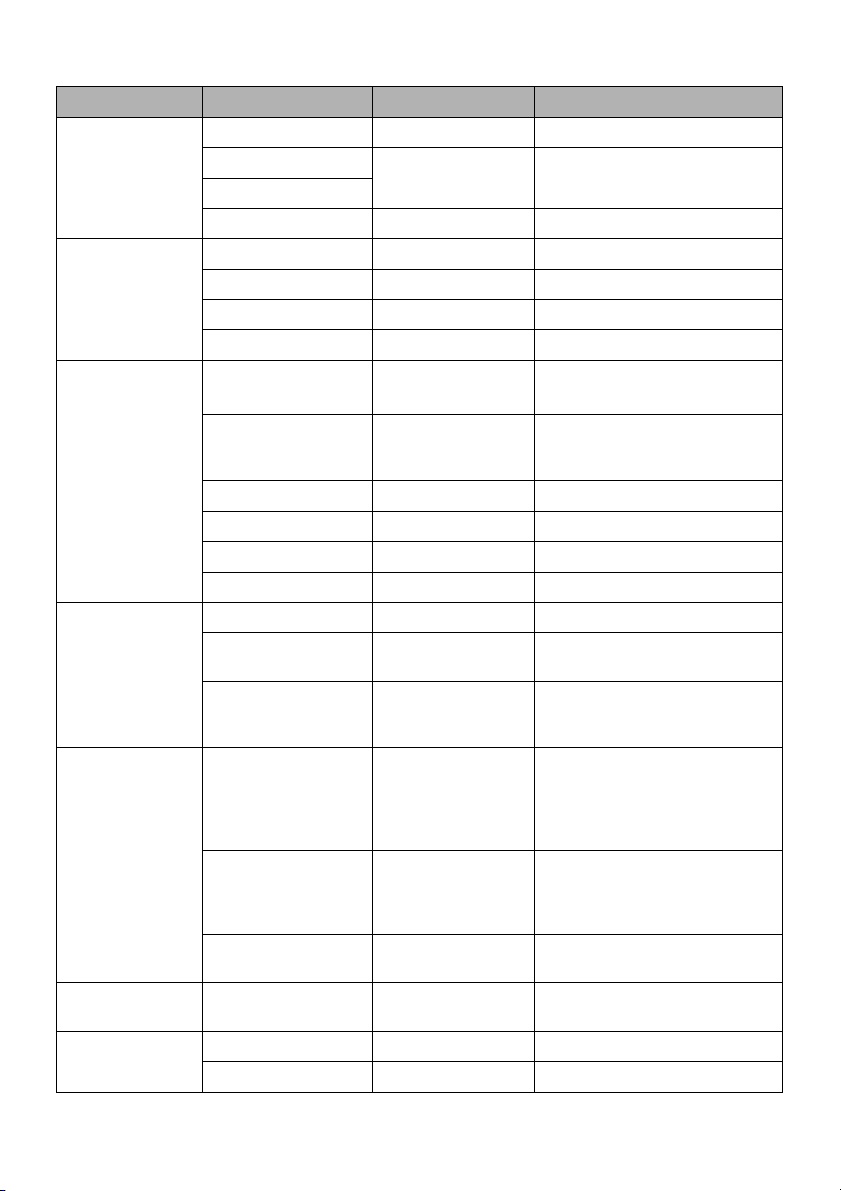
List of Functions
Main Menu
Sub-Menu
Options
Description
Input Source
DP
N/A
Switch to DisplayPort input
HDMI 1 (2.0)
N/A
Switch to HDMI signal input
HDMI 2 (1.4)
Type-C
N/A
Switch to Type-C signal input
Brightness/
Contrast
Brightness
0~100
Adjust display brightness
Black level
0~100
Adjust display black levels
Contrast
0~100
Adjust display contrast
DCR
On, Off
Enable/disable DCR function
Color Setting
Gamma
Gamma 1.8/2.0/
2.2/2.4/2.6
Set Gamma add-in
Picture Mode
Standard, Photo,
Movie, Game,
FPS, RTS, sRGB
Set visual mode according to
activity
Color Temperature
Warm, Cool, User
Select color temperature
Low Blue Light
0~100
Set blue light filtering level
Hue
0~100
Adjust hue levels
Saturation
0~100
Adjust saturation levels
Picture Quality
Setting
Sharpness
0~100
Set display sharpness
Response Time
Off, High, Middle,
Low
Adjust the response time of
the monitor
Noise Reduction
Off, High, Middle,
Low
Reduce the interference of
image noise caused by signal
source interference
Super Resolution
Off, High, Middle,
Low
When the resolution of the
display screen is low, this
function can be turned on to
enhance the image
resolution.
Dynamic Luminous
Control
On, Off
Compensate for gray scale
display screen and
strengthen the expression of
gray scale
MPRT
On, Off
Sets the moving picture
response time
Display
Aspect Ratio
Wide Screen, 4:3,
1:1, Auto
Select on-screen aspect ratio
Audio
Mute
On, Off
Mute/unmute
Volume
0~100
Adjust audio volume
Page 15
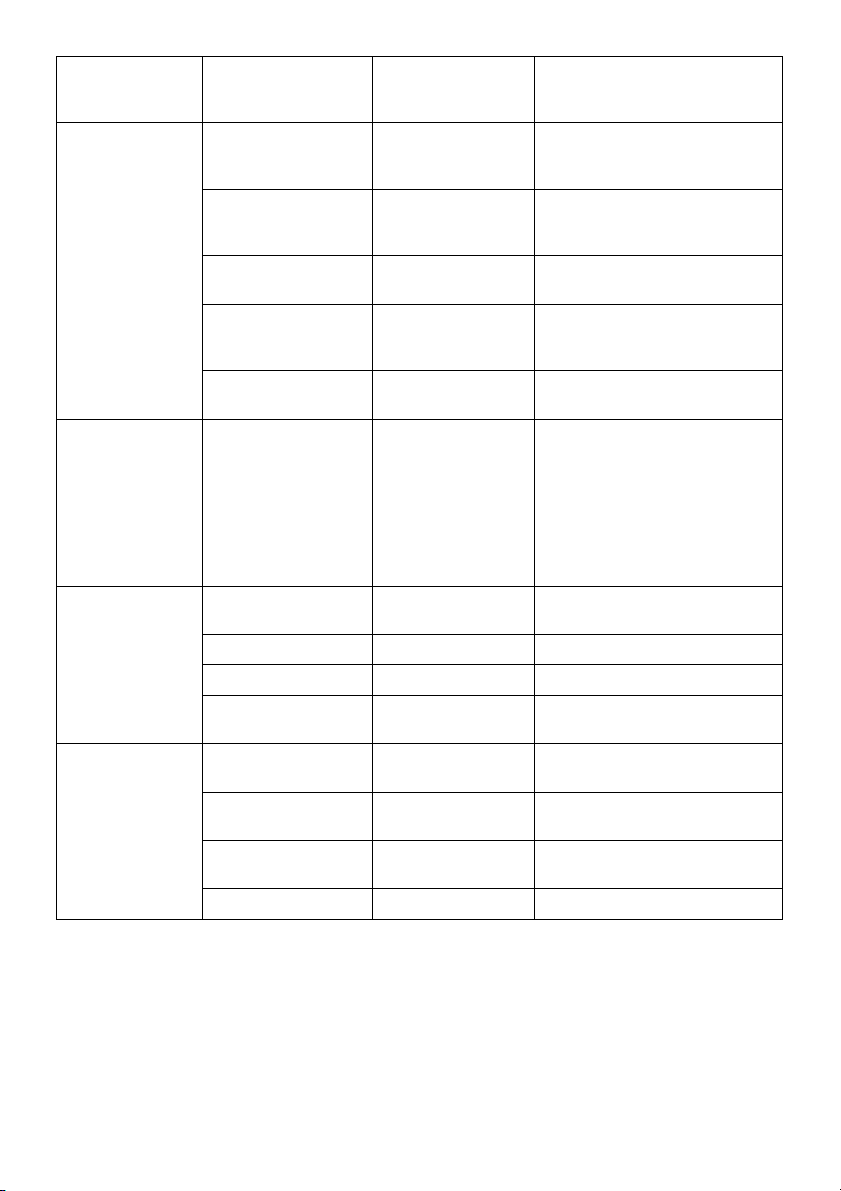
Audio Source
Auto Source, DP,
HDMI 1(2.0), HDMI
2(1.4), Type-C
Select audio input via HDMI,
DisplayPort or Type-C
Multi-Window
Multi-Window
Off, PIP Mode,
PBP 2Win
Select PIP/PBP modes
according to the number of
input signals etc.
Sub Win2 Input
DP, HDMI 1(2.0),
HDMI 2(1.4), TypeC
Select according to input
signal for PIP/PBP mode
PIP Size
Small, Medium,
Large
Adjust the PIP/PBP window
size
PIP Position
Top Right, Top
Left, Bottom
Right, Bottom Left
Adjust the PIP/PBP window
position
Swap
NONE
Swap the PIP/PBP signal
sources
OSD
Language
English,
简体中文,한국어,
Русский,
Español, 日本語,
Français
Set OSD language
OSD H-Position
0~100
Adjust OSD horizontal
position
OSD V-Position
0~100
Adjust OSD vertical position
OSD Transparency
0~100
Set OSD overall transparency
OSD Time Out
5~100
Set how long the OSD
remains open after last input
Other
DP Version
DP1.1, DP1.2
DisplayPort compatibility
setting
FreeSync (Adaptive
Sync)
On, Off
Enable/disable FreeSync
function
HDR
Off, On,
Auto Detect
Enable/disable HDR mode
Reset
None
Restore factory defaults
Page 16
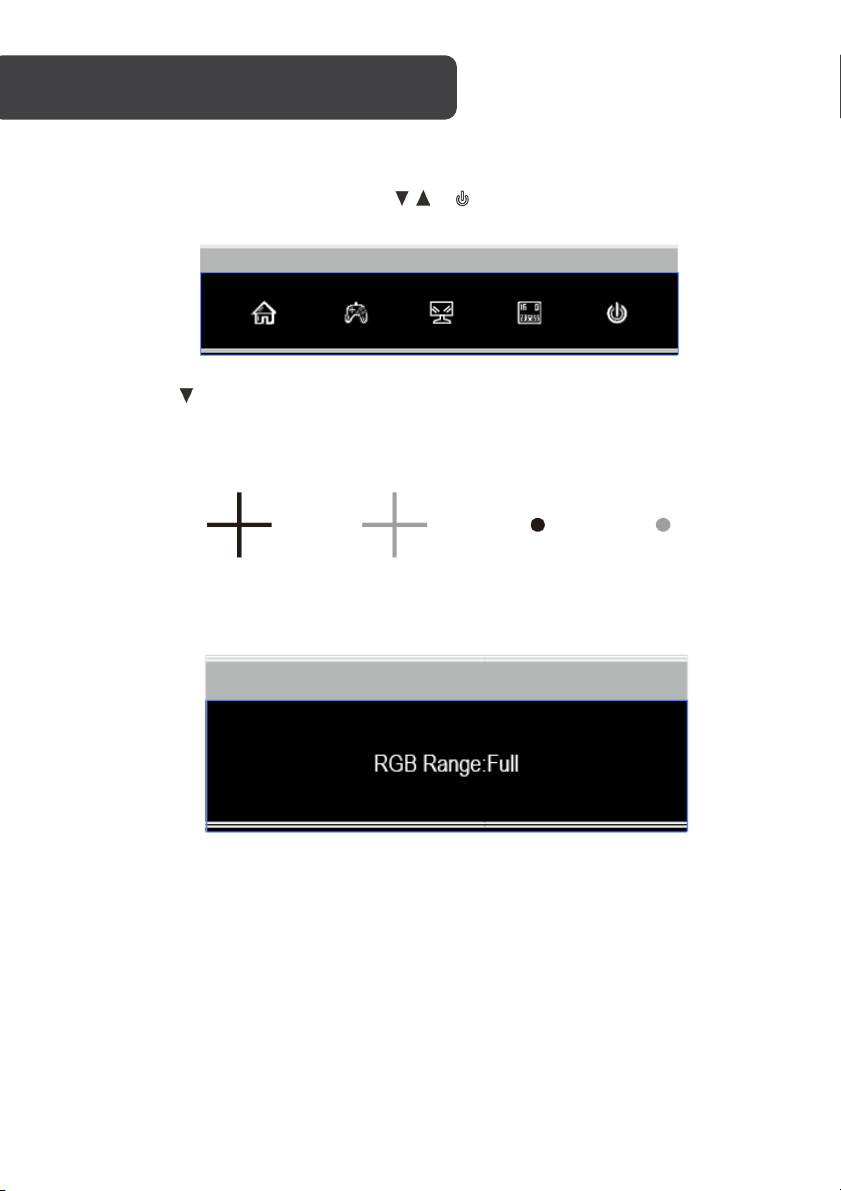
GAMEPLUS SWITCHING
1. Press any one of the buttons(M, , ,E, )to activate the navigation window.
2. Press button to switch Gameplus modes. According to the needs of your game,
choose the corresponding game icon. These game icons are primarily designed to
optimize your aim during shooting games, though they can be used for other
scenarios.
3. Press E button to switch RGB Ranges included Limited and Full. Full Range is
suitable for most activities.
Page 17

Model
KAMN44UWCLA
Screen Size
44"
Aspect Ratio
32:9
Backlight
E-LED
Brightness
600 cd/m2 (HDR on), 350 cd/m2 (Ty p i c a l )
Panel
IPS
Resolution
3840 x 1080
Refresh Rate
120Hz
Response Time
1ms
Viewing Angle
≥178° (H) / 178° (V)
Contrast Ratio
1000:1
VESA Mounting
100 x 100
Colours
1.07B
AMD FreeSync
Yes
Signal Input
DP1.2 * 1, HDMI1.4 * 1, HDMI2.0 * 1, USB-A 3.0*3, USB-B
3.0*1, USB-C 3.1*1
Power
AC 100-240V~ 50/60Hz 2.2A
Audio
Speakers
Yes
Audio Out
Ye s
Additional Functions
Low Blue Light
Yes
Physical Dimensions
Dimensions (with stand)
1089 x 547 x 287mm
Dimensions (without stand)
1089 x 329 x 83mm
Net Weight
11.5kg
Gross Weight
14.4kg
Page 18
NOTES
Page 19
Page 20

Need more information?
We hope that this user guide has given you
the assistance needed for a simple set-up.
For th e mo st up-to-date guide for your product,
as well as any additional assistance you may require,
head online to help.kogan.com
 Loading...