

Page 1

27" Cinema Display WQHD
2560x1440 IPS LED Monitor
Quick Start Guide
KALED27MONC
Safety Precautions
Read these instructions carefully for future reference.
1. Unplug the monitor before cleaning it with a slightly damp, soft cloth.
2. Wiping the screen with a dry cloth is recommended, only once the screen has been
turned off.
3. Do not use cleaning alcohol or ammonia-based liquids.
4. This monitor is designed with ventilation holes on the back of the cabinet. Do not cover
them or block them.
5. Avoid placing the monitor near heaters, stoves, fireplaces or other sources of heat, as
well as in rooms lacking in adequate ventilation.
6. Do not insert any objects or spray liquids into the vents.
7. Please do not position the monitor in unsafe locations. If the monitor falls, it may be
damaged and may hurt nearby people.
8. Unplug the monitor if it is not going to be in use for an extended period of time.
9. Please do not put heavy items on the monitor or on its cord.
10. Do not open the monitor back panel, as the monitor contains high voltage current, even
when not plugged into a power source.
What's In The Box
• Monitor
• Dual link DVI-D cable
• Power cord
• Power adapter
• Warranty card
• Quick Start Guide
• Audio Cable
Features
• 1.07B colours
• Smart image screen settings – OSD with simple layout
• Smart control interfaces for easy settings
• Auto function: when no settings are select, will auto-adjust for optimal results.
1
Page 2
Basic Setup
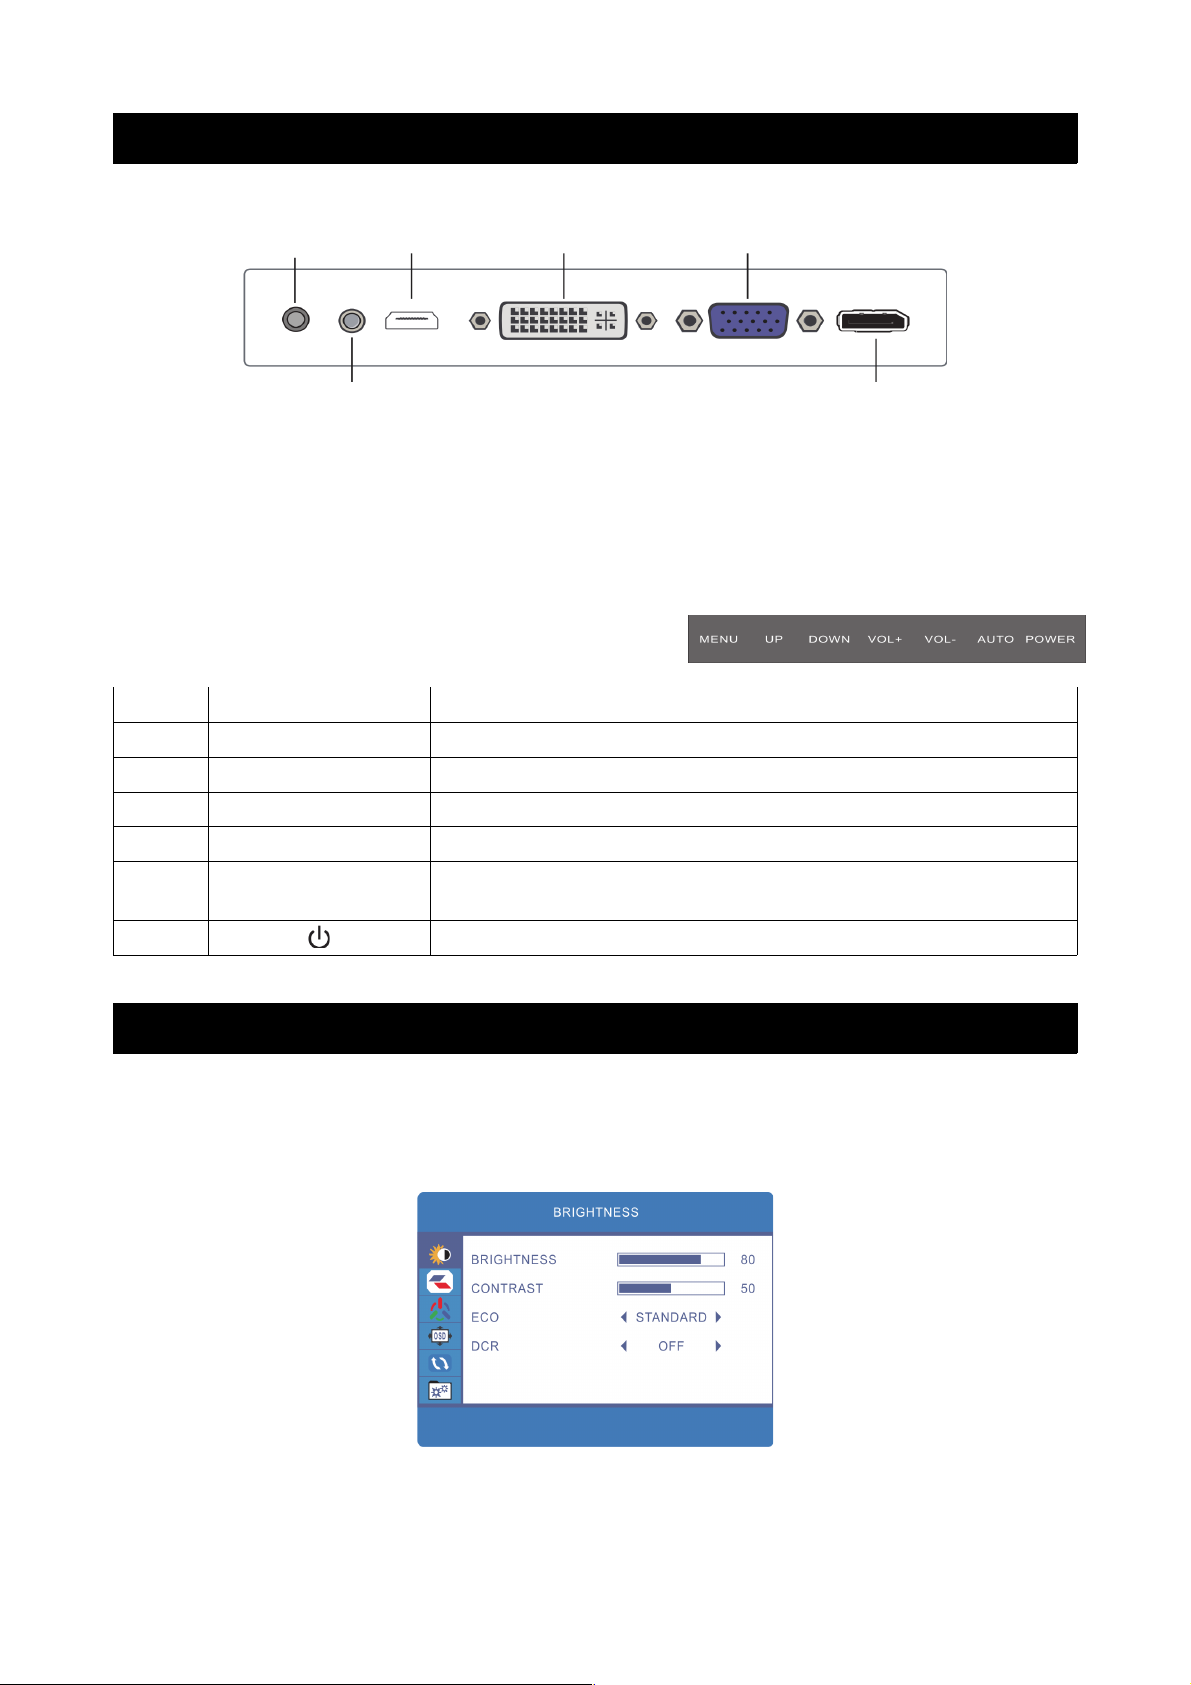
1. Insert the DVI cable, HDMI cable, DisplayPort cable or VGA cable into the PC output port.
We recommend using one of the digital options (HDMI or DisplayPort)
2. The monitor has a wide power voltage range; it can be used on AC100-240V~ 50/60Hz
power supplies.
3. Connect the power cable to the monitor power socket, and to the power source in the
room.
4. Turn on the power source supply.
5. To switch on the monitor, press the power control key.
Image Settings
The right side of the monitor has five keys that will adjust
the monitor settings with aid of the OnScreen Display.
1 MENU Show main menu
2 UP Adjust the options – move up or higher/Hotkey
3 DOWN Adjust the options – move down or lower/Hotkey
4 VOL + Increase sound level/Adjust the options – move right
5 VOL - Decrease sound level/Adjust the options – move left
6 AUTO
Exit main menu/when no menus – auto adjust image/display
source list
7 Power ON/OFF
Functions
Brightness
Press MENU, and the main menu will appear as below
Press UP/DOWN to select BRIGHTNESS in the main menu, then press MENU to enter.
2
DC IN
HDMI connector
DVI connector
VGA connector
Audio connector DisplayPort connector
Page 3
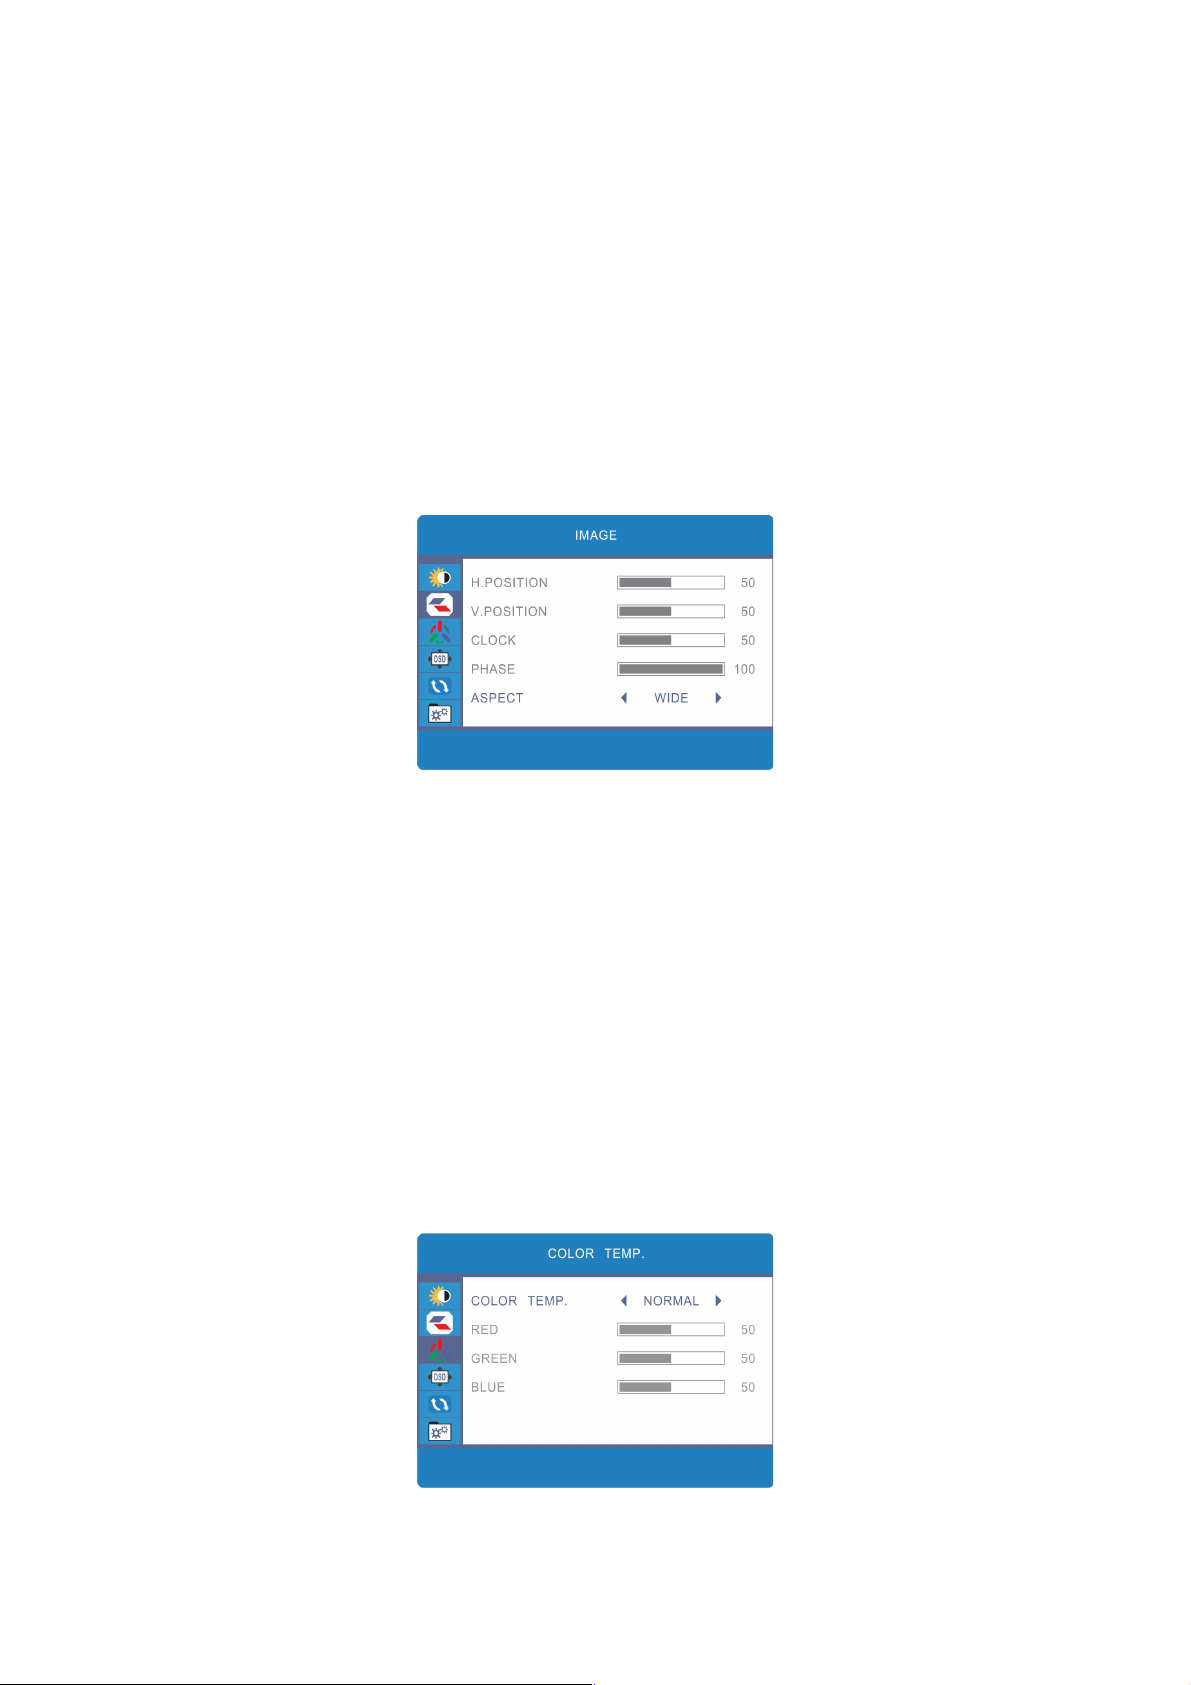
• BRIGHTNESS
Press UP/DOWN to select BRIGHTNESS, then press MENU to confirm, then press VOL+/VOL- to adjust.
• CONTRAST
Press UP/DOWN to select CONTRAST, then press MENU to confirm, then press VOL+/VOL- to adjust.
• ECO
Press UP/DOWN to select ECO, then press MENU to confirm. Then press VOL+/VOL- to select from the choices.
(Standard, Text, Movie, Game).
• DCR
Press UP/DOWN to select DCR, then press MENU to confirm. Then press VOL+/VOL- button to select ON
or OFF.
Image
Press MENU, and the main menu will appear as below
Press UP/DOWN to select IMAGE in the main menu, then press MENU to enter.
• H.POSITION
Press UP/DOWN to select H.POSITION, then press MENU to confirm, then press VOL+/VOL- to adjust.
• V.POSITION
Press UP/DOWN to select V.POSITION, then press MENU to confirm, then press VOL+/VOL- to adjust.
• CLOCK
Press UP/DOWN to select CLOCK, then press MENU to confirm, then press VOL+/VOL- to adjust.
• PHASE
Press UP/DOWN to select PHASE, then press MENU to confirm, then press VOL+/VOL- to adjust.
• ASPECT
Press UP/DOWN to select ASPECT, then press MENU to confirm, then press VOL+/VOL- to select between
WIDE or 4:3.
Colour Temperature
Press MENU, and the main menu will appear as below
Press UP/DOWN to select COLOR TEMP in the main menu, then press MENU to enter.
3
Page 4
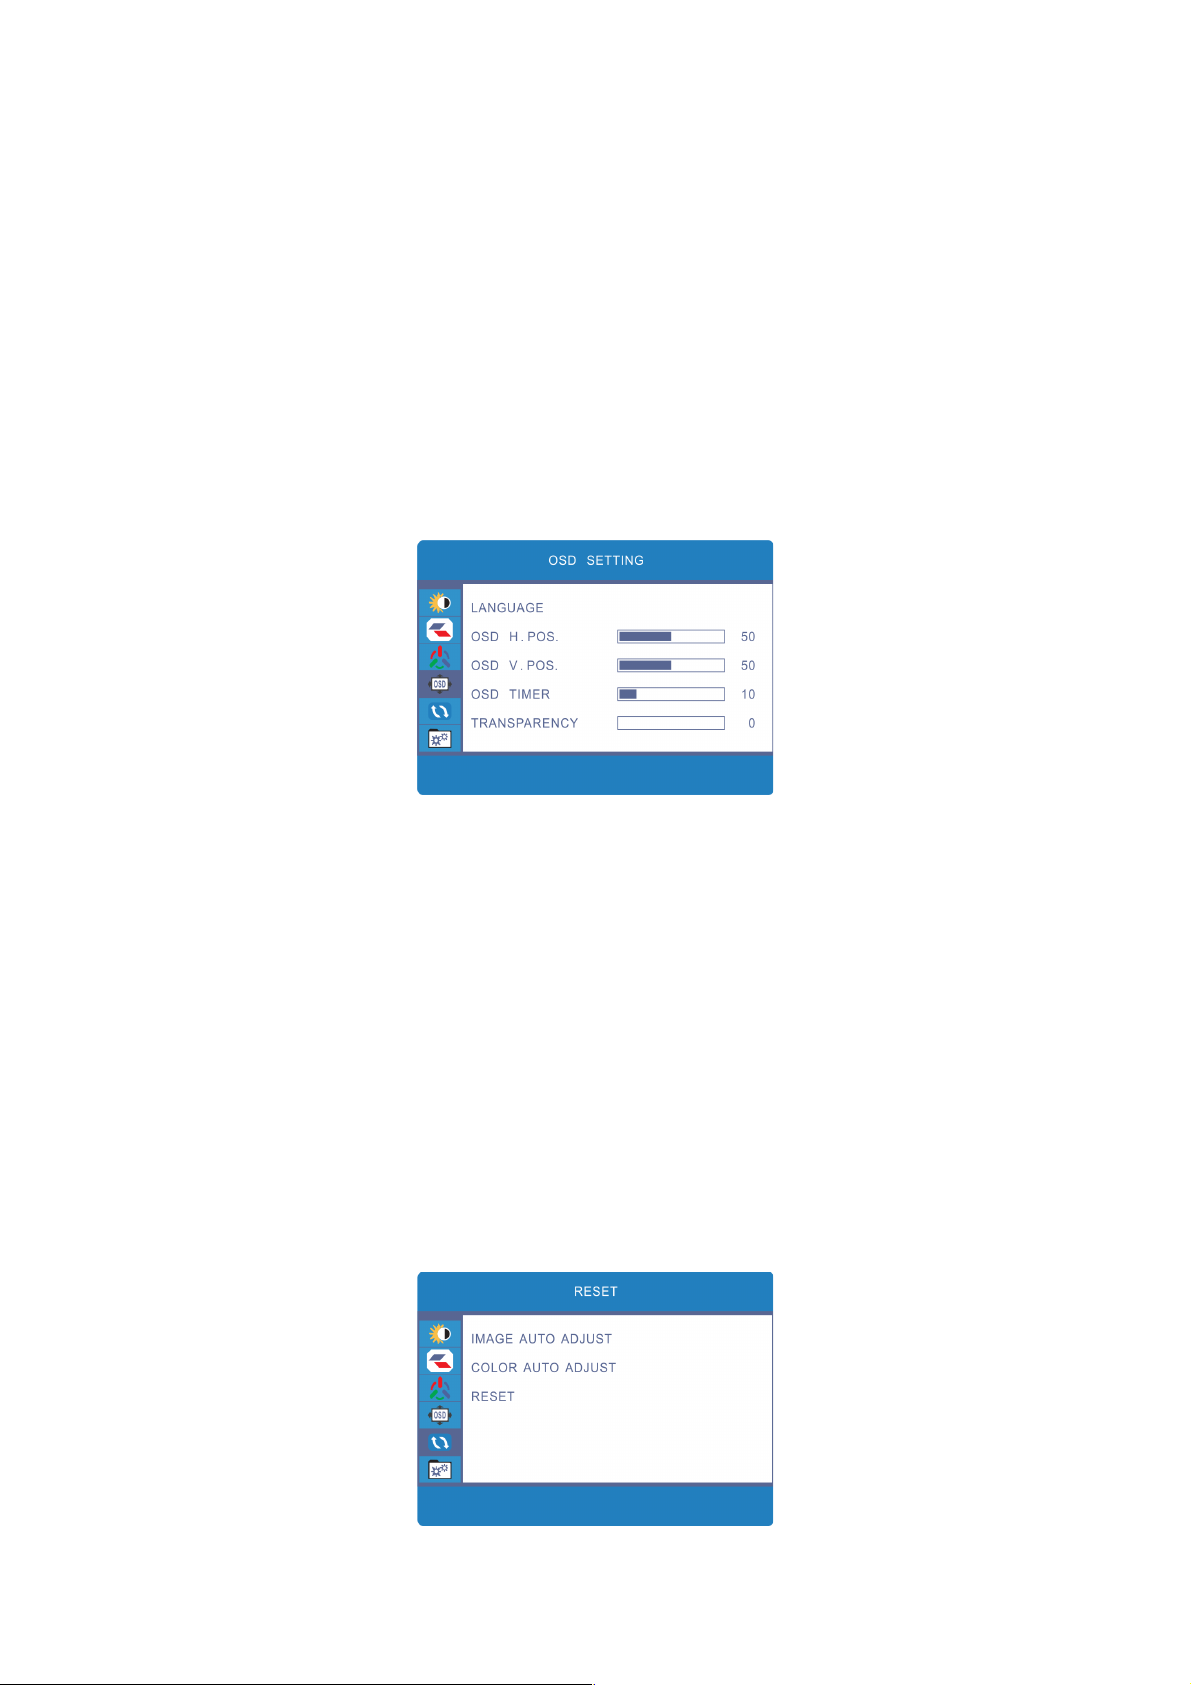
• COLOR TEMP
Press UP/DOWN to select COLOR TEMP, then press MENU to confirm, then press VOL+/VOL- to select.
(Normal, cool, user, warm).
• RED
Press UP/DOWN to select H.POSITION, then press MENU to confirm, then press VOL+/VOL- to adjust the value
of the primary colour red.
• GREEN
Press UP/DOWN to select H.POSITION, then press MENU to confirm, then press VOL+/VOL- to adjust the value
of the primary colour green.
• BLUE
Press UP/DOWN to select H.POSITION, then press MENU to confirm, then press VOL+/VOL- to adjust the value
of the primary colour blue.
OSD Settings
Press MENU, and the main menu will appear as below
Press UP/DOWN to select OSD SETTING in the main menu, then press MENU to enter.
LANGUAGE
Press UP/DOWN to select LANGUAGE, then press MENU to confirm. Press UP/DOWN to select
your language (English, Francais, Deutsch, Italiano, Espanol, Netherlands), then press MENU to
confirm choice.
• OSD H.POS
Press UP/DOWN to select OSD H.POS, then press MENU to confirm, then press VOL+/VOL- to adjust.
• OSD V.POS
Press UP/DOWN to select OSD V.POS, then press MENU to confirm, then press VOL+/VOL- to adjust.
• OSD TIMER
Press UP/DOWN to select OSD TIMER, then press MENU to confirm, then press VOL+/VOL- to adjust.
• TRANSPARENCY
Press UP/DOWN to select CLOCK, then press MENU to confirm, then press VOL+/VOL- to adjust.
Reset
Press MENU, and the main menu will appear as below
Press UP/DOWN to select RESET in the main menu, then press MENU to enter.
4
Page 5
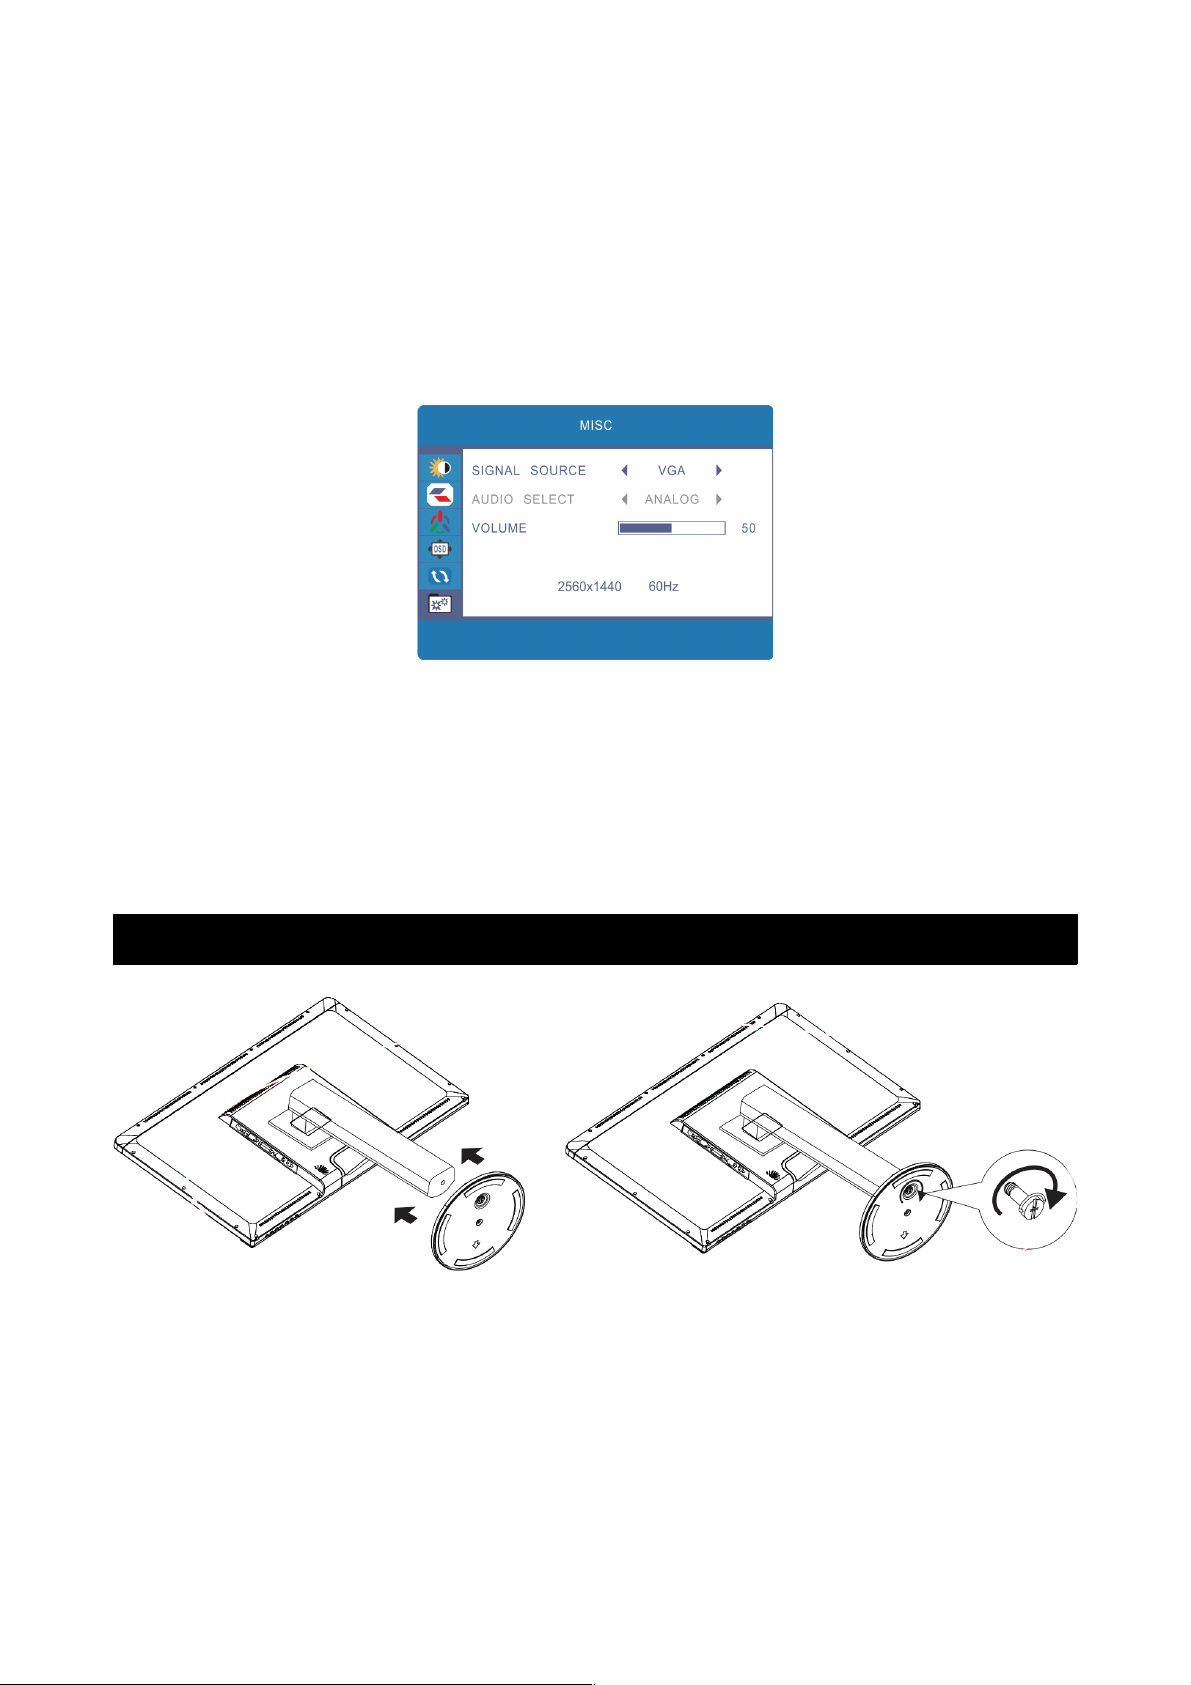
• IMAGE AUTO ADJUST (in VGA mode)
Adjust CLOCK and FOCUS or hot keys (AUTO)
• COLOR AUTO ADJUST (in VGA mode)
Adjust the RGB colour or choose a new colour temperature.
• RESET
Reset menu
Misc
Press MENU, and the main menu will appear as below
Press UP/DOWN to select MISC in the main menu, then press MENU to enter.
• SIGNAL SOURCE
Press UP/DOWN to select SIGNAL SOURCE, then press MENU to confirm. Press VOL+/VOL- to select the
source (VGA/DVI/HDMI), then press MENU to confirm.
• AUDIO SELECT
Press UP/DOWN to select AUDIO SELECT, then press MENU to confirm. Press VOL+/VOL- to select the audio
format (ANALOG/DIGITAL). This can only be adjusted in HDMI mode.
• VOLUME
Press UP/DOWN to select VOLUME, then press MENU to confirm. Press VOL+/VOL- to adjust.
Stand Installation
1. Place the monitor face down on a soft cloth, cushion or table.
2. Unpack the base, hold the monitor steady and pull the base onto the arm.
3. Tighten the screw on the base by turning it clockwise.
5
Page 6
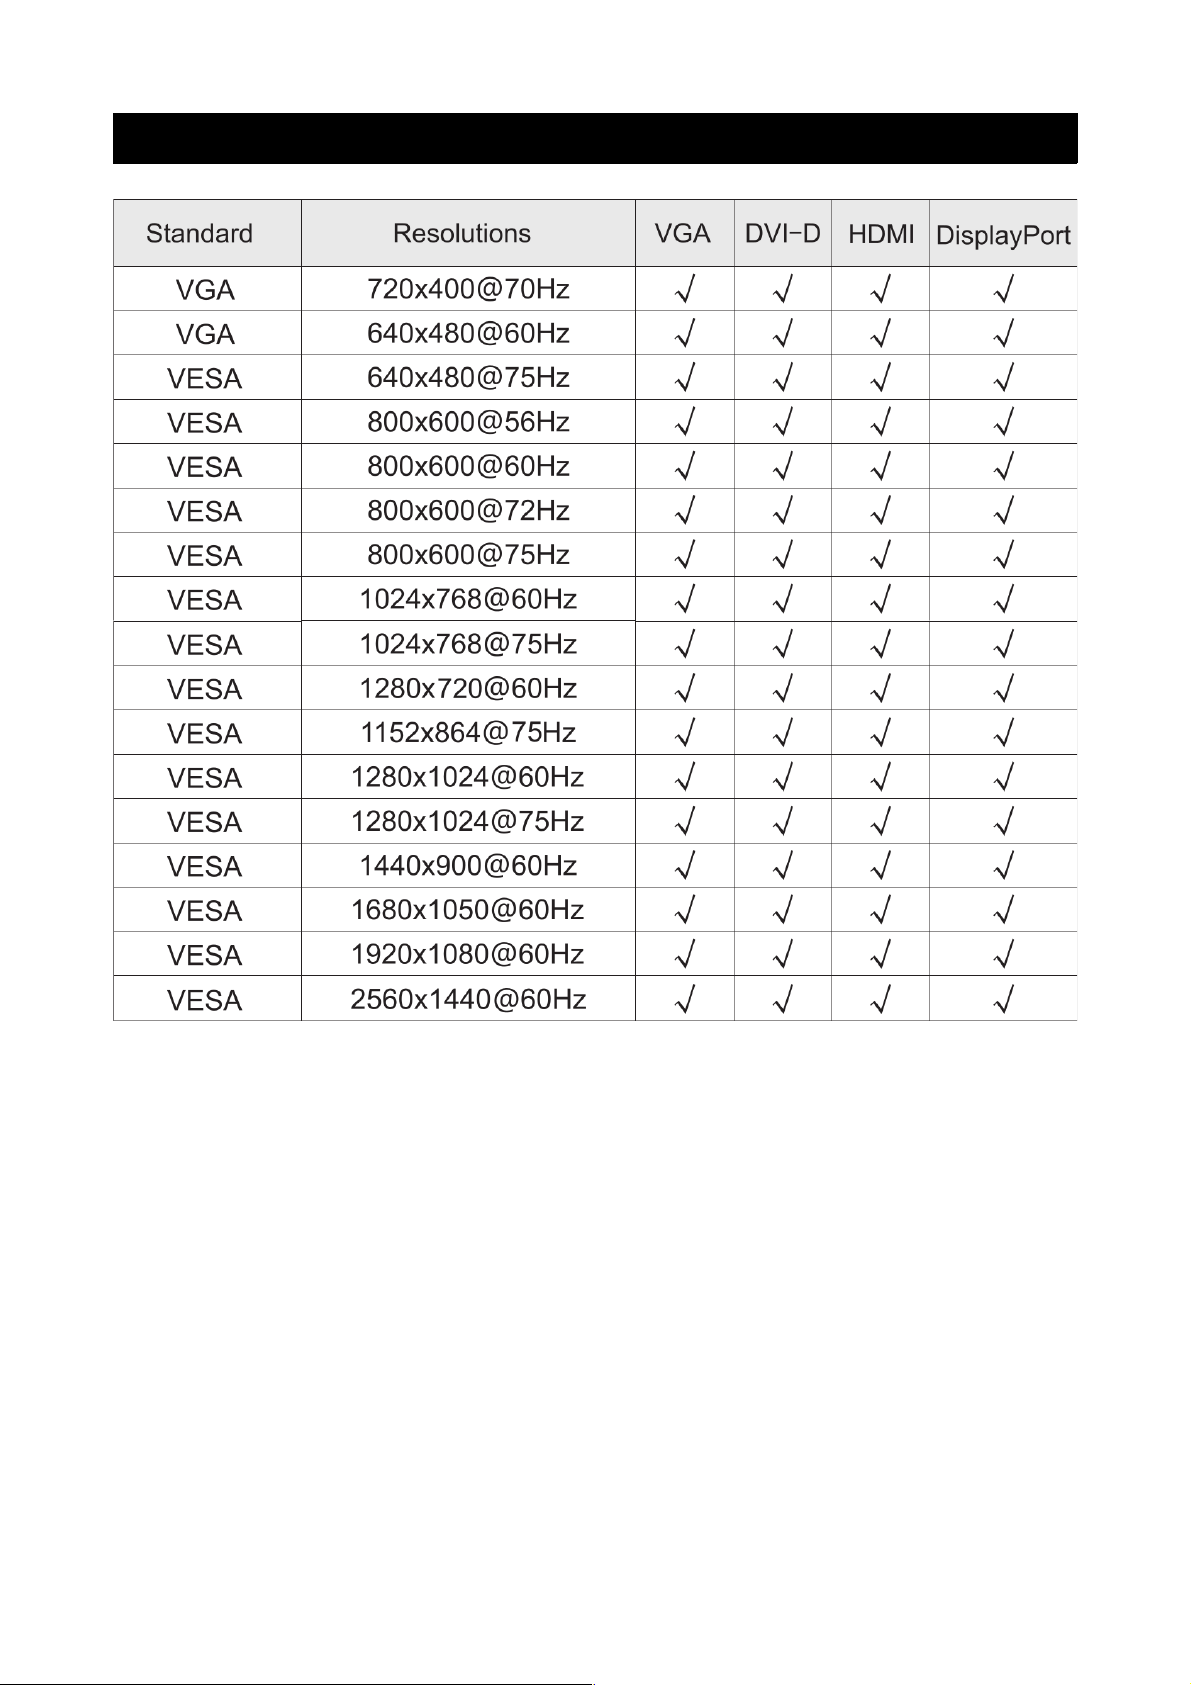
Supported Timing Modes
WARNING: Do not set your graphics card to exceed these maximum refresh rates. Doing so may
result in permanent damage to your monitor.
6
Page 7
Troubleshooting
No image on screen
1. Check if the power button has been switched on.
2. Verify the brightness and contrast of the monitor is within normal settings.
3. Check if the power indicator is orange. If so, then the monitor is powered but not
receiving an input signal.
4. If the source signal is a notebook or laptop, ensure that the signal has been switched to
an external screen mode.
Image is unfocused
1. Check that the source cable has been inserted properly.
Flashing screen
1. The power is insufficient to power the monitor.
2. Check to ensure there are no strong magnetic fields around the monitor such as
speakers, fluoroscent lights, fans, hair dryers etc.
3. By pressing the AUTO key, the Auto Adjust Image function will automatically apply the
optimal image settings.
Colours are incorrect
1. If red, green, blue or any other colour disappears, check to ensure that the signal cable is
connected properly.
2. Try connecting to another PC for comparison.
Product Specifications
Dimension
27"
Monitor Type
LED
Brightness
300 cd/m2
Colour
1.07B
Resolutions
2560x1440@60Hz
Power Requirement
100-240V ~ 50/60Hz
Power Mains Adapter
DC24V 2.71A
Power Consumption
65W
Input Connector
VGA
D-sub 15pin Connector
DVI-D
DVI-D 24+1pin Connector
HDMI
HDMI Ver 1.4 Connector
DisplayPort
DisplayPort Ver 1.2A Connector
Audio Input
3.5mm Stereo Jack
Environment
Operation Temp: 0°C ~ 40°C
Humidity: Less than 80%
Storage Temp: -20°C ~ 60°C
If you have any questions, please contact the Kogan.com customer support team.
7
 Loading...