


 Loading...
VirtualReScan® 3.5
User’s Manual
10300409-000
Revision A
Copyright
Copyright © 2004 Kofax Image Products. All Rights Reserved. Printed in the U.S.A.
The information contained in this document is the property of Kofax Image Products. Neither receipt nor possession hereof confers or transfers any right to reproduce or disclose any part of the contents hereof, without the prior written consent of Kofax Image Products. No patent liability is assumed, however, with respect to the use of the information contained herein.
Trademarks
VirtualReScan, Kofax, ImageControls, and Adrenaline are registered trademarks of Kofax Image Products.
ISIS and PixTools are trademarks of Pixel Translations, a division of Captiva Software Corporation.
TWAIN is a registered trademark of the TWAIN Working Group.
All other product names and logos mentioned herein are the property of their respective companies.
Disclaimer
The instructions and descriptions contained in this document were accurate at the time of printing. However, succeeding products and documents are subject to change without notice. Therefore, Kofax Image Products assumes no liability for damages incurred directly or indirectly from errors, omissions, or discrepancies between the product and this document.
An attempt has been made to state all allowable values where applicable throughout this document. Any values or parameters used beyond those stated might have unpredictable results.

Contents
How to Use This Guide. . . . . . . . . . . . . . . . . . . . . . . . . . . . . . . . . . . . . . . . . . . . . . . . . vii
Introduction . . . . . . . . . . . . . . . . . . . . . . . . . . . . . . . . . . . . . . . . . . . . . . . . . . . . . . . . . . . . . vii How this Guide is Organized . . . . . . . . . . . . . . . . . . . . . . . . . . . . . . . . . . . . . . . . . . . . . . vii Related Documentation . . . . . . . . . . . . . . . . . . . . . . . . . . . . . . . . . . . . . . . . . . . . . . . . . . viii Technical Support Information . . . . . . . . . . . . . . . . . . . . . . . . . . . . . . . . . . . . . . . . . . . . . .ix
1 Overview . . . . . . . . . . . . . . . . . . . . . . . . . . . . . . . . . . . . . . . . . . . . . . . . . . . . . . . . . . . . . 1
Introduction . . . . . . . . . . . . . . . . . . . . . . . . . . . . . . . . . . . . . . . . . . . . . . . . . . . . . . . . . . . . . . 1 Standard Features . . . . . . . . . . . . . . . . . . . . . . . . . . . . . . . . . . . . . . . . . . . . . . . . . . . . . . . . . 2 Certified Scan Applications . . . . . . . . . . . . . . . . . . . . . . . . . . . . . . . . . . . . . . . . . . . . . . . . . 3 Certified vs. Non-Certified Scanners . . . . . . . . . . . . . . . . . . . . . . . . . . . . . . . . . . . . . . . . . 3
2 Operating VRS. . . . . . . . . . . . . . . . . . . . . . . . . . . . . . . . . . . . . . . . . . . . . . . . . . . . . . . . . |
5 |
Introduction . . . . . . . . . . . . . . . . . . . . . . . . . . . . . . . . . . . . . . . . . . . . . . . . . . . . . . . . . . . . . . |
5 |
Scanning with VRS Default Settings . . . . . . . . . . . . . . . . . . . . . . . . . . . . . . . . . . . . . . . . . . |
5 |
Starting VRS . . . . . . . . . . . . . . . . . . . . . . . . . . . . . . . . . . . . . . . . . . . . . . . . . . . . . . . . . . |
5 |
Kofax VRS Scan Interfaces . . . . . . . . . . . . . . . . . . . . . . . . . . . . . . . . . . . . . . . . . . . . . . . . . . |
8 |
Kofax VRS TWAIN Interface . . . . . . . . . . . . . . . . . . . . . . . . . . . . . . . . . . . . . . . . . . . . |
8 |
Kofax VRS ISIS Interface . . . . . . . . . . . . . . . . . . . . . . . . . . . . . . . . . . . . . . . . . . . . . . . |
11 |
Configuring VRS Before You Scan . . . . . . . . . . . . . . . . . . . . . . . . . . . . . . . . . . . . . . . . . . |
15 |
Using the VRS Taskbar Icon . . . . . . . . . . . . . . . . . . . . . . . . . . . . . . . . . . . . . . . . . . . . |
15 |
VRS Menu . . . . . . . . . . . . . . . . . . . . . . . . . . . . . . . . . . . . . . . . . . . . . . . . . . . . . . . . . . . |
16 |
Preview . . . . . . . . . . . . . . . . . . . . . . . . . . . . . . . . . . . . . . . . . . . . . . . . . . . . . . . . . . |
16 |
Profile . . . . . . . . . . . . . . . . . . . . . . . . . . . . . . . . . . . . . . . . . . . . . . . . . . . . . . . . . . . |
16 |
Admin Utility . . . . . . . . . . . . . . . . . . . . . . . . . . . . . . . . . . . . . . . . . . . . . . . . . . . . . |
17 |
QC Modes . . . . . . . . . . . . . . . . . . . . . . . . . . . . . . . . . . . . . . . . . . . . . . . . . . . . . . . . |
17 |
VRS Administration Utility . . . . . . . . . . . . . . . . . . . . . . . . . . . . . . . . . . . . . . . . . . . . . |
19 |
Warnings Tab . . . . . . . . . . . . . . . . . . . . . . . . . . . . . . . . . . . . . . . . . . . . . . . . . . . . . |
21 |
Errors Tab . . . . . . . . . . . . . . . . . . . . . . . . . . . . . . . . . . . . . . . . . . . . . . . . . . . . . . . . |
23 |
Accelerated Scanning Tab . . . . . . . . . . . . . . . . . . . . . . . . . . . . . . . . . . . . . . . . . . |
26 |
Updating the VRS Administration Utility Dialog Box . . . . . . . . . . . . . . . . . . |
27 |
Using the Auto Resolve Manager . . . . . . . . . . . . . . . . . . . . . . . . . . . . . . . . . . . . . . . |
29 |
Previewing Images . . . . . . . . . . . . . . . . . . . . . . . . . . . . . . . . . . . . . . . . . . . . . . . . . . . . |
30 |
VRS User’s Manual |
iii |
Contents
Using VRS While You Scan . . . . . . . . . . . . . . . . . . . . . . . . . . . . . . . . . . . . . . . . . . . . . . . . . 31 When Does VRS Come into Play? . . . . . . . . . . . . . . . . . . . . . . . . . . . . . . . . . . . . . . . . 31 Using the VRS Viewer . . . . . . . . . . . . . . . . . . . . . . . . . . . . . . . . . . . . . . . . . . . . . . 32 Using the Zoom Menu to Adjust the View . . . . . . . . . . . . . . . . . . . . . . . . . . . . 33 Using Mouse Buttons to Adjust the View . . . . . . . . . . . . . . . . . . . . . . . . . . . . . 33 Updating Image Properties . . . . . . . . . . . . . . . . . . . . . . . . . . . . . . . . . . . . . . . . . . . . . 34 VRS Interactive Properties Dialog Box Tabs . . . . . . . . . . . . . . . . . . . . . . . . . . . 35 VRS Interactive Properties Dialog Box Buttons . . . . . . . . . . . . . . . . . . . . . . . . . 36 Using the Clarity Tab . . . . . . . . . . . . . . . . . . . . . . . . . . . . . . . . . . . . . . . . . . . . . . . . . . 37 Automatic Image Enhancement . . . . . . . . . . . . . . . . . . . . . . . . . . . . . . . . . . . . . . 38 Understanding Contrast, Brightness, and Gamma Settings in VRS . . . . . . . . 39 Manual Image Adjustment . . . . . . . . . . . . . . . . . . . . . . . . . . . . . . . . . . . . . . . . . . 46 Using the Noise Tab . . . . . . . . . . . . . . . . . . . . . . . . . . . . . . . . . . . . . . . . . . . . . . . . . . . 49 Using the Skew Tab . . . . . . . . . . . . . . . . . . . . . . . . . . . . . . . . . . . . . . . . . . . . . . . . . . . 51 Using the Profile Tab . . . . . . . . . . . . . . . . . . . . . . . . . . . . . . . . . . . . . . . . . . . . . . . . . . 54 Selecting, Creating, and Deleting Profiles . . . . . . . . . . . . . . . . . . . . . . . . . . . . . 55 Using the Options Tab . . . . . . . . . . . . . . . . . . . . . . . . . . . . . . . . . . . . . . . . . . . . . . . . . 58 Using the Analysis Tab . . . . . . . . . . . . . . . . . . . . . . . . . . . . . . . . . . . . . . . . . . . . . . . . . 60 Using the About Tab . . . . . . . . . . . . . . . . . . . . . . . . . . . . . . . . . . . . . . . . . . . . . . . . . . . 61
VRS Advanced Properties Dialog Box Overview . . . . . . . . . . . . . . . . . . . . . . . . . . . . . . 62 Endorser Tab . . . . . . . . . . . . . . . . . . . . . . . . . . . . . . . . . . . . . . . . . . . . . . . . . . . . . . . . . 62 Text Definition Dialog Box . . . . . . . . . . . . . . . . . . . . . . . . . . . . . . . . . . . . . . . . . . 64 Color Tab . . . . . . . . . . . . . . . . . . . . . . . . . . . . . . . . . . . . . . . . . . . . . . . . . . . . . . . . . . . . 69 Picking Rectangle Tab . . . . . . . . . . . . . . . . . . . . . . . . . . . . . . . . . . . . . . . . . . . . . . . . . 71 Rotation Tab . . . . . . . . . . . . . . . . . . . . . . . . . . . . . . . . . . . . . . . . . . . . . . . . . . . . . . . . . . 72 About Tab . . . . . . . . . . . . . . . . . . . . . . . . . . . . . . . . . . . . . . . . . . . . . . . . . . . . . . . . . . . . 73
A VRS Restore Default Values Utility . . . . . . . . . . . . . . . . . . . . . . . . . . . . . . . . . . . . . . . .75
Overview . . . . . . . . . . . . . . . . . . . . . . . . . . . . . . . . . . . . . . . . . . . . . . . . . . . . . . . . . . . . . . . . 75
Installation Instructions . . . . . . . . . . . . . . . . . . . . . . . . . . . . . . . . . . . . . . . . . . . . . . . . . . . . 75
Restoring VRS Settings . . . . . . . . . . . . . . . . . . . . . . . . . . . . . . . . . . . . . . . . . . . . . . . . . . . . 77
Changing the Default VRS Scanner . . . . . . . . . . . . . . . . . . . . . . . . . . . . . . . . . . . . . . . . . . 78
B Long Paper Support . . . . . . . . . . . . . . . . . . . . . . . . . . . . . . . . . . . . . . . . . . . . . . . . . . . .79
Overview . . . . . . . . . . . . . . . . . . . . . . . . . . . . . . . . . . . . . . . . . . . . . . . . . . . . . . . . . . . . . . . . 79
Activating Long Paper Support . . . . . . . . . . . . . . . . . . . . . . . . . . . . . . . . . . . . . . . . . . . . . 79
C VRS Non-Interactive Mode. . . . . . . . . . . . . . . . . . . . . . . . . . . . . . . . . . . . . . . . . . . . . . .81
Using Non-Interactive Mode vs. Interactive Mode . . . . . . . . . . . . . . . . . . . . . . . . . . . . . 81
iv |
VRS User’s Manual |
Contents
D Enhanced Bar Code Engine. . . . . . . . . . . . . . . . . . . . . . . . . . . . . . . . . . . . . . . . . . . . . 83
Overview . . . . . . . . . . . . . . . . . . . . . . . . . . . . . . . . . . . . . . . . . . . . . . . . . . . . . . . . . . . . . . . . 83
Standard vs. Enhanced Bar Code . . . . . . . . . . . . . . . . . . . . . . . . . . . . . . . . . . . . . . . . 83
How to Switch Between Bar Code Engines . . . . . . . . . . . . . . . . . . . . . . . . . . . . . . . 85
Accessing the Bar Code Properties Dialog Box . . . . . . . . . . . . . . . . . . . . . . . . . . . . 86
Using the Bar Code Properties Dialog Box . . . . . . . . . . . . . . . . . . . . . . . . . . . . . . . . 87
Recognition Group . . . . . . . . . . . . . . . . . . . . . . . . . . . . . . . . . . . . . . . . . . . . . . . . 87
Interpret Bar Code Group . . . . . . . . . . . . . . . . . . . . . . . . . . . . . . . . . . . . . . . . . 88
Bar Size Group . . . . . . . . . . . . . . . . . . . . . . . . . . . . . . . . . . . . . . . . . . . . . . . . . . . . 88
Search Direction Group . . . . . . . . . . . . . . . . . . . . . . . . . . . . . . . . . . . . . . . . . . . . 89
Quality Group . . . . . . . . . . . . . . . . . . . . . . . . . . . . . . . . . . . . . . . . . . . . . . . . . . . . 89
Checksum Group . . . . . . . . . . . . . . . . . . . . . . . . . . . . . . . . . . . . . . . . . . . . . . . . . . 89
E Patch Code Recognition. . . . . . . . . . . . . . . . . . . . . . . . . . . . . . . . . . . . . . . . . . . . . . . . 91
Overview . . . . . . . . . . . . . . . . . . . . . . . . . . . . . . . . . . . . . . . . . . . . . . . . . . . . . . . . . . . . . . . . 91 Using the Patch Code Properties Dialog Box . . . . . . . . . . . . . . . . . . . . . . . . . . . . . . 92 Enable . . . . . . . . . . . . . . . . . . . . . . . . . . . . . . . . . . . . . . . . . . . . . . . . . . . . . . . . . . . 92 Left Offset to Center of Patch Code . . . . . . . . . . . . . . . . . . . . . . . . . . . . . . . . . . 92
F Advanced Color Processing . . . . . . . . . . . . . . . . . . . . . . . . . . . . . . . . . . . . . . . . . . . . 93
Overview . . . . . . . . . . . . . . . . . . . . . . . . . . . . . . . . . . . . . . . . . . . . . . . . . . . . . . . . . . . . . . . . 93 Automatic Color Detection . . . . . . . . . . . . . . . . . . . . . . . . . . . . . . . . . . . . . . . . . . . . . 93 Color Content Aggressiveness . . . . . . . . . . . . . . . . . . . . . . . . . . . . . . . . . . . . . . 94 Small Color Object Detection . . . . . . . . . . . . . . . . . . . . . . . . . . . . . . . . . . . . . . . . 94 Color Background Saturation . . . . . . . . . . . . . . . . . . . . . . . . . . . . . . . . . . . . . . . . . . . 94 Color Saturation Aggressiveness . . . . . . . . . . . . . . . . . . . . . . . . . . . . . . . . . . . . 94 Color Selection . . . . . . . . . . . . . . . . . . . . . . . . . . . . . . . . . . . . . . . . . . . . . . . . . . . . . . . 95
Using the Color Tab . . . . . . . . . . . . . . . . . . . . . . . . . . . . . . . . . . . . . . . . . . . . . . . . . . . . . . . 96 Color Confidence Out of Range Warning . . . . . . . . . . . . . . . . . . . . . . . . . . . . . . . . . . . . 99 Color Information on the Analysis Tab . . . . . . . . . . . . . . . . . . . . . . . . . . . . . . . . . . . . . 100
Index. . . . . . . . . . . . . . . . . . . . . . . . . . . . . . . . . . . . . . . . . . . . . . . . . . . . . . . . . . . . . . . 103
VRS User’s Manual |
v |
Contents
vi |
VRS User’s Manual |

How to Use This Guide
Introduction
The VRS User’s Manual, which gives instructions for using VirtualReScan (VRS), is intended for all potential scan operators. Whether you are an expert at image processing or have no special knowledge of scanning, this manual provides the information you need to make the best use of VRS features and functionality.
How this Guide is Organized
This manual consists of the following chapters and appendices:
Chapter 1 - Overview gives a general description of the VRS product and summarizes the standard features.
Chapter 2 - Operating VRS explains how to start, configure, and use VRS with your scan application. This chapter includes instructions on how to use the Kofax VRS scan interfaces, the VRS menu, the VRS Administration Utility, the VRS Interactive Properties dialog box, and the VRS Auto Resolve Manager dialog box. This chapter also describes how you can access optional features, such as endorsing support.
Appendix A - VRS Restore Default Values Utility describes the VRS Restore Default Values Utility, which is included in every VRS installation.
Appendix B - Long Paper Support explains how to configure VRS for long paper scanning with production class scanners.
Appendix C - VRS Non-Interactive Mode provides information on using the VRS Non-Interactive Mode, which is available only for Böwe Bell + Howell Spectrum series scanners.
Appendix D - Enhanced Bar Code Engine gives an overview of how to implement and use the Kofax Enhanced Bar Code engine.
VRS User’s Manual |
vii |
How to Use This Guide
Appendix E - Patch Code Recognition covers VRS patch code support.
Appendix F - Advanced Color Processing explains how to use advanced color processing options that are available if your scanning application is set to color mode and you are using VRS with a Böwe Bell + Howell Spectrum II series scanner.
Related Documentation
The VRS User’s Manual is just one piece in the VRS documentation set. Your VRS product package also includes related documentation, as outlined in this section.
VRS Installation Guide
The VRS Installation Guide includes instructions for installing and testing VRS. The manual is intended for system administrators who are responsible for installing the application and configuring VRS.
VRS Online Help
VRS online help provides online assistance with your application. You can access the online help by pressing F1 from any VRS dialog box.
VRS Quick Reference
The VRS Quick Reference contains screen shots, shortcuts, and basic user tips.
VRS Release Notes
Late-breaking product information is available from the release notes. You should read the release notes carefully, as they contain information that may not be available in the other VRS documentation.
viii |
VRS User’s Manual |
How to Use This Guide
Technical Support Information
For additional technical information about Kofax products, visit the Kofax Web site at www.kofax.com and select an appropriate option from the Support menu. The Kofax Support pages provide product-specific information, such as current revision levels, the latest drivers and software patches, online documentation and user manuals, updates to product release notes (if any), technical tips, and an extensive searchable knowledgebase. You can find VRS FAQs on the VRS Support pages.
The Kofax Web site also contains information that describes support options for Kofax products. Please review the site for details about the available support options. If you need to contact Kofax Technical Support, please have the following information available:
•VRS software version
•Scanning application
•Operating system
•Scanner make and model
•Scanner engine (board) type
•SCSI Scanner controller (if applicable)
•Special/custom configuration or integration information
VRS User’s Manual |
ix |
How to Use This Guide
x |
VRS User’s Manual |
Chapter 1
Overview
Introduction
VirtualReScan (VRS) works with a wide range of scanning applications in a variety of settings—from single-user desktop systems to large-scale enterprise solutions. VRS is an extremely effective and versatile imaging tool that is easy to use for beginners and experts alike. VRS works hand-in-hand with your scan application. By giving you access to the VRS Interactive Interface and QC Modes, VRS gives you the ability to drive your image processing with true power. VRS keeps it simple, though. Basically, VRS can be used in three ways:
1Default Settings—You can use VRS to scan documents and accurately capture data effortlessly using the default settings. These default settings have been carefully chosen to allow VRS to excel at a wide range of documents without adjustments.
2Automatic Image Enhancement—VRS also monitors images, detecting poor image quality and performing automatic image enhancements that greatly reduce image quality and recognition errors with the assistance of usercreated profiles. You determine the best settings for the documents you scan. VRS does the rest.
3Manual Image Enhancement—For cases in which you want the ability to modify an image manually, VRS provides an interactive settings control that eliminates the guesswork with easy, real-time image correction.
Whether you choose to let VRS work completely on its own using its superior default settings, or make image adjustments yourself, you can be certain that every scanned image meets the highest standards.
Note VRS is equipped with context-sensitive help. Press F1 to view screen-specific information that helps you perform crucial tasks, without leaving the application.
VRS User’s Manual |
1 |

Chapter 1
Standard Features
VRS is designed to ensure that every scanned image meets your quality standards. While VRS products are designed to make high-volume scanning easier and more cost-effective, VRS provides the same advantages for low-volume scanners.
Key VRS features include the ability to scan batches that consist of multiple document sizes or varying degrees of quality, as well as the ability to automatically assign brightness settings that are optimal for your document type. It is not necessary to presort mixed batches. During image optimization VRS suppresses any background or noise, which keeps image file sizes to a minimum. VRS detects paper jams and equipment conflicts. In addition to the time savings, post-processing accuracy is increased and storage requirements are reduced.
For batch scans in which Optical Character Recognition (OCR) precision is crucial, low-contrast documents traditionally pose significant problems. With VRS, you can enable “Auto-Brightness,” and by selecting a high contrast value (greater than 50), process the batch with confidence, knowing that every low-contrast image will be adjusted automatically to the acceptable level of quality required for OCR.
Also critical for OCR is the VRS ability to perform an automatic deskew without character deformation. Traditional deskew software produces jagged edges, but with VRS, character edges remain smooth and precise even after deskew, as shown in Figure 1-1.
Figure 1-1. Traditional Deskew vs. VRS
In addition to contrast enhancement, brightness adjustment, and high quality deskew correction, VRS offers a range of other features to help you ensure the highest level of quality for every scanned image:
•Automatic image cropping or Auto Crop (available only on scanners that produce black borders)
•Despeckling
•Gamma correction
2 |
VRS User’s Manual |

Overview
•Character smoothing
•Character dilation/erosion
•Accelerated scanning
•Advanced color processing (scanner dependent)
Certified Scan Applications
As part of the certification process, Kofax tests VRS compatibility with a wide range of scan applications. While the list of certified scan applications is updated on a regular basis, it is important to know that VRS is designed to work with any application that is based on ImageControls, ISIS, or TWAIN.
Certified vs. Non-Certified Scanners
When a scanner is certified for VRS, it goes through a rigorous testing process during which the best default settings are identified and selected. For this reason, we recommend that you use VRS only with certified scanners. You can use the product page on the Kofax Web site to view the list of VRS-certified scanners. In addition to listing the scanner name and manufacturer, the VRS product page includes the following information:
•Driver used for VRS 3.5 (TWAIN, ISIS, or Kofax SCSI)
•Black or white background (black borders are necessary for automatic cropping)
•Additional memory required for optimal performance (if applicable)
•Interface certified by VRS (SCSI, USB, or FireWire)
VRS is also capable of working with certain non-certified “compatible” scanners, provided that they have been configured with the Kofax Source Manager (KSM). It is important to be aware that you may experience less than optimal image quality when using a non-certified scanner with VRS.
Not every scanner can be used with VRS. To be configured as compatible with VRS, a non-certified scanner must meet the following requirements:
•Ability to output a 256-level grayscale image as a single image.
•Provide a TWAIN driver or an ISIS driver. While VRS works best with an ISIS driver, it also supports some scanners with TWAIN drivers.
Note For more information about using non-certified scanners with VRS, refer to “Configuring Non-Certified Scanners” in the VRS Installation Guide.
VRS User’s Manual |
3 |
Chapter 1
4 |
VRS User’s Manual |

Chapter 2
Operating VRS
Introduction
This chapter explains how to operate VRS using the default settings, how to set up custom profiles, and how to configure and use the manual image enhancement features.
Scanning with VRS Default Settings
With VRS, you can scan documents and accurately capture data in the shortest time possible using the default settings. These default settings have been carefully chosen to allow VRS to excel at a wide range of documents without adjustments. In order to take advantage of VRS, simply start VRS using the instructions below and scan.
Starting VRS
Once VRS is installed and you have opened your scan application, select VRS, as described in the following procedure.
XTo start VRS
1 Power on your scanner and switch on your PC. 2 Start your scan application.
3 From the scan application, select a VRS scan source. The format for the dialog box used to select the VRS scan source and the name of the scan source will vary, according to your scan application (ImageControls-based, ISIS-based, or TWAIN-based). Generally, the name of the VRS scan source will follow one of these three formats:
•<Your Scanner Model> with VRS (ImageControls-based applications)
•Kofax VRS Scanner (ISIS-based applications)
•Kofax VRS – TWAIN (TWAIN-based applications)
Refer to Figure 2-1 through Figure 2-3 for examples.
VRS User’s Manual |
5 |

Chapter 2
Figure 2-1. Select Scan Source Dialog Box (ImageControls-based application)
Figure 2-2. Select TWAIN Source Dialog Box (TWAIN-based application)
Figure 2-3. Scanner Selection Dialog Box (ISIS-based application)
4Click the OK or Scan button, as applicable to your scan application.
5For ImageControls-based applications, the VRS icon (Figure 2-4) will appear on your Windows taskbar. For ISIS and TWAIN applications that do not use the VRS ISIS or TWAIN interfaces, the VRS taskbar icon should appear after scanning starts. See Kofax VRS Scan Interfaces on page 8 for more information.
6 |
VRS User’s Manual |

Operating VRS
VRS Icon
Figure 2-4. VRS icon on Windows Taskbar
The scanner associated with the Kofax VRS ISIS or Kofax VRS TWAIN source is the default scanner. The default VRS scanner is set in three ways:
•When you select a scanner during the VRS installation process
•When you select a scanner as the default scanner from the Kofax Source Manager
•When you select a default scanner using the Restore Default Values (RDV) utility
Note For more information about the VRS installation process or the Kofax Source Manager, refer to the VRS Installation Guide. For information about the RDV utility, refer to VRS Restore Default Values Utility on page 75 of this manual.
6 Follow your scan application instructions and scan as usual.
VRS User’s Manual |
7 |

Chapter 2
Kofax VRS Scan Interfaces
Kofax VRS TWAIN Interface
The Kofax VRS TWAIN interface is designed to serve as a liaison between your TWAIN scan application and VRS. In most cases, the Kofax VRS TWAIN interface will automatically appear whenever you select the Kofax VRS TWAIN scanner source.
Figure 2-5. Kofax VRS TWAIN Interface
Some TWAIN applications may hide the Kofax VRS TWAIN interface and use their own interface instead. For several of these applications, the TWAIN interface includes a More button that typically gives you access to the VRS user interface.
You can use the Kofax VRS TWAIN interface to control scanner features made available via the TWAIN scanner driver. The Kofax VRS TWAIN interface is divided into two groups: the Profiles group and the General group.
You can use the Profiles group to create and manage configuration settings (scanner presets). You can use the list box to type in the name of a new profile which can then be saved, restored, or deleted using the Save, Restore, or Delete buttons. You can establish multiple profiles to accommodate different scanning situations. Although you can create an unlimited number of profiles, only seven profiles at a time will be visible in the Profiles window.
8 |
VRS User’s Manual |
Operating VRS
Note The profiles that you create from the Kofax VRS TWAIN interface are different from the profiles created from the Profile tab of the VRS Interactive Properties dialog box.
The General group consists of the following options:
•Source (Paper Source) – Select between the available input paper sources: Flatbed or ADF.
•Resolution (DPI) – Select an option for scan resolution or DPI (dots per inch).
•Color Mode – Select from the color modes supported by the scanner, which may include Black/White, Grayscale, or RGB (color).
•Paper Size – Select a paper size, such as Letter, A5, etc.
•Orientation – Select the paper orientation (portrait/landscape).
•Simplex/Duplex – Select single-sided or double-sided scanning.
A Preview check box, located in the lower left corner of the interface, allows you to not only view the image as it is being scanned, but also to make changes to the image in real time using the VRS Interactive Properties dialog box.
You can select the About button to view installation location and version information.
Figure 2-6. Kofax TWAIN Interface - About Dialog Box
XTo scan using the Kofax VRS TWAIN interface 1 Open your scan application.
2 Select the Kofax VRS TWAIN scan source and click OK.
VRS User’s Manual |
9 |
Chapter 2
Figure 2-7. Kofax VRS TWAIN Interface – Select Source
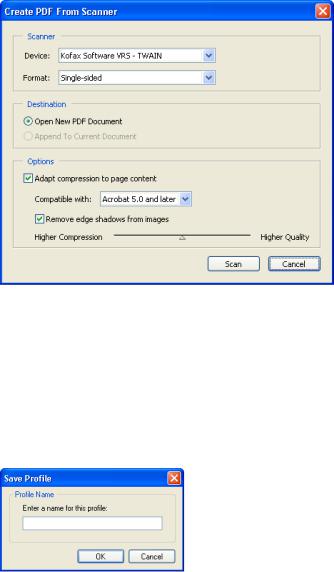
3The Kofax VRS TWAIN interface will launch. Make your selections from the General group, such as the Source, DPI, Color Mode, Paper Size, etc.
4If desired, click Save to create a profile to save the settings for future use. a At the Save Profile dialog box, type a name for the profile.
b Click OK. In the future, you can load a profile by selecting it and clicking the Restore button, or erase it by clicking the Delete button.
Figure 2-8. Kofax VRS TWAIN Interface - Save Profile Dialog Box
5 Click Scan to scan, or click Cancel to exit without making any changes.
10 |
VRS User’s Manual |
Operating VRS
Kofax VRS ISIS Interface
The Kofax VRS ISIS interface is designed to serve as a liaison between your ISIS scan application and VRS. In most cases, the Kofax VRS ISIS interface will automatically appear whenever you select the Kofax VRS scanner source.
Figure 2-9. Kofax VRS ISIS Interface
Some ISIS applications hide the Kofax VRS ISIS interface and use their own interfaces instead.
You can use the Kofax VRS ISIS interface to control scanner features made available via the ISIS driver. The interface is divided into two groups: the Scanner Presets group and the General group.
You can use the Scanner Presets group to create and manage configuration settings (scanner presets). You type in the name of a new preset which can then be saved, restored, or deleted using the New, Save, Restore, or Delete buttons.
Note The Profiles (Scanner Presets) that you create on the Kofax VRS ISIS interface are different from the profiles created on the Profile tab of the VRS Interactive Properties dialog box.
The General group consists of the following options:
•Source (Paper Source) – Select between the available input paper sources: Flatbed or ADF.
VRS User’s Manual |
11 |

Chapter 2
•Resolution (DPI) – Select an option for scan resolution or DPI (dots per inch).
•Color Mode – Select from the color modes supported by the scanner, which may include Black/White, Grayscale, or RGB (color).
•Paper Size – Select a paper size, such as Letter, A5, etc.
•Orientation – Select the paper orientation (portrait/landscape).
•Simplex/Duplex – Select single-sided or double-sided scanning.
For situations in which you want to adjust image settings, you can access the VRS Interactive Properties dialog box by clicking on the Advanced button. An option to detect the page size being scanned is available by selecting Options | Special Features, and then selecting the Detect Page Length check box from the Advanced Settings dialog box.
Figure 2-10. Kofax VRS ISIS Interface - Advanced Settings Dialog Box
And finally, you can select the About button to open the About dialog box where installation location and version information is listed.
12 |
VRS User’s Manual |

Operating VRS
Figure 2-11. Kofax VRS ISIS Interface - About Dialog Box
XTo scan using the Kofax VRS ISIS interface 1 Open your scan application.
2 Select the Kofax VRS Scanner source.
Figure 2-12. Kofax VRS ISIS Interface – Select Source Dialog Box
3The Kofax VRS ISIS interface will launch, as shown in Figure 2-9. Make your selections from within the General group, such as the Paper Source, DPI, Mode, Paper Size, etc.
4If desired, click New to create a profile to save the settings for future use.
a At the New Profile dialog box, type a name for the profile in the text box. b Type the filename for the document into the text box.
VRS User’s Manual |
13 |

Chapter 2
Figure 2-13. Kofax VRS ISIS Interface - New Profile Dialog Box
5Click OK to close the Kofax VRS ISIS interface, or click Cancel to exit without making any changes. In the future, you can change a profile by changing the information in the General group, selecting it and clicking on the Save button. You may also load a profile by clicking on the Restore button, or erase it by clicking the Delete button.
14 |
VRS User’s Manual |

Operating VRS
Configuring VRS Before You Scan
VRS is designed so that, if desired, it can be customized to suit a particular kind of document or batch of documents. In addition, you can customize responses to scanner events (out of paper, cover open, etc.). You may want to adjust the VRS settings before you scan. This section gives an overview of the options that you can use to adjust VRS to suit your scanning preferences.
Using the VRS Taskbar Icon
The VRS taskbar icon, shown in Figure 2-14 is located in the Windows taskbar (the lower right corner of your Windows desktop). When you position your mouse cursor over the icon, the ToolTip text displays as “VirtualReScan.”
VRS Icon
Figure 2-14. VRS Taskbar Icon
Figure 2-15. VRS ToolTip
Right-click on the VRS taskbar icon to access a VRS menu where you can set your responses to potential errors and events (exception conditions) in the VRS Administration Utility, preview and update image properties, select or change a profile, or choose an operating (QC) mode.
When the VRS menu is enabled, it will appear as in Figure 2-16.
Figure 2-16. VRS Menu Enabled
VRS User’s Manual |
15 |

Chapter 2
The VRS menu is not available while scanning is in progress (even though the VRS taskbar icon is still visible). When the VRS menu is unavailable, it will appear as it does in Figure 2-17.
Figure 2-17. VRS Menu - Unavailable
XTo open the VRS menu
1While scanning is not in progress, right-click on the VRS icon on the Windows taskbar.
2Select one of the four commands of the VRS menu:
•Preview
•Profile
•QC Modes
•Admin Utility
If you want to optimize VRS for a particular document type, begin by selecting the Preview command. For more information, refer to Previewing Images on page 30.
VRS Menu
This section explains each command that is available from the VRS menu.
Preview
Selecting Preview from the VRS menu opens the VRS Interactive Properties dialog box in Preview mode. Use this command to open a sample image that you can use to test image property settings.
Profile
Selecting Profile from the VRS menu displays a submenu that lists available profiles. A profile is a user-defined set of options for image processing. The Profile submenu indicates the currently loaded profile (also called the active profile) with a check mark. When you select a profile, the settings from the VRS Clarity tab, Noise tab, and
16 |
VRS User’s Manual |

Operating VRS
Skew tab are loaded from permanent storage into operational memory. The newly loaded profile becomes the active profile, which is indicated by a check mark on the tray menu. VRS remembers the active profile designation across sessions. For more information, refer to Using the Profile Tab on page 54.
Admin Utility
Selecting Admin Utility from the VRS menu opens the VRS Administration Utility dialog box, which is used to define exception condition parameters. For more information, refer to the VRS Administration Utility section on page 19.
QC Modes
Selecting QC Modes from the VRS menu displays a submenu of available QC Modes. The QC Modes control the conditions under which the VRS user interface opens for image inspection and interactive updates. The default QC Mode is On Errors. The default value of the Hardware Warnings setting is on (checked).
Once selected, a QC mode or the Hardware Warnings setting stays in effect until it is changed, even across scanning sessions. The currently selected QC Mode or Hardware Warnings setting is indicated by a check mark.
Figure 2-18. QC Modes Menu
By selecting the QC Modes command from the VRS menu, you can request that the VRS user interface display under the following conditions:
On Errors
VRS dialog boxes open only when exception conditions occur during the scanning process. This is the default setting after installation.
First Page
VRS dialog boxes open when you scan the first page of a batch and when exception conditions occur. This mode gives you the ability to set a VRS profile or enable a specific feature for all the documents in a batch. The first page in the batch is used as a sample image to adjust VRS settings.
VRS User’s Manual |
17 |

Chapter 2
Every Page
VRS dialog boxes open after each document scans, or with duplex scanning, after each document side scans. This mode can be used for extremely complex documents that require individual adjustments. This is an unusual condition because VRS has the ability to handle a wide range of document types without any adjustments.
Disabled
VRS dialog boxes remain out of view, even if exception conditions occur.
Hardware Warnings
You can use the Hardware Warnings option to specify how to respond to hardware conditions such as Paper Jam, Out of Paper, and Cover Open on a global scale. Selecting the Hardware Warnings option means that you are choosing to handle these errors exactly as defined by the Actions in the Administration Utility. When this option is not selected, it is the equivalent of choosing to Return Error (see the Action Options section on page 25 for a description) as your Action for all hardware error conditions in the Administration Utility.
Note If you have a Böwe Bell + Howell Spectrum series scanner and you selected VRS Non-Interactive mode during the installation process, your default QC Mode is Disabled and the default value of the Hardware Warnings setting is off (unchecked). VRS Non-Interactive mode only applies to Böwe Bell + Howell Spectrum series scanners. For more information, refer to VRS Non-Interactive Mode on page 81.
XTo change the QC mode
1 From the Windows taskbar, right-click on the VRS taskbar icon. 2 From the VRS menu, select QC Modes.
3 From the QC Modes submenu, select an operating mode.
18 |
VRS User’s Manual |
Operating VRS
VRS Administration Utility
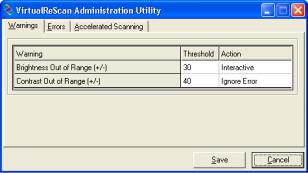
The VRS Administration Utility dialog box consists of three tabs:
•Warnings tab: settings related to image quality conditions
•Errors tab: settings that affect the VRS response to errors that occur in connection with equipment conflicts and paper transport issues
•Accelerated Scanning tab: settings that you can use to maximize the speed of your scanner
Figure 2-19. VRS Administration Utility Dialog Box
The default settings for VRS provide optimal scanning and accurate data capture for a wide range of documents. For most situations, it should not be necessary to adjust the default settings, which are listed in Table 2-1.
Table 2-1. VRS Administration Utility Dialog Box Default Settings
Tab |
Warning/Error |
Threshold |
Action |
Setting |
|
Type |
|
|
|
|
|
|
|
|
Warnings |
Brightness Out of |
30 |
Interactive |
NA |
|
Range |
|
|
|
|
|
Ignore Error1 |
|
|
|
|
|
|
|
Warnings |
Contrast Out of |
40 |
Ignore Error |
NA |
|
Range |
|
|
|
|
|
|
|
|
Errors |
Paper Jam |
NA |
Auto Resolve |
NA |
|
|
|
|
|
Errors |
Out of Paper |
NA |
Auto Resolve |
NA |
|
|
|
|
|
Errors |
Cover Open |
NA |
Auto Resolve |
NA |
|
|
|
|
|
VRS User’s Manual |
19 |
Chapter 2
Table 2-1. VRS Administration Utility Dialog Box Default Settings (continued)
Tab |
Warning/Error |
Threshold |
|
Action |
Setting |
|
Type |
|
|
|
|
|
|
|
|
|
|
Errors |
Multifeed1 |
NA |
|
Auto Resolve |
NA |
Errors |
Scanner Offline1 |
NA |
|
Auto Resolve |
NA |
Errors |
Feeder Timeout1 |
NA |
|
Auto Resolve |
NA |
Errors |
Scanner Stop |
NA |
|
Auto Resolve |
NA |
|
Key1 |
|
|
|
|
Errors |
Scanner Page |
NA |
|
Auto Resolve |
NA |
|
Sensor Error1 |
|
|
|
|
Accelerated |
NA |
NA |
|
NA |
Image quality: Best |
Scanning |
|
|
|
|
Acceleration: None |
|
|
|
|
|
NA1 |
1 Böwe Bell + Howell Spectrum series scanners only |
|
|
|||
If desired, you can modify the VRS Administration Utility settings. Before scanning, set up parameters that define your requirements for image quality and exception handling. To set the parameters, open the VRS Administration Utility dialog box by selecting the Admin Utility command from the VRS menu.
From the Warnings and Errors tabs, you define settings that tell VRS exactly how to respond when it detects an exception image, an equipment conflict, or a paper transport issue. You can use the default settings on the Warnings and Errors tabs, or customize how VRS handles each exception type. Once you are satisfied with the settings, click Save. Changes that you have made on any of the tabs are saved permanently (until changed) and they take effect at the start of the next scan operation. When you use the Cancel button to dismiss this dialog, changes made on any of the tabs are automatically discarded.
For detailed information on how to modify settings on the VRS Administration Utility, refer to the next section, Warnings Tab, the Errors Tab section on page 23, or the Accelerated Scanning Tab section on page 26. A listing of the default VRS Administration Utility settings is also available from the online help system.
20 |
VRS User’s Manual |
Loading...