

Page 1
Software VRS
Software VRS
PPeerrffeecctt SSccaannss –– TThhee FFiirrsstt TTiimmee,, EEvveerryy TTiimmee
PPeerrffeecctt SSccaannss –– TThhee FFiirrsstt TTiimmee,, EEvveerryy TTiimmee
Software VRS Quick Reference
Page 2
Software VRS
Quick Reference
Launch...
Once you install VRS, follow these steps:
1 Turn on your scanner.
2 Switch on your PC.
3 Start your scanning application.
4 Select a scan source.
a Go to File | Select Scan Source (Scanner or Device)
b Select the appropriate scan source or device from this list:
Ÿ <Your Scanner Model> with SVRS Source (ImageControls)
Ÿ Kofax Software VRS - ISIS
Ÿ Kofax Software VRS - TWAIN
c Click OK.
NoteNote The Software VRS icon will appear immediately for ImageControls
applications, but after you scan for ISIS and TWAIN applications.
...then scan!
That’s all you need for great scans. At install, Software VRS settings are optimized
for your scanner, making it possible to scan documents with a variety of back-
ground colors, text quality, and paper sizes with exceptional results. Plus, you can
still adjust Software VRS for those particularly difficult documents that no other
scanner is able to tackle. To learn about manually adjusting images with Software
VRS, read on...
10000912-000
Revision A
Page 3
Customizing
Software VRS
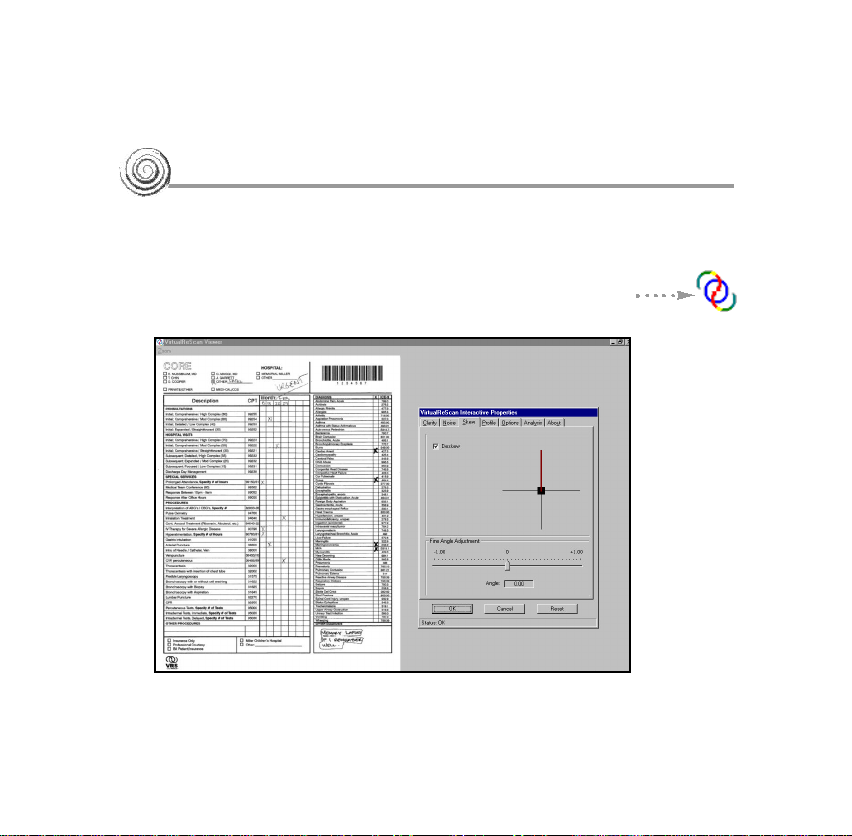
Open Images in the SVRS Image Viewer...
The Viewer and Interactive Properties dialog box open together so you can make
real-time adjustments to a WYSIWYG image, then accept or reject them.
Here’s how to preview an image:
1 Scan a document (or document type) you plan to (batch) scan.
2 Right click on the Software VRS menu on your desktop.
3 Select Preview.
SVRS Viewer and Interactive Properties Dialog Box
2
Page 4
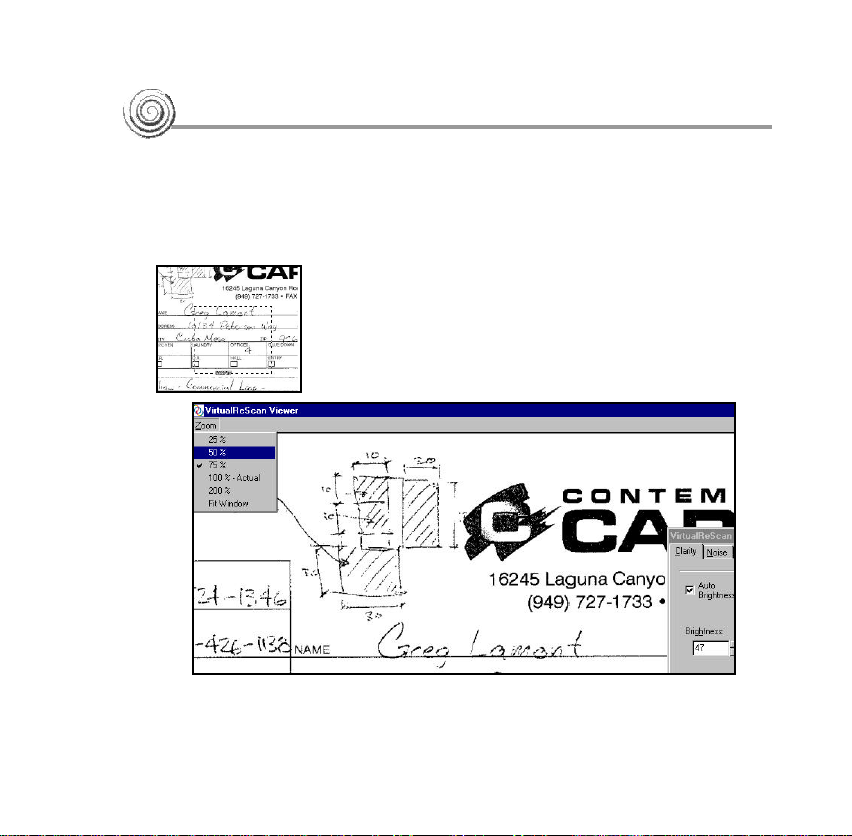
Zoom in on Specific Areas...
Use the Zoom menu to magnify or reduce the image in the Viewer.
1 With the cursor, click and drag a rectangle around a zone to enlarge it.
-or1 With the Viewer open, click on the Zoom menu button as shown below.
2 Select the zoom level. (Fit Window to see entire image again.)
Using the Cursor to Zoom
on the Viewer
3
SVRS Viewer With Zoom Set to 75%
Page 5

Use the Interactive Properties Dialog Box...
Each tab on the Interactive Properties
dialog box controls a different aspect of an
image. You can make changes to one or all
the tabs before you click OK to accept
changes. Click Cancel to exit with no changes.
Clarity
Move the Brightness slider up to erase the background and reveal text.
Move it down to increase
the background. Move the
Contrast slider right to
enhance text and lines by
finding their edges.
Noise
Thin/thicken characters
or remove speckling.
Skew
Straighten the image in
the Viewer, enable
Automatic Deskew, Auto
Crop, or Edge Cleanup.
Profile
Create and manage
Profiles (saved settings
from the Clarity, Noise,
and Skew tabs).
4
Page 6

...To Modify or Display Image Information
Activate optional features
specific to your scanner.
View property settings for
the most recently
scanned image.
Get information on
Software VRS and Kofax
Image Products.
Link to the Kofax web site at
www.kofax.com to find prod-
uct information and Software
update downloads.
...Then Adjust or Accept the Image in the Viewer
Once you’ve made changes to the image, click Ok. The property settings are
saved and put into effect for the next batch of scanned documents. You can
always save the settings to use again by creating a profile.
5
Options
Analysis
About
VRS product
Page 7

Create a Profile for Difficult Documents
A profile “packages” settings you make to certain tabs of the Interactive
Properties dialog box and lets you put a memorable name on it. To set a profile:
1 Open the Software VRS Interactive Properties dialog box.
2 Make changes to the Clarity, Noise, Skew, or Options tabs.
3 Select the Profile tab.
4 Type the profile name (alphanumeric characters) in the New Profile box.
5 Select Save As. The new profile becomes the active profile.
6 Click OK to close the Interactive Properties dialog box.
Default Profile
The default profile is
highlighted.
New Profile Text Box
Type the name of the pro-
file into this text box.
Remember to make the
profile name memorable,
such as First Quarter
Product Data Sheet., then
click Save As.
6
Page 8

Set the Mode...
The Mode determines when you want the
Software VRS user interface to open for image
quality inspection and interactive updates. After
installation, the mode is set to Stop on Errors,
but you can easily change it. Just remember that
once you select a mode, it stays in effect until
you change it again.
1 From the Windows taskbar,
right click on the Software VRS icon.
2 From the Software VRS menu,
select Mode.
3 Select an operating mode from
the menu.
7
Stop Every Page
SVRS UI opens after each
document or each side of
a document scans.
Stop on Errors
SVRS UI opens only when
exception conditions
occur.
Stop on First Page
SVRS UI opens when you
scan the first page of a
batch and when exception
conditions occur.
Stop Never
SVRS dialogs remain out
of view, even if exception
conditions occur.
Page 9

...and Go to the Administration Utility
Warnings
Set the threshold and
response for exceptions
related to image quality.
Accelerated
Scanning
Adjust the slider to
increase the speed of your
scanner.
Errors
Set the SVRS response
for exceptions related to
equipment conflicts,
paper transport errors,
and edge detection.
8
Page 10

... to Adjust the Tab Settings
The Software VRS Administration Utility dialog box consists of three tabs.
The WarningsWarnings and ErrorsErrors tabs let you tell Software VRS exactly how to
respond when it detects an unacceptable image, an equipment conflict, a
paper jam, etc. The Accelerated ScanningAccelerated Scanning tab lets you use a slider to increase
the speed of your scanner. Adjustments to the settings stay in effect until you
change them again.
1 From the Windows taskbar, right click on the Software VRS icon.
2 Select Configure.
3 Click on one of the following tabs:
Ÿ Warnings tab
Ÿ Errors tab
4 Adjust the settings for each tab.
Ÿ Warnings tab - Threshold. Type directly into the Threshold box,
or use the arrows to select a threshold setting.
Ÿ Warnings tab/Errors tab - Action. From the Warnings tab or the
Errors tab, define a response to each exception type by selecting
from the drop-down Action list.
5 Click Save.
And You Can Always Get Help By...
Software VRS is equipped with context-sensitive help. Press F1 for screen-
specific information to help you complete crucial tasks, without
9
leaving the application.
Page 11

Kofax Image Products
16245 Laguna Canyon Road
Irvine, CA 92618-3603
949-727-1733
Fax: 949-727-3144
Web: www.kofax.com
Copyright © 2001 - Kofax Image Products, All Rights Reserved.
Unauthorized Use, Duplication, or Distribution is Strictly Prohibited.
 Loading...