

Page 1

Getting Started
Ascent Xtrata Pro
Version 3.0
10300602-000 Revision A
with
Page 2

Copyright
Copyright © 2002-2006 LCI GmbH. All right reserved. Printed in USA.
Portions, Copyright 2006 Kofax Image Products, Inc. All Rights Reserved.
The information contained in this document is the property of LCI GmbH. Neither
receipt nor possession hereof confers or transfers any right to reproduce or disclose
any part of the contents hereof, without the prior written consent of LCI GmbH. No
patent liability is assumed, however, with respect to the use of the information
contained herein.
Trademarks
Kofax, Ascent, Ascent Capture, and Ascent Capture Internet Server are registered
trademarks; and Xtrata and VRS are trademarks of Kofax Image Products, Inc.
The software is subject to copyright © 2002-2006 LCI GmbH.
ABBYY® FineReader® Engine 7.0 © ABBYY Software Ltd. 2004, ABBYY
FineReader—the keenest eye in OCR.
ABBYY, FINEREADER and ABBYY FineReader are registered trademarks of ABBYY
Software Ltd.
Chinese, Japanese, Korean recognition:
Technologies from NewSoft Inc. are used to recognize Chinese, Japanese and Korean
texts:
Recore®, NewSoft®, Presto! ®.
All other product names and logos are trade and service marks of their respective
companies.
Disclaimer
The instructions and descriptions contained in this document were accurate at the
time of printing. However, succeeding products and documents are subject to change
without notice. Therefore the Kofax Image Products, Inc. assumes no liability for
damages incurred directly or indirectly from errors, omissions, or discrepancies
between the product and this document.
ii
Page 3

An attempt has been made to state all allowable values where applicable throughout
this document. Any values or parameters used beyond those stated may have
unpredictable results.
iii
Page 4

iv
Page 5

Contents
How to Use This Guide..........................................................................................................xv
Introduction .......................................................................................................................... xv
How This Guide is Organized............................................................................................ xv
Related Documentation......................................................................................................xvi
Training................................................................................................................................xvii
Kofax Technical Support ...................................................................................................xvii
Overview ...................................................................................................................................1
Introduction ............................................................................................................................ 1
Ascent Xtrata Pro.................................................................................................................... 1
Capture Flow ............................................................................................................ 2
Ascent Xtrata Pro Project Builder......................................................................................... 3
Ascent Xtrata Pro Synchronization...................................................................................... 5
Ascent Xtrata Pro Knowledge Base Administration ......................................................... 6
Ascent Xtrata Pro Server ....................................................................................................... 6
Ascent Xtrata Pro Validation ................................................................................................ 7
Ascent Xtrata Pro Statistics Viewer...................................................................................... 7
Ascent Xtrata Pro Technology.............................................................................................. 7
Classification............................................................................................................. 8
Document Separation .............................................................................................. 9
Extraction .................................................................................................................. 9
Online Learning...................................................................................................... 10
OCR and Script Integration .................................................................................. 10
Release Script.......................................................................................................... 11
Statistical Information ........................................................................................... 11
Ascent Xtrata Pro User's Guide v
Page 6

Contents
Validation ................................................................................................................11
Invoice Processing.................................................................................................................12
Special Invoice Processing Technology..............................................................................13
Knowledge Bases....................................................................................................13
Templates.................................................................................................................14
Group Locators .......................................................................................................14
Project Builder .......................................................................................................................17
Introduction...........................................................................................................................17
License Activation ..................................................................................................18
Project Level Fields................................................................................................. 21
Classification ...........................................................................................................21
Extraction.................................................................................................................22
Validation ................................................................................................................23
Managing Projects.................................................................................................................23
Creating a new Project ...........................................................................................24
Loading an Existing Project...................................................................................28
Saving a Project.......................................................................................................28
Project Properties....................................................................................................29
Testing and Optimizing a Project.........................................................................33
Invoice Projects......................................................................................................................36
Training Documents for Extraction......................................................................40
Templates.................................................................................................................41
Test and Optimize an Invoice Project ..................................................................42
Setting Up Classification...................................................................................................... 43
Layout Classifier.....................................................................................................43
Adaptive Feature Classifier...................................................................................44
Instruction Classifier ..............................................................................................45
Setting Up Extraction............................................................................................................46
Adding Fields and Locators .........................................................................................46
Setting Up Document Separation .......................................................................................47
Testing Document Separation...............................................................................48
Setting Up Validation...........................................................................................................48
Classification..........................................................................................................................51
Introduction...........................................................................................................................51
vi Ascent Xtrata Pro User's Guide
Page 7

Contents
Concept of Classification..................................................................................................... 51
Classification Engines and Learning by Example............................................................ 53
Definition of Classes and the Class Tree........................................................................... 54
Adding Classes....................................................................................................... 54
Class Hierarchy ...................................................................................................... 55
Class Properties .................................................................................................................... 56
Classification Options..........................................................................................................62
Multipage Evaluation............................................................................................ 62
Hierarchical Evaluation and Other Classification Rules .................................. 65
Layout Classifier................................................................................................................... 75
Concept and Application ...................................................................................... 75
Set Up....................................................................................................................... 75
Layout Classifier Properties ................................................................................. 78
Image Clustering.................................................................................................... 80
Adaptive Feature Classifier................................................................................................. 84
Concept.................................................................................................................... 84
Set Up....................................................................................................................... 84
Properties ................................................................................................................ 86
Thresholds, Precision, and Recall ........................................................................ 89
Auto Optimization................................................................................................. 91
Result Matrix......................................................................................................................... 93
Instruction Classifier............................................................................................................ 96
Concept.................................................................................................................... 96
Set Up....................................................................................................................... 97
Using the Instruction Classifier With the Adaptive Feature Classifier ........ 101
Testing Content Classification.......................................................................................... 102
Managing Views................................................................................................................. 103
Extraction..............................................................................................................................107
Introduction ........................................................................................................................ 107
Locators and Fields ............................................................................................................ 107
Managing Fields .................................................................................................................108
Confidences........................................................................................................... 110
Field Inheritance................................................................................................... 111
Field Formatting................................................................................................... 112
Ascent Xtrata Pro User's Guide
vii
Page 8

Contents
Locators ................................................................................................................................118
Basic Concept of Locators.................................................................................... 118
Managing Locators...............................................................................................121
Exporting and Importing Locators.....................................................................122
Locator Methods...................................................................................................123
Assign Locators to Field.......................................................................................124
Alternatives ...........................................................................................................125
Regions...................................................................................................................126
Testing Locators....................................................................................................129
Field Group Locators.......................................................................................................... 131
Amount Group Locator .......................................................................................131
Invoice Group Locator .........................................................................................132
Order Group Locator ...........................................................................................132
Setting Up Field Group Locators........................................................................ 132
Knowledge Bases ................................................................................................................135
OCR and OMR Profiles......................................................................................................137
Recognition Engines.............................................................................................137
OCR Substitution..................................................................................................138
Script Programming ...........................................................................................................138
Address Evaluator ..............................................................................................................140
Concept ..................................................................................................................140
Properties...............................................................................................................141
Advanced Zone Locator.....................................................................................................142
Concept ..................................................................................................................142
Properties...............................................................................................................142
Barcode Locator...................................................................................................................147
Concept ..................................................................................................................147
Properties...............................................................................................................147
Classification Locator .........................................................................................................148
Concept ..................................................................................................................148
Properties...............................................................................................................149
Using the Classification Locator.........................................................................149
Database Evaluator.............................................................................................................151
Concept ..................................................................................................................152
Properties...............................................................................................................152
Database Locator................................................................................................................. 153
viii Ascent Xtrata Pro User's Guide
Page 9

Contents
Concept.................................................................................................................. 153
Setting Up a Database.......................................................................................... 153
Using the Database Locator................................................................................ 156
Speed Considerations.......................................................................................... 159
Format Locator.................................................................................................................... 160
Concept.................................................................................................................. 160
Regular Expressions............................................................................................. 161
Formats.................................................................................................................. 162
Format Templates ................................................................................................ 164
Keywords .............................................................................................................. 165
Dictionaries ........................................................................................................... 167
Invoice Header Locator ..................................................................................................... 174
Concept.................................................................................................................. 174
Properties .............................................................................................................. 177
OCR Voting Evaluator....................................................................................................... 183
Concept.................................................................................................................. 183
Properties .............................................................................................................. 183
Relation Evaluator..............................................................................................................185
Concept.................................................................................................................. 185
Properties .............................................................................................................. 185
Script Locator...................................................................................................................... 187
Concept.................................................................................................................. 187
Properties .............................................................................................................. 187
Standard Evaluator ............................................................................................................ 188
Concept.................................................................................................................. 188
Properties .............................................................................................................. 189
Table Locator....................................................................................................................... 190
Concept.................................................................................................................. 190
Table Models and Global Columns ................................................................... 190
Language Packages.............................................................................................. 194
Setting up Table Locator ..................................................................................... 201
Methods of Finding Tables ................................................................................. 202
Comparing the Methods ..................................................................................... 205
Manual Mode........................................................................................................ 206
Order Numbers .................................................................................................... 209
Zone Locator ....................................................................................................................... 210
Concept.................................................................................................................. 210
Ascent Xtrata Pro User's Guide
ix
Page 10

Contents
Properties...............................................................................................................211
Set Up Validation .................................................................................................................215
Introduction......................................................................................................................... 215
Setting Up Validation.........................................................................................................215
Step 1 Set Up Classification and Extraction ............................................................216
Step 2 Set up Validation with Project Builder.........................................................216
Step 3 Add Ascent Xtrata Pro Validation to a Batch Class....................................216
Set Up Validation within Ascent Xtrata Pro Project Builder.........................................216
Extraction ......................................................................................................................217
Field Properties ..................................................................................................... 218
Field Formatter......................................................................................................218
Validation Methods.....................................................................................................219
Validation Rules...........................................................................................................221
Sequence of Validation Rules..............................................................................225
Validation Sequence.................................................................................................... 225
Validation Forms .........................................................................................................225
Validation Test .............................................................................................................230
Validation Script Events..............................................................................................232
Validation Design User Interface......................................................................................233
User Interface Elements ..............................................................................................234
Menu Bar................................................................................................................234
Toolbar ...................................................................................................................234
Form Elements ......................................................................................................236
Document Viewer.................................................................................................237
InPlace Editor........................................................................................................ 237
Validation Form and Form Elements Properties..............................................237
General Dialog Boxes ..................................................................................................242
Define Tab Sequence Dialog Box........................................................................242
Default Font Settings Dialog Box........................................................................243
Validation Sample...............................................................................................................244
Step 1: Set up Classification and Extraction Project................................................244
Step 2: Define Validation ............................................................................................245
Define Validation Methods .................................................................................245
Validation Rules....................................................................................................247
Validation Form....................................................................................................250
Project Builder User Interface............................................................................................251
Introduction......................................................................................................................... 251
x Ascent Xtrata Pro User's Guide
Page 11

Contents
User Interface Elements..................................................................................................... 251
Initial View............................................................................................................ 251
Project Panel.......................................................................................................... 260
Project Panel for Invoice Projects....................................................................... 262
Classification Design Panel................................................................................. 266
Classification Result Panel.................................................................................. 267
Extraction Design Panel ...................................................................................... 269
Extraction Result Panel........................................................................................ 272
Validation Rules Panel ........................................................................................ 273
Result Matrix Panel.............................................................................................. 274
Test Folder Panel.................................................................................................. 276
Training Set (Classification) Panel..................................................................... 278
Training Set (Extraction) Panel........................................................................... 280
Selection Panel...................................................................................................... 281
New Samples Panel ............................................................................................. 283
Document Viewer ................................................................................................ 286
General Dialog Boxes......................................................................................................... 289
Add Classification View Dialog Box................................................................. 289
Advanced Zone Locator Zone Settings Dialog Box......................................... 291
Application Language Dialog Box..................................................................... 294
Class Based Precision and Recall Dialog Box................................................... 295
Classification Results Dialog Box....................................................................... 296
Class Properties Dialog Box................................................................................ 297
Create new class and table locator Dialog Box ................................................ 301
Dictionary Options Dialog Box .......................................................................... 303
Field Formatter Properties Dialog Boxes.......................................................... 306
Field Properties Dialog Box ................................................................................ 313
Filter Options Dialog Box.................................................................................... 319
Fuzzy Database Options Dialog Box................................................................. 322
Global Columns Settings Dialog Box ................................................................ 327
Instruction Properties Dialog Box...................................................................... 328
New Field Formatter Dialog Box ....................................................................... 330
New Validation Method Dialog Box ................................................................. 331
OCR Substitution Dialog Box............................................................................. 332
Open Test Folder Dialog Box.............................................................................. 333
Project Properties Dialog Box............................................................................. 334
Project Settings Dialog Box................................................................................. 335
Read Protection Password Dialog Box.............................................................. 353
Recognition Engine’s Properties Dialog Box.................................................... 354
Script Code Dialog Box ....................................................................................... 361
Table Model Properties Dialog Box................................................................... 363
Ascent Xtrata Pro User's Guide
xi
Page 12

Contents
Validation Methods Properties Dialog Boxes................................................... 365
View Table for Field Dialog Box.........................................................................381
View Properties Dialog Box ................................................................................381
Write Protection Password Dialog Box .............................................................386
Zone Locator Zone Settings Dialog Box ............................................................387
Zone Locator Zone Profile Settings Dialog Boxes............................................393
General Invoice Dialog Boxes............................................................................................397
Create Knowledge Base Dialog Box................................................................... 397
Select Knowledge Base Dialog Box ....................................................................399
Create Knowledge Base Activation Code Dialog Box.....................................401
Edit Document Dialog Box..................................................................................402
Import Knowledge Base Dialog Box..................................................................406
Insert Knowledge Base Activation Code Dialog Box.......................................408
Knowledge Base Activation Dialog Box............................................................ 410
Move Training Document Dialog Box...............................................................411
Locator Properties Dialog Boxes.......................................................................................411
User Interface Elements .......................................................................................412
Address Evaluator Properties Dialog Box.........................................................413
Advanced Zone Locator Properties Dialog Box...............................................417
Barcode Locator Properties Dialog Box.............................................................425
Classification Locator Properties Dialog Box....................................................430
Database Evaluator Properties Dialog Box .......................................................436
Database Locator Properties Dialog Box........................................................... 438
Format Locator Properties Dialog Box...............................................................445
Invoice Header Locator Properties Dialog Box ................................................457
OCR Voting Evaluator Properties Dialog Box..................................................472
Relation Evaluator Properties Dialog Box.........................................................476
Script Locator Properties Dialog Box.................................................................479
Standard Evaluator Properties Dialog Box .......................................................484
Table Locator Properties Dialog Box..................................................................486
Zone Locator Properties Dialog Box .................................................................. 494
Invoice Locator Properties Dialog Boxes......................................................................... 502
Amount Group Locator Properties Dialog Box................................................503
Invoice Group Locator Properties Dialog Box..................................................509
Order Group Locator Properties Dialog Box....................................................512
Setup a Batch Class in Ascent Capture............................................................................517
Introduction......................................................................................................................... 517
Adding Ascent Xtrata Pro to a Batch Class..................................................................... 518
xii Ascent Xtrata Pro User's Guide
Page 13

Contents
Batch Class Considerations............................................................................................... 519
Synchronizing Projects ........................................................................................ 519
Recognition Server............................................................................................... 519
Publishing Batch Classes..................................................................................... 520
Importing/Exporting Batch Classes.................................................................. 521
Synchronize Project with Batch Class.............................................................................. 521
Open Synchronization Tool................................................................................ 522
Extended Synchronization Settings................................................................... 523
Assigning Classes to Form Types ...................................................................... 525
Assigning Extraction Fields to Index Fields of Document Classes ............... 531
Perform Synchronization .................................................................................... 536
Adding Ascent Xtrata Pro Validation to a Batch Class ................................................. 538
Using the Release Script .................................................................................................... 539
Processing Batches.............................................................................................................543
Introduction ........................................................................................................................ 543
Ascent Capture 7.0 Features ............................................................................... 543
Multiprocessor Support ...................................................................................... 543
High Availability Support .................................................................................. 544
Ascent Capture Internet Server (ACIS) Support.............................................. 544
Processing Batches with Ascent Xtrata Pro Server ........................................................ 544
Processing Batches with Ascent Xtrata Pro Batch Processing Service ........................ 545
Ascent Xtrata Pro Batch Processing Service Performance Monitoring ......... 546
Quick Tour of the Ascent Xtrata Pro Server User Interface.......................................... 548
Polling Interval..................................................................................................... 550
Understanding the Log File .............................................................................................. 550
Ascent Xtrata Pro Validation...............................................................................................553
Introduction ........................................................................................................................ 553
Quick Tour of the User Interface...................................................................................... 553
User Interface Elements....................................................................................... 554
Settings Dialog Box.............................................................................................. 561
Select Folder Class Dialog Box ........................................................................... 565
Application Language Dialog Box..................................................................... 566
Adjusting the User Interface............................................................................... 567
Processing Batches with Ascent Xtrata Pro Validation................................................. 568
Ascent Xtrata Pro User's Guide
xiii
Page 14

Contents
Validate a Document............................................................................................ 570
Batches with No Invalid Documents .................................................................571
Batch Editing .........................................................................................................572
Show Field Contents in Batch Tree ....................................................................576
Online Learning ....................................................................................................576
Character Level Editing .......................................................................................577
Shortcut Keys ........................................................................................................577
Read-Only Fields ..................................................................................................578
Force Valid Field...................................................................................................578
Assign a Document Class ....................................................................................578
Reject Documents or Pages..................................................................................580
Table Indexing.......................................................................................................581
Security Boost........................................................................................................ 581
Shortcuts...............................................................................................................................582
Statistics Viewer ..................................................................................................................585
Introduction......................................................................................................................... 585
Quick Tour of the User Interface ......................................................................................586
Elements................................................................................................................. 587
Reports..................................................................................................................................589
Actual Reports.......................................................................................................589
Historical Reports ................................................................................................. 592
Report Conditions.................................................................................................595
Index......................................................................................................................................597
xiv Ascent Xtrata Pro User's Guide
Page 15

How to Use This Guide
Introduction
This guide contains information about using Ascent Xtrata Pro. It is provided for
system administrators, operators, project developers, and other personnel who are
setting up and using Ascent Xtrata Pro components for use with Ascent Capture.
This guide assumes that you have a thorough understanding of Windows standards
and interfaces, and Ascent Capture.
How This Guide is Organized
This guide includes the following chapters:
• Chapter 1 – Overview introduces the components installed with Ascent
Xtrata Pro and the key features provided with the product.
• Chapter 2 – Project Builder describes how to create new projects with Ascent
Xtrata Pro Project Builder and introduces some of its interfaces and panels. It
also includes some high-level general procedures for setting up classification,
extraction, and validation.
• Chapter 3 – Classification contains details about setting up classification
projects.
• Chapter 4 – Extraction contains details about setting up extraction projects.
• Chapter 5 – Setting Up Validation contains details about setting up
validation in projects, including instructions for designing custom validation
forms.
• Chapter 6 – Project Builder User Interface provides information about
Project Builder user interface items and various dialog boxes.
Ascent Xtrata Pro User's Guide xv
Page 16

• Chapter 7 – Setting Up a Batch Class in Ascent Capture explains how to add
Ascent Xtrata Pro components to Ascent Capture batch classes and use the
Synchronization tool to synchronize the project classes and fields with Ascent
Capture.
• Chapter 8 – Processing Batches describes the general operation of Ascent
Xtrata Pro Server and provides information about its user interface.
• Chapter 9 – Ascent Xtrata Pro Validation describes the general operation of
the Ascent Xtrata Pro Validation module.
• Chapter 10 – Statistics Viewer describes the general operation of the Ascent
Xtrata Pro Statistics Viewer module.
Related Documentation
In addition to this Getting Started with Ascent Xtrata Pro guide, the following
documentation is available.
Installation Guide for Ascent Xtrata Pro
This installation guide is provided as a separate document in the Ascent Xtrata Pro
software case.
Using the Ascent Xtrata Pro Knowledge Base Administration Module
This guide contains information about training, creating, and otherwise managing
knowledge bases for invoice projects.
Ascent Xtrata Pro Online Help
Ascent Xtrata Pro online help is available from the application components as
follows:
• From any of the Ascent Xtrata Pro components, click the Help button from
the toolbar or select Help|Contents (or Index) from the menu bar.
• From any dialog box, click the Help button to display context sensitive help
information for the dialog box.
xvi Ascent Xtrata Pro User's Guide
Page 17

How to Use This Guide
Scripting Online Help
Information about scripting is available from the Help menu of any Project Builder
interface that allows you to write or access scripts. Select Help and then the desired
help component.
Ascent Xtrata Pro Release Notes
Late-breaking product information is available from the release notes. You should
read the release notes carefully, as they contain information that may not be included
in other Ascent Xtrata Pro documentation.
Training
Kofax offers a variety of training options that will help you make the most of your
software. Visit the Kofax Web site at www.kofax.com for complete details about the
available training options and schedules.
Kofax Technical Support
For additional technical information about Kofax products, visit the Kofax Web site
at www.kofax.com and select an appropriate option from the Support menu. The
Kofax Support pages provide product-specific information, such as current revision
levels, the latest drivers and software patches, online documentation and user
manuals, updates to product release notes (if any), technical tips, and an extensive
searchable knowledgebase.
The Kofax Web site also contains information that describes support options for
Kofax products. Please review the site for details about the available support options.
If you need to contact Kofax Technical Support, please have the following
information available:
• Ascent Xtrata Pro software version
• Ascent Capture and ACI Server software versions
• Operating system and service pack version
• Network and client configuration
• Copies of your error log files
• Scanner make and model
Ascent Xtrata Pro User's Guide
xvii
Page 18

• Scanner engine (board) type
• Special/custom configuration or integration information
xviii Ascent Xtrata Pro User's Guide
Page 19

How to Use This Guide
Ascent Xtrata Pro User's Guide
xix
Page 20

Introduction
This chapter introduces the components installed with Ascent Xtrata Pro, as well as
their key features.
The rest of this guide describes these components in more detail, and explains how
to incorporate Ascent Xtrata Pro into your Ascent Capture processing flow.
Ascent Xtrata Pro
Ascent Xtrata Pro is a complete system for processing structured, semi-structured,
and unstructured documents within the Ascent Capture framework. Ascent
Capture’s document and data capture capabilities are enhanced by advanced
intelligent document processing. Ascent Xtrata Pro provides methods for
hierarchical, content-based classification, and the free-form field extraction of
arbitrary, mixed, and unstructured documents.
Chapter 1
Overview
Ascent Xtrata Pro adds the following components to your Ascent Capture system:
• Ascent Xtrata Pro Project Builder lets you set up, store, and test Ascent
Xtrata Pro projects that contain all the information required to process
documents.
• Ascent Xtrata Pro Synchronization tool is a setup component that is
integrated into the Ascent Capture Administration module as a custom panel.
It is used for linking Ascent Capture document classes and index fields to
classes and fields in the Ascent Xtrata Pro project.
• Ascent Xtrata Pro Knowledge Base Administration is used to train
documents and manage knowledge bases for a given project. Fields cannot be
added to the project and locator settings cannot be changed.
Ascent Xtrata Pro User's Guide 1
Page 21

Chapter 1
• Ascent Xtrata Pro Server processes batches in the Ascent Capture workflow
by performing document classification and data extraction. The Server
module uses the definitions stored in a project and executes them when
processing batches for a linked batch class.
• Ascent Xtrata Pro Validation provides enhanced validation functionality. It
allows for validating and manually correcting documents that contain invalid
classification and/or extraction results. Problem documents can be flagged
for additional training.
• Ascent Xtrata Pro Statistics Viewer is used to show statistical data gathered
by Ascent Xtrata Pro Server.
• Ascent Xtrata Pro XDoc Browser is used to view the contents of XDoc files.
These files contain a textual representation of the contents, structure, and
extraction results from image files. Ascent Xtrata Pro uses XDoc files
internally when processing batches.
• Ascent Xtrata Pro Image Classifier is a utility that you can use to classify and
cluster documents without using the Project Builder
Once Ascent Xtrata Pro is installed, you can add Ascent Xtrata Pro Server and Ascent
Xtrata Pro Validation to any batch class already defined in the Ascent Capture
Administration module. Typically, Ascent Xtrata Pro Server is placed directly after
the Scan module and replaces the Recognition Server in the Ascent Capture
workflow. Documents are classified and processed for data extraction and then
routed to the Ascent Xtrata Pro Validation module and/or the Release module.
Capture Flow
An overview of a typical Ascent Capture workflow that includes Ascent Xtrata Pro
Server is shown below.
2 Ascent Xtrata Pro User's Guide
Page 22

Overview
Ascent Xtrata Pro
Server
Figure 1-1. Typical Capture Workflow with Ascent Xtrata Pro Server and Validation
First, documents are prepared for scanning. There is no need to sort the documents,
but the pages must be smoothed and all staples and/or clips removed. Then, using a
professional scanner with VRS, batches of documents are scanned into Ascent
Capture. Ascent Xtrata Pro Server processes the documents and provides the
classification and recognition results. Invalid results are reviewed, and if necessary,
corrected in the Ascent Xtrata Pro Validation module.
Optionally, documents in the batch can be routed to either the Ascent Capture
Recognition Server or Ascent Xtrata Pro Server to perform advanced forms
processing. After all the documents are validated and verified either by Ascent
Capture Validation or Ascent Xtrata Pro Validation, the batch is passed to the
Release module and exported to the final repository.
Ascent Xtrata Pro Project Builder
Ascent Xtrata Pro Project Builder is a standalone program intended for system
administrators, operators, project developers, and other skilled individuals who are
setting up Ascent Xtrata Pro projects. Project Builder allows for defining the
hierarchical structure of classes (categories of documents) and adding sample
documents and classification instructions to these classes. Extraction rules and fields
can be defined for each class.
Note that for invoice projects there is, by definition, only one class (the invoice class).
Consequently, class related settings are not displayed and are handled automatically
by the program.
Ascent Xtrata Pro User's Guide
3
Page 23

Chapter 1
A project created with Project Builder is stored in its own project folder. The folder
includes the project file and a number of additional files that contain everything
needed to manage and execute the project. This project folder is portable; if desired,
it can be copied to another location and used from there.
Project Builder supports robust features for interactively testing project settings
during configuration and maintenance. Thorough testing, using your own sets of test
documents, is vitally important for evaluating the behavior of defined rules and
learned document samples. The settings can then be adjusted (and retested) until the
desired results are achieved.
Test documents can be displayed in an integrated document viewer. A test set may
contain any number of .tif, .txt, or .xdc files placed in one or more designated folders.
(.xdc is a proprietary file format used by Ascent Xtrata Pro that contains textual and
geometric information extracted from a .tif file by the built-in Optical Character
Recognition (OCR) engine.)
Project Builder has flexible features you can use to test classification results for the
entire test set or extraction results for a single document. Test results are displayed in
the Classification Results or Extraction Results panels for quick review. Or, you can
directly view the results in the Document Viewer when the document is displayed.
The results are also displayed in a result matrix, which provides a three-dimensional
column graph of the classification results. This matrix provides an immediate, highly
visual assessment of classification quality.
4 Ascent Xtrata Pro User's Guide
Page 24

Overview
Figure 1-2. Classification Result Matrix for a News Group Project of Nine Classes
Ascent Xtrata Pro Synchronization
Once classes and fields are defined in the Ascent Xtrata Pro project, they must be
mapped to Ascent Capture document classes, form types, and index fields.
Ascent Capture document classes, form types, and index fields can be set up in
Ascent Capture as usual. The batch class does not need sample pages, index zones,
or other recognition settings because these items are set up in Project Builder.
A project can be synchronized with any batch class that contains Ascent Xtrata Pro
Server as a queue. To facilitate the synchronization process, the Ascent Xtrata Pro
Synchronization tool has an easy-to-use and efficient interface for linking Ascent
Xtrata Pro project elements with corresponding elements in the Ascent Capture batch
class.
The Synchronization tool is available from the Ascent Capture batch class context
menu so long as Ascent Xtrata Pro Server is set up as a queue.
Ascent Xtrata Pro User's Guide
5
Page 25

Chapter 1
Ascent Xtrata Pro Knowledge Base Administration
Once a project is set up, the Knowledge Base Administration module is used to train
the project, as well as manage training sets and knowledge bases. For complete
information on this application, refer to the Using the Ascent Xtrata Pro Knowledge
Base Administration Module guide that is included with your product.
Ascent Xtrata Pro Server
Ascent Xtrata Pro Server is a custom module that performs document classification,
OCR, and data extraction. Once installed, it can be added to the list of processing
queues for any Ascent Capture batch class.
Ascent Xtrata Pro Server normally runs as an unattended module. Statistical data
and error messages are available through a log file. A user interface shows the status
of the batch, the document, and the recognition results for the current document.
Ascent Xtrata Pro Server can be started manually for one batch from the Ascent
Capture Batch Manager or run as a polling server that automatically processes all
batches that are ready for it. For each batch, the project associated with its batch class
is automatically loaded by the Server as needed.
The Server can run as an application, where it has a graphical user interface, or it can
run in the background as a Windows service. Start the Server in application mode
from either the Windows start button or the Ascent Capture Batch Manager. To
automatically start the Server as service every time the computer starts, change the
starting mode from ‘manual’ to ‘automatic’. Select Control Panel | Administrative
Tools | Services, find “Ascent Xtrata Pro Batch Processing Service,“ and change the
starting mode from “manual“ to “automatic.“
To monitor the service a performance counter “Ascent Xtrata Pro Batch Processing
Service“ is added to the Microsoft Windows monitoring system. To add the
performance counter, select Start | Control panel | Administrative
Tools | Performance and start the monitoring system. From the context menu, click
“‘Add Counters“ and type “Ascent Xtrata Pro Batch Processing Service“.
The Ascent Xtrata Pro Server (including when running as a service) supports multiprocessor CPUs. Parallel document processing supports up to four services. For
example, while processing a batch, the Server can allocate multiple processors so that
each one is dedicated to a single document.
6 Ascent Xtrata Pro User's Guide
Page 26

Overview
The Server collects statistical data on all documents as they are processed and saves
this information in the XDocument (XDoc). A release script retrieves the data from
the XDoc and stores it in a database. The statistics are also updated based on changes
that occur during validation.
The Server collects the following statistics:
• Number of pages/documents per day/month.
• Recognition rates (correct, reject, error) per field and per document.
• Processing time per page.
• Field and Document statistics grouped by index field or classification result.
The statistics feature offers the following capabilities:
• Cleanup of obsolete data within in a specified time span.
• Collection of data grouped by index field for each classification result.
• Automatic archiving of data older than a month.
Ascent Xtrata Pro Validation
Ascent Xtrata Pro Validation is a custom module that can be used in conjunction
with Ascent Xtrata Pro Server for Ascent Capture batches. It provides an interface for
validating and manually correcting classification and extraction results returned by
the Server.
Ascent Xtrata Pro Statistics Viewer
The Ascent Xtrata Pro Statistics Viewer is a standalone application that displays the
statistical data gathered by the Ascent Xtrata Pro Server and the Ascent Xtrata Pro
Validation module. The statistics contain information about speed as well as about
recognition accuracy.
Ascent Xtrata Pro Technology
The following sections give a short overview of the processing capabilities of Ascent
Xtrata Pro. The capabilities are documented in detail in the following chapters.
Ascent Xtrata Pro User's Guide
7
Page 27

Chapter 1
Classification
Classification is the process of determining the category (class) of a document by
identifying its relevant characteristics. The features used for classifying a document
can be geometrical or textual. The Ascent Xtrata Pro classification engine can use
either of these characteristics to make the best determination.
Classification Hierarchy
In most organizations, the manual classification of documents follows a hierarchical
scheme. First, the main category of a document is determined and then classification
is refined and performed in greater detail over several steps until the final result (the
type of document) is obtained.
With Ascent Xtrata Pro you can replicate your legacy classification hierarchy when
using automatic classification, thereby ensuring familiar results. This type of
hierarchical evaluation is designed to traverse the full extent of the classification tree
defined for a project. Different classification methods can be used at each level of the
hierarchy. Extraction can be defined for any class in the tree and is inherited by any
sub nodes of that class.
Layout Classification
Layout classification uses the geometric structure of a document to classify it. This
structure is learned automatically from a single sample page that serves as a
prototype for the geometric analysis. If the class contains documents of several
distinct layouts, layout classification can be used to match new documents with the
appropriate class.
Typically, layout classification is used for identifying forms in a batch. But, it can
also be used for recognizing the sender of a letter, if the sender’s document layout is
unique. For example, this might be the case for formal letters and invoices.
Content Classification
Content classification uses the textual content of a document to classify it. This type
of classification is trained with several dozen sample documents per class. The
Adaptive Feature Classifier (AFC) automatically determines the features that are
relevant for a class. Because the AFC is fault tolerant and evaluates words as well as
other features, even information with OCR or typing errors can be used to correctly
classify a document. The sample documents are analyzed and a classification pattern
is automatically created for use during production.
8 Ascent Xtrata Pro User's Guide
Page 28

Overview
Instruction Classification
Instruction classification uses explicit rules about a document to classify it. These
rules consist of words and phrases that can be combined using Boolean operations.
Negative instructions can be used to inhibit placing a document into a class. When
used in conjunction with the AFC, these explicit instructions can be used to handle
exceptions.
Document Separation
Ascent Xtrata Pro is capable of separating multi-page .tif images into single
documents or grouping loose pages into multi-page documents.
Although disabled by default, document separation can be enabled as a project-level
setting in Project Builder. A variety of options are available for defining how Ascent
Xtrata Pro Server handles unclassified pages. When the feature is enabled, Ascent
Xtrata Pro Server performs document separation before extraction.
For details about setting up document separation, see Project Builder.
Extraction
Extraction is the act of processing a document, usually with an OCR engine, to
identify information from an image file and preserve that information as text.
For classified documents, a class-specific extraction algorithm is applied to the index
fields for that class. Ascent Xtrata Pro provides several complementary extraction
methods for both finding relevant information in a document, and for filling the
index fields with the extracted items.
Extraction is not performed for unclassified documents.
Locators
Extraction methods, which are called locators, are available as integrated components
that can be configured for any class or at the project level.
Locators are attached to one or more fields that store the results of the locator
algorithm. Locators and fields are inherited by classes in accordance with their
position in the class tree.
Ascent Xtrata Pro User's Guide
9
Page 29

Chapter 1
Evaluators
In addition to the locators, various evaluators are available. Evaluators work on the
results of locators and do not directly retrieve data from the document.
Online Learning
The New Samples working mode is available within Project Builder. This working
mode shows documents that have been returned from validation. These documents
can be added to either a classification or extraction training set so that they may
optimize the extraction of tables and invoice header locators.
In order to make online learning available for a batch class, the Ascent Capture
Release module must be added to the list of queues for the batch class.
OCR and Script Integration
In addition to the classification and extraction methods provided with Ascent Xtrata
Pro, Project Builder also provides access to OCR settings and an editor for the builtin script engine.
OCR Integration
To process unstructured documents and locate arbitrary content, the complete
document must be processed by the OCR engine before any of the extraction
methods can be applied. The OCR results are stored in a structured representation of
the document that is saved as an .xdc (XDoc) file. All subsequent algorithms operate
on the XDoc representation of the original file.
OCR is integrated transparently into Project Builder and Ascent Xtrata Pro Server. It
is also performed automatically during runtime, and only on demand. This means
that it is only done when the full text results of a page are needed. For example,
when extraction is restricted to the first page of the document, and none of the
classification methods require more than one page, OCR is only performed on the
first page.
Ascent Xtrata Pro is delivered with the ABBYY ® Finereader ® 8.0 OCR engine. An
additional language package for Asian languages for ABBYY ® Finereader ® and an
additional recognition engine KADMOS 4.2 ®, developed by Recognition GmbH, is
available. The language package as well as additional recognition engines like for
example KADMOS 4.2 ® must be licensed separately.
10 Ascent Xtrata Pro User's Guide
Page 30

Overview
Script Integration
A VBA-compatible script engine is built into Ascent Xtrata Pro. This engine can be
used to extend the capabilities of the classification, extraction, and validation
methods. The script is called when specific events occur before and after
classification. In the scripting environment, the complete Ascent Xtrata Pro object
document model is available to the script programmer.
Release Script
The Xtrata Pro Statistics release script lets you configure the settings for online
learning and statistical information.
To make online learning and statistical information available, the standard Ascent
Capture Release module must be added to the list of queues for the batch class and
the Xtrata Pro Statistics release script must be added to each Ascent Capture
document class in the batch class.
For further details about release scripts, see the Ascent Capture documentation.
Statistical Information
The statistics database contains information about server performance and
recognition accuracy. For a period of time, statistical information is available for each
field and document. After a user configurable number of days, this detailed
information will be accumulated into average daily values.
You can set the number of days in the properties dialog box for the release script.
Recognition accuracy statistics are available at the field level and as an average value
for each document. Furthermore, it is possible to group the statistical information by
the classification result or by other field values. You can then further evaluate the
statistical data by grouping it according to the value of that field. For example,
recognition accuracy or OCR computing time can be tracked for a field and then
grouped by supplier or by Ascent Capture document class.
The group value is set in the properties dialog box for the release script.
Validation
Before you can use the Ascent Xtrata Pro Validation module to correct documents,
validation must be set up in the Ascent Xtrata Pro Project Builder. Furthermore,
validation thresholds must be assigned, as well as validation methods and rules.
Ascent Xtrata Pro User's Guide
11
Page 31

Chapter 1
Optionally, custom validation forms can be designed for the Ascent Xtrata Pro
Validation module. For more information, see Setting up Validation.
Validation Methods and Rules
Validation methods include the implementation of automatic check functions, which
can be predefined standard methods or customer-specific methods developed with
the integrated scripting feature.
Validation rules are used to assign validation methods to one or more fields.
Validation Forms
Validation forms are set up in Ascent Xtrata Pro Project Builder. They can be defined
for any class and can contain fields and other elements to provide enhanced features
for correcting documents in Ascent Xtrata Pro Validation.
Invoice Processing
Ascent Xtrata Pro also includes a set of features designed to optimize the processing
of invoices. Basic configuration for an invoice project is done within the Ascent
Xtrata Pro Project Builder, but when working on an invoice project, there is a slightly
different functionality, and the user interface switches to a different mode. For
further details see Project Builder.
Invoice projects in Ascent Xtrata Pro are used to find and extract information from
invoices by taking advantage of the intrinsic, logical information they contain. This
means that there is no extensive setup or preparation required to read the standard
types of fields usually found on invoices.
Ascent Xtrata Pro is preconfigured to extract the following items from an invoice:
• Vendor name, customer number, and taxpayer ID number
• PO number and date
• Invoice date
• Net amount
• Total amount
• Taxes
12 Ascent Xtrata Pro User's Guide
Page 32

Overview
• Additional fees and tolls
These fields are read by a pre-trained system that can already recognize a certain
percentage of invoices. Since additional information is created during the data
extraction process, this information can be used to improve the recognition of invoice
data through additional training.
In addition to the preconfigured items, fields can be added to an invoice project
specifically for the extraction of additional information. Data for these fields are
extracted using “locators.” Locators are special algorithms that encompass a variety
of methods for extracting invoice data. For instance data can be read from bar codes,
fields with specific formatting, or by database lookup.
Special Invoice Processing Technology
The following sections give a short overview of the special invoice processing
capabilities of Ascent Xtrata Pro.
Knowledge Bases
Invoice projects make use of a learning system that needs very little user intervention
to create a working invoice project.
Knowledge bases are binary files used to store extraction patterns. A knowledge base
is relatively compact. For example, a knowledge base for 341 trained invoices might
be about 60 Kbytes. This size roughly increases linearly, such that for 5,000 trained
invoices, the knowledge base will be about 1 Mbyte.
When a knowledge base is imported into a new project, this inherited store of
knowledge makes it possible for that project to immediately extract data from a
certain percentage of invoices. A single project may have multiple knowledge bases.
Documents that were not properly extracted can then be used to improve the
extraction results for your project. This training is typically the responsibility of the
system administrator who will process sample documents that have been placed in a
training set. The training session will create new extraction patterns that are stored
with the project.
In addition, these new extraction patterns can be made portable by adding them to a
knowledge base. If this is done, all projects using that knowledge base will benefit
from the training. It is important to note that only the relevant extraction pattern
Ascent Xtrata Pro User's Guide
13
Page 33

Chapter 1
information is stored in the knowledge base, and the training document contents are
not available and cannot be displayed from the knowledge base.
Knowledge bases can either be created with the help of the Project Builder or the
Knowledge Base Administration module. The Knowledge Base Administration
module possesses the same functionality concerning knowledge bases as the Project
Builder, but provides a simplified user interface as this application can not be used to
neither set up extraction nor validation. For further information see Extraction -
Knowledge Bases.
Protection
You can control the use of your knowledge bases by protecting them with a
password. You may choose to do this if you share your knowledge base with other
users.
For project development and testing purposes, these users can use a protected
knowledge base in the Project Builder or the Knowledge Base Administration
module without any restrictions. However, if they want to use a protected
knowledge base during production, they must obtain an activation code to unlock it.
To get an activation code for a knowledge base, the user sends his hardware key
serial number to the owner of the knowledge base. The knowledge base owner then
uses either the Project Builder or Knowledge Base Administration module to create
an activation code for that hardware key’s serial number and returns this activation
code. Finally, the customer uses this code to unlock the knowledge base so that it can
be used for production. Once a knowledge base has been unlocked for a hardware
key, it can be used in any number of projects.
Templates
For invoice projects only a simplified class hierarchy is provided. Only the base class
level is available and only one additional hierarchy level can be defined. These
derived classes are called templates. To recognize templates, layout classification is
performed . For further information about how to set up templates, see Project
Builder.
Group Locators
There are several types of group locators that extract data based on the geometric
relationships of items on the invoice. There are three different group locators, the
Amount Group, the Invoice Group, and the Order Group.
14 Ascent Xtrata Pro User's Guide
Page 34

Overview
Ascent Xtrata Pro is designed to read semi-structured invoices. Therefore every
project has a set of predefined fields for the most common items found on all types of
invoices. These fields are almost always logically arranged on the invoice, and each
field has one of the group locators assigned to it.
Each group locator takes advantage of existing knowledge about the geometry of
these groups, and uses that knowledge to improve data extraction.
This means that you should train all fields you care about by setting up a training set
with sample documents, or use an existing knowledge base. To improve the quality
of recognition it is recommended to train all fields for a group locator that are
available on the document even if you do not need, like for example postage and
packaging.
For further information, see Extraction – Amount Group Locator, Extraction – Invoice
Group Locator, and Extraction – Order Group Locator.
Ascent Xtrata Pro User's Guide
15
Page 35

Chapter 1
16 Ascent Xtrata Pro User's Guide
Page 36

Introduction
Project Builder lets you set up, store, and test projects for Ascent Xtrata Pro that
contain all the necessary information for processing documents.
In Ascent Xtrata Pro there are three main aspects to setting up a project:
classification, extraction, and validation. You may define projects that contain only
classification, with no extraction or validation. However, projects that contain
validation must also contain classification and extraction.
Special invoice features are provided in Ascent Xtrata Pro Project Builder to
configure and train your invoice projects by setting parameters and analyzing
extraction examples from invoices. To aid in this training process, your settings can
be tested and the results immediately viewed.
Depending on the license, two different types of projects are supported:
• Ascent Xtrata Pro Projects
3 No field group locators are available.
3 The Project panel of the graphical user interface shows a complete
Chapter 2
Project Builder
hierarchical class tree.
• Ascent Xtrata Pro Invoice Projects
3 The Project panel of the graphical user interface does not show the class
tree, since for invoice projects the class hierarchy is restricted to the base
class and one sub class.
3 No content classification is provided that means that you can neither train
Adaptive Feature Classifier nor set up Instruction classifier.
3 Field group locators are available.
Ascent Xtrata Pro User's Guide 17
Page 37

Chapter 2
License Activation
The Ascent Xtrata Pro setup will install the Project Builder with a demo license. The
demo license is valid for three days from the date of installation. The Project Builder
can be used without any restrictions until the license expires.
After the expiration date, the Project Builder will not work except for the license
activation component. Until activation is complete, Project Builder will display a
dialog box asking the user to activate the license.
License activation enables the use of Project Builder on a single computer based on
an Ascent Capture hardware key. License activation requires the user to plug in an
Ascent Capture license key with either a time/volume restricted Ascent evaluation
license or an unrestricted Ascent Xtrata Pro license (either a General Base License or
an Invoice Base License).
After activation, the Ascent Capture hardware key is no longer required by the
Project Builder.
During startup the Project Builder splash screen will display the Ascent serial
number, the name of the user and the company name together with the current
version. If a time restricted Ascent Product Suite Evaluation license has been used for
activation, Project Builder will also show the expiration date. Note that Project
Builder will stop functioning after the expiration date. If an unrestricted Ascent
Xtrata Pro license has been used for activation, Project Builder will not be time
limited.
Demo Period
Without Ascent
Capture hardware
key, works 3 days
Displays “Demo” in
splash screen
License Activation
With Ascent Capture
hardware key attached
(Evaluation or nonevaluation, Xtrata Pro
features)
Enter user and
company name
Production State
Without hardware key,
unlimited
Displays serial number,
user name, company
name and (optional)
expiration date in splash
screen
18 Ascent Xtrata Pro User's Guide
Page 38

Project Builder
Activating a License
To activate a license, the user has to activate either a time/volume restricted Ascent
Product Suite Evaluation license or an unrestricted Ascent Xtrata Pro license on the
local machine. License activation is performed within a simple dialog box, as
described below.
1 During the demo period, the user is asked to activate the license each time
the application starts. You can continue starting Project Builder without
activating the license by clicking No. To activate the license, click Yes to open
the Activate License dialog box.
Note Use Help | Activate License from the main menu to activate a license
or to change the activation type of the Project Builder to a new hardware key,
(for example from an evaluation key to a permanent production key), or to
change the display values for the user and company names.
2 When you start Project Builder after the demo period, the Activate License
dialog box is displayed and the license needs to be activated with an Ascent
Capture hardware key before Project Builder can be used.
Ascent Xtrata Pro User's Guide
19
Page 39

Chapter 2
Figure 2-1. License Activation
The Activate License dialog box has two panels, Current License that shows
the information for the currently activated license and New License that
allows entering the name and company for the new license and shows the
dates of the attached hardware key. Both panels provide the following fields:
• Name - for the current license, the name of the licensee is displayed; for a
new license activation, the name of the licensee must be inserted.
• Company - for the current license, the company name of the licensee is
displayed; for a new license activation, the company name of the licensee
must be inserted.
• Expires - shows the expiration date, either when the demo period ends or
the activated hardware key expires.
• Hardware key number – shows the number of the hardware key. During
the demo period, a hardware key does not need to be attached.
• Type of License – the type can either be Demo License, Evaluation
License, or Permanent License
• License Status – the license can either be valid or invalid / expired.
20 Ascent Xtrata Pro User's Guide
Page 40

Project Builder
The following buttons are provided:
• Read Hardware Key – Reads the hardware key information from the
attached hardware key.
• Activate License – Click Activate License to check if an Ascent Hardware
key is attached to the local computer by calling the Ascent Capture
licensing functions. If not, the user is prompted to attach the hardware
key
• Cancel – Click Cancel to close the License Activation dialog box.
• Help – Click Help to open the online Help topics.
Project Level Fields
You can define fields at the project level, for which extraction is performed at the
beginning of classification. The extraction results of these fields may be used for the
classification of a document. For example, this makes it easy to classify a document
according to a barcode or to perform a language dependent classification using a
classification locator. When doing this, the locator result is saved to a project level
field.
Classification
A project consists of a class hierarchy in which each class is assigned a set of
classifiers and the data to be extracted during processing is defined. The classes
represent different types of documents. Each class of documents is treated differently
during the extraction of information, but all documents of a certain class are handled
identically.
Note By definition, an invoice project has only a single class (the invoice class) and
one sub class, so there is no class tree displayed in the application interface.
The classifiers decide to which class a document belongs. There are two types of
classifiers:
• Image classifiers identify documents based on a graphical representation of
the image.
• Content classifiers identify documents based on their textual content, and
require the results from an Optical Character Recognition (OCR) engine.
Ascent Xtrata Pro User's Guide
21
Page 41

Chapter 2
Layout Classifier
The Layout Classifier analyzes the graphical representation of the document image
and automatically creates classes of similar documents. Training documents are
needed to enable layout classification for a class. The representations of these
training documents are used to train the classifier. For detailed information, see
Layout Classifier on page 43.
Adaptive Feature Classifier
The Adaptive Feature Classifier (AFC) analyzes the textual representations of
documents and automatically creates classes of similar documents. Training
documents are needed to enable the AFC for a class. The classifier is trained with the
textual representation of these training documents. For detailed information, see
Adaptive Feature Classifier on page 44.
Instruction Classifier
The Instruction Classifier searches for specified phrases in the textual representation
of a document; therefore, no training documents are needed. To enable the
Instruction Classifier, characteristic phrases (referred to as instructions) are defined.
For detailed information, see Instruction Classifier on page 45.
Classification based on extraction
You can project level define fields for which extraction is performed before
classification. The extraction results for these project level fields can be used to
classify the document. For example, you can classify a document based on a barcode.
Reclassify Documents
The classification result can also be changed during extraction, after which extraction
is performed once again for the new class.
Extraction
Each class can be set up to contain a set of fields for storing the extracted data. These
fields can be synchronized with Ascent Capture fields. The fields are filled by agents
(referred to as locators) that search for data on the document. Locators exist in
different flavors, which are distinguished by their way of searching. There are
different locator types, described in detail in Extraction.
22 Ascent Xtrata Pro User's Guide
Page 42

Project Builder
For invoice projects, there are special field group locators for predefined invoice
fields, which only need to be trained with sample documents. These locators can also
be combined with the normal “rule-based” locators.
Extraction Benchmark
You can test the extraction results for the current project settings against a reference
set. The reference set has to be created first, for example by processing the documents
with Ascent Xtrata Pro Server and Validation.
The benchmark test processes the selected reference set using the current project
settings and compares these test results against the results that are stored in the
XDocs of the reference set. The results are shown as statistics for the complete test set
as well as for each document, so that the documents yielding different results can
easily be identified.
Validation
In addition to classification and extraction, the project contains validation settings.
Validation methods and rules are defined using the Show Validation Rules working
mode. Custom validation forms can also be created for each class. Derived classes
inherit the form from their parent class.
You can also customize the Project panel to include a column for “Val. Form,” which
shows an icon if a validation form is available for a class. (Select View | Choose
Details from the main menu to customize the columns shown in the Project panel.)
After the validation methods and rules have been defined for the fields of a class, and
the validation form has been created, you can test validation. Select the class in the
Project panel and load test documents to the Test Folder panel. Select a document,
and click Extract Document. Then, click Validate Document from the main toolbar to
apply the validation rules and show the results in the validation form.
Managing Projects
You can either create a new project or update existing projects. The Project Builder
can be used to manage two types of projects, standard Ascent Xtrata Pro projects or
invoice projects. You need dedicated licensing to work with invoice projects. An
invoice project can always be converted to a standard project, but you cannot convert
a standard project to an invoice project.
Ascent Xtrata Pro User's Guide
23
Page 43

Chapter 2
Creating a new Project
There are two ways to create a new project:
• Create a project from a directory: With this method, you specify folder(s)
during the project creation process that contain image and/or text files to use
as classification training sets. (You must set up the training set folders before
you create the project.) Any subfolders that exist for the folder(s) are used for
creating classes and training sets.
• Create a project manually: With this method, you create the project without
specifying folders. You add your training sets after the project is created.
With both methods, you can add, delete, and maintain your classes and training
documents for your project from within Project Builder.
X To create a project from a directory
1 Click New Project from the main toolbar to open the New Project dialog box.
Figure 2-2. Create New Project
2 From the Project Folder tab, enter a name for the project and specify the root
location for the project folder. The path to the project folder displays at the
bottom of the dialog box.
24 Ascent Xtrata Pro User's Guide
Page 44

Project Builder
Figure 2-3. New Project Dialog Box – Project Folder Tab
3 If the root folder exists already and you want to overwrite it, select “Delete
existing files” to delete all previously existing files and folders in the selected
folder when the project is created. This might be useful for reusing an
existing folder for which you do not need any of the existing files or folders.
Note Review the contents of an existing folder before deleting its contents. If
the folder contains files or folders that you need, copy them to another
location or disable the “Delete existing files” option before you create your
project. Otherwise, your files will be deleted.
4 Click Next to continue to the next tab.
Ascent Xtrata Pro User's Guide
25
Page 45

Chapter 2
Figure 2-4. New Project Dialog Box – Content Classification Tab
5 If you want to use an existing set of files for content classification, select
“Import existing training set for content classification.” Then, specify the
folder that contains the text files and subfolders to be used for the creation of
classes and training documents. You can enter the path in the Path field or
browse for the folder.
6 Click Next to continue to the next tab.
Figure 2-5. New Project Dialog Box – Layout Classification Tab
26 Ascent Xtrata Pro User's Guide
Page 46

Project Builder
7 If you want to use an existing set of files for layout classification, select
“Import existing training set for layout classification.” Then, specify the
folder that contains the image files and subfolders to be used for the creation
of classes and training documents. You can enter the path in the Path field or
browse for the folder.
8 Click Finish to create the project and close the dialog box.
X To create a Project manually
1 Select File | New Project from the main menu to display the New Project
dialog box.
2 From the Project Folder tab, enter a name for the project and specify the root
location for the project folder. The path to the project folder displays at the
bottom of the dialog box.
3 If the root folder exists already and you want to overwrite it, select “Delete
existing files” to delete all previously existing files and folders in the selected
folder when the project is created. This might be useful for reusing an
existing folder for which you do not need any of the existing files or folders.
Note Review the contents of an existing folder before deleting its contents. If
the folder contains files or folders that you need, copy them to another
location or disable the “Delete existing files” option before you create your
project. Otherwise, your files will be deleted.
4 Click Finish to create the project and close the dialog box.
5 Build the class hierarchy:
a. Right-click the Project item from the class hierarchy to open a context
menu.
b. Select Add Class to create a new class under Project. Repeat for as many
classes as you need.
c. To insert a derived class, right-click the parent class from the class
hierarchy and select Add Class. Repeat for as many derived classes as
you need.
6 Set up classification for each class. For more information, see Setting Up
Classification on page 43.
7 Set up extraction for each class. For more information, see Setting Up
Extraction on page 31.
Ascent Xtrata Pro User's Guide
27
Page 47

Chapter 2
8 Set up validation. For more information, see Setting Up Validation on
page 48.
9 Save the project.
Loading an Existing Project
When you load an existing project, it will automatically be validated. . If necessary, a
warning message will describe any issues that were found during the project
validation process. This warning may also be displayed, if you select File | Validate
Project from the main menu.
If no problems are detected, “No problems are found in this project” is displayed.
It is possible to upgrade existing projects from an earlier version of Project Builder.
To do this, select File | Open Project from the main menu, or click Open Project from
the main toolbar, and open the project file. The project will be validated and
automatically upgraded to the new version.
In some cases, the new version of Project Builder may incorporate improvements or
changes that can not be automatically applied to an older project when it is loaded.
In such cases, some settings may need to be customized by the user. Any such
changes are shown in the Upgrade Warnings area. For further details see Validate
Project on page 33.
Saving a Project
To save the current project you either select File | Save Project from the main menu
or click Save Project from the toolbar. If you make changes to a project and attempt to
exit the application without saving, a warning is displayed.
You can create a complete copy of an existing project file by you selecting File | Save
Project As from the main menu. A dialog box is shown where you can change the
name of the project file, and select another folder for the project file.
28 Ascent Xtrata Pro User's Guide
Page 48

Project Builder
Figure 2-6. Save Project As Dialog Box
To change the name of the project file select the Name text box and enter a name for
the new project file. Click the folder icon to navigate to a different folder and click
OK. The text at the bottom of the dialog box shows the new project file name and the
complete path to its new location.
Project Properties
The Project Properties dialog box allows you to insert a project description or assign
read and/or write protection to the project file.
The Project Settings dialog box contains several tabs that allow you to configure a
variety of global settings such as document separation and classification rules.
Project Properties
Select File | Project Properties from the main menu to display the dialog box.
Description
You may add a description to the project. This description is then visible within
the Synchronization tool.
Password Protection
A project file may be read and/or write protected.
If you read protect your project file, you will have to enter the read protection
password in the text field to load the project. If you provide the wrong password
or click Cancel, the project will not open. If you did not set a write protection
Ascent Xtrata Pro User's Guide
29
Page 49

Chapter 2
password, the project will open in full edit mode once you provide the read
protection password.
Figure 2-7. Open Read Protected Project File
If the project file is write protected, you have to enter the write protection
password and click OK to open the project file for editing. If you click Cancel, the
project will open in read only mode.
Figure 2-8. Open Write Protected Project File
The following table shows the relationship between the read and write
passwords. As you can see, from the bold rows, there are four combinations of
password settings that allow the project to be opened in full edit mode.
Read
Password
Not set N/A Not set N/A Opens in full edit
Not set N/A Set Correct Opens in full edit
Not set N/A Set Wrong Does not open
Not set N/A Set Cancel
Status Write
Password
Status Behavior
mode
mode
Opens in read only
30 Ascent Xtrata Pro User's Guide
Page 50

Project Builder
mode
Set Correct Not set N/A Opens if full edit
mode
Set Wrong Not set N/A Does not open
Set Cancel Not set N/A Does not open
Set Correct Set Correct Opens in full edit
mode
Set Wrong Set N/A Does not open
Set Cancel Set N/A Does not open
Set Correct Set Wrong Does not open
Set Correct Set Cancel
Opens in read only
mode
.
Project Settings
Project-level settings are set from the Project Settings dialog box, which includes the
tabs described below. Select Project | Project Settings from the main menu to display
the dialog box.
General
This tab provides options for automatic rotation, validation, color images, and
document separation.
By default, document separation is disabled. If you enable this option, document
separation options become available in the Class Properties dialog box for each
class. For details, see Project Builder User Interface - Project Settings Dialog Box –
General Tab .
Classification
This tab provides settings for default classification and classification evaluation.
It also provides options for setting up content and layout classification. For
details, see Project Builder User Interface - Project Settings Dialog Box – Classification
Tab .
Views
This tab allows views to be added, deleted, renamed, and edited. A classifier
instance inside the project is called a view. For details, see Project Builder User
Interface - Project Settings Dialog Box –Views Tab.
Ascent Xtrata Pro User's Guide
31
Page 51

Chapter 2
Profiles
Use this tab to define the OCR or OMR Bar code profiles, to import or export
profiles, and to change profile settings. In general three different types of profiles
can be created:
• Page
• Zone OCR
• Zone OMR
Each profile has properties for defining languages, as well as settings for
orientation, background removal, separation characters, and printer types. For
details, see Project Builder User Interface - Project Settings Dialog Box – OCR Tab .
Databases
Use this tab to manage databases. For details, see Project Builder User Interface Project Settings Dialog Box – Databases Tab.
Dictionaries
Use this tab to manage dictionaries. For details, see Project Builder User Interface Project Settings Dialog Box – Dictionaries Tab .
Tables
This tab provides options for setting up table models. You can define models
manually by defining table columns or importing an existing model. You can
add new columns, delete existing columns, or change the order of columns by
editing the properties of the model. You can export table models for use with
other projects. For details, see Project Builder User Interface - Project Settings Dialog
Box – Tables Tab.
Formatting
Use this tab to add, delete, and rename field formatters, and to edit their
properties.
By default two formatters are defined when the project is created, the
“DefaultDateFormatter” as Date Formatter, and the “DefaultAmountFormatter”
as Amount Formatter. For more information about field formatters, see chapter
Extraction – Managing Fields – Field Formatter.
Validation
This tab provides options for setting up validation methods. For details, see
Project Builder User Interface - Project Settings Dialog Box –Validation Tab.
32 Ascent Xtrata Pro User's Guide
Page 52

Project Builder
Knowledge Base
This tab is used to manage knowledge bases in order to create new knowledge
bases and to import, export, and encrypt a knowledge base. For details, see
Project Builder User Interface - Project Settings Dialog Box –Knowledge Base Tab.
Testing and Optimizing a Project
When you test or optimize a project you have to distinguish between standard and
invoice projects.
Validate Project
You can check a project for inconsistencies or missing configurations by selecting File
| Validate Project from the main menu. If any problems occur the Warnings dialog
box is displayed.
Figure 2-9. Warnings Dialog Box
In general two different types of warnings are shown:
• Upgrade Warnings –warnings shown in this area must be changed by the
user manually. For example if the ‘old’ project uses an obsolete table locator,
Ascent Xtrata Pro User's Guide
33
Page 53

Chapter 2
it must be corrected by the user to conform to the new settings for the current
table locator.
• Misc. Warnings - shows malfunctions or missing definitions. For example if
a locator uses a dictionary, but the dictionary is not available.
Check Licensed Features with Current Project
You can check the project against the current license by selecting File | License
Utility from the main menu. A dialog box summarizing the licensing status for the
project will display. Features highlighted in green are allowed by the current license.
Red indicates that the project is attempting to use features that are not allowed.
Figure 2-10. License Utility
34 Ascent Xtrata Pro User's Guide
Page 54

Project Builder
Optimize Project
To optimize a project, you can:
• Test classification for a selected document using one of the following
methods:
3 Select Process | Classify Document from the main menu.
3 Click Classify Document from the main toolbar.
3 Press F5.
• Test classification for the selected test folder using one of the following
methods:
3 Select Process | Classify Folder from the main menu.
3 Click Classify Folder from the toolbar.
3 Press Ctrl + F5.
• Test extraction for a selected document separately using one of the following
methods:
3 Select Process | Extract Selected Document from the main menu.
3 Click Extract Selected Document from the toolbar.
3 Press F6.
• Test classification and extraction for a selected document using one of the
following methods:
3 Select Process | Process Selected Document from the main menu.
3 Click Process Selected Document from the toolbar.
3 Press F7.
• Change the class hierarchy by adding or deleting classes, and changing
settings for the class properties.
• Insert additional documents to the training set of the Layout Classifier or
Adaptive Feature Classifier.
• Insert additional instructions or change instructions for the Instruction
Classifier.
• Add additional fields or change settings for field properties for a class. For
more information about adding or working with fields, see Extraction.
Note When you add, delete, or rename fields, you must resynchronize them
with the Ascent Capture index fields using the Synchronization tool.
Ascent Xtrata Pro User's Guide
35
Page 55

Chapter 2
• Add locators or change properties for locators for a class. For more
information about adding and working with locators, see Extraction.
• You can test the fields and locators and their settings. If you make changes to
the training set, you must retrain the project:
3 Select Process| Train Project from the main menu.
3 Click Train Project from the toolbar.
Invoice Projects
The following sections describe the steps that have to be taken to create a new
invoice project.
Note Remember that for an invoice project, content classification is not available.
You can not add documents to train content classification, and the corresponding
working mode to set up the instruction classifier is not provided.
X To create an invoice project
1 Select File | New Invoice Project from the main menu to open the New
Invoice Project dialog box.
2 From the Project Folder tab, enter a name for the project and specify the root
location for the project folder. The path to the project folder is shown at the
bottom of the dialog box.
36 Ascent Xtrata Pro User's Guide
Page 56

Project Builder
Figure 2-11. New Invoice Project Dialog Box – Project Folder Tab
3 From the Tax Model tab, select the type of tax model that you want to
use. If you are using a European VAT model, you can enter individual
tax rates.
Figure 2-12. New Invoice Project Dialog Box – Tax Model Tab
Ascent Xtrata Pro User's Guide
37
Page 57
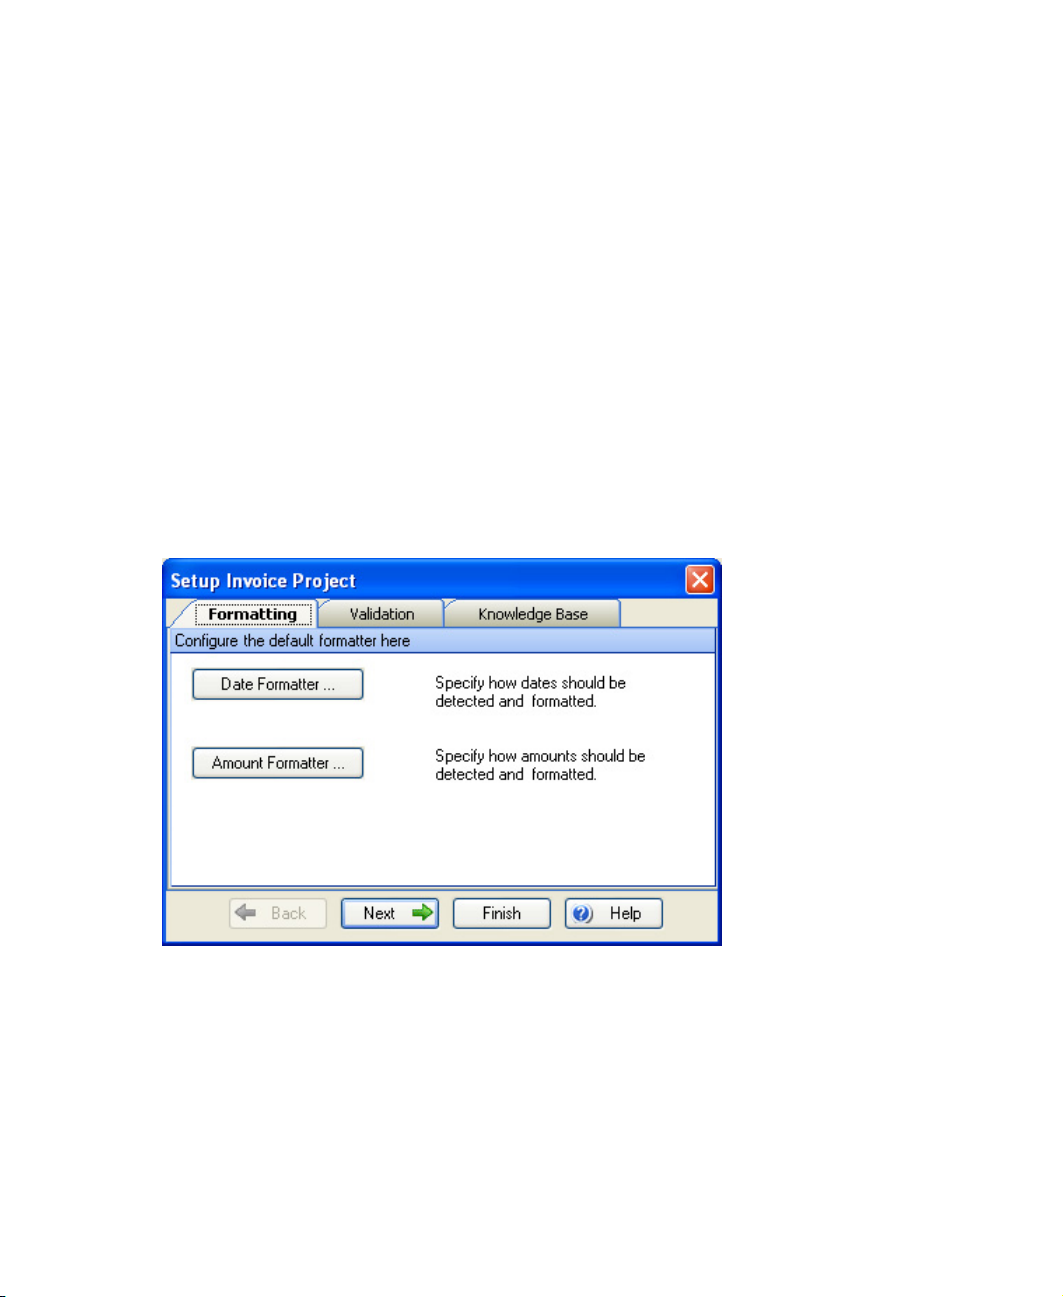
Chapter 2
Default Settings
By default a set of formatters and validation rules is added to an invoice project. If
you select the ”Show project details” option, the Setup Invoice Project dialog box
will display so you can change the settings for the date, amount formatter, existing
validation rules, or import knowledge bases.
The Setup Invoice Project dialog box shows the default settings on three tabs. You do
not need to make any changes for those formatters, validation rules and knowledge
bases at the beginning of the project. You can edit and change the properties from the
Project Settings dialog box at any time.
Formatting Tab
Click Date Formatter or Amount Formatter to view, and if necessary change, the
settings for these formatters. To edit the properties of these formatters later, open the
Project Settings dialog box – Formatting tab and select the properties for the desired
formatter.
Figure 2-13. Setup Invoice Project Dialog Box – Formatting Tab
Validation
Select the Validation tab and click on one of the items, to open its properties dialog
box. To edit the properties of these rules later, open the Project Settings dialog box –
Validation tab and select the properties for the desired validation rules.
38 Ascent Xtrata Pro User's Guide
Page 58

Project Builder
Figure 2-14. Setup Invoice Project Dialog Box – Validation Tab
Knowledge Base
Select the Knowledge Base tab and click Import to open the Import Knowledge Base
dialog box in order to import knowledge bases. To import knowledge bases later,
open the Project Settings – Knowledge Base tab and click import.
Figure 2-15. Setup Invoice Project Dialog Box – Knowledge Base tab
Ascent Xtrata Pro User's Guide
39
Page 59

Chapter 2
Upgrading an Invoice Project from an Earlier Version
To upgrade an invoice project from an earlier version you have to open it with the
normal “Open Project” menu command.
The updated project must be saved in a different folder. A special dialog requests
you to specify a new location for saving the project. The original project will not be
modified.
While loading, the project is validated and automatically upgraded to the new
version. The new version may have improvements that can not be adjusted
automatically, but must be customized by the user. All changes that have to be made
manually are shown in the
Upgrade Warnings area.
Changing an Invoice Project to a Standard Project
An invoice project cannot use the content classification or the document separation
feature. To make these features available, the invoice project must be converted into a
standard project. Use the “Save Project As” menu command and check the “Convert
to standard project” checkbox before pressing the “Save” button.
Training Documents for Extraction
An invoice project is created with a set of standard invoice fields and invoice group
locators. The group locators can be trained with document samples, where the
correct extraction results have to be pointed out on the document.
X To add a document as a new sample for extraction for the base class
1 Select Base Class from the Navigation Pane on the lower left.
2 Change to the “Test Folder” or “New Samples” panel by selecting View |
Test Folder or View | New Samples from the main menu (or click the Test
Folder button in the vertical toolbar in the middle of the interface)
If necessary, click Open Test Folder or Open New Samples Directory to open
the folder where the training documents are located ,and select XDocument
(*.xdc) as file type.
3 Select a document to add to the training set.
4 Click “Train for Extraction” from the toolbar, or use F10, to open the Edit
Document dialog box.
40 Ascent Xtrata Pro User's Guide
Page 60

Project Builder
5 Train all the fields on the document by selecting a field on the left and then
selecting the corresponding data on the document image.
6 Click Add to Training Folder. The document will be saved to the default
training folder and will appear in the list of files in the Training Set
(Extraction) panel.
If desired, you can add additional training folders to better organize your
training sets. Note that you need to set a training folder as the default folder
before you can add new training documents.
Note After adding a document to the training set, all group locators are
updated immediately. There is no need to train the complete project again.
However, after modifying or deleting a document in the training set you
have to retrain the complete project by selecting Process | Train Project.
Note You can add also training documents for templates. By default field group
locators are inherited from the base class. So, for example, if you want to train an
order group locator to use different validation rules during extraction, then you need
to add a new trainable locator (either an Amount Group, an Order Group, or an
Invoice Group Locator) to this template first. To do this, change to Extraction Design
and define a new order group locator for this template, and finally assign the new
locator to the fields. To train these fields, select the template from the Templates
panel, select the document from the Test Folder and click F10 to change to the Edit
Document dialog box. Only those fields that have the new group locator assigned are
able to be trained. All other fields are disabled and must be trained for the base class.
Templates
For invoice projects, a simplified class hierarchy is created that consists of a base class
and an optional sub-class level, called “Templates.” Invoice projects use layout
classification when attempting to match a document to a template.
You can change a template’s properties, rename or delete the template, and edit the
template to train fields.
X To add a template
1 Start the Ascent Xtrata Pro Project Builder and create or open an invoice
project.
Ascent Xtrata Pro User's Guide
41
Page 61

Chapter 2
2 Click the Templates label on the navigation panel to switch to the template
working mode.
3 From the menu select Project | Add Template. A new template is created in
the list of templates.
4 Use the context menu of the new template to rename it.
To be able to classify documents using this template, you have to specify one or more
sample documents.
X To add sample documents to a template
1 Select the appropriate template in the list of the templates.
2 Select a document from the Test Folder or New Samples panel to be used for
the classification training.
3 Select the desired document and click the “Add to training set of selected
class” button from the toolbar.
4 Select “Use for layout classification” from the context menu.
5 Click Yes if prompted to add image classification support to the project.
Test and Optimize an Invoice Project
To optimize the project, you can either:
• Add locators or change locator settings within the locator properties dialog
boxes. For further information see Extraction – Managing Locators.
• Add additional documents to the training set. You can either add
unprocessed documents or documents that were not processed correctly and
returned from Ascent Xtrata Pro Validation.
• Add documents as templates. You can either add unprocessed documents or
documents that were not processed correctly and returned fromAscent Xtrata
Pro Validation.
Note When you add, delete or rename fields, you have to synchronize them
with the corresponding Ascent Capture fields with the Ascent Xtrata Pro
Synchronization tool.
For changes concerning training sets or templates, you need to retrain the project by
selecting Project | Train Project from the main menu.
42 Ascent Xtrata Pro User's Guide
Page 62

Project Builder
Note You cannot train the “Credits” or “Currency” properties in the Amount Group
locator.
For problem invoices, you can define templates. Templates are not needed for the
extraction process, but can help improve extraction quality for difficult or unusual
invoice layouts. For all fields on the document that work correctly, you can use the
definitions from the training set. For fields that have failed, you can change the field
settings or define additional fields in the template.
Setting Up Classification
Ascent Xtrata Pro Project Builder has three different classifiers:
• Layout Classifier
• Adaptive Feature Classifier
• Instruction Classifier
The following sections include general instructions for setting up the different
classification engines for a selected class. For details about the different classifiers,
see Classification.
Layout Classifier
The Layout Classifier is an image classifier. It performs image-based classification by
analyzing the graphical elements of an image. To enable this classifier for a class, it is
normally sufficient to add one or two representative documents and to train the
project with these examples.
X To train the Layout Classifier for standard projects
1 Select a class from the Project panel.
2 Add training documents (image files *.tif) for the classifier.
a. Change to the Test Folder by clicking Test Folder from the lower toolbar
in the middle of the graphical user interface.
b. If necessary, click Open Test Folder from the Test Folder toolbar and
browse for the directory where the documents are located and select
Image file (*.tif) as file type. Click OK to show a list of all available
documents.
Ascent Xtrata Pro User's Guide
43
Page 63

Chapter 2
c. Select the desired documents and drag them to the class in the hierarchy
in the Project panel.
Note When you train Layout Classifier for invoice projects, you can not
use drag-and-drop method, instead select the document and click “Add
to Training Set of selected class” from the toolbar.
Tip If you are adding samples from the Test Folder, you can select the
desired document and click the “Add to Training Set of selected class”
button from the toolbar, rather than using the drag-and-drop method.
d. Select “Use for Layout Classification” from the context menu.
3 Train the project by selecting Process | Train Project from the main menu or
clicking Train Project from the main toolbar.
For detailed information about the Layout Classifier, see Classification – Layout
Classifier.
The Adaptive Feature Classifier and the Instruction Classifier are not available for
invoice projects.
Adaptive Feature Classifier
This classifier is a content classifier.
X To train the Adaptive Feature Classifier
1 Select the class from the Project panel.
2 Add training documents (text files *.txt) for the classifier.
a. Change to the Test Folder by clicking Test Folder from the lower toolbar
in the middle of the graphical user interface.
b. If necessary, click Open Test Folder from the Test Folder toolbar and
browse for the directory where the documents are located and select Text
file (*.txt) as file type. Click OK to show a list of all available documents.
c. Select the desired documents and drag them to the class in the hierarchy
in the Project panel.
44 Ascent Xtrata Pro User's Guide
Page 64

Project Builder
Tip If you are adding samples from the Test Folder, you can select the
desired document and click the “Add to Training Set of Selected Class”
button from the toolbar, rather than using the drag-and-drop method.
d. Select “Use for Content Classification” from the context menu.
3 Train the project by selecting Process | Train Project from the main menu or
clicking Train Project from the main toolbar.
For detailed information about the Adaptive Feature Classifier, see Classification –
Adaptive Feature Classifier.
Instruction Classifier
This classifier is a content classifier.
X To set up the Instruction Classifier
1 Select a class from the Project panel.
2 Change to the Classification Design mode by selecting View | Show
Classification Design from the main menu.
3 Add instructions or modify the settings for existing instructions.
a. Click Add Instruction from the Classification Design toolbar. If this is the
first instruction added to the project, a message box will ask if you want
to add instruction support.
b. Click Yes. The Instruction Properties dialog box will display.
c. Enter the text for the instruction in the Phrases text field and set the
instruction options (relevance, or NOT).
d. Click the “Adds a new phrase to the instruction” button.
e. Add additional phrases as desired.
f. Click New to save the instruction without closing the Instruction
Properties dialog box in order to add additional instructions or Close to
save the changes and exit the dialog box.
For detailed information about the Instruction Classifier, see Classification - Instruction
Classifier.
Ascent Xtrata Pro User's Guide
45
Page 65

Chapter 2
Setting Up Extraction
The following section describes the general steps for setting up extraction. For details
about fields and locators, see Extraction.
Adding Fields and Locators
You can define fields at the project level, for which extraction is performed at the
beginning of classification. The extraction results for these fields may be used to
classify a document. For example, you can classify a document based on a barcode,
or you can perform a language dependent classification using a classification locator,
where the locator's result is saved to a field at the project level.
In addition, you can define fields for each class which are then inherited by any
derived classes. For a derived class, you can either use the definitions inherited from
the base class or change the extraction methods for the fields.
X To set up extraction
1 Select a class from the Project panel.
2 Change to the Extraction Design mode by selecting View | Show Extraction
Design from the main menu. The Extraction Design panel shows fields and
locators defined for the class. Note that derived classes inherit fields from all
their parent classes.
3 Add fields:
a Click Add Field from the Fields toolbar (in the Extraction Design panel)
and enter a name for the field.
b Select the type for the field (simple or table) by right-clicking the field
and selecting Field Type from the context menu. The default type is
“Simple Field.”
c Select the desired properties for the field by right-clicking the field and
selecting Field Properties.
For more details about fields, see Extraction.
4 Add a locator:
a Click Add Locator from the Locators toolbar (in the Extraction Design
Panel) and enter a name for the locator.
b Assign a locator method by expanding the drop-down list of locator
methods and selecting one.
46 Ascent Xtrata Pro User's Guide
Page 66

Project Builder
c Select the desired properties for the locator by right-clicking the locator
and selecting Locator Properties.
For more details about locators, see Extraction.
Note You can create fields and locators in any order, but you must create the
locator before you can assign it to a field.
5 Assign a locator to a field. First, select a field from the list of fields. Then,
expand the drop-down list of locators and select one.
Setting Up Document Separation
The following procedure describes the general steps for setting up document
separation. For details, see Project Builder User Interface – General Dialog Boxes.
X To set up document separation
1 Open the Project Settings dialog box. To do so, select Project | Project
Settings from the main menu or right-click Project from the Project panel and
select Project Settings from the context menu.
2 Select “Activate document separation” from the General tab and set other
settings as desired. This enables document separation for all classes in the
project.
3 To set additional document separation parameters for a class, open the Class
Properties dialog box for the class. To do so, select the desired class from the
Project panel. Then, select Project | Class Properties from the main menu or
right-click the class and select Class Properties from the context menu.
You can deactivate document separation for a class by selecting the “Ignore
for separation” option on the Class Properties dialog box.
Note If desired, you can define special document separation processing with scripts.
Three script events are available for implementing class-specific document
separation in a script: Document_BeforeSepartePages, Document_AfterSepartePages,
and Document_SeparateCurrentPage.
Ascent Xtrata Pro User's Guide
47
Page 67

Chapter 2
Testing Document Separation
To test document separation, open a folder containing test documents and click Test
Document Separation from the main toolbar. After processing, a dialog box displays
showing the document separation results based on the project settings and the class
properties.
Figure 2-16. Document Separation Results
Setting Up Validation
The following procedure describes the general steps for setting up validation. For
details, see Setting up Validation.
Note that the steps must be repeated for each class for which validation is set up.
Derived classes inherit validations from their parent classes.
X To set up validation
1 Select a class from the class hierarchy in the Project panel.
48 Ascent Xtrata Pro User's Guide
Page 68

Project Builder
2 In the field properties dialog box, edit the options for the defined fields.
Validation thresholds for valid fields must be set, and if necessary, the
“Require manual field confirmation” option enabled.
3 Create validation methods.
a. Select Project | Project Settings from the main menu bar to display the
Project Settings dialog box.
b. Select the Validation tab.
c. Click Add to display the New Validation Method dialog box.
d. Enter a name for the method and select the type of the validation
method.
e. Click OK to open the validation method’s properties dialog box to set its
parameters. For more details about the properties dialog box of the
selected validation method type, see Project Builder User Interface –
Validation Method’s Properties Dialog Box.
f. Click OK to save your settings and close the dialog box.
4 Add single field or multi-field validation rules.
a. Select the class. Classification and extraction must already be set up for
the class. All the relevant extraction fields for that class are listed in the
Field.
b. Select Show Validation Design from the vertical toolbar.
c. Add a single field validation rule by clicking “Add Single Field Rule”
from the toolbar, to display the properties dialog box for single fields; or
click “Add Multi-Field Rule” to display the properties dialog box for
multi-fields.
d. Make the necessary definitions. For further details on setting up
validation rules, see Setup Validation – Validation Rules.
e. Click Close to save the rule. The rule is automatically mapped to the
field. For a normal field, a single field validation rule is created;
otherwise, a single table field validation rule is created.
5 Define a validation form, and if necessary, implement script events. For more
details on setting up a validation form, see Setup Validation – Validation Form.
Ascent Xtrata Pro User's Guide
49
Page 69

Chapter 2
a. In the Project panel, right-click on a class and select Validation Form. The
Validation design dialog box will display, showing the new default
validation form for the selected class.
b. Customize the form as desired by adding or removing elements.
c. Test the validation form for different screen resolutions to check whether
the fields fit. For example, select Size | 800 x 600 to display the form for
that resolution.
d. Define the desired script events. For example, if you add a button to the
form, you have to define the click events for the button. For further
details see interactive script events.
6 Test the validation form. For further details see Set Up Validation – Validation
Test .
a. Select a test document from the Test Folder panel.
Note The extraction process will not perform OCR; therefore, you must
select an XDocument, or you must perform OCR on the documents
before the extraction. (Select Perform OCR on the Folder.)
b. Select Process | Extract Selected Document from the main menu, or click
Extract Selected Document from the main toolbar, or use F6.
c. Before validation, you can check the extraction results first. Change to
the Extraction Results panel by clicking Show Extraction Results from
the toolbar. Invalid fields are marked with a blue question mark (
valid fields with a green check mark (
).
) and
d. Select Process | Validate Document from the main menu, or click
Validate Document from the main toolbar, or use F8.
e. The validation form for the processed document is displayed showing
the extracted values. Edit the form as needed.
50 Ascent Xtrata Pro User's Guide
Page 70

Introduction
Ascent Xtrata Pro automatically classifies documents based on format, content, and
the subsequent extraction of items. Classification is performed in the first processing
step, separately from extraction. However, the classification results may
subsequently be changed based on the extraction results.
Ascent Xtrata Pro features a full framework of classification technologies that can be
used together in a flat structure or in a hierarchy. This chapter introduces you to the
classification methods and their usage.
Chapter 3
Classification
Concept of Classification
In the context of document capture, classification signifies the assignment of a
document to a category. A category is one element of a predefined classification
scheme, which is also called the class hierarchy.
The classification result is the name of the class (in the current hierarchy) for which a
document matches predefined classification criteria. A class hierarchy is defined for
each project; therefore, the set of classification results is limited by the set of defined
classes and their properties.
Classification can either be based on the physical format/layout of a single document
page or on the content returned from full-text OCR. In the simplest case, if all of the
documents are single page documents, or deal with only a single, subject there is no
need to subdivide the documents into smaller parts, such as pages or paragraphs.
On the other hand, if the documents are more complex, it is necessary to analyze and
break them into smaller parts in order to determine the overall classification result.
Ascent Xtrata Pro User's Guide 51
Page 71

Chapter 3
A typical document may contain a brief letter (one or two pages) describing the
reason for sending the document, plus an arbitrary number of additional
attachments. For such documents, it is usually sufficient to classify only the letter
since the attachments may not contain the information required to detect the correct
class. The classification algorithm used by Ascent Xtrata Pro makes this assumption
by default.
It is also possible to define different classification behaviors. For example, you may
want to classify all of the attachments to determine the overall class from the single
page results, which requires additional classification scripting.
Figure 3-1. Manual Classification
Manual classification in organizations typically follows a hierarchical scheme. First,
the main category of a document is determined and then classification is successively
refined over several steps until the final document category is determined. Ascent
Xtrata Pro allows you to replicate your manual classification hierarchy structure so
that automatic classification achieves familiar results.
An iterative evaluation is performed to allow for full utilization of the classification
hierarchy. Different classification methods can be used at each level of the hierarchy.
An extraction method can be defined for any class in the hierarchy and that method
is inherited by the derived classes in the hierarchy. For further details about iterative
evaluation see section Hierarchical Evaluation and Other Classification Rules on page 65.
52 Ascent Xtrata Pro User's Guide
Page 72
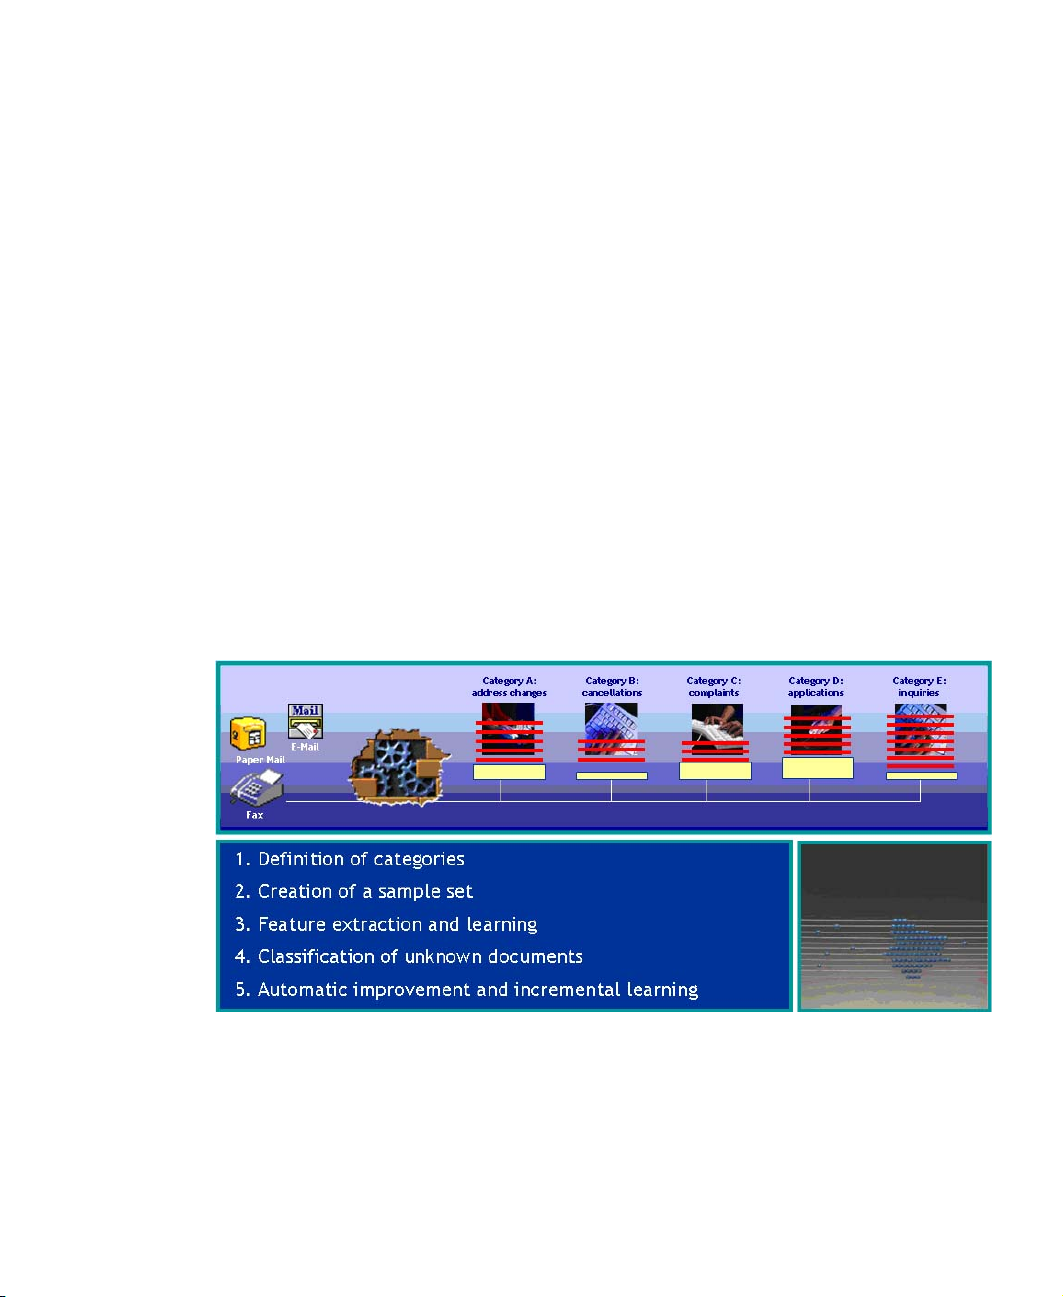
Classification
Classification Engines and Learning by Example
The classification algorithms in Ascent Xtrata Pro can be used as classification engines.
That means that they are implemented such a way that they can easily be replaced,
and depending on the licensing an engine may or may not be available.
The following classification engines are available:
• Layout Classifier: Performs image-based classification on the image using
only graphical elements.
• Adaptive Feature Classifier (AFC): Performs content-based classification by
automatically analyzing the text created by full-text OCR or imported from
any kind of office document, for example Word files or pdf files.
• Instruction Classifier: Performs rule-base classification based on Boolean
expressions that operate on the document content.
The first two classification engines support learning by example. The only effort
required is to assign appropriate sample documents to each class. The classification
engines then execute a training process, where all the sample documents are
analyzed and important features are extracted and used to elaborate the definition of
the class in that project.
Figure 3-2. Automatic Classification
The classification engines do not need access to the training documents during
runtime. The project file contains all of the extracted information required for
Ascent Xtrata Pro User's Guide
53
Page 73

Chapter 3
classification. The key to setting up a project with sample documents is to select the
appropriate samples and design an appropriate classification scheme.
Additionally, the ability of a project to learn by example makes it much easier to
maintain. The primary maintenance task becomes one of adding additional sample
documents or removing unsatisfactory ones.
Definition of Classes and the Class Tree
Adding Classes
Before any documents can be classified, it is necessary to set up a class hierarchy that
defines all of the classification categories. New classes can be inserted under the
Project node, either by using the context menu for the node or selecting
Project | Add Class from the main menu bar.
A new class can be created as a base class or as a child class for the currently selected
class. If you want to insert a base class, you must make sure that the Project node is
selected. If you want to insert a child class, you have to select the desired parent class
before adding the new class.
X To insert a new base class
1 Right-click the Project item in the class hierarchy to display the context menu
for the project.
Note You must create a new project or load an existing project before you
can add classes.
2 From the context menu, select Add Class to add a new class to the hierarchy.
A default class name is added in edit mode, allowing you to easily rename the
class.
3 Change the class name to something meaningful and press Enter. The new
base class is placed in the class hierarchy in alphabetical order.
54 Ascent Xtrata Pro User's Guide
Page 74

Classification
X
To insert a new child class
1 Right-click the desired parent class in the hierarchy to display a context menu
for the class.
2 From the context menu, select Add Class to add a new class beneath the
parent. A default class name is added in edit mode, allowing you to easily
rename the class.
3 Change the class name to something meaningful and press Enter. The new
child class is placed into the class hierarchy in alphabetical order.
Note Class names must be unique inside the project. You cannot insert two
classes with the same name, even if they have different parents.
Class Hierarchy
The class hierarchy shows the names of all defined classes and their relationship
inside the hierarchy. Specific settings for a class are indicated by a “changed class”
icon. A class can be selected by left-clicking the class name in the hierarchy. You
must first select a class when:
• Managing the training set of the class
• Configuring instructions for the class (see Instruction Classifier)
• Configuring locator and field properties for the class
• Testing the extraction for the class without a classification step
Each class node provides a context menu that includes options for renaming,
deleting, accessing the class properties, opening the script window for the class, and
more.
Table 10-1. Icons for class conditions
Icon Description
Ascent Xtrata Pro User's Guide
Class icon shown when you select cut from the context menu to
paste the class to another position within the class tree hierarchy.
Class icon shown when a class is defined as default classification
result.
55
Page 75

Chapter 3
Class Properties
The following properties are available for a selected class.
Class icon shown when a class is just added to the class hierarchy.
Class icon shown when a class is not a valid classification result.
Default class icon.
Class icon shown when this class redirects all documents to another
defined class.
Class icon shown when subtree classification is enabled for the
class.
56 Ascent Xtrata Pro User's Guide
Page 76

Classification
Figure 3-3. Class Properties Dialog Box
General
The general options are used to specify that a class can serve as a classification
result, to make the class visible in the Ascent Xtrata Pro Validation form, and to
specify that the class can be processed by with the Ascent Capture Recognition
Server.
Valid classification result
If this option is checked (which is the default), the class can be used as the result
of the classification step; otherwise, documents cannot be assigned to this class
by the classification process.
Ascent Xtrata Pro User's Guide
57
Page 77

Chapter 3
Prohibiting the class from becoming the classification result might be useful for
classes that are inserted as base classes for the sole purpose of defining common
fields and common extraction methods.
If a class meets the classification criteria but is prohibited from becoming the
classification result, its parent (if there is one) will be used as the classification
result. If there is no parent, the document will not be classified.
Visible in validation
In addition to showing the classification results for documents, the Ascent Xtrata
Pro Validation form also has a list of classes that validation operators can use to
assign a class. If “Visible in validation” is selected (which is the default), the class
name will be included in the list. Otherwise, the class name will be excluded
from the list and the operator will not be able to assign it as the classification
result.
Note In case a document is classified to a ‘non-visible’ class, then this class will
appear in the drop down list of classes for this document.
Extract this class with external server
If this option is selected (by default, it is not selected), Ascent Xtrata Pro Server
performs extraction for the class, but does not save the field results in Ascent
Capture.
This might be useful if you want to use the extraction results from the Ascent
Capture Recognition Server module, rather than Ascent Xtrata Pro Server. The
only requirement is that the class name must exactly match the name of the
associated form type in Ascent Capture.
During publishing, a warning is shown if the project contains a class for which
extraction is performed by a server other than Ascent Xtrata Pro Server.
Warning If you are using an external server, it is recommended that you not use
Ascent Xtrata Pro Validation
Subtree Classification
Enable subtree classification
If this option is checked, and this class is a valid classification result, then a
second classification step will be started for the complete child class tree using
the confidence and distance values defined for the subtree classification.
Furthermore, hierarchical rules, such as “single child wins over parent” will be
applied. This additional step is called subtree classification.
58 Ascent Xtrata Pro User's Guide
Page 78

Classification
For the purposes of subtree classification, you can set different confidence and
distance values, which makes it possible to get more highly differentiated
classification results than possible with a single classification step.
Typically, for the first classification step you would use either adaptive feature
classification or layout classification. Instruction classification is normally the
best choice for subtree classification.
The instructions used for subtree classification should have a lower relevance
than the global classification threshold, so that they will not influence the first
classification step. In addition, the distance setting for the subtree classification
should be lower than the global distance. This makes it possible to find a result
inside the subtree based on the defined instructions.
By using subtree classification, you can also combine layout and content
classification. This requires classifying a document with the Layout Classifier
and activating subtree classification for the class. For the evaluation inside the
subtree, only the results from content classification will be used. This can help to
distinguish between forms that are very similar in layout and therefore must be
distinguished based on textual content.
When the option ‘Subtree classification via parent class required’ is activated,
then a class can only be a valid classification result, when the subtree
classification was performed for the parent class that is selected from the drop
down list.
For further details see section Subtree Classification.
Redirection
Redirect classification result to class
This option makes it possible to replace the classification result. If set,
reclassification will be done exactly once for each document, and cannot be
chained, even if several redirections are defined.
If a document is placed in this class as a final result, and a redirection option is
specified, then the specified class will become the final result with the same
confidence as the original result for the original class.
This option is useful if there are a number of different forms that all belong to
one logical class (for example, change of address). Continuing with this example,
there could be a separate subclass for each document type (such as for
multilingual documents). If there is no need to perform any special actions with
these forms, they can be redirected to the logical class for address changes.
For further details see section Redirection.
Document Separation
Ascent Xtrata Pro User's Guide
59
Page 79

Chapter 3
Batches may contain single page or multi page documents, or a combination of
both, or loose pages. Document separation processes multi page documents to
split them to separate documents according to the settings, if necessary.
If document separation is activated then all loose pages of a batch are added to
one multi page document that will be processed by document separation. In a
first step document separation is executed, for which all multi page documents
of a batch are processed and each multi page document itself sequentially page
by page. After document separation the new created documents are classified.
For the separation of a multi page document each single page is classified and
either a new document is created to which the page is added or it is added to the
current document depending on the separation settings for the class the page
was classified to. Then the next page is classified and added to the current
document or added to a new document until the complete multi page document
is processed.
When document separation is not activated then for each loose page a single
page document is created.
You generally activate document separation at the project level. For detailed
information, see Project Builder User Interface - Project Settings Dialog Box –
Classification Tab .
Note These options will be disabled unless document separation has been
enabled for the project.
Ignore for separation
When document separation is enabled for a project (by default it is disabled), you
may disable document separation for single classes by selecting “Ignore for
separation.” If the option is not selected, documents in this class will be
separated, and several additional options become available.
This class represents a
If the First page option is selected, a fixed page length can be set. By default, the
value for the fixed page length is 0 (zero), which means that the number of pages
is unlimited. For example when document separation is processed for a multi
page document, for which this option is set to three, then during processing of
the multi page document the following will happen. Document separation
processes the multi page document page by page. For each page classification is
performed and in case a page is classified to this class, then a new document is
created and the page is added to this new document. As the fixed document
length is set to three the following two pages are added to the document without
60 Ascent Xtrata Pro User's Guide
Page 80

Classification
classifying them and regardless if they would belong to another class and after
the third page is added, the current document is closed; it contains three pages
now. The next page of the multi page document is processed until all pages of
the multi page document are processed.
If the value is set to zero and a page of a processed multi page document is
classified to this class, then a new document is created and the page is added.
The next page of the multi page document is added to the current document
when it is either unclassified or classified to a class that has the option ‘Middle
page’ (‘Last page’) selected and the selected ‘Corresponding first page’ is
identical to the class to which the first page of the current document was
classified to. When a processed page of the multi page document to another class
that is not a middle or last page of the current document, then the current
document is closed and the current page is added to a new document. After all
pages of the multi page document are processed the next multi page document
within the batch is performed.
If Middle page or Last page is selected, then the list for “Corresponding first
page” is enabled, allowing a class for the middle or last page to be specified. If
this is done, then a middle page (or last page) is added to the currently processed
document, when the first page of the current document was classified to the class
that is selected for the option ‘Corresponding first page.’ Otherwise, the
document is closed and the middle (or last) page is added to a separate new
document.
Important If you define a middle or last page for a first page then the option
‘Fixed page length’ for the first page must be set to ‘0’ (unlimited) as this option
has priority over other settings. If ‘Fixed page length’ is set to 1 or higher then the
settings for middle or last page will never be taken into account as for a fixed
page length the pages are added without classifying them.
If <none> is chosen, then the middle page is always added to the current
document. For a last page, it works the same way except that the document is
closed after the page was added and a new document is started for the next
processed page of the multi page document.
Note If you define a middle or last page for a first page for which a fixed page
length is defined, these settings will not be taken into account as the option ‘fixed
page length’ has priority over the other settings. For the middle page respectively
the last page single page documents.
Ascent Xtrata Pro User's Guide
61
Page 81

Chapter 3
OCR
You can select different OCR profiles for each class. By default the default profile
is selected. Click the OCR Profiles button to open the – Profiles tab of the Project
Settings dialog box.
Click Profile Settings to display or edit the settings of the currently selected
profile.
Classification Options
Multipage Evaluation
For documents containing more than one page, it is quite important to specify how
single pages should be processed inside a document. This can be controlled with the
classification settings for the project.
X To set classification settings
1 From the main menu bar, select Project | Project Settings to display the
Project Settings dialog box.
2 Select the Classification tab.
3 Select the desired settings.
62 Ascent Xtrata Pro User's Guide
Page 82

Classification
Figure 3-4. Project Settings Dialog Box – Classification Tab
Classification Settings
Default classification result
This option specifies the class to be used if a classification result cannot be
determined. Select the desired default class from the list.
Automatic evaluation
This is the default option. The specified values for confidence and distance are
used to evaluate the classification result. For multipage documents, classification
is performed page-by-page, and stops when a page can be classified. The pages
following the classified page are not processed.
Script implemented evaluation
If this option is selected, the same page-by-page classification loop is executed,
but a custom script is responsible for evaluating the classification results,
breaking the classification loop, and determining the final classification result for
the document. The confidence and distance settings are ignored.
Ascent Xtrata Pro User's Guide
63
Page 83

Chapter 3
Content Classifier
Classify only first page
When this option is enabled, only the first page of a document is classified.
Classify each page
When this option is enabled, every page of a document is classified.
Classify all pages at once
If this option is checked, the text of all pages is merged and classified.
Do not use content classification
If this option is checked, the Content Classifier is not used. This option should be
selected to speed up processing if only the Layout Classifier is needed.
Min. Confidence
The minimum confidence specifies the minimum value required for automatic
evaluation to determine a classification result.
Min. Distance
This value specifies the minimum required gap between the best and the second
best classification result. If the gap is too small, the document will not be
classified.
Layout Classifier
Classify only first page
When this option is enabled, only the first page of a document is classified.
Classify each page
When this option is enabled, every page of a document is classified.
Do not use layout classification
If this option is checked, the Layout Classifier is not used. This option should be
selected to speed up processing if only the Content Classifier is needed.
Min. Confidence:
The minimum confidence specifies the minimum value required for automatic
evaluation to determine a classification result.
Min. Distance:
This value specifies the minimum required gap between the best and the second
best classification result. If the gap is too small, the document will not be
classified.
64 Ascent Xtrata Pro User's Guide
Page 84

Classification
Hierarchical Evaluation and Other Classification Rules
The evaluation of classification results is primarily based on the minimum
confidence and distance defined in the project settings. But, if the class hierarchy
contains hierarchical elements, a set of hierarchical evaluation rules is automatically
applied to the classification result. This might result in a classification that does not
have the highest confidence.
The following sections provide more information about these classification rules.
Classification based on extraction
You can define fields on project level such that extraction is performed before
classification, and where those extraction results can be used for classification. For
example, it is possible to classify a document based on bar code results. In a similar
manner, it is possible to perform classification using zones. For example, using form
IDs at certain places on the document.
For example:
Private Sub Document_AfterClassifyXDoc(pXDoc As _
CASCADELib.CscXDocument)
If pXDoc.Fields(0).Text = "XYZ" Then
pXDoc.Reclassify "NewClass3"
End If
End Sub
Reclassification of Documents
The classification result can also be changed during extraction, in which case
extraction is repeated for the new class. Inside the classification script, the extraction
results for the project-level fields can be used to manually reassign the classification
result. In order to avoid loops, this sort of reclassification can only be done once per
document.
Fields, locators, and validation rules (at the project level) are available in all classes as
derived items. By default, the project-level fields and locators will not be extracted
again during any subsequent extractions. Once extraction has been performed, the
preserve-flag for these fields and locators will be set to 'TRUE'. If one of the fields or
locators needs to be extracted again, the preserve-flag must be set to 'FALSE' at the
beginning of extraction.
Ascent Xtrata Pro User's Guide
65
Page 85

Chapter 3
Extraction design and validation rules are available when the project item in the class
tree is selected.
Single Child Wins Over Parent
This rule is applied if a parent and only a single child have a confidence higher than
the global threshold. For this special case, the child is preferred over the parent,
regardless of which one has the higher confidence. If there is more than one child
with a confidence higher than the global threshold, the parent will not be considered
during the evaluation of minimum distances, unless two or more children are within
the minimum distance.
Figure 3-5. Classification Rule – Single Child Wins Over Parent
66 Ascent Xtrata Pro User's Guide
Page 86

Classification
The figure above shows an example for this rule. Politik is the parent of
Energiepolitik. Both have a classification confidence higher than the global threshold
of 50%, and the parent has the highest confidence. Due to the “Single child wins over
parent” rule, Energiepolitik becomes the final classification result.
Parent Represents Competing Children
This rule helps to resolve conflicts when two or more children of the same parent
have a classification confidence higher than the global threshold and closer than the
required minimum distance. Instead of leaving the document unclassified, the parent
class is used, meaning the parent can represent its children.
Figure 3-6. Classification Rule - Parent Represents Competing Children
The figure shows an example for this rule. The difference in the classification results
for the child classes Energiepolitik (59.4 %) and Wirtschaftspolitik (65.0%) is smaller
than the required minimum distance of 10.0%. Politik, which is the nearest common
Ascent Xtrata Pro User's Guide
67
Page 87

Chapter 3
parent, becomes the classification result and is given the maximum confidence from
among the children.
Note You can avoid invoking this evaluation rule if you don’t select “Valid
classification result” in the Class Properties dialog box for Politik. If you do this the
document will be unclassified since Politik is prevented from becoming a
classification result.
Local Not-Flag
The Local Not-Flag is a special result of the Instruction Classifier. If the Instruction
Classifier has a confidence of less than -50% for a single class, it applies the Local
Not-Flag to this class. This flag is stored together with the confidence inside the
classification result and overrules any other result from a text classifier like the AFC.
Figure 3-7. Classification Rule – Local Not-Flag
The figure above shows the Classification Results dialog box that provides the
confidences for the different classification algorithms. To show the classification
results open a document in the document viewer, and select some text, and then
select Classify selection from the context menu.
The above example shows that the Instruction Classifier has applied the local NotFlag for Energiepolitik. Even if the Content Classifier (Adaptive Feature Classifier)
has assigned the highest confidence to this class, due to this rule the final
classification confidence for Energiepolitik becomes 0 (zero).
68 Ascent Xtrata Pro User's Guide
Page 88

Classification
Propagated Not-Flag
This rule is similar to the Local Not-Flag but the flag setting propagates to the child
classes. If instructions are found on a document and the sum of their relevancies are
less than -50 % (negative instructions), then the class is excluded from the
classification results and all child classes are also excluded. This means that it is
possible to disable the classification of an entire subtree by defining negative
instructions at the root of that branch.
Figure 3-8. Classification Rule – Propagated Not Flag
The above figure shows an example for this rule. A negative instruction for Politik
has disabled the entire hierarchy below this class. Even though Energiepolitik (which
is a child of Politik) has the highest content classification confidence, it cannot be the
final classification result, due to this rule.
Ascent Xtrata Pro User's Guide
69
Page 89

Chapter 3
Note If a classification rule has been applied to a document, a special icon is
displayed next to it inside the classification results pane. A tool tip for the icon
explains the applicable rule.
Subtree Classification
The subtree classification rule enables iterative classification inside a subtree using
different threshold values for each level. To use this rule, “Enable subtree
classification” must be selected in the Class Properties dialog box of the parent. Once
selected, you can specify lower thresholds for minimum confidence and distance. If
the parent is selected as the classification result an additional evaluation step will be
performed which applies its threshold values to the children. If those thresholds are
not met, the parent will not be used as the final classification result.
A class with subtree classification is indicated by a special folder icon.
Figure 3-9. Classification Rule – Subtree Classification
70 Ascent Xtrata Pro User's Guide
Page 90

Classification
The above example shows that Politik has the highest confidence, and as such, would
normally become the classification result after the first step. But, Politik also has the
subtree classification option enabled with a threshold of 30% for the minimum
confidence and 5% for the minimum distance settings. Due to this lower value,
Energiepolitik, with 40% confidence, becomes the final classification result. The
confidence of 60% for Kultur doesn’t matter here, because only classes inside the
subtree below Politik are considered during this additional step.
Note Subtree classification will cascade down the entire branch of the tree so long as
the “Enable subtree classification” option is enabled for a parent at that level. Each
time this condition is met, another evaluation step using the child classes of the
current result is performed. In order for this nesting to work successfully, the
confidence and distance values at each level must be less than the preceding level,
otherwise, the different hierarchy levels will be in conflict.
X To configure subtree classification
1 Right-click the class in the hierarchy where you want to configure subtree
classification.
2 From the context menu, select Class Properties. The Class Properties dialog
box will display.
Ascent Xtrata Pro User's Guide
71
Page 91

Chapter 3
Figure 3-10. Class Properties Dialog Box – Subtree Classification
3 Select “Enable subtree classification” and modify the confidence and distance
thresholds as appropriate.
4 Click OK to save your settings and close the dialog box. The icon next to the
class in the hierarchy will change to indicate that subtree classification is
enabled.
Redirection
The redirection rule forces a classification result to be replaced with some other class.
It does not require any particular class relationships, and is invoked only once at the
very end of the classification evaluation process. This redirection is absolute, and no
subtree classification or other classification rules are applied after the redirection
occurs.
A class with redirection is indicated by a special folder icon.
72 Ascent Xtrata Pro User's Guide
Page 92

Classification
X
To configure redirection
1 Right-click the class item in the hierarchy where you want to configure
redirection.
2 From the context menu, select Class Properties. The Class Properties dialog
box will display.
3 Select the desired class from the list in the Redirection area.
4 Click OK to save your settings and close the dialog box. The icon next to the
class in the hierarchy will change to indicate that a redirection has been
applied.
Figure 3-11. Class Properties Dialog Box – Redirection
Default Classification Result
There may be cases where a document cannot be classified using any of the specified
classifiers. In such cases, you can force that document into a default classification. A
default class such as this may be useful if extraction is necessary, even if classification
Ascent Xtrata Pro User's Guide
73
Page 93

Chapter 3
does not succeed or if the target system cannot deal with unclassified documents.
Furthermore, unclassified documents will automatically be sent to the Ascent
Capture Quality Control module for special handling.
You can define a default class to avoid such situations.
The default class is indicated by a special folder icon.
X To define a default classification result
1 Right-click Project in the hierarchy.
2 From the context menu, select Project Settings. The Project Settings dialog box
will display.
3 Select the Classification tab.
Figure 3-12. Project Settings Dialog Box – Default Classification Result
4 Select the desired class from the list under “Default classification result.”
74 Ascent Xtrata Pro User's Guide
Page 94

Classification
5 Click OK to save your settings and close the dialog box. The icon next to the
class in the hierarchy will change to indicate that it will be used as the default
class.
Layout Classifier
Concept and Application
Layout classification makes use of the geometrical structure of a document to
determine its class. Ascent Xtrata Pro can automatically learn about the geometrical
structure of a class by analyzing a number of example documents that are
representative of that class.
Documents with completely different layouts can be associated with a single class
provided you have examples of each. Typically, layout classification is used to
identify documents in a batch. But, it can also be utilized to recognize the sender of a
letter if the sender’s document layout is unique. This might be the case for formal
letters or invoices.
Set Up
The Layout Classifier can be inserted into the current project the first time documents
are added to a class and the “Use for layout classification” option is selected from the
list.
The first time you do this, you are asked if you want to add image classification
support to the project. If you click Yes, the Layout Classifier is added to the project.
Once the Layout Classifier has been added to the project, you are no longer asked
this question.
You can freely add or remove documents from the Training Set for each class.
Before the Layout Classifier can be tested, it must be trained with the document in
the training sets. This step extracts the relevant features from all the training images
and stores them inside the project.
Ascent Xtrata Pro User's Guide
75
Page 95

Chapter 3
To train the classifier, select Process | Train Project from the main menu bar, or click
Train Project from the toolbar. A progress bar showing the current status is displayed
while training is performed.
X To add documents to a training set
1 Select a class in the hierarchy.
2 Use Windows Explorer or select a reference set (a test folder or the Selection
List) to open a folder that contains the image files that you want to add to the
training set.
3 Select the desired documents and drag them to the class in the hierarchy in
the Project panel.
Tip If you are adding samples from the Test Folder or Selection list, you can
select the desired document and click the “Add to training set of selected
class” button, rather than using the drag-and-drop method.
4 Select “Use for layout classification” from the context menu.
Figure 3-13. Add a New Sample Image to Layout Classification
76 Ascent Xtrata Pro User's Guide
Page 96

Classification
5 If the message “Do you want to add image classification support to this
project” displays, click Yes. (The message only displays the first time you
specify layout classification for the project.) The documents will be added to
the training set for the current class.
Training sets can be easily managed at any time. New sample images can be added
and existing sample images can be viewed or deleted.
X To view documents in a training set
1 Select the class in the hierarchy.
2 From the main menu bar, select View | Training Set Classification. The
document list switches to the Training Set view. Make sure that Layout
Classifier is selected in the combo box inside the training set view.
3 To view an image, double-click the document or click Show Document from
the toolbar. The Document Viewer will open and display the image.
Figure 3-14. Display Sample Images for a Class in the Training Set View
X To delete documents from a training set
1 Open the training set for a class as described above.
Ascent Xtrata Pro User's Guide
77
Page 97

Chapter 3
2 Select the document that you want to delete and click Delete Selected
Document from the toolbar. Or, right-click the document and select Delete
Selected Document from the context menu. To delete all documents, select the
Delete All Documents button or context menu option.
3 When the message “Delete the selected document from training set” displays,
click Yes to confirm the operation. The selected documents are removed from
the list and the image files are deleted from the Training Set folder.
Note You must retrain the project before any changes to the training set will
affect the Layout Classifier.
Layout Classifier Properties
The Layout Classifier can be configured with the Layout Properties dialog box.
X To display the Layout Properties dialog box
1 From the main menu bar, select Project | Project Settings. The Project Settings
dialog box will display.
2 Select the Views tab, which has a list of all classifiers used in the project.
3 Select Layout Classifier from the list and click Properties. The Layout
Properties dialog box will display.
4 Click Advanced to see more options.
78 Ascent Xtrata Pro User's Guide
Page 98

Classification
Figure 3-15. Layout Classifier Properties Dialog Box – Advanced Settings
Optimize Classification for
Invoices
If this option is selected, the classifier will analyze only the upper and lower
parts of the document. The remainder of the document is not used for
classification. This is especially useful for invoices, which often have a preprinted
header and footer area. It might also apply for other types of business documents
that have a similar structure.
Forms
If this option is selected, the classifier uses the entire region of the image. This
should be used for forms and other types of documents that have a fixed layout
over the entire region of the image.
Image Preparation
Enable skew tolerance
This option can be used if the processed documents are not already deskewed by
some other application. For example, when using VRS during scanning (which
automatically deskews images), there is no need to select this option.
Ascent Xtrata Pro User's Guide
79
Page 99

Chapter 3
Training
Max samples per class
The Layout Classifier supports an unlimited number of samples per class. If the
sample images are very different, the Layout Classifier internally learns different
patterns for each sample. For performance reasons, you might want to limit the
number of sample documents that are used for feature extraction. A value of 0
means no limitation.
Class homogeneity
This feature controls how sensitive the classifier is to variations in the layout of
the images in the training set. If the sample images are very different, the Layout
Classifier automatically creates internal patterns for each new type. These types
are not visible to the user.
The more types the better the classification accuracy, but the slower the
classification speed. The value set by this control is a threshold, which
determines when new internal types are created. In most cases the default value
of 80.0 works the best.
Noise Filter
This feature controls how to match regions with low contrast (for example,
images with a fine background pattern). A value closer to the “max. precision”
side would not classify images with low contrast. This means that even
documents from the training set would not have 100% confidence. The
probability of getting misclassified documents would then be much smaller,
resulting in a higher accuracy but more rejects. If you make the value closer to
the “max. recall” side, higher confidence values are returned for documents with
low contrast. However, this might mean that high confidence values are
determined for other classes with low contrast in the same region of the
document, which might lead to a higher error rate. In most cases the default
value of 15.0 works best.
Image Clustering
To facilitate set up of the Layout Classifier, a special function is provided that
performs automatic clustering (grouping) of unknown document images. The images
are clustered by geometrical similarity and can be easily added to the training set.
80 Ascent Xtrata Pro User's Guide
Page 100

Classification
Figure 3-16. Image Clustering Properties
Image source
Select the directory with the image files you want to be organized into clusters.
The specified directory tree will be searched recursively for files with a .tif
extension.
Algorithm options
Threshold for clustering
This threshold controls if a document is assigned to an existing cluster or if it is
assigned to a new cluster. A higher value causes more clusters, but the clusters
will be smaller in size. A lower value causes fewer clusters, but the clusters will
be larger.
Enable skew tolerance
Select this option if the images were not deskewed during scanning. If the
images are not skewed (or have been deskewed), you should uncheck this option
to speed up the clustering process.
Minimum cluster size
This is a filter option for displaying the clustered images. The value specifies the
minimum number of images required for a cluster to be displayed in the
Ascent Xtrata Pro User's Guide
81
 Loading...