

Page 1

KOFAX
Front-Office Server
2.7
Installation Guide
10300836-000
Page 2

© 2007–2009 Kofax, Inc., 15211 Laguna Canyon Road, Irvine, California 92618, U.S.A. All rights
reserved. Use is subject to license terms.
Third-party software is copyrighted and licensed from Kofax’s suppliers. For information on third-party
software included in this product, see “KFSTHIRDPARTYLICENSEREDME.txt.”
This product is protected by U.S. Patent No. 6,370,277.
THIS SOFTWARE CONTAINS CONFIDENTIAL INFORMATION AND TRADE SECRETS OF KOFAX,
INC. USE, DISCLOSURE OR REPRODUCTION IS PROHIBITED WITHOUT THE PRIOR EXPRESS
WRITTEN PERMISSION OF KOFAX, INC.
Kofax, the Kofax logo, VirtualReScan, the “VRS VirtualReScan” logo, and VRS are trademarks or
registered trademarks of Kofax, Inc. in the U.S. and other countries. All other trademarks are the
trademarks or registered trademarks of their respective owners.
U.S. Government Rights Commercial software. Government users are subject to the Kofax, Inc. standard
license agreement and applicable provisions of the FAR and its supplements.
You agree that you do not intend to and will not, directly or indirectly, export or transmit the Software
or related documentation and technical data to any country to which such export or transmission is
restricted by any applicable U.S. regulation or statute, without the prior written consent, if required, of
the Bureau of Export Administration of the U.S. Department of Commerce, or such other governmental
entity as may have jurisdiction over such export or transmission. You represent and warrant that you
are not located in, under the control of, or a national or resident of any such country.
DOCUMENTATION IS PROVIDED “AS IS” AND ALL EXPRESS OR IMPLIED CONDITIONS,
REPRESENTATIONS AND WARRANTIES, INCLUDING ANY IMPLIED WARRANTY OF
MERCHANTABILITY, FITNESS FOR A PARTICULAR PURPOSE OR NON-INFRINGEMENT, ARE
DISCLAIMED, EXCEPT TO THE EXTENT THAT SUCH DISCLAIMERS ARE HELD TO BE LEGALLY
INVALID.
Page 3

Contents
How to Use This Guide ................................................................................................................................7
Introduction ............................................................................................................................................7
Related Documentation ........................................................................................................................7
Training ...................................................................................................................................................8
Technical Support ..................................................................................................................................8
Overview ........................................................................................................................................................9
Types of Kofax Front-Office Server Configurations .........................................................................9
Scaling and High Availability Options ......................................................................................................9
Load Balancing with IIS Components for Kofax Front-Office Server .........................................10
Adding Kofax Front-Office Server Nodes ................................................................................11
Scaling the IIS Servers .........................................................................................................................11
Specifying the ProxyServer Value .............................................................................................12
Removing the Kofax IIS Components .......................................................................................12
Adding Kofax Front-Office Server Nodes to an IIS Cluster ...................................................12
Removing Kofax Front-Office Server Nodes from an IIS Cluster .........................................14
Load Balancing with Microsoft NLB ................................................................................................14
NLB Using VM Images ................................................................................................................15
Specifying the ProxyServer Value .............................................................................................15
Adding Kofax Front-Office Server Nodes to an NLB Cluster ...............................................16
Removing Kofax Front-Office Server Nodes from an NLB Cluster .....................................16
System Requirements .................................................................................................................................16
Server Requirements ...........................................................................................................................16
Supported Operating Systems ....................................................................................................16
Certified VMWare Configurations ............................................................................................17
Supported Databases for the Enterprise Configuration .........................................................17
Support for User Account Control (UAC) ................................................................................18
Minimum Hardware Requirements ..........................................................................................18
Hard Drive Space Requirements ................................................................................................18
Host Name .....................................................................................................................................18
Port Configuration .......................................................................................................................19
Client Requirements ............................................................................................................................19
Monitor Display Resolution ........................................................................................................19
Certified Web Browsers ...............................................................................................................19
Adobe Reader Requirement .......................................................................................................19
Preparing for New Installations ...............................................................................................................19
Log On Requirements .........................................................................................................................19
Network Configuration Requirements ............................................................................................20
Installing on a Local Drive .................................................................................................................20
Requirement for Free Hard Drive Space ..........................................................................................20
Kofax, Inc. 3
Page 4

Contents
Registry Access ....................................................................................................................................20
Restarting the Server ...........................................................................................................................20
Invalid Drive Path ...............................................................................................................................21
Using Kofax Front-Office Server on a Virtual Machine (VM) ......................................................21
Browser Configuration .......................................................................................................................21
Security Settings for Browsers ....................................................................................................21
Text Resizing in Browsers ...........................................................................................................21
Installing Kofax Front-Office Server with Kofax Capture .............................................................21
Required Database Information for Installation .............................................................................22
Database Information for the Departmental Configuration ..................................................22
Database Information for the Enterprise Configuration ........................................................23
Installation Notes for 64-Bit Computers ..........................................................................................23
Preparing for Upgrades .............................................................................................................................24
Types of Upgrades ..............................................................................................................................24
Supported Upgrades ....................................................................................................................24
Unsupported Upgrades ...............................................................................................................25
Precautions and Preliminary Tasks Before Upgrading ..................................................................25
Upgrade Notes for User Accounts .............................................................................................25
Internet Connection Requirement ..............................................................................................26
Role-Based Permissions for Web Client Activities ..................................................................26
Services Running before Upgrading .........................................................................................26
Authentication from Directory Services after Upgrades ........................................................26
Inbox Documents .........................................................................................................................26
Documents in a Queue ................................................................................................................27
Workflow Processes .....................................................................................................................27
Backing up before Upgrading ....................................................................................................27
Upgrade Notes for MFPs ....................................................................................................................28
Preparation for Upgrades ............................................................................................................28
Upgrading the Kofax Front-Office Server Application for Fujitsu .......................................28
Upgrading the Client Software for Other MFPs ......................................................................28
Upgrade Notes for Shortcuts .............................................................................................................29
Upgrade Notes for Destinations ........................................................................................................29
Notes for Kofax Capture .............................................................................................................29
Installing a New System ............................................................................................................................29
Installing a Departmental Configuration .........................................................................................29
Installing an Enterprise System .........................................................................................................32
Installing on One Server or the First Server of a Cluster ........................................................32
Installing on Additional Servers in a Cluster ...........................................................................33
Upgrading Existing Systems .....................................................................................................................34
Performing an In-Place Upgrade .......................................................................................................35
Upgrading by Migrating ............................................................................................................................35
Preliminary Steps before Migrating ..................................................................................................36
Migrating Destination Types ......................................................................................................36
Exporting Data from the Current Installation .................................................................................36
Importing Data into the New Installation ........................................................................................37
4 Kofax, Inc.
Page 5

Contents
Troubleshooting Migration ................................................................................................................39
Post-Installation and Upgrade Notes ......................................................................................................39
Licensing ...............................................................................................................................................39
Editing Default Roles after Migration ..............................................................................................39
Shared Folders Created by the Installer ...........................................................................................39
Maintaining Configuration Files in an Enterprise Cluster ............................................................39
Viewing the Installation Log Files .....................................................................................................40
Reinstalling Custom Workflows and Destinations after an Upgrade .........................................40
Managing MFPs after an Upgrade or Migration ............................................................................40
Managing MFPs after an Upgrade .............................................................................................40
Managing MFPs after Migration ................................................................................................41
Configuring Kofax Front-Office Server Destination Types ..................................................................41
Installing MFP Front Panel Software .......................................................................................................41
Other Configuration Tasks ........................................................................................................................42
Stopping and Restarting Kofax Front-Office Server ..............................................................................42
Using the Kofax Front-Office Server Status Icon ............................................................................42
Using the Services Console ................................................................................................................43
Uninstalling Kofax Front-Office Server ...................................................................................................43
Index ..............................................................................................................................................................45
Kofax, Inc. 5
Page 6

Contents
6 Kofax, Inc.
Page 7
How to Use This Guide
Introduction
This guide includes instructions on installing Kofax Front-Office Server. Read this guide
completely before using the software. This guide was written with the assumption that you have a
thorough understanding of Microsoft Windows and network configuration.
Related Documentation
In addition to this guide, Kofax Front-Office Server includes the following documentation. Except
for the Help and release notes, you can select to view any of the documentation by opening
guides.html on the installation media root or \Documentation\KFSguides.html after installation
(if you select to install Documentation).
Kofax Front-Office Server Installation Guide
Figure 1. Guides Page
Kofax Front-Office Server Administrator’s Guide
The Kofax Front-Office Server Administrator’s Guide shows how to change the configuration by
modifying properties files and performing other administration tasks to keep Kofax Front-Office
Server working properly. The guide is in the \setup\Guides folder on the Kofax Front-Office
Server installation media. It is also installed with the software in the \Documentation\Guides
folder.
Kofax Front-Office Server Configuration Guide for Kofa x Capture
This guide shows how to connect Kofax Front-Office Server with Kofax Capture. This guide is in
the \setup\Guides folder on the Kofax Front-Office Server installation media. It is also installed
with the software in the \Documentation\Guides folder.
For instructions on using Kofax Capture, refer to the Kofax Capture guides and Help.
Kofax, Inc. 7
Page 8

Kofax Front-Office Server Installation Guide
Multifunction Peripheral (MFP) Administrator Guides
These guides show how to make Kofax Front-Office Server features available on MFP front
panels. The MFP administrator guides are in the \setup\Guides folder on the Kofax Front-Office
Server installation media. They are also installed with the software in the
\Documentation\Guides folder.
Help for Kofax Front-Office Server Applications
Kofax Front-Office Server Web Client (referred to as the Web Client) and Kofax Front-Office
Server Administration Console (referred to as the Administration Console) have Help that
describes how to use the application. Each Help system has a table of contents, index, and full-text
search to assist you in finding information. To view the Help from the application, click the Help
button. The Help appears in a separate browser window. You can also view the Help when you
are at the server by selecting Start | Programs | Kofax | Documentation and then the Help
system.
Release Notes
Late-breaking product information is available from the release notes. Read the release notes
carefully, because they contain information that may not be included in other Kofax Front-Office
Server documentation. The release notes are available for viewing or downloading from the Kofax
Web site.
Documentation for Deprecated Features
Documentation for deprecated features is provided for your reference. It is recommended that
you use the new features as indicated in the release notes. Deprecated features are retained in the
product for backward compatibility. These features may be removed in a future release.
For information about deprecated features and the new features to use instead, refer to the release
notes.
Training
Kofax offers both classroom and computer-based training that will help you make the most of
your Kofax Front-Office Server solution. Visit the Kofax Web site at www.kofax.com for complete
details about the available training options and schedules.
Technical Support
For additional technical information about Kofax products, visit the Kofax Web site at
www.kofax.com and select an appropriate option from the Support menu. The Kofax Support
pages provide product-specific information, such as current revision levels, the latest drivers and
software patches, online documentation and user manuals, updates to product release notes (if
any), technical tips, and an extensive searchable knowledgebase.
The Kofax Web site also contains information that describes support options for Kofax products.
Please review the site for details about the available support options.
8 Kofax, Inc.
Page 9

If you need to contact Kofax Technical Support, please have the following information available:
Kofax Front-Office Server software version and build number
Operating system and service pack version
MFP or scanner make and model
Kofax Document Scan Server version
Destination type name, version, and configuration
Special/custom configuration or integration information
Overview
Kofax Front-Office Server enables documents from a variety of sources, including multifunction
peripherals (MFPs), to be delivered to content management systems, email servers, and other
destinations. You can install Kofax Front-Office Server on a single server or in a load-balanced
cluster of multiple servers for maximum scalability and availability. See Scaling and High
Availability Options for more information.
Types of Kofax Front-Office Server Configurations
You can install Kofax Front-Office Server in the following configurations:
Kofax Front-Office Server Installation Guide
Departmental: Install Kofax Front-Office Server on a single computer using the embedded
database.
Enterprise: Install Kofax Front-Office Server on one computer or several computers in a
load-balanced cluster with a Microsoft SQL Server or Oracle database.
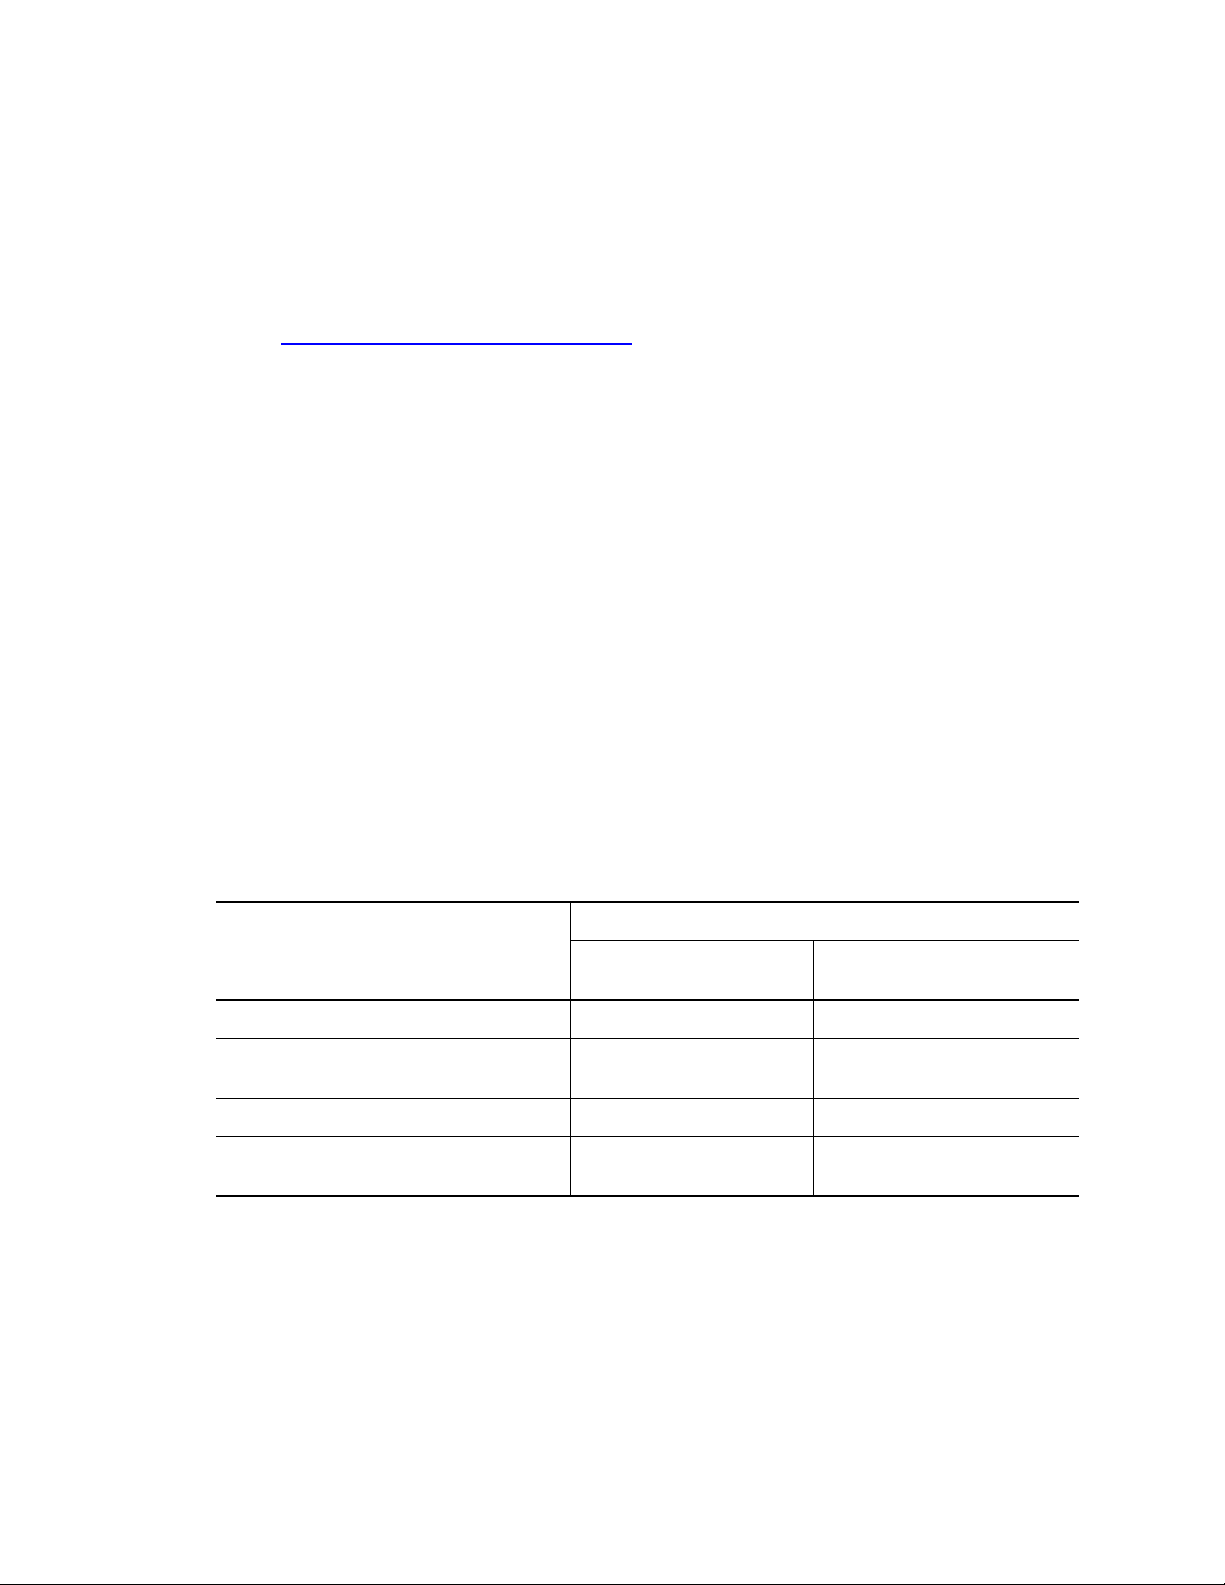
Table 1 shows which configuration you would use for the type of Kofax Front-Office Server
system you want to set up.
Table 1. When to Use Different Configurations
Type of System Recommended Configuration
Evaluation or training system Departmental
Small Departmental system when an external database is not available Departmental
Any size system with an external database Enterprise
A single-computer system with the option for expansion Enterprise
A load-balanced clustered system Enterprise
Use IIS as a Web server and load balancer Enterprise
Scaling and High Availability Options
You can implement a variety of Enterprise options that will provide scalability and high
availability. With an Enterprise installation, there are many load balancing options available. This
section describes two possible options:
Kofax IIS Components for Kofax Front-Office Server, which integrate the JK load balancer
with IIS (this is the recommended option).
Microsoft Windows Network Load Balancer (NLB)
Kofax, Inc. 9
Page 10
Kofax Front-Office Server Installation Guide
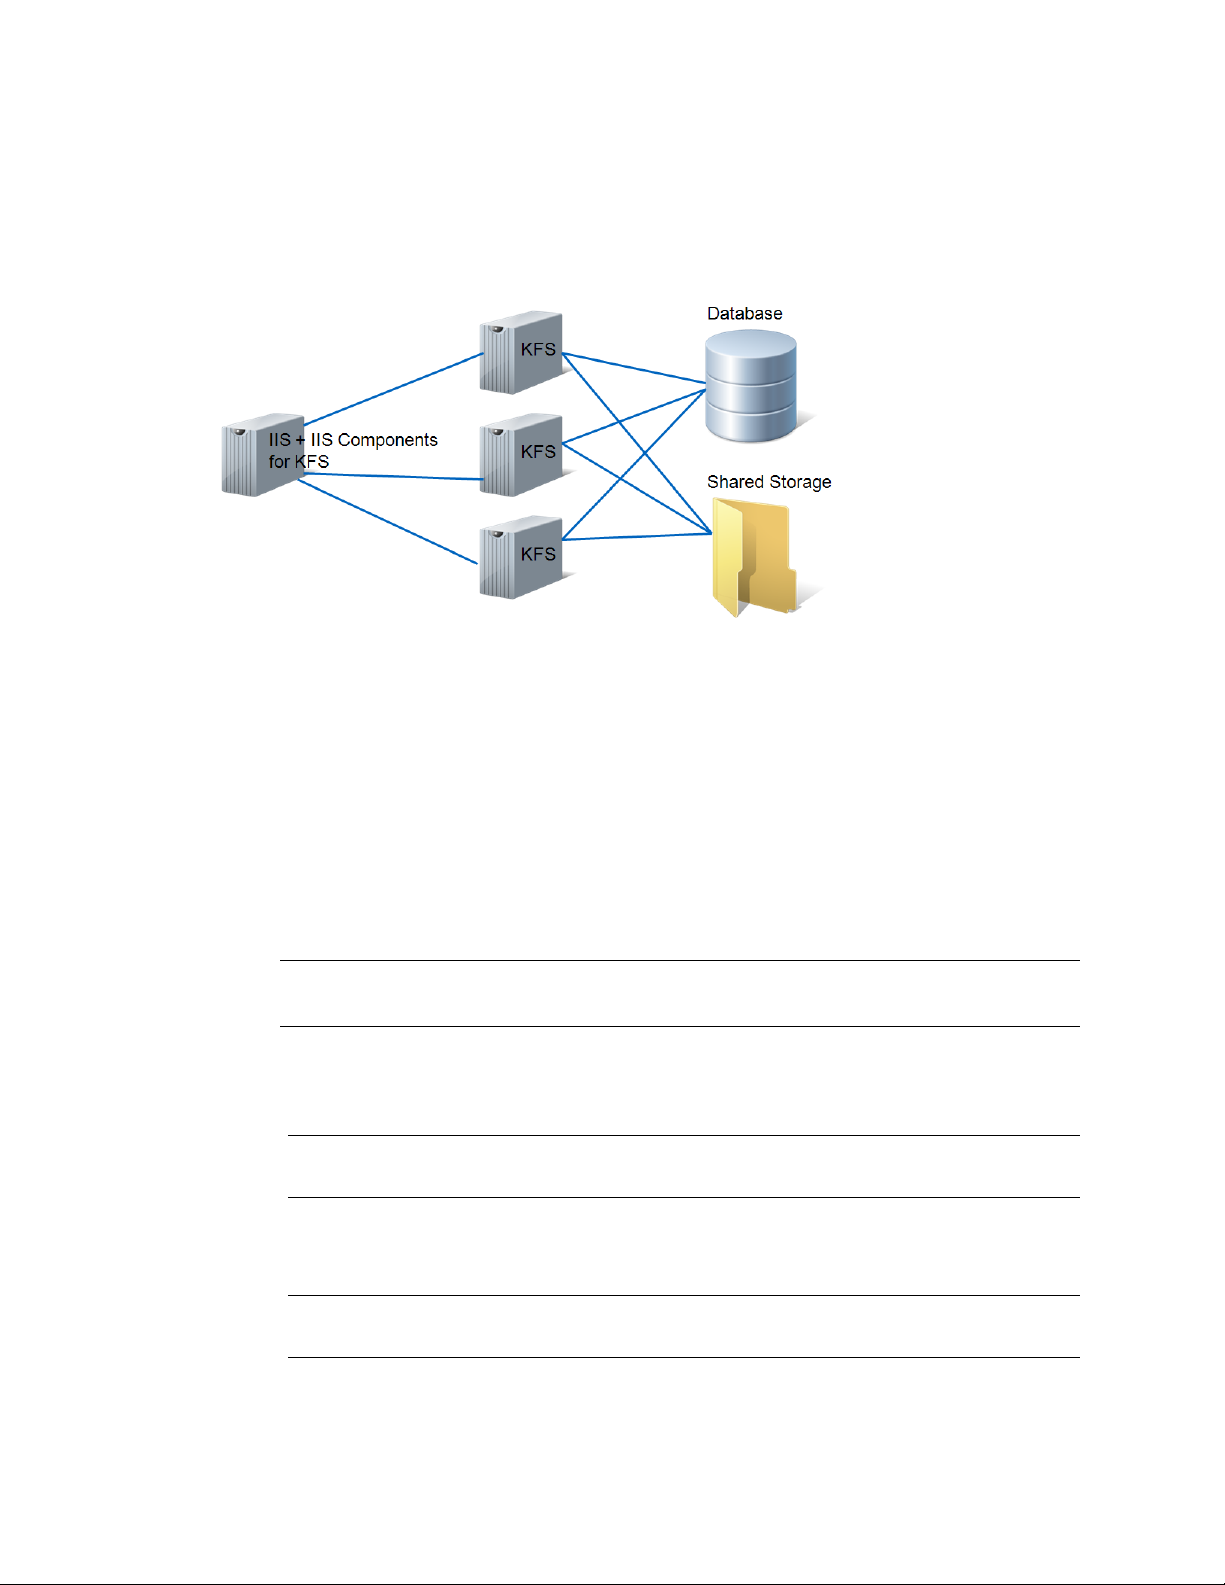
Load Balancing with IIS Components for Kofax Front-Office Server
You can use the integrated JK load balancer installed by Kofax IIS Components. You install the
Kofax IIS components on an IIS Web server to distribute requests among multiple Kofax FrontOffice Server nodes. The Kofax IIS components installer installs and integrates the Apache Tomcat
Connector (also known as mod-jk or JK) load balancer into IIS.
Figure 2. IIS/JK integrated Load Balanced Enterprise Installation
The IIS server and Kofax Front-Office Server must be on separate machines, and the IIS server
must have ports 8080, 8888, and 8443 free.
The supported versions of IIS are:
Microsoft IIS 6 running on Windows 2003 server
Microsoft IIS 7 running on Windows 2008 server
Some advantages of using IIS to load balance are:
You can configure Kofax Front-Office Server to use HTTPS by configuring Microsoft IIS.
Authentication and authorization for IIS can be managed through the Microsoft IIS Web
server.
Note IIS authentication does not enable users to automatically log on to the
Administration Console or the Web Client (also known as single sign-on).
X To install the IIS components
1 On the IIS server, make sure IIS is enabled and the “Default Web Site” is present.
Note The installer only supports using the “Default Web Site” of IIS to host the load-
balancer, so this Web site must be present.
2 Insert the Kofax Front-Office Server installation media into your drive.
3 Run setupiis.exe, which is in the root of the Kofax Front-Office Server installation media.
Note The setupiis program detects a 32-bit or 64-bit computer and starts the correct
installer.
4 Review the Kofax Front-Office Server license agreement and select “I accept the terms of
the License Agreement” to continue with the installation. Click Next to continue.
10 Kofax, Inc.
Page 11

Kofax Front-Office Server Installation Guide
5 Accept the default installation path of C:\Program Files\Kofax\IIS Components for KFS,
or browse and choose another location. Click Next.
6 Choose the folder that is shared by the Kofax Front-Office Server nodes. Click Next.
7 The Proxy Server screen notifies you that you must set the ProxyServer value after
installation. Click Next.
8 Review the pre-installation summary. To start the installation, click Install.
9 When the installation is complete, click Done.
10 On one of the Kofax Front-Office Server nodes, in the \conf folder, locate the
des.properties file and open it in a text editor. In the ProxyServer property, type the host
name or IP address of the IIS machine. Save the file.
Caution You must enter the value for the ProxyServer property.
11 Copy the des.properties file you just edited to the \conf folder on each of the remaining
Kofax Front-Office Server nodes.
12 Stop and restart Kofax Front-Office Server on each of the nodes.
Note If you are using IIS 7 and an HP MFP, you may need to increase the maximum
allowed HTTP request size to accommodate
larger documents. Refer to the Kofax Front-
Office Server Administrator’s Guide for HP MFPs for instructions.
Adding Kofax Front-Office Server Nodes
You can add additional Kofax Front-Office Server nodes at any time.
X To add a new node, install Kofax Front-Office Server on the new node, following the
instructions in Installing on Additional Servers in a Cluster
. The name of the new node is
automatically added to the load balance servers property in the master configuration file in
the shared folder.
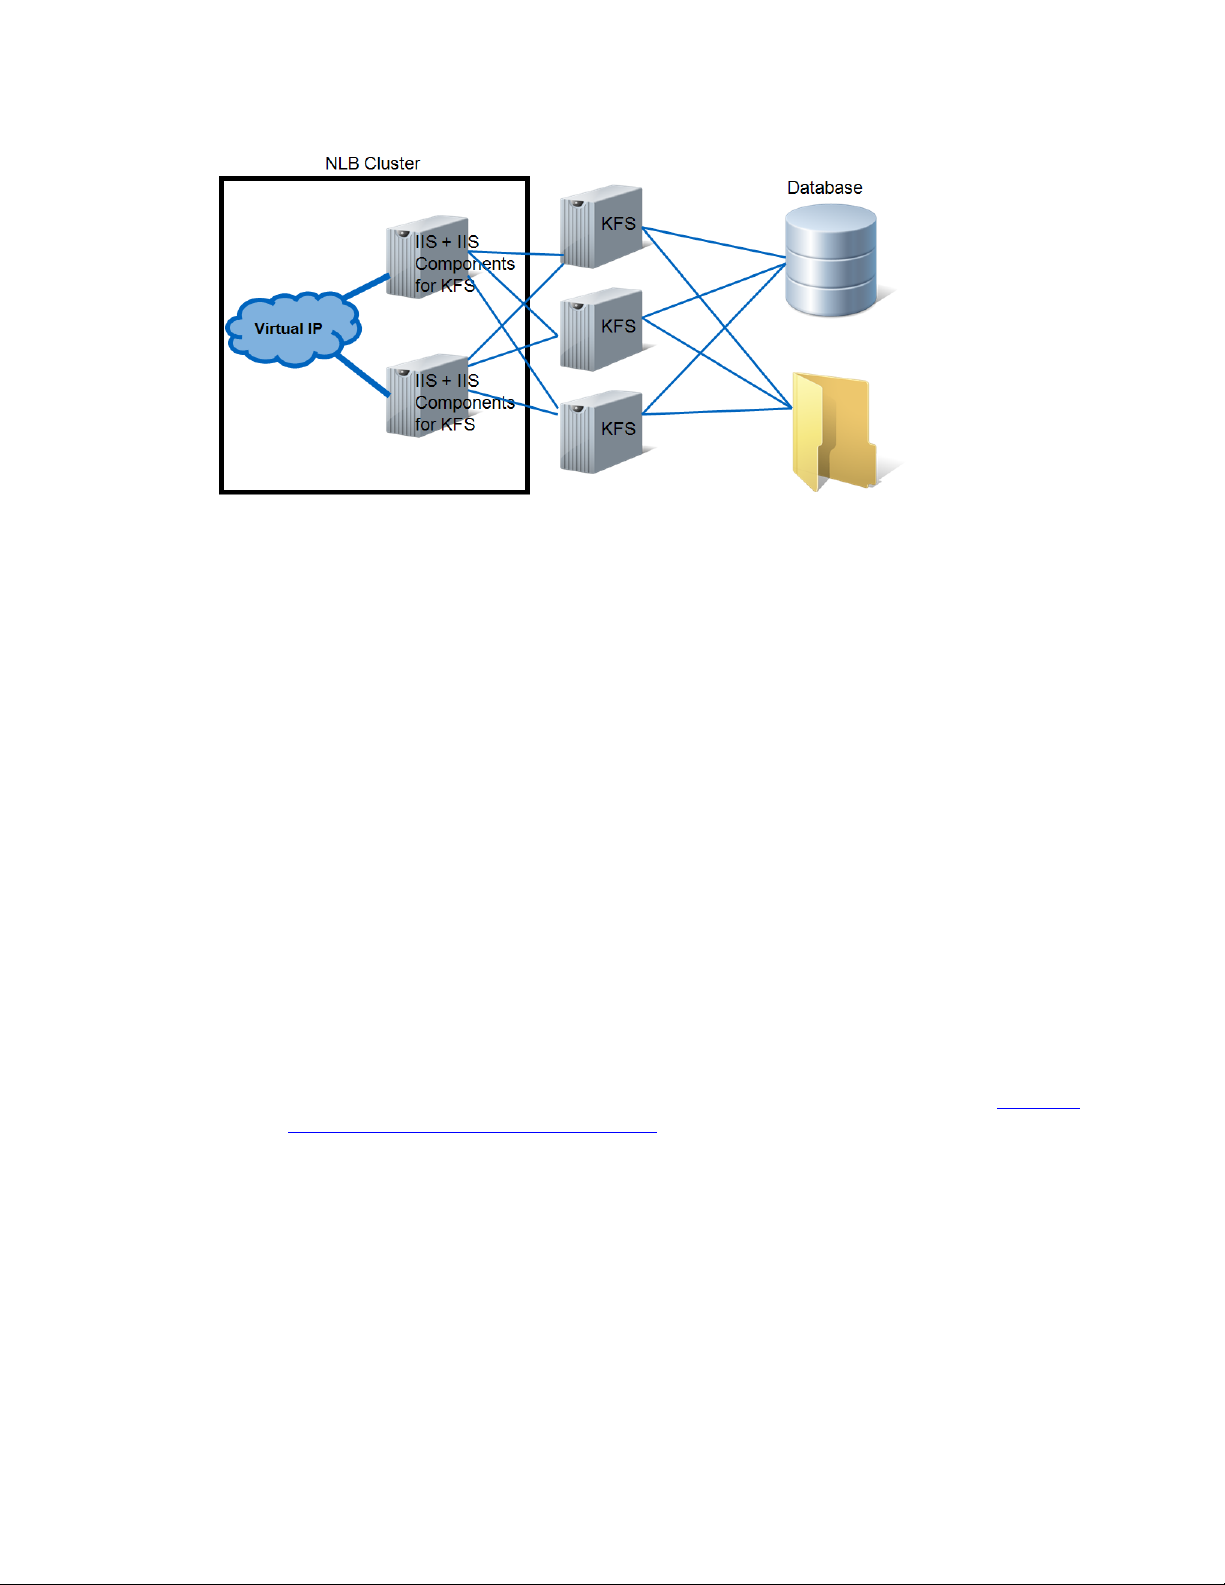
Scaling the IIS Servers
You can scale the number of IIS servers by installing the IIS Components for Kofax Front-Office
Server on additional IIS servers. Follow the installation instructions in Load Balancing with IIS
Components for Kofax Front-Office Server for each IIS server.
When all IIS servers have been configured, use a load-balancer such as NLB to create a cluster and
add all the IIS servers as hosts in the cluster. You use the URL of the NLB cluster to log on to the
Administration Console and Web Client.
To create the NLB cluster, the following must be true of each IIS server:
Each IIS server must use a static IP address.
Each machines networkk adapter must have a unique adapter GUID. If you are using VM
images, see NLB Using VM Images
for instructions.
Kofax, Inc. 11
Page 12
Kofax Front-Office Server Installation Guide
Figure 3. Scaled and Highly Available Enterprise Installation
Specifying the ProxyServer Value
Once your NLB cluster is configured, you need to specify the cluster information as the
ProxyServer value in a configuration file. This will identify the cluster as the host address URL for
connection to the Kofax Front-Office Server applications.
X To specify the ProxyServer value
1 In the \conf folder, locate the des.properties file and open it in a text editor.
2 In the ProxyServer property, type the IP address of the NLB cluster.
3 Save the file.
Removing the Kofax IIS Components
To remove the Kofax IIS components, use the Control Panel Add/Remove Programs to remove
“IIS Components for Kofax Front-Office Server.”
Adding Kofax Front-Office Server Nodes to an IIS Cluster
You can add additional Kofax Front-Office Server nodes to an existing IIS cluster at any time.
X To add a new node
1 Install Kofax Front-Office Server on the new node, following the instructions in “Installing
on Additional Servers in a Cluster on page 33”.
2 Go to the any IIS server in the existing IIS cluster. In the <installation path>\IIS
components for Kofax Front-Office Server\Apache Software Foundation\Jakarta Isapi
Redirector\conf folder, locate the workers.properties.minimal file and open it in a text
editor such as WordPad.
3 You will see a section with five lines for each existing node. An example of a node section:
# Node KFS01
worker.KFS01_node.port=8009
worker.KFS01_node.host=KFS01
worker.KFS01_node.type=ajp13
worker.KFS01_node.lbfactor=1
12 Kofax, Inc.
Page 13

Kofax Front-Office Server Installation Guide
4 Copy and paste a section to create a new section for each new node, and edit each of the
properties to match the host name of the node. See the example below.
Caution Do not change the values of any of the properties except for the
worker.[hostname]_node.host value. This value should be changed to match the host
name of the new node.
5 Edit the property worker.loadbalancer.balance_workers, adding the new node to the
comma-delimited list of nodes.
6 Save the file, and replace workers.properties.minimal on all the IIS servers in your
configuration with the new copy, and restart IIS on each server.
Example
Here is an example of a file for an existing IIS cluster of KFS01 and KFS02:
# Define list of KFS01 workers that will be used for mapping requests
# Node KFS01
worker.KFS01_node.port=8009
worker.KFS01_node.host=KFS01
worker.KFS01_node.type=ajp13
worker.KFS01_node.lbfactor=1
# Node KFS02
worker.KFS02_node.port=8009
worker.KFS02_node.host=KFS02
worker.KFS02_node.type=ajp13
worker.KFS02_node.lbfactor=1
worker.loadbalancer.type=lb
worker.loadbalancer.balance_workers=KFS01_node,KFS02_node,
worker.loadbalancer.sticky_session=1
worker.list=loadbalancer
worker.status.type=status
Here is the file after performing the editing steps to add a new node for IIS server KFS03. After
pasting the new section for the new KFS03 node, the edits you make are shown in a colored font.
# Define list of KFS01 workers that will be used for mapping requests
# Node KFS01
worker.KFS01_node.port=8009
worker.KFS01_node.host=KFS01
worker.KFS01_node.type=ajp13
worker.KFS01_node.lbfactor=1
# Node KFS02
worker.KFS02_node.port=8009
worker.KFS02_node.host=KFS02
worker.KFS02_node.type=ajp13
worker.KFS02_node.lbfactor=1
# Node KFS03
worker.KFS03_node.port=8009
Kofax, Inc. 13
Page 14
Kofax Front-Office Server Installation Guide
worker.KFS03_node.host=KFS03
worker.KFS03_node.type=ajp13
worker.KFS03_node.lbfactor=1
worker.loadbalancer.type=lb
worker.loadbalancer.balance_workers=KFS01_node,KFS02_node,KFS03_node,
worker.loadbalancer.sticky_session=1
worker.list=loadbalancer
worker.status.type=status
Important Host names and IP addresses are not interchangeable in the
workers.properties.minimal file. You must always use host names. If you are in an environment
where the host names of other machines in your configuration are not being resolved correctly or
consistently, you should fix this by editing your Windows hosts file in
\Windows\system32\drivers\etc.
Removing Kofax Front-Office Server Nodes from an IIS Cluster
To remove a node, delete the node information in the workers.properties.minimal file, and copy
the file to and restart all IIS servers in the cluster. Then use the Control Panel Add/Remove
programs to remove Kofax Front-Office Server on the removed node.
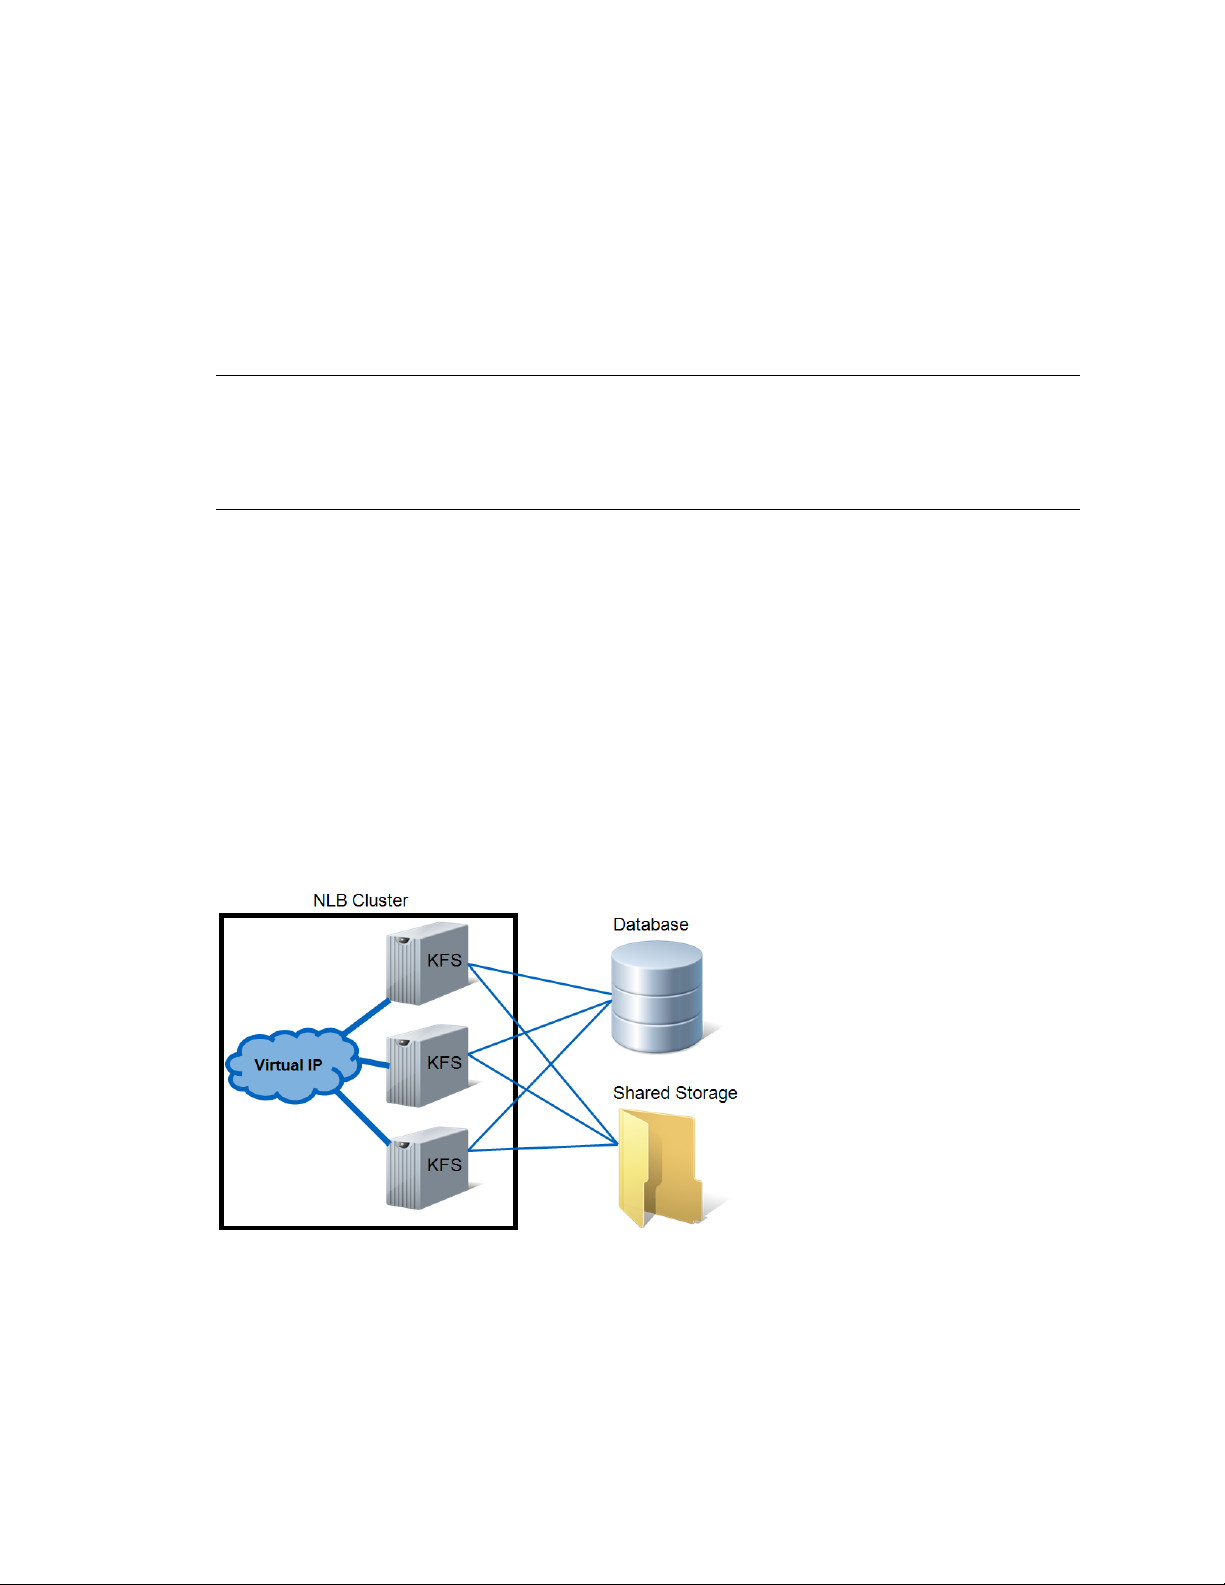
Load Balancing with Microsoft NLB
You can use NLB to create a load-balanced cluster, which will redirect Kofax Front-Office Server
client HTTP traffic to all nodes in the cluster. If a node fails, convergence is initiated to redistribute
the load among the remaining nodes. However, the NLB nodes will not replicate HTTP sessions,
so if a user is logged on to the Administration Console or Web Client and that node fails, the user
will have to log back on.
Figure 4. Possible Load Balanced (NLB) Enter pr ise Installation
You can have up to 32 nodes in an NLB cluster, so the Kofax Front-Office Server installations are
scalable. In an NLB cluster, all servers monitor each other with a heartbeat signal, so there is no
single point of failure.
14 Kofax, Inc.
Page 15

Kofax Front-Office Server Installation Guide
To implement NLB, the following must be true of each Kofax Front-Office Server node:
All nodes share the same scan jobs and inbox folders.
All nodes share the same database.
Each node must use a static IP address.
Each node’s network adapter must have a unique adapter GUID. If you are using VM
images, see NLB Using VM Images
for instructions.
To create an NLB cluster, start the Network Load Balancing Manger: open nlbmgr from Start |
Run, type it in the Command Prompt window, or select it from the Control Panel’s Administrative
Tools.
Important When setting up the cluster Port Rules, you must select the default Affinity setting of
Single.
NLB Using VM Images
When using VMWare virtual machines (VMs) that were cloned or copied from the same image,
the GUIDs of the network adapters would be the same. To set up NLB, however, each adapter
must have a unique GUID. To make sure that each VM network adapter has a unique GUID,
follow these instructions:
X To change the network adapter GUID for VMs
1 On one of the VMs, go to Device Manager. Right-click My Computer, select Properties,
select the Hardware tab and click the Device Manager button.
2 Expand Network Adapters, and right-click the Network adapter that you will add to the
NLB configuration.
3 Select Uninstall. The network interface card (NIC) is uninstalled.
4 Right click the server name at the top of the Device Manager list and select “Scan for
hardware changes”. Wait for a moment: The NIC is installed and assigned a new GUID.
5 Exit Device Manager.
6 Verify or reconfigure the TCP/IP connection properties.
7 Repeat this process on each VM in the cluster.
Tip If you have clustered storage in a highly available environment, you can use Microsoft
Cluster Server to create file shares accessible through a UNC path and then specify that path in the
install.properties file.
Specifying the ProxyServer Value
Once your NLB cluster is configured, you need to specify the cluster information as the
ProxyServer value in a configuration file. This will identify the cluster as the host address URL for
connection to the Kofax Front-Office Server applications.
X To specify the ProxyServer value
1 In the \conf folder, locate the des.properties file and open it in a text editor.
2 In the ProxyServer property, type the host name or IP address of the NLB cluster.
3 Save the file.
Kofax, Inc. 15
Page 16

Kofax Front-Office Server Installation Guide
4 Stop and restart Kofax Front-Office Server.
Adding Kofax Front-Office Server Nodes to an NLB Cluster
You can add additional Kofax Front-Office Server nodes to an existing NLB cluster at any time.
X To add a new node
1 Install Kofax Front-Office Server on the new node, following the instructions in Installing
on Additional Servers in a Cluster.
2 In NLB Manager, add the new node as a new host to the NLB cluster.
Removing Kofax Front-Office Server Nodes from an NLB Cluster
To remove a node, delete the host from the NLB cluster first to ensure outgoing requests to the
server are stopped. Then, use the Control Panel Add/Remove Programs to remove Kofax FrontOffice Server from the node.
System Requirements
The server and client workstations used for Kofax Front-Office Server must meet the system
requirements described in this section. These requirements will be updated on the Kofax Web site
as new configurations are supported. Refer to the Web site for the latest information.
Server Requirements
Kofax Front-Office Server must be installed on a server that meets the requirements in this section.
Supported Operating Systems
Table 2 shows the operating systems supported for use with Kofax Front-Office Server. Note the
following:
This list represents the minimum requirement for each operating system family and
edition. This list does not specify each version and service pack available, only the
minimum requirement.
If you are installing Kofax Front-Office Server on a server where Kofax Capture is
installed, make sure that the server’s operating system also supports Kofax Front-Office
Server.
Microsoft Cluster Services is supported in all operating systems, but certified with
Windows Server 2003 Enterprise x64 Edition (32 and 64-Bit) with Service Pack 2
Although not explicitly tested, Kofax offers technical support for the indicated operating
systems. Operating systems marked as certified represent those which have been explicitly
tested with Kofax Front-Office Server functionality.
Table 2. Operating Systems Supported by Kofax Front-Office Server
Operating System Supported Certified
Windows Server 2008 Enterprise Edition with Service Pack 1 XX
Windows Server 2008 Enterprise x64 Edition (64-Bit) with Service Pack 1 XX
Windows Server 2008 Standard Edition with Service Pack 1 X
16 Kofax, Inc.
Page 17

Kofax Front-Office Server Installation Guide
Table 2. Operating Systems Supported by Kofax Front-Office Server
Operating System Supported Certified
Windows Server 2008 Standard x64 Edition (64-Bit) with Service Pack 1 X
Windows Server 2003 Enterprise Edition with Service Pack 2 XX
Windows Server 2003 Enterprise x64 Edition (64-Bit) with Service Pack 2 XX
Windows Server 2003 Standard Edition with Service Pack 2 X
Windows Server 2003 Standard x64 Edition (64-Bit) with Service Pack 2 X
Windows XP Professional with Service Pack 3
(for internal and evaluation use only)
X
Certified VMWare Configurations
VMWare ESX Server 3.5 has been certified for use with Kofax Front-Office Server, which have
been explicitly tested with Kofax Front-Office Server functionality. VMWare Server 2.0 is
supported, but not certified.
Supported Databases for the Enterprise Configuration
Table 3 and Table 4 show the databases supported for use with Kofax Front-Office Server in an
Enterprise configuration in single-server and cluster systems.
Although not explicitly tested, Kofax offers technical support for all supported databases.
Databases marked as certified represent those which have been explicitly tested against Kofax
Front-Office Server functionality.
Table 3. Databases Supported in an Enterprise Configuration (Single-Server)
Database Supported Certified
Microsoft SQL Server 2008 – 32-bit X
Microsoft SQL Server 2008 – 64-bit XX
Microsoft SQL Server 2005 – 32-bit X
Microsoft SQL Server 2005 – 64-bit XX
Oracle 10g Release 2 – 32-bit X
Oracle 10g Release 2 – 64-bit XX
Table 4. Databases Supported in an Enterprise Configuration (Cluster)
Database Supported Certified
Microsoft SQL Server 2008 with Microsoft Cluster Services – 32-bit X
Microsoft SQL Server 2008 with Microsoft Cluster Services – 64-bit XX
Microsoft SQL Server 2005 with Microsoft Cluster Services – 32-bit X
Kofax, Inc. 17
Page 18

Kofax Front-Office Server Installation Guide
Table 4. Databases Supported in an Enterprise Configuration (Cluster)
Database Supported Certified
Microsoft SQL Server 2005 with Microsoft Cluster Services – 64-bit X
Oracle Real Application Cluster (RAC) 10g – 32-bit X
Oracle RAC 10g – 64-bit XX
Support for User Account Control (UAC)
Kofax Front-Office Server 2.7 supports User Account Control (UAC) on Windows Server 2008. If
you are using Kofax Front-Office Server in an enterprise configuration, you need to use a
Windows user account with administrator rights to start the KofaxServer service. This user
account must also have full access to the folder used for the Kofax Front-Office Server shared
folder. Refer to the Kofax Front-Office Server Administrator’s Guide for information about changing
the user account for the KofaxServer service.
The user account for the KofaxServer service does not need to be changed for UAC if Kofax FrontOffice Server is installed in a Departmental configuration.
Minimum Hardware Requirements
The server must meet the following minimum hardware requirements. Production servers should
exceed these requirements.
2 GHz Pentium 4 or compatible microprocessor
2 GB RAM
100/1000 Mbps network card (10 Mbps not supported)
Hard Drive Space Requirements
Make sure that there is sufficient space on the hard drive for the database. A minimum of 25 GB is
recommended as an initial amount of free hard drive space. Additional space will be needed as
the database grows. Refer to the Kofax Front-Office Server Administrator’s Guide for information
about configuring Kofax Front-Office Server to allow sufficient free drive space.
Host Name
The computer’s host name should not exceed 15 characters, which is a requirement for the
embedded database installation. If you cannot modify the host name to meet this requirement,
install Kofax Front-Office Server on another computer.
The host name of a computer should not be changed after Kofax Front-Office Server has been
installed. Changing the host name may cause problems with licensing and connecting to MFPs.
You can restore licensing by changing the host name back to the one you used when you licensed
Kofax Front-Office Server.
The host name of an MFP also should not be changed after it has been added to Kofax Front-Office
Server. The Administration Console does not recognize that the MFP’s host name has changed,
but instead recognizes it as a different device. If you add the device with the new host name, the
Administration Console will have two records for the same device.
18 Kofax, Inc.
Page 19

Kofax Front-Office Server Installation Guide
Port Configuration
Ports 80 and 8080 must be available for use by Kofax Front-Office Server. If IIS, a Web server, or
another application uses these ports, reconfigure it to use different ports. If IIS, a Web server, or an
application cannot be reconfigured, disable or uninstall it or install Kofax Front-Office Server on
another computer. If you are installing Kofax Front-Office Server on a computer with Kofax
Capture and Kofax Capture Import Connector - Web Services, refer to Installing Kofax Front-
Office Server with Kofax Capture.
Some MFPs also need port 8888 open in the network connection between Kofax Front-Office
Server and the device. Refer to the MFP administrator guide for information.
Client Requirements
This version of Kofax Front-Office Server provides browser-based applications, the Web Client
and the Administration Console, which require the following.
Note For information on additional requirements if you want to allow users to scan directly from
the Web Client (using the feature called WebScan), see the Kofax Front-Office Server Administrator’s
Guide.
Monitor Display Resolution
To view client software correctly in a browser, the monitor display resolution must be at least
1024 x 768 with 16-bit color and Normal fonts.
Certified Web Browsers
Kofax Front-Office Server requires a Web browser to run thin clients and view the Help. The
following browsers have been tested with Kofax Front-Office Server:
Microsoft Internet Explorer 6.0 and 7.0
Mozilla Firefox 1.5 and 2.0
Note Firefox support is deprecated in this version of Kofax Front-Office Server.
Adobe Reader Requirement
To view PDF files on Kofax Front-Office Server client workstations, you need the current version
of Adobe Reader.
Preparing for New Installations
Before installing Kofax Front-Office Server, follow these instructions to prepare your computer
and avoid potential problems.
Log On Requirements
You must have administrator rights to install Kofax Front-Office Server.
If you want Kofax Front-Office Server to connect to Active Directory automatically, the computers
where you are installing Kofax Front-Office Server must be on the same domain as the Active
Kofax, Inc. 19
Page 20

Kofax Front-Office Server Installation Guide
Directory server. Depending on the type of installation you are using, you need to log on with the
following user account to enable Kofax Front-Office Server to connect to Active Directory
automatically:
For an Enterprise installation, log on as a domain user.
For a Departmental installation, log on as a local or domain user. To connect to the Active
Directory, select Local System or a domain user when prompted for a user account to run
the Kofax Front-Office Server service.
Network Configuration Requirements
Destination types and Kofax Document Scan Server devices need to be on the same network as
Kofax Front-Office Server with routable addresses from the server.
Kofax Front-Office Server uses the IP address of the first network connection listed in the
connection order. If there are multiple network cards in the server, you may need to change the
order of network connections so that the connection used by MFPs and destination types is first.
Refer to the Microsoft Windows Server documentation for instructions on changing the
connection order.
Installing on a Local Drive
Kofax Front-Office Server must be installed on a local drive, which can be any drive letter. Do not
install Kofax Front-Office Server on a network drive, including a mapped drive.
Requirement for Free Hard Drive Space
Make sure that there is sufficient space on the hard drive for the database. A minimum of 25 GB is
recommended as an initial amount of free hard drive space for the database. Additional space will
be needed as the database grows. You can manage the database size by periodically purging old
records. Kofax Front-Office Server can also block database requests if the free drive space reaches
a specified threshold. For information about freeing hard drive space, refer to the Kofax Front-
Office Server Administrator’s Guide.
Registry Access
Kofax Front-Office Server needs to modify the Registry during installation. If you are using
software that restricts changes to the Registry, turn it off while installing Kofax Front-Office
Server.
Restarting the Server
Do not restart the server manually while the installation program is running. Restarting the server
will cause the installation to fail.
20 Kofax, Inc.
Page 21

Kofax Front-Office Server Installation Guide
Invalid Drive Path
If you change the default path during installation, you must select an install path that includes a
valid local drive letter. The following error appears if you select a drive letter that does not exist.
You do not have write permissions to the chosen installation destination.
Using Kofax Front-Office Server on a Virtual Machine (VM)
Kofax Front-Office Server may not run properly on a VMware Virtual Machine when the host
computer has multiple processors, multiple cores, or hyperthreading enabled. The following
problems may occur:
When users attempt to download a PDF file, the following error appears.
KDE 16017 - Cannot download the document. Verify that document is not
locked by another process. If the document cannot be downloaded, ha ve the
system administrator verify that the VRS component has been installed with
the Kofax Front-Office Server.
If PDF is selected as the format for a destination file, scanned documents will not be sent to
that destination. This setting also affects documents scanned from Kofax Document Scan
Server. These documents may appear in the Web Client without pages and preview
images.
Workaround: Configure the VM as a dual virtual processor computer. If the problem continues,
set the BIOS of the host computer to turn off hyperthreading.
Browser Configuration
Note the following requirements for using Kofax Front-Office Server client applications on Web
browsers.
Security Settings for Browsers
If a browser is set to the highest security setting, the Administration Console and the Web Client
may not work correctly. These applications depend on JavaScript, and they must be able to
communicate with the server. Therefore, make the Administration Console, the Web Client, and
their Help systems trusted sites and enable JavaScript and cookies.
Text Resizing in Browsers
Panels and scroll bars are not resized automatically when the text size changes. This can cause
enlarged text to appear outside the borders of a panel. It can affect automatic scrolling, such as
when you drag a document to the bottom of a Destination panel to scroll down the list of
destinations. To cause resizing, use the browser’s Refresh command so the panels and scroll bars
are resized to fit the text.
Installing Kofax Front-Office Server with Kofax Capture
If you want to install Kofax Front-Office Server and Kofax Capture on the same server, make sure
that the operating system is supported by Kofax Front-Office Server. (Refer to Supported
Operating Systems for more information.) If Kofax Capture is installed on an operating system
that is not supported by Kofax Front-Office Server, install Kofax Front-Office Server on a separate
server.
Kofax, Inc. 21
Page 22

Kofax Front-Office Server Installation Guide
X To install Kofax Front-Office Server with Kofax Capture
1 Install Kofax Capture 8 with Service Pack 4.
2 Install Kofax Capture Import Connector - Web Services that is provided with Kofax Front-
Office Server as follows:
a Insert the Kofax Front-Office Server installation media into your drive.
b Browse to the \OtherResources\Kofax Capture Import Connector - Web Services
folder.
c Open the readme.txt file and follow the instructions.
3 Install the Kofax Capture 8.0 feature package as follows:
a On the Kofax Front-Office Server installation media, browse to the
\OtherResources\Kofax Capture folder.
b Double-click ColorCompressionSetup.msi to run the installer.
4 If the Web server for Kofax Capture Import Connector - Web Services is also installed on
the server, use Internet Information Service (IIS) Manager to change the port of the
Default Web Site, which is used by Kofax Capture Import Connector - Web Services. You
can use any unused port, such as 8008. Do not use ports 80, 8080, and 8888, which are used
by Kofax Front-Office Server.
Note If you are using any client applications that connect to the Web server for Kofax
Capture Import Connector - Web Services, change the configuration to use the new port
number. You must also specify the port number when specifying the host name in
rs.connector.kofaxcapture.properties.
5 Verify that Kofax Capture and Kofax Capture Import Connector - Web Services works
properly and is licensed.
6 Install Kofax Front-Office Server.
Note Kofax Capture must be installed before Kofax Front-Office Server on a server. Installing
Kofax Capture on a server where Kofax Front-Office Server is already installed is not supported.
Required Database Information for Installation
Depending on whether you are installing a Departmental or Workgroup configuration, you need
to provide information to connect to the database and log on.
Database Information for the Departmental Configuration
During installation, you are prompted to provide the following information for the embedded
database:
The password for the Windows user account for starting the database service. This account
is created by the Installer.
A user name and password for a database account to authenticate with the database. This
user account is created in the database. It does not need to be a user who will be used for
Kofax Front-Office Server.
22 Kofax, Inc.
Page 23

Kofax Front-Office Server Installation Guide
Database Information for the Enterprise Configuration
During installation, you are prompted to provide the following information for the database to
which you are connecting:
A user account in the database to be used by Kofax Front-Office Server for authentication.
You will be prompted to provide the user name and password for this user account.
Connection information. Depending on which database you use, you need to provide
connection information as shown in the following sections.
Microsoft SQL Server 2005/2008
Provide the following information:
Host name
Instance name
Database name
Complete the “Instance name” field if Microsoft SQL Server has been installed as a named
instance. If not, leave this field blank.
Oracle 10g
Provide the following information:
Host name
Port number
SID or service name
Oracle RAC
Enter the description portion of the RAC definition in the \network\admin\tnsnames.ora file
where Oracle is installed. Locate the description, which looks similar to this example:
RAC=(description=
(address_list=
(load_balance=on)
(failover=on)
(address=(protocol=tcp)(host=2k3rac1-vip)(port=1521))
(address=(protocol=tcp)(host=2k3rac2-vip)(port=1521)))
(connect_data=(service_name=kfsrac)
)
)
When you are prompted during installation to provide the Oracle RAC connection, copy the
description for your RAC and paste it into the field. If you are typing the string manually, remove
line breaks and extra spaces, as in this example:
(description=(address_list=(load_balance=on)(failover=on)(address=(protocol=
tcp)(host=2k3rac1-vip)(port=1521))(address=(protocol=tcp)(host=2k3rac2vip)(port=1521)))(connect_data=(service_name=kfsrac)))
Installation Notes for 64-Bit Computers
If you are installing Kofax Front-Office Server on a 64-bit computer, note the following additional
requirements.
Kofax Front-Office Server supports the AMD64 instruction set and architecture on the Windows
operating system. Intel Itanium processors are not supported.
Kofax, Inc. 23
Page 24
Kofax Front-Office Server Installation Guide
The C:\Program Files (x86) folder is still required for some components of Kofax Front-Office
Server. To support these components, the installer does the following:
Bonjour is installed in both C:\Program Files and C:\Program Files (x86). A Bonjour
subfolder is created in each folder.
VRS and PostgreSQL are installed in C:\Program Files (x86). The PostgreSQL database is
installed on the C drive even if Kofax Front-Office Server is installed on another local
drive. There must be sufficient space on the C drive to accommodate the database. Refer to
Requirement for Free Hard Drive Space
All other files are installed in the installation path you specified.
Preparing for Upgrades
This section provides information to identify which upgrade you need to perform and any
information you need before upgrading.
Types of Upgrades
Kofax Front-Office Server provides two ways to upgrade to version 2.7:
In-place upgrade: The current version of Kofax Front-Office Server is upgraded to the new
version and the data is automatically migrated to the new version.
Migration: You need to perform a new installation of Kofax Front-Office Server and then
migrate the data from the old system to the new one.
for more information.
Supported Upgrades
Table 5 shows in-place and migration upgrades that are supported in Kofax Front-Office Server
2.7:
Table 5. Supported In-Place and Migration Upgrades
Source Configuration Target Configuration
Kofax Front-Office Server 2.7
Departmental
Version 2.5 with the embedded database In-Place Upgrade
Version 2.5 with a WebLogic and Oracle
database
Version 2.0 with the embedded database In-Place Upgrade
Version 2.0 with a WebLogic and Oracle
database
Kofax Front-Office Server 2.7
Enterprise with Oracle
Migration
Migration
24 Kofax, Inc.
Page 25

Kofax Front-Office Server Installation Guide
Unsupported Upgrades
Upgrades and migrations of the following configurations are not supported:
Versions before 2.0 directly to 2.7.
Versions 2.0 or 2.5 with the embedded database to Kofax Front-Office Server 2.7 with a
Microsoft SQL Server or Oracle database.
Versions 2.0 or 2.5 with WebLogic and an Oracle database to Kofax Front-Office Server 2.7
with Microsoft SQL Server.
Any configuration of Kofax Front-Office Server 2.7 to a different database.
Precautions and Preliminary Tasks Before Upgrading
Upgrade Notes for User Accounts
User accounts and data are retained during an in-place upgrade or migration if they meet certain
requirements.
User Accounts and Data That Are Retained
During an in-place upgrade or migration, the following are retained:
Internal users. If you are upgrading from version 2.0, user accounts stored in the
OpenLDAP database are moved to the Kofax Front-Office Server database. Then, the
OpenLDAP database and services are shut down and deleted.
User roles that you defined before the upgrade, along with the users who were assigned to
that role.
Users assigned to any user role in the Administration Console.
Users from a directory service (such as Active Directory), if you had logged on as shown in
Log On Requirements
Group shortcuts. These are updated to reflect changes to user groups.
before upgrading Kofax Front-Office Server.
User Accounts and Data That Are Not Retained
The following are not retained:
Users in directory services (such as external LDAP servers) other than the Active Directory
on the domain where you logged on. These connections to directory services are deleted
and need to be reconnected after the upgrade. (Refer to the Kofax Front-Office Server
Administrator's Guide for instructions.) The user’s inbox documents remain on the original
computer, and you can upload them into the Web Client.
Note If you did not log on as a user of a domain where the Active Directory is located, the
connection to it is also removed and needs to be reconnected after the upgrade.
Documents in inboxes. Have user release all documents before you upgrade.
Personal shortcuts. These need to be recreated by users after the upgrade.
Personal profiles. New profiles are generated as users user the new version of Kofax Front-
Office Server.
Kofax, Inc. 25
Page 26

Kofax Front-Office Server Installation Guide
Handling Disconnected User Accounts and Profiles
If a user role is removed from an Active Directory user (either as an individual user or a member
of a group), that user no longer has access to Kofax Front-Office Server, but that user’s profiles,
documents, and shortcuts remain on the server. If you upgrade or migrate, the following happens
to the data of these disconnected users:
Disconnected user accounts are not upgraded or migrated to the new Kofax Front-Office
Server version.
For an upgrade or migration from version 2.0, their user profiles, including folder
configurations and personal shortcuts, are deleted.
Inbox documents remain on the original computer, and you can import them into new
profiles later by uploading them in the Web Client.
If you assign the user to a role before upgrading or migrating, the user account and associated
data is migrated.
Internet Connection Requirement
Make sure that the computer where you are upgrading Kofax Front-Office Server is connected to
the Internet. One of the configuration files requires a remote schema for validation.
Role-Based Permissions for Web Client Activities
Users may no longer have permission to do certain activities in the Web Client, such as scanning
with WebScan. To allow access to the appropriate activities, edit user roles in the Administration
Console and associate the appropriate permissions. For details, see the Administration Console
Help.
Services Running before Upgrading
Make sure that the PostgreSQL Database Server, which is used by Kofax Front-Office Server, is
running before you perform the upgrade. For an upgrade from version 2.0, the OpenLDAP-slapd
must be running as well. If one of those services is shut down early during the upgrade, the
installer may be unable to roll back the installation to the previous state.
Authentication from Directory Services after Upgrades
If you use a directory service, this version of Kofax Front-Office Server uses the sAMAccount
name for authentication. The common name is no longer used, and there is no way to configure
authentication using common name. Refer to the Kofax Front-Office Server Administrator’s Guide for
information about connecting to directory services.
Inbox Documents
We recommend that users release all of their documents in their inbox before you upgrade Kofax
Front-Office Server.
26 Kofax, Inc.
Page 27

Kofax Front-Office Server Installation Guide
Documents in a Queue
Documents in a queue are handled as follows during an upgrade or migrating:
If the queue is on a separate local shared drive, the documents are moved to a subdirectory
of the Inbox folder on the new computer.
If the queue is on an external shared drive, the documents are used by the computer, but
the original CDI files are moved into a folder named backup. If you want to revert to using
the former computer, copy the backed up CDI files to their original location.
Workflow Processes
Make sure that all workflow processes are in completed state before upgrading. Paused and
terminated workflows must be processed before an upgrade, because the pause and resume
options have been discontinued to support clustering in Kofax Front-Office Server 2.7.
Workflow processes that are in failed state cannot be restarted after an upgrade. If you attempt to
restart a failed workflow process after an upgrade, the following error occurs:
KAC 20004 - Cannot process the request at server “localhost.” The reported
error is “Internal data processing error: ‘Cannot find the definition, ID =
‘mfpRelease@3.00.10’, in database’”.
Backing up before Upgrading
Before upgrading Kofax Front-Office Server, do the following:
Back up your data and settings.
Save custom workflows to reinstall after the upgrade.
Make sure that all scan jobs from the MFP and other inputs have been sent to the server.
Any scan jobs that have not arrived at the server are lost during the upgrade.
If you have Kofax Fax Connector installed with Kofax Front-Office Server, see the Kofax
Fax Connector Installation Guide before you install the Kofax Front-Office Server upgrade.
Backing Up during an In-Place Upgrade
During an in-place upgrade of a Departmental configuration, the installer backs up folders and
data in case an error prevents the upgrade from completing. The installer can then use the backup
to roll back to your previous configuration.
Even though the installer performs this automatic backup, you should still back up your data and
settings manually in case a failed upgrade cannot be rolled back. Refer to the Kofax Front-Office
Server Administrator’s Guide for instructions.
The installer backs up the following folders automatically during the upgrade:
Avalin
DES, except DES and EmailWatcher
Documentation
Uninstall
Install Logs
jre
Kofax, Inc. 27
Page 28

Kofax Front-Office Server Installation Guide
The following are also backed up or exported:
Database
Registry (Web Client entries only)
Workflows
VRS and JRE are not backed up and cannot be rolled back.
Note The backup may require large amounts of disk space. When the upgrade has been
completed successfully, you have the option of deleting some or all of your backup files.
Saving Custom Workflows
Custom workflows are not upgraded. During the upgrade, workflows are exported from the
database as part of the backup. The exported workflows are saved in the backup folder you
specify in the installer in a workflow folder. Use the exported workflow files if you do not have
the original .wfd files.
After performing the upgrade, deploy the custom workflow on the server with the Administration
Console. Refer to the Administration Console Help for more information.
Restarting Kofax Front-Office Server after a Rollback
After rolling back a failed Kofax Front-Office Server upgrade, you may need to do the following to
restore normal operation:
Restart the KofaxServer service and any other services used by Kofax Front-Office Server.
Clear the browser’s cache.
Upgrade Notes for MFPs
Preparation for Upgrades
Before upgrading a Kofax Front-Office Server with attached MFPs, make sure that all scan jobs
from the MFPs have been sent to the server. Any scan jobs that have not arrived at the server are
lost during the upgrade.
Upgrading the Kofax Front-Office Server Application for Fujitsu
The Kofax Front-Office Server application for the Fujitsu fi-6000NS network scanner must be
upgraded in order to use it with Kofax Front-Office Server 2.7. If the application is not upgraded,
the device will not connect with Kofax Front-Office Server 2.7. Refer to the Kofax Front-Office
Server Administrator’s Guide for Fujitsu Network Scanners for instructions on removing and
installing the Kofax Front-Office Server application.
Upgrading the Client Software for Other MFPs
Upgrading the MFP client software is optional for the other MFPs. For these devices, Kofax FrontOffice Server is backward-compatible with earlier versions of MFP client software. If there are
new features of the MFP client software that you want to use, uninstall the current version of the
client software, install or deploy the new client software, and redeploy your profiles from the
Administration Console.
Refer to the Kofax Front-Office Server administrator’s guide for your MFP for instructions on
installing client software.
28 Kofax, Inc.
Page 29

Upgrade Notes for Shortcuts
Some global and personal shortcuts may need to be deleted and recreated after upgrading.
Global shortcuts created for Ascent Capture are upgraded for Kofax Capture. After the upgrade,
you need to redeploy the profiles for the global shortcuts in order for the shortcuts to work from
the MFPs.
Upgrade Notes for Destinations
Notes for Kofax Capture
Any user account in Kofax Capture, that has a corresponding external user account in Kofax
Front-Office Server, needs to be linked in Kofax Capture for your Active Directory or directory
service. Without the appropriately linked user account in Kofax Capture, the corresponding
external user in Kofax Front-Office Server will be unable to release documents to Kofax Capture.
Installing a New System
Follow the instructions in this section to install a new Kofax Front-Office Server system for a
Departmental or Enterprise configuration. Before starting the installation, you must log on as
shown in Log On Requirements
automatically connected to your new Kofax Front-Office Server installation.
Kofax Front-Office Server Installation Guide
. The Active Directory on the domain you used to log on is
Refer to Upgrading Existing Systems
Office Server system.
for information about upgrading an existing Kofax Front-
Installing a Departmental Configuration
Run the installer to install Kofax Front-Office Server and all necessary components on your
Departmental server. If there is a previous version of Kofax Front-Office Server that can be
upgraded, you are prompted to upgrade it. Refer to Upgrading Existing Systems
Note Do not run the installer from a UNC path.
X To install a Departmental configuration
1 Insert the Kofax Front-Office Server installation media into your drive.
2 Run setup.exe, which is in the root of the Kofax Front-Office Server installation media.
Note The setup program detects a 32-bit or 64-bit computer and starts the correct
installer.
3 You are prompted to confirm that the necessary ports are open. Refer to Port
Configuration for more information. If the ports are available for Kofax Front-Office
Server, click OK to continue the installation.
4 The introduction screen appears (Figure 5). Click Next.
for instructions.
Kofax, Inc. 29
Page 30

Kofax Front-Office Server Installation Guide
Figure 5. Kofax Front-Office Server Installer Introduction Screen
5 Review the Kofax Front-Office Server license agreement and select “I accept the terms of
the License Agreement” to continue with the installation. Click Next to continue.
6 If you have VRS installed on your computer that is not part of a previous Kofax Front-
Office Server installation, you have the option to upgrade it and clean up any leftover
files. Click OK to do this.
7 When you are prompted to select the type of installation, select “Departmental
installation.” Click Next.
8 Type the path where Kofax Front-Office Server will be installed. Use the default folder or
change it by clicking Choose and selecting the path from the window that appears. The
install path must be on a local drive and have a maximum of 65 characters. If you want to
switch back to the default folder, click Restore Default Folder. When you have selected the
folder, click Next.
Note You cannot specify a UNC path or install Kofax Front-Office Server on a network
drive.
9 Select the shared folder that will be used for storing inboxes and scan jobs. The shared
folder can be on any computer accessible to the server where you are installing Kofax
Front-Office Server. If you specify a folder on a local drive that does not exist, the folder is
created for you and shared. The share name of the folder is set to KFS.
Enter a local, network, or UNC path to the folder. To select a folder from a window, click
Choose. When you have entered or selected the path, click Next.
10 Type a password for the user account that Windows uses to start the database service.
Make sure that the password meets your Network Administrator’s password policy and
has a maximum of 14 characters. Click Next to continue.
11 Create the administrator for the embedded database by entering a user name and
password. This account is used Kofax Front-Office Server to access the database. Only
alphanumeric characters (0–9, A–Z, a–z) are permitted, and both the user name and
password are case-sensitive. Click Next to continue.
30 Kofax, Inc.
Page 31

Kofax Front-Office Server Installation Guide
12 Type the user name and password for the initial Kofax Front-Office Server administrator.
Use this user account to log on to the Administration Console for the first time. The user
name and password must meet the following rules:
User names must be unique on the server.
User names are case-insensitive, cannot include spaces, and the following characters
are not permitted: ~ # % * \ ; / : & ? . ' , " ` $ < + >
Passwords are case-sensitive and can include spaces, but not at the beginning or end.
There can be no repeating spaces.
The password for the initial administrator cannot include the following characters that
are prohibited by the database: & $ < ' > \ * / "
You can create additional administrators by assigning the Administrator role to other
users in the Administration Console.
Click Next to continue.
13 A Windows user account is needed to run the Kofax Front-Office Server service. Select
either the Local System account or use another Windows user account by selecting “This
account” and entering a user name and password. For the user name, use either the
domain\username or username@domain.com format.
The Windows user account that you select must have read/write access to the shared
folder that you specified in step 9. If you are creating a new shared folder, the user
account is granted access automatically. If you are using an existing shared folder, you
must add read/write access to the user account manually.
When you have entered the user name and password, click Next.
14 Review the pre-installation summary (Figure 6). To start the installation, click Install.
Figure 6. Pre-Installation Summary
Note the following while the installer is running:
Do not close the installer window until the installation is complete. Interrupting the
installation can leave the installation in an unrecoverable state.
If you are installing on the 64-bit version of Windows, the installation of Bonjour is not
a silent installation. You will be prompted to complete the Bonjour installation screens.
15 A screen indicates when the installation is finished. Click Finish to close the installer.
Kofax, Inc. 31
Page 32

Kofax Front-Office Server Installation Guide
Installing an Enterprise System
If you are installing Kofax Front-Office Server on a single server, follow the procedure in Installing
on One Server or the First Server of a Cluster. To install Kofax Front-Office Server on additional
servers, refer to Installing on Additional Servers in a Cluster
Scaling and High Availability Options
Installing on One Server or the First Server of a Cluster
Follow this procedure if you are installing on an Enterprise configuration on a single server. You
can later add nodes to the cluster.
Note Do not run the installer from a UNC path.
X To install an Enterprise configuration on one server or on the first server of a clust er
1 Insert the Kofax Front-Office Server installation media into your drive.
2 Run setup.exe, which is in the root of the Kofax Front-Office Server installation media.
Note The setup program detects a 32-bit or 64-bit computer and starts the correct
installer.
. To set up load balancing, refer to
.
3 You are prompted to confirm that the necessary ports are open. Refer to Port
Configuration for more information. If the ports are available for Kofax Front-Office
Server, click OK to continue the installation.
4 The introduction screen appears (Figure 5). Click Next.
5 Review the Kofax Front-Office Server license agreement and select “I accept the terms of
the License Agreement” to continue with the installation. Click Next to continue.
6 If you have VRS installed on your computer that is not part of a previous Kofax Front-
Office Server installation, you have the option to upgrade it and clean up any leftover
files. Click OK to do this.
7 When you are prompted to select the type of installation, select “Enterprise installation -
first server.” Click Next.
8 Type the path where Kofax Front-Office Server will be installed. Use the default folder or
change it by clicking Choose and selecting the path from the window that appears. The
install path must be on a local drive and have a maximum of 65 characters. If you want to
switch back to the default folder, click Restore Default Folder. When you have selected the
folder, click Next.
Note You cannot specify a UNC path or install Kofax Front-Office Server on a network
drive.
9 Select the shared folder that will be used for storing inboxes and scan jobs. The shared
folder can be on any computer accessible to the server where you are installing Kofax
Front-Office Server. If you specify a folder on a local drive that does not exist, the folder is
created for you and shared. The share name of the folder is set to KFS.
Enter a local, network, or UNC path to the folder. To select a folder from a window, click
Choose. When you have entered or selected the path, click Next.
32 Kofax, Inc.
Page 33

Kofax Front-Office Server Installation Guide
Note You need to specify a path to the same folder on each server in the cluster.
10 Select the database that you are connecting to and then click Next.
11 Enter the connection information for the database. For more information, refer to
Database Information for the Enterprise Configuration
. Click Next.
12 Enter the user name and password of a user in the database that Kofax Front-Office Server
can use for authentication. Click Next. The Installer verifies the connection with the
database.
13 Type the user name and password for the initial Kofax Front-Office Server administrator.
Use this user account to log on to the Administration Console for the first time. The user
name and password must meet the following rules:
User names must be unique on the server.
User names are case-insensitive, cannot include spaces, and the following characters
are not permitted: ~ # % * \ ; / : & ? . ' , " ` $ < + >
Passwords are case-sensitive and can include spaces, but not at the beginning or end.
There can be no repeating spaces.
The password for the initial administrator cannot include the following characters that
are prohibited by the database: & $ < ' > \ * / "
You can create additional administrators by assigning the Administrator role to other
users in the Administration Console.
Click Next to continue.
14 Specify the Windows user account to be used for the Kofax Front-Office Server service.
Enter the user name and password.
The Windows user account must have read/write access to the shared folder that you
specified in step 9. If you are creating a new shared folder, the user account is granted
access automatically. If you are using an existing shared folder, you must add read/write
access to the user account manually.
When you have entered the user name and password, click Next.
15 Review the pre-installation summary (Figure 6). To start the installation, click Install.
Note the following while the installer is running:
Do not close the installer window until the installation is complete. Interrupting the
installation can leave the installation in an unrecoverable state.
If you are installing on the 64-bit version of Windows, the installation of Bonjour is not
a silent installation. You will be prompted to complete the Bonjour installation screens.
16 A screen indicates when the installation is finished. Click Finish to close the installer.
Installing on Additional Servers in a Cluster
Follow this procedure if you are installing Kofax Front-Office Server on additional servers in the
cluster. Make sure you set up load balancing among the servers in the cluster.
Note Do not run the installer from a UNC path.
X To install an Enterprise configuration on additional servers in a cluster
1 Insert the Kofax Front-Office Server installation media into your drive.
Kofax, Inc. 33
Page 34

Kofax Front-Office Server Installation Guide
2 Run setup.exe, which is in the root of the Kofax Front-Office Server installation media.
Note The setup program detects a 32-bit or 64-bit computer and starts the correct
installer.
3 You are prompted to confirm that the necessary ports are open. Refer to Port
Configuration for more information. If the ports are available for Kofax Front-Office
Server, click OK to continue the installation.
4 The introduction screen appears (Figure 5). Click Next.
5 Review the Kofax Front-Office Server license agreement and select “I accept the terms of
the License Agreement” to continue with the installation. Click Next to continue.
6 If you have VRS installed on your computer that is not part of a previous Kofax Front-
Office Server installation, you have the option to upgrade it and clean up any leftover
files. Click OK to do this.
7 When you are prompted to select the type of installation, select “Enterprise installation -
additional server.” Click Next.
8 Type the path where Kofax Front-Office Server will be installed on this server. Use the
default folder or change it by clicking Choose and selecting the path from the window
that appears. The install path must be on a local drive and have a maximum of 65
characters. If you want to switch back to the default folder, click Restore Default Folder.
When you have selected the folder, click Next.
Note You cannot specify a UNC path or install Kofax Front-Office Server on a network
drive.
9 Specify the shared folder by entering the following UNC path:
\\server\sharename
Where server is the name of the server you specified when installing Kofax Front-Office
Server on the first server of the cluster, and sharename is KFS. All servers on the cluster
must use the same shared folder.
Enter the UNC path or click Choose to select a folder from a window. When you have
entered or selected the path, click Next.
The Installer verifies that the folder has a valid configuration file. If an error is reported,
make sure that you have specified the correct folder on the first server.
10 Review the pre-installation summary (Figure 6). To start the installation, click Install.
Note the following while the installer is running:
Do not close the installer window until the installation is complete. Interrupting the
installation can leave the installation in an unrecoverable state.
If you are installing on the 64-bit version of Windows, the installation of Bonjour is not
a silent installation. You will be prompted to complete the Bonjour installation screens.
11 A screen indicates when the installation is finished. Click Finish to close the installer.
Upgrading Existing Systems
Depending on your current version of Kofax Front-Office Server, you can perform an in-place
upgrade or migrate your data to a new installation. (Refer to Types of Upgrades
34 Kofax, Inc.
to determine
Page 35

Kofax Front-Office Server Installation Guide
which type of upgrade is needed.) Follow the upgrade procedure that applies to the upgrade you
need.
Performing an In-Place Upgrade
Run the installer to upgrade Kofax Front-Office Server. You must log on as a user with
administrator rights to the local computer to upgrade Kofax Front-Office Server.
Note Do not run the installer from a UNC path.
X To perform an in-place upgrade
1 Insert the Kofax Front-Office Server installation media into your drive.
2 Run setup.exe, which is in the root of the Kofax Front-Office Server installation media.
Note The setup program detects a 32-bit or 64-bit computer and starts the correct
installer.
3 The installer indicates that an existing version of Kofax Front-Office Server is on the
computer, and it can be upgraded. Click Next to continue.
4 The introduction screen appears. Click Next.
5 If you have VRS installed on your computer that is not part of a previous Kofax Front-
Office Server installation, you have the option to upgrade it and clean up any leftover
files. Click OK to do this.
6 Review the Kofax Front-Office Server license agreement and select “I accept the terms of
the License Agreement” to continue with the installation. Click Next to continue.
7 Select the folder that the installer uses for its backup. Use the default folder or change it by
clicking Choose and selecting the path from the window that appears. The path must be
on a local drive and have a maximum of 65 characters. If you want to switch back to the
default folder, click Restore Default Folder. When you have selected the folder, click Next.
8 Review the installation settings. To start the upgrade, click Install. The installer begins the
upgrade and indicates the status. When it is finished, it indicates whether the upgrade
was successful. Click Next.
Caution Do not close the installer window until the upgrade is complete. Interrupting
the installation can leave the installation in an unrecoverable state.
9 If the upgrade is successful, you have the option of deleting the files that were backed up
during the upgrade. Select the option if you want to delete the backup files and click Next.
Upgrading by Migrating
To migrate to a new version of Kofax Front-Office Server, perform a new installation as shown in
Installing a New System
On a managed server of your existing Kofax Front-Office Server cluster, export the
. Then, do the following:
information.
On any server of your new Kofax Front-Office Server, import the information into the new
Kofax Front-Office Server installation.
Kofax, Inc. 35
Page 36

Kofax Front-Office Server Installation Guide
The migration process does not remove information from your existing system. If your new
installation already contains data, including user accounts and roles, it is overwritten by the
imported data.
Preliminary Steps before Migrating
Before you export or import data, do the following:
Have users release all documents in their inboxes. Files in the scanjobs folder are not
migrated.
Back up the data from your current Kofax Front-Office Server installation. If the migration
fails, the data is still safe.
Shut down Kofax Front-Office Server on each computer of the cluster. Refer to Stopping
and Restarting Kofax Front-Office Server for instructions. You can restart Kofax Front-
Office Server when the export or import is finished.
Migrating Destination Types
If you are migrating an installation that has Documentum or IBM Content Manager destination
types, do the following:
Before migrating data to the new installation, install the Documentum and IBM Content
Manager client software on the computers where the new Kofax Front-Office Server
software is installed.
After migrating data to the new installation, follow the instructions in the Kofax Front-
Office Server configuration guide for the destination type about configuring Kofax FrontOffice Server. Copy the files for the destination type. Do not copy the .jar and .properties
files provided with Kofax Front-Office Server because they are already copied over during
migration.
For more information about configuring the connection to a destination type, refer to the Kofax
Front-Office Server configuration guide for the destination type.
Exporting Data from the Current Installation
X To export data from the existing Kofax Front-Office Server cluster
1 On a managed server, insert the Kofax Front-Office Server installation media into your
drive.
2 In the MigrationUtility folder, run ExportMigration.exe. The Export Migration window
appears as shown in Figure 7. Click Next to continue.
36 Kofax, Inc.
Page 37
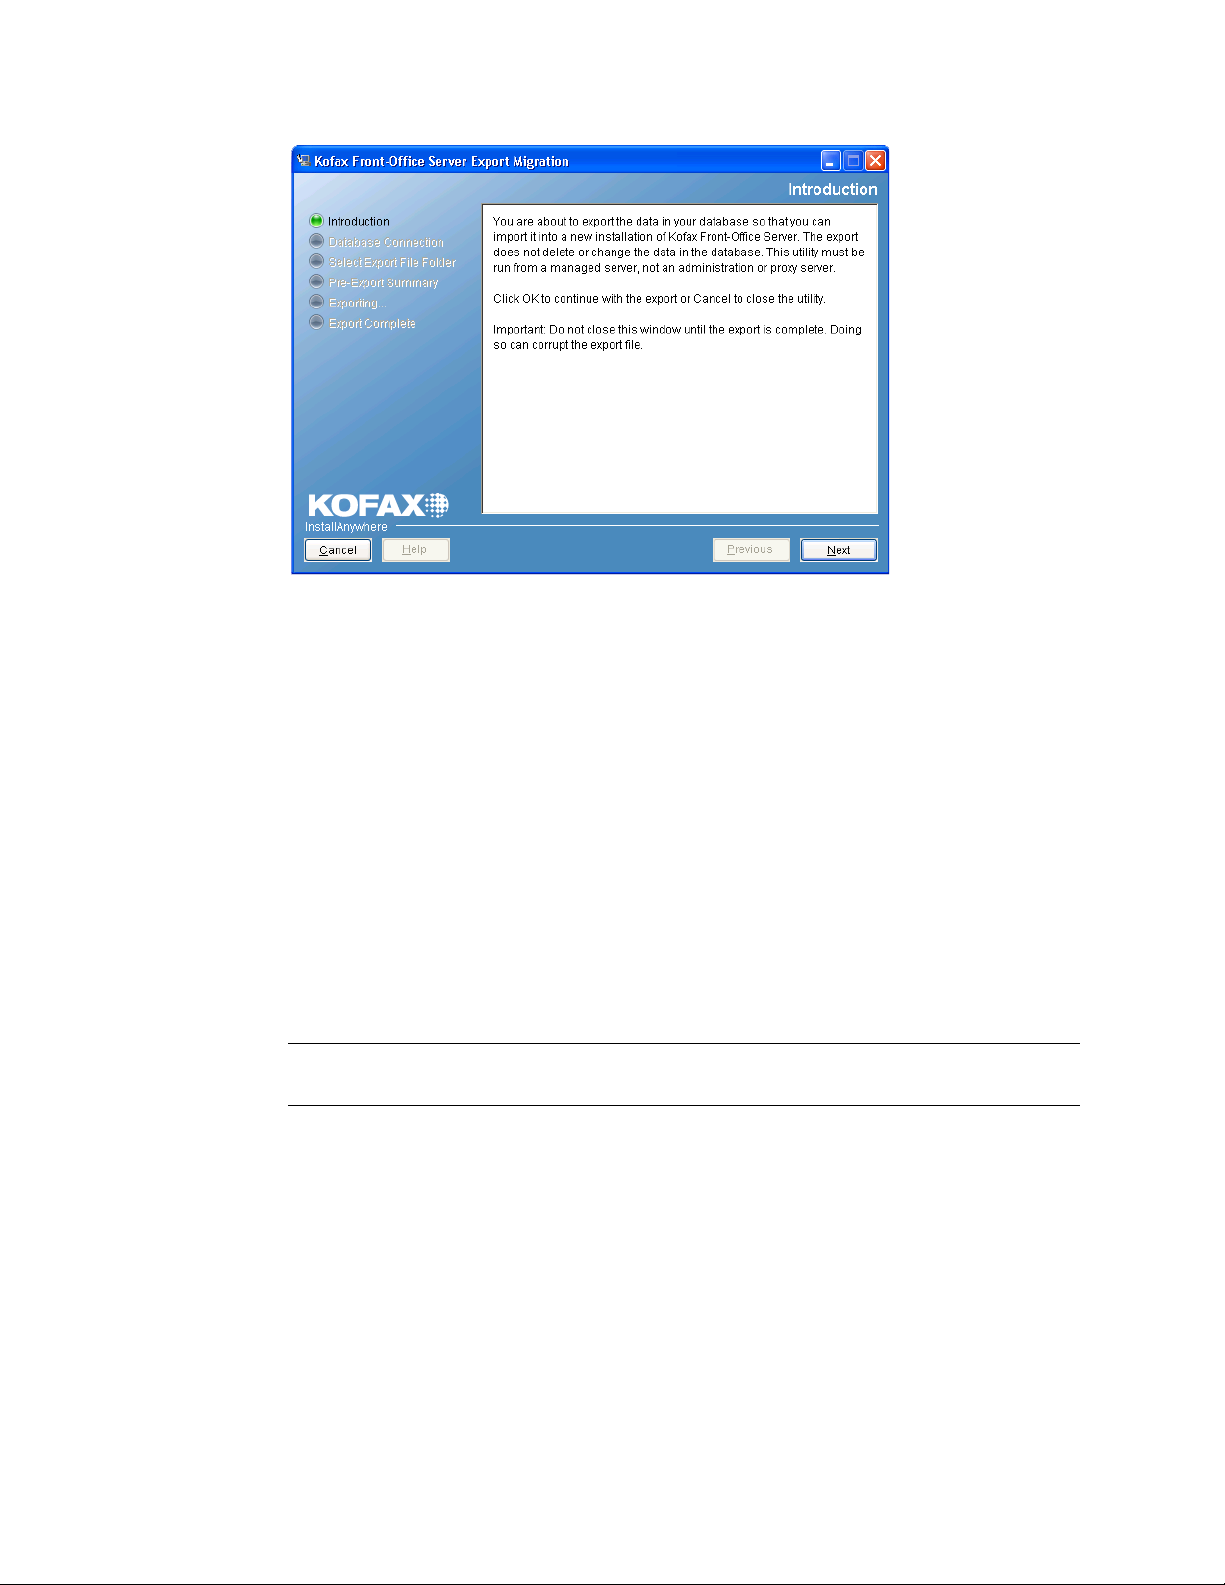
Kofax Front-Office Server Installation Guide
Figure 7. Kofax Front-Office Server Export Migration Introduction Screen
3 If you have not shut down the cluster, you are prompted to do so. Stop the cluster, and
click OK to continue with the export.
4 Enter the connection information for the database. Make sure that the server where the
database is located is online and the network connection works. Click Next.
5 Enter the user name and password to connect to the database. Click Next. The export
verifies the database connection.
6 Select the folder and the name of the export file. Note the following:
The folder should be writable and accessible to the server with the new version of
Kofax Front-Office Server.
If you specify an export file that already exists, it is overwritten and any data in it is
lost.
Click Next.
7 Review the pre-export summary, which lists the path and name of the export file. To start,
click Export.
Note Do not close the window until the export is complete. Interrupting the export can
make the data unusable for import.
8 The window indicates when the export is finished. Click Done to close the window.
Importing Data into the New Installation
X To import the data into the new installation of Kofax Fr ont-Office Server
1 Log on to any server where the new version of Kofax Front-Office Server is installed as a
user with administrator rights to the local computer.
2 Insert the Kofax Front-Office Server installation media into your drive.
3 In the MigrationUtility folder, run ImportMigration.exe. The Import Migration window
appears as shown in Figure 8. Click Next to continue.
Kofax, Inc. 37
Page 38

Kofax Front-Office Server Installation Guide
Figure 8. Kofax Front-Office Server Import Migration Introduction Screen
4 If you have not shut down the cluster, you are prompted to do so. Click OK. Then, stop
the cluster and click Next.
5 Enter the user name and password for an administrator of the new Kofax Front-Office
Server installation into which you are importing the data. Click Next.
6 Select the folder where the export files were saved by clicking Choose. Click Next
7 Review the pre-import summary, which lists the path and name of the file from which
you are importing. To start, click Import.
Note Do not close the window until the import is complete. Interrupting the import can
leave the new system in an incomplete state.
8 A screen indicates when the import is finished. Click Done to close the window.
Note If the import fails, the new Kofax Front-Office Server installation is rolled back to a
state before the upgrade. Any data that was in the new database is retained.
9 If you are migrating from a cluster, do the following to move the release connectors and
configuration files to the appropriate folders on each computer in the cluster where Kofax
Front-Office Server is installed:
a In the shared folder, locate the Migrated Files folder.
b Copy the files in the deploy folder to the Avalin\jboss\server\avalin\deploy folder
where Kofax Front-Office Server is installed.
c Copy the files in the conf folder to the Avalin\jboss\server\avalin\conf folder where
Kofax Front-Office Server is installed.
d Restart Kofax Front-Office Server. Refer to Stopping and Restarting Kofax Front-Office
Server for instructions.
38 Kofax, Inc.
Page 39

Troubleshooting Migration
The Import and Export generate log files that you can use to troubleshoot any problems. The files
are located in the C:\Kofax Install Logs\Kofax Front-Office Server folder and have the following
names:
Kofax Front-Office Server Export Log.xml
Kofax Front-Office Server Import Log.xml
Post-Installation and Upgrade Notes
When the installation or upgrade is complete, note the following regarding additional tasks and
folders and logs to check.
Licensing
Kofax Front-Office Server is installed with an evaluation license that grants you the use of the
product for a limited time. Before using Kofax Front-Office Server with production data, you must
install a production license. Use the Administration Console to install the production license file.
For a cluster in an Enterprise configuration, you only need to install the license on the first server.
Refer to the Administration Console Help for instructions on installing a license file.
Kofax Front-Office Server Installation Guide
Editing Default Roles after Migration
If you made changes to the default user roles (Administrator, DES User, and WebScan) in the
original installation, you need to make these changes in the new Kofax Front-Office Server
installation after importing. Any custom settings you made to the default user roles are not
preserved during a migration.
Shared Folders Created by the Installer
The installer automatically sets permissions to shared folders created during installation.
Administrators group members share the \KFS\KFS folder, which is located in the Kofax FrontOffice Server folder you specified and is used for storing user inboxes. You can change this folder:
see the Kofax Front-Office Server Administrator’s Guide for instructions.
Do not share any other folders in the folder where Kofax Front-Office Server is installed. Users
other than administrators do not need to have rights to the folders in order to use Kofax FrontOffice Server.
Maintaining Configuration Files in an Enterprise Cluster
There are many configuration files that are installed to the \conf folder. The Kofax Front-Office
Server Administrator’s Guide has instructions on how to use these files to customize your
implementation. In a Enterprise clustered environment, all nodes in the cluster must use the same
configuration settings. The recommended way to accomplish this is to maintain each managed
server’s local \conf folder and manage the files either manually or by using a centralized file or
folder synchronization tool.
Kofax, Inc. 39
Page 40
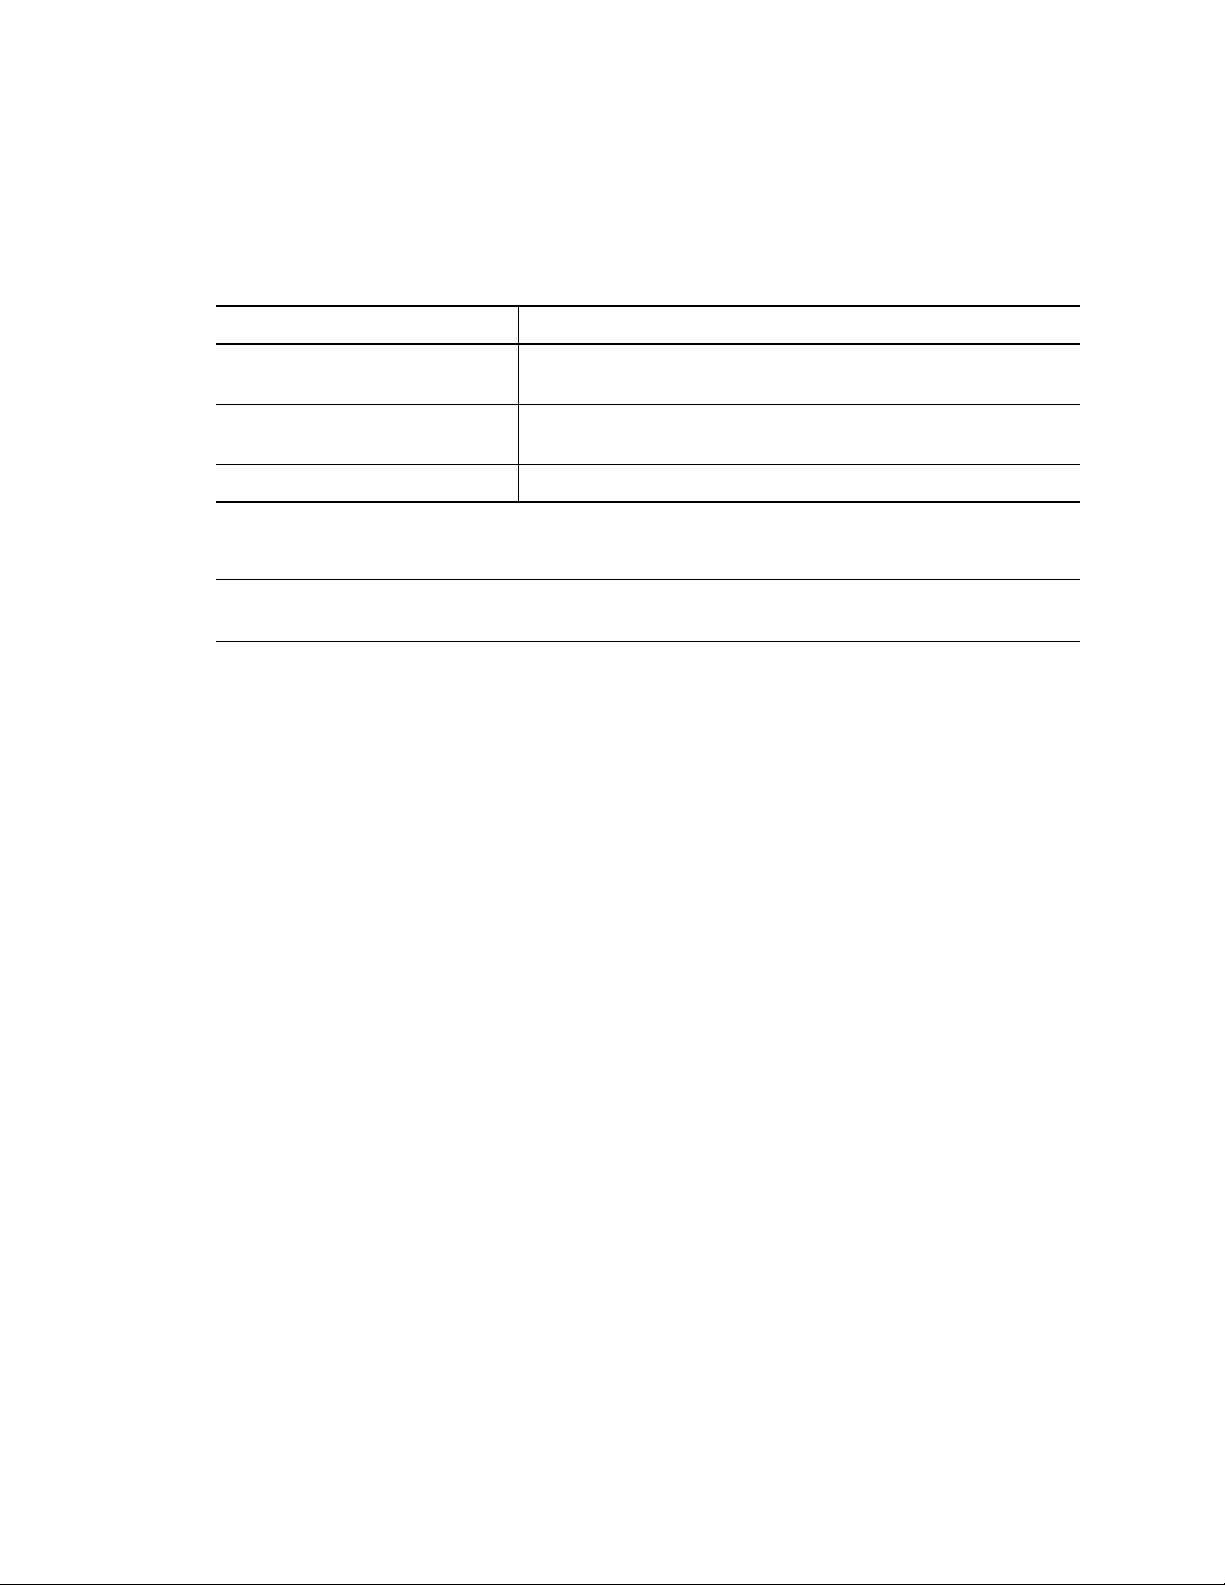
Kofax Front-Office Server Installation Guide
Viewing the Installation Log Files
If you need to resolve a problem with the installation, you can view the installation log files for
detailed information. The location of the log files depends on the result of the installation or
upgrade. Refer to Table 6.
Table 6. Log File Location
Installation or Upgrade Result Log File Location
Installation or upgrade finished
successfully
Installation or upgrade failed or
canceled
Uninstallation completed C:\Kofax Install Logs\Kofax Front-Office Server
Install Logs folder where Kofax Front-Office Server is installed
C:\Kofax Install Logs\Kofax Front-Office Server
Important The installation log files include passwords in plain text. After you are finished with
the files, delete them or save them in a secure location.
Reinstalling Custom Workflows and Destinations after an Upgrade
If you have custom workflows and destinations, do the following:
Redeploy custom workflows with the Administration Console. Refer to the Administration
Console Help for more information.
Reinstall custom destinations. Refer to the instructions provided with your custom
destination.
Managing MFPs after an Upgrade or Migration
If you have MFPs connected to Kofax Front-Office Server, you must perform these tasks to enable
these devices to be connected after upgrading and migrating Kofax Front-Office Server.
Managing MFPs after an Upgrade
After an upgrade, do the following:
Upgrade the client software for the MFP, if necessary. Refer to the Kofax Front-Office Server
Release Notes and the support pages of the Kofax Web site to determine if there is new MFP
client software that needs to be installed.
Redeploy your profiles from the Administration Console.
40 Kofax, Inc.
Page 41

Kofax Front-Office Server Installation Guide
Managing MFPs after Migration
After a migration, do the following to connect the MFP to the new Kofax Front-Office Server
installation. Refer to the Kofax Front-Office Server administrator’s guide for your MFP for
instructions.
Fujitsu: At the front panel of each device, change the server host to the IP address or host
name of the new Kofax Front-Office Server installation.
Lexmark: At the Lexmark Web page, configure the MFP to connect to the new IP address
or host name of Kofax Front-Office Server.
Ricoh: From the Administration Console, use the Deploy Client command to deploy the
front panel software. This establishes the connection with the new Kofax Front-Office
Server installation.
After updating the connection, deploy profiles to the devices. For an HP MFP, deploying profiles
also establishes the connection with the new Kofax Front-Office Server installation.
Configuring Kofax Front-Office Server Destination Types
Three destination types are preinstalled with Kofax Front-Office Server:
Network Location to send documents to a network folder
Kofax Queue to send documents to a queue
Kofax Capture to send documents to Batch Manager
Note For information about configuring network folders to use as destinations and setting up
queues, refer to the Kofax Front-Office Server Administrator’s Guide. For more information about
using Kofax Capture as a destination type, refer to the Kofax Front-Office Server Configuration Guide
for Kofax Capture.
To configure Kofax Front-Office Server for additional destination types, you need to deploy one or
more connector files and modify a properties file with configuration options. Refer to the
configuration guides provided with Kofax Front-Office Server for each destination. You will find
the configuration guides in the following folders:
The \Documentation\Guides folder where Kofax Front-Office Server is installed (usually
C:\Program Files\Kofax\Front-Office Server)
The \setup\Guides folder on the Kofax Front-Office Server installation media
Installing MFP Front Panel Software
Your MFP may require additional software to display Kofax Front-Office Server shortcut buttons
on the front panel. Instructions for installing the software and other information about setting up
the MFP are in administrator guides in the following folders:
The \Documentation\Guides folder where Kofax Front-Office Server is installed (usually
C:\Program Files\Kofax\Front-Office Server)
The \setup\Guides folder on the Kofax Front-Office Server installation media
For more information about supported MFPs, refer to the Kofax Web site.
Kofax, Inc. 41
Page 42

Kofax Front-Office Server Installation Guide
Other Configuration Tasks
Refer to the Kofax Front-Office Server Administrator’s Guide for instructions for modifying properties
files and making other configuration changes.
Stopping and Restarting Kofax Front-Office Server
You may need to stop and restart Kofax Front-Office Server when changing configuration files or
for routine maintenance. The process depends on which application server and configuration you
use.
Kofax Front-Office Server is installed as a Windows service named KofaxServer. You can start and
stop the service when needed from the Services console. Let all currently running workflow
processes finish before stopping the KofaxServer service.
Tip If you are using 32-bit Microsoft Windows, an icon on the taskbar displays the status of Kofax
Front-Office Server.You can stop and start KofaxServer service by right-clicking the status icon
instead of using the Services console.
Using the Kofax Front-Office Server Status Icon
If you are using the 32-bit version of Microsoft Windows, a status icon appears in the notification
area on the right side of the task bar to indicate the status of Kofax Front-Office Server. This icon
does not appear in the 64-bit version of Microsoft Windows.
Table 7. Kofax Front-Office Server Icon (For 32-Bit Windows Only)
Icon Description
Green (bottom) light: Server is running
Red (top) light: the Server is stopped
Right-click the status icon to display a menu of commands:
Start
Starts Kofax Front-Office Server after it has been stopped.
Stop
Stops Kofax Front-Office Server if it is running.
Exit
Removes the Kofax Front-Office Server icon from the notification area, but does not affect
the operation of Kofax Front-Office Server.
Note To display the icon again after removing it with the Exit command, select Start |
Programs | Kofax | Kofax Server Monitor.
42 Kofax, Inc.
Page 43

Kofax Front-Office Server Installation Guide
Using the Services Console
You can use the Services console to start and stop the KofaxServer service, or you can configure it
to start manually or automatically. For more information about using the Services console, refer to
its Help.
X To control Kofax Front-Office Server through the Services console
1 Select Administration Tools | Services. Depending on the version and configuration of
Windows, the Administration Tools are in the Control Panel or Programs.
2 Locate KofaxServer in the Services console.
3 Do either of the following to start or stop the Kofax Front-Office Server service:
Right-click KofaxServer and select the command.
Select KofaxServer and use the toolbar buttons.
Depending on the status, you can start, stop, or restart the service. Pause and Resume are
not supported.
X To select automatic or manual startup
1 Locate KofaxServer in the Services console and do either of the following:
Right-click KofaxServer and select Properties.
Select KofaxServer and click the Properties button in the toolbar.
The KofaxServer Properties window appears.
2 Select the General tab.
3 In the “Startup type” field, select Automatic or Manual.
Uninstalling Kofax Front-Office Server
Before uninstalling Kofax Front-Office Server, make sure that you have backed up your data and
closed all Kofax Front-Office Server files.
You must log on to the computer as a user with Administrator rights to uninstall Kofax FrontOffice Server. Use Add or Remove Programs in the Control Panel to remove Kofax Front-Office
Server and all software installed with it.
In a Departmental configuration, uninstalling Kofax Front-Office Server shuts down the service,
deletes all user data from the shared folder, and restarts the server. If you had saved files and
settings that are preserved during an upgrade, they are also deleted.
In an Enterprise configuration, refer to the following sections to remove the server as a node in the
cluster:
MS NLB: Removing Kofax Front-Office Server Nodes from an NLB Cluster
IIS: Removing Kofax Front-Office Server Nodes from an IIS Cluster
Then, uninstall Kofax Front-Office Server using the procedure that follows. Note that the shared
folder containing user data and the configuration file is preserved after uninstalling an Enterprise
server so that you can reinstall Kofax Front-Office Server later.
X To uninstall Kofax Front-Office Server
1 Open Control Panel from the Windows Start menu.
2 From Control Panel, select Add or Remove Programs.
Kofax, Inc. 43
Page 44

Kofax Front-Office Server Installation Guide
3 Locate Kofax Front-Office Server in the list of currently installed programs. Click
Change/Remove. The Uninstaller starts and displays an introduction screen (Figure 9).
Click Next.
Figure 9. Uninstall Kofax Front-Office Server Introduction Screen
4 A message explains what the uninstallation does and asks if you want to continue the
process. Click OK to continue.
5 At the Uninstall Options window, make sure that Complete Uninstall is selected.
(Uninstall Specific Features is reserved for future use.) Click Next.
6 Click Uninstall to start the uninstallation process. Follow the instructions to remove the
software. When the process is complete, click Finish. Restart the computer when
prompted.
44 Kofax, Inc.
Page 45

Index
Numerics
32-bit version of Microsoft Windows
starting and stopping Kofax Front-Office Server, 42
64-bit version of Microsoft Windows
installation notes, 23
starting and stopping Kofax Front-Office Server, 42
A
Active Directory
connecting during installation, 19, 29
disconnected user accounts, 26
Kofax Capture users, 29
user accounts migrated or upgraded, 25
Administrator’s Guide, 7
Adobe Reader, supported versions, 19
B
Backup
before upgrade, 27
deleting during uninstallation, 43
folder used by Installer, 35
C
Client requirements, 19
Clusters
configuration files, 39
installation for additional servers, 33
installation for first server, 32
Internet Information Services (IIS), 10
Microsoft Windows Network Load Balancer (NLB), 14
upgrades for, 24
Configuration file maintenance, 39
D
Databases
export for migration, 36
required information for installation, 22
supported, 17
Departmental configuration
description, 9
installation, 29
licensing, 39
uninstallation, 43
Deprecated features, documentation for, 8
Destination types
configuring, 41
upgrading, 29
Directory services
authentication, 26
Kofax Capture users, 29
user accounts migrated or upgraded, 25
Documentum, preliminary step before migrating, 36
E
Enterprise configuration
databases supported, 17
description, 9
installation of additional servers, 33
installation of first server, 32
licensing, 39
uninstallation, 43
H
Hard drive space requirements, 18
Help, Kofax Front-Office Server applications, 8
High availability and scaling options, 9
Host name requirements, 18
I
IBM Content Manager, preliminary step before
migrating, 36
Installation
Departmental configuration, 29
logs, 40
Internet Information Services (IIS)
adding nodes, 12
load balancing, 10
load balancing with Kofax IIS Components, 10
reconfiguring ports, 19
removing Kofax components, 12
removing nodes, 14
supported versions, 10
K
Kofax Capture
destination configuration guide, 7
installing with Kofax Front-Office Server, 21
Kofax Front-Office Server icon
description, 42
Kofax Front-Office Server Installation Guide 45
Page 46

Index
redisplaying, 42
Kofax Front-Office Server service
icon, 42
stopping and starting, 42
L
Licensing, 39
Load Balancing with Kofax IIS Components, 10
Log files, installation, 40
M
Microsoft Windows Network Load Balancer (NLB)
adding nodes, 11, 16
removing nodes, 16
setting up, 14
Migration. See Upgrades, migration
Monitor display resolution, 19
MS NLB. See Microsoft Windows Network Load Balancer
(NLB)
Multifunction peripherals (MFPs)
documentation to configure, 8
post-upgrade tasks, 40
software installation, 41
upgrading, 28
O
Operating systems
Kofax Capture and Kofax Front-Office Server, 21
supported, 16
supported for VMs, 17
Oracle 10g, connection information, 23
Oracle RAC, connection information, 23
P
Passwords, requirements, 31, 33
Permission requirement
installation, 29
uninstallation, 43
upgrade, 35
Ports,configuration, 19
Proxy Server Value
specifying, 12, 15
additional servers in a cluster, 34
folders not to share, 39
selecting and creating, 32
Shortcuts, upgrading, 29
Startup mode, 43
Stopping the server, 42
System requirements, 16
T
Technical support, 8
Training, 8
Troubleshooting, import, 39
U
Uninstallation
deleted items, 43
Kofax Front-Office Server, 43
Upgrades
backing up before upgrade, 27
custom workflows, 28
destination types, 29
log files, 40
MFPs, 28
preliminary tasks, 27
shortcuts, 29
unsupported, 25
user accounts, 25
Upgrades, in-place
description, 24
procedure, 35
supported versions, 24
Upgrades, migration
default roles, 39
description, 24
exporting data, 36
preliminary steps, 36
procedure, 35
supported versions, 24
troubleshooting, 39
User Account Control (UAC) support, 17, 18
User accounts
disconnected, 26
migrated or upgraded, 25
User names, requirements, 31, 33
R
Related documentation, 7
Release notes, 8
Rollback, restarting after, 28
S
Scaling and High Availability Options, 9
Servers
minimum hardware requirements, 18
supported operating systems, 16, 17
Shared folders
V
VMWare, supported configurations, 17
W
Web browsers
certified, 19
security and text settings, 21
Workflows, upgrading custom, 28
46 Kofax Front-Office Server Installation Guide
 Loading...