

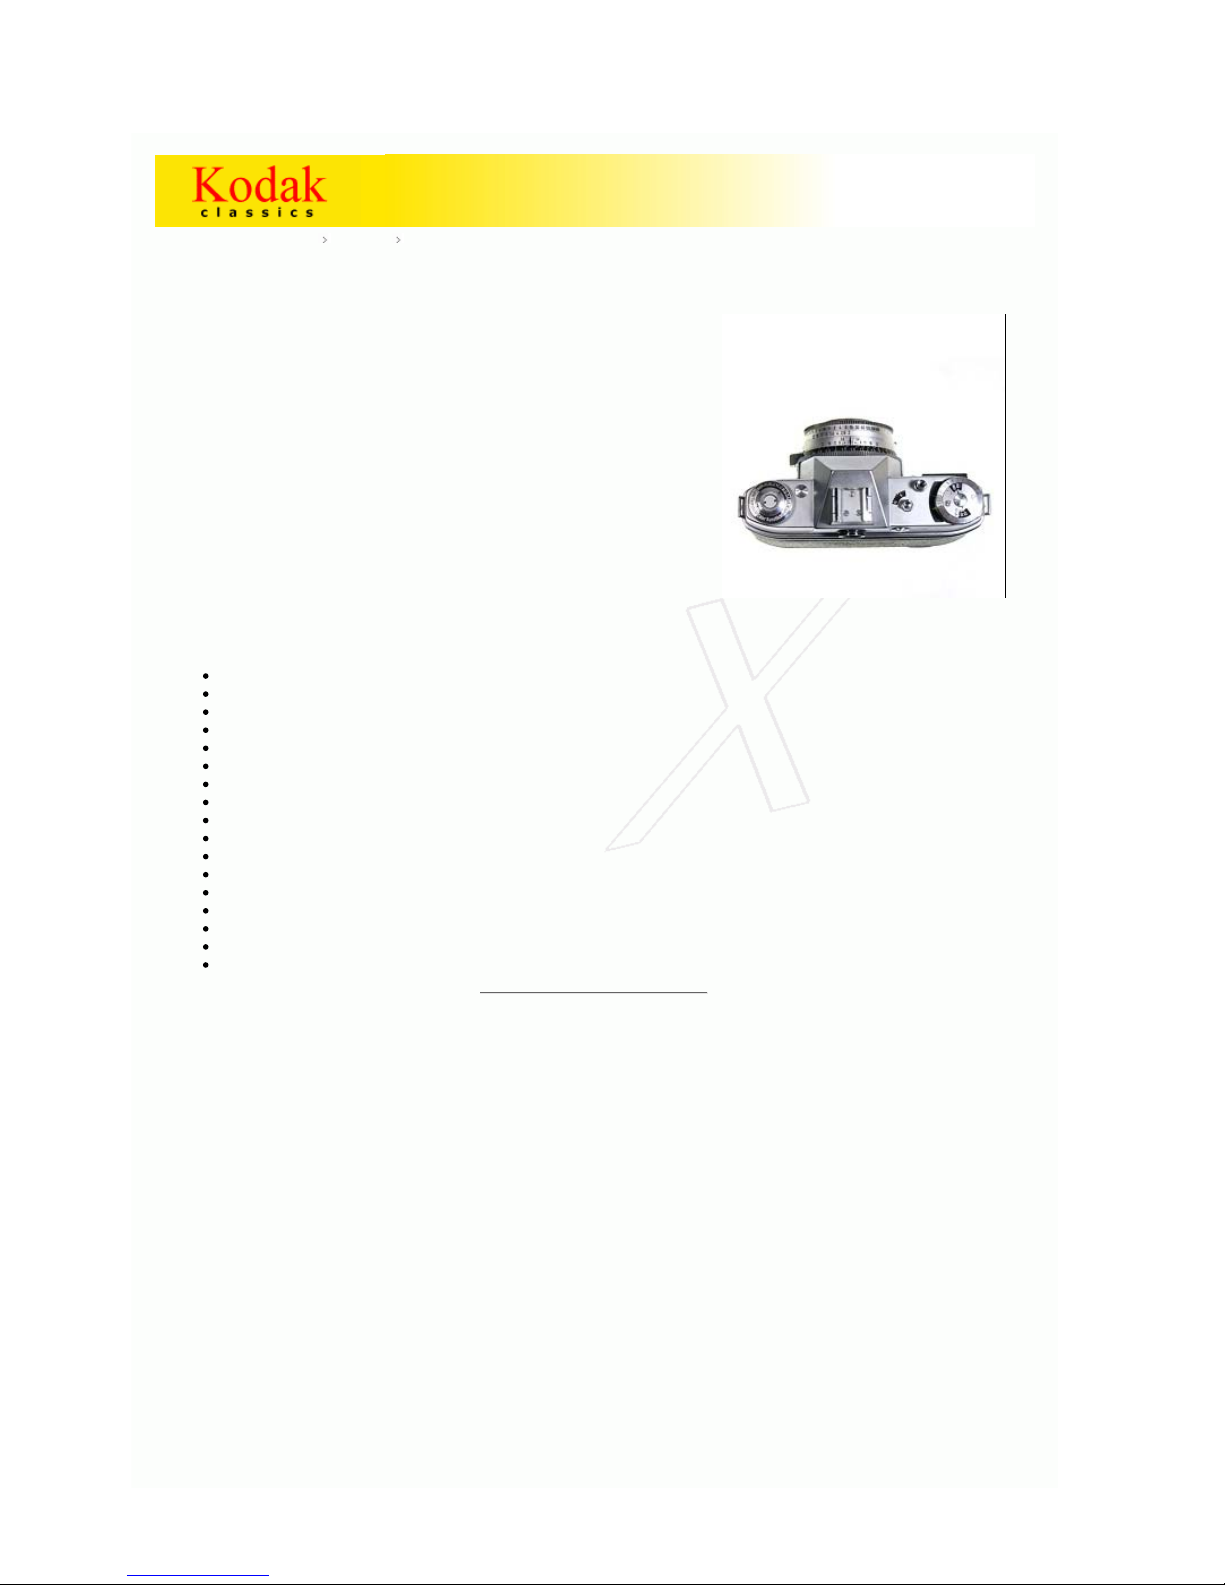
Page 1
by mischa koning
kodak.3106.net > index manuals information
The Retina Reflex Guide
These web-pages have been scanned and converted from a photocopy
of the "Focal Press" publication "Retina Reflex Guide", 1970 edition.
There may be reference to "current" and "discontinued" models.
Obviously all Retina cameras are now long discontinued, but For ease of
editing if nothing else, all the original text has been retained.
The original book was divided into two sections, effectively an overview
and a "green pages" section covering specific models in more detail.
I've not bothered with a green background to these pages, but
hopefully I will have included links where appropriate to the relevant
text. Similarly, page-number references ; as I've included each subsection of the book on one web-page, original page number references
have been linked to the new layout.
Table of Contents
The Retina Reflex
The Winding and Release Sequence
Retina Reflex Evolution
Handling the Retina Reflex
Handling, Winding and Trimming the Film
Films and Filters
Exposure
Using an Exposure Meter
Flash with the Retina Reflex
Using Alternative Lenses
The Retina Reflex IV
The Retina Reflex III
The Retina Reflex and Retina Reflex S
The Retina Reflex
Retina Reflex Lenses
Accessories
Facts, Figures and Tables
The Retina Reflex
The Retina Reflex is an eye-level 35 mm. reflex camera with interchangeable lenses for all general photography
as well as technical work, copying, photomicrography, stereo photography, etc. In many of these fields the
ground-glass screen is a distinct advantage. The camera takes normal 35 mm. perforated film and produces a
negative size 24x36 mm.(1 x 1½ in.).
The viewing system consists of a 45-degree mirror which throws the image formed by the lens on to a ground
glass screen on top of the camera. A pentaprism permits observation of this image -- which appears upright and
the right way round -- at eye-level.
The centre of the focusing screen is taken up by a pair of crossed wedges which are set in the screen and act as
a split image rangefinder.
For the exposure the mirror swings out of the way together with a light-tight capping plate in front of the film
aperture, thus leaving the way free for the lens to form its image on the film. This image exactly corresponds in
sharpness and field to the screen image which is absolutely free from parallax irrespective of the lens used.
In order to permit observation of the image, the shutter is open while the mirror is in the viewing position. On
pressing the release the shutter closes while the mirror and capping plate fold away, and then opens and closes
again to take the picture.
Page 2
The mirror and capping plate are also linked to the transport mechanism. This is operated by a rapid winding
lever. In addition to advancing the film, the rapid winding lever closes the capping plate, brings down the mirror
into the viewing position, advances the film counter, and tensions and opens the shutter for viewing.
The film transport acts directly on the sprocket which pulls the film through the camera, and is also linked to the
friction-driven take-up spool.
Two types of lens system are available. On the Retina Reflex III, IV and S the whole lens is mounted
interchangeably in front of the shutter. Each lens has an automatic depth of field indicator.
On the earlier Retina Reflex the front unit is interchangeable and can be changed for a wide-angle or telephoto
unit, while the rear component is firmly mounted behind the shutter blades.
The shutter is a Synchro-Compur with coupled aperture and speed settings. It is MX-synchronized with built-in
self-timer; the synchronizing lever can only be adjusted after releasing a safety lock.
A photo-electric exposure meter is built into the body at the right-hand (transport) end of the camera. A
diffusing disc is available to fit over the cell for incident light readings.
The camera back is hinged at one end; a special safety device prevents accidental opening. The pressure plate
does not press the film directly against the track, but leaves a very thin channel for the film.
The Retina Reflex will accept most of the accessories made for the Retina IIS to IIIC cameras. The lenses of the
Retina Reflex III, IV and S are interchangeable with the Retina III S lenses; those of the earlier Reflex are
interchangeable with Retina IIC to IIIC lens units.
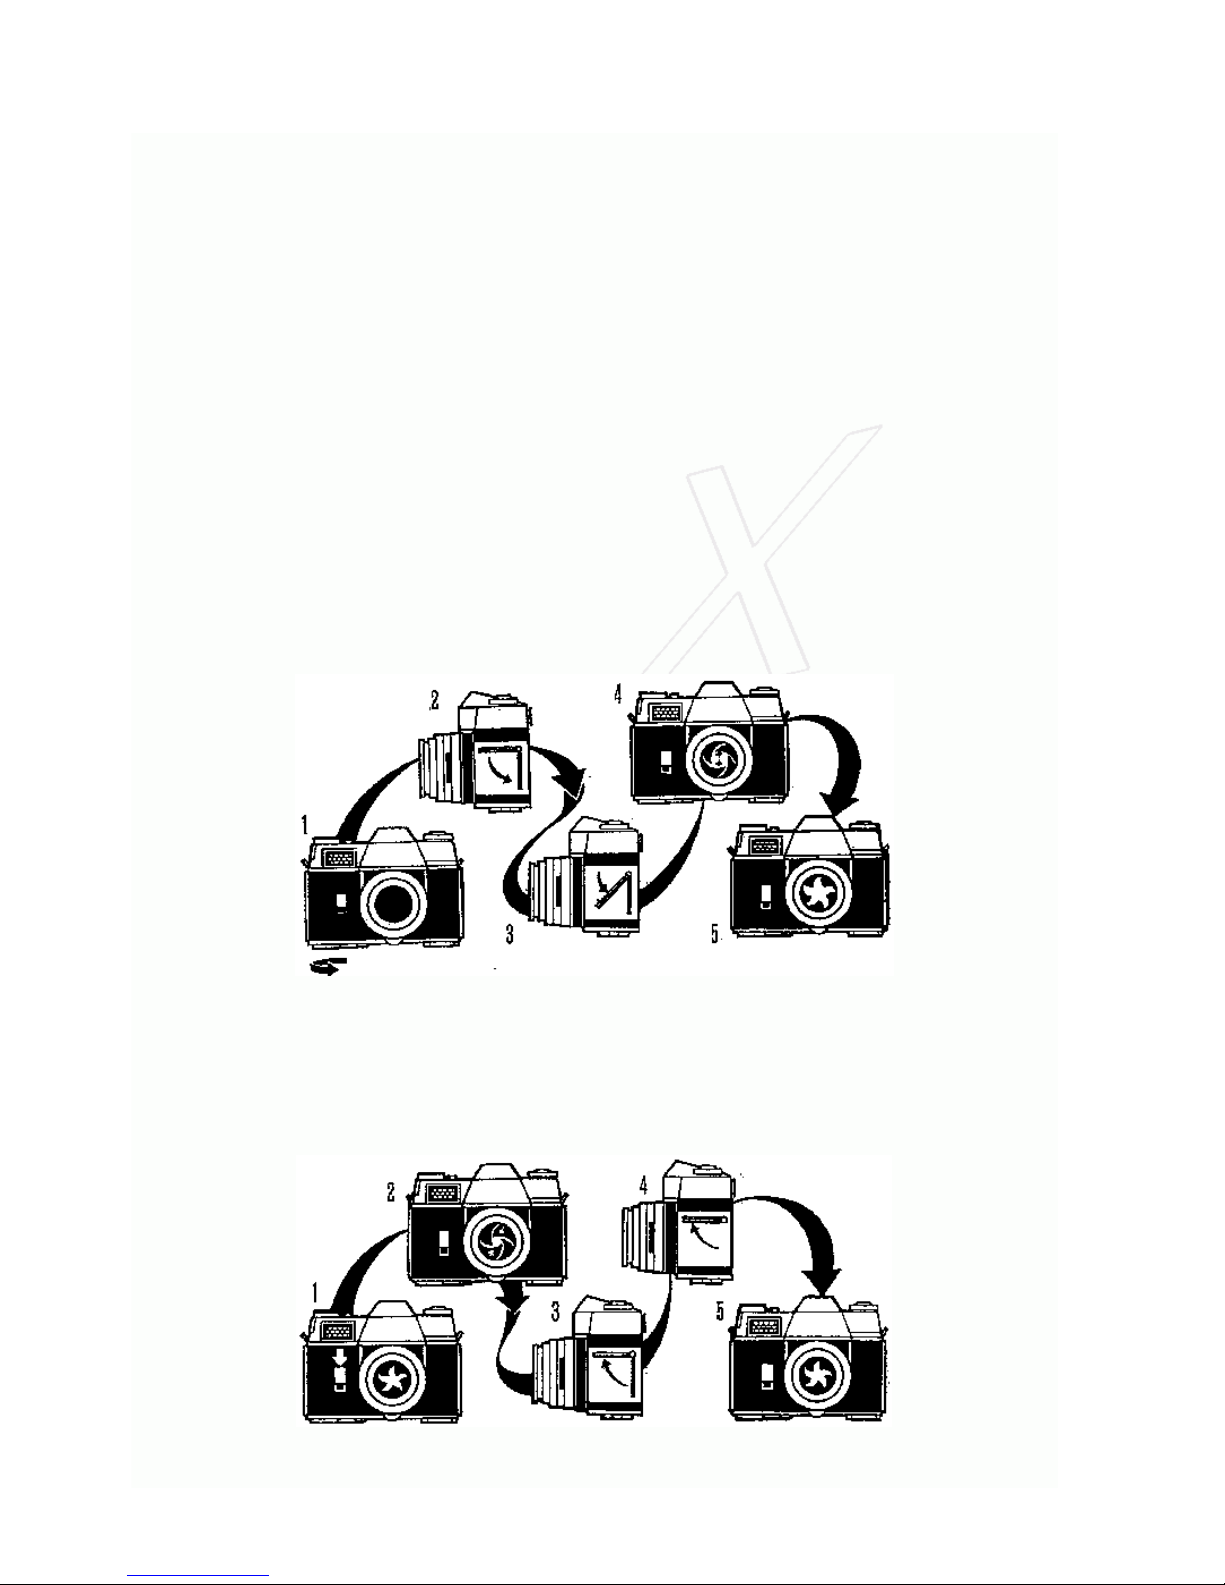
THE WINDING AND RELEASE SEQUENCE
Working the rapid winding lever gets the camera ready for the next exposure. The operations taking place are :
1. The film and film counter advance to the next frame;
2. The capping plate comes down to protect the film against the light;
3. The mirror swings down into position for viewing;
4. The lens diaphragm opens up to it's maximum aperture;
5. The shutter is tensioned and opens for viewing and focusing.
In fact, some of these functions take place more or less simultaneously.
On pressing the release button a number of operations take place immediately preceding the actual exposure.
Page 3

1. The shutter closes;
2. The lens iris closes down to it's pre-selected stop;
3. The mirror swings up out of the way;
4. The capping plate also swings out of the way to open the way to the film;
5. The shutter opens again and closes to expose the film.
This complete sequence takes a little over 1/50 second.
Retina Reflex Evolution
The Retina Reflex camera was first introduced in 1957. The original model has a built-in photoelectric meter
with exposure values, the lens front is interchangeable to accept tele and wide-angle front elements.
In 1959 the Retina Reflex S appeared with the photoelectric exposure meter coupled to the aperture-shutter
speed setting and interchangeable lens mount to accept telephoto and wide-angle lenses.
The Retina Reflex III of 1961 has the exposure meter indicator visible in the reflex finder and extra large
viewfinder eyepiece and a release key on the camera front with safety lock.
The Retina Reflex IV of 1964 has, in addition to the exposure meter indicator in the reflex finder of the Model
III, aperture and shutter speed values shown in a window in the finder, a red warning signal when taking
pictures in extreme lighting conditions and a fresnel screen for greater brightness. The split image rangefinder is
placed diagonally. The standard lens focuses down to 23½ in. (60 cm.). In addition to the flash socket there is
also a direct flash connection in the accessory shoe. The rewind knob is fitted with a fold-over crank. The film
counter is automatically reset on opening the camera back.
HANDLING THE RETINA REFLEX
In order to simplify the description and handling of the Retina Reflex camera without being confused by different
features of individual models, this guide has been divided into a general section which applies to all Retina
Reflex models while the requirements and consequently different handling of each model are found on the green
pages.
For convenience, a symbolic reference system is also used in the general section. Wherever the sign
appears,
further details will be found in the camera pages of the green section for each camera (e.g. III, Standard and S,
etc.). The sign
refers to lens details in the green section, and to accessories. The appropriate pages are
marked accordingly in the bottom left- or right-hand corner
Holding
It is obvious that the camera should be held as steady as possible, as the slightest shake, even if not seen in
the negative, will become visible in an enlargement . Always stand with your legs apart.
FOR HORIZONTAL PHOTOGRAPHS grip the camera with your right hand with the index finger on the release and
the thumb against the camera back. Thumb and index finger of the left hand move the focusing mount while the
camera body rests on the middle finger and ball of the left hand for additional support. Keep the elbows pressed
against the body. Either the right or the left eye may be used for the finder.
FOR VERTICAL PHOTOGRAPHS turn the camera through 90° so that in the same basic holding position as for
horizontal photographs -- your right hand grips the top.
You can vary this standard hold, of course, to suit your own convenience. By some experimenting, you will find
the grip which suits you best, and enables you to hold the camera really steady.
To release the shutter, press the release with the ball of the finger. Use finger pressure only, and keep the hand
and its grip on the camera steady. The actual pressing down will have to be done slowly and smoothly. The
slower the exposure time, the smoother must be the release.
For slow exposures in the hand it is advisable to rest the elbows, or at least to lean the body, against some
support in order to avoid shake. In this way 1/15, 1/8 and 1/4 and even 1/2 sec. can be risked without incurring
camera shake.
Such a support is also desirable for faster exposures, as several movements take place inside the camera after
pressing the release button. A slightly unsteady hold may thus easily lead to blurred pictures. For the same
reason, keep the camera steady for a moment after pressing the button; do not jerk it away from the eye
straight away, as the shutter opens about 1/50 sec. after pressing.
The use of a tripod is necessary when taking time exposures and it is also recommended for speeds from 1/15 to
1 sec. For upright photographs from the tripod use a ball and socket head to allow changing from the horizontal
to the vertical position.
Carrying
Page 4
To be ready for quick action it is best to carry the camera on a short strap round the neck so that it lies on your
chest. Lifting it up to the eye is then a matter of a split second.
For convenience and protection the Retina Reflex should always be carried in its ever-ready case. This case is
designed to hold the camera ready for use. A camera retaining screw fixed to the case screws into the tripod
bush to hold the camera securely in the case even when open. The elastic clip inside the top of the case is
intended to hold the incident light diffuser of the exposure meter.
For horizontal shots hold the camera firmly with the right hand, with the
index finger resting lightly on the release key. The second and third fingers
of the left hand can be used to turn the focusing ring.
For upright shots turn the camera through
90° so that it is supported from below with
the left hand. The hol for the Retina Reflex S and earlier models is slightly
different since the release button is on top of the body.
Below: With the Retina Reflex models it is specially important to keep the
camera really steady during the exposure and for a fraction of a second after
pressing the release button. Support your body against something solid (a tree,
or wall) whenever possible or prop up your arms on some suitable support (a
fence or railing, or even against your knees). Time exposures should always be taken with a camera mounted on
a tripod, using a cable release to release the shutter. This screws into the socket underneath the release key, or
into the release button of earlier models.
Page 5
Viewing and Focusing
The image reflected by the lens on to the screen is only visible after winding the shutter. It disappears once the
shutter is released. This indicates at the same time whether the camera is ready for the next exposure, as
winding the shutter also advances the film. The reflex image is large and brilliant and appears almost in natural
size; it is free from parallax. A viewing pentaprism shows the image upright and right-way-round at eye-level.
The centre of the reflex finder image contains a clear circle. This centre circle is cut in half by a horizontal line
and acts as a split image rangefinder. The distance to the subject can be measured in two ways.
First, by observing through the centre circle of the reflex finder a vertical line of the subject to be focused e.g.,
a tree, edge of a wall, outline of a person and suchlike. On turning the camera focusing mount (the serrated ring
on the lens mount nearest to the camera body) the image in the upper half moves in relation to the lower half of
the circle. The lens is focused correctly when the two halves are exactly in line with each other. If the camera is
held vertically, choose a horizontal line of the subject; the centre appears split vertically, otherwise the
procedure is the same as described above.
Alternatively, and particularly if the subject does not show any prominent vertical or horizontal lines, observe the
image on the ground glass which surrounds the circle. Turn the lens mount until the image of the subject
appears perfectly sharp on the ground glass.
Whilst focusing with the split image rangefinder is quite straightforward, some experience is required to obtain
the best definition quickly when using the ground glass method. The best way to arrive at critical definition is to
turn the focusing ring of the lens mount slowly to and fro while observing on the ground glass the subject to be
focused. As you turn the focusing mount, the image becomes more and more sharp up to a certain point,
beyond which it will again lose definition. At this "beyond" stage, turn the mount back again, narrowing down
the degree of movement until you arrive at the point of best definition.
The orthodox way of focusing with either split field range-finder or ground glass may be adopted for taking
photographs of subjects that are fairly stationary. A different method of focusing is required when taking
subjects in motion. Set the rangefinder to a distance at which the subject will be in a given moment, or focus at
some spot which it actually has to pass, and press the release button when the subject is reaching the prefocused point. With subjects liable to react self-consciously (e.g., children) set the lens to a suitable distance,
and then approach the subject quickly, exposing as soon as the ground glass image appears sharp, or the two
halves of the rangefinder are in line with each other.
Alternatively, focus at some object which is at the same distance from the camera as the subject, but in a
different direction, and when the range is found swing round to press the release button as soon as the victim
slips into the field of view of the finder. See also quick shooting with zone focusing (p.41).
FOCUSING AND VIEWING
The Retina Reflex is a single lens reflex camera with (on the current model) fully interchangeable lenses. The
section through the camera (above) shows the main components of the optical system. The heavy arrowed line
indicates the path of the light from the lens to the finder.
Page 6
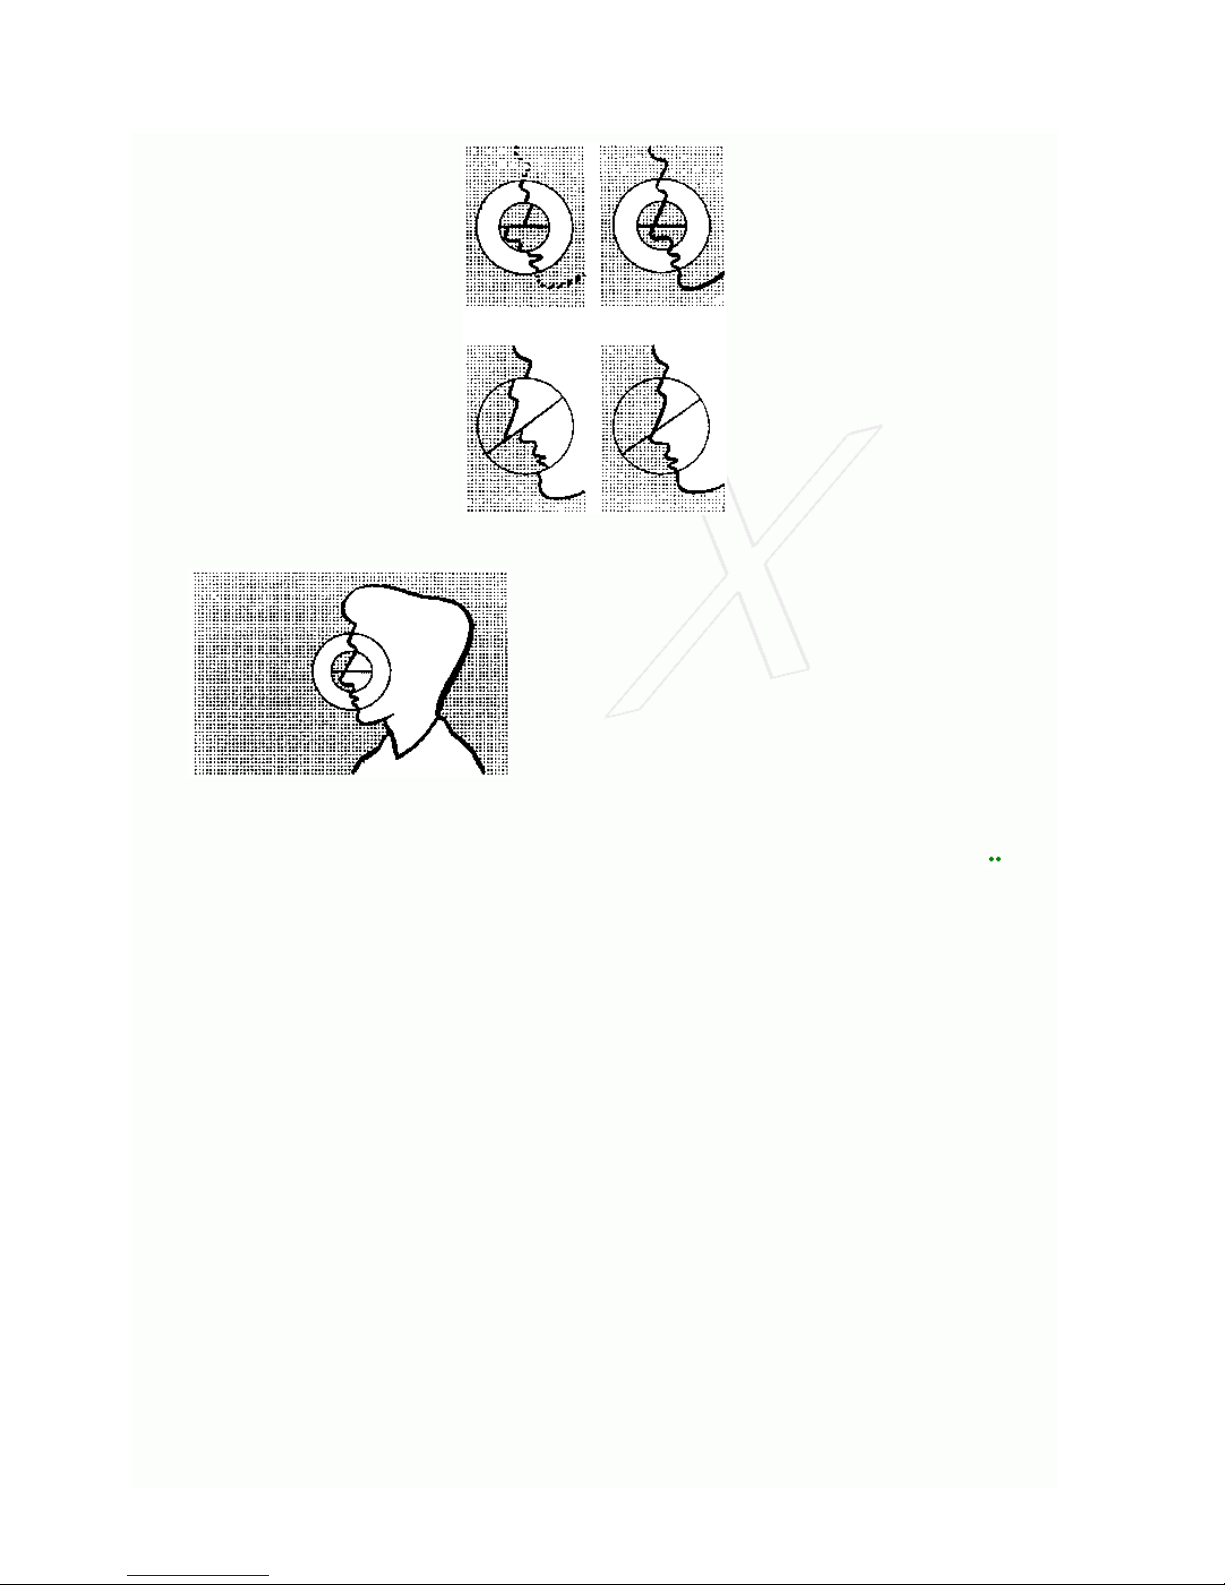
The centre of the screen of the Retina Reflex carries a split
image optical rangefinder which shows the incorrectly focused
subject in two displaced halves (right. The remainder of the
finder field constitutes a ground glass focusing screen. When the
subject is accurately focused, it appears sharp on the screen and
the two halves of the rangefinder image move together to form a
continuous line (above and extreme right).
Shooting
Practise the following operations first with an empty camera until you can do them practically automatically.
1. Work the film transport. Swing film transport lever out as far as it will go (180°). It will only spring back
into its original position if it has been wound fully. This advances the film and film counter, tensions the
shutter, opens up the aperture and brings down the mirror, ready for the next exposure.
2. Set the exposure. Adjust the shutter for the right amount of light for the subject conditions. The built-in
photo-electric exposure meter indicates the setting required, or even sets the controls.
3. Select the aperture speed combination you want to use, smaller aperture for greater depth of field (p.
40) or faster speed to arrest movement (p.38).
4. Focus and determine picture area to obtain a sharp picture and the view you want.
5. Release the shutter gently.
LOADING AND UNLOADING
The Retina Reflex uses standard perforated cine film, 35 mm. wide, as used in the majority of other 35 mm.
miniature cameras. It is available in various packings (see also p. 18), the most convenient being standard
daylight cassettes. These are light-tight containers with a ready cut and trimmed length of film for 36 or 20
exposures and are loaded into the camera in daylight.
Avoid loading or unloading the camera in brilliant sunlight, though. Choose a shady spot or do it in the shadow
of your own body if nothing better is available.
Loading
1. Open the camera back by turning the double lever surrounding the tripod bush on the camera base in the
direction of the arrow. Then press the little button underneath the lever, and the back will spring open.
2. Fully pull out the rewind knob above the film chamber.
3. Insert the film cassette so that projecting spool peg lies in the recess in the bottom of the spool chamber.
4. Push back the rewind knob.
5. Fix the film to the take-up spool. Pull out about 3½ in. of film from the cassette; turn the built-in take-up
spool so that the slot is accessible. Push the film end into the slot and anchor a perforation hole in the
Page 7
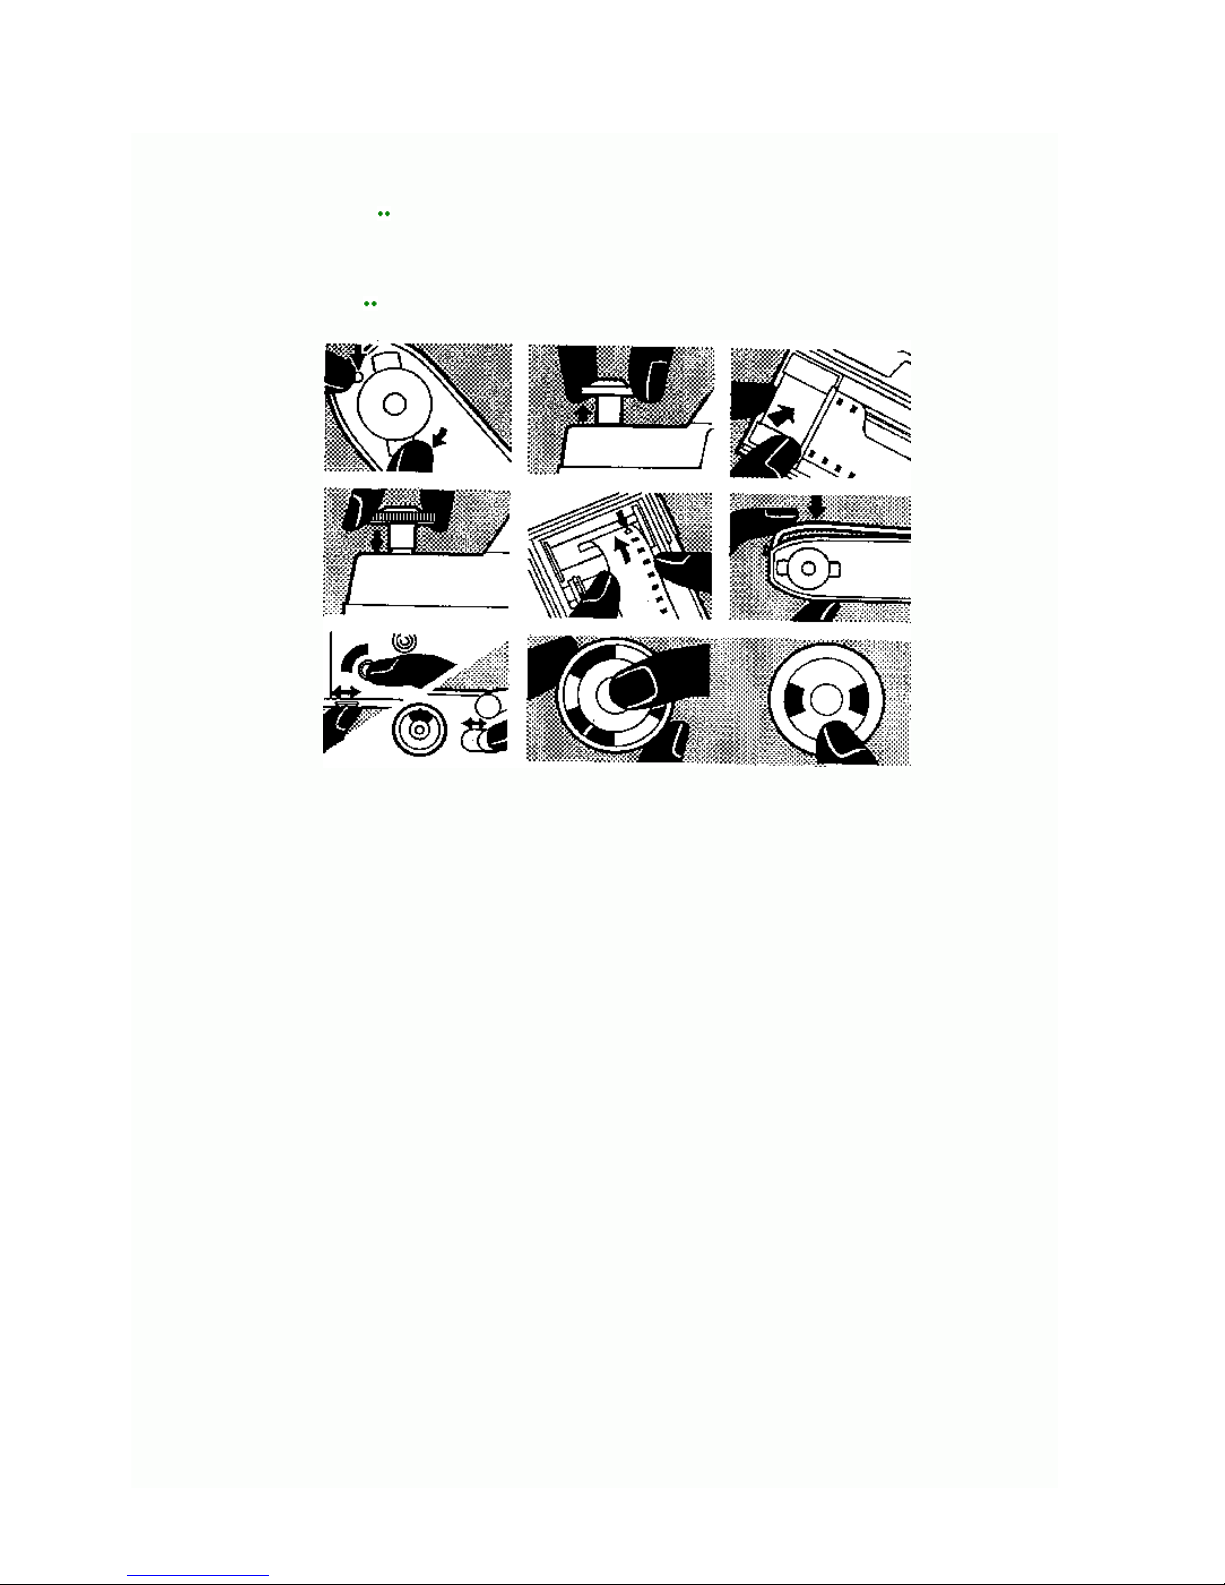
hook of the slot. Turn the take-up spool to take up the film slack. It should lie flat across the film
aperture, and the "teeth" of the sprocket wheel engage the lower row of perforations. Not less than two of
the upper perforations should overlap the film track.
6. Close the back by pressing the back against the body until the catch engages.
7. Set the film counter .
8. Set the film indicator. The film indicator on top of the rewind knob is marked with various types of films
available. Grip the rewind knob with two fingers and turn the inner serrated ring with your fingertip until
the triangular index mark points to the type or speed of film loaded. This is to aid your memory. It has no
influence on the exposure or working of the camera.
9. Set the film speed.
Top left: Open the camera back.
Top centre:Pull out the rewind knob (on Reflex S and original models) to its second stop.
Top right: Insert the cassette with film into the empty chamber.
Centre left: Push back the rewind knob into its normal position.
Centre: Thread the film into the slit of the take-up spool.
Centre right: Close the camera back.
Bottom left: Set the film counter according to the number of frames of film in use.
Bottom right: Set the film speed on the exposure meter.
Unloading
After all exposures have been made, the camera has to be unloaded. The exposure counter window
should, at this stage, indicate 0. The film transport lever locks after you have made the last exposure on
your film.
1. Depress the reversing button in the base of the camera situated in the curve of the film transport
lever.
2. Rewind the film. Turn the rewind knob in the direction of the engraved arrow (clockwise) until the
reversing button ceases to rotate. This button carries a black dot near its edge for easy observation
of movement.
3. Open the camera back as for loading (p.13).
4. Remove the cassette after pulling up the rewind knob.
5. Close the camera back or reload with a new film.
Page 8
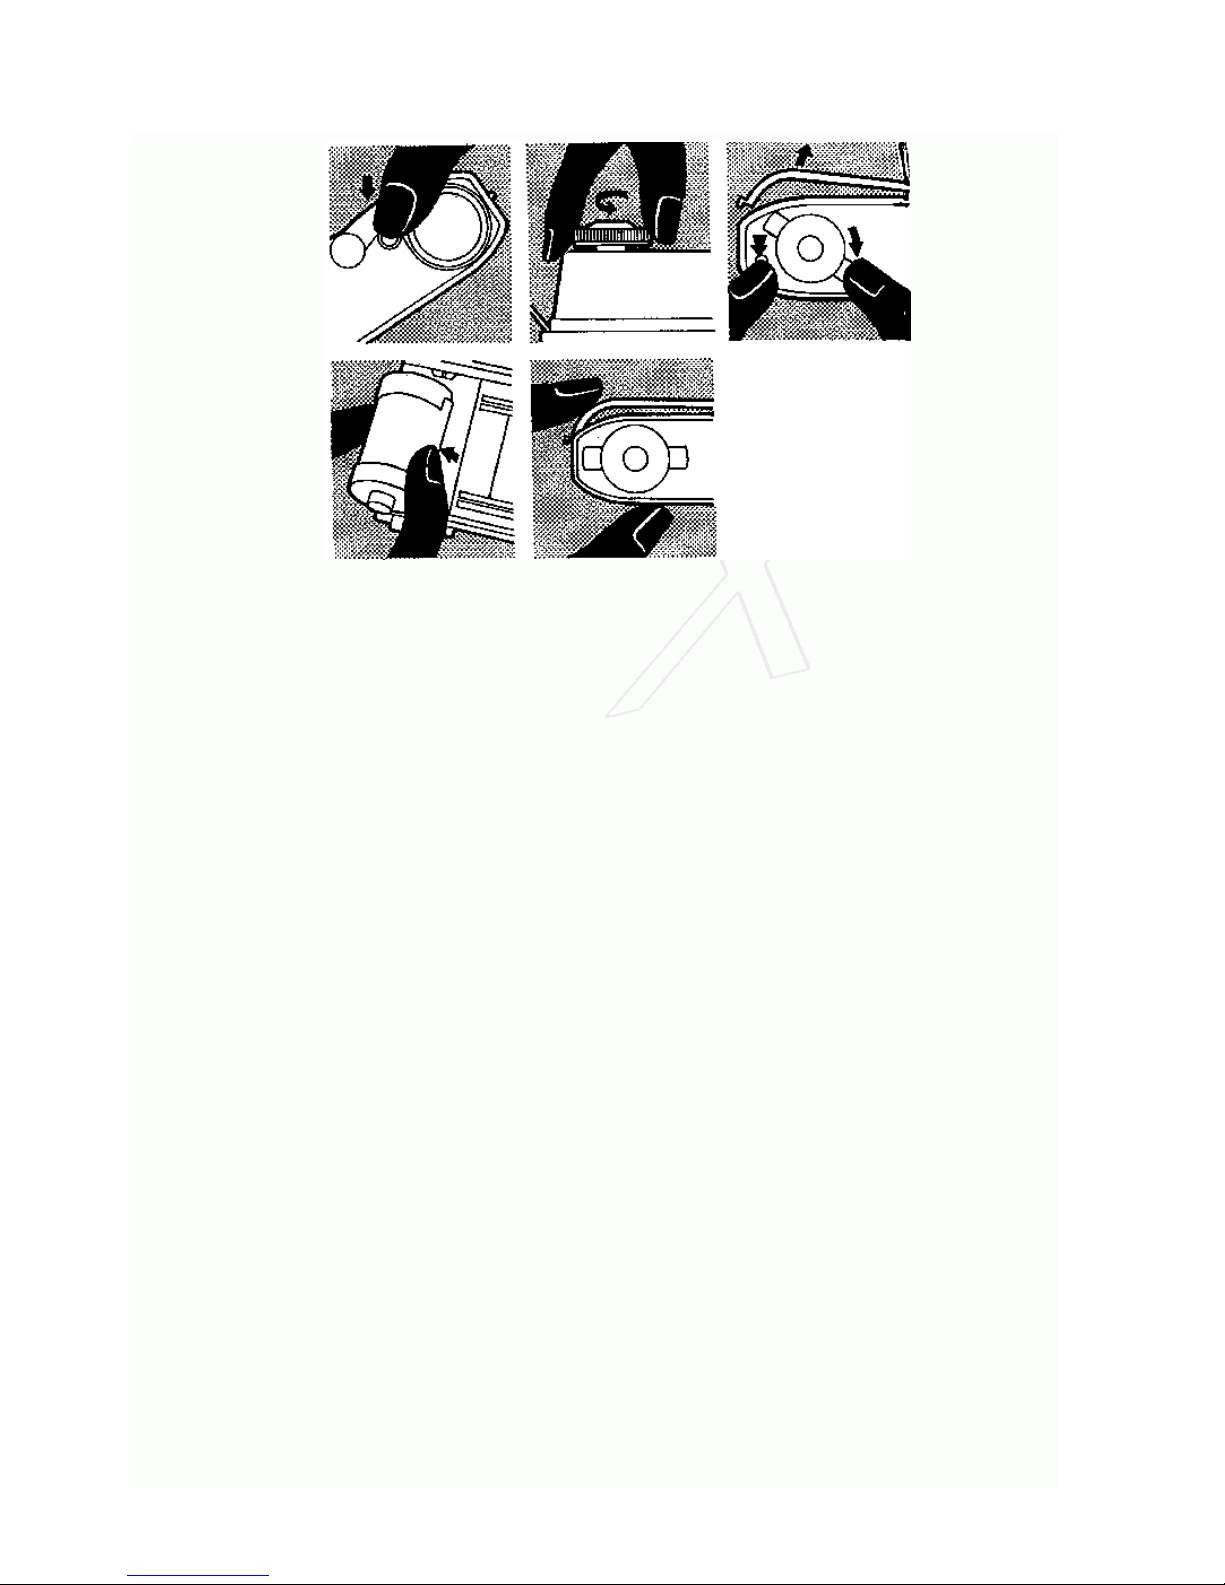
Top left: Press down the rewind button in the base of the camera.
Top centre: Rewind the film.
Top right: Open the camera back.
Bottom left: Pull out the rewind knob fully and take out the cassette.
Bottom right: Close the camera back or reload with a new film.
Cutting Off Exposed Lengths
If a film which is only partly exposed has to be processed, it can be cut off in the darkroom or in complete
darkness. After the last exposure wind on the film transport once more, open the camera back in the
darkroom, and cut the film about ½ in. away from the cassette. The exposed part on the take-up spool is
removed by winding the film from the take-up spool and wrapping it up in three pieces of black opaque
paper. The remaining film in the cassette can now be re-inserted on the take-up spool and the camera
closed. If the re-inserting has been done in the darkroom no further blind exposure is necessary; if the
film has been re-inserted in daylight, two blind exposures should be made and the film counter should be
advanced by two divisions. Note that short lengths of some makes of colour reversal film will not be
accepted for processing.
Changing Partly-Exposed Films
To replace a partly-exposed film by another one, for instance if you want to take a few colour photographs
in between some black-and-white shots, proceed as follows:
1. Check the number of exposed frames on the film counter .
2. Rewind the film but stop immediately you feel a slight resistance. This resistance comes from
pulling the film end from the take-up spool. If the film is to be reloaded again, you must not pull the
whole film into the cassette, otherwise the film end would have to be extracted by opening the
cassette in the darkroom for subsequent re-insertion into the camera.
3. Unload the re-wound film and note the number of exposures taken on the beginning of the film.
Now you can load the camera with any other type of film.
WHEN RELOADING, load the partly-exposed film in the same way as a new one. Push the film
counter setting button (model III only) in the direction of the arrow, and hold it there. Wind the
transport lever until the film counter has advanced by the number of frames already exposed. On
earlier models press the film release button every time. To be on the safe side it is advisable to
allow one more frame to pass.
The rest of the film can now be exposed in the usual way.
The Film Release of the Retina Reflex
The film release (not on Model IV) helps in rectifying any jamming which may lock the mechanism of the
rapid winder. Pushing the film counter-setting button in the direction of the arrow (on earlier models :
pressing the film release button next to the shutter release) clears the winder, without losing a frame or
risking a double exposure. If the film release does not release the winder, this automatically indicates that
the end of the film has been reached.
Page 9

Similarly, if you did not set the film counter when loading you may reach No. 1 on the film counter before
the end of the film is reached. At No.1 the rapid winding lever automatically locks. By working the film
release you can re-set the exposure counter, which at the same time will free the winding lever.
Should the winding lever stick in an in-between position, work the film release to make it spring back.
Double Exposures
The double-exposure lock of the Retina Reflex prevents accidental double exposures. To make a deliberate
double exposure for special purposes, press the reversing button after the first exposure, and keep it
depressed while tensioning the shutter with the rapid winding lever. The film then remains in position for a
second exposure on the same frame.
Note that operating the rapid winder after the second exposure also advances the film counter to indicate
one frame more than the number exposed.
Other Film Packings
In addition to standard cassettes, 35 mm. black-and-white film is available in loose packings for loading
into cassettes. This is a much cheaper way of using film as you do not have to buy a new cassette every
time with the film. The following packings are available.
DARKROOM REFILLS are lengths cut and trimmed for 36 exposures and have to be loaded into a cassette
in total darkness (e.g. in a darkroom, a really well darkened room at night or a light-tight changing bag).
DAYLIGHT REFILLS are cut and trimmed lengths for 20 or 36 exposures which are wound on to a centre
spool (as used in the cassette) and covered with a black paper leader strip to allow loading of a cassette
in daylight.
BULK FILM is supplied in lengths of 18 to 200 ft., and is the most economical way of using film. A suitable
length is cut off to be loaded into a cassette in total darkness. Working in total darkness for loading
darkroom refills or bulk film is not difficult. It is, however, advisable to practise filling with a dummy film
first in daylight before starting the darkroom work.
WINDING AND TRIMMING FILM
1: The correct trimming of the wedge-shaped end (which is
fitted to the centre spool of the cassette) with a standard
trimming template.
2: Trimming of the curved cut with a standard trimming
template.
3: The appearance of the trimmed film: left, wedge; right,
curved cut.
Page 10
4: The film cassette, its outer shell, centre spool and separate top.
5: How to fix the film to the centre spool of the cassette with a piece of adhesive tape.
6: Winding the film with the mechanical film winder to the centre spool.
7. Assembling the cassette 8. Loading the film into the camera.
Handling, Winding and Trimming the Film
When handling the actual film, particular care must be taken not to touch its emulsion (matt) side. Always
handle it and wind on to the centre spool of the cassette by holding the film by either side of its edge, preferably
between thumb and index finger. At the same time, it is of no less importance that the spot on which the loading
is done should be perfectly dry, clean and dust free .
When using bulk film in loading cassettes, the edge of the work-bench can be marked with notches or drawingpins to indicate various distances, let us say for 12, 24, 36 exposures of film. This considerably simplifies the
measuring of film lengths in the darkroom.
The film ends need trimming. At the beginning of the roll of film make either a straight or wedge-shaped cut for
the centre spool of the cassette and measure off the required length of film (see table, p.20). At the end of this
make the curved cut for the take-up spool. The curved cut should start between the fifth and sixth bottom
perforation -- when emulsion is towards you -- and must not go through a perforation hole.
The ready-cut film is now spooled on the centre spool of the cartridge or cassette. While winding on, hold the
film only by its edges.
Also, take care not to press too hard on the film, and don't squeeze the film-ends when drawing through the
hand. Failure to take the first precaution may result in fogging, while neglect of the latter precaution may give
rise to peculiar kinds of exposure effects known as "lightning flashes". These are due to electrical discharges,
and appear as dark, zigzag lines running from the edge of the film towards the centre of the picture.
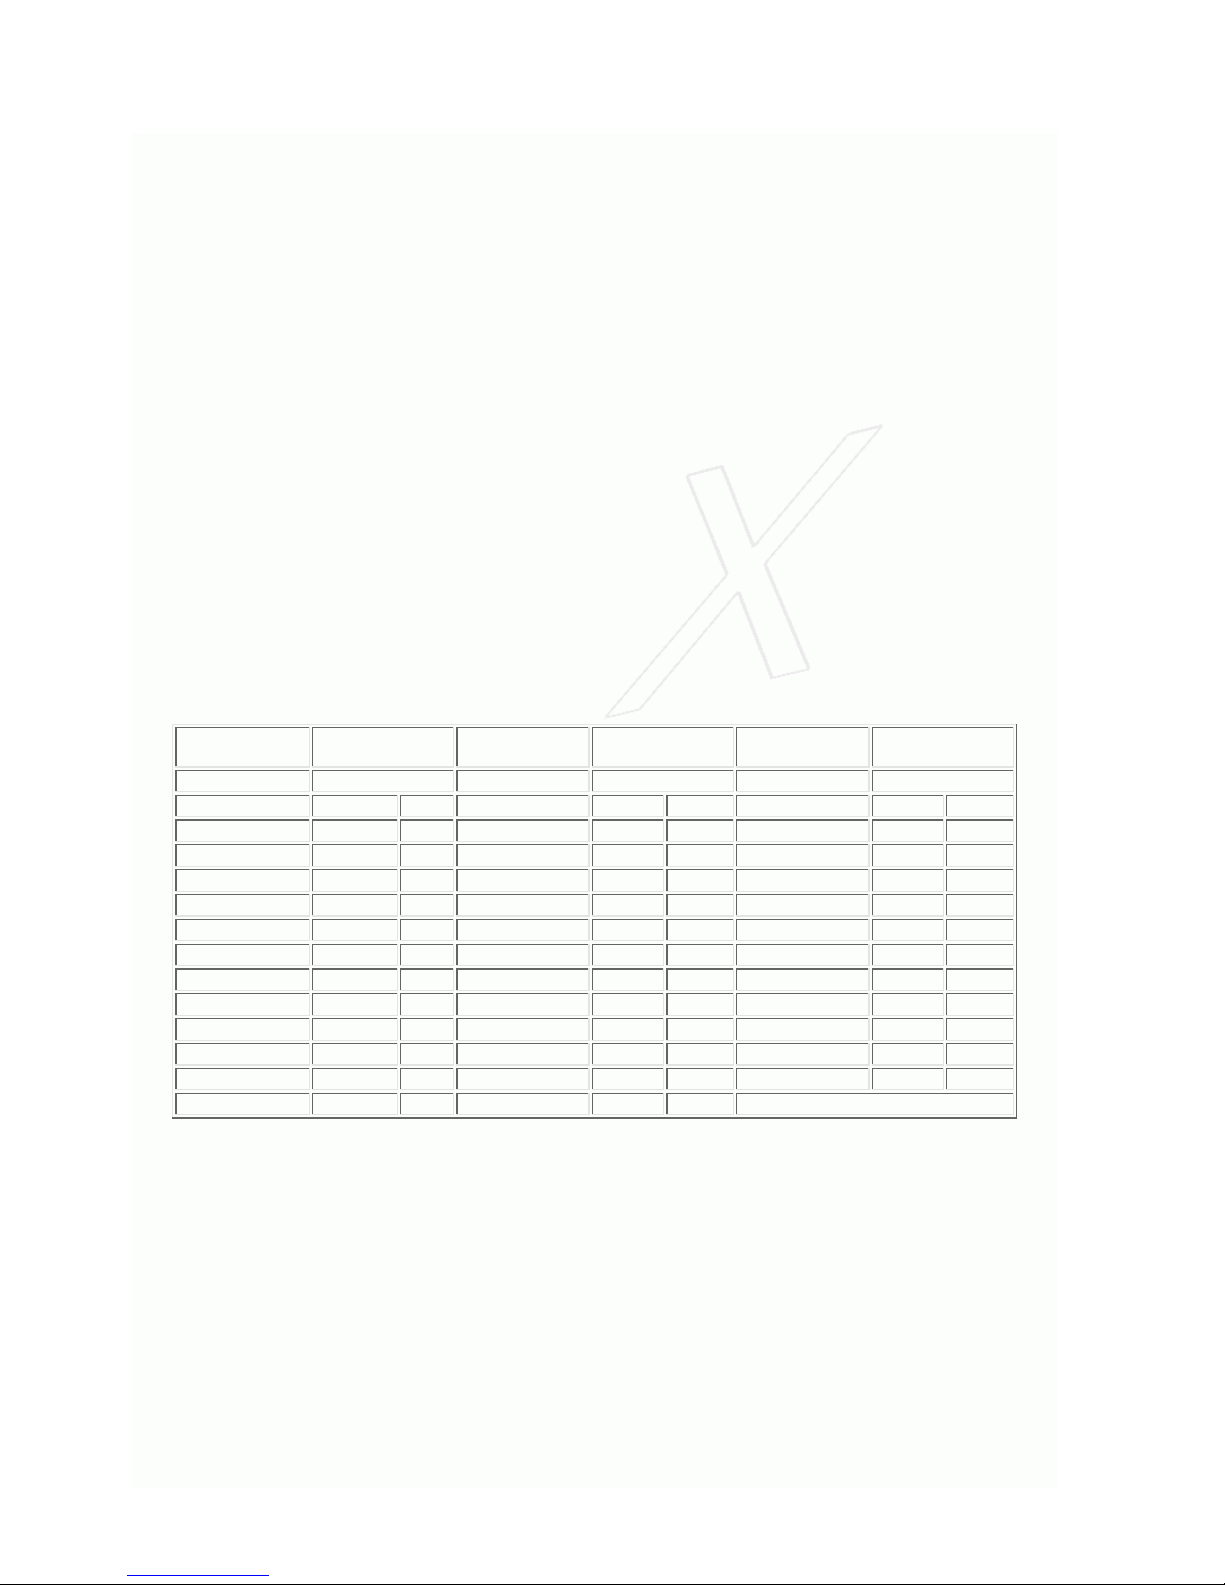
LENGTH OF FILM REQUIRED FOR ANY NUMBER OF EXPOSURES
Number of
Exposures
Length of Film
Required
Number of
Exposures
Length of Film
Required
Number of
Exposures
Length of Film
Required
in. -- cm. In. -- cm. In. -- cm.
1 11¾ 30 14 31¾ 80 27 51 130
2 13¼ 34 15 33 84 28 52½ 133
3 15 38 16 34½ 88 29 54 137
4 16¼ 41 17 36¼ 92 30 55½ 141
5 17¾ 45 18 37¾ 96 31 57 145
6 19¼ 49 19 39¼ 100 32 58½ 148
7 20¾ 53 20 40½ 103 33 60 152
8 22 56 21 42 107 34 61½ 156
9 23¾ 60 22 43¾ 111 35 63 160
10 25¼ 64 23 45 114 36 64½ 164
11 26¾ 68 24 46½ 118 37 66 167
12 28½ 72 25 48 122 38 67½ 171
13 30 76 26 49½ 126 Including trimming
Loading Standard Cassettes
The majority of cassettes consist of a centre spool which is in a shell with top and bottom cover. The film leaves
the shell by a light-trapped slot. The centre spool can be removed from the shell by removing either top or
bottom of the cassette, according to the construction of the particular container.
Most cassettes are actually intended by their makers to be used once only, and with the film originally supplied
in it. However, provided they are reasonably robustly made, and the light-trapping velvet slot is in good
condition, these cassettes can be reloaded many times, and will give perfectly satisfactory results -- if handled
carefully.
Loading with Bulk Film or Darkroom Refills
Work in total darkness and prepare the film as described (p. 18).
1. Open the cassette.
Page 11

2. Fix the film to the centre spool. If the centre spool is fitted with a film catch, thread the tapered end of
the film into it. In cases where the centre spool is fitted with a spring, thread the end under it and fold it
sharply back. If the centre spool is without any suitable fitting to hold the film, it has been proved best to
wind a 1½ in. (4 cm.) piece of cellulose tape round the centre spool, so that on either side about ½ in.
tape is used to secure the film.
3. Wind the mm on the centre spool.
4. Insert the centre spool into shell, leaving the first 2 in. of film protruding through the light-trap.
5. Close the cassette. Where top and bottom are originally fastened by the outside label, fix the top and
bottom cover to the shell, preferably with a length of cellulose tape.
Loading with Daylight Refills
No darkroom is necessary, but work in subdued daylight or artificial light.
1. Remove film wrappings and label of refill.
2. Open the cassette.
3. Introduce the refill into shell of the cassette; leaving the first 2 in. of paper-leader protruding through
light-trap. The actual centre spool of the cassette is not needed.
4. Close the cassette.
5. Pull out the paper-leader and 2 in. of film.
6. Cut off the paper-leader. Where top and bottom are originally fastened by the outside label, fix the top
or bottom cover to the shell, preferably with a length of cellulose tape.
FILMS AND FILTERS
There are two kinds of films available for the Retina Reflex : black-and-white and colour.
Black-and-White Film
This produces a negative in which the colours and brightness range of the subject are translated into black and
white. From it, prints or enlargements on paper or black-and-white transparencies can be made.
The black-and-white film used normally is panchromatic, that means that it is sensitive to all colours. There is a
choice of several types differing mainly in sensitivity as well as certain other characteristics.
SLOW FILMS are of low sensitivity, requiring comparatively great exposure. Their main advantage is the
extremely fine grain, permitting a high degree of enlargement without its granular structure becoming
unpleasantly visible. Such films also yield images of the greatest sharpness. On the other hand, these slow films
are not very suitable for coping with fast movement in other than exceptionally good lighting, nor for general
work in poor light. Such films are rated at 40-80 ASA or l7-20° DIN.
MEDIUM SPEED FILMS still yield a reasonably fine grain with good gradation. They are the most suitable
material for all-round photography, other than in poor light. These films are rated at 100-l60 ASA or 21-24°
DIN.
FAST FILMS with somewhat coarser grain (still acceptable for reasonable degrees of enlargement) will cope with
most light conditions including poor light and interiors in favourable conditions. This is the right film for the
photographer who wants to be prepared for the unusual, to arrest fast movement with high shutter speeds, as
well as shots in poor light. The speeds are 200-400 ASA or 24-27° DIN.
ULTRA FAST FILMS are primarily intended for high-speed sports shots in dull weather, interior snapshots in poor
light, night photography and ill-lit stage pictures. These films are specialist types for conditions where normal
materials are totally inadequate. They should not be used for general photography. The high speed is achieved
at some cost in definition and graininess. Speed ratings range from 500 ASA or 28° DIN upwards.
The above speed figures are based on the latest ASA Standard for film speeds (and on the BS and DIN
Standards under revision). These figures, when used on the exposure meter, give minimum correct exposures,
to make the most of the versatility of the film and of the image quality. They are also the figures quoted by
most film manufacturers. Sometimes films are, however, still rated according to earlier standards which in effect
incorporated a generous safety factor against under-exposure -- by the simple process of over-exposing films
about 100 per cent. (well within the exposure latitude of most black-and-white films). So you may come across
films apparently only half as fast as others of similar type, because of this difference in ratings. The table on p
69 indicates the current film speeds to he used with the exposure meter, even if the film packing gives a lower
rating.
This applies to black-and-white negative materials only; speed rating methods have not changed for colour films.
There is a wide range of different makes of films in all speeds on the market. Their characteristics, apart from
speed, vary slightly from make to make. It is safe to say that all well-known brands are reliable and good. The
best film is the one you are used to. Professional photographers and advanced amateurs may find one or the
other characteristics of a particular make, i.e. its gradation, granular structure, acutance, etc., of particular
value for specific jobs.
Page 12
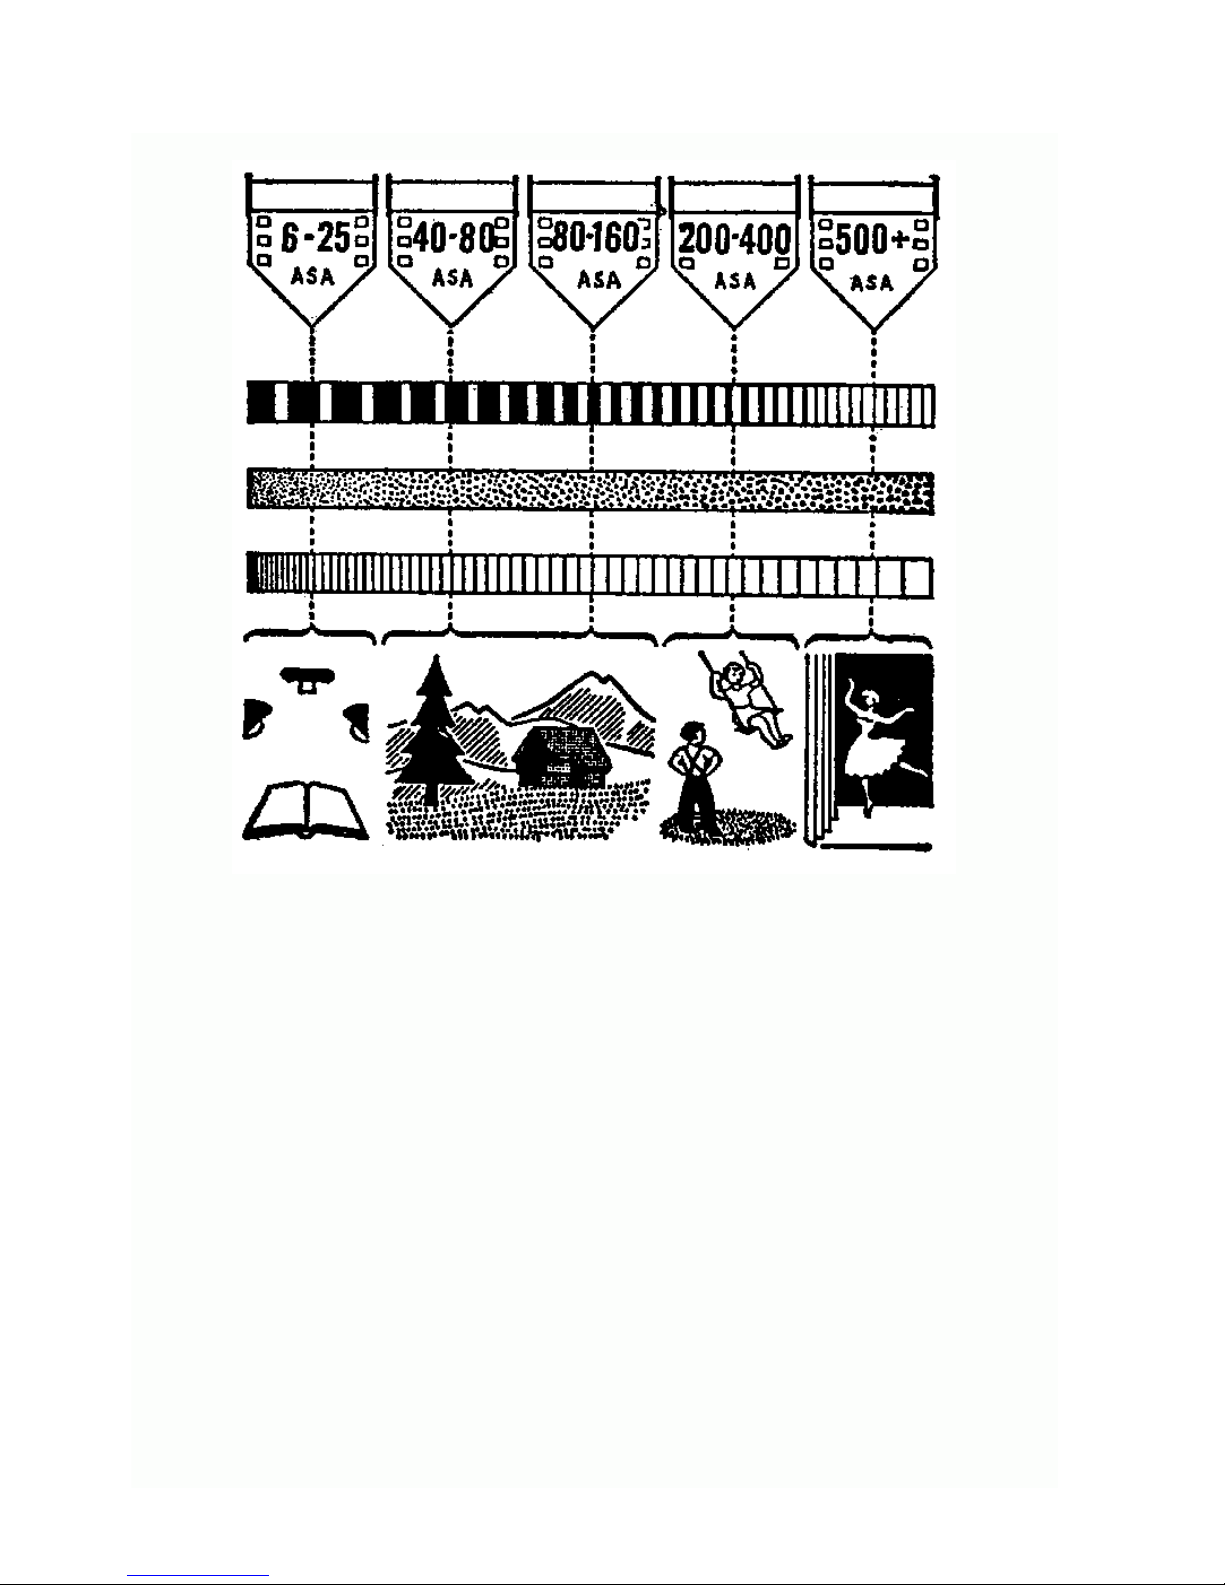
FILM SPEED, CONTRAST, GRAIN, RESOLVING POWER.
Generally speaking, low speed goes with greatest contrast, finest grain and highest resolving power and vice
versa. The film speed in the top row points to the corresponding contrast, grain and resolving power. The
contrast row shows (from left to right) how high contrast becomes medium and low as speed shows. The grain
row shows (from left to right) how fine grain turns into medium grain with growing speed and finally the
resolving power row shows the the decrease of resolving power (number of lines) with increase of film speed.
The bottom row indicates the type of subjects for which films of the various speeds are best.
Colour Film
These films produce an image in colour after appropriate processing, corresponding directly or indirectly to the
natural colours of the subject. From the practical point of view, colour film is as easy to use as black-and-white
film needs a little more care in exposure. Processing is more complex and is often carried out by the film maker
or specially appointed processing laboratories.
There are two basic types of colour film : reversal and negative.
Colour Reversal Film
This produces a colour transparency on the actual film exposed in the camera. This transparency held up to the
light shows a positive image with all parts of the subject in their original colours. It can be viewed in a suitable
transparency viewer with a magnifier or it can be projected in a slide projector to give a large and brilliant
picture on a screen.
There is little doubt that the projected image is the most natural and best for showing colour.
Although the colour transparency is an end product, it can still be used to make:
(a) duplicate positive colour transparencies,
(b) a black-and-white negative which can then be used to produce black-and-white prints or enlargements,
Page 13

(c) a colour negative for making colour prints and enlargements, as from colour negative film (described below),
(d) direct colour enlargements on colour reversal paper.
Colour prints on paper invariably show a loss of colour quality as compared with the original positive
transparency.
For correct colour rendering, colour reversal films have to be carefully matched to the light by which they are to
be exposed. Accordingly, most makes are available in two or more of the following types:
(a) daylight colour film, which will give correct colour reproduction in daylight or with blue-tinted flash bulbs or
electronic flash.
(b) artificial light type colour film which will give correct rendering by photoflood illumination or high-power
tungsten light,
Colour films made for one kind of light may often be used under different light conditions with the aid of a
conversion filter as recommended by the manufacturer.
Different makes of colour film may yield transparencies of a slightly different characteristic colour quality, colour
saturation and colour contrast. Which you prefer is very much a matter of personal taste, and you can only be
recommended to try various makes to find the one which suits you best.
Colour Negative Film
On processing, this produces a colour negative which shows a negative image of the subject in its
complementary colours; e.g. blue appears yellow, red appears blue-green and so on. These colours may
sometimes be hidden under an overall orange or reddish tint.
The main purpose of the colour negative is the production of colour prints on paper. The quality is generally
higher than that obtained from a positive transparency.
From the colour negative you can make:
(a) any number of colour prints in varying sizes,
(b) direct black-and-white prints or enlargements, in the same way as from a black-and-white negative.
(c) positive colour transparencies for viewing or projection.
Colour negative films are mostly suitable for exposure by any type of light, e.g. daylight, flash or photofloods.
The necessary adjustment of the colour rendering is carried out during the printing stage. Manufacturers
sometimes recommend conversion filters even with colour negative films. These mainly serve to simplify the
subsequent correction needed in printing.
Colour Film Speeds
The majority of colour films, reversal and negative, are rated between 25 and 64 ASA or 15 and 19 DIN, which
corresponds to a fairly slow speed for black-and-white material. A few films go up to 160 ASA or more for poor
light conditions. Others may be as slow as 10 ASA or 11 DIN. As with black-and-white films, the slower types
tend to yield improved image detail, especially with negative colour film, while the fastest emulsions may show
slightly reduced colour saturation and image sharpness.
The Choice of Colour Film
Making your choice between colour reversal or negative film (in spite of the various uses that can be made of
either type of material) remains an individual question.
First there is the way you want to see the result, as a colour print or as a colour transparency. The print has no
doubt much to commend itself. It is easily shown, stored and carried about. The transparency calls for the aid of
a viewer or projector.
Next, the cost of a colour print is about three times that of the transparency. This may at times be mitigated by
the fact that from unsuitable negatives no Colour prints need or can be made. The transparency user, however,
has additional outlay in the form of a viewer or projector with screen (in most cases both).
A final point to consider is the quality. The transparency will record each colour and its brilliance in full. Held to
the light or projected on a screen, the brightness range, which may be 100:1, is fully or almost fully retained. It
shows colours brilliant with great depth and realism. The colour print can at its best only reflect four-fifths of the
light falling on it and even the darkest tones reflect about one-twentieth to one-tenth, so that the full range is
no more than 16:1. While the colour print is, by necessity, duller than the transparency, it is only fair to say
that the eye soon adjusts itself to the reduced brightness range and subjects without great contrasts will be very
satisfying.
From the point of view of convenience, reversal film has the advantage that it directly gives finished colour
pictures of high quality and is still capable of producing colour prints as well. For the maximum versatility and
control in print making, however, negative film is superior.
Page 14

Filters for Black-and-white Film
By its nature, a black-and-white film can only translate colour values of the subject into tones of lighter or
darker grey. Mostly these correspond fairly closely to the brightness of the colours, but do not of course
differentiate between them. In certain cases the difference between the brightness of two colours may be so
slight that both record in almost the same tone of grey.
There a filter helps by modifying the depth of one or the other colour, and so making it show up lighter or darker
than it would normally.
The commonest example is the blue sky with white clouds in a landscape. The blue is so brilliant (and the film is
often excessively sensitive to it) that the clouds do not show up against it. By putting a yellow filter in front of
the camera lens we can subdue or "hold back" the blue, so making it record darker in the final print. We can
even go further and over-emphasize the effect progressively with an orange or red filter; these darken the blue
so much that the sky looks almost black for a really dramatic effect.
The same considerations hold for other filter effects. For instance, the film renders a red rose in the same tone
of grey as the green leaves of the rose bush. With the colour contrast gone, the rose disappears in its
surroundings. A green filter makes the rose darker and the leaves lighter; conversely a red filter will show up the
rose as light against dark foliage. Scientifically, both filters falsify the tone rendering, but produce a more
acceptable pictorial result.
In all these cases a filter lightens objects of its own colour, and darkens objects of its complementary colour.
Apart from isolated instances in pictorial photography, such contrast control is very valuable in copying and
scientific work (e.g. photomicrography).
All filters cut out some part of the light and thus, as a compensation, an increase in exposure time is necessary
when using them. This is stated on most filters in the form of a filter factor indicating by how much (e.g. 2
times, 3 times), the exposure must be increased with that filter. The factors are approximate for they depend
not only on the nature of the filter but also on the exact colour sensitivity of the film and on the colour of the
prevailing light.
Filters for Colour Film
The normal yellow, orange and other filters for black-and-white film must never be used with colour films as
they would give the picture a strong overall colour tint.
In daylight and with daylight type film, only two filters are ever required. One is a haze filter, almost colourless
but for a slight straw tinge. It is usefully employed on hazy days and in high altitudes to avoid excessive
bluishness of the colour picture, especially with distant landscapes, seascapes and near water. This filter does
not call for any change in exposure. On dull days, a skylight filter compensates for the excessive coldness of the
colour rendering.
Either filter is also useful for colour photography with electronic flash as it produces somewhat warmer tones.
Conversion filters are used if a colour film, balanced for one type of light, should be used in another type of
light. The film manufacturers give specific recommendations , generally in the instructions with the film.
Polarizing Filter
There are times when the judicious use of reflections will enhance the pictorial effect of the picture, but they are
also frequently obtrusive and undesirable. Thus highly-polished subjects are difficult to illuminate successfully so
as to obtain a true photographic rendering, since they will reflect too much light and so spoil the reproduction
with a glare which obscures the detail. To overcome this difficulty the polarizing filter suppresses light
reflections from glass, china, enamel, polished wooden surfaces, water, etc.(but not metals.) This filter will
prove particularly useful when taking shop windows, furniture, photography of wet objects, etc. The effect is
greatest when the camera points at a reflecting surface at an angle of about 35°.
The filter must be rotated to find out its best position on the lens. The Retina Reflex camera is ideal for this
observation. The filter is simply held in front of the lens, and then slowly rotated to find the best or desired
result on the reflex-focusing screen. Push the filter on to the lens in the position selected. As the polarizing filter
is slightly tinted, the exposure time should be increased by a factor of 3.
The polarizing screen is, in addition, particularly useful in colour photography where it acts similarly to the
yellow filter in black-and-white photography, i.e. it darkens a "milky" blue sky. The bluish colour cast obtained
with diffused sky light is removed or at least appreciably reduced with the polarizing filter. The reduction or
elimination of reflections through this filter is of course just as useful in colour pictures as it is in black-andwhite.
EXPOSURE
Exposure means -- to expose the film in your camera to light. The dose of light any film needs to produce the
right sort of image depends on how sensitive that film is to light. A fast film is more sensitive than a slow film.
Page 15

Once your choice of film is settled, the basic condition of exposure is settled with it. You are now left with the
problem of scaling the light you find in front of your camera to the amount your film needs.
Your job is to judge the light reflected from the subject you are about to photograph. Your grandfather as an
amateur photographer used to take into account his geographical position, the time of the year, the hour of the
day, the state of the sky as well as the tone of the subject itself, and by so adding one thing to another size up
the light reflected from the subject. The experienced professional, of course, hardly ever worked that way. He
just had a look and he knew.
Today a light meter or exposure meter does the same for any photographer. It takes a look, it measures the
light and it lets you know.
In fact, it does more than that. It translates the light measured straight into terms of photographic exposure. It
does so by presenting you with the choice of aperture numbers and shutter speeds, sorting them out in pairs.
Aperture and Speed
The aperture number or f-stop controls the amount of light allowed to enter through the lens. These numbers
run in a series: 2-2.8-4-5.6-8-11-16-22. Each higher stop number lets through half the light of the next lower
number (next larger stop).
The shutter speed controls the length of time for which the lens is kept open to light. Shutter speed figures
represent fractions of a second: 2 = ½ second, 4 = ¼ second...500 = 1/500 second.
The actual exposure is a product of these two: "how much" and "how long". A large amount of light striking the
film for a short time may produce an image similar to that produced by a small amount of light striking the film
for a long time. Hence the free choice from a series of balanced aperture-shutter combinations offered by your
exposure meter: more or less open apertures paired with more or less quick shutter speeds, and more or less
stopped down apertures paired with more or less slow shutter speeds.
Cameras of recent vintage combine these pairs, made up of aperture stops and shutter speeds, into single
figures which are then called exposure values or light values. Once you set the exposure value suggested by the
exposure meter both the aperture and the shutter speed move up and down in step against each other, and so
keep the resulting exposure right at every combination.
With exposure meters built into the camera and coupled to cross-linked aperture-speed controls you may even
be able to set the right exposure without looking up the number either on the meter or the camera. You set the
exposure visually by following the swing of the needle in the meter and matching it with a pointer or a circle on
the spot where the needle comes to rest.
Choosing the Combination
But whether you work out the right exposure from an elaborate table or chart;
whether you are presented with a series of exposure values or pairs of aperture figures and shutter speeds;
whether you just set the exposure to the point shown by the needle in your meter;
or whether the meter does the job for you altogether -- you still have one decision to face: which apertureshutter combination to choose for any given shot. Paradoxically enough, they all are right yet one is better than
the other.
Why should it be so?
Because both the aperture and the shutter also have secondary functions and effects.
The aperture not only controls the amount of light that is allowed to pass the lens -- it also has a bearing on
how much of the image will be sharp.
The shutter, in controlling the length of time for which the light strikes the film, will inevitably record any
movement that happened during that time as a slight or greater blur.
So you are left with three things to think of:
How fast is the action you want to catch?
How much of the scene in front of the lens has to be sharp?
Is the light good enough to go by either?
If there is fast action you have to choose and pre-set an appropriately fast shutter speed (p.38) and then pair it
with the stop you get by the cross-coupled controls or from your meter.
Page 16

If the scene is to be sharp from a point close to the lens to some other point well away from it, you should
choose the stop that will yield the necessary depth of field (p.40) and then pair it with the shutter speed
necessary for the correct exposure.
If the light is very poor, the chances are that you may not be able to cope with either extremely fast or
particularly deep subjects. Yet your choice in putting shutter speed or depth of field first should still be governed
by what you value most about the picture you propose to take.
Exposure nowadays is no problem at all. You can arrive at the right exposure by guessing it, measuring it, or
just leaving it to the camera. But to hit it off in such a way that it will produce the picture you want is still a
matter of intelligent judgement.
Time Exposures
When the light is very weak, especially when you have to use a small stop, even the slowest shutter speed of 1
sec. may be too short. In that case, you need time exposures. Set the shutter to B and press the release
button. The shutter now remains open for any length of time until you let go of the release button.
For such time exposures, the camera must be mounted on a firm support such as a tripod.
It is safest to release the shutter with the help of a cable release to avoid shaking the camera. This release
screws into the bush in the centre of the body release button.
For long time exposures, where the shutter is to remain open for longer than you can conveniently keep the
release depressed, use a cable release with a lock. To make the exposure set the shutter to B, press the cable
release plunger with the locking plate lifted. The shutter will now remain open until the locking plate is
depressed. On cable releases with locking screws, tighten the screw on pressing the plunger and undo the screw
to close the shutter.
The Self-timer
The Retina Reflex models carry a delayed action release or self-timer. This is usually controlled by the same
lever as the flash synchronization (p.42). When you press the release button with the self-timer in operation,
the shutter only goes off after a delay of 8-10 seconds and you have time to take your place in your own
picture. The camera must, of course, be mounted on a tripod.
USING THE EXPOSURE METER
For normal meter readings. point the camera with the cell at the
subject by observing the latter on the finder screen. With
landscapes and other open views point the camera slightly
downwards to exclude excessively bright sky areas which might give
misleading results.
For accurate readings against very light or very dark backgrounds,
go close to the subject with the camera so that the meter cell just
takes in the important part of subject.
Page 17

Subjects of great contrast with very bright as well as very dark
areas call for separate close-up readings. Here you measure the
light first of the bright and then of the dark parts independently,
noting the apertures obtained in each case, and finally set the
aperture scale (with the exposure wheel) to an in-between value.
The meter needle will of course in this case no longer be lined up
with its setting index.
Incident light readings are most reliable for colour film, and have the
advantage that they need very little correction for the subject itself.
To take such readings first fit the diffusing screen supplied with the
camera over the exposure meter cell. Then point the camera with
the meter from the subject towards the camera position to be used
for the exposure.
Using an Exposure Meter
To get the best results an exposure meter has to be used intelligently. This may look like a contradiction, since
we have already said that it is an accurate light measuring instrument. But light from all parts of the subject -highlights, shadows and middle tones -- falls on the meter, so the reading it gives us is an average one for the
whole subject area.
Meters are scaled to suit typically average subjects -- i.e. subjects with average areas of light, dark and middle
tones. So if you point the meter at a subject of this kind, the exposure reading will be correct.
But if the subject is not average -- if there are large highlight areas and little shadow, or large shadow areas
with few highlights -- then you have to modify the exposure reading to obtain the best results.
So there is more to using a meter than just pointing it at the subject and accepting the reading without
question.
Reflected Light Readings
The usual method of using a meter is to point it directly at the subject. This gives the correct exposure reading
provided the subject has an average mixture of highlights, shadows and middle tones. But if there is a large
bright area, or a large dark area, the best method is to go near to the main subject and take a close-up reading.
For example, if the subject is a figure against a white or dark background, by going closer you will reduce the
amount of background affecting the meter and therefore get a reading in terms of a more average subject,
which is what you want.
For some subjects you can take a reading from really close up, aiming the meter at the part of the subject that
you want to make sure has optimum exposure. For instance, many photographers take a close-up reading of the
sitter's face in portraiture; out-of-doors you can take the reading from the back of your hand instead of going up
to the subject.
If you cannot go close up to a subject that needs a close-up reading, then try to find something near at hand
that is similar in tone to the subject, and take a reading from this.
When taking readings of general scenes including a good deal of sky, you have to tilt the meter down slightly to
reduce the area of sky "seen" by the meter. The sky is a bright highlight, and by tipping the meter down to
exclude some of it, the subject becomes "average" in tone range.
Open views, such as distant landscapes, usually have very light shadows, so you can give a shorter exposure
than the meter indicates. It is usual to give half the exposure -- i.e. use double the shutter speed, or use one
stop smaller.
INCIDENT LIGHT MEASUREMENT. Another method of assessing exposure is to measure the strength of the light
falling on the subject instead of that reflected by it. But if you point the meter straight at the light you get a
much higher reading than if you point it at the subject. So the light has to be cut down for the meter to indicate
the correct exposure. This is done by fitting a white diffuser supplied with the meter over the honeycomb cell.
The diffuser is designed to reduce the light by just the right amount. It also serves another important purpose,
and this is to ensure that the meter includes all the light falling on the subject over an angle of almost a full
180°.
Page 18

The incident light method is particularly useful for reversal colour films, and for subjects with contrasty
backgrounds when it is impossible to take a close-up reading.
To take a reading, the method is simply to turn your back on the subject and point the meter in exactly the
opposite direction. If the main light -- say the sun -- is coming from the side, don't just partly turn round and
point the meter at this; turn round completely, and let the main light strike the meter at the same angle at
which it strikes the subject.
If the light on the subject is different from that on yourself at the camera position (say if the subject is in the
shade, and you are in the sun), you must then go up to the subject and take the reading, pointing the meter
towards the camera position.
AGAINST THE LIGHT subjects are extreme cases of non-average tone range. The main lighting becomes a very
bright highlight in the field of view, so if you point the meter straight at the subject it will indicate too short an
exposure and give you a silhouette effect in the final picture.
This is all right if you want a silhouette. But if you want correct exposure for the subject, you should either take
a close-up reading, or take a reflected light reading from the camera position and give four to eight times the
exposure indicated.
COLOUR FILMS have little exposure latitude, so particularly careful reading is advisable. The meter is used in the
same way as for black-and-white films.
Because of the importance of the highlights, if you are using a meter from the camera position for an againstthe-light shot, it is best to only double the reading, and not multiply it four to eight times as recommended for
black-and-white negative films.
Shutter Speeds and Movement
The actual shutter-speed you need within a series of available aperture speed combinations is governed by
considerations of camera steadiness as well as of subject movement.
An unsteady camera hold results in camera shake, to which a small and light instrument such as the Retina
Reflex is particularly liable. Even the slightest shake will result in inferior definition of the negative. Practical
experience goes to show that 1/125 sec. is safe, while you have to hold the camera particularly steady when
using 1/60 or 1/30 sec. Where lighting conditions make even longer exposure times essential and there is no
subject movement, either support the camera on a tripod, or look round for extra support for your elbows and
hands -- e.g. a wall, railing, etc.
The shutter speed required to arrest movement depends of course primarily on the speed with which the subject
moves. Remember, however, that parts of the subject (e.g. the legs of a runner) may move faster than the
subject as a whole; you may sometimes have to compromise and show such parts slightly unsharp. Often that is
not a serious fault, as slight blurring -- provided the main part of the subject is sharp -- helps to emphasize the
impression of movement.
Other factors to consider are the distance of the subject -- the farther away, the less noticeable the movement
blur; the focal length of the lens -- a long-focus lens in effect brings the subject nearer; and the direction of the
movement. Objects moving across your field of view blur more than if they are approaching or receding.
The most convenient way of allowing for all these factors with the aid of a simple table (p. 65).
Aperture and Depth of Field
When you focus the Retina Reflex on a given object, the image of that object will be really sharp on the film.
Things nearer or farther away will be gradually less and less sharp, until they are noticeably blurred. The range
of distances over which objects are still acceptably sharp, before you do notice the loss of definition, is known as
the depth of field.
You can control the extent of this sharp zone by the lens aperture. As you stop down the lens, the zone of
sharpness grows in both directions; as you open up the lens, its depth decreases.
You can obtain the actual zone of sharpness at various apertures and distances from depth tables but in practice
the most convenient way is to use the depth of field indicator.
On the Retina Reflex IV, III and S this consists of two red pointers above the distance scale of each lens coupled
to the aperture setting. The pointers automatically close up at large apertures and move apart at small
apertures. One pointer indicates the near, the other the far limit of the depth of field for the distance and
aperture the camera has been set to. For example, at 9 ft. and f2.8, you will find the two pointers opposite 8
and 10 ft. so you have a sharp zone from 8 to 10 ft. At f16 the distances opposite the pointers may be 5½ and
25 ft. respectively.
The original Retina Reflex has a special scale of aperture numbers marked opposite the distance scale. There are
two sets of such numbers from the largest stop (f 2.8 or f1.9) to the smallest (f22)on each side of the focusing
index (the mark that indicates the distance to which you have set the lens).
Page 19

You will also notice that the depth of field is greater at far distances than near ones. At 5 ft. and f2.8 the sharp
zone covers from 4¾ ft. to 5½ ft. -- less than 1 ft. all together -- against 2 ft. at the 9 ft. setting and some 1520 ft. at 25 ft.
Two more points on depth of field.
First, the depth obtained depends also on the focal length of the lens. Short focus lenses yield more depth and
tele lenses less depth. That is why the alternative lens units of the Retina Reflex have their own depth of field
indicator.
Secondly, the sharp zones obtained by the indicator are based on a somewhat arbitrary assumption of how
much blurring is acceptable . So depth of field data for different cameras with the same lens may not always
agree, and you are also quite safe in rounding off figures obtained from such data. And if you intend to make
realty big enlargements from your negatives, you can use stricter standards of sharpness by simply stopping
down the lens by one stop.
The depth of field scale shows clearly how much of the subject will be sharp at any given distance and aperture.
The figure opposite the triangular index mark (top) is the focused distance (8 ft). The figures to either side of
the index mark represent aperture settings . If we then read off the distance opposite the aperture settings, we
see indicated the area of sharp focus. So with an aperture of f16 this area extends from just under 5 ft. to about
50 ft. But at f4 the depth of field is more limited, from just over 5 ft. to about 10 ft.
On the Retina Reflex S and III two pointers automatically show the depth of field zone (bottom). The pointers
are coupled with the aperture control and move apart at small stop settings and together at large apertures.
Zone Focusing
With action subjects and similar occasions where you want to shoot quickly, determining sharp zones even with
the depth of field indicator wastes too much time. There you need prepared settings covering given near and
medium distance ranges that you can easily memorize and set on the camera. The focusing zone table (p.49)
gives such settings : then you only have to worry about keeping the subject within that zone while you shoot.
FLASH WITH THE RETINA REFLEX
Flash is an efficient light source where no or insufficient daylight is available such as at night, indoors, etc. In
the flashlight you carry you own private "sun" with which you can illuminate your subject or scene at any time
and place.
Page 20

THE FLASH BULB is similar to a small electric bulb. However, when current passes through it, it lights up in an
intense flash lasting usually about 1/40 to 1/60 sec. Each bulb will flash only once and has to be discarded
afterwards.
The flash bulb is inserted in a flash gun and the current of the battery fires the bulb, while a reflector fixed
behind the bulb makes sure that all the light is directed towards the subject. Most flash guns incorporate a
capacitor unit which increases the reliability of firing, even when the battery is nearly exhausted. The shutter
speed, provided it is slower than 1/30 sec. (1/60 sec. with smaller bulbs), has no effect on exposure, since the
flash is shorter than the exposure time.
Most flash bulbs are available with a clear glass bulb (for black-and-white and negative colour film and for type
F reversal colour film) or with a blue-tinted bulb (for daylight type reversal colour films). The blue bulbs can
also be used for fill-in lighting by daylight with any type of colour film.
ELECTRONIC FLASH UNITS utilize the discharge of a high-tension capacitor through a flash tube. The power is
derived from an accumulator or battery (there are also models working from the mains electricity supply). The
electronic flash outfit is rather bigger and heavier than the flash bulb outfit, its comparative light output equals
a small flash bulb and its initial cost higher.. On the other hand, anything from 10,000 to 25,000 flashes are
obtained from one tube. The flash duration is extremely short (1/700 to 1/2000 sec.) and will arrest the fastest
movements. The cost of an individual exposure is negligible.
Electronic flash is suitable for black-and-white and negative colour film and also for daylight type, reversal
colour films. It can also be used for fill-in lighting by daylight.
Above: The synchronizing settings showing also the synchronizing locking lever (top left) and the flash socket on
the camera front which accepts the flash gun lead (top centre and right). At the M setting, flash bulbs can be
synchronized with any shutter speed from 1 to 1/500 sec. (lower left). At the X setting, electronic flash will
synchronize at any speed from 1 to 1/500 sec.. but flash bulbs only to 1/30 sec. (lower centre). The V setting
controls the delayed-action release and synchronizes in the same way as the X setting (lower right).
Right: More natural-looking lighting results from "bouncing" flash
light from a light surface (i.e., a ceiling) For ease of operation, the
flash gun can be fitted into a shoe on a movable ball which itself fits
into the camera accessory shoe.
Left: The Kodablitz flash gun
for the Retina Reflex uses a
capacitor unit and a 22.5-volt miniature battery. The gun will fit either
into the accessory shoe on the camera, or on to a bracket which is
screwed into the tripod bush.
How to Use Flash
Page 21

The Retina Reflex shutter is internally synchronized for use with flash bulbs and electronic flash. The cable from
the flash gun is plugged into the flash socket of the camera. On releasing the shutter, an electric circuit is
automatically closed through the flash socket, setting off the flash at this moment.
A synchronizing lever protrudes on the side of the shutter.This can be set to X or M.
The Retina Reflex IV has no synchronization lever. Its shutter is X-synchronized only.
Therefore the information on M-synchronization below does not apply to this model.
WITH THE SYNCHRONIZING LEVER SET TO X the shutter closes the flash circuit at the moment when the blades
are fully open. Therefore, electronic flash is synchronized at any shutter speed to 1/300 or 1/500 sec. This
setting may also be used with flash bulbs with short firing delay (i.e. bulbs which require only 4-6 milliseconds -
- thousandths of a second) to reach the peak of their light output with the shutter set to 1/60 sec. With other
bulbs, the fastest usable speed is 1/30 sec.
WITH THE SYNCHRONIZING LEVER SET TO M the shutter closes the flash circuit 16-18 milliseconds before the
shutter blades open to allow for the firing delay of most average flash bulbs. This setting is suitable for normal
flash bulbs at all speeds up to 1/300 or 1/500 sec. The M-setting will not synchronize electronic flash or shortdelay bulbs.
WITH THE SYNCHRONIZING LEVER SET TO V (not on early models of the Retina) the delayed action release for
self-portraits is brought into action. At the same time the shutter works with X-synchronization. This means that
you can work with delayed action and flash at X-synchronization; delayed action with M-synchronization is not
possible.
Exposure Guide Numbers
There is a convenient way of working out exposures with flash, and this is by means of a guide number. When
you buy flash bulbs you will always find the guide number for any speed of film printed on the packet.
To find the correct aperture to use, divide the guide number by the distance between the flash and the subject.
For instance, suppose you find that the guide number of the bulb with the film in use is 160. If you then want to
take a photograph at a distance of 10 ft. from the subject, divide 160/10 = 16. Therefore, the correct aperture
to use is f16. Alternatively, if you want to use an aperture of f8 for any reason, then the correct flash distance is
160/8 = 20. So the flash must be 20 ft. from the subject.
So far we have assumed that the exposures have been for average shots without much subject movement . For
these a shutter speed of 1/30 sec. is long enough to utilize all the light emitted from the bulb. On the other
hand, to arrest fast movements a faster shutter speed is required, such as 1/125, 1/250 or even 1/500 sec.
With each of these speeds a different guide number is needed (usually printed on the flash bulb packet) to
determine the correct exposure. They allow for a wider aperture to compensate for the fact that at fast shutter
speeds some of the light emitted from the bulb is lost.
USING ALTERNATIVE LENSES
The field of view covered by the standard lens is ideal for the majority of subjects. Occasionally, however, a
greater or reduced field of view has distinct advantages. Most Retina Reflex models have an interchangeable
lens system providing alternative focal lengths
for such occasions.
Wide-angle Lens
A wide-angle lens is a lens of shorter focal length; it sees and reproduces more of the subject in front of the
camera than does the standard lens.
Such a wide-angle lens has definite advantages in cases where the practicable distance between camera and
subject is limited and insufficient for the standard lens to record the subject in its entirety. The wide-angle lens
is, therefore, primarily used for architectural photography and interiors.
In view of its short focal length, the depth of field covers a particularly wide zone, even at full aperture. It can,
therefore, be employed with advantage as a quick-shooting lens for general purposes where accurate focusing or
distance-setting would be inconvenient (e.g. insufficient time).
To get a large image, even of a near object, you have to go really close to it. Near objects then tend to dwarf
more distant ones, and the resulting picture shows pronounced perspective effects, In this way, the wide-angle
lens can be used to emphasize perspective.
Telephotography
A tele lens on the other hand has a smaller angle of view than the standard lens. It is of longer focal length, it
reproduces less of the subject in front of the camera than the standard lens does, but on a larger scale.
Such a lens is particularly suitable for subjects that are difficult to approach closely such as animals, children,
architectural detail, sports events, etc. In photographing distant views without near foreground, it brings the
Page 22

subject nearer. It also permits a greater camera-to-subject distance in portraiture, producing a more pleasing
and subdued perspective. At the same time, its lesser depth of field concentrates definition on the portrait,
avoiding a sharp background which would detract from the main object.
Focusing and Viewing
Using a wide-angle or telephoto lens focusing is not different from that of the standard lens. The Retina Reflex
screen enables the image to be focused accurately by means of the split image rangefinder or on the ground
area.
At the same time, the reflex screen shows the exact field of view of the particular lens used. There is no parallax
error.
THE RETINA REFLEX IV
THE RETINA REFLEX IV camera is fitted with either the four-element Retina Xenar f2.8 50 mm. or the sixelement Retina Xenon f1.9 50 mm. Both have an angle of view of 47° and permit focusing from infinity to 24 in.
(60 cm.).
The complete lens is interchangeable against wide-angle and tele-photo lenses. The built-in photo-electric
exposure meter is directly coupled to the aperture setting. The meter needle is set in the viewfinder without
taking the camera from the eye. The exposure meter needle is also visible in a window on top of the camera.
A red signal appears in the viewfinder when there is insufficient light to take the picture. The shutter speed and
aperture are reflected into the viewfinder. The reflex screen has a fresnel lens, yielding a brighter image. The
split image rangefinder has a diagonal cutting line for easy vertical and horizontal focusing.
The built-in Synchro-Compur shutter has cross-coupled shutter speed and aperture settings and is X flash
synchronized with direct flash contact in accessory shoe and flash contact on camera body. The exposure
counter is self-zeroing and the rewind knob is fitted with a foldover hand crank.
The f2.8 lenses accept 32 mm. screw-in filters and close-up lenses (32 mm. is the outside diameter). The lens
hood is rectangular with a tubular bayonet fitting on the back to fit the bayonet mount surrounding the lens
itself.
The f1.9 lenses accept filters and close-up lenses of 60 mm. diameter. No lens hood is ordinarily required as the
lens is deeply recessed in its mount.
OTHER ACCESSORIES include a close-up attachment , table stand, copying stand, 1:1 close-up stand, microscope
adaptor, and framefinder.
The film speeds are set on the film speed dial with the aid of the locking knob on the back of the camera and the
exposure wheel. The meter needle is visible in the needle window on top of the cameras well as in the
viewfinder. A lens setting reflector above the lens also shows apertures and shutter speeds in the viewfinder.
The rewind knob is fitted with a rewind crank. An automatic depth-of-field indicator is coupled with the aperture
Page 23

control. Aperture and shutter scales are cross-coupled and are also coupled with the meter needle via the
exposure wheel. The winding lever is on the base of the camera with the rewind button situated beside it. The
film counter is also in the base and is reset with the counter setting button.
Shooting with the Retina Reflex IV. From left to right: work the winding lever; turn the exposure wheel to centre
the meter needle between the two fixed prongs in the finder field; select the most suitable aperture-speed
combination; focus the image in the finder; press the shutter release to expose.
Loading
1. Open the camera back .
2. Pull out the rewind knob .
3. Insert the film cassette .
4. Push back the rewind knob .
5. Pull out 3½ in. of film .
6. Fix the film to the take-up spool .
7. The exposure counter is self-setting . Transport film and release until the counter shows to 36. If films
with 20 or 12 exposures are used, push the exposure-counter button beside the counter window until the
diamond mark points to 23 or 15 in the counter window and only then transport film and release until the
counter points to 20 or 12 respectively.
8. Set film speed by pushing upwards the small locking knob on the back of the camera below the speed
indicator window while at the same time turning the exposure setting wheel below the lens mount until
the required film speed in ASA or DIN appears opposite the cut-out in the film speed window.
Unloading
1. Depress the reversing button.
2. Rewind film after folding over crank in rewind knob; the knob automatically rises slightly.
3. Open the camera back.
4. Remove the cassette.
5. Close the camera back or reload with a new film.
Shooting
1. Work the film transport.
2. Set the exposure time before taking a reading with the coupled meter (below). The shutter speed ring
bears two sets of figures separated by the letter B. The figures to the right of B denote fractions of a
second (e.g. 30 = 1/30 sec.) Turn the ring until the required speed is opposite the arrow head; usually 1/
60 sec. is a convenient starting point.
Look through the finder. Take care not to get your fingers in front of the honeycomb cell of the meter.
Turn the exposure setting wheel below the lens mount until the meter needle is centred between the
heavy double lines to the left of the viewfinder field. This sets the correct aperture for the pre-selected
shutter speed.
You can also watch the meter needle in the window in the top of the camera. This is useful if the depth of
field obtained should be observed at the same time. Point the camera at the subject, and turn the setting
wheel until the needle is centred between the two markers. The correct aperture is now set for the preselected shutter speed.
A resistance while you turn the setting wheel indicates that you have reached the limits of the aperture
scale. If you turn on, you then also change the shutter speed to obtain a correct exposure setting.
3. Select the aperture-speed combination. If you should want a different shutter speed or aperture after
having set the correct exposure, turn the shutter speed ring by its two black finger holds, until the
appropriate combination is opposite the arrow head. Aperture and shutter speed rings move in opposite
directions, and only the figures actually opposite the arrow head indicate the correct combination. To set
apertures and speeds separately (e.g. for flash shots) adjust first the shutter speed and then the aperture
(by the exposure setting wheel).
4. Focus. Look through the viewfinder and turn the lens mount by the protruding knob on the front until the
image is sharp in the finder. On some of the lenses you move the milled focusing ring.
5. Release the shutter gently by pressing the key on the camera front.
Special Controls
Page 24

FOR TIME EXPOSURES turn the shutter setting ring to bring the letter B (=brief time) opposite the arrow head.
On pressing the release, the shutter will remain open as long as the release is pressed down, and closes as
soon as the pressure on the released is removed.
The green figures on the exposure scale are time exposures. They indicate the time in seconds for which the
release has to be depressed at some of the smaller apertures at low lighting levels. If, for example, an exposure
setting gives 1 sec. at f2.8 any of the following combinations may be used: 4 sec. at f5.6; 8 sec. at f8; 15 sec.
at f11; or 30 sec. at f16. Incidentally, there is no green number 2. Its place is taken up by B. When reading off
full seconds, read 2 seconds for the B position. In the example above, if you want to use f4, you would require 2
seconds.
THE DELAYED-ACTION RELEASE for self-portraits, built into the shutter, is brought into action by moving
upwards the green lever on the shutter beside the release key.
On pressing the release button with the lever set to "V", the shutter goes off after a delay of approximately 10
sec., giving the operator time to take his place in the picture. Once the lever has been set to "V", it cannot be
moved again. On releasing, the lever will automatically spring back into the original position.
FLASH. The Retina Reflex IV has a fixed X flash synchronization. Therefore only those instructions on page 60
referring to X-synchronization apply.
THE RETINA REFLEX III
THE RETINA REFLEX III is fitted with a 2-in. (50 mm.) Retina Xenar or Retina-Ysarex f2.8 or a 2 in. (50 mm.)
Retina-Xenon or Retina -Heligon f 1.9. The f2.8 lenses are four-element triplets, the f1.9 lenses have six
elements of symmetrical four-component design. All have an angle of view of 47° and permit focusing from
infinity down to 3 ft.
The complete lens is interchangeable against wide-angle and tele-photo lenses. The built-in photo-electric
exposure meter is directly coupled to the aperture setting. The meter needle is set in the viewfinder without
taking the camera from the eye. The exposure meter needle is also visible in a window on top of the camera.
The extra-large eyepiece of the finder shows the entire picture on the ground glass screen even when wearing
spectacles or sunglasses.
A release key with safety button prevents unintentional exposures. The handy location of the key ensures
particularly smooth release.
The built-in Synchro-Compur shutter has cross-coupled shutter speed and aperture settings.
The f2.8 lenses accept 32 mm. screw-in filters and close-up lenses. (32 mm. is the outside diameter). The lens
hood is rectangular with a tubular bayonet fitting on the back to fit the bayonet mount surrounding the lens
itself.
The f1.9 lenses accept filters and close-up lenses of 60 mm. diameter. No lens hood is ordinarily required as the
lens is deeply recessed in its mount.
OTHER ACCESSORIES include a close-up attachment , table stand, copying stand, 1:1 close-up stand, microscope
adaptor, and framefinder.
Page 25

The film speeds on the film speed dial are set with the aid of the speed button and the exposure wheel. The
meter needle is visible in the needle window on top of the camera, as well as through the viewfinder. The rewind
knob incorporates a fllm-type indicator. The focusing knob moves the lens forward and backwards and is
attached to the front mount with the distance scale. An automatic depth of field indicator is coupled with the
aperture control. The aperture and shutter speed scales are cross-coupled with each other, as well as being
coupled with the meter needle via the exposure wheel. The film counter in the camera base counts exposures
backwards, and can be reset by the counter setting button. The transport lever in the camera base advances the
film and film counter, and also actuates the other operations of the winding sequence.
Shooting with the Retina Reflex III. From left to right: Work the rapid winding lever; turn the exposure wheel to
centre the meter needle between the two fixed prongs in the finder field; select the most suitable aperturespeed combination; focus the image in the finder; press the release key to expose.
Loading
1. Open the camera back.
2. Pull out the rewind knob.
3. Insert the film cassette.
4. Push back the rewind knob.
5. Pull out 3½# in.of film.
6. Fix the film to the take-up spool.
7. Set the mm counter by pushing the film counter setting button in the base of the camera (between
transport lever and counter window) repeatedly in the direction of the arrow, until the diamond mark
between 36 and 1 in the counter window is opposite the cut-out on the rim. If a 20 exposure film is used,
set the diamond mark next to 23 to the cut-out. Pull out the rapid winding lever as far as it will go and let
it fly back. Release the shutter. Repeat this until No.36 (or No.20 for a 20 exposure film) appears opposite
the cut-out of the film counter.
8. Set the film indicator.
9. Set the film speed on the exposure meter. Depress the button on the camera top between the film
speed dial and needle window. On later models, push up the knob on the back of the camera below the
speed indicator window. At the same time turn the exposure setting wheel below the lens mount until the
required film speed in ASA or DIN appears opposite the cut-out in the film speed window.
Unloading
1. Depress the reversing button.
2. Rewind the film.
3. Open the camera back.
4. Remove the cassette.
Page 26

5. Close the camera back or reload with a new film.
Shooting
1. Work the film transport.
2. Set the exposure time before taking a reading with the coupled meter (below). The shutter speed ring
bears two sets of figures separated by the letter B. The figures to the right of B denote fractions of a
second (e.g. 30=1/30 sec.). Turn the ring until the required speed is opposite the arrow head; usually 1/
60 sec. is a convenient starting-point.
Look through the finder. Take care not to get your fingers in front of the honeycomb cell of the meter.
Turn the exposure setting wheel below the lens mount until the meter needle is centred between the
heavy double lines to the left of the viewfinder field. This sets the correct aperture for the pre-selected
shutter speed.
You can also watch the meter needle in the window in the top of the camera. This is useful if the depth of
field obtained should be observed at the same time. Point the camera at the subject, and turn the setting
wheel until the needle is centred between the two markers. The correct aperture is now set for the preselected shutter speed.
A resistance while you turn the setting wheel indicates that you have reached the limits of the aperture
scale. If you turn on, you then also change the shutter speed to obtain a correct exposure setting.
3. Select the aperture-speed combination. If you should want a different shutter speed or aperture after
having set the correct exposure, turn the shutter speed ring by its two black finger holds, until the
appropriate combination is opposite the arrow head. Aperture and shutter speed rings move in opposite
directions, and only the figures actually opposite the arrow head indicate the correct combination. To set
apertures and speeds separately (e.g. for flash shots) adjust first the shutter speed and then the aperture
(by the exposure setting wheel).
4. Focus. Look through the viewfinder and turn the lens mount by the protruding knob on the front until the
image is sharp in the finder. On some of the lenses you move the milled focusing ring.
5. Release the shutter gently by pressing the key on the camera front. The release will only move if you
press down the black safety catch at the same time.
Special Controls
FOR TIME EXPOSURES turn the shutter setting ring to bring the letter B (=brief time) opposite the arrow head.
On pressing the release, the shutter will remain open as long as the release is pressed down, and closes as
soon as the pressure on the release is removed.
The green figures on the exposure scale are time exposures. They indicate the time in seconds for which the
release has to be depressed at some of the smaller apertures at low lighting levels. If, for example, an exposure
setting gives 1 sec. at f2.8, any of the following combinations may be used: 4 sec. at f5.6; 8 sec. at f8; 15 sec.
at f11; or 30 sec. at f16. Incidentally, there is no green number 2. Its place is taken up by B. When reading off
full seconds, read 2 seconds for the B position. In the example above, if you want to use f4, you would require 2
seconds.
THE DELAYED-ACTION RELEASE for self-portraits, built into the shutter, is brought into action by moving the
lever on the right of the shutter (looking down from the top) to "V". This can only be done after the film has
been advanced. First depress the small projecting stud next to the word "SYNCHRO" behind the shutter ring. On
pressing the release button with the lever set to "V", the shutter goes off after a delay of approximately 10 sec.,
giving the operator time to take his place in the picture. Once the lever has been set to "V", the position cannot
be altered any more. On releasing, the lever will automatically move back to the X position.
FLASH SETTINGS. For X- or M-synchronization, set the lever at the right of the shutter to X or M, at the same
time depressing the small protruding lock on the left.
THE RETINA REFLEX AND RETINA REFLEX S
THE RETINA REFLEX S is fitted with a 2 in. (50 mm.) Retina Xenar or Retina-Ysarex f2.8 or the 2 in. (50 mm.)
Retina-Xenon or Retina -Heligon f 1.9. The f2.8 lenses are four-element triplets, the f1.9 lenses have six
elements of symmetrical four-component design. All have an angle of view of 47° and permit focusing from
infinity down to 3 ft.
The complete lens is interchangeable against wide-angle and telephoto lenses. The built-in photo-electric
exposure meter is directly coupled to the aperture setting, the meter setting is obtained by super-imposing a
pointer with a needle, while observing the exposure meter window in the top of the camera.
The built-in Synchro-Compur shutter has cross-coupled shutter speed and aperture settings.
The f2.8 lenses accept 32 mm. screw-in filters and close-up lenses (32 mm. is the outside diameter). The lens
hood is rectangular with a bayonet fitting on the back to fit the bayonet mount surrounding the lens itself.
Page 27

The f1.9 lenses accept filters and close-up lenses of 60 mm. diameter. No lens hood is ordinarily required as the
lens is deeply recessed in its mount.
OTHER ACCESSORIES include close-up attachment, table stand, copying stand, 1:1 close-up stand, microscope
adaptor, right-angle finder, and framefinder.
The film speeds are set on the film speed dial of the exposure meter. The film counter in the camera top counts
exposures backwards. The film release frees the film transport lock and permits advancing the film without
exposing it (for example when changing partly exposed films). The release button in the camera top
incorporates the cable release socket. The film counter setting button is mounted in the back of the camera. The
rewind knob incorporates a film-type indicator. The automatic depth of field indicator is coupled with the
aperture control. The shutter speed and aperture scales are cross-coupled with each other and are also coupled
with the setting marker of the exposure meter via the exposure setting wheel. The focusing knob is attached to
the focusing lens mount which carries a distance scale. The rapid winding lever advances the film and film
counter as well as bringing the winding sequence into action The reversing button in the camera base
disengages the film transport for rewinding the film.
Shooting with the Retina Reflex S. From left to right: Advance the film and tension the shutter with the rapid
winding lever; turn the exposure wheel to line up the setting marker with the meter needle; select a suitable
aperture-speed combination; focus the image through the viewfinder; press the release to expose.
THE RETINA REFLEX
THE RETINA REFLEX is fitted with a 2 in. (50 mm.) Retina-Xenon or Retina-Heligon f2. These lenses consist of
six elements of a symmetrical four-component design and have an angle of view of 47°. They focus from infinity
down to 2½ ft. The front element is interchangeable and can be replaced by wide-angle or telephoto units,
converting the whole lens into a wide-angle or telephoto system.
The built-in photo-electric exposure meter works with a setting marker, which has to be set to the needle
position and directly indicates exposure values.
The built-in Synchro-Compur shutter is similarly calibrated for exposure values and has cross-coupled speed and
apertures.
The lens accepts 32 mm. screw -in filters and close-up lenses (32 mm. is the outside diameter). The lens hood is
rectangular with a bayonet fitting on the back to fit the bayonet mount, surrounding the lens itself.
Page 28

OTHER ACCESSORIES include a close-up attachment , table stand, copying stand, microscope adaptor, stereo
attachment, right -angle finder and frame-finder.
THE ORIGINAL RETINA REFLEX
The meter wheel controls the setting marker of the exposure meter and incorporates the film speed setting. The
meter window shows the meter needle and setting marker. The film counter in the camera top counts exposures
backwards. The film release disengages the transport lock for changing partly exposed films. The release button
incorporates a cable release socket. The film counter setting button is mounted in the camera back. The rewind
knob incorporates a film-type indicator. The shutter speed and aperture controls are cross-coupled, but not
coupled with the exposure meter. The exposure value lever selects exposure values. The focusing ring carries
the distance scale. The synchronizing lever selects X or M synchronization, and tensions the self-timer. The front
lens component is interchangeable to yield alternative focal lengths. The rapid winding lever tensions the
shutter, advances the film, and actuates the winding sequence. The lens catch releases the interchangeable lens
component. The reversing button disengages the film transport mechanism.
Shooting with the original Retina Reflex. From left to right: Work the rapid winding lever; set the exposure
value; select an appropriate aperture speed combination; focus the image through the viewfinder; press the
release to expose.
Loading
1. Open the camera back.
2. Pull out the rewind knob.
3. Insert the film cassette.
4. Push back the rewind knob.
5. Pull out 3½ in. of film.
6. Fix the film to the take-up spool.
7. Set the film counter by pushing the counter setting button at the right of the viewfinder in the direction
of the engraved arrow, while at the same time pressing the film release button behind the exposure
counting window. Keep pushing the setting button over until the diamond mark between the No.1 and 36
in the film counter is opposite the notch in the window. If a 20-exposure film is used, set the diamond
mark between Nos. 20 and 25 to the notch. Now pull the transport lever as far as it will go and press the
film release. Repeat until No.36 (or No.20 on a 20-exposure film) appears in the film counter.
8. Set the film indicator.
9. Set the film speed on the exposure meter. On the Retina Reflex S depress the button in the centre of the
meter dial and turn the exposure setting wheel below the lens barrel to bring the required ASA or DIN
figure into the appropriate cut-out of the meter dial. On the earlier Retina Reflex turn the inner disc of the
exposure meter dial by the small stud near its circumference to bring the required film speed opposite the
appropriate (ASA or DIN) arrow head.
Page 29

Unloading
1. Depress the reversing button.
2. Rewind the film. On the early Retina Reflex pull up the rewind knob to its first stop for rewinding.
3. Open the camera back.
4. Remove the cassette.
5. Close the camera back or reload with a new film.
Shooting
1. Work the film transport.
2. Retina Reflex S: Set the exposure before taking a reading with the coupled meter. The shutter speed
ring bears two sets of figures separated by the letter B. The figures to the right of B denote fractions of a
second (e.g. 30=1/30 sec.). Turn the ring until the required speed is opposite the arrow head; usually 1/
60 sec. is a convenient starting-point. Then point the camera at the subject and turn the exposure setting
wheel below the lens barrel until the yellow pointer covers the white indicator needle of the meter. That
sets the correct aperture for the pre-selected shutter speed.
The white lines visible in the two corners of the meter window indicate the limits of the meter readings. If
the white meter needle is outside these marks, the light conditions are too strong or too weak for the
measuring range of the meter.
A resistance while you turn the setting wheel indicates that you have reached the limits of the aperture
scale. If you turn on, you then also change the shutter speed to obtain a correct exposure setting.
3. Retina Reflex: Set the exposure value. The shutter rim carries a range of numbers engraved in red
from 2-18 which represent exposure values for correct exposure. Each exposure value covers a range of
shutter speed-aperture combinations as by a single setting. The built-in exposure meter of the Retina
Reflex (see below) is calibrated in exposure values, the reading can thus be transferred directly to the
shutter. To set the exposure value, slightly depress the serrated lever on the left of the shutter front and
move the red dot beside it to the appropriate exposure value on the scale. Intermediate exposure values,
e.g. 10½, 11½, etc., can also be set.
4. Select the aperture-speed combination. If you want to change the shutter speed or aperture on the
Retina Reflex S, turn the shutter speed ring by its two black finger holds, until the appropriate
combination is opposite the arrow head. Aperture and shutter speed rings move in opposite directions, and
only the figures actually opposite the arrow head indicate the correct combination.
On the Retina Reflex, change the combination by turning the milled shutter ring. Aperture and speed
scales here move together. The figures opposite each other represent alternative combinations
corresponding to the exposure value set. Again only the aperture and speed actually opposite the double
arrow head are the ones in use.
To set apertures and speeds separately with both models (e.g. for flash shots) adjust first the shutter
speed and then the aperture by turning the exposure setting wheel of the Reflex S, or by depressing the
exposure value lever and turning the aperture ring on the Reflex.
5. Focus. Look through the viewfinder and turn the front lens mount of the Retina Reflex S, or the large
serrated ring on the back of the shutter rim of earlier Reflex models, until the image appears sharp in the
finder.
6. Release the shutter by gently pressing down the release button.
The Exposure Meter of the Retina Reflex
1. Set the film speed as described for loading.
2. Point the camera at the subject, taking care not to obscure the honey-comb meter window by a
finger.
3. Turn the meter setting ring to line up the yellow pointer with the white meter needle. The white
needle moves in the cut-out window (between body release and exposure meter wheel). Turn the
meter setting ring (the outer milled ring of the exposure meter knob) until the yellow pointer lies
exactly over the top of the white needle.
4. Read off the exposure value opposite the red triangle on the inner disc of the exposure meter
knob. If the triangle points to a position between two numbers, set the intermediate light value. For
example, if the triangle points between 8 and 9, use 8.5 for greatest accuracy.
Special Controls
FOR TIME EXPOSURES turn the shutter setting ring until B (=brief time) is opposite the index mark. On
releasing, the shutter will remain open as long as the release button is pressed down and closes as soon
as the pressure on the release is removed.
On the Retina Reflex S the green figures on the exposure scale are for calculating time exposures. With
the shutter speed ring set to B, the green figures indicate the time in seconds required at smaller
apertures and low lighting levels. If, for example, an exposure setting gives 1 sec. at f2.8, any of the
following combinations may be used: 4 sec. at f5.6; 8 sec. at f8; 15 sec. at f11; or 30 sec. at f16.
Incidentally, there is no green number 2. Its place is taken up by B. When reading off full seconds, read 2
seconds for the B position. In the example above, if you want to use f4, you would require 2 seconds.
THE DELAYED-ACTION RELEASE for self-portraits built into the Synchro-Compur MXV shutter is brought
into action by moving the lever on the left of the shutter (right on the Reflex S) to "V". This can only be
done after the film has been advanced. To move the lever first depress the small projecting stud at the
rear of the shutter ring (on the earlier Reflex the stud in the depth of field ring near the base of the
camera). On pressing the release button with the lever set to "V", the shutter goes off after a delay of
Page 30

approximately 10 sec., giving the operator time to take his place in the picture. Once the lever has been
set to "V", the position cannot be altered any more. On releasing, the lever will automatically move back
to the X position.
FLASH SETTINGS. For X- or M-synchronization, set the lever at the right of the shutter (on the lower part
of the shutter on earlier Reflex models) to X or M, at the same time depressing the small protruding lock,
as for the self-timer setting.
THE RETINA REFLEX IV, III AND S LENSES
The Retina Reflex IV, III and S lenses are interchangeable, being held in place by quick-change bayonet fitting.
The shutter is situated behind the lens, and any lens inserted can be accurately focused by both the split-image
rangefinder and the ground glass focusing screen. As the taking lens is at the same time the finder lens, you
always see the correct view in the finder with any lens used.
The iris diaphragm of all lenses couples up automatically with the aperture-speed controls on the shutter, and
with the pre-selector mechanism that stops down the lens on releasing the shutter.
Wide-Angle Lenses
The 1 1/8 in. (28 mm.) Retina Curtagon f4 covers an angle of 76° as compared with the standard lens of 47°,
and is an ultra-wide angle lens.
The 1 1/8 in. (30 mm.) Retina Eurygon f2.8 has a slightly smaller angle of view than the 28 mm. lens, but is
intended for the same applications.
The 1 3/8 in. (35 mm.) Retina Curtagon f2.8 and Retina Eurygon f4 cover an angle of 64° and are normal wideangle lenses. The focusing range of the wide-angle lenses extends from infinity down to 3 ft.
The 28 mm. and 30 mm. lenses take 60 mm. filters; no lens hood is required, the lens being sufficiently
recessed in the mount.
The 35 mm. lens takes 32 mm. filters and a special rectangular bayonet lens hood.
Tele Lenses
The 3 3/8 in. (85 mm.) Retina Tele-Arton and Retina Rotelar f4 cover an angle of 28° as compared with the
standard lens of 47°. The focusing range of the 85 mm. lenses extends from infinity to 6 ft.
The 5 3/8 in. (135 mm.) Retina Tele-Xenar and Retina Rotelar f4 cover an angle of 19°.
The focusing range of the 135 mm. lenses extends from infinity to 14 ft. For close-ups with this lens, see below.
The 7 7/8 in. (200 mm.) Tele-Xenar focuses from infinity to 25 ft. and covers an angle of 12°.
The 85 mm. lens accepts 32 mm. filters and uses the rectangular bayonet hood (as used for the 35 mm. lens)
with a supplementary attachment.
The 135 mm. lens accepts 60 mm. filters and uses a round slip-on lens hood.
THE INTERCHANGEABLE LENSES
Page 31

Above: The interchangeable lenses greatly increase the versatility of the Retina Reflex cameras. The wide-angle
lens (top left and centre) covers a large angle of view as compared with the standard lens (bottom left). The tele
lenses on the other hand include a much narrower angle and show distant subjects larger (right).
To remove the lens of the Retina III or S press the catch below the lens barrel, and turn the milled lens
mounting ring anti-clockwise to lift out the lens. To insert an alternative lens, place it in position with the red dot
on the lens opposite the red dot on the camera mount. Then turn clockwise to let the bayonet catch engage.
Changing Lenses
To remove the lens of the Reflex III and S, depress the lens lock underneath the lens barrel and at the same
time turn the lens fully anti-clockwise. Then lift out.
To insert a lens, place it in position with the red dot on the lens mount against a similar red dot on the bayonet
ring of the shutter. Now turn the lens clockwise until the catch engages.
Focusing and Depth of Field
After changing the standard lens against the wide-angle or telephoto units, the image is focused on either the
ground glass screen or with the split-image rangefinder in the same way as with the standard lens. At the same
time, the reflex screen shows the exact field of view of the particular lens used. There is no parallax error nor
are any supplementary viewfinders required.
The tele and wide-angle lenses for the Retina Reflex IV, III and S have their own depth of field indicator pointers
which show directly the extent of the sharp zone at all settings.
Close-ups with the Tele Lenses
The 135 mm. lenses can also focus on distances nearer than 14 ft. For this purpose a TII/60 supplementary is
used for close-ups between about 13 and 7 ft., and a TI/60 lens for distances between 6½ and 4¾ ft. A TI/32
supplementary lens in the same way covers near distances from 6 to 3½ ft. with the 85 mm. tele lenses.
THE RETINA REFLEX LENS SYSTEM
The earlier Retina Reflex has a convertible lens system with an interchangeable front component which can be
replaced by various alternative front components for different focal lengths.
Page 32

The Wide-Angle Units
If the Retina Reflex is equipped with the standard Xenon C lens, only the 1 3/8 in. (35 mm.) Curtar-Xenon f4 or
f5.6 can be used as wide-angle unit. If the camera has a standard Heligon C lens, only the 1 3/8 in. (35 mm.)
Heligon C f4 or f5.6 can be fitted. These 35mm. lenses increase the angle of view to 64º compared with the 47º
of the standard lens.
The 35 mm. f5.6 lenses accept 32 mm. filters and the standard lens hood with supplementary rectangular
bayonet attachment.
The 35 mm. f4 lenses take 60 mm. filters and a round 60 mm. slip-on lens hood.
The Tele Units
If the Retina Reflex is equipped with the Xenon C as the standard lens, only the 3 1/8 in. (80 mm.) Longar
Xenon C f4 can be used as telephoto unit. Cameras with a Heligon C standard lens take the 3 1/8 in. (80 mm.)
Heligon C f4.
These 80 mm. lenses decrease the angle of view to 30º as compared with the 47º of the standard lens. They are
fully corrected.
The 80 mm. lenses take 60 mm. filters. The lens hood required forms part of the plastic container in which the
lens is supplied.
Lens Changing
To remove the interchangeable front component of the standard Retina Reflex lens, press the safety catch
inwards (towards the lens) and turn the front part of the lens in an anti-clockwise direction as far as it will go,
that is, until its red dot is opposite the red dot on the black outer rim of the lens mount. The lens can now be
lifted out. For easy removal and safe storage of the standard lens, the special container available for it should be
used. . .
To insert an alternative lens unit into the camera, place it in position over the mount so that the red dot on the
lens lies opposite to the red dot on the shutter rim. When the lens is seated, turn it firmly in a clockwise
direction as far as it will go to engage the bayonet lock. A slight click is usually audible.
The standard lens of the Retina Reflex must not be changed against a standard lens from another Retina Reflex
or from a Retina IIC or IIIC camera. Therefore, make sure that the serial number engraved on the lens itself is
the same as the serial number engraved on the bayonet mount front plate of the camera.
THE CONVERTIBLE LENSES
To change the lenses of the original Retina Reflex remove the front component by pressing the catch inwards
and turn the lens anticlockwise (left), then lift out (centre). When inserting a lens line up the red dot on the lens
component with the red dot on the front of the shutter. then turn clockwise to engage the bayonet lock.
Page 33

Above: With the wide-angle lens (left) the zone focus setting is marked by a small black circle. Set this circle to
the red triangular index mark. The black scale now indicates about 20 ft. Set the distance scale to 20 ft. and the
aperture to f11. This yields a sharp zone of focus from about 5½ ft. to infinity. The telephoto lens (right) has
two small black circles. For near focusing, set the circle near figure 15 to the red triangle. The black scale then
indicates 6 ft. Set the distance scale to 6 ft. and the aperture to f11, and the zone of sharp focus extends from
about 11½ ft. to 20 ft. For far focusing, set the black circle near figure 50 to the red triangle. The black scale
will then indicate 20 ft. Set this figure on the distance scale and the aperture to f11, and the zone of sharp focus
extends from 25 ft. to infinity.
Focusing and Depth of Field
After changing the standard lens against the wide-angle or telephoto lens units, the image is focused on either
the ground glass screen or with the split image rangefinder in the same way as with the standard lens. At the
same time, the reflex screen shows the exact field of view of the particular lens used. There is no parallax error
nor are any supplementary viewfinders required.
To ascertain the depth of field obtained with either telephoto or wide-angle lens, focus the Retina Reflex with the
rangefinder or reflex screen. Read off the distance setting on the distance scale opposite the elongated diamond
mark. Then set this figure on the black scale of the telephoto or wide-angle unit against the red triangular mark.
The extent of depth of field can now be read off to the right and left of this triangular mark on the white scale of
the lens (see also below).
ZONE FOCUSING WITH C LENSES. The zone focus setting on the wide-angle lens is marked by a black circle
near the 10 ft. position on the lens scale, marked "35 mm." in red. Set this circle to the red triangular mark on
the adjacent scale. The triangle lined up with the circle points to the black distance scale of this lens to 20 ft.,
thus indicating that the distance on the camera focusing scale should be set to 20 ft. to obtain a depth of field
from 5½ ft. to infinity at f11.
The telephoto unit carries two zone focus settings each marked by a black circle, one near the 50 ft. figure (far
zone setting) and the other one near the 15 ft. figure (near zone setting) on the distance scale marked "80
mm." in red.
For far zone focus setting, line up the circle near the 50 ft. mark with the red triangular mark on the adjacent
scale and they will point to 20 ft. on the black scale. Set camera distance to 20 ft., and at f11 a depth of field
from about 25 ft. to infinity is obtained.
For near focusing use the black circle near the 15 ft. mark and align with the red triangle. When properly aligned
they will point to 6 ft. on the black distance scale. At an aperture of f11 a depth of field from approximately 11½
to 20 ft. is obtained.
The scale rings on both the telephoto and wide-angle units are solely calculating rings for depth of field and zone
focus setting. They have no other function; in particular, they are not used for distance setting.
Close-ups with the Telephoto C Lens
The telephoto lens covers distances between 6½ ft. and infinity. Closer distances, between 3½ and 6½ ft., can
be taken with the aid of the TI/60 close-up lens. This will be found particularly useful for close-up portraits to
avoid distortion. The correct distance setting as well as the accurate field covered is -- as in all other cases -observed through the reflex finder. To determine the depth of field available, focus on the subject in the normal
way. Read off the distance setting and set the equivalent figure on the black scale of the lens to the red
triangular mark. Now read off the extent of depth of field to the left and right of the red triangle on the yellow
scale.
Page 34

Exposures with the Interchangeable Lenses
With the interchangeable lens units you use the same exposure value settings of the exposure meter as with the
standard lens. Watch that you do not use lower aperture values (larger apertures ) than the maximum aperture
of the lens unit employed. With the f4 telephoto and wide-angle lens units, the aperture on the camera must not
be used wider open than f4, and the alternative f5.6 wide-angle lens unit must not be used with the aperture on
the camera wider than f5.6.
RETINA REFLEX ACCESSORIES
Close-Up Lenses
While the Retina Reflex normally focuses down to 3 ft. (90 cm.), one can work at still shorter distances with the
aid of the Retina supplementary lenses. Separate lens diameters are available for f2.8 (f2 on earlier Retina
Reflex) and f1.9 lenses.
Two different lenses are available.
The Retina Supplementary Lens N1 (featuring mark: one ring around the circumference) for distances between
38¼ and 18 in. (90 to 46 cm.) covering a subject field from 17½x26¾ in. to 8½x12¾ in. (45 x 68.5cm.to
21.5x32.5 cm.).
The Retina Supplementary Lens N2 (featuring mark : two rings around the circumference) for distances between
20 and 12 in. (50 to 30 cm.) covering a subject field from 8½x12¾ in. to 4 1/8 x 6 1/8 in. (21.5x32.5 cm. to
10.5x 15.5cm.).
N1 and N2 lenses can be used together (by screwing them into each other) for distances between 14 7/8 and 12
in. (37.5 to 30 cm.) covering a field from 5 3/4 x8 5/8 in. to 4 1/8 x 6 1/8 in. (14.5x22 cm. to l0.5x15.5 cm.).
For ultra close-ups three two-element colour corrected, coated, supplementary R lenses, mounted in metal
screw-in mounts, are designed for photographs at four fixed distances between 11 and 6 in. The R lenses are
only available for use with f2.8 lens of the Retina Reflex III and S. They also fit the f2 lens of earlier Retina
Reflex models.
Lens R1:4.5 gives an approximate scale of reproduction of 1:4.5 covering a field of 4¼ x 6 in. (11 x 15.5 cm.).
Lens R1:3 gives an approximate scale of reproduction of 1:3 covering a field of 2 3/4 x 4 1/8 in. (7 x 10.5 cm.).
Lens R1:2 gives an approximate scale of reproduction of 1:2 covering a field of 1 7/8 x 2 3/4 in. (4.75 x 7 cm.).
Lens R1:4.5 combined with lens R1:2 gives an approximate scale of reproduction of 1:1.5, covering a field of 1
3/8x2in.(3.5x5cm.).
Close-up lenses screw over the standard lens. The reflex ground glass screen of the camera shows the exact
image covered free from parallax, and the picture can be focused in the same way as without a close-up lens.
At full aperture the definition falls off slightly, especially towards the corners, and the camera lens should be
stopped down to about f5.6 in the case of the N lenses and to f8 when using the R close-up lenses to regain full
edge definition. No change of exposure time is required.
The depth of field when working at close range with the supplementary lenses is obviously rather limited. The
table on p.68 gives the extent of the depth to be expected for close-up work.
CLOSE-UP LENSES
Page 35

The NI supplementary lens allows focusing between 38¼ in. and 17¾ in. and at these distances the field
covered is 26 3/8 x 17 1/2 in. and 11¼ x 7½ in. respectively. The N2 lens allows focusing between 20 in and 13
3/8 in. and again at these distances covers a field of 12¾ x 8½ in. and 7+ )( 41 in. respectively. Mounted
together. even closer distances can be focused, from 14 7/8 in. to 11 5/8 in. Here the field covered is 8 5/8 x 5
3/4 in. and 5 3/4 x 3 7/8 in. respectively.
For ultra close-up work three supplementary R lenses are available (not available for f1.9 lenses). RI:4.5 gives
an approximate scale of reproduction of 1:4.5 and covers a field of 6x4¼ in. RI:3 gives an approximate scale of
reproduction of 1:3 and covers a field of 4 1/8 x2 3/4 in. RI:2 gives an approximate scale of reproduction of 1:2
and covers a field of 2 3/4 x 1 7/8 in. RI:4.5 combined with RI:2 gives an approximate scale of reproduction of
1:1.5 and covers a field of 2 x 1 3/8 in.
CLOSE-UP EQUIPMENT
Left: The Retina copying outfit consists of a camera holder
with extendible legs and incorporates its own lighting unit. It
is used with the N2 supplementary lens and covers two field
sizes.
Page 36

Right: The micro-adaptor enables the Retina Reflex to be used
with most microscopes. Extreme right: The close-up attachment is
a simplified version of the combination of table stand and field
frames.
Extreme left: The Retina table stand used with the N supplementary
lenses and (left) the stand in use with R lenses and a frame holder
taking close-up field frames.
Right: The stereo attachment for the original Retina Reflex only. An
optical system produces two upright pictures side by side with the
correct stereo separation.
The Close-up Attachment
When working with the ultra-close R lenses the reflex screen will, of course, permit parallax-free focusing.
Nevertheless, for close-ups of live subjects the use of the Retina close-up attachment is recommended. It
consists of a camera platform which takes four alternative sets of legs which act as a distance gauge and show
the correct field area covered at the same time.
To use it, screw the R lens required to the camera lens and clamp the corresponding set of two legs into the
appropriately marked notches of the attachment. Then approach the subject until it is in the plane of the gauge
rods fixed into the front ends of the legs.
The Table Stand
The table stand has been developed for close-up subjects which allow or need longer exposure times as well as
for all types of close-ups where quick setting-up and absolute steadiness of the camera is important.
The stand consists of a U-shaped base with an adjustable column and a ball and socket head. The latest version
has, in addition, a baseplate to support the camera in its centre. The stand can be taken apart into its individual
components for easy transport and storage. It is specially useful for close-ups with the N close-up lenses.
Alternatively, the ultra close-up lens set R1:2, R1:3 and R1:4.5 can be used with the table stand in conjunction
with a frame holder and close-up field frames showing the correct distance and field with these R lenses. This
ultra-close-up attachment for the table stand is, however, no longer in production.
The Copying Stand
For quick and convenient copying of documents, important letters, valuable prints, book pages and the like from
about 6 x 8 in. to 8 x 12 in. in size a special copying stand has been designed.
The outfit consists of a camera holder which takes four extendible legs. The bottom ends of the legs are fixed
into the four corners of a glass plate which is laid on top of the document or other matter to be copied.
Page 37

The N2 supplementary lens is used. The legs are used fully extended with the lens set to infinity, and fully
pushed in (a different baseplate is used) with the lens set to the nearest distance. A special lighting unit
consisting of two adjustable lamp reflectors with arms fixing to the camera holder is available as an extra
THE CLOSE-UP STAND
The table stand is used with the Retina Reflex Iii and S
models for close-ups in natural size. To assemble the
stand, the main collar (2) with the legs fits into the
camera (1) in place of the lens (3). The latter. with an
R1:2 close-up lens (4) and the lens hood (5), goes into
the extension collar. The base plate (6), extended to
the ends of the legs, acts as a distance gauge and
outlines the field taken in.
In use, the close-up stand with the camera is simply
placed on top of the subject to be copied. The plane of
sharpest focus is the underside of the base plate.
For copying colour slides on black-and-white film, a
slide holder attachment screws into the bottom of the
base plate (lower left) and holds the slide in position.
The diffusing screen belonging to the slide holder
illuminates the transparency from behind when pointed
at a suitable light source.
FINDER ACCESSORIES
The right-angle finder attachment (left) fits over the
eyepiece of the Retina Reflex and Reflex S Models (a
special adaptor is required for the Reflex III) for a
waist-level view of the image (e.g., when shooting
round corners) or for a horizontal view when the
camera Is pointing downwards.
The frame finder model S (right) is useful for sports
photography. Swing-in frames outline the reduced field
of view 85 mm. and 135 mm. lenses.
The 1:1 Close-up Stand
This permits same-size reproductions with the Retina Reflex III and S with f2.8 lens. It is used in conjunction
with the R1:2 close-up lens. This stand permits easy reproduction of things like postage stamps, jewellery, small
mechanical parts, etc., of little thickness. It will also be found useful for copying colour transparencies. For this
purpose a slide holder with diffusing screen is available.
The stand consists of a baseplate with a 24x36 mm. opening, and an extension tube ring with legs. The latter
hold the camera system at the right distance from the subject plane.
To set up the stand, loosen the black thumb-screw connecting the baseplate to the body. Move the baseplate
until the ends of the legs are flush with the baseplate. Tighten the thumb-screw again.
Attach the stand to the camera in place of the lens. Screw the R1:2 lens into camera lens and clip on the lens
hood. Mount the camera lens on table stand. Place the camera with the table stand on top of the subject. Stop
down to f22 to obtain maximum depth of field. A slide holder with diffusing screen can be screwed to the
baseplate to hold colour transparencies in a spring clip.
The Micro-Adaptor
For making photographic records in black-and-white or colour of microscope investigations, the Retina Reflex
micro-adaptor is useful and simple to handle.
The micro-adaptor allows the Retina Reflex camera (but not with f1.9 Xenon or Heligon) to be used with any
microscope with a standard eyepiece diameter of 25 mm. The attachment consists of a light metal body with a
focusing eyepiece at the front and an arm to hold the camera at the back.
Page 38

To make photomicrographs with the Retina Reflex, remove the microscope eyepiece, connect the microscope
tube to the micro-attachment, and re-insert the eyepiece. Mount the Retina Reflex on the camera bracket. Focus
through the focusing eyepiece of the attachment using the coarse and fine adjustment of the microscope. The
focusing scale of the camera must be set to infinity and the lens to its largest aperture.
The Stereo Attachment
Stereoscopic photographs may be taken with the Retina Reflex camera by taking two pictures, one immediately
after the other. For this purpose parallelogram or sliding base attachments are available each giving the correct
separation of 64 mm. Both types of attachment must be used in conjunction with a tripod and are only suitable
when the subject photographed is stationary.
A more convenient method of taking stereoscopic photographs with the Retina Reflex (not Reflex IV or S) is,
however, to use the stereo attachment. This consists of an optical system which produces two upright pictures
side by side each measuring 16 x 22 mm. The prisms are so arranged that the two pictures are taken with the
correct separation of 64 mm. which corresponds with the average separation between human eyes.
To use the stereo attachment, fit it over the standard lens by lining up the red dot on the rear of the attachment
with the red dot on the camera lens. The attachment is then turned clockwise into a horizontal position to
engage. The ground glass reflex image shows the correct double image and permits focusing in the usual way.
Stereoscopic pictures can be taken at distances from 6 ft. to infinity.
Exposure times are unchanged for apertures of f5.6 and smaller with the stereo attachment. For wider apertures
double the exposure indicated by the meter by reducing the light value by 1.
Special Finders
RIGHT-ANGLE FINDER. To tackle low angle views, subjects near the ground and copying, a right -angle
viewfinder has been designed for the Retina Reflex (not for III). It fits over the viewfinder eyepiece and is held
in position by a bayonet lock.
FRAME FINDER MODELS. A folding frame finder is available for the Retina Reflex. This fits into the accessory
shoe of the camera and is intended for shooting fast-moving subjects, architectural studies or any shot where it
is desirable to be able to see the field of view immediately outside that of the viewfinder. Its frame gives the
correct field of view for the standard lens and masking devices can be swung into position to cover the field of
the telephoto lenses. Parallax adjustment for close-range work is provided.
FACTS AND FIGURES
This section gives the more important data for Retina Reflex films, lenses, exposure, etc., in handy tabular form
for easy reference.
CONVERSION OF FEET AND INCHES INTO METRIC UNITS
Many cameras are marked only in either the metric or English and
American system, while most of the tables in this book are also given only in
one system. The table below shows at a glance equivalent lengths.
British to Metric Metric to British
1/8 in. 0.32 cm. 0.5 cm. 3/16 in.
1/4 in. 0.64 cm. 1 cm. 3/8 in.
1/2 in. 1.27 cm. 2 cm. 13/16 in.
1 in. 2.54 cm. 3 cm. 1 3/16 in.
2 in. 5.08 cm. 4 cm. 1 9/16 in.
3 in. 7.62 cm. 5 cm. 1 15/16 in.
4 in. 10.2 cm. 6 cm. 2 3/8 in.
5 in. 12.7 cm. 7 cm. 2 3/4 in.
6 in. 15.2 cm. 8 cm. 3 1/8 in.
7 in. 17.8 cm. 9 cm. 3 1/2 in.
8 in. 20.3 cm. 10 cm. 3 15/16 in.
9 in. 22.9 cm. 12 cm. 4 3/4 in.
10 in. 25.4 cm. 15 cm. 5 7/8 in.
11 in. 27.9 cm. 20 cm. 7 7/8 in.
1 ft. 30.5 cm. 25 cm. 9 13/16 in.
2 ft. 61 cm. 30 cm. 11 3/4 in.
Page 39

3 ft. 91.4 cm. 40 cm. 15 3/4 in.
4 ft. 1.22 m. 50 cm. 19 3/4 in.
5 ft. 1.52 m. 60 cm. 23 5/8 in.
6 ft. 1.83 m. 80 cm. 31 1/2 in.
7 ft. 2.13 m. 100 cm. 39 1/2 in.
8 ft. 2.44 m . 1.5 m. 4 ft. 11 in.
9 ft. 2.74 m. 2 m. 6 ft. 7 in.
10 ft. 3.05 m. 2.5 m. 8 ft. 3 in.
15 ft. 4.57 m. 3 m. 9 ft. 10 in.
20 ft. 6.10 m. 4 m. 13 ft. 2 in.
30 ft. 9.14 m. 5 m. 16 ft. 5 in.
40 ft. 12.20 m. 10 m. 33 ft. 0 in.
50 ft. 15.24 m. 15 m. 49 ft. 2 in.
100 ft. 30.48 m. 20 m. 66 ft. 0 in.
SHUTTER SPEEDS TO ARREST MOVEMENT WITH THE RETINA
Distance between Camera and Object
Subject
10 ft.
3m.
20 ft.
6m.
40 ft.
12 m.
80 ft.
25 m.
160 ft.
50 m.
Swimmer 1/60 1/30 1/15 1/8 1/4
Walker 1/125 1/60 1/30 1/15 1/8
Runner 1/500 1/250 1/125 1/60 1/30
Cyclist 1/500 1/250 1/125 1/60 1/30
Skater -- 1/500 1/250 1/125 1/60
Horse galloping 1/500 1/250 1/125 1/60 1/30
Horse trotting 1/250 1/125 1/60 1/30 1/15
Horse walking 1/125 1/60 1/30 1/15 1/8
Racehorse -- 1/500 1/250 1/125 1/60
Waves 1/500 1/250 1/125 1/60 1/30
Heavy waves -- 1/500 1/250 1/125 1/60
Boats making 10 knots 1/500 1/250 1/125 1/60 1/30
Boats making 20 knots -- 1/500 1/250 1/125 1/60
Tramcar 1/500 1/250 1/125 1/60 1/30
Motor car on road -- 1/500 1/250 1/125 1/60
Slow train 1/500 1/250 1/125 1/60 1/30
Fast train -- -- 1/500 1/250 1/125
Aeroplane -- -- -- 1/500 1/250
The shutter speeds as listed above are applicable to motion which cuts
right across the direction in which the lens and photographer look.
If the motion photographed is at an acute angle with the direction in which
the lens points the exposure time can be longer, say 1/30 second instead of
1/60.
If the subject moves directly towards the lens (or for that matter away
from it) the exposure time can be three or four times longer, say 1/8 second
instead of 1/30.
ZONE FOCUSING
With 50mm. Lens With 35mm. Lens With 80-85mm. Lens
Subject Stop
Distance
Setting
Depth
From --- To
Distance
Setting
Depth
From --- To
Distance
Setting
Depth
From --- To
Portraits 8 4 ft. 3½ - 4½ ft. -- -- 6 ft. 5½ - 6½ ft.
Children 8 6 ft. 5 - 7½ ft. 6 ft. 4½ - 10 ft. 10 ft. 9 - 11¼ ft.
Children 8 *10 ft. 7½ - 15 ft. *10 ft. 6 - 30 ft. *15 ft. 13 - 18 ft.
Groups 8 12 ft. 9 - 20 ft. *10 ft. 6 - 30 ft. -- --
Landscapes 8 30 ft. 15 ft. - inf 15 ft. 7½ ft. - inf 70 ft. 35 ft. - inf
Page 40

Landscapes 11 22 ft. 10 ft. - inf -- -- *50 ft. 25 ft. - inf
*The original Retina reflex has a black circle near these distances to indicate useful focusing zones.
APERTURES WITH CLEAR FLASH BULBS (80-100 ASA FILMS
(For 100 ASA Film)
Distance
G.E.,
Mazda,
G.E.C. No. 1
Philips:
PF 1
AG1
Mazda,
G.E.,
G.E.C.:
No. 5
Philips:
PF 5
Sylvania:
Press 25
Philips:
PF38
Sylvania:
Press 40
G.E.:
No. 11
Philips:
PF 60
G.E.:
No. 22
Sylvania:
No. 2
6ft.(2m.) 16------
8 ft (2.5m.) 12.5 -- -- --
10 ft (3m.) 10 16 -- --
12 ft. (3.6m.) 8 16 16 --
15 ft. (4.5m.) 6.3 11 12.5 16
20 ft. (6m.) 4.5 8 10 12.5
25 ft. (7.5m.) 4 6.3 8 11
30 ft. (9m.) 3.5 5.6 6.3 9
In bright rooms (kitchen, bathroom) or with films faster than 100 ASA use next
smaller aperture. In very large rooms, at night outdoors or with 40-64 ASA films
use next larger aperture.
The Focal Flash Chart gives exposure for all types of flash as well as for flash
combined with daylight. It further contains a list of all flash bulbs with their use
and performance, also information on "colour and flash" and much additional flash
data.
APERTURES WITH BLUE FLASH BULBS
(For 10-12 ASA Daylight Type Colour Film)
Distance
PF 1/B
No. 1B
AG 1B
PF 60/97
No. 22B
3½ ft. (1m.) f8--
5ft.(1.5m.) f5.6 f16
7ft.(2.2m.) f4 f11
10 ft. (3m.) f2.8 f8
For 40-50 ASA films use two stops smaller (e.g., f 16 instead of f8).
FACTORS WITH RETINA REFLEX FILTERS
Filter
Filter
Code
Factor
On Retina Reflex
reduce exposure
value setting by
Light Yellow F I 1½ ½
Medium yellow F II 2 1
Yellow green F III 2 1
Orange F IV 3 1½
Red F V 7 3 (2¾)
Blue F VI 2½ 1½ (1¼)
Ultra-violet -- -- --
Polarizing Filter -- 2½ 1½ (1¼)
Page 41

CLOSE-UP FOCUSING FOR RETINA REFLEX SUPPLEMENTARY LENSES (INCHES)
Camera
Lens
Focusing
Scale
Setting
(Feet)
RETINA REFLEX LENS NI RETINA REFLEX LENS NII RETINA REFLEX LENSES NI + NII
Supplementary
Lens to
Subject Distance*
(in inches)
Approximate
Field size
(in inches)
Supplementary
Lens to
Subject Distance*
(in inches)
Approximate
Field size
(in inches)
Supplementary
Lens to
Subject Distance*
(in inches)
Approximate
Field size
(in inches)
inf 38.25 15.75x23.37 20 7.5x11.37 14.87 5.37x8
50 35.75 15.12x22.75 19.5 7.37x11 14.62 5.25x7.75
25 34.25 14.37x21.5 19 7.12x10.75 14.37 5.12x7.62
15 32.37 13.75x20.12 18.37 6.87x10.25 14.12 5x7.37
12 31.5 12.75x19 18 6.62x10 14 4.87x7.25
10 30 12.12x18.25 17.62 6.5x9.75 13.75 4.75x7.12
8 28.37 11.37x17.12 17.25 6.25x9.5 13.5 4.62x7
7 27.62 10.75x16.12 16.87 6.12x9.12 13.37 4.62x6.87
6 26.37 10.37x15.5 16.5 6x9 13.12 4.5x6.75
5 24.75 9.75x14.5 16.12 5.62x8.5 12.87 4.37x6.5
4.5 24 9.25x13.87 15.75 5.5x8.25 12.75 4.25x6. 37
4 22.87 8.75x13 15.37 5.25x7.87 12.5 4.12x6.25
3.5 21.62 8.12x12 14.87 5x7.5 12.25 4x6
3 19.75 7.37x11.25 14.12 4.62x7 12 3.75x5.75
2.5 17.75 6.62x10 13.37 4.37x6.5 11.62 3.5x5.37
*measured from film plane
CLOSE-UP DEPTH OF FIELD
f 3.5
37.75
39.5
41.37
33.75
35
36.5
29
30
31.25
25.19
26
26.81
20.5
21
21.56
19.06
19.5
20
15.37
16
16.25
11.87
12
12.25
10.81
11
11.19
f 5.6
36.56
39.5
42.81
32.62
35
37.56
28.06
30
31.62
24.62
26
27.31
20.12
21
22
18.75
19.5
20.37
15.62
16
16.5
11.75
12
12.44
10.69
11
11.31
f 8
35.44
39.5
44.62
32.62
35
38.87
27.37
30
32.56
24.06
26
28
19.75
21
22.5
18.44
19.5
20.81
15.19
16
16.75
11.56
12
12.62
10.56
11
11.44
f 16
32.12
39.5
51.25
29.06
35
43.75
25.37
30
35.81
22.5
26
30.44
18.62
21
24.19
17.44
19.5
22.19
14.5
16
17.69
11.12
12
13.19
10.19
11
12
CONVERSION OF FILM SPEED SYSTEMS
ASA
and BS
Arith.*
ASA and
BS Log
(New)
DIN
BS
Log
(Old)
3 6 16º
6 1º 9 19º
12 2º 12 22º
25 3º 15 25º
50 4º 18 28º
100 5º 21 28º
200 6º 24 31º
400 7º 27 37º
800 8º 30 40º
1600 9º 33 43º
*Also Weston
35 mm. BLACK-AND-WHITE FILMS
Make
Speed in
ASA and BS
Arithmetic
Make
Speed in
ASA and BS
Arithmetic
Page 42

Adox---
KB 14
KB 17
KB 21
KB 27
UKB-17 Reversal
40
80
200
800
80
Hauff---
Pancola Granex
Pancola 17
Pancola 21
Pancola S 25
40
80
200
500
Agfa---
Isopan IFF 13
Isopan IF 17
Isopan ISS 21
Isopan Record
32
80
200
1250
Ilford---
Pan F
F.P.3
H.P.3
H.P.S
50
125
400
800
Agfa Wolfen (ORWO)--
-
Isopan IFF 10
Isochrome IF 17
Isopan IF 17
Isopan ISS 21
Isopan Ultra
16
80
80
200
320
Kodak---
Panatomic X
Plus X
Tri-X
Microfile Pan
50
125
400
25
Ansco---
Super Hypan 500
Konica---
Konicapan S
Konicapan SS
Konicapan SSS
100
200
400
Ferrania---
P 24
P 30
P 33
P 66
40
160
320
640
Perutz---
P 14
P 17
P 21
P 25
Miniature Reversal
40
80
200
500
25
Gevaert---
Gevapan 27
Gevapan 30
Gevapan 33
Gevapan 36
Dia-Direct 26
Reversal
64
125
250
500
50
Tura---
Pan 14
Pan 17
Pan 21
Pan 24
40
80
200
400
The above film speeds are based on the latest ASA Standard, giving the
minimum correct exposure to make the most of the films' versatility and
image quality. Some manufacturers, however, still quote their speeds from
the older system which gives a more generous exposure. This accounts for
any disparity between these tables and the manufacturers figures.
35 mm. COLOUR FILMS
Daylight
Film Type
Speed in
ASA and BS
Arithmetic
Processing
Negative Films
Agfacolor CN14 Universal 20 U
Agfacolor Universal 40 U
Ferraniacolor N27 Daylight 40 U
Fujicolor Universal 32 M
Gevacolor NS Universal 25 L
Ilford Colorprint Universal 64 M
Kodacolor Universal 32 U
Kodacolor X Universal 64 L
Telcolor Universal 16 L
Valcolor Universal 16 L
Reversal Films
Agfacolor CT18 Daylight 50 M
Agfacolor CK20 Artificial light 80 M
Anscochrome 40 Daylight 40 M
Anscochrome T100 Artificial light 100 M
Anscochrome 100 Daylight 100 M
Page 43

Ektachrome E2 Daylight 32 U
Ektachrome X Daylight 64 U
H.S. Ektachrome Daylight 160 U
H.S Ektachrome B Artificial light 125 U
Ferraniacolor Daylight 25 U
Ferraniacolor Artificial light 20 U
50 M
Fujicolor Daylight 10 M
Gevacolor R5 Daylight 40 M
Ilford Colorslide Daylight 32 M
Ilford Super Colorslide Daylight 64 M
Kodachrome II Daylight 25 M
Kodachrome IIA Artificial light 40 M
Kodachrome X Daylight 64 M
Konicolor Daylight 16 M
Perutz Color C18 Daylight 50 M
Telcolor Daylight 50 M
PROCESSING: M = films can be processed only by the maker; L = films can
be processed only by an approved laboratory through a photographic dealer :
U = films can be processed by the user by means of special processing kits.
More Focal Press Guides
The Retina Guide (1965 edition)
The Retinette Guide (1965 edition)
You may copy and print this document or parts of this document for your own personal use. You may not,
however, reprint or republish this work, in whole or in part, without prior permission from me, Mischa Koning.
Such republication includes inclusion of this work in other Web sites, Web pages, FTP archives, books,
magazines or other periodicals, CD-ROM and DVD-ROM compilations or any other form of publication or
distribution.
kodak.3106.net
copyright © mischa koning 2006
30. April 2006 - 20:21
 Loading...