

Page 1
Kodak 1400 Printer Setup Tips
Below are some tips that may make the job of setting up your new Kodak 1400 printer easier.
Printer Setup
Ribbon Installation:
The ribbon is held in a ribbon carrier, which makes inserting and removing the ribbon from the
printer easier. Place the ribbon carrier on a flat surface with the handle to the right side. You
will notice that the left side of the carrier has large holes, while the right side has a V-shaped slot
with a hole beneath it.
Remove the ribbon spools from the protective wrapper and insert the spools into the carrier. The
spool with the ribbon on it is the supply spool and goes to the rear of the carrier. The other spool
(takeup) goes to the front of the carrier.
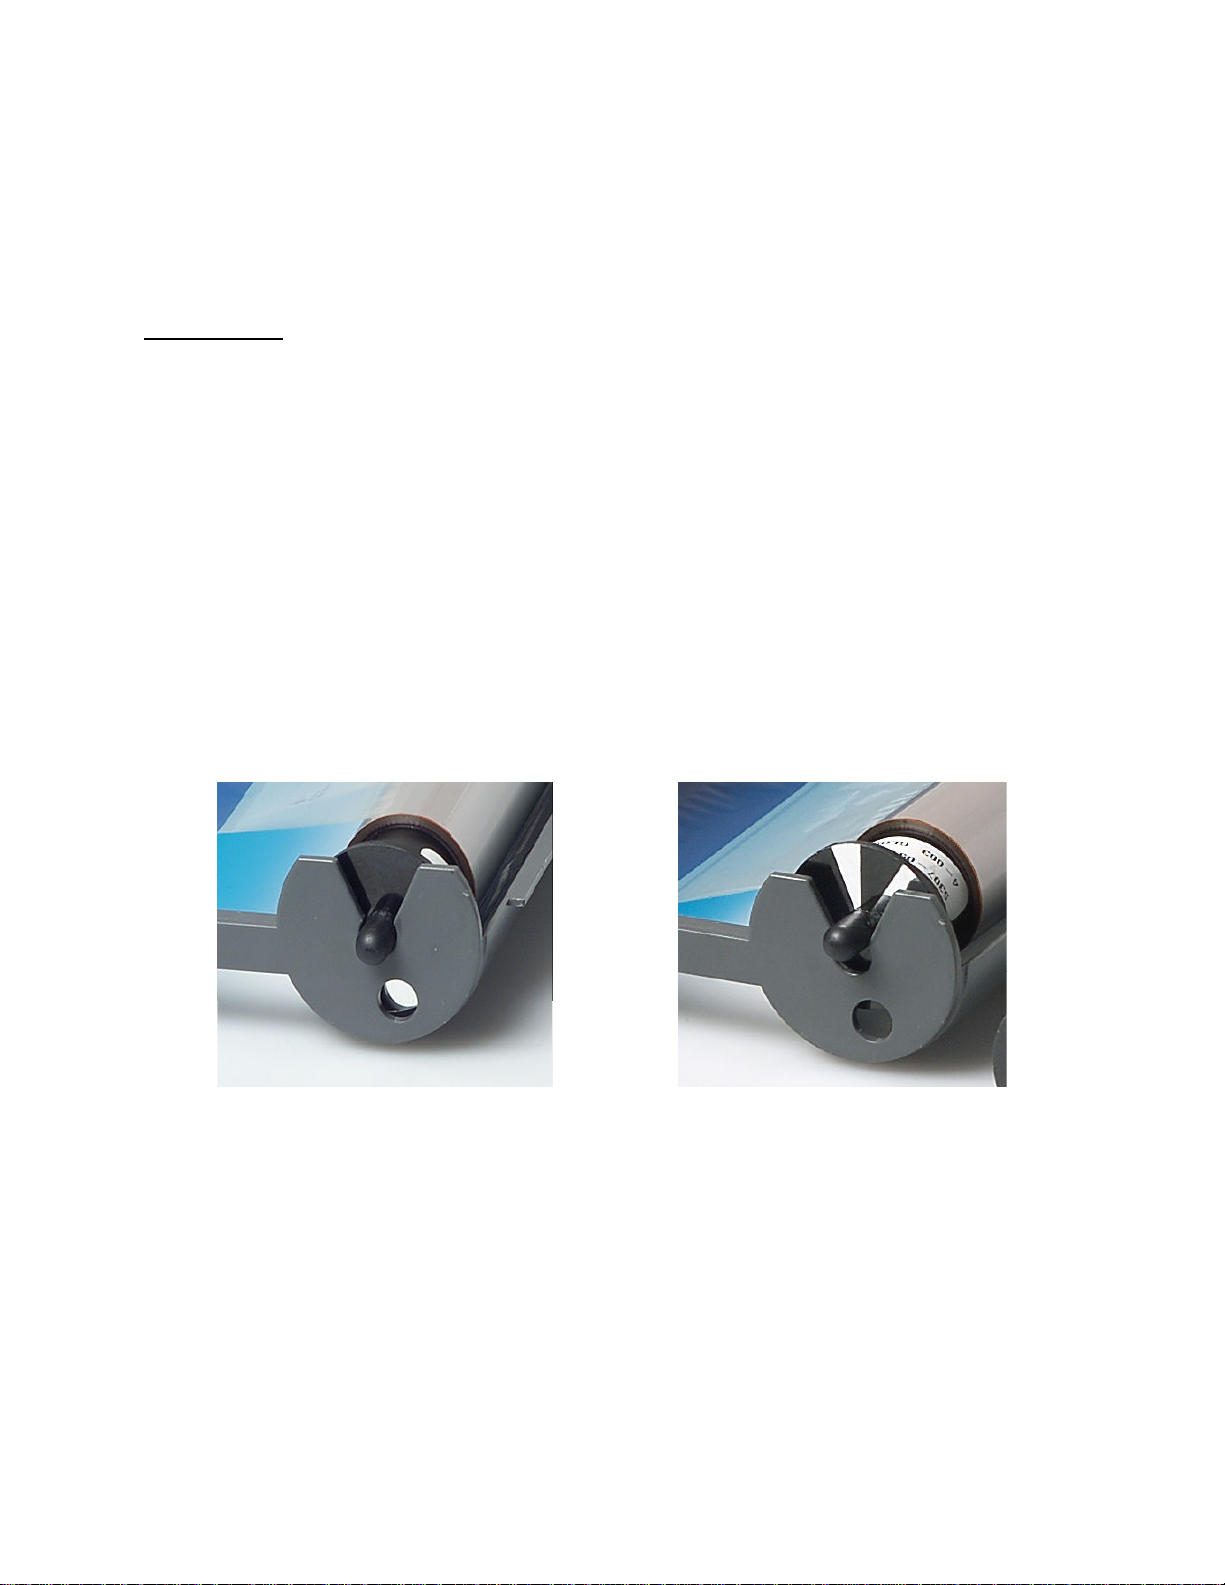
Be certain to fully seat the ribbon spools into the carrier, paying particular attention to the right
side. If you look at the right side of the carrier, the ribbon spool “axle” should be in the round
hole beneath the V-shaped slot.
Correct Installation Incorrect Installation
Paper Installation:
Place the paper tray on a flat surface and remove the paper tray dust cover. With the tray empty,
press down on the paper platten (hinged black plastic piece on the bottom near the back of the
tray) until it “locks” in the down position, and adjust the green paper end stop to the appropriate
position for the paper size that you have. Remove the paper from the package and insert
“emulsion” side up (Kodak logo side down). Be careful not to touch the paper within the
printable area, or you’ll see fingerprints on your prints. There is approximately 1 inch of
unprinted area at both ends of the paper, so it is safe to touch the paper in that area when loading
the paper.
Page 2

Making a Printer Test Print (Optional)
To make a printer test print, press and hold the Cancel button while powering on the printer.
Hold the button for approximately 10 seconds after turning on the printer and release. When the
printer has finished initializing, the Media and Error lights will alternately flash green.
Momentarily press the Cancel button to initiate the test print. Making a test print will verify that
the printer is operational as well as informing you of the firmware version that is currently
installed in the printer. After the test print is complete, power cycle the printer to put it back into
“normal” print mode.
Driver Installation
To ensure that you have the latest version of the printer driver, download the software from the
Kodak web site and use that instead of the version that comes on the CD with the printer. Install
the printer driver before connecting the printer to the computer. Once the driver has been
installed, connect the printer to the computer. The computer should recognize that the printer
has been connected and complete the driver installation.
Once the driver has been installed, open the Printers & Faxes folder (Windows), right click on
the Kodak 1400 printer icon, and select Printing Preferences. Set the paper size and ribbon type
(glossy or matte) to correspond with what you are using.
If at any time after installation, you get unexplained printer errors when attempting to print, do
the following. Disconnect the printer from the computer and delete the printer queue (printer
icon) from the Printers & Faxes folder. After the icon is deleted, reconnect the printer and
Windows will re-establish the printer queue (add the icon back in). This likely will solve your
problem.
Calibration Utility Installation (optional)
To ensure that you have the latest version of the Calibration Utility software, download the
software from the Kodak web site and use that instead of the version that comes on the CD with
the printer. The Calibration Utility software allows you to calibrate the printer, either with a
densitometer (preferred) or visually. The visual calibration allows you to correct any unwanted
color cast that may be present.
You can operate the Calibration Utility in either of two modes: EasyCal or Normal. EasyCal is a
wizard-based version of the Visual Gray Balance calibration. It walks you through the process
of making a calibration test print consisting of 49 numbered “clusters”, where each cluster
consists of a four-step grayscale. Each of the 49 clusters has a slightly different color balance.
Choose the cluster number that looks most neutral (gray) and enter it into the program when
prompted.
An alternate way of calibrating the printer visually, is to print a grayscale image from the
application you use for printing. Below is a step-by-step procedure for doing this:
-2-
Page 3

1) Launch the Calibration Utility. If a dialog appears with two buttons: "Begin EasyCal" and
"Launch Normal Utility", select "Launch Normal Utility". That should bring you to a "blank"
window that says Printer Calibration Utility in the title bar. Select File/New and click OK on the
dialog that appears. There should now be some "content" in the Printer Calibration Utility
window. You should see three buttons: Send & Print, Input, and Send.
2) Click on Send & Print. A dialog will appear showing a thumbnail of the Visual Gray Balance
calibration target. Click on the Print button to make the print. If you examine the print, you'll
see that there are 49 numbered "clusters", with each cluster having a different color balance. The
colors are arranged in the form of a "color wheel", with 228 being red, 206 being yellow, 202
being green, 222 being cyan, 244 being blue, and 248 being magenta. The center (225) is
"neutral" meaning that it has equal RGB code values. If you need less correction, think of
drawing a vector from the center cluster to the color direction that you want. For example, if you
want to make the print slightly red, select 226, 227, or 228 depending upon how much red you
want to add.
3) To determine what cluster number to select, do the following. Create a grayscale image that
has a reasonable tonal range. You can do this by opening a color image and converting it to
grayscale mode. Print the image (using the default calibration table sent to the printer in step 2).
Examine the print under the lighting that you will use to judge prints (the neutral balance will
change somewhat depending upon the illumination: daylight, tungsten, fluorescent, etc.). If the
print doesn't look neutral, determine what color direction you need to move in (not always easy).
4) Once you determine what color direction you need to move the color balance, go back to the
Calibration Utility. Click on the "Input" button, and enter the cluster number that will move the
color balance in the direction that you need, and click on the "Recompute the Table" button.
Next, click on the "Send" button to send the new calibration table to the printer. Please note that
the Calibration Utility has more of an effect on the highlights and lighter midtones than it does
on the darker levels.
5) Reprint your grayscale image. If it looks good, you're finished. If not, then go back to the
Calibration Utility, select File/Close (don't save) and select File/New again, and click on OK.
Repeat step 4, this time selecting a different cluster number that will hopefully bring you closer
to the correct color balance.
If you find that there is an "overall" color balance error, rather than primarily concentrated in the
highlight region, you might want to try the Color Adjust sliders in the driver. The Red, Green,
and Blue sliders adjust the Gamma of that particular color, effectively giving an overall change
in the color balance.
-3-
Page 4

USB Setup & Operation
In most cases, you won’t have to do anything special with your computer’s USB ports.
However, if you are experiencing random USB errors, check to see if updated motherboard
drivers exist for your computer. Often, that will take care of the problem. The Kodak 1400
printer is a High-Speed USB 2.0 device. While it will work with a USB 1.0 port, for best
operation (speed and reliability), you should connect the printer to a USB 2.0 port whenever
possible. The printer can be used with a USB hub, however you must use a powered hub.
Updating the Printer Firmware
In all likelihood, your printer arrived with older firmware than what is currently available on the
Kodak web site. In most cases, you will see better performance and fewer problems by updating
to the latest firmware. Firmware versions less than 113 had a problem where the ribbon could
stick to the print, causing a paper jam. If you are experiencing this problem, updating the
firmware should correct the problem.
One caution when updating the firmware. At one point in the upgrade process, a dialog will
appear on your computer monitor telling you to remove the ribbon carrier from the printer and
press the OK button. It is imperative that you remove the ribbon when instructed to do so.
Failure to do so will result in the ribbon patch sensor becoming “uncalibrated”, causing ribbon
errors. If this happens, simply rerun the firmware upgrader again, this time removing the ribbon
when instructed to do so.
-4-
 Loading...