

Page 1

{OperatorsManual}{Product io n}{HealthImaging}
Publication No. 3E0815
29SEP99
HEALTH IMAGING
OPERATOR MANUAL
for the
Kodak Min-R MAMMOGRAPHY PROCESSOR
H176_0001AC
© Eastman Kodak Company, 1999
Page 2

PLEASE NOTE The information contained herein is based on the experience and knowledge relating to the
subject matter gained by Eastman Kodak Company prior to publication.
No patent license is granted by this information.
Eastman Kodak Company reserves the right to change this information without notice, and
makes no warranty, express or implied, with respect to this information. Kodak shall not be liable
for any loss or damage, including consequential or special damages, resulting from any use of
this information, even if loss or damage is caused by Kodak’s negligence or other fault.
Warning
To avoid hazardous conditions, keep floors and floor coverings around your Processor and associated drains clean
and dry at all times. Any accumulation of fluids from mixing tanks, drain lines, etc., should be cleaned up immediately.
In the event of an accumulation of liquid due to backup, overflow, or other malfunctions of the drain associated with
your Processor, call a plumber or other contractor to correct any problem with the drain. Kodak accepts no
responsibility or liability whatsoever for the serviceability of any drain connected to or associated with a Processor.
Such drains are the sole responsibility of the customer.
Table of Contents
Description Page
Safety . . . . . . . . . . . . . . . . . . . . . . . . . . . . . . . . . . . . . . . . . . . . . . . . . . . . . . . . . . . . . . . .3
Overview
Processing Film
Processing Solutions
Correcting Difficulties
Cleaning and Periodic Maintenance
New Equipment Warranty
. . . . . . . . . . . . . . . . . . . . . . . . . . . . . . . . . . . . . . . . . . . . . . . . . . . . . . . . . . . . . . 5
. . . . . . . . . . . . . . . . . . . . . . . . . . . . . . . . . . . . . . . . . . . . . . . . . . . . . . . . . 6
Start Up
Feeding Sheet Film
Shutdown
Preparing the Solutions
Draining the Tanks
Filling the Tanks
Daily Procedure
Every Two Week s
Warranty Coverage
How to Obtain Service
Limitations
. . . . . . . . . . . . . . . . . . . . . . . . . . . . . . . . . . . . . . . . . . . . . . . . . . . . . . . . . . . 6
. . . . . . . . . . . . . . . . . . . . . . . . . . . . . . . . . . . . . . . . . . . . . . . . . . 9
. . . . . . . . . . . . . . . . . . . . . . . . . . . . . . . . . . . . . . . . . . . . . . . . . . . . . . . . . . 10
. . . . . . . . . . . . . . . . . . . . . . . . . . . . . . . . . . . . . . . . . . . . . . . . . . . . . 11
. . . . . . . . . . . . . . . . . . . . . . . . . . . . . . . . . . . . . . . . . . . . . . . 11
. . . . . . . . . . . . . . . . . . . . . . . . . . . . . . . . . . . . . . . . . . . . . . . . . . . 11
. . . . . . . . . . . . . . . . . . . . . . . . . . . . . . . . . . . . . . . . . . . . . . . . . . . . . 13
. . . . . . . . . . . . . . . . . . . . . . . . . . . . . . . . . . . . . . . . . . . . . . . . . . . . 16
. . . . . . . . . . . . . . . . . . . . . . . . . . . . . . . . . . . . . . . . . 18
. . . . . . . . . . . . . . . . . . . . . . . . . . . . . . . . . . . . . . . . . . . . . . . . . . . . . 18
. . . . . . . . . . . . . . . . . . . . . . . . . . . . . . . . . . . . . . . . . . . . . . . . . . . 19
. . . . . . . . . . . . . . . . . . . . . . . . . . . . . . . . . . . . . . . . . . . . . . . . . 21
. . . . . . . . . . . . . . . . . . . . . . . . . . . . . . . . . . . . . . . . . . . . . . . . . . 21
. . . . . . . . . . . . . . . . . . . . . . . . . . . . . . . . . . . . . . . . . . . . . . . . 21
. . . . . . . . . . . . . . . . . . . . . . . . . . . . . . . . . . . . . . . . . . . . . . . . . . . . . . . . . 21
2 29SEP99 – 3E0815
Page 3

Safety
Section 1: Safety
Chemical Hazard
Warning
Gloves and protective eyewear must be worn when working with chemistry, especially fixer solutions. If chemicals
get into the eyes, flush them thoroughly with large volumes of water. If irritation persists, see a doctor.
Besides being a potential cause of falls, the chemistry can contaminate waste water and irritate the skin and eyes.
Chemistry spills must be cleaned up immediately. You must:
• prevent the spilled chemistry from entering a waste water drain.
• clean up the spill with a moist mop or rag.
• dispose of cleaning material s and was te water col lecte d duri ng the clean up acc ordi ng to envi r onm ent
regulations.
• ensure that the air exhaust pipe is always connected to a ventilation system, because inhalation of chemicals is
dangerous to health and should be avoided.
• observe all environmental regulation for storage and disposal of waste chemicals.
• use these instructions in conjunction with the chemical instructions.
Operator Precaution
Warning
The operator must:
• only be allowed to remove the Top Cover to avoid electrical and mechanical hazard.
• not exchange any internal parts.
• call service personnel to perform any repairs.
• not operate equipment with a damaged power cord.
• not use an extension cord to power this equipment.
• position the power cord so it will not be tripped over or pulled.
Equipment Damage
Caution
The equipment is not contained in a sealed cabinet. Therefore, it must not be used in locations where it can come in
contact with liquids, including bodily fluids.
This equipment generates, uses, and can radiate radio frequency energy. If not installed by qualified service
personnel and used in accordance with the User Guide, may cause interference to radio communications and other
electronic devices. Operation of this equipment in a residential area may cause interference, in which case the user,
at their own expense, will be required to take whatever measures may be required to correct the interference.
3E0815 – 29SEP99 3
Page 4
OPERATORS MANUAL
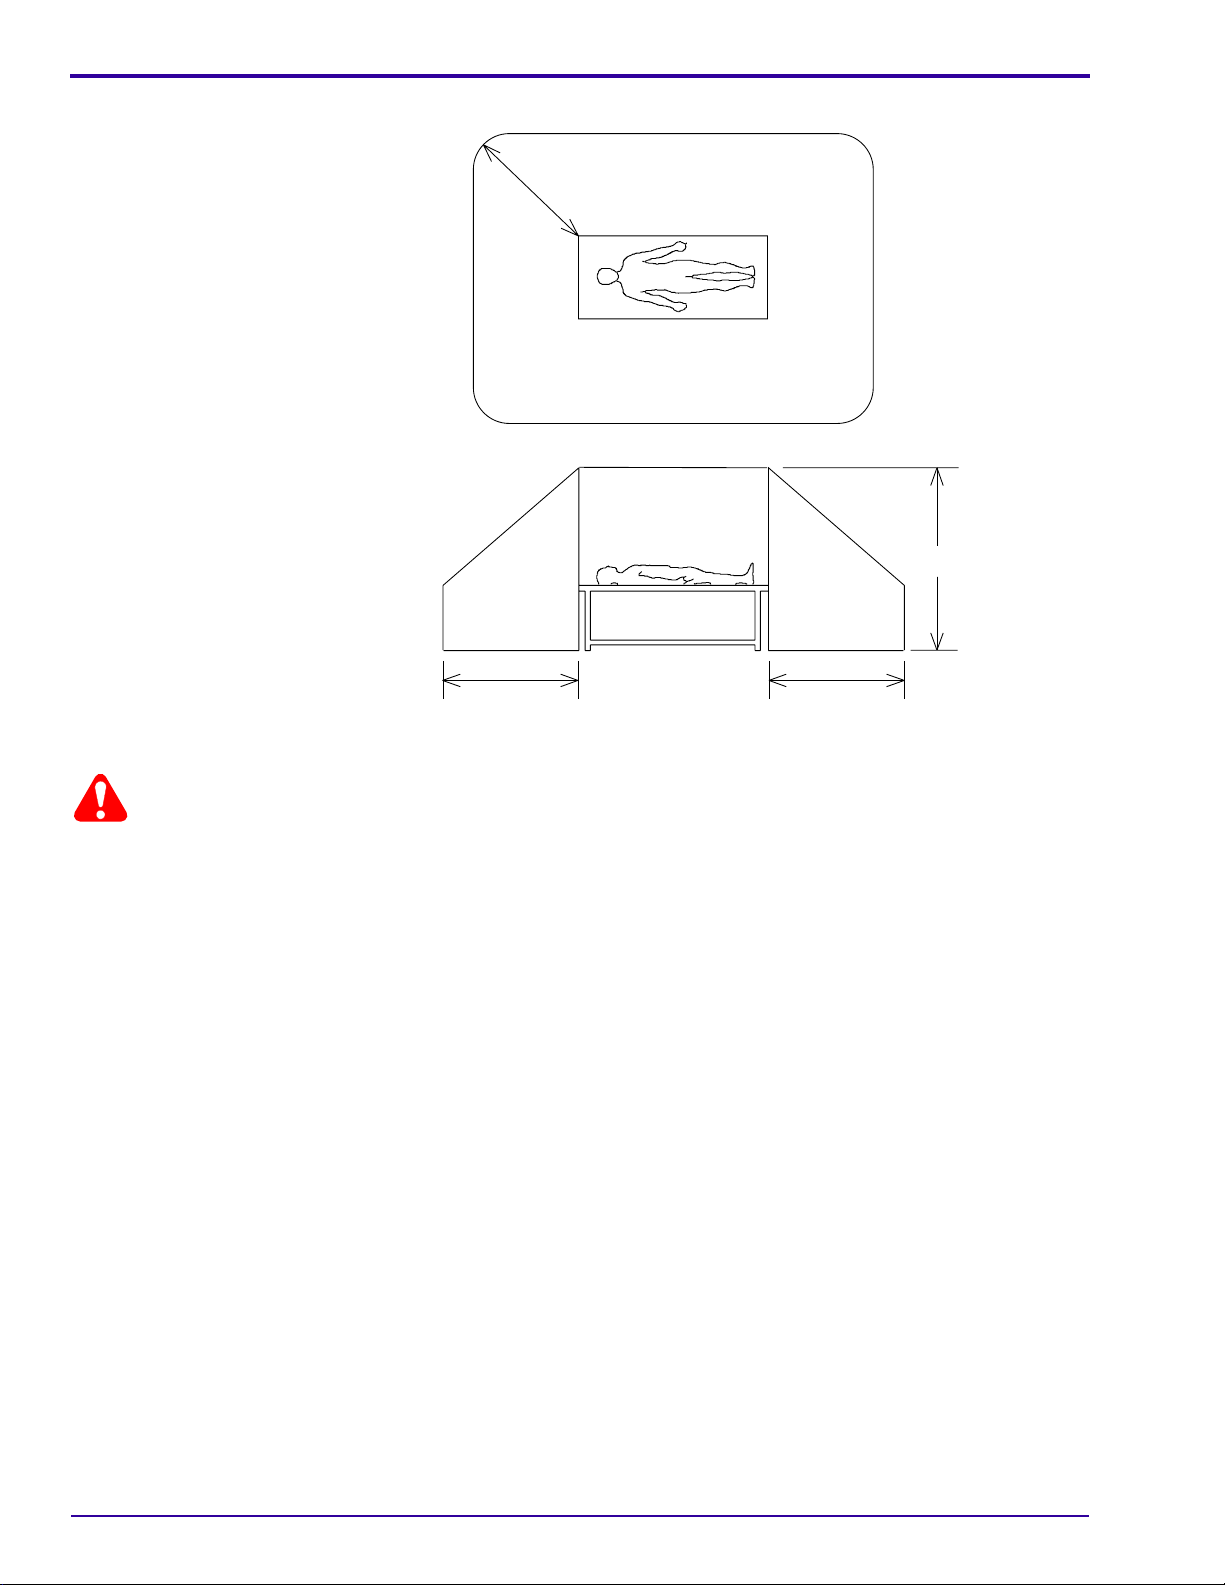
Nonpatient Contact Equipment
1.83 m
2.5 m
1.83 m1.83 m
H176_0034HC
Warning
This device is not medical equipment according to EN 60 601-1 and must not enter the patient environment as
defined by EN 60 601-1. The following requirements have to be met:
• Distance from the device to Nonpatient Contact Equipment:
Horizontal = 1.83 meters
Vertical = 2.5 meters above the floor under the patient
• Contact of the patient and the device simultaneously by the caregiver is not allowed.
• No direct electrical connection is allowed between the device and the Nonpatient Contact Equipment.
4 29SEP99 – 3E0815
Page 5

Overview
Section 2: Overview
The Processor is designed to process medical x-ray sheet film that can be processed in the Kodak RP X-Omat
Developer and Replenisher, the Kodak RP X-Omat Fixer and Replenisher, and the Kodak RP X-Omat EX Developer
and Replenisher.
The self-threading roller transport system has:
• a film-length detection system
• a replenishment system
• a developer solution filter
• a recirculation system for the developer and fixer solutions
• an automatic standby feature
The Processor can operate at 2 different transport speed cycles:
• Standard Cycle has a transport speed of 76.2
dry to dry, for a 43 cm (17 in.) sheet of film. The developer temperature is 33.3
• Rapid Cycle has a transport speed of 101.6 ±
dry to dry, for a 43 cm (17 in.) sheet of film. The developer temperature is 34.4 ±
Note
The transport speed and the developer solution filter can only be changed by qualified service personnel.
A film feed signal sounds 3 seconds after the film being processed has cleared the Rollers of the Detector Crossover
Assembly. This indicates that the Processor is ready to accept another piece of film.
± 1.5 cm (30.4 ± 0.6 in.) per minute or 157 ± 5 seconds drop time,
± 0.3°C (92.0 ± 0.5°F).
± 2.0 cm (40.0 ± 0.8 in.) per minute or 118 ± 4 seconds drop time,
± 0.3°C (94.0 ± 0.5°F).
3E0815 – 29SEP99 5
Page 6
OPERATORS MANUAL
Section 3: Processing Film
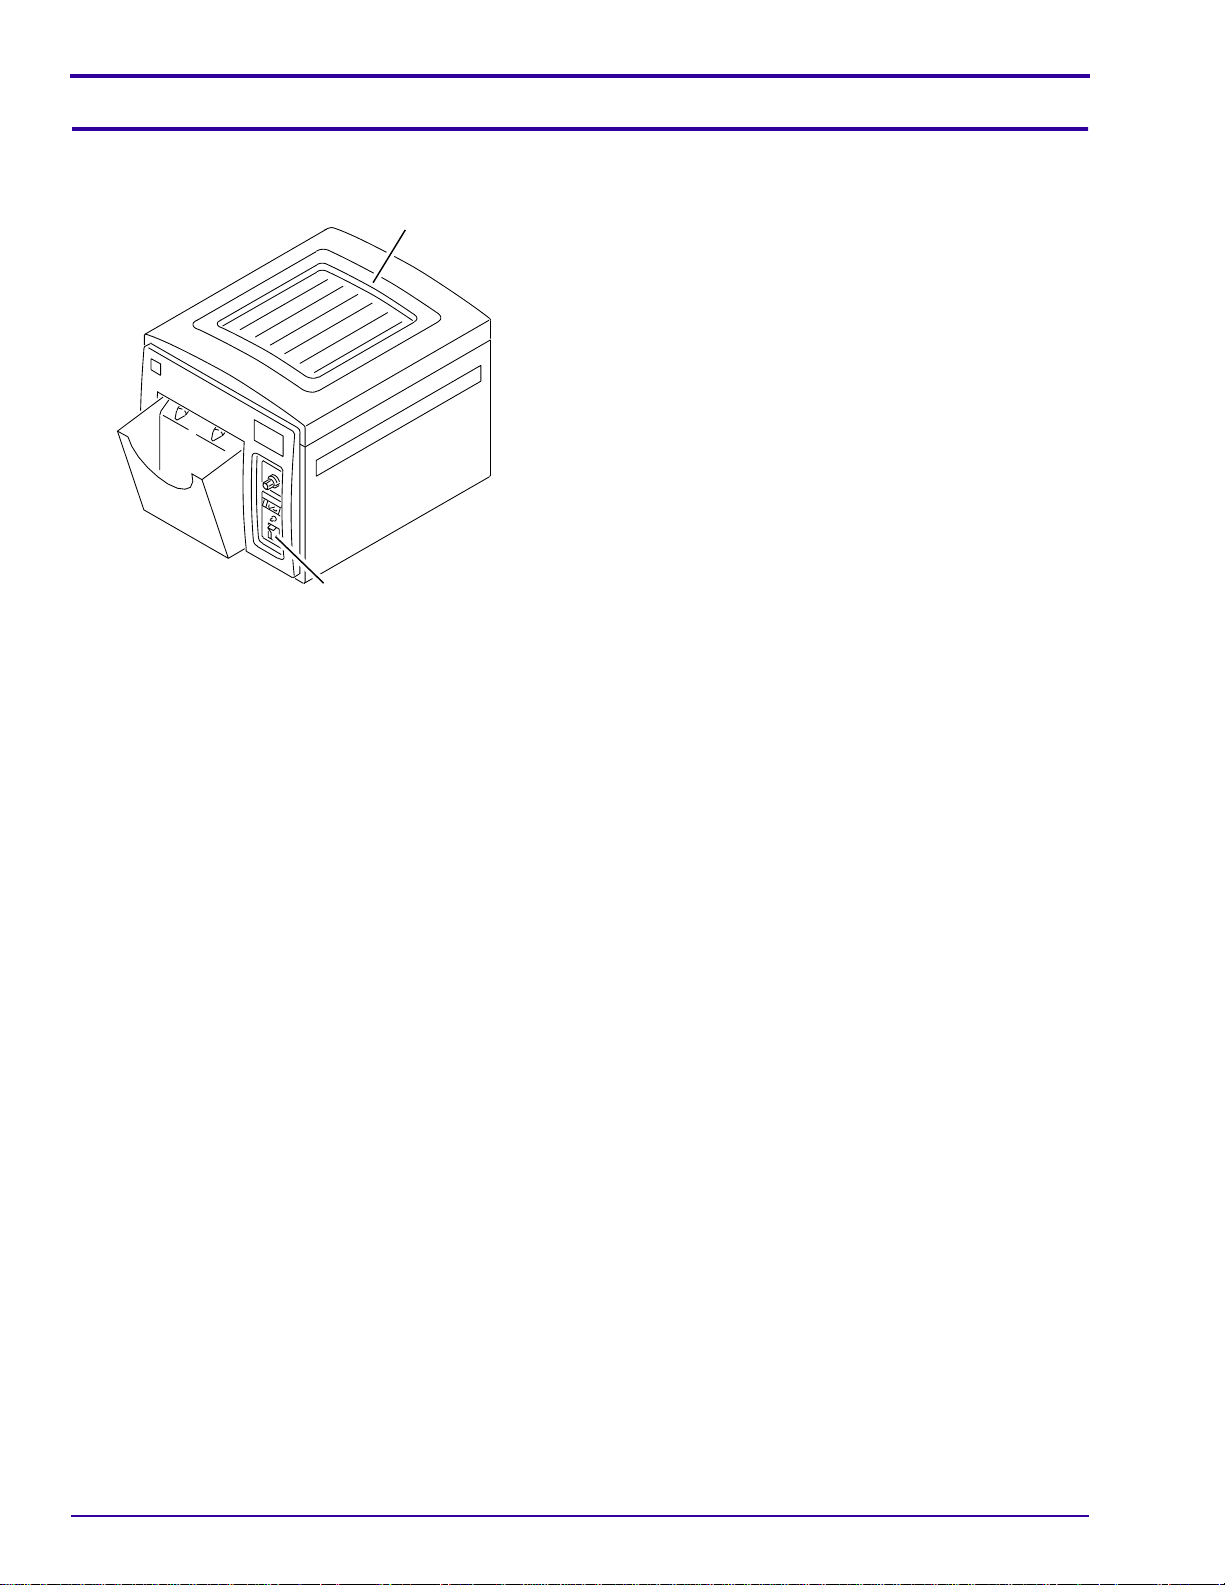
Start Up
H176_0001ACB
H176_0001AC
TOP COVER
MAIN POWER SWITCH
[1] Check that the Processor is off.
[2] Remove the Top Cover.
6 29SEP99 – 3E0815
Page 7
Processing Film
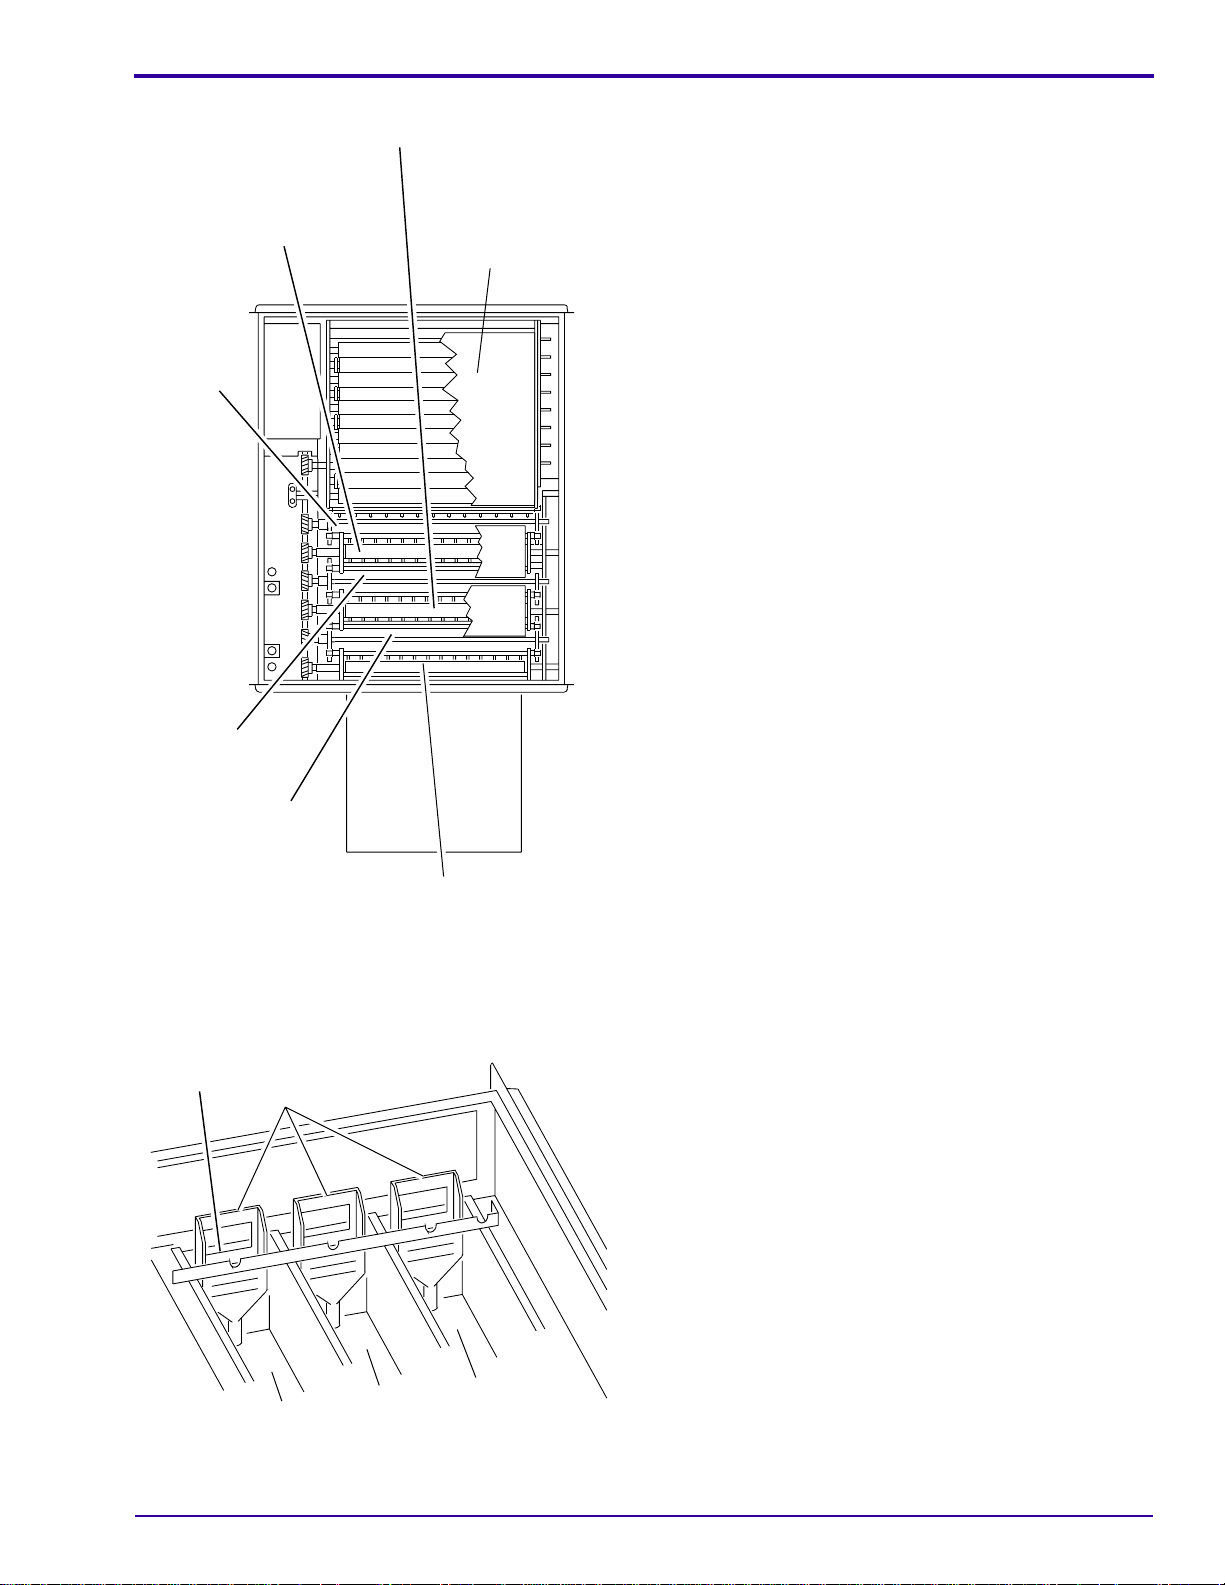
FIXER/WASH
CROSSOVER
ASSEMBLY
WASH
RACK
DEVELOPER/FIXER
CROSSOVER ASSEMBLY
DRYER
ASSEMBLY
[3] Check that the following are seated correctly:
• Developer Rack
•Fixer Rack
• Wash Rack
• Fixer/Wash Crossover Assembly
• Developer/Fixer Crossover Assembly
• Detector Crossover Assembly
•Dryer Assembly
FIXER
RACK
DEVELOPER
RACK
OVERFLOW
LEVEL
WEIRS
DETECTOR
DETECTOR
CROSSOVER
CROSSOVER
ASSEMBLY
ASSEMBLY
H172_1001CCD
H172_1001CC
[4] Check that the solutions in the Developer, Fixer,
and Wash Tanks are at the Overflow Level.
[5] Turn on the water supply.
H172_1004ACE
H172_1004AC
3E0815 – 29SEP99 7
WASH
TANK
FIXER
TANK
DEVELOPER
TANK
Page 8

OPERATORS MANUAL
2 EVAPORATION
COVERS
WATER
INLET TUBE
TOP
COVER
H172_1000ACB
H172_1000AC
DRYER TEMPERATURE
CONTROL KNOB
[6] Check:
• water is flowing from the Water Inlet Tube of
the Wash Tank
• 2 Evaporation Covers are installed
[7] Install the Top Cover .
Warning
Dangerous Voltage
[8] Energize the Processor.
[9] Wait until the Digital T emperature Display displays
the correct temperature of the developer solution:
Cycle Temperature
Standard 33.3 ± 0.3°C (92.0 ± 0.5°F)
Rapid 34.4 ± 0.3°C (94.0 ± 0.5°F)
H176_0001ACA
H176_0001AC
DIGITAL
TEMPERATURE
DISPLAY
RUN / STANDBY SWITCH
[10] Press the Run/Standby Switch.
[11] F eed a sheet of Kodak Roller Transport Cleanup
Film into the Processor.
[12] Adjust the Dryer T emperature Control Knob to the
lowest possible temperature that will still allow the
film to dry.
8 29SEP99 – 3E0815
Page 9

Feeding Sheet Film
Processing Film
1 each
35 x 43 cm
or
14 x 17 in.
1 each
24 x 30 cm
or
10 x 12 in.
1 each
1 each
35 x 35 cm
or
14 x 14 in.
1 each
24 x 24 cm
1 each
[1] Press the Run/Standby Switch. The Motors will
begin to operate.
Important
• Feed Mammography film with the emulsion side
down.
• Feed General Radiography film with the emulsion
side up.
• A film feed signal will sound when it is safe to feed
another sheet of film.
[2] Check that the developer solution is at the correct
temperature. See the table on Page 8
, Step 9.
[3] Feed a sheet of film into the Processor.
Note
The Processor will automatically return to the “Standby”
mode after the last film exits the Processor.
18 x 24 cm
2 each
10 x 10 cm
or
4 x 4 in.
1 each
11 x 14 in.
18 x 43 cm
H172_1002CC
3E0815 – 29SEP99 9
Page 10

OPERATORS MANUAL
Shutdown
TOP COVER
MAIN
POWER
SWITCH
H172_0502ACA
H172_0502AC
[1] Turn off:
• Main Power Switch
• water supply
Warning
Dangerous Voltage
[2] Disconnect the main power.
[3] Do the “Daily Procedure” on Page 18
.
[4] Install the T op Cover with a 5 cm (2 in.) opening for
venting purposes.
Note
The optimum time to do daily cleaning is at shutdown.
10 29SEP99 – 3E0815
Page 11

Processing Solutions
Section 4: Processing Solutions
Preparing the Solutions
Warning
• Use eye protection and rubber gloves.
• Wash the mixing equipment thoroughly between solutions to prevent contamination of the processing solutions.
• Do not mix more than a 2-week supply of chemicals.
[1] Mix the volume of processing solution required. Use the instructions packed with the chemicals.
Draining the Tanks
Warning
Dangerous Voltage
[1] De-energize and disconnect the main power.
SILVER RECOVERY UNIT
FIXER DRAIN
TUBE
H172_1007ACB
H172_1007AC
FIXER TANK
Warning
Use eye protection and rubber gloves.
[2] Remove the Top Cover.
[3] If the Processor has a Silver Recovery Unit
connected, disconnect the Fixer Drain Tube at the
input side of the Silver Recovery Unit.
[4] Place the Fixer Drain Tube in the Floor Drain or a
compatible collection container. Check the local
codes for the correct collection procedures.
WASH TANK
red WEIR
H176_0026BCA
H176_0026BC
3E0815 – 29SEP99 11
DEVELOPER
TANK
blue WEIR
beige WEIR
Page 12

OPERATORS MANUAL
Caution
Drain only 1 Tank at a time.
Check the local codes for the correct collection procedures.
Do not interchange the Weirs:
Weir Tank
red Developer
blue Fixer
beige Wash
[5] Remove the blue Weir.
[6] Drain the Fixer Tank.
[7] Install the blue Weir.
[8] Remove the red Weir.
[9] Drain the Developer Tank.
[10] Install the red Weir.
[11] Remove the beige Weir.
[12] Drain the Wash Tank.
[13] Install:
• beige Weir
• Top Cover
12 29SEP99 – 3E0815
Page 13

Filling the Tanks
Processing Solutions
FIXER/WASH
CROSSOVER
ASSEMBLY
WASH
RACK
DEVELOPER/FIXER
CROSSOVER ASSEMBLY
Warning
Dangerous Voltage
[1] De-energize and disconnect the main power.
Warning
Use eye protection and rubber gloves.
[2] Remove the Top Cover.
[3] Carefully and slowly remove the correct
Crossover Assembly and Rack from the Tank that
is to be filled.
FIXER
RACK
DEVELOPER
RACK
DETECTOR
DETECTOR
CROSSOVER
CROSSOVER
ASSEMBLY
ASSEMBLY
H172_1001CCE
H172_1001CC
3E0815 – 29SEP99 13
Page 14

OPERATORS MANUAL
DRIP TRAY
DEVELOPER
TANK
FIXER
TANK
H172_1004ACA
H172_1004AC
WEIRS
WASH
TANK
FIXER
TANK
SPLASH GUARD
H172_1003ACB
H172_1003AC
FILL
LINES
DEVELOPER
TANK
[4] Install the Splash Guard between the Developer
Tank and the Fixer Tank.
Caution
• Small amounts of fixer will cause excessive
developer contamination.
• Use the Drip Tray.
• If solutions are changed in both Tanks, fill the Fixer
Tank first so any solution that spills into the
Developer Tank can be completely cleaned.
[5] T o fill the Fixer Tank, add fixer replenisher until the
solution is at the higher Fill Line on the blue Weir.
[6] Remove and rinse the Splash Guard.
[7] Install the Splash Guard over the Fixer Tank.
[8] To fill the Developer Tank:
(a) Fill the Developer T ank half full of dev eloper
replenisher from the Replenisher Tank.
(b) Add the Kodak RP X-Omat Developer
Starter:
• for Mammography, 380 mL
(13 fl oz)
• for General Radiography,
190 mL (6.5 fl oz)
(c) Fill the Developer Tank to the lower Fill Line
on the red Weir with developer replenisher.
14 29SEP99 – 3E0815
Page 15

DEVELOPER/FIXER
CROSSOVER ASSEMBLY
FIXER/WASH
CROSSOVER
ASSEMBLY
DEVELOPER RACK
red WIRE TIE
FIXER RACK
blue WIRE TIE
WASH RACK
white WIRE TIE
DRYER
ASSEMBLY
DETECTOR
CROSSOVER
ASSEMBLY
ROLLERS
"D"
WASHER
"F"
WASHER
"W"
WASHER
Processing Solutions
Caution
• Prevent contamination and spills.
• The Racks are identified with a letter on the Washer
and a color on the Wire Tie:
“D” for the Developer Rack - red
“F” for the Fixer Rack - blue
“W” for the Wash Rack - white
[9] Slowly and carefully install the Racks. Use:
• Drip Tray
• Splash Guard
[10] Remove the Splash Guard and rinse thoroughly
with water.
[11] Install:
• Crossover Assemblies
• 2 Evaporation Covers
• Dryer Assembly, if removed
[12] Check that the developer solution is at the correct
temperature. See the table on Page 8
[13] Install the Top Cover.
, Step 9.
H176_0033CCA
H176_0033CC
3E0815 – 29SEP99 15
Page 16

OPERATORS MANUAL
Section 5: Correcting Difficulties
1. Transport Failure
2. Surface Artifacts
3. Abnormal Film Densities
4. Wet Films
5. Low Solution Levels
6. Overlapping of Films
123456
• • Film Feeding Error
Feed only single thicknesses of film. Feed the next film only after the
film feed signal sounds If there is no film feed signal, refer the difficulty
to qualified service personnel.
•••• Feed only compatible films.
• • Check that all Racks and Crossovers are seated correctly.
•• Check that the surfaces of all the Roller s are cle an and sm ooth , espe ci al ly in
the Developer Turnaround Assembly.
• • Check that the Dryer Air Tubes are in the correct positions.
• • Remove any dirt from the Dryer Rollers and Air Tubes from the Dryer
Assembly, especially the slots. Use a bottle brush and rinse with water.
• ••• Check that the replenishment rates are correct.
• Adjust the Dryer temperature control setting to the lowest possible
temperature that still allows good drying.
• Clean the Feed Shelf and Detector Rollers.
•• • Clean any biological growth in the Wash Tank with a mild solution of chlorine
bleach. Use 60 mL (2 fl oz) of bleach per 3.8 L (1 gallon) of water. Wipe the
Tanks with a soft sponge.
• • Check that the Weirs are seated correctly. Check that the Tanks are full.
•••• • Change any chemicals that were not mixed correctly, are exhausted, or are
contaminated. Check that the replenishment flow rates are correctly set. Fill
the Replenishment Tanks if necessary.
•• • Check that all Rollers are in place and positioned and rotating correctly.
•• • Check that all Roller Gears, Sprockets, and Idlers are engaged.
•• • Replace any Roller that has a broken or worn Gudgeons.
•• • Replace any Bearings that do not allow the Turnaround Rollers to rotate
correctly.
•• Check the tension on the Rack Chain. Check that the Rollers do not hesitate
and that the Chain moves smoothly.
• With the Processor on, check for movement on the surface of the solutions.
Movement indicates recirculation.
•• If the incoming wash water is dirty, clean the Rack and Tank thoroughly.
Change the incoming Water Filter. Use the correct Water Filter.
• Check that the Dryer Air Exhaust is free from any obstruction.
• • Check that the Turnaround Assembly is adjusted correctly. The Turnaround
Assemblies must be square with the Racks.
• • Check the incoming water temperature. Temperature must be between
°C (40°F) and 29.4°C (85°F).
4.4×
16 29SEP99 – 3E0815
Page 17

Correcting Difficulties
1. Transport Failure
2. Surface Artifacts
3. Abnormal Film Densities
4. Wet Films
5. Low Solution Levels
6. Overlapping of Films
123456
• Check that the correct Bulb and Safelight Filter are in the Safelight and at the
correct distance from the Feed Shelf and work surface.
• • Check that the Top Cover is tight on the Processor. Check that there are no
leaks in the Light Lock Gasket.
• 10 x 10 cm films - feed films diagonally if they fail to transport reliably.
• For all transport speeds, the buzzer should sound once the trailing edge of the
film has advanced 75 mm (3 in.) into the Processor.
••• • Check that the Tank solution levels are at the overflow Weirs.
• Check for solution in the Replenishment Tanks. Fill if necessary.
NOTE: Mix developer replenisher in quantities not to exceed a 2-week
supply.
• With a reliable thermometer, check that the temperature of the developer is
correct. If necessary, have qualified service personnel make adjustments.
NOTE: Check the incoming water temperature. It must be a minimum of 4×
(7
°×F) lower than the desired developer temperature.
°C
3E0815 – 29SEP99 17
Page 18

OPERATORS MANUAL
Section 6: Cleaning and Periodic Maintenance
Daily Procedure
DRYER
ASSEMBLY
ROLLERS
CROSSOVER
ASSEMBLIES
DETECTOR
CROSSOVER
ASSEMBLY
GUIDE
SHOE
2 EVAPORATION
COVERS
H172_1001CCF
H172_1001CC
Important
The optimum time to do daily cleaning is at shutdown.
[1] Identify any change in the operating condition of
the Processor to service personnel.
Warning
Dangerous Voltage
[2] De-energize the Processor. Disconnect the main
power.
[3] Turn off the water supply.
Warning
Use eye protection, rubber gloves, and protective
clothing before doing any maintenance procedures.
[4] Remove the Top Cover.
Caution
Do not touch or move the Guide Shoes.
[5] Remove and rinse with warm water:
• 2 Evaporation Covers
• Crossover Assemblies
[6] Rotate and clean the Rollers with a soft brush and
warm water.
[7] Use a cloth or synthetic sponge to remove any
water from the Rollers or allow to air dry.
[8] Remove all chemical deposits above the solution
level in the processing section.
[9] Clean off debris or buildup from the dryer area
with a warm, damp sponge or cloth.
[10] Install:
• Crossover Assemblies
• 2 Evaporation Covers
[11] At shutdown for venting purposes, install the Top
Cover with a 5 cm (2 in.) gap.
18 29SEP99 – 3E0815
Page 19

Every Two Weeks
Cleaning and Periodic Maintenance
RACKS
DRYER
ASSEMBLY
[1] Do Step 2 - Step 8 of the “Daily Procedure” on
Page 18
.
[2] Remove the Dryer Assembly.
[3] Clean off debris from the dryer area and Dryer
Assembly with a warm, damp sponge or cloth.
Caution
• Avoid contamination of the processing solutions.
• Use the Drip Tray when moving Racks to or from
the Processor.
[4] Remove the Racks.
[5] Install the Splash Guard between the Developer
Tank and the Fixer Tank. See Page 14
[6] Rinse the Racks and wipe them with a clean soft
cloth.
, Step 4.
H172_1008ACC
H172_1008AC
CHAIN
ROLLER
H172_1001CCG
H172_1001CC
[7] Check:
• Chains move freely
• Rollers rotate smoothly
[8] Install:
• Racks
• Dryer Assembly
• Top Cover
3E0815 – 29SEP99 19
Page 20

OPERATORS MANUAL
SILVER RECOVERY UNIT
BYPASS
H172_1007ACA
H172_1007AC
[9] T o check the operation of the Silver Recovery Unit
if installed:
(a) Check that no solution is flowing through the
Bypass.
(b) If soluti on is present in the Bypass, the Silver
Recovery Unit is not operating. Make a call
to service personnel.
(c) Use the Kodak Silver Estimating Test
Papers, Catalog No. 196 5466, to check the
silver content of the solution flowing into the
drain.
(d) If the test results indicate more than
1 gram/liter of silver, a new Silver Recovery
Unit must be installed. Make a call to service
personnel.
20 29SEP99 – 3E0815
Page 21

New Equipment Warranty
Section 7: New Equipment Warranty
Warranty Coverage
Kodak warrants the Processors to function properly for 1 year from the date of initial installation, when installed within
one year from the date of shipment.
If the equipment does not function correctly during the warranty period, the dealer that sold the equipment will provide
or arrange for repair of the equipment during the dealer's normal working hours. Such repair service will include any
necessary adjustments and/or replacement of parts necessary to maintain your equipment in good working order.
How to Obtain Service
Should equipment require service, see the sales contract for details on whom to call for service, or contact the dealer
that sold you the equipment.
Limitations
• Warranty service is limited to the contiguous United States, the island of Oahu in Hawaii, and certain areas of
Alaska.
• This warranty does not cover circumstances beyond Kodak's control, misuse, or abuse. Any attachments,
accessories, or alterations not marketed by Kodak (including service or parts to correct problems resulting from
the use of such attachments, accessories or alterations), failure to follow Kodak's operating instructions, or
supply items.
• Kodak makes no other warranties, express, implied, or of merchantability for this equipment.
• Repair without charge is Kodak's and the dealer's only obligation under this warranty.
– Kodak will not be responsible for any consequential or incidental damages resulting from the sale,
use, or improper functioning of this equipment even if loss or damage is caused by the negligence
or other fault of Kodak.
– Such damages for which Kodak will not be responsible, include, but are not limited to, loss of revenue or
profit, downtime costs, loss of use of the equipment, cost of any substitute equipment, facilities or services
or claims of your customers for such damages.
• This limitation of liability will not apply to claims for injury to persons or damage to property caused by the sole
negligence or fault of Kodak or by persons under its direction or control.
Publication History
Affected
Print Date Pub No. ECO No.
29SEP99 3E0815 4014-504 All om3752_1_29sep99.fm First Printing
3E0815 – 29SEP99 21
Pages File Name Notes
Page 22

Printed in U.S.A. • om3752_1.fm
EASTMAN KODAK COMPANY
Rochester, NY 14650
Kodak, Min-R and X-Omat are trademarks.
HEALTH IMAGING
 Loading...