

Page 1

KodakKE60
35 mm Camera
ENGLISH/ESPAÑOL/FRANÇAIS
Page 2

This device complies with part 15 of the FCC Rules. Operation is subject to the follow-ing two
conditions: (1) this device may not cause harmful interference, and (2)
this device must accept any interference received, including interference that may cause
undesired operation.
NOTE: Your model camera has been tested and found to comply with the limits for a Class B
digital device, pursuant to Part 15 of the FCC Rules. These limits provide reasonable protection against interference in residential use. The camera generates, uses and can radiate radio
frequency energy and, if not used in accordance with the instructions, may cause interference
to radio communications. There is no guarantee that interference will not occur. If this camera
does cause interference to radio or television reception, which can be determined by turning
the camera off and on, you may reduce the interference by the following:
— Reorient or relocate the receiving antenna.
— Increase the separation between the camera and the receiver.
— Consult the dealer or an experienced radio/television technician for help.
Changes or modifications not approved by the party responsible for compliance could void
the user’s authority to operate the equipment.
This Class B digital apparatus meets all requirements of the Canadian
Interference-Causing Equipment Regulations.
Page 3
Camera Identification
1
9
3
2
4
5
6
7
8
Page 4
11
27
26
25
23
24
10
22
21
20
19
12
13
14
15
16
17
18
Page 5
31
28
29
30
32
33
AUTO AUTO
34
38
37
36
35
Page 6

Kodak KE60 35 mm Camera
NEED HELP WITH YOUR CAMERA?
Visit our Web sites at http://www.kodak.com (for US) or
http://www.kodak.ca (for Canada) or call:
Kodak (USA only) from 9:00 a.m. to 7:00 p.m. (Eastern time) Monday
through Friday at 1-800-242-2424.
Kodak (Canada only) from 8:00 a.m. to 5:00 p.m. (Eastern time) Monday
through Friday at 1-800-465-6325, ext. 36100; for the Toronto area,
call 416-766-8233, ext. 36100.
When you call, please have your camera available.
For warranty purposes, please keep your sales receipt as proof
of the date of purchase.
ENGLISH
ENGLISH
1
Page 7

CONTENTS
CAMERA IDENTIFICATION ................ 3
ATTACHING THE STRAP ................. 4
LOADING THE BATTERY................. 5
Low-battery indicator ................... 6
Auto power off ............................. 6
Battery tips .................................. 7
ATTACHING THE LCD LABEL.......... 8
Using the LCD backlight .............. 8
LOADING THE FILM ......................... 9
TAKING PICTURES......................... 12
Using the focus lock ................... 13
Tips for better pictures................ 14
TAKING FLASH PICTURES ............ 15
Flash-to-subject distance ............ 16
Using the red-eye reduction........ 17
2
FLASH MODES ................................ 18
Flash off....................................... 18
Fill flash ....................................... 19
Nightview with flash ..................... 19
Nightview without flash ................ 20
Selecting the flash modes ........... 20
USING THE SELF-TIMER ................ 22
SPECIAL OPTION MODES .............. 23
Portrait mode ............................... 23
Infinity-focus mode ...................... 25
UNLOADING THE FILM .................... 26
Automatic rewind ......................... 26
Manual rewind ............................. 26
CARING FOR YOUR CAMERA ........ 27
TROUBLESHOOTING ...................... 28
SPECIFICATIONS ............................ 30
Page 8

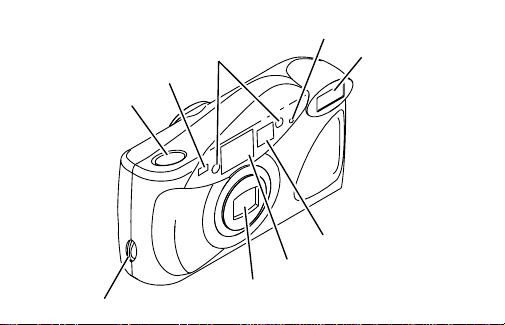
CAMERA IDENTIFICA TION
Unfold cover flaps of manual
to view camera diagrams.
1 SHUTTER BUTTON
2 SELF-TIMER BULB/RED-EYE-
REDUCTION BULB
3 AUTO-FOCUS WINDOWS
4 LIGHT SENSOR
5 FLASH
6 VIEWFINDER LIGHT DIFFUSER
7 VIEWFINDER
8 LENS/LENS COVER
9 STRAP POST
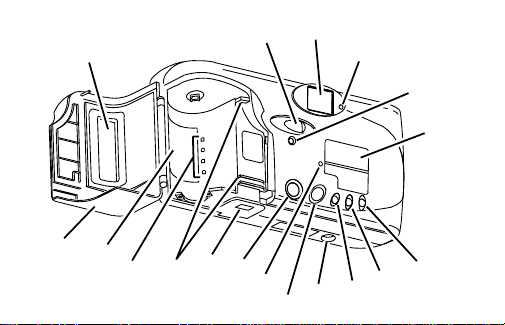
10 FILM-DOOR LATCH
11 VIEWFINDER EYEPIECE
12 FLASH-READY LIGHT
13 FILM-DOOR-LOCK INDICATOR
14 LCD PANEL
15 SELF-TIMER BUTTON
16 FOCUS-MODE BUTTON
17 EXPOSURE-MODE BUTTON
18 TRIPOD SOCKET
19 LCD BACKLIGHT BUTTON
20 FILM-REWIND BUTTON
21 ON/OFF BUTTON
22 BATTERY DOOR
23 FILM-GUIDE RAILS
24 DX/DXN CODE SENSORS
25 FILM CHAMBER
26 FILM DOOR
27 FILM WINDOW
3
Page 9

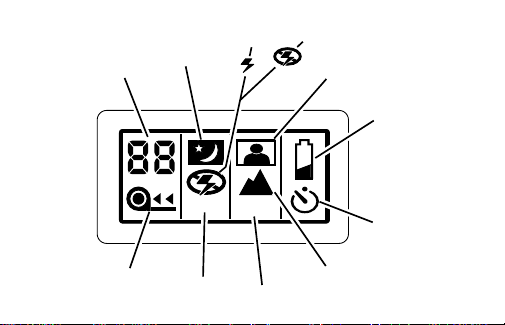
LCD Panel
28 FRAME COUNTER
29 NIGHTVIEW SYMBOL
30 FILL-FLASH SYMBOL
31 FLASH-OFF SYMBOL
32 PORTRAIT SYMBOL
33 BATTERY SYMBOL
34 SELF-TIMER SYMBOL
35 INFINITY-FOCUS SYMBOL
36 AUTO-FOCUS INDICATOR
37 AUTO-FLASH INDICATOR
38 FILM-MOTION INDICATOR
4
AT T ACHING THE STRAP
1. Insert one end of the
strap under the
STRAP POST
pull it through.
2. Thread the longer
end of the strap
through the
shorter loop.
3. Pull the strap tight.
(9) and
Page 10
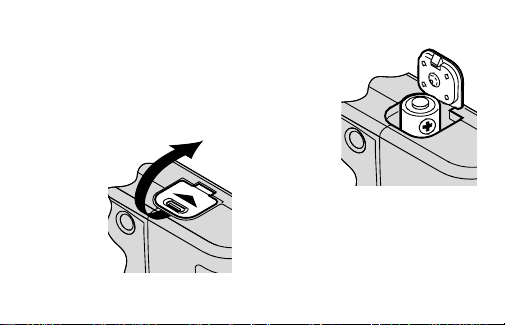
LOADING THE BATTER Y
This camera uses one 3-volt lithium
KODAK K123LA (or equivalent)
Battery that supplies power for all
camera operations.
1. Open the
BATTERY DOOR
• Before you remove the old
battery, turn off
the camera.
(22).
2. Insert the battery into the
chamber as shown.
3. Snap the
battery
door
closed.
5
Page 11

Low-battery indicator
It is time to replace the battery when—
• the
BATTERY SYMBOL
LCD PANEL
on the
• none of the indicators appear on
LCD
panel and the
the
BUTTON
(1) cannot be released.
(33) appears
(14).
SHUTTER
6
Auto power off
This camera automatically turns off
after approximately 4 minutes to
conserve the battery life. To awaken
the camera, press the
(21).
BUTTON
• Turn the camera off when the
camera is not going to be used for
an extended length of time.
ON/OFF
Page 12

Battery tips
• Dispose of the battery according to
local and national regulations.
• Keep spare batteries with you at
all times.
• Read and follow all warnings
and instructions supplied by the
battery manufacturer.
• Keep batteries away from children.
• Do not try to take apart, recharge
or short circuit the battery, or
subject it to high temperature
or fire.
• Store batteries in their original
packaging prior to use.
• Remove the battery from the
camera when the camera is not
going to be used for an extended
length of time.
• In the unlikely event that battery
fluid leaks onto your skin, contact
Kodak Health, Safety and
Environment Information at
1-716-722-5151 in the U.S.
• In the unlikely event that battery
fluid leaks inside the camera, U.S.
customers can contact the Kodak
Information Center (KIC) at 1-800242-2424. Customers outside the
U.S. can contact their local Kodak
Customer Service representative.
7
Page 13
ATTACHING THE
LCD LABEL
English text references for the LCD
control buttons are printed below the
LCD PANEL
(14). You can replace the
English text for Chinese, Arabic, Thai,
Polish, French,
Spanish,
Portuguese, or
Russian
with one of the
eight supplied
labels. Simply remove
the peel-off label of your choice and
place it over the English text. The label
is removable if you want to reposition
it or replace it with a different one.
REMBOBINAGE
POSE
MISE AU
8
POINT
RETAR-
DATEUR
Exposure
Focus
Timer
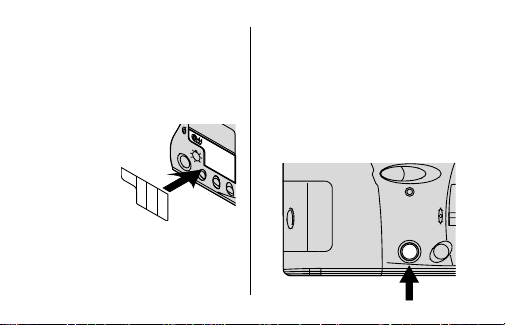
Using the LCD backlight
This camera features an LCD panel
backlight for easy viewing and use in
low-light or nighttime settings.
1. Press the
ON/OFF BUTTON
uncover the
the camera.
EASYLOAD
LENS
(21) to
(8) and to turn on
ON/OFF
Page 14
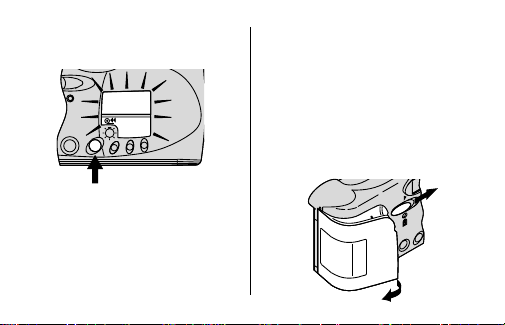
2. Press the
• The backlight automatically turns
LCD BACKLIGHT
(19) to turn on the light.
BUTTON
Timer
Focus
Exposure
off in approximately 20 seconds
or you can manually turn off the
light by repressing the
backlight button.
LCD
LOADING THE FILM
If in sunlight, turn your back to the
sun and load the film in the shade of
your body. The unique KODAK
Easyload feature of this camera makes
film loading simple.
1. Slide the
FILM-DOOR LATCH
in the direction of the arrow to open
FILM DOOR
the
(26).
(10)
OPEN
9
Page 15
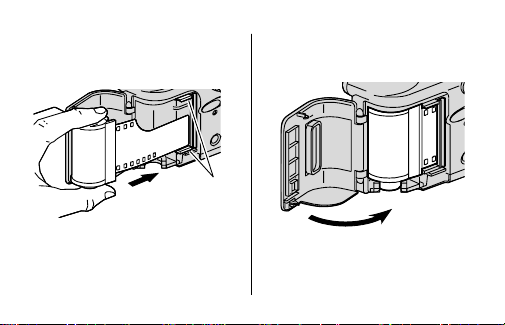
2. Insert the film leader into the slot in
the back of the camera between
FILM-GUIDE RAILS
the
(23).
FILM-GUIDE
RAILS
3. Push the film cartridge completely
down into the
until it fits securely in place.
FILM CHAMBER
(25)
NOTE: Do not pull additional film
out of the cartridge. You can use
the film just as it comes out of the
film carton.
10
• Do not force it into the
film chamber.
Page 16
4. Close the
FILM DOOR
the auto-film advance.
EASYLOAD
• The
LCD PANEL
first exposure.
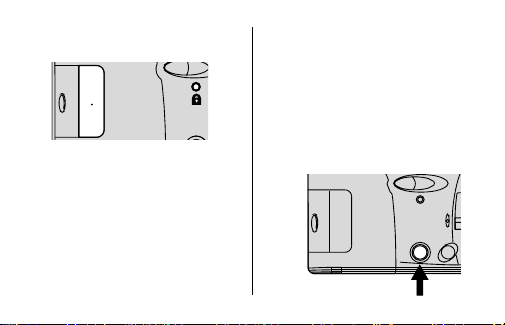
• The
FILM WINDOW
the film information.
• The
FILM-DOOR-LOCK INDICATOR
changes from black to amber to
indicate the film door is locked
and that the film is correctly
loaded in the camera.
(26) to start
GA24 100/21°
(14) shows the
(27) displays
(13)
• After you close the safety inter-
locked film door and the film
advances, you cannot open
the film door until the film is
completely rewound into
the film cartridge.
5. Press the
uncover the
the camera.
EASYLOAD
ON/OFF BUTTON
LENS
(21) to
(8) and to turn on
ON/OFF
11
Page 17
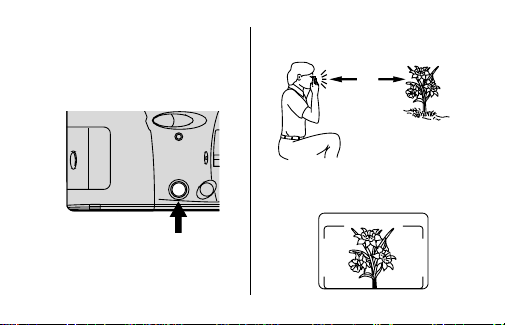
TAKING PICTURES
1. Press the ON/
uncover the
on the camera.
OFF BUTTON
LENS
(8) and to turn
(21) to
2. For a sharp picture, stand at least
1.5 ft (0.5 m) from your subject.
1.5 ft
(0.5 m)
EASYLOAD
ON/OFF
3. Look through the
EYEPIECE
VIEWFINDER
(11) to see your subject.
12
Page 18
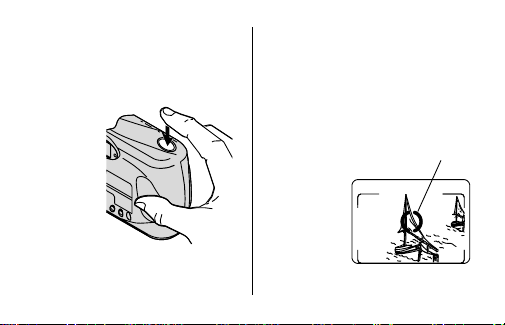
4. Hold the camera steady and gently
press the
SHUTTER BUTTON
take the picture.
• After you take the picture, the
film automatically advances to
the next
picture.
5. Turn off
the
camera
when you
are done
taking
pictures.
(1) to
Using the focus lock
This camera automatically focuses on
the subject that is within the autofocus circle of the viewfinder. If you
want to take a picture with the subject
positioned outside the auto-focus
circle, follow these instructions.
1. Place the autofocus circle
on the
subject you
want
focused
in the
picture.
AUTO-FOCUS
CIRCLE
VIEWFINDER
13
Page 19
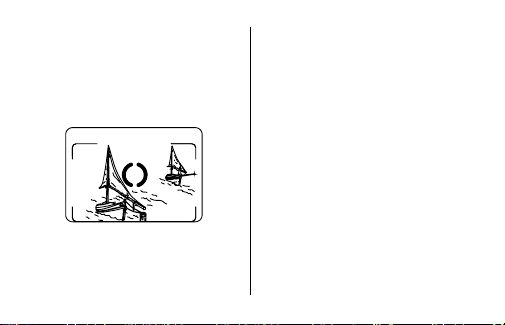
2. Press the
3. While still pressing the shutter
4. Press the shutter button com-
14
SHUTTER BUTTON
halfway down to lock the focus.
button, move the camera until your
subject is where you want it within
VIEWFINDER EYEPIECE
the
(1)
(11).
pletely down to take the picture.
Tips for better pictures
• To avoid blurry pictures, hold your
camera steady by keeping your
elbows close to your body when
you press the shutter button.
• Stand close enough to your subject
so it fills the viewfinder but not
closer than 1.5 ft (0.5 m).
• Take pictures at the subject’s level.
Kneel down to take pictures of
children and pets.
• Hold your camera vertically to
capture tall, narrow subjects, such
as a waterfall, skyscraper, or a
single person.
Page 20

• Add interest to your picture by
framing it with a tree branch,
a window, or even the rails of
a fence.
• Keep the sun behind you.
This provides the best
subject illumination.
• Keep your hand, fingers, or objects
away from the flash and picturetaking lens.
• Stand at an angle to shiny
surfaces like windows or mirrors to
avoid flash reflection and bright
spots in your pictures.
TAKING FLASH
AUTO
PICTURES
In dim light, such as indoors or
outdoors in heavy shade, or on dark
overcast days, you need flash. This
camera features an automatic flash
that fires when you need it.
1. Press the
ON/OFF BUTTON
uncover the
the camera.
LENS
(21) to
(8) and to turn on
15
Page 21
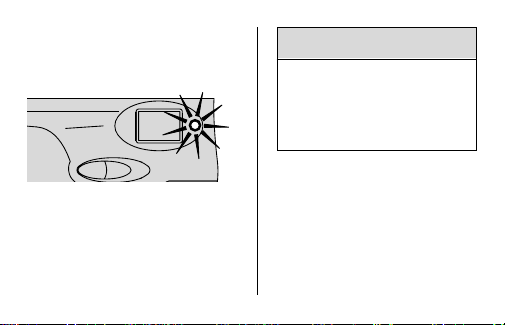
2. W ait for the
and the
on the
stop blinking.
3. Keep the subject within the
distance range for the speed of
film in your camera.
16
FLASH-READY LIGHT
AUTO-FLASH INDICATOR
LCD PANEL
(14) to
(12)
(37)
ISO film Flash-to-subject
speed distance
100 1.5 to 12 ft (0.5 to 3.7 m)
200 1.5 to 17 ft (0.5 to 5.2 m)
400 1.5 to 23 ft (0.5 to 7.0 m)
800 1.5 to 28 ft (0.5 to 8.5 m)
•
Don’t take pictures beyond the
maximum distance or your
pictures will be dark.
Page 22

4. Hold the camera steady and gently
SHUTTER BUTTON
press the
completely down to take
the picture.
• To prevent battery drain, turn off
the camera by pressing the on/off
button when you are done
taking pictures.
(1)
Using the red-eye reduction
Some people’s eyes (and some pets’)
can reflect flash with a red glow.
To minimize red eye in flash or fillflash pictures, use the red-eyereduction feature.
1. Press the
ON/OFF BUTTON
uncover the
the camera.
LENS
(21) to
(8) and to turn on
2. Partially depress the
BUTTON
(1) to turn on the
RED-EYE-REDUCTION BULB
3. Have your subject look directly at
the red-eye-reduction bulb.
4. Press the shutter button completely
down to take the picture.
SHUTTER
(2).
17
Page 23

FLASH MODES
Besides the auto-flash mode, which is
the default setting of the camera, you
can select flash off, fill flash, or
nightview with or without flash.
18
Flash off
When you do not want to use the
flash, especially indoors where flash
is prohibited or when you want to take
twilight scenes, distant subjects that
are beyond the flash range, or to
capture the ambiance of existing light,
use the flash-off feature. Attach a
tripod to the camera
SOCKET
(18) or place the camera on
another firm support, and use highspeed film to ensure the best
exposure possible for taking
pictures without flash.
TRIPOD
Page 24

Fill flash
When bright light indoors or outdoors
comes from behind the subject
(backlighting), dark shadows
(especially on faces) may occur. Use
fill flash to lighten these shadows.
Nightview with flash
In this mode, the camera balances the
flash and existing-light exposure so
that you can take beautiful pictures of
people at sunset or at night. Use a
tripod by attaching it to the camera
TRIPOD SOCKET
camera on another firm support, and
use high-speed film because the
shutter speed at night is typically
slow.
(18) or place the
19
Page 25
Nightview without flash
FOCUS
EXPOSURE
TIMER
In this mode, you can capture the
natural existing-light of city-night
scenes or fireworks at night. Attach a
tripod to the camera
(18) or place the camera on
SOCKET
another firm support, and use highspeed film because the shutter speed
at night is typically slow.
TRIPOD
20
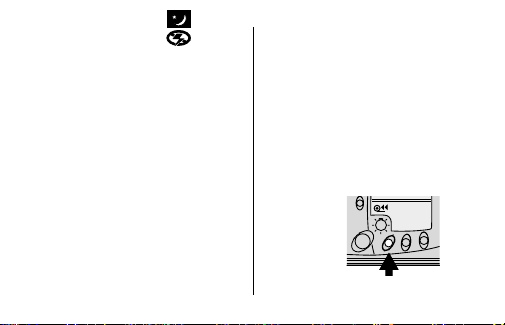
Selecting the flash modes
1. Press the
2. Repeatedly press the
ON/OFF BUTTON
uncover the
on the camera.
MODE BUTTON
OFF SYMBOL
SYMBOL
SYMBOL
appears on the
LENS
(8) and to turn
(17) until the
(31),
FILL-FLASH
(30), or
NIGHTVIEW
(29) with or without flash
LCD PANEL
(21) to
EXPOSURE
(14).
FLASH
-
-
Page 26

3.
For flash off and fill flash
Hold the camera steady
settings:
and gently press the
(1) completely down to
BUTTON
take a picture.
For nightview with and without
flash settings:
shutter button completely down for
approximately 4 seconds, without
lifting your finger, until the shutter
automatically releases to take
a picture.
• If you remove your finger from
the shutter button before
4 seconds, the shutter
releases but in the standard
auto-flash mode.
SHUTTER
Press and hold the
The nightview modes cancel after you
take a picture, whereas the off-flash
and fill-flash modes remain selected.
To cancel the fill-flash or flash-off
mode, turn off the camera by pressing
ON/OFF BUTTON
the
different
EXPOSURE-MODE BUTTON
(21) or select a
flash mode by pressing the
(17).
21
Page 27
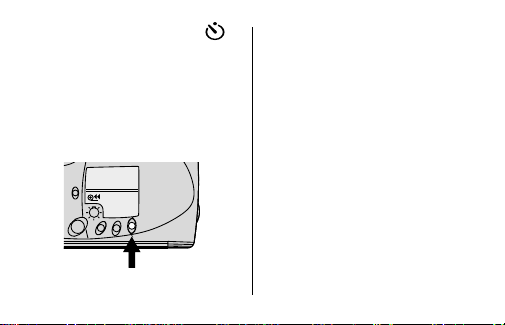
USING THE SELF-TIMER
Use this feature when you want to
include yourself in the picture.
1. Attach a tripod to the camera
TRIPOD SOCKET
another firm support.
2. Press the
22
(18) or place it on
SELF-TIMER BUTTON
TIMER
FOCUS
EXPOSURE
(15).
• The
SELF-TIMER SYMBOL
appears on the
3. Look through the
EYEPIECE
(11) to compose the
picture and to allow room for
yourself in it.
4. Hold the camera steady and gently
5. Position yourself in the composed
SHUTTER BUTTON
press the
take the picture.
picture making sure that you see
SELF-TIMER BULB
the
(34)
LCD PANEL
(14).
VIEWFINDER
(1) to
(2) completely.
Page 28

NOTE: If you do not see the
entire bulb, you may not be in
the picture.
• The self-timer bulb on the front of
the camera glows and then blinks
during the 10 seconds
self-timer countdown.
• The self-timer automatically
cancels after the shutter releases.
SPECIAL OPTION MODES
Repeatedly press the
BUTTON
(16) to view the special
option modes and to make your
selection. The special option modes
for portrait and infinity focus let you
tailor the camera’s fully automatic
operation for optimal camera settings.
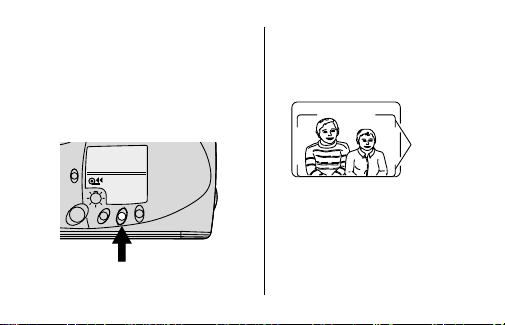
Portrait mode
The portrait selection allows you to
take sharp, close-up pictures of
people. In this mode, the camera
enters the close-focus zone at any
distance away from the subject.
If its distance exceeds 3 ft (0.9 m),
FLASH-READY LIGHT
the
red” to warn you of incorrect focus.
FOCUS-MODE
(12) “blinks
23
Page 29
1. Press the ON/
uncover the
the camera.
2. Repeatedly press the
BUTTON
SYMBOL
LCD PANEL
OFF BUTTON
LENS
(8) and to turn on
EXPOSURE
FOCUS
TIMER
FOCUS-MODE
PORTRAIT
(16) until the
(32) appears on the
(14).
24
(21) to
3. Look through the
EYEPIECE
picture within the close-framing
guides of the viewfinder.
VIEWFINDER
4. Hold the camera steady and
gently press the
BUTTON
• The selection cancels after
you take the picture.
VIEWFINDER
(11) and compose your
CLOSE-FRAMING
GUIDES
SHUTTER
(1) to take the picture.
Page 30

Infinity-focus mode
In this mode, you can capture sharp,
distant scenery for outdoor picture-taking.
1. Press the
2. Repeatedly press the
ON/OFF BUTTON
uncover the
the camera.
BUTTON
FOCUS SYMBOL
LCD PANEL
• In this mode the camera is
LENS
(16) until the
(14).
automatically set for flash off,
the only available flash option.
(21) to
(8) and to turn on
FOCUS-MODE
INFINITY
(35) appears on the
-
3. Look through the
EYEPIECE
4. Hold the camera steady and gently
press the
take the picture.
• The selection cancels after you
take the picture.
VIEWFINDER
(11) to see your subject.
SHUTTER BUTTON
(1) to
25
Page 31

UNLOADING THE FILM
Automatic rewind
The camera automatically rewinds the
film into the film cartridge after the last
exposure.
1. Wait for the motor to stop
running before you open the
FILM DOOR
(26).
• The
FILM-MOTION INDICATOR
blinks and the
COUNTER
as the film is rewinding.
2. Remove the film and reload with
fresh KODAK Film.
• The frame counter displays “0.”
FRAME
(28) counts down
26
(38)
Manual rewind
If you don’t want to take pictures on
the entire roll of film, you can rewind
the film manually. But you will not be
able to reload the film.
1. Gently press the
BUTTON
film
rewind.
2. Follow
steps 1
and 2
from
Automatic rewind.
FILM-REWIND
(20) to start the automatic
TIMER
FOCUS
EXPOSURE
Page 32

CARING FOR YOUR CAMERA
• Protect the camera from dust,
moisture, sudden impact, and
excessive heat.
CAUTION: Do not use solvents or
harsh or abrasive cleaners on the
camera body.
• If the lens appears dirty, breathe on
it to form a mist and wipe the
surface gently with a soft, lintless
cloth or camera lens-cleaning
tissue. Never wipe a dry lens.
CAUTION: Use solvents or
solutions designed for cleaning
camera lenses. Do not use
chemically treated tissues intended
for cleaning eyeglasses.
• Remove the battery when you
store the camera for an
extended time.
CAUTION: To prevent possible
damage and electrical shock, do
not attempt to disassemble
or repair the camera or flash unit
by yourself.
27
Page 33

TROUBLESHOOTING
What happened Probable cause Solution
Camera will Lens cover closed Open lens cover
not operate completely
Battery weak, dead, Replace or
missing, or reload the battery
improperly loaded
Flash not ready Wait for the blinking
Film not properly Reload the film; see
loaded in camera LOADING THE
Film needs to be See UNLOADING
rewound/removed THE FILM on page 24
28
flash-ready light
to disappear
FILM on page 9
Page 34

What happened Probable cause Solution
Shutter button No film in camera Load film
cannot be released into camera
Film-door latch Film is not Complete taking
does not open completely rewound pictures or
LCD panel is blank Battery weak, dead, Replace or
Lens cover closed Press on/off button
into the cartridge press the film-
missing, or reload the battery
improperly loaded
to open lens cover
rewind button
29
Page 35

SPECIFICATIONS
Lens: 29 mm all-glass lens
Shutter: Programmed shutter;
1/60 to 1/400 seconds
f
Aperture:
Film speed: DX (ISO) 100, 200,
Focus range: Daylight: 1.5 ft (0.5 m)
Viewfinder: Projected image,
Flash unit: Built-in
Flash-recycle time: 6 seconds with
30
/5.6
400, or 800 print film
to infinity
center-spot-aiming circle,
macro parallax correction
fresh battery
Power source: One 3 V
lithium battery
Dimensions: 38 x 62 x 124 mm
Weight: 6.1 oz. (173 g)
Page 36

Kodak and “e” mark are trademarks.
31
Page 37

Este dispositivo cumple con la parte 15 de las reglamentaciones de la FCC. El
manejo está supeditado a las siguientes dos condiciones: (1) Este dispositivo
puede no causar interferencia dañina, y (2) este dispositivo debe aceptar cualquier
interferencia recibida, incluyendo interferencia la cual pudiese causar un
funcionamiento indeseable.
NOTA: El modelo de su cámara ha sido aprobado y cumple con las limitaciones
establecidas para un dispositivo digital Clase B, de acuerdo con la Parte 15 de las
reglamentaciones de la FCC. Estas limitaciones proveen una protección razonable en
contra de la interferencia que se encuentra en uso residencial. La cámara genera, usa,
y puede emitir energía de frecuencia radial y si no es usada de acuerdo con las
instrucciones, puede causar interferencia a comunicaciones de radio. No se puede
garantizar que esta interferencia no ocurra. En caso de que ésta cámara cause
interferencia a la recepción de radio o televisión, lo cual puede ser determinado
encendiendo y apagando la cámara, puede reducir la interferencia haciendo lo siguiente:
– Vuelva a orientar o situar la antena de recepción
– Aumente la distancia entre la cámara y el receptor
– Para recibir ayuda consulte con el distribuidor o un técnico especializado
en radio/televisión
Cambios o modificaciones no aprobadas por el contratante responsable de acatar estas
regulaciones podría anular la autoridad del consumidor para operar éste equipo.
32
Page 38

Cámara KE60
¿NECESITA AYUDA CON SU CÁMARA?
Contacte nuestro sitio en la red mundial electrónica (worldwide web) a la
dirección http://www.kodak.com (en los Estados Unidos) o http://www.kodak.ca
(en el Canadá) o llame a:
Kodak (en los Estados Unidos solamente), al 1-800-242-2424, de lunes a
viernes de 9:00 a.m. a 7:00 p.m. (hora del este).
Kodak (solamente en el Canadá), al 1-800-465-6325, extensión 36100, de
lunes a viernes de 8:00 a.m. a 5:00 p.m. (hora del este); para el área de
Toronto, llame al 416-766-8233 extensión 36100.
Cuando llame, favor de tener su cámara disponible
Para hacer válida la garantía, sírvase guardar el recibo de venta como
prueba de la fecha de compra.
Kodak
33
ESPAÑOL
Page 39

CONTENIDO
IDENTIFICACIÓN DE
LA CÁMARA.................................. 35
COMO AJUSTAR LA CORREA
DE LA CÁMARA ........................... 37
COMO CARGAR LA BATERÍA ........ 38
Indicador de batería débil ....... 39
Apagado automático............... 39
Consejos para usar
las baterías......................... 40
COMO PEGAR LA ETIQUETA
AL LCD .......................................... 41
Como usar la iluminación de
fondo en el LCD ................. 42
COMO CARGAR LA PELÍCULA ...... 43
34
COMO TOMAR FOTOGRAFÍAS ...... 46
Como usar el cerrojo
de enfoque ......................... 48
Consejos útiles para obtener
mejores fotografías............. 49
COMO TOMAR FOTOGRAFÍAS
CON FLASH .................................. 50
Distancia del sujeto
al flash ............................... 51
Como usar la reducción
de ojos rojos ...................... 52
MODOS DE FLASH ......................... 53
Flash apagado ....................... 53
Flash de relleno ..................... 54
Vista de noche con flash ....... 54
Vista de noche sin flash ........ 55
Como seleccionar los
modos de flash ................... 55
Page 40

COMO USAR EL
AUTODISPARADOR ..................... 57
MODOS DE OPCIONES
ESPECIALES ................................ 58
Modo de retrato ..................... 58
Modo de enfoque infinito ....... 60
COMO DESCARGAR
LA PELÍCULA................................ 61
Rebobinado automático......... 61
Rebobinado manual .............. 62
CUIDADO DE SU CÁMARA ............ 63
PROBLEMAS Y SOLUCIONES ....... 64
ESPECIFICACIONES ...................... 67
IDENTIFICACIÓN DE
LA CÁMARA
Abra las cubiertas del manual para ver los
diagramas de la cámara.
1 DISPARADOR
2 BOMBILLA DE AUTODISPARADOR/
REDUCCIÓN DE OJOS ROJOS
3 VENTANAS DE
4 SENSOR DE ILUMINACIÓN
5 FLASH
6 DIFUSOR DE LUZ EN EL VISOR
7 VISOR
8 LENTE/CUBIERTA DEL LENTE
9 PRESILLA DE LA CORREA
ENFOQUE
AUTOMÁTICO
35
Page 41

10 CERROJO DE LA PUERTA DEL
COMPARTIMIENTO
11 OCULAR DEL VISOR
12 INDICADOR LUMINOSO DE
FLASH
13 INDICADOR DE LA CERRADURA DE
PUERTA DEL COMPARTIMIENTO
LA
DE LA PELÍCULA
14 PANEL LCD
15 BOTÓN DE AUTODISPARADOR
16 BOTÓN DE MODO DE ENFOQUE
17 BOTÓN DE MODO DE EXPOSICIÓN
18 MONTAJE PARA TRÍPODE
19 BOTÓN DE ILUMINACIÓN DE
FONDO
DE LA PELÍCULA
LISTO
EN EL LCD
36
20 BOTÓN DEL REBOBINADO DE
PELÍCULA
LA
21 BOTÓN DE ENCENDER/APAGAR
22 PUERTA DEL COMPARTIMIENTO DE
BATERÍA
LA
23 CARRILES DE GUÍA DE LA PELÍCULA
24 SENSORES DE CÓDIGO DX/DXN
25 COMPARTIMIENTO DE LA PELÍCULA
26 PUERTA DEL COMPARTIMIENTO DE
PELÍCULA
LA
27 VENTANA DE LA PELÍCULA
Page 42

Panel LCD
28 CONTADOR DE FOTOGRAFÍAS
29 SÍMBOLO DE VISTA DE NOCHE
30 SÍMBOLO DE FLASH DE RELLENO
31 SÍMBOLO DE FLASH APAGADO
32 SÍMBOLO DE RETRATO
33 SÍMBOLO DE LA BATERÍA
34 SÍMBOLO DE AUTODISPARADOR
35 SÍMBOLO DE ENFOQUE INFINITO
36 INDICADOR DE ENFOQUE
AUTOMÁTICO
37 INDICADOR DE FLASH AUTOMÁTICO
38 INDICADOR DEL MOVIMIENTO
DE LA PELÍCULA
COMO AJUSTAR LA
CORREA DE LA CÁMARA
1. Pase una de las
puntas de la correa
por detrás de la
PRESILLA DE LA
(9) y tire
CORREA
de ella.
2. Pase el
extremo largo de la
correa a través
del corto.
3. Tire de la correa
hasta que
quede ajustada.
37
Page 43

COMO CARGAR LA BA TERÍA
Esta cámara utiliza una batería de
litio de 3 voltios KODAK K123LA
(o su equivalente) que proporciona la
energía necesaria para todas las
funciones de la cámara.
PUERTA DEL COMPARTIMIENTO
1. Abra la
LA
BATERÍA
DE
• Antes de
retirar la
batería
usada,
apague
la
cámara.
38
(22).
2. Coloque la batería en su
compartimiento como se indica.
3. Cierre la puerta a presión.
Page 44

Indicador de batería débil
Debe cambiar la batería cuando—
• el
SÍMBOLO DE LA BATERÍA
aparece en el
• ninguno de los indicadores
aparecen el el panel LCD y el
DISPARADOR
(1) no funciona.
PANEL LCD
(33)
(14).
Características de la Conservación
Automática de Energía
Apagado automático
Para conservar la energía de la
batería, esta cámara se apaga
automáticamente cuando no se usa
por aproximadamente 4 minutos.
Para encender la cámara, oprima el
BOTÓN DE ENCENDER/APAGAR
• Cuando no use la cámara por un
período de tiempo prolongado,
apáguela.
(21).
39
Page 45

Consejos para usar las baterías
• Deseche la batería usada
según las regulaciones locales
y nacionales.
• Acuérdese de llevar baterías
de repuesto con usted en
todo momento.
• Lea y siga todas las advertencias
e instrucciones del fabricante de
la batería.
• Mantenga las baterías fuera del
alcance de los niños.
• No intente desarmar, recargar o
cortocircuito la batería o exponerla
a altas temperaturas o fuego.
40
• Antes de usarlas, guarde las
baterías en su empaque original.
• Cuando no vaya a usar la cámara
por un período prolongado, quite la
batería de la cámara.
• Si sucediera que el líquido de la
batería tocase su piel,
comuníquese, en los Estados
Unidos, con el departamento de
Salud, Seguridad, e Información
Medioambiental de Kodak
llamando al 1-716-722-5151.
Page 46

• Si sucediera que el líquido de la
batería se derramase dentro de la
cámara, los clientes de Kodak en
los Estados Unidos pueden
comunicarse con el Centro de
Información de Kodak (KIC)
llamando al 1-800-242-2424. Para
los clientes que se encuentren
fuera de Estados Unidos es
necesario que se comuniquen con
el representante local de Kodak.
COMO PEGAR LA
ETIQUETA AL LCD
Texto de referencia en inglés para los
botones de control del LCD están
impresos debajo del
Puede reemplazar la etiqueta en
inglés sustituyéndola por una de las
ocho que se
incluyen las
cuales están
escritas en los
idiomas chino,
árabe, tai, polaco,
francés, español,
portugués, o ruso. Simplemente
escoja la etiqueta de su elección y
póngala sobre la etiqueta en inglés.
En caso de que desee cambiar la
etiqueta por otra distinta solo tiene
que removerla.
PANEL LCD
REMBOBINAGE
POSE
MISE AU
POINT
RETAR-
DATEUR
(14).
Exposure
Focus
Timer
41
Page 47

Como usar la iluminación de
fondo en el LCD
Esta cámara tiene la característica de
iluminación de fondo en el LCD para
poder usar y ver con facilidad el texto
del panel LCD en escenas de poca
iluminación o durante la noche.
1. Oprima el
BOTÓN DE ENCENDER
APAGAR
(21) para destapar el
LENTE
(8) y encender cámara.
EASYLOAD
/
ON/OFF
42
2. Oprima el
BOTÓN DE ILUMINACIÓN DE
EN EL
LCD
FONDO
encender la luz.
• La iluminación de fondo se
apaga automáticamente en
aproximadamente 20 segundos o
usted puede manualmente
apagar la luz oprimiendo
nuevamente el botón de
iluminación de fondo del LCD.
(19) para
Timer
Focus
Exposure
Page 48

COMO CARGAR
LA PELÍCULA
Bajo luz solar, colóquese de espalda
al sol y cargue la película a la sombra
de su cuerpo. La característica
especial de esta cámara de KODAK
de Carga Fácil
hace sencilla
la carga de
la película.
1. Deslice el
CERROJO DE LA
DEL
PUERTA
COMPARTIMIENTO DE LA PELÍCULA
en la dirección que indica la
flecha para abrir la
COMPARTIMIENTO
PUERT A DEL
DE LA
OPEN
PELÍCULA
(10)
(26).
2. Introduzca, entre los
DE LA
GUÍA
de la película en la ranura que
se encuentra en el reverso de
la cámara.
NOTA: No necesita sacar
película adicional del cartucho.
Puede usar la película según
viene en su envase.
PELÍCULA
CARRILES DE
(23), la punta
CARRILES
DE GUÍA DE
LA PELÍCULA
43
Page 49

3. Empuje el cartucho de la película
hacia abajo en el
LA
PELÍCULA
DE
en su lugar.
• No fuerce la película para que
entre en su compartimiento.
COMPARTIMIENTO
(25) hasta que trabe
44
4. Cierre la
PUERT A DEL
COMPARTIMIENTO DE LA PELÍCULA
para comenzar el avance
automático de la película.
EASYLOAD
GA24 100/21°
• El
PANEL LCD
primera exposición.
• La
muestra la información de
la película.
(14) muestra la
VENTANA DE LA PELÍCULA
(26)
(27)
Page 50

• El
INDICADOR DE LA CERRADURA DE
PUERTA DEL COMPARTIMIENTO DE
LA
LA PELÍCULA
negro al color ámbar para indicar
que la puerta del compartimiento
de la película está cerrada y que
la película está cargada
correctamente en la cámara.
• Una vez que haya cerrado la
puerta de seguridad del
compartimiento de la película y
empiece a avanzar la película,
no puede abrir la puerta del
compartimiento de la película
hasta que la película esté
completamente rebobinada.
(13) cambia del color
5. Oprima el
BOTÓN DE ENCENDER
APAGAR
(21) para destapar el
LENTE
(8) y encender la cámara.
EASYLOAD
/
ON/OFF
45
Page 51

COMO TOMAR
FOTOGRAFÍAS
1. Oprima el
BOTÓN DE ENCENDER
APAGAR
(21) para destapar el
LENTE
(8) y encender la cámara.
2. Para una fotografía nítida,
manténgase a una distancia
/
mínima de 1.5 pies (0,5 m)
del sujeto.
1.5 pies
(0,5 m)
EASYLOAD
ON/OFF
46
Page 52

3. Para ver a su sujeto, mire a través
OCULAR DEL VISOR
del
(11).
4. Sostenga la cámara estable y
oprima suavemente el
DISPARADOR
la fotografía.
• Después que tome la fotografía,
5. Apague la
cámara
cuando
termine de
tomar las
fotografías.
(1) para tomar
la película avanza
automáticamente a la próxima
fotografía.
47
Page 53

Como usar el cerrojo de enfoque
Esta cámara se enfoca
automáticamente en el sujeto que
aparece en el círculo de enfoque
automático del visor. Si desea tomar
una fotografía con el sujeto fuera del
círculo de enfoque automático, siga
estas instrucciones:
1. Coloque el
círculo de
enfoque
automático
sobre el
sujeto que
desee enfocar en la
fotografía.
48
CÍRCULO DE ENFOQUE
AUTOMÁTICO
VISOR
2. Oprima parcialmente el
DISPARADOR
el enfoque.
3. Con el disparador parcialmente
oprimido, mueva la cámara hasta
que el sujeto se encuentre en la
posición que usted desee dentro
del
4. Oprima completamente el
disparador para tomar la fotografía.
(1) para trabar
OCULAR DEL VISOR
(11).
Page 54

Consejos útiles para obtener
mejores fotografías
• Para evitar fotografías borrosas,
sostenga la cámara estable al
oprimir el disparador manteniendo
sus codos cerca del cuerpo.
• Acérquese lo suficiente al sujeto a
fotografiar de modo que éste
ocupe todo el visor, pero no más
cerca de 1.5 pies (0,5 m).
• Tome fotografías al nivel del
sujeto. Arrodíllese para fotografiar
niños y animales.
• Haga tomas verticales de sujetos
altos y angostos, como cascadas,
rascacielos o una persona sola.
• Agregue interés a su fotografía
incluyendo una rama, una ventana
o una cerca.
• Manténgase de espalda al sol.
Así se logra la mejor iluminación
del sujeto.
• No obstruya los lentes del flash y
el enfoque con sus manos, dedos,
u otros objetos.
• Párese en ángulo a superficies
brillantes tales como ventanas o
espejos para de esta forma evitar
reflejos del flash o puntos
luminosos en sus fotografías.
49
Page 55

COMO TOMAR
AUTO
FOTOGRAFÍAS
CON FLASH
A poca luz, ya sea en interiores, en
exteriores donde hay mucha sombra o
en días obscuros o nublados,
necesitará usar el flash. Su cámara
incluye un flash automático el cual se
dispara cuando es necesario.
1. Oprima el
50
BOTÓN DE ENCENDER
APAGAR
(21) para destapar el
LENTE
(8) y encender la cámara.
/
2. Tome la fotografía cuando el
INDICADOR LUMINOSO DE FLASH
LISTO
(12) y el
INDICADOR DE FLASH
(37) en el
AUTOMÁTICO
LCD
(14) dejen de parpadear.
3. Mantenga el sujeto a fotografiar
dentro del alcance indicado para
la sensibilidad de la película en
su cámara.
PANEL
Page 56

Sensibilidad Distancia del
ISO de sujeto al flash
la película
100 1.5 a 12 pies
200 1.5 a 17 pies
400 1.5 a 23 pies
800 1.5 a 28 pies
• No tome fotografías a más
distancia de la indicada o sus
fotografías saldrán obscuras.
(0,5 a 3,7 m)
(0,5 a 5,2 m)
(0,5 a 7,0 m)
(0,5 a 8,5 m)
4. Sostenga la cámara estable y
oprima suavemente el
DISPARADOR
la fotografía.
• Para evitar que la batería se
(1) para tomar
descargue cuando no esté
usando la cámara, apague la
cámara oprimiendo el botón de
encender/apagar.
51
Page 57

Como usar la reducción
de ojos rojos
Los ojos de algunas personas (y
algunos animales) se pueden reflejar
en la fotografía, cuando se usa el
flash, como un brillo rojo. Para
disminuir el brillo al tomar fotografías
con flash o con flash de relleno, use
la característica de reducción de
ojos rojos.
52
1. Oprima el
2. Oprima parcialmente el
3. Haga que el sujeto mire
4. Oprima completeamente el
BOTÓN DE ENCENDER
APAGAR
(21) para destapar el
LENTE
(8) y encender la cámara.
DISPARADOR
REDUCCIÓN DE OJOS ROJOS
(1) para encender el
/
(2).
directamente a la luz roja brillante.
disparador para tomar la fotografía.
Page 58

MODOS DE FLASH
Además del modo de flash
automático, que es el ajuste inicial de
la cámara, puede seleccionar flash
apagado, flash de relleno o vista de
noche con o sin flash.
Flash apagado
Cuando no quiera usar el flash,
especialmente en interiores donde el
uso del flash está prohibido, o cuando
quiera fotografiar escenas en
penumbras, sujetos que se
encuentren fuera del alcance del
flash, o capturar el ambiente con la
luz existente, use esta característica.
Use un tripié usando el
(18) o coloque la cámara
TRÍPODE
sobre otro soporte firme, y use
película de alta sensibilidad para
asegurar la mejor exposición posible
para la toma de fotografías sin flash.
MONTAJE PARA
53
Page 59

Flash de relleno
En escenas interiores o exteriores de
mucho contraste, sombras
(especialmente en las caras) pueden
ser causadas cuando los sujetos
tienen como iluminación de fondo una
luz brillante. Use el flash de relleno
para aclarar estas sombras.
54
Vista de noche con flash
Para que usted pueda tomar
fotografías bellas de personas a la
puesta del sol o por la noche, en este
modo la cámara crea un balance
entre el flash y la luz presente. Use un
tripié usando el
TRÍPODE
sobre otro soporte firme, y use
película de alta sensibilidad
porque, por la noche, la abertura
del diafragma es
típicamente lenta.
MONTAJE PARA
(18) o coloque la cámara
Page 60

Vista de noche sin flash
En este modo, usted puede capturar
la iluminación natural de las luces de
la ciudad por la noche o fuegos
artificiales. Use un tripié usando el
MONTAJE PARA TRÍPODE
la cámara sobre otro soporte firme, y
use película de alta sensibilidad
porque, por la noche, la abertura del
diafragma es típicamente lenta.
(18) o coloque
Como seleccionar los modos
de flash
1. Oprima el
2. Oprima repetidamente el
BOTÓN DE ENCENDER
APAGAR
(21) para destapar el
LENTE
(8) y encender la cámara.
DE
EXPOSICIÓN
MODO
el
SÍMBOLO DE FLASH APAGADO
SÍMBOLO DE FLASH DE RELLENO
o el
SÍMBOLO
VISTA
DE
DE NOCHE
(29)
con o sin flash
aparezca en el
PANEL LCD
(14).
BOTÓN DE
(17) hasta que
EXPOSURE
/
(31),
(30),
FOCUS
TIMER
55
Page 61

3. Para flash apagado y flash de
relleno: Sostenga la cámara
estable y oprima suavemente el
DISPARADOR
fotografía.
Para vista de noche con o
sin flash: Oprima y mantenga
oprimido el disparador por
aproximadamente 4 segundos
hasta que el disparador se dispare
automáticamente para tomar
la fotografía.
• Si deja de oprimir el disparador
antes de los 4 segundos, el
disparador se dispara pero en el
modo regular de flash automático.
56
(1) para tomar la
Los modos de vista de noche se
cancelan después de tomar la
fotografía, pero los modos de flash
apagado y flash de relleno se
mantienen seleccionados. Para
cancelar los modos de flash apagado
y flash de relleno, apague la cámara
oprimiendo el
APAGAR
distinto de flash oprimiendo el
DE
BOTÓN DE ENCENDER
(21) o seleccione un modo
MODO DE EXPOSICIÓN
(17).
/
BOTÓN
Page 62

COMO USAR EL
AUTODISP ARADOR
Use esta característica si quiere
incluirse en las fotografías.
1. Use el
MONTAJE PARA TRÍPODE
para poner la cámara en el tripié o
póngala sobre otro soporte firme.
2. Oprima el
BOTÓN DE
AUTODISPARADOR
FOCUS
EXPOSURE
(15).
TIMER
(18)
• El
SÍMBOLO DE
AUTODISPARADOR
en el
3. Mire a través del
VISOR
(11) para componer su
fotografía dejando un espacio
libre para usted.
4. Sostenga la cámara estable
y oprima cuidadosamente el
DISPARADOR
la fotografía.
PANEL LCD
(1) para tomar
(34) aparece
(14).
OCULAR DEL
57
Page 63

5. Colóquese en el espacio libre de
la fotografía asegurándose de ver
completamente la
AUTODISPARADOR
NOTA: Si no ve la bombilla
completa, puede que no salga en
la fotografía.
• La bombilla del autodisparador
en la parte del frente de la
cámara brilla y entonces
parpadea durante los 10
segundos de la cuenta regresiva
del tiempo.
• El autodisparador se cancela
automáticamente una vez que
funcione el disparador.
58
BOMBILLA DEL
(2).
MODOS DE OPCIONES
ESPECIALES
Oprima repetidamente el
MODO DE ENFOQUE
modos de opciones especiales y
hacer su selección. Los modos de
opciones especiales para retrato y
enfoque infinito le permiten ajustar el
funcionamiento automático de la
cámara a las mejores
configuraciones.
Modo de retrato
El modo de retrato le permite tomar
fotografías nítidas de personas desde
cerca. En este modo, la cámara entra
a la zona de enfoque de cerca a
BOTÓN DE
(16) para ver los
Page 64

cualquiera distancia del sujeto. Si la
distancia es de más de 3 pies (0,9 m)
INDICADOR LUMINOSO DE FLASH
el
(12) «parpadea rojo» para
LISTO
advertirle del enfoque incorrecto.
1. Oprima el
2. Oprima
BOTÓN DE ENCENDER
APAGAR
(21) para destapar el
LENTE
(8) y encender la cámara.
repetidamente el
BOTÓN DE MODO
DE ENFOQUE
hasta que el
SÍMBOLO DE
RETRATO
aparezca en el
PANEL LCD
(16)
(32)
(14).
EXPOSURE
/
TIMER
FOCUS
3. Mire a través del
(11) y componga su
VISOR
fotografía dentro de las guías de
enmarcar del visor.
4. Sostenga la cámara estable y
oprima suavemente el
DISPARADOR
la fotografía.
• La selección se cancela después
de tomar la fotografía.
VISOR
(1) para tomar
OCULAR DEL
GUÍAS DE
ENMARCAR
DEL VISOR
59
Page 65

Modo de enfoque infinito
En este modo, puede capturar
fotografías de escenas nítidas a
mucha distancia cuando toma
fotografías en exteriores.
1. Oprima el
2. Oprima repetidamente el
60
BOTÓN DE ENCENDER
APAGAR
(21) para destapar el
LENTE
(8) y encender la cámara.
DE MODO DE ENFOQUE
SÍMBOLO DE ENFOQUE
que el
INFINITO
(35) aparezca en el
PANEL LCD
(14).
• En este modo la cámara
automáticamente está ajustada
para flash apagado, la única
opción de flash disponible.
BOTÓN
(16) hasta
/
3. Mire a través del
VISOR
4. Sostenga la cámara estable y
oprima suavemente el
DISPARADOR
la fotografía.
• La selección se cancela después
de tomar la fotografía.
OCULAR DEL
(11) para ver su sujeto.
(1) para tomar
Page 66

COMO DESCARGAR
LA PELÍCULA
Rebobinado automático
Esta cámara automáticamente
rebobina la película una vez que se
haya tomado la última fotografía.
1. Espere a que el motor se detenga
antes de abrir la
COMPARTIMIENTO
PELÍCULA
• El
INDICADOR DEL MOVIMIENTO DE
PELÍCULA
LA
CONTADOR DE FOTOGRAFÍAS
marca la cuenta regresiva según
la película se va rebobinando.
PUERT A DEL
DE
LA
(26).
(38) parpadea y el
(28)
2. Retire la película de la cámara y
vuelva a cargarla con un rollo
nuevo de película Kodak.
• El contador de fotografías
mostrará «0».
61
Page 67

Rebobinado manual
Si no desea tomar el rollo completo
de fotografías, puede rebobinar la
película manualmente pero no podrá
volver a cargar la película.
1. Para comenzar el rebobinado
automático, oprima suavemente el
BOTÓN DEL REBOBINADO DE LA
(20).
PELÍCULA
TIMER
FOCUS
EXPOSURE
62
2. Siga los pasos 1 y 2 del
Rebobinado automático.
Page 68

CUIDADO DE SU CÁMARA
• Proteja la cámara del polvo,
humedad, golpe repentino, y
calor excesivo.
Precaución: No use solventes o
soluciones ásperas o abrasivas en
el cuerpo de la cámara.
• Si el lente se ve sucio, cúbralo con
su aliento para empañarlo y limpie
la superficie cuidadosamente con
un paño suave que no tenga
pelusas o con un pañuelo
especialmente diseñado para la
limpieza de lentes. Nunca limpie el
lente en seco.
Precaución: No use solventes o
soluciones que no hayan sido
diseñadas para la limpieza de
lentes de cámaras. No use
pañuelos con químicos diseñados
para la limpieza de gafas.
• Remueva la batería cuando vaya
a guardar la cámara por un
largo período.
Precaución: Para prevenir la
posibilidad de daño y choque
eléctrico, no trate, usted mismo,
de desarmar o reparar la cámara o
la unidad del flash.
63
Page 69

PROBLEMAS Y SOLUCIONES
Problema Causa probable Solución
La cámara La cubierta del Abra completamente
no funciona lente está cerrada la cubierta del lente
64
La batería está débil, Reemplace o vuelva a
descargada, mal cargar la batería
colocadas, o
falta colocarla
El flash no está listo Espere a que el
indicador luminoso
de flash listo
parpadeante
desaparezca
Page 70

Problema Causa probable Solución
La cámara La película no Vuelva a cargar la
no funciona fue cargada película; vea COMO
El disparador No hay película Cargue un rollo
no se en la cámara de película
desengancha en la cámara
correctamente CARGAR LA
La película necesita Vea COMO
ser rebobinada/retirada DESCARGAR
La cubierta del Oprima el botón de
lente está cerrada de encender/apagar
PELÍCULA en la
página 43
LA PELÍCULA en
la página 61
para abrir la cubierta
del lente
65
Page 71

Problema Causa probable Solución
El seguro de la La película no se ha Termine de tomar
puerta del compar- rebobinado todas las fotografías
timiento de la completamente dentro u oprima el
película no abre cartucho de la película botón del rebobinado
El panel LCD La batería está débil, Reemplace o vuelva a
está en blanco descargada, mal cargar la batería
66
colocada, o
falta colocarla
de la película
Page 72

ESPECIFICACIONES
Lente: Lente de vidrio de 29 mm
Velocidad del disparador:
Disparador programado;
1/60 a 1/400 segundos
Abertura de diafragma: ƒ/5.6
Sensibilidad de la película: DX
(ISO) de 100, 200, 400 ó 800 para
fotografía de impresión
Enfoque: Luz del día: 1.5 pies
(0,5 m) a infinito
Visor: Imagen proyectada,
círculo para centralizar el
punto de enfoque, rectificación
macro paralaje
Unidad del flash: Integrado
Tiempo de reciclaje del flash:
6 segundos con baterías nuevas
Fuente de energía: Una batería de
litio de 3 voltios
Dimensiones: 38 x 62 x 124 mm
Peso: 6.1 onzas (173 g)
67
Page 73

68
Kodak y la marca «e» son marcas registradas.
Page 74

Appareil-photo Kodak KE60
BESOIN D’AIDE POUR UTILISER VOTRE APP AREILPHOTO?
Visitez nos sites Web à http://www.kodak.ca (Canada)
ou http://www.kodak.com (États-Unis), ou encore appelez : Kodak (Canada
seulement) du lundi au vendredi, de 8 h à 17 h (heure normale de l’Est), au
numéro 1 800 465-6325, poste 36100. Dans la région de Toronto, composez le
(416) 766-8233, poste 36100.Kodak (É.-U. seulement), sans frais, du lundi au
vendredi, de 9 h à 19 h (heure normale de l’Est), au numéro 1 800 242-2424.
Assurez-vous d’avoir en main votre appareil-photo au moment
de téléphoner.
Pour les besoins de la garantie, veuillez conserver votre facture de
vente comme preuve de la date d’achat.
Cet appareil numérique de Classe B répond à toutes les
exigences du Règlement sur le matériel brouilleur du Canada.
FRANÇAIS
69
Page 75

TABLE DES MATIÈRES
DESCRIPTION DE
L’APPAREIL-PHOTO..................... 71
INSTALLATION DE
LA DRAGONNE ............................ 73
INSTALLATION DE LA PILE ............ 74
Indicateur de pile faible ............... 75
Arrêt automatique ....................... 75
Conseils au sujet des piles ......... 76
APPOSITION DE L’ÉTIQUETTE
DU PANNEAU ACL ....................... 77
Panneau ACL lumineux .............. 78
CHARGEMENT DU FILM ................ 79
70
POUR PRENDRE DES PHOTOS .... 82
Mémorisation de la
mise au point ........................... 84
Conseils pour faire de
meilleures photos ..................... 85
POUR PRENDRE DES PHOTOS
AU FLASH ..................................... 86
Distances entre le sujet
et le flash ................................. 87
Utilisation du mode de
réduction des yeux rouges ....... 88
MODES FLASH ............................... 89
Flash désactivé........................... 89
Flash d’appoint ........................... 90
Vue nocturne avec flash ............. 90
Vue nocturne sans flash ............. 91
Sélection des modes flash.......... 91
Page 76

RETARDATEUR............................... 93
MODES SPÉCIAUX ......................... 94
Portrait........................................ 94
Mise au point à l’infini ................. 96
RETRAIT DU FILM .......................... 97
Rembobinage automatique ......... 97
Rembobinage manuel ................. 98
ENTRETIEN DE VOTRE
APPAREIL-PHOTO ....................... 99
DÉPANNAGE................................. 100
CARACTÉRISTIQUES................... 102
DESCRIPTION DE
L’APP AREIL-PHOTO
Pour consulter les schémas de
l’appareil-photo, dépliez les rabats
des couvertures de ce manuel.
1 DÉCLENCHEUR
2 TÉMOIN DU RETARDATEUR/
RÉDUCTION DES YEUX ROUGES
3 FENÊTRES DE MISE AU
AUTOMATIQUE
POINT
4 CAPTEUR DE LUMIÈRE
5 FLASH
6 DIFFUSEUR DU VISEUR
7 VISEUR
8 OBJECTIF/COUVRE-OBJECTIF
9 OEILLET DE LA DRAGONNE
71
Page 77

10 LOQUET DU COMPARTIMENT
FILM
DU
11 OCULAIRE DU VISEUR
12 TÉMOIN DU FLASH PRÊT
13 INDICATEUR DE VERROUILLAGE DU
COMPARTIMENT
14 PANNEAU ACL
15 BOUTON DU RETARDATEUR
16 BOUTON DE MODE MISE AU POINT
17 BOUTON DE MODE EXPOSITION
18 ÉCROU DU TRÉPIED
19 BOUTON D’AFFICHAGE
LUMINEUX
DU FILM
ACL
72
20 BOUTON DE REMBOBINAGE
21 BOUTON MARCHE/ARRÊT
22 COUVERCLE DU COMPARTIMENT
LA PILE
DE
23 RAILS DE GUIDAGE DU FILM
24 CAPTEURS DE CODE DX/DXN
25 COMPARTIMENT DU FILM
26 COUVERCLE DU COMPARTIMENT
FILM
DU
27 FENÊTRE DU FILM
Page 78

Panneau ACL
28 COMPTEUR DE POSES
29 SYMBOLE DE VUE NOCTURNE
30 SYMBOLE DE FLASH D’APPOINT
31 SYMBOLE DE FLASH DÉSACTIVÉ
32 SYMBOLE DU PORTRAIT
33 SYMBOLE DE LA PILE
34 SYMBOLE DU RETARDATEUR
35 SYMBOLE DE MISE AU POINT
À L’INFINI
36 INDICATEUR DE MISE AU
AUTOMATIQUE
POINT
37 INDICATEUR DE FLASH
AUTOMATIQUE
38 INDICATEUR DE MOUVEMENT
FILM
DU
INSTALLA TION DE
LA DRAGONNE
1. Glissez une des
extrémités de la
dragonne sous
ŒILLET DE LA
l’
(9),
DRAGONNE
puis tirez
légèrement.
2. Enfilez la plus
longue extrémité de
la dragonne dans la
petite boucle.
3. Tirez ensuite
fermement.
73
Page 79

INSTALLATION DE LA PILE
Cet appareil-photo requiert une Pile
au lithium KODAK K123LA de 3 volts
(ou l’équivalent), laquelle fournit
l’énergie nécessaire à toute opération.
1. Ouvrez le
74
COUVERCLE DU
COMPARTIMENT DE LA PILE
• Avant de retirer l’ancienne pile,
mettez
l’appareilphoto
hors
tension.
(22).
2. Insérez la pile dans le
compartiment de la façon
illustrée ci-contre.
3. Refermez bien le couvercle du
compartiment de la pile.
Page 80

Indicateur de pile faible
Il faut remplacer la pile lorsque :
• le
SYMBOLE DE LA PILE
PANNEAU ACL
sur le
• aucun des indicateurs n’apparaît
sur le panneau ACL et que le
DÉCLENCHEUR
être actionné.
(33) apparaît
(14).
(1) ne peut
Fonctions automatiques
d’économie d’énergie
Arrêt automatique
Cet appareil-photo se met
automatiquement en mode veille
après plus de 4 minutes d’inactivité
pour préserver l’énergie de la pile.
Pour remettre l’appareil-photo sous
tension, appuyez sur le
/
ARRÊT
MARCHE
• Lorsque vous n’utilisez pas
l’appareil-photo pendant une
longue période, mettez-le hors
tension afin de prolonger
davantage la durée de vie
des piles.
(21).
BOUTON
75
Page 81

Conseils au sujet des piles
• Jetez les piles épuisées
conformément aux
réglementations locales et
nationales en vigueur.
• Ayez toujours des piles de
rechange avec vous.
• Lisez le mode d’emploi et
observez les mises en garde
fournies par le fabricant des piles.
• Gardez les piles hors de la portée
des enfants.
• N’essayez pas de démonter, de
recharger ou de court-circuiter la
pile, ou encore de l’exposer à
des températures élevées ou
aux flammes.
76
• Conservez les piles dans leur
emballage d’origine jusqu’à ce que
vous les utilisiez.
• Retirez la pile de l’appareil-photo
lorsque vous prévoyez qu’il ne
sera pas utilisé pendant une
longue période.
• Dans l’éventualité peu probable où
le fluide de la pile entrerait en
contact avec votre peau, contactez
le Centre d’information Kodak en
santé, sécurité et environnement
au (716) 722-5151, aux États-Unis.
Page 82

• Dans l’éventualité peu probable où
le fluide de la pile s’écoulerait à
l’intérieur de l’appareil-photo,
veuillez contacter le Centre
d’information Kodak au
1 800 465-6325 ou, à l’extérieur
des États-Unis, votre représentant
du Service à la clientèle.
APPOSITION DE L’ÉTIQUETTE
DU PANNEAU ACL
Des annotations textuelles en anglais
apparaissent à côté des boutons de
contrôle sous le
Vous pouvez remplacer le texte
anglais par l’équivalent français,
espagnol, portugais, russe, chinois,
PANNEAU ACL
(14).
arabe, thaïlandais ou polonais
apparaissant sur l’une des huit
étiquettes fournies. Pour ce faire, il
suffit de retirer la pellicule détachable
de l’étiquette de votre choix et de
placer l’étiquette sur le texte anglais.
L’étiquette peut être retirée facilement
si vous devez la repositionner ou la
remplacer par une autre.
Exposure
REMBO-
BINAGE
POSE
MISE AU
POINT
RETAR-
DATEUR
Focus
Timer
77
Page 83

Panneau ACL lumineux
Cet appareil-photo est doté d’un
panneau ACL lumineux qui facilite
le visionnement et le réglage des
fonctions en lumière faible ou
en soirée.
1. Appuyez sur le
ARRÊT
OBJECTIF
l’
sous tension.
BOUTON MARCHE
(21) pour découvrir
(8) et mettre l’appareil
EASYLOAD
ON/OFF
/
78
2. Appuyez sur le
’
AFFICHAGE LUMINEUX ACL
D
allumer la lumière.
• Le panneau lumineux s’éteint
automatiquement après environ
20 secondes; vous pouvez aussi
l’éteindre manuellement en
appuyant de nouveau sur le
bouton d’affichage lumineux ACL.
BOUTON
Timer
Focus
Exposure
(19) pour
Page 84

CHARGEMENT DU FILM
Par temps ensoleillé, tournez le dos
au soleil et chargez le film dans
l’ombrage produit par votre corps. Le
dispositif unique KODAK Easyload,
dont est pourvu cet appareil-photo,
simplifie grandement le chargement
du film.
1. Faites glisser
LOQUET DU
le
COMPARTIMENT
FILM
(10)
DU
dans la
direction
indiquée par la flèche
pour ouvrir le
COMPARTIMENT DU FILM
COUVERCLE DU
OPEN
(26).
2. Insérez l’amorce du film dans la
fente arrière de l’appareil-photo
RAILS DE GUIDAGE DU
entre les
(23).
FILM
RAILS DE
GUIDAGE
DU FILM
NOTA : Ne sortez pas davantage
l’amorce de film; utilisez le film tel
qu’il est lorsque vous le retirez
de l’emballage.
79
Page 85

3. Poussez la cassette de film
COMPARTIMENT DU FILM
dans le
jusqu’à ce qu’elle soit bien
en place.
• N’exercez pas de pression
excessive pour l’insérer dans le
compartiment du film.
80
(25)
4. Refermez le
COMPARTIMENT
activer le dispositif d’avance
automatique du film.
• Le
• La
COUVERCLE DU
DU
FILM
(26) pour
EASYLOAD
GA24 100/21°
PANNEAU ACL
première pose.
FENÊTRE DU FILM
voir les renseignements
concernant le film.
(14) montre la
(27) laisse
Page 86

• L’
INDICATEUR DE VERROUILLAGE DU
COMPARTIMENT
du noir au ambre pour indiquer
que le compartiment du film est
verrouillé et que le film est
correctement chargé dans
l’appareil-photo.
• Une fois que le couvercle du
compartiment à verrouillage de
sécurité est fermé et que le film
avance, vous ne pouvez plus
ouvrir ce couvercle tant que le
film n’est pas complètement
rembobiné dans la cassette
de film.
DU
FILM
(13) passe
5. Appuyez sur le
ARRÊT
l’
OBJECTIF
l’appareil-photo sous tension.
BOUTON MARCHE
(21) pour découvrir
(8) et mettre
EASYLOAD
ON/OFF
/
81
Page 87

POUR PRENDRE
DES PHOTOS
1. Appuyez sur le
ARRÊT
OBJECTIF
l’
l’appareil-photo sous tension.
BOUTON MARCHE
(21) pour découvrir
(8) et mettre
2. Pour une photo nette, placez-vous
à au moins 0,5 m (1,5 pi) de votre
/
sujet. 0,5 m (1,5 pi)
0,5 m
(1,5 pi )
EASYLOAD
ON/OFF
82
Page 88

3. Regardez dans l’
(11) pour voir votre sujet.
VISEUR
OCULAIRE DU
4. Pour prendre la photo, tenez
l’appareil-photo
fermement, puis
appuyez
délicatement
sur le
DÉCLENCHEUR
• Lorsque la
photo est prise,
le film avance
automatiquement à la
prochaine pose.
5. Refermez l’appareil-photo une fois
les photos prises.
(1).
83
Page 89

Mémorisation de la mise au point
Cet appareil-photo effectue automatiquement la mise au point sur tout
ce qui se trouve à l’intérieur du cercle
de mise au point automatique de
l’oculaire du viseur. Si vous désirez
que le sujet principal de la photo soit
à l’extérieur du cercle de mise au
point, utilisez la fonction
de mémorisation
comme suit :
1. Centrez
votre sujet
principal à
l’intérieur
du cercle
de mise
au point.
84
VISEUR
CERCLE DE
MISE AU POINT
2. Enfoncez partiellement le
DÉCLENCHEUR
en position pour verrouiller la mise
au point.
3. Toujours en maintenant le
déclencheur
partiellement
enfoncé,
déplacez
l’appareilphoto
jusqu’à ce
que votre sujet se trouve à
l’endroit voulu dans l’
DU
4. Enfoncez complètement le
déclencheur pour prendre la photo.
VISEUR
(11).
(1) et maintenez-le
OCULAIRE
Page 90

Conseils pour prendre de
meilleures photos
• Pour éviter de prendre des photos
floues, tenez l’appareil-photo
fermement en serrant les coudes
contre votre corps au moment
d’appuyer sur le déclencheur.
• Approchez-vous suffisamment de
votre sujet pour qu’il remplisse le
viseur, sans toutefois vous placer
à moins de 0,5 m (1,5 pi).
• Placez-vous au même niveau que
votre sujet. Quand vous
photographiez des enfants ou des
animaux, agenouillez-vous.
• Tenez votre appareil-photo à la
verticale pour mettre en valeur les
sujets de forme allongée, comme
les chutes d’eau, les gratte-ciel ou
les personnes isolées.
• Donnez de la dimension à vos
photos en les encadrant avec une
branche d’arbre, une fenêtre ou encore
avec les traverses d’une clôture.
• Placez-vous dos au soleil afin
d’offrir le meilleur éclairage
possible à votre sujet.
• N’obstruez pas l’objectif ou le flash
avec votre main, vos doigts ou tout
autre objet.
• Placez-vous de biais par rapport
aux surfaces brillantes, comme les
fenêtres ou les miroirs, pour éviter
le reflet du flash ou les taches
brillantes dans vos photos.
85
Page 91

POUR PRENDRE DES
AUTO
PHOTOS AU FLASH
En lumière faible (notamment à
l’extérieur dans des lieux ombragés
ou par temps couvert, ou à l’intérieur),
il faut utiliser un flash. Cet appareilphoto est doté d’un flash automatique
qui se déclenche au besoin.
1. Appuyez sur le
ARRÊT
OBJECTIF
l’
l’appareil-photo sous tension.
86
BOUTON MARCHE
(21) pour découvrir
(8) et mettre
/
2. Attendez que le
(12) et l’
PRÊT
AUTOMATIQUE
de clignoter sur le
3. Assurez-vous que votre sujet se
trouve à une distance qui soit
appropriée pour la sensibilité
du film chargé dans votre
appareil-photo.
TÉMOIN DU FLASH
INDICATEUR DE FLASH
(37) cessent
PANNEAU ACL
(14).
Page 92

Sensibilité Distance entre
ISO du film le sujet et le flash
100 0,5 à 3,7 m
200 0,5 à 5,2 m
400 0,5 à 7,0 m
800 0,5 à 8,5 m
• Ne prenez pas de photos au-delà
de la distance maximum; sinon,
vos photos seront sombres.
(1,5 à 12 pi)
(1,5 à 17 pi)
(1,5 à 23 pi)
(1,5 à 28 pi)
4. Pour prendre la photo, tenez
l’appareil-photo fermement, puis
appuyez délicatement sur le
DÉCLENCHEUR
• Pour éviter que votre pile ne
s’épuise trop rapidement,
mettez l’appareil-photo hors
tension en appuyant sur le
bouton marche/arrêt lorsque
vous ne l’utilisez pas.
(1).
87
Page 93

Utilisation du mode de réduction
des yeux roughes
Les yeux de certaines personnes (et
de certains animaux familiers)
peuvent réfléchir la lumière du flash et
paraître rouges. Pour minimiser ce
phénomène dans les photos au flash
ou au flash d’appoint, utilsez le mode
de réduction des yeux rouges.
1. Appuyez sur le
ARRÊT
l’
OBJECTIF
l’appareil-photo sous tension.
88
BOUTON MARCHE
(21) pour découvrir
(8) et mettre
/
2. Appuyez partiellement sur le
DÉCLENCHEUR
DES YEUX ROUGES
allumée tant que vous appuyez
partiellement sur le déclencheur.
3. Demandez à votre sujet de
regarder directement la lampe de
réduction des yeux rouges.
4. Appuyez complètement sur le
déclencheur de l’obturateur pour
prendre la photo.
(1). La
RÉDUCTION
(2) demeure
Page 94

MODES FLASH
Outre le mode par défaut flash
automatique, vous pouvez choisir
les modes flash désactivé, flash
d’appoint ou encore vue nocturne
avec ou sans flash.
Flash désactivé
Lorsque vous ne voulez pas utiliser le
flash, notamment à l’intérieur dans les
endroits où on l’interdit, pour
photographier des scènes au
crépuscule ou des sujets éloignés
situés au-delà de la portée du flash,
ou encore pour saisir l’atmosphère
créée par la lumière ambiante, utilisez
la fonction de flash désactivé. Fixez
un trépied sous l’appareil-photo à
ÉCROU DU TRÉPIED
l’aide de l’
encore placez l’appareil sur une
surface stable et utilisez un film de
sensibilité élevé pour vous assurer
d’avoir la meilleure exposition
possible lorsque vous prenez des
photos sans flash.
(18) ou
89
Page 95

Flash d’appoint
À l’intérieur ou à l’extérieur, la lumière
vive projetée sur des sujets éclairés à
contre-jour peut créer des ombres
marquées (en particulier sur les
visages). Pour adoucir ces ombres,
il suffit d’utiliser le flash
d’appoint.
90
Vue nocturne avec flash
Avec ce mode, l’appareil-photo est en
mesure d’équilibrer l’intensité du flash
en fonction de l’éclairage existant
pour vous permettre de prendre de
superbes photos de gens au coucher
du soleil ou en soirée. Placez
l’appareil-photo sur un trépied à l’aide
ÉCROU DU TRÉPIED
de l’
sur une surface stable et utilisez un
film de sensibilité élevée parce que la
vitesse d’obturation est généralement
plus lente la nuit.
(18) ou encore
Page 96

Vue nocturne sans flash
Avec ce mode, vous pouvez saisir
l’éclairage naturel des scènes
urbaines nocturnes ou des feux
d’artifice en soirée. Fixez un trépied
sous l’appareil-photo à l’aide de
ÉCROU DU TRÉPIED
l’
placez l’appareil sur une surface
stable et utilisez un film de sensibilité
élevée parce que la vitesse
d’obturation est généralement plus
lente la nuit.
(18) ou encore
Sélection des modes flash
1. Appuyez sur le
ARRÊT
OBJECTIF
l’
l’appareil-photo sous tension.
2. Appuyez de façon répétée sur le
BOUTON DE MODE EXPOSITION
jusqu’à ce que le
FLASH
DE FLASH D’APPOINT
SYMBOLE DE VUE NOCTURNE
avec ou
sans flash
apparaisse
sur le
ACL
(14).
BOUTON MARCHE
(21) pour découvrir
(8) et mettre
DÉSACTIVÉ
PANNEAU
SYMBOLE DE
(31), le
(30) ou le
(17)
SYMBOLE
(29)
FOCUS
EXPOSURE
/
TIMER
91
Page 97

3.
Pour les réglages de flash
désactivé ou flash d’appoint :
Tenez l’appareil-photo fermement,
puis appuyez délicatement sur
DÉCLENCHEUR
le
la photo.
Pour les réglages de vue
nocturne avec ou sans flash :
Appuyez sur le déclencheur et
maintenez-le en position abaissée
pendant environ 4 secondes (sans
relever votre doigt), jusqu’à ce que
le déclencheur s’actionne pour
prendre la photo.
92
(1) pour prendre
• Si vous retirez votre doigt du
bouton du déclencheur avant que
les 4 secondes se soient
écoulées, le déclencheur
s’actionne quand même, mais en
mode flash automatique.
Les modes de vue nocturne
s’annulent une fois la photo prise,
tandis que les modes flash désactivé
et flash d’appoint demeurent actifs.
Pour annuler ces derniers, mettez
l’appareil-photo hors tension en
appuyant sur le
ARRÊT
mode de flash en appuyant sur le
BOUTON DE MODE EXPOSITION
BOUTON MARCHE
(21) ou sélectionnez un autre
/
(17).
Page 98

RETARDATEUR
Utilisez cette fonction si vous
souhaitez vous inclure dans la photo.
1. Fixez un trépied sous l’appareilphoto à l’aide de l’
TRÉPIED
sur une surface stable.
2. Appuyez sur le
RETARDATEUR
ÉCROU DU
(18) ou placez l’appareil
BOUTON DU
(15).
TIMER
FOCUS
EXPOSURE
• Le
SYMBOLE DU RETARDATEUR
apparaît sur le
3. Composez votre photo en
regardant par l’
DU VISEUR
prévoir de la place pour vous.
4. Tenez fermement l’appareil-photo
et appuyez délicatement sur le
DÉCLENCHEUR
compte à rebours.
PANNEAU ACL
OCULAIRE
(11) et n’oubliez pas de
(1) pour activer le
(34)
(14).
93
Page 99

5. Prenez votre place tout en vous
assurant de voir entièrement le
TÉMOIN DU RETARDATEUR
NOTA : Si vous ne voyez pas
entièrement le témoin du
retardateur, il est possible que
vous n’apparaissiez pas sur
la photo.
• Le témoin du retardateur, placé
sur le devant de l’appareil-photo,
s’allume et clignote pendant
les 10 secondes du compte
à rebours.
• Le retardateur se désactive
automatiquement une fois le
déclencheur actionné.
94
(2).
MODES SPÉCIAUX
Appuyez de façon répétée sur le
BOUTON DE MODE MISE AU POINT
pour voir les modes spéciaux et faire
votre sélection. Les modes spéciaux
pour le portrait et la mise au point à
l’infini vous permettent d’adapter le
fonctionnement entièrement
automatique de l’appareil-photo pour
obtenir les réglages optimaux.
Portrait
Le mode portrait vous permet de
prendre de bonnes photos de
personnages en gros plan. Avec ce
mode, l’appareil-photo entre en zone
de mise au point rapprochée pour
(16)
Page 100

n’importe quelle distance du sujet. Si
la distance excède 0,9 m (3 pi), le
TÉMOIN DU FLASH PRÊT
en rouge » pour vous indiquer que la
mise au point est incorrecte.
1. Appuyez sur le
ARRÊT
(21) pour découvrir
OBJECTIF
l’
l’appareil-photo sous tension.
2. Appuyez de façon
répétée sur le
BOUTON DE MODE
AU
MISE
jusqu’à ce que le
SYMBOLE DU
PORTRAIT
apparaisse sur le
PANNEAU ACL
BOUTON MARCHE
(8) et mettre
POINT
(16)
(32)
(14).
(12) « clignote
/
FOCUS
EXPOSURE
TIMER
3. Cadrez bien votre sujet dans
OCULAIRE DU VISEUR
l’
servant des repères de mise au
point rapprochée.
VISEUR
4. Tenez fermement l’appareil-photo
et appuyez délicatement sur le
DÉCLENCHEUR
la photo.
• La sélection est annulée une fois
la photo prise.
(11) en vous
REPÈRES DE MISE
AU POINT
RAPPROCHÉE
(1) pour prendre
95
 Loading...