

Page 1

8G7939-01
KODAK 1500 Intraoral Camera
User’s Guide
Page 2
Notice
©Carestream Health, Inc., 2009. No part of this publication may be reproduced,
stored in a retrieval system, translated to another language, or transmitted in any form
by any means, electronic, mechanical, photocopied, recorded, or otherwise, without
prior written permission.
The information in this document is subject to change. Neither Carestream Health,
Inc. nor any of its subsidiaries shall be liable for errors contained herein or for
incidental damages in conjunction with the furnishing, performance, or use of this
material.
Carestream is a trademark of Carestream Health, Inc.
The Kodak trademark and trade dress are used under license from Kodak.
All other trademarks and registered trademarks are the property of their respective
holders.
US Federal law restricts this device to sale by or on the order of a dentist.
The Kodak 1500 intraoral camera is also marketed and sold as the STV Pro +
intraoral camera.
Manual Name: KODAK 1500 Intraoral Camera User’s Guide
Part Number: 8G7939
Revision Number: 01
Print Date: August 2009
Authorized Representative:
Handpiece:
FCC ID: U72KODAK1500H
IC: 7027A-KODAK1500
Docking Station
FCC ID: U72KODAK1500
IC: 7027A-KODAK 1500
Carestream Health France
LES MERCURIALES
40. rue Jean Jaures
93176 BAGNOLET CEDEX
France
Page 3

Contents
About This Guide
Chapter 1
KODAK 1500
Intraoral Camera
Overview
Chapter 2
Acquisition Module
Overview
Chapter 3
Getting Started
Camera Components . . . . . . . 1
Wireless Camera . . . . . . . . 1
Wired Camera . . . . . . . . . 3
Camera Holder Components . . . 4
Docking Station Components . . . 4
Charge Station Components . . . 7
System Components . . . . . . . 8
Computer System Requirements . .11
General Software Overview . . . .11
KODAK Dental Imaging
Software . . . . . . . . . . . .11
KODAK Acquisition Module . . .12
Capture Window . . . . . .12
Settings . . . . . . . . . .13
Review Window . . . . . . .14
Image Processing Toolbar . .15
Setting Up the KODAK 1500 Intraoral
Camera . . . . . . . . . . . . . .17
Inserting the Battery into a
Wireless Camera . . . . . . . .17
Inserting the Cable into a
Wired Camera . . . . . . . . .18
Setting up the Camera Holder . . .18
Setting up the Docking Station . .20
Connecting the Docking
Station to a Computer . . . . .20
Connecting the Docking
Station to a Video Monitor. . . .21
Status Icons . . . . . . . . . .23
Setting up the Charge Station
for a Wireless Camera. . . . . . .26
Connecting the Charge Station
to the Docking Station . . . . .27
Connecting the Antenna to the
Docking Station . . . . . . . .28
KODAK 1500 Intraoral Camera User’s Guide (8G7939) iii
Page 4

Using the Charge Station as a
Stand-Alone Device. . . . . . .28
Pairing the Wireless Camera
to the Docking Station. . . . . .29
Using the Camera with a
Protective Sheath . . . . . . . 30
Chapter 4
Acquiring,
Reviewing, and
Storing Images
Chapter 5
Maintenance
Chapter 6
Troubleshooting
Chapter 7
Technical Features
and Specifications
Acquiring Images Using a Video
Monitor . . . . . . . . . . . . . .31
Acquiring Images Using a
Computer . . . . . . . . . . . . .32
Hygiene and Disinfection. . . . . .35
Maintenance. . . . . . . . . . . 36
Daily . . . . . . . . . . . . . 36
Monthly. . . . . . . . . . . . 36
Disposing of the Battery . . . . . .37
iv Contents
Page 5
About This Guide
Warning: Failure to heed this warning could
result in damage to property or in bodily injury.
Caution: Points out procedures that you must
follow precisely to avoid damage to the system
or any of its components, yourself, or others.
Note: Provides additional information, such as
expanded explanations, hints, or reminders.
Tip: Provides extra information to improve
workflow.
This guide documents the Kodak 1500 intraoral camera and
contains the following messages to emphasize information or
indicate potential risk to personnel or equipment:
Note to the User
To use and operate your software, you must follow the
instructions contained in this guide.
KODAK 1500 Intraoral Camera User’s Guide (8G7939) v
Page 6
Warning and Safety Instructions
When operating the Kodak 1500 intraoral camera, observe the
following warning and safety instructions:
DANGER OF ELECTRIC SHOCK
This is an electrical unit. DO NOT expose it to
water spray. Such action may cause an electric
shock or a malfunction of the unit.
CAUTIONS:
• You are responsible for the operation and maintenance
of this camera. Only qualified persons can operate this
camera. They MUST have training to use the camera.
When necessary, have a trained authorized service
technician carry out inspection and maintenance
operations.
• DO NOT place the computer and the peripheral
equipment connected to it in the immediate vicinity of
the patient. Leave at least 1.83 m distance between the
patient and the equipment..
• See your computer installation guide for details of the
data processing system, computer and screen. Leave a
sufficient amount of clear space around the computer
to ensure that it is properly ventilated.
• To obtain maximum image quality and visual comfort,
position the screen to avoid direct light reflections from
internal or external lighting.
vi About This Guide
Page 7
• DO NOT place objects within the field of operation of
the equipment.
• Disinfect any parts of the camera that come into
contact with the patient and the operator after each
patient has been exposed to the camera.
• Always use a new protective sheath for each patient.
• Turn off the camera before charging. Failure to do so
will shorten the life of the battery.
• The surface temperature of the LED window can rise up
to 39°C. Do not allow the window to come in contact
with the patient’s mouth for more than 10 minutes.
• When the camera is not in use, ensure that the ON/OFF
button is set to OFF.
• Ask the patient to refrain from moving during the entire
period of exposure.
• The power adapter is certified by IEC 60601-1. You
MUST use the provided AC Mains adapter only.
Marking and Labeling Symbols
Type BF device symbol complying
with the IEC 60601-1 standard
KODAK 1500 Intraoral Camera User’s Guide (8G7939) vii
Page 8

viii About This Guide
Page 9

1 KODAK 1500 Intraoral
Camera Overview
The Kodak 1500 intraoral camera is compliant with the
requirements of the EEC and international medical standards.
The camera has been designed to carry out the following
functions:
• Acquire still images and video
• Review images
• Store images
Camera Components
The camera is available in two models: wired and wireless.
Although they look similar, the buttons and LEDs have different
functions for different modes. The following illustrations
describe the components and functions for wired and wireless
models.
Wireless Camera
The wireless camera may be powered by a battery or a cable. If
you use a cable, the functions of the LEDs and buttons are the
same as those described for the wired camera.
KODAK 1500 Intraoral Camera User’s Guide (8G7939) 1
Page 10

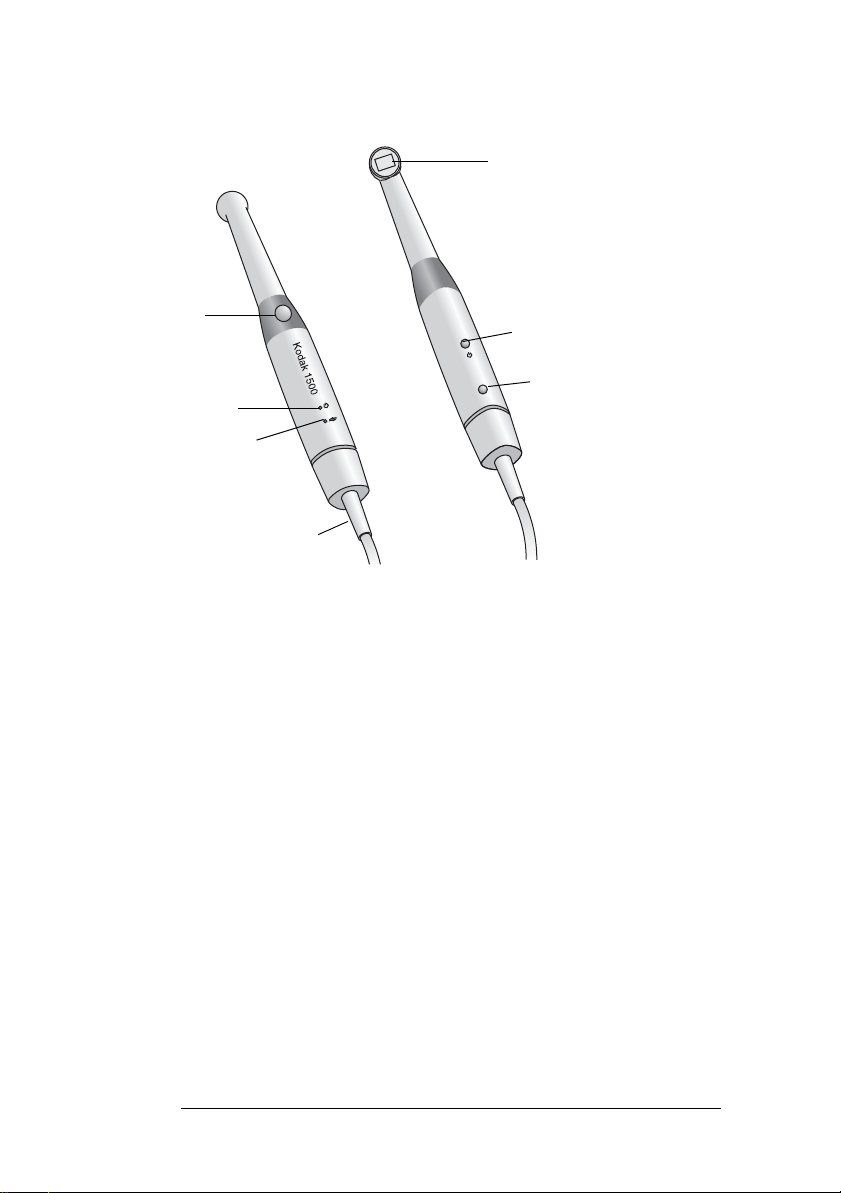
Figure 1 Camera Components—Wireless
1
2
3
4
5
6
7
1
LED and Lens
window
2
Power On/Off
button
3
Battery Release
View white LEDs that illuminate the
oral cavity.
Press 3 seconds to power on. Press
5 seconds to power off.
Press button and pull battery out.
button
4
Shutter Release
button
Press halfway down to perform auto
focus. Press all the way down to
capture an image. Press halfway
down and release to return to video
mode.
5
Battery indicator Green indicates the battery is working
properly; blinking orange indicates
the battery is low.
6
Wi-Fi indicator Solid blue indicates the connection is
working properly; blinking blue
indicates a communications problem.
7
Battery Insert rechargeable cylindrical
Lithium-ion battery into bottom of
camera until it fits tightly in place.
2 Chapter 1 KODAK 1500 Intraoral Camera Overview
Page 11
Wired Camera
1
2
3
4
5
6
7
Figure 2 Camera Components—Wired
1
2
3
4
LED and Lens
window
Power On/Off
button
Cable Release
button
Shutter
Release
button
View white LEDs that illuminate the oral
cavity.
Press 3 seconds to power on. Press 5
seconds to power off.
Press button and pull cable out.
Press halfway down to perform auto focus.
Press all the way down to capture an
image. Press halfway down and release it
to return to video mode.
5
6
7
Power
indicator
Green indicates the camera is powered on;
no light indicates the camera is powered
off.
USB
Connection
indicator
Solid blue indicates the connection is
complete; blinking blue indicates the
connection is in progress.
Cable Insert cable into bottom of camera until it
fits tightly in place.
KODAK 1500 Intraoral Camera User’s Guide (8G7939) 3
Page 12
Camera Holder Components
1
2
Note: After the camera is idle for 1.5 minutes,
it goes into sleep mode. To use it again, pick it
up or press the Shutter Release button. After
the camera is idle for 1 hour, it shuts down.
Place the camera in the holder when you are not using the
camera. See “Setting up the Camera Holder” on page 18.
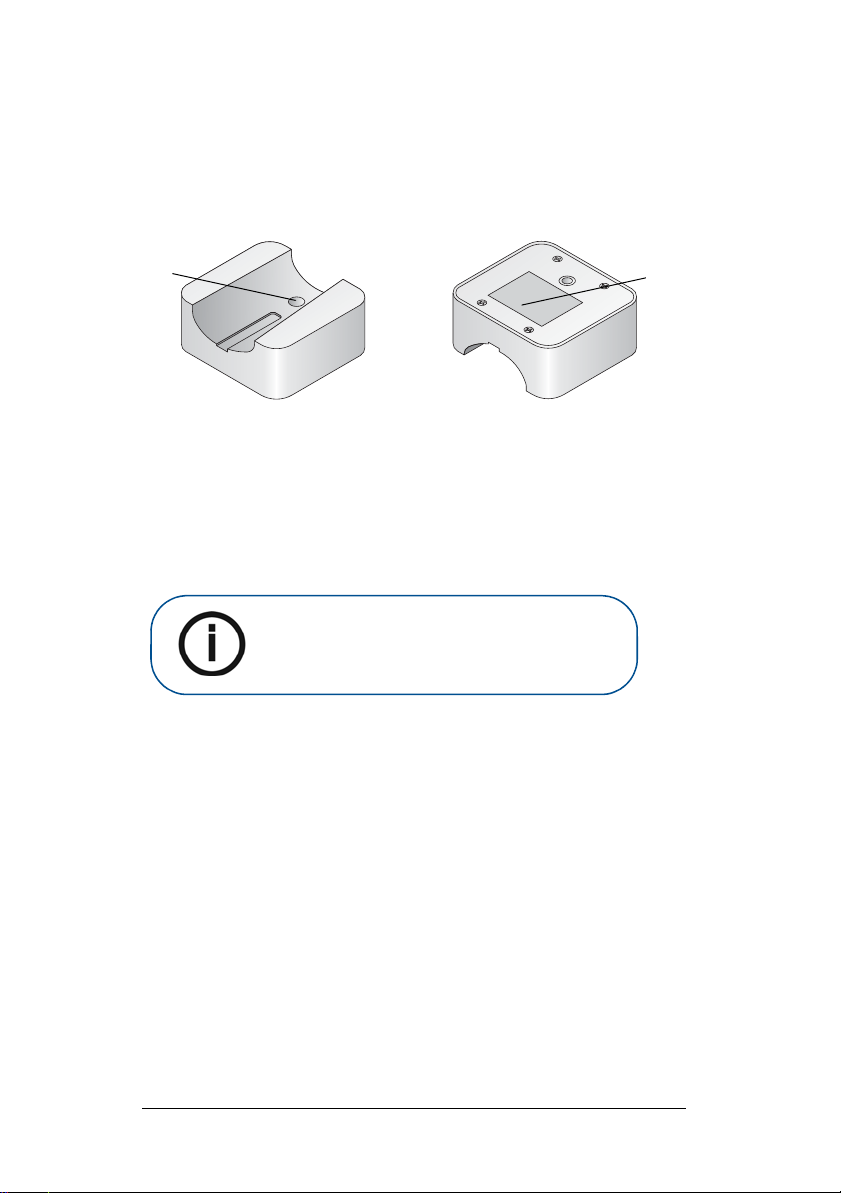
Figure 3 Camera Holder Components
1
Opening to fasten the holder securely to the surface
2
Adhesive tape
Docking Station Components
The docking station provides connectivity and power for the
camera. It lets you connect to a computer or a video monitor.
The docking station contains the SD card slot and all of the
connections for using the camera.
4 Chapter 1 KODAK 1500 Intraoral Camera Overview
Page 13
6
7
8
9
10
11
12
Front View
Back View
2
3
4
5
1
13
Bottom View
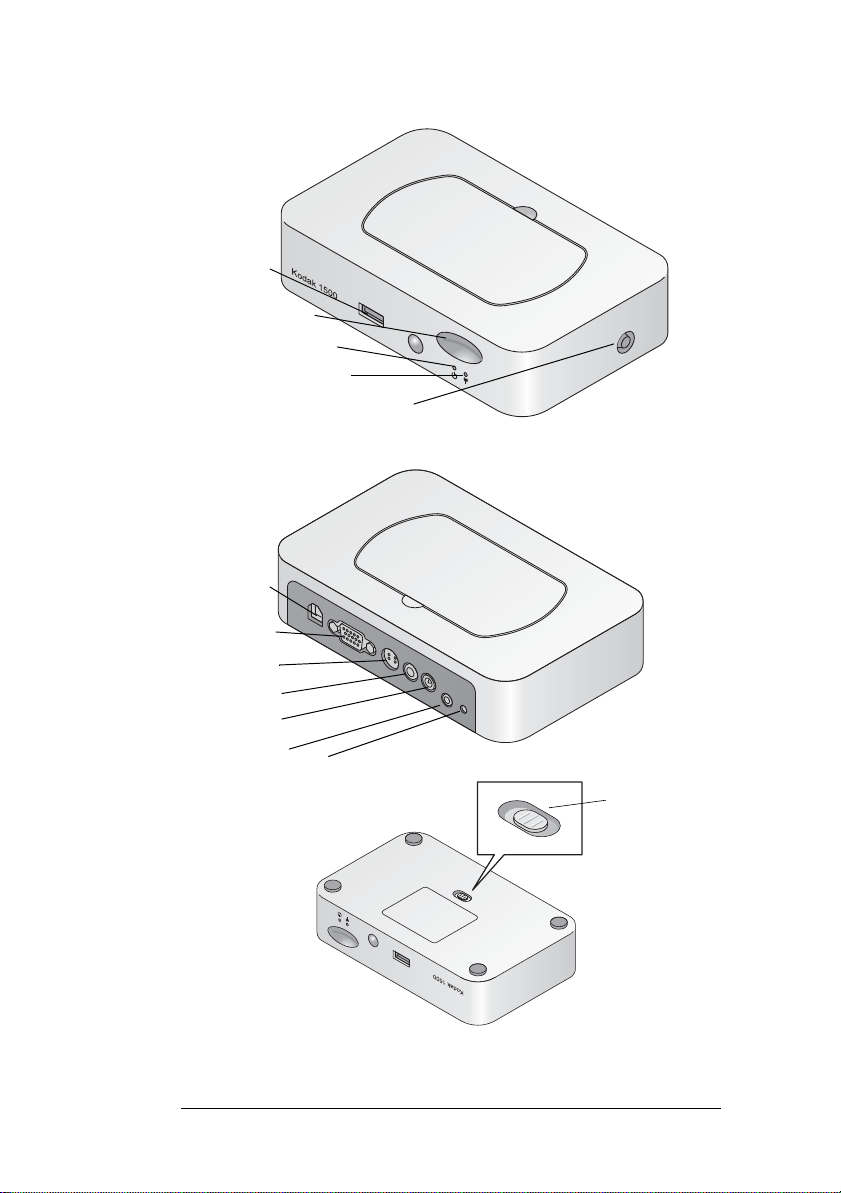
Figure 4 Docking Station Components
KODAK 1500 Intraoral Camera User’s Guide (8G7939) 5
Page 14

1
USB connector to camera
2
3
4
5
6
7
8
9
10
11
12
13
SD card socket
Power indicator: green = power normal; dark = no power
USB connection indicator (wired): blue = normal; blinking
= not normal
Wi-Fi indicator (wireless): blue = normal; blinking = not
normal
Antenna connector (wireless)
USB connector to computer
VGA connector
S-video connector
AV-out connector
Power DC-in connector
Footpedal connector (optional accessory)
DC-out connector (wireless)
Output switch: NTSC, PAL, S-Video, VGA
6 Chapter 1 KODAK 1500 Intraoral Camera Overview
Page 15
Charge Station Components
4
1
3
2
Note: If the camera is in the charge station for
more than 1 hour, it shuts down.
The charge station is used to charge the wireless camera and
the additional battery at the same time or separately. You can
use the charge station as a stand-alone unit or attach it to the
docking station. The unit is used for wireless configuration only.
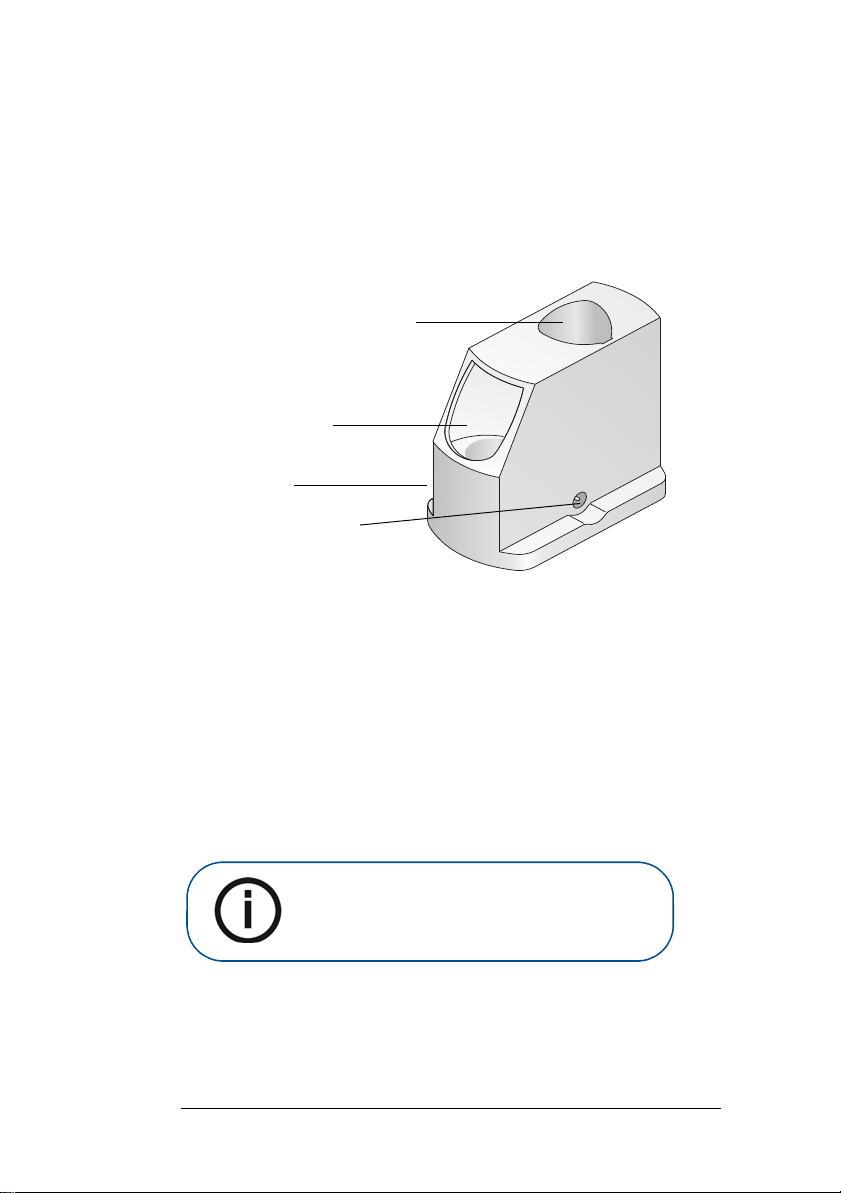
Figure 5 Charge Station Components
1
2
3
4
Camera port
Battery port
Battery charging indicator: green = charge complete;
orange = charging
Power input
KODAK 1500 Intraoral Camera User’s Guide (8G7939) 7
Page 16
System Components
The Kodak 1500 intraoral camera consists of a camera that
captures video or still images when connected wirelessly or
cabled to a computer or video monitor. If you use a computer,
Kodak dental imaging software is required to view images. If you
use a video monitor, additional software is not required.
Tab l e 1 shows the system components for the Kodak 1500
intraoral camera.
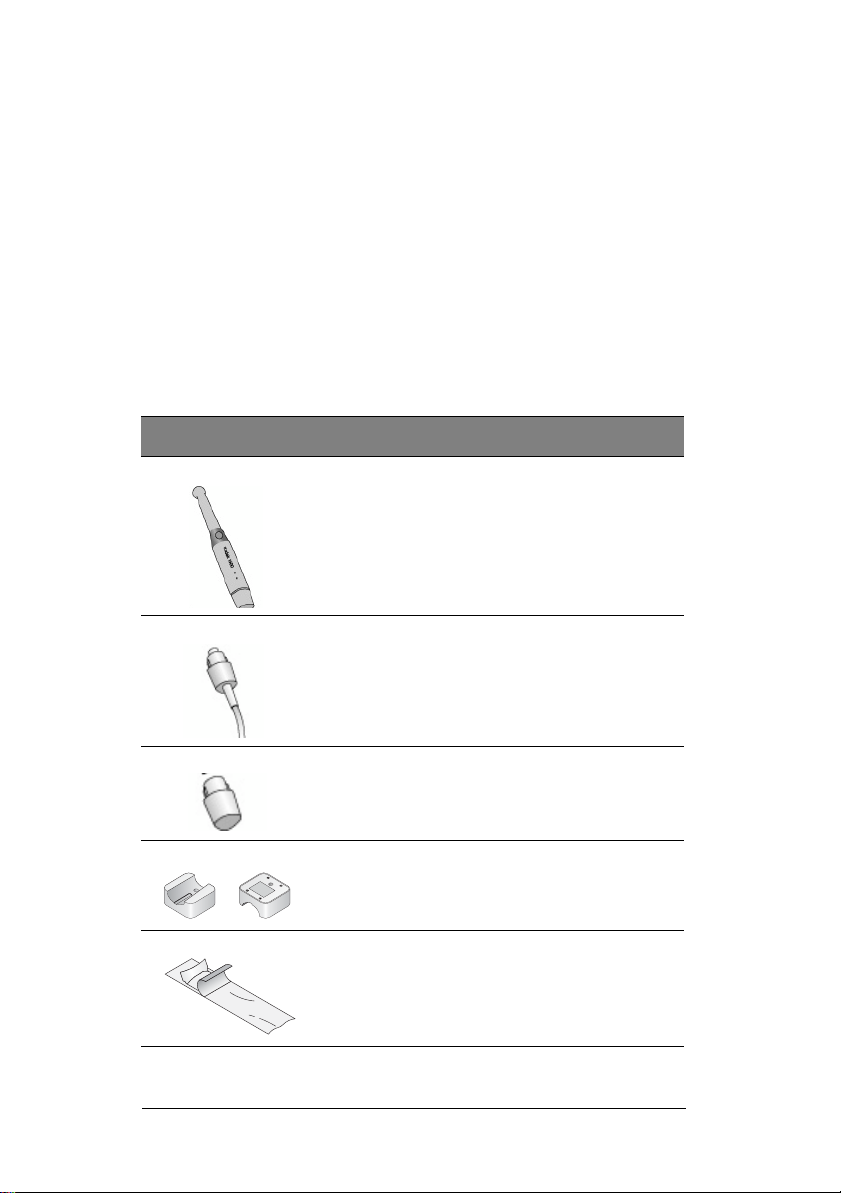
Table 1 System Components
Item Description
1camera
1 camera cable
2 rechargeable cylindrical Lithium-ion
batteries (wireless)
1 camera holder
Disposable sheaths
8 Chapter 1 KODAK 1500 Intraoral Camera Overview
Page 17
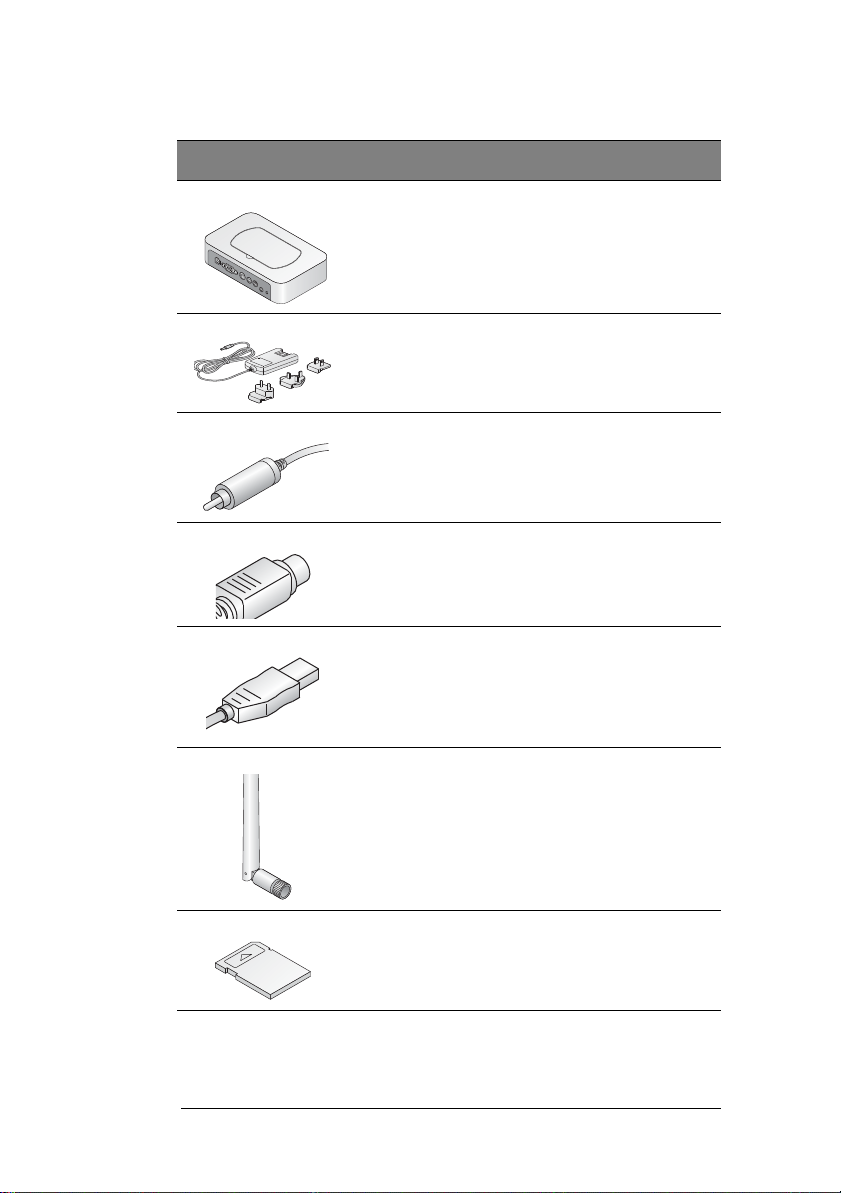
Table 1 System Components (Continued)
Item Description
1 docking station
1 DC power cable and adapter
1 AV cable
1 S-video cable
1 USB cable
1 antenna (wireless)
1 2G SD card
KODAK 1500 Intraoral Camera User’s Guide (8G7939) 9
Page 18

Table 1 System Components (Continued)
Item Description
1 charge station (wireless)
Charge station power cord
CD containing:
• User’s guide
• Safety and Regulatory guide
Document and
Software Package
• Accessory Information
Printed copies:
• Quick Start guide
• Safety Information sheet
• Warranty sheet
10 Chapter 1 KODAK 1500 Intraoral Camera Overview
Page 19

2 Acquisition Module
Overview
Computer System Requirements
The computer must meet the following requirements:
• Intel Pentium IV, 1.8 GHZ or higher
• 512 MB RAM (1 G RAM for Windows Vista Ultimate,
32 bits)
• DVD drive
• Standard CRT/LCD monitor with a minimum of
1024 X 768 screen resolution
• Direct X 9.0c supporting video board
• USB 2.0 high-speed port
General Software Overview
The Kodak 1500 intraoral camera operates with the following
software:
• Kodak dental imaging software, version 6.11 or higher
• Acquisition module
For more information, see the KODAK Dental Imaging Software
Quick Start Guide.
KODAK Dental Imaging Software
The Kodak dental imaging software is a user-friendly working
interface, which is the common imaging platform for all of our
digital systems for dentistry.
KODAK 1500 Intraoral Camera User’s Guide (8G7939) 11
Page 20

KODAK Acquisition Module
1
2
3
4
5
6
7
8
9
10
11
12
The following windows and settings are used in the Kodak
acquisition module.
Capture Window
The Capture window icon is located in the upper-left corner of
the screen. Across the bottom of the window is a series of still
thumbnail images of the entire exam.
Figure 6 Capture Window
1
Capture button Displays the Capture window.
2
Preview screen Displays either live video or captured
images.
3
Captured Images Displays or hides thumbnails of captured
4
Delete button Deletes an image.
images and videos.
12 Chapter 2 Acquisition Module Overview
Page 21

5
1
2
3
4
5
Done button Loads images into the Kodak dental
imaging software and closes the
acquisition module.
6
Record Video
Records video.
button
7
Capture Still
Captures still images.
Image button
8
Mirror button Displays live video in mirror mode.
9
Camera model Identifies the camera model.
10
Full Screen
Displays live video in full frame.
button
11
Connection status Identifies the strength of the connection.
12
Settings Displays user-adjustable settings for the
acquisition module and camera.
Settings
1
2
Frequency
Setting
Brightness
Setting
Selects the correct power frequency of
your country.
Adjusts the brightness value from 1 to 7.
KODAK 1500 Intraoral Camera User’s Guide (8G7939) 13
Page 22

3
1
2
3
4
5
6
7
9
8
10
Contrast
Setting
4
2-level capture
button
5
Version Displays the firmware versions of the
Review Window
Adjusts the contrast value from 1 to 7.
Works as a 2-level button by default. You
can change the Shutter Release button
operation to work as a 1-level button by
turning off this item.
docking station, camera, and acquisition
software.
Figure 7 Review Window
1
Review button Displays the Review window.
2
Review screen Displays a captured video or
captured images.
3
Captured Images Displays or hides thumbnails of
captured images and videos.
4
Delete button Deletes an image.
14 Chapter 2 Acquisition Module Overview
Page 23

5
Done button Loads images into the Kodak
dental imaging software and
closes the acquisition module.
6
Arrow buttons Displays the next or previous
images in the Review window.
7
Comment button Displays the comment and tooth
number functions.
8
Too t h N u m be r s input
field
9
Image Processing
Input standard tooth numbers; use
commas to separate the numbers.
See “Image Processing Toolbar.”
toolbar
10
Comments input
Displays the comment function.
field
Image Processing Toolbar
Zoom In: Select to magnify the image or to switch
viewing from 4-up to normal.
Zoom Out: Select to reduce the image or to switch
viewing from normal to 4-up.
Mirror: Displays the image in Mirror mode.
Rotate: Rotates the image 90 degrees.
Brightness: Adjusts the brightness of the image.
Contrast: Adjusts the contrast of the image.
Reset: Adjusts all manual settings to the default
settings.
KODAK 1500 Intraoral Camera User’s Guide (8G7939) 15
Page 24

16 Chapter 2 Acquisition Module Overview
Page 25

3 Getting Started
Battery Release
button
Setting Up the KODAK 1500 Intraoral Camera
Refer to the System Component List and visually inspect the
packages of the Kodak 1500 intraoral camera after the
shipment is received. If there are any signs of damage or
missing parts, contact the shipping company and Carestream
Health, Inc. immediately.
Inserting the Battery into a Wireless Camera
To insert the battery into a wireless camera, hold the camera in
one hand and push the battery into the bottom of the camera.
Make sure the battery is locked into place.
To release the battery, press the Battery Release button and
gently pull the battery out.
Figure 8 Inserting the Battery
KODAK 1500 Intraoral Camera User’s Guide (8G7939) 17
Page 26

Inserting the Cable into a Wired Camera
Cable Release
button
To insert the cable into a wired camera, hold the camera in one
hand and insert the cable end into the bottom of the camera.
Make sure the cable is locked into place.
Figure 9 Inserting the Cable
To release the cable, press the Cable Release button and gently
pull the cable out.
Setting up the Camera Holder
To set up the camera holder, follow these steps:
1 Select a smooth, flat, accessible area.
2 Clean the surface.
3 Remove the double-sided tape protection from the support
(2).
4 Place the taped side of the camera holder on the cleaned
surface and press firmly several times. Leave for two hours.
18 Chapter 3 Getting Started
Page 27

You can also attach the camera holder with a screw through
.
1
2
Note: The camera reverts to sleep mode when
placed in the holder. If the camera is in the
holder for more than one hour, the camera
shuts down.
the hole in the top (1).
Figure 10 Top and Bottom Views of the Camera Holder
KODAK 1500 Intraoral Camera User’s Guide (8G7939) 19
Page 28

Setting up the Docking Station
1
2
3
To set up the docking station, follow these procedures.
Connecting the Docking Station to a Computer
To connect the docking station to a computer, follow these
steps:
1 Connect the camera USB cable to the docking station (1).
2 Connect the computer USB cable to the docking station
(
2).
3 Connect the other end of the USB cable to the computer
USB port.
4 Connect the DC power supply into the docking station (3).
20 Chapter 3 Getting Started
Page 29

5 Insert the DC power cord into the power outlet. The power
1
indicator on the front of the docking station turns green.
Figure 11 Set-up for a Camera and a Computer
Connecting the Docking Station to a Video Monitor
To connect the docking station to a video monitor, follow these
steps:
1 Using the switch on the bottom of the docking station,
switch the output to the correct video output: NTSC, PAL,
VGA, or S-video (
1).
KODAK 1500 Intraoral Camera User’s Guide (8G7939) 21
Page 30

2 Insert the SD card into the socket on the front of the
Caution: Do not remove the SD card while
the docking station is powered on until the
SD card access icon at the lower-right of the
monitor disappears.
5
2
3
4
docking station. Without the SD card, or if the card is full,
the docking station can store the last 12 images. When the
card is inserted, the images are transferred automatically to
the card.
3 Select the correct video cable and connect to the docking
station: VGA (
4 Connect the other end of the video cable to the monitor.
2), S-video (3), AV-out (4).
22 Chapter 3 Getting Started
Page 31

5 Connect the DC power supply to the docking station (5).
6 Connect the DC power cord to the power outlet. The power
indicator on the front of the docking station turns green.
Figure 12 Set-up for a Camera and a Video Monitor
Status Icons
Low Battery
Sufficient Battery
Firmware Update Error
Firmware Update Successful
KODAK 1500 Intraoral Camera User’s Guide (8G7939) 23
Page 32

Firmware Update in Progress
No Connection between Docking Station and
Camera
Connection between Docking Station and Camera
via USB
Connection between Docking Station and Camera
via WiFi
WiFi Code is Successful
WiFi Code Error
SD Card is Not Inserted
SD Card is Inserted
SD Card is Full
SD Card is Saving Files - Do Not Remove Card
24 Chapter 3 Getting Started
Page 33

Error Saving File to Internal Flash or SD Card
Saving to Internal Flash or SD Card Successful
Internal Cache is Full
KODAK 1500 Intraoral Camera User’s Guide (8G7939) 25
Page 34

Setting up the Charge Station for a Wireless Camera
You can attach the charge station to the docking station, or you
can use it as a stand-alone device placed on a counter. Make
sure to place it in a clean, dry area free from any magnetic field.
Use the following guidelines for charging the camera:
• The camera port charges the camera with a single
battery assembled.
• The battery charging indicator is orange while charging
is in progress and turns green when charging is
finished.
• The battery port charges an additional battery.
• The power comes from the docking station or from the
power adapter.
• It takes two hours to charge the battery fully.
• A fully charged battery typically lasts 45 minutes.
26 Chapter 3 Getting Started
Page 35

Connecting the Charge Station to the Docking Station
To connect the charge station to the docking station, follow
these steps:
1 Remove the top cover from the docking station.
2 Place the charge station on top of the docking station.
Verify the connections and align the section correctly.
3 Press into place.
Figure 13 Charge Station with Docking Station
KODAK 1500 Intraoral Camera User’s Guide (8G7939) 27
Page 36

Connecting the Antenna to the Docking Station
Antenna
1
To connect the antenna to the docking station, screw the
antenna into the connection on the right side of the docking
station. Make sure the antenna is screwed tightly into the
connection.
Figure 14 Docking Station with Antenna
Using the Charge Station as a Stand-Alone Device
The charge station may be used as a stand-alone device that is
powered by a wall outlet.
Figure 15 Charge Station Alone
28 Chapter 3 Getting Started
Page 37

To use the charge station as a stand-alone device, follow these
steps:
1 Connect the charge station power cable to the power input
(1).
2 Connect the power plug to a wall outlet.
3 Insert the camera or battery into the charge station.
Figure 16 Camera in Charge Station
Pairing the Wireless Camera to the Docking Station
Typically, the wireless camera is paired, one camera to one
docking station, before shipment. If more than one camera or
docking station are purchased, they need to be paired by
pressing the Power button and Shutter Release button together
for approximately five seconds. The pairing is complete when a
window opens in the Acquisition screen or the icon appears on
the video monitor.
KODAK 1500 Intraoral Camera User’s Guide (8G7939) 29
Page 38

Using the Camera with a Protective Sheath
1
2
The protective sheath covers the camera and provides a
sanitary shield for the patient. Use a new sheath with each
patient. Always discard the sheath after each use. Extra
protective sheaths are available from your dealer.
To use the protective sheath, follow these steps:
1 Make sure the window is clean by wiping it with a moist
lint-free cloth or lens tissue.
2 Place the sheath, paper side down, on a flat surface.
Kodak 1500
Kodak 1500
3 With the camera window facing down, insert the camera all
the way into the sheath between the sheath’s white tab and
paper backing (
4 Hold the sheath in place on the camera by gently pressing
1).
the white tab against the camera with your thumb or finger.
5 Pull the blue tab on the front of the sheath straight down
away from the camera
(2) until the paper backing is pulled
away. Discard, leaving the clear plastic sheath on the
camera.
6 Adjust the sheath if necessary. The end should be tight to
prevent fogging or blurring of the image.
30 Chapter 3 Getting Started
Page 39

4 Acquiring, Reviewing,
Note: If you are using a wireless camera,
verify the battery power level connection.
See “KODAK 1500 Intraoral Camera
Overview” on page 1.
and Storing Images
You can acquire images using the camera and a video monitor
or computer. With the computer and the acquisition module, you
can manipulate, label, and store images on your computer.
Acquiring Images Using a Video Monitor
When you acquire images using the camera with a video
monitor, you can view live video and captured images. You can
store up to 12 images in the docking station or an additional
10000 images on the SD card in the docking station.
If you want to manipulate, label, or store images, move the
images from the camera and the SD card to your computer, and
then view them using the Kodak dental imaging software with
the acquisition module or any software capable of viewing .jpg
images.
To acquire images using a video monitor, follow these steps:
1 Turn the video monitor on.
2 Turn the camera on by pressing and holding the Power On
button for at least 3 seconds until the green power indicator
is illuminated.
KODAK 1500 Intraoral Camera User’s Guide (8G7939) 31
Page 40

3 Cover the end of the camera with a protective sheath. See
“Using the Camera with a Protective Sheath” on page 30.
4 Hold the camera over the area you want to view. Live video
appears on the video monitor.
5 Press the Shutter Release button on the camera to capture
an image. The still image appears on the video monitor. See
“KODAK 1500 Intraoral Camera Overview” on page 1.
6 Press the Shutter Release button on the camera half-way
down and release it to view live video on the video monitor.
7 When the image capture is complete, remove and dispose
of the protective sheath.
Acquiring Images Using a Computer
When you acquire images using the camera, a computer, the
Kodak dental imaging software, and the acquisition module, you
can view live video and captured images on your computer.
To acquire images using a computer, follow these steps:
1 Turn the computer on.
2 Turn the camera on by pressing and holding the Power On
button for at least 3 seconds until the green power indicator
illuminates. See “KODAK 1500 Intraoral Camera Overview”
on page 1.
3 Open the Kodak dental imaging software on your computer.
4 Click the button on the Kodak dental imaging toolbar.
The acquisition module opens, displaying the Capture
window.
32 Chapter 4 Acquiring, Reviewing, and Storing Images
Page 41

5 Click the button in the acquisition module. The
patient name displays in the upper-left of the window.
6 Cover the end of the camera with a protective sheath. See
“Using the Camera with a Protective Sheath” on page 30.
7 Hold the camera over the area you want to view. Live video
appears on the Preview screen in the Capture window.
8 To capture a still image, press the Shutter Release button.
The Acquisition panel switches to the Review window, and
the captured image is displayed in the Preview screen.
9 Press the Shutter Release button halfway down and release
it to return to the Capture window and live video.
10 To record a video, click the button in the Capture
window. Click the red Record button to stop video
recording.
11 Remove and dispose of the protective sheath when the
image capture is complete.
KODAK 1500 Intraoral Camera User’s Guide (8G7939) 33
Page 42

Note: After the camera is idle for 1.5 minutes,
it goes into sleep mode. To use it again, pick it
up or press the Shutter Release button. After
the camera is idle for 1 hour, it shuts down.
34 Chapter 4 Acquiring, Reviewing, and Storing Images
Page 43

5 Maintenance
Note: If the camera is visibly soiled, it must be
thoroughly cleaned prior to disinfecting.
Note: The disinfectant should be approved
by the applicable competent authority for use
on a dental medical device.
Perform the following maintenance activities on your camera
and accessories regularly.
Hygiene and Disinfection
The camera is delivered unsterilized. To ensure maximum
hygienic safety for the patient, carefully follow the instructions in
this user’s guide to prepare the camera for use.
After each patient, the camera must be thoroughly disinfected.
To disinfect the camera, follow these steps:
1 Remove the protective sheath.
2 Use a clean, lint-free cloth to thoroughly wipe the camera
with a disinfecting solution, being careful not to use too
much liquid. Use an intermediate-level disinfectant with
tuberculocidal activity, as recommended by the
manufacturer of the disinfectant.
KODAK 1500 Intraoral Camera User’s Guide (8G7939) 35
Page 44

3 To adequately disinfect the camera, follow the disinfectant
Caution: Do not use disinfectants containing
phenolics or idophors, which will damage the
surface coating.
Caution: Never put the camera in a sterilizing
device or immerse it completely.
manufacturer’s instructions for the appropriate contact time.
Maintenance
Perform the following maintenance activities.
Daily
Perform these activities daily on the camera and docking station.
Table 2 Daily Maintenance
Description
Decontamination
and Disinfecting
User Instructions and
Precautions
• Prior to disinfectant
remove all visible soil.
Use a wipe to clean the
camera.
• Do not rinse.
• Allow to dry in the open
air.
• Read the Disinfectant
Material Safety Data
Sheet (MSDS) prior to
use.
Do not immerse the
camera in a
disinfecting liquid.
Monthly
Wipe the outer covers of the units with a soft, dry cloth.
36 Chapter 5 Maintenance
Cautions
Page 45

Disposing of the Battery
In the European Union, this symbol indicates
that when a user discards this product, it
must be sent to the appropriate facility for
recovery and recycling.
Contact your local Carestream Health
representative or access
http://recycle.carestreamhealth.com for
more information.
The battery is a user-replaceable part ordered directly from the
distributor or dealer. The battery comes inserted in a new
camera bottom for easy installation into the camera. See
“Inserting the Battery into a Wireless Camera” on page 17.
At the end of its useful life, properly dispose of the battery
following all local regulations. Your community may offer a
battery collection program. Check with program sponsors for
participation details.
For information on disposal/recycling options in the European
Union, see the European Portable Battery Association (EPBA)
at http://www.epbaeurope.net/.
KODAK 1500 Intraoral Camera User’s Guide (8G7939) 37
Page 46

38 Chapter 5 Maintenance
Page 47

6 Troubleshooting
To troubleshoot a wired camera, see Ta b le 3 .
Table 3 Troubleshooting a Wired Camera
Camera with Wired Configuration
Video
Monitor
Computer Problems Causes and Solutions
Problems Causes and Solutions
No image is
displayed on
the screen.
Image is
blurred.
Colors are not
true.
No image is
displayed on
the screen.
• Make sure the power indicator LED
on the docking station is green.
• Make sure the power indicator LED
on the camera is green.
• Make sure the correct port is used
to connect the docking station and
the monitor.
• Make sure the lens is not fogged.
• Make sure the protective sheath is
flattened against the lens and is
placed properly (transparent side
facing the lens).
• Adjust the monitor contrast and
brightness to change the colors.
• Make sure the power indicator LED
on the docking station is green.
• Make sure the power indicator LED
on the camera is green.
• Make sure the correct port is used
to connect the docking station and
the computer.
• Make sure the camera drivers are
installed correctly.
KODAK 1500 Intraoral Camera User’s Guide (8G7939) 39
Page 48

Table 3 Troubleshooting a Wired Camera (Continued)
Note: The Kodak 1500 intraoral camera uses
LED indicators to show the status of the camera.
Be sure to note the color of the indicator if the
camera is not functioning correctly.
Camera with Wired Configuration (Continued)
Image is
blurred.
Colors are not
true.
Camera
focuses on
sheaths during
auto focus
process.
Cannot enter
tooth number in
Tooth number
option.
• Make sure the lens is not fogged.
• Make sure the protective sheath is
flattened against the lens and is
placed properly (transparent side
facing the lens).
• Check the camera configuration in
the Kodak dental imaging software
manual.
• During the auto focusing process,
the camera momentarily focuses on
the sheath, before focusing on the
correct item.
• Make sure the correct
country/region for the tooth
number standard is selected in the
KDIS menu: Options >
Preferences > Imaging > Tooth
numbering system > European
(Default)/American.
To troubleshoot a wireless camera, see Table 4 on page 41.
40 Chapter 6 Troubleshooting
Page 49

Table 4 Troubleshooting a Wireless Camera
Camera with Wireless Configuration
Video
Monitor
Problems Causes and Solutions
No image is
displayed on the
screen.
• Make sure the power indicator LED
on the docking station is green.
• Make sure the status of the Wi-Fi
indicator in the camera and
docking station are correct.
• Make sure the correct port is used
to connect the docking station and
the monitor.
Image is blurred.
• Make sure the lens is not fogged.
• Make sure the protective sheath is
flattened against the lens and is
placed properly (transparent side
facing the lens).
Colors are not
true.
• Adjust the monitor contrast and
brightness to change the colors.
KODAK 1500 Intraoral Camera User’s Guide (8G7939) 41
Page 50

Table 4 Troubleshooting a Wireless Camera (Continued)
Camera with Wireless Configuration (Continued)
Computer Problems Causes and Solutions
No image is
displayed on the
screen.
Image is blurred.
• Make sure the power indicator LED
on the docking station is green.
• Make sure the status of the Wi-Fi
indicator in the camera is correct.
• Make sure the USB connection
between the docking station and
the computer is correct.
• Make sure the camera drivers are
installed correctly.
• Make sure the lens is not foggd.
• Make sure the protective sheath is
flattened against the lens and is
placed properly (transparent side
facing the lens).
Colors are not
true.
Camera focuses
on sheaths
during auto
focus process.
Cannot enter
tooth number in
Tooth number
option.
• Check the camera configuration in
the Kodak dental imaging software
manual.
• During the auto focusing process,
the camera momentarily focuses
on the sheath, before focusing on
the correct item.
• Make sure the correct
country/region for the tooth
number standard is chosen in the
KDIS menu: Options >
Preferences > Imaging > Tooth
numbering system > European
(Default)/American.
42 Chapter 6 Troubleshooting
Page 51

Table 5 Troubleshooting System Setup
Problem/Solution
Error message: ffdshow compatibility manager
TW.exe
1. Select Use
ffdshow (always) and
Don't show me
again.
2. Click OK.
Live video does not work. Make sure that the
KODAK 1500 Intraoral Camera User’s Guide (8G7939) 43
hardware acceleration
of the computer
graphics card is set up
correctly .
To set the hardware
acceleration of the
computer graphics
card, follow these
steps:
1. Right-click the
desktop window and
select Properties.
2. Click the Settings
tab.
3. Click Advanced.
4. Click the
Troubleshoot tab.
Page 52
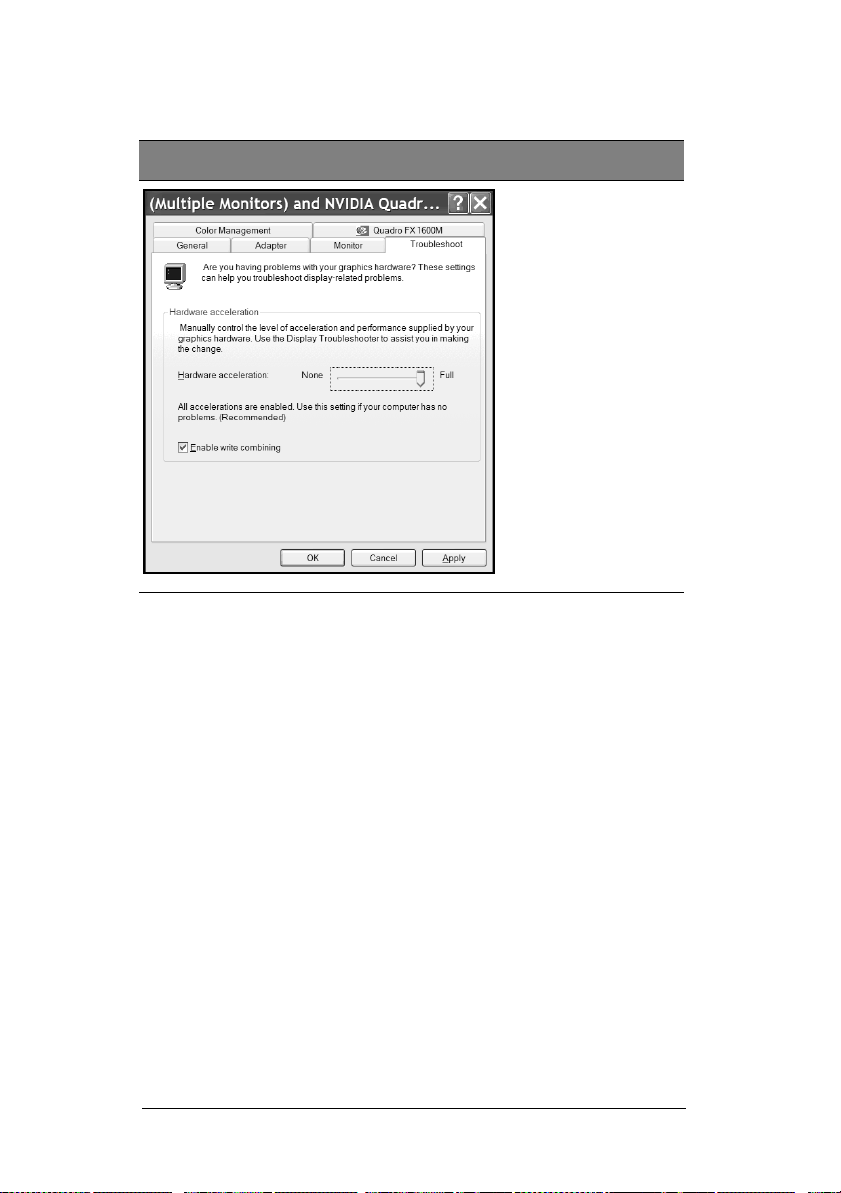
Table 5 Troubleshooting System Setup (Continued)
Problem/Solution
5. Set Hardware
acceleration to FULL.
6. Select Enable write
combining.
7. Click Apply.
44 Chapter 6 Troubleshooting
Page 53

7 Technical Features
and Specifications
Tab l e 6 provides the specifications for the Kodak 1500 intraoral
camera.
Table 6 Technical Features and Specifications
Power supply DC 6 V, 2.5 A
Video signal S-Video; TV (PAL, NTSC); VGA
Digital connection USB 2.0 high speed; Wi-Fi 802.11 g
White balance Automatic
Output impedance 75 ohm
Camera: 191 x 31 x 25 mm
Dimensions
Wei ght
Docking station: 149 x 93 x 32 mm
Charge station: 92 x 58 x 73 mm
Camera without cable/battery: 61 g
Camera with battery: 91 g
Docking station: 225 g (wireless), 215 g (wired)
Charge station: 180 g
Environment
KODAK 1500 Intraoral Camera User’s Guide (8G7939) 45
Operating temperature: +5 ~ +30
Transit and storage temperature: -10
Relative humidity: 10 ~ 85% RH
Atmospheric pressure 700-1060 hPa
Not protected against water spray
°C
−60°C
Page 54

Table 6 Technical Features and Specifications
Caution: Not suitable for use in the
presence of flammable anesthetics or a
mixture of flammable anesthetics with air,
oxygen, or nitrous oxide.
1 S-video output
1 PAL output
1 NTSC output
Output
Camera
Adapter AC adapter complies with IEC 60601-1
1 VGA video output
1 digital USB 2.0 output
1 SD card socket
1 DC power output
1/2.5 inch CMOS with 1024 x 768 pixels
Lighting: super white LEDs / Class 1 LED
according to IEC 60825-1
Image capture: 1 Shutter Release button
FOV: 80
View angle: 90°
Connecting cable length: 2.5 m
°
Battery
750mAh; ICR17360 ISO75B37A1
manufactured by DLG Battery (Shanghai) CO.,
LT D
CARESTREAM HEALTH, INC.
150 Verona Street
Rochester, Ny 14608
© Carestream Health, Inc., 2009.
CARESTREAM is a trademark of Carestream Health, Inc.
The Kodak trademark and trade dress are used under license.
46 Chapter 7 Technical Features and Specifications
 Loading...