

Page 1

Page 2

Safety
User precautions
• Do not install the scanner in a location subject to dust, humidity or steam. This
may cause electrical shock or fire.
• Make sure the electrical power outlet is located within 1.52 meters (5 feet) of
the scanner and is easily accessible.
• Be sure the power adapter is securely plugged into the wall outlet.
• Use only the AC adapter that is supplied with the scanner.
• Leave sufficient space around the power outlet so it can be easily unplugged in
case of an emergency.
• Do not use the scanner if it becomes inordinately hot, has a strange odor, emits
smoke, or makes unfamiliar noises. Immediately stop the scanner and
disconnect the power adapter from the power outlet. Contact Kodak Service.
• Do not disassemble or modify the scanner or the AC power adapter.
• Do not move the scanner with the power adapter and USB cable attached. This
may cause damage to the adapter/cable. Remove the power adapter from the
wall outlet before moving the scanner.
• Material Safety Data Sheets (MSDS) for chemical products are available on the
Kodak website at: www.kodakalaris.com/go/msds. When accessing the
MSDSs from the website, you will be required to provide the catalog number or
keyword of the consumable you want the Material Safety Data Sheet for. See
the section entitled, “Supplies and consumables” later in this guide for supplies
and catalog numbers.
Page 3

• Follow Kodak recommended cleaning procedures. Do not use air, liquid or gas
spray cleaners. These cleaners displace dust, dirt and debris to other locations
within the scanner, which may cause the scanner to malfunction.
Environmental information
•The Kodak ScanMate i940 Scanner is designed to meet worldwide
environmental requirements.
• Guidelines are available for the disposal of consumable items that are replaced
during maintenance or service; follow local regulations or contact Kodak locally
for more information.
• For recycling or reuse information, contact your local authorities, or in the USA,
visit: www.kodakalaris.com/go/scannerrecycling.
• The product packaging is recyclable.
•The Kodak ScanMate i940 Scanner is Energy Star compliant and is shipped
from the factory with the default time set to 15 minutes.
EMC statements
United States: This equipment has been tested and found to comply with the
limits for a Class B digital device pursuant to Part 15 of the FCC rules. These
limits are designed to provide reasonable protection against harmful interference
in a residential installation. This equipment generates, uses, and can radiate radio
frequency energy and, if not installed and used in accordance with the instruction
manual, may cause harmful interference to radio communications. However, there
is no guarantee that interference will not occur in a particular installation. If this
equipment does cause harmful interference to radio or television reception, which
can be determined by turning the equipment off and on, the user is encouraged to
try to correct the interference by one or more of these measures:
• Reorient or relocate the receiving antenna.
Page 4

• Increase the separation between the equipment and receiver.
• Connect the equipment into an outlet on a circuit different from that to which the
receiver is connected.
• Consult the dealer or an experienced radio/TV technician for additional
suggestions.
Any changes or modifications not expressly approved by the party responsible for
compliance could void the user’s authority to operate the equipment. Where
shielded interface cables have been provided with the product or specified
additional components or accessories elsewhere defined to be used with the
installation of the product, they must be used in order to ensure compliance with
FCC regulation.
Korea: As this equipment has obtained EMC registration for household use, it can
be used in any area including residential areas.
Japan: This is a Class B product based on the standard of the Voluntary Control
Council for interference by information Technology Equipment (VCCI). If this is
used near a radio or television receiver in a domestic environment, it may cause
radio interference. Install and use the equipment according to the instruction
manual.
Page 5

Acoustic emission
Maschinenlärminformationsverordnung – 3, GSGV
Der arbeitsplatzbezogene Emissionswert beträgt <70 dB(A).
[Machine Noise Information Ordinance — 3, GSGV
The operator-position noise emission value is <70 dB(A).]
European Union
This symbol indicates that when the last user wishes to discard this
product, it must be sent to appropriate facilities for recovery and
recycling. Please contact your local Kodak representative or refer to
www.kodakalaris.com/go/recycle for additional information on the
collection and recovery programs available for this product.
Please consult www.kodakalaris.com/go/REACH for information
about the presence of substances included on the candidate list according to
article 59(1) of Regulation (EC) No. 1907/2006 (REACH).
Page 6

Table of Contents
Overview . . . . . . . . . . . . . . . . . . . . . . . . . . . . . . . . . . . . . . . . . . . . . . . . 1
What’s in the box . . . . . . . . . . . . . . . . . . . . . . . . . . . . . . . . . . . . . . . 1
Scanner components . . . . . . . . . . . . . . . . . . . . . . . . . . . . . . . . . . . . 2
Setup . . . . . . . . . . . . . . . . . . . . . . . . . . . . . . . . . . . . . . . . . . . . . . . . . . . 4
1 Install Software . . . . . . . . . . . . . . . . . . . . . . . . . . . . . . . . . . . . . . . 4
2 Connect Scanner. . . . . . . . . . . . . . . . . . . . . . . . . . . . . . . . . . . . . . 6
Turning on/off the scanner . . . . . . . . . . . . . . . . . . . . . . . . . . . . . 11
3 Scanning . . . . . . . . . . . . . . . . . . . . . . . . . . . . . . . . . . . . . . . . . . . 13
Getting your documents ready to scan. . . . . . . . . . . . . . . . . . . . 13
Getting your scanner ready . . . . . . . . . . . . . . . . . . . . . . . . . . . . 14
Making your first scan. . . . . . . . . . . . . . . . . . . . . . . . . . . . . . . . . 15
Scanning cards. . . . . . . . . . . . . . . . . . . . . . . . . . . . . . . . . . . . . . 17
Scanning applications. . . . . . . . . . . . . . . . . . . . . . . . . . . . . . . . . 18
Maintenance . . . . . . . . . . . . . . . . . . . . . . . . . . . . . . . . . . . . . . . . . . . . 18
Cleaning or replacing the separation module. . . . . . . . . . . . . . . . . 21
Cleaning or replacing the feed module. . . . . . . . . . . . . . . . . . . . . . 23
Cleaning the imaging guides . . . . . . . . . . . . . . . . . . . . . . . . . . . . . 26
Supplies and consumables . . . . . . . . . . . . . . . . . . . . . . . . . . . . . . 27
Page 7

Troubleshooting . . . . . . . . . . . . . . . . . . . . . . . . . . . . . . . . . . . . . . . . . 28
Problem solving . . . . . . . . . . . . . . . . . . . . . . . . . . . . . . . . . . . . . . . 28
LED error codes. . . . . . . . . . . . . . . . . . . . . . . . . . . . . . . . . . . . . . . 32
Contacting Service. . . . . . . . . . . . . . . . . . . . . . . . . . . . . . . . . . . . . 33
Appendix A, Specifications. . . . . . . . . . . . . . . . . . . . . . . . . . . . . . . A-1
System requirements . . . . . . . . . . . . . . . . . . . . . . . . . . . . . . . . . . .A-3
Appendix B, Warranty . . . . . . . . . . . . . . . . . . . . . . . . . . . . . . . . . . . B-1
Page 8

Overview
The Kodak ScanMate i940 Scanner is a desktop, duplex color scanner
that scans two sides of a document in a single pass at up to 20 p ages per
minute. The scanner can accommodate documents up to 21.6 x 165.1 cm
/ 8.5 x 60 inches using the 20-sheet auto matic document feeder when the
host PC is configured with adequate memory.
What’s in the box
• Kodak ScanMate i940 Scanner
• USB power cable
• USB 2.0 data cable
• AC power cable
• AC plug adapters
• Installation CD and documentation
• NewSoft Presto BizCard
A-61766 May 2014 1
Page 9

Scanner components
Top cover
Side guide
Scan buttonScanner cover
Function
window
Scroll button
Side guide
Input tray
extender
Input tray
Card feeder/Thick document switch
Card feeder tray
Front view
A-61766 May 2014 2
Page 10

Inside view
Feed module
and cover
Imaging
guides
Separation
roller and cover
Power port
USB
port
Rear view
A-61766 May 2014 3
Page 11

Setup
Install Software
1. Insert the Kodak ScanMate i940 Scanner Installation CD into the
CD-ROM drive. The installation program starts automatically.
2. Select Install Scanner Software.
A-61766 May 2014 4
Page 12

NOTES:
• If the CD does not start automatically, open the My Computer icon on
your desktop. Double-click the icon indicating your CD-ROM drive,
then double-click on setup.exe.
• If the message Portions of this application are already installed is
displayed, click Yes to continue the ins tallation proc ess. Any
previously installed Kodak Scanner software that is shared with this
scanner will be updated.
3. Click Next when the Welcome screen is displayed.
4. Click I Agree after you have read and agreed with the terms of the
Software License Agreement. The installation will start and several
progress screens will be displayed.
5. Click Finish when the installation is complete.
6. Remove the Kodak ScanMate i940 Scanner Installation CD from the
CD-ROM drive
.
A-61766 May 2014 5
Page 13

Connect Scanner
When the software has been installed, make one of the following power
connections to the scanner. Refer to the illustrations on the following
pages for making proper connections. Make sure the power outlet is
located within 1.52 meters (5 feet) of the scanner and is easily accessible.
You can use your scanner in one of the following ways:
Option 1: Using the AC power cable and USB data
cable — this connection is typically used when the scanner is used in a
stationary location.
Option 2*: Using the USB data cable — this connection provides easy
portability when using the scanner in different locations.
Option 3*: Using the USB power cable and USB data cable — when
scanning thick documents, it is recommended that you use the USB
power cable with the USB data cable.
* These options will decrease the scanner throughput.
A-61766 May 2014 6
Page 14

Option 1: Using the AC power cable and USB data cable
1. Select the appropriate AC plug adapter for your region from the
supply of plug adapters packed with your scanner.
2. Attach the correct plug adapter to the power supply and insert the
power supply into the wall outlet.
3. Plug the AC power cable into the power port on the scanner.
A-61766 May 2014 7
Page 15

4. Attach the USB data cable to the scanner USB port, located on the
back of the scanner.
5. Attach the other end of the USB data cable to the proper USB port on
your laptop or desktop PC.
A-61766 May 2014 8
Page 16

Option 2: Using the USB data cable
1. Attach the USB data cable to the scanner USB port, located on the
back of the scanner.
2. Attach the other end of the USB data cable to the proper USB port on
your laptop or desktop PC.
A-61766 May 2014 9
Page 17

Option 3: Using the USB power cable and USB data cable
1. Plug the USB power cable into the power port on the scanner.
2. Attach the other end of the USB power cable to the proper USB port
on your laptop or desktop PC.
3. Attach the USB data cable to the scanner USB port, located on the
back of the scanner.
4. Attach the other end of the USB data cable to the proper USB port on
your laptop or desktop PC.
A-61766 May 2014 10
Page 18
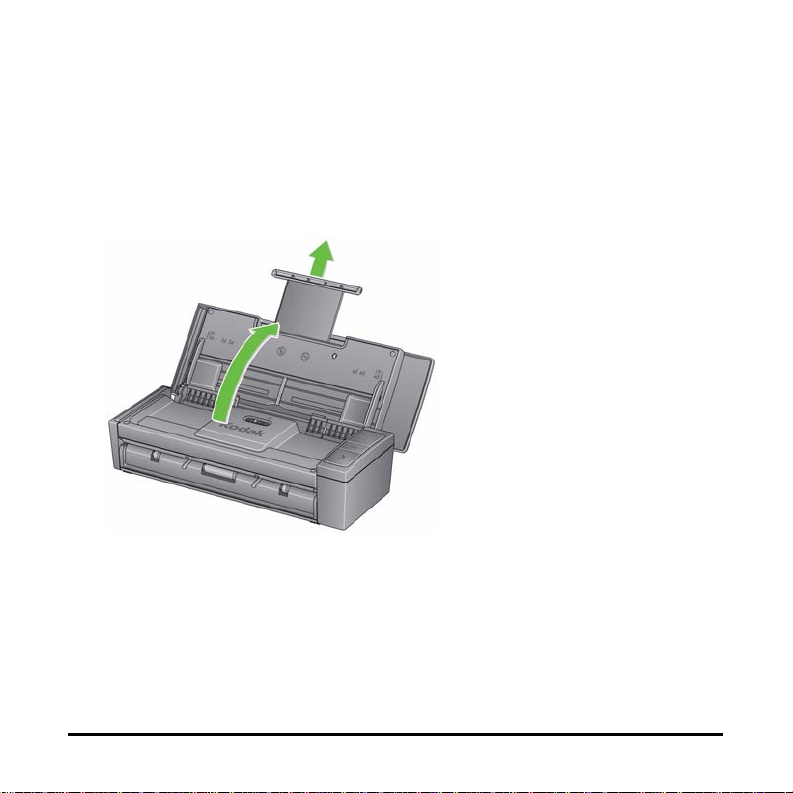
Turning on/off the scanner
• To turn the scanner on: open the top cover. When you turn on the
scanner, the green indicator on the front of the scanner will flash as
the scanner goes through a series of self tests. When the green light
is steady, the scanner is ready.
Do not disconnect the AC power cord while the cover is open.
A-61766 May 2014 11
Page 19

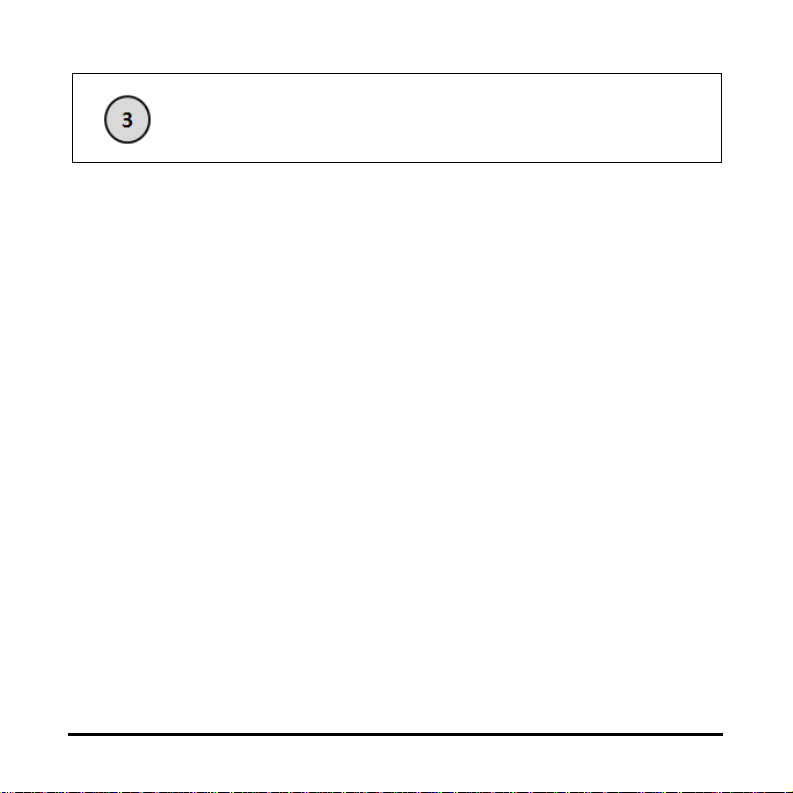
NOTES:
Scanner not ready Scanner ready
• If the Smart Touch application is not installed, you will not see the
Smart Touch icon in your system tray.
• When the scanner is ready, you will see the Smar t Touch scanner icon
in your system tray.
• To turn the scanner off: close the top cover. It is recommended that
when the scanner is not in use you keep the cover closed. By default,
if the scanner is on and left idle for more than 60 minutes after the
scanner goes into energy star mode, the scanner will power off. To
power the scanner back on, close the cover and then open the cover.
Power saver mode: by default, after 15 minutes of inactivity, the scanner
will automatically enter into power saver mode.
To activate the scanner from power saver mode press the Up arrow or
close the cover then open the cover.
A-61766 May 2014 12
Page 20
Scanning
Getting your documents ready to scan
• Standard paper size documents feed easily through the scanner.
When organizing documents for scanning, stack the documents so
the lead edges are aligned and centered in the input tray. This allows
the feeder to introduce documents into the scanner one at a time.
• Remove all staples and paper clips before scanning. Staples and
paper clips on documents may damage the scanner and documents.
• All inks and correction fluids on the paper must be dry before scan ning
is started.
• Be sure the front side of the document is positioned against the input
tray and the top of the document is inserted into the input tray first.
• If you are scanning thick documents (i.e., card stock, etc.) using the
input tray, move the card feeder/thick document switch to the right
until it snaps into place. The switch should be pushed to the left when
scanning normal weight documents.
• If you are scanning credit cards, ID cards, thick cards, etc. place the
card(s) in the card feeder tray and move the card feeder/thick
document switch to the right until it snaps into place.
• When scanning business cards, the card feeder/thick document
switch should be pushed to the left.
A-61766 May 2014 13
Page 21
The steps in the next section “Getting your scanner ready to scan” and
Scanner ready
the section entitled, “Making your first scan” only apply if the Smart Touch
application is installed.
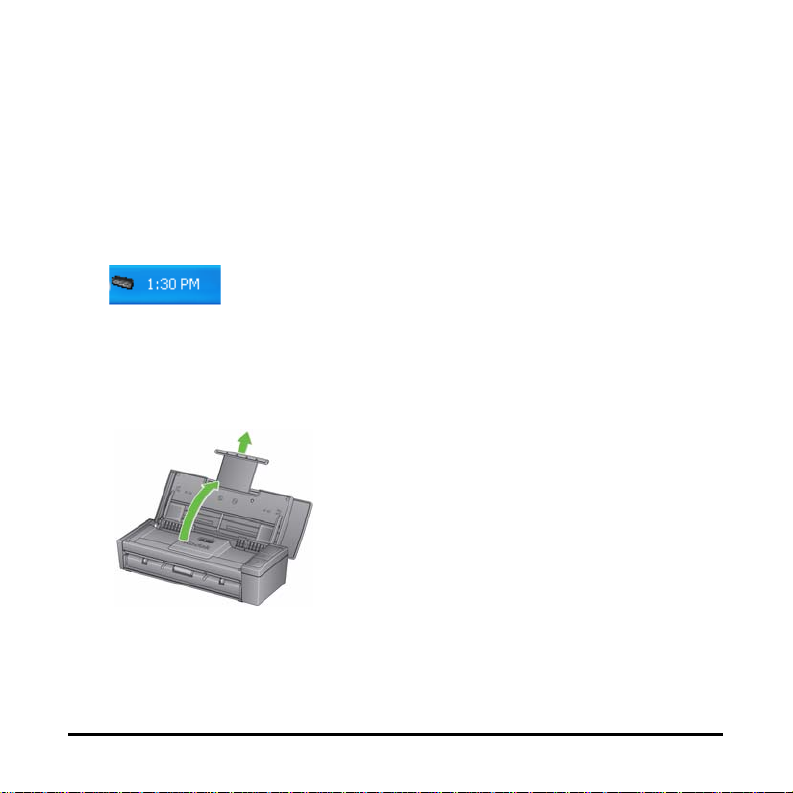
Getting your scanner ready to scan
1. Be sure the scanner is on and ready to scan (green indicator light is
on and constant) and the Smart Touch scanner icon is ready in your
system tray.
NOTE: Smart Touch allows you to quickly and easily perform
common scanning tasks. Nine different tasks can be
assigned and performed.
2. Pull out the document extender on the input tray.
3. Adjust the side guides (by sliding them in or out) to accommodate the
size of documents you are scanning.
A-61766 May 2014 14
Page 22
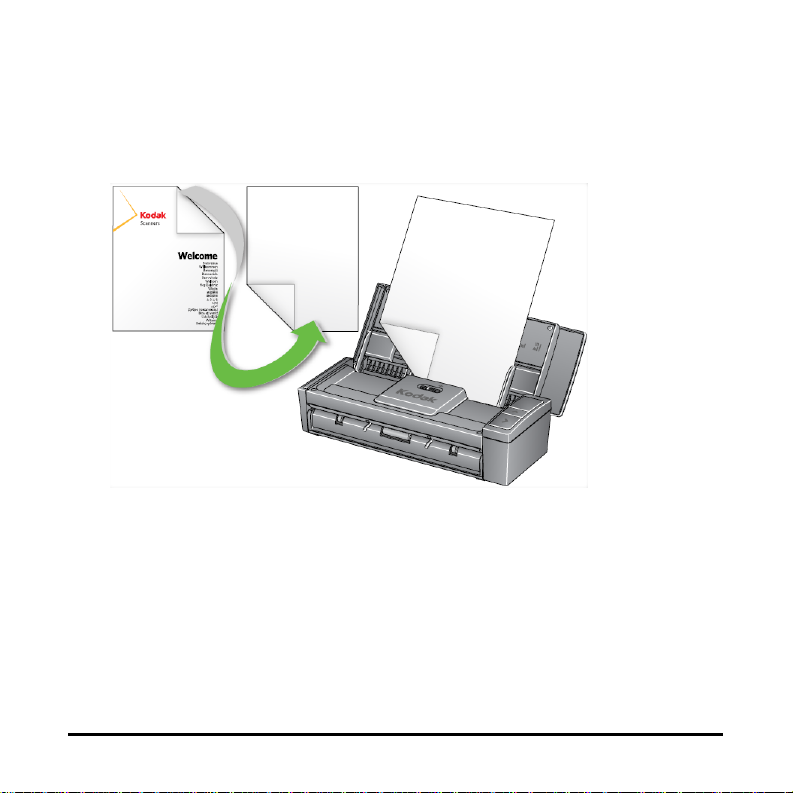
Making your first scan
1. Insert a standard size document into the input tray. Be sure the front
side of the document is positioned against the input tray and the top of
the document is inserted into the input tray first.
2. Verify that the number 1 is displayed in the Function window. If the
number 1 is not displayed, press the Scroll button until number 1 is
displayed.
NOTE: Smart Touch is pre-configured with tasks 1-9. Task number 1
is assigned: Color PDF.
3. Press the Scan button.
A-61766 May 2014 15
Page 23
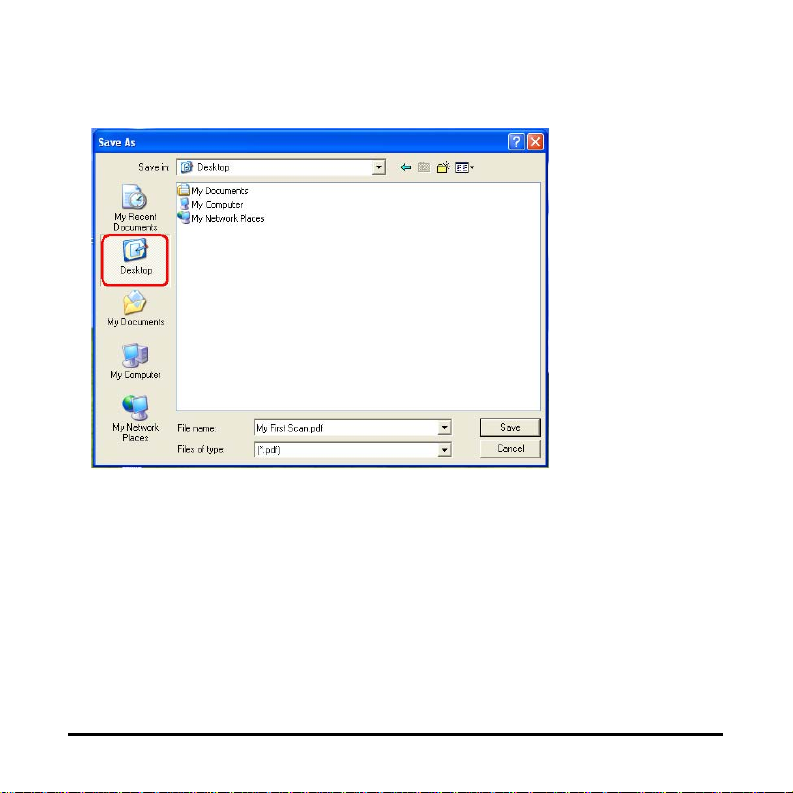
When the document has finished scanning, the Save As dialog box will
be displayed.
4. Enter a file name (e.g., My First Scan.pdf) and select a location where
you want to save the file (e.g., on the Desktop) and click Save.
After clicking Save, the document will be displayed for viewing.
NOTE: Smart Touch can be configured to meet your scanning needs.
For more information about Smart Touch, see the
Documentation folder on the CD that came with your scanner .
Your scanner is ready to use.
A-61766 May 2014 16
Page 24
Scanning cards
Card feeder
tray
Card feeder/Thick
document switch
When scanning thick/hard cards:
1. Plac e th e car d in the ca rd feede r tra y.
2. Slide the card feeder/thick document switch to the right.
3. Press the Scan button.
When scanning business cards:
1. Plac e th e car d in the ca rd feede r tra y.
2. Press the Scan button.
NOTE: You do not need to move the card feeder/thick document
switch to the right
A-61766 May 2014 17
Page 25

Scanning applications
Smart Touch
Kodak provides Smart T ouch functionality which allows you to quickly and
easily perform common scanning tasks; such as:
• scan and share incoming client correspondence with a co-worker in a
branch office
• create a searchable PDF of a printed report
• scan and print/fax an invoice
• scan a photo to add to a presentation
Nine predefined task shortcuts are available for you to use. You can
modify and rename any of the shortcuts to create your own custom tasks.
You can also preview and easily edit images (zoom, pan, rotate, crop,
and much more) before they are sent to their des tin ation.
For more information about Smart Touch, see the Documentation folder
on the CD that came with your scanner.
NewSoft Presto BizCard
Kodak provides NewSoft Presto BizCard which allows you to quickly and
easily convert the contact information from business cards into a
searchable, digital database that can be easily synchronized between
PCs, notebooks, PDAs and PIMs.
A-61766 May 2014 18
Page 26

Maintenance
This section provides procedures for cleaning the scanner and replacing
consumables.
Your scanner needs to be cleaned periodically. If your documents do not
feed easily, if several documents feed at the same time or if streaks
appear on your images, it is time to clean your scanner. The section
entitled “Supplies and consumables” later in this chapter, provides a
listing of the supplies required to clean your scanner.
IMPORTANT: Use only cleaners such as those provided through Kodak
Parts Services. Do not use household cleaners.
Do not use air, liquid or gas spray cleaners.
Allow surfaces to cool to ambient temperature before use.
Do not use cleaners on hot surfaces.
Use adequate ventilation. Do not use cleaner s in confined
areas.
Certain paper types may require cleaning the scanner
rollers more frequently and changing consumables more
often.
1. Disconnect the power from the scanner before performing cleaning
procedures.
2. Open the top cover.
A-61766 May 2014 19
Page 27
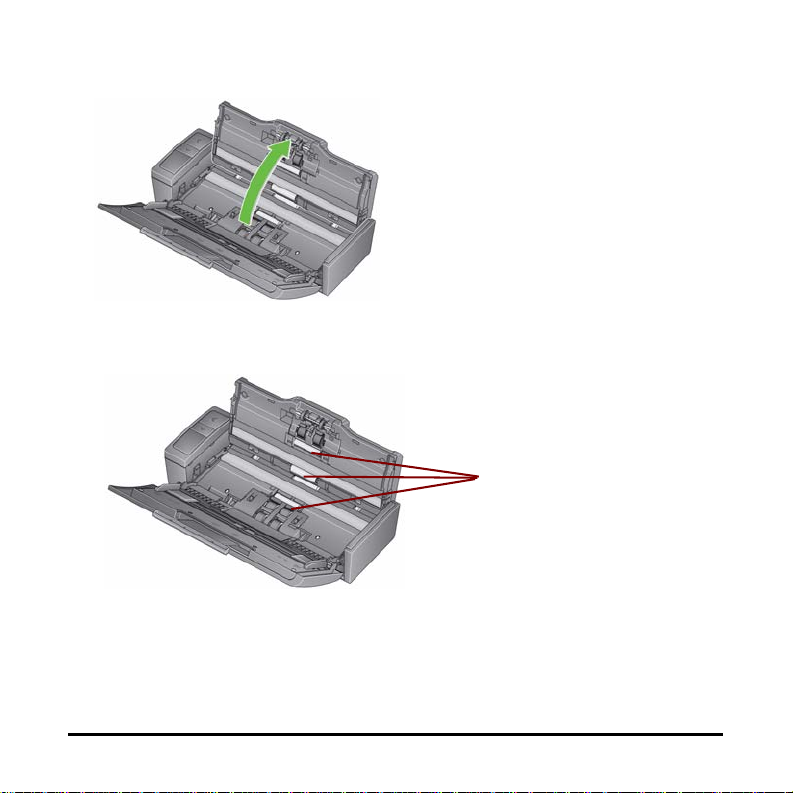
3. Open the scanner cover.
Rollers
4. With a roller cleaning pad, wipe the three feed rollers from side to
side. Rotate the rollers to clean the entire surface.
IMPORTANT: The roller cleaning pad contains sodium lauryl ether
sulfate which can cause eye irritation. Wash your hands
with soap and water after performing maintenance
procedures. Refer to the MSDS for more information
.
A-61766 May 2014 20
Page 28

Cleaning or replacing the separation module
1. Release the separation roller cover.
2. Remove the separation roller.
• If the separation roller is worn and there is a degradation of feeder
performance, replace the separation roller and go to Step 4.
A-61766 May 2014 21
Page 29

• If the separation roller needs to be cleaned, continue with Step 3.
3. Wipe the rollers from side to side.
4. Reinstall the cleaned separation roller or install a new separation
roller.
5. Close the separation roller cover.
A-61766 May 2014 22
Page 30

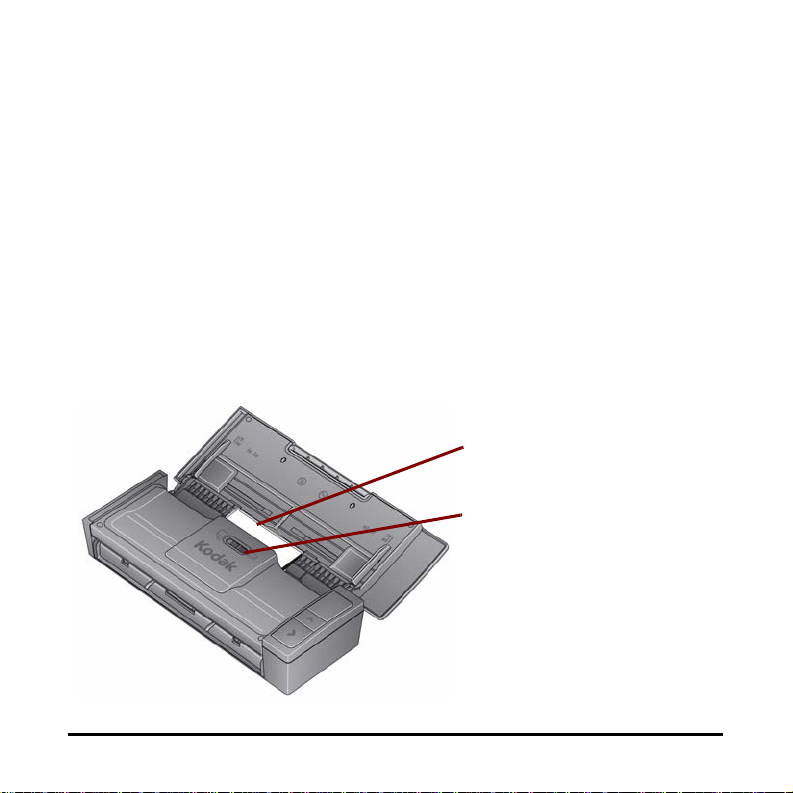
Cleaning or replacing the feed module
Tabs
IMPORTANT: Before removing the feed module cover, the tabs need
to be in the lower position.
1. Power on the scanner by opening the top cover.
2. Open the scanner cover. The feed module tires will rotate and lower
the tabs.
A-61766 May 2014 23
Page 31

3. Remove the feed module cover by squeezing the tabs on each side of
the cover and lifting the cover out of place.
4. Remove the feed module.
A-61766 May 2014 24
Page 32

NOTE: It may be necessary to place your finger in the opening
underneath the scanner cover and push up on the module to
release it from its position.
• If the feed module tires are worn and there is a degradation of
feeder performance, replace the feed module and go to Step 6.
• If the feed module tires need to be cleaned, continue with Step 5.
5. Wipe the rollers from side to side.
6. Reinstall the cleaned feed module or install a new feed module.
7. Reinstall the feed module cover and close the scanner cover.
A-61766 May 2014 25
Page 33
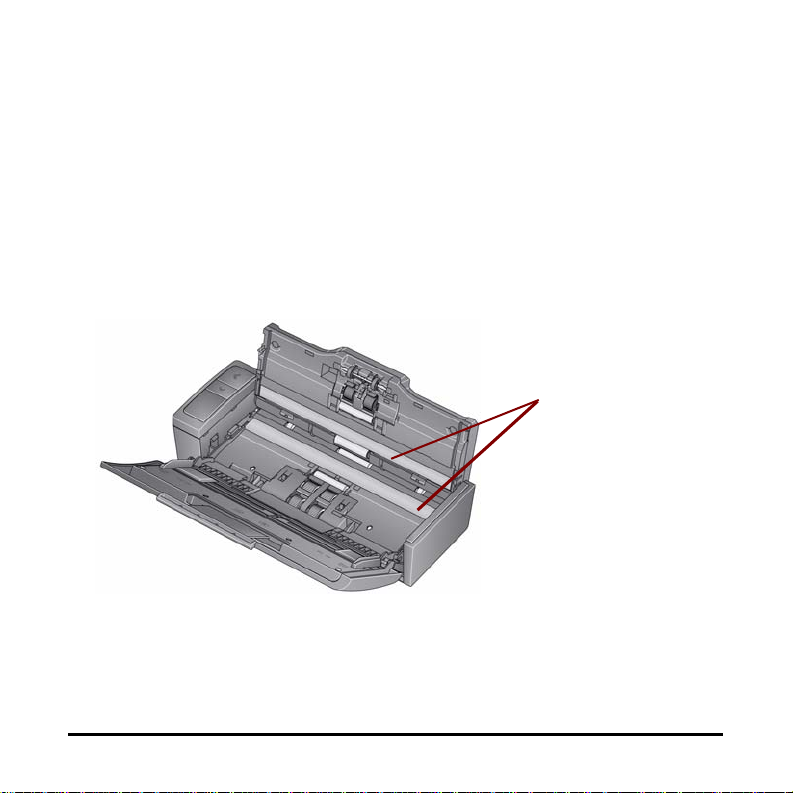
Cleaning the imaging guides
Imaging guides
1. Open the top cover and open the scanner cover.
2. Remove dust and debris from the front and rear imaging guides by
using a Staticide wipe or a small brush. Be careful not to scratch the
glass.
IMPORTANT: Staticide wipes contain isopropanol which can cause eye
irritation and dry skin. Wash your hands with soap and
water after performing maintenance procedures. Refer to
the MSDS for more information
.
3. Wipe the front and rear imaging guide again with an almost dry
Staticide wipe to remove any streaks.
4. When finished, close the scanner cover and reconnect the power.
A-61766 May 2014 26
Page 34

Supplies and consumables
Contact your scanner supplier to order supplies.
Description CAT No.
Feed Module Assembly 846 7839
Separation Module Assembly 177 5246
Kodak Digital Science Roller Cleaning Pads 853 5981
Kodak Digital Science Transport Cleaning Sheets 169 0783
Staticide wipes for Kodak Scanners 896 5519
NOTE: Items and catalog numbers are subject to change.
A-61766 May 2014 27
Page 35

Troubleshooting
Problem solving
Occasionally you may encounter a situation with your scanner where it
may not function properly. Use the chart below as a guide to check
possible solutions to help you resolve the situation before calling
Technical Support.
Problem
A document is
jammed in the
scanner
Distorted images
Image has
clipped corners
A-61766 May 2014 28
Possible Solution
• Open the scanner cover.
• Remove any jammed document(s) from inside
the scanner.
• Close the scanner cover and resume scanning.
The feeder holds up to 20 documents in the input
tray. While scanning is taking place, you cannot
add documents to the feeder. If you do add
documents, your images may be distorted.
If your images have clipped corners, the skew
angle was too large for the scanner to handle. Be
sure documents are placed in the input tray with
the edges aligned and the side guides positioned
correctly to accommodate the size documents you
are feeding to avoid large skew angles.
Page 36

Problem
Possible Solution
Scanner will not
scan/feed
documents
Image quality is
poor or has
decreased
Roller marks
appear on the
document after
scanning
Make sure that:
• the power cord is plugged securely into the back
of scanner and the wall outlet.
• the green LED on the scanner is lit.
• the wall outlet is not defective (call a licensed
electrician).
• the PC was restarted after installing the software.
• document(s) is making contact with the feed
rollers.
• the scanner is properly conn ected. The scanner
will not work if only the USB 2.0 power cable is
connected.
• If you have a Kodak i920 ScanMate Scanner,
you must use both the USB data cable and the
AC power adapter. The i920 Scanner does not
have the USB power cable option.
Clean the scanner. See the procedures in the
Maintenance chapter.
Clean the rollers. See the procedures in the
Maintenance chapter.
A-61766 May 2014 29
Page 37

Problem
Possible Solution
Documents are
jamming or
multiple
documents are
feeding
No images are
being displayed
Make sure that:
• the input tray and side guides are adju sted for the
width and length of the documents you are
scanning.
• the thick document switch is in the correct
position. The switch should be moved to the right
when scanning thick documents; and to the left
when scanning normal documents.
• all documents meet the specifications for size,
weight and type. See Appendix A, Specifications
for more information.
• the scanner is clean.
• Documents should only be inserted in the feeder
after the scanner is powered up and ready.
• If you are scanning one side of a document, be
sure the side you want to scan is placed toward
the feed tray (not facing you). For more
information, see the section entitled, “Getting
your documents ready to scan”.
A-61766 May 2014 30
Page 38

Problem
Possible Solution
Scanner is
running slow
• Your PC may not meet the minimum
requirements for the scanner.
• The scanner is rated and designed to operate
with USB 2.0, but will function with USB 1.1. If
you are using a USB 1.1 connection, update your
connection to USB 2.0.
A-61766 May 2014 31
Page 39

LED error codes
Following is a listing of the error codes that may be displayed in the
Function window. When an error occurs, the red indicator will blink and a
number is displayed in the Function window.
Code Problem Remedy
U6 Scanner cover is
Close the scanner cover.
open
E4 Scanner error Turn the scanner off, then on again.
Restart the scanning application and try
again. If the problem persists, contact
Technical Support.
E5 Scanner time-out Check USB cable then turn off the
scanner and turn it back on again.
U8 Multifeed detected The scanner has detected a multifeed
document.
U9 Document jam Open the scanner cover and clear the
paper jam.
Function window is
blank
Check to be sure your scanner is
properly connected. The scanner will
not work if only the USB power cable is
connected.
A-61766 May 2014 32
Page 40

Contacting Service
1. Visit www.kodakalaris.com/go/scanners to obtain the current phone
number for your country.
2. When calling, please have the following information ready:
• A description of your problem.
• The scanner model and serial number.
• Computer configuration.
• Software application you are using.
A-61766 May 2014 33
Page 41

Appendix A Specifications
This appendix provides scanner specifications and system requirements.
Scanner Type/
Speed
Scanning Speeds B/W, grayscale @ 200 dpi: 20 ppm/40 ipm (AC power)
Scanning
Technology
Scan Resolutions 100, 150, 200, 240, 250, 300, 400, 600 and 1200 dpi
File Format Output BMP, TIFF, JPEG, RTF, Searchable PDF, PDF
Acceptable Paper
Weight
Maximum
document size
Minimum
document size
ADF Capacity 20 sheets
Recommended
Daily Volume
A-61766 May 2014 A-1
Duplex color scanner with an automatic document feeder
Color @ 200 dpi: 15 ppm/30 ipm (AC power)
BW, grayscale, color @ 200 dpi: 8 ppm/16 ipm (USB power)
Contact Image Sensor (CIS) x 2
Grayscale output bit depth is: 8
Color capture bit depth is: 24
Color output bit depth is: 24
2
4.9 to 398 g/m
21.6 x 152.4 cm (8.5 x 60 in.)
8.0 x 5.2 cm (3.15 x 2.05 in.)
1000
(10.7 to 220 lbs.)
Page 42

Light source 3 color LED (R,G,B)
Electrical
requirements
Scanner
Dimensions
Scanner Weight 1.3 kg / 2.86 lbs.
Host Connection USB 2.0
Operating
Temperature
Humidity 10 to 85% RH
Environmental
Factors
Power
Consumption
Acoustic Noise
(Sound Power level)
Bundled software TWAIN Datasource, ISIS Driver, Smart Touch, WIA, NewSoft
AC Adapter: DC 12V, 1.5A or USB power
Height: 157 mm / 6.18 in. with tray fully extended
80.4 mm / 3.17 in. with tray closed
Width: 289 mm / 11.38 in.
Depth: 307 mm / 12.09 in. with tray fully extended
109 mm / 4.29 in. with tray closed
10°C to 35°C (50F to 95°F)
Energy Star qualified scanners
Off mode: <1.0 watts
Running: <15 watts
Energy Star: <4.3 W base limit
Operating: less than 58 dB
Off mode: less than 46 dB
Presto BizCard
A-61766 May 2014 A-2
Page 43

System requirements
Following is the minimum recommended system configuration to run
Kodak ScanMate i940 Scanner.
• Recommended processor and memory: Core Duo 2.1 GHz processor,
2 GB of RAM with USB 2.0 connection
• Supported operating systems:
- Microsoft Windows 8.1 (32-bit and 64-bit)
- Microsoft Windows 7, SP1 (32-bit and 64-bit)
- Microsoft Windows Vista with SP2 (32-bit and 64-bit)
- Microsoft Windows XP with SP3 (32-bit and 64-bit)
A-61766 May 2014 A-3
Page 44

Appendix B Warranty
Congratulations on the purchase of a Kodak Scanner. Kodak Scanners are
designed to provide end users with the highest performance and reliability. All
Kodak Scanners are covered by the following Limited Warranty.
Limited warranty for Kodak Scanners
Kodak Alaris Inc. provides the following Limited Warranty on Kodak Scanners
(excluding spare parts and consumables) distributed by Kodak or through Kodak’s
authorized distribution channels:
Kodak warrants that a Kodak Scanner, from the time of sale through the Limited
Warranty period applicable to the Product, will be free of defects in materials or
workmanship and will conform to the performance specifications applicable for the
particular Kodak Scanner.
All Kodak Scanners are subject to the Warranty Exclusions described below. A
Kodak Scanner found to be defective or which does not conform to the product
specifications will be repaired or replaced with new or refurbished product at
Kodak’s option.
Purchasers may determine the applicable Limited Warranty period for the Kodak
Scanners purchased by calling (800) 822-1414, or by visiting
www.kodakalaris.com/go/disupport or by reviewing the Limited Warranty
Summary Card enclosed with the Kodak Scanner.
Proof of purchase is required to demonstrate eligibility for warranty service.
A-61766 May 2014 B-1
Page 45

Warranty exclusions
Kodak’s Limited Warranty does not apply to a Kodak Scanner that has been
subjected to physical damage after purchase, caused, for example, by casualty,
accident, acts of God or transportation, including (a) by a failure to properly
package and ship the Scanner back to Kodak for warranty service in accordance
with Kodak’s then current Packaging and Shipping Guidelines, including failure to
replace the shipping restraint prior to shipping, or by a failure to remove the
shipping restraint prior to use; (b) resulting from the user’s installation, system
integration, programming, re-installation of user operating systems or applications
software, systems engineering, relocation, reconstruction of data, or removal of
the product or any component (including breakage of a connector, cover, glass,
pins, or seal); (c) from service, modification or repair not performed by Kodak or a
service provider authorized by Kodak or by tampering, use of counterfeit or other
non-Kodak components, assemblies, accessories, or modules; (d) by misuse,
unreasonable handling or maintenance, mistreatment, operator error, failure to
provide proper supervision or maintenance, including use of cleaning products or
other accessories not approved by Kodak or use in contravention of
recommended procedures or specifications; (e) by environmental conditions
(such as excessive heat or other unsuitable physical operating environment),
corrosion, staining, electrical work external to the product or failure to provide
electro-static discharge (ESD) protection; (f) by failure to install firmware updates
or releases available for the product and (g) by such other supplemental
exclusions published from time to time online at www.kodakalaris.com/go/
disupport or by calling (800) 822-1414.
Kodak provides no Limited Warranty for products purchased from countries other
than the United States. Purchasers of products from foreign distribution channels
must seek warranty coverage, if any, through the original source of purchase.
A-61766 May 2014 B-2
Page 46

Kodak provides no Limited Warranty for products that are purchased as part of a
third party manufacturer’s product, computer system or other electronic device.
Any warranty for these products is provided by the OEM (Original Equipment
Manufacturer) as part of that manufacturer’s product or system.
The replacement product assumes the remainder of the Limited Warranty period
applicable to the defective product or thirty (30) days, whichever is longer.
Installation Warning and Disclaimer
KODAK WILL NOT BE RESPONSIBLE FOR ANY CONSEQUENTIAL OR
INCIDENTAL DAMAGES RESULTING FROM THE SALE, INSTALLATION, USE,
SERVICING OR IMPROPER FUNCTIONING OF THIS PRODUCT,
REGARDLESS OF THE CAUSE. SUCH DAMAGES FOR WHICH KODAK WILL
NOT BE RESPONSIBLE, INCLUDE, BUT ARE NOT LIMITED TO, LOSS OF
REVENUE OR PROFIT, LOSS OF DATA, DOWNTIME COSTS, LOSS OF USE
OF THE PRODUCT, COST OF ANY SUBSTITUTE PRODUCT, FACILITIES OR
SERVICES OR CLAIMS OF CUSTOMERS FOR SUCH DAMAGES.
If there is any conflict between other sections of this appendix and the Limited
Warranty, the terms of the Limited Warranty prevail.
How to obtain limited warranty service
Kodak Scanners are supplied with information on unpacking, setup, installation
and operation. Careful reading of the User’s Guide will answer most of the
technical questions the end user might have regarding proper installation,
operation and maintenance of the product. However, should additional technical
support be required, you may visit our website at: www.kodakalaris.com/go/
disupport or contact:
Response Center: (800) 822-1414
A-61766 May 2014 B-3
Page 47

The Response Center is available Monday – Friday (excluding Kodak holidays) 8
a.m. to 5 p.m. EST.
Before placing the call, the eligible purchaser should have the Kodak Scanner
model number, part number, serial number and proof of purchase available. The
eligible purchaser should also be prepared to provide a description of the
problem.
Response Center personnel will assist the end user in resolving the problem over
the phone. The end user may be asked to run some simple, self-diagnostic tests
and report the resulting status and error code messages. This will assist the
Response Center in determining if the problem is the Kodak Scanner or another
component and if the problem can be resolved over the ph one. If the Response
Center determines a hardware problem exists that is covered either under the
Limited Warranty or a purchased Maintenance Agreement, a Return Material
Authorization Number (RMA) will be assigned as needed, a service request will be
initiated and repair or replacement procedures will follow.
A-61766 May 2014 B-4
Page 48

Packaging and shipping guidelines
Purchaser must ship all warranty returns in a method that guarantees full
protection of the product from shipping damage. Failure to do so will void the
Kodak Scanner warranty. Kodak advises the purchaser to keep the original box
and packing materials for storing or shipping. Kodak is not responsible for issues
related to shipping damage. The purchaser must return only the Kodak Scanner.
Prior to shipment, purchaser must remove and retain all “add-on” items, (i.e.
adapters, cables, software, manuals, etc.). Kodak accepts no responsibility for
these items and they will not be returned with the repaired or replacement Kodak
Scanner. All products should be returned to Kodak in the original shipping
container, or an authorized packaging box for the units being returned. Purchaser
must install the shipping restraint before the Kodak Scanner is shipped. When the
original packaging is not available, contact Kodak’s Response Center at (800)
822-1414 for part numbers and replacement packaging ordering information.
Return procedure
Eligible purchasers seeking services for Kodak Scanners covered under this
Limited Warranty must obtain a Return Material Authorization number (“RMA”) by
calling (800) 822-1414 and within ten (10) business days from the date of
issuance of the RMA must return the Kodak Scanner to the address designated in
the RMA at the end user’s own expense and risk, in compliance with Kodak’s
current Packaging and Shipping Guidelines.
Any defective products or parts replaced by Kodak become the property of Kodak.
A-61766 May 2014 B-5
Page 49

Customer responsibility
BY REQUESTING SERVICE, THE ELIGIBLE PURCHASER ACKNOWLEDGES
THE TERMS OF THE LIMITED WARRANTY, INCLUDING THE DISCLAIMER
AND LIMITATION OF LIABILITY PROVISIONS. PRIOR TO SEEKING SERVICE,
THE END USER MUST BACK-UP ANY DATA OR FILES THAT MAY BECOME
DAMAGED OR LOST. KODAK IS, WITHOUT LIMITA TION, NOT RESPONSIBLE
FOR LOST OR DAMAGED DATA OR FILES.
Warranty Service descriptions
Kodak Alaris Inc. offers a range of service programs to support its Limited
Warranty and to assist with the use and care of the Kodak Scanner (“Service
Methods”). A Kodak Scanner represents an important investment. Kodak
Scanners provide the productivity needed to stay competitive. The sudden loss of
this productivity, even temporarily, could seriously affect the ability to meet
commitments. Downtime can be very expensive, not just in the cost of the repair
but also in time lost. To help alleviate these problems, Kodak may use one of the
service methods listed below, depending upon product type, in providing service
under its Limited Warranty.
Included with selected Kodak Scanners is a Limited Warranty Registration card
and a Limited Warranty Summary card. The Limited Warranty Summary card is
specific by model. The Limited Warranty Summary card contains important
warranty information, including the model number and the Limited Warranty. Refer
to the Limited Warranty Summary card to determine the available Service
Methods applicable to the particular Kodak Scanner.
If the Limited Warranty Registration card or Limited Warranty Summary card
cannot be located, additional information may be obtained about the product,
including updated warranty and service program information and restrictions,
online at www.kodakalaris.com/go/disupport or by phone at (800) 822-1414.
A-61766 May 2014 B-6
Page 50

To avoid service delays, Kodak urges end users to complete and return the
enclosed Limited Warranty Registration Card at the first opportunity. If you cannot
locate the Limited Warranty Registration card, you may register online at
www.kodakalaris.com/go/disupport or by phone at (800) 822-1414.
Kodak also provides a variety of service programs that may be purchased to
assist with the use and care of the Kodak Scanner.
Kodak is committed to providing its customers with quality, performance, reliability
and service under the Limited Warranty.
On-site service
For the selected Kodak Scanner, and after the Response Center verifies a
hardware problem, a service call will be opened and logged. An Kodak Field
Engineer will be dispatched to the product location to perform repair service if the
product is located within the contiguous forty-eight (48) United States, in certain
areas of Alaska and Hawaii, and if there are no security, safety or physical
requirements that would restrict the Field Engineer’s access to the scanner. For
additional information on service areas, please visit our website at:
www.kodakalaris.com/go/docimaging. On-Site Service will be provided between
the hours of 8 a.m. and 5 p.m. local time, Monday through Friday (excluding
Kodak holidays).
A-61766 May 2014 B-7
Page 51

AUR
AUR may be one of the easiest and most comprehensive service offerings in the
industry. In the unlikely event of a product defect, for eligible purchasers of certain
Kodak Scanners, Kodak will replace that product within two business days.
The AUR provides advance replacement on specific failed or broken Kodak
Scanner. To be eligible to take advantage of the AUR, the eligible purchaser must
obtain an RMA number, sign an Advance Replacement Agreement and provide a
credit card deposit to secure the replacement product. The RMA number should
be kept in the event that the status of the replacement product needs to be
checked. The eligible purchaser will be asked for the address where the
replacement product is to be shipped. The eligible purchaser will also be faxed
packing and shipping instructions for the malfunctioning product. The eligible
purchaser will then receive a replacement product within 2 business days after the
service call initiation and Kodak’s receipt of the signed agreement. The
malfunctioning product must be received by Kodak within ten (10) days of the end
user’s receipt of the replacement product or the end user ’s credit card will be
charged the list price of the replacement product. Sh ipment of replacement
Imaging Product will be made at Kodak’s expense and choice of freight carrier.
Shipments not made under Kodak’s directions and choice of freight carrier may
void the Limited Warranty.
Before the product is returned to Kodak, be sure to remove all options and
accessories (which include power cord, documentation, etc.) that are not covered
by the Limited Warranty . The box and packaging in which the replacement product
was shipped must be used to return the malfunctioning product. If the
malfunctioning product is not returned in the box and packaging in which the
replacement product was shipped the Limited Warranty may be voided. The
Return Material Authorization Number (“RMA”) must be clearly marked on the
outside of the box to ensure proper receipt and credit of the defective product.
A-61766 May 2014 B-8
Page 52

Depot service
If the Kodak Scanner is not eligible for Advance Exchange or On-Site Service, an
eligible purchaser may utilize our Depot Repair Service. The eligible purchaser
will be instructed to ship the product to the nearest authorized Depot Repair
Center. Product must be shipped at the eligible purchaser’s risk and expense to
the repair center. Before the product is returned to the repair center, be sure to
remove all options and accessories (which include power cord, documentation,
etc.) not covered by the Limited Warranty. All products should be returned to
Kodak in the original shipping container, or in a recommended packing box. The
Kodak Scanner must have the shipping restraint installed before it is shipped.
When the original packaging is not available, contact Kodak’s Response Center at
(800) 822-1414, for ordering information. Eligible purchasers seeking services for
Kodak Scanners must obtain a Return Material Authorization number (“RMA”) by
calling (800) 822-1414, and within ten (10) business days from the date of
issuance of the RMA must return the Kodak Scanner to the address designated in
the RMA at the end user’s own expense and risk. The Return Material
Authorization Number (“RMA”) must be clearly marked on the outside of the box
to ensure proper receipt and credit of the defective product.
Upon receipt of the product, the repair center will repair product within ten (10)
business days. The repaired product will be shipped back two-day express mail at
no expense to the eligible purchaser.
A-61766 May 2014 B-9
Page 53

Important restrictions
Eligibility: The Advance Exchange Program and the Depot Service are available
to eligible purchasers in the fifty (50) United States, and On-Site Service is
available in the contiguous forty-eight (48) states and in certain areas of Alaska
and Hawaii for products purchased from authorized distributors of Kodak. The
Kodak Scanner will be ineligible for any service under warranty if the product falls
under any of Kodak’s then-current Warranty Exclusions, including a purchaser’s
failure to return defective products to Kodak in compliance with Kodak’s then
current Packaging and Shipping Guidelines. Persons are only considered “eligible
purchasers” or “end users” if they originally purchased the Kodak Scanner for their
own personal or business use, and not for resale.
Consumables: Consumables are items that wear out under normal use and must
be replaced by the end user as needed. Consumables, supplies, other
expendable items and those items identified as being the user’s responsibility in
the User’s Guide are not covered under the Limited Warranty.
If any of the above excluded parts or services are required, they may be available
through an authorized service provider at their hourly rates and at terms then in
effect.
Any defective products or parts replaced by Kodak become the property of Kodak.
Contacting Kodak
• For Information on Kodak Scanners: www.kodakalaris.com/go/docimaging
• For U.S. Service, Repair and Technical Assistance by Telephone: 5 a.m. to 5
p.m. Monday-Friday; (800) 822-1414 (excluding Kodak holidays)
• For Technical Documentation and FAQ’s available 24 hours a day:
www.kodakalaris.com/go/disupport
A-61766 May 2014 B-10
Page 54

 Loading...