

Kodak i1405, i1420, i1440, i1410 Setup Manual

Scanning Setup Guide for ISIS Driver
Contents Starting the Scan Validation Tool .......................................................2
Using the ISIS Driver ......................................................................... 3
The Scan Validation Tool dialog box.................................................. 4
The main ISIS Driver window.............................................................5
Main tab.........................................................................................6
Layout tab......................................................................................9
Scan Area dialog box....................................................................11
Image Processing tab..................................................................12
Scanner tab ................................................................................. 14
Auto Color Detect tab .................................................................. 16
Adjustment tab.............................................................................18
Dropout tab..................................................................................20
Blank Image Detection tab...........................................................21
Imprinter tab.................................................................................22
Logs tab.......................................................................................24
About tab ..................................................................................... 24
The Kodak i1400 Series Scanners provide the ability to process
scanned images to improve their quality by using image processing
features.
Image processing refers to features of the scanner that allow you to
automatically adjust each image that may improve the resulting images
(i.e., correcting any skew in the fed document, cutting the edges of the
image off to remove unneeded borders or cleaning up extraneous
“noise” on the image).
The information in this guide provides procedures for using the ISIS
Driver as well as descriptions of the features. The same features should
be available on the user interface of the scanning application you are
using (i.e., Kodak Capture Software).
A-61661 May 2010 1
Starting the Scan
Validation Tool
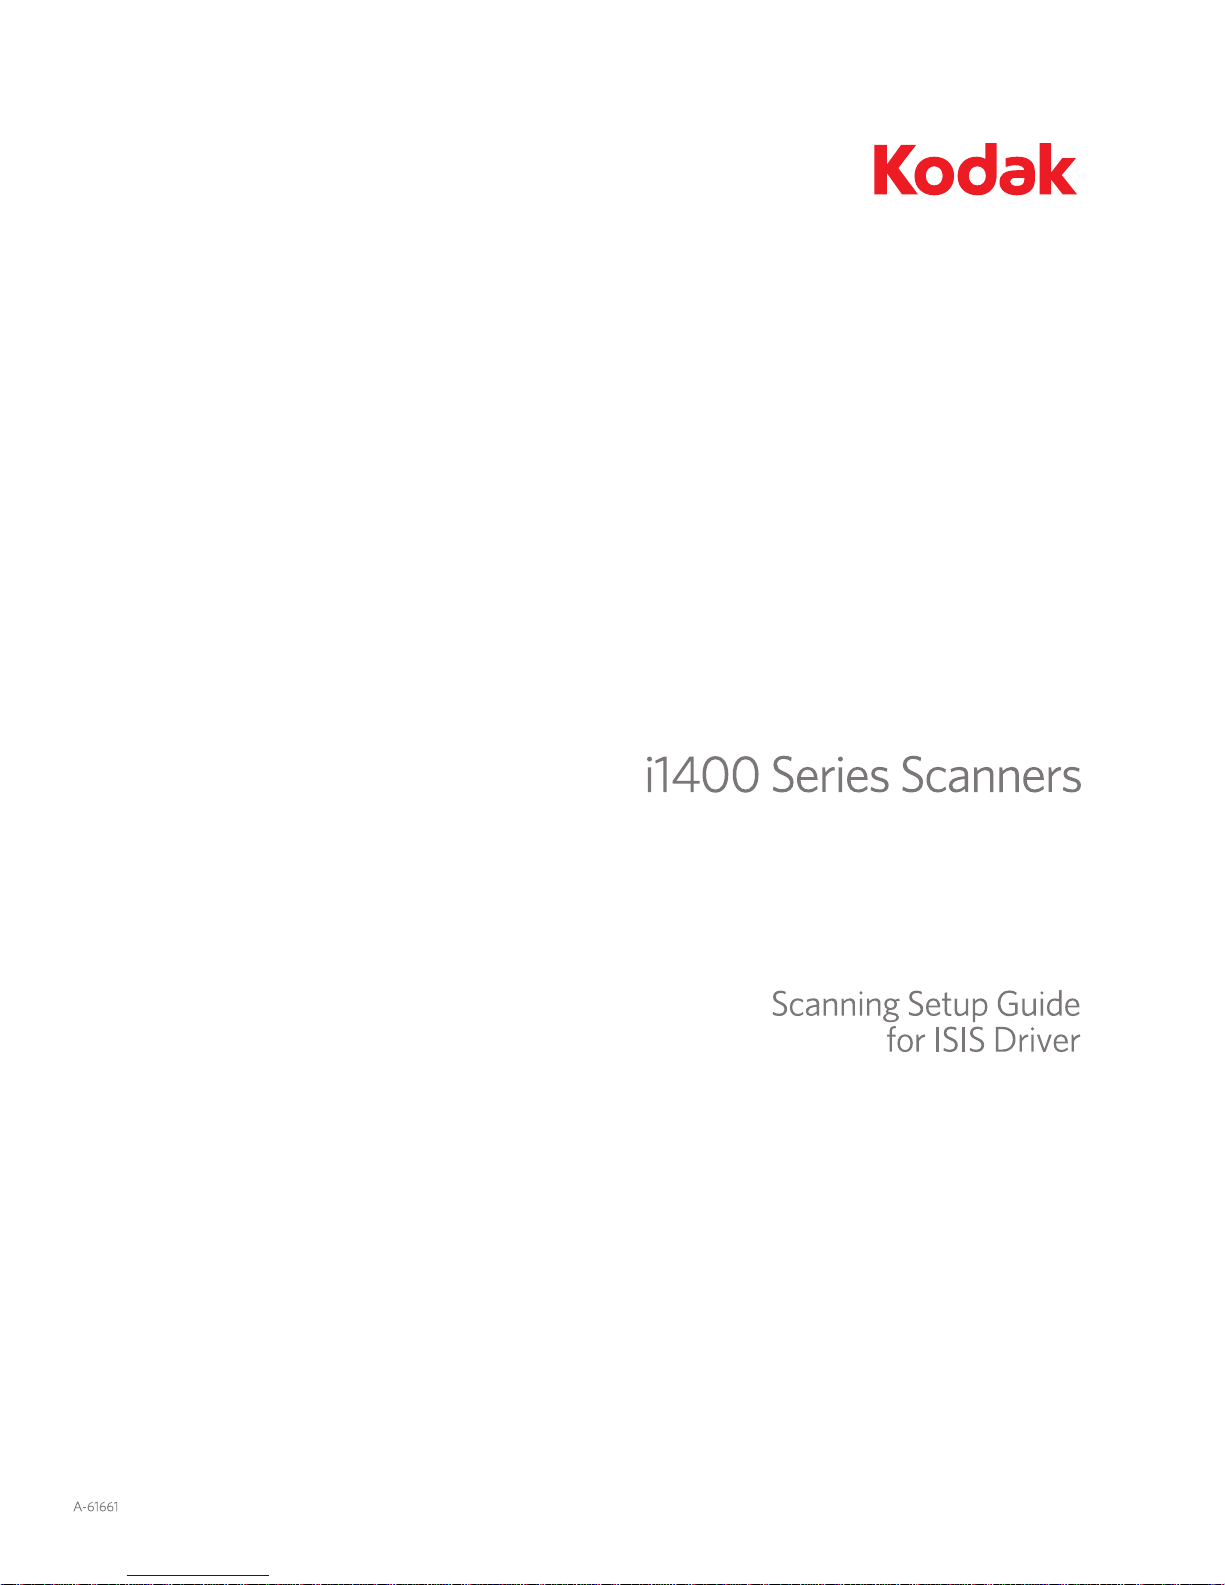
1. Select Start>Programs>Kodak>Document Imaging>Scan
Validation Tool.
2. Select ISIS for the Driver Type and the Kodak Scanner i14XX
Scanner as the Driver. The Scan Validation Tool dialog box will be
displayed.
NOTE: For a description of the icons on the Scan Validation Tool
dialog box, see the section entitled, “Scan Validation Tool
dialog box” at the end of this guide.
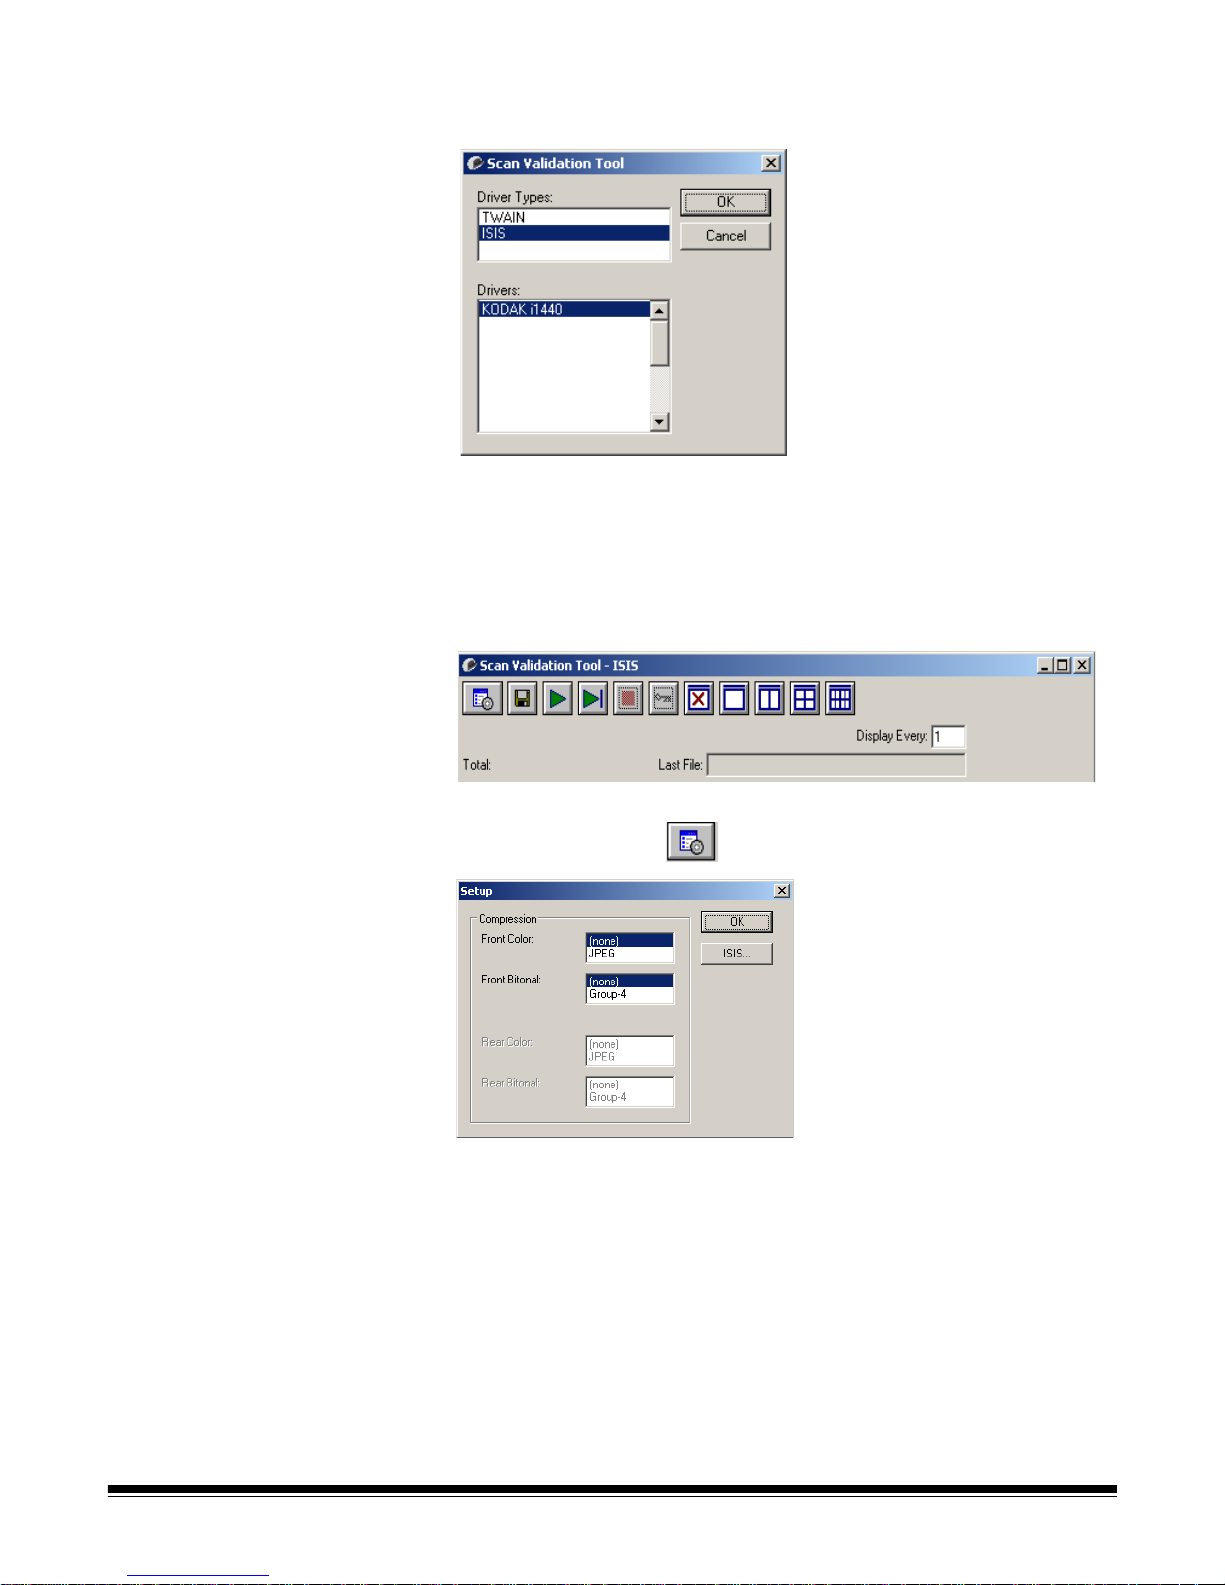
3. Click the Setup icon . The Setup dialog box will be displayed.
4. Click ISIS to display the Main tab.
2 A-61661 May 2010

Using the ISIS driver The Kodak i1400 Series Scanners can provide a wide variety of
electronic images. This can be done by using the ISIS Driver which is
created and maintained by EMC Captiva and is provided with the
scanner by Kodak. Many scanning applications support ISIS drivers
and this driver can be used to interface with them. The ISIS Driver is
the part of the capture system which links the scanner to your scanning
application.
This guide provides descriptions of the options on the tabs of the main
ISIS Driver window and how to set these options.
For the purpose of this manual, all displayed windows assume the
features available on the Kodak i1405, i1420 and i1440 Scanners. If
you have a Kodak i1410 Scanner, all options are limited to one-sided
scanning only.
See the section entitled, “Starting the Scan Validation Tool” earlier in
this document to access the ISIS Driver.
A-61661 May 2010 3

The Scan Validation
Tool dialog box
The Scan Validation Tool (SVT) is a diagnostic application provided by
Kodak. The SVT user interface allows access to all the features of the
scanner and is a good way to verify that the scanner is working
properly. The Scan Validation Tool allows you to verify scanner
functionality using the ISIS driver.
Toolbar buttons
Setup — displays the user interface for the selected driver.
Destination — allows you to select a directory to stor e scanned
images and their file names. This option is only available when
Save Images to Files is selected.
Start Scanning — scans the documents in the input tray.
Scan One Page — scans only one page.
Stop Scanning — ends the scan session.
License Key — displays the License Key window
No Image Display mode — closes the Image Viewer window
(no images will be displayed).
One Image Display mode — displays one image at a time.
Two Image Display mode — displays two images at a time.
Four Image Display mode — displays four images at a time.
4 A-61661 May 2010
Eight Image Display mode — displays eight images at a time.
The main ISIS Driver
window
The main ISIS Driver window provides a set of several tabs. You can
select each of these tabs and make any choices necessary to meet
your scanning needs.
The buttons on the bottom of the window apply to all the tabs:
Default ⎯ when you select Default, the values will be reset to the
factory defaults.
Copy ⎯ this function is only available when scanning two-sided
documents. The Copy button provides a convenient way to set up the
color, grayscale or black and white image settings on one side and
transfer them to the other. For example, if you highlight and set up
Front Image #1, you can use the Copy button to duplicate those
settings for Back Image #1.
OK ⎯ saves the values set on all tabs.
Cancel ⎯ closes the window without saving any changes.
A-61661 May 2010 5
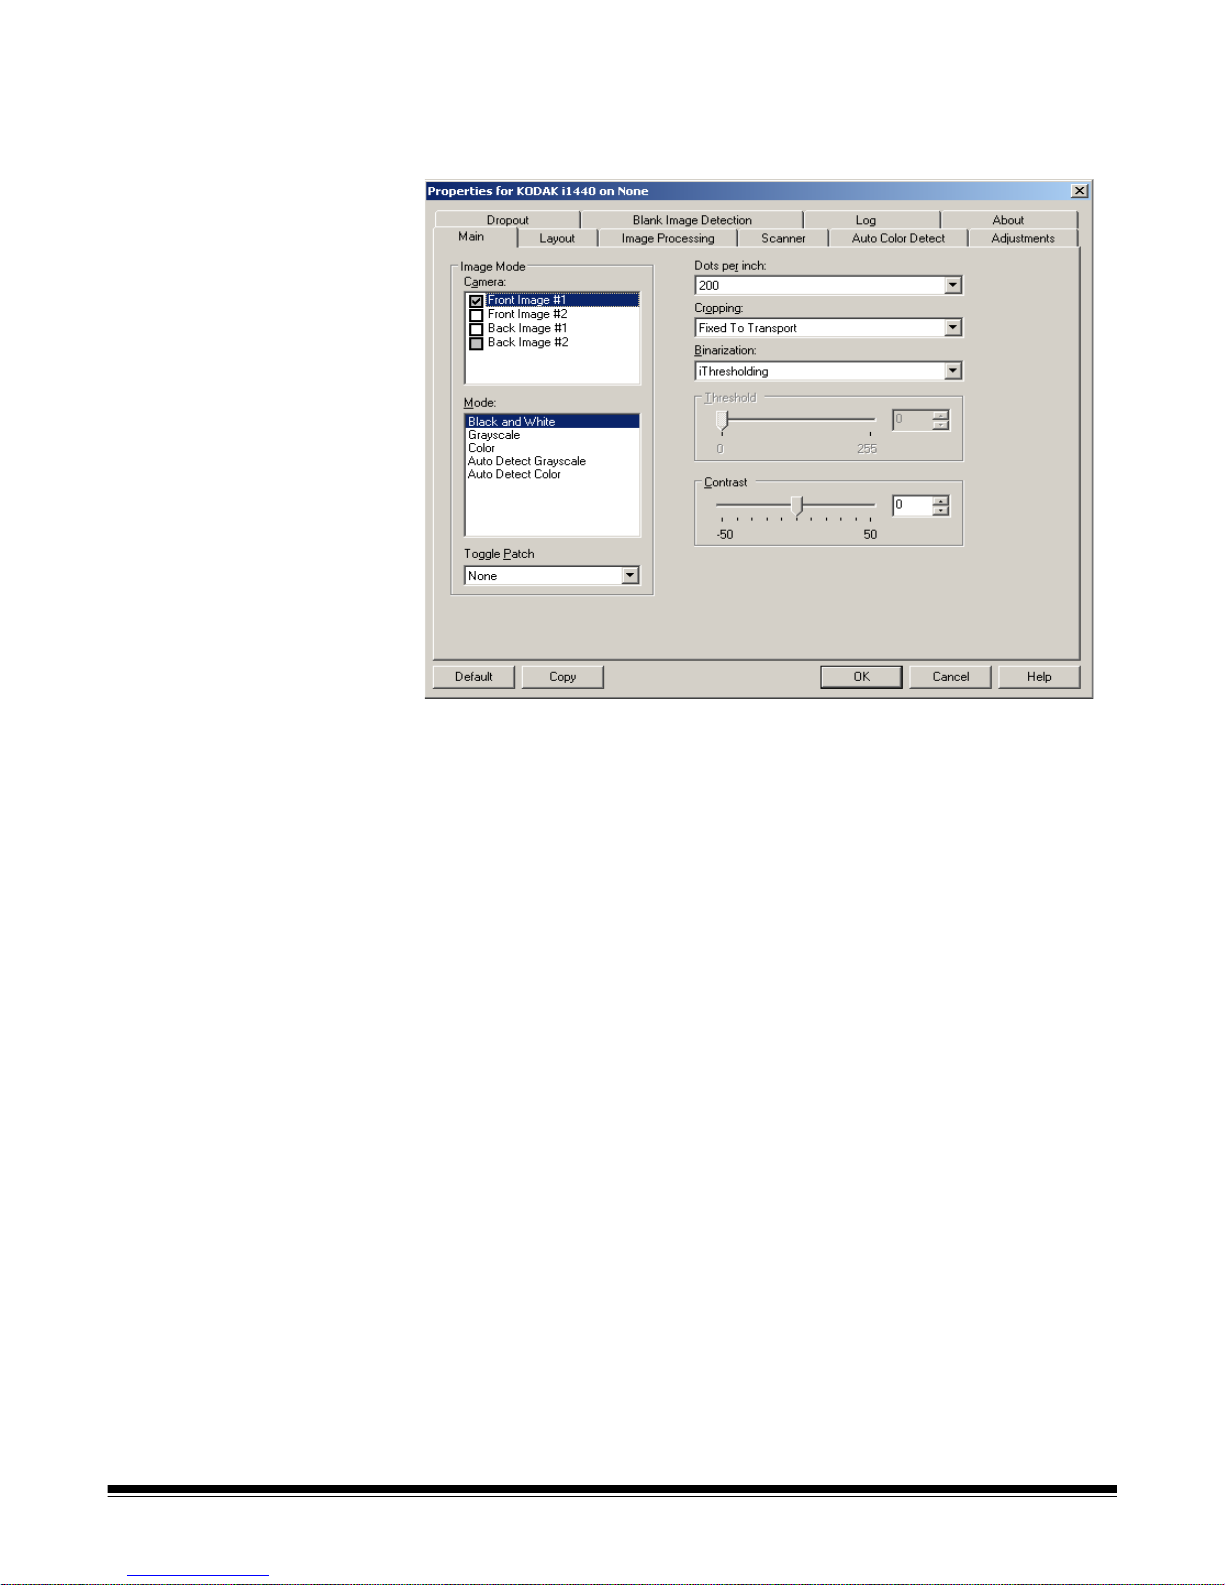
Main tab The Main tab provides the following options:
Image Mode
Camera — the selections in the Camera box list the available sides
(front and back) of an image where you can define individual image
processing values. Options include: Front Image #1, Front Image #2,
Back Image #1 and Back Image #2.
The Kodak Scanner drivers allow you to control the camera settings
independently. Some settings apply only to black and white images,
others apply to color/grayscale images. By selecting the appropriate
camera and image mode, you can control the scanner’s output.
Mode
• Black and white: if you want your electronic image to represent all
elements of your document in black and white.
• Grayscale: if you want your electronic image to have a range of
varying shades of gray from black to white.
• Color: if you want your electronic image to be in color.
• Auto Detect Grayscale: sets auto color detect for grayscale. See
the section entitled, “Auto Color Detect tab” for more information.
• Auto Detect Color: sets auto color detect for color. See the section
entitled, “Auto Color Detect tab” for more information.
6 A-61661 May 2010

Toggle Patch — indicates you want to tell the scanner, via a toggle
patch document, if the document is color/grayscale or black and white.
You can select:
• Off: no patches will be used.
• Same Side: only the side which recognizes the patch sheet will
toggle.
• Both Sides: a patch will be recognized on either the fro nt or the back
side.
NOTE: Not all scanners have toggle patch functionality.
Dots per inch (dpi) or resolution ⎯ indicates the scanning resolution,
which largely determines the quality of the scanned image. The greater
the resolution, the better the reproduction. However, scanning at a
higher resolution also increases scanning time and file size.
Select a resolution value from the drop-down list. The default is 200 dpi.
Available resolutions are: 75, 100, 150, 200, 240, 300, 4 00 and 600 d pi.
Cropping ⎯ allows you to capture a portion of the document being
scanned. All cropping options can be used with color/grayscale and
black and white images. Front and Back cropping are independent,
however, for dua l stream scanning, color/grayscale and black and white
cropping must be the same per side. Only one cropping option can be
assigned per image.
• Fixed to Transport: (used for batches of same-sized documents)
allows you to define the area to be imaged. Fixed to Transport
cropping is used in conjunction with paper size and page layout and
assumes you are center-feeding your documents. If you are not using
center feeding, you must select the Layout tab to define your scan
area. See the section entitled “Layout tab” later in this chapter.
• Automatic: dynamically adjusts the cropping window for different
document sizes based on the edges of the image.
• Aggressive: eliminates any residual black border on any image
edges. In order to achieve this, there is a possibility that a small
amount of image data from the edge of the document may be lost.
• Relative to Document: (zone processing): (used for batches of
same-sized documents) — zone processing is a floating fixed crop
window (the zone) located relative to the upper left corner of a
document. It allows you to select an area on the document to be
delivered in either color/grayscale or black and white format (a
separate window for both black and white and color/grayscale may
be defined). Different parameters may be selected for both the front
and back of the image.
This option may be used in conjunction with Automatic cropping
where a separate color/grayscale or black and white area to be
saved is desired. It is useful in applications where a photograph,
signature, embossment or seal appears in a consistent area for an
application (you may want that small area in color/grayscale and the
rest in black and white). To define a zone, select the Layout tab.
A-61661 May 2010 7
 Loading...