

Kodak FS-10-N Operation & Maintenance Manual

PR~JfCT~R
Get ACf/u(Jillted
the pzojecto ond...ipeaker, how to thread the film, and how to
operate the amplifier .... these steps are arranged in sequence so hat you-cen-
easily follow the text as you complete the individual operations .
Projection of sound pictures will be easy right from the start if your
Sound Kodascope is set up correctly and the instructions followed closely.
This manual is designed to help you do this quickly.
OPERATION
MAINTENANCE
• Operational maintenance .... the things you will have to do to keep your
equipment producing brilliant pictures, accompanied by true reproduction of
sound. Many of these suggestions will become a part of routine operation. They
are just as important as correct focus or good tone' if you are to enjoy your
Sound Kodascope.
PROJECTION
SETUP
The Night
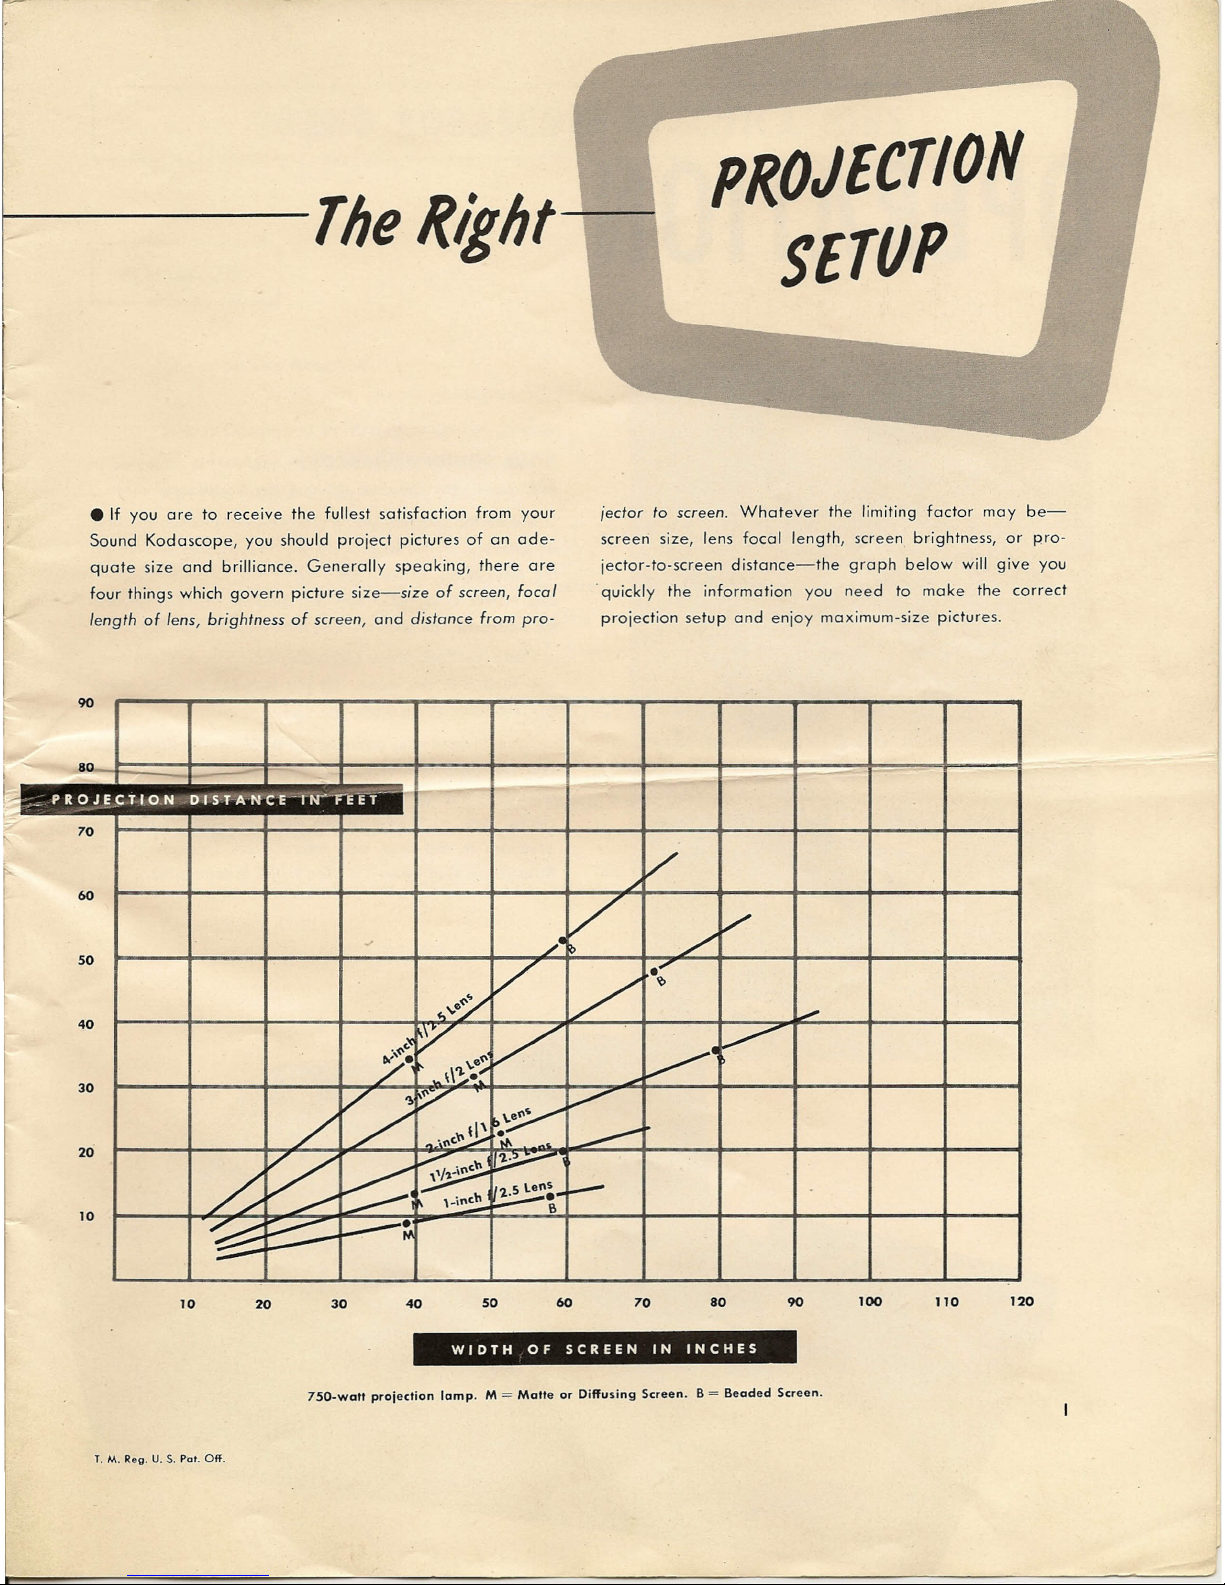
• If you are to receive the fullest satisfaction from your
Sound Kodascope, you should project pictures of an ade-
quate size and brilliance. Generally speaking, there are
four things which govern picture size-size of screen,
focal
length
of lens,
brightness
of screen, and
distance from pro-
jecfor to
screen. Whatever the limiting factor may be-
screen size, lens focal length, screen brightness, or pro-
jector-to-screen distance-the graph below will give you
.quickly the information you need to make the correct
projection setup and enjoy maximum-size pictures.
-
-
J.~.!=
T ION
D
1ST
A N
C E
-TW'-l'E
tf;=o.
./
/
/'
/
./
'>:
..;-
~
V
.'
V
'¢
.:/'
•...•••e
--
~
~
V
V·
~
~.
....e<'-
\\~-;
..•..
V~
~
t..~
V
/
-:
\1\
----
.",,,~
~
y
~
~
~
-:
,,/
..
-'
,. '_i~
'l
5
\.811S,••
~
~
~~
.~
:::::::-
--::.:::;;-~
:;;;;.-
90
80
._ PRO
70
60
50
40
30
20
10
100
90
110
60
70
80
10
30
40
50
20
WIDTH OF SCREEN IN INCHES
7S0-wall projection lamp. M=Malle or Diffusing Screen. B=Beaded Screen.
T. M. Reg. U. S. Pat. Off.
120
OPERATION
=
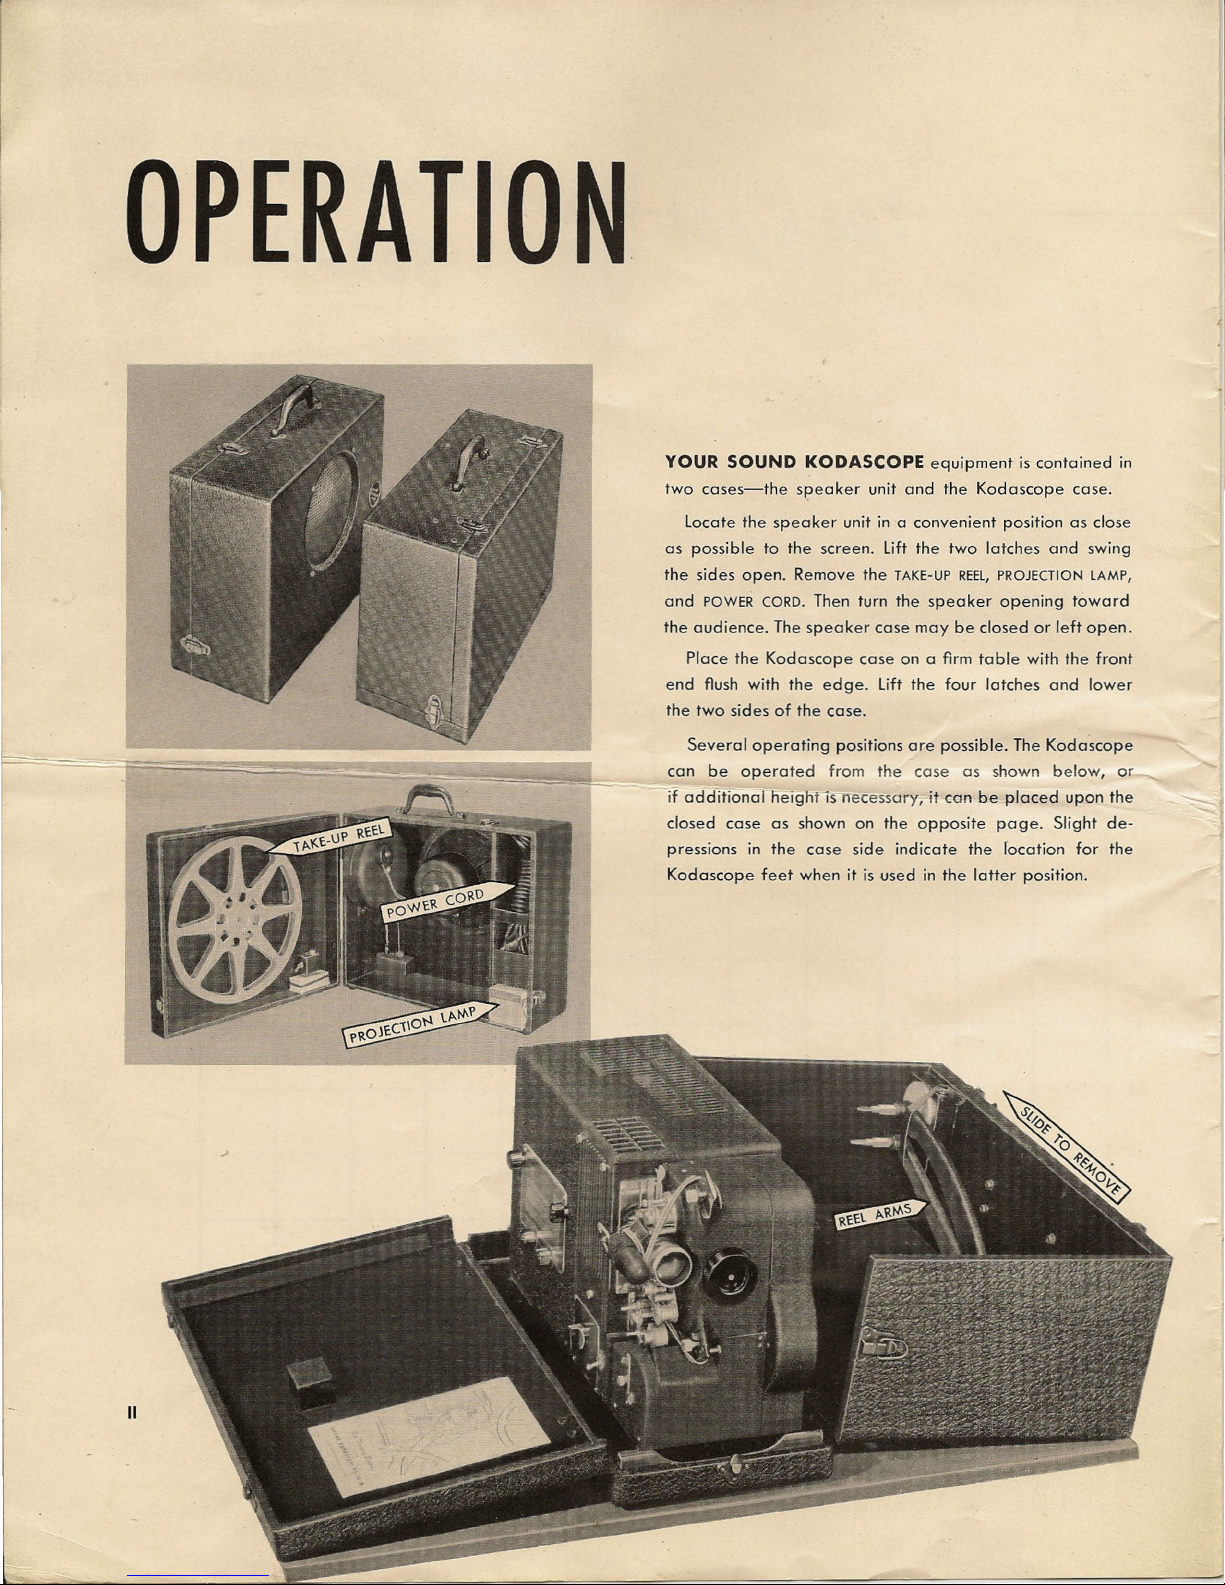
YOUR SOUND KODASCOPE
two cases-the speoker unit and the Kodascope case.
Locate the speaker unit in a convenient position as close
as possible to the screen. Lift the two latches and swing
the sides open. Remove the
and
POWER CORD.
the audience. The speaker case may be closed or left open.
Place the Kodascope case on a firm table with the front
end flush with the edge. lift the four latches and lower
the two sides of the case.
Several operating positions are possible. The Kodoscope
can be operated from the case as shown below, or
-if additional neightis rrecessaryj'it con be placed upon the
closed case as shown on the opposite page. Slight de-
pressions in the case side indicate the locotion for the
Kodascope feet when it is used in the latter position.
Then turn the speaker opening toward
equipment is contained in
TAKE-UP REEL, PROJECTION LAMP,
II
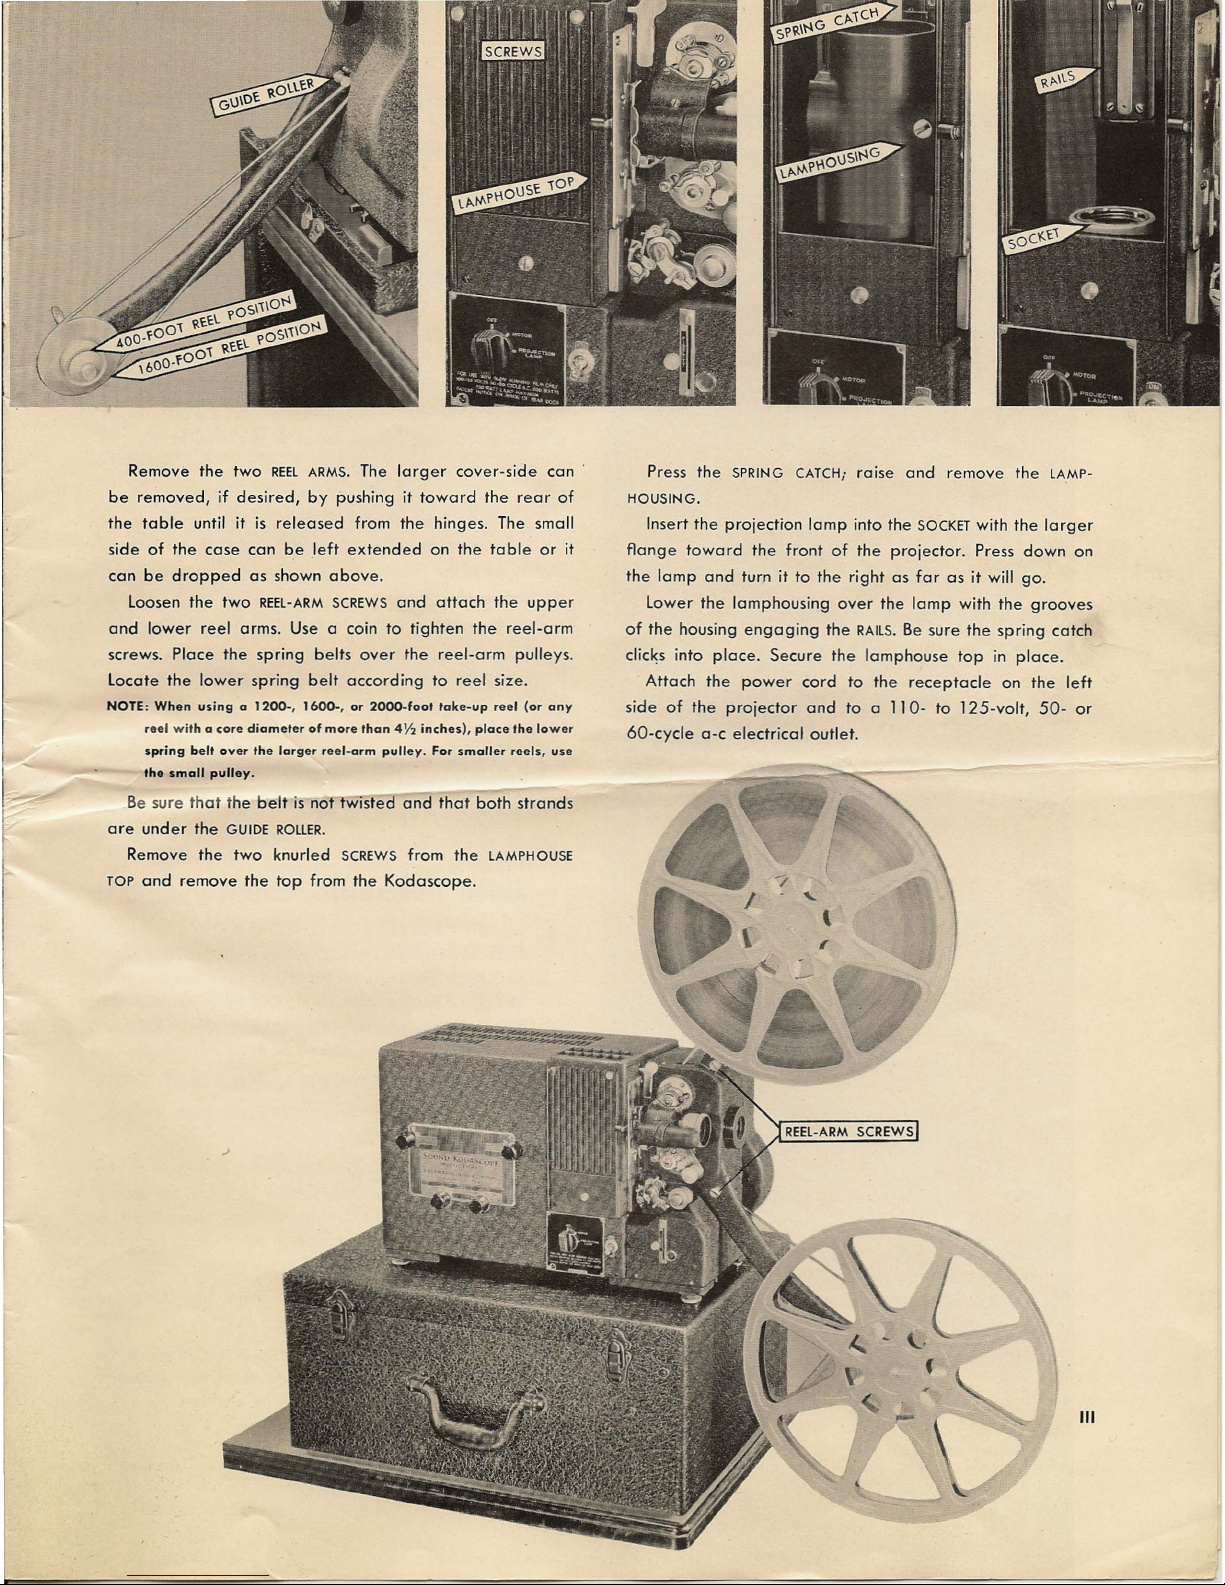
Remove the two
REEL ARMS.
The larger cover-side can
be removed, if desired, by pushing it toward the rear of
the table until it is released from the hinges. The small
side of the case can be ,left extended on the table or it
can be dropped as shown above.
Loosen the two
REEL-ARM SCREWS
and attach the upper
and lower reel arms. Use a coin to tighten the reel-arm
screws. Place the spring belts over the reel-arm pulleys.
Locate the lower spring belt according to reel size.
NOTE: When using a 1200-, 1600-, or 20oo-foot take-up reel (or any
reel with a core diameter of more than 4Y2inches), place the lower
spring belt over the larger reel-arm pulley. For smaller reels, use
the small pulley.
Press the
SPRING CATCH;
raise and remove the
LA,MP-
HOUSING.
Insert the projection lamp into the
SOCKET
with the larger
flange toward the front of the projector. Press down on
the lamp and turn it to the right as far as it will go.
Lower the lamphousing over the lamp with the grooves
of the housing engaging the
RAILS.
Be sure the spring catch
clicks into place. Secure the lamphouse top in place.
Attach the power cord to the receptacle on the left
side of the projector and to a 110- to 125-volt, 50- or
60-cycle c-c electrical outlet.
Be sure that the belt is not wlsteo and that both strands
are under the
GUIDE ROLLER.
Remove the two knurled
SCREWS
from the
LAMPHOUSE
TOP
and remove the top from the Kodascope.
III
~~~I~=--':'-Now
JHREAD THE KODASCOPE • •
It
mlliiiiiillllllir .
TONE
.fiillliii 1111
I
11I1111I1111I
SOUND KoDASCOPE
MODEL
FS-10-N
-b",
EASTMAN-KoDA~
COMPANY
R.OCHESTER. °
oN .Y.
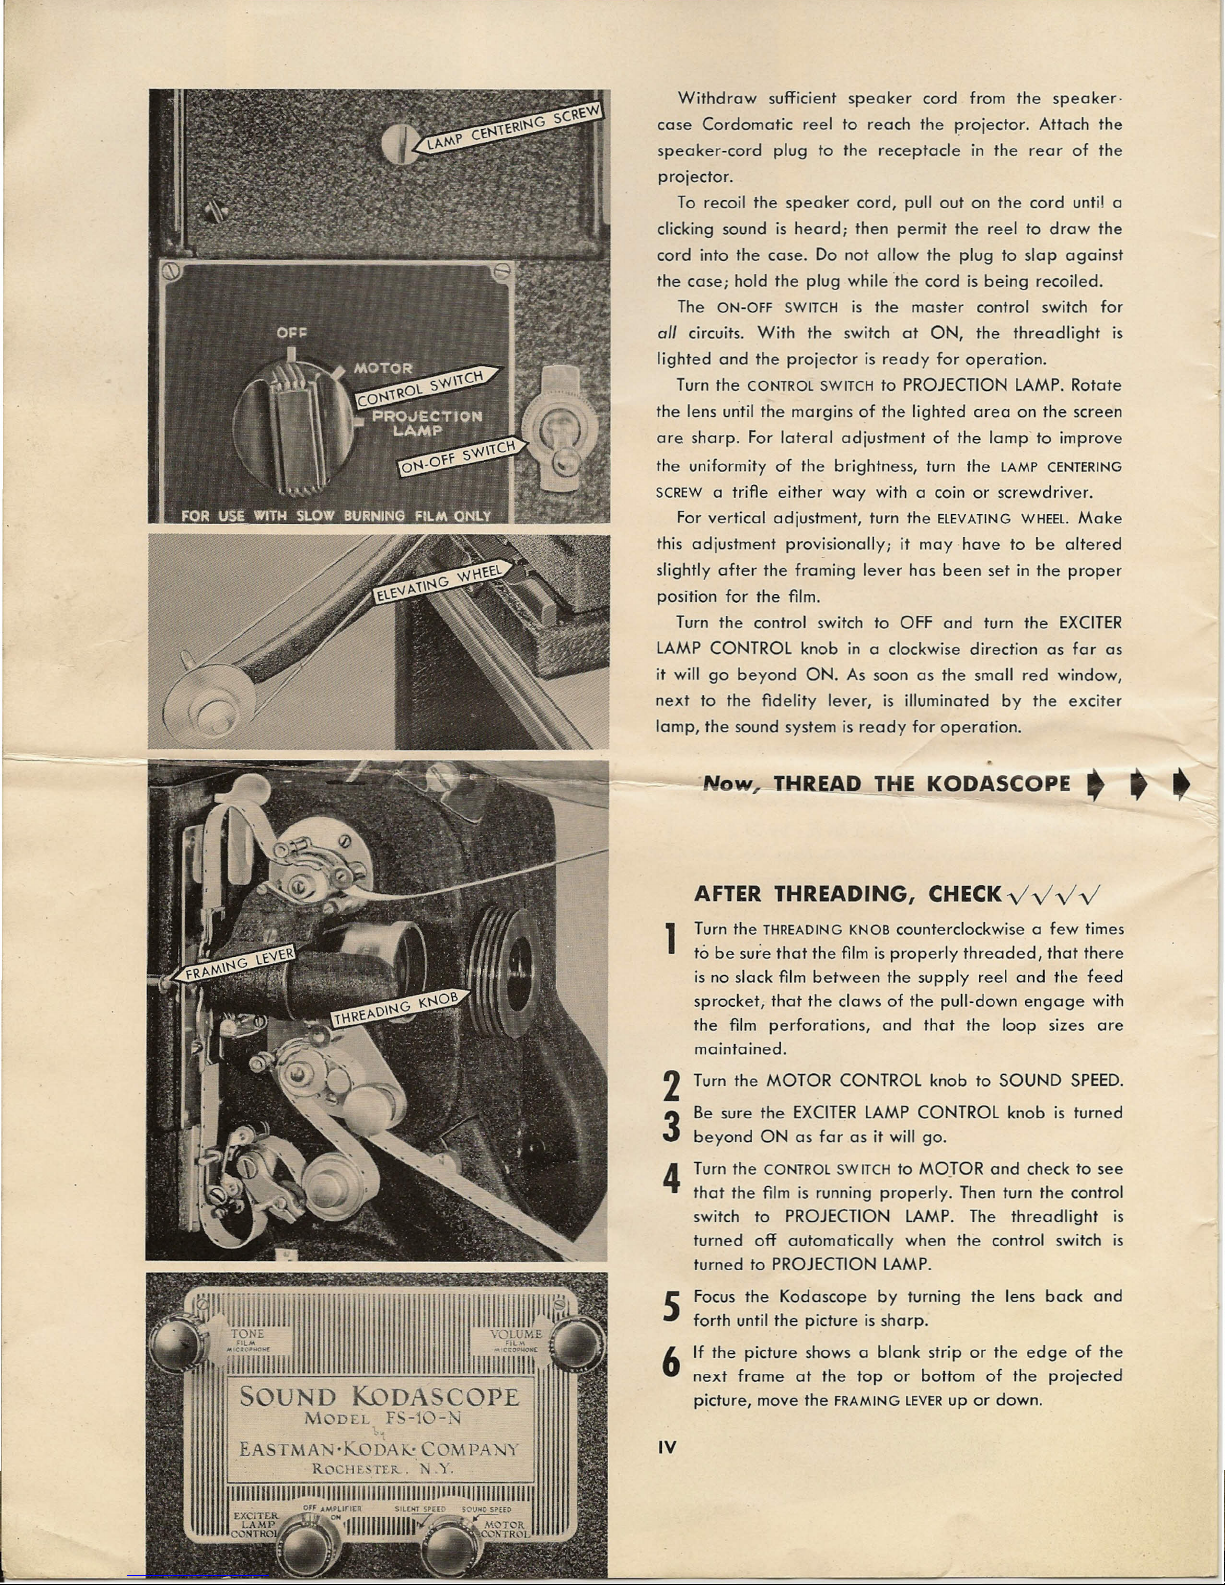
Withdraw sufficient speaker cord from the spe oker-
case Cordomatic reel to reach the projector. Attach the
speaker-cord plug to the receptacle in the rear of the
projector.
To recail the speaker cord, pullout on the cord until a
clicking sound is heard; then permit the reel to draw the
cord into the case. Do not allow the plug to slap against
the case; hold the plug while °the cord is being recoiled.
The
ON-OFF SWITCH
is the master control switch for
all circuits. With the switch at ON, the threadlight is
lighted and the projector is ready for operation.
Turn the
CONTROL SWITCH
to PROJECTION LAMP. Rotate
the lens until the margins of the lighted area on the screen
are sharp. For lateral adjustment of the lamp' to improve
the uniformity of the brightness, turn the
LAMP CENTERING
SCREW
a trifle either way with a coin or screwdriver.
For vertical adjustment, turn the
ElEVATING WHEEl.
Make
this adjustment provisionally; it may have to be altered
slightly after the framing lever has been set in the proper
position for the film.
Turn the control switch to OFF and turn the EXCITER
LAMP CONTROL knob in a clockwise direction as far as
it will go beyond ON. As soon as the small red window,
next to the fidelity lever, is illuminated by the exciter
lamp, the sound system is ready for operation.
AFTER THREADING,
CHECKVVVV
1
Turn the
THREADING KNOB
counterclockwise a few times
to be sure that the film is properly threaded, that there
is no slack film between the supply reel and the feed
sprocket, that the claws of the pull-down engage with
the film perforations, and that the loop sizes are
maintained.
2
Turn the MOTOR CONTROL knob to SOUND SPEED.
3
4
Be sure the EXCITER LAMP CONTROL knob is turned
beyond ON as far as it will go.
Turn the
CONTROL SWITCH
to MOJOR and check to see
that the film is running properly. Then turn the control
switch to PROJECTION LAMP. The thread light is
turned off automatically when the control switch is
turned to PROJECTION LAMP.
S
Focus the Kodascope by turning the lens back and
forth until the picture is sharp.
6
If the picture shows a blank strip or the edge of the
next frame at the top or bottom of the projected
picture, move the
FRAMING LEVER
up or down.
IV
 Loading...