

Page 1

Kodak EasyShare printer dock
6000
User’s Guide
Visit Kodak on the World Wide Web at www.kodak.com
Page 2

Eastman Kodak Company
343 State Street
Rochester, New York 14650
© Eastman Kodak Company, 2003
Kodak and EasyShare are trademarks of Eastman Kodak Company.
P/N 6B8312
Page 3

Kodak EasyShare printer dock 6000
Page 4

Page 5
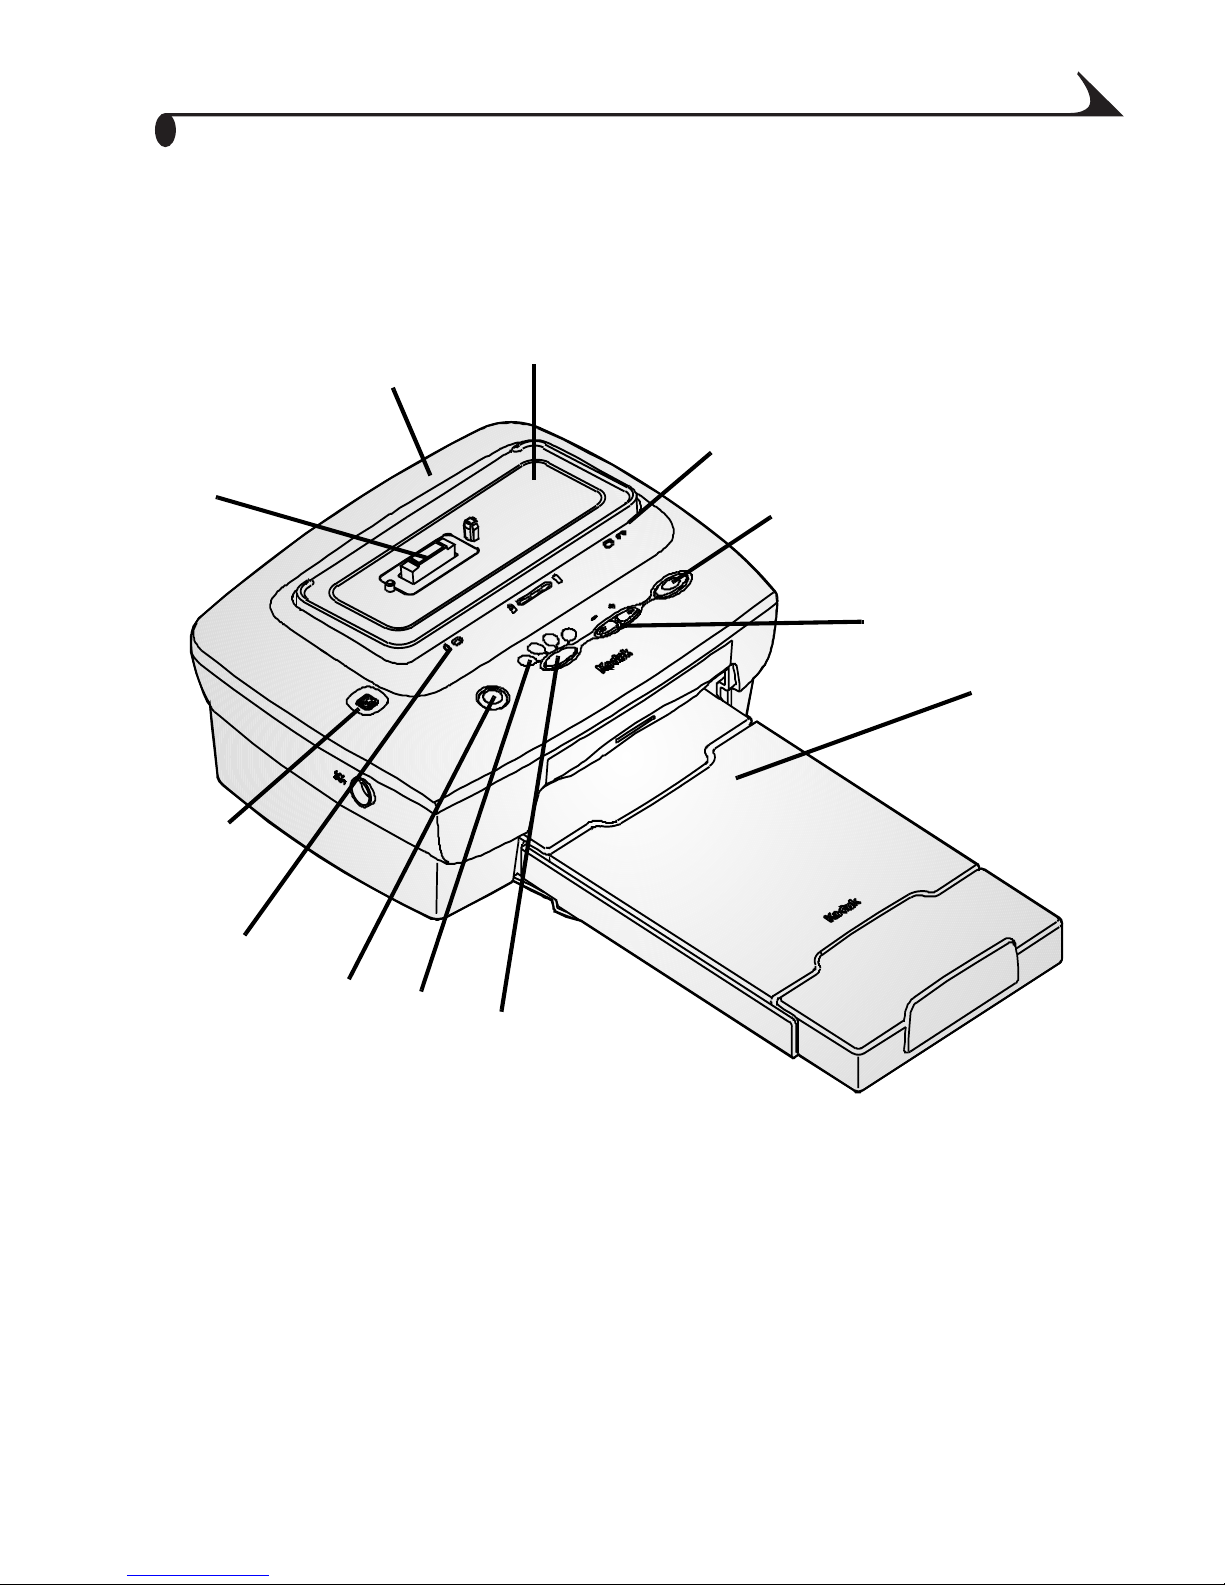
Front View
Product Overview
2
1
3
12
11
10
9
8
4
5
6
7
1 Printer dock
3 Color cartridge light
4 Print button
5 Arrow keys
6 Paper tray
7 Print mode button
8 Print mode lights2 Universal insert
9 Transfer button
10 Paper light
11 Slide show button
12 Camera connection
i
Page 6
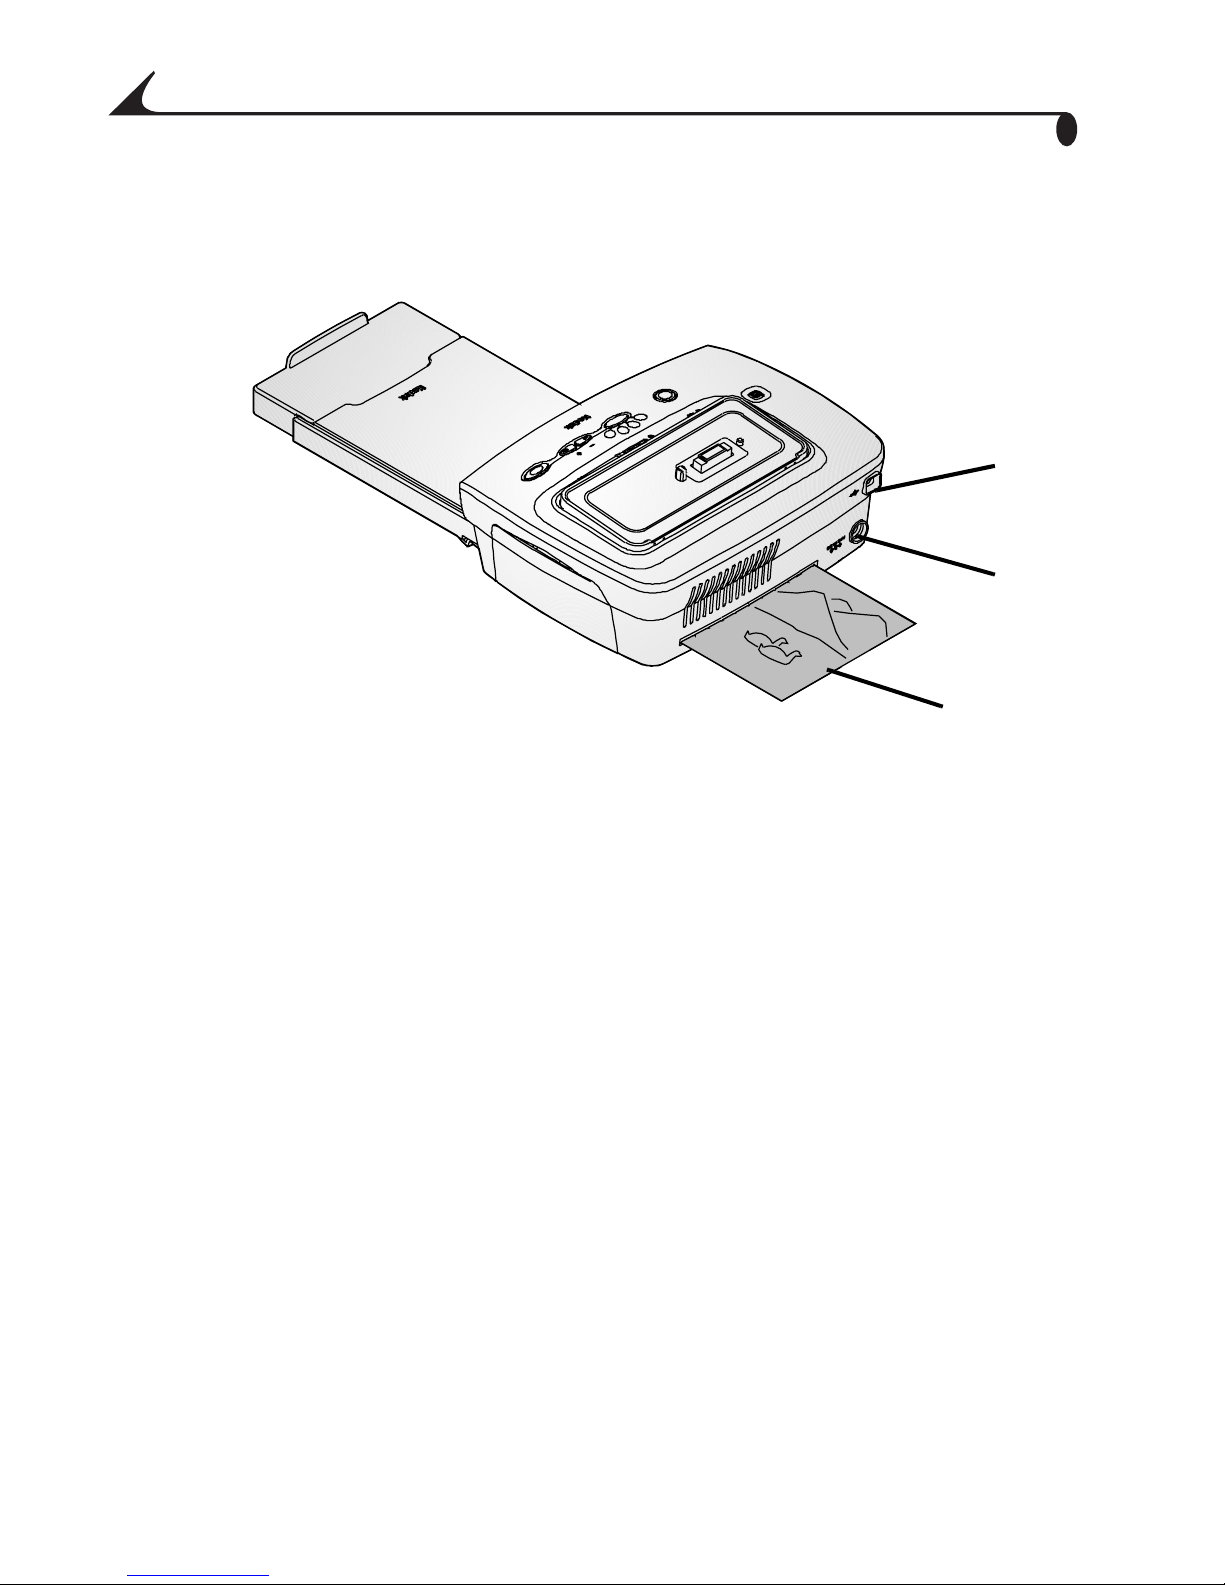
Back View
Product Overview
1
2
1 USB connector
2 DC power connector
3 Paper path
3
ii
Page 7
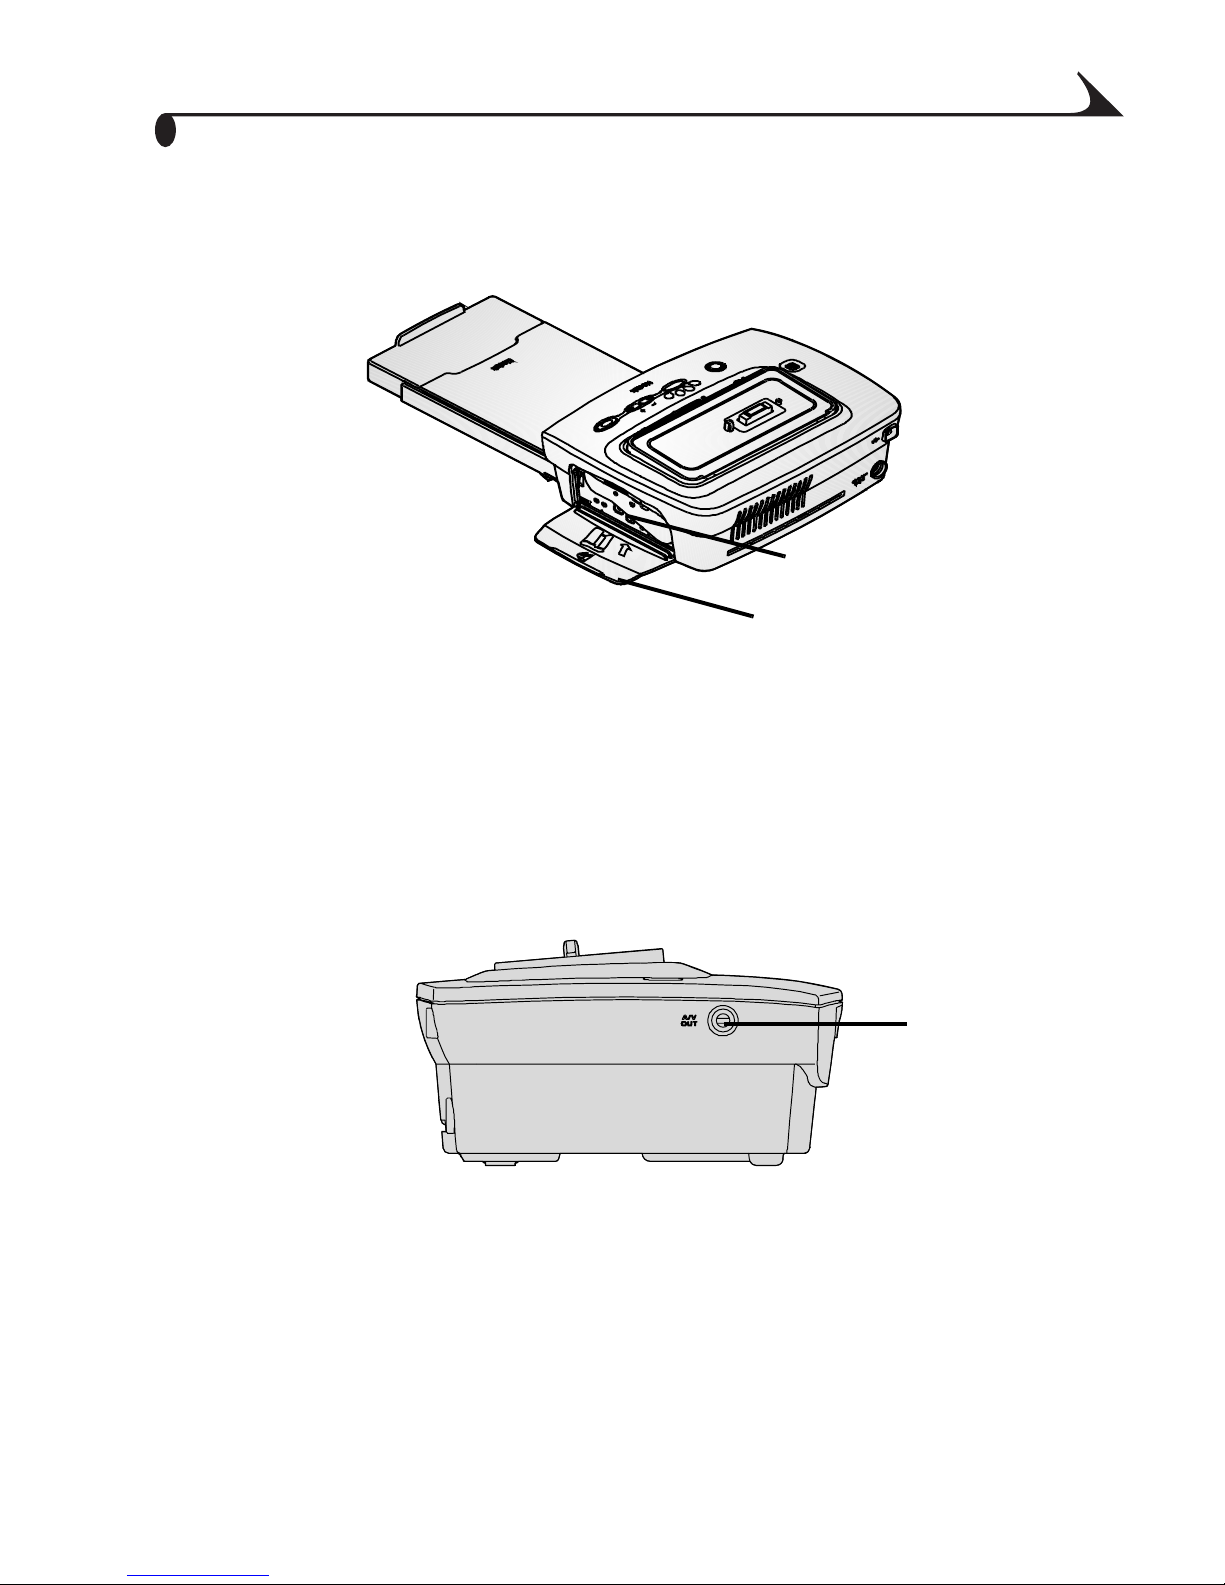
Side Views
Product Overview
1
2
1 Color cartri dge slot
2 Color cartridge door
1 A/V out connector
1
iii
Page 8

Page 9

Table of Contents
1 Getting Started with Your Printer Dock ......................1
Need This Guide in Larger Print?............................................1
What Can I Do With My Printer Dock? ..................................1
Printer Dock Package Contents............................................2
Finding a Location for the Printer Dock............................. 3
Installing the Camera Insert.................................................. 4
Connecting the Power .............................................................. 5
Loading the Color Cartridge...................................................6
Loading the Paper......................................................................7
Inserting the Paper Tray.........................................................8
Indicator Lights and Buttons............................................... 9
2 Getting Started with Your Camera ............................ 11
Loading the Camera Battery ................................................ 11
Setting Picture Quality ......................................................... 12
Docking and Charging the Camera......................................13
3 Printing Without a Computer .......................................15
Printing from Your Camera ...................................................15
Removing Perforated Tabs from Prints ............................16
Canceling Printing .................................................................... 17
4 Reviewing Pictures and Videos .....................................19
Running a Slide Show..............................................................19
Displaying Pictures and Videos on a Television..............20
v
Page 10

5 Using the Printer Dock with a Computer ................ 23
System Requirements...........................................................23
Installing the Software .........................................................24
Connecting to a Computer...................................................26
Transferring Pictures ............................................................ 27
Printing from a Computer ....................................................28
Removing Perforated Tabs from Prints ...........................30
Status Monitor—Windows only..........................................31
Canceling Printing ....................................................................31
Ordering Supplies....................................................................32
6 Care and Maintenance ................................................. 33
General Care.............................................................................33
Cleaning the Print Head........................................................34
Clearing a Paper Jam.............................................................35
Clearing a Color Cartridge Jam ......................................... 36
Cleaning the Printer Dock.................................................... 36
Traveling with your Printer Dock......................................... 37
7 Troubleshooting ...............................................................39
Printing Problems....................................................................39
Problems Transferring Pictures .........................................46
Printer Dock Status Lights................................................. 47
8 Getting Help ..................................................................... 51
Helpful Web Links...................................................................... 51
Help in this User’s Guide.......................................................51
vi
Page 11

Software Help............................................................................51
Telephone Customer Support ............................................. 52
9 Appendix ............................................................................ 55
Printer Dock Specifications ................................................ 55
Upgrading Your Software and Firmware .........................56
Accessories and Supplies.....................................................57
Safety Labels...........................................................................58
Regulatory Information.........................................................58
Disposal Information .............................................................59
vii
Page 12

viii
Page 13

1 Getting Started with Your
Printer Dock
Need This Guide in Larger Print?
For a large print version of this User’s Guide:
1 Go to the support page at www.kodak.com/go/printerdock.
2 Under Manuals/Guides, View PDF, click your language to open the User’s
Guide.
3 With the User’s Guide open on a Windows-based computer:
From the File menu, select Print.
In the Print window, select Fit to Page.
With the User’s Guide open on Mac OS X:
From the File menu, select Page Setup.
Change Scale to 200%.
4 Print as usual.
What Can I Do With My Printer Dock?
Use the Kodak EasyShare printer dock 6000 to make high-quality 4 x 6 in.
(102 x 152 mm) photos, with or without a computer.
The printer dock works with Kodak EasyShare CX/DX 6000 series and LS600
series digital cameras.
Without a computer, you can:
Print pictures directly from your camera
View a slide show on your television
1
Page 14

Chapter 1
Print from a slide show on your television
Charge your camera battery pack
With a computer, you can:
Transfer pictures from your camera to the computer
Organize, edit, and print pictures
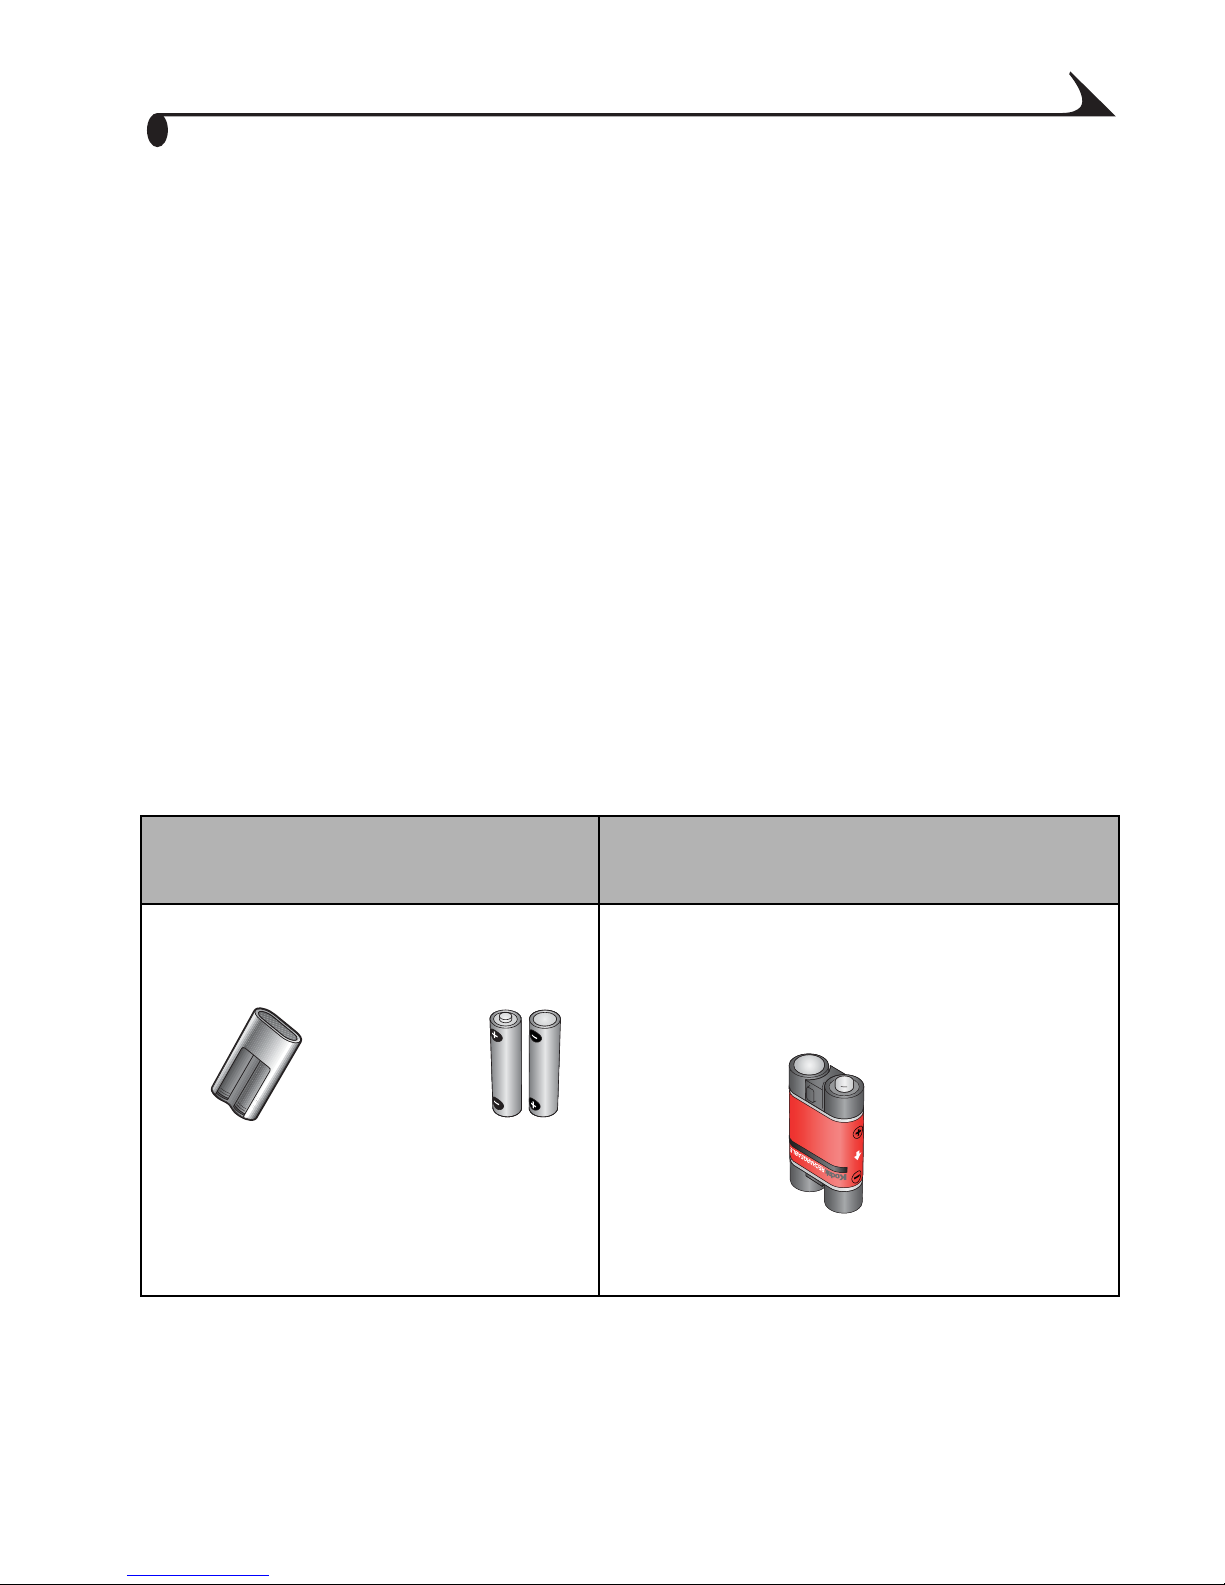
Printer Dock Package Contents
1
2
1 Printer dock
2 Universal insert (installed)
3 Paper tray
3
4 Kodak EasyShare Ni-MH rechargeable
5
4
6
7
battery pack *
5 AC power cord
6 AC power adapter
7 Sample color cartridge (10 pictures)
9
8
8 Sample photo paper pack(10 Pack)
9 Print head cleaning tool
10
10 Welcome kit; includes user’s guide**, quick
start guide, registration card, and Kodak
EasyShare printer dock 6000 software CD
To purchase accessories see a retail dealer of Kodak products or visit
www.kodak.com/go/printerdock.
*The EasyShare Ni-MH rechargeable battery pack is for use with selected
EasyShare digital cameras (see Loading the Camera Battery, page 11). If your
camera uses a EasyShare Li-Ion rechargeable battery, it will be included with
your camera.
**In some countries, the user’s guide is provided only on CD.
2
Page 15
Chapter 1
Finding a Location for the Printer Dock
Allow 5 inches (12.7 cm) clearance on all
sides of the printer dock.
Place the printer dock on a flat, clean, dust-
free surface, out of direct sunlight.
Make sure airflow around the top and back
is not blocked.
Do not place the printer dock on cloth or
carpeted surfaces.
Avoid areas where ventilation ducts, open
doors, or frequent passersby might expose
the printer dock and paper to high levels of
dust and debris. Airborne dirt particles can
cause image-quality problems.
3
Page 16

Chapter 1
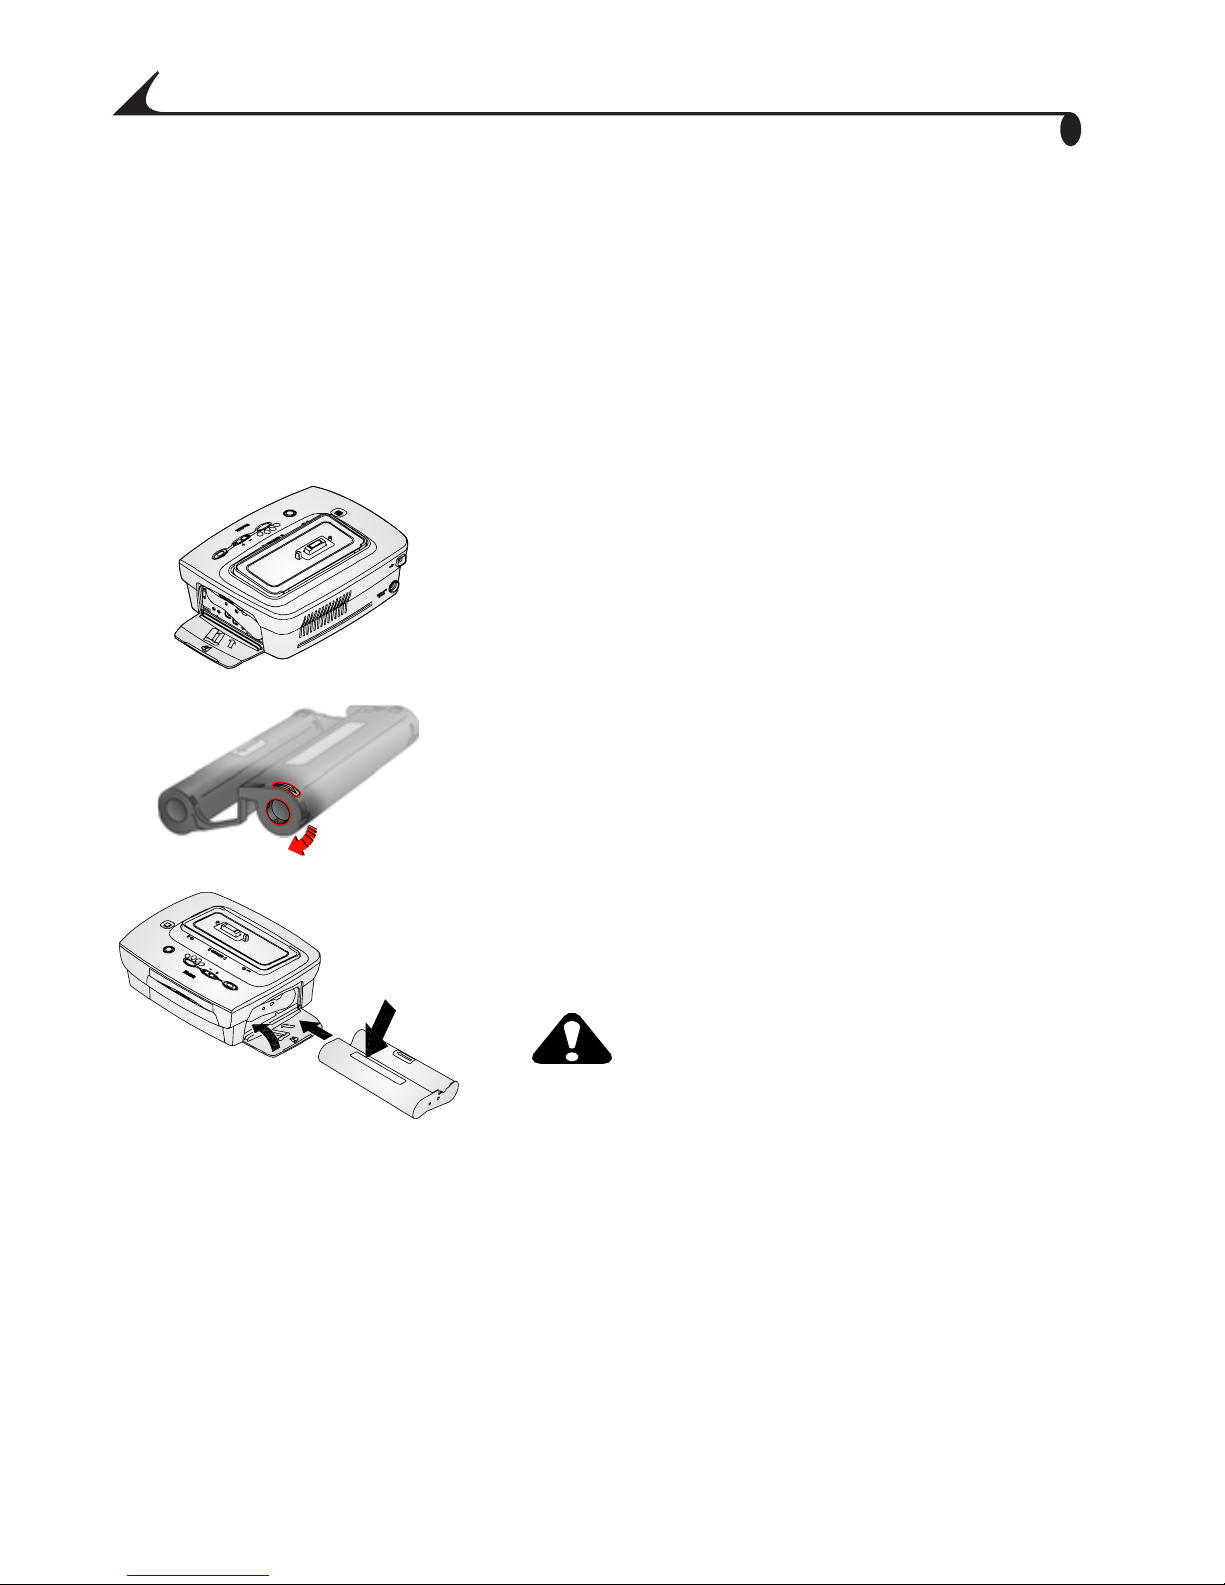
Installing the Camera Insert
The printer dock comes with a universal camera insert installed, which is used
to fit the camera to the printer dock. The universal insert is used with most
cameras.
If your camera comes with a custom insert, use that one instead of the
universal insert. Do not discard the universal insert.
1 To remove the universal insert:
a Push the insert towards the front of the
printer and lift up the back edge.
b Push the insert towards the rear of the
printer and lift out the front edge.
2 To Install the custom insert (included with
your camera) See your camera manual.
a Place the front tabs on the insert in the
slots in the printer dock.
b Fit the back of the insert down into the
dock and snap the insert into place.
NOTE: To order a custom insert for your camera, visit our Web site at
www.kodak.com/go/accessories.
4
Page 17

Chapter 1
Connecting the Power
CAUTION:
Use only the AC adapter and power cord included with the
printer dock. Other adapters and cords can damage your
camera, printer dock, or computer.
IMPORT ANT : R emove your camer a fr om the printer doc k when you
are connecting power.
1 Connect the AC power cord to the adapter,
then to the back of the printer dock.
2 Connect the AC power cord into a power
outlet.
Bottom View
NOTE: Your power cord may be different from
the one pictured. Use the plug that
accommodates your type of power
outlet.
3 Route the cable along the channels located
on the underside of the printer dock, so that
the cable does not interfere with the paper
path.
5
Page 18
Chapter 1
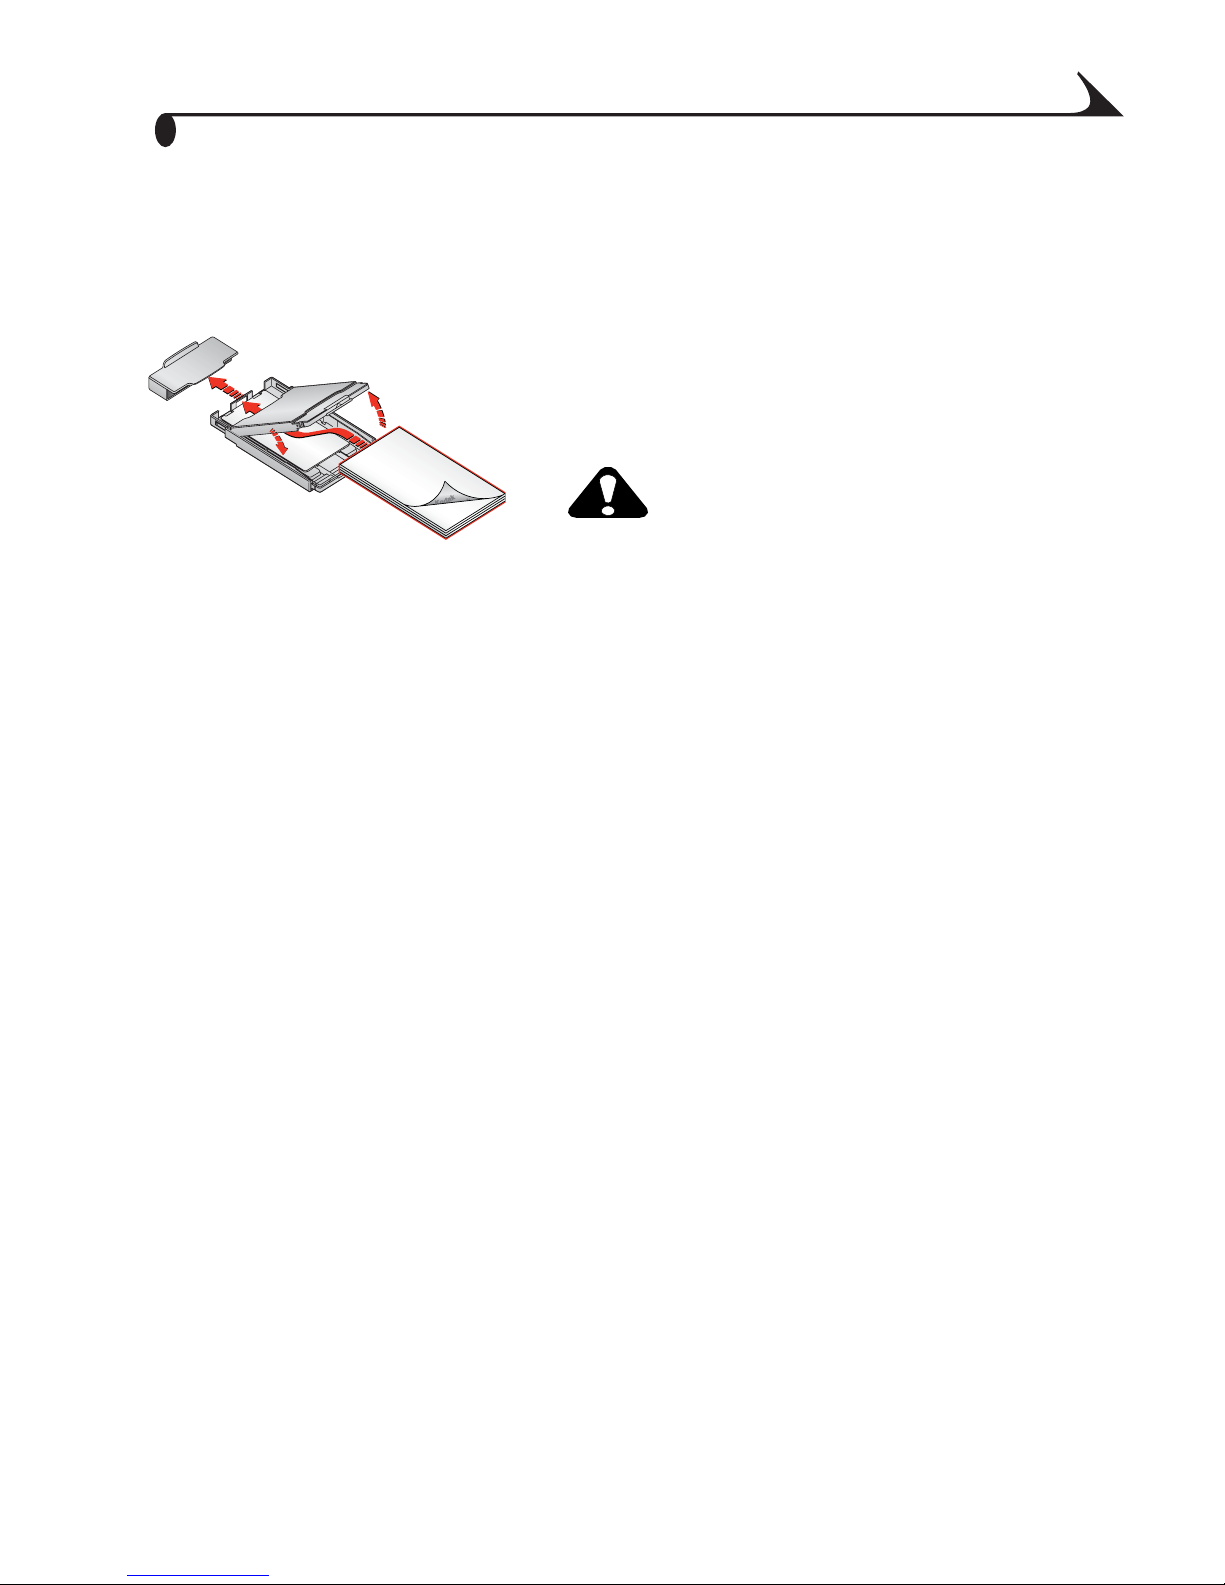
Loading the Color Cartridge
The color cartridge provides the dyes and a protective laminate coating for
making your photos.
A sample Kodak color cartridge & photo paper kit (10Pk) are included with
the printer dock. To purchase a color cartridge, photo paper kit, and other
accessories, see a retail dealer of Kodak products or visit www.kodak.com/go/
printerdock.
1 Open the color cartridge door on the side of
the printer dock.
2 Remove the slack in the color cartridge by
pushing in on the spool, then rotating the
cartridge spool in the direction of the
arrow.
3 Slide the color cartridge in, label side up
and with the arrow pointing toward the
printer dock, until it locks into place.
CAUTION:
Do not force the cartridge into
the slot.
4 Close the color cartridge door.
Handling and Storing the Color Cartridge
For best quality prints, store the cartridge in a location where the
temperature does not exceed 85 °F (30 °C).
To avoid fingerprints, handle the color cartridge by the spool ends.
Store the color cartridge away from direct sunlight.
6
Page 19
Chapter 1
Loading the Paper
IMPORTANT: To avoid getting fingerprints on the paper, handle
the paper by the edges or by the perforated tabs.
1
4
3
1 Remove the protective cap from the paper
tray. Do not discard.
2
2 Lift the paper tray cover.
CAUTION:
Use the upper limit line inside
the paper tray as a guide to
avoid overloading the paper.
Do not load more than 25
sheets. Do not load paper that
is missing perforated tabs. Use
only the Kodak color cartridge
& photo paper kit PH-40. Do
not use inkjet paper.
3 Load a pack of paper (20 sheets) into the
paper tray, with the Kodak logo side facing
down.
4 Close the paper tray cover.
7
Page 20
Chapter 1
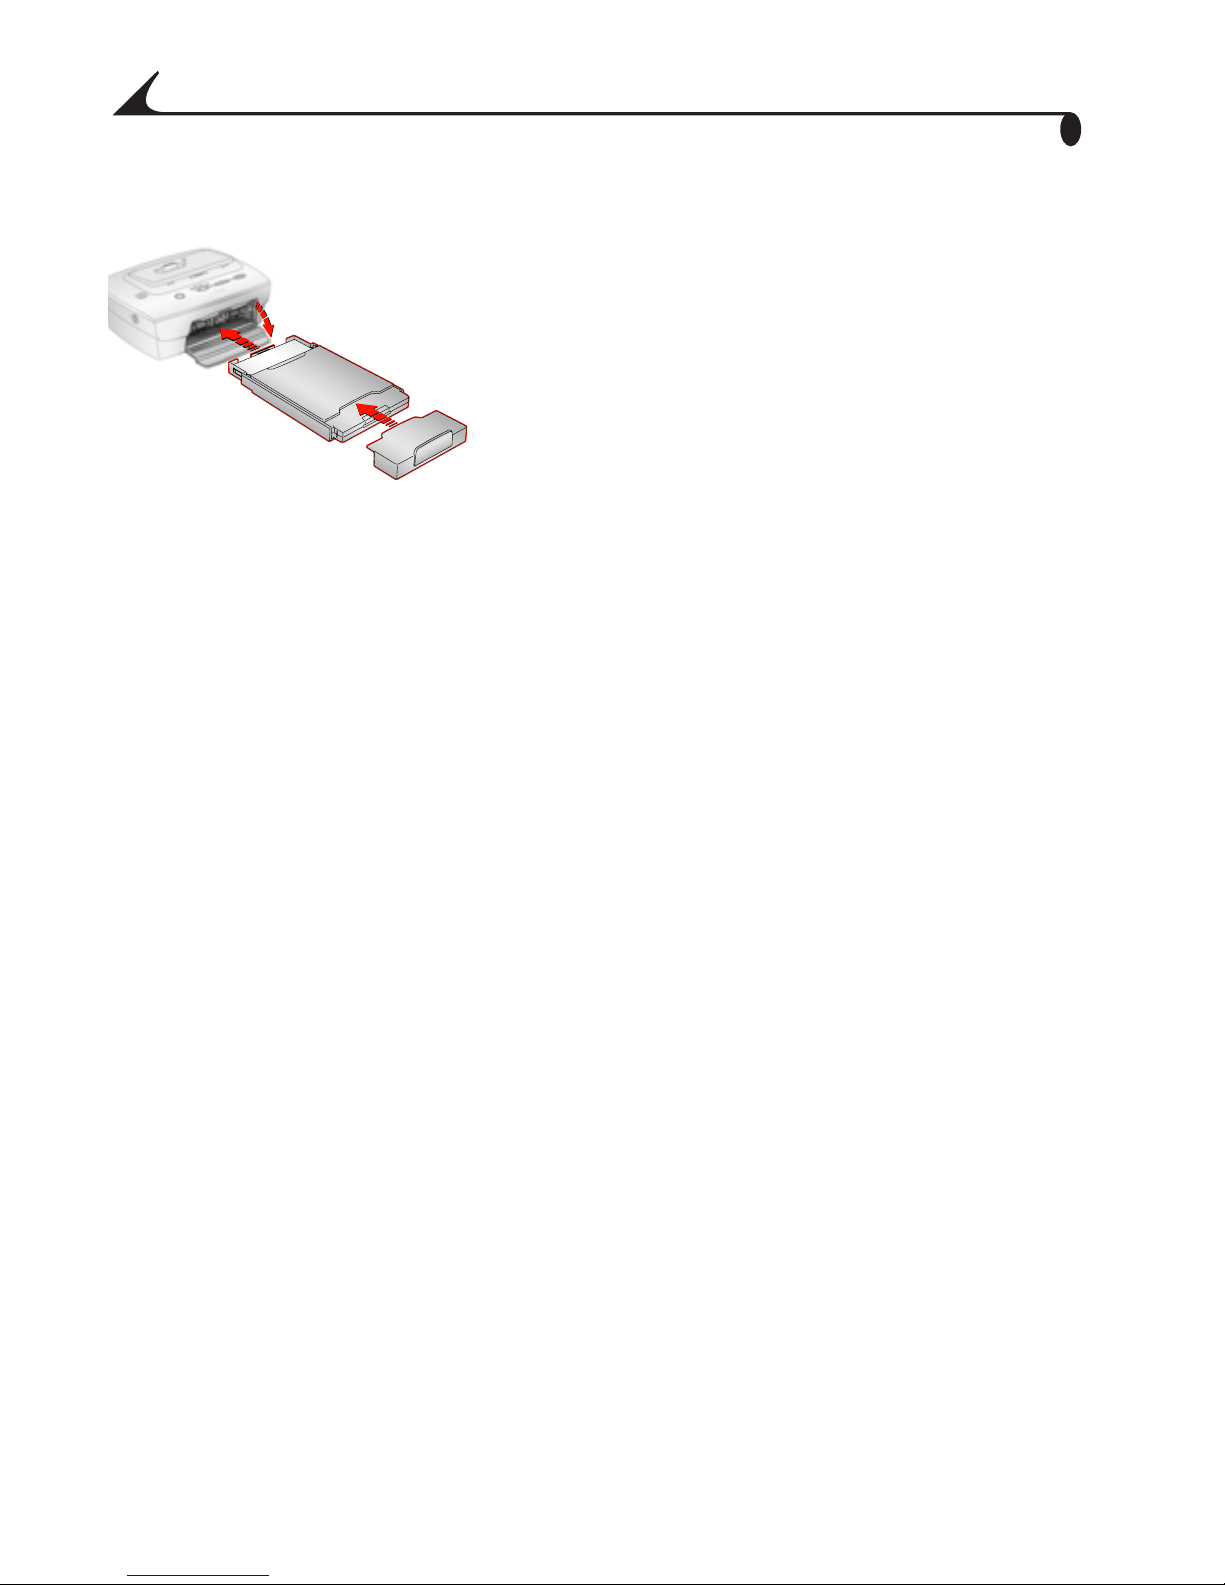
Inserting the Paper Tray
1 Open the paper tray door.
2 Slide the paper tray in until the tray locks
into place.
3 Replace the protective cap on the front of
the paper tray to catch the completed prints.
Handling and Storing the Paper
Do not touch the glossy side of the paper.
Store the paper away from direct sunlight.
8
Page 21
Chapter 1
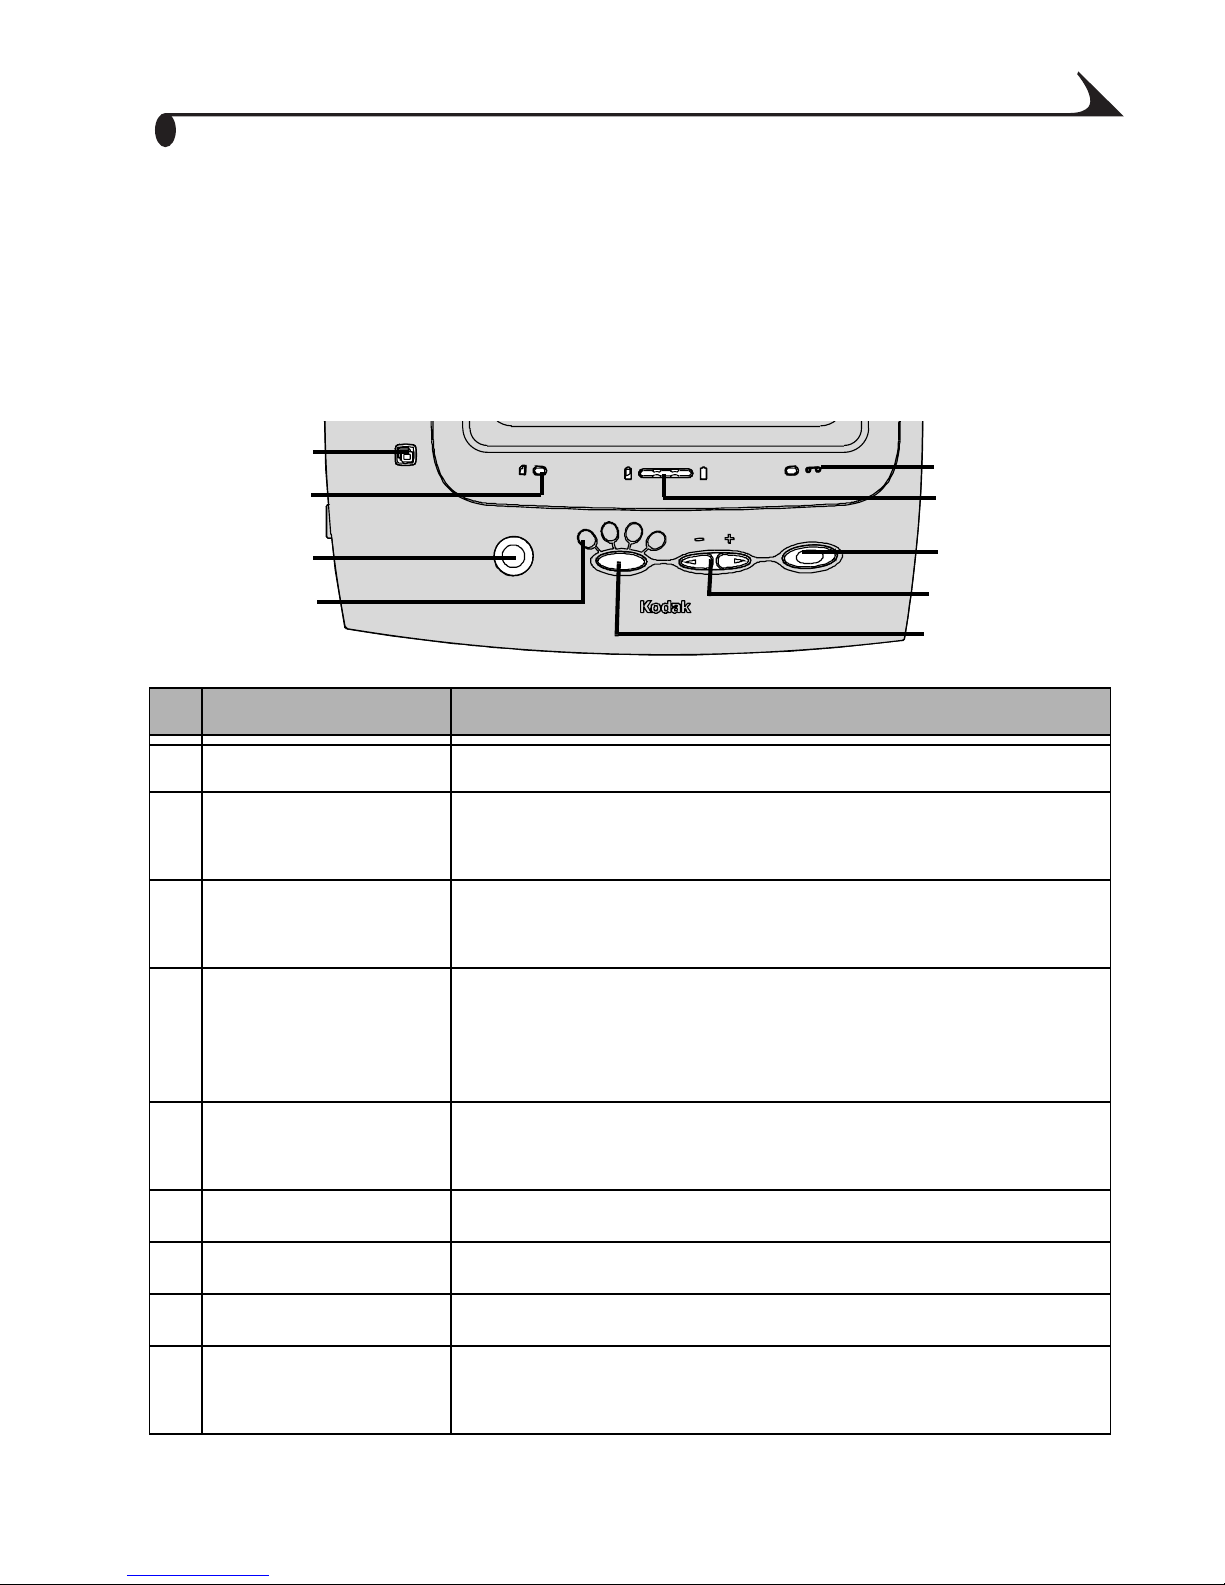
Indicator Lights and Buttons
The lights and buttons on the printer dock indicate the status of the printer
dock and the camera, as well as printing options based on the configuration of
your camera. For Troubleshooting information, see Printer Dock Status Lights,
page 47.
9
8
7
6
Lights/Buttons Function:
1 Cartridge light Indicates the color cartridge needs replacing.
2 Battery light Indicates battery charge levels, for rechargeable
batteries.
3 Print button Used to print pictures directly from your camera
without a computer.
4 Arrow keys Used to select the number of copies to be printed.
1
2
3
4
5
5 Print Mode button Used to select available print modes: Tagged,
6 Print Mode lights Indicates print selection: Tagged, Current, All, Index.
7 Transfer button Used to transfer pictures to a computer.
8 Paper light Indicates paper tray is empty or jammed.
9 Slide Show button Used to run a slide show on your television or
Used to advance through pictures in current mode,
tagged mode, print all mode, and slide show mode.
Current, All, Index.
camera display.
9
Page 22

Page 23
2 Getting Started with Your
Camera
Loading the Camera Battery
NOTE: The battery pack is not charged when you receive it. The battery needs
to be completely charged before using your camera.
Which Battery Do I Use?
IMPORTANT: The printer dock charges only the provided Kodak
EasyShare Ni-MH rechargeable battery pack and LiIon rechargeable battery (included with some
cameras). If you use any other batteries, rechargeable
or not, no charging takes place.
If your camera came with: Install this rechargeable in your
camera:
Non-rechargeable starter batteries:
OR
CRV3
Lithium, 3V
2, AA
1.5V
The Ni-MH rechargeable battery pack
that came with your printer dock.
Ni-MH rechargeable
11
Page 24
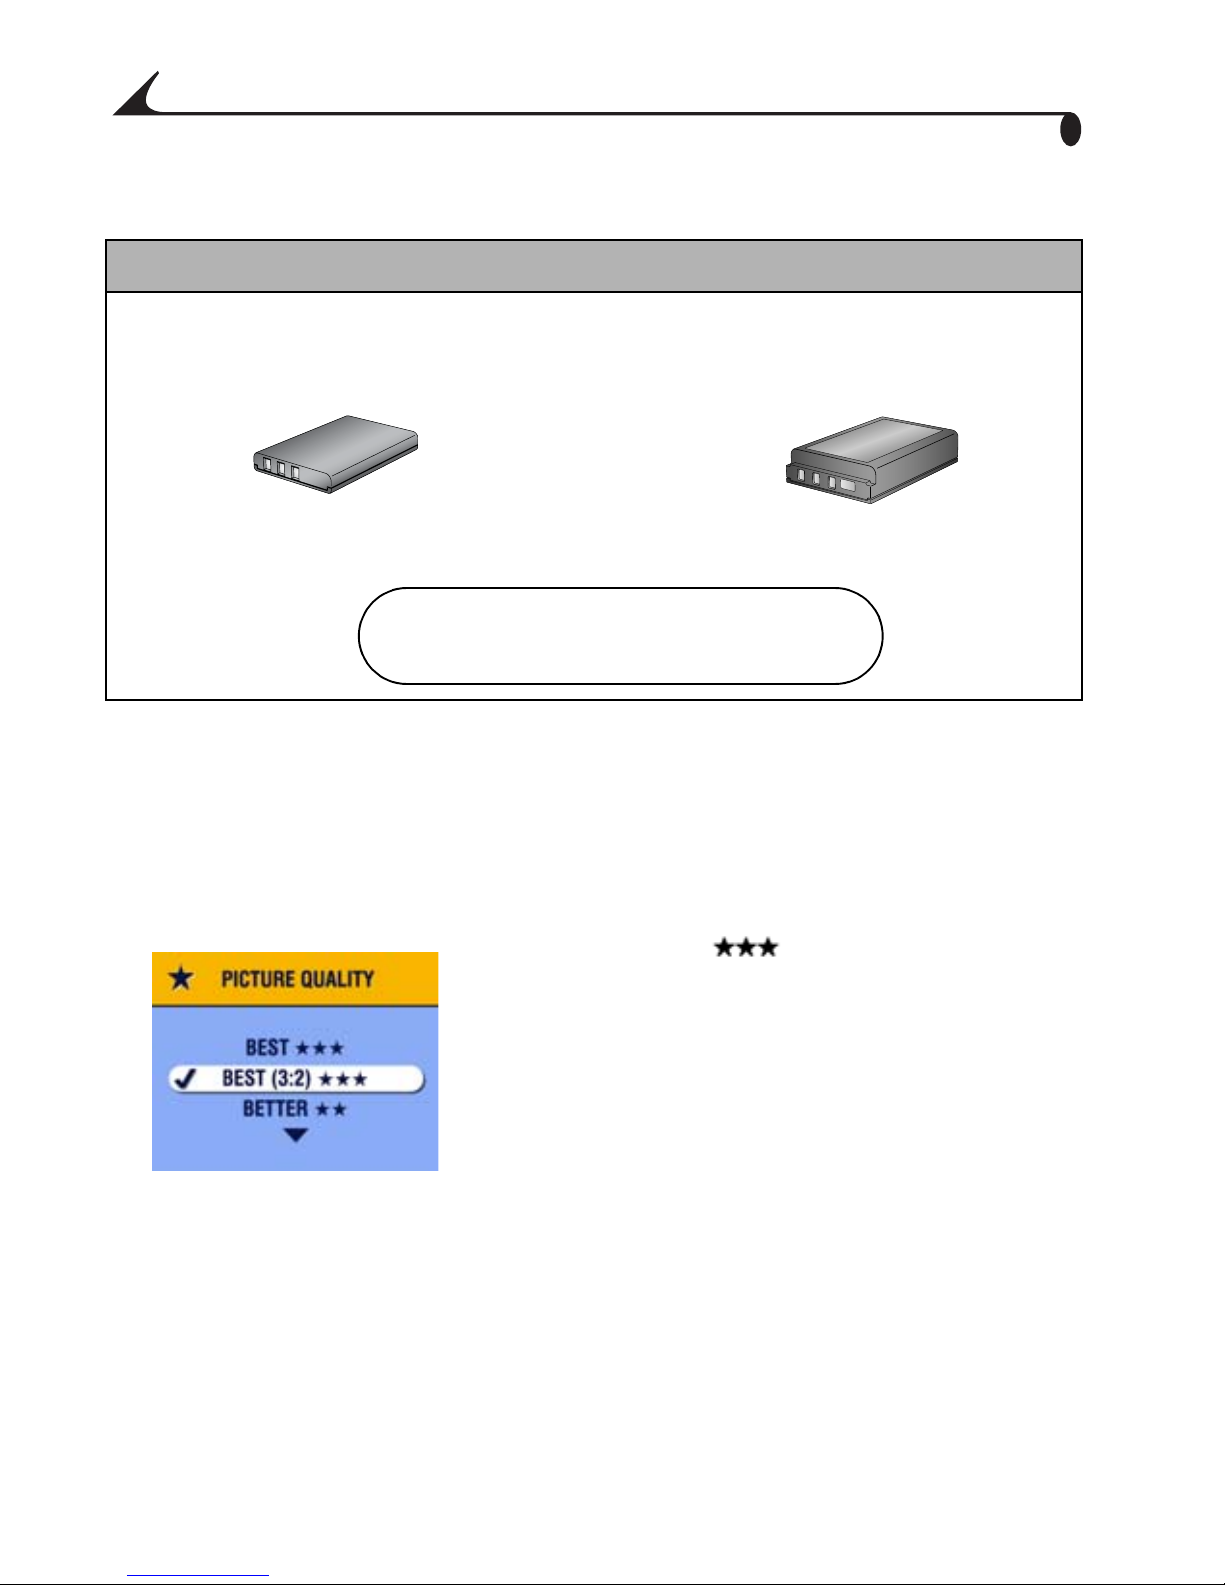
Chapter 2
If your camera came with a Li-Ion rechargeable battery:
Install the Li-Ion rechargeable battery in your camera.
OR
Li-Ion, 1050 mAh Li-Ion, 1700 mAh
Do not use the Ni-MH battery pack
that came with the printer dock.
Setting Picture Quality
Your printer dock uses Best (3:2) aspect ratio for printing pictures. To take
advantage of the aspect ratio and make sure your pictures are not cropped
when printed, set your camera’s Picture Quality as follows.
Best (3:2)
See your camera user’s guide for details on
Setting Picture Quality.
12
Page 25

Chapter 2
Docking and Charging the Camera
Docking your camera lets you make prints directly from the camera, transfer
pictures from the camera to the computer, and charge the camera battery.
1 Make sure the battery is installed in the camera. See your camera user’s
guide for details.
2 On the camera bottom, locate the
connector.
3 Place the camera in the printer dock and
push down to seat the connectors.
Charging begin when camera enters auto
power-off. See your camera user’s guide
for details.
The camera is now powered by the printer
dock instead of the camera battery.
The Kodak EasyShare Ni-MH rechargeable
battery pack and Li-Ion rechargeable
batteries take 2.5 to 3.0 hours to fully
charge.
After the battery is charged, leave the
camera in the printer dock to maintain the
full charge.
The three green charging lights monitor the
1
2
3
charging status (see Printer Dock Status
Lights, page 47).
1 Battery is less than half charged.
2 Battery is more than half charged.
3 Battery is fully charged.
13
Page 26

Page 27

3 Printing Without a Computer
Printing from Your Camera
1 Make sure the AC power cord is connected and the color cartridge and
paper are loaded (see Chapter 1, Getting Started with Your Printer Dock).
2 Take a picture with your camera.
3 Place the camera in the printer dock (see Chapter 2, Getting Started with
Your Camera).
4 On the printer dock, press the Print Mode
button to change print modes:
Tagged —prints pictures tagged for
print in your camera’s Share menu.
Current —prints the pictures displayed
on the camera screen. Use the arrow keys
on the printer dock to select a
picture.
All —prints all the pictures in your
camera internal memory and memory card.
Index —prints index prints of all the
pictures in your camera internal memory
and memory card.
15
Page 28

Chapter 3
Press the Print button.
5
The copy screen appears on your camera
when current mode is highlighted on your
printer dock.
Use the arrow keys on the
printer dock to select the number of
copies to print, then press the Print
button again.
Printing starts.The paper cycles four
4X
times during the printing process before
the finished print is ejected. Each of the
first three passes places a layer of color
(cyan, yellow, and magenta). The fourth
pass places a clear coating that protects
and preserves the image quality.
CAUTION:
Wait until printing is complete before removing prints, the
paper tray or the camera. Failure to do so can cause paper
misfeeds or jams and can damage the printer dock.
Removing Perforated Tabs from Prints
1 Fold the side tabs away from the print.
16
2 Remove each side tab and discard.
Page 29

Chapter 3
Canceling Printing
Press and hold the Print button for 2
seconds.
The print job is immediately canceled
and ejected into the paper tray. If you
cancel a print during the fourth pass
(clear coat), the print is ejected upon
4X
completion.
17
Page 30

Page 31

4 Reviewing Pictures and
Videos
To review pictures and videos stored on your camera:
1 Make sure the power is connected to the printer dock (see Connecting the
Power, page 5).
2 Place the Kodak EasyShare camera in the printer dock (see Docking and
Charging the Camera, page 13).
3 Press the arrow keys on the printer dock to scroll through the
pictures and videos on your camera.
Running a Slide Show
Use the Slide Show to automatically review your pictures and videos, and to
display pictures and videos on a television screen (see Displaying Pictures and
Videos on a Television, page 20).
1 Make sure the power is connected to the printer dock (see Connecting the
Power, page 5).
2 Place the Kodak EasyShare camera in the printer dock (see Docking and
Charging the Camera, page 13).
3 Press the Slide Show button .
The pictures and videos are displayed in the order in which you took
them. The slide show is finished when "The End" appears on the screen.
To manually navigate through pictures and videos during the slide
show, press the arrow keys on the printer dock.
To select images to print during the slide show, press the Print button
and select the number of copies to print.
19
Page 32

Chapter 4
IMPORTANT: If, after you press the Print button, you decide not to
print the picture , select 0 on the copies scre en before
resuming the slide show.
To resume the slide show, press the Print button again or press the
Slide Show button . If neither button is pressed, after a short time
the slide show resumes automatically.
To cancel the slide show, press and hold the Slide Show button
until "The End" appears on the screen.
When the slide show ends, all the pictures you selected are
printed.
Changing the Slide Show Display Interval
Use your Kodak EasyShare camera settings to change the length of time slides
are displayed in the slide show. See your camera user’s guide for details.
Running a Continuous Slide Show Loop
When you turn on Loop on your Kodak EasyShare camera, the slide show is
continuously repeated. See your camera user’s guide for details.
To cancel the slide show, press and hold the Slide Show button until
"The End" appears on the screen.
Displaying Pictures and Videos on a
Television
You can display pictures and videos on a television, computer monitor, or any
device equipped with a video input. (Images may not look as good on a
television as on a computer monitor or when printed.)
An Audio/Video cable is required to connect to a television. Use the A/V cable
that came with your Kodak EasyShare camera. To purchase one separately, see
a retail dealer of Kodak products or visit www.kodak.com/go/printerdock.
You need at least one still image or video on your camera to display the picture
on your television.
20
Page 33

Chapter 4
Make sure the power is connected to the
1
printer dock (see Connecting the Power,
page 5).
2 Connect the Audio/Video cable from the
printer dock A/V out connector to the
television video-in port.
3 Turn on your television, and change to a
video channel.
See your television user’s guide for details.
4 Place the Kodak EasyShare camera in the
printer dock (see Docking and Charging the
Camera, page 13).
5 Press the Slide Show button .
The camera screen turns off; the
television screen acts as the camera
display. If a picture does not appear on
your television screen see Chapter 7,
Troubleshooting.
To manually navigate through pictures
and videos during the slide show, press
the arrow keys on the printer
dock.
For more information, see Running a Slide
Show, page 19.
21
Page 34

Page 35

5 Using the Printer Dock with a
Computer
System Requirements
Windows-based Computer
Personal computer running Windows 98, 98SE, ME, 2000*, or XP*
233 MHz processor or greater
64 MB of RAM (128 MB for Windows XP)
200 MB of available hard disk space
CD-ROM drive
Built-in USB port
Color monitor with a minimum resolution of 800 x 600 pixels; High Color
(16-bit) or true color (24-bit) recommended
Internet access for ordering supplies online
Mac OS X
Power Mac G3, G4, G4 Cube; iMac Powerbook G3, G4; iBook
Mac OS 10.1.5* minimum
128 MB of available RAM
200 MB of available hard disk space
CD-ROM drive
Built-in USB port
Color monitor with a minimum resolution of 800 x 600 pixels; thousands
or millions of colors recommended
Internet access for ordering supplies online and for downloading software
* You must have Administrator rights to install software on these systems.
23
Page 36

Chapter 5
Installing the Software
CAUTION:
Do not install the Kodak
EasyShare printer dock 6000
software with the printer dock
connected to the computer. It
may cause the software to load
incorrectly. If the printer dock
is connected, disconnect it
before you proceed.
NOTE: For more information on installing the software, see the ReadMe file on
the Kodak EasyShare printer dock 6000 software CD.
On a Windows-based computer:
1 Close all software applications that are open on your computer.
2 Place the Kodak EasyShare printer dock 6000 software CD into the CD
drive.
3 Load the software:
a If an install window does not appear, select Run from the Start menu
and type: d:\setup.exe (if d is the drive letter that contains the CD).
b Follow the on-screen instructions. Use the installer menus to select a
language. If prompted, restart the computer when the installation is
complete.
The Kodak EasyShare printer dock 6000 is added to your computer.
On Mac OS X:
1 Close all software applications that are open on your computer.
2 Place the Kodak EasyShare printer dock 6000 software CD into the CD
drive.
24
Page 37

Chapter 5
Load the software:
3
a Double-click the CD icon on the desktop, then double-click the
Kodak PD6000 Installer icon.
b Follow the on-screen instructions. Use the installer menus to select a
language. When prompted, restart the computer.
c Open the finder window and click the Applications button. If you don’t
see the Applications button, access the Applications folder on your
operating drive.
d Open the Utilities folder, then double-click Print Center.
e In the Printer List window, click the Add Printer button.
f Select Kodak PD6000, then click Add.
The Kodak EasyShare printer dock 6000 is added to your computer.
Uninstalling
On a Windows-based computer:
1 From the Start menu, select Settings, then select Control Panel.
2 Double-click Add/Remove Programs.
3 Select the Kodak PD6000 program, then click Remove. Follow the
on-screen instructions. If prompted, restart the computer.
4 From the Start menu, select Settings, then select Printers.
5 Right-click the Kodak PD6000 printer icon, then select Delete.
6 Follow the on-screen instructions. For Windows 2000 or Windows XP,
continue to the next step. Otherwise stop here.
7 From the Start menu, select Settings, then select Printers.
8 Select Server Properties from the File menu, then click the Drivers tab.
9 Select Kodak PD6000, then click Remove.
10 Click OK when complete.
25
Page 38

Chapter 5
On Mac OS X:
1 Double-click the operating drive for your system.
2 Select Library, then select Printers.
3 Open the Kodak folder, then double-click Kodak PD6000 Uninstaller.
Follow the on-screen instructions.
Connecting to a Computer
A USB cable is required to connect to a computer. Use the USB cable that came
with your Kodak EasyShare camera. To purchase one separately, see a retail
dealer of Kodak products or visit www.kodak.com/go/printerdock.
CAUTION:
Make sure your camera is NOT in the printer dock when
you are connecting to the computer.
1 Make sure the power is connected to the printer dock (see Connecting the
Power, page 5), and the Kodak EasyShare printer dock 6000 software is
installed on the computer (see Installing the Software, page 24).
2 Plug the labeled end of a USB cable into
the labeled USB port on your computer. See
your computer documentation for details.
3 Plug the other end of the USB cable into the
square USB connector on the back of the
printer dock.
4 Route the cable through the channel located
on the underside of the printer dock, so that
the cable does not interfere with the paper
path.
26
Page 39

Chapter 5
Transferring Pictures
You can transfer pictures directly from your Kodak EasyShare camera to your
computer (see your camera user’s guide), or with the camera docked, you can
transfer pictures through the printer dock.
1 Make sure the Kodak EasyShare printer dock 6000 software is installed
(see Installing the Software, page 24) and the printer dock is connected to
your computer (see Connecting to a Computer, page 26).
2 Place the camera in the printer dock (see Docking and Charging the
Camera, page 13).
3 Press the Transfer button on the printer dock.
A new drive appears for the printer dock, and the Kodak EasyShare
software opens on your computer (if it is installed).
4 Use the Kodak EasyShare software to transfer pictures from the printer
dock to your computer.
The printer dock Transfer light blinks green while the pictures are
being transferred. Charging is suspended during transfer.
See your camera quick start guide or the Kodak EasyShare software Help
for information on installing and using the Kodak EasyShare software.
NOTE: If the Kodak EasyShare software is not installed, you can transfer from
the printer dock to your computer by copying pictures from the newly
established printer dock drive to your computer hard drive. See your
computer documentation for details.
27
Page 40

Chapter 5
Printing from a Computer
We recommend using the Kodak EasyShare software included with your Kodak
EasyShare camera for printing. This software lets you to take advantage of a
wide range of features, including full color enhancement, red eye reduction,
picture organization, and much more.
See your camera quick start guide or the Kodak EasyShare software Help for
information on installing and using the Kodak EasyShare software.
If there are no pictures on your computer, use the printer dock to transfer
pictures from your camera before printing (see Transferring Pictures,
page 27).
Printing with Kodak EasyShare software
1 Make sure the Kodak EasyShare printer dock 6000 software is installed
(see Installing the Software, page 24) and the printer dock is connected to
your computer (see Connecting to a Computer, page 26).
2 For borderless 4" x 6" prints, set the Kodak EasyShare software settings as
follows:
On a Windows-based computer:
Paper size—4.0 x 6.0 in. (102 x 152 mm)
Paper type—Other or Kodak Photo Paper PH-10/40
Print layout—Full size
On Mac OS X:
Format for—Kodak PD6000
Paper size—Photo Paper
Print layout—Full size
Picture in print size—Fill
Turn on One-Touch to Better Pictures feature—No
3 Change any other settings as needed.
4 On the Print at Home screen, click Print.
28
Page 41

Chapter 5
Printing Using Other Applications
1 Make sure the Kodak EasyShare printer dock 6000 software is installed
(see Installing the Software, page 24), and the printer dock is connected to
your computer (see Connecting to a Computer, page 26).
2 Open the pictures you wish to print in the application from which you want
to print.
3 Access printer settings by selecting Print or Page Setup from the File menu
(depending on your application and platform).
4 Make sure that Kodak PD6000 is selected as the printer and that paper size
in Windows is set to 4" x 6" (102 x 152 mm). On Mac OS X, make sure
paper size is set to Photo Paper.
5 Change any other settings if needed, then click OK or Print. Depending on
your application and platform, you may first need to return to the main
menu and select Print from the File menu.
Kodak Color Mode
The Kodak EasyShare printer dock 6000 features two Kodak color mode
options:
Natural—to get clear prints with no adjustment in color.
Enhanced—to get richer, more vivid colors from your pictures (default).
To change the Kodak color mode:
On Windows 2000/XP:
1 From the Start menu, select Settings, then select Printers.
2 Right-click the Kodak PD6000 printer icon, then select Printing
Preferences.
3 Click the Advanced button.
4 Under Document Options, select Printer Features, then select Kodak Color
Mode.
5 Select Natural or Enhanced, then click OK.
6 Click OK when complete.
29
Page 42

Chapter 5
On Windows 98/ME:
1 From the Start menu, select Settings, then select Printers.
2 Right-click the Kodak PD6000 printer icon, then select Properties.
3 Click the Printer Options tab.
4 Under Color Control, select Natural or Enhanced.
5 Click OK when complete.
On Mac OS X:
Make sure the Kodak PD6000 is selected as the current printer.
1 From an application File menu, select Print.
2 Use to scroll through the available panels and select Color.
3 Select Kodak Color.
4 Choose Natural or Enhanced.
5 Click OK when complete.
Removing Perforated Tabs from Prints
1 Fold the side tabs away from the print.
2 Remove each side tab and discard.
30
Page 43

Chapter 5
Status Monitor—Windows only
The Kodak EasyShare printer dock 6000 status monitor icon appears in
the Windows taskbar in the lower-right corner of your computer screen. The
status monitor provides information about the status of the printer and the
current print job and lets you order supplies and accessories online.
Right-click the status monitor icon to select one of the following:
Open Status Monitor—displays the current printer status and job progress.
You can also cancel the current print job (see Canceling Printing, page 31)
and order supplies online.
Remove Icon from Taskbar—permanently removes the status monitor icon
from the Windows taskbar (can be re-added by re-installing the software).
About Kodak Status Monitor—displays the version of the Kodak EasyShare
printer dock 6000 status monitor.
Exit—temporarily disables the status monitor. The icon will reappear upon
Windows startup.
Canceling Printing
On a Windows-based computer:
1 From the Start menu, select Settings, then select Printers.
2 Double-click the Kodak PD6000 printer icon.
3 Select the print job you want to cancel.
4 Select Document, then select Cancel.
NOTE: You may cancel the current print job using the status monitor (see
Status Monitor—Windows only).
On Mac OS X:
1 In Print Center, double-click the Kodak PD6000 printer icon.
2 Click the job you want to cancel, then select Delete.
31
Page 44

Chapter 5
Ordering Supplies
For a full range of Kodak accessories and supplies, see your retailer of Kodak
products or visit www.kodak.com/go/printerdock.
In addition, you can order printer dock supplies online using the Kodak
EasyShare printer dock 6000 software.
On a Windows-based computer:
1 From the Start menu, select Settings, then select Printers.
2 Right-click the Kodak PD6000 printer icon, then select Printing
Preferences (in Windows 2000/XP) or Properties (in Windows 98/ME).
3 Click the About tab.
4 Click Order Supplies.
5 Click OK when complete.
NOTE: You can also order supplies by double-clicking the status monitor icon
in the taskbar (see Status Monitor—Windows only, page 31).
On Mac OS X:
1 From an application File menu, select Print.
2 Use to scroll through the available panels and select Printer
Support.
3 Click Order Supplies.
32
Page 45

6 Care and Maintenance
General Care
Keep the printer dock, accessories and
supplies away from high temperatures,
humidity and direct sunlight for extended
periods of time.
Support the printer dock and tray by placing
it on a flat, level surface. Do not block the
air vents.
Avoid blocking the back of the printer dock
and paper tray exit.
Keep power and USB cables away from the
paper path.
Keep the printer dock clean.
Keep the surrounding area vacuumed and
litter-free.
Protect the printer dock from tobacco
smoke, dust, sand, and liquid spills.
Avoid placing objects on the printer dock.
33
Page 46

Chapter 6
Cleaning the Print Head
Clean the print head when lines, streaks, or scratches appear on the prints. The
head cleaning tool can be used several times, but should be replaced when the
cleaning pad appears soiled or is no longer effective. Replacement cleaning
tools are available at www.kodak.com/go/printerdock.
Use the print head cleaning tool to clean the print head.
1 Disconnect the power cord.
2 Open the color cartridge door.
3 Push up on the green lever and remove the
color cartridge.
3-4
x
4 Insert the cleaning tool, white pad facing
up, into the color cartridge slot.
IMPORTANT: Do not touch or remove the
white cleaning pad on the
cleaning tool. The cleaning
tool can only be inserted one
way. Do not force it into the
slot.
5 Reinsert and remove the tool at least 3 to 4
times.
6 Reinstall the color cartridge (see Loading
the Color Cartridge, page 6).
7 Close the color cartridge door.
34
Page 47

Chapter 6
Clearing a Paper Jam
If a paper jam occurs, the Paper light
flashes red.(see Indicator Lights and
Buttons, page 9).
1 Remove the paper tray.
2 Disconnect the power cord, wait 5 seconds,
then plug it back in.
3 The printer will reset and eject the paper. if
CAUTION:
Do not use force when
removing the paper jam.
the paper does not eject, try to remove it
manually.
4 Replace the paper tray.
5 Press the Print button on the printer to
resume printing.
35
Page 48

Chapter 6
Clearing a Color Cartridge Jam
If a color cartridge jam occurs the cartridge
light flashes red.
1 Open the color cartridge door.
2 Push up on the green lever and remove the
color cartridge.
3 Remove the slack in the color cartridge by
pushing in on the spool, then rotating the
cartridge spool in the direction of the
arrow.
4 Reinstall the color cartridge (see Loading
the Color Cartridge, page 6).
Cleaning the Printer Dock
CAUTION:
Do not use abrasives or harsh chemicals to clean any part
of the printer dock. Disconnect the power before cleaning.
Wipe the printer dock and the paper tray with a dry, lint-free cloth.
36
Page 49

Chapter 6
Traveling with your Printer Dock
IMPORTANT: Protect the printer, accessories and supplies from high
temperatures when transporting.
1 Disconnect the power cord and remove all
cables.
2 Remove the paper tray from the printer
dock, and close the door.
3 Protect the paper by removing the
protective cap from the front of the paper
tray and placing it on the back of the paper
tray.
4 Repack the printer dock in the original
packing box, or use the optional printer
dock travel bag. See a retail dealer of Kodak
products or visit
www.kodak.com/go/printerdock.
37
Page 50

Page 51

7 Troubleshooting
This chapter contains help for your printer dock.
For updates to Troubleshooting information, visit our Web site at
www.kodak.com/go/printerdock.
Printing Problems
Printing
Problem Cause Action/Solution
Paper misfeeds
or pulls multiple
sheets through
the printer.
Paper stops
during mid-print,
Paper or
Cartridge lights
flash.
Paper stops
traveling before
print is
completed.
Too much paper is
loaded in the paper
tray, or the paper is
improperly loaded.
The paper tray is
improperly installed.
The paper is jammed. Clear the paper jam (page 35).
The color cartridge is
jammed.
The removable tabs
may be missing,
causing the paper to
misfeed.
Reload the paper (page 7), using
no more than 25 sheets.
Re-install the paper tray (page 7).
Clear the cartridge jam (page 36).
Remove the paper tray and make
sure removable tabs have not been
detached. Reload with new paper if
necessary (page 7).
39
Page 52

Chapter 7
Printing
Problem Cause Action/Solution
Print is scratched
along the length
of the print.
The print head may
need cleaning.
The paper may be
dusty or dirty.
Print is blank or
light
The color cartridge is
improperly installed.
The color cartridge is
empty.
The paper is loaded
upside down.
The wrong paper is
loaded.
Print is smudged. There were
Clean the print head (page 34).
Remove dirty paper.
Re-install the color cartridge
(page 6).
Install a new color cartridge
(page 6).
Reload the paper with the print side
facing up and Kodak logo facing
down.(page 7).
Use only Kodak color cartridge &
photo paper kit PH-40.
Handle paper by the edges or by the
fingerprints on the
print side prior to
printing.
Print is spotted The paper may be
dusty or dirty.
removable tabs.
Remove dirty paper.
40
Page 53

Chapter 7
Printing
Problem Cause Action/Solution
Print is dark. The captured image is
too dark.
High print head
temperature.
Cooling vents may be
blocked or dirty.
Pictures are
cropped.
Your camera is set at
(4:3) aspect ratio.
Try re-taking the picture under
better lighting conditions or change
the exposure compensation in your
camera.
Edit the picture using the computer
and Kodak EasyShare software.
Make sure the printer dock is not
placed in direct sunlight or is not
operating in a high-temperature
environment. Let the printer dock
cool down for 5 minutes.
Check that the cooling vents are not
blocked or dirty (page 3).
Set your camera to Best (3:2)
picture quality.
Adjust cropped pictures using the
computer and Kodak EasyShare
software.
41
Page 54

Chapter 7
Printing
Problem Cause Action/Solution
Nothing happens
when you try to
print.
...from the
The AC power cord is
not securely
connected.
The paper tray is
improperly installed.
The paper tray is
empty.
The color cartridge is
improperly installed.
The color cartridge is
depleted.
The camera is not in
Check the connections (page 5)
and try again.
Remove the paper tray, check that
paper is properly loaded, and re-
install (page 7).
Check that the paper light appears,
then load paper (page 7).
Re-install the color cartridge
(page 6).
Check that the color cartridge light
appears, then install a new color
cartridge (page 6).
Replace the camera on the printer
camera.
the printer dock or is
improperly seated.
There are no pictures
in the camera.
dock (page 13) and try again.
Check the camera’s internal
memory and memory card.
42
Page 55

Chapter 7
Printing
Problem Cause Action/Solution
...from the
computer.
The USB cable is not
securely connected.
The print job is paused
or held in the print
queue.
The battery monitor or
similar software runs
constantly.
The computer is
transferring images.
The computer is
unable to detect the
printer dock or the
camera.
Check the connections (page 26)
and try again.
Access the printer menu for your
system. Make sure no check mark
appears next to the Pause Printing
option.
Close that software before starting
the Kodak software.
Wait a few seconds, then try to print
from the computer.
1 Finish the current print job (if
in standalone mode).
2 End slide show (if it is
running).
3 Check the connections
(page 26) and try again.
43
Page 56

Chapter 7
Printing
Problem Cause Action/Solution
...from the
computer
(continued).
There are too many
applications running
on your computer.
Some Advanced Power
Management utilities
on laptops turn off
ports to save battery
life.
The software is not
fully or properly
installed on the
computer.
1 Disconnect the USB cable from
the printer dock (page 26).
2 Close all software applications.
3 Reconnect the USB cable
(page 26) to the printer dock.
See the power management section
of your laptop user’s guide to
disable this feature.
1 Disconnect the USB cable from
the printer dock.
2 Close all software applications.
3 Uninstall the software
(page 24).
Computer is not
running efficiently.
4 Re-install the Kodak EasyShare
printer dock 6000 software
(page 24).
5 Reconnect the USB cable to the
printer dock (page 26).
Consider upgrading your computer
to meet the recommended system
requirements (page 23).
44
Page 57

Chapter 7
Printing
Problem Cause Action/Solution
Printing is slow. High print head
temperature.
Cooling vents may be
blocked or dirty
Picture file size is
large.
There are too many
applications running
on your computer.
Make sure the printer dock is not
placed in direct sunlight or is not
operating in a high-temperature
environment. Let the printer dock
cool down for 5 minutes.
Check that the cooling vents are not
blocked or dirty (page 3).
Check your computer configuration
for memory.
1 Disconnect the USB cable from
the printer dock (page 26).
2 Close all software applications.
3 Reconnect the USB cable
(page 26) to the printer dock.
Computer is not
running efficiently.
Consider upgrading your computer
to meet the recommended system
requirements (page 23).
45
Page 58

Chapter 7
Problems Transferring Pictures
Transferring Pictures
Problem Cause Action/Solution
Cannot transfer
pictures to the
computer.
The Transfer button was
not pressed.
The AC power adapter or
USB cable is not securely
connected.
The camera was
removed from the
printer dock during
picture transfer.
There are too many
applications running on
your computer.
The software is not fully
or correctly installed on
the computer.
Press the Transfer button.
Check the connections
(page 26) and try again.
Replace the camera on the
printer dock (page 13) and
try again.
Close all software
applications and try again.
1 Disconnect the USB cable
from the printer dock.
2 Close all software
46
applications.
3 Uninstall the software:
(page 24).
4 Re-install the Kodak
EasyShare software
(page 24).
5 Reconnect the USB cable
to the printer dock
(page 26).
Page 59

Chapter 7
Printer Dock Status Lights
Cartridge Light
Light Status Cause Action/Solution
Light glows steady
red
Light blinks red The color cartridge is
Light off The color cartridge is
Paper Light
Light Status Cause Action/Solution
Light glows steady
red
The color cartridge is
depleted.
improperly installed.
There is a color cartridge
jam.
properly installed.
The paper tray is empty. Load paper (page 7).
Install a new color
cartridge (page 6).
Remove and re-install
the color cartridge
(page 6).
Install a new color
cartridge (page 6).
None required.
Light blinks red The paper tray is improperly
installed.
There is a paper jam. Clear the paper jam
Light off The paper tray is properly
installed and has an ample
supply of paper.
Remove the paper tray,
check that paper is
properly loaded, and reinstall (page 7).
(page 35).
None required.
47
Page 60

Chapter 7
Battery Charging Lights
Light Status Cause Action/Solution
No lights Camera is not properly seated in
the printer dock.
Camera is turned on. Turn off the camera.
Correct battery is not installed. Install a Kodak EasyShare
Green lights
Battery is less than half charged. Leave camera on dock to
Battery is more than half charged.
Battery is fully charged. Leave camera on the dock
Place the camera in the
printer dock (page 13) or
readjust the camera
placement.
Ni-MH rechargeable battery
pack or Kodak EasyShare
Li-Ion rechargeable battery
(page 11).
continue charging.
One green
light
Red light
(blinking)
to maintain charge.
Camera was placed in camera
dock.
None; dock is checking the
charge status of the battery.
Battery is not properly installed. Re-install the battery.
Battery or connector pin is
Check for damage.
damaged.
Camera and battery have been
exposed to extreme
temperatures.
Slowly return the camera
and battery to room
temperature.
48
Page 61

Chapter 7
Print Mode Lights
Light Status Cause Action/Solution
One light glows
steady green
All lights are off There are no pictures in the
The respective print option is
available and selected.
camera.
The camera is in (auto
power-off).
None required.
To change modes, push
the Print mode button
repeatedly (page 9).
Press the Print button or
any button.
Print Light
Light Status Cause Action/Solution
Light glows steady
green
The printer dock is ready for
printing.
None required.
Light blinks green The printer dock is printing.
Transfer Light
Light Status Cause Action/Solution
Light glows steady
green
The printer dock is ready for
transferring pictures.
None required.
Light blinks green Pictures are being
transferred to the computer.
49
Page 62

Chapter 7
Transfer Light
Light Status Cause Action/Solution
Light is off There are no pictures in the
camera.
The camera is not in the
printer dock or is improperly
seated.
The printer dock is not
connected to the computer.
The camera is in auto poweroff.
The printer dock is either
printing in standalone mode
or running a slide show.
None required.
Place the camera in the
printer dock (page 13)
or readjust the camera
placement.
Connect the printer
dock to the computer
(page 23).
Press any button.
The Transfer button is
disabled.
The computer is not running. Turn on the computer.
50
Page 63

8 Getting Help
Helpful Web Links
For help with your printer dock http://www.kodak.com/go/printerdock
For help navigating through a
Windows-based computer and
working with digital pictures
To download firmware, printer
dock drivers, and EasyShare
software.
For product support on cameras,
software, accessories, and more
To purchase a full range of
digital camera and dock
accessories
http://www.kodak.com/go/pcbasics
http://www.kodak.com/go/
printdockdownloads
http://www.kodak.com/go/camerasupport
http://www.kodak.com/go/accessories
Help in this User’s Guide
For help with problems you may have with your printer dock or computer
connections, see Chapter 7, Troubleshooting.
Software Help
For help with the Kodak EasyShare printer dock 6000 software, see Installing
the Software, page 24.
51
Page 64

Chapter 8
Telephone Customer Support
If you have questions concerning the operation of the software or printer dock,
you may speak directly to a customer support representative.
Customer support hours vary by location.
Before You Call
If the printer dock is connected to a computer, please be at the computer, and
have the following information available:
Operating system__________________________________________
Processor speed (MHz)_____________________________________
Computer model __________________________________________
Amount of memory (MB)____________________________________
Exact error message you received_______________________________
Version of installation CD____________________________________
Printer dock serial number___________________________________
Camera model____________________________________________
52
Page 65

Telephone Numbers
Australia 1 800 147 701
Austria/Osterreich 0179 567 357
Belgium/Belgique 02 713 14 45
Brazil 0800 15 0000
Canada 1 800 465 6325
China 800 820 6027
Denmark/Danmark 3 848 71 30
Ireland/Eire 01 407 3054
Finland/Suomi 0800 1 17056
Chapter 8
France 01 55 1740 77
Germany/Deutschland 069 5007 0035
Greece 00800 441 25605
Hong Kong 800 901 514
India 91 22 617 5823
Italy/Italia 02 696 33452
Japan 03 5644 5050
Korea 0798 631 0024
Netherlands/Nederland 020 346 9372
New Zealand 0800 440 786
Norway/Norge 23 16 21 33
Philippines 1 800 1 888 9600
Portugal 021 415 4125
Singapore 800 6363 036
53
Page 66

Chapter 8
Spain/España 91 749 76 53
Sweden/Sverige 08 587 704 21
Switzerland/Schweiz/Suisse 01 838 53 51
Taiwan 0080 861 008
Thailand 001 800 631 0017
UK 0870 243 0270
United States 1 800 235 6325
Outside the United States 585 726 7260
International Toll Line +44 131 458 714
International Toll Fax Number +44 131 458 962
For the most up-to-date listings, visit: http://www.kodak.com/US/en/digital/
contacts/DAIInternationalContacts.shtml.
54
Page 67

9 Appendix
This appendix serves as a resource for technical information about your
printer dock.
Printer Dock Specifications
Specifications—Printer Dock
Printing Process Thermal Dye Transfer
Operating Temperature-for best
picture quality
DC Voltage input
AC Voltage
Operating Humidity 10% to 86% Relative Humidity
Printer Dimensions
(without insert)
Printer Dimensions
(without paper tray)
Printer Dimensions
(with paper tray)
Width
Depth
Height
Weight 38 oz (1.08 kg)
Width
Depth
Depth 13 in. (33 cm)
49 to 95
24 V DC at 1.8 Amps
110 V to 240 V 50/60 Hz
7.9 in. (20.1 cm)
6.25 in. (15.8 cm)
3.0 in. (7.6 cm)
7.9 in.(20.1 cm)
6.25 in. (15.8 cm)
° F (10 to 35°C)
Desk or surface
space
Paper tray Width
Depth 18 in. (45.7 cm)
4.75 in.(12 cm)
Depth
7.75 in. (19.75 cm)
55
Page 68

Chapter 9
Specifications—Printer Dock
Color cartridge
Photo size 4 x 6 in. (102 x 152 mm)
Width
Depth
3.14 in.(8 cm)
5.21 in.(13.25 cm)
CAUTION:
Do not use inkjet paper
Paper size 4 x 7.13 in.(102 x 181 mm)
Upgrading Your Software and Firmware
Take advantage of the latest enhancements to your Kodak software and printer
dock firmware. Software refers to the applications included on the Kodak
EasyShare printer dock 6000 software. Printer dock firmware is the internal
software that runs on the printer dock.
To download the latest versions of software and firmware, visit
www.kodak.com/go/printerdock.
56
Page 69

Chapter 9
Accessories and Supplies
Kodak accessories and supplies for the printer dock include:
Accessories and Supplies
Item Catalog Number
Kodak EasyShare printer dock 6000 823-7448
US w/sensormatic tag
EAMER
LAR
GCR
APR
Canada
Kodak color cartridge & photo paper kit (PH-40) 123-1349 (English)
Audio/Video cable (included with camera) 198-3881
EasyShare Li-Ion batteries (1050 mAh) 849-9741
EasyShare Ni-MH rechargeable battery pack 114-8683
Kodak camera and printer dock travel bag 126-8903
867-0952
120-9105
173-1801
140-9390
149-5985
105-9948
116-5257 (Multi-lingual)
For a full range of Kodak accessories and supplies, see your retailer of Kodak
products or visit www.kodak.com/go/printerdock.
57
Page 70

Chapter 9
Safety Labels
RISK OF ELECTRIC SHOCK:
Do not open. Dry location use only.
CAUTION:
To avoid electrical hazard, use only with products
specified in this user manual. Read all instructions before
using.
Regulatory Information
FCC Compliance and Advisory
This equipment has been tested and found to comply with the limits for a Class
B digital device, pursuant to Part 15 of the FCC Rules. These limits are designed
to provide reasonable protection against harmful interference in a residential
installation.
This equipment generates, uses, and can radiate radio frequency energy and, if
not installed or used in accordance with the instructions, may cause harmful
interference to radio communications. However, there is no guarantee that
interference will not occur in a particular installation.
If this equipment does cause harmful interference to radio or television
reception, which can be determined by turning the equipment off and on, the
user is encouraged to try to correct the interference by one or more of the
following measures: 1) reorient or relocate the receiving antenna; 2) increase
the separation between the equipment and the receiver; 3) connect the
equipment to an outlet on a circuit different from that to which the receiver is
connected; 4) consult the dealer or an experienced radio/TV technician for
additional suggestions.
Any changes or modifications not expressly approved by the party responsible
for compliance could void the user’s authority to operate the equipment.
Where shielded interface cables have been provided with the product or
58
Page 71

Chapter 9
specified additional components or accessories elsewhere defined to be used
with the installation of the product, they must be used in order to ensure
compliance with FCC regulation.
Canadian DOC Statement
DOC Class B Compliance—This Class B digital apparatus complies with
Canadian ICES-003.
Observation des normes-Class B—Cet appareil numérique de la classe B
est conforme à la norme NMB-003 du Canada.
Disposal Information
The printer dock and the AC adapter contain a small amount of lead in the
circuit board. Disposal of this material may be regulated due to environmental
considerations. For disposal or recycling information, contact your local
authorities, or contact the Electronics Industry Alliance Web site at
www.eiae.org.
59
Page 72

Page 73

Index
Numerics
800 number for customer
support, 54
A
AC power connector, 2
accessories and
supplies, 32, 51, 57
B
back view of printer dock, 2
batteries
loading, 11—12
ordering, 57
canceling printing, 17, 31
care and maintenance of printer
dock, 33
cartridge door, color, 3
cartridges
clearing jams, 36
handling and storing, 6
loading, 6
specifications, 56
status lights, 47
catalog numbers for accessories
and supplies, 57
changing interval of slide show
display, 20
status lights, 48
buttons and lights, 9
buying accessories and
supplies, 57
C
cables, 26, 57
camera
battery, loading, 11—12
docking and charging, 13
printing from, 15
Canadian compliance, 59
charging
batteries, 48
the camera, 13
cleaning
print head, 34
printer dock, 36
clearance around printer
dock, 3
clearing
cartridge jams, 36
paper jams, 35
color cartridge door, 3
61
Page 74

Index
color cartridges
installing, 6
jams, clearing, 36
color mode options, 29
compliance with FCC
regulations, 58
computer
connecting to, 26
helpful Web sites, 51
and printer dock, 23
printing from, 28
system requirements, 23
connecting
to a computer, 26
power, 5
contacting Kodak, 52—54
contents of package, 2
continuous loop for slide
show, 20
customer support
numbers, 52—54
door, color cartridge, 3
E
electricity, connecting, 5, 55
enhanced color mode, 29
environmental requirements, 55
F
FCC compliance, 58
firmware, upgrading, 51, 56
formatting page layout, 28
front view of printer dock, 1
H
handling and storing
color cartridges, 6
paper, 8
help
technical, 51—54, 56
telephone support, 52—54
troubleshooting printer
dock, 39
D
dimensions of printer, 55
displaying
pictures and videos, 20
slide show interval, 20
docking and charging the
camera, 13
62
I
indicator lights and buttons, 9
inserting paper tray, 8
installing
cartridges, 6
software, 24
Page 75

Index
international phone
numbers, 53—54
interval of slide show,
changing, 20
J
jams, clearing, 35, 36
jobs, monitoring print, 31
K
Kodak
contacting, 52—54
EasyShare software, 28, 51
Web sites, 51
modes, color, 29
monitor, requirements, 23
monitoring print job status, 31
moving printer dock, 37
N
natural color mode, 29
numbers, telephone, 53—54
O
operating temperature and
humidity, 55
ordering supplies, 32
L
layout, formatting, 28
lights, status, 9, 47—49
loading
camera battery, 11—12
color cartridge, 6
paper, 7
software, 24
location for printer dock, 3
loop, slide show, 20
M
Macintosh system
P
package contents, 2
packing printer dock for
moving, 37
paper
formatting, 28
jams, clearing, 35
loading, 7
path, 2
specifications, 56
status light, 47
tray,1,8
PC system requirements, 23
perforated tabs from prints,
requirements, 23
maintenance of printer dock, 33
removing, 16, 30
63
Page 76

Index
pictures
reviewing, 19
setting quality, 12
transferring, 27
power, connecting, 5
print head, cleaning, 34
print job status, 31
Print Mode button and status
lights, 1, 49
printer dock
accessories and supplies, 57
back view, 2
care and maintenance, 33
cleaning, 36
from camera, 15
problems, 39
with a computer, 28
with other applications, 29
problems
printing, 39
transferring pictures, 46
product support, 51, 56
Q
quality, setting, 12
R
regulatory information, 58, 59
and computer, 23
connecting, 26
front view, 1
location and setup, 3
print head, cleaning, 34
side view, 3
specifications, 55
status lights, 47—49
technical help, 51—54, 56
travelling with, 37
troubleshooting, 39
upgrading, 51, 56
printer, status monitor, 31
printing
canceling, 17, 31
removing perforated tabs from
prints, 16, 30
requirements
environmental, 55
system, 23
resolving problems
with printing, 39
with transferring pictures, 46
reviewing pictures and
videos, 19
running a slide show, 19
S
service and support, 52—54
setting picture quality, 12
side view of printer dock, 3
64
Page 77

Index
slide show, running, 19
software
help, 51
installing, 24
Kodak EasyShare, 28, 51
printing with other, 29
requirements, 23
uninstalling, 25
upgrading, 51, 56
specifications
Macintosh OS, 23
printer dock, 55
Windows-based OS, 23
status lights, 47—49
toll free number for customer
support, 54
Transfer button and status
lights, 49
transferring pictures, 27, 46
travelling with printer dock, 37
tray, inserting paper, 8
troubleshooting
cartridge jams, 36
paper jams, 35
printing problems, 39
transferring pictures
problems, 46
status monitor, 31
storing color cartridges, 6
strap, wrist, 4
supplies and
accessories, 32, 51, 57
support, technical, 51—54, 56
system requirements, 23
T
tabs from prints,
removing, 16, 30
technical support, 51—54, 56
telephone numbers, 53—54
television, displaying pictures
U
uninstalling software, 25
upgrading software, 51, 56
URLs for Kodak Web sites, 51
USB cable connections, 2, 26
V
videos, reviewing, 19
views of printer dock, 1—3
W
Web sites for Kodak, 51
weight of printer dock, 55
Windows system
on, 20
temperature requirements, 55
requirements, 23
wrist strap, 4
65
Page 78

 Loading...