

Page 1
EasyShare 5100
All-in-One Printer
User’s Guide
for Windows
Page 2
Eastman Kodak Company
Rochester, New York 14650
© Eastman Kodak Company, 2007
Kodak and EasyShare are trademarks of Eastman Kodak Company.
Windows is a registered trademark of Microsoft Corporation in the United States and other countries.
The Bluetooth word mark and logos are owned by the Bluetooth SIG, Inc. and any use of such marks is under license.
Wi-Fi® is a registered trademark of the Wi-Fi Alliance.
©1989-2007 I.R.I.S. (Image Recognition Integrated Systems), All Rights Reserved
P/N 1K2091
Page 3

Table of Contents
Product Overview.................................................................................................................................... 1
Main Components.............................................................................................................................................. 1
Control Panel Layout......................................................................................................................................... 2
Status Lights........................................................................................................................................................4
USB Port ...............................................................................................................................................................9
Home Center Software................................................................................................................................... 10
Getting Started .......................................................................................................................................11
Connect Power .................................................................................................................................................. 11
Install the Printhead ......................................................................................................................................... 11
Install Ink Cartridges ........................................................................................................................................13
Install the Duplexer ..........................................................................................................................................15
Startup .................................................................................................................................................................15
Demo Sheet........................................................................................................................................................15
Transfer Photos ................................................................................................................................................ 16
Printer Status .................................................................................................................................................... 16
General Settings............................................................................................................................................... 18
Handling and Loading Paper................................................................................................................ 21
The Scanner Glass ............................................................................................................................................21
Load Main Tray ................................................................................................................................................22
Load Photo Tray ...............................................................................................................................................23
Load Envelopes.................................................................................................................................................24
Load Labels........................................................................................................................................................25
Print ........................................................................................................................................................27
Print with Control Panel .................................................................................................................................28
Bluetooth Printing ............................................................................................................................................28
Print with Computer........................................................................................................................................29
Print Settings.....................................................................................................................................................29
Layouts ...............................................................................................................................................................32
Copy........................................................................................................................................................47
Copy with Control Panel ................................................................................................................................47
Copy with Computer...................................................................................................................................... 48
Scan ........................................................................................................................................................53
Scan with Control Panel .................................................................................................................................53
Scan with Computer........................................................................................................................................53
User’s Guide i
Page 4

Table of Contents
Maintenance .......................................................................................................................................... 81
General Care......................................................................................................................................................81
Clean the Scanner Glass.................................................................................................................................81
Clean the Scanner Lid..................................................................................................................................... 82
Print Diagnostic Sheet.................................................................................................................................... 82
Firmware Upgrade .......................................................................................................................................... 82
Ink Cartridges ................................................................................................................................................... 82
Printhead ........................................................................................................................................................... 85
Support ..................................................................................................................................................89
Contact Kodak.................................................................................................................................................. 89
Limited Warranty ............................................................................................................................................ 89
Telephone Customer Support....................................................................................................................... 91
Messages........................................................................................................................................................... 93
Troubleshooting............................................................................................................................................... 98
Appendix ............................................................................................................................................. 109
Computer Requirements ............................................................................................................................. 109
Paper Types ....................................................................................................................................................109
Safety.................................................................................................................................................................. 111
Regulatory Compliance..................................................................................................................................112
Glossary.................................................................................................................................................115
Index.......................................................................................................................................................117
ii Kodak EasyShare 5100 AiO
Page 5

1 Product Overview
Product Overview
The Kodak EasyShare 5100 All-in-One (AiO) Printer allows you to print, copy, and scan photos or
documents. Many functions can be operated directly from the Control Panel. You can print, store, manage,
and share your digital photos with family members and friends with the Kodak EasyShare software. You
can buy optional accessories to enhance your Kodak EasyShare AiO experience.
Main Components
1 Scanner Lid 8 Main Tray
2 Control Panel 9 Output Tray Extender
3 Printer Access Door 10 Paper Width Guide
4 USB Port 11 Output Tray
5 Photo Tray Light 12 Rear Access Door
6 Photo Tray 13 Power Connector
7 Paper Length Guide 14 USB Port
User’s Guide 1
Page 6
Chapter 1
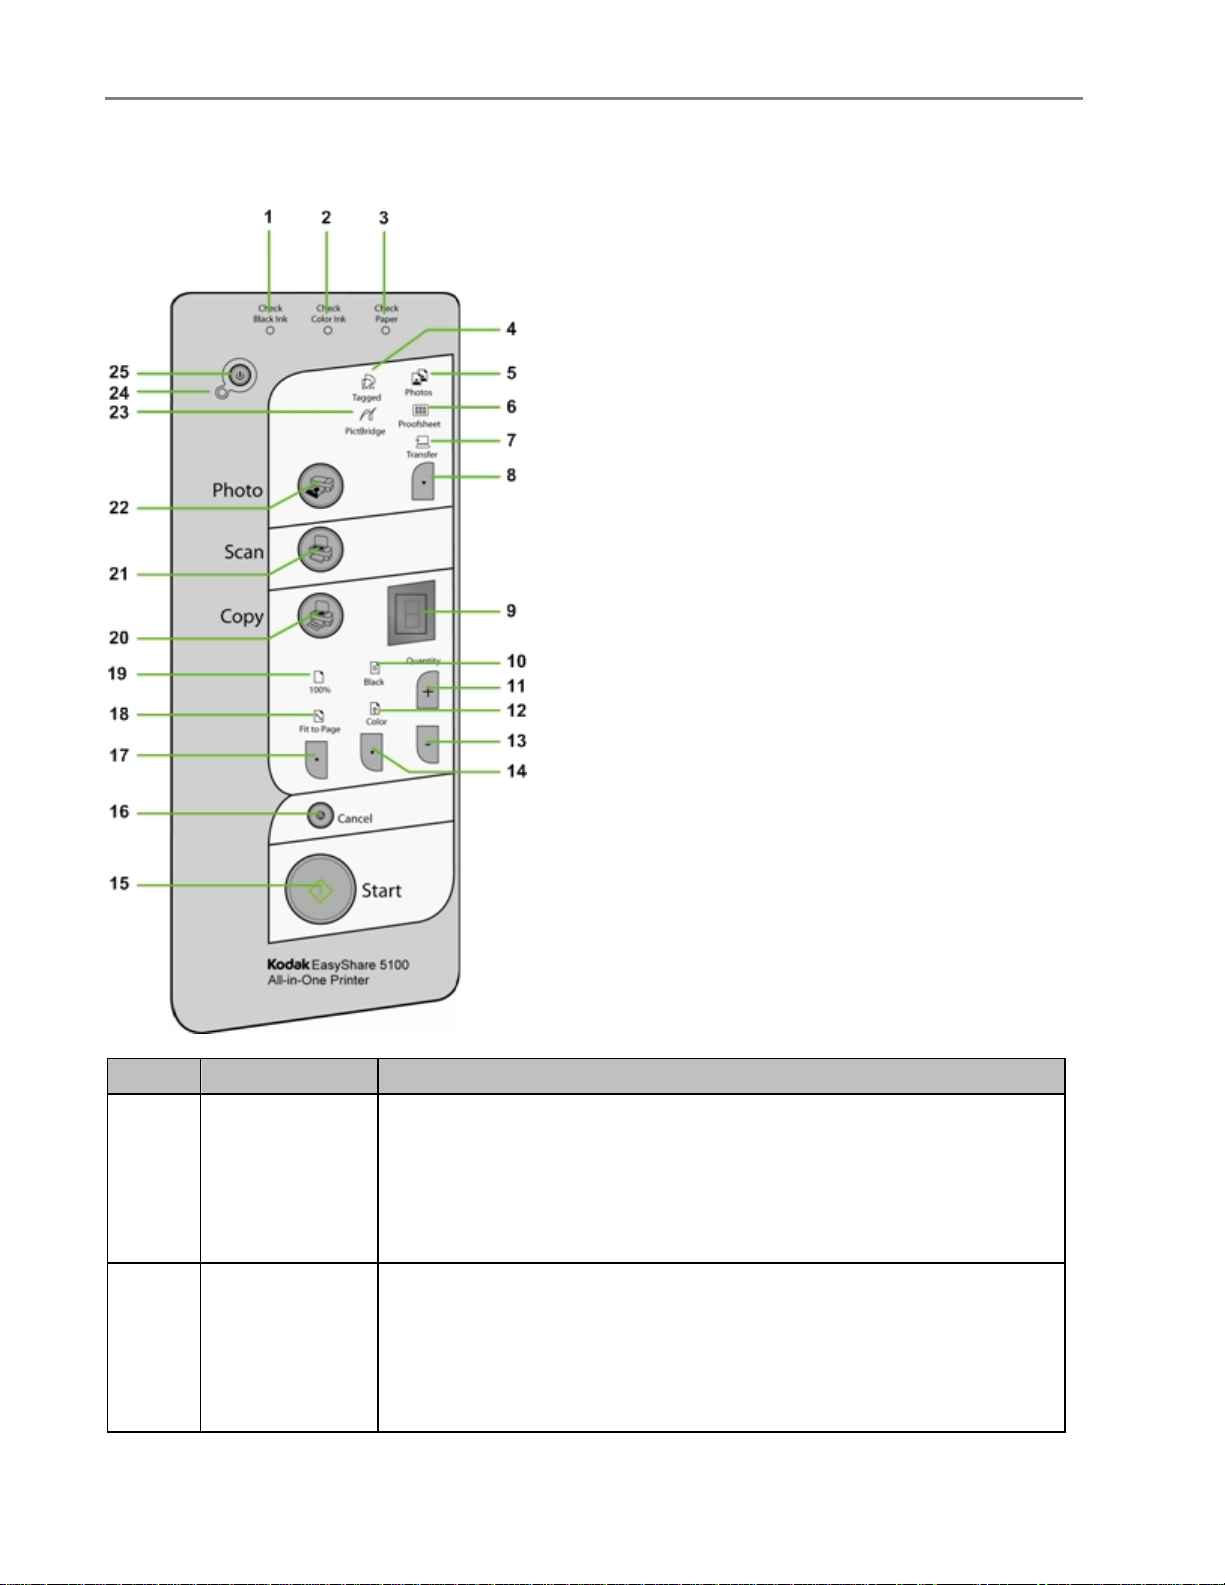
Control Panel Layout
Number Name Description
Flashes fast when low on black ink
Flashes slow when:
1
2
2 Kodak EasyShare 5100 AiO
Check Black Ink
Light
Check Color Ink
Light
• Out of black ink
• Black cartridge not inserted correctly
• Black cartridge missing
• Black cartridge not functioning properly
Flashes fast when low on color ink
Flashes slow when:
• Out of color ink
• Color cartridge not inserted correctly
• Color cartridge missing
• Color cartridge not functioning properly
Page 7

Number Name Description
Flashes when:
• Out of Paper
• Paper Jam
• Rear Access Door/Duplexer Missing or Ajar
• Wrong Paper Size
This green LED lights when a DPOF print file is found on the photo source
connected to 5100 AiO. It will remain on until the source has been
removed.
3
4
Check Paper
Light
Tagged Light
Product Overview
5
6
7
8
9
10
11
12
13
14
15
16
17
18
19
20
21
22
23
24
25
Photos Light On when Photos is selected by Photo Action button.
Proofsheet Light On when Proofsheet is selected by Photo Action button.
Transfer Light On when Transfer is selected by the Photo Action button.
Photo Action
Button
Quantity Display Displays how many copies will be produced (1-9).
Black Light Indicates copies will print in black and white.
+ Button
Color Light Indicates copies will print in color.
– Button
Copy Color
Button
Start Button Starts a copy, print, transfer, or scan operation.
Cancel Button Cancels a copy, print, transfer or scan operation.
Copy Print Size
Button
Fit to page Light Indicates the print size for Copy mode is Fill Page.
100% Light Indicates the print size for Copy mode is 100%.
Copy Button Press to enter Copy mode. Lit when in Copy mode.
Scan Button Press to enter Scan mode. Lit when in Scan mode.
Pictures Button Press to enter Print mode. Lit when Print mode.
PictBridge Light On when a PictBridge device is connected.
On/Off Light
On/Off button
If the photo tray is not engaged, select either Transfer, or Proofsheet.
If the photo tray is engaged, selects either Transfer or Photos (4x6 print).
Increases the number of copies from 1 – 9.
Decreases the number of copies from 9 – 1.
Selects between Color and Black copies. The default is Color.
Selects between print sizes of 100% and Fill Page.
Green when Starting Up, Ready, or in Standby mode.
Flashes red when in an error state.
Is not lit when in Sleep mode.
If the EasyShare AiO is currently Ready, pressing On causes it to enter
Standby mode (or Sleep mode, see Standby and Sleep Modes). If the
EasyShare AiO is currently in Standby mode, pressing On returns it to
Ready mode. If the EasyShare AiO is currently in Sleep mode, pressing On
initiates the Startup sequence (see
currently busy executing a job, pressing On cancels the current job as if the
Cancel button had been pressed. After the Cancel behavior sequence
completes, the EasyShare AiO enters Sleep mode.
Startup). If the EasyShare AiO is
User’s Guide 3
Page 8
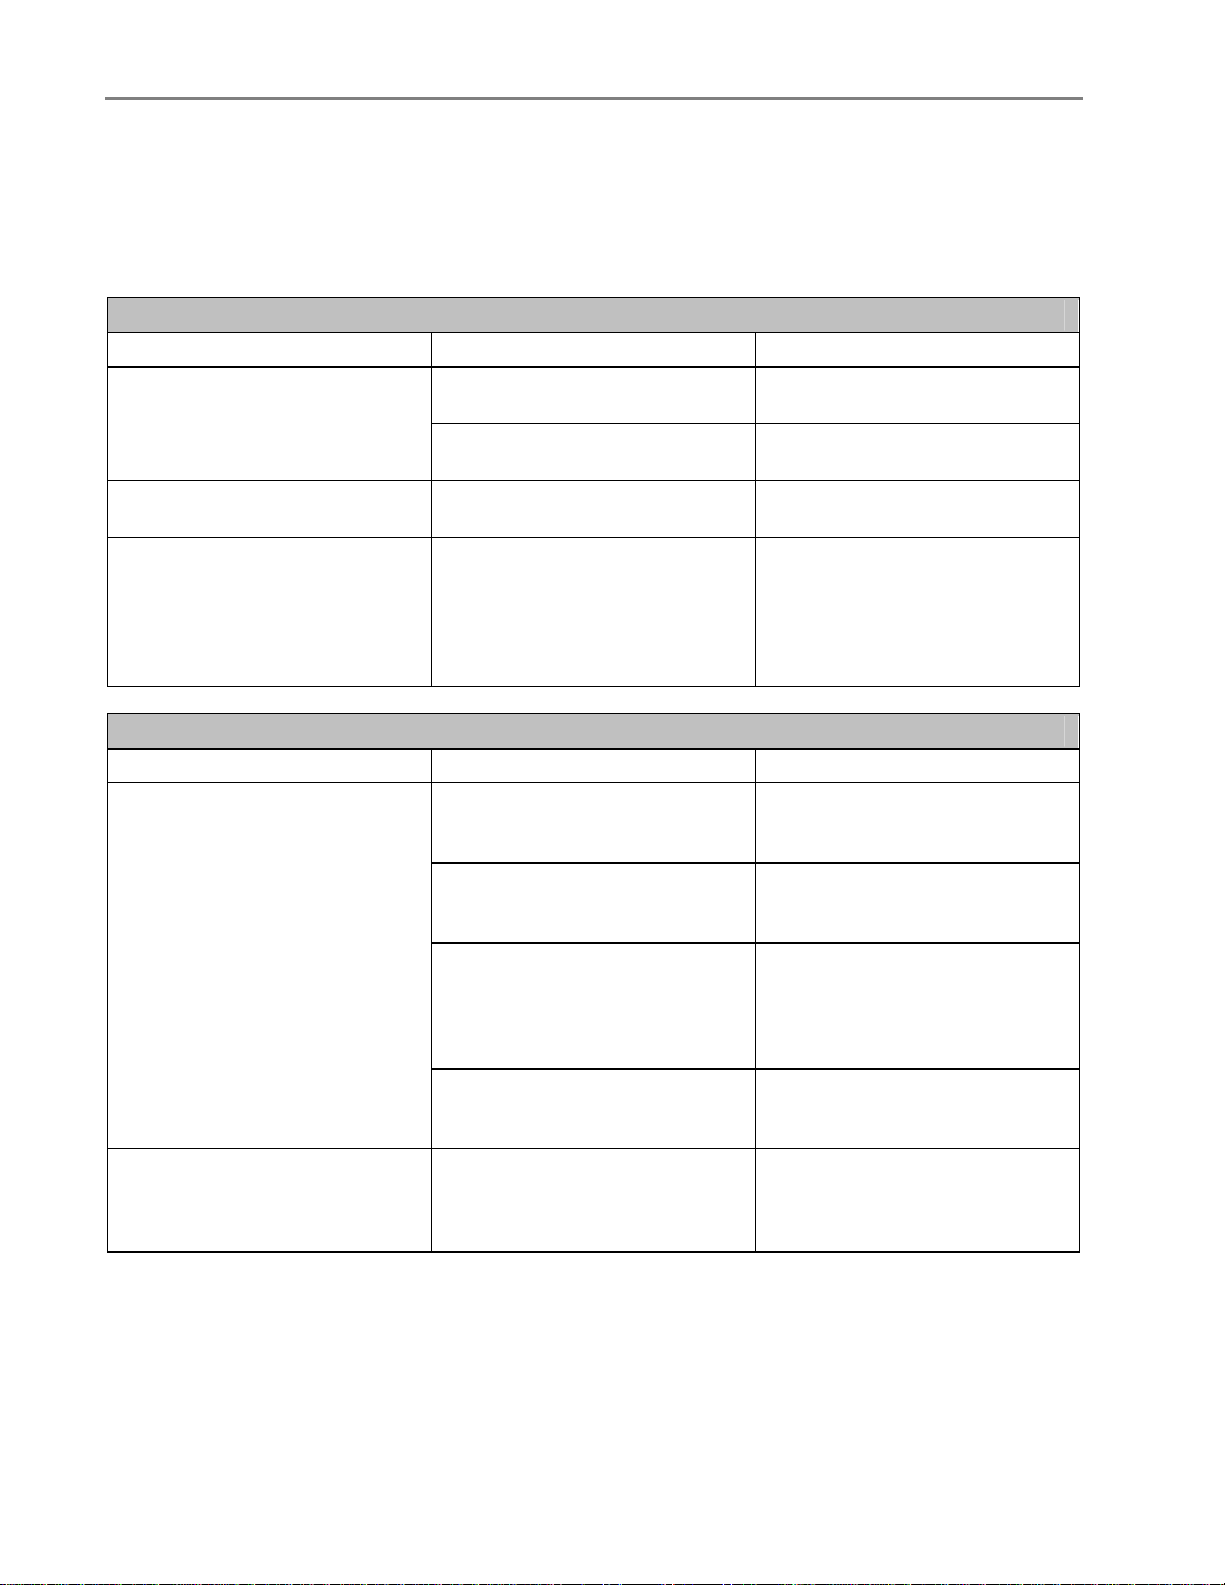
Chapter 1
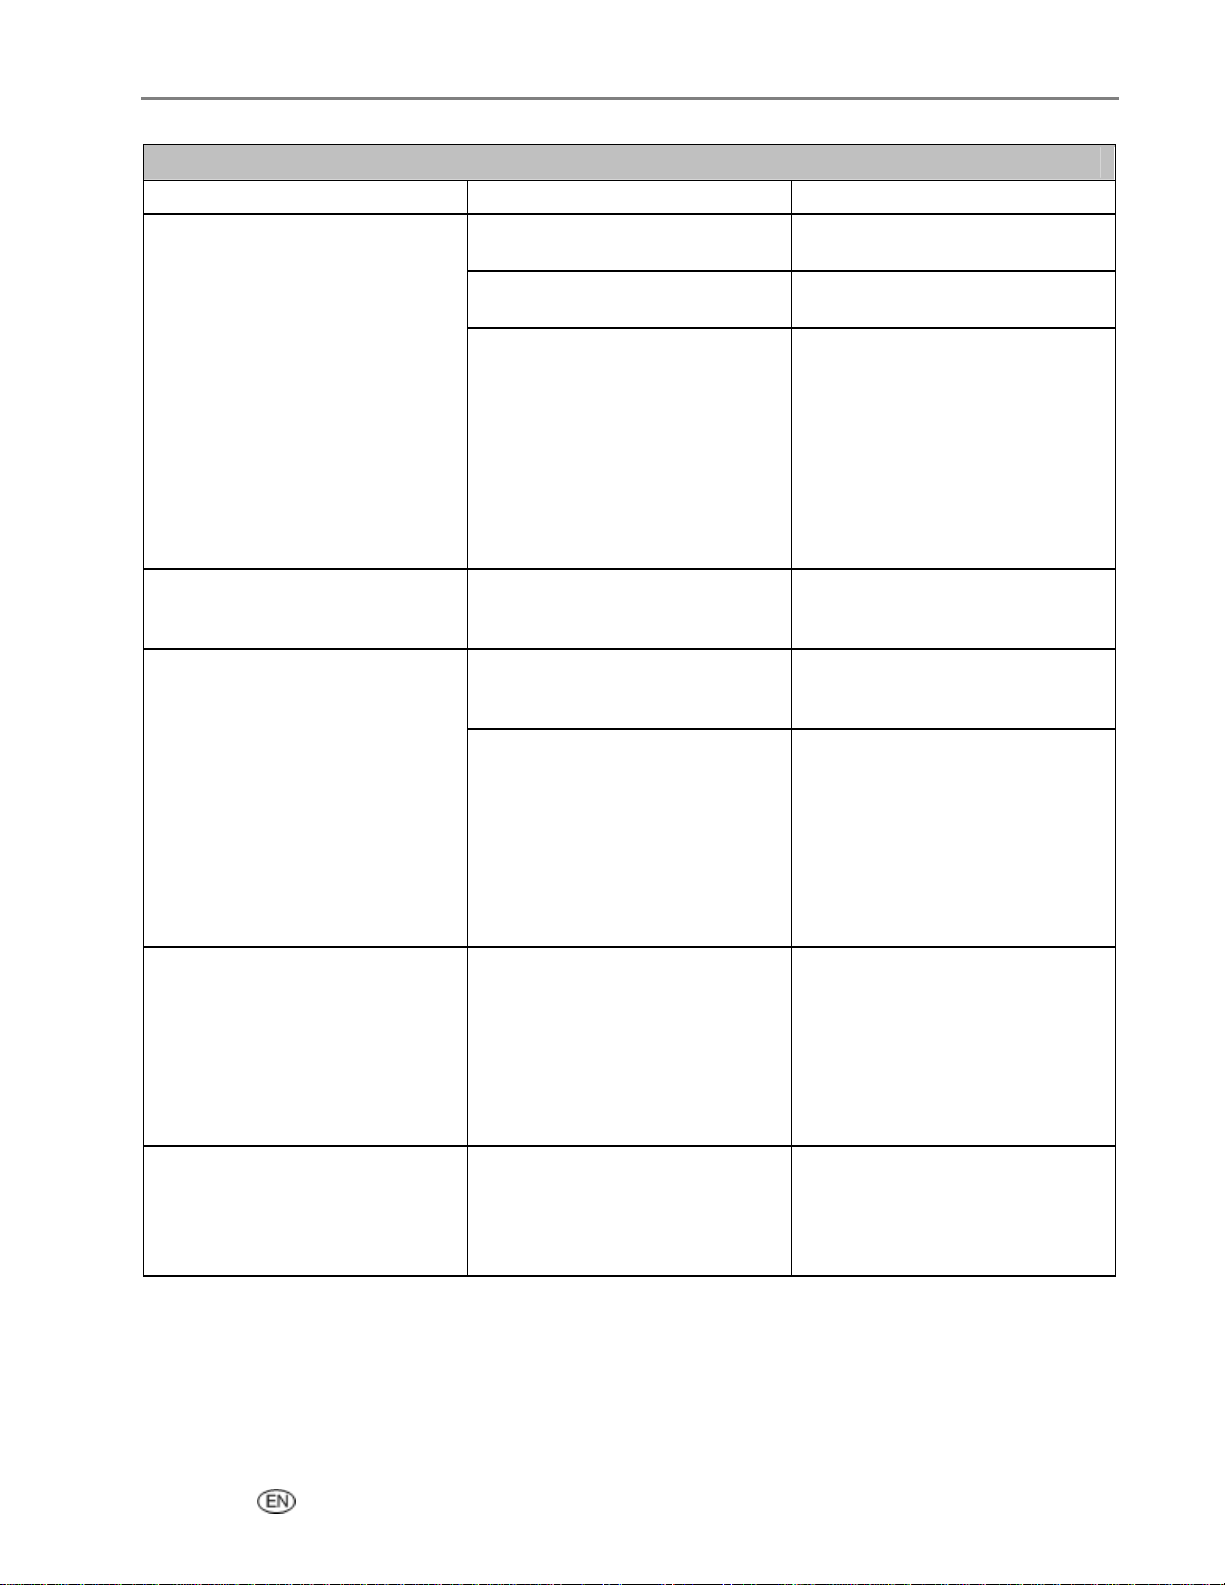
Status Lights
The following tables contain information on the EasyShare AiO lights.
Control Panel
Light Status Cause Action/Solution
All lights and displays are off.
All lights Flash once. The Printer is Initializing.
All lights are flashing and the
On/Off Light is flashing yellow.
The printer is turned off.
The Printer does not have power
applied.
The Printer has detected an
error condition.
Power Light on Power Cord
Press the On/Off button to turn
the printer on.
Check the Power Cord Light
status.
None: Allow the Printer to finish
the initialization process.
Disconnect power for 5 seconds
and reconnect power. If the
condition persists, please check
the 8 Segment Display for
additional codes. Contact Kodak
for assistance.
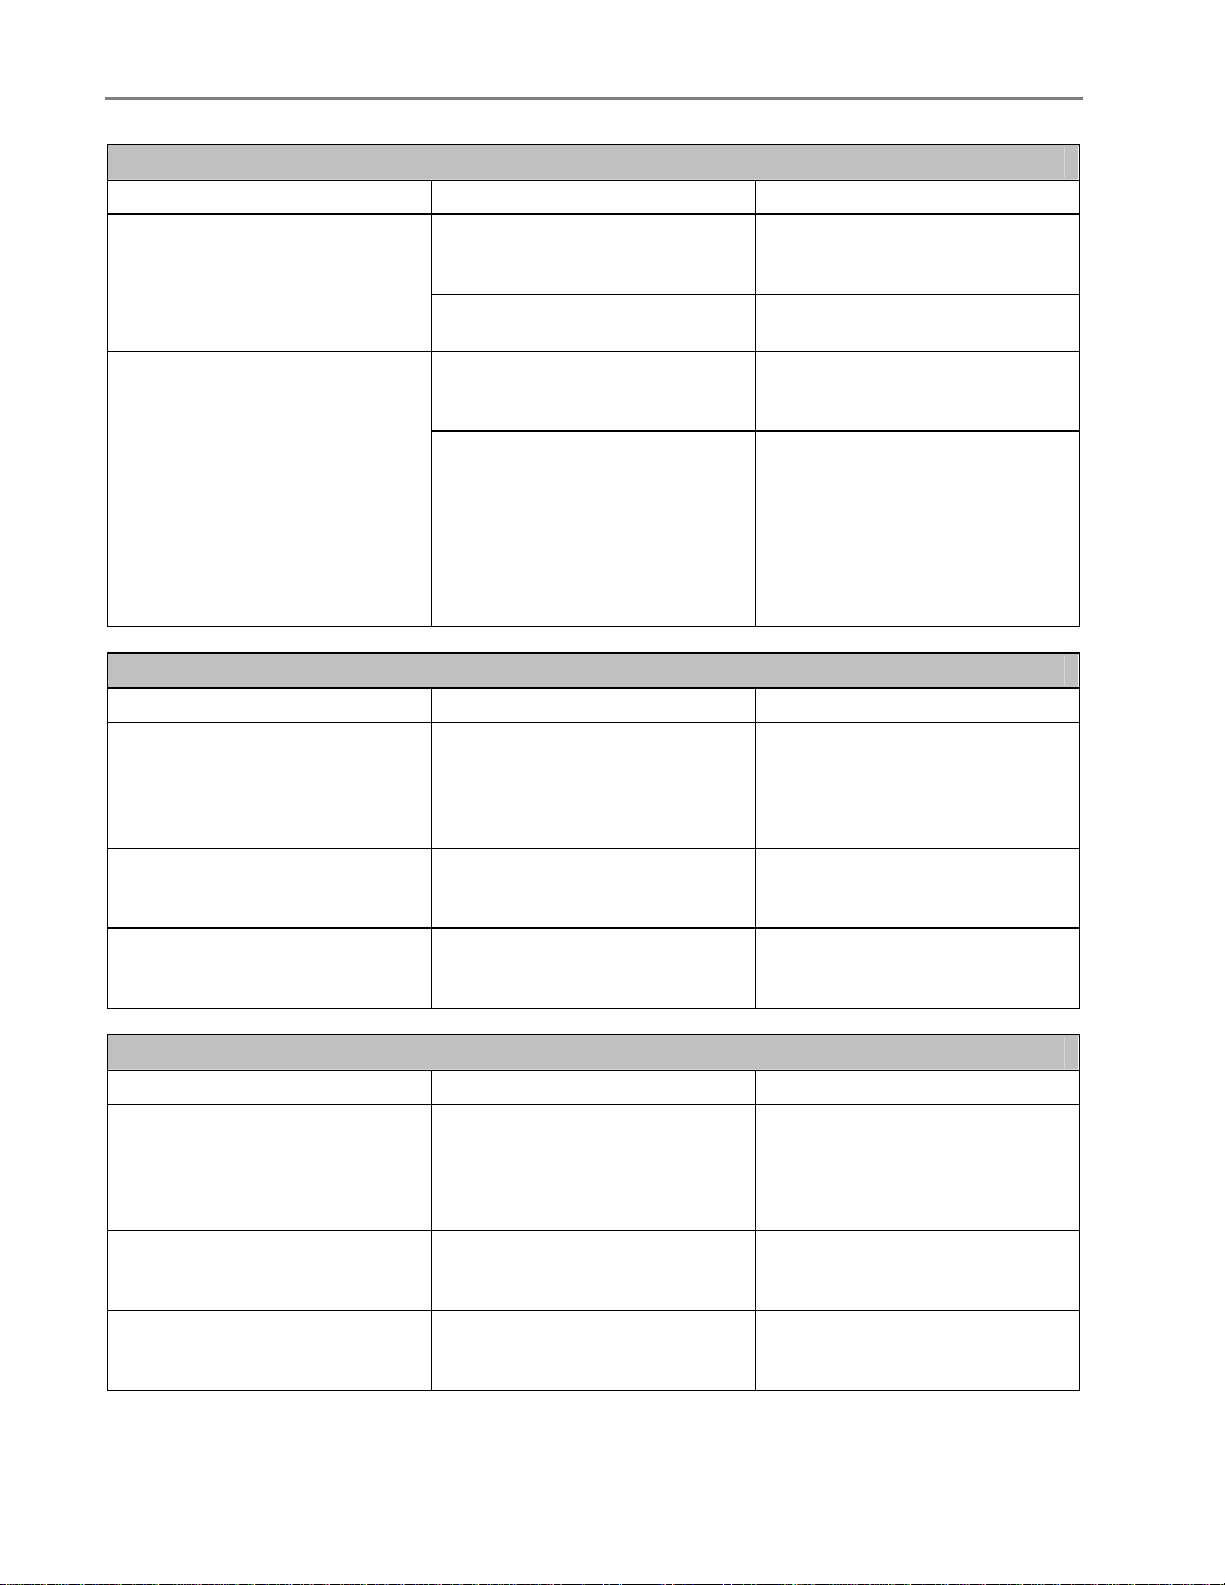
Light Status Cause Action/Solution
Power cord light is off.
Power cord light is on.
The printer to power supply cord
is not properly connected to the
Power Supply.
The power supply to your wall
outlet cord is not properly
connected to your wall outlet.
You do not have the appropriate
power available at your wall
outlet.
There may be an issue with the
power supply.
The power cord and power
supply are properly connected
and ready to supply power to the
printer.
Reseat the printer to power
supply cord.
Reseat the Power Supply to your
Wall Outlet Cord.
Test your wall outlet by plugging
a known working device into you
wall outlet. Have your wall outlet
checked by a qualified
electrician.
Visit Kodak.com for additional
troubleshooting steps or contact
your local Kodak Call Center.
Ensure that the power cord in
properly plugged into the back of
the printer.
4 Kodak EasyShare 5100 AiO
Page 9
On/Off Light
Light Status Cause Action/Solution
On/Off light is off.
The On/Off light is a steady
green.
The On/Off light is a flashing
green.
The On/Off light is a flashing
yellow.
The On/Off light is a flashing
red.
The printer is turned off.
The printer does not have power
applied.
The printer needs attention.
The printer is properly powered
up, on, and ready.
The printer is busy.
The printer is in the initializing
process.
The printer has detected an error
condition.
The printer has detected an error
condition that needs your
attention.
Press the On/Off button to turn
the printer on.
Check the power cord light
status.
Check to see if the Photo Tray
light is on. If the Photo Tray light
is on for more that 20 seconds
and the On/Off light does not
come on, disconnect the power
for 5 seconds and reconnect the
power. If the Photo Tray light
does not go out after 20 seconds
and the On/Off light comes on,
contact Kodak for assistance.
None: You may start printing,
copying, scanning, or other
tasks.
None: Normal operation when
performing a print, copy, scan, or
other job request.
None: Please wait and allow the
printer to complete the
initialization process (About 30
seconds). If the flashing green
persists, you may have an issue
with the printer. Visit Kodak.com
for additional troubleshooting
steps or contact your local
Kodak Call Center.
Disconnect power for 5 seconds
and reconnect power. If the
condition persists, please check
the Quantity Display for
additional codes. Contact Kodak
for assistance.
Check the status monitor on your
computer for a message.
Please check for other Lights to
be on and follow the instruction
for that Light.
Check the status monitor on your
computer for a message.
Product Overview
User’s Guide 5
Page 10
Chapter 1
Photo Tray Status Light
Light Status Cause Action/Solution
Photo tray light is off.
Photo tray light is on.
The photo tray is not engaged.
The printer is not turned on.
The photo tray is engaged.
The printer is powering up.
Push the photo tray in to engage
if you want to print 4 x 6 inch
pictures.
Press the On/Off button to turn
the printer on.
Pull the photo tray out to
disengage if you do not want to
print 4 x 6 inch pictures.
None: Please wait and allow the
printer to complete the
initialization process. If the
flashing green persists, you may
have an issue with the printer.
Visit Kodak.com for additional
troubleshooting steps or contact
your local Kodak Call Center.
Check Color Ink Light
Light Status Cause Action/Solution
Check Color Ink light is off.
Check Color Ink light is flashing
red slowly.
Check Color Ink light is flashing
red rapidly.
Normal operation. This light
should be off when a color ink
cartridge has been properly
installed and has enough ink to
print.
The color ink cartridge needs
attention or the ink level is low.
The color ink cartridge needs
attention or one of the colors is
below the safe operating level.
None.
Check the ink level on the Status
Monitor. Ensure that the color ink
cartridge is properly installed.
Replace the color ink cartridge.
Check Black Ink Light
Light Status Cause Action/Solution
Check Black Ink light is off.
Check Black Ink light is flashing
red slowly.
Check Black Ink light is flashing
red rapidly.
Normal operation. This light
should be off when a black ink
cartridge has been properly
installed and has enough ink to
print.
The black ink cartridge needs
attention or the ink level is low.
The black ink cartridge needs
attention or the ink is below the
safe operating level.
None.
Check the ink level on the Status
Monitor. Ensure that the black
ink cartridge is properly installed.
Replace the black ink cartridge.
6 Kodak EasyShare 5100 AiO
Page 11
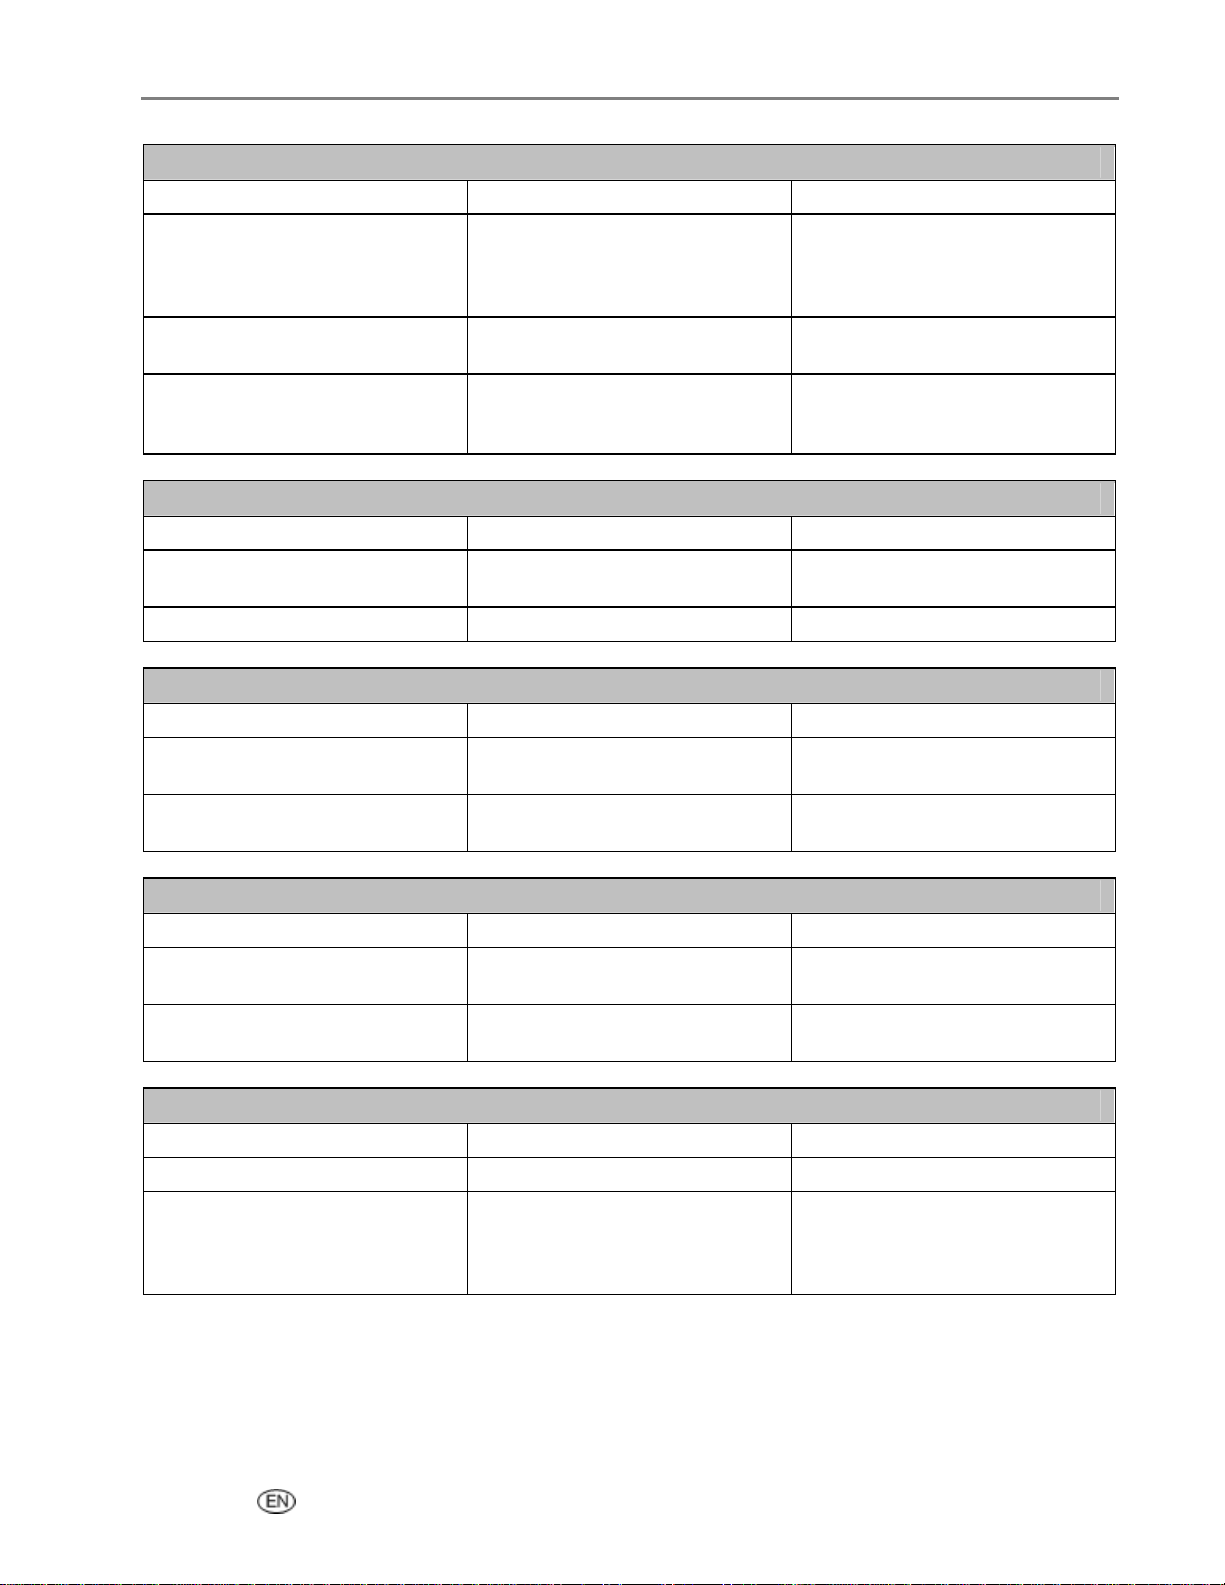
Check Paper Light
Light Status Cause Action/Solution
Check Paper light is off.
Check Paper light is flashing
red.
Check Paper light is on (red).
Normal operation. This light
should be off when paper has
been properly loaded in the main
paper tray.
The paper tray you are trying to
print to is out of paper.
The printer has a Duplexer
attached and the Duplexer is in
manual mode.
None.
Load the paper tray with paper
and press Start to continue.
None.
Photo Button Light
Light Status Cause Action/Solution
Light is off. The printer is not in Photo mode.
Light is on. The printer is in Photo mode. None.
Press Photo to place the printer
in Photo mode.
Wireless Light
Product Overview
Light Status Cause Action/Solution
Light is off.
Light is on.
No Bluetooth dongle in USB
port.
A Bluetooth dongle is in a USB
port.
None.
None.
PictBridge Light
Light Status Cause Action/Solution
Light is off.
Light is on.
No PictBridge camera
connected.
A PictBridge camera is
connected.
None.
None.
Pictures Light
Light Status Cause Action/Solution
Light is off. Pictures mode is not selected. None.
Light is on.
A camera is connected or
Pictures mode has been
selected with the Photo Action
button.
None.
User’s Guide 7
Page 12
Chapter 1
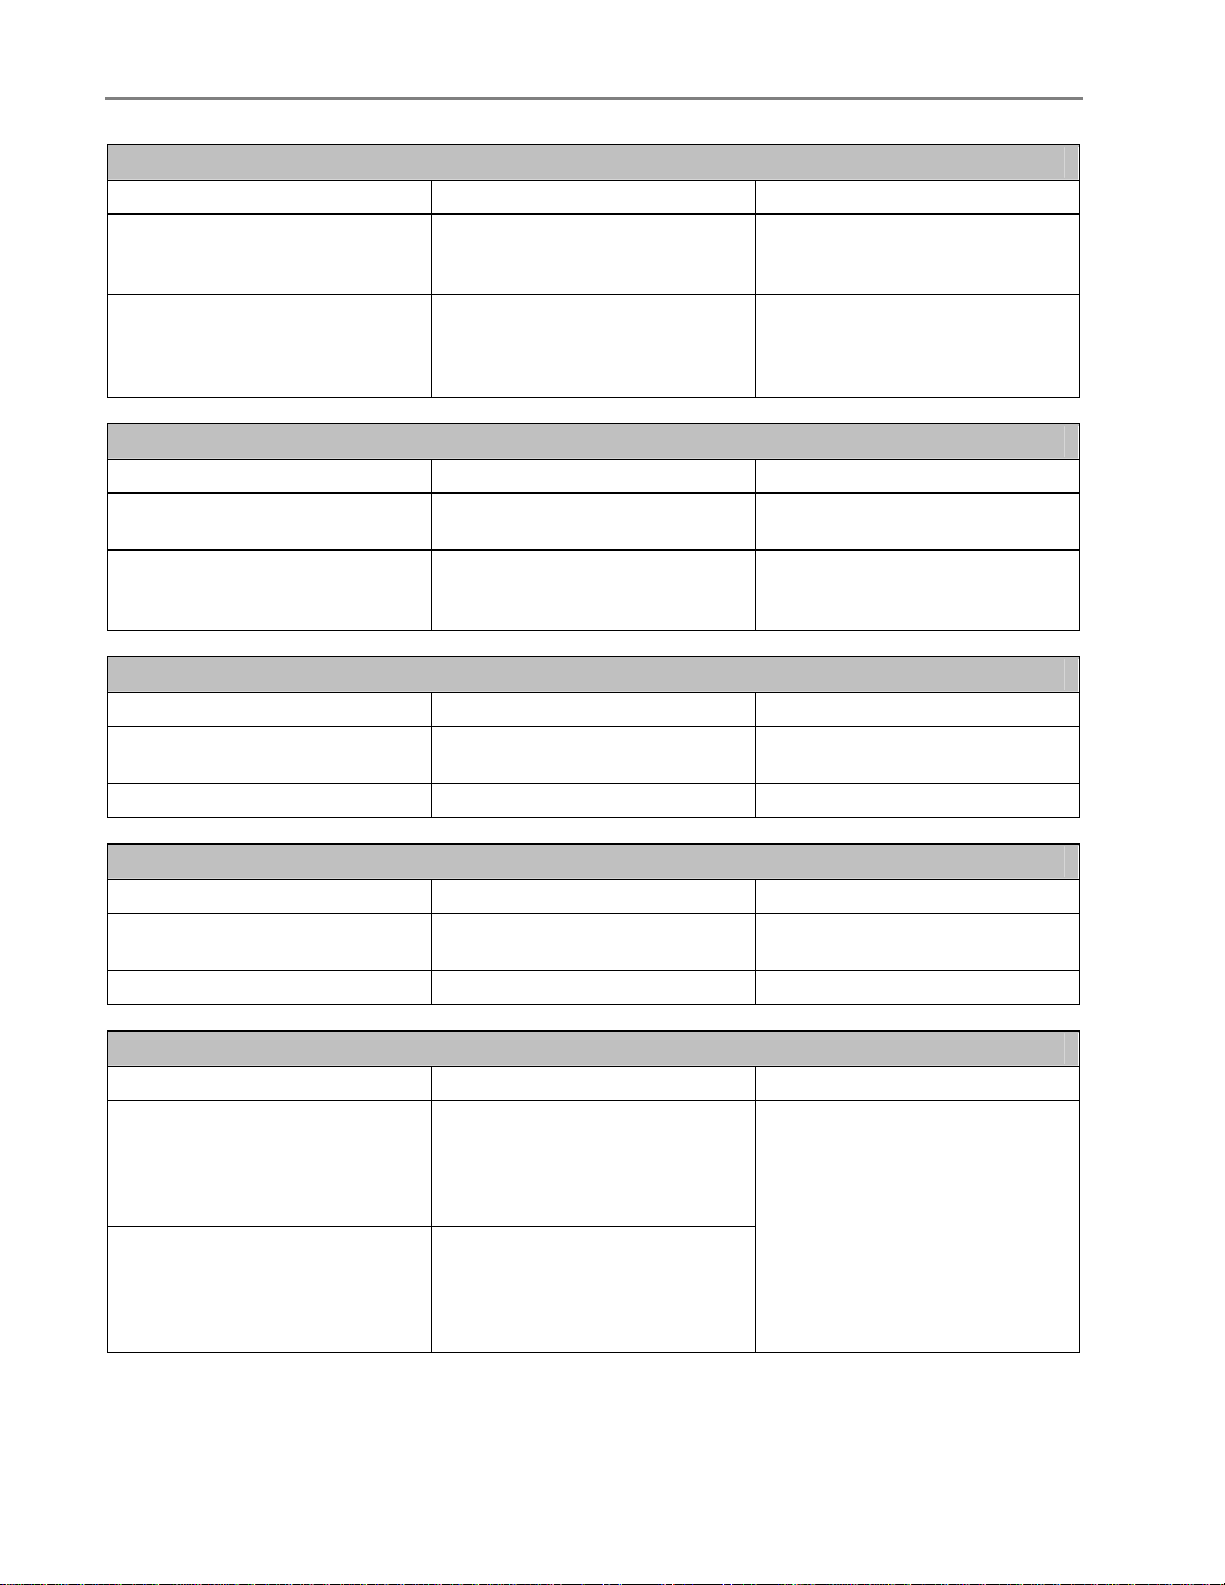
Proofsheet Light
Light Status Cause Action/Solution
Light is off. Proofsheet mode is not selected.
Light is on.
A camera is connected to the
printer with images and you have
selected to print a proofsheet of
those image.
Press the Photo Action button
until the Proofsheet light is lit if
you want to print a proofsheet.
Press Start to print a proofsheet.
Transfer Light
Light Status Cause Action/Solution
Light is on.
Light is off. Transfer mode is not selected.
The printer is ready to transfer
pictures.
Press Start to transfer pictures
to your computer.
Press the Photo Action button
until the Transfer light is lit if you
want to transfer photos.
Scan Button Light
Light Status Cause Action/Solution
Light is off. The printer is not in Scan mode.
Light is on. The printer is in Scan mode. None.
Press Scan to select Scan
mode.
Copy Button Light
Light Status Cause Action/Solution
Light is off. The printer is not in Copy mode.
Light is on. The printer is in Copy mode. None.
Press Copy to select Copy
mode.
100% and Fit to Page Lights
Light Status Cause Action/Solution
100% light is on. Fit to page
light is off.
100% light is off. Fit to page
light is on.
Indicates a copied document
would be copied at the full size
of the document. These lights
work when the printer is in Copy
mode.
Indicates a copied document
would be copied to fit the full size
of the paper selected to print to.
These lights work when the copy
light is on.
Press the Copy Paper Size
button to toggle between these
two modes for the action you
prefer.
8 Kodak EasyShare 5100 AiO
Page 13
Black and Color Lights
Light Status Cause Action/Solution
Color light is on. Black light is
off.
Color light is off. Black light is
on.
Indicates a document will be
copied color. These lights work
when the printer is in Copy
mode.
Indicates a document will be
copied black and white. These
lights work when the printer is in
Copy mode.
Press the Copy Color button to
toggle between these two modes
for the action you prefer.
Quantity Display
Light Status Cause Action/Solution
Number character displayed.
— displayed.
Alpha character displayed.
Indicates the number of copies
to be made.
The printer is in the Calibrate
mode.
The printer has detected an error
condition.
Press the + and – buttons to
select the number of copies you
want to make.
Allow the calibration to complete.
Disconnect power for 5 second
and reconnect power. If the
condition persists, please check
the Quantity display for
additional codes. Contact Kodak
for assistance.
Product Overview
USB Port
You can connect a digital camera to the Kodak EasyShare AiO through the USB Port and print directly from
the camera. The Kodak EasyShare AiO reads the contents of the memory card while it is still in the camera.
If your EasyShare AiO beeps three times when you plug a device into the USB Port, it means the device is
not supported.
User’s Guide 9
Page 14
Chapter 1
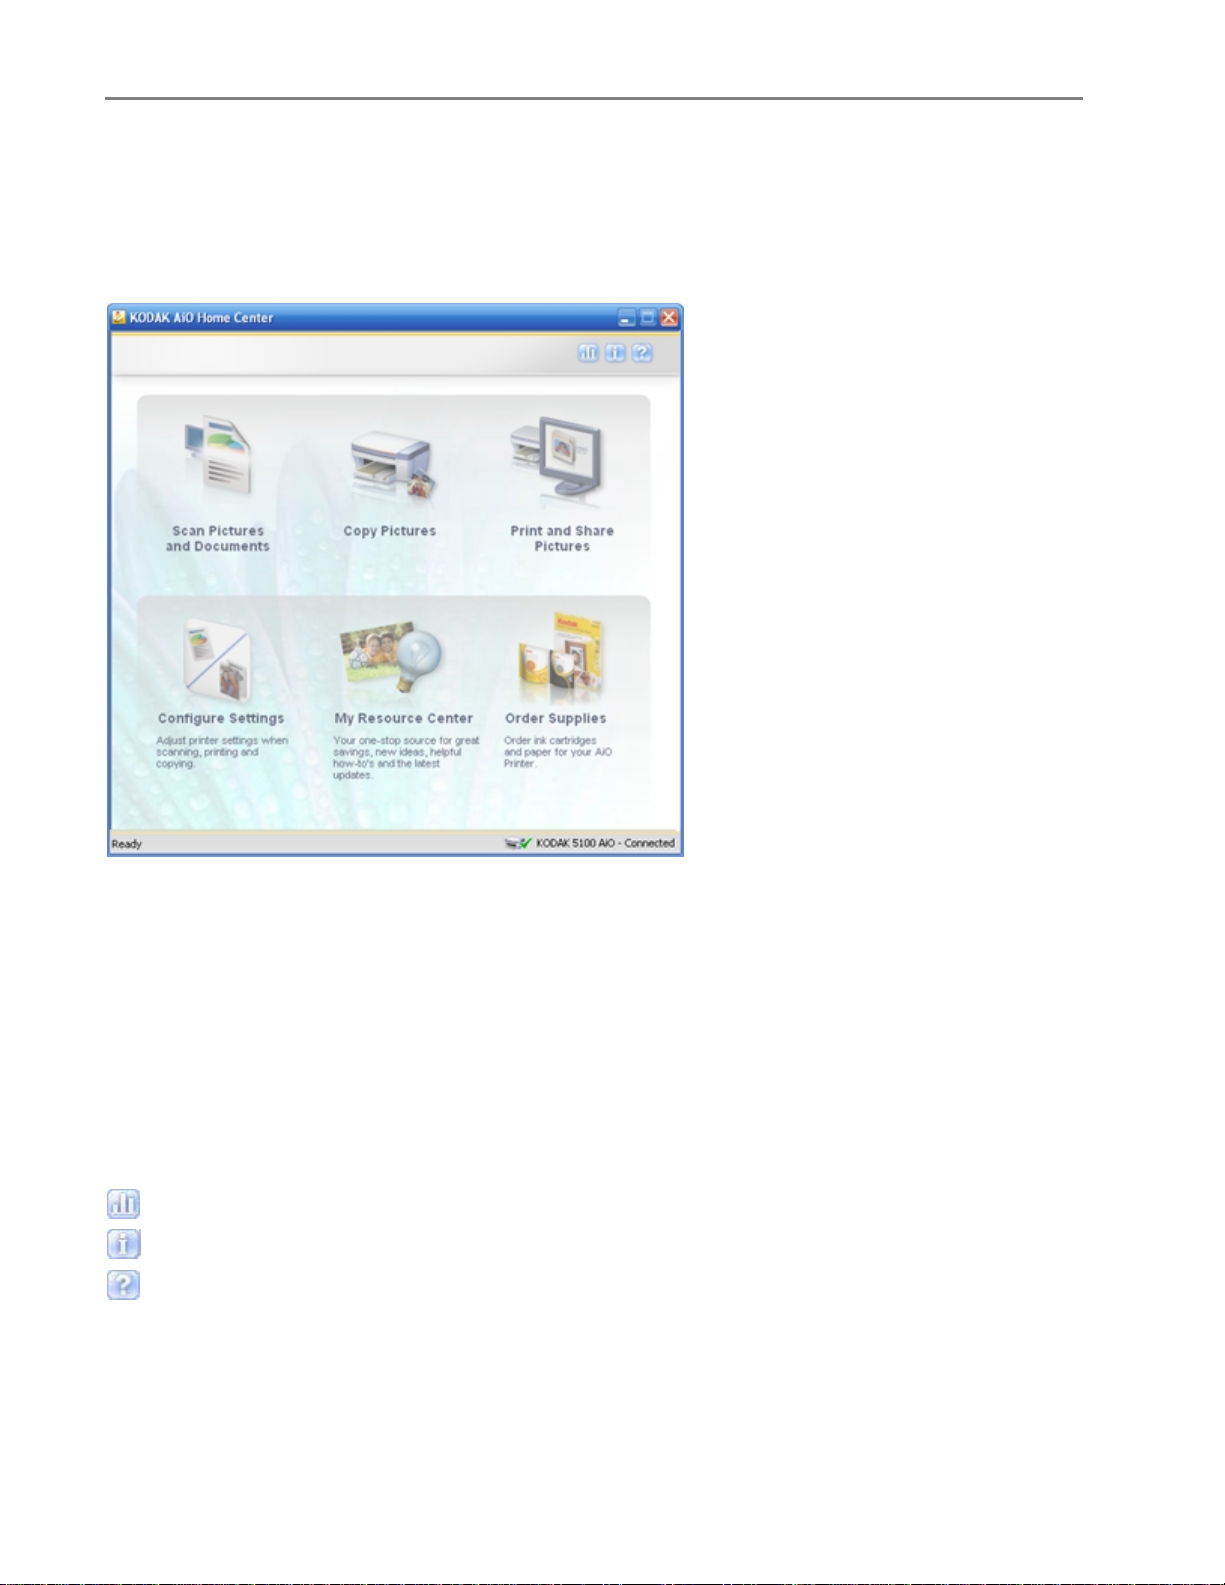
Home Center Software
The EasyShare AiO Home Center software is an application that runs on the computer. It enables you to
copy, scan, and configure your EasyShare AiO from the computer. You can also launch Kodak EasyShare
software for transferring, viewing, and working with your digital pictures/videos.
The six large icons on the AiO Home Center main window let you:
Scan Pictures and Documents
Copy Pictures
Print and Share Pictures
Configure Settings for Printing and Scanning.
Access My Resource Center at Kodak
Order Supplies
There are three small icons in the upper right corner of the window:
Displays the Status Monitor
Displays information about the Kodak AiO Home Center
Displays a Help panel for the Home Center software
10 Kodak EasyShare 5100 AiO
Page 15
2 Getting Started
Getting Started
It is important to find a good location for your AiO Printer. Place the printer on a clean flat surface, in a dry
location, and out of direct sunlight. Make sure the printer has proper ventilation.
Avoid areas where ventilation ducts, open doors, or high traffic might expose the EasyShare AiO and paper
to high levels of dust and debris. Airborne particles can affect picture quality.
Allow enough space on all sides of the EasyShare AiO to let you connect and disconnect cables, change
the ink cartridges, and remove and load paper.
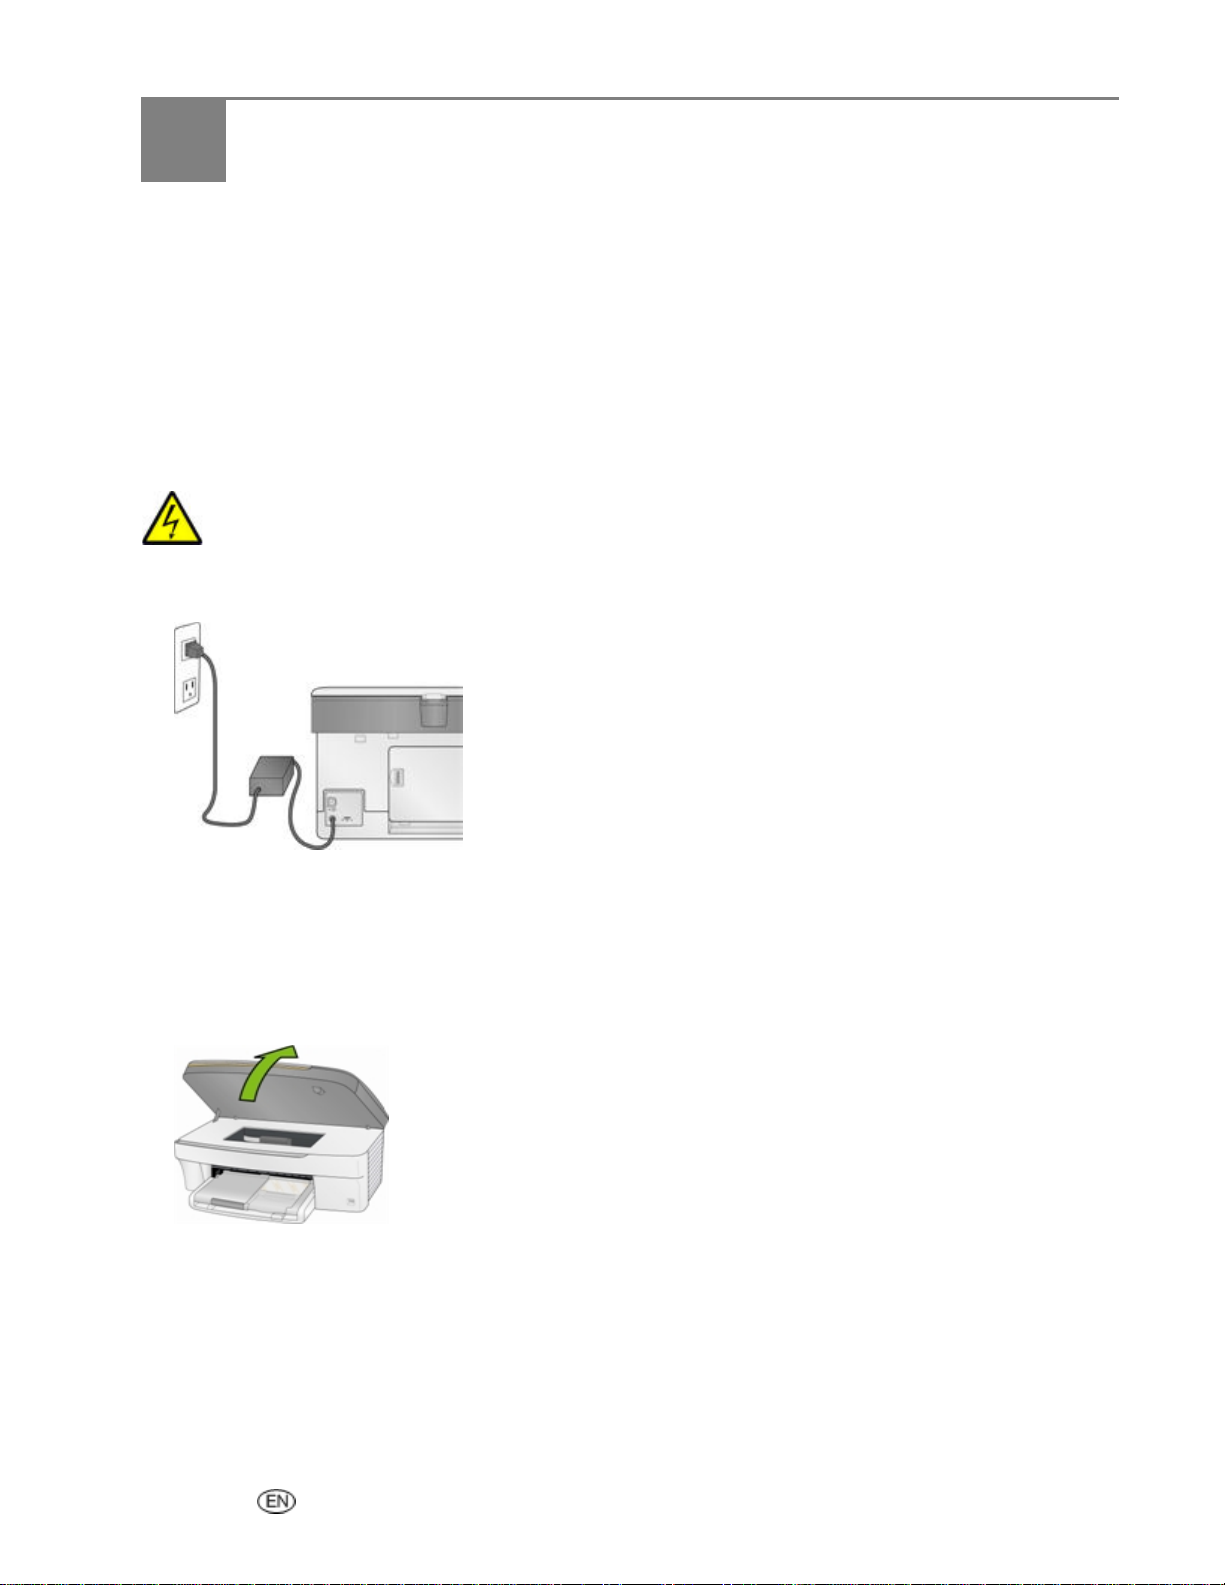
Connect Power
Risk of Electric Shock Use only the AC power adapter included with your AiO printer. Other
adapters or cords could damage your printer or computer.
1 Connect the printer power cord to the AC power adapter, then to the back of the AiO printer.
2 Plug the AC adapter power cord into a power outlet.
Install the Printhead
The printhead dispenses the ink from the cartridges onto the paper.
1 Make sure the EasyShare AiO is on.
2 Open the printer access door. The carriage moves to a center position.
User’s Guide 11
Page 16

Chapter 2
3
Remove the printhead from its bag.
4 Remove and discard the clear plastic casing and the orange protective cap.
5 Place the printhead into the carriage.
6 Push against the back wall of the printhead until it clicks into place.
7 Install the ink cartridges.
12 Kodak EasyShare 5100 AiO
Page 17
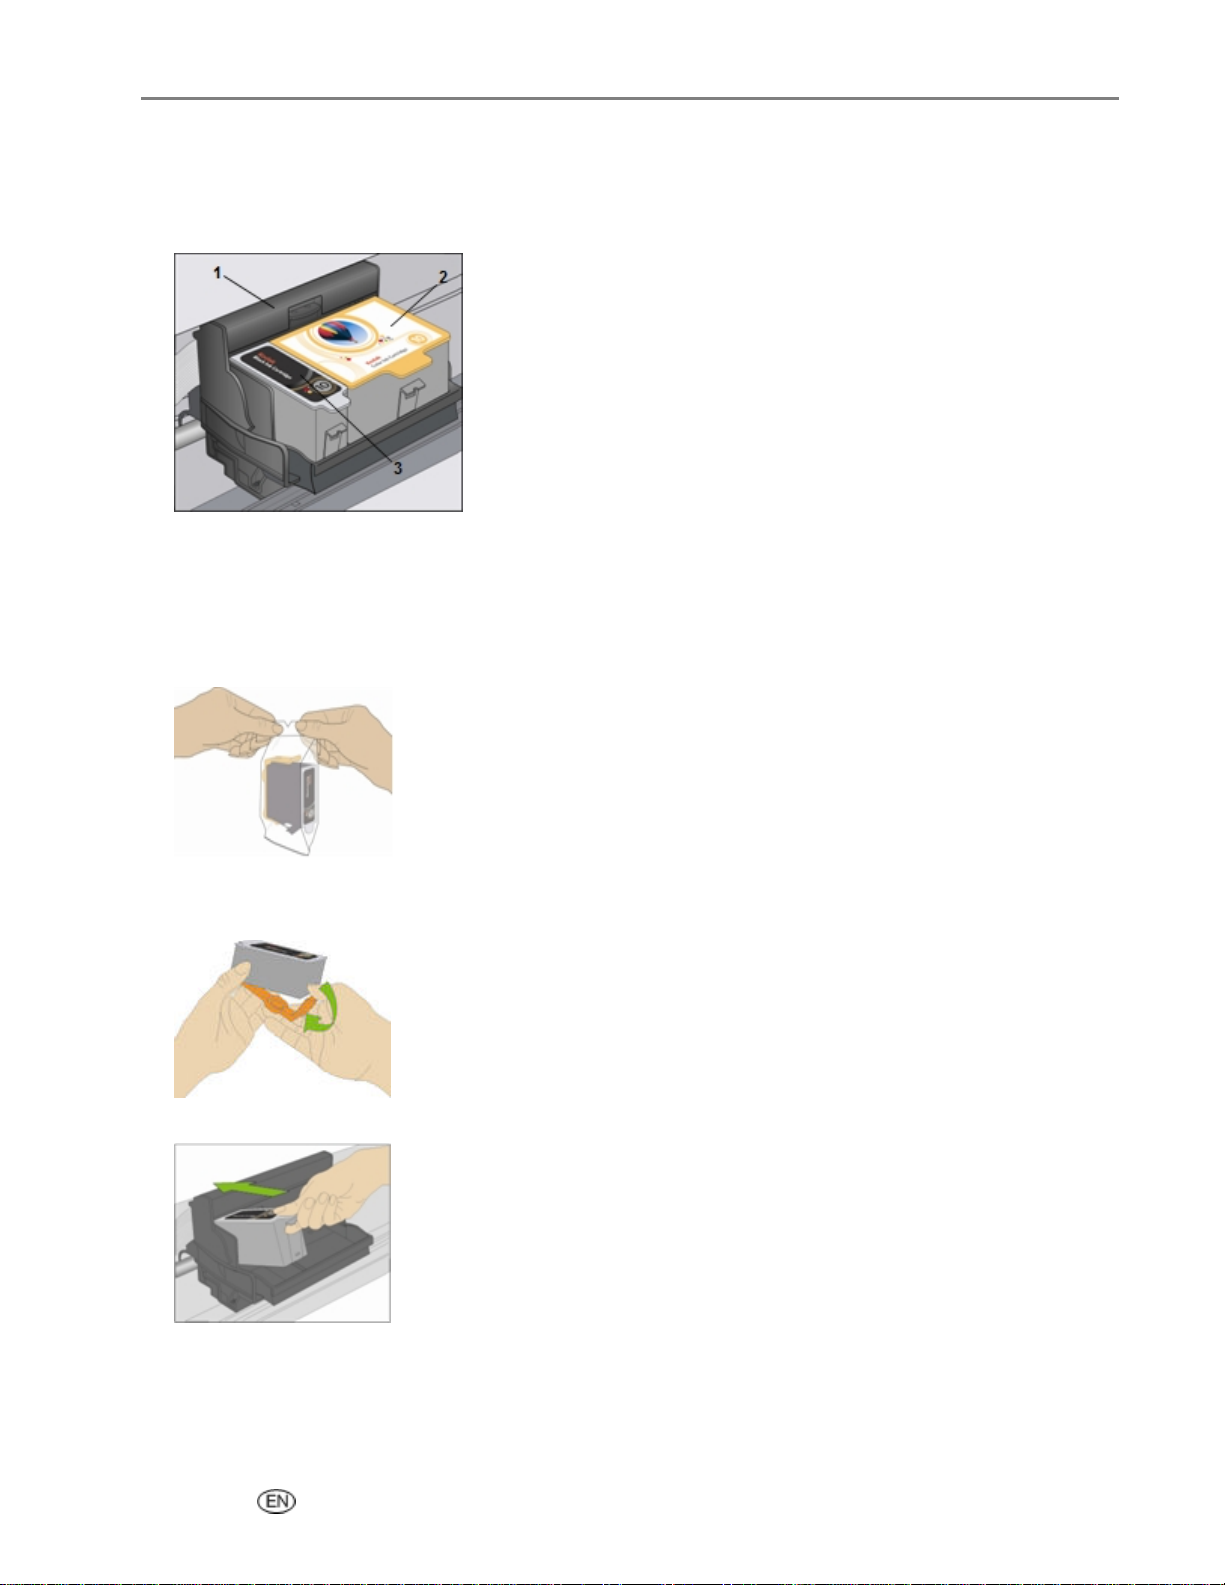
Install Ink Cartridges
After installing the printhead, you need to install the black and color ink cartridges.
1 Printhead
2 Color ink cartridge
3 Black ink cartridge
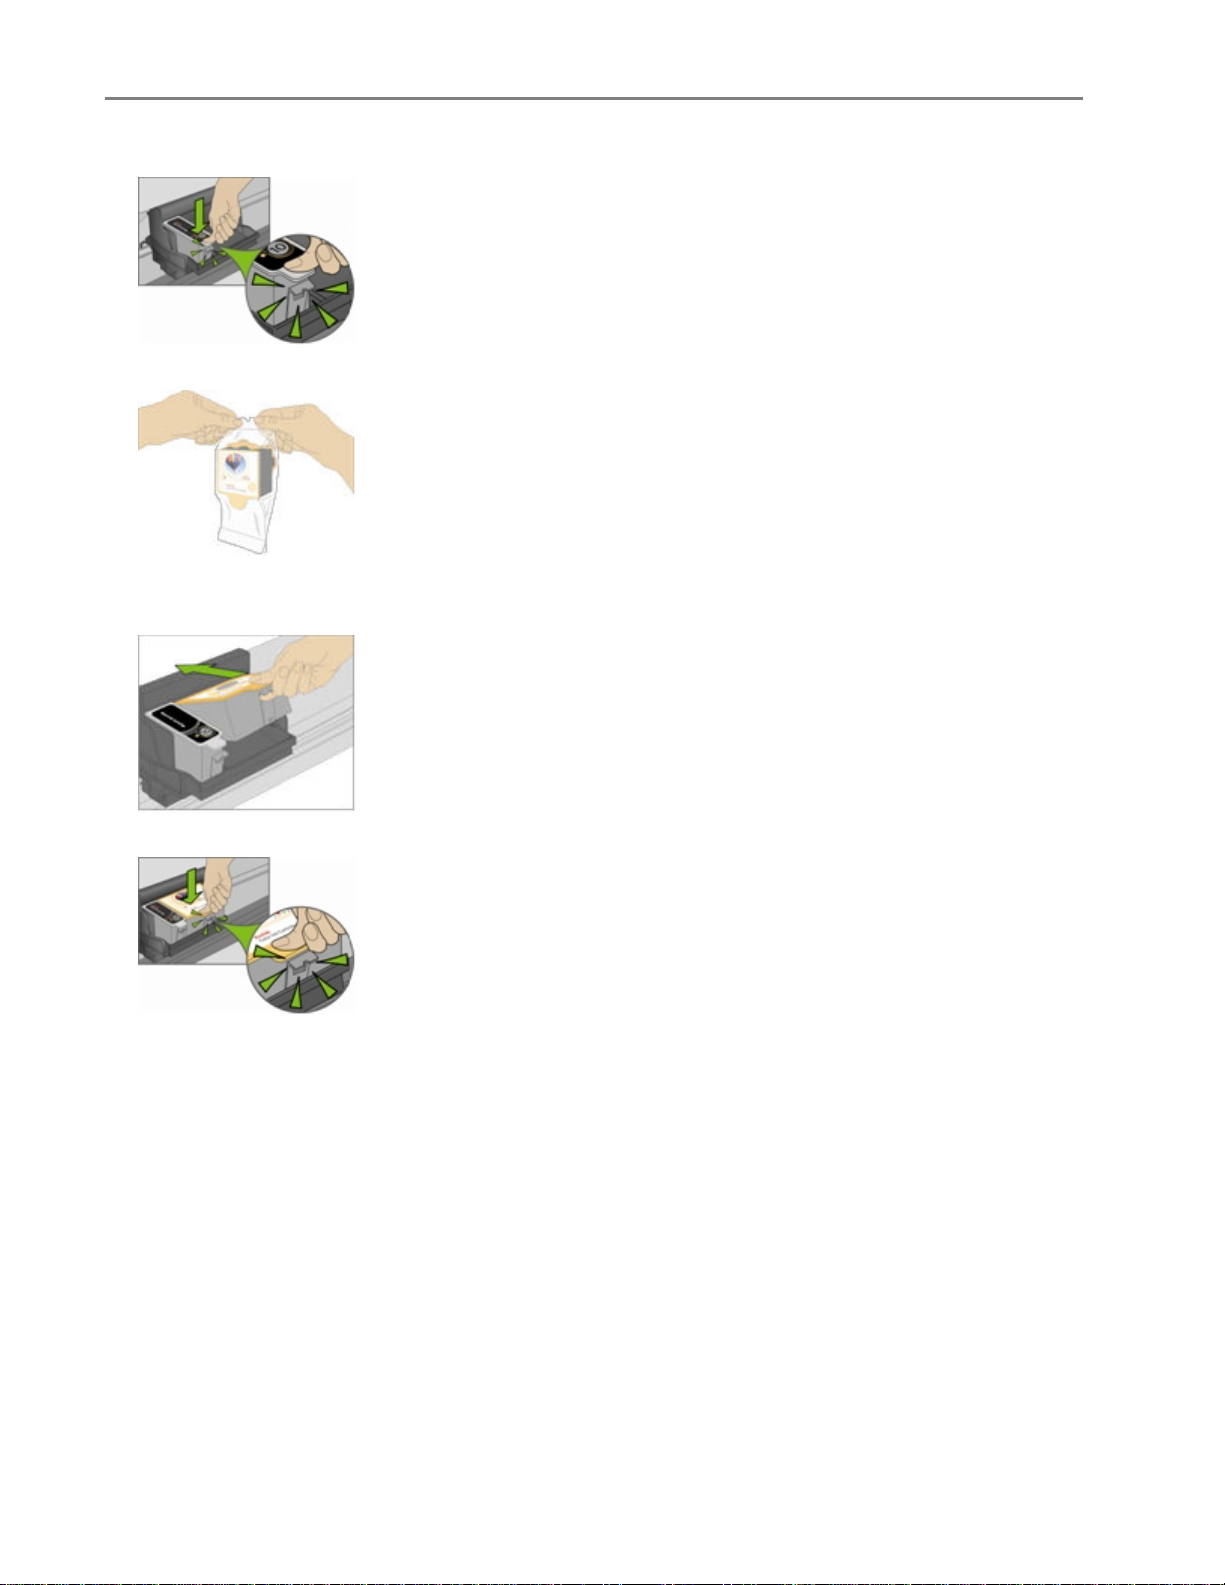
1 Tear open the black ink cartridge bag at the notch and remove the ink cartridge.
Getting Started
IMPORTANT: Insert the ink cartridge immediately to prevent any drying of the ink.
2 Remove and discard the orange cap.
IMPORTANT: Handle ink cartridge carefully to avoid ink transfer.
3 Insert the black ink cartridge into the printhead.
User’s Guide 13
Page 18
Chapter 2
4
Press down on the ink cartridge until you hear it snap into position.
5 Tear open the color ink cartridge bag at the notch and remove the ink cartridge.
6 Remove and discard the orange cap.
7 Insert the color ink cartridge into the printhead.
8 Press down firmly on the cartridge until you hear it snap into position.
9 Close the printer access door.
NOTE: For the best quality prints, store ink cartridges in a location where the temperature does not
exceed 85° F (30° C).
14 Kodak EasyShare 5100 AiO
Page 19
Getting Started
Install the Duplexer
The Kodak EasyShare AiO supports an optional duplexer (Kodak EasyShare 5000 Series Two-Sided
Printing Accessory) that enables printing on both sides of the paper. When installed, the duplexer is
automatically detected by the printer and computer system software.
The duplexer is limited to plain paper ( no photo paper). The paper dimensions that can be used are from
6.9 to 8.5 inches (17.5 to 21.6 cm) wide and from 9.8 to 11.7 inches (24.9 to 29.7 cm) long.
You can purchase a duplexer and other accessories for your printer at
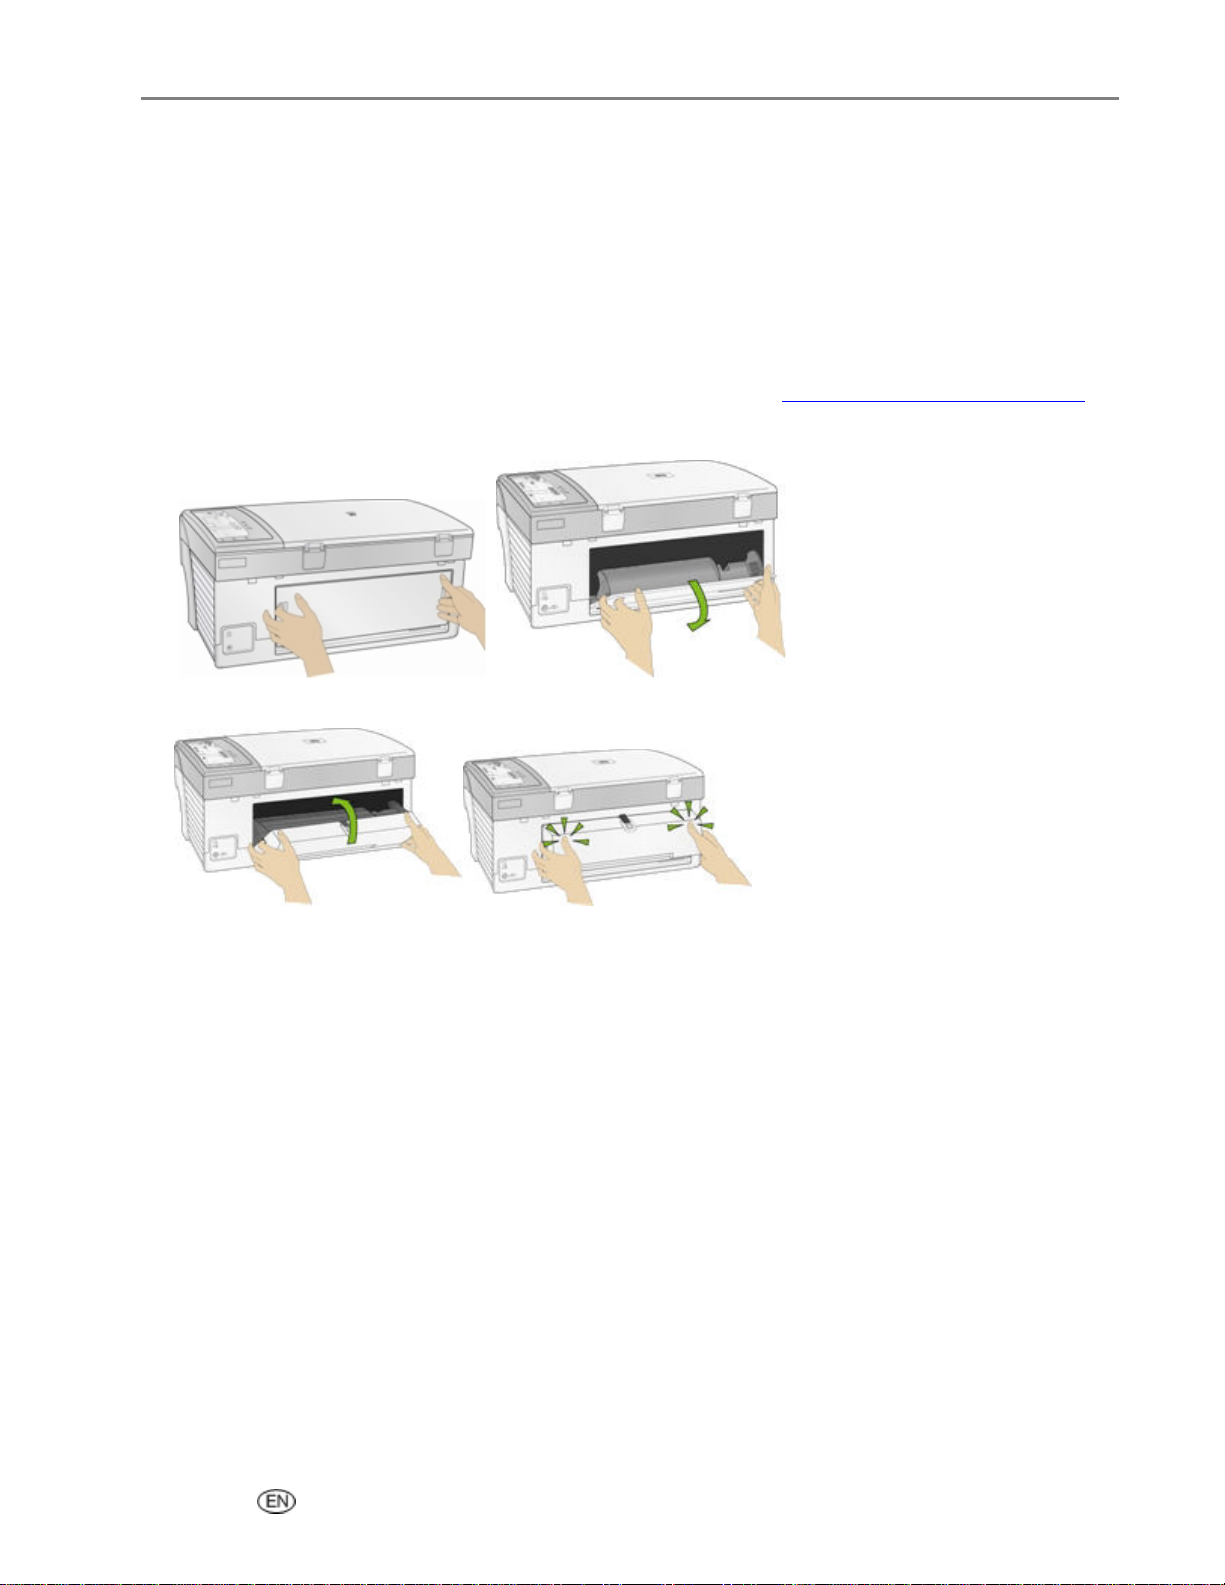
1 Remove the door on the back of the printer by pressing in on the two latches and pulling out.
2 Insert the bottom of the duplexer into the printer and press the top in until it clicks.
You can control how long the printer waits before a sheet is flipped by the duplexer with the AiO Home
Center (See General Settings).
www.kodak.com/go/accessories.
Startup
When the Kodak EasyShare AiO initially powers up, the Light associated with the On/Off button blinks
until the unit is ready to operate. After the startup is complete, the EasyShare AiO enters the Copy mode,
unless a photo device is attached. If a photo device is attached, the EasyShare AiO enters the Photo mode.
Demo Sheet
You can print a sample page on US Letter or A4 size paper to evaluate print quality. The Demo Sheet is a
single sheet of paper that displays information about the features and capabilities of your EasyShare AiO
printer.
You can print a Demo Sheet by pressing the Copy and Photo buttons at the same time.
User’s Guide 15
Page 20
Chapter 2
Transfer Photos
After you take photos with your digital camera, you can print them immediately or save them directly to
your computer. You can transfer from memory cards, PTP cameras, and USB mass storage devices.
1 Connect a USB device or PTP camera to the USB Port.
2 Press the Photo Action button to enter transfer mode (Transfer Light lit).
3 Press Start to transfer.
4 Complete the transfer with the Select Device dialog and Scanner and Camera Wizard on your
computer.
By default, files are saved in month and year folders depending on when the photos were taken. These
folders are created under the C:\Documents and Settings\<username>\My Documents\My Pictures folder.
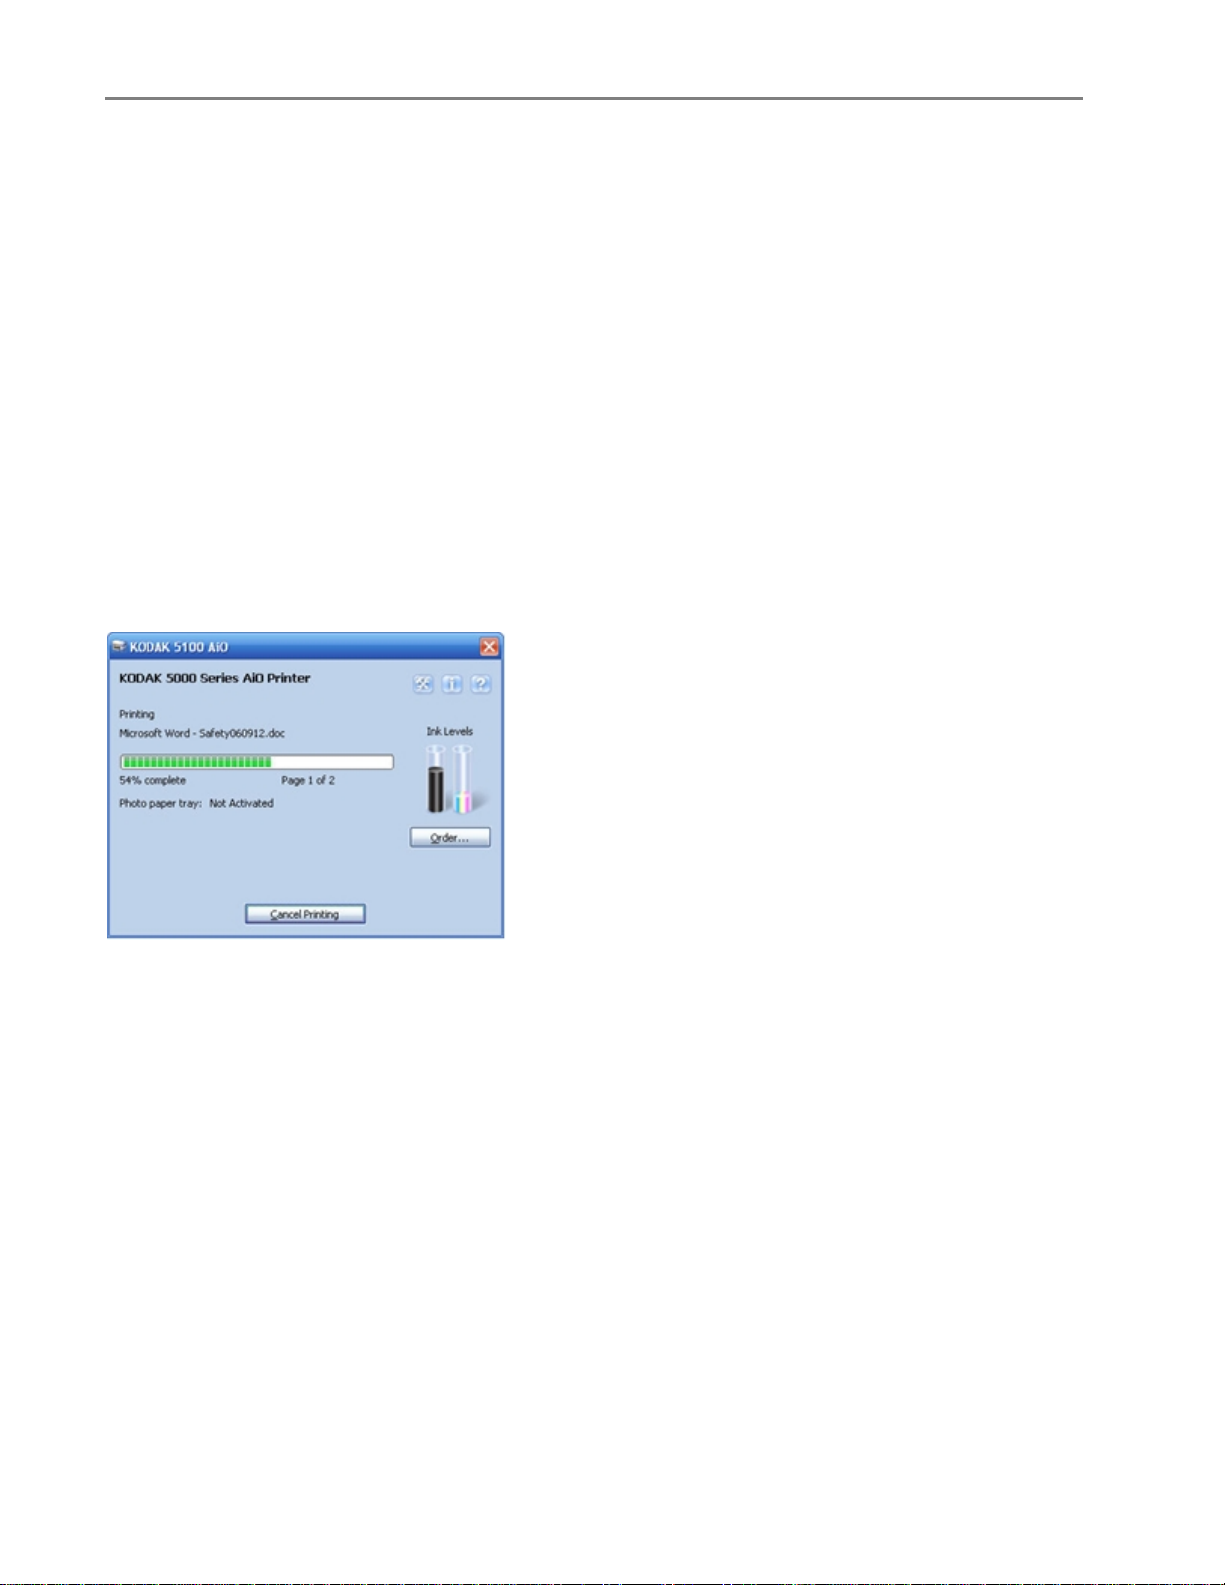
Printer Status
The Status Monitor displays printer errors, warnings, operational statuses, ink levels, and printer response.
When printing from a PC, the application and name of the file printing are displayed.
Waiting to Print is displayed If a print job is started and your All-in-One is busy with another task.
When printing, a progress bar is displayed graphically showing the status of the print operation.
The percentage complete is displayed under the progress bar indicating the percentage of the print
operation complete.
The page number of the current page printing and the total number of pages in the print job is
displayed under the progress bar.
Photo paper tray: Status of the photo paper tray.
Ink Levels
The Ink Level icons display the ink levels of the black and color ink tanks. The level shown for the color ink
cartridge is the current lowest level for the five colors within the cartridge. Clicking on either icon displays
the Ink Levels dialog box.
16 Kodak EasyShare 5100 AiO
Page 21

Getting Started
A Warning icon is displayed over the ink level icon when a low ink condition exists. A Critical icon is
displayed over the ink level icon when an out of ink condition exists.
Click Order... to buy supplies from Kodak online.
Errors
If an error occurs, the Status Monitor displays an error message, error correction instructions, and a link to
the Support section of the AiO Home Center Help.
Set Options for Status Monitor
An icon is present in the Status Notification area of the Taskbar when the Status Monitor is active.
If an error occurs, the icon changes appearance.
This menu is displayed when you right click on the icon.
The following options are displayed when you select Options in the menu.
Always display the Status Monitor
Only display the Status Monitor when an error occurs
User’s Guide 17
Page 22
Chapter 2
General Settings
Printer Date and Time
The date and time factory default is synchronized to the computer connected to the AiO printer. The date
and time format is based on the language and country/region setting.
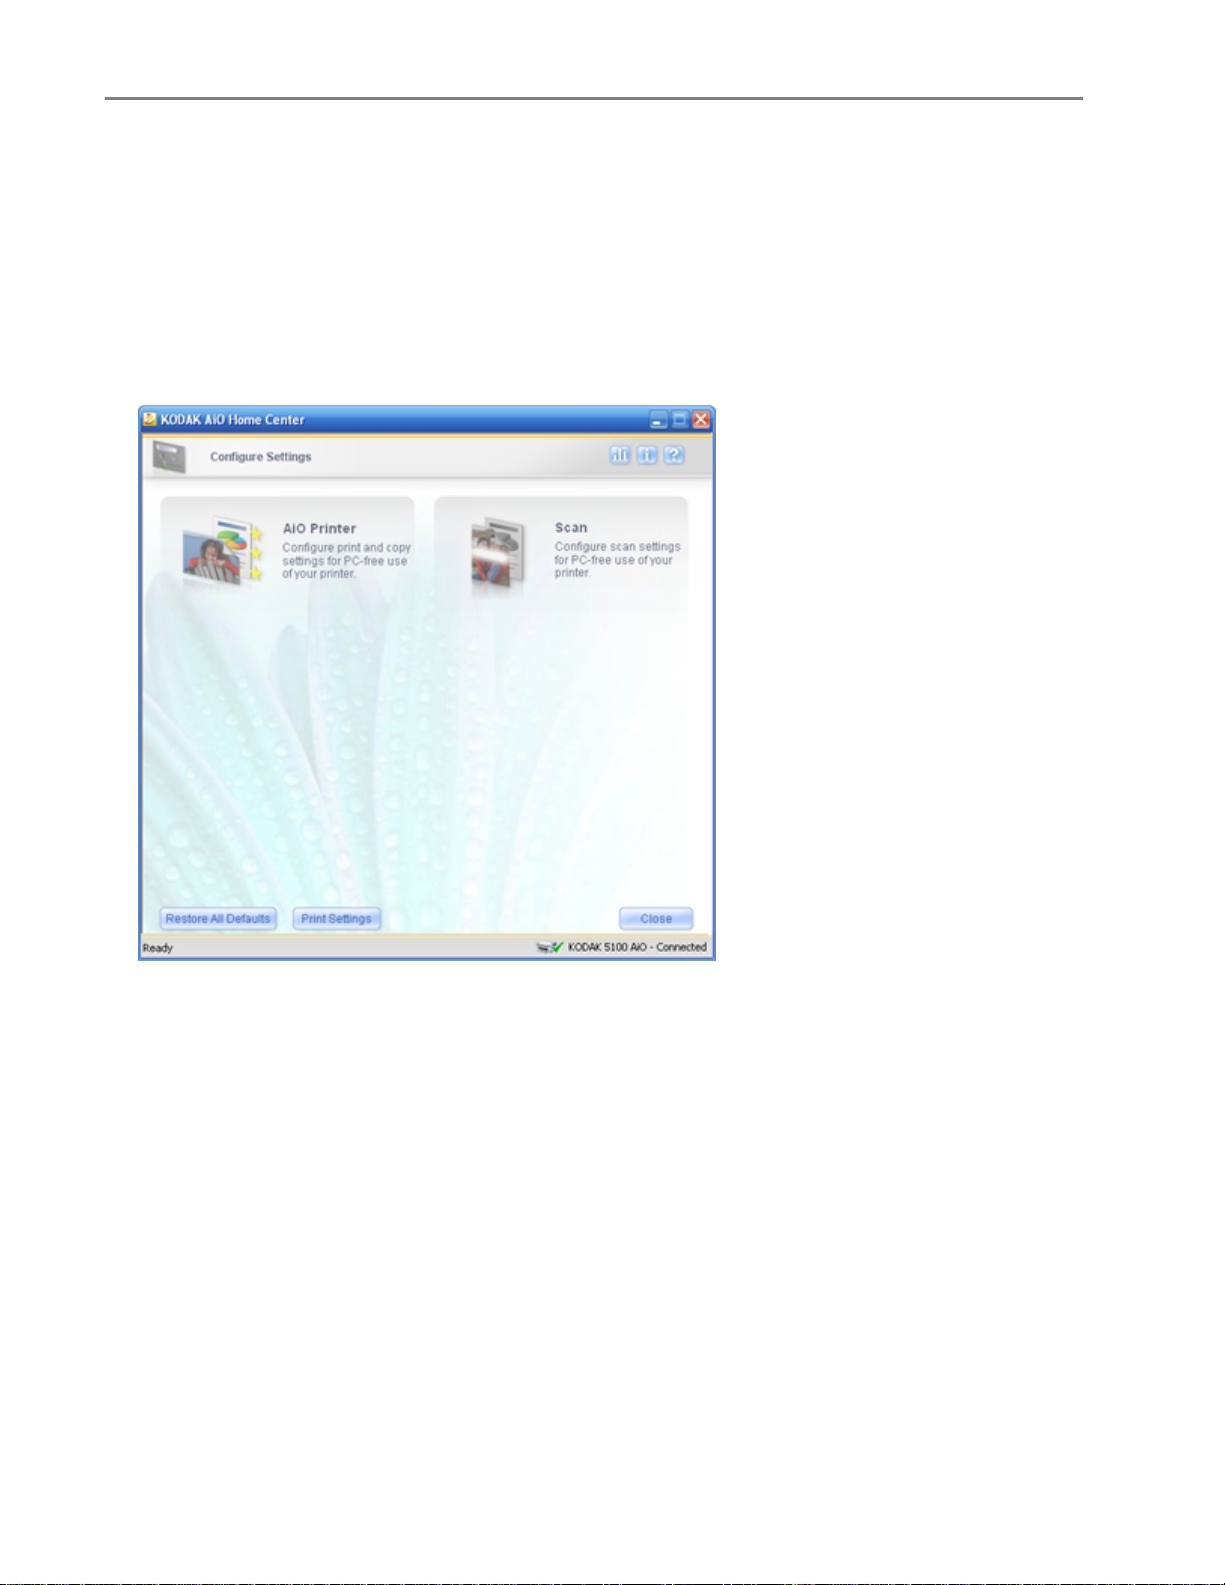
To enable or disable the date and time synchronization
1 On the main Home Center window, click Configure Settings.
18 Kodak EasyShare 5100 AiO
Page 23
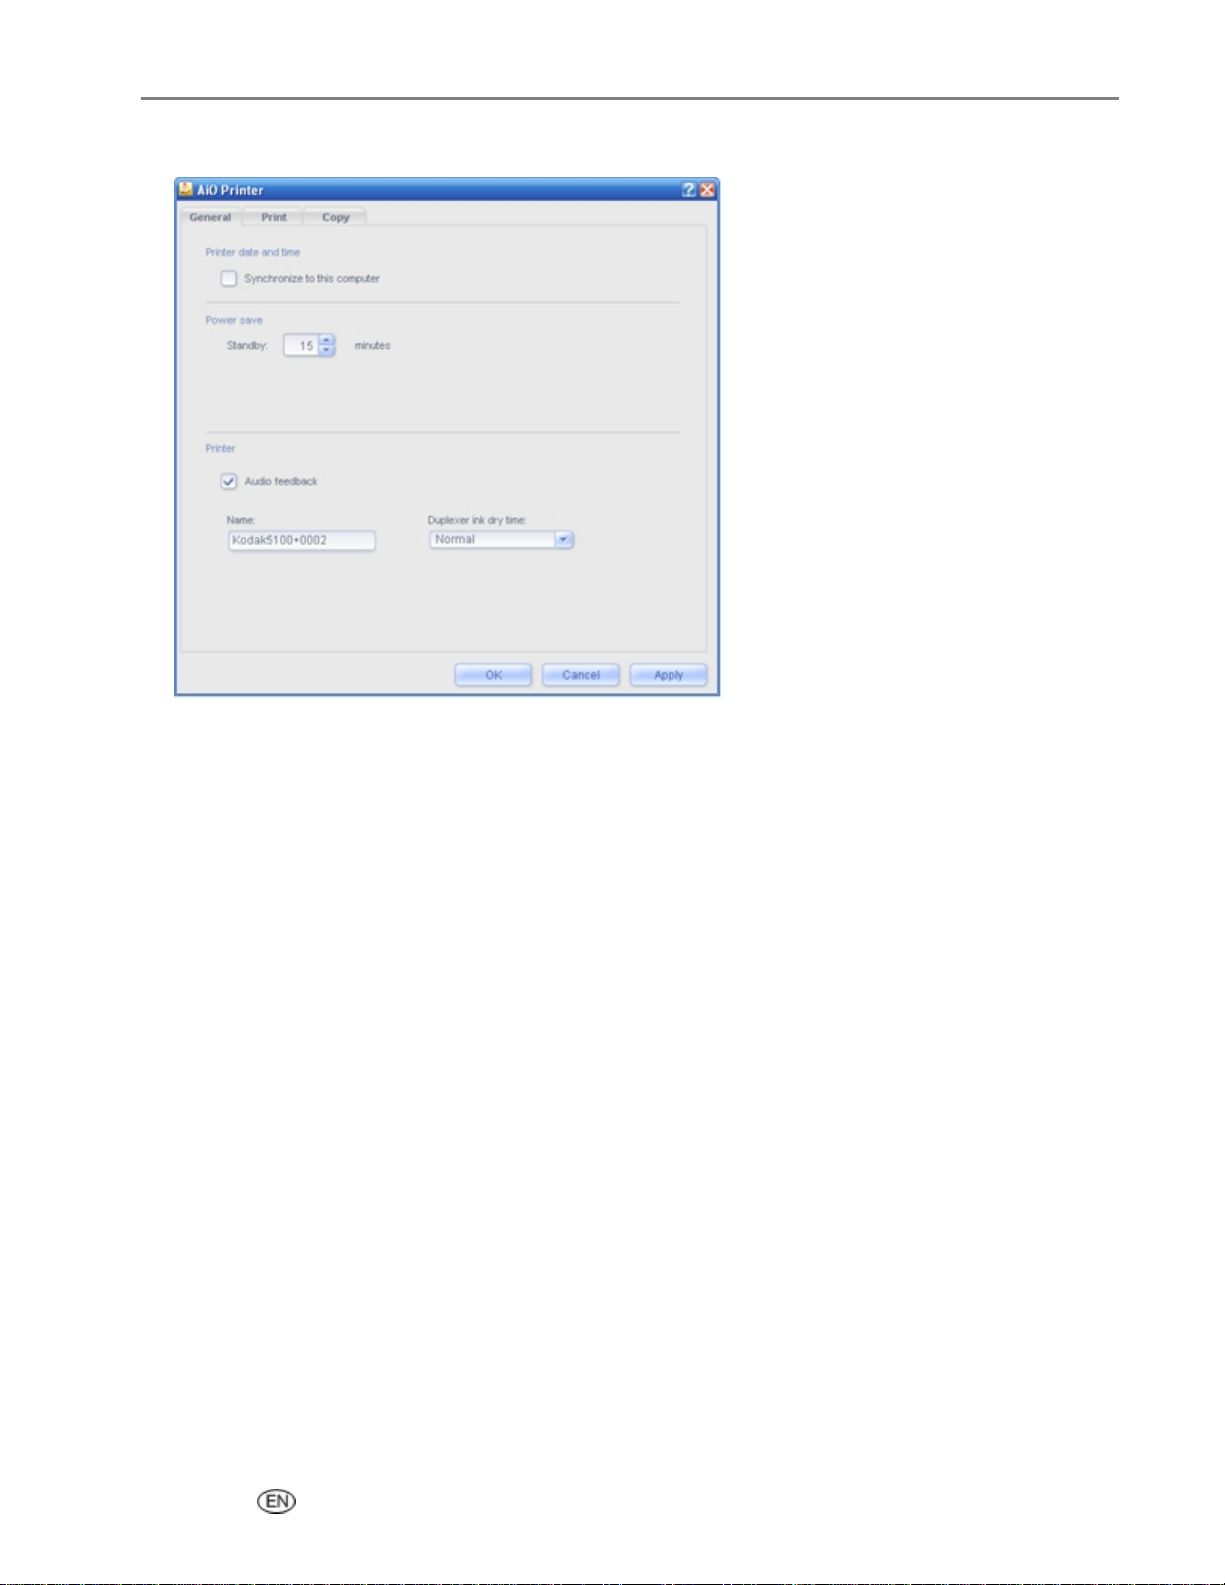
2
Click AiO Printer.
Getting Started
3 On the General tab, select or clear the Synchronize to this computer checkbox to enable or disable
date and time synchronization.
4 Click OK or Apply.
Power
You can set your EasyShare AiO to enter Standby mode after a timeout of 1 to 60 minutes.
To change the power settings
1 On the main Home Center window, click Configure Settings.
2 Click AiO Printer.
3 On the General tab, select timeout values from the Standby drop-down list.
4 Click OK or Apply.
User’s Guide 19
Page 24

Chapter 2
Printer
To change printer settings
1 On the main Home Center window, click Configure Settings.
2 Click AiO Printer.
3 On the General tab, change the following options as desired.
Audio feedback: When checked, a beep generated when you press a button on the Control Panel.
Duplexer ink dry time: Indicates how long to wait before a sheet is flipped by the optional duplexer.
Name: Your EasyShare AiO has a serial number that is used to construct name for Bluetooth printing.
The default name is Kodak5100+XXXX, where XXXX represents the last four digits if the AiO printer's
serial number. You can change this to a more user-friendly name by entering a new name in the edit
box.
4 Click OK or Apply.
20 Kodak EasyShare 5100 AiO
Page 25
3 Handling and Loading Paper
Handling and Loading Paper
Use the following guidelines when handling paper.
To avoid fingerprints, handle the paper by the edges as much as possible.
Avoid touching the glossy side of photo paper.
Keep the input and 4x6 paper trays closed to keep out dust and debris.
Store paper flat.
Keep paper away from direct sunlight, and out of high-temperature environments (such as a vehicle
parked in the sun).
You can load many different types and sizes of paper in your Kodak EasyShare AiO, including letter paper,
photo paper, transparencies, and envelopes (see Paper Types in the Appendix). The EasyShare AiO
automatically detects the size and type of paper you load in the input tray, and then adjusts to generate
the highest quality output for that paper.
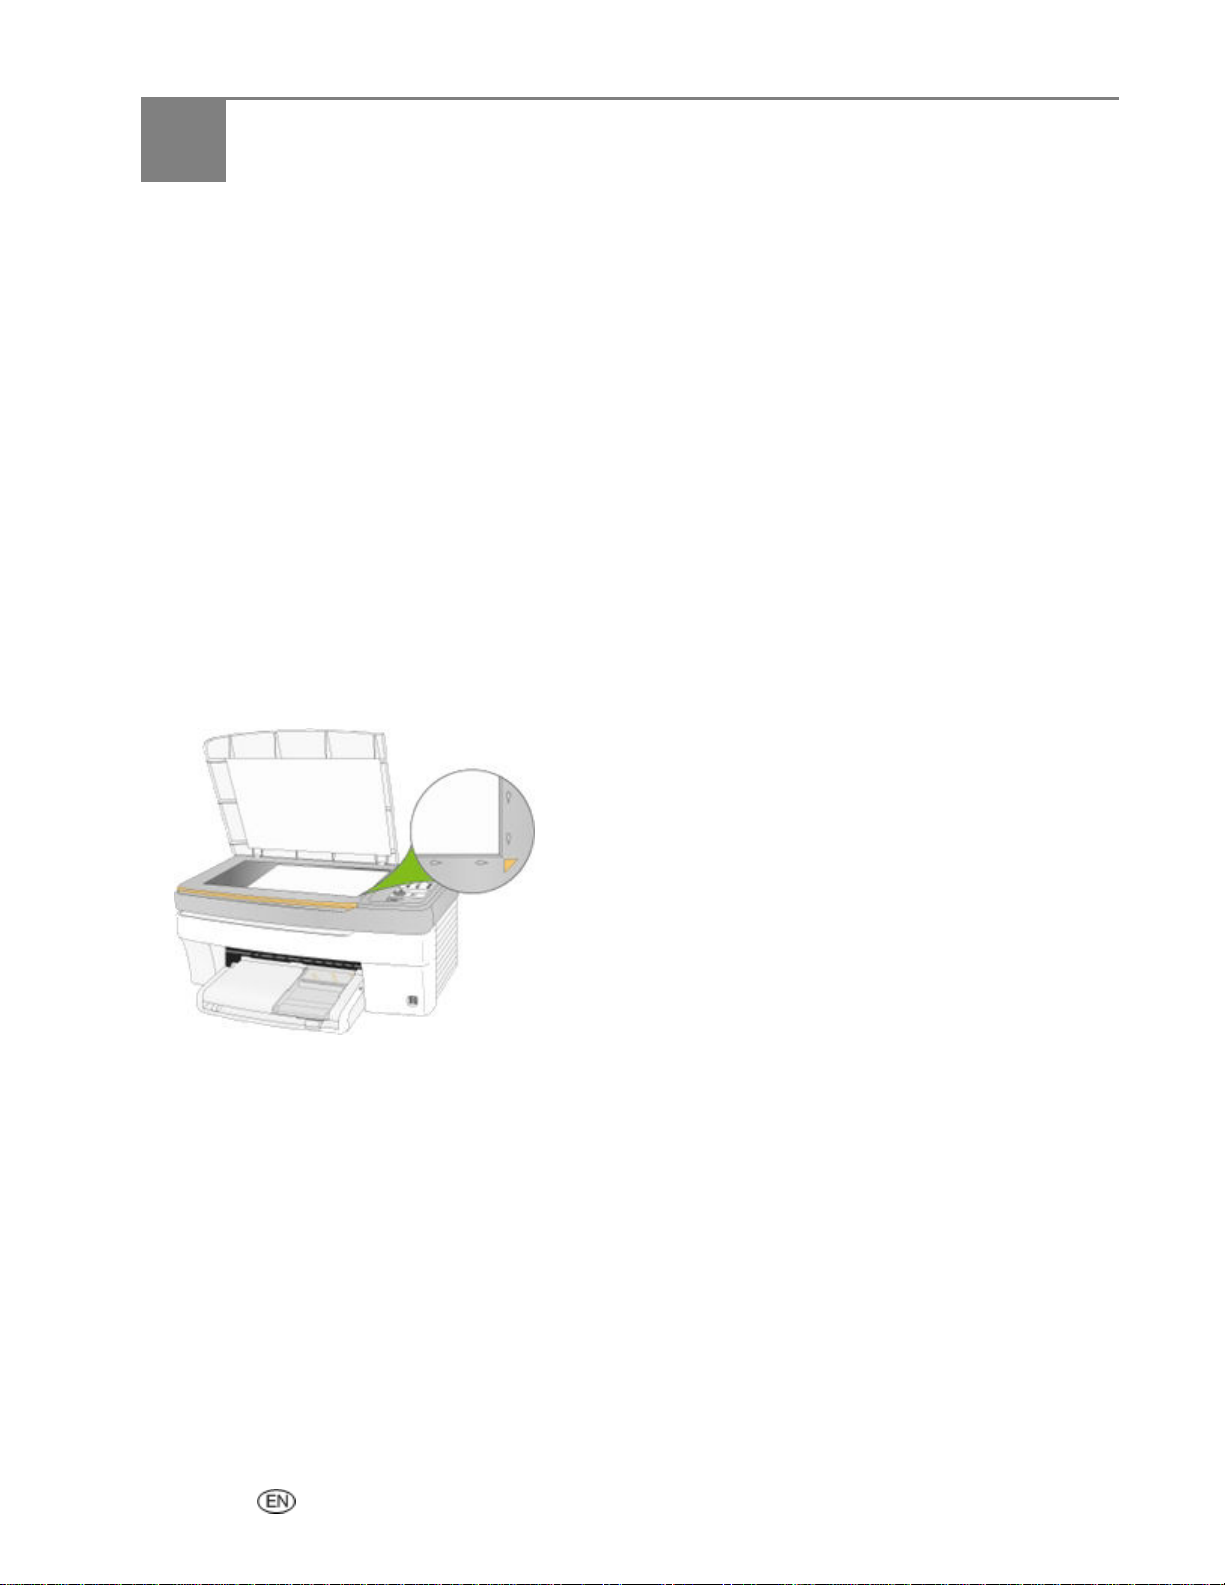
The Scanner Glass
The scanner glass is where you place originals for copying or scanning.
1 Lift the lid and place your original face down on the right front corner of the scanner glass.
2 Close the lid.
User’s Guide 21
Page 26

Chapter 3
You can copy or scan oversized originals by completely removing the lid from your EasyShare AiO. To
remove the lid, lift the lid to the open position, grasp the sides of the lid, and then pull the lid upward.
Your EasyShare AiO functions normally with the lid removed. Replace the lid by inserting the tabs on the
hinge back into the appropriate slots.
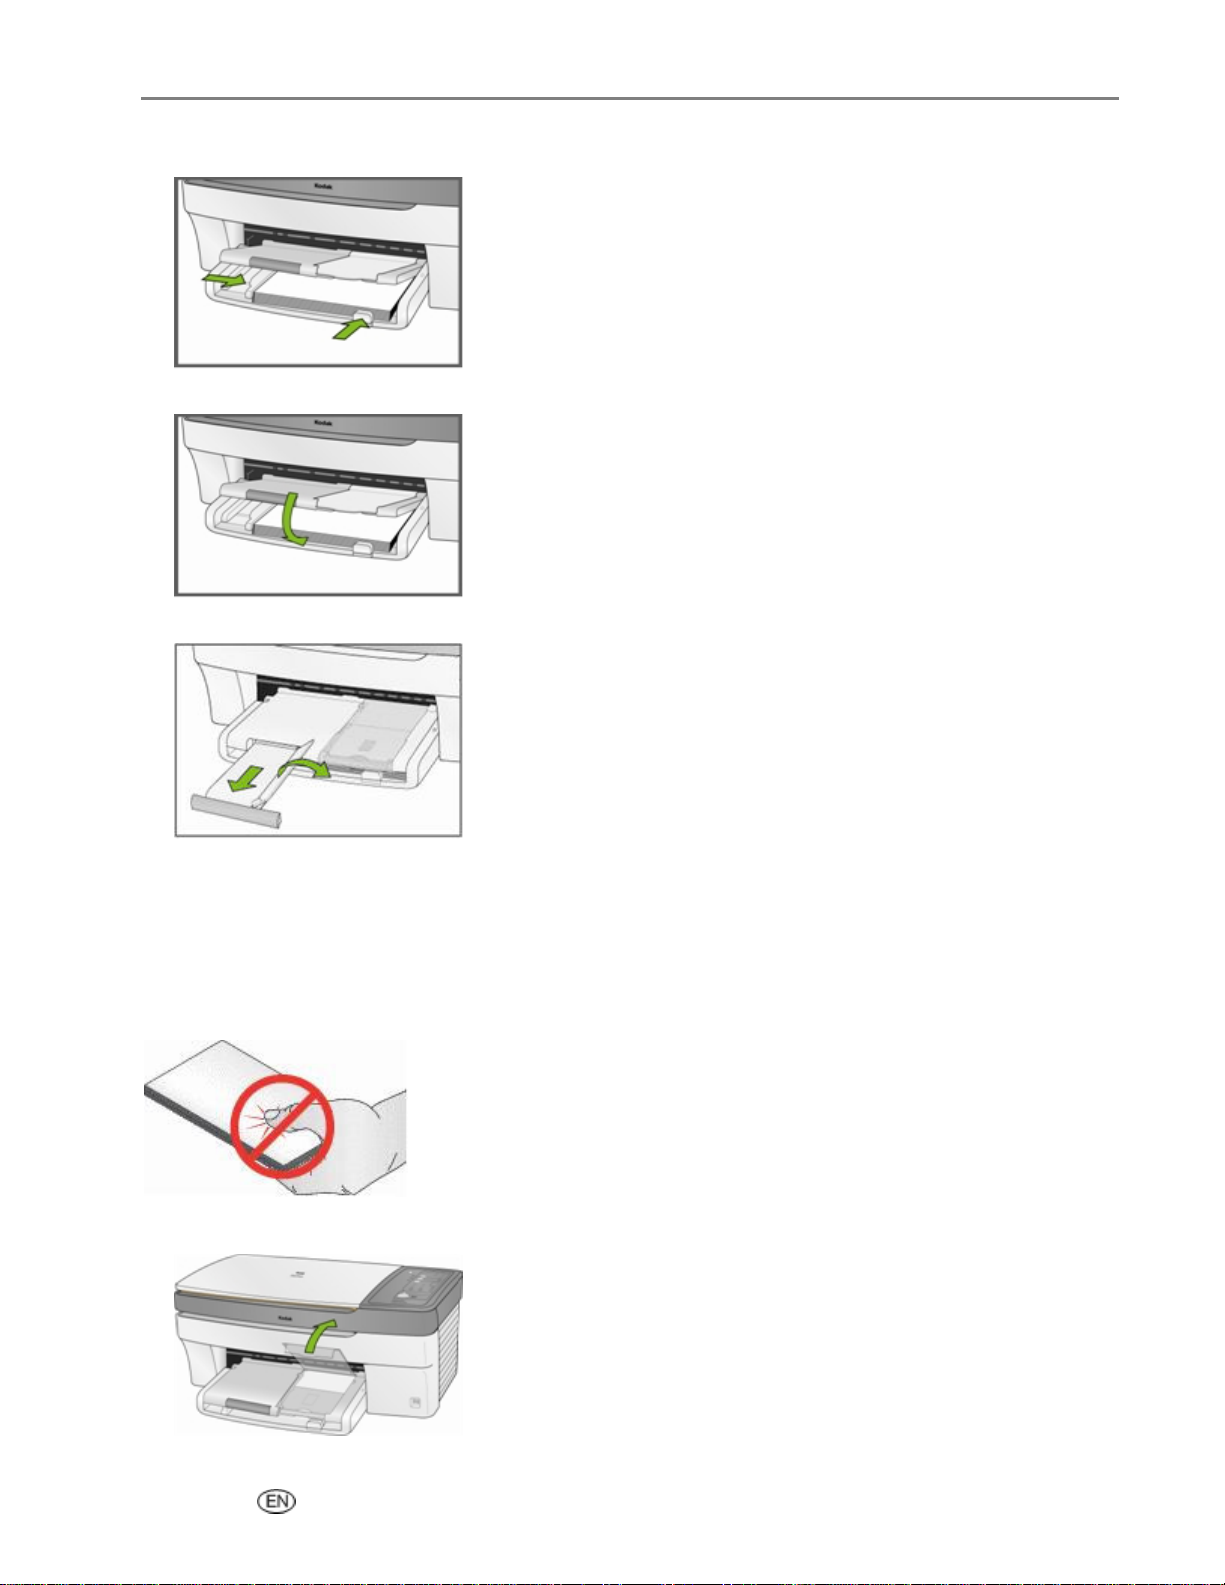
Load Main Tray
You can load the main paper tray with various types of paper from 3 to 8.5 inches wide and 5 to 14 inches
long, with a capacity of 100 sheets of 20 lb plain paper (clean stack of new paper).
IMPORTANT: To print from the main paper tray, make sure the photo tray is not engaged, pulled all the
way out, and the lid closed.
1 Lift the output tray, and slide the paper-width and paper-length guides to their outermost positions.
2 Align the edges of a stack of paper.
3 Insert the stack of paper into the input tray with the short edge forward and the print side down. Slide
the stack of paper forward until it stops.
22 Kodak EasyShare 5100 AiO
Page 27
Handling and Loading Paper
4
Slide the paper-width and paper-length guides inward until they stop at the edges of the paper.
5 Lower the output tray.
6 Pull the extender tray out.
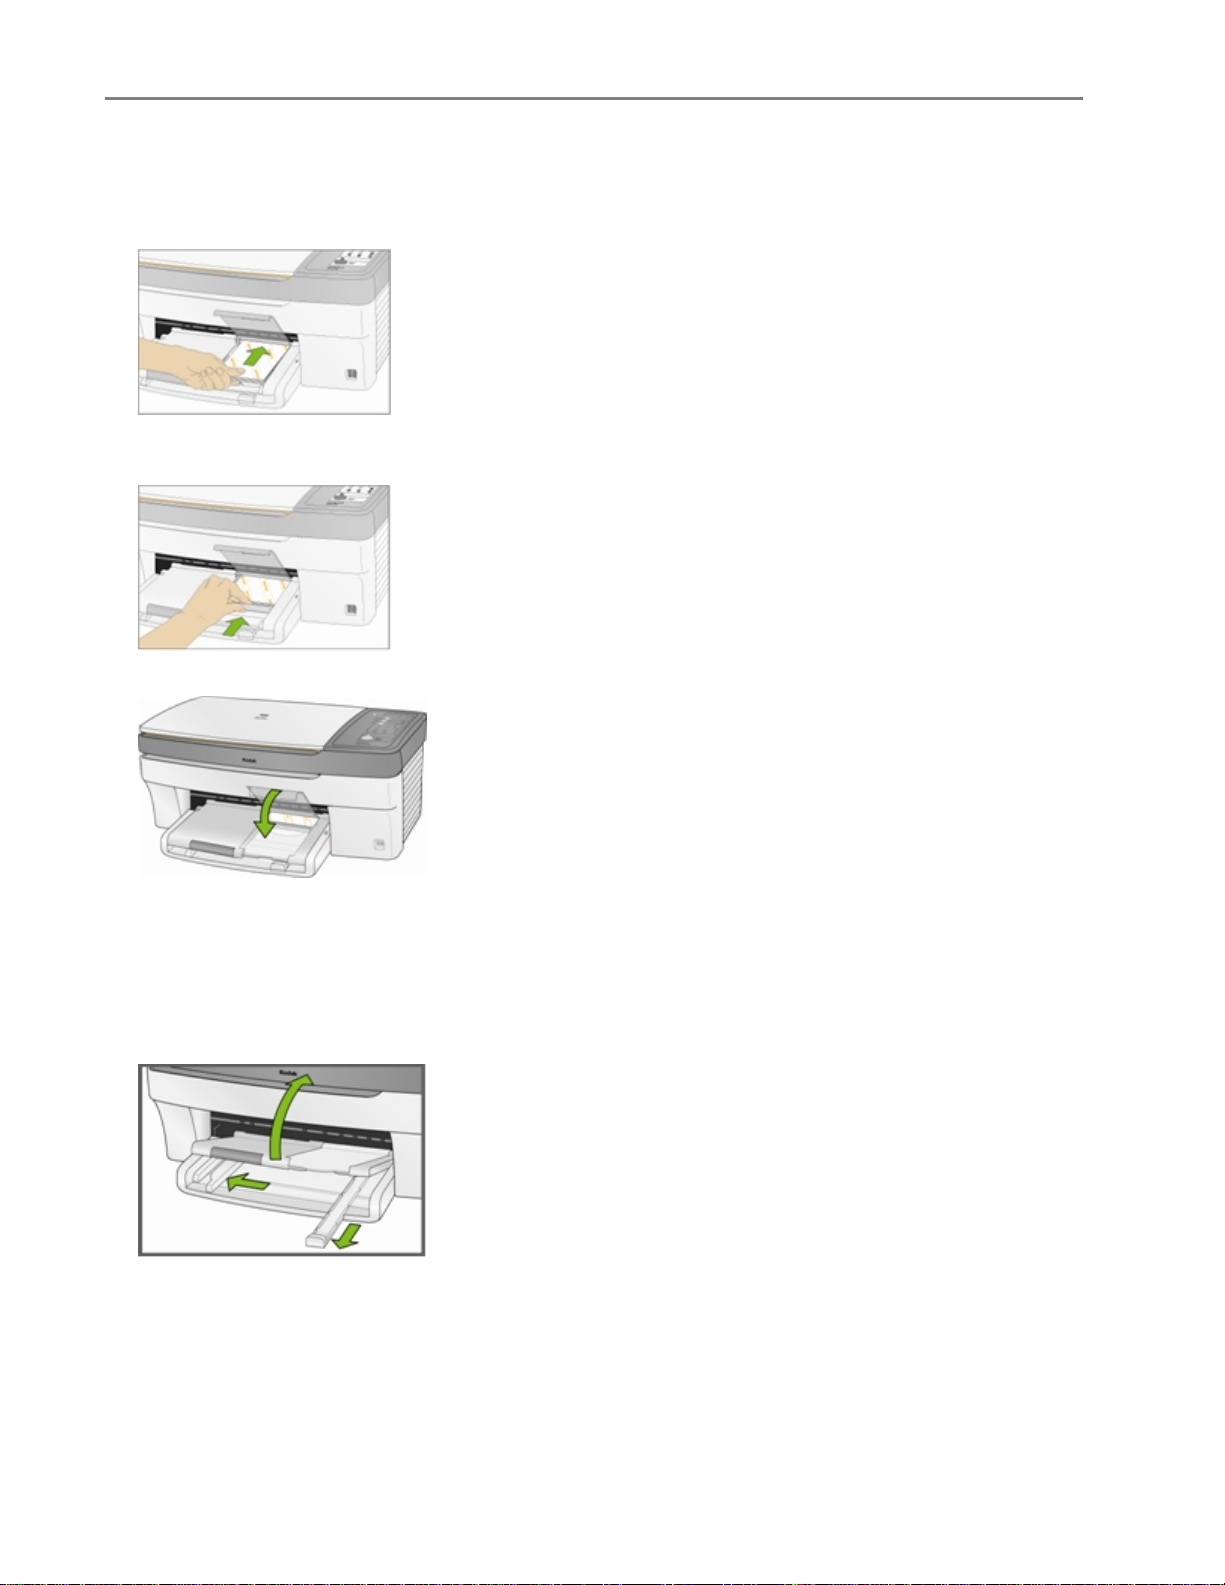
Load Photo Tray
You can load up to 20 sheets of 10 mil thick 4x6 inch (101x150 mm) photo paper into the photo tray.
TIP: To avoid fingerprints, handle the paper by the edges or by the perforated tabs. Avoid touching the
glossy side of the paper.
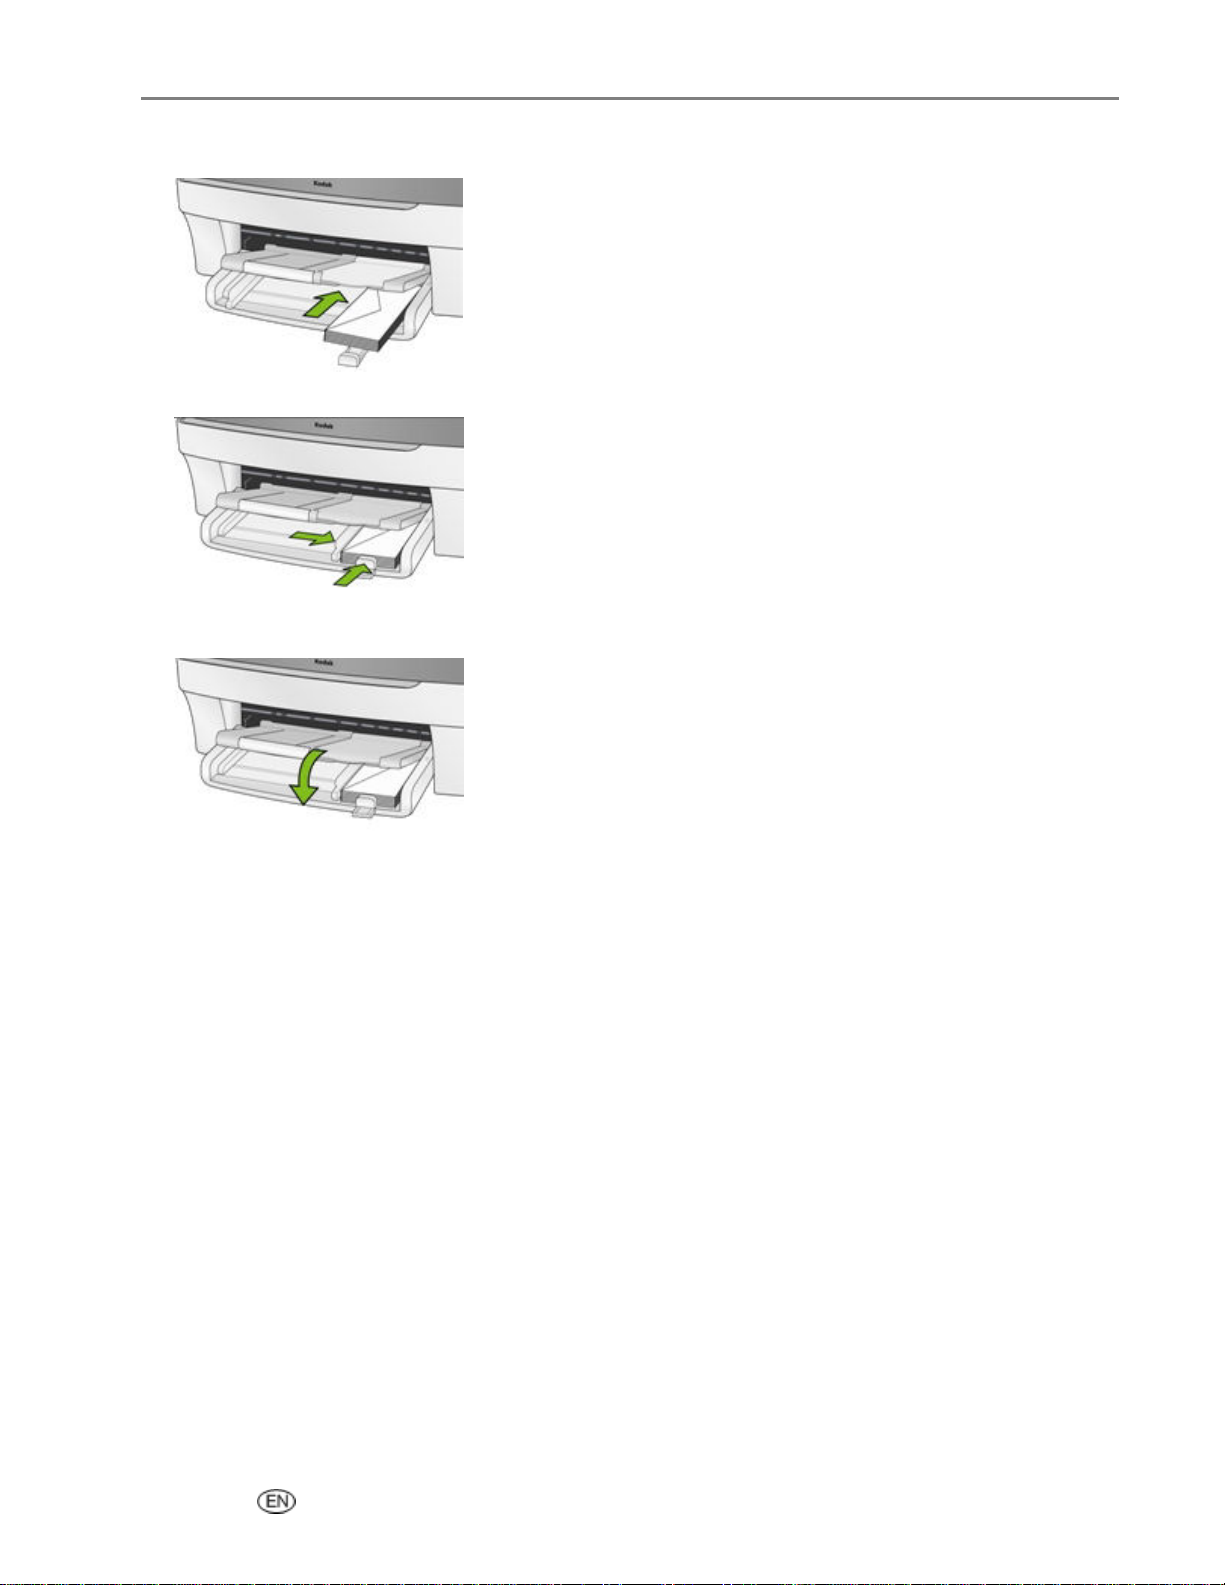
1 Lift the photo tray lid.
User’s Guide 23
Page 28
Chapter 3
2
Slide the photo tray towards you until it stops.
NOTE: When the photo tray is disengaged, the main paper tray is active.
3 Insert the stack of photo paper into the photo tray glossy side down.
4 Slide the photo tray with the stack of photo paper in until it stops. Engaging the photo tray turns the
photo tray light on.
5 Close the photo tray lid.
Load Envelopes
You can load plain envelopes into the main input tray of your Kodak EasyShare AiO. Do not use envelopes
with cutouts or cellophane windows.
1 Lift the output tray.
2 Remove any paper in the input tray.
3 Insert one or more envelopes face down with the envelope flaps to the left.
24 Kodak EasyShare 5100 AiO
Page 29
4
Slide the stack of envelopes forward until it stops.
5 Slide the paper guides inward against the stack of envelopes until they stop.
6 Close the output tray.
Handling and Loading Paper
Load Labels
Use letter or A4 (designed for use with ink jet printers) label sheets.
1 Ensure that none of the pages are sticking together.
2 Place a stack of label sheets on top of standard paper in the input tray, label side down.
User’s Guide 25
Page 30

Page 31

4 Print
You can print pictures on your Kodak 5100 EasyShare All-in-One directly from a camera or by a
Proofsheet.
When you print from an application, the EasyShare AiO printer driver provides the following features.
Non-photo Paper Print Quality
Draft Produces the fastest print speed, but the lowest quality.
Normal Delivers high-quality output and is the default setting. Normal prints faster than Best.
Best Produces the highest quality for all paper and eliminates the banding (striping) effect that
sometimes occurs in solid areas. Best is the slowest print speed.
Page Size
You can select a standard page size or create a custom size.
Borderless
Prints without any margin on the printed media.
Orientation
You can print a document with the short edge of the paper at the top of the page (portrait), or with the long
edge of the paper at the top of the page (landscape).
Print last page first
Causes printing to begin with the last page and end with the first page.
NOTE: There can be a delay when printing a large document while it is being spooled. Printing will begin
when the last page is spooled.
Collate
You can collate pages when printing multiple copies.
Scale Layout
You can scale pages or pictures by percentage or page size.
Multi-page Layout
The driver can reduce multiple pages so that they can all be printed on one sheet of paper.
Poster Layout
This function enlarges a picture, divides it into several pages, and prints each page on a separate sheet of
paper. You can paste these sheets of paper together to create a poster.
Booklet Layout
The pages are distributed and printed on both sides of the paper and arranged is sequence. When they are
folded in the middle and stapled they create a booklet.
Print Mirror Image
Flips the image for iron-on printing.
Two-sided Printing
You can print on both sides of the paper.
Watermark
You can select or create a background watermark.
User’s Guide 27
Page 32

Chapter 4
Print with Control Panel
1 Connect your camera to the EasyShare AiO.
2 Load the photo tray with photo paper.
3 Use your camera to select and print photos.
Print Photos from a Proofsheet
A proof sheet is a simple and convenient way to select photos and make prints directly from a camera
without the need for a computer.
1 Connect a camera to the USB port.
2 Load the main tray (see Load Main Tray in Chapter 3) with letter size plain paper.
3 Press Photo Action to enter Proofsheet mode (Proofsheet Light lit).
4 Press Start. The On/Off light flashes while the Proofsheet is printing. When the Kodak EasyShare AiO
finishes reading the memory card in the camera the On/Off button stops flashing and stays lit.
5 To print photos, follow the instructions on the proofsheet.
Bluetooth Printing
Bluetooth is a short-range radio technology that enables wireless connectivity between electronic devices.
This feature supports an optional Kodak USB Bluetooth Adapter that accepts JPEG/EXIF image file types
from the following types of Bluetooth enabled devices.
Mobile camera phones
PDAs
Digital still cameras
You can purchase a Bluetooth Adapter directly from Kodak at
To enable Bluetooth wireless connectivity, plug your Kodak Bluetooth Adapter into the front USB port.
www.kodak.com/go/accessories.
NOTE: Your EasyShare AiO supports connection to only one Bluetooth device at a time and has an 8MB
file size limitation.
28 Kodak EasyShare 5100 AiO
Page 33

Print
Range
The recommended maximum distance between Bluetooth devices for the highest transfer speed is 10
meters or 32.81 feet. However, Bluetooth will work beyond this distance.
User-friendly Name
Your EasyShare AiO has a serial number that is used to construct name for Bluetooth printing. The default
name is Kodak5100+XXXX, where XXXX represents the last four digits if the AiO printer's serial number.
You can change this to a more user-friendly name with the AiO Home Center (See General Settings in
Chapter 2).
Printing
When a Bluetooth connection is made, no other functions are available. You control printing from your
Bluetooth device.
Print with Computer
You can print from any application that has a Print command in the File menu.
You can also print from Kodak EasyShare software (when installed). Kodak EasyShare software lets you
take advantage of a wide range of features, including editing, printing options, and picture organization.
1 Click Print and Share Pictures EasyShare.
2 Make sure the My Collection tab is selected.
3 Select an album under My Albums.
4 Select the pictures you wish to print and drag them to the Picture tray.
5 Click the Print at Home tab.
6 Make sure the current printer is set to the EasyShare AiO (Click Printer Setup).
7 Change any other settings, such as paper size and print layout, then click Print.
Print Settings
You can set print options for printing from the control panel with the Home Center software. When
printing from a computer, use the printer driver preferences to set options.
User’s Guide 29
Page 34

Chapter 4
Print Quality
Kodak picture quality is automatically selected when photo paper is detected in the main or photo input
trays.
The following print quality options are available for printing on plain paper.
Draft Produces the lowest quality, but the fastest print speed.
Normal Delivers high-quality output and is the default setting. Normal prints faster than Best.
Best Produces the highest quality for all paper and eliminates the banding (striping) effect that
sometimes occurs in solid areas. Best is the slowest print speed.
To set print quality for plain paper
1 On the main Home Center window, click Configure Settings.
2 If the Current selected printer is not the one you want to configure, click Select and choose another
one from the list.
3 Click AiO Printer.
30 Kodak EasyShare 5100 AiO
Page 35

4
Click the Print tab. and drag them to the Picture tray
Print
5 Select Draft, Normal, or Best.
6 Click OK or Apply.
Print Options
Whenever possible, the photo layouts on your Kodak AiO Printer “snap” to the nearest standard print size
based on the combination of layout and paper size loaded. Otherwise the layouts are based on a standard
2x3 aspect ratio.
To set print options
1 On the main Home Center window, click Configure Settings.
2 If the Current selected printer is not the one you want to configure, click Select and choose another
one from the list.
3 Click AiO Printer.
4 Click the Print tab.
5 Set the following print options as desired.
Enable printing of tagged pictures: Enables the Kodak EasyShare AiO to detect tagged photo files
(DPOF) and prompt you for options.
Automatically apply screen balance to digital camera pictures: Scene balance is the ability to
adjust the color and density of digital images for brighter color and truer flesh tones.
Print date on front: Select to print todays date on the front of the picture.
User’s Guide 31
Page 36

Chapter 4
Layouts
The photo layouts on your Kodak EasyShare AiO “snap” to the nearest standard print size whenever
possible based on the combination of layout and paper size loaded. Otherwise the layouts are based on a
standard 2x3 aspect ratio. The table below shows the print sizes that result from the various layouts when
applied to US Letter size paper (8.5 X 11 in).
Layout A Paper Print Size
Borderless 8.5x11”
Bordered 8x10”
2 per Page 5x7”
3 per Page 4x6”
4 per Page 3.5x5”
9 per Page 2.5x3.25 (wallet)
In addition to US Letter size paper, your EasyShare AiO provides photo layout support the following of US
and ISO 216 paper sizes. US sizes are measured in inches and ISO 216 sizes are based on the metric
system.
US photo paper sizes
3.5 X 5 inches
4 X 6 inches
5 X 7 inches
8 X 10 inches
ISO 216 paper sizes
A4 (21 X 30 centimeters)
A5 (15 X 21 centimeters)
A6 (10 X 15 centimeters)
B5 (17.6 X 25 centimeters)
The international paper size standard, ISO 216, consists of an A series and a less common B series. This
standard has been adopted by all countries in the world except the United States and Canada. The most
widely used size in the ISO format is A4.
The charts on the following pages compare the most common paper sizes.
32 Kodak EasyShare 5100 AiO
Page 37

Print
User’s Guide 33
Page 38

Chapter 4
34 Kodak EasyShare 5100 AiO
Page 39

3.5x5 Inch Paper
Print
1 per page borderless
3 per page
1 per page bordered
4 per page
2 per page
9 per page
User’s Guide 35
Page 40

Chapter 4
4x6 Inch Paper
1 per page borderless
3 per page
1 per page bordered
4 per page
2 per page
9 per page
36 Kodak EasyShare 5100 AiO
Page 41

5x7 Inch Paper
Print
1 per page borderless
3 per page
1 per page bordered
4 per page
2 per page
9 per page
User’s Guide 37
Page 42

Chapter 4
8x10 Inch Paper
1 per page borderless
3 per page
1 per page bordered
4 per page
2 per page
9 per page
38 Kodak EasyShare 5100 AiO
Page 43

US Letter
Print
1 per page borderless
3 per page
1 per page bordered
4 per page
2 per page
9 per page
User’s Guide 39
Page 44

Chapter 4
Panoramic
40 Kodak EasyShare 5100 AiO
Page 45

A4 Paper
Print
1 per page borderless
3 per page
1 per page bordered
4 per page
2 per page
9 per page
User’s Guide 41
Page 46

Chapter 4
A5 Paper
1 per page borderless
3 per page
1 per page bordered
4 per page
2 per page
9 per page
42 Kodak EasyShare 5100 AiO
Page 47

A6 Paper
Print
1 per page borderless
3 per page
1 per page bordered
4 per page
2 per page
9 per page
User’s Guide 43
Page 48

Chapter 4
B5 Paper
1 per page borderless
3 per page
Index Sheet
1 per page bordered
4 per page
2 per page
9 per page
The Index Sheet layout shows thumbnail images, filenames, and sequence numbers of each photo on a
memory card. It also prints a date range and the sequence numbers continue incrementing across multiple
pages. Index pages can be printed on US Letter/A4 paper or 4x6 paper.
44 Kodak EasyShare 5100 AiO
Page 49

US Letter/A4 Index Sheet
Print
User’s Guide 45
Page 50

Chapter 4
4x6 Index Sheet
46 Kodak EasyShare 5100 AiO
Page 51

5 Copy
Copy
The Kodak EasyShare AiO allows you to produce high-quality color and black-and-white copies on a
variety of paper types, including transparencies. Once copying has started, you may at any time abort a
copy operation by pressing the Cancel button.
Copy with Control Panel
The Kodak EasyShare AiO allows you to produce high-quality color and black-and-white copies on a
variety of paper types, including transparencies. When you lift the cover, the EasyShare AiO scanning lamp
begins to warm up. The lamp goes into power save after one minute of no scan activity so other operations
can occur. Once copying has started, you may at any time abort a copy operation by pressing the Cancel
button.
The default settings are 100%, Color and 1 copy. Whenever printing on photo paper, or doing anything
other than 100% copy onto plain paper, the Kodak EasyShare AiO pre-scans and sizes the data as needed
to fit the output page, or to scale as requested.
Copy to Main Tray
1 Load the main tray with paper and make sure the photo tray is pulled out.
2 Place your original face down on the right front corner of the scanner glass.
3 If necessary, press the Copy button to enter Copy mode.
4 Press the + and - buttons to select the number of copies.
5 Press the Copy Print Size button to select between 100% or Fit to page.
Selecting 100% produces a 1:1 copy. Selecting Fit to page fits the original to the paper size loaded.
6 Press the Copy Color button to select between Color and Text copies.
7 Press the Start button.
User’s Guide 47
Page 52

Chapter 5
Copy to Photo Tray
1 Load the photo tray with photo paper (see Load Photo Tray).
2 Place a 4x6 photo face down on the right front corner of the scanner glass with the 6 inch side towards
the front.
3 If necessary, press the Copy button to enter Copy mode.
4 Press the + and - buttons to select the number of copies.
5 Press the Copy Print Size button to select between 100% of Fit to page.
Selecting 100% produces a 1:1 copy. Selecting Fit to page fits the original to the paper size loaded.
6 Press the Copy Color button to select between Color and Text copies.
7 Press the Start button.
Copy with Computer
You can make copies of pictures on your Kodak EasyShare AiO with Home Center Software.
Copy Pictures
Copying pictures with the AiO Home Center allows you to set copy options not available on the Control
Panel.
To copy pictures
1
Place your original photo photos face down in the scanner glass.
48 Kodak EasyShare 5100 AiO
Page 53

2
On the main Home Center window, click Copy Pictures to open the Basic Copy window.
3
Click Go to Advanced to open the Advanced Copy window.
Copy
4
Select an output type from the Select photo output drop-down list.
4x6 Copy: Print individual borderless 4" x 6" copy(s) of each picture on the scanner glass.
8x10 Copy: Print individual borderless 8" x 10" copy(s) of each picture on the scanner glass.
8.5x11 Copy: Print individual borderless 8.5" x 11" copy(s) of each picture on the scanner glass.
Exact Copy: Print individual, exact size copy(s) of each picture on the scanner glass.
Collage Copy: Copy picture(s) exactly as placed on the scanner glass.
Color Restored Copy: Restores color from faded pictures.
5
Select Color or Black and White.
User’s Guide 49
Page 54

Chapter 5
6
Set the following copy options as desired.
Resolution: Choose the Resolution from the drop-down list you want to use for the copy. Use 300 dpi
when the print size selected is Original. Use a higher resolution when the print size is larger than the
original, and a lower resolution when the print size is smaller than the original.
Copy as individual pictures: Copies all pictures on scanner glass to separate she ets of photo paper.
When this check box is not selected, the entire scanner glass is copied.
Color restoration: Select to restore color on old faded photos.
Kodak Perfect Touch: Automatically corrects for common image flaws and "mistakes," such as
shadows, and backlighting. Kodak Perfect Touch technology also enhances the desirable qualities of
photos, for vibrant color and richer detail.
NOTE: Color restoration and Kodak Perfect Touch can be used together to enhance pictures.
Paper size: Select the paper size loaded. The default selection is Current Tray. When the Photo Tray
is engaged, it becomes the current tray. When the Photo Tray is not engaged, the Main Tray is the
current tray.
Print size: Select the size you want printed when making a copy to the Main Tray.
Borderless: Select to output a print with no border.
Paper saver: This feature automatically lays out your photos using the least amount of space so
less paper is wasted when you cut out the photos. The pictures on the scanner glass are un-skewed
and printed on the same sheet of paper. This checkbox is disabled when the photo tray is engaged.
Copies: Select the number of copies to make of the original.
7
If desired, click to save the options you selected as a shortcut.
8
If desired, click Preview > to preview the scanned photos.
9
Click Copy Now to start the copy. The pictures(s) are scanned and copy progress information
appears that shows the progress of the copy.
Copy Settings
The copy settings on this tab affect making copies from the control panel. The settings you make or
shortcut you select on the Copy Pictures window controls the copies you make from the Home Center
(see Copy Pictures).
Output Quality
Kodak picture quality is automatically selected when photo paper is detected in the main or photo input
trays.
The following print quality options are available for printing on non-photo paper.
Draft Produces the lowest quality, but the fastest copy speed.
Normal Delivers high-quality output and is the default setting. Normal copies faster than Best.
Best Produces the highest quality for all paper and eliminates the banding (striping) effect that
sometimes occurs in solid areas. Best is the slowest copy speed.
50 Kodak EasyShare 5100 AiO
Page 55

To set output quality for non-photo paper
1 On the main Home Center window, click Configure Settings to display the settings options.
2 Click AiO Printer to open the AiO Printer dialog.
3 Click the Copy tab.
Copy
5 Select Draft, Normal, or Best.
6 Click OK or Apply.
Copy Options
1 On the main Home Center window, click Configure Settings to display the settings options.
2 Click AiO Printer to open the AiO Printer dialog.
3 Click the Copy tab.
4 Set the following options as desired.
Brightness: Use the slide-bar to increase or decrease the brightness of copies.
5 Click OK or Apply.
User’s Guide 51
Page 56

Page 57

6 Scan
Scan
You can start a scan from the Kodak AiO Control Panel or your computer.
Scan with Control Panel
Scanning is the process of converting text and pictures into an electronic format for your computer. The
Scan mode becomes active when you press Scan. The Scan status light is always on when the EasyShare
AiO is in Scan mode.
To use the scan features, your EasyShare AiO must be connected to a computer. The Kodak AiO Home
Center software must be installed and running on your computer prior to scanning.
1 Place your original face down in the right front corner of the scanner glass.
2 Press Scan.
3 Press Start. If the Scan application is open on the computer, the item scanned appears on the monitor.
If the Scan application is not open, open it to view the scanned item.
Scan with Computer
Scanning is the process of converting text and pictures into an electronic format for your computer. The
Scan mode becomes active when you click Scan Pictures and Documents. The Scan status light is always
on when the EasyShare AiO is in Scan mode. After loading your original onto the scanner glass, you click
Scan Now to initiate a scan operation. If you select Color, the EasyShare AiO performs a color scan. If you
select Grayscale or Black & White, then the EasyShare AiO scans for black and white with grayscale. The
Scan status light blinks during data transfer.
To use the scan features, your EasyShare AiO and computer must be connected and turned on. The Kodak
AiO Home Center software must also be installed and running on your computer prior to scanning.
Scanning Pictures
The AiO Home Center software allows you to scan pictures to a file or an application.
Scan to File
1
Place your photo or photos face down on the scanner glass. Your Kodak All-in-One Printer can
User’s Guide 53
Page 58

Chapter 6
detect multiple photos.
2
On the main Home Center window, click Scan Pictures and Documents to open the Basic Scan
window.
3
Click Go to Advanced to open the Advanced Scan window.
4
Select Picture.
5
Select Color or Black & White.
54 Kodak EasyShare 5100 AiO
Page 59

6
If desired, set the following options.
Resolution: Choose the Resolution from the drop-down list you want to use for the scan. 300 dpi
is the default and is fine for 4x6 pictures. 600 dpi should be used for smaller pictures. The higher
the resolution, the larger the file size and the slower the scan.
Sharpening: This drop-down list is available when scanning color pictures. It contains a list of
supported sharpen levels for enhancing fuzzy images; None, Default, High, and Maximum.
Color restoration: Select to restore color on old faded photos. This check-box is available when
scanning pictures.
Red Eye reduction: Select to automatically minimize red eye in flash photos. This check-box is
available when scanning color pictures.
Kodak Perfect Touch: Automatically corrects for common image flaws and "mistakes," such as
shadows, and backlighting. Kodak Perfect Touch technology also enhances the desirable qualities
of photos, for vibrant color and richer detail. This check-box is enabled when scanning pictures.
7
If desired, save the options you selected as a scan shortcut.
8
If desired, click Preview > to view of the scanned image (see Scan Preview).
9
Click Scan Now to start the scan.
The picture is scanned and scan progress information appears that shows the progress of the scan.
When the scan is completed, scan complete information and controls appear.
Scan
10
If you have more pictures to scan, place the next one on the scanner glass and click Scan Next or
Preview>.
11
When you have finished scanning, you can enhance your scanned pictures before selecting an
output option by clicking Edit
12
Click Continue to select output options.
13
Make sure File is selected in the Destinations list box.
14
Select a folder for saving the file from the Location drop-down list, or click Browse to select a
(see Enhance Picture).
folder from the Open dialog.
15
Enter a name for the file in the Filename edit box.
16
Select a graphic file format from the File type drop-down list.
17
If you selected JPEG .(jpg) as the File type, select the quality of the output file from the Quality
drop-down list. The higher the quality the larger the file size.
18
Click Send to Destination to save the scanned picture(s) to the selected location. If you select all
the scanned pictures, they are saved in separate files.
User’s Guide 55
Page 60

Chapter 6
Scan to Printer
1
Place your photo or photos face down on the scanner glass. Your Kodak All-in-One Printer can
detect multiple photos.
2
On the main Home Center window, click Scan Pictures and Documents to open the Basic Scan
window.
3
Click Go to Advanced to open the Advanced Scan window.
4
Select Picture.
5
Select Color or Black & White.
6
If desired, set the following options.
Resolution: Choose the Resolution from the drop-down list you want to use for the scan. 300 dpi
is the default and is fine for 4x6 pictures. 600 dpi should be used for smaller pictures. The higher
the resolution, the larger the file size and the slower the scan.
Sharpening: This drop-down list is available when scanning color pictures. It contains a list of
supported sharpen levels for enhancing fuzzy images; None, Default, High, and Maximum.
Color restoration: Select to restore color on old faded photos. This checkbox is available when
scanning pictures.
Red Eye reduction: Select to automatically minimize red eye in flash photos. This checkbox is
available when scanning color pictures.
Kodak Perfect Touch: Automatically corrects for common image flaws and "mistakes," such as
shadows, and backlighting. Kodak Perfect Touch technology also enhances the desirable qualities
of photos, for vibrant color and richer detail. This checkbox is enabled when scanning pictures.
7
If desired, save the options you selected as a scan shortcut.
8
If desired, click Preview to view of the scanned image (see Scan Preview).
56 Kodak EasyShare 5100 AiO
Page 61

9
Click Scan Now to start the scan.
The picture is scanned and scan progress information appears that shows the progress of the scan.
When the scan is completed, scan complete information and controls appear.
10
If you have more pictures to scan, place the next one on the scanner glass and click Scan Next or
Preview>.
11
When you have finished scanning, you can enhance your scanned pictures before selecting an
output option by clicking Edit
12
Click Continue to select output options.
13
Select Printer in the Destinations list box.
14
Click Print to print the scanned picture(s) to your EasyShare AiO.
(see Enhance Picture).
Scan to EasyShare
1
Place your photo or photos face down on the scanner glass. Your Kodak All-in-One Printer can
detect multiple photos.
2
On the main Home Center window, click Scan Pictures and Documents to open the Basic Scan
window.
Scan
3
Click Go to Advanced to open the Advanced Scan window.
4
Select Picture.
5
Select Color or Black & White.
User’s Guide 57
Page 62

Chapter 6
6
If desired, set the following options.
Resolution: Choose the Resolution from the drop-down list you want to use for the scan. 300 dpi
is the default and is fine for 4x6 pictures. 600 dpi should be used for smaller pictures. The higher
the resolution, the larger the file size and the slower the scan.
Sharpening: This drop-down list is available when scanning color pictures. It contains a list of
supported sharpen levels for enhancing fuzzy images; None, Default, High, and Maximum.
Color restoration: Select to restore color on old faded photos. This checkbox is available when
scanning pictures.
Red Eye reduction: Select to automatically minimize red eye in flash photos. This checkbox is
available when scanning color pictures.
Kodak Perfect Touch: Automatically corrects for common image flaws and "mistakes," such as
shadows, and backlighting. Kodak Perfect Touch technology also enhances the desirable qualities
of photos, for vibrant color and richer detail. This checkbox is enabled when scanning pictures.
7
If desired, save the options you selected as a scan shortcut.
8
If desired, click Preview to view of the scanned image (see Scan Preview).
9
Click Scan Now to start the scan.
The picture is scanned and scan progress information appears that shows the progress of the scan.
When the scan is completed, scan complete information and controls appear.
10
If you have more pictures to scan, place the next one on the scanner glass and click Scan Next or
Preview>.
11
When you have finished scanning, you can enhance your scanned pictures before selecting an
output option by clicking Edit
12
Click Continue to select output options.
13
Select Kodak EasyShare in the Destinations list box.
14
Select an album from the drop-down list or enter the name of a new album
15
Enter a base filename in the edit box.
16
If desired, select Open EasyShare software.
17
Click Send to Destination to send the scanned picture(s) to Kodak EasyShare.
(see Enhance Picture).
Scan to Application
1
Place your photo or photos face down on the scanner glass. Your Kodak All-in-One Printer can
detect multiple photos.
2
On the main Home Center window, click Scan Photos and Documents to open the Basic Scan
window.
3
Click Go to Advanced to open the Advanced Scan window.
58 Kodak EasyShare 5100 AiO
Page 63

4
Select Picture.
Scan
5
Select Color or Black & White.
6
If desired, set the following options.
Resolution: Choose the Resolution from the drop-down list you want to use for the scan. 300 dpi
is the default and is fine for 4x6 pictures. 600 dpi should be used for smaller pictures. The higher
the resolution, the larger the file size and the slower the scan.
Sharpening: This drop-down list is available when scanning color pictures. It contains a list of
supported sharpen levels for enhancing fuzzy images; None, Default, High, and Maximum.
Color restoration: Select to restore color on old faded photos. This checkbox is available when
scanning pictures.
Red Eye reduction: Select to automatically minimize red eye in flash photos. This checkbox is
available when scanning color pictures.
Kodak Perfect Touch: Automatically corrects for common image flaws and "mistakes," such as
shadows, and backlighting. Kodak Perfect Touch technology also enhances the desirable qualities
of photos, for vibrant color and richer detail. This checkbox is enabled when scanning pictures.
7
If desired, save the options you selected as a scan shortcut.
8
If desired, click Preview > to view of the scanned image (see Scan Preview).
9
Click Scan Now to start the scan.
The picture is scanned and scan progress information appears that shows the progress of the scan.
When the scan is completed, scan complete information and controls appear.
10
When you have finished scanning, you can enhance your scanned pictures before selecting an
output option by clicking Edit
User’s Guide 59
(see Enhance Picture).
Page 64

Chapter 6
11
Click Continue to select output options.
12
Select an application from the Destinations list box. To add or delete applications from the list,
click Modify List (see Scan Pictures Settings).
13
Click Send to Destination to save the scanned picture(s) to the selected application. If you select
all the scanned pictures, they are inserted as separate pictures.
Scan Preview
Pictures
Picture controls are enabled if you are scanning pictures.
Automatically detect multiple pictures: Select to have the EasyShare AiO detect how photos are
positioned on the scanner glass.
Manually select pictures: Select to use selection boxes in the Preview area to select the areas to scan.
Selection Box Size: The drop-down list and button are enabled when you select Manually select
pictures. Choose a selection box size from the list and click
mouse to move and resize the selection boxes in the Preview area to manually select the areas to scan.
to add it to the Preview area. Use the
Properties
Size: The size of the selected selection box's corresponding item, in the format of width and height units
selected for the ruler.
Estimated .jpg file size: The size based on the resolution selected.
Quality prints up to: The maximum size you can print this image without losing quality.
Selection Box
Delete Selection Box: Enabled if a selection box is selected in the Preview area. Clicking deletes
the selected selection box from the Preview area.
Rotate Selection Box: Enabled if a selection box is selected in the Preview area. Clicking rotates
the selected selection box 90 degrees clockwise in the Preview area.
Zoom
To zoom the preview, grab the slider with the mouse and slide it to the
right.
Preview Display
The preview display area shows the results of a preview scan and any adjustments you make to the
scanned item. The preview display area is re-sizable.
Ruler Units
Click to select ruler units from menu; inches or centimeters.
60 Kodak EasyShare 5100 AiO
Page 65

Scan
Edit Picture
The Enhance Picture dialog opens with the Enhancements options shown. Click to hide options and
to show options. The results of the selected checkboxes are reflected on the photo in the preview area.
Rotate: Rotates the picture 90 degrees clockwise in the Preview area.
Zoom: To zoom the picture, grab the slider with the mouse and slide it to
the right.
Enhancements
Sharpening: This drop-down list is available when scanning color pictures. It contains a list of supported
sharpen levels for enhancing fuzzy images; None, Normal, High, and Exaggerated.
Kodak Perfect Touch technology: Automatically corrects for common image flaws and "mis takes," such as
shadows, and backlighting. Kodak Perfect Touch technology also enhances the desirable qualities of photos,
for vibrant color and richer detail. This checkbox is disabled when scanning black and white pictures.
Red Eye Reduction: Select to automatically remove red eye in flash photos. This checkbox is available
when scanning color pictures.
Color Restoration: Select to restore color on old faded photos. This checkbox is available when scanning
color pictures.
Adjustments
Brightness: Move the slider with the mouse, or enter a number between -10 and +10 in the text box to
adjust brightness.
Contrast: Move the slider with the mouse, or enter a number between -10 and +10 in the text box to adjust
contrast.
Saturation: Move the slider with the mouse, or enter a number between -10 and +10 in the text box to adjust
saturation.
Kodak Perfect Touch technology: Automatically corrects for common image flaws and "mis takes," such as
shadows, and backlighting. Kodak Perfect Touch technology also enhances the desirable qualities of photos,
for vibrant color and richer detail. This checkbox is disabled when scanning black and white pictures.
Shadows: Move the slider with the mouse, or enter a number between -10 and +10 in the text box to adjust
shadows.
Midtones: Move the slider with the mouse, or enter a number between -10 and +10 in the text box to adjust
midtones.
Highlights: Move the slider with the mouse, or enter a number between -10 and +10 in the text box to
adjust highlights.
Crop
Picture Size Crop: Allows you to select crop sizes from the drop-down list, rotate the crop box, and move
and resize the crop box with the mouse.
Free Form: Allows you to move and resize the crop box with the mouse.
NOTE: A "Crop selection is below the minimum cropping size" message is displayed if you crop too much
of the picture. The minimum cropping size is not fixed values, but depends on picture size and
resolution.
User’s Guide 61
Page 66

Chapter 6
Scanning Documents
The AiO Home Center software allows you to scan documents to a file, Email, or an application.
Scan to File
1
Place your original face down on the right front corner of the scanner glass.
2
On the main Home Center window, click Scan Photos and Documents to open the Basic Scan
window.
3
Click Go to Advanced to open the Advanced Scan window.
4
Select Document.
5
Select Color, Grayscale, or Black & White.
6
If desired, change the Resolution.
62 Kodak EasyShare 5100 AiO
Page 67

7
If you changed the Resolution, you can save it as a scan shortcut.
8
Click Scan Now to start the scan.
The page on the scanner glass is scanned and scan progress information appears that shows the
progress of the scan. When the scan is completed, scan complete information and controls appear.
9
If you have more pages to scan, place the next page on the scanner glass and click Scan Next or
Preview>.
Scan
10
When you have finished scanning, click Continue to select output options.
User’s Guide 63
Page 68

Chapter 6
11
Make sure File is selected in the Destinations list box.
12
Select a folder for saving the file from the Location drop-down list, or click Browse to select a
folder from the Open dialog.
13
Enter a name for the file in the Filename edit box.
14
Select a file format from the File type drop-down list. To produce a file that can be edited, select
RTF (.rtf).
15
If you selected JPEG (.jpg) as the File type, select the quality of the output file from the Quality
drop-down list. The higher the quality the larger the file size.
16
If desired, select Combine selected pages into single document.
17
Click Send to Destination to save the scanned page(s).
64 Kodak EasyShare 5100 AiO
Page 69

Scan to Email
1
Place your original face down on the right front corner of the scanner glass.
2
On the main Home Center window, click Scan Photos and Documents to open the Basic Scan
window.
3
Click Go to Advanced to open the Advanced Scan window.
4
Select Document.
Scan
5
Select Color, Grayscale, or Black & White.
6
If desired, change the Resolution.
7
If you changed the Resolution, you can save it as a scan shortcut.
8
Click Scan Now to start the scan.
The page on the scanner glass is scanned and scan progress information appears that shows the
progress of the scan. When the scan is completed, scan complete information and controls appear.
User’s Guide 65
Page 70

Chapter 6
9
If you have more pages to scan, place the next page on the scanner glass and click Scan Next or
Preview>.
10
When you have finished scanning, click Continue to select output options.
11
Select Email n the Destinations list box.
66 Kodak EasyShare 5100 AiO
Page 71

12
Select a folder for saving the file from the Location drop-down list, or click Browse to select a
folder from the Open dialog.
13
Enter a name for the file in the Filename edit box.
14
Select a graphic file format from the File type drop-down list.
15
If you selected JPEG (.jpg) as the File type, select the quality of the output file from the Quality
drop-down list. The higher the quality the larger the file size.
16
If desired, select Combine selected pages into single document.
17
Click Send to Destination to save the scanned page(s) to the selected location.
Scan to Printer
1
Place your original face down on the right front corner of the scanner glass.
Scan
2
On the main Home Center window, click Scan Pictures and Documents to open the Basic Scan
window.
3
Click Go to Advanced to open the Advanced Scan window.
User’s Guide 67
Page 72

Chapter 6
4
Select Document.
5
Select Color, Grayscale, or Black & White.
6
If desired, change the Resolution.
7
If you changed the Resolution, you can save it as a scan shortcut.
8
Click Scan Now to start the scan.
The picture is scanned and scan progress information appears that shows the progress of the scan.
When the scan is completed, scan complete information and controls appear.
68 Kodak EasyShare 5100 AiO
Page 73

9
If you have more pages to scan, place the next page on the scanner glass and click Scan Next or
Preview>.
Scan
10
When you have finished scanning, click Continue to select output options.
11
Select Printer in the Destinations list box.
User’s Guide 69
Page 74

Chapter 6
12
Click Print to print the scanned picture(s) to your EasyShare AiO.
Scan to EasyShare
1
Place your original face down on the right front corner of the scanner glass.
2
On the main Home Center window, click Scan Pictures and Documents to open the Basic Scan
window.
3
Click Go to Advanced to open the Advanced Scan window.
4
Select Document.
5
Select Color, Grayscale, or Black & White.
6
If desired, change the Resolution.
7
If you changed the Resolution, you can save it as a scan shortcut.
70 Kodak EasyShare 5100 AiO
Page 75

8
Click Scan Now to start the scan.
The document is scanned and scan progress information appears that shows the progress of the
scan. When the scan is completed, scan complete information and controls appear.
9
If you have more pictures to scan, place the next one on the scanner glass and click Scan Next or
Preview>.
Scan
User’s Guide 71
Page 76

Chapter 6
10
Click Continue to select output options.
11
Select Kodak EasyShare in the Destinations list box.
12
Select an album from the drop-down list or enter the name of a new album.
13
Enter a base filename in the edit box.
14
If desired, select Open EasyShare software.
15
Click Send to Destination to send the scanned page(s) to Kodak EasyShare.
Scan to Application
1
Place your original face down on the right front corner of the scanner glass.
2
On the main Home Center window, click Scan Photos and Documents to open the Basic Scan
window.
3
Click Go to Advanced to open the Advanced Scan window.
72 Kodak EasyShare 5100 AiO
Page 77

4
Select Document.
Scan
5
Select Color, Grayscale, or Black & White.
6
If desired, change the Resolution.
7
If you changed the Resolution, you can save it as a scan shortcut.
8
Click Scan Now to start the scan.
The page on the scanner glass is scanned and scan progress information appears that shows the
progress of the scan. When the scan is completed, scan complete information and controls appear.
User’s Guide 73
Page 78

Chapter 6
9
If you have more pages to scan, place the next page on the scanner glass and click Scan Next or
Preview>.
10
When you have finished scanning, click Continue to select output options.
11
Select an application from the Destinations list box. To add or delete applications from the list,
click Modify List (see Scan Documents Settings).
74 Kodak EasyShare 5100 AiO
Page 79

12
Click Send to Destination to save the scanned page(s) to the selected application.
Scan Settings
You can use the AiO Home Center to change the default scan settings and establish applications for
scanning.
Scan General Settings
1 On the Home Center main window, click Configure Settings.
Scan
User’s Guide 75
Page 80

Chapter 6
2
Click Scan.
3 On the General tab, set the following options as desired.
Default item type: Click the appropriate icon to set the default scan mode to Documents or Pictures.
Default scan destination: You can set the default to scan to a file, application, or memory card.
Application List: Opens a dialog where you can add and remove applications from the destination list
for scanned items.
4 Click OK or Apply.
76 Kodak EasyShare 5100 AiO
Page 81

Scan Document Settings
Basic Settings
1 On the Home Center main window, click Configure Settings.
Scan
2 Click Scan.
3 Click the Document tab.
User’s Guide 77
Page 82

Chapter 6
4
Set the following options as desired.
Scan as: Select a color from the drop-down list.
Color Sets the AiO to scan a color photo in color.
Grayscale Sets the AiO to scan a black and white photo and convert it to grays.
Black & White Sets the AiO to scan in black and white.
Resolution: You can choose a resolution you want to use for scanning. The resolutions supported are
75, 150, 300, 600, and 1200 dpi.
File: When scanning to a file, you can save the scanned image as a PDF, RTF, JPEG, or TIFF file. Select a
format from the drop-down list.
5 Click OK or Apply.
File Save Settings
When you initiate a scan to file operation, you can have the AiO Home Center prompt you for the filename
and location to save the file, or save the file automatically to the name and location you specify.
1 On the Home Center main window, click Configure Settings.
2 Click Scan.
3 Click the Document tab.
4 Set the following options as desired.
Prompt for filename and location: Select to have the AiO Home Center prompt you for the filename
and location to save the file.
Automatically save: Select to automatically save scans to the name and location you specify. The
default filename base is Scan appended with a three digit integer that increments sequentially as
photos are scanned and saved.
Base name: Edit field for entering your base filename.
Location: Edit field and Browse button for choosing a folder.
Save into new folder with current date as file name: Select to save scanned files to the base name
and location you specified.
5 Click Apply or OK.
78 Kodak EasyShare 5100 AiO
Page 83

Scan Picture Settings
Basic Settings
1 On the Home Center main window, click Configure Settings.
Scan
2 Click Scan.
3 Click the Picture Tab.
User’s Guide 79
Page 84

Chapter 6
4
Set the following options as desired.
Scan as: Select a color from the drop-down list.
Color Sets the AiO to scan a color photo in color.
Black & White Sets the AiO to scan in black and white.
Automatically detect picture: When this checkbox is selected, your EasyShare AiO automatically
detects how you arranged pictures on the scanner glass. When it is unchecked, the entire glass is
scanned as one picture.
Resolution: You can choose a resolution you want to use for scanning. The resolutions supported are
75, 150, 200, 300, 600, and 1200 dpi.
File format: When scanning to a file, you can save the scanned image as a BMP, JPEG, or TIFF file.
Select a format from the drop-down list.
Quality: When scanning to a file and the selected file format is JPEG, you can select the compression
quality of the saved file. A higher quality means the compression will be lower, resulting in a larger file
size.
5 Click OK or Apply.
File Save Settings
When you initiate a scan to file operation, you can have the AiO Home Center prompt you for the filename
and location to save the file, or save the file automatically to the name and location you specify.
1 On the Home Center main window, click Configure Settings.
2 Click Scan.
3 Click the Picture Tab.
4 Set the following options as desired.
Prompt for filename and location: Select to have the AiO Home Center prompt you for the filename
and location to save the file.
Automatically save: Select to automatically save scans to the name and location you specify. The
default filename base is Scan appended with a three digit integer that increments sequentially as
photos are scanned and saved.
Base name: Edit field for entering your base filename.
Location: Edit field and Browse button for choosing a folder.
Save into new folder with current date as file name: Select to save scanned files to the base name
and location you specified.
5 Click OK or Apply.
80 Kodak EasyShare 5100 AiO
Page 85

7 Maintenance
Maintenance
The Kodak EasyShare All-in-One requires little maintenance. However, you should clean the glass and lid
backing to remove dust and fingerprints.
Fingerprints and other debris on the glass or lid backing could slow down performance and affect the
accuracy of scanning.
This section covers the Settings menu, printhead installation, printhead calibration, checking ink levels, and
changing ink cartridges.
General Care
IMPORTANT: Always disconnect the power before cleaning. Do not use harsh or abrasive cleaners or organic
solvents on the EasyShare AiO or any of its parts.
WARNING
Do not leave items on the scanner glass. The heat of the scanning lamp may cause them to
stick.
To clean, wipe the outside of the EasyShare AiO and LCD with a clean, dry cloth.
Keep the surrounding area vacuumed and litter-free.
Protect the EasyShare AiO from tobacco smoke, dust, sand, and liquid spills.
Avoid placing objects on the EasyShare AiO.
Keep the EasyShare AiO, accessories, and supplies away from direct sunlight and out of high-
temperature environments.
Do not allow chemicals, such as suntan lotion, to come into contact with the painted surface of the
EasyShare AiO.
If the EasyShare AiO has been subjected to inclement weather or you suspect water has gotten inside
the EasyShare AiO, turn it off and let it dry out. If this does not resolve the problem, contact customer
support (see Telephone Customer Support).
Service agreements are available in some countries. Contact a dealer of Kodak products for more
information.
The EasyShare AiO and the AC power adapter contain a small amount of lead in the circuit board.
Disposal of this material may be regulated due to environmental considerations.
For more disposal or recycling information, contact your local authorities. In the US, visit the Electronics
Industry Alliance Web site at
www.eiae.org.
Clean the Scanner Glass
To ensure that your copies and scans remain clear, keep the scanner glass and lid backing clean and dust
the exterior.
1 Turn off the EasyShare AiO and raise the lid.
2 Clean the glass with a soft cloth or sponge slightly moistened with a nonabrasive glass cleaner.
User’s Guide 81
Page 86

Chapter 7
WARNING
Do not use abrasives, acetone, benzene, or carbon tetrachloride on the glass, since they can
damage it. Do not place or spray liquid directly on the glass. The liquid might seep under the
glass and damage the device.
3 Dry the glass with a lint fee cloth.
Clean the Scanner Lid
Minor debris can accumulate on the document backing located underneath the scanner lid of the Kodak
EasyShare AiO.
1 Turn off the EasyShare AiO and raise the lid.
2 Clean the lid underside with a soft cloth or sponge slightly moistened with a mild soap and warm water.
3 Wipe the underside gently to loosen debris. Do not scrub.
4 Dry the underside with a chamois or soft cloth.
WARNING
Do not use paper-based wipes, as these might scratch the underside.
5 If further cleaning is needed, repeat the previous steps using isopropyl (rubbing) alcohol, and wipe the
underside thoroughly with a damp cloth to remove any residual alcohol.
Print Diagnostic Sheet
The Diagnostic Page contains information about your printer that can be useful when contacting Kodak
support. To print a Diagnostics Page, press and hold the Copy and Plus(+) buttons together.
Firmware Upgrade
You can update the firmware in your EasyShare AiO with the most recent available from the Home Center
software. This requires an internet connection.
1 Click the Help button to open the Help panel.
2 Under General Links, click Maintenance.
3 Click Firmware Upgrade.
Ink Cartridges
Your Kodak EasyShare AiO uses separate black and color ink cartridges. The ink levels are displayed on the
Control Panel and the printer software. When replacing, use genuine Kodak ink cartridges to ensure best
results and avoid printhead damage not covered under warranty.
82 Kodak EasyShare 5100 AiO
Page 87

Maintenance
Check Ink Levels
You can easily check the ink levels to determine how soon you might need to replace an ink cartridge. The
Control Panel has two ink level indicators, one for the black ink cartridge and one for the color ink
cartridge. These indicators blink slow when ink levels are low, and fast when the ink cartridge should be
replaced.
Replace Ink Cartridges
When the ink level in an ink cartridge is low, its Ink Level indicator on the Control Panel blinks slow. When
an ink cartridge should be replaced, its Ink Level indicator blinks fast.
NOTE: For the best quality prints, store ink cartridges in a location where the temperature does not
exceed 85° F (30° C).
WARNING
Use genuine Kodak ink cartridges to ensure best results and avoid printhead damage not
covered under warranty. Third party ink cartridges may not contain the necessary Smart Chip
information to notify you before the ink cartridge is empty.
1 Open the printer access door by lifting from the front center of the unit. The ink tanks are located in the
print head.
1 Print head
2 Color ink cartridge
3 Black ink cartridge
User’s Guide 83
Page 88

Chapter 7
2
Wait until the printhead is idle and silent, then pinch the pinch latch on the old ink cartridge with your
thumb and forefinger and lift it out of the print head.
3 Open the box of the new ink cartridge.
4 Remove the bagged ink cartridge from the box and tear open the bag at the notch and remove the ink
cartridge.
IMPORTANT: Insert the ink cartridge immediately to prevent any drying of the ink.
5 Remove the orange cap from the cartridge by grasping the top edge and pulling/rotating it off the ink
cartridge.
6 Slide the ink cartridge into the printhead.
7 Press down on the tab until you hear a click and feel the latch snap into position.
8 Close the printer access door.
84 Kodak EasyShare 5100 AiO
Page 89

Maintenance
Printhead
The printhead dispenses the ink from the ink cartridges onto the paper. Printer maintenance involves:
Calibration
Clean the printhead
Calibration
The Kodak EasyShare AiO performs a calibration every time you install or replace a printhead. However,
you can run a calibration if you are seeing changes in the image quality. Calibration aligns the printheads
and performs a nozzle health check to enable high-quality prints.
To calibrate from computer
1 Load the main tray or photo tray with photo paper.
IMPORTANT: If you don't have any photo paper, you can use plain paper, but photo paper is highly
recommended for calibrations.
2 Start the AiO Home Center.
3 Click to open the Help panel.
4 Under General Links, click Maintenance.
5 Click Calibration to make a calibration print.
6 Follow the instructions on the calibration print to calibrate the printer.
To calibrate from control panel
1 Load the main tray or photo tray with photo paper.
IMPORTANT: If you don't have any photo paper, you can use plain paper, but photo paper is highly
recommended for calibrations.
2 Press and hold Photo and Cancel together to make a calibration print.
3 Follow the instructions on the calibration print to calibrate the printer.
Clean Printhead
If you notice a degradation in the quality of prints, the printhead may need cleaning.
1 Start the AiO Home Center.
2 Click to open the Help panel.
3 Under General Links, click Maintenance.
4 Click Printhead Cleaning.
User’s Guide 85
Page 90

Chapter 7
Replace Printhead
1 Make sure the EasyShare AiO is on.
2 Open the printer access door. The carriage moves to a center position.
3 Wait until the printhead is idle and silent, then pinch the pinch latch on the ink cartridge with your
thumb and forefinger and lift it out of the print head. Remove both ink cartridges.
4 Unlatch the printhead by pressing the button in the upper-left corner of the carriage.
5 Remove the old printhead.
86 Kodak EasyShare 5100 AiO
Page 91

6
Remove the printhead from its bag.
7 Remove and discard the clear plastic casing and the orange protective cap.
8 Place the printhead into the carriage.
Maintenance
9 Push against the back wall of the printhead until it clicks into place.
10 Reinstall the ink cartridges.
User’s Guide 87
Page 92

Page 93

8 Support
Support
If you have a problem with your AiO printer, refer to the Troubleshooting topics in this book. Additional
technical information is available in the ReadMe file located on the Kodak EasyShare software CD. For
online support, visit
Contact Kodak
www.kodak.com/go/support.
Kodak
Printer
Software
Other
Resource Center
Get support for your product (FAQs, troubleshooting
information, etc.).
Purchase full range of digital camera and printer
accessories.
Download latest printer software, firmware and
drivers.
Online tutorials.
Get information on EasyShare software. www.kodak.com/go/easysharesw
Get help with the Windows operating system and
working with digital pictures.
Get support for Kodak printers, cameras, software,
accessories, more. Print a Diagnostics Page before
contacting Kodak support (see Print Diagnostic Sheet
in the Maintenance chapter).
Optimize your printer for truer, more vibrant colors. www.kodak.com/go/onetouch
Register your printer.
www.kodak.com/go/resourcecenter
www.kodak.com/go/support
www.kodak.com/go/accessories
www.kodak.com/go/downloads
www.kodak.com/go/howto
(or click the Help button in the
EasyShare software)
www.kodak.com/go/pcbasics
www.kodak.com/go/support
www.kodak.com/go/register
Limited Warranty
Kodak warrants Kodak consumer electronic products and accessories ("Products"), excluding batteries, to
be free from malfunctions and defects in both materials and workmanship for one year from the date of
purchase.
Retain the original dated sales receipt. Proof of the date of purchase will be required with any request for
warranty repair.
Limited Warranty Coverage
Warranty service is only available from within the country where the Products were originally purchased.
You may be required to ship Products, at your expense, to the authorized service facility for the country
where the Products were purchased.
Kodak will repair or replace Products if they fail to function properly during the warranty period, subject to
any conditions and/or limitations stated herein. Warranty service will include all labor as well as any
necessary adjustments and/or replacement parts. If Kodak is unable to repair or replace a Product, Kodak
User’s Guide 89
Page 94

Chapter 8
will, at its option, refund the purchase price paid for the Product provided the Product has been returned to
Kodak along with proof of the purchase price paid. Repair, replacement, or refund of the purchase price
are the sole remedies under this warranty.
If replacement parts are used in making repairs, those parts may be remanufactured. or may contain
remanufactured materials. If it is necessary to replace the entire Product, it may be replaced with a
remanufactured Product. Remanufactured Products, parts and materials are warranted for the remaining
warranty term of the original Product, or 90 days after the date of repair or replacement, whichever is
longer.
Limitations
This warranty does not cover circumstances beyond Kodak's control. This warranty does not apply when
failure is due to shipping damage, accident, alteration, modification, unauthorized service, misuse, abuse,
use with incompatible accessories or attachments (such as third party ink or ink tanks), failure to follow
Kodak's operation, maintenance or repacking Instructions, failure to use items supplied by Kodak (such as
adapters and cables), or claims made after the duration of this warranty.
KODAK MAKES NO OTHER EXPRESS OR IMPLIED WARRANTY FOR THIS PRODUCT, AND DISCLAIMS
THE IMPLIED WARRANTIES OF MERCHANTABILITY AND FITNESS FOR A PARTICULAR PURPOSE. In
the event that the exclusion of any implied warranty is ineffective under the law. the duration of the
implied warranty will be one year from the purchase date or such longer period as required by law.
The option of repair, replacement, or refund is Kodak's only obligation. Kodak will not be responsible for
any special, consequential or incidental damages resulting from the sale, purchase, or use of this product
regardless of the cause. Liability for any special. consequential or incidental damages (including but not
limited to loss of revenue or profit, downtime costs, loss of the use of the equipment, cost of substitute
equipment, facilities or services. or claims of your customers for such damages resulting from the
purchase use or failure of the Product), regardless of cause or for breach of any written or implied
warranty is expressly disclaimed.
Your Rights
Some states or jurisdictions do not allow exclusion or limitation of incidental or consequential damages, so
the above limitation or exclusion may not apply to you. Some states or jurisdictions do not allow
limitations on how long an implied warranty lasts, so the above limitation may not apply to you.
This warranty gives you specific rights. and you may have other rights which vary from state to state or by
jurisdiction.
90 Kodak EasyShare 5100 AiO
Page 95

Support
Outside the United States and Canada
In countries other than the United States and Canada, the terms and conditions of this warranty may be
different. Unless a specific Kodak warranty is communicated to the purchaser in writing by a Kodak
company, no warranty or liability exists beyond any minimum requirements imposed by law, even though
defect, damage, or loss may be by negligence or other act.
EASTMAN KODAK COMPANY
Rochester, NY 14650
U.S.A.
© Eastman Kodak Company, 2006. MC/MR/TM: Kodak Printed in China.
Telephone Customer Support
If you have questions concerning the operation of your EasyShare software, Home Center software, or
EasyShare AiO, you may speak with a customer support representative. When you call, please have the
following information available.
Computer model, operating system
Processor type and speed (MHz)
Amount of memory (MB) and free hard disk space
Printer serial number
Version of Kodak EasyShare software
Version of Kodak Home Center software
Print a Diagnostics Page
Exact error message you received
Your unit's Kodak Service Number (under the printer access door).
User’s Guide 91
Page 96

Chapter 8
Customer Support Phone Numbers
Australia 1800 147 701
Austria 0179 567 357
Belgium 02 713 14 45
Canada 1 800 465 6325
Denmark 3 848 71 30
Finland 0800 1 17056
France 01 55 1740 77
Germany 069 5007 0035
International Toll Fax +44 131 458 6962
International Toll Line +44 131 458 6714
Ireland 01 407 3054
Italy 02 696 33452
Japan 03 5540 9002
Netherlands 020 346 9372
New Zealand 0800 440 786
Norway 23 16 21 33
Portugal 021 415 4125
Spain 91 749 76 53
Sweden 08 587 704 21
Switzerland 01 838 53 51
UK 0870 243 0270
US (toll-free) / (toll) 1 800 235 6325 / 1 800 23 KODAK
Visit www.kodak.com/go/dfiswwcontacts.
92 Kodak EasyShare 5100 AiO
Page 97

Support
Messages
The following tables explain the EasyShare AiO printer messages.
Color Ink Messages
Message Cause Action/Solution
Color ink cartridge is low.
Please take the time to order
more ink.
Color ink cartridge needs
replacing.
Color ink cartridge not
recognized.
New updates are available to
optimize your print quality. Use
the Home Center to upgrade
your printer.
Color ink cartridge is not inserted
properly.
Color ink cartridge is not
installed.
Ink remaining in color tank is
less than 20 percent.
The color ink cartridge has
reached its end of life and needs
to be replaced.
Ink Cartridge has an Invalid
Manufacturer Code.
Better performance can be
achieved with the currently
installed ink cartridges if a
firmware upgrade is performed.
An improper electrical
connection to the ink cartridge
was detected.
An Ink Cartridge is not installed
or an incorrect or damaged ink
cartridge is installed.
Black Ink Messages
Check the ink levels. You will
need a replacement Ink cartridge
soon.
Install a new Kodak approved
Ink Cartridge for best results.
Install a new Kodak approved
Ink Cartridge for best results.
Upgrade your printer’s firmware
for best results.
Reinstall the color ink cartridge.
Install a new Kodak approved
Ink Cartridge for best results.
Message Description Action/Solution
Black ink cartridge is low.
Please take the time to order
more ink.
Black ink cartridge not
recognized.
New updates are available to
optimize your print quality. Use
the Home Center to upgrade
your printer.
Black ink cartridge needs
replacing.
Black ink cartridge is not inserted
properly.
Black ink cartridge is not
installed.
Ink remaining in black tank is
less than 20 percent.
Ink Cartridge has an Invalid
Manufacturer Code.
Better performance can be
achieved with the currently
installed ink cartridges if a
firmware upgrade is performed.
The black ink cartridge has
reached its end of life and needs
to be replaced.
An improper electrical
connection to the ink cartridge
was detected.
An Ink Cartridge is not installed
or an incorrect or damaged ink
cartridge is installed.
Check the ink levels. You will
need a replacement Ink cartridge
soon.
Install a new Kodak approved
Ink Cartridge for best results.
Upgrade your printer’s firmware
for best results.
Install a new Kodak approved
Ink Cartridge for best results.
Reinstall the black ink cartridge.
Install a new Kodak approved
Ink Cartridge for best results.
User’s Guide 93
Page 98

Chapter 8
Paper Messages
Message Cause Action/Solution
Paper jam
1. Clear the paper jam.
2. Press the OK button on the
printer.
The printer has detected an error
condition that indicates that
paper may be jammed in the
printer or failed to feed from the
input tray.
IMPORTANT: For best result,
use only Kodak ink cartridges &
paper for your printer.
1 Disengage the photo paper
tray if engaged.
2 Turn the AiO off for 5
seconds, and then turn it back
on.
3 Any paper stuck in the printer
should automatically eject.
4 If the paper does not
automatically eject, disconnect
the power from the printer and
carefully remove any paper stuck
in the printer including paper
pieces.
Important Check the paper
access on the back of the printer
for jammed paper.
5 Remove the paper supply
from the paper tray(s). Carefully
fan the paper to keep the sheets
from sticking together.
6 Reload the paper tray(s). Do
not overfill.
7 Reconnect the power to the
printer.
8 Re-engage the photo paper
tray, if desired, then press Start
to resume printing for a
computer print job. You will have
to start a local print job over.
9 If the problem persists, call
Kodak service for assistance.
Paper is loaded incorrectly.
Print carriage jam.
Photo paper was loaded upside
down.
For some reason, most likely a
paper jam, the carriage cannot
Load photo paper print-side
down.
Clear paper and press OK to
continue..
travel freely.
Kodak paper not recognized.
Using default photo paper
The Kodak paper loaded needs
a later version of firmware.
Upgrade your printer’s firmware.
settings. To avoid this message
in the future, upgrade printer
firmware.
Proofsheet no longer valid.
Print a new proofsheet, select
pictures, and place it on the
scanner glass.
The device used to print the
proofsheet was removed. A new
session number is assigned
each time a Proofsheet is
Print a new proofsheet.
printed. When the printer scans
94 Kodak EasyShare 5100 AiO
Page 99

Support
Paper Messages
Message Cause Action/Solution
the Proofsheet it must match the
current session number.
Load plain paper for duplexing.
Wrong paper type for duplexing
loaded.
Load plain paper in the main
tray.
User’s Guide 95
Page 100

Chapter 8
Print Messages
Message Cause Action/Solution
Printhead missing or not
installed correctly.
Printer requires calibration.
Calibration unsuccessful
Cannot read calibration sheet.
Some photos may not be visible.
Maximum number of photos
exceeded.
Ink overflow container is full. Press the OK button to continue.
Printer error. Print job
unsuccessful.
The printer has detected that a
Printhead is not installed.
The printer has detected that you
have installed a new Printhead
and now it must be calibrated.
Calibration sheet not inserted
correctly.
The printer detected a calibration
sheet, but can not read it.
A device was attached that
contained more than the
supported maximum of 1000
images. Memory Card or PTP
Camera, USB Thumbdrive.
The printer failed to finish
printing a swath successfully.
Install the printhead.
Press Start to continue.
Check calibration sheet
placement and press OK to
continue.
Press the OK button on the
printer.
None.
Press the OK button on the
printer.
Rear Access Door Messages
Message Cause Action/Solution
Replace the rear access door.
Print job stopped.
Replace rear access door.
Press OK to restart job.
The Rear Access Door on the
back of the printer is off or not
properly installed.
During printing the printer
detected that the Rear Access
Door is latched.
Install the Rear Access door.
Latch the Rear Access door.
Printer Access Door Message
Message Cause Action/Solution
Printer access door open
Close the printer access door.
The Printer access Door on the
top of the printer is open while
printing.
Close the Printer Access Door.
Scanner Message
Message Cause Action/Solution
Scan operation failed. Please try
again.
96 Kodak EasyShare 5100 AiO
Scan operation initiated from the
printer fails to communicate with
the computer within a timeout
period. The computer was
supposed to start the scan
operation.
Retry the scan operation.
 Loading...