

Page 1
Load the Batteries
Kodak
Preview Camera
Quick Start Guide
Printed in U.S.A.
Pt. No. 919 4929a
Kodak, Advantix, and the Advanced Photo System
symbol and logotype are trademarks.
ENGLISH/ESPAÑOL
Web site (USA): http://www.kodak.com — Help Number (USA): 1 (800) 242-2424
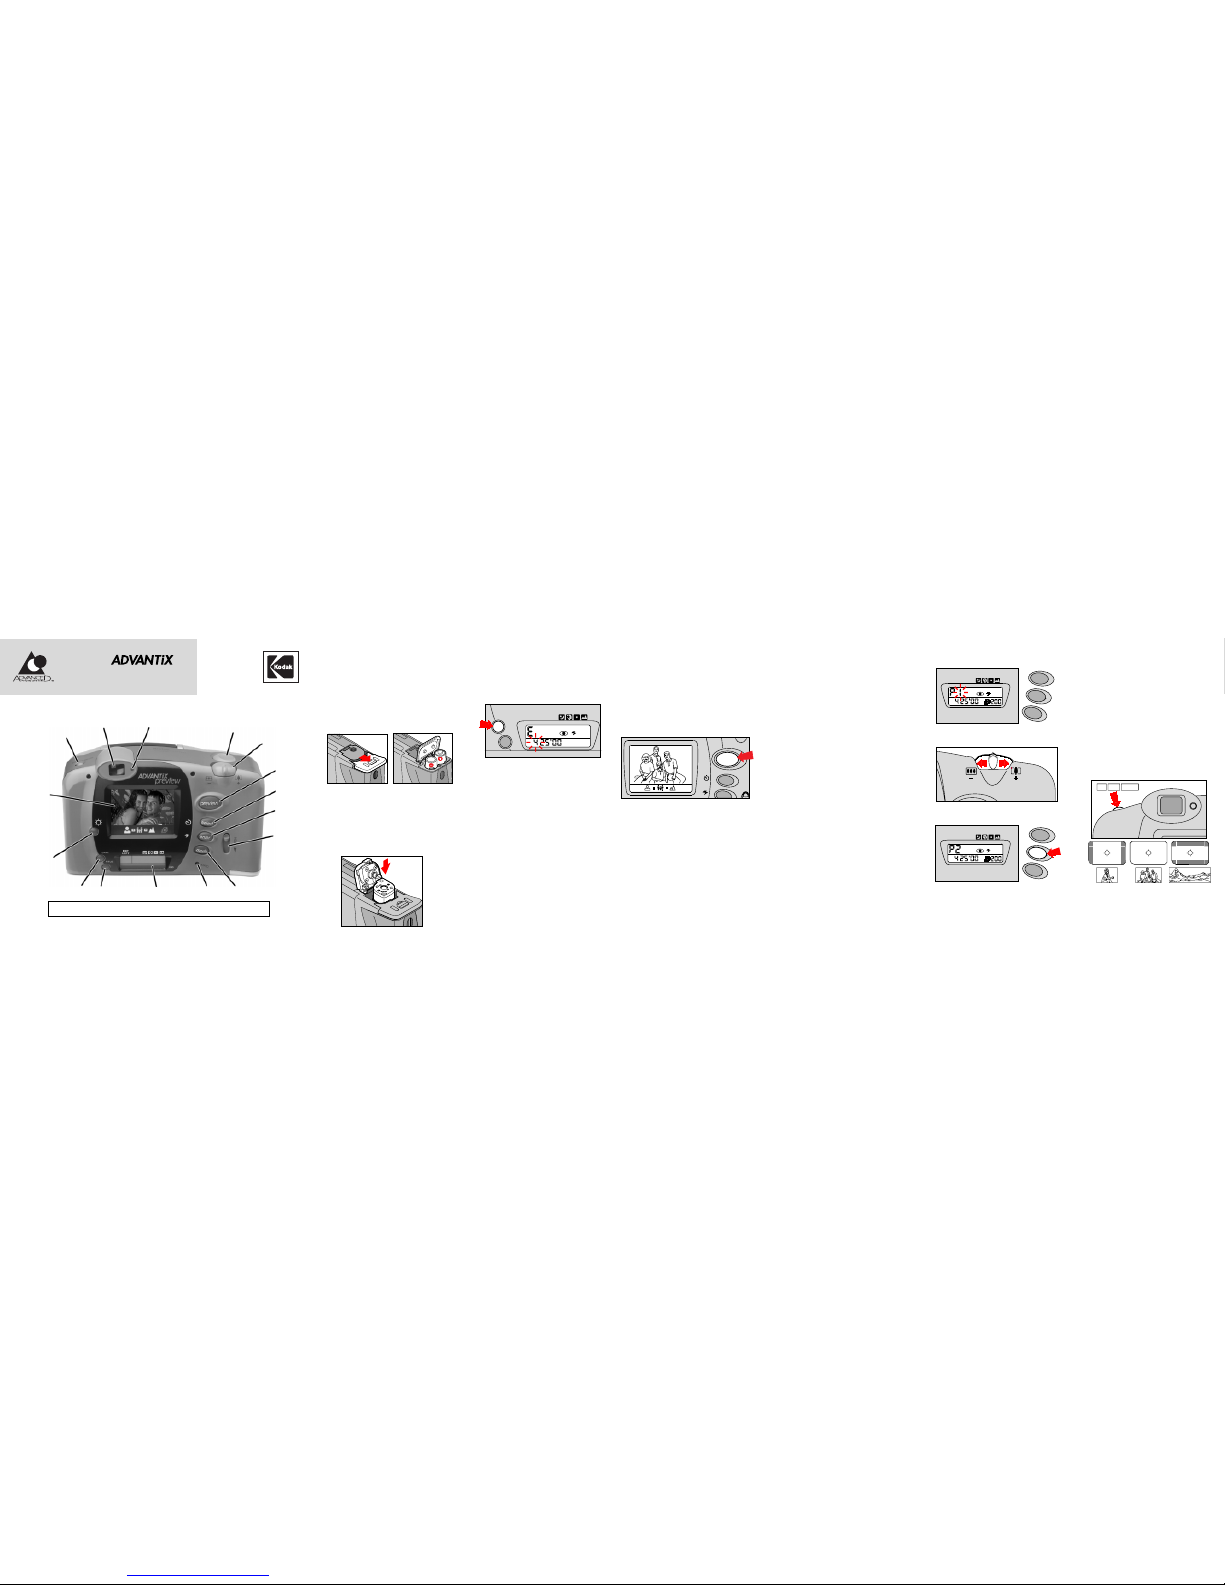
Viewfinder
Flash/Camera-Ready Lamp
Shutter Button
Zoom Dial
PREVIEW
SELECT
ENTER
Film-Door
Lever
MODEMRC
LCD Panel
TITLE
DATE
BrightnessControl
Button
Preview
Screen
Print-Format
Button
Set the Date and Time
1. Lift up the lens cover/flash to turn on
the camera.
2. Press and hold
DATE
until the first
number “blinks.”
3. Move the
Zoom Dial
to select
the number.
4. Press
ENTER
to save the number and to
actuate the next blinking number. Repeat
steps 3 and 4 to continue setting the date
and time or close the lens cover/ flash to
end your selection.
1
2
3
4
TITLE
DATE
LEFT
AUTO
EXP
1
Preview the Print
Select the Print Quantity
© Eastman Kodak Company, 2000
AUTO
LEFT
EXP
ISO
SELECT
ENTER
MODE
1. Press
PREVIEW
. The print-quantity
number P”1” blinks.
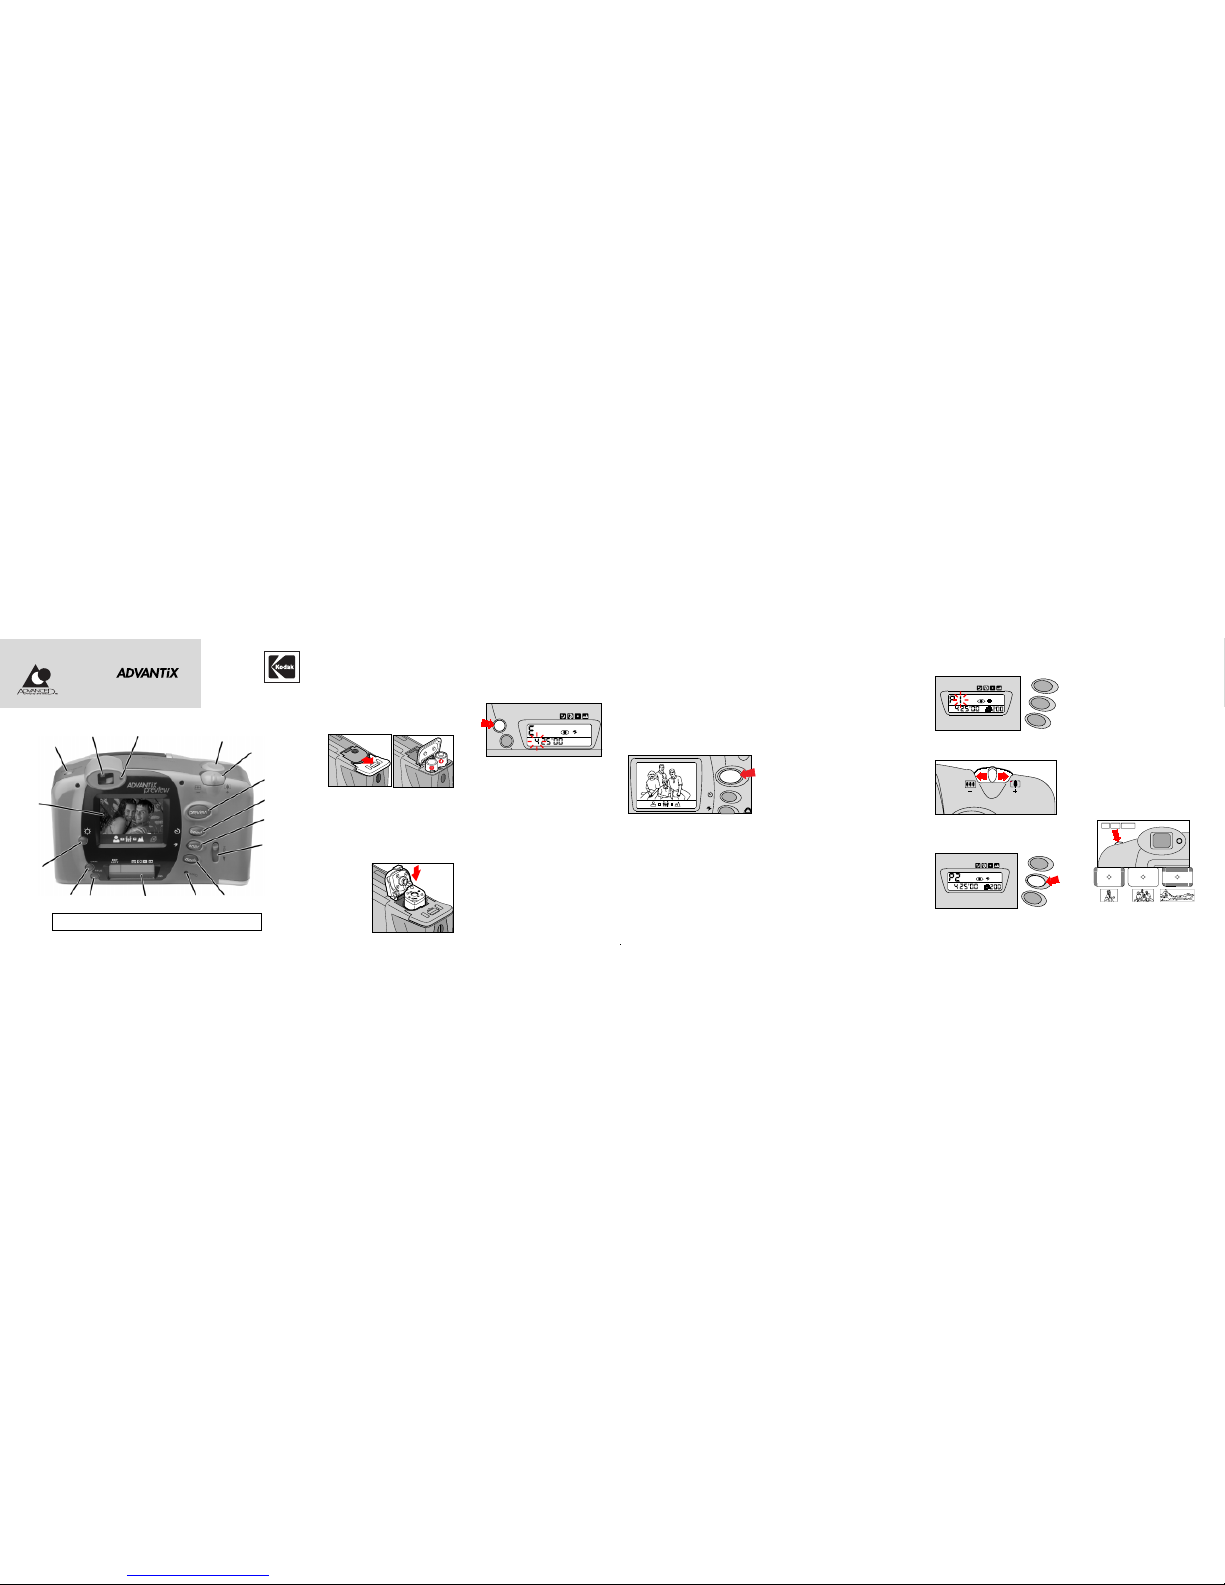
Change the Print Format
P
H
C
C H P
LEFT
EXP
AUTO
ISO
ENTER
MODE
SELECT
3. Press
ENTER
or close the lens cover/flash
to save the print quantity.
Uses two 3 V lithium KODAK K123LA
(or equivalent) Batteries.
1. Open the battery door on the
bottom of the camera.
2. Insert the batteries into the
battery chamber.
3. Snap the battery door closed.
Load the Film
1. Slide the
Film-Door Lever
to open
film door.
2. Insert the film into the film chamber.
3. Close the film door. You can now
take pictures.
Choosing the format
You can choose from three formats:
(month/day/year, day/month/year, or
year/month/day) and time format
(hour/minute) with PM or AM display.
1. Repeatedly press
DATE
to choose
a format.
2. Press
ENTER
or close the lens cover/flash
to save the format.
You can be sure you got the shot when you
preview your picture on the
Preview Screen
.
After you take a picture, you can press
PREVIEW
to immediately see your picture.
The last picture you take, at any time, is saved
into the memory of the camera and remains
there until you take the next picture or
remove the film from the camera.
NOTE: To conserve battery power, the
Preview Screen
automatically turns off in
10 seconds. Press
PREVIEW
to turn the
screen back on or press it again to turn it off.
You can select the number of prints,
from 0–9, that you want your photofinisher
to print while previewing the picture.
The magnetic Information Exchange (IX)
technology records the ordering information
on the film, so the selected number of
each print is produced automatically
during processing.
If you are happy with the picture, you can
order multiple prints. Selecting multiple prints
does not mean that you will use more film.
The camera exposes one frame of film for
every picture that you take no matter how
many prints you order for each frame.
If you are unhappy with the picture, you
can select “0” for zero and take a new
picture. Selecting zero prints does not mean
that you will lose the picture. The picture
remains on the film and prints can be made
from it later, if you change your mind.
You can see on the
Preview Screen
how
your print will look in the different formats —
for example, to see how a picture taken in
the Classic (C) format would look if printed in
the Group/HDTV (H) or Panoramic (P)
format. You can then change the format to
the one that looks the best. The selections
are recorded directly on the cassette, so the
sizes of each print are produced automatically during processing.
1. Press
PREVIEW
to view the picture.
2. Press the
Print-Format Button
to change
the format of the picture to C, H, or P.
3. Press
ENTER
or close the lens cover/flash
to save the print format.
2. Move the
Zoom Dial
to select the
print quantity.
ENTER
SELECT
PREVIEW
Page 2
Kodak
Cámara Prevista
Guía de Arranque Rápido
Disparador
Dial de zoom
PREVISTA
(
PREVIEW
)
Palanca de la
puerta del
compartimiento de la
película
MRC
Panel de
cristal líquido
Botón de
control de
luminosidad
Pantalla de
prevista
Como Cargar las Baterías
Usa dos baterías de litio de 3 voltios
KODAK K123LA (o su equivalente).
1. Abra la puerta del compartimiento de
las baterías en la parte de abajo de
la cámara.
2. Coloque las baterías en su compartimiento.
3. Cierre la puerta a presión.
Botón del formato
de impresión
Visor
Lámpara de flash/cámara lista
Sitio en la red mundial (EE.UU.): http://www.kodak.com
Número de teléfono de ayuda (EE.UU.): 1 (800) 242-2424
El símbolo y logotipo de Kodak, Advantix y el Advanced Photo System son marcas registradas.
Como Cargar la Película
1. Deslice la palanca de la puerta del
compartimiento de la película para
abrir la puerta del compartimiento de
la película.
2. Coloque la película en su
compartimiento.
3. Cierre la
Puerta del
compartimiento
de la
película
.
Ahora puede
empezar a
tomar
fotografías.
Como Fijar la Fecha y Hora
1. Levante la cubierta del lente/flash para
encender la cámara.
2. Oprima y mantenga oprimido
FECHA (DATE)
hasta que el primer número “parpadee”.
3. Oprima el
Dial de zoom
para cambiar
el número.
4. Oprima
ENTRAR (ENTER)
para guardar el
número seleccionado y para activar el
siguiente número parpadeante. Repita
los pasos 3 y 4 para continuar fijando la
fecha y la hora o cierre la cubierta del lente/
flash y de esta forma completar su selección.
1
2
3
4
TITLE
DATE
LEFT
AUTO
EXP
Prevista de la Impresión Como Seleccionar el Número
de Impresiones
1. Oprima
PREVISTA (PREVIEW)
.
El número de la cantidad de
reproducciones P “1” parpadea.
2. Mueva el
Dial de zoom
para seleccionar
la cantidad de reproducciones que desee
mandar a hacer.
3. Oprima
ENTRAR (ENTER)
o cierre la
cubierta del lente/flash para guardar la
cantidad de reproducciones
seleccionadas.
AUTO
LEFT
EXP
ISO
SELECT
ENTER
MODE
LEFT
EXP
AUTO
ISO
ENTER
MODE
SELECT
Como Cambiar el Formato
de la Impresión
Puede ver en la pantalla de prevista como
cada una de sus impresiones lucirán en los
distintos formatos; por ejemplo, ver como
una fotografía que fue tomada con el
formato Clásico (C) luciría si fuese impresa
usando el formato de Grupo (G) o
Panorámico (P). Entonces puede cambiar
el formato al que le parezca mejor. Las
selecciones se registran directamente en el
cartucho, por lo tanto el/los tamaño(s)
de cada impresión se produce(n) automáticamente durante el procesamiento.
1. Oprima
PREVISTA (PREVIEW)
para ver
la fotografía.
2. Oprima el
Botón de formato de impresión
para cambiar el formato de la fotografía
a C, H o P.
3. Oprima
ENTRAR (ENTER)
o cierre la
cubierta del lente/flash para guardar el
P
H
C
C H P
Usted puede seleccionar el número de
reproducciones, del 0 al 9, que desee
mandar a hacer mientras que esté viendo
la fotografía en la pantalla de prevista La
tecnología magnética de Intercambio de
información (IX) registra la información de
la orden en la película, de esta forma se
imprimen automáticamente el número
seleccionado de reproducciones durante
el procesamiento.
Si está satisfecho con la fotografía puede
mandar a hacer impresiones múltiples.
Seleccionando la característica de
impresiones múltiples no significa que
usará película adicional. La cámara expone
un cuadro de película por cada fotografía
que tome sin que el número de
reproducciones que ordene para cada
cuadro tenga ninguna consecuencia.
Si no está satisfecho con la fotografía,
puede seleccionar “0” para cero
impresiones y tomar una fotografía nueva.
El seleccionar cero impresiones no significa
que se borrará la fotografía. La fotografía
permanece en la película y más tarde,
si así lo desea, puede mandar a hacer
impresiones.
Como escoger el formato
Puede escoger uno de tres formatos:
(mes/día/año, día/mes/año, año/mes/día)
y formato de hora (hora/minuto) indicando
p.m. o a.m.
1. Oprima repetidamente
FECHA (DATE)
para escoger el formato deseado.
2. Oprima
ENTRAR (ENTER)
o cierre la
cubierta del lente/flash para guardar el
formato seleccionado.
Puede asegurarse que tomó la fotografía
que deseaba cuando lo comprueba en la
pantalla de prevista. Después de tomar una
fotografía, puede oprimir
PREVISTA
(PREVIEW)
inmediatamente para ver su
fotografía. La última fotografía que tome,
en cualquier momento, se guarda en la
memoria de la cámara hasta que tome la
próxima fotografía o remueva la película de
la cámara.
NOTA: Para conservar la energía de las
baterías, la pantalla de prevista se apaga
automáticamente en 10 segundos.
Oprima nuevamente
PREVISTA (PREVIEW)
para volver a encender la pantalla o una
vez más para apagarla.
SELECCIÓN
(
SELECT
)
ENTRAR
(
ENTER
)
MODO
(
MODE
)
TÍTULO
(
TITLE
)
FECHA
(
DATE
)
ENTER
SELECT
PREVIEW
 Loading...