

Page 1

KODAK PROFESSIONAL
8660/8670 PS Thermal Printer
Network Interface Guide
Part Number 6B4389
Page 2

Page 3
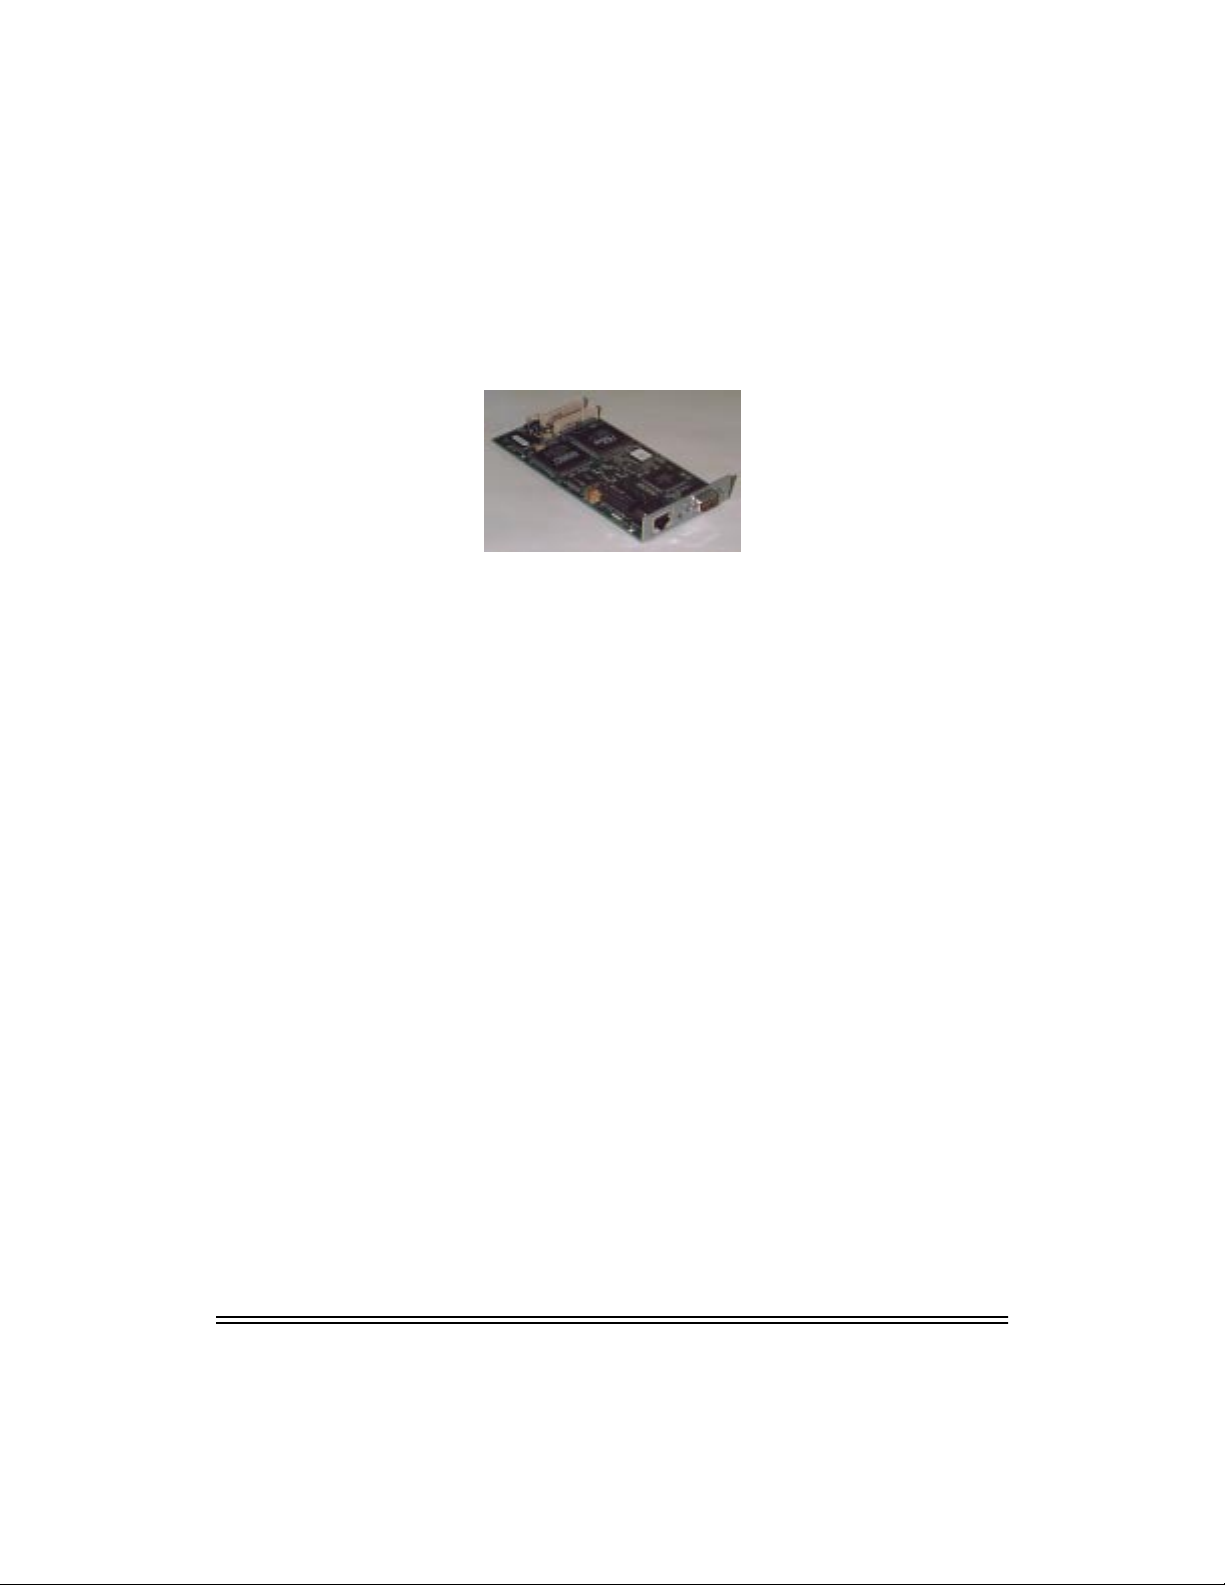
Kodak Pr ofessional 10/100 Network Interface Card
Quick Configuration Reference Guide
NIC Identification (EK Cat # 844-5074)
• Stickers on packaging and on NIC with Cat #, Serial #, and Ethernet
Hardware Address
• NIC advertises on networks as KOD_XXXXXX . . ., where xxxxxx is
last the 6 digits of the NIC Ethernet Hardware Address.
Protocols Supported
• TCP/IP, IPX/SPX, AppleTalk, NetBEUI
Networked Platforms Supported
• Windows and Macintosh
• Novell, NT, and Unix Servers
NIC Interfaces
• 100 Mbit (100baseTX) or 10 Mbit (10baseT) connectivity. (The speed
of network environment is automatically determined by NIC.)
• Serial port for NIC configuration or debug. (Remote configuration
utilities are also available.).
Note: Refer to the user’s guide provided with the Network Interface
Card for details on configuring the NIC and user platforms to
print to your networked Kodak printer. Kodak printer and NIC
documentation/software are also available on the Kodak Web
site (www.kodak.com).
June 1999 1
Page 4
Quick Configuration Reference Guide
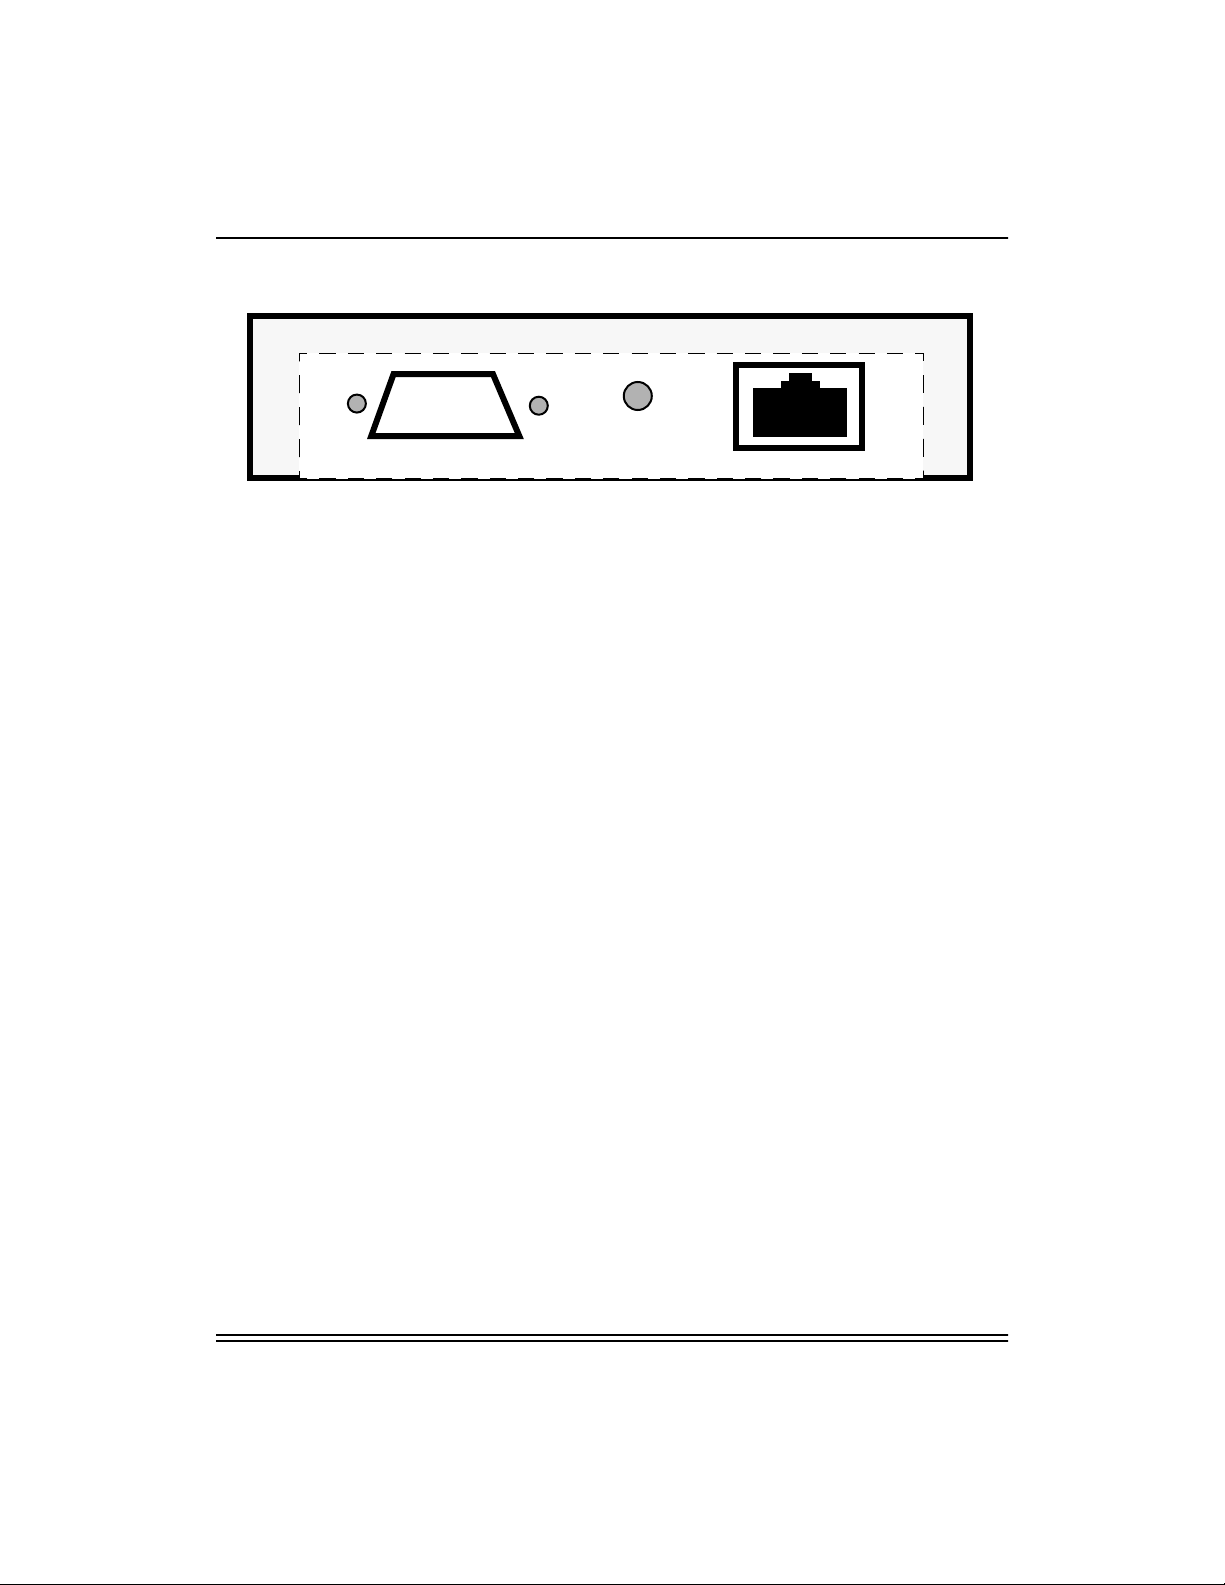
NIC Faceplate
o o o o
o o o o o
Serial Config Port
Faceplate - Reset/Configuration Page Push-button Switch
The NIC has a single, recessed push-button switch located between the
serial port and network connector. It has the following functions:
Factory Reset/
Config Page
10 BaseT/100BaseTX
• To print a configuration test page, press the switch in for at least oneeighth second but less than five seconds
• To reset the unit back to factory default settings, press the switch and
hold it in for at least 5 seconds.
Note: Reset and configuration pages can also be generated by using
remote configuration utilities.
Faceplate - 10baseT/100baseTX Network Cable Connector
• A 100baseTX/10baseT RJ45 connector accommodates 100 Mbit
(100baseTX) or 10 Mbit (10baseT) connectivity.
Faceplate - Serial Configuration Port
• The serial port may be used for NIC configuration and diagnostics.
Note: Remote configuration utilities are usually used instead of the
serial port because the necessary computer resources are
already on the network.
NIC LEDs (Not on Faceplate)
There are 3 LEDs, red, yellow, and green, located on the bottom of the
NIC when it is installed in the printer. The back of the printer must be
pulled out to view the LEDs.
2 June 1999
Page 5

Quick Confiruration Reference Guide
• Red TEST LED - When the printer is powered up, the red LED should
blink momentarily and then go out. If the red LED blinks continuously,
there is a problem.
• Green LINK OK LED - When the printer is READY , the green LED is lit
continuously if valid link connectivity to a corresponding hub/switch
network port is established.
• Y ellow 100baseT LED - When the printer is READY , the yello w LED is
lit continuously if the NIC detects 100 Mbit network operation. If the
yellow LED is OFF, the NIC has detected 10 Mbit network operation.
NIC Configuration Utilities
Note: The printer must be either reset using remote configuration tools
or power cycled after changing NIC parameters.
• Printer Front Control Panel: Some NIC configuration parameters
such as the TCP/IP address can be configured from the printer’s front
control panel.
• Web Browser: Any platform with internet access can use a Web
browser tool to access and configure the NIC by entering the printer
(NIC) IP address as the Web location. (It may be necessary to turn
proxies off.) The NIC default access password is “access”.
• Windows: The NIC may be configured from Windows platforms using
a Web browser, XAdmin, XConfig or Telnet.
• Macintosh: The AppleTalk Name can be modified by using
LaserWriter utilities provided with Macintosh systems. Ref er to Apple’ s
Web site for these utilities.
• Unix: Use a Web Browser or Telnet.
• Serial Interface to NIC: A serial interface is also provided on the NIC
face plate for NIC configuration and troubleshooting.
June 1999 3
Page 6
Quick Configuration Reference Guide
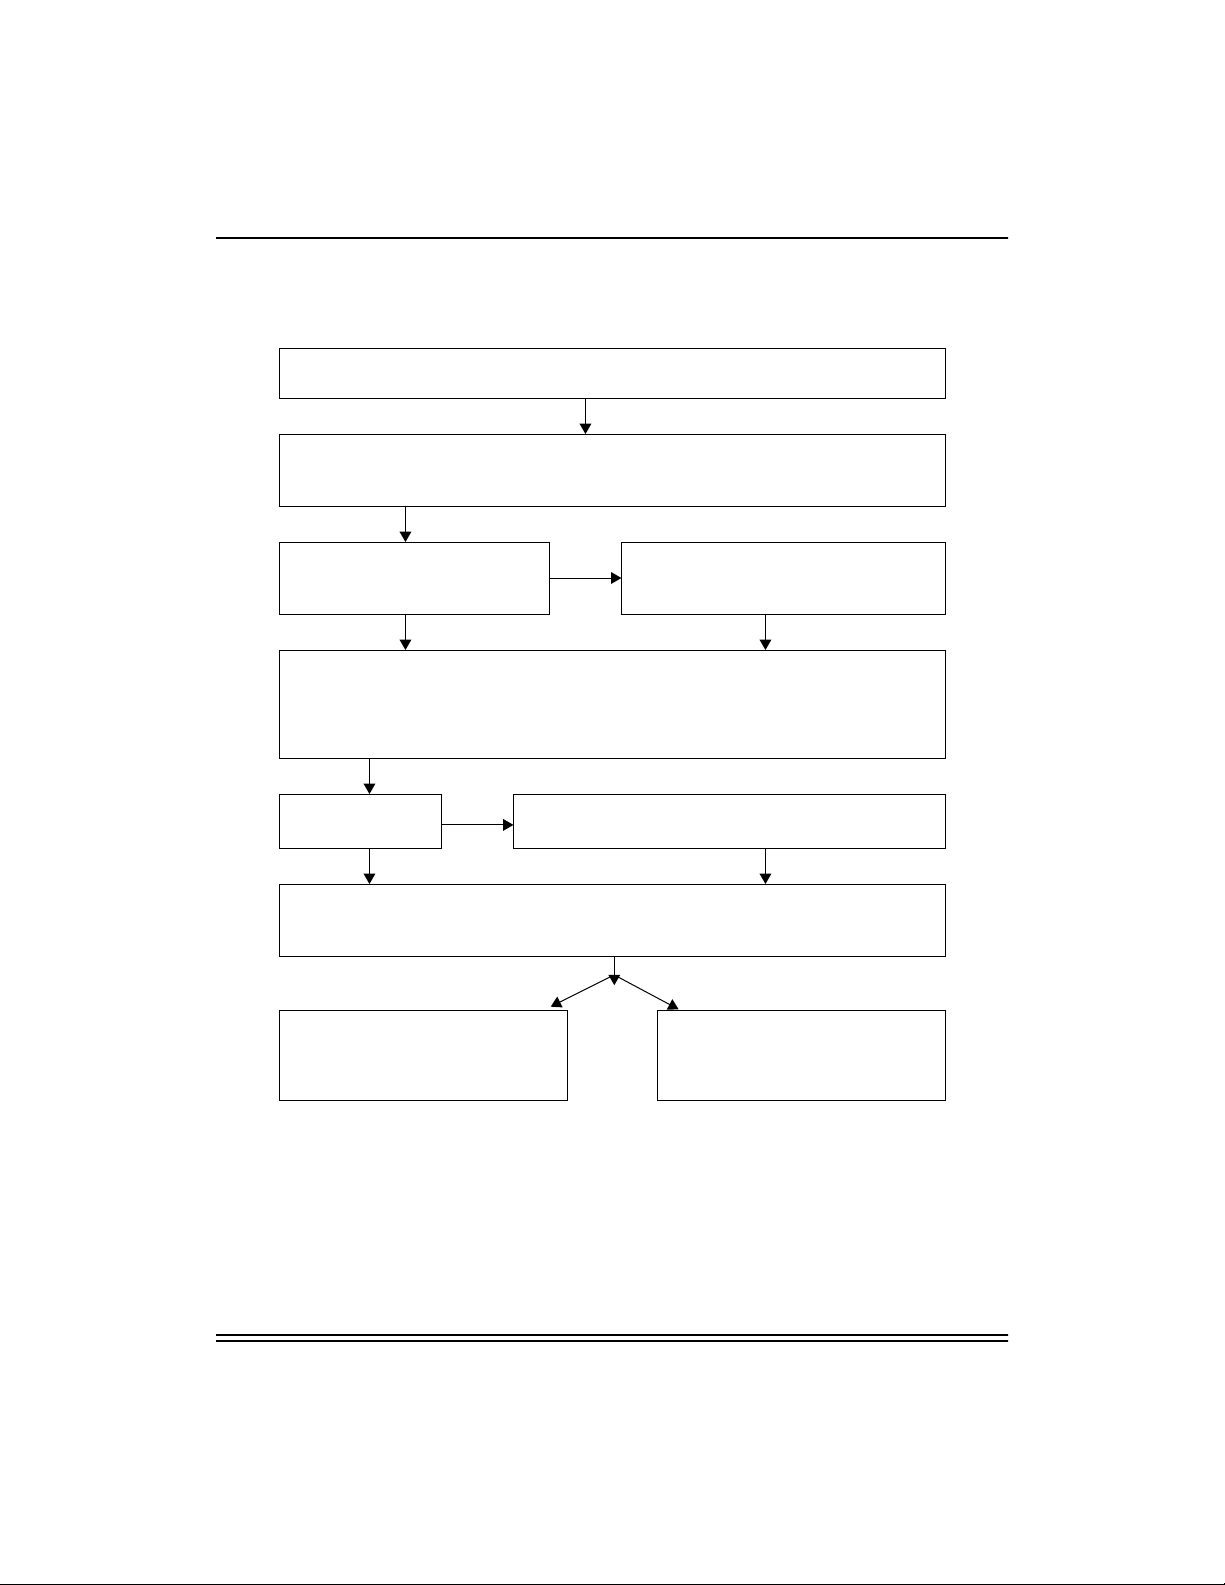
Printer/NIC Installation and Configuration Overview
Step 1:Determine your Network and Printing Environment.
NIC supports TCP/IP, IPX, AppleTalk & NetBEUI protocols.
Step 2: Gather Necessary Hardware & Software Components:
Printer and driver S/W (Provided with printer)
NIC and configuration S/W (provided with NIC)
NIC Pre-installed in Printer?
No
Step 3: Install the NIC in the Printer.
Refer to user’s guide for the NIC for
Installation instructions.
Yes
Step 4: Configure the NIC ONLY if default settings are unacceptable. (Use Web based
Interface, XAdmin, or Telnet)
Recommendation: Use defaults until successful network printing is demonstrated.
(TCP/IP minimally requires an appropriate IP address that can be entered from the printer’s
front control panel).
Use Server
Print Queues?
Yes
Step 5:Configure Server (Novell, Windows NT)
No
Install proper PostScript driver printing and/or Kodak cxport module for exporting files from
Step 7:Printing Files (PostScript)
from Applications and select the
Step 6: Configure Workstations for Printing or Exporting.
Adobe PhotoShop.
Use File > Print
from Adobe PhotoShop and select
Kodak printer or queue.
Step7:Exporting Files
Use File > Export
the Kodak printer or queue.
4 June 1999
Page 7

Contents
1 Introduction........................................................................................................... 1-1
About this Guide................................................................................................ 1-1
About the Network Interface Card..................................................................... 1-1
Features ............................................................................................................ 1-1
Protocols.................................................................................................... 1-2
Network Operating System Compatibility .................................................. 1-2
Compliance........................................................................................................ 1-2
Getting Help....................................................................................................... 1-2
Overview of Installing and Configuring the N IC................................................ 1-3
2 Installing the Hardware ........................................................................................ 2-1
Static Electricity Precautions............................................................................. 2-1
Package Contents............................................................................................ 2-1
Requirements.................................................................................................... 2-2
Installing the NIC in an 8660 Printer.................................................................. 2-2
Installing the NIC in an 8670 PS Printer............................................................ 2-4
Installing the Ethernet Cable ............................................................................. 2-7
Printing a Test Page.......................................................................................... 2-7
Configuring the NIC........................................................................................... 2-8
3 Using Configuration Utilities ............................................................................... 3-1
Using a Web Browser to Configure the NIC...................................................... 3-2
Service Names .......................................................................................... 3-3
Examples of Configuration Screens .......................................................... 3-4
Using the XAdmin Utility.................................................................................... 3-8
Using XConfig Utility........................................................................................ 3-12
Telnet Configuration Utility (Any Platform) ...................................................... 3-14
Connecting the NIC Serial Configuration Port to a Console Terminal............. 3-16
Configuring the NIC from the Printer’s Display Panel...................................... 3-17
Part No. 6B4389 June 1999 i
Page 8

Contents
Additional Mechanisms for Establishing an IP Address .................................. 3-19
Enabling IP access using ARP................................................................ 3-19
Using Arp on Unix Systems..................................................................... 3-19
4 Configuring Servers and Workstations for Printing.......................................... 4-1
AdobePS Drivers and Export Modules.............................................................. 4-1
Novell Servers................................................................................................... 4-1
Windows NT 4.0, Windows 2000 Servers and Workstations ............................ 4-1
Unix Servers and Workstations......................................................................... 4-2
Windows for Work Groups (3.x) ........................................................................ 4-2
Windows 95/98.................................................................................................. 4-2
Macintosh.......................................................................................................... 4-2
5 Microsoft Peer to Peer Print Services (NetBEUI)............................................... 5-1
Workstation Networking Software for Peer to Peer Services............................ 5-1
Setting up a Kodak PostScript Printer for Windows 95/98 ................................ 5-2
Setting up a Kodak PostScript Printer for Windows NT..................................... 5-4
AdobePS Setup Utility for Windows NT............................................................ 5-6
Verification of AdobePS Driver.......................................................................... 5-9
Setting up Windows 95/98/NT to Export Kodak Raster Files.......................... 5-10
6 Novell NetWare ..................................................................................................... 6-1
Before You Begin .............................................................................................. 6-1
NIC Operating Modes with Novell NetWare...................................................... 6-2
Configuring for a Novell NetWare Network........................................................ 6-2
Novell Queue and Printer/NIC Association Using JetAdmin...................... 6-3
Novell Queue and Printer/NIC Association Using XAdmin or XConfig...... 6-3
Configuring for NDS Using NWAdmin............................................................... 6-4
Configuring for NDS Using JetAdmin or XAdmin .............................................. 6-4
Configuring for NDS Using PCONSOLE and XConfig ...................................... 6-5
PCONSOLE............................................................................................... 6-5
ii Part N o.6B4389 June 1999
Page 9

Contents
XConfig...................................................................................................... 6-6
Configuring for Queue Server Mode using PCONSOLE and XConfig.............. 6-7
PConsole.................................................................................................. 6-7
XConfig.............................................................................................................. 6-8
7 Configuring for TCP/IP......................................................................................... 7-1
Configuration Summary..................................................................................... 7-2
Networking Software for TCP/IP........................................................................ 7-2
Novell Netware Servers............................................................................. 7-2
Configuring TCP/IP (LPR) Printers on NT Systems.......................................... 7-3
Installing the Printing Software for Windows NT Systems................................. 7-4
Installing the Export Module for Raster Printing (8660/8670 Printers)....... 7-4
Installing the Printing Software for PostScript Printing (8670 Printer) ....... 7-4
Configuring an LPR Printer on NT Systems...................................................... 7-7
Configuring Unix Systems for TCP/IP Printing................................................ 7-12
Adding the Kodak Printer to the Host Table ............................................ 7-12
Assigning a Print Queue.......................................................................... 7-12
Setting Up the Remote Printer................................................................. 7-12
Creating a Spool Directory....................................................................... 7-16
8 Configuring for AppleTalk Networks .................................................................. 8-1
Printer and NIC Installation................................................................................ 8-1
Finding the Printer’s Name in the Chooser........................................................ 8-2
Changing the Printer’s Name ............................................................................ 8-2
Changing the Printer’s Zone.............................................................................. 8-2
WIndows NT Systems vs AppleTalk.................................................................. 8-3
9 Troubleshooting ................................................................................................... 9-1
NIC Start-up Sequence ..................................................................................... 9-1
Intermittent Problems ........................................................................................ 9-3
TCP/IP Troubleshooting ............................................................................ 9-3
Part No. 6B4389 June 1999 iii
Page 10

Contents
NetWare Troubleshooting.......................................................................... 9-5
AppleTalk Troubleshooting........................................................................ 9-6
Windows NT Troubleshooting.................................................................... 9-6
Windows Peer-to-Peer Troubleshooting.................................................... 9-7
Technical Assistance......................................................................................... 9-7
Kodak Customer Assistance Center.......................................................... 9-7
Appendix A NIC Services.................................................................................... A-1
Overview................................................................................................... A-1
Environment/Protocol ............................................................................... A-2
BOT/EOT Strings...................................................................................... A-2
Filters ....................................................................................................... A-3
Appendix B Command Summary....................................................................... B-1
General Server Commands...................................................................... B-1
TCP/IP Commands................................................................................... B-4
NetWare Commands................................................................................ B-5
AppleTalk Commands .............................................................................. B-6
Index ....................................................................................................................... I-1
iv Part N o.6B4389 June 1999
Page 11

1 Introduction
About this Guide
This guide provides instructions for network administrators on installing
the Kodak Professional 10/100 network interface card in the Kodak
Professional 8660 and 8670 PS thermal printers and configuring the
printers for use over a network. This guide also provides instructions on
configuring workstations to send jobs to the printers.
About the Network Interface Card
The Kodak Prof essional 10/100 network interface card (NIC) is an integr al
PCI bus compatible print server that allows a printer to be shared on an
Ethernet 10 MB or Fast Ethernet 100MB network. Because the NIC has
multiprotocol capabilities, users with computers running different network
operating systems can simultaneously access the same printer.
Before you install the NIC in the printer, unpack and set up your printer
and install the printing software on each workstation that will send jobs to
the printer.
Features
The NIC has the following features:
• connects to either a 10BaseT or 100Base TX Fast Ethernet network
and autodetects the network type.
• contains flash memory for updating the firmware.
• contains a serial port to connect a console terminal or a serial printer.
• connects to the printer through a 33MHz 32-bit PCI bus.
• is configurable remotely using a Web browser.
• is compatible with Hewlett-Packard’s JetAdmin NetWare, Windows 95
Peer-to-Peer printer management software, and XAdmin Windowsbased NetWare management utility.
• has remote console capability management using Telnet or NetWare.
• contains IP security to restrict printing based on IP address
Part No. 6B4389 June 1999 1-1
Page 12

Introduction
Protocols
The NIC supports the following protocols:
• TCP/IP
• IPX/SPX
• AppleTalk
• NetBEUI
Network Operating System Compatibility
The NIC is compatible with the following operating systems:
• Systems that support either the Berkeley lpr/lpd printing protocol, the
HP JetDirect card, or printing to a raw TCP port
• Novell NetWare V2.15 or above, V3.xx, or V4.xx, including support for
NetWare Directory Services (NDS)
• AppleTalk Phase 2
• Windows NT and NT Server V4.0
• Windows 95/98 (Peer-to-Peer or client mode)
• NetBIOS/SMB
Compliance
The NIC complies with Part 15 of the FCC Rules. The operation of the
NIC may not cause harmful interference, and it must accept any
interference received including any that may cause undesired operation.
Getting Help
Help is available on the Kodak Web site at www.kodak.com. The site
contains questions and answers, user documentation, and printing
software. Refer to “Troubleshooting” before contacting your retailer or
Kodak for technical assistance.
1-2 Part No. 6B4389 June 1999
Page 13
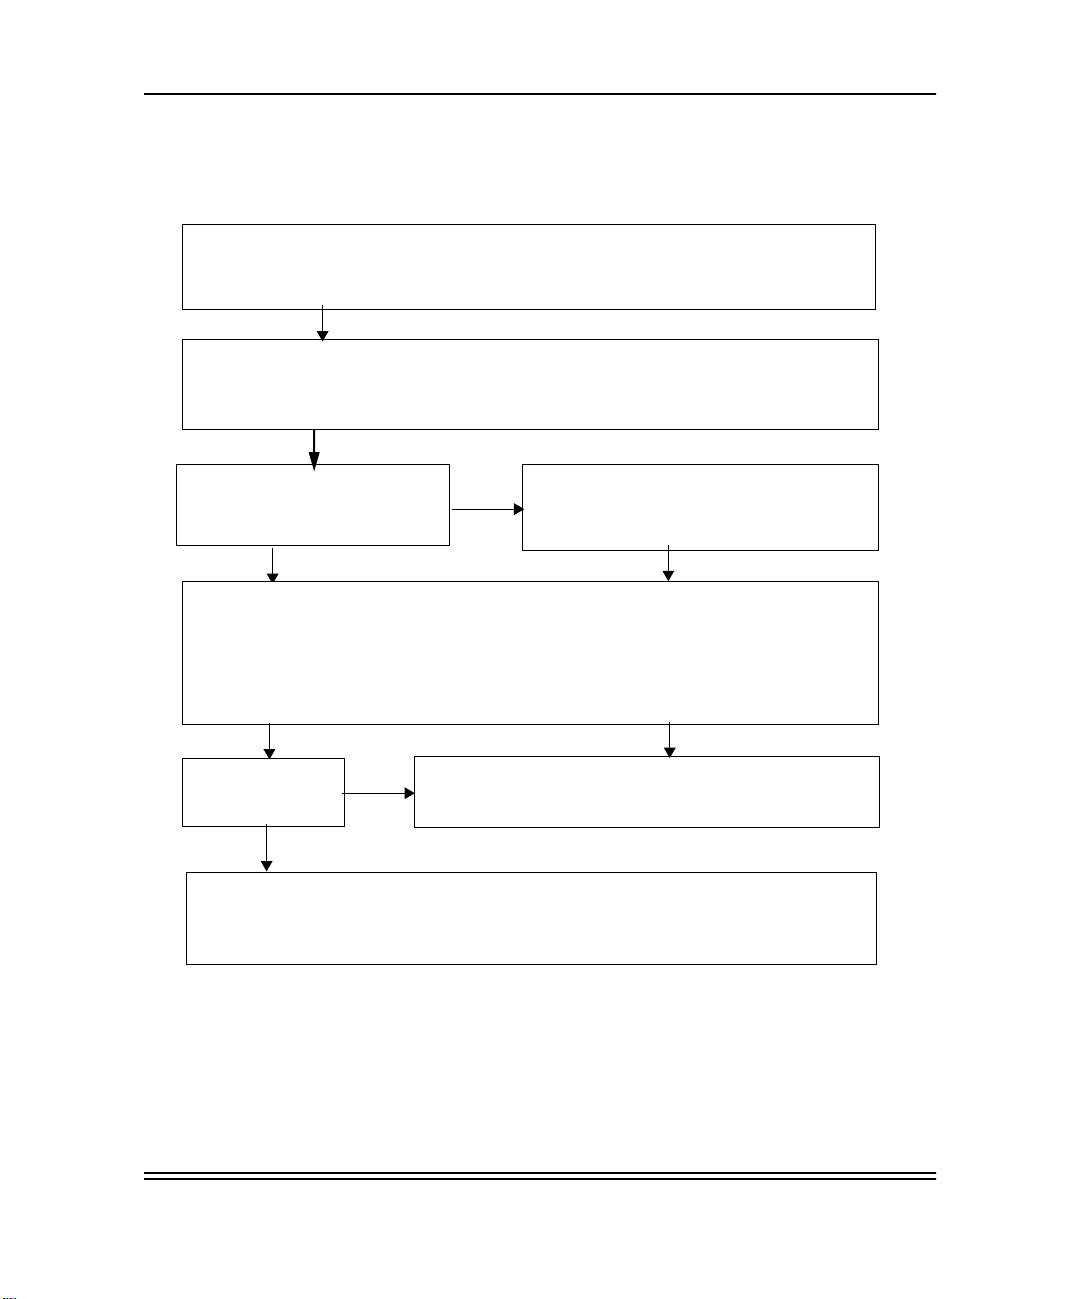
Overview of Installing and Configuring the N IC
To install and configure the NIC:
Step 1: Determine your network and printing environment.
NIC supports TCP/IP, Novell Netware, AppleTalk, and NetBEUI protocols.
Step 2: Gather necessary hardware and software components:
printing software (included on the CD that came with the printer),
NIC, and utilities diskette.
Introduction
Is the NIC installed in the
printer?
Yes
Step 4: Configure the NIC if the default settings are unacceptable.
Use a Web-based interface, Telnet, Or the XAdmin utility.
Recommendation: Use the defaults until you can demonstrate successful
network printing. (TCP/IP minimally requires an appropriate IP address
that can be entered from the printer’s front control panel.)
Use server
print queues?
No
Step 6: Install the printing software.
Yes
No
Step 5: Configure server (Novell, Windows NT)
Step 3: Install the NIC in the printer.
Requires Phillips or T10 torque
screwdriver and static strap.
Part No. 6B4389 June 1999 1-3
Page 14

Introduction
Step 1: Assess your network and printing environments.
Consult with your system/network administrator regarding:
•
Servers
sent to the printer.
•
Printing Platforms
used for creating and sending jobs to the printer.
•
Protocols
AppleTalk, or NetBEUI that will be used for communicating to the
printer. All protocols are enabled by default.
Step 2: Gather the necessary components.
•
Hardware
MB operation depending upon the speed of your network.
•
Networking components
are not included with the NIC. You must purchase interconnecting
networking components to support a specific environment separately.
•
NIC Configuration software
configuring the NIC from Windows workstations. Web based
configuration and Telnet do not require additional software installation.
—Determine the servers or queues to spool and manage jobs
—Determine the workstation platforms that will be
—Determine the network protocols for TCP/IP, Novell IPX,
— printer, NIC, and network cabling certified for 10 or 100
—cables, converters, hubs, and switches
— XAdmin software is provided for
NOTE: Make sure that the printing software is installed on the
workstations that will be sending jobs to the printer. If the
CD included with the printer does not include the
appropriate printing software for your workstation’s
operating system, it may be available through alternate
vendors who support the 8660 and 8670 PS thermal
printers. You can use a generic PostScript or LaserWriter
driver. However, they may not support all of the printer’s
features.
Step 3: Install the NIC.
• Install the NIC in the printer if it was not preinstalled. Refer to
“Installing the Network Interface Card” for instructions.
1-4 Part No. 6B4389 June 1999
Page 15

Introduction
Step 4: Configure the NIC from the desired platform
• With the exception of TCP/IP, it is not necessary to reconfigure the NIC
unless its default parameters are unacceptable. We recommend that
you verify that the printer functions on your network before you modify
existing NIC parameters.
• The use of TCP/IP requires only that you enter an appropriate IP
address at the printer’s display panel or by using one of the NIC’s
configuration utilities.
• In Macintosh environments, you may wish to change the printer’s
default name (the NIC’ s unique Ethernet hardware address) to a name
that is more recognizable on your network.
NIC Configuration Utilities:
See Appendix A for information on using the follo wing utilities to configure
the NIC.
• configuring NIC parameters such as the TCP/IP Address from the
printer’s display panel.
• configuring the NIC from Windows platforms using a Web browser,
XAdmin, or Telnet.
• configuring the NIC from Macintosh platforms using a Web bro wser or
Telnet. You may be able to use the LaserWriter utilities provided on
Macintosh systems to modify the printer’s name over AppleTalk name
and its zone.
• configuring the NIC from Unix workstations using a Web browser or
Telnet.
• using the serial interface on the NIC faceplate for configuration and
troubleshooting.
Step 5: Configure the print servers
Determine if server print queues will be used, and configure the
appropriate Novell or NT servers.
Step 6: Configure the printer on the workstations.
Follow the appropriate steps to add a printer to each workstation that will
send jobs to the printer. Refer to the platform specific chapters to
configure the workstations.
Part No. 6B4389 June 1999 1-5
Page 16

Introduction
Step 7: Printing
From your application select either Print or Export to verify that the
workstations can send a job to the printer.
1-6 Part No. 6B4389 June 1999
Page 17

2 Installing the Hardware
This chapter describes how to:
• install the Kodak Professional 10/100 network interface card
(NIC) in the printer.
• install the Ethernet cable.
• make a test print.
Static Electricity Precautions
To help prevent static electricity from damaging the NIC during
installation:
• Touch the metal frame of the printer to discharge the static
electricity from your body.
• Grasp the NIC only by its edges.
• Avoid movement during installation that can generate static
electricity.
• Avoid working in a carpeted area.
Package Contents
The following items are included in the package for the NIC:
• Network Interface Card
• 3.5 inch diskette containing PCONSOLE and XConfig utilities
• Antistatic strap
• Network Interface Guide
Part No. 6B4389 June 1999 2-1
Page 18
Installing the Hardware
Requirements
Installing the NIC in an 8660 Printer
You need the following to install the NIC:
• Network cabling certified for 10 and 100 MB operation. The NIC
supports 10BaseT and 100BaseT cabling. Use category 5
unshielded twisted pair cabling for 100 MB operation.
• Phillips-head screwdriver
• If a BNC (10Base2) connection is required, purchase a BNC/
RJ45 transceiver or hub from your local dealer or distributor.
• If a connection from a single computer to a printer is required,
use a mini-hub and two network cables.
NOTE: You can use an Rx/Tx crossover cable as a direct
connection to a single computer without a hub. However,
an Rx/Tx crossover cable is a nonstandard cable that
may not be available from a local dealer. If you use an
Rx/Tx crossover cable , make sure that it is clearly labeled
so it is not confused with standard network cables for use
with network hubs or switches.
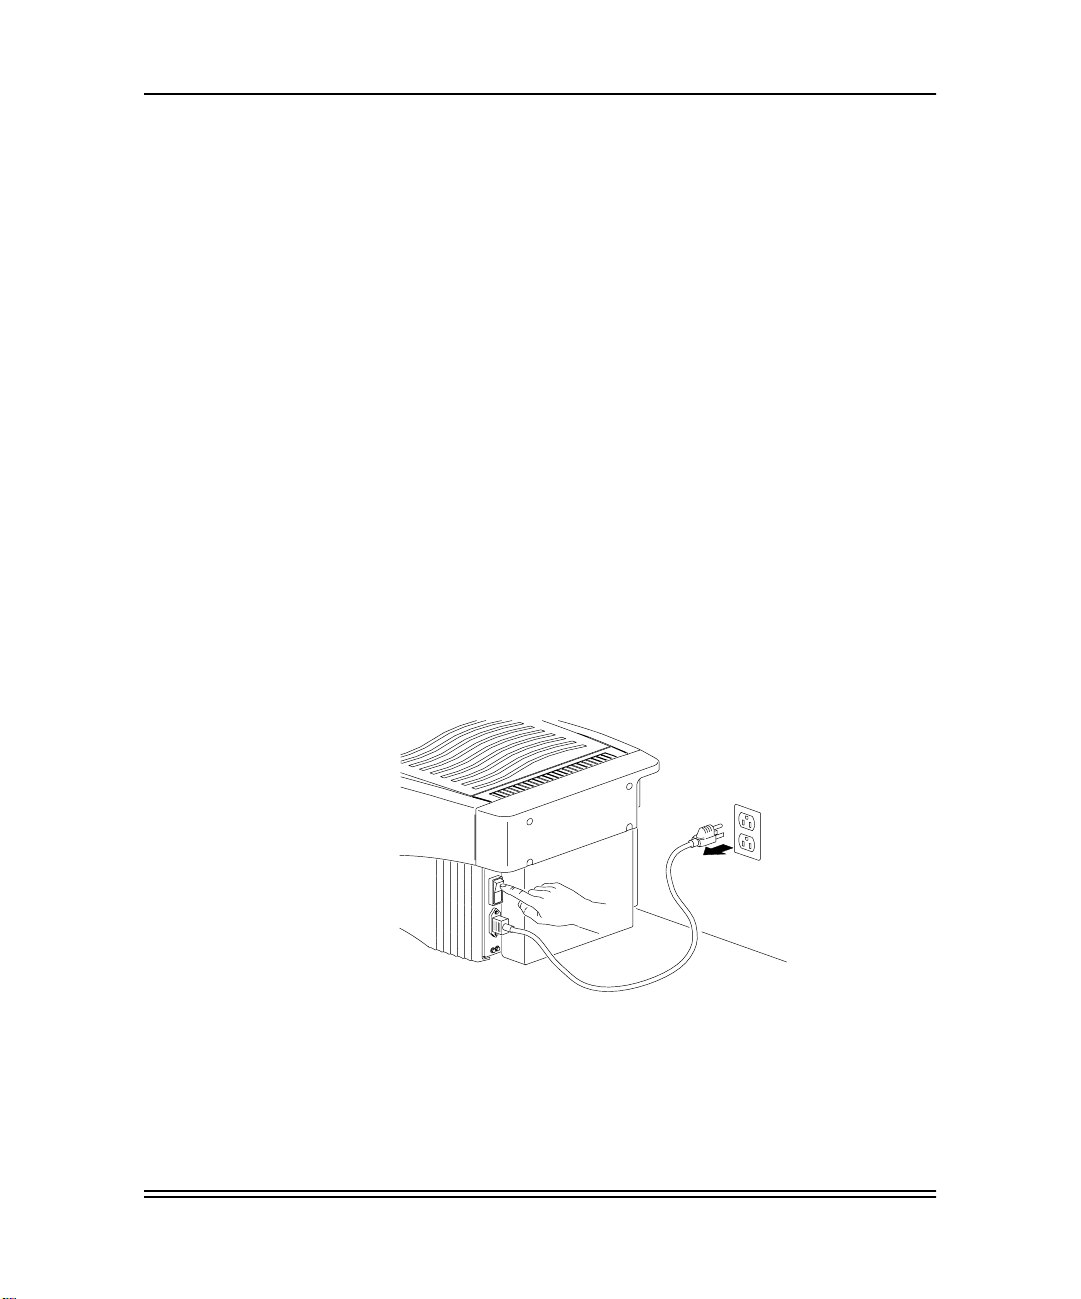
1. Turn off, and unplug the 8660 printer.
2-2 Part No. 6B4389June 1999Au-
Page 19
Installing the Hardware
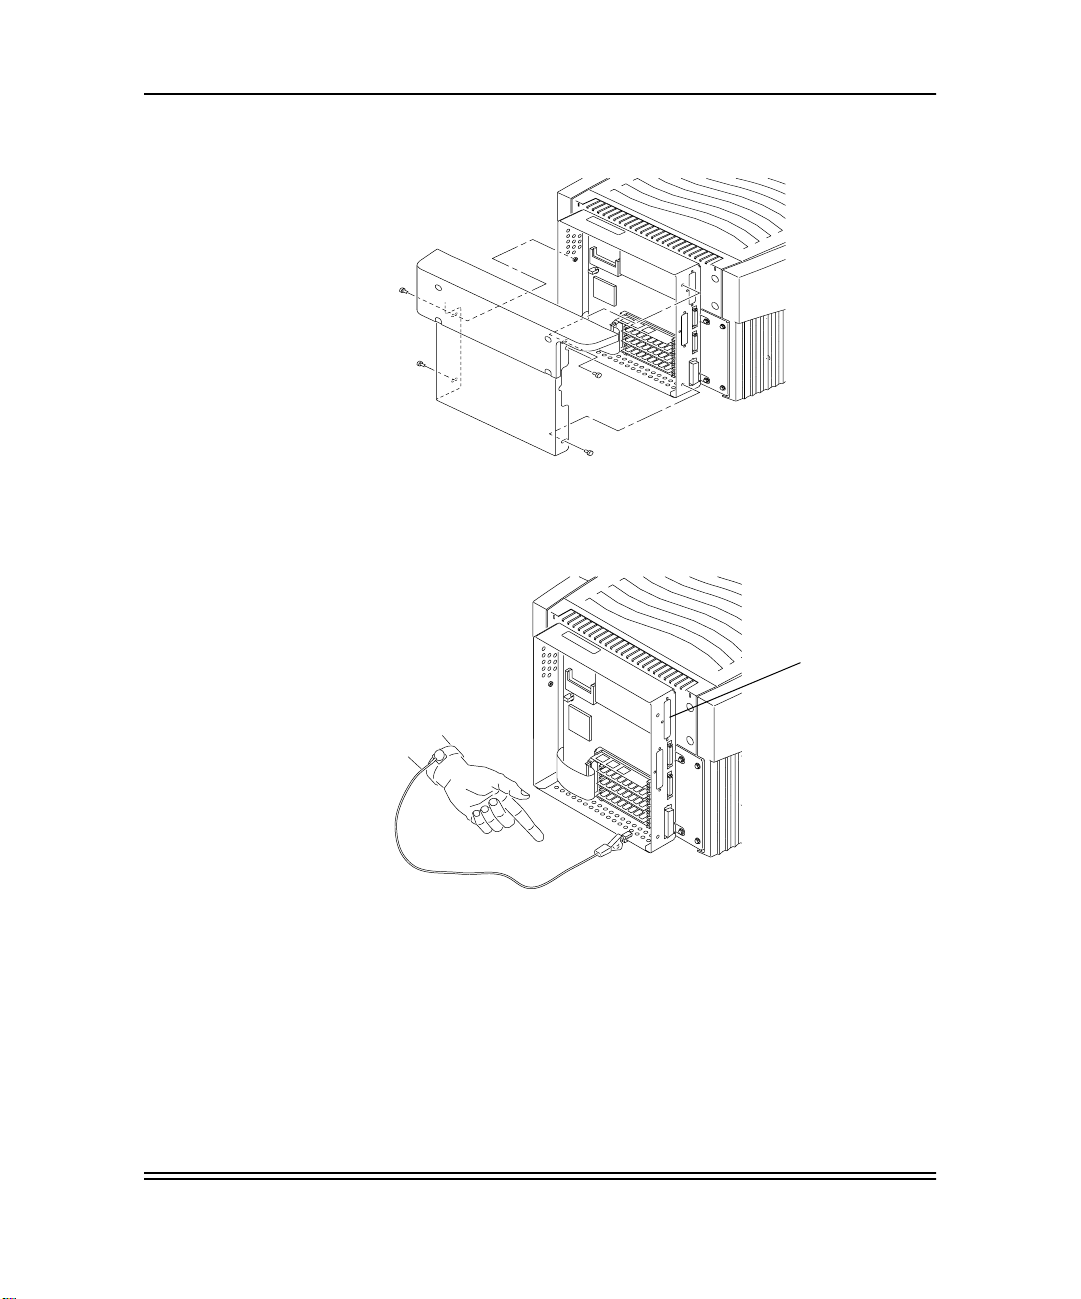
2. Remove the four screws on the back of the 8660 printer.
3. Remove the back panel.
4. Attach the wrist portion of a static strip to your wrist. Attach the
other end of the strap to the metal frame of the 8660 printer.
Slot cover
CAUTION: Wear the antistatic strap during this
installation procedure so that you do generate
static electricity that can damage the
8660printer.
5. Remove the screws which hold the slot cover for the Network
Interface Card in place.
6. Remove the Network Interface Card from the antistatic bag.
Part No. 6B4389 June 1999 2-3
Page 20
Installing the Hardware
Installing the NIC in an 8670 PS Printer
7. Hold the card so that the network cable receptacle is toward
the slot cover. Tilt the card slightly and slide the face plate
connector against the slot.
8. Position the printer interface connectors against the
receptacles on the motherboard to seat the NIC. Press the NIC
gently into place.
9. Install the screws that held the faceplate in place to secure the
NIC.
10.Install the back cover and the 4 screws.
11.Go to the section in this chapter on “Installing the Ethernet
Cable.”
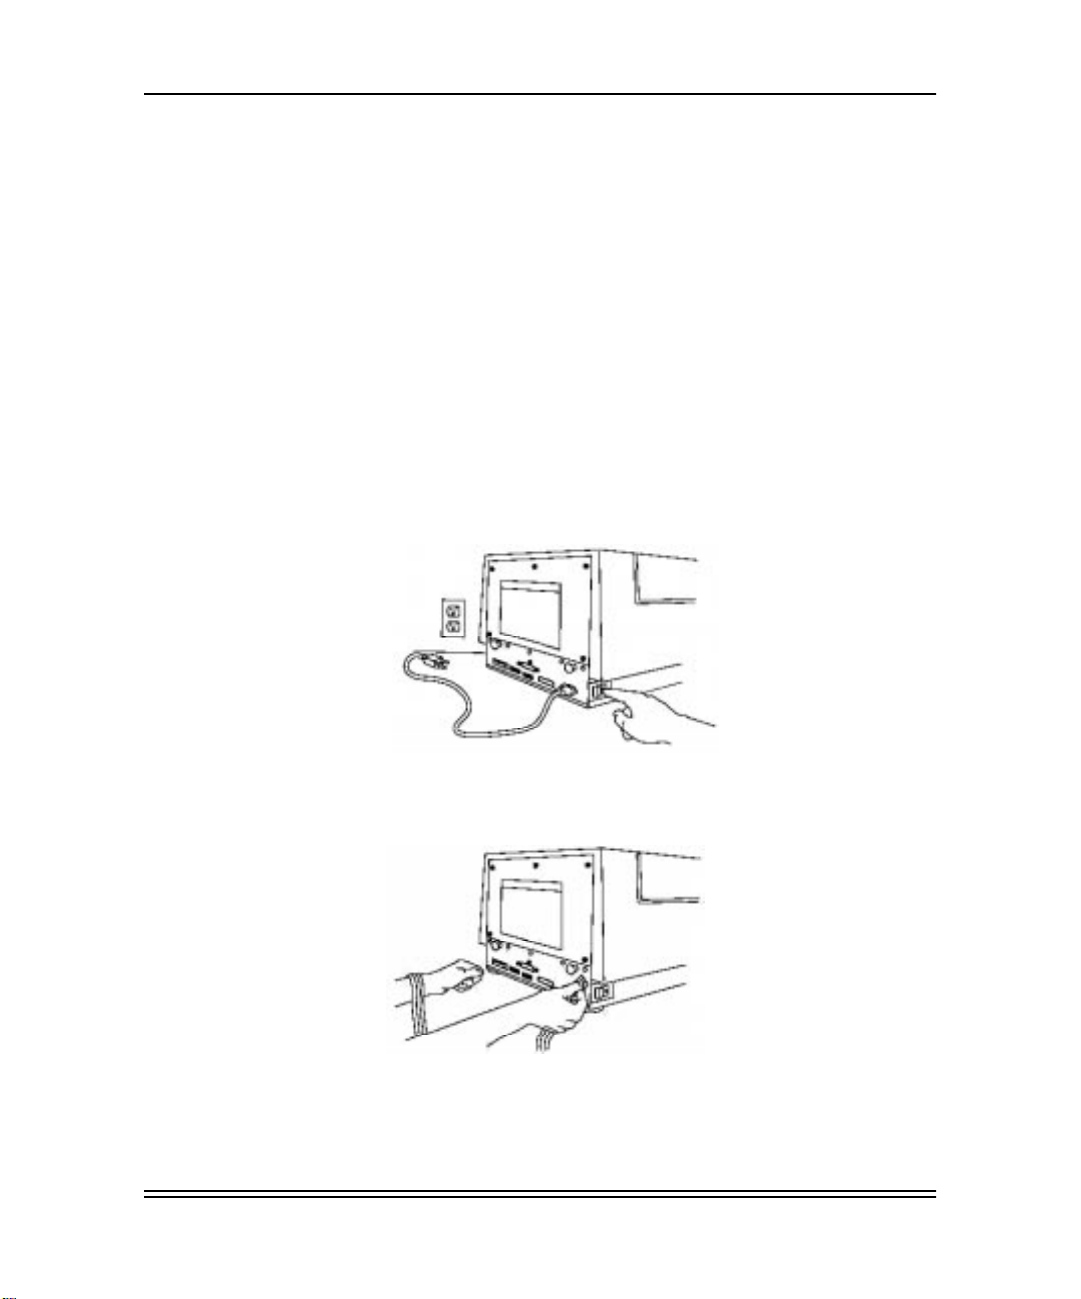
1. Turn off, and unplug the printer.
2. Attach the wrist portion of the antistatic strap to your wrist.
Attach the other end of the strap to the metal plate on the back
of the printer.
CAUTION: Wear the antistatic strap during this installation
procedure so that you do not generate static
electricity that can damage the printer.
2-4 Part No. 6B4389June 1999Au-
Page 21
Installing the Hardware
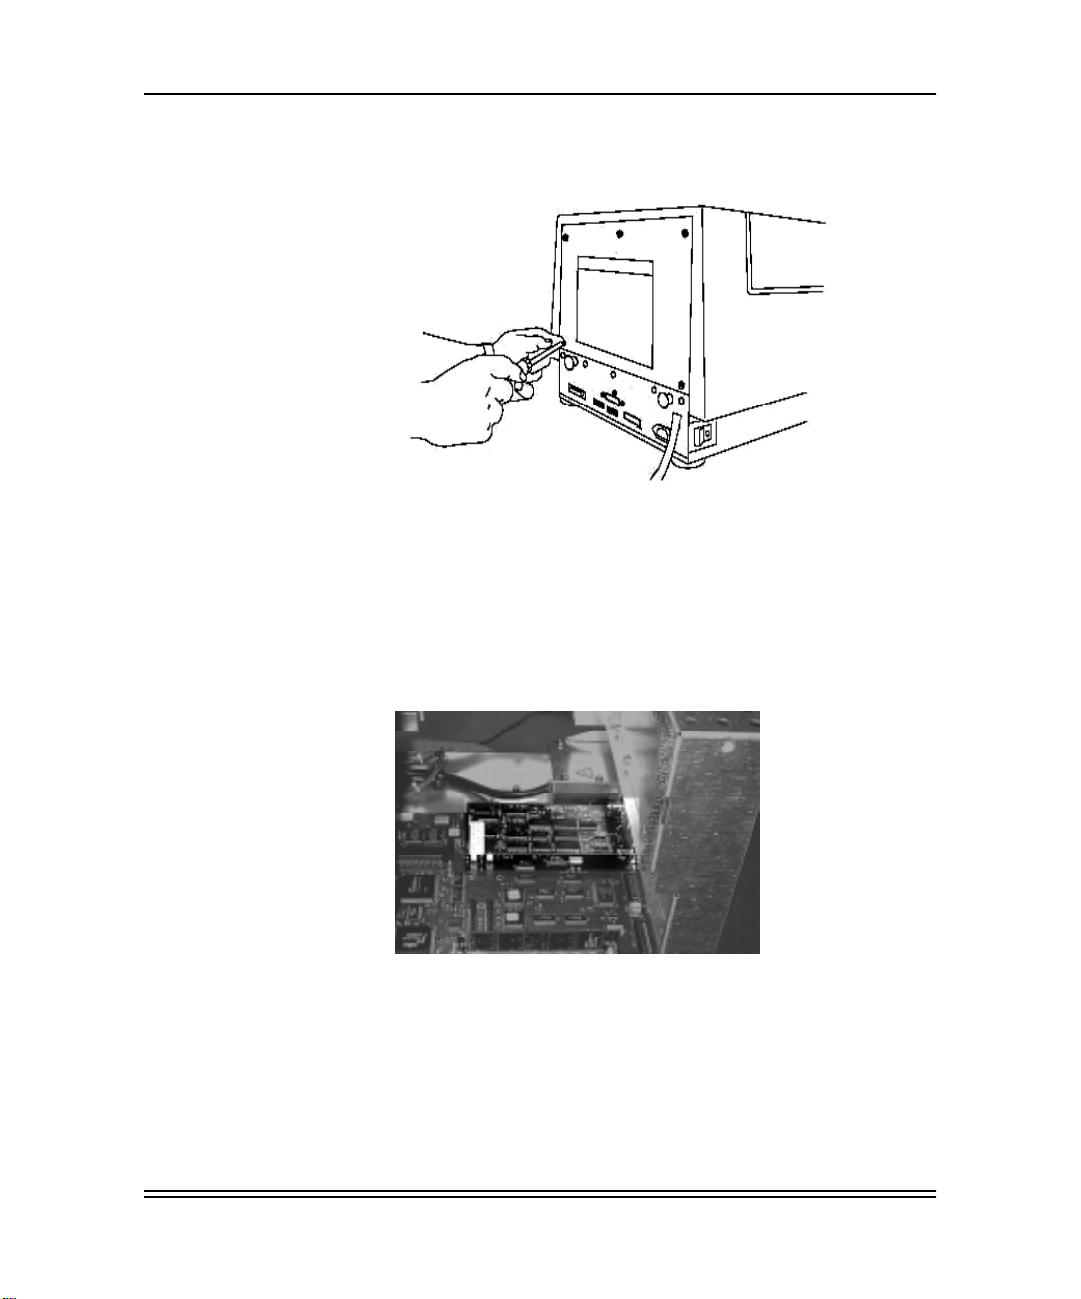
3. Remove the five screws on the back of the printer.
4. Grasp the two blac k handles on the metal plate . Slowly pull the
drawer out about six inches.
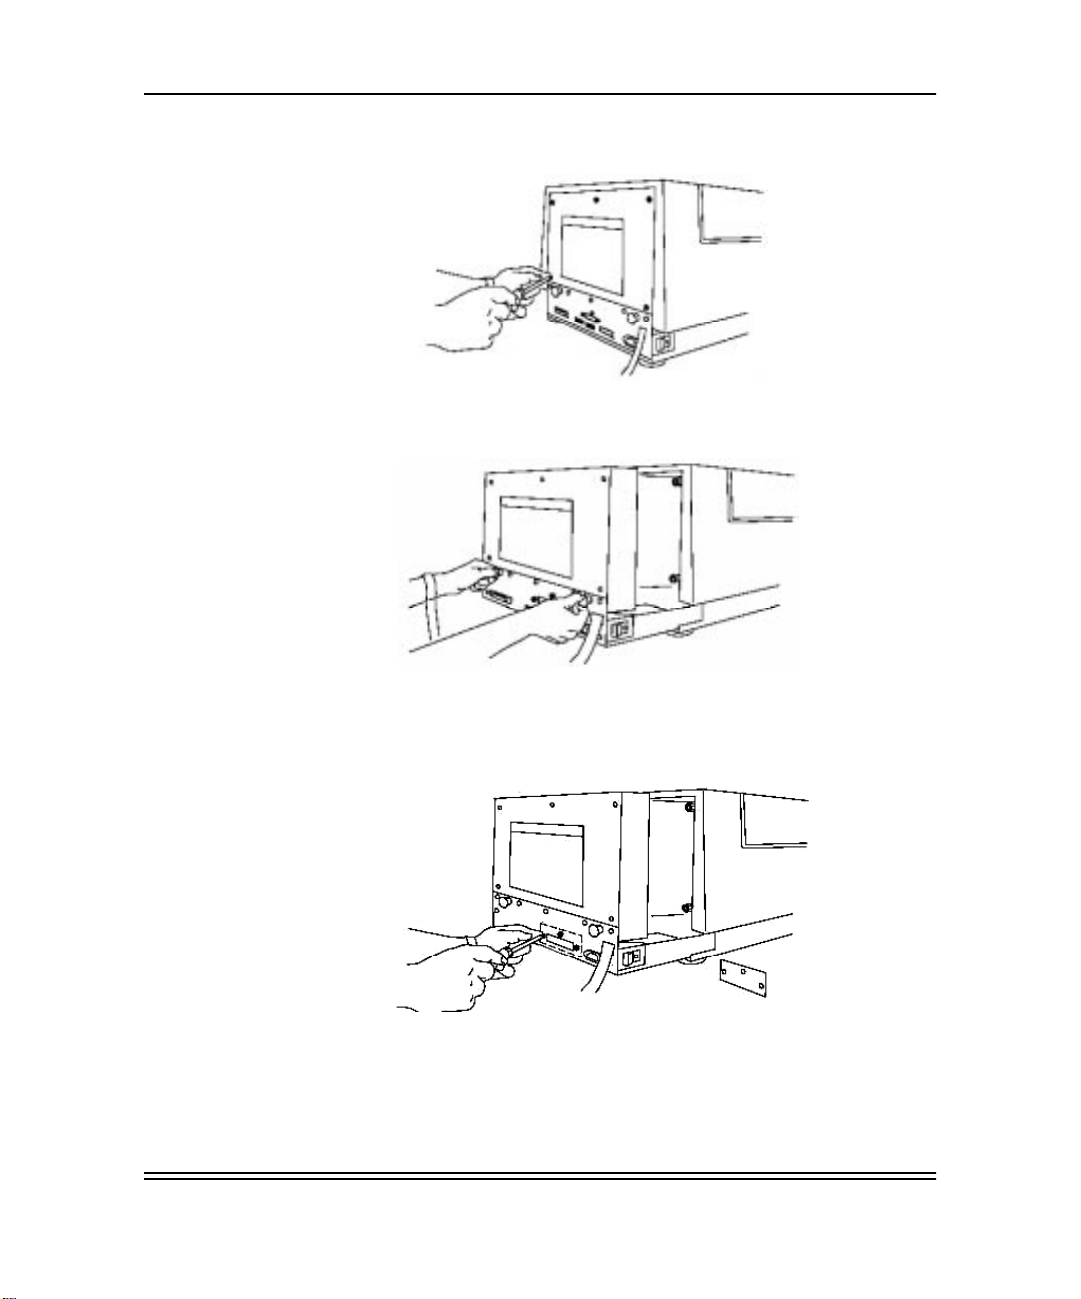
5. Remove the scre ws that hold the slot cov er f or the NIC in place
(slot nearest to power receptacle).
6. Remove the slot cover, and set it aside.
7. Remove the NIC from the antistatic bag.
Part No. 6B4389 June 1999 2-5
Page 22
Installing the Hardware
8. Hold the card so that the printer connectors are on the bottom
and the network cable receptacle is toward you.
9. Hold the card so that the network cable receptacle is toward
the slot cover. Tilt the card slightly, and slide the face plate
connector against the NIC slot.
10.Position the printer interface connectors against the
receptacles to seat the NIC. Press the NIC gently into place.
11.Secure the NIC faceplate to the printer by replacing the screws
you removed.
12.Grasp the handles on the back of the printer, and slide the back
of the printer in.
13.Replace the back panel screws you removed.
2-6 Part No. 6B4389June 1999Au-
Page 23
Installing the Ethernet Cable
To connect the NIC to a 10baseT or 100baseTX Fast Ethernet
network, you need a 10 or 100 MB capable Ethernet hub/switch
with at least one unused port installed on your network and an
appropriate length of RJ45 modular cable. Category 5 cabling is
necessary for 100 MB operation.
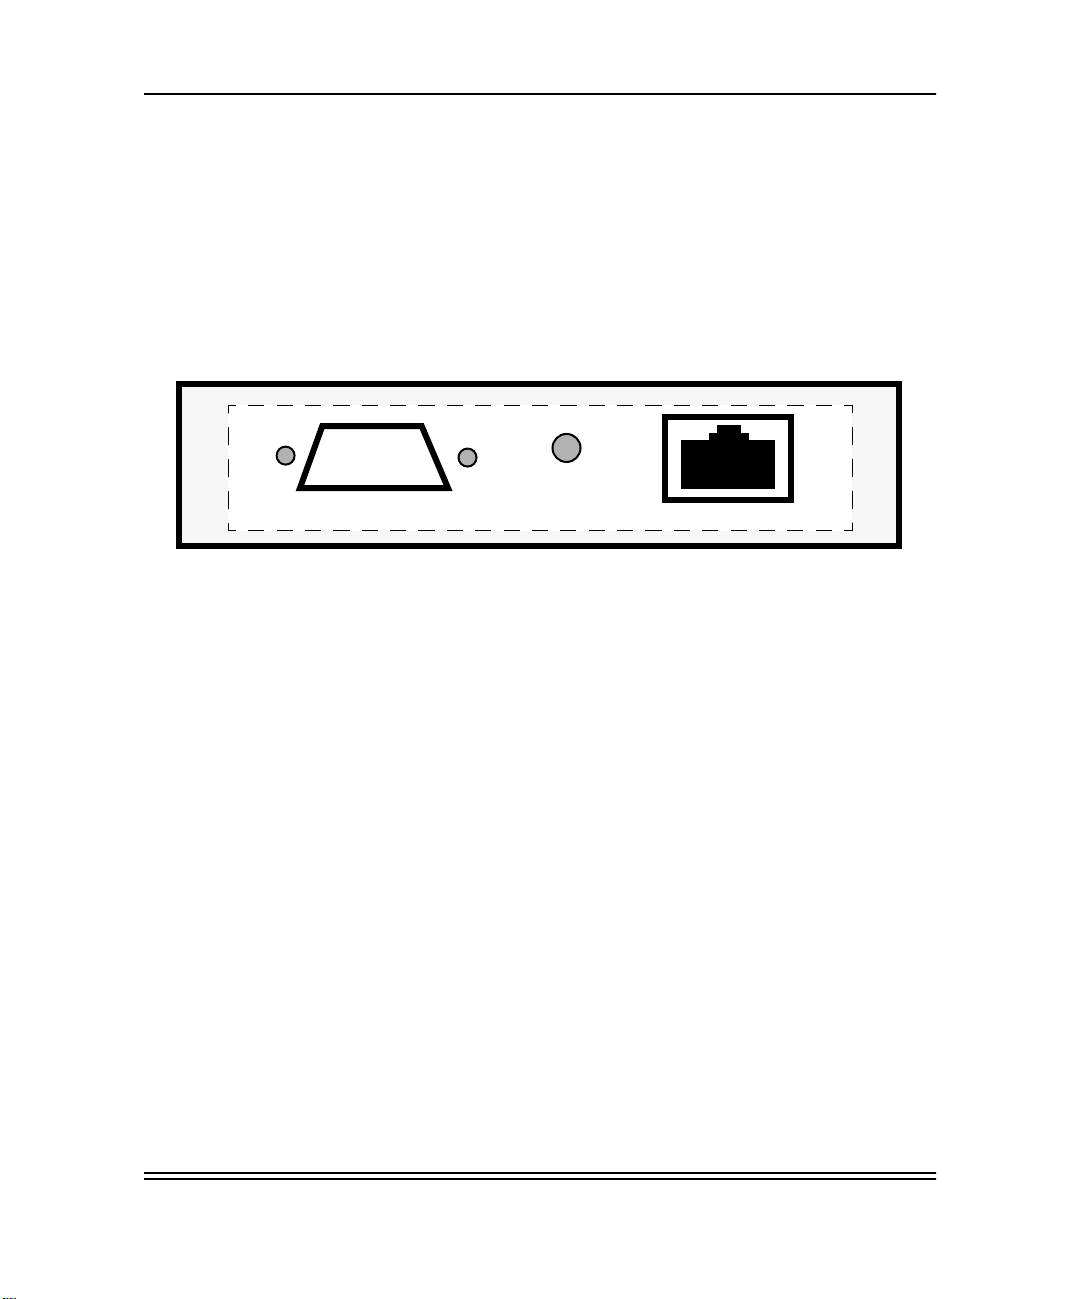
1. Connect one end of the RJ45 network cable to the Ethernet
port on the NIC.
o o o o
o o o o o
Serial Port
2. Connect the other end of the RJ45 network cable to the
Ethernet port on your hub or switch.
The NIC automatically senses if it is connected to a 10BaseT or a
100BaseTX network.
Test Button
Installing the Hardware
Ethernet Port
Printing a Test Page
You need to print a test page to verify that the NIC is installed
correctly. Use the test b utton on the NIC face plate to make a test
print. The test b utton is located between the Ethernet port and the
serial port.
NOTE: The test button is also used to reset the NIC to factory
defaults. Press the switch, and hold it in for at least 5
seconds to reset the NIC to factory defaults.
To print a test page:
1. Make sure that the printer is connected to a functioning
network. If the NIC does not detect protocols such as
AppleTalk, it automatically disables that protocol.
2. Turn on the power to the printer.
3. Locate the test button on the NIC faceplate.
Part No. 6B4389 June 1999 2-7
Page 24

Installing the Hardware
4. If this is the first time you are setting up or verifying NIC
operation, push in on the NIC test button for at least five
seconds to set all of the NIC configuration parameters to
factory defaults.
5. Push in on the test button again for approximately a second
(less than 5 seconds) to print a test page.
Retain the test print. It contains information you will need to
configure the NIC.
If the test page does not print:
• make sure that the NIC is installed securely in the printer.
• check the LEDs on the bottom of the NIC. When you turn on
the power to the printer, the NIC runs a set of power-up
diagnostics. If the NIC operates correctly, the red test LED
blinks momentarily and then goes out. The test LED blinking
continuously indicates a problem with either the installation of
the NIC or the Ethernet cable.
Refer to the chapter “TroubleShooting” for more information on
diagnosing the problem.
Configuring the NIC
If the NIC test page printed, configure the NIC for network printing
only if you wish to change the default settings. Refer to “Using
Configuration Utilities” for information on the various utilities that
you can use to configure the NIC.
2-8 Part No. 6B4389June 1999Au-
Page 25

3 Using Configuration Utilities
You can use various utilities to configure the Kodak Professional
10/100 network interface card (NIC):
Web Browser Configuration Tool
configure from any platform that supports Web access; requires
an IP address. No additional configuration software necessary.
XAdmin Configuration Utility—
Windows only; software provided with the NIC. Does not provide
AppleTalk configuration.
Apple LaserWriter Utilities
only; software pro vided with the Macintosh operating system or is
available on Apple’s Web site; functionality limited to AppleTalk
parameters and downloading a PostScript file.
XConfig Utility
software provided with the NIC. Does not provide AppleTalk
configuration. Refer to Appendix B for more information on the
NIC configuration commands.
Telnet—
that supports the use of Telnet (TCP/IP); requires an IP address.
Refer to Appendix B for more information on the NIC
configuration commands
NIC Serial Port—
serial terminal. Refer to Appendix B for more information on the
NIC configuration commands
Printer Front Control Pane
parameters such as IP address that can be established from the
printer’s control panel.
Command line interface; configure from any platform
—Command line interface; Windows only;
Command line interface; configure from any
—Graphical interface; Macintosh
l—Describes NIC configuration
—Graphical interface;
Graphical interface; use for
Additional Mechanisms for Establishing an IP Address—
Describes use of ARP, RARP and BOOTP.
NIC Services
Appendix B.
NIC Commands
utilities are summarized in the Appendix B.
Part No. 6B4389 June 1999 3-1
—Services and names are summarized in
—Commands for command line configuration
Page 26
Using Configuration Utilities
NOTE: The Web browser and Telnet tools provide capability for
Kodak support is limited to networked printers using the NIC in
NetBIOS/NetBeui, NetWare (IPX/SPX), TCP/IP and AppleTalk
environments. However, the various print server utilities provided
are generic and reference additional protocols and services such
as Banyan, DEC LAT, DLC/LCC and POP3/SMTP. These
additional environments have not been tested and are not
supported by Kodak for use with the NIC.
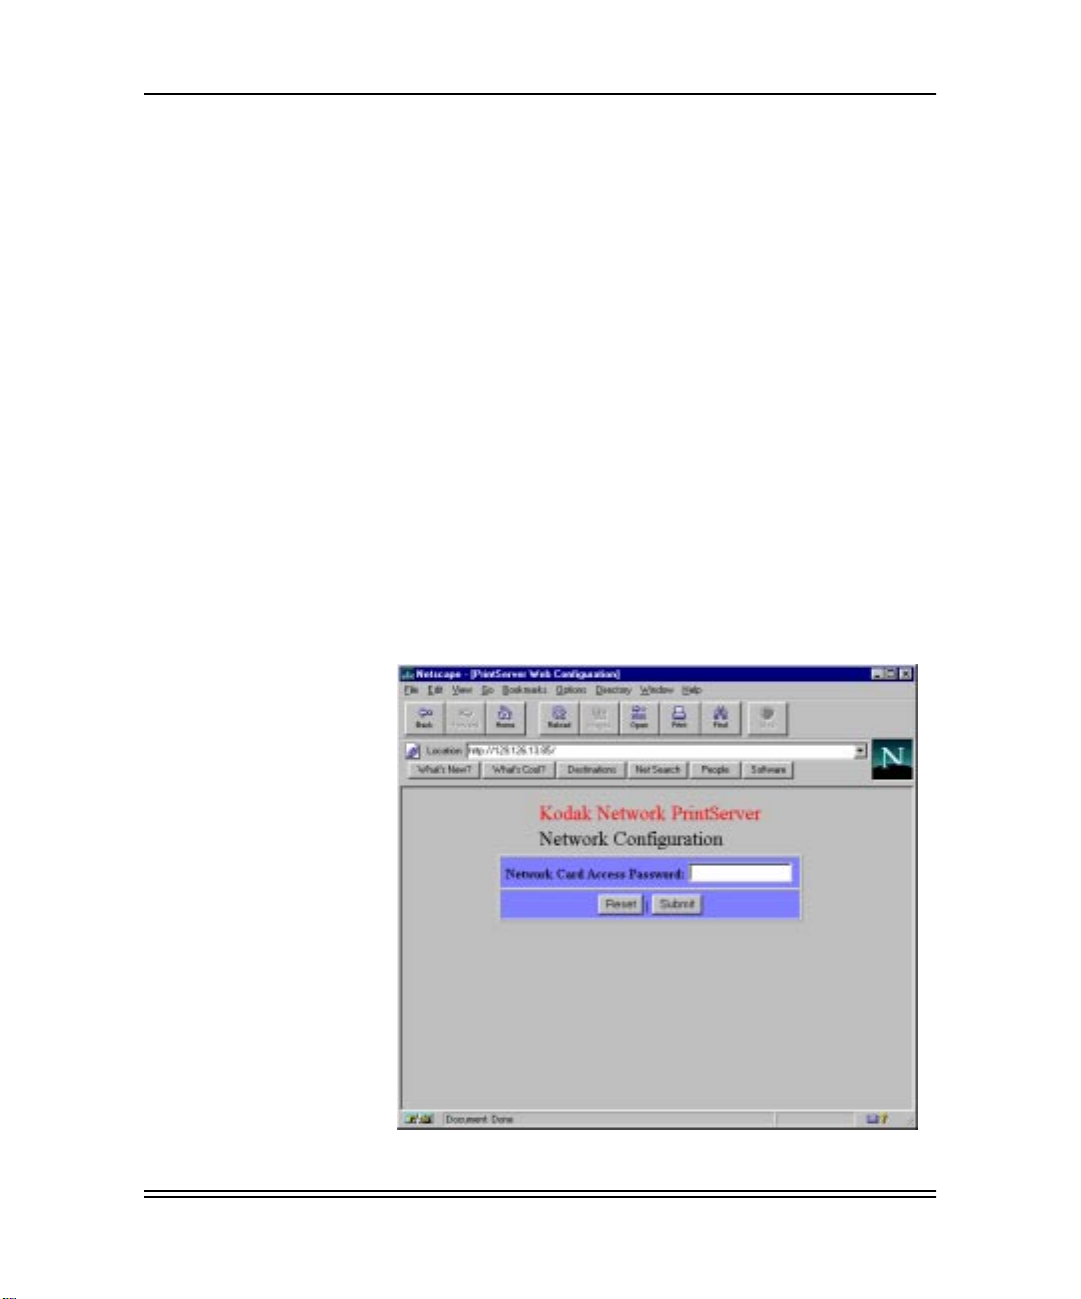
Using a Web Browser to Configure the NIC
To configure the NIC from your Web browser:
1. From any internet browser on any platf orm, enter the NIC’ s IP
NOTE: It may be necessary to disable proxies for your Web
configuring all protocols. Other utilities such as XAdmin
and XConfig limit configuration capabilities for Windows
environments.
address as the internet location.
browser to access the NIC.
The Network Configuration window appears.
3-2 Part No. 6B4389 June 1999
Page 27
Using Configuration Utilities
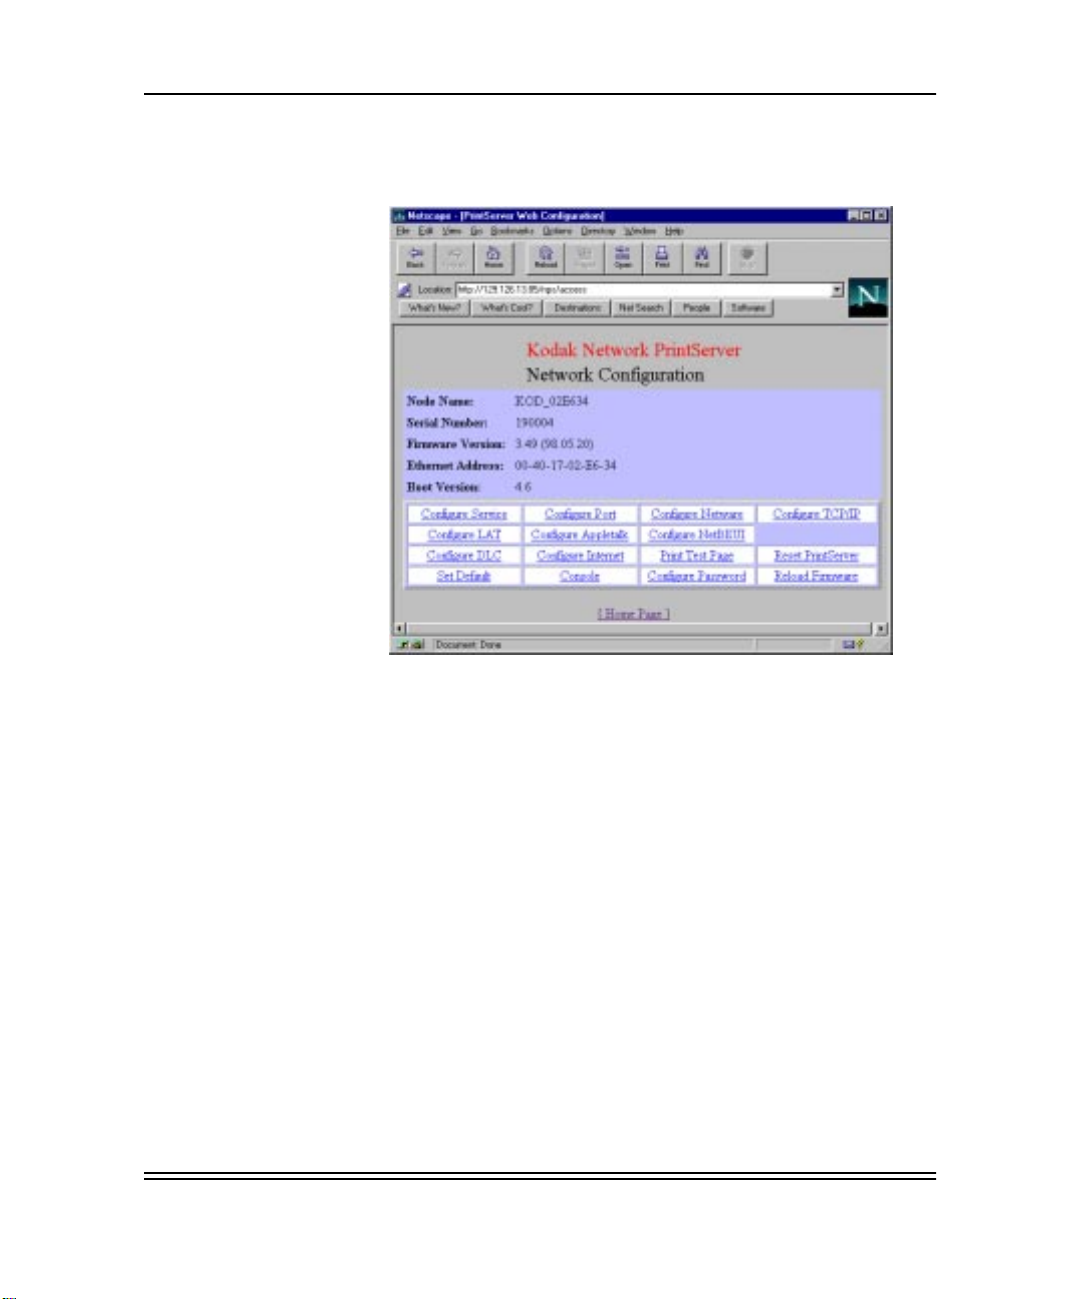
2. Enter
3. Click on the desired option.
Access
A screen that lists your configuration options appears.
for the password.
Service Names
Service names associated with the various protocols correspond
to names that will show up on your network such as Windows
Network Neighborhood and Macintosh Chooser. Default service
names reflect the NIC’s unique Ethernet hardware address digits.
If you wish to change the service names that are advertised on
your network to something more descriptive of your printer, click
on the corresponding service and type the name you prefer.
NOTE: For any modified parameters to take effect, they must be
saved by resetting the print server before terminating your
Web browser connection or by turning the printer off and
then on.
Part No. 6B4389 June 1999 3-3
Page 28
Using Configuration Utilities
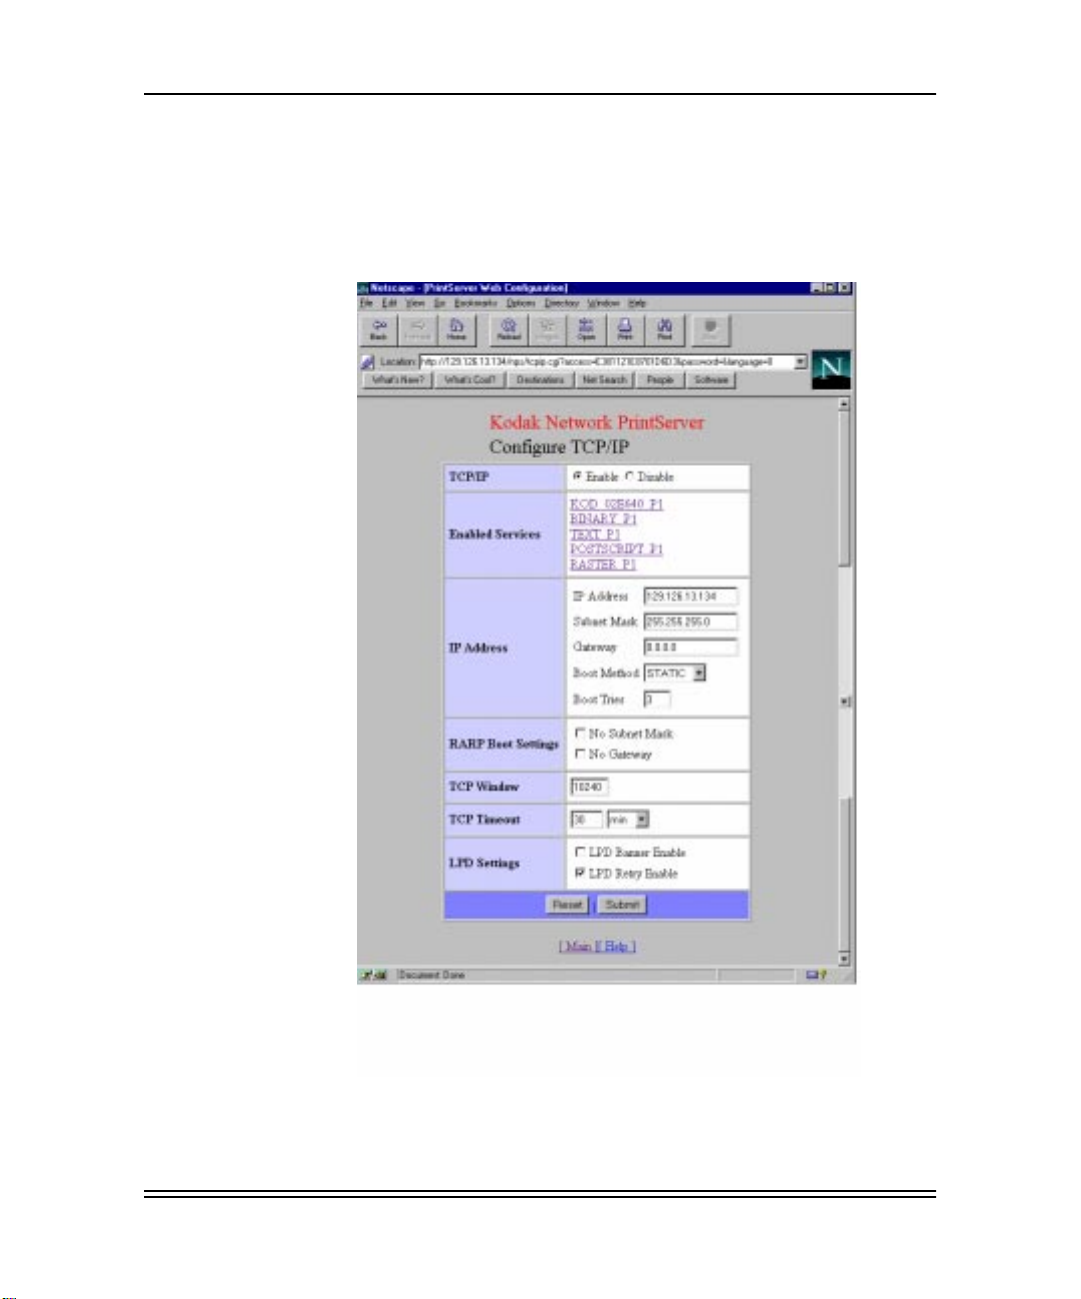
Examples of Configuration Screens
The following screens are examples of Web interface features
that are supported.
TCP/IP
3-4 Part No. 6B4389 June 1999
Page 29
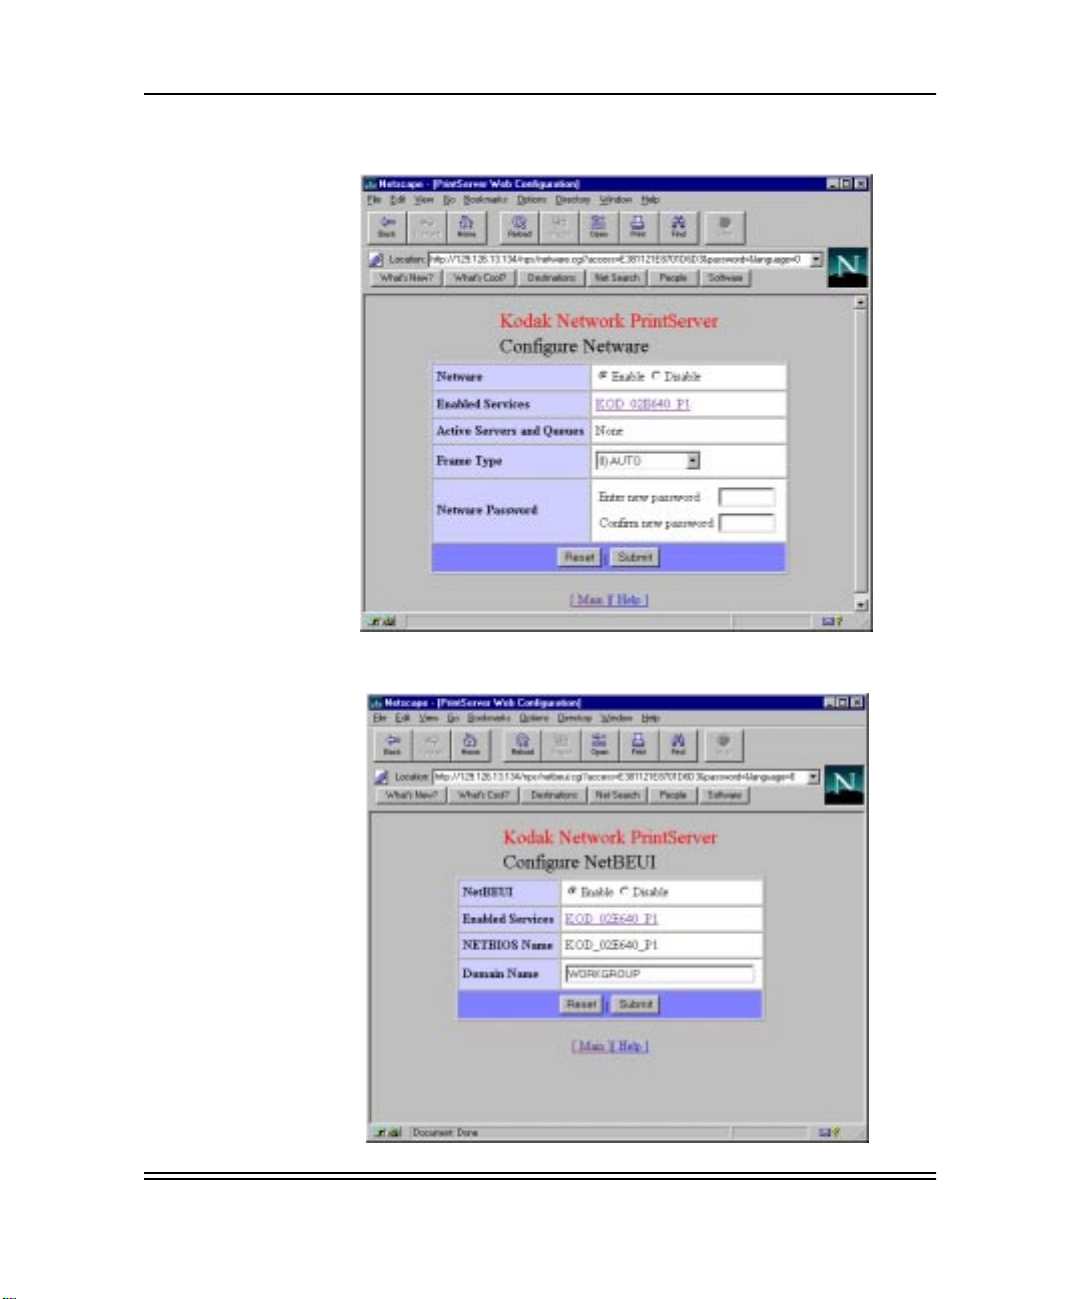
Novell Netware
Using Configuration Utilities
NetBEUI
Part No. 6B4389 June 1999 3-5
Page 30
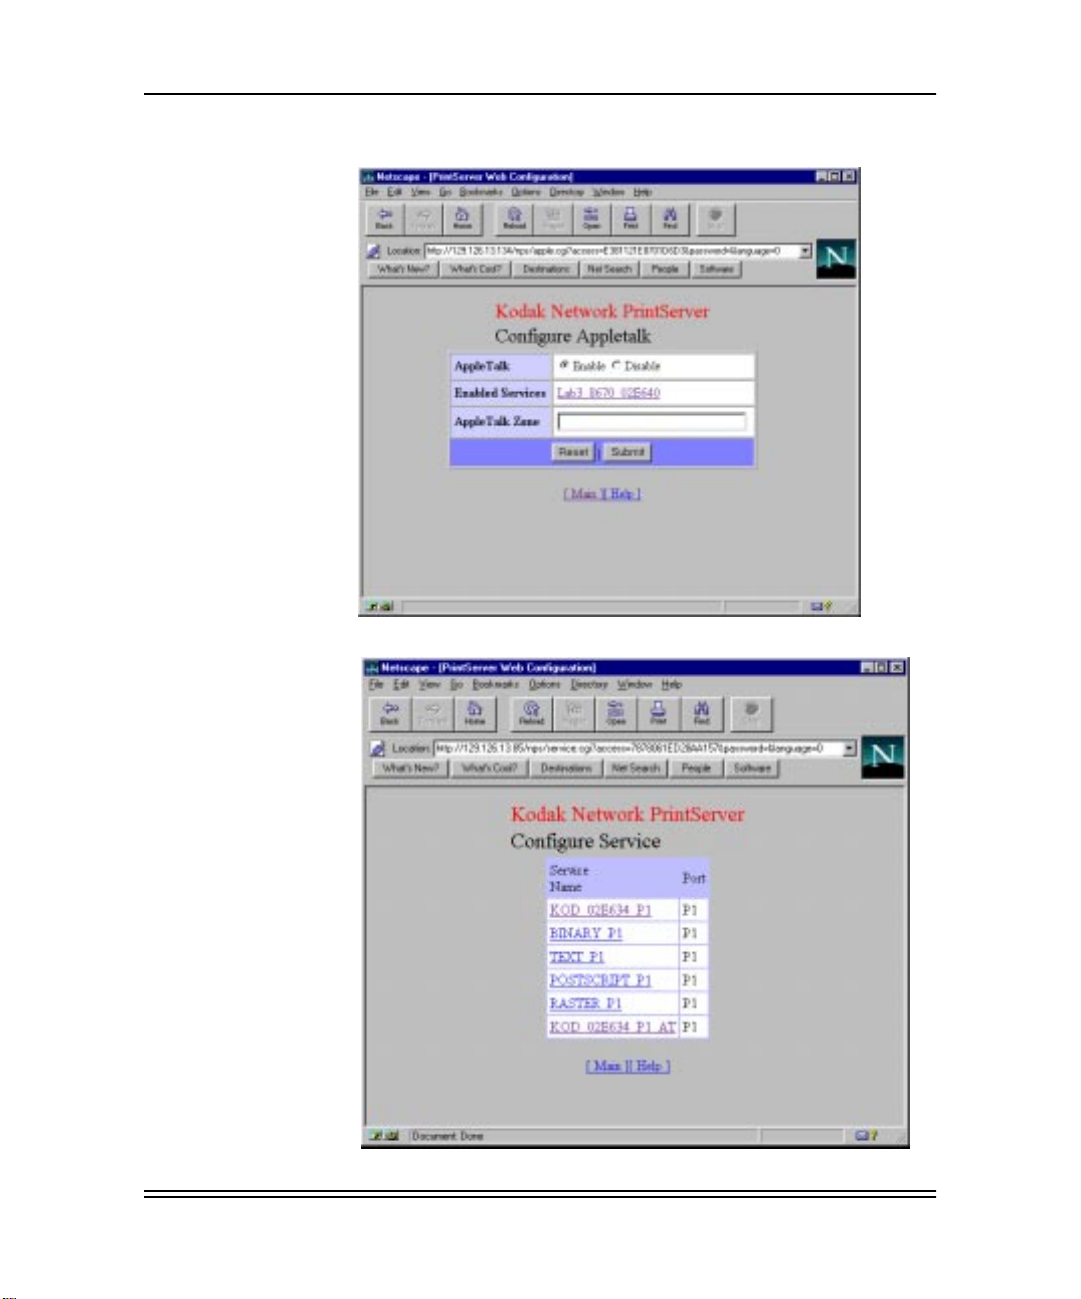
Using Configuration Utilities
AppleTalk
3-6 Part No. 6B4389 June 1999
Page 31

Using Configuration Utilities
Part No. 6B4389 June 1999 3-7
Page 32

Using Configuration Utilities
Using the XAdmin Utility
The XAdmin utility is provided with the NIC for use with Windows
operating systems. A setup utility must be executed to install
XAdmin. XAdmin can be used as an alternative to JetAdmin
NetWare if you are using Netware.
Most parameters for NetBEUI, NetWare, and TCP/IP can be
modified with XAdmin. F or configuration of additional par ameters,
use a Web browser, XConfig, or Telnet utilities.
1. To start XAdmin, either use the Win 95/NT Start > Programs
2. Double-click on the appropriate NIC represented as
> XAdmin > XAdmin mechanism or click on the XAdmin
executable installed in the XAdmin folder.
KOD_xxxxxx_P1 in the list.
3. Enter
NOTE: Your password will not appear as it does in the illustration.
Access
as the password.
3-8 Part No. 6B4389 June 1999
Page 33

Using Configuration Utilities
The following screens illustrate XAdmin interface feat ures:
Part No. 6B4389 June 1999 3-9
Page 34

Using Configuration Utilities
3-10 Part No. 6B4389 June 1999
Page 35

Using Configuration Utilities
Part No. 6B4389 June 1999 3-11
Page 36

Using Configuration Utilities
Using XConfig Utility
The XConfig utility is provided with the NIC for use with Windows
operating systems. Use the setup utility to install XConfig along
with XAdmin. XConfig is a command line interface that can be
used to issue commands and get a status from the NIC.
XConfig and Telnet are equivalent command line interfaces.
XConfig does not require a prior address configuration if your
system is configured to support IPX. (The NIC can be selected
from its default “KOD_xxxxxx_P1” address.) However, Telnet
requires that an IP address first be established on the NIC.
1. To start XConfig, either use the Win 95/NT Start > Programs
> XAdmin > XConfig mechanism or click on the XConfig
executable which is installed in the XAdmin folder.
If you have one printer with a NIC installed, you will are
immediately connected. If you have more than one NIC, a
screen appears that gives you a list of available NICs.
2. Select the appropriate NIC represented as KOD_xxxxxx_P1.
3-12 Part No. 6B4389 June 1999
Page 37

Using Configuration Utilities
3. Enter Access at the # prompt for the password.
Part No. 6B4389 June 1999 3-13
Page 38

Using Configuration Utilities
4. Type Help for further assistance.
NOTE: Refer to the configuration command section in Appendix B
for a summary of commands and syntaxes for use with
XConfig, Telnet or serial port sessions with the NIC.
Telnet Configuration Utility (Any Platform)
The Telnet utility is not provided with the NIC as utility
software.Telnet is typically provided with any system that
supports communications with TCP/IP.
XConfig and Telnet are essentially equivalent command line
interfaces. However, Telnet requires that an IP address first be
established on the NIC.
An IP address can be established in a variety of ways. One
method is to enter an IP address on the printer’s front display
panel by entering the setup menu and following the prompts.
Refer to the Operator’s Guide on the CD that came with the
printer for more information on using the Setup menu.
1. A Telnet session is typically established by entering the
following command line:
3-14 Part No. 6B4389 June 1999
Page 39

telnet <IP Address>
2. Enter Access as the password.
3. Type Help for further assistance.
Using Configuration Utilities
NOTE: Refer to the configuration command section in Appendix B
for a summary of commands and syntaxes for use with
XConfig, Telnet or serial port sessions with the NIC.
Part No. 6B4389 June 1999 3-15
Page 40

Using Configuration Utilities
Connecting the NIC Serial Configuration Port to a
Console T erminal
The console facility is used for diagnosing and configuring the
NIC. It can also be used for downloading new firmware to the
NIC. The console is accessed from the NIC’s serial port which
has a PC-compatible 9-pin male D-connector.
The following table lists the function of each of the pins in the Dconnector:
DE9 DTE DCE
Pin Signal Signal Pin Pin
1 Not Used Not Used - 2 Recve Data Trnsmt
Data
3 Trnsmt
Data
4 DTR Out DSR In 6 20
5 Signal Grnd Signal Grnd 7 7
6 DSR In DTR Out 20 6
7 RTS Out CTS In 5 4
8 CTS In RTS Out 4 5
9 Not Used Not Used - -
Settings: 9600 bps No Parity XOn/XOff 8 bit
The standard 9-pin female to 25-pin male PC cables require a
null modem to connect to most printers or terminals. The cable
must connect input signals such as receive data on the NIC to the
equivalent output signals such as transmit data on the device and
vice-versa.
Recve Data 3 2
23
Chars
3-16 Part No. 6B4389 June 1999
Page 41

Using Configuration Utilities
The serial port always operates at 9600 bps with no parity, XON/
XOFF flow control, and 8-bit characters when in console mode.
Make sure that your terminal is set to these parameters.
NOTE: Refer to Appendix B for a summary of commands and
syntaxes for use with XConfig, Telnet or serial port
sessions with the NIC.
Configuring the NIC from the Printer’s Display Panel
Some NIC parameters can be configured from the printer’s
display panel.
Keys on the printer control panel can be used to:
• enter the Setup menu (Setup/Select key).
• scroll up through menus (Print key).
• scroll down through menus (Cancel key).
• select items (Setup/Select key).
Setup menu items can either be viewed f or status or configured to
accommodate your network printing environment. Use the scroll
keys to scroll to the next number.
1. When the printer is in the Ready state, select Setup.
2. Scroll through the menu items to select Status or Ports for
NIC parameters.
3. Exit the setup mode.
4. Reset the NIC to save any configuration changes.
The following items are available on the Status menu for the NIC:
Status>
Part No. 6B4389 June 1999 3-17
NIC> Serial #
FW V ersion
Link
Page 42

Using Configuration Utilities
The following options are available from the Ports menu:
Ports> Network
IPX FrameTypes 802.3
802.2
SNAP
Ethernet II
Auto (Default)
TCP/IP Status IP Address
Router Addr
Subnet Mask
Address IP Address
Router Addr
Subnet Mask
Type Static
BootP
RARP
DHCP
Auto (Default)
# of Tries 3 (Default)
EtherTalk Version 2
1
Test Print
2
Reset
1This test print is for NIC configuration parameters. Exit Setup before the test print can be generated.Do
not confuse this test print with the test print generated by pressing Print on the front display.
2Resets the NIC for parameter changes.
NIC Config Parameters
(NIC Only)
3-18 Part No. 6B4389 June 1999
Page 43

Using Configuration Utilities
Additional Mechanisms for Establishing an IP Address
Enabling IP access using ARP
You must be on the same Ethernet segment to use the arp -s
command. There cannot be a router between the NIC and the
system using ARP.
The arp mechanism will only enable that workstation to access
the NIC using the IP address used in the arp command. It is still
necessary to set that IP address on the NIC using any NIC
configuration utility in order for that IP address to be sav ed on the
NIC.
To use arp on Windows:
1. From the MS-DOS prompt use the arp -s command to enter
the IP address into the NIC as shown in the following
example:
arp -s 192.189.207.77 00-40-17-00-ed-d6
Substitute your actual IP address for 192.189.207.77, and
replace the 00-40-17-00-ed-d6 with the actual Ethernet
address of the NIC.
2. Use the ping command with the NIC’s IP address to v erify the
connection. For example:
ping 192.189.207.77
Substitute your actual NIC IP address in 192.189.207.77 in
the above examples. You should get a response back from
the NIC if the IP address has been set and the NIC installed
in the printer is alive on the network.
Using Arp on Unix Systems
To use arp, enter the following command at the UNIX system
prompt:
arp -s ipaddress ethernetaddress temp
Ethernetaddress is the Ethernet address of the print server, and
IPaddress is the IP address of the print server. For example:
arp -s 192.189.207.2 00:40:17:00:c3:e4 temp
Part No. 6B4389 June 1999 3-19
Page 44

Using Configuration Utilities
Using rarp to Configure the IP Address
You can configure the NIC IP address using the reverse ARP
(rarp) utility on the host computer. To use rarp , edit the /etc/ethers
file with an entry similar to the following. If the file does not exist,
you can create it.
00:40:17:00:01:07 KOD_000107
The first entry is the Ethernet address of the NIC print server, and
the second entry is the name of the NIC.
NOTE: The name must be the same as the one you entered in the
If the rarp daemon is not already running, start it by using one of
the following commands:
• rarpd
• rarpd -a in.rarpd -a
NOTE: Refer to the system’s documentation for more information
To verify that the rarp daemon is running on a Berkeley Unix
system, type the following command:
/etc/hosts file.
about starting the rarp daemon.
ps -ax I grep -v grep I grep rarpd
For At&T UNIX systems, type the following command:
ps -ef I grep -v grep I grep rarpd
The NIC will get the IP address from the rarp daemon when it is
powered on.
Using BOOTP to Configure the IP Address
BOOTP is an alternative to rarp that allows configuration of the
subnet mask and gateway. To use BOOTP to configure the IP
address into the NIC, make sure that BOOTP is installed and
running on your host computer. It should appear in the /etc/
services file on your host as a real service.
BOOTP is usually started from the /etc/inetd.conf file. To enable it,
remove the # in front of the bootp entry in that file. For example, a
typical bootp entry in the /etc/inetd. Conf file would be:
#bootp dgram udp wait /usr/etc/bootpd bootpd -1
3-20 Part No. 6B4389 June 1999
Page 45

Using Configuration Utilities
Depending on the system, this entry might be called bootps
instead of boot’.
To enable BOOTP, use an editor to delete the # sign. If the # sign
does not appear, BOOTP is enabled.
Edit the BOOTP configuration file (usually /etc/bootptab) to enter
the name, network type (1 for Ethernet), Ethernet address (found
on the label on the NIC box), and IP address, subnet mask and
gateway of the NIC.
NOTE: Refer to your system documentation to determine how to
enter this information.
Some BOOTP host software implementations will not respond to
BOOtP requests if you have not included a download filename in
the configuration file. If necessary, create a null file on the host
and specify the name of this file and its path in the configuration
file.
The NIC will load its IP address from the BOOTP server when the
printer is powered on.
If you do not have subnets, use one of the following default
subnet masks:
255.255.255.0 for class C networks
255.255.0.0 for class B networks
255.0.0.0 for class A networks
NOTE: The type of network you have can be identified by the
leftmost group of digits in your IP address. The v alue of this
group ranges from 192 through 255 for Class C networks,
128 through 191 for Class B networks, and 1 through 127
for Class A networks.
3. Enter the address of the gateway with the command SET IP
ROUTER. The router address is the desired IP address of the
gateway you wish to assign to the NIC. For example:
Local> SET IP ROUTER 192.198.207.1
4. Enter SHOW IP to verify that you have entered the IP
information correctly.
5. Press CTRL-D to end the remote console session.
Part No. 6B4389 June 1999 3-21
Page 46

Using Configuration Utilities
6. Use the Unix ping command with the IP address of the NIC to
NOTE: You should get a message that the NIC is active. You will
7. Use the standard lpr command with the -P option to specify
verify the connection between the host and the NIC:
ping 192.189.207.3
not be able to print if you cannot ping the NIC. If you get an
error message or no response, there is no connection.
Verify that you have set up the host and the NIC correctly
and check the connections. Refer to “Troubleshooting”.
the queue name. For example, to print the file TEST on the
queue laser1, you would enter:
lpr -Plaser1 TEST
Some AT&T Unix systems such as SCO and HP/UX use the
standard lp command instead of lpr. For these systems use
the -d option instead of -P to specify the queue name as
shown in the following example:
lp -dlaser1 TEST
3-22 Part No. 6B4389 June 1999
Page 47

4 Configuring Servers and Workstations for
Printing
AdobePS Drivers and Export Modules
The AdobePS drivers (supplied with your K odak printer software)
must be installed on each workstation that will be printing files to
a Kodak PostScript printer.
The Kodak export module (supplied with your Kodak printer
software) must be installed on each workstation that will be
exporting files to a Kodak raster printer.
NOTE: Kodak does not provide drivers and export modules for
Unix systems. Refer to “Configuring for TCP/IP” for more
information on Unix support.
Novell Servers
Refer to “Novell NetWare” for details on configuring Novell server
queues to support your Kodak printer.
Novell Netware 5.x supports communications using TCP/IP. Prior
versions (3.x, 4.x) support IPX and AppleTalk Print Services but
do not support TCP/IP. Refer to your Novell Netware 5.x
documentation for information about using TCP/IP and
configuring print queues.
Windows NT 4.0, Windows 2000 Servers and Workstations
Refer to “Configuring for TCP/IP” for details on configuring these
platforms as servers or workstations using an LPR port.
Windows 95/98/NT systems also support Peer to Peer printing
using NetBEUI. Ref er to “Microsoft Peer to P eer Printing Services
(NetBEUI)” for configuration details. For PostScript printing, a
local printer must be set up on each workstation. For raster file
printing, the printer can be selected by browsing the network from
the export module for a network queue.
Part No. 6B4389 June 1999 4-1
Page 48

Configuring Servers and Workstations for Printing
Unix Servers and Workstations
Refer to “Configuring for TCP/IP” for details on configuring these
platforms as servers or workstations. Also refer to the notes in
that chapter regarding support for Unix systems.
Windows for Work Groups (3.x)
Windows for Work Groups systems can not be set up to print
directly to printers over the network. An existing network print
queue must be selected and captured to an LPT port.
Windows 95/98
It is recommended that a Novell, NT or Unix network server print
queue be established to support printing from Windows 95/98
systems. This method will support both PostScript and raster file
printing.
Windows 95/98/NT systems also support Peer to Peer printing
using NetBEUI. Refer to the “MicroSoft Peer to Peer Print
Services NetBEUI)” for configuration details. For PostScript
printing, a local printer must be set up on each workstation. For
raster file printing, the printer can be selected by browsing the
network from the PhotoShop export module for a network queue.
Macintosh
Macintosh systems use AppleTalk for network communications.
Refer to “Configuring f or AppleTalk” for details on network printing
using AppleTalk.
4-2 Part No. 6B4389 June 1999
Page 49

5 Microsoft Peer to Peer Print Services (NetBEUI)
Windows 95, Windows 98 and Windows NT systems provide Microsoft
Peer to Peer services which allow these systems to share resources
within a limited network domain. These nativ e services utilize the system’ s
NetBIOS in conjunction with NetBEUI protocol.
Native Peer to Peer services can also utilize the system’s NetBIOS in
conjunction with IPX protocol. Refer to the section at the end of this
chapter for configuring peer to peer services using IPX and JetAdmin
tools.The Kodak Professional 10/100 Network Interface Card (NIC)
supports these peer to peer services by supporting communications via
NetBEUI
By default the NIC’ s NetBEUI domain name is w orkgroup . This parameter
must match the domain name defined for your Windows peer to peer
network in order for the printer to appear as a resource in that domain.
The NIC’s domain name can be changed to reflect your domain name
with NIC configuration utilities.
KOD_xxxxxx_p1 is the default NIC (printer) name advertised for peer to
peer services. xxxxxx corresponds to the last six digits of the NIC’s
Ethernet address.
NetBEUI is a non-routable protocol. This means that peer to peer service
resources such as printers will ONLY be accessible to users on the same
subnet (and domain) that the printer is on.
N
E
T
B
E
U
I
Workstation Networking Software for Peer to Peer Services
The following system software components must be installed on each
Windows system that must support peer to peer resource sharing. Use
the Network Control Panel to view or install these components.
• Client: Client for Microsoft Networks
• Service: File and Printer Sharing for MicroSoft Networks
• Protocol: NetBEUI
Note: Refer to the documentation and software provided with your printer
for specific installation details you may need to know for that
printer, especially if you encounter problems.
Part No. 6B4389 June 1999 5-1
Page 50

N
E
T
B
E
U
Microsoft Peer to Peer Print Services (NetBEUI)
Setting up a Kodak PostScript Printer for Windows 95/98
1. Run the AdobePS setup utility provided on your printer CD.
Note: Only significant setup screens are illustrated.
You may see additional self-explanatory screens for reading readme files
and copying the AdobePS setup utility.
I
2. When prompted for the type of connection, select Network Printer.
5-2 Part No 6B4389 June 1999
Page 51

Microsoft Peer to Peer Print Services (NetBEUI)
3. Browse the network for your Kodak printer.
4. If the printer displays immediately as KOD_xxxxxx_p1 (default name),
select it and continue.
Otherwise continue your search by selecting Entire Network >
Microsoft Windows Network > Peer to Peer Domain Name
(WorkGroup by default), for example until your printer is located.
Note: If you receive Network Path not Found, Not a Win95 Host
messages after selecting KOD_xxxxxx_p1 and then p1as the
corresponding printer port, ignore them and continue
N
E
T
B
E
U
I
Part No. 6B4389 June 1999 5-3
Page 52

Microsoft Peer to Peer Print Services (NetBEUI)
5. Locate the drive and directory where the printing software resides for
your Kodak printer and select the Kodak printer, Kodak 8670 PS.
N
E
T
B
E
U
6. Continue through setup screens, assign a printer name, and finish by
selecting the appropriate printer media in the Properties menus.
The user may now print from applications after selecting the K odak printer
from the list of printers available in the Print/Setup windows.
I
Setting up a Kodak PostScript Printer for Windows NT
The setup for Windows NT is similar to the Windows 95/98 setup using
the AdobePS setup utility. On NT systems however, peer to peer
resources that are not host resources or queues do not show up in the
AdobePS utility when browsing for a network printer.
On NT systems, it is necessary to establish a local printer port mapped to
the NetBEUI resource first and then run the AdobePS setup utility
selecting the resource as a local instead of a network printer.
Note: KOD_xxxxxx_p1 and p1 are default printer/NIC NetBeui names. A
resulting printer/port would appear in a text window as
\\KOD_xxxxxx_p1\p1.
Use the Network Neighborhood utility to locate your NetBEUI network
resource in the form of KOD_xxxxxx_p1 and then p1as the corresponding
printer port in the following manner:
5-4 Part No 6B4389 June 1999
Page 53

Microsoft Peer to Peer Print Services (NetBEUI)
1. Select Entire Network (If KOD_xxxxxx_p1 does not already appear.)
Note: If Microsoft Windows Network appears, select it and the> Peer to
Peer Domain Name (WorkGroup by default) until your printer is
located.
N
E
T
B
E
U
I
2. By selecting p1, you will be prompted to setup the printer. Select any
driver since you are merely establishing a port on your system.
Part No. 6B4389 June 1999 5-5
Page 54

N
E
T
B
E
U
Microsoft Peer to Peer Print Services (NetBEUI)
After completing this setup utility, the NetBEUI network port is added to
your system as an available printer port which can now be selected when
running the AdobePS setup utility.
AdobePS Setup Utility for Windows NT
1. Run the AdobePS setup utility provided with your printer.
Note: Only significant setup screens are illustrated.
I
You may see additional self-explanatory screens for reading readme files
and copying the AdobePS setup utility.
2. When prompted for the type of connection, select Local Printer.
5-6 Part No 6B4389 June 1999
Page 55

Microsoft Peer to Peer Print Services (NetBEUI)
Note: The network cannot be selected because the NetBEUI print
service does not show up in when browsing.
3. Locate the drive and directory where the printing software for your
Kodak printers located, and select the Kodak printer.
N
E
T
B
E
U
I
Part No. 6B4389 June 1999 5-7
Page 56

N
E
T
B
E
U
Microsoft Peer to Peer Print Services (NetBEUI)
4. Select the NetBEUI printer port designated as \\KOD_xxxxxx_p1\p1.
(KOD_xxxxxx_p1 is the default NetBEUI name for the printer (NIC).
5. If the printer is shared, enter a queue name. The printer setup on
subsequent systems will be simply a matter of selecting Network
Printer and browsing for a network queue
I
6. Continue through setup screens to assign a printer name and select
the appropriate printer media in the Properties and/or document
defaults menus.
5-8 Part No 6B4389 June 1999
Page 57

Microsoft Peer to Peer Print Services (NetBEUI)
The user may now print from applications after selecting the K odak printer
from the list of printers available in the Print/Setup windows.
Verification of AdobePS Driver
After installation, the AdobePS driver should appear as an availab le driver
in any printer Properties window.
1. Check the properties for the printer that was created in the previous
steps to make sure that the AdobePS driver, AdobePS Kodak 8670
PS, appears in the driver pulldown selections.
N
E
T
B
E
U
I
Note: If Kodak 8670 PS appears without the AdobePS prefix, the
Microsoft PostScript driver with the Kodak PPD has been installed.
This driver is NOT recommended because it does not provide all of
the features that are available with the AdobePS driver.
If the AdobePS driver has already been installed, select it as the driver for
any subsequent printers created. Mak e sure you also chec k the remaining
printer property tabs and make selections for the media in the printer.
Part No. 6B4389 June 1999 5-9
Page 58

N
E
T
B
E
U
Microsoft Peer to Peer Print Services (NetBEUI)
Setting up Windows 95/98/NT to Export Kodak Raster Files
1. Run the Export - setup utility provided with your printer software. This
will install the necessary plug-ins and media files necessary for
exporting files from Adobe PhotoShop.To exporting files from
Photoshop:
1. From Adobe PhotoShop, select File > Export > Kodak Printer Name.
2. Select the Kodak printer as KOD_xxxxxx_p1/p1 (default name) where
xxxxxx corresponds to the last six digits of the printer’s (NIC) Ethernet
address.
3. Select Print.
I
5-10 Part No 6B4389 June 1999
Page 59

6 Novell NetWare
A NetWare file server provides print spooling for clients so that
they can print over a network. The file server holds print jobs until
it is contacted by a print server on the network which in turn
sends the job to the appropriate printer. NetWare print servers
are typically special-purpose networking hardware such as the
Kodak Professional 10/100 network interface card (NIC).
NOTE: It is assumed that network administrators are familiar with
This chapter provides details on selecting and configuring the
printer/NIC to service Novell queues.
Before Y ou Begin
Before you begin the configuration for NetWare, make sure that
you have completed the following steps:
• Establish the NetWare queues and services before you
• Consult NetWare documentation f or instructions on setting up
• Set up the printer. Refer to the QuickSetup card or the
setting up Novell NetW are systems and print queues using
appropriate utilities such as PConsole and NWAdmin.
configure the printer ‘s network Interface to service them.
queues and services.
Operator’s Guide which is included on the CD for instructions
on setting up your printer.
• Install the NIC in the printer and connect it to an Ethernet
network. Refer to “Installing the Hardware” for instructions on
installing and verifying the NIC and the network connection.
• Install printer software for Windows 95, Windows NT, or
Windows 3.11 on PCs that will be sending jobs to the
printer.This software is included on the CD that came with the
printer.
Part No. 6B4389 June 1999 6-1
Page 60

Novell NetWare
NIC Operating Modes with Novell NetWare
To service NetWare print queues, the NIC operates in the
following two modes:
Remote printer mode or NPRINTER mode on NetWare 4.xx or
RPRINTER mode on NetWare 2.xx or 3.xx networks.
In remote printer mode, the user sends the print job to the file
server which then spools it to a print server and sends it to the
printer. Remote printer mode does not use a user license on the
file server. If you have NetWare 4.xx and need to take advantage
of NetWare Directory Services, you must use remote printer
mode.
Queue server mode also called printer server or PSERVER
mode.
In queue server or print server mode, the NIC functions as a
NetWare print server eliminating the need for a dedicated print
server. Jobs from the a PC are spooled to the file server which in
turn spools the job directly to the NIC. Queue server and print
server mode, however, require a user slot on the file server.
NOTE: We recommend that you use queue server mode if you
have NetWare2.xx or 3.xx unless you have a limited
number of available user slots.
Configuring for a Novell NetWare Network
To use the NIC on a Novell network, one or more file servers must
be configured with a print queue that the NIC can service. Users
send their print requests to the file server’s print queue, and the
jobs are then spooled to the NIC directly or through an
intermediate print server in remote printer mode.
6-2 Part No. 6B4389 June 1999
Page 61

Novell NetWare
Novell Queue and Printer/NIC Association Using JetAdmin
The NIC is compatible with Hewlett-Packard’s JetAdmin tool.
JetAdmin may be used to select a particular printer/NIC that is
advertising its services on the network. The NIC’s Netware
service is KOD_xxxxxx_P1, by def ault where xxxxxx is the last six
digits of the NIC’s Ethernet hardware address. The NIC can then
be associated with a particular Novell server and queue.
NOTE: You must be logged into the particular Novell server as an
administrator in order to set up NIC parameters associated
with that server.
JetAdmin can be used to configure NetWare related parameters
on the NIC.
Novell Queue and Printer/NIC Association Using XAdmin or XConfig
Refer to “Using Configuration Utilities” for additional details on
using the following configuration utilities for the NIC:
• XAdmin is a graphic configuration utility which is included on
the diskette that comes with the NIC. XAdmin allows an
administrator to establish and associate the NIC with a
NetWare queue using the NetWare submenu options.
NOTE: You must be logged into the particular Novell server as an
administrator to set up NIC parameters associated with
that server.
• XConfig is a command line oriented NIC configuration utility
which is included on the diskette that comes with the NIC. It is
similar to invoking a Telnet session without the necessity of
first establishing an IP address on the NIC.
NOTE: A new name can be entered for the NIC if desired.
Changing the name also changes any other protocols that
use the same name.
Part No. 6B4389 June 1999 6-3
Page 62

Novell NetWare
Configuring for NDS Using NWAdmin
Refer to your NWAdmin documentation for specific details on
using NWAdmin.
Make sure that you are logged in as Admin in NDS mode on the
NetWare 4.xx file server.
To configure the NIC using NWAdmin:
1. Select the desired organizational unit that will contain the
new printer.
2. Create/Add a new printer object with the name of the printer
(NIC).
3. Select the desired container object (organizational unit) that
will contain the default print queue.
4. Create a new print queue.
5. Select the print queue and assign the print queue to the
printer you created.
6. Exit NWAdmin.
Configuring for NDS Using JetAdmin or XAdmin
Refer to your JetAdmin documentation for specific details on the
use of JetAdmin.
NOTE: The same service cannot be used for both queue server
mode and remote printer mode. If you wish to enable
remote printer capabilities or services other than the
default NetWare services, you must define the new
services that are enabled for NetWare and for the desired
port.
1. Double-click on the icon for JetAdmin or XAdmin. Select the
name of the NIC from the list
NOTE: The default name of the NIC is KOD_xxxxxx.
2. From JetAdmin or Xadmin, select the remote printer as the
operating mode. Select the name of your printer/NIC as the
print server name, and select the number of the printer you
made a note of as the printer number.
3. Select the desired default printer driver.
6-4 Part No. 6B4389 June 1999
Page 63

4. Exit Jet Admin or XAdmin.
5. Reload the PSERVER NLM from the NetWare file server
console.
Configuring for NDS Using PCONSOLE and
XConfig
The following steps describe how to use PCONSOLE and
XConfig to configure the NIC for remote printer operation.
PCONSOLE
1. Make sure that the PSERVER NetWare Loadable Module
(NLM) is loaded on your file server.
2. Log in as supervisor (Netware 3.xx) or as admin (NetWare
4.xx).
NOTE: If you want NDS support, do not log in under bindery
mode.
3. Run the PCONSOLE utility from your PC workstation.
4. Create a new print queue. Enter a volume name, if
necessary.
Novell NetWare
5. Select Print Servers from the PCONSOLE menu and then
select the name of the printer/NIC.
6. Enter the printer name from the Object and Class menus.
7. Select the printer’s name, and make a note of the printer
number assigned by PCONSOLE.
8. Select the print queue, and assign it to the remote printer.
9. Exit PCONSOLE.
Part No. 6B4389 June 1999 6-5
Page 64

Novell NetWare
XConfig
1. Insert the diskette that came with the NIC into the disk drive.
Enter:
A:XCONFIG.
2. Select the NIC from the list of print servers. Press ENTER
when the message that the NIC is connected appears.
3. Enter the password access when the # prompt appears.
4. Press ENTER when the Enter Username> prompt appears.
5. When the Local> prompt appears, enter:
SET NETW NPRINTER pserver number ON service
SET NEW RESCAN
EXIT
Pserver is the name of the printer/NIC on your file server. Number
is the printer number which must match the printer number you
selected during the PCONSOLE configuration in the previous
steps. Service is the name of the service where the default
service is KOD_xxxxxx. The xxxxxx is the last 6 digits of the
Ethernet address. For example, to set up remote printer 3 on the
NIC, KOD_00C3E4 using the printer/NIC called KOD1PS, you
would enter:
SET NETW NPrinter KOD1PS 3 ON KOD 00C3E4 P1
SET NETW RESCAN
EXIT
NOTE: You cannot use the same service for both queue server
mode and remote printer mode.
To enable remote printer capabilities on services other than the
default NetWare services, define the new services that are
enabled for NetWare and the desired port. Refer to Appendix A
for more information.
6. Reload the PSERVER NLM from your NetWare file server
console to apply the changes.
6-6 Part No. 6B4389 June 1999
Page 65

Novell NetWare
Configuring for Queue Server Mode using PCONSOLE
and XConfig
The following steps describe how to use the standard Novell
PCONSOLE utility with XCONFIG to set up your print queues.
PConsole
1. Log in as Supervisor for Netware 3.xx or as ADMIN for
NetWare 4.xx. Make sure that you specify the /b option for
bindery mode.
2. Run the PCONSOLE utility from your PC workstation.
3. Select Print Servers from the available Options menu.
4. To create a new print server, enter the NIC Netware service
name. The default name is KOD_xxxxxx. The xxxxxx is the
last 6 digits of the Ethernet address. Press ENTER.
5. Create a new queue on the file server. Enter the new queue
name, and press ENTER.
NOTE: The name does not need to be related to the name of the
NIC print server resources, but it should be short and
convenient for users to remember.
6. Configure the queue by selecting Print or Queue Servers and
specify which network print servers can print jobs from this
print queue.
7. Select the NIC NetWare service name to add it to the list.
8. Exit PCONSOLE.
9. To force the NIC to rescan the file servers for print jobs, turn
the printer off and then on.
NOTE: You may also use the XConfig command SET NETWARE
RESCAN to force the NIC to rescan for file servers.
Part No. 6B4389 June 1999 6-7
Page 66

Novell NetWare
XConfig
1. Log in as Supervisor (Netware 3.xx) or as Admin (NetWare
4.xx). Make sure that you specify the /b option for bindery
mode.
2. Insert the diskette that came with the NIC into the disk drive.
Enter the following at the DOS prompt:
A:XCONFIG or A:XCONFIG ppsname
Ppsname is the name of the NIC. The default name is
KOD_xxxxxx. The xxxxxx is the last six digits of the Ethernet
address.
3. Select the NIC from the list of print servers if you did not
specify the print server name in the XConfig command.
4. 4. When you get the message that the NIC is connected,
enter the password Access in response to the # prompt.
Press Enter in response to the Enter Username> prompt.
5. At the Local> prompt, enter:
SET NETWARE SERVER servername ENABLED
NOTE: The servername is the name of the file server on which the
print queue will reside. If there is more than one file server
from which you wish to print, repeat this command as
many times as necessary.
6. Exit XConfig.
6-8 Part No. 6B4389 June 1999
Page 67

7 Configuring for TCP/IP
The Kodak Professional 10/100 network interface card (NIC)
supports TCP/IP. The NIC appears to the network as a print
server with its own IP address using the lpd line printer daemon
protocol. Any host computer that supports the remote lpr
command can spool jobs to the NIC. The NIC also supports
gateways f or comm unications with hosts on remote networks. For
special applications, a raw TCP port is available. Kodak develops
printing software and supports networked printing environments
for Windows and Macintosh platforms.
Windows
For Windows platforms, NT is the only platform that supports
TCP/IP printing. Win95/98 systems do not support direct printing
using TCP/IP printing without the addition of special purpose
TCP/IP LPR printing software.
Macintosh
Macintosh systems use AppleTalk protocol for network
communications and do not support TCP/IP printing without the
addition of special purpose TCP/IP software.
Unix
• Kodak does not develop printing software for Unix platforms.
However, Kodak assists third-party developers who provide
applications and printing software to support Kodak printers.
Refer to the K odak Web site (www.kodak.com) for information
on third-party developer solutions.
• Some customers who have Unix applications and drivers
capable of generating PostScript output files may wish to
submit these files to Kodak PostScript printers.
• General information for configuring printers on Unix platforms
is provided to accommodate the use of lpr to send output files
to Kodak printers. If you encounter problems, administrators
should refer to the documentation for their specific Unix
platform for configuring print queues.
NOTE: Although generic PostScript files should print on Kodak
PostScript printers, Kodak cannot guarantee the quality of
output generated from non-Kodak drivers that may not
support features such as calibration of Kodak printers.
Part No. 6B4389 June 1999 7-1
Page 68

Configuring for TCP/IP
Configuration Summary
The following are the steps you need to complete to set up your
printer for network printing:
1. Set up the printer. Refer to the QuickSetup card or the
Operator’s Guide that is included on the CD for instructions
on setting up your printer.
2. Install the NIC in the printer and connect it to an Ethernet
network. Refer to Chapter 2 for instructions on installing the
NIC and Ethernet cable.
3. Obtain an IP address for the printer (NIC). Assign the IP
address to the printer (NIC) using the printer’s front control
panel or by using remote NIC configuration tools.
4. Print a NIC configuration page to verify that the installation is
correct. Refer to Chapter 2 for instructions on printing a NIC
configuration page.
5. Configure network communications using TCP/IP on each
workstation or server that will be communicating directly with
the printer.
NOTE: Configuring network communications between workstation
clients and servers is beyond the scope of this manual. For
client/server environments, it is presumed that a functional
client/server network environment already exists.
6. Install the printing software (AdobePS driver for and PPD for
PostScript printing and/or export module for raster printing)
on each workstation that will be sending jobs to the printer.
Networking Software for TCP/IP
Novell Netware Servers
Novell Netware 5.x supports communications using TCP/IP. Prior
versions (3.x, 4.x) support IPX and AppleTalk Print Services, but
do not support TCP/IP. Refer to your Novell Netware 5.x
documentation for communications using TCP/IP and configuring
print queues.
7-2 Part No. 6B4389 June 1999
Page 69

Configuring for TCP/IP
Configuring TCP/IP (LPR) Printers on NT Systems
NOTE: You should refer to the documentation and software
provided with your printer for specific installation details.
To configure a printer on a Windows NT workstation/server, first
configure an IP address for both the workstation and the printer.
The following steps describe how to configure TCP/IP on a
Windows NT workstation:
1. Install TCP/IP on your Windows NT 4.0 or Windows 2000
system:
— Click on Start, and select Settings and then Control
Panel.
— Double-click on the Network icon.
— Click on the Protocols tab, and select Add.
— Double-click on TCP/IP protocol.
— Insert the requested system disk to copy the required
files.
— Click on the Services tab, and double-click on Microsoft
TCP/IP Printing.
2. Click on the TCP/IP protocol, and add the host’s IP address,
subnet mask, and gateway address.
NOTE: If you are not directly connected to the Internet, assign any
arbitrary Class C address. Use the following example:
aaa.bbb.ccc.ddd where aaa is any number from 192 to
222, bbb and ccc are any number from 0 to 255, and ddd is
any number from 0 to 254. You may also use a subnet
mask of 255.255.255.0 with no gateway address.
3. If the printer (NIC) does not have a valid IP address, assign
an IP address to the printer using the printer’s front control
panel; or use remote configuration methods. Refer to “Using
Configuration Utilities” for more information.
Part No. 6B4389 June 1999 7-3
Page 70

Configuring for TCP/IP
Installing the Printing Software for Windows NT Systems
Installing the Export Module for Raster Printing (8660/8670 Printers)
The export module must also be installed on each workstation
that will be exporting files from Adobe PhotoShop to a Kodak
raster printer. Run the setup utility provided with the export
module.
Installing the Printing Software for PostScript Printing (8670 Printer)
Users must install and use the AdobePS driver on all
workstations that are directly sending PostScript files to the
printer or through a server queue.
To Install the printing software:
1. Run the AdobePS setup utility that is provided with the
printing software for your NT workstation.
7-4 Part No. 6B4389 June 1999
Page 71

Configuring for TCP/IP
2. When prompted for the type of connection, select Local
Printer.
NOTE: Select Network only if a print server queue has already
been established and can be selected by browsing the
network.
3. When prompted for an appropriate PPD , na vigate to the drive
and directory that contains the software for Windows NT.
Part No. 6B4389 June 1999 7-5
Page 72

Configuring for TCP/IP
4. When prompted for a printer port, choose LPT1.
5. Select:
• Not Shared if you will be printing from this NT workstation.
• Select Shared if you are establishing an NT print queue for
others to print through. Enter in an appropriate name for
the print queue.
7-6 Part No. 6B4389 June 1999
Page 73

Configuring for TCP/IP
6. Enter the name of this printer. This is the name that will
appear in the Printers window after you install the printing
software.
7. Select the appropriate properties when a Printer Properties
window appears.
NOTE: This is only necessary if you will be printing from this
workstation.
The AdobePS Kodak 8670 PS driver should appear in the list of
available drivers in any Printer Properties window. Selected it as
the driver to use after an LPR printer is established.
Configuring an LPR Printer on NT Systems
The following steps describe how to add an LPR port and
corresponding printer IP address on an NT workstation/server.
1. Select Settings from the Start menu and then select Printer.
2. Double-click on the Add Printer icon. Click on Next.
3. Select My Computer, and click on Next.
Part No. 6B4389 June 1999 7-7
Page 74

Configuring for TCP/IP
4. Select Add Port and then LPR Port from the list of available
ports. Click on New Port.
5. Enter the IP address you wish to assign to the NIC in the
Name or address of server providing lpd box. Enter anything
you wish in the Name of printer or print queue on that server
box.
7-8 Part No. 6B4389 June 1999
Page 75

Configuring for TCP/IP
NOTE: If you do not have a router on the network, the IP address
must match the first three octets of the IP address of your
computer.
6. Click on OK, and then click on Close.
The new print server IP address should be listed and
highlighted as an available port.
7. Click on Next.
8. Select a printer driver, and click on Next.
NOTE: You can select any driver because it will be replaced with
the AdobePS driver after the LPR printer is established.
9. Select Keep Existing Driver.
10. Change the name of the printer , if desired, and/or set it as the
default printer. Click on Next.
Part No. 6B4389 June 1999 7-9
Page 76

Configuring for TCP/IP
11. If desired, mak e the printer shared; and enter a queue name.
Click on Next.
NOTE: If users will be exporting images from Adobe PhotoShop,
the printer must be shared since the export module only
allows selection of a network print queue.
12. Select Yes to print a test page, and click on Finish.
If a print queue has been established, the following remaining
steps are NOT necessary since properties and document
defaults will be set up on each workstation printing through the
queue.
If the printer is NOT shared, the resulting LPR printer’s properties
and document defaults must now be selected to select the
AdobePS driver and printer media settings.
13. Select Settings from the Start menu and then select Printer.
14. Select the new LPR printer and use the pulldown menu to
select the printer’s properties.
15. Select the AdobePS driver from the list of available drivers.
7-10 Part No. 6B4389 June 1999
Page 77

Configuring for TCP/IP
16. Select the new LPR printer.
17. Use the pulldown menu to select the printer’s document
defaults.
NOTE: Make selections consistent with the media for your printer.
Part No. 6B4389 June 1999 7-11
Page 78

Configuring for TCP/IP
Configuring Unix Systems for TCP/IP Printing
Refer to notes on Unix support at the beginning of this chapter
regarding support for Unix platforms.
Assign an IP address to the printer (NIC) using the printer’s front
control panel or by using utilities described in the “Using
Configuration Utilities.”
The configuration procedure for Unix TCP/IP printing includes the
following steps on a Unix workstation:
— Adding the 8670 printer to the host table.
— Assigning a print queue.
— Setting up the remote printer.
— Creating a spool directory.
Adding the Kodak Printer to the Host Table
Use an editor to add an entry to the hosts file containing the IP
address and node name of the NIC. An example of an IP address
and node are:
1982.189.207.3 KOD_00C351
NOTE: Some systems such as HP/UX and AIX allow you to enter
the IP address as the host name when setting up the print
queue. In this case you do not need to configure the /etc/
hosts file.
Assigning a Print Queue
Choose the NIC service you wish to use.
Setting Up the Remote Printer
Modify the /etc/printcap file to set up the remote printer for most
Unix systems. If you have an RS/6000 AIX, HP/US, Sun Solaris
2.xx, and other systems that do not use the printcap file, skip to
the appropriate section for the Unix system you hav e to configure
the Unix workstations for TCP/IP.
7-12 Part No. 6B4389 June 1999
Page 79

Configuring for TCP/IP
Modifying the /etc/printcap File to Set Up the Remote Printer
Configure the /etc/printcap file on each workstation to specify the
local print queue, the NIC name (also called remote machine or
rm), and the print server service name (also called remote printer,
remote queue, or rp), and the spool directory.
The following is an example of a typical printcap file:
Kodak1IPrinter on Floor 1:\
:lP=:\
:rm=KOD_003C51:\
:rp=BINARY_P1:\
:sd=/usr/spool/lpd/Kodak1:
This creates a queue named Kodak1 on the host computer that
communicates to the NIC with a node name (rm) of
KOD_003C51 and a service name (rp) of BINARY_P1 f or printing
files through the spool directory /usr/spool/lpd/Kodak1.
Setting Up the Remote Printer for HP/UX Systems
For HP/UX systems, use the same program to set up the remote
printer.
1. Enter sam, and select Peripheral Devices and then Add
Remote Printer.
2. Enter the following remote printer settings:
— Line printer name (user selectable).
— Remote system name. The name of the NIC must match
the name in the hosts file NIC or use the NIC IP address.
— Remote printer queue (NIC binary or text service name).
— Remote Printer is on a BSD System (Yes).
Setting Up the Remote Printer for IBM RS/6000 AIX Systems
The RS/6000 AIX operating system uses the smit program to set
up the remote printer.
1. Enter smit, and select devices.
2. Select printer/plotter.
Part No. 6B4389 June 1999 7-13
Page 80

Configuring for TCP/IP
3. Select manage remote printer subsystem:.
4. Select client services.
5. Select remote printer queues.
6. Select add a remote queue.
7. Enter the following remote queue settings:
— Name of queue to add (user selectable)
— Activate the queue (Yes)
— Destination host (NIC name which must match name in /
etc/hosts file or use the NIC IP address)
— Name of queue on remote printer (Pony Print Server
Binary or text service name)
— Name of device to add (user selectable; for example, lp0
Setting Up the Remote Printer for IBM RS/6000 AIX Systems
Sun Solaris 2.x uses the lpsystem and lpadmin programs for
remote printer configuration:
lpsystem -t bsd queue
lpadmin -p queue -sPPSname!PPService
accept queue
enable queue
Queue is the name of the local print queue, PPSname is the
name of the NIC (must match the entry in the /etc/hosts file), and
PPS service is the NIC binary service. If this is the first printer you
are configuring, you must also use the lpsched command
immediately prior to the accept command.
You may use the Printer Manager in the admintool utility under
Open Windows. Select Edit, Add, and Add Access to Remote
Printer. Enter the NIC name in the format Sname!PPSservice as
described above. Make sure that the Printer Server OS is set to
BSD, the default setting, and click on Add.
7-14 Part No. 6B4389 June 1999
Page 81

Configuring for TCP/IP
Setting Up the Remote Printer for SCO Unix Configurations
SCO Unix requires TCP/IP V1.2 or later to work with the NIC.
Configure the files /etc/hosts and /etc/printcap as described in the
Adding the 8670 Printer to the Host Table and the Modifying the /
etc/printcap File to Set Up the Remote Printer sections. Run the
sysadmsh program as follows:
1. Select Printers.
2. Select Configure.
3. Select Add.
4. Enter the name of the print queue you entered in the /etc/
printcap file as the printer name.
5. Enter anything as the comment and class name.
6. Select Existing for use printer interface.
7. Press F3 to get a list of available interfaces, and select the
desired on as the name of interface using the arrow ke ys and
Enter keys.
8. Select Direct as the connection
9. Enter the desired device name. (/dev/lp generally works.)
10. Select Hardwired as the device.
11. Select No for the Require banner field.
Other Systems
Other systems use similar programs to set up the NIC. These
programs require the following information:
Requested Information Use:
remote printer NIC binary service name
remote host computer
name
remote host IP address NIC IP address
Part No. 6B4389 June 1999 7-15
Any name (must match name in
printcap file if any) or in some
cases, you may enter the print
server IP address
Page 82

Configuring for TCP/IP
Creating a Spool Directory
If you have not already created a spool directory, you need to do
so now. If you are using HP/UX, AIX, Solaris 2.xx, and some
other systems, a spool directory has already been created. The
lpd spool directory is located in the /usr/spool directory. Check
with your system manager to see if the location is different for
your system.
Use the mkdir command to create a spool directory . For e xample,
to create a spool directory for the queue kodak1, you would enter:
mkdir /usr/spool/lpd/kodak1
NOTE: It is also necessary to start the daemon on some systems.
Use the lpc start command on the Berkeley-compatible
Unix systems. For example:
lpc start kodak1Adding an IP Address
7-16 Part No. 6B4389 June 1999
Page 83

8 Configuring for AppleTalk Networks
The Kodak Professional 10/100 network interface card (NIC)
supports the AppleT alk protocol allo wing Macintosh computers to
print jobs to a Kodak printer simultaneously with jobs from
computers using TCP/IP, Novell NetWare, and NetBEUI.
The NIC broadcasts AppleTalk information to computers on the
network and automatically appears in the Chooser on
workstations.
The NIC is compatible with Apple LaserWriter 8 printer drivers as
well as the AdobePS and PhotoShop export module for
Macintosh that came with the printer.
Printer and NIC Installation
Before you begin the configuration for AppleTalk, make sure you
have completed the following steps:
1. Set up the printer, and install the printing software on the
workstations that will be sending jobs to the printer. Refer to
the QuickSetup card or the Operator’s Guide which is
included on the CD for instructions on setting up the printer.
2. Install the NIC in the printer, and connect it to your Ethernet
network.
3. Generate a NIC configuration page, and verify that the
AppleTalk service on the NIC is enabled. Refer to Chapter 2
for instructions on installing and verifying the NIC
configuration.
NOTE: The NIC will automatically disable AppleTalk if the printer is
powered up when it is NOT connected to a functional
network. You should be able to re-enable AppleTalk by
power cycling the printer when it is connected to an
AppleTalk network.
4. Enable Ethernet from the Macintosh’s control panel.
Part No. 6B4389 June 1999 8-1
Page 84

Configuring for AppleTalk Networks
Finding the Printer’s Name in the Chooser
From the Chooser:
1. Select the AdobePS icon.
2. Select the correct zone from the list of AppleTalk zones.
3. Select the name of the printer from the list of printers.
NOTE: The default name for the printer (NIC) is
KOD_xxxxxx_P1_AT. The xxxxx represents the last six
digits of the NIC Ethernet address.
Changing the Printer’s Name
1. Select the printer in the Chooser.
2. Double-click on the LaserWriter Utility.
NOTE: If LaserWriter utilities are not already installed on your
Macintosh, they are available from Apple’s Web site
(www.apple.com).
3. Select Name Printer from the Utilities menu.
The currently-selected printer is listed in the dialog box.
4. Enter a new name for the printer, and click on Rename.
5. Click on OK in the confirmation box.
The new name for the printer should now appear in the list of
printers in the Chooser.
Changing the Printer’s Zone
The printer (NIC) will automatically detect the EtherTalk zone it
resides in and show up (in Chooser) in that zone. It should not be
necessary to define a zone for the NIC unless the particular
subnet that it resides on has multiple logical zones assigned to it.
If your LaserWriter utility supports zone naming, then use it in the
same manner as for Changing the Printer Name. Otherwise , ref er
to “Using the Configuration Utilities” for alternate methods.
8-2 Part No. 6B4389 June 1999
Page 85

Configuring for AppleTalk Networks
WIndows NT Systems vs AppleTalk
Kodak supports printing using AppleTalk ONLY from Macintosh
systems. Kodak does not recommend or support the use of
AppleTalk printing from Windows NT systems.
Cautions and Limitations using NT AppleTalk
• Unreliable and inconsistent results have been encountered in
mixed Macintosh/Windows environments when NT servers
are used to secure and/or limit access to AppleTalk resources.
There is otherwise, no benefit for configuring the printer on an
NT server as an AppleTalk printer since the Kodak printer
supports other Windows compatible protocols such as.TCP/IP,
NetBEUI, and Novell (IPX).
• Using an NT server to configure and capture an AppleTalk
printer may subsequently prevent the printer from showing up
on Macintosh systems.
• Kodak printers that are raster only will not show up on an
AppleTalk network as LaserWriter printers. Therefore, they
cannot be set up as NT AppleTalk printers.
Part No. 6B4389 June 1999 8-3
Page 86

Page 87

9 Troubleshooting
This chapter describes procedures for troubleshooting problems
you may encounter with the Kodak Professional 10/100 network
interface card (NIC).
NIC Start-up Sequence
NIC LEDs
The NIC should go through the following start-up sequence upon
power up:
1. The NIC will run through a set of power-up diagnostics for a
NIC Factory Defaults
2. If this does not work, try pressing the push button switch on
few seconds. If the NIC is operating properly, the red TEST
LED will blink momentarily and then go out. If the TEST LED
blinks continuously, there is a problem. If this is the case, first
verify that you have a good Ethernet connection and then try
powering the unit off and then on again.
the NIC for at least 5 seconds (factory defaults) and po wering
the NIC off and then on again. If the problem persists, the
NIC may be defective.
It will then try for a few seconds to obtain TCP/IP
configuration information via BOOTP and RARP.
3. The print server will then check that the code in the FlashROMs is valid. If so, it will load that code and begin normal
execution.
Once the Flash code has been loaded and the unit is running
normally, the yellow 100baseT LED will come on solid if a
100baseT connection is detected and the green LINK OK LED
lights when a valid link is established. If the lights do not come on
as described, there may be a cabling problem or a bad hub port.
If necessary, try a different cable and/or hub port.
NIC Configuration Page
4. Generate a NIC configuration page as described in Chapter 2
to verify that the connection between the printer and the NIC
is good. If the test fails, turn the printer off and reinstall the
NIC making sure that it is securely seated.
Part No. 6B4389 June 1999 9-1
Page 88

Troubleshooting
Protocol Checks
— If you have a TCP/IP capable system, ping the NIC from
the host operating system prompt with the ping ipaddress
command. If a successful response is received, go to the
TCP/IP troubleshooting section.
— If you have a Novell system, verify that the NIC can be
seen on the network. Log in as the SUPERVISOR, go
into PCONSOLE, select PRINT SERVER
INFORMATION, and select the name of the NIC. If you
can see Print Server Status and Control in the menu, the
NIC is visible to the network. Proceed to the NetWare
troubleshooting section.
— If you are running AppleTalk and you have a PostScript
printer, make sure that y ou can see the print server name
under the LaserWriter icon in the Chooser. If it is visible,
the connection is good. Go to the AppleTalk
troubleshooting section.
5. If you cannot make any of the protocol connections, check
the following:
Networking Component Checks
— Make sure the printer is powered on and is on line.
— V erify that the cabling and netw ork connections are good.
If possible, try the print server on a different connection
on the network. Do a printer self-test to see if bytes are
being transmitted and received.
— If you using a repeater or hub, make sure that SQE is
turned off at the hub. If you have a hub or multiport
repeater, verify that the hub or repeater port is good by
trying the print server on a different port.
9-2 Part No. 6B4389 June 1999
Page 89

— If you have a bridge or router located between the print
server and the host computer, make sure that the device
is set up to allow the print server to send and receive
data from the host. For example, a bridge can be set up
to only allow certain types of Ethernet addresses to pass
through. Therefore, such a bridge must be configured to
allow NIC addresses. Also , a router can be set up to pass
only certain protocols, so make sure that the desired
protocol can be passed through to the NIC.
— If the job exits the queue but does not print, make sure
that you are not printing a text job to a PostScript printer.
Make sure that the printer is not forced into PostScript
mode.
— Make sure that you are not performing an illegal
operation such as attempting to print a job on a paper
size not supported by the printer.
Intermittent Problems
If the NIC and printer start up but you intermittently have printing
problems, do the following:
Troubleshooting
1. Disable NetWare with the command SET NETWARE
DISABLED.
2. Make sure you have enough memory in your computer if you
can print small jobs but large graphics jobs are distorted or
incomplete.
3. Check the individual protocol troubleshooting sections in this
chapter for additional causes of intermittent printing
problems.
TCP/IP Troubleshooting
If you are using TCP/IP and cannot print to the print server and
you have checked the hardware and network as described in the
previous steps, check the following:
1. The problem may be the result of mismatched or duplicate IP
addresses. Verify that the IP address is correctly loaded into
the print server via the self-test page or through the remote
console and make sure that no other nodes on the network
Part No. 6B4389 June 1999 9-3
Page 90

Troubleshooting
have this address. Duplicate IP addresses are the greatest
cause of TCP/IP printing problems. If the address is not
correct, check if the loading procedure was properly
executed.
2. If you used XCONFIG to enter the IP address, make sure that
you exited the remote console properly using CTRL-D and
that you turned the printer off and then on. It may take up to
two minutes for the IP address to take effect.
3. If you used rarp, make sure that y ou started the rarp daemon
using the rarpd, rarpd -a, or equivalent command. Verify that
the /etc/ethers file contains the correct Ethernet address and
that the print server name matches the name in the/etc/hosts
file.
4. If you used bootp, make sure that bootp is enabled. The #
should be removed from the bootp entry.
/etc/inetd.conf. Verify that the /etc/bootptab file is correctly
configured.
5. Verify that the host computer and the print server are either
on the same subnet or that the router is properly configured
to pass data between the two devices.
6. Make sure that the /etc/printcap file is entered correctly. In
particular look for missing “:” and “\” characters because a
small error anywhere in the file can have major
consequences. Also, check the /usr/spool directory to make
sure that you have created a valid spool directory.
7. If you are using a Berkeley-based UNIX, make sure that the
daemon is started on Berkeley based systems with the
command lpc start printer where printer is the name of the
local print queue.
8. If you are using an AT&T based Unix operating system, make
sure the printer is enabled (enable printer where printer is the
name of the local print queue.)
9. Make sure that the lpr/lpd remote line printer service is
running on the host computer. Refer to your host computer
documentation for information on how to do this.
10. If you cannot print more than one job at a time, increase the
IP time out using the SET IP TIMEOUT command.
9-4 Part No. 6B4389 June 1999
Page 91

Troubleshooting
11. If PostScript jobs do not print or run together, set the service
(remote printer) with EOT set to string number 3 (control-D).
For example:
SET SERVICE HP_PRINTER EOT 3
12. If you cannot print long jobs (over I MB, add the line mx#0 to
your /etc/printcap file entry.
NOTE: If you are using Sun Solaris V2.4 or earlier, there is a bug
with long print jobs on the NIC.
NetWare Troubleshooting
If you cannot print from NetWare and you have checked the
hardware and network as described in the previous steps, verify
that the NIC is attached to the server queue by going to
PCONSOLE selecting PRINT QUEUE INFORMATION and then
CURRENTLY ATTACHED SERVERS. If the NIC does not appear
in the list of attached servers, check the following:
1. If you changed the log in password, change the password in
both the NIC printer server using the SET NETWARE
PASSWORD command and in the file server using the
PCONSOLE Print Server Information Change Password
command.
2. Make sure that you have enabled at least one NetWare file
server using the SET NETWARE SERVER servername
ENABLED command.
3. Check if you have exceeded your NetWare user limit.
4. Make sure that the print server name you used in
PCONSOLE exactly matches the name that is configured in
the NIC server and make sure it is defined as a Queue Server
for the print queue.
5. If you are running both 802.3 and Ethernet II frames on
different file servers on your network, the NIC print server
may not make a connection to the desired file server. Force
the frame type to the desired one using the SET NETWARE
FRAME command from the Print server remote console.
6. If you are losing portions of your print job, set the TIMEOUT
parameter in your CAPTURE statement to a higher value—at
least 50 seconds for Windows.
Part No. 6B4389 June 1999 9-5
Page 92

Troubleshooting
AppleTalk Troubleshooting
If you cannot print from a Macintosh computer with AppleTalk,
check the following:
1. Make sure that you are running Phase 2 AppleTalk and that
you have selected the correct network interface from the
Network Control Panel on the Macintosh.
2. If you have a large network, make sure that you have the
AdobePS, LaserWriter 8.xx, or equivalent driver since earlier
versions may cause PostScript errors. Verify that you get the
correct printer information when you select Printer Info from
the Setup button in the Chooser.
3. Make sure that you have selected the correct Printer
Description File from the Chooser.
4. Verify that you selected the correct AppleTalk zone. Because
the NIC receives its zone inf ormation from router broadcasts,
it may not be in the zone you expect and will not show up in
the Choose. You may need to force the zone name with the
SET APPLETALK ZONE command.
5. If you are running an old version of Macintosh OS, verify that
the Laser Prep versions on all Macintosh computers that
need to print to the NIC are the same.
Windows NT Troubleshooting
If you are having trouble printing with Windows NT, check the
following:
1. Make sure that you can ping the NIC using the DOS
command PING
of the NIC.
2. Make sure that TCP/IP is installed and running on the
Windows NT system.
9-6 Part No. 6B4389 June 1999
ipaddress
where ipaddress is the IP address
Page 93

Troubleshooting
3. If you cannot print to the NIC from a client PC that is
connected to a Windows NTAS file server, verify that y ou can
print directly from DOS. If you can print from the file server
but not from the client, the problem is probably with the
NetBEUI communications rather than with the TCP/IP link to
the NIC. Check your file server network setup to make sure
that you can print from the client to other printers on the
network.
Windows Peer-to-Peer Troubleshooting
If you cannot print on a Windows Peer-to-P eer network, check the
following:
Peer to Peer using NetBEUI
If the print server does not show up in the Network Neighborhood
on a Windows Peer-to-Peer network, remove the Windows
network software for netBEUI from the Network Control panel and
then reinstall it.
— Install the NetBEUI Protocol, the client for Microsoft
Networks, and the network adapter card driver.
Peer to Peer using IPX
If the print server does not show up under JetAdmin on a
Windows Peer-to-Peer network, remove the Windows network
software from the Network Control panel and then reinstalling it
as follows:
— Install the IPX/SPX-Compatible Protocol, the client for
Microsoft Networks, and the network adapter card driver.
— Restart the system, and add the HP JetAdmin service.
Technical Assistance
If you have questions about the printer or the NIC, the retailer
from whom you purchased the printer may be able to answer
them. Kodak provides retailers with additional technical
information.
Kodak Customer Assistance Center
Contact the Kodak Customer Assistance Center if you:
Part No. 6B4389 June 1999 9-7
Page 94

Troubleshooting
• have questions about your warranty.
• want to know where to get service.
• have questions about the printing software.
In the US, call 1-800-235-6325 from 9:00 a.m. to 8:00 p.m.
Eastern Standard Time on regular business days. Refer to the
Operator’s Guide for telephone numbers outside the United
States.
9-8 Part No. 6B4389 June 1999
Page 95

Appendix A NIC Services
Overview
A service is a resource for the Kodak Professional network
interface card (NIC) that must be selected by computers
configured to print to a NIC. The NIC provides the following
predefined services as defaults (xxxxxx is the last six digits of the
NIC’s Ethernet address):
Service Port Filter BOT EOT OPT Protocols
KOD_xxxxxx_P1
BINARY_P1
* TEXT_P1
POSTSCRIPT_P1
RASTER_P1
KOD_xxxxxx_P1_AT
P1 0 1 1 BQ NW, NB, IP
P1 0 1 1 BQ IP
P1 1 1 1 BQ IP
P1 0 1 1 BQ IP
P1 0 1 1 BQ IP
P1 2 1 1 BQ AT
Use the default services for the NIC used in typical Windows and
Macintosh networked environments. Howe ver , it ma y be desirab le
to modify a service name to reflect something more meaningful to
users when browsing a network for a Kodak printer.
• Service TEXT_P1 is not applicable to Kodak PostScript/raster
printers and should not be used.
• Port P1 is the representation of the NIC’s interface port to the
printer. Since there is only one interface, P1 is the only option.
• Filter 0 = No filter. The AppleTalk filter (#2) is the only pertinent
filter that must be used to define an AppleTalk compatible
service, KOD_xxxxxx_P1_AT.
• BOT & EOT = 1 = “Null String”. This means that there are no
Beginning or End Of Transfer command strings associated
with any of the default services.
• Options = Bidirectional and queueing are enabled for all
services.
Part No. 6B4389 June 1999 A-1
Page 96

Appendix A NIC Services
• Protocols = NetWare, NetBEUI, TCP/IP, and AppleTalk are the
protocols that Kodak supports for this NIC. (Do not be alarmed
with references to LAT & DLC protocols. You may wish to
disable LAT and DLC protocols, but this is not necessary for
proper NIC operation with other protocols.)
Environment/Protocol
For Netware environments , the KOD_xxxxxx_P1 identifier should
appear in Network Neighborhood as a resource.
For NetBEUI environments, the KOD_xxxxxx_P1 identifier should
appear in Network Neighborhood under a default domain called
WorkGroup as a resource. If a different domain name exists for
your environment, the NetBEUI domain parameter must be
modified to reflect it.
For TCP/IP environments, it is necessary to select any NIC
service with IP enabled as the remote printer queue name (any
service except Text_P1 and KOD_xxxxxx_P1_AT).
For AppleTalk environments, select an AppleTalk related service,
for example, KOD_xxxxxx_P1_AT.
BOT/EOT Strings
The following begin of transfer and end of transfer strings are
included here for reference only.
No. String Definition
1 NULL Null string
2 \1BE PCL reset (<ESC>E)
3 \04 PostScript reset (CTRL-D)
4 \1B%-123435X PJL UEL
5 @PJL Enter PJL mode
6 Enter Language= PJL language switch
7 PCL\0A PJL PCL command
A-2 Part No. 6B4389 June 1999
Page 97

Appendix A NIC Services
No. String Definition
8 PostScript\0A PJL PostScript command
9 \FF\04\FF\05\FF\06\FF\07 Enter Language=PCL
10 \FF\04\FF\05\FF\06\FF\08 Enter Language=PostScript
11 \0C Formfeed
Filters
A filter is a program built into the NIC that performs a specific
function. Four filters are available. The only filter pertinent to this
NIC used in Kodak printers is the AppleTalk filter(#2).
Filter No. Description
1 Substitutes one user-specified character
string for another character string. By
default it adds a carriage return character
plus a line feed character every time a line
feed character is encountered in the data
stream. It is useful for printing Unix text files
because these files do not have carriage
returns at the end of lines.
2 Default AppleTalk filter (no binary support)
3 Converts a text file to P ostScript f or use with
PostScript only printers. Requires V3.27 or
later firmware.
4 Allows AppleTalk binary files to be printed
on any printer that supports the HP Tagged
Binary Communications Protocol
Part No. 6B4389 June 1999 A-3
Page 98

Page 99

Appendix B Command Summary
Command line input applies to the use of the following NIC
configuration mechanisms:
• XConfig
• Telnet
• Terminal on NIC Serial Port
When connecting to the NIC, you get a message such as
Console Connected or Remote Console Reserved when you are
connected. Press RETURN, type the password ACCESS when
you get the # prompt, and type anything in response to the Enter
Username prompt. Enter commands at the Local>prompt.
NOTE: The commands available are generally a subset of the
commands used on terminal servers. There is no
distinction between the SET and DEFINE commands or
between the CLEAR and PURGE commands. When you
type CTRL-D to exit the remote console, any of these
commands take effect, and the results are stored
permanently. It is not necessary to enter both a SET and a
DEFINE to execute a command and save the results.
General Server Commands
CLear SERVErSTRing
Removes a string number. Refer to Appendix B for more
information.
CLear FAtal
Deletes fatal error log
CLear POrt P1 JOB
clears current entry in the NIC’s internal queue
EXIT/^D
Exits print server console
HElp
Provides information on available commands
INitialize
Part No. 6B4389 June 1999 B-1
stringnumber
Page 100

Appendix B Command Summary
Resets the NIC
SET DEFAULT
Sets the NIC’s parameters to factory defaults
SET LOAD Disable
Disables firmware reload after exit
SET LOAD ENable
Enables firmware reload after exit
SET LOAD HOst <name>
Sets node name of boot host for (NetWare firmware load)
SET LOAD IP aa.bb.cc.dd
Sets IP address of load host (TCP/IP firmware load)
SET LOAD SOfware <
Sets host filename of firmware to load
SET PAssord <password>
Sets console password (default password is ACCESS)
file
name>
SET PORT P1 BIDIR [ENIDIS]
Enable/disable bidirectional mode on print server
SET PROtect <password>
Set console protection password to prevent access to SET
commands (use UNPROTECT command to access SET
commands)
SET SERVEr DEscription
Sets node description string displayed with SHOW SERVER
command
SET SERVEr STRing n “...”
Defines server BOT/EOT string. Refer to Appendix B.
SET SERVice <servicename><protocol> [ENIDIS]
Enable or disables specified protocol on the specified service.
SET SERVice <servicename> BOT nn
B-2 Part No. 6B4389 June 1999
 Loading...