

Page 1

KODAK PROFESSIONAL
8657 Thermal Printer
Export Module for
ADOBE PHO TOSHOP Software and
KODAK DIGITAL SCIENCE
Utility Software f or MACINT OSH and
MICROSOFT Windows
TM
Calibration
User’s Guide
Part No. 3H0595
Page 2

Contents
Introduction
Job Scheduling......................................................................... 1-2
Communication Channels........................................................1-2
Accessing the Export Module................................................... 1-3
.....................................................................................1-1
Installing the Software
System Requirements for Windows.........................................2-1
Hardware..................................................................... 2-1
Software......................................................................2-1
System Requirements for Macintosh....................................... 2-3
Hardware..................................................................... 2-3
Software......................................................................2-3
Installing the Software on Macintosh Systems......................... 2-4
Installation Methods .................................................... 2-5
Easy Install Procedure ................................................ 2-6
Custom Install Procedure for Macintosh ..................... 2-8
Removing the Software............................................... 2-9
Installing the Software on Windows Systems ........................2-10
................................................................2-1
Dialog Boxes
Export Module Dialog Box........................................................ 3-2
Select an 8657 Printer Dialog Box........................................... 3-6
8657 Printer Dialog Box........................................................... 3-7
Printer Status Dialog Box.........................................................3-8
March 1998 i
...................................................................................3-1
Button and Field Descriptions ..................................... 3-2
Button and Field Descriptions ..................................... 3-6
Button and Field Descriptions ..................................... 3-7
Button and Field Descriptions ..................................... 3-8
Page 3

Contents
Error Messages
Appendix A: About Printer Tables
Additive and Subtractive Color ................................................ A-1
Standard Tables ...................................................................... A-2
Custom RGB Windows Tables................................................ A-2
Custom RGB Macintosh Tables .............................................. A-3
Creating New Printer Tables.................................................... A-3
Appendix B: Getting Additional Help
Asia/Pacific Region Helpline Numbers.................................... B-1
European Helpline Numbers.................................................... B-2
Appendix C: About SCSI Connection
Windows Systems ................................................................... C-1
Macintosh Systems..................................................................C-2
..............................................................................4-1
......................................... A-1
................................... B-1
..................................C-1
Appendix D: Changing the Network Name on Macintosh
for the 8657 Printer
Changing the Network Name for the 8657 Printer................... D-1
......................................................................D-1
Index
ii March 1998
Page 4

1. Introduction
The Kodak Professional 8657 thermal printer export
module for Adobe Photoshop software and Kodak Digital
Science calibration utility software for Macintosh and
Microsoft windows (export module) allows you to print from
within Adobe Photoshop (Photoshop) using the Kodak
Professional 8657 thermal printer (8657 printer). This
guide assumes that you are an experienced computer user
who understands how to install software applications.
If you have questions about the 8657 thermal printer, the
retailer where you purchased the printer may be able to
answer them. You can also visit the Kodak Web site at
http://www.Kodak.com.
To download the most recent export module, access the
Kodak Web site and use the path: Service & Support/
Download Software and Drivers for KODAK Products/Dye
Sub Printer Drivers and Calibration Software.
The export module is a plug-in for Photoshop, an image
editing program. Since the export module runs from within
Photoshop, you can use Photoshop’s image processing
functions before you print.
The export module allows you to:
•
Scale an image
•
Reprint the last image sent to the printer
•
Print in landscape or portrait mode
•
Apply print sharpening
•
Specify printer tables to perform custom
color rendering
•
Specify XtraLife ribbon to protect prints
•
Center an image on the page
•
Create a mirror image
March 1998 1-1
Page 5

Introduction
Job Scheduling
The number of jobs that can be queued to the printer at
one time is dependent on the available memory in the
printer. If large image files are sent, fewer jobs can be
processed. Installing optional memory in the printer
increases the number of jobs that can be processed. This
is described in the user’s guide for the Kodak
Professional 8657 thermal printer.
The other factor impacting job scheduling is the printer’s
network configuration. When the printer is connected
through more than one port, the printer polls the ports in
a round-robin method. The position of the ports in the list
impacts the order in which jobs are processed.
Communication Channels
Your computer can print to the 8657 printer through a
SCSI or parallel connection or through an Ethernet
connection if the optional Network Interface Card is
installed in the printer. Refer to the user’s guide for the
Kodak Network Interface Card f or more inf ormation about
network connectivity.
1–2 March 1998
Page 6
Introduction
Accessing the Export Module
To access the export module:
NOTE: The illustrations in this chapter show Macintosh
system dialog boxes. Except where noted, the
dialog boxes f or Windows applications are similar
and have identical functionality.
1. Open Photoshop.
2. Open an image file.
NOTE: You cannot access the export module without
opening an image file.
3. From the File menu, select “Export” and then “Kodak
Professional 8657 thermal printer”.
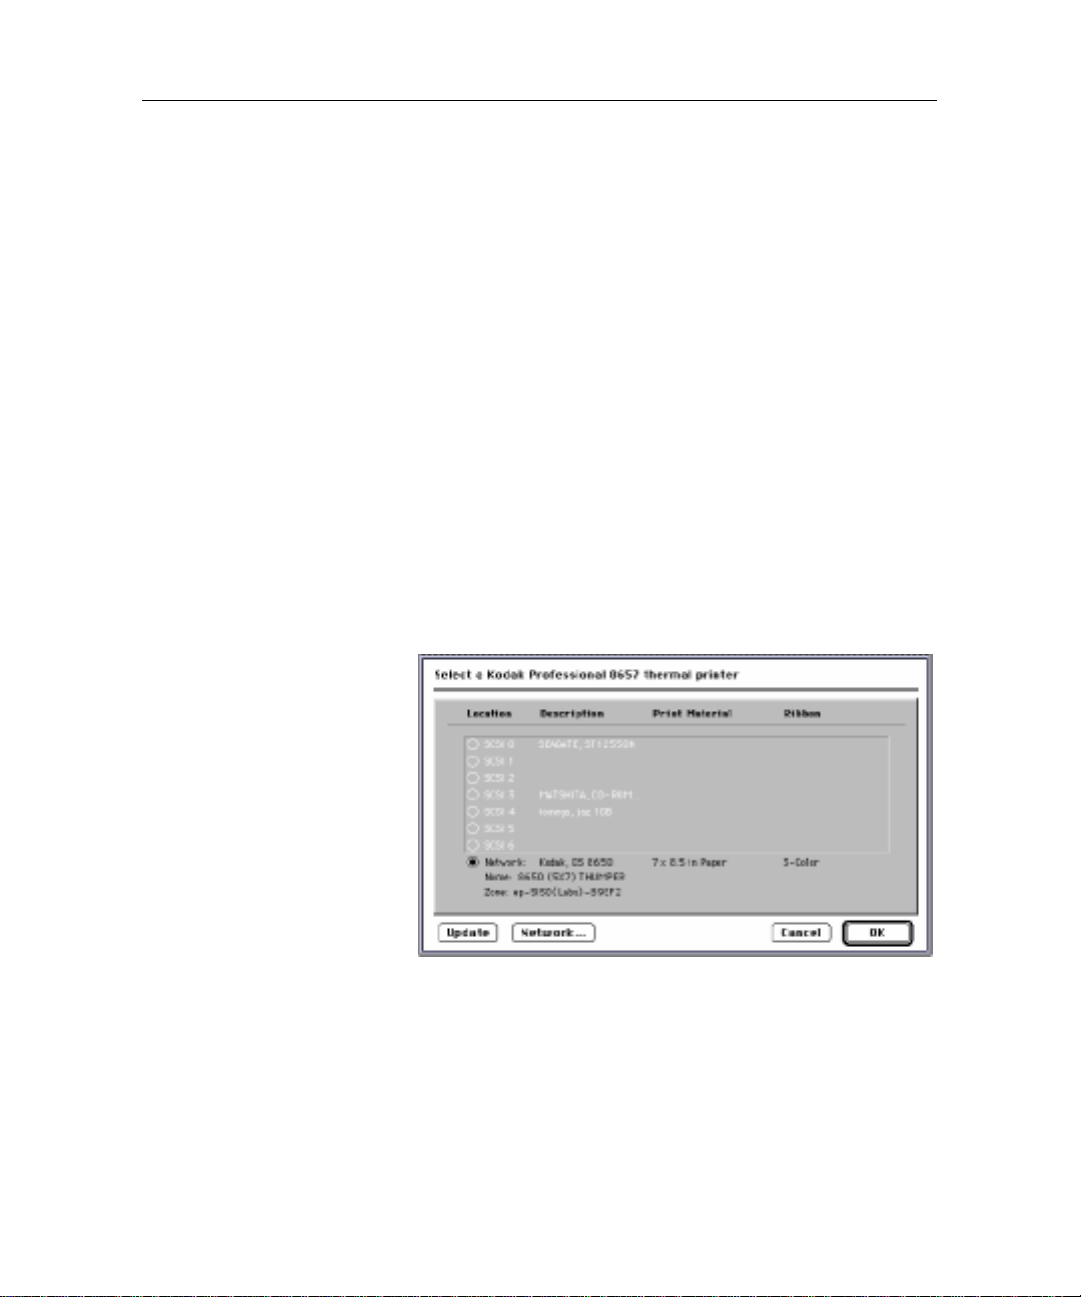
For Macintosh, the first time you access the export
module, the dialog box below appears requesting
that you select a printer.
For Windows, the export module automatically
selects a default printer.
March 1998 1–3
Page 7
Introduction
4. For Macintosh, select the correct printer. If the
printer:
•
has a network connection to your host computer,
click on
dialog box that opens. Click on OK.
•
has a SCSI connection to your host computer,
click on the radio button for the correct printer.
Network
. Select the correct printer in the
5. Click on
NOTE: The export module recognizes other Kodak
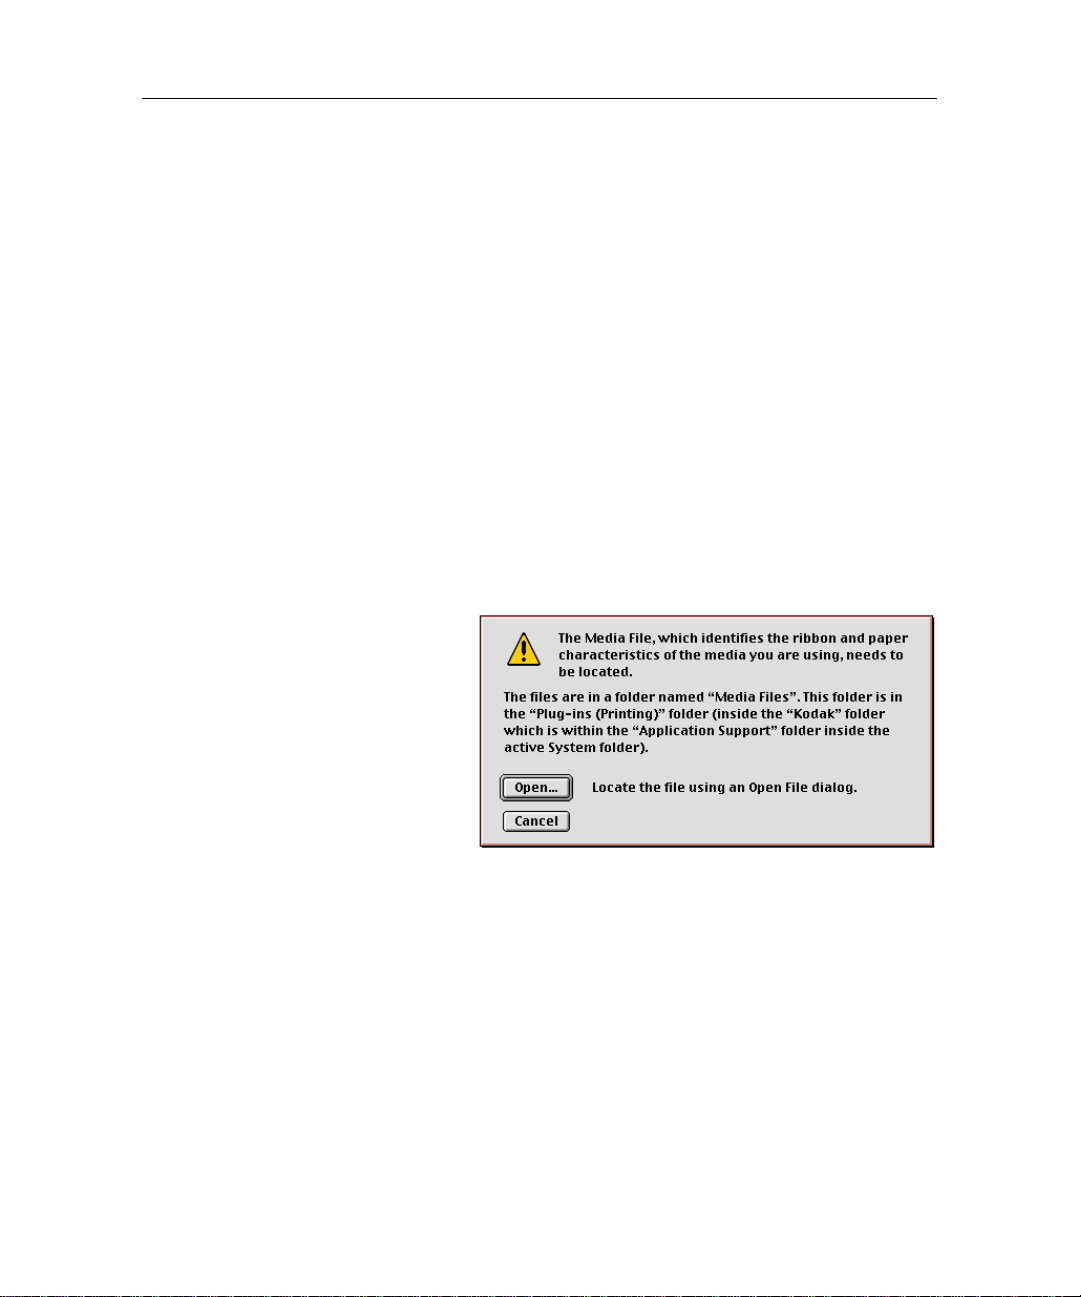
A dialog box may also appear asking you to locate
the Media File. The Macintosh dialog box is shown
below.
6. Click
An open file dialog box appears.
OK
in the Select an 8657 printer dialog box.
printers in the Select a Kodak 8657 Printer list. If
the printer you selected was not a valid 8657
printer, a Selection Error dialog box appears.
Click on OK, and select a valid 8657 printer.
Open
in the dialog box.
1–4 March 1998
Page 8
7. For Macintosh:
Select:
•
“System Folder”
•
“Application Support”
•
“Kodak”
•
“Plug-ins” (Printing)
•
“Media Files”
For Windows:
•
Locate the Media File in the Plug-ins folder within
Photoshop.
•
Locate the “MEDFILES” folder.
8. Select the 8657 media file.
Introduction
9. Click on
The Kodak Professional 8657 thermal printer dialog
box opens.
Refer to the chapter “Dialog Boxes” for descriptions
of the dialog boxes in the export module.
Open
.
March 1998 1–5
Page 9

2. Installing the Software
System Requirements for Windows
Hardware
The following hardware is recommended to load and use
the Kodak Professional 8657 thermal printer export
module:
•
80486 or higher processor
•
minimum of 12 MB of RAM
•
color monitor with a minimum monitor resolution of
640 x 480 pixels
•
CD-ROM drive
•
an available LPT port, SCSI host adapter, or network
connection
NOTE: SCSI communications are enabled only if a SCSI
host adapter board is installed in your PC.
Software
Your PC must be installed with:
•
Windows 95 or Windows NT 4.0 (workstation or server)
•
Photoshop version 3.0.5 or later
March 1998 2-1
Page 10

Installing the Software
Requirements for SCSI-Connected Installations
•
an Adaptec SCSI host adapter board
NOTE: Kodak tested the AHA 1542 and 2940 boards.
Other cards may work but have not been tested.
Fast, wide, and ultra are not supported. These
features must be disabled on the SCSI host
adaptor board for the SCSI ID to which the printer
is assigned. Refer to the documentation that
came with the adapter board for instructions on
disabling these features.
a SCSI cable
•
•
a SCSI terminator
•
Adaptec EZ–SCSI Software. This software is
commonly provided with ADAPTEC SCSI host
adapter boards when they are purchased. The
supplier of your board should be able to provide the
software if you do not have it, or you can purchase it
through Adaptec directly.
NOTE: Windows 4.0 requires EZ-SCSI 4.01b.
Refer to Appendix C: “About SCSI Connection,” for more
information.
2-2 March 1998
Page 11

Installing the Software
System Requirements for Macintosh
Hardware
The following hardware is recommended to use the
export module:
•
68040 or higher processor
•
minimum of 8 MB of RAM (required by Photoshop)
•
hard disk space of at least three times your image
size
•
a special Apple SCSI terminator with an external
SCSI disk drive or another peripheral device if you are
using a Macintosh IIfx
OR
a standard SCSI terminator if you are not using a
Macintosh IIfx computer to daisy–chain your external
disk drive or another peripheral with the 8657 printer
Software
Your Macintosh system must be installed with:
•
Apple System, version 7.5.5 or later
•
Adobe Photoshop version 3.0.4 or later
March 1998 2-3
Page 12
Installing the Software
Installing the Software on Macintosh Systems
The following steps describe how to install the export
module on your Macintosh system:
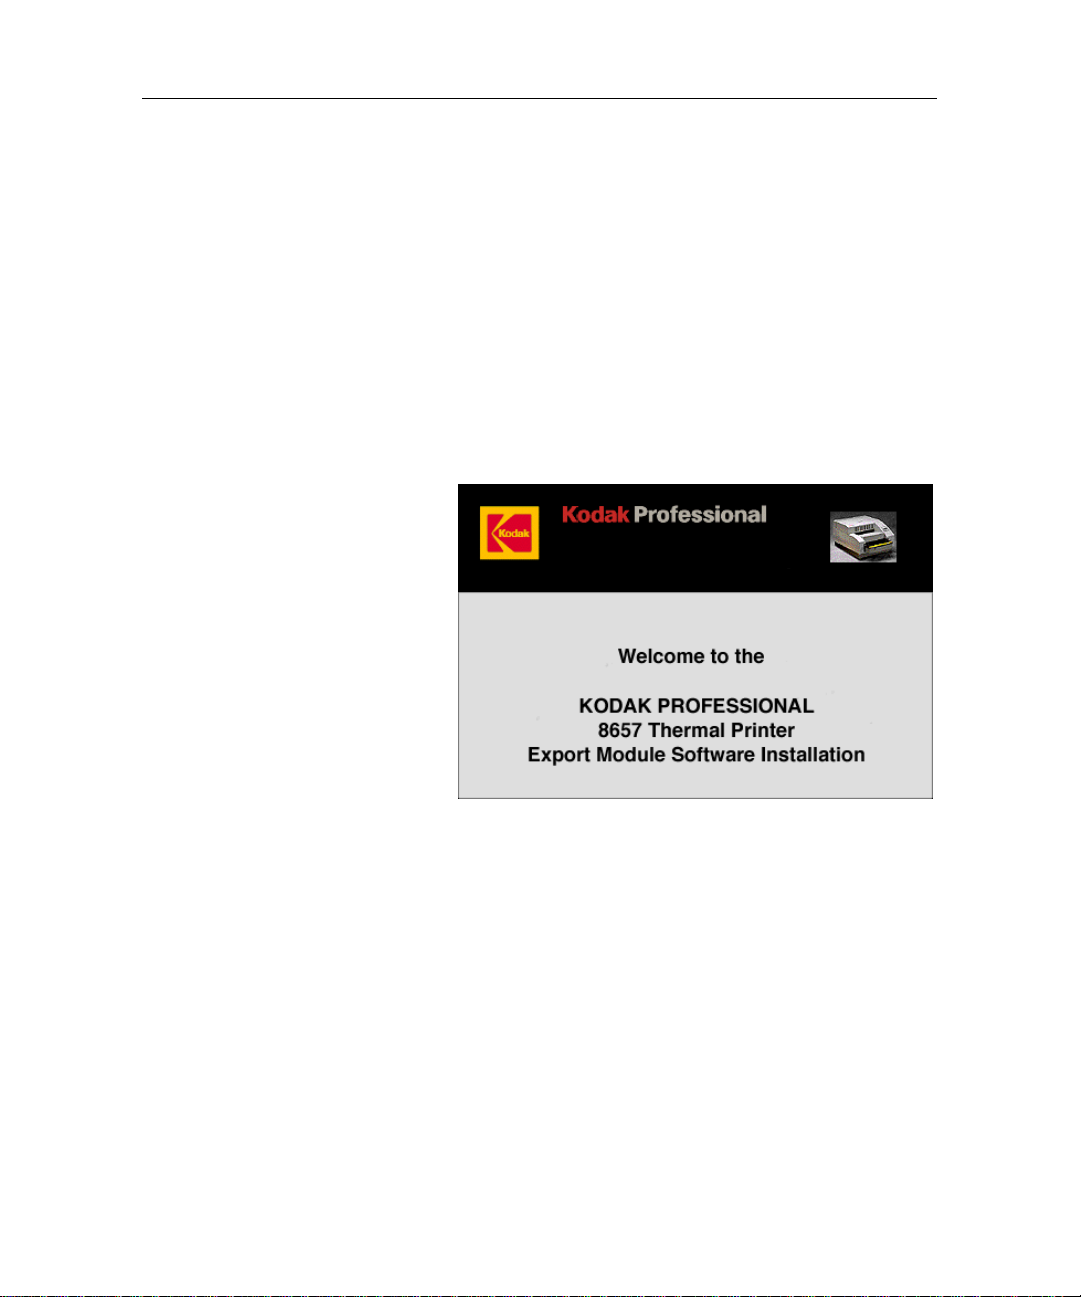
1. Insert the export module CD in the CD-ROM drive.
Double-click on the icon for the CD.
2. Double-click on the Export folder.
3. Double-click on the icon for the
Installer
The splash screen for the export module appears.
4. Click on the screen.
The license agreement window appears.
.
Kodak 8657 Export
2-4 March 1998
Page 13
Installing the Software
5. If you accept the terms of the license agreement, click
on
Accept
The Installer dialog box appears.
.
Installation Methods
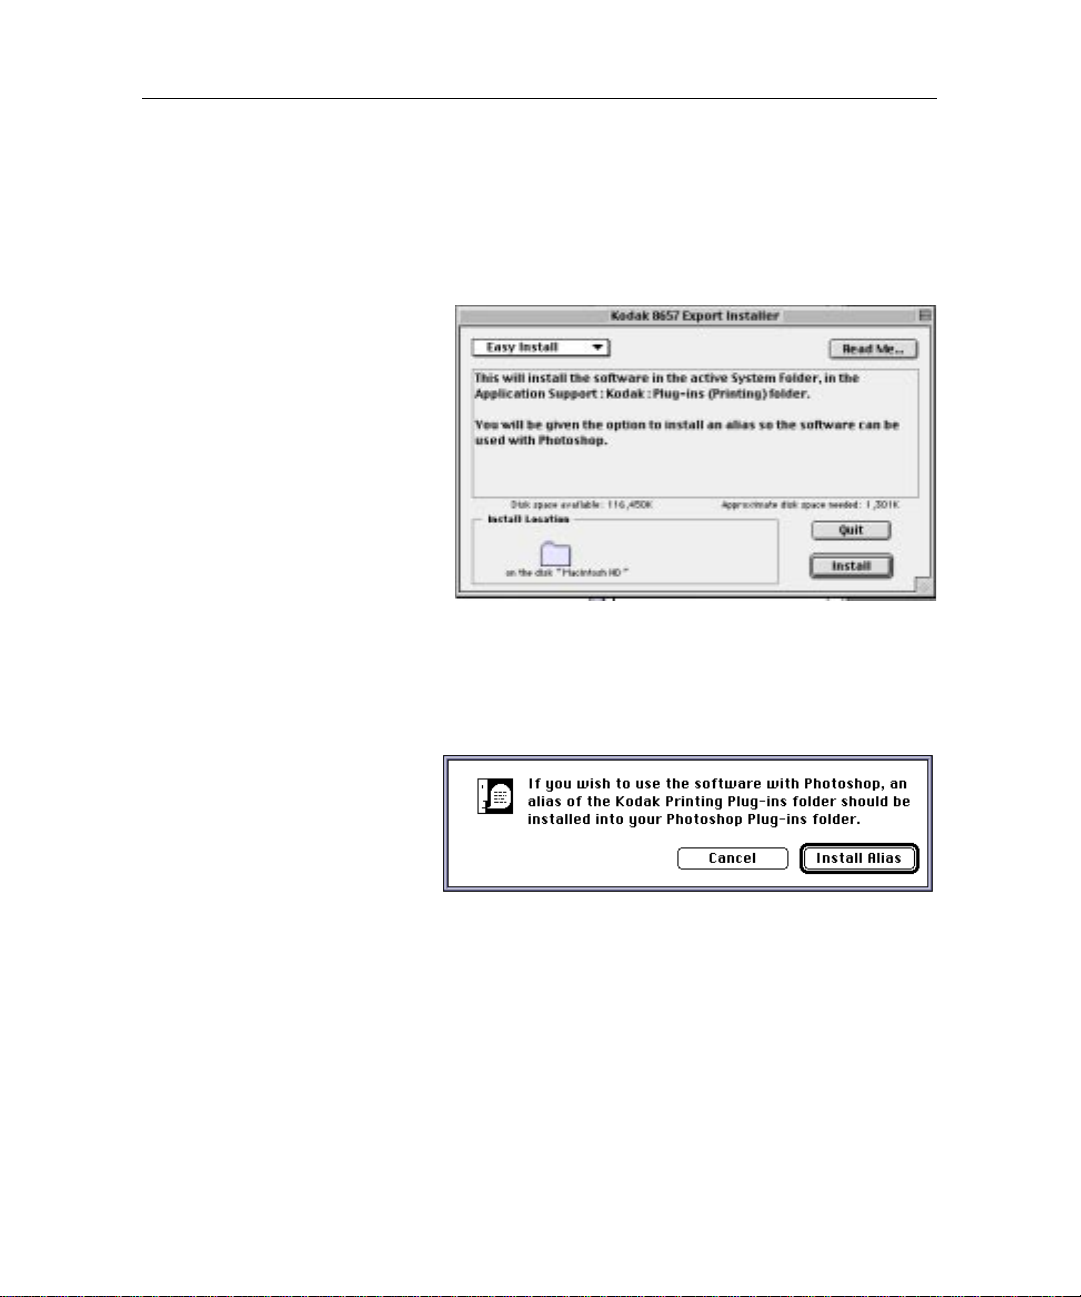
You can install the software by using either the Easy
Install procedure or the Custom Install procedure.
Easy Install—
Install
appears in the upper-left corner of the Install
dialog box automatically installs the export module, the
RGB Printer Tables, and the Kodak printer utility.
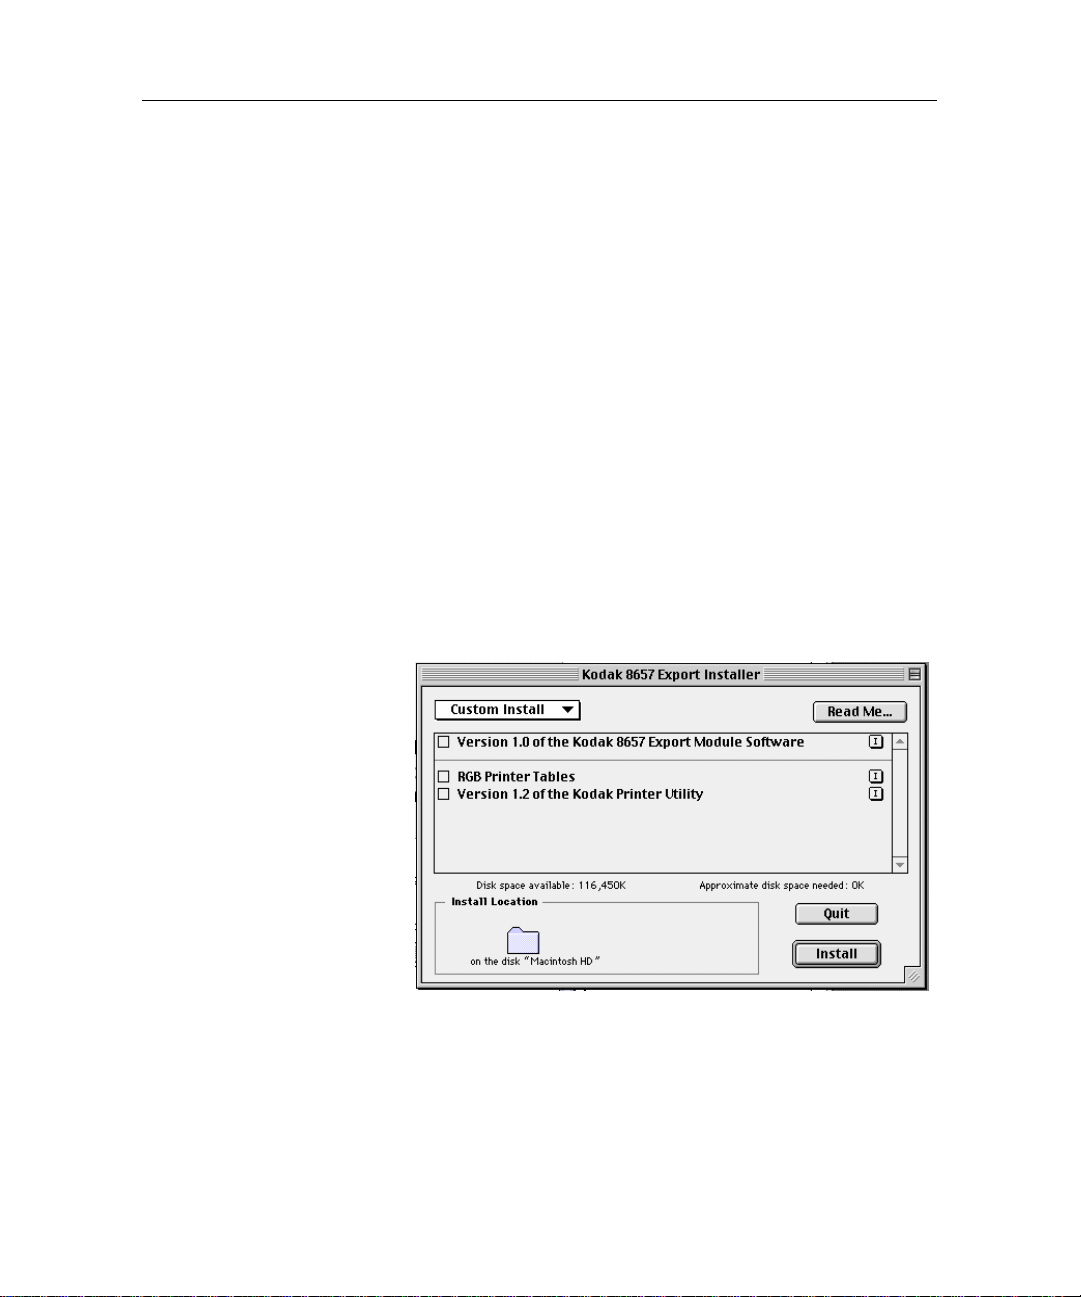
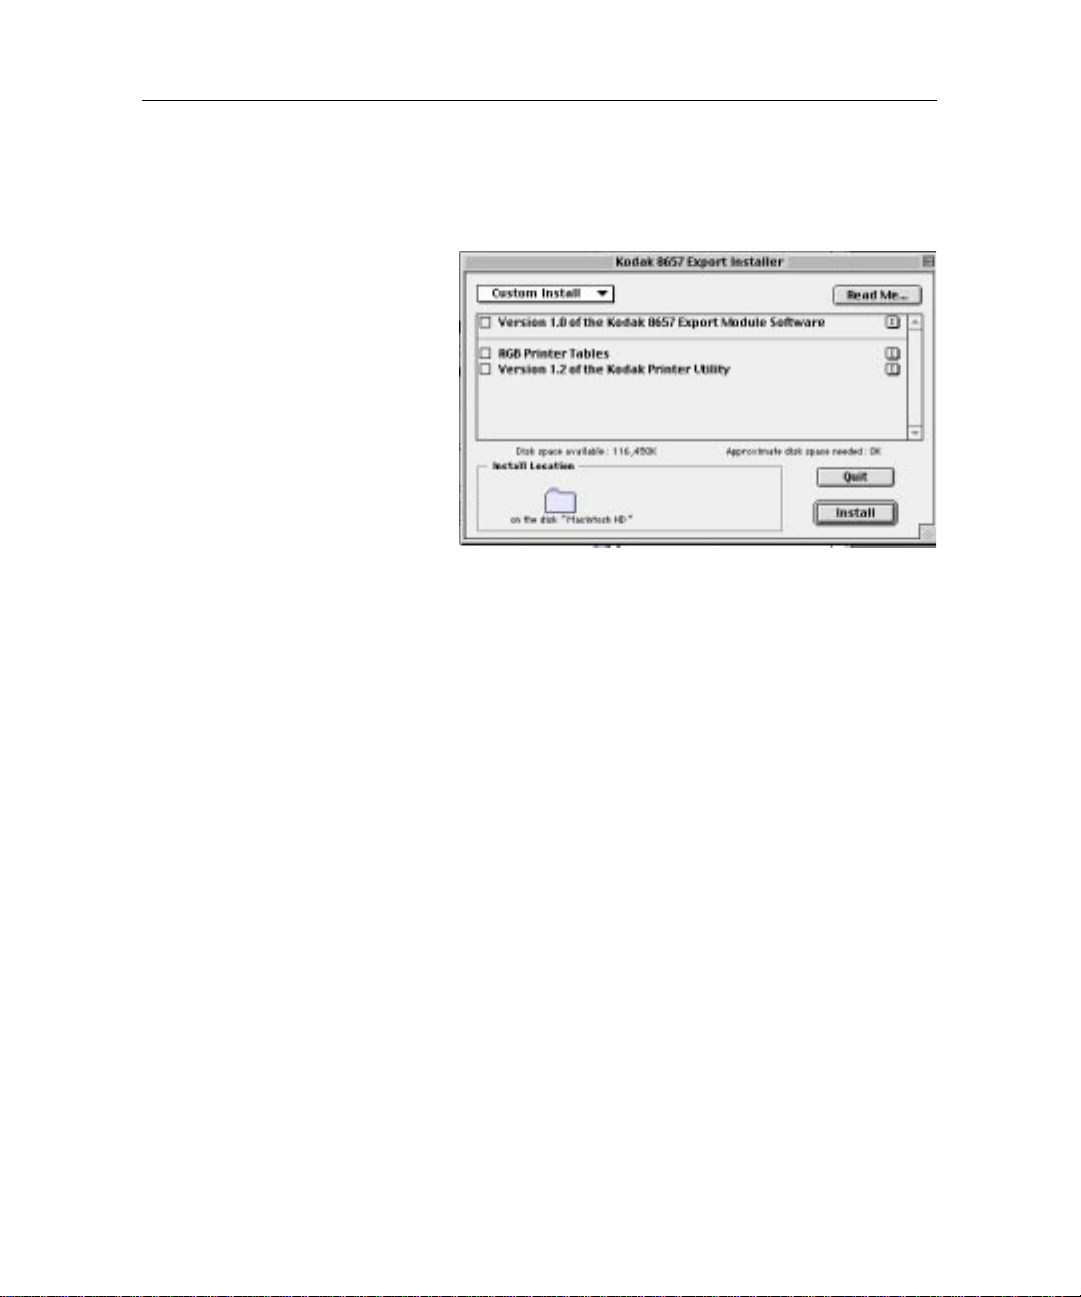
Custom Install—
installation drop-down box accesses the Custom Install
dialog box. The Custom Install allows you to individually
install the export module, the RGB Printer Tables , and the
Kodak printer utility. A Remove option also appears in the
installation drop-down box. Refer to “Removing the
Software” for more information.
March 1998 2-5
clicking on the
selecting the
Install
button when
Custom Install
Easy
from the
Page 14
Installing the Software
Easy Install Procedure
The following steps describe the Easy Install procedure.
1. Make sure that Easy Install appears in the upper-left
corner of the Install dialog box.
Install
2. Click on
.
The software is installed and the Install Alias dialog
box appears.
3. If you wish to install an alias of the export module in
your Adobe Photoshop Plug-ins folder, click on
Alias
.
Messages indicating that the software is installing
appear.
2-6 March 1998
Install
Page 15
Installing the Software
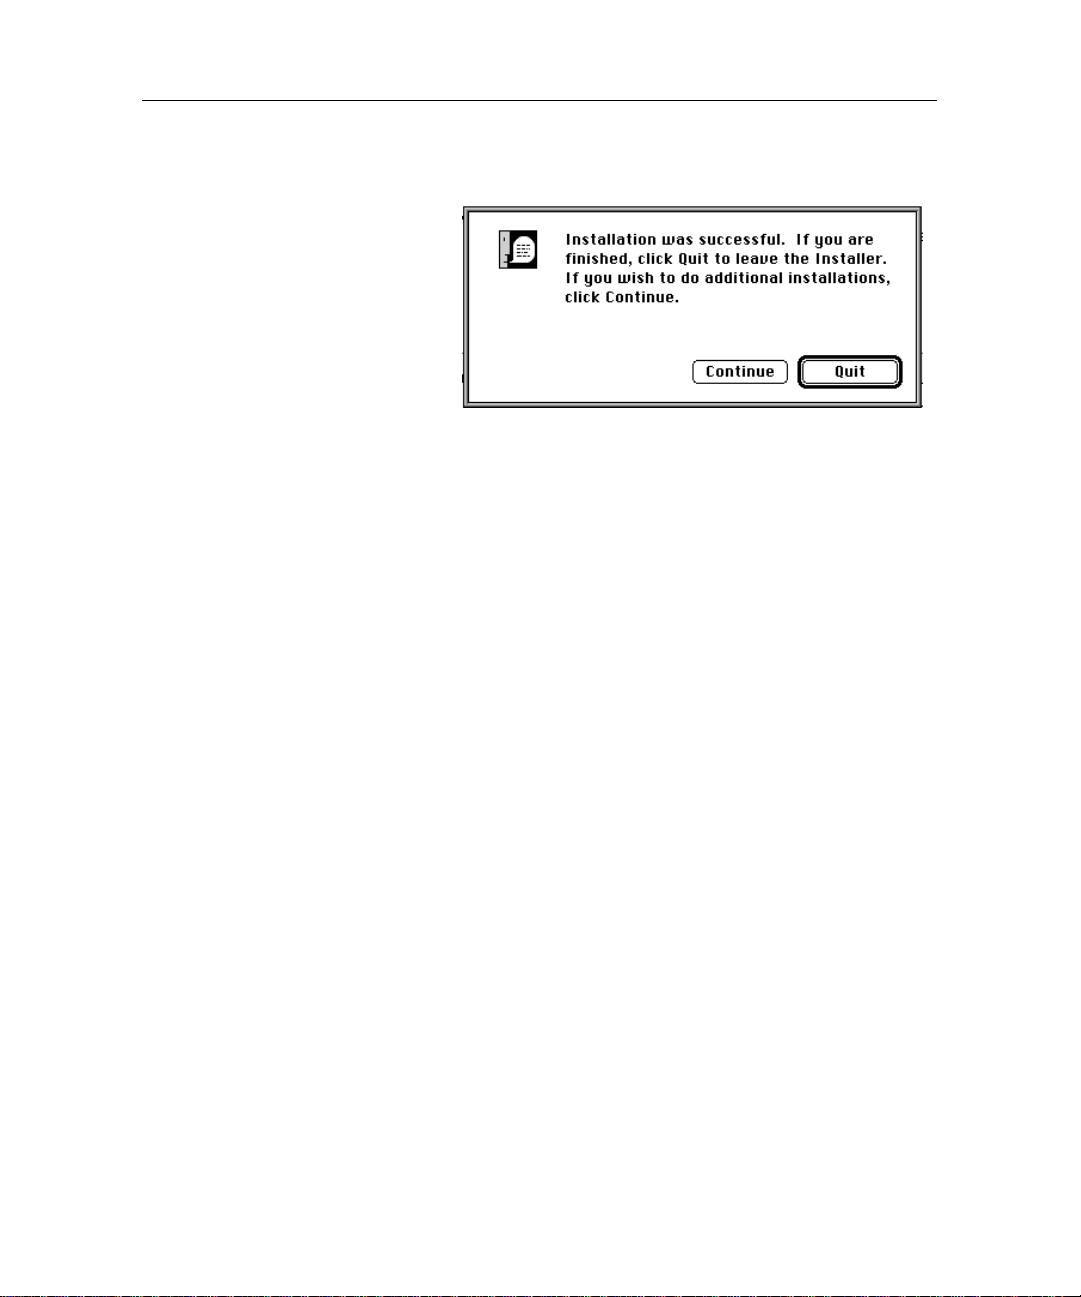
When installation is complete, the following dialog bo x
appears.
4. Click on
Continue
Quit
to return to your desktop, or click on
to do additional installations.
March 1998 2-7
Page 16

Installing the Software
Custom Install Procedure for Macintosh
The following steps describe the Custom Install procedure
for Macintosh.
1. From the Installation drop-down box select “Custom
Install".
The dialog box changes to look like this.
2. Select the software you want to install.
3. Click on
The selected software is installed. The Install Alias
dialog box appears.
4. If you wish to install an alias of the export module in
your Adobe Photoshop Plug-ins folder, click on
Alias
A message indicating that the software is installing
appears.
2-8 March 1998
Install.
Install
.
Page 17

Installing the Software
A prompt appears when the installation finishes.
Quit
5. Click on
Continue
to return to your desktop, or click on
to do additional installations.
Removing the Software
You can use the Install dialog box to remove the export
module software from your system. The following steps
detail removing the software.
1. From the Installation drop-down box, select “Remo ve”.
2. Click on
3. Click on
March 1998 2-9
Remove
Quit
.
to return to your desktop.
Page 18

Installing the Software
Installing the Software on Windows Systems
The following steps describe the Install procedure for
Windows.
1. Start the installation program from “Setup”.
The Welcome Screen appears.
Next
2. Click on
The Software License Agreement Screen appears.
3. Click on
agreement.
2-10 March 1998
.
Yes t
o accept the terms of the license
Page 19

Installing the Software
The Choose Printing, Calibrating, or Both screen
appears.
The installation path presented in the next screen
depends on which of the radio buttons is selected on
this screen.
4. Select the correct radio button, and click on
March 1998 2-11
Next
.
Page 20

Installing the Software
The Choose Destination Screen appears.
The installer copies the export module, printer tables,
media file, and the Help file to the path defined on this
screen.
Next
5. Click on
2-12 March 1998
.
Page 21

Installing the Software
The Status screen appears; and when the installation
is complete, the Setup Complete screen appears.
6. Click on
Finish
.
March 1998 2-13
Page 22

3. Dialog Boxes
The dialog boxes shown and described in this chapter are
used in the Kodak Prof essional 8657 thermal printer export
module for Adobe Photoshop software and Kodak Digital
Science calibration utility software for Macintosh and
Microsoft windows (export module).
Descriptions are given for buttons and fields unique to the
export module. Buttons and fields common to most
Macintosh and Windows applications are not described.
The illustrations in this chapter show Macintosh system
dialog boxes. Except where noted, the dialog boxes for
Windows applications are similar and have identical
functionality.
NOTE: Invalid options are dimmed for Macintosh systems
and removed from the options list for Windows
systems.
Error messages appear when invalid
combinations of print mode and ribbon type or
incorrect print material are selected.
When the export module is used for the first time,
the error message “Media File is Missing”
appears. See “Error Messages” for more
information.
March 1998 3-1
Page 23

Dialog Boxes
Export Module Dialog Box
The Kodak Professional 8657 thermal printer allows you
to control printer features by choosing from available
options.
Button and Field Descriptions
Printer
port, view printer status, and reprint images.
3-2 March 1998
—the
Printer
area allows you to specify a printer
Select
—opens the Select an 8657 printer dialog box.
See the “Select an 8657 Printer Dialog Box” section
in this chapter for more information.
Status
the “Printer Status Dialog Box” section in this chapter
for more information.
Reprint
The last image sent to the printer remains in the
buffer until the printer is shut off, the next image is
sent, or the SCSI bus is reset.
When the
Media, Layout,
are grayed out and cannot be selected.
—opens the Printer Status dialog box. See
—reprints the last image sent to the printer.
Reprint
box is selected, the options in the
and
Image Processing
group boxes
Page 24

Dialog Boxes
Media
—the
Media
area allows you to specify the print
mode, paper size, and XtraLife lamination options.
NOTE: If the wrong media is loaded in the printer after
the job has been received and processed, error
messages appear on the printer’s display panel.
Print Mode
Size
—displays a paper size of 7 x 8.5 in.
The imageable area of the media size is provided in the
following table.
Media Size Image Size
(in Inches)
7 x 8.5 in.
179 x 216 mm
XtraLife
XtraLife ribbon must be loaded in the printer to have
this option applied.
—displays Paper as the media.
5 x 8.0 in. 128 x 204 mm 1500 x 2400
—applies XtraLife lamination to the print.
Image Processing
sharpness of an image and to select an appropriate
printer table.
Print Sharpening
sharpness of continuous tone or photographic
images. Available options include “None”, “Normal”,
and “High”.
Image Size
(in Millimeters)
—allows you to manipulate the
—allows you to improve the
Image Size
(in Pixels)
Selecting “Normal” or “High” enhances edge
definition of images to varying degrees, but it also
increases processing time.
March 1998 3-3
Page 25

Dialog Boxes
Printer Table
which produces the closest possible match between
the image colors displayed on your monitor and the
printed colors of that image. Available options are:
NOTE: On Windows systems, the list of printer tables is
accessed by the Load table button. The
Table
Macintosh version. The following is an e xample of
the Image Processing section of the 8657 Printer
Dialog Box for Windows.
—allows you to select a printer table
None
—use this option if you are using color
management software in conjunction with
Photoshop.
Default
values appropriate for most print jobs.
Selected
printer table.
Select
dialog box which allows you to select from a
list of printer tables.
—use this option to select correction
—displays the name of the current
—opens a standard file selection
Printer
list box has the same functionality as the
See Appendix A: “About Printer Tables,” for more
information.
Layout
mirroring, and scaling of the image.
3-4 March 1998
—allows you to manipulate orientation, centering,
Orientation
the image on the page. Available options include:
—allows you to manipulate orientation of
Automatic
orients the image on the page.
Portrait
the page.
—for Windows, automatically
—vertically orients the image on
Page 26

Dialog Boxes
Landscape
on the page.
Scale
—scales images to fit or fill the entire page.
You may indicate the percentage that images are to
be scaled in the text box. Available options include:
To Fit Page
smaller than the page are scaled to fit the
page without cropping or distorting
the image.
To Fill Page
smaller than the size of the current media
are cropped in order to fill the page.
By Size
image width and height. For example,
scaling an 8 x 10 in. image by 50% prints a
4 x 5 in. image.
By Pixels
number of pixels in the image width and
height. For example, scaling an 800 x 1000
pixel image by 200% prints an 1600 x 2000
pixel image.
Center
unchecked, images are positioned in the upper left
corner of the page.
—centers the image on the page. If left
—horizontally orients the image
—images that are larger or
—images that are larger or
—images are scaled based on the
—images are scaled based on the
Mirror
—flips the image left to right on the page,
producing a mirror image.
March 1998 3-5
Page 27

Dialog Boxes
Select an 8657 Printer Dialog Box
Access the Select an 8657 Printer dialog box by clicking
the
Select
button in the 8657 Printer dialog box.This
dialog box displays the location (on Macintosh) or ports
(on Windows) and the 8657 printers that are connected
(either directly or by a network) to them. The dialog box
also indicates the print media and ribbon type currently
loaded in the printer.
Button and Field Descriptions
Update
information that has changed.
Network
available when the optional Network Interface Card is
installed on the printer and the printer is connected to an
Ethernet network. When you select this b utton, the K odak
Professional 8657 Printers dialog box opens. See the
“8657 Printers Dialog Box” section in this chapter for
more information.
For Windows systems this option is only available when
the operating system is Windows 95. When you select
this button, the network’s dialog box opens.
3-6 March 1998
—refreshes the screen and replaces any
—for Macintosh systems network printing is only
Page 28

Dialog Boxes
8657 Printer Dialog Box
Access the Kodak Professional 8657 thermal printer
dialog box by clicking the
an 8657 Printer dialog box.
This dialog box allows you to select from the available
AppleTalk zones so that you can choose a printer.
Network
button on the Select
Button and Field Descriptions
Update
information that has changed.
OK
you have highlighted in the Select a Kodak 8657 Printer
list box should be the active printer. OK can be selected
only when a printer is highlighted
NOTE: The export module recognizes other Kodak
March 1998 3-7
—refreshes the screen and replaces any
—closes the dialog box and indicates that the printer
printers in the Select a Kodak 8657 Printer list. If
the printer you selected was not a valid 8657
printer, a Selection Error dialog box appears.
Click on OK, and select a valid 8657 printer.
Page 29

Dialog Boxes
Printer Status Dialog Box
Access the Printer Status dialog box by selecting the
Status
button on the 8657 printer dialog box. The
information displayed corresponds to the printer that is
currently selected for printing.
NOTE: On Windows, the status button is only enabled if
a SCSI port is being used.
Button and Field Descriptions
Printer Information
printer. Information includes the printer model, loaded
ribbon and print media, printer status (Idle, Printing, or
Busy), printer location, amount of RAM installed on your
system, and the printer version number.
Job Information
processed and number of copies left to print of the
current job.
3-8 March 1998
—describes the state of the selected
—lists the number of jobs being
Page 30

4. Error Messages
Many of the error messages displayed by the Kodak
Professional 8657 thermal printer export module for Adobe
Photoshop software and Kodak Digital Science calibration
utility software for Macintosh and Microsoft windows
(export module) are self-explanatory. The following list
provides additional information for frequently encountered
messages.
If you do not find a display ed error message in the list, refer
to your Macintosh, Windo ws , or Photoshop documentation.
Error Message Solution
Media File is Missing For Macintosh, select:
• “System Folder”
• “Application Support”
• “Kodak”
• “Plug-ins”
• “Media Files”
For Windows:
• locate the Media File in the
plug-ins folder within
Photoshop
• locate the “MEDFILES” folder
Image Mode is invalid!
You must convert this image to RGB Color or
Grayscale in Photoshop before it can be
printed, or you can reprint the image currently
stored in the printer.
The file is too large for the Kodak 8657 printer!
Resize the image in Photoshop before printing.
The maximum size is 120 MB.
AppleTalk is inactive.
Set AppleTalk to “Active” in the Chooser.
(Only on Macintosh systems.)
March 1998 4-1
Change the Photoshop mode to print
the file.
Make the image smaller to print the
file. To make the image smaller,
select
Image Size
menu, and enter a smaller height
or width.
Indicates AppleTalk is not running.
Open the Chooser and turn
AppleTalk on.
from the
Image
Page 31

Error Messages
Error Message Solution
The printer cannot be found!
Check connections, make sure the printer is
turned on, or select another 8657 printer.
The printer cannot scale the image (up or
down) enough to completely fit (fill) the page!
The export module will set the scaling to the
limit of the printer.
The select Kodak printer on “X” is busy!
Jobs in process, waiting to print: “Y”
Current job, copies to print: “Z”
The printer port will be set to LPT1.
Press the
to select another port.
(Only appears in Windows versions)
Various Media Mismatch Messages The requested print media does not
Select
button on the Print dialog box
For other errors, check all connections and make sure
the printer display shows the READY prompt. If the
problem persists, restart the printer and the computer. If
you still have trouble, try reinstalling the export module.
Indicates that the printer is not
connected or turned on.
Indicates the scaling limits in the
printer were exceeded. The export
module will readjust the scaling to fit
the printer.
Indicates the printer is busy and
informs on job status and jobs in
queue. Dialog box closes when the
printer becomes available.
Appears the first time the export
module is run or if the previously
selected SCSI printer is no longer
available.
match the media loaded in the
printer. Follow the instructions in the
message to resolve the problem.
4-2 March 1998
Page 32

Appendix A: About Printer Tables
Printer tables are powerful tools for precisely adjusting the
print’s color and characteristics. The tables allow you to
obtain the closest possible match between a displayed
image and a print of that image. Kodak TableMaker
software (TableMaker software), allows you to create new
tables or modify existing tables. TableMaker software only
works with RGB tables.
Additive and Subtractive Color
Displayed and printed images have different appearances
due to the nature of the processes used to produce the
colors on monitors and in prints.
A monitor uses an additive color process to produce a
screen image. Red, green, and blue light from the color
phosphors in the tube are added together to produce white
light. Various mixtures of the three colors produce a variety
of colors. A color printer uses a subtractive color process,
where ambient light passes through layers of color dyes
(cyan, magenta, yellow, and sometimes black), reflects off
a white paper base, and passes back through the color dye
layers to your eyes. The dyes produce color by absorbing
portions of the color spectrum from the light striking the
surface of the print. The perceived color of a print is also
strongly influenced by the type and intensity of the light in
which it is viewed.
A color gamut is the range of visible colors that can be
produced by a specific set of colors (such as red, blue, and
green, or cyan, magenta, yellow, and black). Monitors,
scanners, and color prints also have diff erent color gamuts.
Many different CRT phosphors and color dyes are
available, and each produces a different range of colors
called gamuts. Phosphors generally produce a wider color
gamut than photographic printing dyes, particularly in the
blue and green regions. However, some printable colors
cannot be displayed on a typical monitor.
March 1998 A-1
Page 33

Appendix A: About Printer Tables
Standard Tables
Each printer table is named according to its correction
formula. There are 45 standard RGB tables. The
standard printer tables consist of combinations from one
of the available gamma correction values (1.0, 1.2, 1.4,
1.6, 1.8, 2.0, 2.2, 2.5, 2.8) and one of the available black
level values (-40, -30, -20, -10, 0). For example, the
printer table SG16BN30 has a gamma correction value of
1.6 and a black level value of -30.
The standard tables are all set for a hue shift of 0°, a
saturation level of 100%, and an automatic contrast
calculation.
The default table for the export module is gamma 2.0,
black le v el -20. Choosing a black lev el of -10 or 0 lightens
a print and helps to bring out details in and shadow
areas. A black level of -30 or -40 darkens a print.
Custom RGB Windows Tables
Four custom tables are included with the Windows
version of the export module.
SLINEAR.TBL—does not modify the digital color data it
receives from the application. It outputs the same values
it receives, which allows y ou to use calibrated digital color
data directly from a color calibration program.
SYELLOW.TBL—includes a color matrix that modifies
the yellow digital image data it receives. These modified
values produce a lighter shade of yellow, which is better
suited for graphic arts applications.
SPHOTOCD.TBL—obtains maximum image quality from
Photo CD images that were opened using the RGB video
metric.
SDEF A ULT.TBL—uses the same correction values as
the XLS Default selection and the SG20BN20.TBL printer
table.
A-2 March 1998
Page 34

Appendix A: About Printer Tables
Custom RGB Macintosh Tables
Four custom tables are included with the Macintosh
version of the export module. They are stored in a folder
named Custom Tables.
Linear Table—does not modify the digital color data it
receives from the application. It outputs the same values
it receives, which allows y ou to use calibrated digital color
data directly from a color calibration program.
Graphic Arts Yellow Table—includes a color matrix that
modifies the yellow digital image data it receives. These
modified values produce a lighter shade of yellow, which
is better suited for graphic arts applications.
Photo CD Table—obtains maximum image quality from
Photo CD images that were opened using the RGB video
metric.
PostScript Level 1 T able—achie ves results equiv alent to
the Kodak Digital Science
color rendering path.
TM
8650 PS PostScript level 1
Creating New Printer Tables
The printer tables supplied with the export module should
be sufficient for most of your printing needs. However, if
you have a special printing requirement that cannot be
met by an existing printer table, you can order Kodak
TableMaker software to create new tables for RGB
printing.
Contact your Kodak dealer to order one of the following
versions of the Kodak Tablemaker software:
• Macintosh, order catalog # 824 8833
• Windows, order catalog # 840 4998
March 1998 A-3
Page 35

Appendix B: Getting Additional Help
If you have questions about the Kodak Professional 8657
thermal printer (8657 printer), the retailer where you
purchased the printer may be able to answer them. You
can also visit the Kodak Web site at http://www.K odak.com.
You may also call for technical support at
1-800-235-6325 between 9:00 a.m. and 8:00 p.m. Eastern
Standard Time on regular business days if you have
questions about:
• your warranty
• supplies
• service
• other Kodak products
• software/printer interaction
• setting up or operating the printer
To download the most recent export module, access the
Kodak Web site and use the path: Service & Support/
Download Software and Drivers for KODAK Products/Dye
Sub Printer Drivers and Calibration Software.
Asia/Pacific Region Helpline Numbers
Country Country code Helpline number
Australia 61 3 353 2173
Hong Kong 85 2 5649387
Indonesia 62 21 430 4527
Korea 82 02 708 5471 4
Malaysia 60 3 757 2722
Philippines 63 2 816 67 18
Singapore 65 4736611
Thailand 66 2 271 3040 x396
Taiwan 88 6 2 893 8234
March 1998 B-1
Page 36

Appendix B: Getting Additional Help
European Helpline Numbers
Country Country code Helpline number
Belgium 32 02 2632400
Denmark 45 43 717111
Finland 358 90 87071
France 33 1 4989 0083
Germany 49 0711 406 5561
Italy 39 02 66028454
Netherlands 31 03405 99704
Norway 47 02 818181
Spain 34 91 6267100
Sweden 46 08 58023663
UK 44 044261122
Ext. 44239
B-2 March 1998
Page 37

Appendix C: About SCSI Connection
A SCSI terminator is included with the Kodak Professional
8657 thermal printer. You must obtain the proper cabling
required for your configuration and system from your
printer retailer or distributor.
The two SCSI connectors on the back of the printer are
female submini, 50-pin SCSI II connectors.
Windows Systems
To connect the Kodak Professional 8657 thermal printer
(8657 printer) directly to your computer (or to daisy-chain
the printer through an external SCSI device), perform the
following steps.
1. Set the SCSI device number using the 8657 printer’s
display panel.
The 8657 printer is set at the factory for SCSI ID 5. If
you need to change the SCSI ID, refer to the user’s
guide for the Kodak Professional 8657 thermal printer
for instructions about setting the SCSI device number.
2. Turn off all equipment before connecting or
disconnecting any equipment from the SCSI bus.
3. Install the SCSI host adapter board in the computer.
4. Attach a SCSI cable appropriate to your equipment’s
configuration.
5. Attach a SCSI terminator.
NOTE: Some equipment is internally terminated.
Refer to the equipment documentation for
details.
March 1998 C-1
Page 38

Appendix C: About SCSI Connection
6. Turn on the 8657 printer and when the printer is
ready, turn on the computer.
NOTE: If the New Hardware dialog bo x is displa y ed
7. For Windows NT 4.0 only , run the Adaptec EZ–SCSI
software install program to install the software on
your system.
Instructions for installation are included in the
Adaptec EZ-SCSI User’s Manual.
Macintosh Systems
To connect the 8657 printer directly to your Macintosh
computer (or to daisy-chain the printer with an external
SCSI device), perform the following steps.
by Windows 95 the first time your PC is
restarted, choose NEXT to let Windows
search for a driver. Then choose FINISH
after Windows is unable to find a driver. The
printer utilizes a Photoshop export module
rather than a SCSI driver.
IMPORTANT: If you are using a Macintosh IIfx computer,
you must install a special terminator
provided by Apple Computer; or
unpredictable results can occur.
1. Set the SCSI device number using the 8657 printer’ s
display panel.
The printer is set at the factory for SCSI ID 5. If you
need to change the SCSI ID, refer to the user’s guide
for the Kodak Professional 8657 thermal printer for
instructions about setting the SCSI device number.
2. Turn off all equipment before plugging or unplugging
equipment on the SCSI bus.
3. Attach a SCSI cable appropriate to your equipment’ s
configuration.
4. Attach the SCSI terminator.
C-2 March 1998
Page 39

Appendix C: About SCSI Connection
NOTE: Some equipment is internally terminated. If
you have questions , ref er to y our equipment
documentation.
5. Turn on the 8657 printer and the computer.
March 1998 C-3
Page 40

Appendix D: Changing the Network Name on
Macintosh for the 8657 Printer
Changing the Network Name for the 8657 Printer
The Kodak Printer Utility allows you to change the name of
the Kodak Prof essional 8657 thermal printer (8657 printer)
as it is known over an AppleTalk network.
NOTE: The name you specify is the name for the 8657
printer only when it is running in raster mode and
only when the 8657 printer is connected to the
network through the optional Network Interface
Card.
IMPORTANT: This utility must be copied to the hard drive.
It does not run correctly from the CD Rom
drive.
Refer to the user’s and printer driver guides for the Kodak
Professional 8657 thermal printer for more information
about printer modes and network connectivity.
1. Double-click on the icon for the Kodak printer utility.
If your AppleTalk zone does not contain a Kodak color
printer running in raster mode, the following Kodak
Raster Printers dialog box appears.
March 1998 D-1
Page 41

Appendix D: Changing the Network Name on Macintosh for the 8657 Printer
2. From the AppleTalk Zone list bo x, select the zone of
the printer you want to rename.
The Select a Kodak Printer list box displays the
printers from that AppleTalk zone.
3. Select the printer you want to rename from the
Select a Kodak Printer list box.
4. Click on
The Kodak Raster Printers window closes.
D-2 March 1998
OK
.
Page 42

Appendix D: Changing the Network Name on Macintosh for the 8657 Printer
5. From the
A dialog box similar to the following appears.
6. Type the new name for the printer in the New Name
text entry box.
7. Click on
A confirmation panel similar to the following appears.
Utilities
Rename
menu select
.
Rename Printer.
8. Click
March 1998 D-3
on OK.
The 8657 printer running in raster mode is now
renamed to the name you specified.
Page 43

Index
A
accessing the export module 1-3
Adaptec EZ-SCSI software 2-2, C-2
additive color A-1
AppleTalk
error messages about 4-1
zones 3-7, D-1
C
cabling, SCSI
for Macintosh C-2
for PC C-1
centering images on the page 3-5
checking the printer’s status 3-8
choosing a printer 3-6, 3-7
color gamut A-1
color mode
error messages about 4-1
communication channels 1-2
cropping images 3-5
Custom remove option
on Macintosh systems 2-5
D
dialog boxes
8650 Color Printer 3-2
8650 Color Printers 3-7
Kodak Raster Printers D-1, D-2
Printer Status 3-8
Rename Printer D-3
Select an 8650 Color Printer 3-6
E
error messages 4-1–4-2
ethernet network 3-6
export module
accessing 1-3
getting additional help B-1
what it can do 1-1
March 1998 Index-1
Page 44

Index
F
file size
error messages about 4-1
G
gamut, color A-1
H
help, additional
see Appendix B
helpline numbers
Asia/Pacific B-1
European B-2
I
image processing 3-3
Install button
on Macintosh systems 2-5, 2-6
Install dialog
using to remove software from Macintosh systems 29
installation
methodsfor Macintosh systems 2-5
on PC systems 2-1
system requirements on Macintosh systems 2-3
system requirements on PC systems 2-1
Installation procedures
Custom Install
on Macintosh systems 2-8, 2-10
Customize
on Macintosh systems 2-5
Easy Install
on Macintosh systems 2-6
J
job scheduling 1-2
jobs being processed
finding information about 3-8
Index-2 March 1998
Page 45

K
Kodak TableMaker software A-3
L
lamination, Xtra Life 3-3
landscape, page orientation 3-5
M
Macintosh IIfx
cable, terminator for C-2
media field 3-3
mirroring images 3-5
N
network interface card 3-6, D-1
network name
changing on Macintosh systems D-1
P
page orientation
landscape 3-5
portrait 3-4
paper sizes 3-3
plug-in 1-1
portrait, page orientation 3-4
print mode 3-3
print sharpening 3-3
printer
finding the version number 3-8
selecting a 3-6, 3-7
status 3-8
printer tables
additive and subtractive color A-1
creating new A-3
custom, for Macintosh A-3
custom, for PC A-2
Kodak TableMaker software A-3
printer table button 3-4
standard A-2
see Appendix A
Index
March 1998 Index-3
Page 46

Index
Q
queue, printer 1-2
R
RAM, installed 3-8
Removing the Software
from Macintosh systems 2-9
S
scaling images 3-5
SCSI connection. see Appendix C
cabling C-1, C-2
device number C-1, C-2
for Macintosh C-2
for Windows C-1
host adapter board 2-2, C-1
requirements 2-2
SCSI bus C-1, C-2
terminator C-1, C-2
selecting a printer 3-6, 3-7
service B-1
status button 3-2
subtractive color A-1
system version
required for Macintosh systems 2-3
T
technical support B-1
terminator, SCSI
for Macintosh C-2
for PC C-1
V
version number, printer 3-8
Index-4 March 1998
Page 47

W
warranty
questions about B-1
X
Xtra Life lamination 3-3
Index
March 1998 Index-5
Page 48

EASTMAN KODAK COMPANY
Rochester, New York 14653
KODAK CANADA INC.
Toronto, Ontario M6M 1V3
Canada
Kodak, Digital Science, and the ds
monogram symbol are trademarks of
Eastman Kodak Company.
AdobeÒ and PostScriptÒ are registered
trademarks of Adobe Systems
Incorporated.
Part No. 3H0595 1/98 ©Eastman Kodak Company, 1998 Printed in U.S.A.
 Loading...